

Page 1
m
. .. . .. . .
H
thebestfrom
UseandCareof
models
Featuresof ~
1.w60,RE961
37”4’’’’$?/-3
youroven
Cookingbytime
cooking
bytemperature
Howtodefrost
Savetimeandmoney.
Beforeyoucallforservice,
,
p5
p6
p8
p7
—
A
usetheproblemSolver
.
—)
The GE Answer( . ‘”
800.626.2-;;‘
~..- , ..
~PUB
.4
.,
plo
.
,..=
Page 2
Helpus H61pYou.. ❑
ReadThisBookCarefully
It is designed to help you operate and maintain your
new Microwave Overt properly.
Keep it handy for answers to your questions.
If you don’t understand something or need more
help. . .Call, toll free:
The GE Answer CenterTM
800.626.2000
consumer information service
or write: (include your phone number);
Consumer Affairs
Hotpoint
Appliance Park
Louisville, KY 40225
WriteDowntheModel
andserial Numbers
You’ll find them on a label inside the oven on the
upper left side.
These numbers are also on the Consumer Product
Ownership Registration Card that came with your
Microwave Oven. Before sending in this card,
please write these numbers here:
Model No.
Serial No.
Use these numbers in any correspondence or ser-
vice calls concerning your Microwave Oven.
BeSureYoLurOvenk Registered
It is important that we, the manufacturer, know the
location of your Microwave Oven should a need
occur for adjustments.
You’re supplier is responsible for registering you as
the owner.
Please check with your supplier to be sure he has
done so; also send in your Consumer Product
Ownership Registration Card. If you move, or if you
are not the original purchaser please write to us,
stating model and serial numbers. This appliance
mustbe registered. Please be certain that it is.
Write to:
Hotpoint
Range Product Service
Appliance Park
Louisville, KY 40225
IF YOU RECEIVED A DAMAGED OVEN, immediately contact the dealer (or builder) that sold you
the Microwave Oven.
SaveTime and Money.. .
E3efcm?Youcall for’service
Check the Problem Solver (page 10). It lists minor
causes of operating problems that you can correct
yourself.
It could save you an unnecessary service call.
*
2
Page 3
e
.—
.—
contents
Before Microwaving
Grounding Instructions . . . . . . . . . . . . . . . . 3
Safety Tips . . .. . . . . . . . .. . . . . .. . . .. . ...4
Features of Your Oven .. .. . . .. . . ... . ...5
Time Cook . . . .. . . .. .. . . . . .. . . . . . .. ...6
Defrost
.. 0,.0.. ... ,,,.. .s00...0
Temp Cook . . . . . . . . . . . . . . . . . . . . . .. . ...8
Care of Your Oven . . . .. . ..o.. . . . .. . ...9
The Problem Solver . . . . . . . . . . . . . .. ...10
Consumer Services OO..oo..o. . . .. ....11
Warranty .. . . . .. . . .. .. . . . . ...Back Cover
● ...s ..00 00 . . . . . . . .
.*...*.
MicrowavingTips
2
@ Make sure all utensils used in your microwave
oven are labeled “suitablef ormicrowaving”. Check
your Cookbook for specific test to determine ~f
“microwave-safe” utensils.
s Paper towels, wax paper, and plastic wrap can
beused tocover dishes in orderto retain moisture
7
and prevent spattering.
@ Some microwaved foods require stirring, rotat-
ing, or rearranging. Check your Cookbook for
specific instructions.
e Some foods such as unshelled eggs and hot
dogs must be pricked to allow steam to escape
during cooking.
E*
eB
K
F
BiBEzz
D
m
F
GroundingInstructions
PREFERREDMETHOD
\.
o
Qq
e
IiiJm
Figure 1
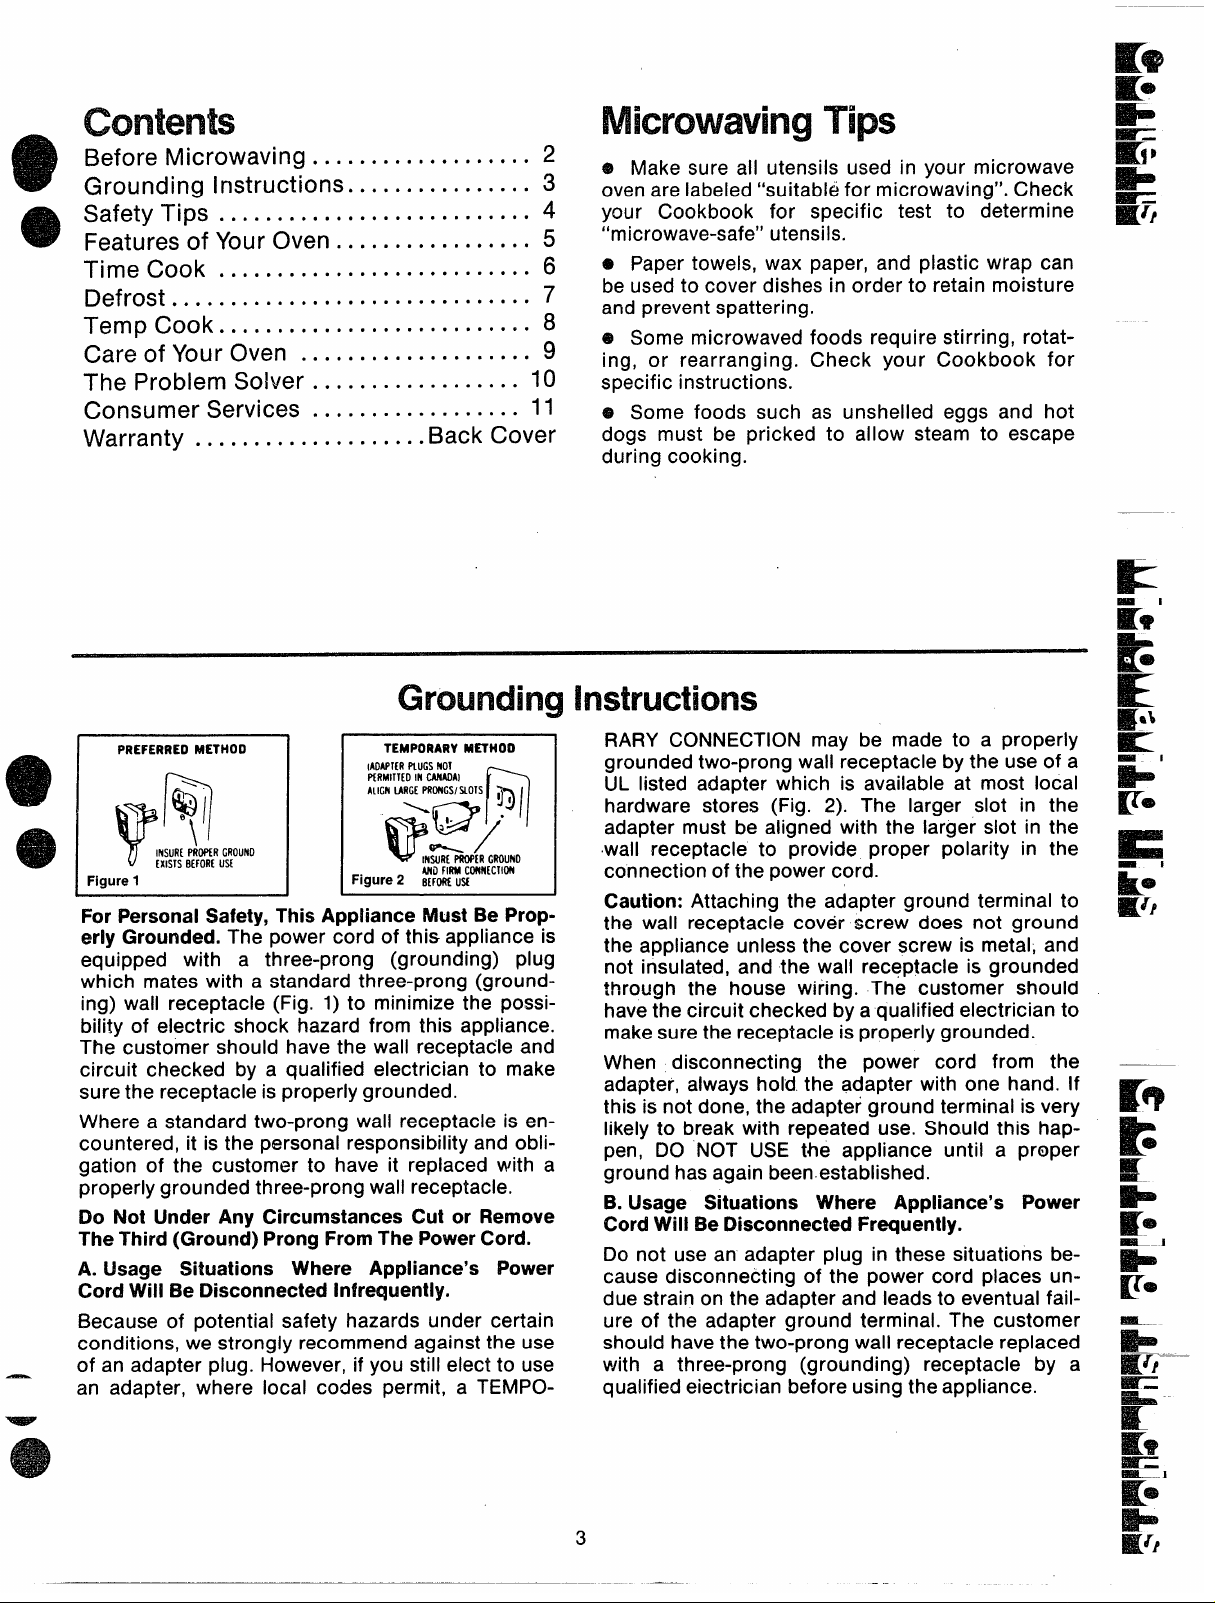
ForPersonal Safety, This Appliance Must Be Prop-
erly Grounded. The power cord of this appliance is
equipped with a three-prong (grounding) plug
which mates with a standard three-prong (grounding) wall receptacle (Fig. 1) to minimize the possibility of electric shock hazard from this appliance.
The customer should have the wall receptacle and
circuit checked by a qualified electrician to make
sure the receptacle is properly grounded.
Where a standard two-prong wall receptacle is en-
countered, it is the personal responsibility and obligation of the customer to have it replaced with a
properly grounded three-prong wall receptacle.
Do Not Under Any Circumstances Cut or Remove
The Third (Ground) Prong FromThe PowerCord.
A. Usage Situations Where Appliance’s Power
Cord Will Be Disconnected Infrequently.
Because of potential safety hazards under certain
conditions, we strongly recommend against the use
of an adapter plug. However, if you still elect to use
an adapter, where local codes permit, a TEMPO-
\
lNSURf PROHR GROUNO
fXISTS BEFORf UM
I
I
TEMPORARYMETHOD
I
IAOAPTERPLUGS NOI
PfRMITlfO IN CAMOAI
AlIGN LARGE PRONGS/ SLOTS
pm
@./
lNSURf PRW’fR GROUNO
Figure2 Bm+KUSS
WI FIRM CONNECTION
1,
n
a’-
●
RARY CONNECTION may be made to a properly
I
grounded two-prong wall receptacle by the use of a
UL listed adapter which is available at most local
hardware stores (Fig. 2). The larger slot in the
adapter must be aligned with the larger slot in the
wall receptacle to provide proper polarity in the
connection of the power cord.
Caution: Attaching the adapter ground terminal to
the wall receptacle cover screw does not ground
the appliance unless the cover screw is metal, and
not insulated, and the wall receptacle is grounded
through the house wiring. The customer should
have the circuit checked by a qualified electrician to
make sure the receptacle is properly grounded.
When disconnecting the power cord from the
adapter, always hold the adapter with one hand. If
this is not done, the adapter ground terminal is very
likely to break with repeated use. Should this happen, DO NOT USE the appliance until a proper
ground has again been.established.
B. Usage Situations Where Appliance’s Power
Cord Will Be Disconnected Frequently.
Do not use an adapter plug in these situations because disconnecting of the power cord places undue strain on the adapter and leads to eventual failure of the adapter ground terminal. The customer
should have the two-prong wall receptacle replaced
with a three-prong (grounding) receptacle by a
qualified electrician before using the appliance.
3
Page 4
s~f~~~~ip~SAVETHESE INSTRUCTIONS Q
———
1. For personal safety the oven must be properly
grounded. See grounding instructions on page 3 of
this book. For best operation, plug this appliance
into its own electrical outlet, to prevent flickering of
lights, blowing of fuse or tripping of circuit breaker.
2. Use of extension cords. Because of potential
safety hazards under certain conditions we strongly
recommend against the use of an extension cord.
However, if you still elect to use an extension cord,
it is absolutely necessary that it be a UL listed 3-wire
grounding type appliance extension cord and that
the current carrying rating of the cord in amperes
be 15 amperes or greater. Such extension cords are
obtainable through General Electric service. !f you
do use an extension cord with your microwave
oven, the interior light may flicker and the blower
sound may vary when oven is in use.
3. Be certain to place the front surface of the door
three inches or more back from the countertop
edge to avoid accidental tipping of the appliance in
normal usage.
4. Use metal only as directed in cookbook. Metal
strips as used on meat roasts are helpful in cooking
food when used as directed. Metal trays may be
used for TV dinners. However, when using metal in
the microwave oven, keep metal at least l-inch
away from sides of microwave oven.
5. Do not operate the oven while empty to avoid
damage to the oven andthe dahger of fire. If by ac-
cident the oven should run empty a minute or two,
no harm is done. However, try to avoid operating
the oven empty at ail times–it saves energy and
prolongs life of the oven.
6. Cooking utensils may become hot because of
heat transferred from the heated food. This is especially true if plastic wrap has been covering the top
and handles of the utensil. Pot holders may be
needed to handle the utensil.
7. Sometimes, ‘theoven floor can become too hot
to touch. Be careful touching the floor during and
after cooking.
8. Do not use any thermometer in food you are
microwaving unless that thermometer, is designed
or recommended for use in the microwave oven.
9. Remove the temperature probe from the oven
when not using it to cook with. If you leave the
probe inside the oven without inserting it in food or
liquid, and turn on microwave energy, it can create
electrical arcing in the oven, and damage oven
walls.
10. Remove wire twist-ties on paper and plastic
bags before placing in oven. Twist-ties sometimes
cause bag to heat, and may cause fire.
11.Don’tdefrost frozen beverages in narrow necked
bottles especially carbonated ones. Even if the container is opened, pressure can build up. This can
cause the container to burst, resulting in injury.
12. Don’t overcook. Excessive overcooking dehy-
drates potatoes, and may cause them to catch fire
causingdamage.
13, If food should ever ignite: Keep the oven door
closed. Turn off the power immediately: Turn
TIMER to “O” or “OFF” or disconnect power cord or
shut off power at the fuse circuit breaker panel.
14. Boiling eggs (in and out of sheii) is not recom-
mended for microwave cooking. Pressure can build
up inside egg yolk and may cause it to burst, resulting in injury.
15. Foods with unbroken outer “skin” such as po-
tatoes, hot dogs or sausages, tomatoes, apples,
chicken livers and other giblets, and eggs (see
above) should be pierced to allow steam to escape
during cooking.
16.’’Boilabie” cooking pouches and tightly closed
piastic bags should be slit, pricked or vented as directed in Cookbook. If they are not, plastic could
burst during or immediately after cooking, possibly
resulting’>in injury. Also, plastic storage containers
should be at least partially uncovered because they
form a tight seal. When cooking with containers
tightly covered with plastic wrap, remove covering
carefully and direct steam away from hands and
face.
17, Do not pop popcorn in your microwave oven
unless in a special microwave popcorn accessory —
or unless you use popcorn labeled for use in microwave ovens. Because of the heat generated without
these precautions, the container could catch fire.
18. Piastic Utensiis–Piastic utensils designed for
microwave cooking are very useful, but should be
used carefully. Even microwave plastic may not be
as tolerant of overcooking conditions as are glass
or ceramic materials and may soften or char if subjected to short periods of overcooking. In longer exposures to overcooking, the food and utensils
could ignite. For these reasons: 1) Use microwave
plastics only “and use them” in strict compliance
with the utensil manufacturer’s recommendations.
2) Do not subject empty utensils to microwaving. 3)
Do not permit children to use plastic utensils without complete supervision.
19. Do not use your microwave oven to dry news-
papers. If overheated, they can catch fire.
20. When cooking pork either conventionally or in
the microwave oven, follow our directions exactly
and always cook the meat to at least 170°. This
assures that, in the remote possibility that trichina
may be present in the meat, it will be killed and
meat will be safe to eat.
21. Avoid heating baby food in glass jars even
without their lids especially meat and egg mixtures.
e
m
@
@
4
Page 5

w
A
?
F=lP m
v
Door Handle. Oven doesn’t operate unless door
is securely latched. Pull handle to open.
!nside Door Latches.
3. Window with Metal Shield. Screen allows cook-
ing to be viewed while keeping microwaves
confined in oven.
4.
Plastic Antenna Cover. Protects the antenna
which distributes microwave energy into the oven.
5.
Oven Vent.
6.
Oven Light. Goes on when door is opened or
when oven is operating in any function.
7.
Oven Floor.
8.
Timer Control. Set timer to desired cooking
time for TIME COOK.
Power Select Control. Select setting before
9.
each use.
10.
Model and Serial Numbers.
Model
REM(I
ModelREW1
The following features are on Model RE961 only:
11.
Automatic Temperature Probe. Use with Tem-
peratureCook function.
Receptacle for Temperature Probe. Tempera-
I G.
ture Probe must be securely inserted into
receptacle before oven will start temperature
microwaving.
Time/Temp Switch. To cook by Time, push to
13.
right, then set timer. To cook by Temperature,
push to left, then set dial.
14.
Temperature Control. Set desired finished tem-
perature by dialing knob. If actual inte?nal temperature of food is more than temperatu~e set,
oven will not start.
Start Button. Push after all controls are set to
15.
start cooking operations.
Page 6

CookingbyTime
The time cooking feature allows
you to preset the cooking time.
The oven shuts off automatically.
HIGH Power Level is recommended
for most time cooking, but you may
change this for more flexibility.
See your Cookbook.
To become better acquainted with
time cooking, make a cup of coffee
by following the steps below.
L--
,
7--
‘L - –-——–—- Step 3: Push TIME/TEMP Switch
Step 1: Fill a cup 2/3 full of water
and add 1teaspoon of freeze dried
coffee. Use a cup that has no metal
decoration. Place cup in oven and
close door.
Step 2: Turn or push Power Level
Switch to HIGH which is the
Power Level recommended for this
cup of coffee.
Questions
and Answers
G).I set my oven for the time called
for in the recipe but at the end of
the time allowed, my dish wasn’t
done. What happened?
A. Since house power varies due
to time or location many Time
Cook recipes give you a time range
to prevent overcooking. Set the
oven for minimum time, test the
food for doneness, and cook your
dish a little longer, if necessary.
on RE961 to TIME position.
Step 4: Set Timer Control. For
coffee set at 1 minute and 20 to 30
seconds. Timer may be reset
during cooking if needed.
Q. I want to cook my dish on a
Power Level other than HIGH,
what do I need to do?
A. To change the Power Level,
simply turn or push switch for new
power level.
Q. Must I change the Power Control every time 1cook?
A. No, if your recipe calls for the
power level that your oven is
already set on, it is not necessary
to change.
Step 5: On RE961, push START
button. On RE960, after Timer is
set and door is closed, oven is
operating.
Step & On RE961 only, when time
is up, oven signals and shuts off
automatically.
Q. Can I interrupt my Time Cook
function to check the food?
A. Yes. To resume cooking, simply
close the door and push START.
NOTE: Microwave power will not
come on until you are ready. You
must push START for cooking to
begin. (On RE960, after Timer is
set and door is closed, oven is
operating.)
6
Page 7

Howto Defrost
The Defrost setting is designed for
even thawing necessary for large
amounts of food and is one of the
most important advantages of a
microwave oven.
@ LOW Power Level is recom-
mended for most defrosting,
but you may change this for
more flexibility.
@ See your Cookbook for the
complete defrosting chart.
defrosting in your oven, defrost
frozen pork chops by following the
steps below.
Skp 1: Place package of frozen
_ chops intheoven and close door.
Step 3: Push TIME/TEMP Switch
on RE961to TIME position. .
Step 4: Turn Timer Control to
8 minutes.
Defrosting-rips
@ Foods frozen in paper or plastic
can be defrosted in the package.
@ Foreven defrosting, many foods
need to be broken up or separated
part of the way through the
defrosting time.
@ Homemade dinners can be
frozen in shallow foil trays and
heated for later use. Select foods
which microwave well.
@ Pre-packaged frozen’ dinners
can be defrosted and microwave
cooked.
Step 2: Turn or push Power Level
Switch to DEFROST setting.
Questions
andAnswers
Q. Can I Defrost small items in a
hurry?
A. Yes, but they will need more
frequent attention than usual. Raise
the Power Level after entering the
time. Power Level MED cuts the
time in 1/2; Power Level HIGH cuts
the time to 1/3.
—
button. On RE960, after Timer is
set and door is closed, oven is
operating.
Step 6: When oven turns off, turn
package over, close door, and
repeat Steps 4 and 5.
Q. When I press START or close
door, I hear a dull thumping noise.
What is it?
A. This sound is normal. It is letting you know the oven is using a
Power Level lower than HIGH,
Q. Can I open the door during
defrosting to check on the progress of my food?
A. Yes. You may open the door at
any time during microwaving. To
resume defrosting, close the door
and press START,
I
@ Check your Cookbook for other
defrosting tips.
Q. Why don’t the defrosting times
in the Cookbook seem right for my
food?
A. Cookbook times are average.
Defrosting time can vary according
to the temperature in your freezer.
Set your oven for the time indicated in your Cookbook. If your
food is still not completely thawed
at the end of that time, re-set your
oven and adjust the time accordingly.
-
7
Page 8

CookingbyTemperature ~
(Mode[~~~6f ~~[y)
For many foods, internal temperature is the best
test of doneness.
Roasts or poultry are cooked to your preference
when temperature cooking. Heating or reheating
foods accurately to a serving temperature you
desire is simple and easy.
TEMP COOK takes the guesswork out of cooking
because the oven shuts off automatically when the
food is done,
The
Temperature Probe
The temperature probe is a food thermometer that
gauges the internal temperature of your food; it
must be used when using Temperature Cooking.
Check with your Cookbook for proper placement of
probe in specific foods.
SENSOR
HANDLE
CLIP
HowtoTempCooka RolledBeefRibIFkx3stto Medium
Step fl: Insert temperature probe
as directed in Cookbook and at-
tach probe securely in oven wall.
Close the door.
Step 2: Turn Power Level Control
to MED.
Step 3: Push TIME/TEMP Switch
to TEMP position.
Step 4: Turn Temperature Knob
to 130.
,
Step 5: Push START button. inte-
rior light and fan come on to tell
you oven is operating.
Step 6: When 130 degrees is
reached, oven automatically turns
off. Remove probe and food from
the oven.
Choking Tips
@ Use a lower Power Level setting: it will heat more evenly even
though requiring more time.
a Be sure frozen food has been
completely defrosted before inserting probe. Probe may break off
if used in frozen foods.
e Always insert probe into the
center of meaty areas; take care
not to touch the fat or the bone.
e Insert probe as horizontally as
possible into foods as directed in
the recipes. Make sure the handle
does not touch the food.
e Use the clip to keep the probe in
place while heating.
@ Cover foods as directed in
Cookbook for moisture control and
quick, even heating.
e
e
@
Questions
andAnswers
Q. Is temperature cooking better
than time cooking for reheating
leftovers?
A. Yes, this type of food is excel-
lent to heat with the probe because
often the amount of food is not
known, therefore cooking time is
only a guess. Cooking to a preset
temperature (usually 1500) elimi-
nates the quesswork,
Q. After setting Power Level and
temperature, I pushed STAR-r but
the oven did not come on. Why?
A. You inust push the TIME/TEMP
Switch to TEMP when temperature
cooking. Also if probe is not
securely seated or forgotten, oven
will not start. Make sure all controls are set properly.
Q. Are there any foods I can’t
Temperature Cook?
A. Yes. Delicate butter icings, ice
cream, frozen whipped toppings,
etc., soften rapidly at warm tem-
peratures. Batters and doughs as
well as frozen foods are also difficult to cook precisely with the
probe. It is best to TIME COOK
these foods.
8
Q. Can I leave my probe in the
oven if it’s not inserted in the food?
A. No. If the probe is left inside the
oven, touching the oven wall, and
not inserted in food, you may
damage the oven.
Q. How do I know what temperature to 3et?
A. Your Cookbook contains sections on all types of foods showing
the temperatures needed to cook
the foods to different degrees of
doneness. For reheating, refer to
Reheating Charts in the front
of the Cookbook for specific
temperatures.
e
@
Page 9

,
.!{
.— ...—
,.. .
,1
j
1
,
..
..
,. -
‘ . ..-
,.
..=-
-..
.
,. ,. -,,,,.
..
.
._
,
,,
,.{,.
,---
.
Page 10

CareforYourMicrowaveOven
—
@
o
e
Your New Microwave Oven is a Valuable Appliance,
Protect If From Misuse By Following These Rules:
@ Keep your oven clean and sweet-smelling.
Opening the oven doora few minutes after cooking
helps “air-out” the interior. An occasional thorough
wiping with a solution of baking soda and water
keeps the interior fresh.
o Don’t usesharp-edged utensils with your oven.
The interior and exterior oven walls can be
scratched. The control panel can be damaged.
e Don’t remove the antenna cover at the top of the
oven (microwave feature 4 on page 5). You will
damage the oven.
BE CERTAIN POWER IS OFF”BEFORE CLEANING ANY PART OF ‘THIS OVEN.
How toCleantheInside
Walls, floor and plastic cover. Because there is little
heat except in the food, or sometimes in the utensils, spills and spatters are easy to remove. Some
spatters can be removed with a paper towel, others
may require a damp cloth. Remove greasy spatters
with a sudsy cloth, then rinse and dry. Do not use
abrasive cleaners on oven walls. NEVER USE A
COMMERCIAL OVEN CLEANER ON ANY PART
OF YOUR MICROWAVE OVEN.
Door-inside. Glass: Wipe up spatters daily, wash
when soiled, with a minimum of sudsy warm water.
Rinse thoroughly and dry.
Metal and plastic parts on door: Wipe frequently
with a damp cloth to remove all soil. DO NOT USE
ABRASIVES, SUCH AS CLEANING POWDERS OR
STEEL AND PLASTIC PADS. THEY MAY MAR THE
SURFACE.
Special note when using Brown ‘N Sear Dish: High
heat generated on bottom of Brown ‘N Sear Dish
can cause scorched appearing stains to bake onto
the oven floor if grease is present. These may be
removed with Bar Keepers Friend@ Cleanser by
SerVaas Laboratories, Inc.
After using Bar Keepers Friend@ Cleanser, rinse
and dry thoroughly, following instructions on can.
Do not use Bar Keepers Friend@ Cleanser on the
painted surfaces such as the walls. It may scratch
the paint.
Bar Keepers Friend@ Cleanser is sold in many
grocery, hardware, and department stores.
Automatic Temperature Probe. Probe is sturdy, but
care should be taken in handling. Do not twist or
bend; avoid dropping temperature probe.
Clean as soon after using as possible. To clean,
wipe with sudsy cloth, then rub lightly with plastic
scouring ball if necessary. Rinse and dry. (Or wash
in dishwasher.)
l-lowto(Hem the outskk
Case. Clean the outside of your oven with soap and
damp cloth, then rinse and dry. The outer pane of
the window is glass. Just wipe clean with a damp
cloth. Woodgrain trim is best wiped with a damp
cloth and then with a dry towel.
control Panel. Wipe with a damp cloth. Dry thoroughly. Do not use abrasives or sharp objects on
the panel: They can damage it.
Cord. If the cord becomes soiled, unplug and wash
with damp cloth. For stubborn spots, sudsy water
may be used, but be certain to rinse and dry thoroughly before plugging cord into outlet.
Oven Lamp Replacement. First, unplug the oven.
Then remove lamp compartment cover by removihg
screw which holds cover in place. Cover is located
at the rear of outer case.
Replace with 40 watt appliance bulb. (It is available
in drug and hardware stores.) Replace compartment cover. Plug in the oven.
9’
Page 11

If you have a problem, it may be minor. You may be able to correct it yourself. Just use this Problem Solver to
locate your problem and then follow the suggested recommendations.
PROBLEM
OVEN WILL NOT ~C)ME ON
WHEN USING TEMPERA- TIM E/TEMP switch must be set at TEMP’position. If Switch isset on
TUFIE PROBE, OVEN WILL
NOT COME ON AFTER
“START” IS PRESSED
FOODS ARE EITHER Over-
COOKED OR UNDERCOOKED
POSSiBLE CAUSE AND REMEDY
A fuse in your home may be blown or the circuit breaker tripped.
Replace fuse or reset circuit breaker.
Make sure 3-prong plug on oven is fully inserted into wall
receptacle.
Door not securely closed.
TIME and there is time left on timer, rotate timer to “O”.
Check to be sure cable end of probe is securely “seated” into oven
receptacle.
Temperature set on TEMPERATURE Dial must be higher than actual
food temperature for oven to start.
cooking times may vary because of starting food temperature, food
density or amount of foods in oven. Set additional cooking time for
completion.
Incorrect Power Level set. Check Cookbook for recommended
Power Level or changing levels d,uring cooking if necessary.
Dish was not rotated, turned or stirred. Some dishes require specific
instructions, Check Cookbook or recipe for these instructions.
“Too many dishes in oven at same time. Cooking time must be
increased when cooking more than one fooditem. Check Cookbook
for recommendation on increasing time.
Temperature probe must be inserted into food properiy. Check
Cookbook for probe placement when cooking by temperature.
t. Steam or vapor escaping from around the
2. Light reflection around door or outer case.
3. Dimming oven light and change in blower sound
may occur while operating at power levels other
than high.
door.
4. Dull thumping sound while operating at power
levels other than high.
5. Some TV-Radio interference might be noticed
while using.,your microwave oven. It’s similar to the
interference caused by other small appliances and
does not indicate a problem with your oven.
Page 12

r-s] ConsumerServices
—
—
,=.
~.v ..-—*
%%$
.-
i ‘Wy --- ‘----
J
At Hotpoint we’re committed to providing you with the best appliances we know how
to build and we know that you w-antyou~appliances to give you many years of dependable
service.
Our Consumer Services are designed with your needs and wants in mind.
———
Warranty Protection
Yournewapplianceis a well designedandengineered Seethe warrantyonthe backpageof this bookfor
product.Beforeit left the factory,it went through
rigorousteststo detect manufacturingdefects.And
youhavea writtenwarrantyto protectyou.
details.
PromptService at your Convenience
Whetheryourapplianceis in orout of warranty,
you’rejust a phonecall awayfrom our nationwide
networkof FactoryServiceprofessionals.
Simplycall our Hotpointserviceorganization.
You’llfind them in theWhite Pagesunder“Hotpoint
FactoryService;’andin the YellowPagesunder
“HotpointCustomerCare”Service.”
Serviceis scheduledat yourconvenienceandthe
techniciandrivesa fully-stockedparts servicetruck
sothat, in most cases,the repaircanbe completed
in onevisit.
We’reproudof our serviceandwantyouto be
pleased,but if for somereasonyouarenot happy
with theserviceyou receive,herearethreestepsto
follow for further help.
FIRST,contact the peoplewhoservicedyour
appliance.Explainwhyyouarenot pleased.In most
cases,this will solvethe problem.
NEXT,if youarestill not pleasedwriteall the details
—
includingyourphonenumberto:
Manager,ConsumerRelations
Hotpoint
AppliancePark
Louisville,Kentucky40225
FINALLY,if yourproblemis still not resolved,write:
MajorApplianceConsumerAction Panel
20NorthWackerDrive
Chicago,Illinois 60606
ServiceContracts
For trouble=freeserwicebeyond d
the written warranty period.
Ifyoupreferto budgetyourrepaire
insteadof beingsurprisedbythem,
offersservicecontractsfor varying
time onall Hotpointmajorapplianc
The(hick Fix’” System
Youcan save time and money
by doing it yourself.
TheQuickFix’” Systemis designedto
meetthe needsof bothexperiencedor
beginningdo-it-yourseifersandtakesa
of mysteryout of homeappliancerepai
Step-by-StepManualscoveringthe repairof ~
standardand largecapacitywashers,standardand
largecapacitydryers,refrigerators,dishwashers
andranges(non-microwave),includeinstructive
Help forYOUByPhone
Shouldyouneedhelp in the selectionand _~:
purchaseof newappliances,or have
questionsabout the operationof the Hotpoint ‘_~= hoursa day,sevendaysa week.
appliancesyounowown—or haveanyother
questionsabout ourconsumerproductsor
servicesyouareonlya TOLL-FREEcall away.
~
The GEAnswerCtde!
800.626.2000 ‘ou anytime”
11
Mostof the repairscan be madewith the kitchen
drawervarietyof tools you alreadyhaveat home.In
fact, the screwdriveris called for most often in Quick
Fix’” Systemprocedures.
~.
~
“—”
~
TheGEAnswerCenter’” 800.626.2000
consumerinformationserviceis open24
Ourstaff of expertsstands readyto assist
Page 13

WHAT IS COVERED FULLONE-YEARWARRANTY
Foroneyear from date of original
purchase,we will provide,free of
charge,parts and servicelabor in
your home to repairor replaceany
part of the microwaveovenlrange
that fails becauseof a manufacturing defect.
LIMITEDADDITIONAL
FOUR-YEARWARRANTY
Forthe secondthrough fifth year
from date of original purchase,
we will provide,free of charge,a
replacementmagnetron tube if the
magnetrontube fails becauseof a
manufacturing defect.You payfor
the servicetrip to your home and
servicelabor charges.
teach you how to usethe product.
Readyour Useand Care material.
If you then haveany questions
about operating the product,
pleasecontact your dealeror our
ConsumerAffairs office at the
addressbelow, or call, toll free;
The GEAnswer Center’”
800.626.2000
consumer information service
o improper installation.
If you havean installation probiem,
contact your deaieror instaiier.
Youare responsiblefor providing
adequateeiectricai, exhausting
and other connecting facilities.
This warranty is extendedto the
original purchaserand any succeeding owner for products purchased
for ordinary home usein the 48
mainlandstates, Hawaiiand
Washington,D.C, In Alaskathe
warranty is the sameexceptthat it
is LIMITED becauseyou must pay “
to ship the product to the service
shop or for the servicetechnician’s
travel coststo your home,
All warranty servicewill be provided
by our FactoryServiceCentersor
by our franchised Customer Care@
servicersduring normal working
hours.Check the White Pagesfor
HOTPOINTFACTORYSERVICE.
Look in the Yellow Pagesfor
HOTPOINTCUSTOMERCARE@
SERVICEor GENERAL ELECTRICHOTPOINT CUSTOMERCARE@
SERVICE,
o Replacementof housefuses
or resetting of circuit breakers.
o Faiiureof the product if it is
usedfor other than itsintended
purposeor usedcommercially.
@Damageto product caused
by accident, fire, fioods or acts
of God.
WARRANTORiS NOT RESPONSii3LE FORCONSEQUENTiAL
DAMAGES.
Somestatesdonotallowtheexclusionorlimitationof incidentalorconsequentialdamages,sotheabovelimitationorexclusion
? ‘
maynotapplyto
knowwhatyourlegalrightsareinyourstate,consultyourlocalorstateconsumeraffairsofficeoryourstate’sAttorneyGeneral.
To
you.Thiswarrantygivesyouspecificlegalrights,andyoumayalsohaveotherrightswhichvaryfromstatetostate.
Manager—ConsumerAffairs,GeneralEiectricCompany,AppliancePark,Louisville,KY40225
I!
Part. No. 862A724 P69 Rev. 1
Pub. No. 39-4491-1
WarrantofiGeneralElectricCompany
$ffudherhelpIsneededconcerningthiswarranty,contact:
*
mti~
4/83
A QUALITY PROOUCT Or
GENERAL ELECTRIC COMPANY
 Loading...