

Page 1

@
Howtoget
the bestfrom
useandCareofmodelRE966
Featuresofyouroven
Touchcontrolpanel
/
,..
HowtouseDefrost
Cookingbytime
Savetimeandmoney.
Beforeyourequestservice,
usetheProblemSolver
p5
p6
p7
p8
p12
.—
——
The GE Answer Cent:?
800.626.2000
%nlNiiL‘“--’‘
. .
Page 2
‘Read this bclokcarefully.
It will help you operate and maintain your new Microwave Oven
properly.
Keep it handy for answersto your
questions.
If you don’t understand something
or need more help. . .
Call, toll free:
GEAnswer Center’”
The
800.626.2000
consumer information service
or write: (include your phone
number);
Consumer Affairs
Hotpoint
Appliance Park
Louisville, KY 40225
Write ckwn the mock!and
serialrtwnber$.
You’ll find them on a label inside
the oven on the upper left side.
These numbers are also on the
Consumer Product Ownership
Registration Card that came with
your Microwave Oven. Before
sending in this card, pleasewrite
these numbers here:
Model No.
Be sureyour Microwave
Ovenis registered.
It is important that we,the manufacturer, know the location of your
Microwave Oven shculd a need
occur for adjustments.
Your supplier is responsiblefor
registering you asthe owner.
Pleasecheck with your supplier to
besure he hasdone so; also send
in your Consumer Product Ownership Registration Card. If you move,
or if you are not the original purchaser pleasewrite to us, stating
model and serial numbers. This
appliancemustbe registered.
Pleasebe cerlainthatit is.
Write to:
Hotpoint
Range Product Service
Appliance Park
Louisville, KY 40225
If you receiveda damaged
OV~BlmI .
immediately contact the dealer (or
builder) that sold you the Microwave Oven.
Savetkne and money
Beforeyou requestservice,check
the ProblemSolveron page 12.R
lists minor causesof operating
problems that you can correct
yourself.
(a) Do NotAttemptto operate this
oven with the door open since open
door operation can result in harmful
exposure to microwave energy. It is
important not to defeat or
with the safety interlocks.
ta~ipe~
(b)Do Not Placeany object
betweenthe oven front face and the
door or allow soil or cleaner residue
to accumulate on sealing surfaces.
(c) Do Not Operatethe oven if it is
damaged. It is particularly important
that the oven door close properly
and that there is no damage to the:
(1) door (bent)
(2) hinges and latches (broken or
loosened)
(3) door sealsand sealing surfaces.
(d)The Oven ShotJMnot be
adjusted or repaired by anyone
except properly qualified service
personnel.
Serial No.
Use these numbers in any
correspondence or servicecalls
concerning your Microwave Oven.
optional Accessoy
Available at extra-cost from your Ilotpoint supplier.
%M-11installationKit
Converts your countertop oven to a built-in wall oven. This microwave
oven is UL listed for installation over Hotpoint wall ovens with black
glass doors.
Page 3
contents
Before Microwaving . . . .. .. .. .. . 2
afety Instructions . . .. . . . . ....3-4
Featuresof Your Oven . .. .. .. . . . 5
ooking Complete Reminder. . . . 5
ouch Control Panel . .. .. .. ....6
Setthe Clock .. . . . .. .. . . . . .. ...6
Defrosting . .. .. .. .. . . . . . .. .. ...7
Time Cook . . . . . . .. .. .. .. . . .. ..8
MiN/SECTimer . . . . . . .. .. .. ....9
Care ofYourOven . .. .. .. . . ...10
Grounding Instructions . . .. .. . . 11
Useof Extension Cords . .. .. .. . 11
The Problem Solver .. .. . . . . .. . 12
Consumer Services. .. . . . . . . . . . 15
Warranty . . . . .. . . . .. .. Back Cover
Microwaving
@Make sure all utensils usedin
your microwave oven are labeled
“suitableformicrowaving”. Check
yourCookbookfor specific test
to determine ’’microwave-safe”
utensils.
e
SI Paper towels, waxpaper, and
Iasticwrap canbe usedto cover
ishesin order to retain moisture
and prevent spattering.
@ Some microwaved foods require
stirring, rotating, or rearranging.
CheckyourCookbook forspecific
instructions.
e Some foods such as unshelled
eggsand hotdogs must be pierced
toallowsteamto escape during
cooking.
Tips
IMPORTANTSAFETYINSTRUCTIONS!!i!i5?
Readall instructionsbeforeusingthisappliance.
When using electrical appliances
basic safety precautions should
be followed, including the
following:
WARNING—TOreduce the risk
of burns, electric shock, fire,
injury to persons or exposure to
excessivemicrowave energy:
e Usethis appliance only for its
intended useas described in this
manual.
e Readand follow the specific
“PRECAUTIONS TO AVOID
POSSIBLE EXPOSURETO
EXCESSIVEMICROWAVE
ENERGY” found on page 2.
e This appliance must be
grounded. Connect only to
properly grounded outlet. See
“GROUNDING INSTRUCTIONS”
found on page 11.
e For best operation, plug this
appliance into its own electrical
outlet, to prevent flickering of
lights, blowing of fuse or trip-
ping of circuit breaker.
e Install or locate this appliance
only in accordance with the provided installation instructions.
49Be certainto placethe front
surfaceof the door three inches
or morebackfromthe countertop edgeto avoidaccidentaltip-
ping of the appliancein normal
usage.
e Do not cover or block any
openings on the appliance.
e Do not use outdoors.
o Do not immerse power cord
or plug in water.
e Keep power cord away from
heated surfaces.
e Do not let power cord hang
over edge of table or counter.
@ Do not operate this appliance
if it has a damaged power cord
or plug, if it is not working properly, or if it has been damaged
or dropped.
e This appliance should be serviced only by qualified service
personnel. Contact nearest
authorized service facility for
examination, repair or ‘%
adjustment.
e As with any appliance, close
supervision is necessarywhen
used by children:
e To reduce the risk of fire in
the oven cavity:
—Do not overcook food. Carefully attend appliance if paper,
plastic, or other combustible
materials are placed inside the
oven to facilitate cooking.
—Remove wire twist-ties from
paper or plastic bags before
placing bag in oven.
—Do not useyour microwave
oven to dry newspapers.
—Papertowelsand napkins,
wax paper.Recycled paper
products can contain metal
flecks which may cause arcing
or ignite. Paper products con-
taining nylon or nylon filaments
should be avoided, as they may
also ignite.
—Do not pop popcornin your
microwaveovenunless in a spe-
cial microwave popcorn accessory or unless you use popcorn
labeled for use in microwave
ovens.
—Do not operatethe ovenwhile
emptyto avoiddamageto the
ovenand the dangerof fire.If by
accident the oven should run
empty a minute or two, no harm
is done. However, try to avoid
operating the oven empty at all
times—it saves energy and pro-
longs life of the oven.
—If materials inside the oven
should ignite, keep oven door
closed, turn oven off, and dis-
connect the power cord, or shut
off power at the fuse or circuit
breaker panel.
~–
—
KsiTmr—
—
—
—
—
miza-—
-,
—-
=.
~—
—.
—
—–
s
~.
E
—
—
~-
——
—
-
~=
—,
—,
=J
~- r
-..
—
—
—
E“
-
—
~
—r
—,
-
-—
___
fmEfr—
—.
-
—
~.
*---
—
~-
—r
-.:=.
e See door surface cleaning
instructions on page 10.
(continued next page)
3
Page 4

IMPORTANTSAFETYINSTRUCTIONS
(continued)
Some products such as
@
whole eggs and sealed containers—for example, closed
glass jars—may explode and
should not be heated in this
oven.
e
Avoid heatingbabyfood in
glass jars,even without their
lids; especially meat and egg
mixtures.
e Don’tdefrostfrozenbever-
agesin narrow necked bottles;
especially carbonated ones.
Even if the container is opened,
pressure can build up. This can
cause the container to burst,
resulting in injury.
e Use metalonlyas directedin
Cookbook.Metal strips as used
on meat roasts are helpful when
used as shown in Cookbook.
TV dinners maybe cooked in
metal trays. However, when
using metal in microwave oven,
keep metalat leastl-inch away
fromsidesof oven.
@ Cooking utensilsmay
becomehot becauseof heat
transferred from the heated
food. This is especially true if
plastic wrap has been covering
the top and handles of the
utensil. Potholders may be
needed to handle the utensil.
@ Sometimes,the ovenfloor
can ‘becometoo hot to touch.
Be careful touching the floor
during and after cooking.
e Do not
in food you are microwaving
unlessthat thermometer is
designed or recommended for
use in the microwave oven.
@ PlasticUtensils—Plastic
utensils designed for microwave
cooking are very useful, but
should be used carefully. Even
microwave plastic may not be as
tolerant of overcooking conditions as are glass or ceramic
materials and may soften or
char if subjected to short periods
of overcooking. In longer exposures to overcooking, the food
and utensils could ignite. For
these reasons:1) Use microwave plastics only “and use
them” in strict compliance with
the utensil manufacturer’s
recommendations. 2) Do not
subject empty utensils to microwaving. 3) Do not permit children
to use plastic utensils without
complete supervision.
o When cooking pork follow
our directions exactly and
always cook the meatto at least
170°. This assuresthat, in the
remote possibility that trichina
may be present in the meat, it
will be killed and meatwill be
safeto eat.
e Boilingeggs(in and out of
shell)isnot recommendedfor
microwave cooking. Pressure
can build up inside egg yolk and
may cause it to burst, resulting
in injury.
use any thermometer
e Foodswith unbrokenouter
“skin”such as potatoes, hot
dogs or sausages,tomatoes,
apples, chicken livers and other
giblets, and eggs (seeabove)
should be pierced to allow
steam to escapeduring cooking.
e “Boilable”cookingpouches
and tightlyclosedplasticbags
should be slit, pierced or vented
as directed in Cookbook. Ifthey
are not, plastic could burst during or immediately after cooking,
possibly resulting in injury. Also,
plastic storage containers should
beat least partially uncovered
becausethey form a tight seal.
When cooking with containers
tightly covered with plastic wrap,
remove covering carefully and
direct steam away from hands
and face.
SAVETHESE
INSTRUCTIONS
4
Page 5
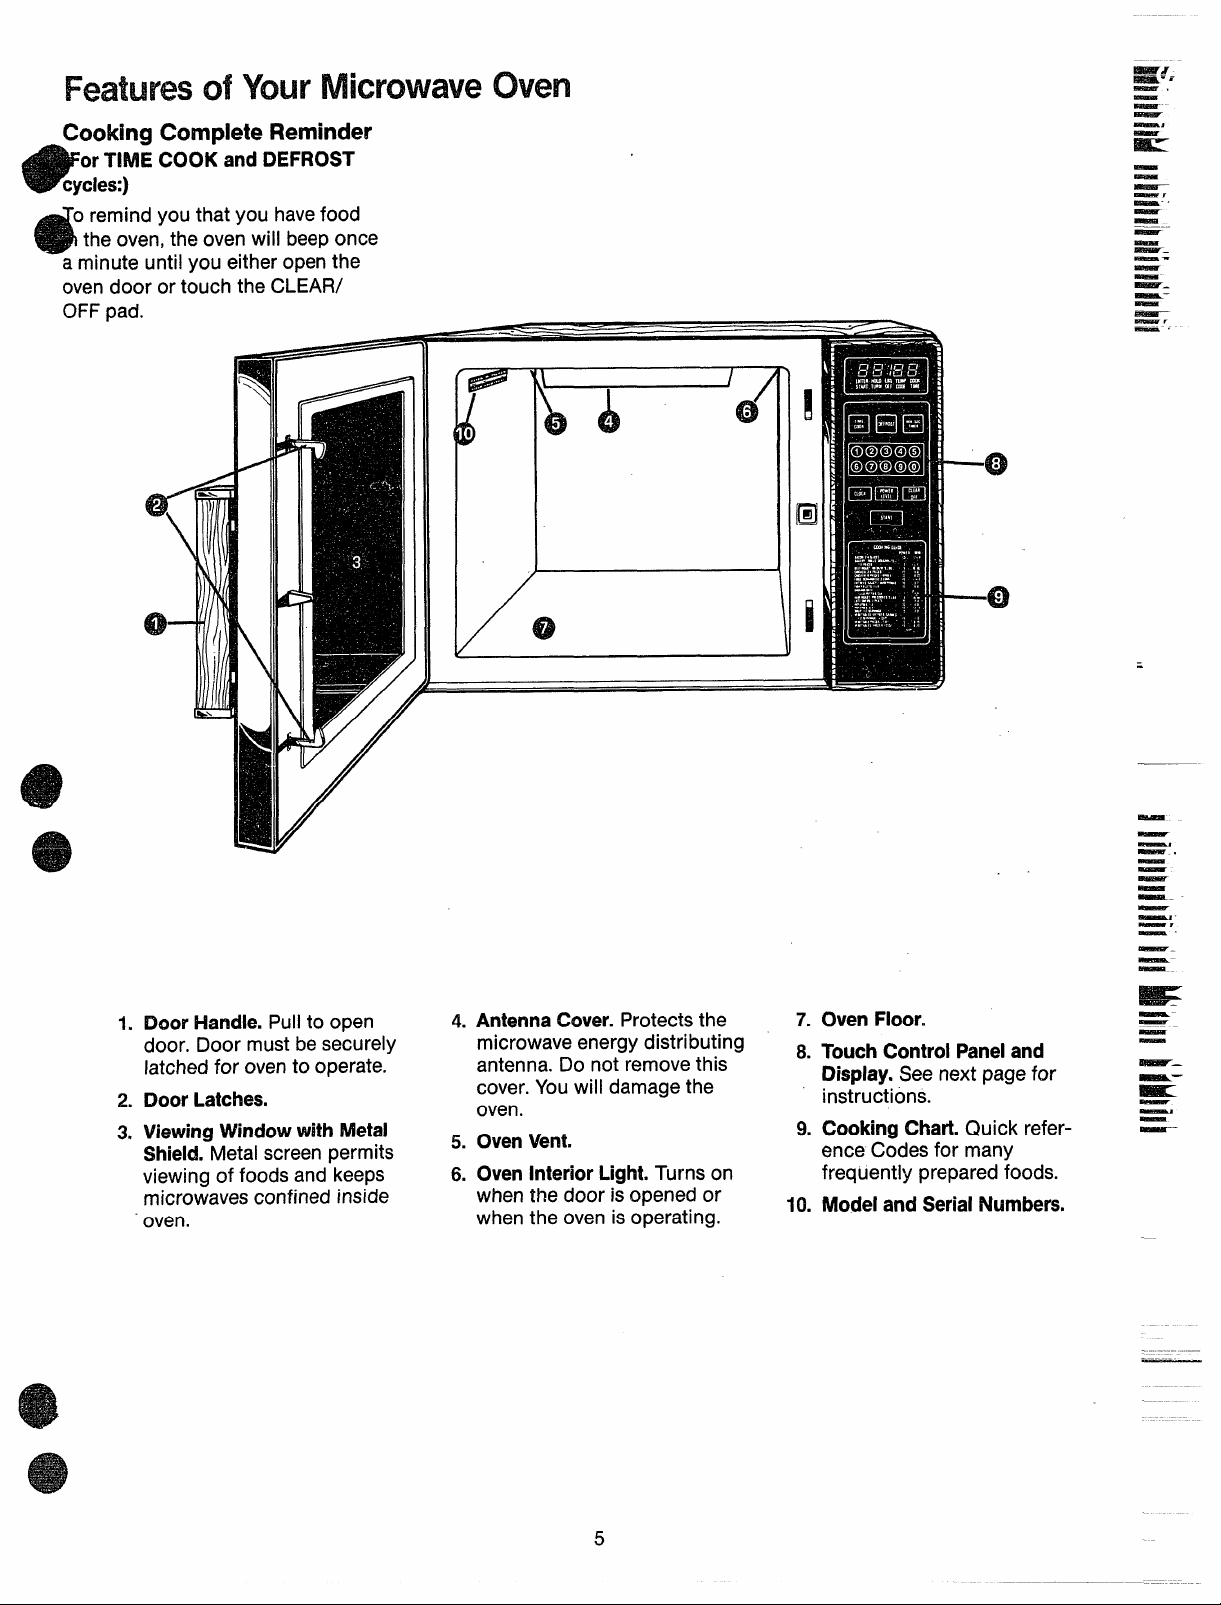
FeaturesofYourMicrowaveOven
CookingCompleteReminder
orTIME COOK andDEFROST
0
remind you that you havefood
the oven, the oven will beeponce
6
a minute unti! you either openthe
ovendoor or touch the CLEAR/
OFFpad
LA
A
1/
.
0
—2
iiii2
-
-
~
—,
-.
—
-
—––
-
~–
—-
-
-
Ei##sr-
1. Door Handle.Pull to open
door, Door must be securely
latched for oven to operate.
2. Door Latches.
3. ViewingWindowwith Metal
Shield.Metal screen permits
viewing of foods and keeps
microwaves confined inside
oven.
4. AntennaCover.Protects the
microwave energy distributing
antenna. Do not removethis
cover. You will damage the
oven.
5. OvenVent.
6. OvenInteriorLight.Turns on
when the door is opened or
when the oven is operating.
7. OvenFloor.
TouchControlPaneland
8.
Display.See
instructions.
9. CookingChart. Quick reference Codes for many
frequently prepared foods.
10. Model andSerialNumbers.
next page for
—
=.
—
—
—
—.
—
—
—,
—.
—–
—–
—–
—
—
—
—
—
--.—-
———..-
-.—.—
Page 6

FeaturesofYourcontrolIPam?ll
The Touch Control Panelallows
you to set the oven controls elec-
tronically with the touch of a finger.
It’s designed to be easyto use and
understand.
DISPLAY.Displaystime of day, tim[
counting down during cooking
functions (or power levelwhen
Power Level Padistouched).
TIME COOK. Microwavesfor a
preset amount of time using automatic Power Level 10(or change
power levelafter entering cooking
time. See page8.)
DEFROST. Gentle, generally uniform thawing at automatic Power
Level 3, (or change power level
after entering defrosting time. See
page 7.)
CLOCK. Touch this padto enter
time of day or check time of day
while microwaving. To set clock,
first touch CLOCK pad and then
enter time of day. For example, if
time is 1:30,touch number pads 1,
3, and Oand 1:30will appear in display. Re-touch CLOCK pad.To
reset or change time, simply repeat
above process.
MIN/SEC TiMEFLThis feature uses
no microwave energy when it functions aseither a kitchen timer or as
a holding period between defrost
and time cooking. (See page9.)
/
NUMBERPADS.Touch these pads
to enter cooking/defrosting time,
time of day or Power Level.
/
POWERLEVEL.Touch this pad
before entering another power level
number if you want to change from
automatic PowerLevel 10(HIGH)
for cooking or Power Level3 (LOW)
for defrosting.
CLEAR/OFF.When touched, it
shuts off the oven and erasesall
settings (except time of day).
@
START.After all selections are
made, touch this pad to start oven.
Page 7
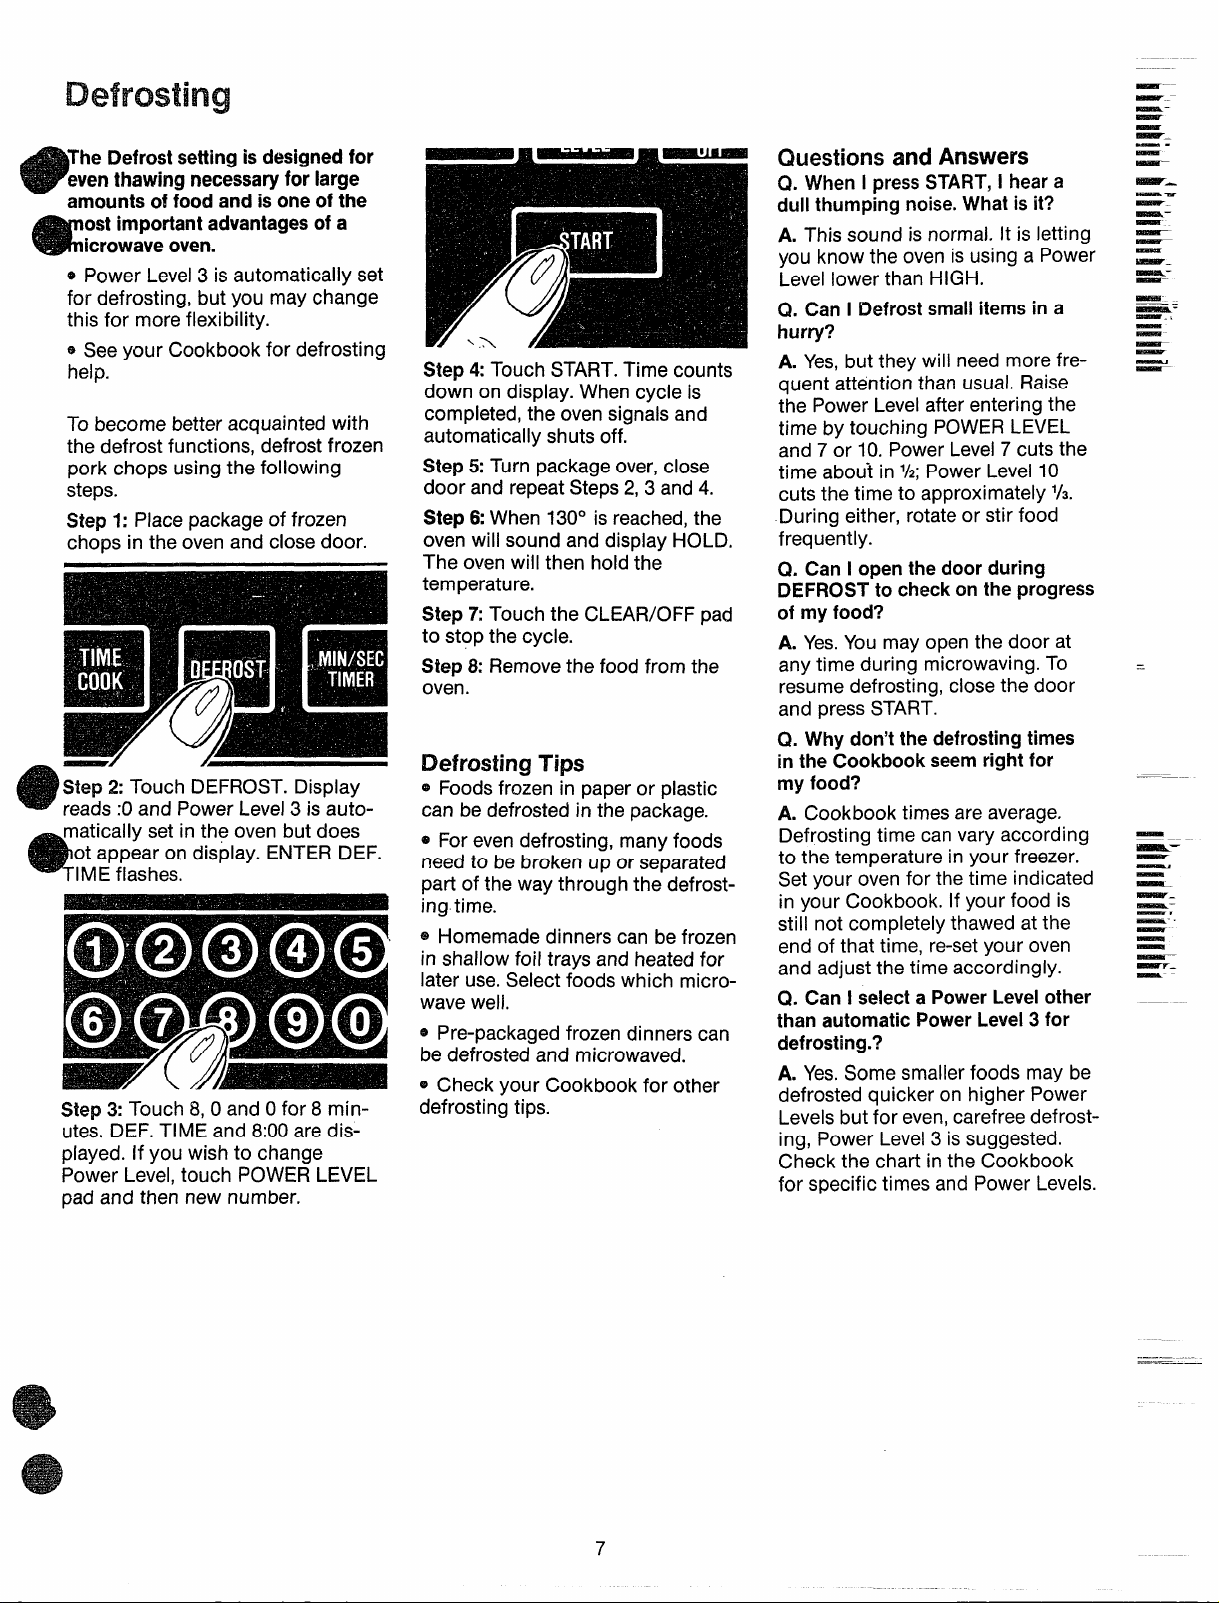
Defrosting
The Defrostsettingisdesignedfor
eventhawingnecessaryfor large
amountsoffoodand isoneof the
ostimportantadvantagesof a
icrowaveoven.
a
* Power Level3 isautomatically set
for defrosting, but you may change
this for more flexibility.
@Seeyour Cookbook for defrosting
help.
To become better acquainted with
the defrost functions, defrost frozen
pork chops using the following
steps.
Step1: Place package of frozen
chops in the oven and close door.
Step2: Touch DEFROST.Display
a
reads:0 and Power Level3 is automatically set in the oven but does
ot appear on display. ENTER DEF.
IME flashes.
*
w/( x~
Step 3: Touch 8,0 and Ofor 8 min-
utes. DEF.TIME and 8:00are displayed. if you wish to change
Power Level, touch POWER LEVEL
pad and then new number.
Step4: Touch START.Time counts
down on display. Whencycle is
completed, the oven signalsand
automatically shuts off.
Step5:Turn packageover, close
door and repeatSteps 2,3 and 4.
Step6:When 130° is reached,the
oven will sound and display HOLD.
The oven will then hold the
temperature.
Step7: Touch the CLEAR/OFF pad
to stop the cycle.
Step8: Removethe food from the
oven.
DefrostingTips
@Foodsfrozen in paper or plastic
can be defrosted in the package.
~ For evendefrosting, many foods
need to be broken up or separated
part of the way through the defrosting time.
~ Homemade dinners can be frozen
in shallow foil trays and heatedfor
later use.Select foods which microwave well.
@Pre-packaged frozen dinners can
be defrosted and microwaved.
~ Check your Cookbook for other
defrosting tips.
QuestionsandAnswers
WhenI pressSTART,I heara
(2.
dullthumpingnoise.Whatis it?
A. This sound is normal. His letting
you know the oven isusing a Power
Level lower than HIGH.
Q. Can I Defrostsmallitemsin a
hurry?
A. Yes,but they will need more fre-
quent attention than usual. Raise
the Power Levelafter entering the
time by touching POWERLEVEL
and 7 or 10.Power Level7 cuts the
time about in %;Power Level10
cuts the time to approximately %.
During either, rotate or stir food
frequently.
Q. Can I openthe doorduring
DEFROSTto checkon theprogress
of myfood?
A. Yes.You may open the door at
any time during microwaving. To
resume defrosting, close the door
and press START.
Q. Why don’tthe defrostingtimes
inthe Cookbookseemrightfor
myfood?
A. Cookbook times are average.
Defrosting time can vary according
to the temperature in your freezer.
Set your oven for the time indicated
in your Cookbook. If your food is
still not completely thawed at the
end of that time, re-setyour oven
and adjust the time accordingly.
Q. Can I selecta PowerLevelother
thanautomaticPowerLevel3 for
defrosting.?
A. Yes.Some smaller foods may be
defrosted quicker on higher Power
Levelsbut for even,carefree defrost-
ing, Power Level3 is suggested.
Check the chart in the Cookbook
for specific times and Power Levels.
_—.
— _–
_–
—
—
E3aac!r=
-.
—
—
~.
—-tsr
—.
~-
—
—
—
—
~.
~-
-
ilmsmia=
—..
—
—
—
—
—
—
—
—
—
~“
—
—
—
~–
—–
—r
—
—
—
—
~—–
..—
Page 8

cookingby Th’ne
The Time Cook featureallowsyou
to presetthecookingtime.
Power Level 10is automatically set
for time cooking, but you may
change this for more flexibility.
Seeyour Cookbook.
When the oven completes Time
Cooking, it automatically shuts off.
It will then display “End” and beep
once a minute until you either open
the door or touch the CLEAR/OFF
pad.
To become better acquainted with
Time Cook function, makea cup of
coffee by using the fo!lowing steps.
.
.
,.
i’
k??!?
Step 1: Fill a cup 2/3 full of water
and add 1teaspoon of freezedried
coffee. Use a cup that has no metal
decoration. Place cup in oven and
close door,
Step2: Touch TIME COOK. The
display shows :0. ENTER COOK
TIME flashes. Power Level 10is
automatically set, but does not
appear on display.
\
Step3: Select your time. Touch 1, 2,
and Ofor a minute and 20 seconds.
TIME COOK and 1:20are displayed.
If another Power Levelis desired,
touch POWERLEVELand the
number although Power Level 10
(HIGH) is preferred for this cup of
coffee.
Step4: Touch START.Time
counting down shows on display.
Step 5: When time is up, the oven
sounds, oven light and fan shut off.
The display will show “End”.
Step6: Openthe door or touch
CLEAR/OFF pad.
QuestionsandAnswers
Q. i setmy ovenfor the time caiied
forin therecipebutat theend of
thetimeallowed,my dishwasn’t
done.Whathappened?
A. Since house power variesdue to
time or location, many Time Cook
recipes give you atime rangeto
prevent overcooking. Set the oven
for minimum time, test the food for
doneness,and cook your dish a
little longer, if necessary.
Q. I wantto cook on a PowerLevei
otherthanHIGH, what do I need
to do?
A. To change the Power Level,
touch the POWERLEVEL pad after
entering desired cooking time.
Enter the desired number and then
touch START.
Q. Can I interruptmyTime Cook
functionto checkthe food?
A. Yes.To resumecooking, simply
close the door and touch START.
NOTE: Microwave power will not
come on until you are ready. You
must touch START for cooking to
begin.
Q. I touchedthenumberpadsand
selectedmy powerlevel.WhenI
touchedSTART,however,my oven
didn’tcomeon. Why not?
A. The TIME COOK pad must be
touched before setting the number
pads or elseyour oven will not
begin cooking.
Q. I triedto changePowerLevel
butthe displaychangedbackto
cookingtime.Why?
A. After touching Power Level pad
you only have4 seconds to enter
the number. Try setting controls
again.
Page 9

Howto Usethe Minute/SecondTimer
heMIN/SEC TIMER hasthree
mingfunctions:
@
* It operatesasa minutetimer.
It can besetto delaycooking.
‘* It can beusedasa holdsetting
afterdefrosting.
The MIN/SEC TIMER operates
without microwave energy.
Howto Time a WV?inute
PhoneCall
1.Touch MIN/SEC TIMER pad.The
display shows :0and ENTERTIME
flashes.
2. Touch number pads 3,0 andO
(for 3 minutes and no seconds).
Display shows 3:00.
3. Touch START.Display shows
time counting down.
4. Whentime is up, ovensignals
and display shows time of day.
Programming a HoldTime
The Minute/Second Timer can also
e usedto program “hold time”
etween microwave cooking func-
@
tions. The time can range from one
econd to 99 minutes and 99
conds. A’HOLD, or “standing”
*
ime may befound in some of your
own recipes or Cookbook.
To setthe oven to delay cooking up
to 99 minutes follow Steps 1 and2
to enter hold time. Then touch
TIME COOK pad and enter time
before pressing START.
How toDefrost,Hokt and
Time Cook
Let’ssay you want to defrost a
frozen casserolefor 15 minutes,
hold for 10 minutes and then Time
Cook for 25 minutes. Here’show
to do it:
Step1:Take casserolefrom freezer
and place it in the oven.
The display shows:0 and ENTER
DEF.TIME flashes.
Step3: Touch pads 1,5,0 and Ofor
15minutes defrosting time. 15:00
appearson display. (Defrosting is
automatically set on Power Level
3 but can be changed by touching
POWER,LEVELpad and the new
Power Level.)
Step4: Setstanding or hold time by
touching MIN/SEC TIMER. :0
appears on display and ENTER
TIME flashes.
Step5: Touch 1,0,0 and Oto hold
for ten minutes. 10:00appears on
display.
Step6: Touch TIME COOK pad.
The display shows:0 and ENTER
COOK TIME flashes.
Step7: Touch 2, 5,0 and Ofor
twenty-five minutes of cooking
time. 25:00appears on display.
Step8: Touch START. 15:00counting down shows on display. As each
function isautomatically performed
oven display shows instructions
entered and the function. While
cooking, you may touch appropriate pad to recall times you set.
Step9: When time is up, the oven
sounds, oven light and fan shut off.
The display will show “End”.
Step10:Open the door or touch
CLEAR/OFF pad.
QuestionsandAnswers
Q. Whatwill happenif I accidentally
reversemydefrost,holdand cook
instructions?
A. The oven automatically rear-
rangesyour program. Defrosting
always comes first, then hold, and
then the cooking function.
Q. Can I defrostand hold only?
A. Yes.Sometimes you may only
want to defrost a food, hold it, and
cook it later. All you need to do is
program in Defrost and amount of
time. Then program Hold and the
amount of time. Be sureto put the
thawed dish in the refrigerator
promptly.
NOTE: Let foods remain at room
temperature only aslong as safe.
Times will vary.
Q. I programmedmyovenfor a
specificdefrostingtime but it
defrostedlongerthannecessary.
Whathappened?
A. When instructions conflict, the
oven carries out the last instruction.
You may haveset the oven to
defrost for 4 minutes, hold for
2 minutes, and then defrost for
6 minutes. In this case,the oven
would defrost for 6 minutes and
hold for 2 minutes and ignore your
first defrost instruction.
——
—
—
—
—
—s
~.
—w
~.
—–
—.
iiiiE
—
—
-=
_.
v—
—
—
—
—
—
m
—
—
—
—
—
—
G
-x
~-
—
—–
—.
——
—–
—
—
——
—-
“’ -
—
—
-
_—
—
—
-—
r
Page 10

careforYourMicrowaveoven
YourNew MicrowaveOvenisa
ValuableAppliance,ProtectIt From
MisuseBy FollowingThese Rules:
e Keepyourovencleanand
sweet-smelling.Opening the oven
door a few minutes after cooking
helps “air-out” the interior. An
occasional thorough wiping with a
solution of baking soda and water
keepsthe interior fresh.
e Don’tusesharp-edgedu~ensils
with youroven.The interior and ex-
terior oven walls can be scratched.
The control panel can be damaged.
@ Don’tremovethe antennacover
at the top of the oven (microwave
feature 4 on page 5).Youwill
damage the oven.
BE CERTAIN POWERS OFF
IBEFORECLEANING ANY
PARTOF THIS OVEN.
HOWtoCleanthe i!nside
Walk, floorand plasticcover.Be-
cause there is little heat except in
the food, or sometimes in the utensils, spills and spatters are easyto
remove. Some spatters can be removed with a paper towel, others
may require a damp cloth. Remove
greasy spatters with a sudsy cloth,
then rinse and dry. Do not use
abrasive cleaners on oven walls.
NEVER USEA COMMERCIAL
OVEN CLEANER ON ANY PART
OF YOUR MICROWAVEOVEN.
Door-inside.Glass: Wipe up spatters
daily, wash when soi!ed, with a min-
imum of sudsy warm water. Rinse
thoroughly and dry.
Metal and plastic parts on door:
Wipe frequently with a damp cloth
to remove all soil. DO NOT USE
ABRASIVES, SUCH AS CLEANING
POWDERS OR STEEL AND PLASTIC PADS.THEY MAY MAR THE
SURFACE.
Specialnotewhen usingBrown‘N
SearDish:High heat generatedon
bottom of Brown ‘N Sear Dish can
causescorched appearing stains to
bakeonto the oven floor if grease is
present.These may be removed
with Bar KeepersFriend@Cleanser
by SerVaasLaboratories, Inc.
After using Bar Keepers Friend@
Cleanser,rinse and dry thoroughly,
following instructions on can. Do
not use Bar KeepersFriend@
Cleanseron the painted surfaces
such asthe walls. It may scratch the
paint.
Bar KeepersFriend@Cleanser is
sold in many grocery, hardware,
and department stores.
How toClean theOutside
Case.Clean the outside of your
oven with soap and damp cloth,
then rinse and dry. The outer pane
of the window is glass. Just wipe
clean with a damp cloth. Chrome
trim is bestwiped with a damp cloth
and then with a dry towel.
ControlPanel.Wipe with a damp
cloth. Dry thoroughly. Do not use
abrasivesor sharp objects on the
panel. They can damage it.
DoorSurface.When cleaning surfaces of door and oven that come
together on closing the door, use
only mild, non-abrasivesoaps or
detergents applied with a sponge
or soft cloth.
PowerCord. If the cord becomes
soiled, unplug and wash with damp
cloth. For stubborn spots, sudsy
water may be used, but be certain
to rinse and dry thoroughly before
plugging cord into outlet.
Oven LampReplacement.First
unplug the oven. Them remove
lamp compartment cover by removing screw which holds cover in
place. Cover is located at the rear
of outer case.
Replacewith 40watt appliance
bulb. (It is availablein drug and
hardware stores.) Replacecompartment cover. Plug in the oven.
10
Page 11
. .. ..
,.
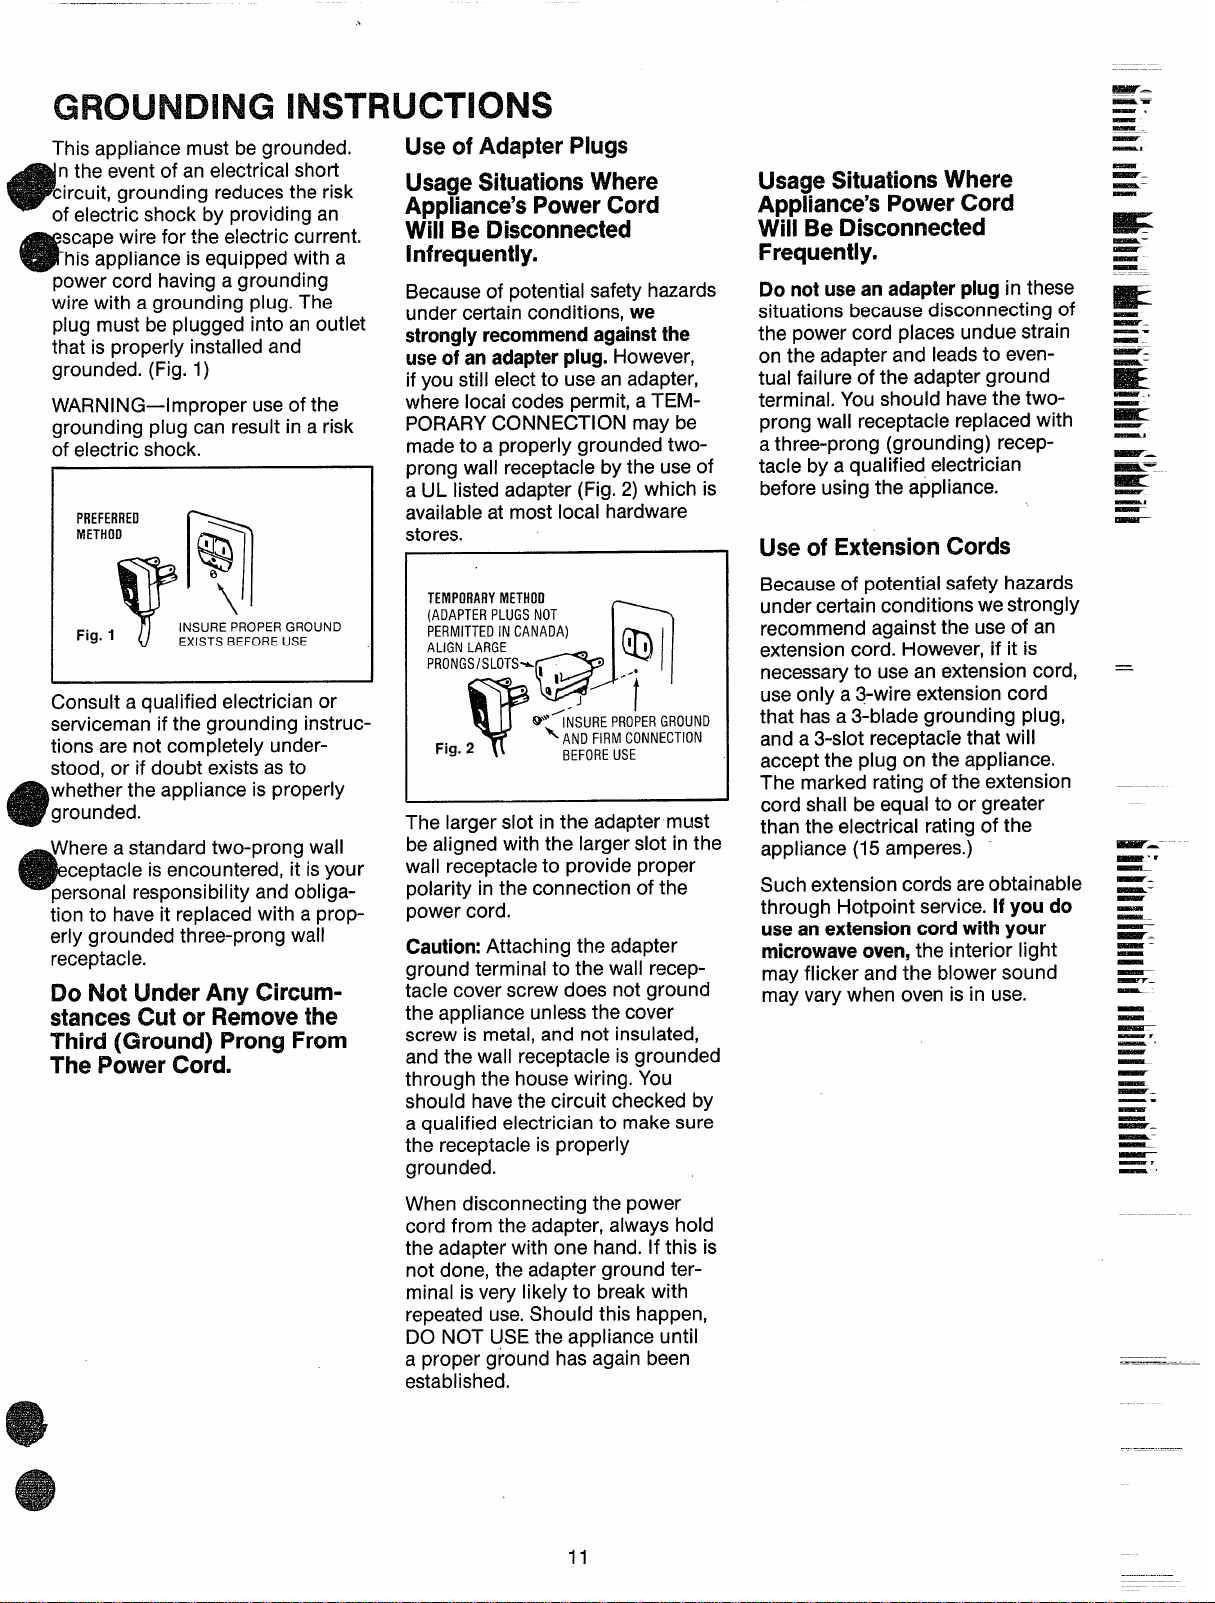
GROUNDING INSTRUCTIONS
This appliance must be grounded.
n the event of an electrical short
circuit, grounding reduces the risk
of electric shock by providing an
scape wire for the electric current.
his appliance is equipped with a
power cord having a grounding
wire with a grounding plug. The
plug must be plugged into an outlet
that is properly installed and
grounded. (Fig. 1)
WARNING—improper use of the
grounding plug can result in a risk
of electric shock.
PREFERRED
METHOO
Fig. 1
Tn
‘1
.
.
Q
:
\
INSURE PROPER GROUND
EXISTS BEFORE USE
Consult a qualified electrician or
serviceman-if the grounding instructions are not completely understood, or if doubt exists asto
whether the appliance is properly
grounded.
e
Where astandard two-prong wall
ceptacle is encountered, it is your
personal responsibility and obligation to have it replaced with a properly grounded three-prong wall
receptacle.
C$Ol’W3t~~ct~r lk~~
(2ircumstarices (24t or I%2movethe
Third
(Ground) ProngFrom
The Power Cord.
Useof AdapterPlugs
UsageSituationsWhere
Appliance’sPowerCord
WillBe Disconnected
infrequently.
Becauseof potential safety hazards
under certain conditions, we
stronglyrecommend againstthe
useofan adapterplug.However,
if you still elect to use an adapter,
where local codes permit, aTEM-
PORARYCONNECTION may be
madeto a properly grounded two-
prong wall receptacle bythe useof
a UL listed adapter (Fig.2) which is
availableat most local hardware
stores.
TEMPORARYMETHOD
(ADAPTER PLUGS NOT
PERMITTED IN CANADA)
ALIGN LARGE
PRONGS/SLOTSn , -
Fig. 2
# i
,
Q
@
-J
@“’iNSURE PROPERGROUND
w
‘AND FIRM CONNECTION
BEFOREUSE
The larger slot in the adapter must
be aligned with the larger slot in the
wall receptacle to provide proper
polarity in the connection of the
power cord.
Caution:Attaching the adapter
ground terminal to the wall receptacle cover screw does not ground
the appliance unlessthe cover
screw is metal, and not insulated,
and the wall receptacle is grounded
through the house wiring. You
should havethe circuit checked by
a qualified electrician to make sure
the receptacle is properly
grounded.
● ~.,
D
l!
Q
t
UsageSituationsWhere
Appliance’sPowerCord
Will BeDisconnected
Frequently.
Do notusean adapterplug in these
situations becausedisconnecting of
the power cord places undue strain
on the adapter and leadsto eventual failure of the adapter ground
terminal. You should havethe two-
prong wall receptacle replaced with
athree-prong (grounding) recep-
tacle by aqualified electrician
before using the appliance.
Useof ExtensionCords
Becauseof potential safety hazards
under certain conditions we strongly
recommend against the useof an
extension cord. However, if it is
necessaryto use an extension cord,
useonly a 3-wire extension cord
that has a3-blade grounding plug,
and a3-slot receptacle that will
accept the plug on the appliance.
The marked rating of the extension
cord shall be equal to or greater
than the electrical rating of the
appliance (15amperes.) -
Such extension cords areobtainable
through Hotpoint service. If you do
usean extensioncordwith your
microwaveoven,the interior light
may flicker and the blower sound
may varywhen oven is in use.
~-
~“r
—
—.
—–
—
—
—–
~
~-
_—
—
—
~–
—
—
—
~
—,
—,
—
—
—
—
——
—.
—
—
~–
—–
—
—
—r
—.
When disconnecting the power
cord from the adapter, always hold
the adapter with one hand. If this is
not done, the adapter ground terminal is very likely to breakwith
repeated use.Should this happen,
DO NOT USE the appliance until
a proper ground has again been
established.
11
——-
——
Page 12

The ProblemSolver
TO
SaveTime and lVloney—
beforeyourequestsemice,
checktheProblemSolver
If you havea problem, it may be
minor. Youmay be ableto correct
it yourself. Just usethis Problem
Solver to locate your problem and
then follow the suggested
recommendations.
AllTheseThingsAreNormal
onYourMicrowaveoven:
● Steam(xvaporescapingfrom
around the door.
~ Light reflection around door or
outer case.
@Dimming oven light and change
in blower sound may occur while
operating at power levelsother than
high.
o
Soundof rotatingantennamaybe
heardfor afew seconds after the
ovenisturnedoff.
. Dull thumping sound while opersting at power levelsother than
high.
o Some TV-Radio interference
might be noticed while using your
microwave oven.It’s similar to the
interference caused by other small
appliances and does not indicate a
problem with your oven.
*
@
PROBLEM
OVEN WILL NOT COME ON
CONTROL PANEL LIGHTED,
YET OVEN WILL NOT START
FOODS ARE EITHER Over- cooking times may vary because of starting food temperature, food
COOKED OR UNDERCOOKED
POSSIBLE CAUSE AND REMEDY
A fuse in your h~me may be blown or the circuit’ breaker tripped.
Replacefuse or reset circuit breaker.
Make sure3-prong plug on oven is fully inserted into wall receptacle.
Door not securely closed.
START must betouched after entering cooking selection.”
Another selection entered already in ovenand CLEAR/OFF nottouched
to cancel it. ,,
Make sure you haveentered cooking time after touching TIME COOK.
CLEAR/OFF was touched accidentally. Reset cooking program and
touch START.
density or amount of foods in oven. Touch TIME COOK and additional
cooking time for completion.
Incorrect Power Level e,ntered. Check Cookbook for recommended
Power Levelor changing levels during cooking if necessary.
Dish was not rotated, turned or stirred; Some dishes require specific
instructions. Check Cookbook or.fecipe for.these instructions.
Too many dishes in oven atsametime. Cooking time must be increased
when cooking ,more than one food ‘item. ~heck Cookbook for recommendatiori on.increasing”time. ~‘’ - ‘
..
l’EEEE” APPEARS ON
DISPLAY , ‘
“PF” APPEARS ON Appears when oven is first plugged in. This is normal.
DISPLAY
When setting Clock, you have poten’tered avalid clock time. ‘
Appears when power to oven has been interrupted, and then resumed.
Touch CLEAR/OFF to erase “PF”. Clock must be reset.
12
Page 13

.——.
m
L
ConsumerServices
I
At Hotpointwe’recommittedto providingyou with thebestapplianceswe know how
to build and we
service.
knowthat youwant your appliances to give you many years of dependable
@_
Our Consumer Services are designed with
your needsandwants in mind.
WarrantyProtection
Yournewapplianceisa welldesignedandengineered Seethe warrantyonthe backpageof this bookfor
product.Beforeit left the factory,it wentthrough
rigoroustests to detectmanufacturingdefects.And
youhavea writtenwarrantyto protectyou.
PromptServiceatyourConvenience
Whetheryourapplianceis inor outof warranty, appliance.Explainwhyyouarenot pleased.Inmost
you’rejust a phonecall awayfromour nationwide
networkof FactoryTrainedServiceprofessionals.
Simplycall ourHotpointserviceorganization.
You’llfind them intheWhite Pagesunder“Hotpoint
FactoryService;’andin the YellowPagesunder
“Hotpoint CustomerCare@Service!’
Serviceis scheduledat yourconvenienceandthe
techniciandrivesa full~stocked partsservicetruck
so that, in most cases,the repaircan becompleted
in onevisit.
We’reproudof our serviceand want youto be
pleased,but if for somereasonyouarenot happy
with the serviceyou receive,herearethreestepsto
follow for furtherhelp.
details.
FIRST,contactthe peoplewhoservicedyour
cases,this will solvethe problem.
NEXT,if youarestill not pleasedwrite all the details
—
includingyourphonenumberto:
Manager,ConsumerRelations
Hotpoint
AppliancePark
Louisville,Kentucky40225
FINALLY,if yourproblemis still not resolved,write:
MajorApplianceConsumerAction Panel
20NorthWackerDrive
Chicago,Illinois 60606
e
ServiceContracts
Fortrouble=freeservicebeyond
thewrittenwarrantyperiod.
If youpreferto budgetyourrepairexpenditure
insteadof beingsurprisedby them, Hotpoint
offersservicecontractsfor varyinglengthsof
time onall Hotpointmajorappliances.With a
TheQuickFix@System
MUI
cansavemoneyand time
bydoing it yourself.
Fordo-it-yourselferswho wouldprefer
to fix Hotpoint majorappliances
themselves...Hotpointoffers an
industryfirst, the Quick Fix@System.
HelpforYouByPhone
Shouldyou needhelp in the selectionand
purchaseof newappliances,or have
questionsabout theoperationof the Hotpoint
appliancesyou nowown—or haveanyother
questionsabout ourconsumerproductsor
servicesyouareonlya TOLL-FREEcalIaway.
tract we’ll keepyourappliancein good
cratingconditionduringthe contractperiod
at noadditionalcharge.Servicecontracts
et you pay today’s pricesfor servicea
A programfor do-it-yourselfappliancerepair,
the systemincludesstep-by-steprepair
manua/sfor refrigerators,most non-microwave
electric ranges,dishwashers,andstandard
and largecapacitywashersanddryers,plus
speciallypackagedreplacementparts, and
technicalhelpwith a tollfree800number
The Gli AnswerCen/e!
800.626.2000
month,ayear,or severalyearsfrom now.
And,you’ll receiveservicefrom Hotpoint
trainedservicetechniciansusingonly
GenuineHotpoint parts.
TheGEAnswerCenterTM800.626.2000
consumerinformationserviceisopen24
hoursa day,sevendaysa week.
Ourstaff of expertsstandsreadyto assist
youanytime.
15
Page 14

—
5?
-L
‘M ~
W!-mrIs CXXERED
FULLONE-YEARWARRANTY
For one yearfrom date of original
purchase,we will provide,free of
charge, parts and service labor in
your home to repairor replaceany
paft of themicrowaveoven/range
that fails becauseof a manufacturing defect.
LIMITEDADDITIONAL
FOUR-YEARWARRANTY
For the second through fifth year
from date of original purchase,
we will provide,free of charge,a
replacement magnetrontube if the
magnetron tube fails because of a
manufacturing defect. Youpay for
the service trip to your home and
service labor charges.
This warranty is extended to the
original purchaserand anysucceeding owner for products purchased
for ordinary home use in the 48
mainland states, Hawaii and
Washington, D.C.In Alaska the
warranty is the same except that it
is LIMITEDbecause you must pay
to ship the product to the service
shop or for the service technician’s
travel costs to your home.
All warranty servicewill be provided
by our Factory Service Centers or
our authorized Customer Care@
by
servicers during normal working
hours.
Look in the White or Yellow Pages
of your telephone directory for
HOTPOINTFACTORYSERVICE,
GENERALELECTRIC-HOTPOINT
FACTORYSERVICEor HOTPOINT
CUSTOMERCARE@SERVICE.
— .
R
~
K$’m
—.
—.
%
&
T
- —.
1?$
%%
I
ii=
11s=
k?~
q..
I
—.
@
%
%!?
.
I “
WH~~ ~~ ~()~ ~()~~~~~ oService trips to your home to
teach you how to usethe product.
Readyour Use andCare material.
If you
then have any questions
about operating the product,
please contact your dealer or our
Consumer Affairs office at the
I
Some statesdo not allowthe exclusionor limitationof incidentalor consequentialdamages,so the abovelimitationor exclusion
maynot applyto you.Thiswarrantygivesyouspecific legalrights,andyoumayalsohaveotherrights whichvaryfrom stateto state.
To
know what your legal rights are in your state,consultyourlocalorstateconsumeraffairsoffice or your state’s Attorney General.
address below, or call, toll
The GEAnswer CenterTM
800.626.2000
consumer information service
● Improper installation.
If you have an installation problem,
contact your dealer or installer.
You are responsible for providing
adequate electrical, exhausting
and other connecting facilities.
Warrantor:General Electric Company
free:
o Replacement of house fuses
or resetting of circuit breakers.
o Failure of the product if it is
used for other than its intended
purpose or used commercially.
o Damageto product caused
by accident, fire, floods or acts
Oi God.
WARRANTOR IS NOT RESPON-
SIBLE FOR CONSEQUENTIAL
DAMAGES.
.!,
B
,J
If furtherhelp is needed concerningthis warranty,contact:
Manager—ConsumerAffairs, General Electric Company,Appliance Park,Louisville,KY 40225
*
A QUALITYPRODUCTOFeGENERALELECTRICCOMPANY
.
3184
 Loading...