

Page 1
How
thebestfrom
UseandCareof
model
IU395
, #
Featuresof
youroven
Cookingbytime
Howto use
Defrost
Savetimeandmoney.
Beforeyoucallfor service,
usetheProblemSolver
p5
p6
p7
p9
.
A.
—
Page 2
HelpUsHelpYou...
Read This Book carefully
It isdesignedto helpyouoperate and maintainyour
new Microwave Oven properly.
Keep it handy for answersto your questions.
If you don’t understand something or need more
help. . .Call, toll free:
The GE Answer Center’”
800.626.2000
consumer information service
or write: (include yourphone number);
Consumer Affairs
Hotpoint
Appliance Park
Louisville, KY 40225
writeDown ‘theModel
andSerial Numbers
You’ll find them on a label inside the oven on the
upper left side.
These numbers are also on the Consumer Product
Ownership Registration Card that came with your
Microwave Oven. Before sending in this card,
please write these numbershere:
Model No.
Serial No.
Use these numbers in any correspondence or ser-
vice calls concerning your Microwave Oven.
Be SW’eYour ovenisRegistered
It is important that we, the manufacturer, know the
location of your Microwave Oven should a need
occur for adjustments.
You’resupplier is responsiblefor registering you as
the owner.
Please check with your supplier to be sure he has
done so; also send in your Consumer Product
Ownership Registration Card. If youmove, or if you
are not the original purchaser please write to us,
stating model and serial numbers. This appliance
must be registered.Please be certain that it is.
Write to:
Hotpoint
Range ProductService
Appliance Park
Louisville,KY 40225
IF YOU RECEIVED A DAMAGED OVEN, immediately contact the dealer (or builder) that sold you
the Microwave Oven.
save Time and Moneym m.
Before You CM for Sewice
Check the Problem Solver (page 9). It lists minor
causesof operating problems that you can correct
yourself.
It could saveyou an unnecessaryservicecall.
2
Page 3
‘contents
MicrowavingTips
BeforeMicrowaving . . . . . . . . . .. . . . . . ...2
Grounding Instructions. . . . . . . . . .. . . . . . 3
Safety Tips . . . . . . . .. . . . ..o.oo. . . . .. ...4
Features of Your Oven . . . .. . . . . . . . .. ...5
Time Cook . . . . . .. . . . . . . . . .. . . . . . . . ...6
Defrost . .. oo. . .. o.. . . . . . . . . .. . . . . . . ...7
Care of Your Oven . . . . . . .. . . . . . . . . ....8
The Problem Solver .. . .. . . . . . . . .. . . ...9
Corisumer Services . . . . . . .. . . . . . . . ...11
warranty . . . . . . .. . . . . . . . . . . ..BackCover
Groundinginstructions
@ Make sure all utensils used in your microwave
ovenare labeled “suitablefor’microwaving”. Check
your Cookbook for specific test to determine
“microwave-safe”utensils.
s Paper towels, wax paper, and plastic wrap can
beused tocover dishes in order to retain moisture
and preventspattering.
@ Some microwaved foods require stirring, rotat-
ing, or rearranging. Check your Cookbook for
specific instructions.
@ Some foods such as unshelled eggs and hot
dogs must be pricked to allow steam to escape
during cooking.
—
PREFERRED METHOD
L.
9
.
Qj
0
Iiijm
FIG. 1
1-
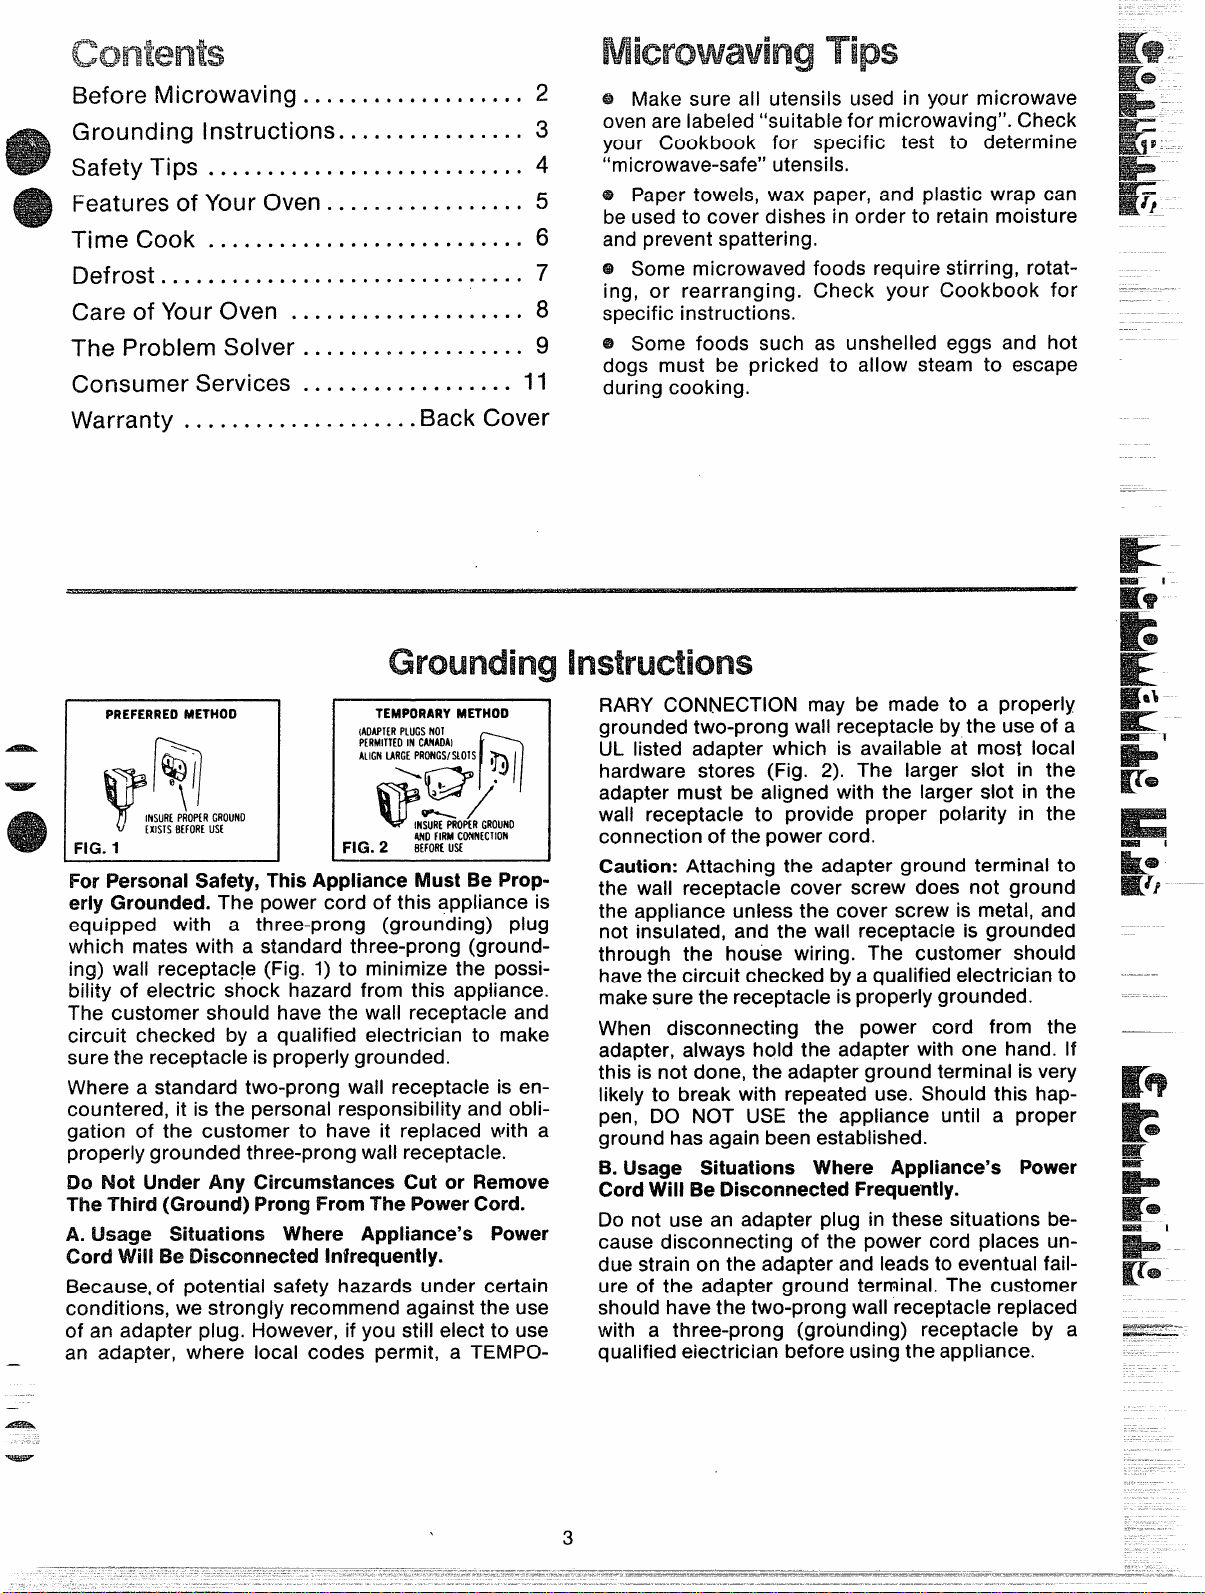
For Persona! Safety, This Appliance Must Be Properly Grounded. The power cord of this appliance is
equipped with a three-prong (grounding) plug
which mates with a standard three-prong (grounding) wall receptacle (Fig. 1) to minimize the possi-
bility of electric shock hazard from this appiiance.
The customer should have the wall receptacle and
circuit checked by a qualified electrician to make
surethe receptacle is properlygrounded.
Where a standard two-prong wall receptacle is encountered, it isthe personal responsibilityand obligation of the customer to have it replaced with a
properlygrounded three-prong wall receptacle.
IDONot Under Any Circumstances Cut or Remove
The Third (Ground) Prong From The Power Cord.
A. Usage Situations Where Appliance’s Power
Cord Will !$e Disconnected Infrequently.
Because,of potentiai safety hazards under certain
conditions, we strongiy recommendagainst the use
of an adapter piug. However, if you stiii eiect to use
an adapter, where iocai codes permit, a TEMPO-
\
INSURE PROPER GROUNO
EXISTS BEFORE uS[
TEMPORARY METHOD
(AOAPTER PLUGS NOT
PERMITTEOIN CANADAI
‘L’GNuRGE pRmGs’QO’s I ,
Q=r7
a‘-
@./
INSURE PROPER GROUNO
AND FIRM CONNECTION
FIG. 2
BEFOREUSE
t)
●
RARY Confection may be made to a properiy
groundedtwo-prong waii receptacle bythe useof a
UL iisted adapter which is avaiiabie at most iocai
hardware stores (Fig. 2). The iarger siot in the
adapter must be aiigned with the iarger siot in the
waii receptacle to provide proper poiarity in the
connectionof the powercord.
Caution: Attaching the adapter ground terminai to
the waii receptacle cover screw does not ground
the appiiance uniessthe cover screw is metai, and
not insuiated, and the waii receptacle is grounded
through the house wiring. The customer shouid
havethe circuit checked bya quaiifiedelectrician to
makesure the receptacle isproperiygrounded.
When disconnecting the power cord from the
adapter, aiways hoid the adapter with one hand. if
this isnot done, the adapter ground terminai isvery
iikeiyto break with repeated use. Shouid this happen, DO NOT USE the appiiance untii a proper
groundhas again been established.
B. Usage Situations Where Appliance’s Power
CordWill ‘BeDisconnected Frequently.
Do not use an adapter piug in these situationsbecause disconnecting of the power cord piaces undue strain on the adapter and ieadsto eventuai faiiure of the adapter ground terminai. The customer
shouidhave the two-prong waii receptacle repiaced
with a three-prong (grounding) receptacle by a
quaiifiedelectrician beforeusing the appiiance.
~
~
—
3
Page 4
SafetyTips
SAVEI’WESE
INSTRUCTIONS
1. For personal safety the oven must be properly
grounded. See grounding instructionson page 3 of
this book. For best operation, plug this appliance
into itsown electricaloutlet, to prevent flickeringof
lights,blowingof fuse or trippingof circuit breaker.
2. Use of extension cords. Because of potential
safetyhazardsunder certain conditions we strongly
recommend against the use of an extension cord.
However, if you still elect to use an extensioncord,
it isabsolutelynecessarythat itbea UL listed3-wire
grounding type appliance extension cord and that
the current carrying rating of the cord in amperes
be 15 amperes or greater. Such extension cordsare
obtainable through Hotpoint service. if you do use
an extension cord with your microwave oven, the
interior light may flicker and the blower sound may
vary when oven is in use.
3. Be certain to place the front surface of the door
three inches or more back from the countertop
edge to avoid accidental tipping ofthe appliance in
normal usage.
4. Use metal only as directed in cookbook. Metal
stripsas used on meat roastsare helpful in cooking
food when used as directed. Metal trays may be
used for TV dinners. However,when using metal in
the microwave oven, keep metal at least l-inch
away from sides of microwaveoven.
5. DO not operate the oven while empty to avoid
damage to the oven and the danger of fire. If by accident the oven should run empty a minute or two,
no harm is done. However, try to avoid operating
the oven empty at all times–it saves energy and
prolongslifeof the oven.
6. Cooking utensils may become hot because of
heat transferredfrom the heated food. This is especially true if plastic wrap has been covering the top
and handles of the utensil. Pot holders may be
needed to handlethe utensil.
7. Sometimes, the oven floor can become too hot
to touch. Be careful touching the floor during and
after cooking.
Do not use any thermometer in food you are
microwaving unless that thermometer is designed
or recommended for usein the microwaveoven.
9. Remove wire twist-ties on paper and plastic
bags before placing in oven. Twist-tiessometimes
cause bag to heat, and may causefire.
10. Don’tdefrost frozenbeverages in narrow necked
bottlesespeciallycarbonated ones. Even if the container is opened, pressure can build up. This can
cause the containerto burst, resultingin injury.
11. Don’t overcook. Excessive overcooking dehy-
drates potatoes, and may cause them to catch fire
causing damage.
12. If food should ever ignite: Keep the oven door
closed. Turn off the power immediately: Turn
TIMER to “O”or“OFF”or disconnectpower cord or
shut off power at the fuse circuit breaker panel.
13. Boiling eggs (in and out of-shell) is not recommended for microwavecooking. Pressurecan build
up insideegg yolkand may cause it to burst, resultingin injury.
14. Foodswith unbroken outer “skin” such as potatoes, hot dogs or sausages, tomatoes, apples,
chicken livers and other giblets, and eggs (see
above) should be pierced to allow steam to escape
duringcooking.
15.‘Boilable” cooking pouches and tightly closed
plastic bags should be slit, pricked or vented as directed in Cookbook. If they are not, plastic could
burst during or immediatelyafter cooking, possibly
resulting in injury. Also, plastic storage containers
should be at leastpartiallyuncovered because they
form a tight seal. When cooking with containers
tightly covered with plasticwrap, remove covering
carefully and direct steam away from hands and
face.
16. Do not pop popcorn in your microwave oven
unless in a special microwave popcorn accessory
or unlessyou use popcorn labeled for use in micro-
wave ovens. Because ofthe heat generated without
these precautions,the containercould catch fire.
17 Plastic Utensils–Plastic utensils designed for
microwave cooking are very useful, but should be
used carefully. Even microwave plastic may not be
as tolerant of overcooking conditions as are glass
or ceramic materialsand may soften or char if subjected to shortperiodsof overcooking. In longer exposures to overcooking, the food and utensils
could ignite. For these reasons: 1) Use microwave
plastics only “and use them” in strict compliance
with the utensil manufacturer’s recommendations.
2) Do not subject empty utensilsto microwaving.3)
Do not permit children to use plastic utensils without complete supervision.
18. Do not use your microwave oven to dry newspapers. If overheated,they can catch fire.
19. When cooking pork follow our directions
exactly and always cook the meat to at least 170°.
This assuresthat, in the remote possibility that trichina may be present in the meat, it will be killed
and meat will be safe to eat.
20. Avoid heating baby food in glass jars even
without their lidsespecially meat and egg mixtures.
4
Page 5

Featuresof
YourMicrowaveOven
/--
.
r
I
,.
@
.-,
..
/
7.
Door Hand[e. Pull
securely latched for ovento operate.
.2s
Door Latches.
3.
ViewingWindow with Metal ShiekL Metalscreen
permitsviewingof foodsand keepsmicrowaves
confined inside oven.
Antenna Cover. Protectsthe microwaveenergy
distributing antenna. Do not removethis cover.
Youwill damage the oven.
vent.
oven
Oven !nterior Light. Turnson when the door is
opened or when the oven isoperating.
Oven Floor.
25 Minute Timer. Set timer to desired cooking
or defrostingtime.
to open door. Door must be
Model RE959
9. Variable Power ControL This control can be set
from levels 1to 10. Youcan vary the amount of
microwave power in the oven assuggested for
recipes in the Cookbook. See Chart below.
What the Power Level Means
IO—HIGH Full power, Use it anytime
speed is important.
7’-MED. ~iGH Medium-high power.
About 3/4 the oven’s full power. Fast
way of heating pre-cooked dishes
without overcooking,
5—MED. Medium power:. A’bout 1/2
the oven’s fuli power, Good for deiicate foods iike omeiets and cheese
dishes.
3—LOW/DEFROST Low power. About
1/3 the oven’s fuii power. Handy for
softenihg butter, reheating deiicate
sauces.
4—-WARM About 1/10 of oven’s fuii
power. Hoid ieftoversor piates offood
1/2 hour to 1 hour.
Page 6

CookingbyTime
The time cooking feature allows
you to presetthe cooking time.
The ovenshutsoff automatically.
Power Level 10 is recommended
for mosttimecooking, butyou may
change this for more flexibility.
See your Cookbook.
To become better acquainted with
time cooking, makea cupof coffee
by following the stepsbelow.
/
\
Step 1: Fill a cup 2/3 full of water
and add 1teaspoon offreeze dried
coffee. Usea cupthat has no metal
decoration. Place cup in oven and
close door.
Step 3: Set Timer Control. For
coffee setat 1 minute and 20 to 30
seconds. Timer may be reset during cooking if needed.
Step 4: Close the door to start the
oven.Whenthe time isup,the oven
shutsoff automatically.
Questions
andAnswers
Q. I set my oven for the time called
for in the recipe but at the end of
the time allowed, my dish wasn’t
done. What happened?
A. Since house power varies due
to time or location many Time
Cook recipesgive you atime range
to prevent overcooking. Set the
oven for minimum time, test the
food for doneness, and cook your
dish a little longer, if necessary.
Step 2: Turn Variable Power Control to 10 HIGH which isthe Power
Levelrecommendedfor this cup of
coffee.
Q. I want to cook my recipe on a
Power Level other than HIGH,
what do I need to do?
A. To change the Power Level
simply turn Power Level Control
for new power level.
Q. Can I interrupt my Time Cook
function to check the food?
A. Yes.To resume cooking, simply
close the door. The timer must be
set for cooking to resume unless
time is remaining on timer.
6
Page 7

HOWtouseDefrost
The Defrostsetting isdesigned for
even thawing necessary for large
amounts of food and is one of the
most important advantages of a
microwaveoven.
Q Power Level 3 is recommended
for mostdefrosting,butyoumay
change thisfor moreflexibility.
s See your Cookbook for the
complete defrosting chart.
To become better acquainted with
the defrostfunction, defrostfrozen
pork chops by following the steps
below.
Step 1: Place package of frozen
chops inthe oven and close door.
Step 2: Turn Variable Power Control to DEFROST (3) setting.
Defrosting Tips
@ Foodsfrozen in paperor plastic
can be defrostedin the package.
s Forevendefrosting,manyfoods
need to bebroken up OFseparated
partofthewaythroughthe defrosting time.
e Homemade dinners can be frozen inshallowfoil traysand heated
for later use. Select foods which
microwavewell.
e Pre-packaged frozen dinners
can be defrosted and microwave
cooked.
Questions
andAnswers
Q. Can I Defrost small items in a
hurry?
A. Yes, small porous foods like
breads and rolls, and small portionsoffrozenfoods maybe microwaved at higher power. Check the
“HOWto Convert Defrost Times”
Chart in the Cookbook for the
amount of time saved when using
higher powers.
Step 3: Turn Timer Control to 8
minutes. Oven startswhen door is
closed.
Step 4: When oven turns off, turn
package over, close door, and set
timer to 8 minutes.
Q. When I closed the docr, I hear a
dull thumping noise.What is it?
A. This sound is normal. It is letting you know the oven is using a
Power Level lowerthat HIGH.
Q. Can I open the door during
defrosting to check on the progress of my food?
A. Yes. You may open the door at
any time during microwaving. To
resume defrosting, closethe door,
oven beginsoperating iftime is left
on timer. If not, resettimer,
@ Checkyour Cookbook for other
defrostingtips.
Q. Why don’t the defrosting times
in the Cookbook seem right for my
food?
A. Cookbook times are average.
Defrostingtime can vary according
to the temperature in your freezer.
Set your oven for the time indicated in your Cookbook. If your
food isstill not completely thawed
at the end of that time, re-set your
oven and adjust the time accordingly.
*
7
—
Page 8

Care for,Your Microwave Oven
—...—
YourNew Microwave Oven is a Valuable Appliance,
Protect H From Misuse By Following These Rules:
@ Keep your oven clean and sweet-smelling.
Opening the oven door a few minutes after cooking
helps “air-out” the interior. An occasionalthorough
wiping with a solution of baking soda and water
keeps the interior fresh.
@ Don’t use sharp-edged utensils with your oven.
The interior and exterior oven walls can be
scratched. The control panel can be damaged.
@ Don’t remove the antenna cover atthe top ofthe
oven (microwave feature 4 on page 5). You may
damage the oven.
BE CERTAIN POWER IS OFF BEFORE CLEANING ANY PART OF THIS OVEN.
A
===1
1
How toCleantheinside
Walls,floor and plastic cover. Becausethere islittle
heat except in the food, or sometimes in the utensils, spills and spatters are easy to remove. Some
spatters can be removed with a paper towel, others
may require a damp cloth. Removegreasy spatters
with a sudsy cloth, then rinse and dry. Do not use
abrasive cleaners on oven walls. NEVER USE A
COMMERCIAL OVEN CLEANER ON ANY PART
OF YOUR MICROWAVE OVEN.
Door-inside. Glass: Wipe up spatters daily, wash
when soiled, with a minimum of sudsywarm water.
Rinse thoroughly and dry.
Metal and plastic parts on door: Wipe frequently
with a damp cloth to remove all soil. DO NOT USE
ABRASIVES, SUCH AS CLEANING POWDERS OR
STEEL AND PLASTIC PADS. THEY MAYMAR THE
SURFACE.
Special note when using Brown ‘N Sear Dish: High
heat generated on bottom of Brown ‘N Sear Dish
can cause scorched appearing stains to bake onto
the oven floor if grease is present. These may be
removed with Bar Keepers Friend@ Cleanser by
SerVaas Laboratories, Inc.
After using Bar Keepers Friend@ Cleanser, rinse
and dry thoroughly, following instructions on can.
Do not use Bar Keepers Friend@ Cleanser on the
painted surfaces such as the walls. It may scratch
the paint.
Bar Keepers Friend@ Cleanser is sold in many
grocery, hardware, and department stores.
How tocleantheoutside
Case. Clean the outside of youroven with soap and
damp cloth, then rinse and dry. The outer pane of
the window is glass. Just wipe clean with a damp
cloth. Chrome trim ~sbestwiped with a damp cloth
and then with a dry towel.
Control Panel. Wipe with a damp cloth. Dry thoroughly. Do not use abrasives or sharp objects on
the panel. They can damage it.
Cord. If the cord becomessoiled, unplug and wash
with damp cloth. For stubborn spots, sudsy water
may be used, but be certain to rinse and dry thor-
oughly before plugging cord into outlet.
Oven Lamp Replacement. First, unplug the oven.
Then removelamp compartmentcoverby removing
screw which holds cover in place. Cover is located
at the rear of outer case.
Replace with 40 watt appliance bulb. (It is available
in drug and hardware stores.) Replace compartment cover. Plug in the oven.
8
Page 9

The ProblemSolver
0 TOSaveTime and llWlcmey—
beforeyoucallforservice,checkthe ProblemSAW
if you havea problem, it may be minor. You may beable to correct it yourself. Just usethis Problem Solver to
locate your problem and then follow the suggestedrecommendations.
PROBLEM
OVEN WILL NOT COME ON
FOODS ARE EITHER OverCOOKED ORUNDERCOOKED
POSSIBLE CAUSE AND REMEDY
A
fuse in your home may be blown or the circuit breaker tripped.
Replacefuse or resetcircuit breaker. Make sure 3-prong plug on oven is fully inserted into wall
receptacle.
Door”notsecurely closed.
cooking times may vary becauseof startingfood temperature, food
density or amount of foods in oven. Set additional,cooking time for
completion.
Incorrect Power Level set. Check Cookbook for recommended
Power Levelor changing levelsduring cooking if necessary.
Dishwas not rotated,turned or stirred. Some dishes require specific
instructions.Check Cookbook or recipe for these instructions.
Too many dishes in oven at-same time. Cooking time must be
increasedwhen cooking more than one fo,oditem. Check Cookbook
for recommendation on increasingtime.
I
‘wzi$@-
Al!TheseThingsAreNormalonYourMicrowaveOven:
1. Steam or vapor escaping from around the door.
2. Light reflection around door or outer case.
3. Dimming oven light and change in blower sound
may occur while operating at power levels other
than high.
4. Dull thumping sound while operating at power
levelsother than high.
5. Some TV-Radio interference might be noticed
while using your microwaveoven. It’ssimilar to the
interference caused by other s’mallappliances and
does not indicate a problem with your oven.
9
Page 10

.“..
r
I
i%
-s
ConsumerServices
—
-
At I-lotpointwe’recommitted to providingyouwith the best applianceswe
knowhow
to build andwe knowthat youwantyourappliancesto giveyou manyyearsof dependable
service.
Our ConsumerServicesare designed with yourneeds and wants in mind.
WarrantyProtection
Yournewapplianceisa welldesignedandengineeredSeethewarrantyonthebackpageofthisbook for
product.Beforeit leftthefactory,itwentthrough
rigorousteststodetectmanufacturingdefects.And
youhaveawritten warrantyto protectyou.
PromptServiceatyourConvenience
Whetheryourapplianceis inor outof warranty,
you’rejust a phonecall awayfromour nationwide
networkof FactoryServiceprofessionals.
Simplycall ourHotpointserviceorganization.
You’llfind them in theWhite Pagesunder“Hotpoint
FactoryService;’andinthe YellowPagesunder
“Hotpoint CustomerCare@Service.”
Serviceisscheduledat yourconvenienceandthe
techniciandrives-afully-stockedpartsservicetruck
sothat, in most cases,the repaircan becompleted
in onevisit.
We’reproudof ourserviceandwantyouto be
pleased,butif for somereasonyouarenot happy
with theserviceyoureceive,herearethreestepsto
follow forfurther help.
details.
FIRST,contact the peoplewhoservicedyour
appliance.Explainwhyyou arenot pleased.In most
cases,this will solvethe problem.
NEXT,if you arestill not pleasedwrite all the details
—
includingyourphonenumberto:
Manager,ConsumerRelations
Hotpoint
AppliancePark
Louisville,Kentucky40225
FINALLY,if yourproblemis still not resolved,write:
MajorApplianceConsumerAction Panel
20NorthWackerDrive
Chicago,Illinois 60606
-—
—
ServiceContracts
Fortrouble=freeservice beyond
the written warranty pqriod.
Ifyoupreferto budgetyourrepaire
insteadof beingsurprisedbythem,
offersservicecontractsfor varying
time onall Hotpoint majorapplianc
TheQuickFixTMSystem
Youcansavetime and money
bydoingit yourself.
TheQuickFix’MSystemis designedto ~
meetthe needsof both experiencedor
beginningdo-it-yourselfersandtakesa lot
of mysteryout of homeappliancerepair. Servicelocations.
Step-by-StepManualscoveringthe repairof ~ Mostof the repairscanbemadewith the kitchen
standardandlargecapacitywashers,standardand
largecapacitydryers,refrigerators,dishwashers
andranges(non-microwave),includeinstructive Fix~MSystemprocedures.
$6
!
<2
HelpforYouByPhone
Shouldyouneedhelp in the selectionand
purchaseof newappliances,or have
questionsabout theoperationof the Hotpoint
appliancesyounowown—or have
questionsabout ourconsumerproductsor
servicesyouareonlya TOLL-FREEcall away.
any other
,=&&#
.@@2?2
#
@“’”
drawervarietyof tools you alreadyhaveat home.In
fact, the screwdriveris called for mostoften in Quick
~—.
~
~.
~
~
TheGE AnswerCen/e!
800.626.2000 ‘ou anytime”
photoson dozensof procedures,plus
diagnosticchartsandtips on preventive
maintenance.Replacementparts for the
most commonrepairsareavailablefrom
the Quick Fix’M Systemdisplay locatedat
participatingdealersor HotpointFactory
TheGEAnswerCenterTM800.626.2000
consumerinformationserviceis open24
hoursa day,sevendaysa week.
Ourstaff of expertsstandsreadyto assist
d
Page 11

Saveproofof originalpurchasedatesuch as your salessliporcancelledcheck to establish warranty period.
II%%
.
---==~
;j&
~,. r
_ .
—.
WHAT !SCOVERED
FULLONE-YEARWARRANTY
Foroneyear fromdate of original
purchase,we will provide,freeof
charge,partsandservicelaborin
yourhometo repairor replaceany
part of the microwaveovenlrange
thatfailsbecauseof a manufacturingdefect.
LIMITED ADDITIONAL
FOUR-YEARWARRANTY
Forthesecondthroughfifthyear
fromdateoforiginalpurchase,
wewillprovide,freeof charge,a
replacementmagnetron tube ifthe
magnetrontubefailsbecauseof a
manufacturingdefect.Youpayfor
theservicetripto your homeand
servicelaborcharges.
W~~~ Is ll$lOT ~~~~~~~ @servicetrips to yourhometo
teachyouhowto usetheproduct.
ReadyourUseandCarematerial.
Ifyouthenhaveanyquestions
aboutoperatingthe product,
pleasecontactyourdealeror our
ConsumerAffairsofficeatthe
addressbelow,orcall,tollfree;
The GEAnswerCenter’m
800.626.2000
consumerinformationservice
o Improper installation.
If you havean installation problem,
contact your dealer or installer.
Youare responsiblefor providing
adequateelectrical, exhausting
andotherconnectingfacilities.
Thiswarrantyisextendedto the
originalpurchaserandanysucceedingownerfor productspurchased
forordinaryhomeuseinthe48
mainlandstates,Hawaiiand
Washington,D.C. InAlaskathe
warrantyisthe sameexceptthatit
isLIMITED becauseyoumustpay
to shipthe producttothe service
shoporfortheservicetechnician’s
travelcoststoyourhome.
Allwarrantyservicewill be provided
byour FactoryServiceCentersor
byourfranchisedCustomerCare@
servicersduringnormalworking
hours.ChecktheWhitePagesfor
HOTPOINTFACTORYSERVICE.
LookintheYellowPagesfor
HOTPOINTCUSTOMERCARE@
SERVICEorGENERALELECTRICHOTPOINTCUSTOMERCARE@
SERVICE.
.=—
llGccmI
Il?$&
I
,,
~
Part No. 1362A724P80
Pub. No. 39-4497
Manager—ConsumerAffairs,&nerai ElectricCXm@wy,AppliancePark,Louisville,KY40225
,’.’.
.-
+
4/83
+
na~
QUALITY PRODUCT OF GENERAL EJECTRIC COMPANY
A
-w~
7
d
4
 Loading...