

Page 1
Page 2
Oven
Co.,
Take the time to readthis book and learn how to enjoy
your new Microwave Oven. It contains detailed oper-
ating instructions and recommended maintenance, as
well as handy tips to help you gain maximum benefits
from your Microwave Oven. Once you have read the
book, keepit handy to answer any questions you may
have.
if you have any additional questions concerning the
operation of your Microwave Ovenf write—including
your phone number—to:
Consumer Affairs
Hotpoint
Appliance Park
Louisville, Kentucky 40225
IF YOU RECEIVED A DAMAGED OVEN, immediately
contact the dealer (or builder) from whom you purchased it. They have been informed of the proper
procedure to take care of such matters and can
handle it for you,
It is important that we, the manufacturer, know the
location of your Microwave Ovenshould a need occur
for adjustments.
Please check with your supplier to be sure he has
registered you as the owner; also send in your Purchase Record Card. If you move, or if you are not the
original purchaser please write to us, stating model
and serial numbers. This appliance must be regis-
tered. Pleasebe certainthat it is.
Write to:
Hotpoint
Range Product Service
AP2-210
Appliance Park
Louisville, Kentucky 40225
serial
A nameplate on which isstamped the model and serial
number is located either inside oven at top left side, or
on rear outside of case,
Model and serial numbers are also on the Purchase
Record Card which’ came with your Microwave Oven.
Record the numbers in the spaces below,
Please refer to both model and serial numbers in any
future correspondence or product service calls concerning your Microwave Oven,
Mode! Number
Serial Number
Date Purchased
KEEP PURCHASE RECEIPT WITH 7’!4S BOOK TO
ESTABLISH THE WARRANTYPERIOD.
——
Check “Common Problems” section. (Seepage 18,)It
lists many minor causes of operating problems that
you can correct yourself and may saveyou an unnecessaryservice call.
In many cities, there’s a Hotpoint Factory Service
Center, Call, and a radio-dispatched truck will come to
your home by appointment—morning or afternoon.
Charge the work, if you like. All the centers accept
both Master Charge and Visa cards. (See Inside Back
Cover.)
Or look for Hotpoint franchised Customer Care@servicers. You’ll find them in the Yellow Pages under
“HOTPOINT CUSTOMER CARE@SERVICE”.
If you need service literature, parts lists, parts or
accessories,contact one of the Factory Service Cen-
ters, a franchised Customer Care@servicer or your
Hotpoint dealer.
Extended SerwiceContracts:The terms of your warranty provide free service covering failures due to
manufacturing defects for a definite period of time.
After this warranty expires you may purchase an
Extended Service Contract which will enable you to ~
budget your service needs, This coverage beyond
warranty isavai!able from our Factory Service Centers —
and from many franchised Customer Care@servicers.
It is a good idea to apply for this coverage before your
warranty expires.
stepsto for
First$contact the people who serviced your micro-
wave oven. Explain why you are dissatisfied. In most
cases,this will solvethe problem,
Next, if you are still dissatisfied, write all the details—
including your phone number—to:
Manager, Consumer Relations
Hotpoint
WCE-312
Appliance Park
Louisville, Ketltucky 40225
Finally,if your problem is still not resolved,write:
Major Appliance Consumer Action Panel
20 North Wacker Drive
Chicago, Illinois 60606
This panel, known as MACAP, is a group of inde-
pendent consumer experts under the sponsorship of
several industry associations, Its purpose is to study
practices and advise the industry of ways to improve
customer service. Because MACAP is free of industry
control and influence, it is able to make impartial
recommendations, considering each case individually,
4
–-
@IgBl (?iene;al Electric
2
U.S.A. All rights reserved.
Page 3
Before ?vlicrowavhg ...........................
Grounding Instructions & Precautions ....3
Safety Tips
......................................
Introduction to Oven.......................... 5
Touch Control Panel ..........................
Set the (Hock
...................................
Automatic Cooking ........................8, 9
Automatic Roasting & Chart .......... 10, 11
Defrost
. . . . . . . . . . . . . . . . . . . . . . . . . . . . . . . . . . . . . . . . . .
13
Time Cook .....................................14
Ternp Cook
....................................15
l-lold/Timer ....................................
2
Care of Your Oven
Problems & Solutions .......................18
4
...........................
Automatic Cooking Recipe Guide ...,,.,.19
6
6
Meats ....................................20,21
Vegetables
.............................
Desserts ................................
Automatic Cooking Chart ............. 26, 27
Factory Service Centers. Inside Back Cover
Warranty ...........................Back Cover
16
17
22, 23
24, 25
PREFERREDMETHOD
L,
9
.
fly
e
tij+’1
For Personal Safety, This Appliance Must Be Properly Grqmded. The power cord of this appliance is
equipped with a three-prong (grounding) plug
which mates with a standard three-prong (grounding) wall receptacle (Fig. 1) to minimize the possi-
bility of electric shock hazard from this appliance,
The customer should have the wall receptacle and
circuit checked by a qualified electrician to make
sure the receptacle is properly grounded.
Where a standard two-prong wall receptacle is encountered, it is the personal responsibility and obli-
gation of the customer to have it replaced with a
properly grounded three-prong wall receptacle.
Do Not Under Any Circumstances Cut or Remove
The Third (Ground) ProngFrom The PowerCord,
A, Usage Situations Where Appliance’s Power
Cord Will BeDisconnected Infrequently,
Because of potential safety hazards under certain
conditions, we strongly recommend against the use
of an adapter plug, However, if you still elect to use
an adapter, where local codes permit, a TEMPO-
\
INSUR[PROPLRGROURO
IXlslsE[foR[ Usf
TEMPORARYMETHOD
IKMPlfRPLUGSNOI
PIRMITTIOINCANAOAI
‘L’GN‘GE ‘RmGs’uO’s t ,
QJ7
3’”
@/
IN%hkPER GROUNll
ANDflRMCONNECTION
BffOREUSE
n
●
RARY CONNECTION may be made to a properly
grounded two-prong wall receptacle by the use of a
UL listed adapter which is available at most local
hardware stores (Fig. 2). The larger slot in the
adapter must be aligned with the larger slot in the
wall receptacle to provide proper polarity in the
connection of the power cord.
caution: Attaching
the wall receptacle cover screw does not ground
the appliance unless the cover screw is metal, and
not insulated, and the wall receptacle is grounded
through the house wiring. The customer should
have the circuit checked by a qualified electrician to
makesure the receptacle is properly grounded.
When disconnecting the power cord from the
adapter, always hold the adapter with one hand. If
this is not done, the adapter ground terminal is very
likely to break with repeated use. Should this hap-
the adapter ground terminal to
pen, DO NOT USE the appliance until a proper
ground has again been established.
B. Usage Situations Where Appliance’s Power
CordWHJBe Disconnected Frequently.
Do not use an adapter plug in these situations be-
cause disconnecting of the power cord places undue strain on the adapter and leads to eventual failure of the adapter ground terminal, The customer
should have the two-prong wall receptacle replaced
with a three-prong (grounding) receptacle by a
qualified electrician before using the appliance.
-.
Page 4
1. For personal safety the oven must be properly
..—
grounded. See grounding instructions on page 3 of
this book. For best operation, plug this appliance
into its own electrical outlet, to prevent flickering of
lights, biowing of fuse or tripping of circuit breaker.
2. Use of extension cords. Because of potential
safety hazards under certain conditions we strongly
recommend against the use of an extension cord,
However, if you stiii elect to use an extension cord,
it is absolutely necessary that it be a UL listed 3-wire
grounding type appliance extension cord and that
the current carrying rating of the cord in amperes
be 15 amperes or greater. Such extension cords are
obtainable through Generai Eiectric service. If you
do use an extension cord with your microwave
oven, the interior iight may fiicker and the biower
sound may vary when oven is in use.
3. Be certain to place the front surface of the door
three inches or more back from the countertop
edge to avoid accidental tipping of the appliance in
normal usage.
4. Use metal only as directed in cookbook. Metal
strips as used on meat roasts are helpfui in cooking
food when used as directed. Metai trays may be
used for TV dinners, However, when using metai in
the microwave oven, keep metal at least l-inch
away from sides of microwave oven.
5. Do not operate the oven while empty to avoid
damage to the oven and the danger of fire. If by ac-
cident the oven shouid run empty a minute or two,
no harm is done. However, try to avoid operating
the oven empty at aii times–it saves energy and
proiongs iife of the oven.
6. Cooking utensils may become hot because of
heat transferred from the heated food. This is especially true if plastic wrap has been covering the top
and handies of the utensii. Pot hoiders may be
needed to handle the utensii.
7. Sometimes, the oven shelf can become too hot
to touch. Be careful touching the sheif during and
after cooking.
8. DO not use any thermometer in food you are
microwaving unless that thermometer is designed
or recommended for use in the microwave oven.
9. Remove the temperature probe from the oven
when not using It to cook with, if you ieave the
probe inside the oven without inserting it in food or
iiquid, and turn on microwave energy, it can create
electrical arcing in the oven, and damage oven
waiis.
10. Remove wire twist-ties on paper and piastic
bags before placing in oven. Twist-ties sometimes
cause bag to heat, and may cause fire.
1f .Don’t defrostfrozen beverages in narrow necked
batties especially carbonated ones, Even if the container is opened, pressure can build up. This can
cause the container to burst, resulting in injury,
12. Don’tovercook. Excessive overcooking dehy-
drates potatoes, and may Gausethem to catch fire
causing damage,
13. If food should ever ignite: Keep the oven door
closed. Turn off the power immediately: Touch
CLEAR/OFF or disconnect power cord or shut off
power at the fuse circuit breaker panei.
14, Boiling eggs (in and out of shell] is not recom-
mended for microwave cooking. Pressure can buiid
up inside egg yoik and may cause it to burst, resuiting in injury,
15. Foodswith unbroken outer “skin” such as potatoes, hot dogs or sausages, tomatoes, appies,
chicken iivers and other gibiets, and eggs (see
above) shouid be pierced to aiiow steam to escape
during cooking.
16.’’Boilable9’cooking pouches and tightly closed
plastic bags shouid be slit, pricked or vented as di-
rected in Cookbook. if they are not, piastic couid
burst during or immediately after cooking, possibiy
resuiting in injury. Aiso, piastic storage containers
shouid be at ieast partiaiiy uncovered because they
form a tight seai. When cooking with containers
tightiy covered with piastic wrap, remove covering
carefuiiy and direct steam away from hands and
face.
17. Do not pop popcorn in your microwave oven
uniess in a speciai microwave popcorn accessory
or uniess you use popcorn iabeied for use in microwave ovens. Because of the heat generated without
these precautions, the container couid catch fire.
18. Plastic Utensfls–Piastic utensiis designed for
microwave cooking are very usefui, but shouid be
used carefuily. Even microwave piastic may not be
as toierant of overcooking conditions as are giass
or ceramic materiais and may soften or char if subjected to short periods of overcooking. in ionger exposures to overcooking, the food and utensiis
couid ignite, For these reasons: 1) Use microwave
piastics oniy “and use them” in strict compliance
with the utensii manufacturer’s recommendations.
2) Do not subject empty utensils to microwaving. 3)
Do not permit chiidren to use piastic utensiis with-
out compiete supervision.
19. Do not use your microwave oven to dry news-
papers. if overheated, they can catch fire.
20. lfse of Shelf Accessory. To position sheif so
that it is secureiy “seated,” insert into the oven cavity above sheif supports and completely to the back
oven waii. Drop into piace so that the recessed
areas are over the sheif supports. To remove sheif,
lift sheif above supports and then puii forward and
out. Do not piace food on sheif uniess it is secureiy
“seated” on the supports.
21. When cooking pork either conventionally or in
the microwave oven, foiiow our directions exactly
and aiways cook the meat to at ieast 170°. This
assures that, in the remote possibility that trichina
may be present in the m~at, it wiii be kiiled and
meat wiil be safe to eat,
—
—
—
4
Page 5
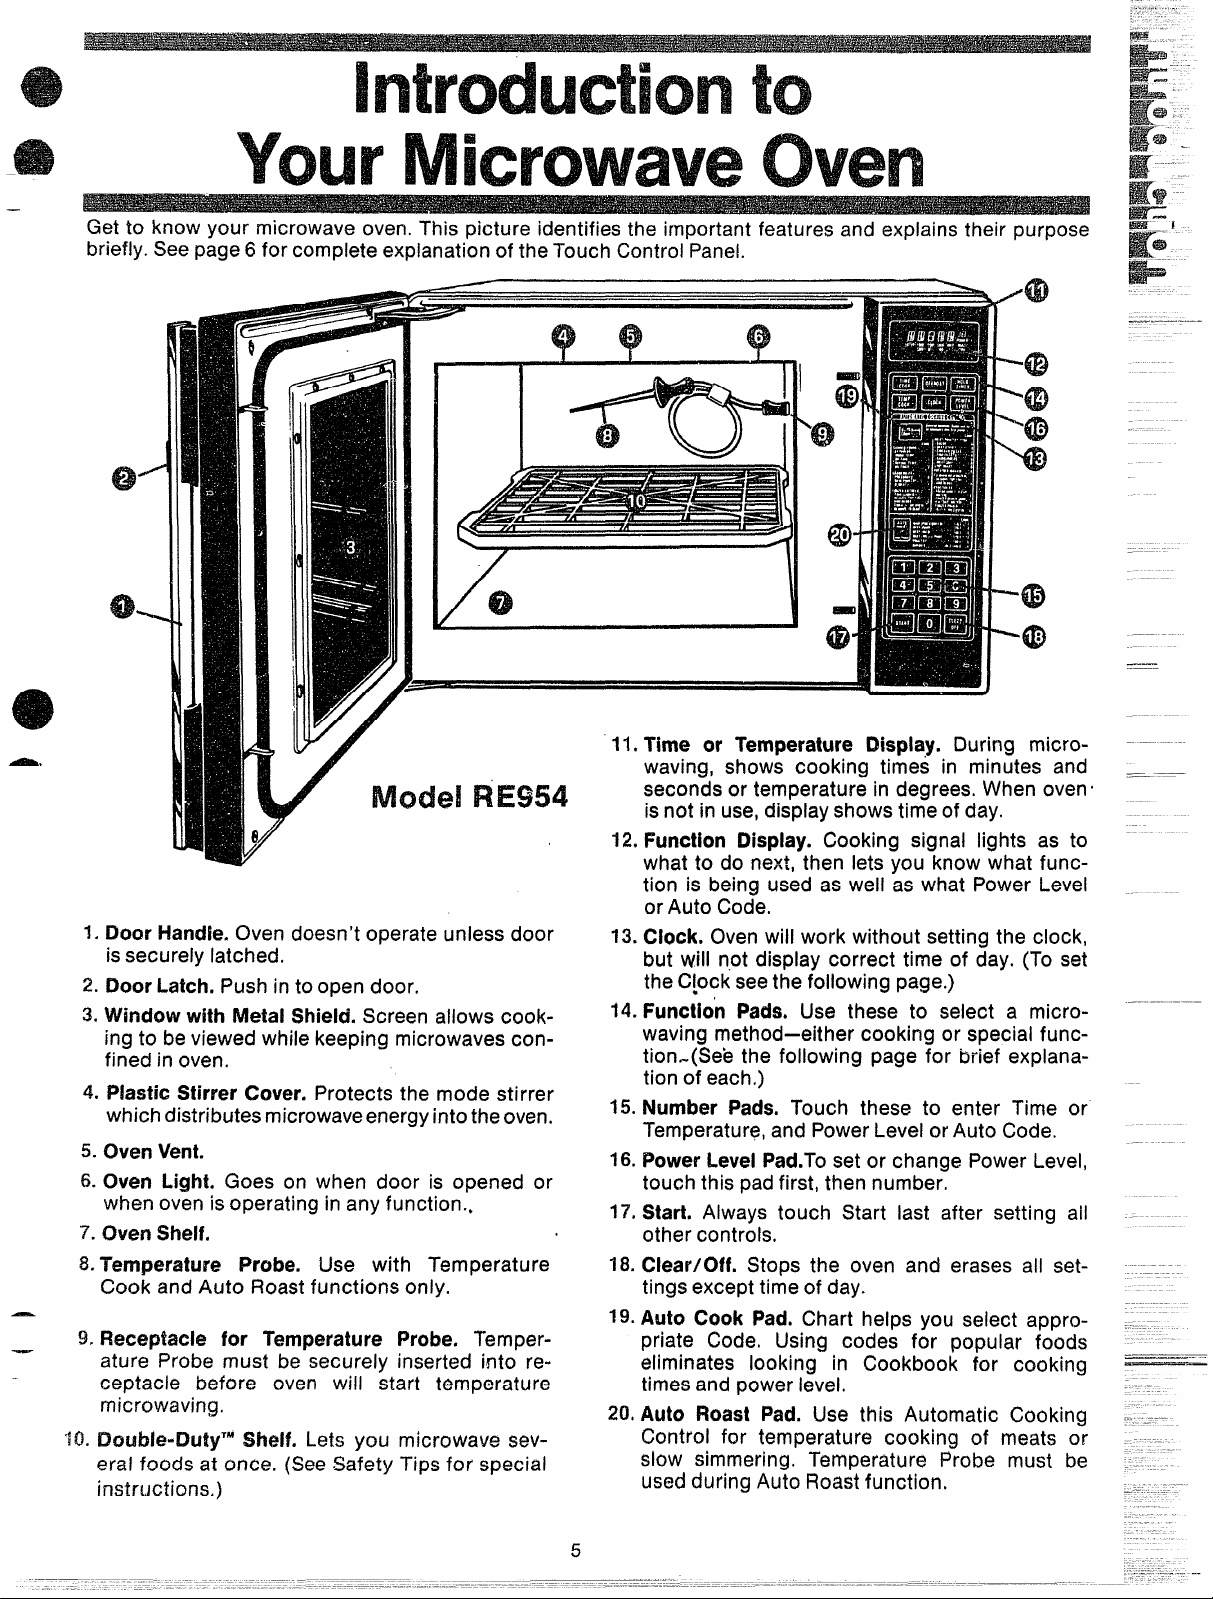
Get to know your microwave oven. This picture identifies the important features and explains their purpose
brief!y. See page 6 for complete explanation of the Touch Control Panel.
43’
6P.
o
1. DcmrHandle. Oven doesn’t operate unless door
is securely latched.
2. Door Latch. Push in to open door.
3. Window with Metal Shield. Screen allows cooking to be viewed while keeping microwaves confined in oven.
4. Plastic Stirrer Cover. Protects the mode stirrer
which distributes microwave energy into the oven.
5. Oven Vent.
& Oven Light. Goes on when door is opened or
when oven isoperating in any functions,
7. oven shelf.
8.Temperature Probe. Use with Temperature
Cook and Auto Roast functions only.
—
9. Receptacle for Temperature Probe, Temperature Probe must be securely inserted into receptacle before oven will start temperature
microwaving.
’10. Shelf. Lets you microwave sev-
eral foods at once. (See Safety Tips for special
instructions,)
.—. - ———
~
II*
Time or Temperature Display. During microwaving, shows cooking times in minutes and
seconds or temperature in degrees. When oven #
is not in use, display shows time of day.
12,
Function Display. Cooking signal lights as to
what to do next, then lets you know what function is being used as well as what Power Level
or Auto Code.
13.
Clock. Oven will work without setting the clock,
but will not display correct time of day, (To set
the C~ock seethe following page.)
14.
Function Pads. Use these to select a micro-
waving method—either cooking or special function-(Seb the following page for brief explanation of each,)
15.
Number Pads. Touch these to enter Time or
Temperature, and Power Level or Auto Code.
16.
Power Level Pad.To set or change Power Level,
touch this pad first, then number,
77.
Start. Always touch Start last after setting all
other controls,
18.
Clear/Off. Stops the oven and erases all set-
tings except time of day.
19. Auto Cook Pad, Chart helps you seiect appropriate Code, Using codes for popular foods
eliminates looking in Cookbook for cooking
times and power level,
20, Auto Roast Pad. Use this Automatic Cooking
Control for temperature cooking of meats or
slow simmering, Temperature Probe must be
used during Auto Roast function,
/al
5
Page 6
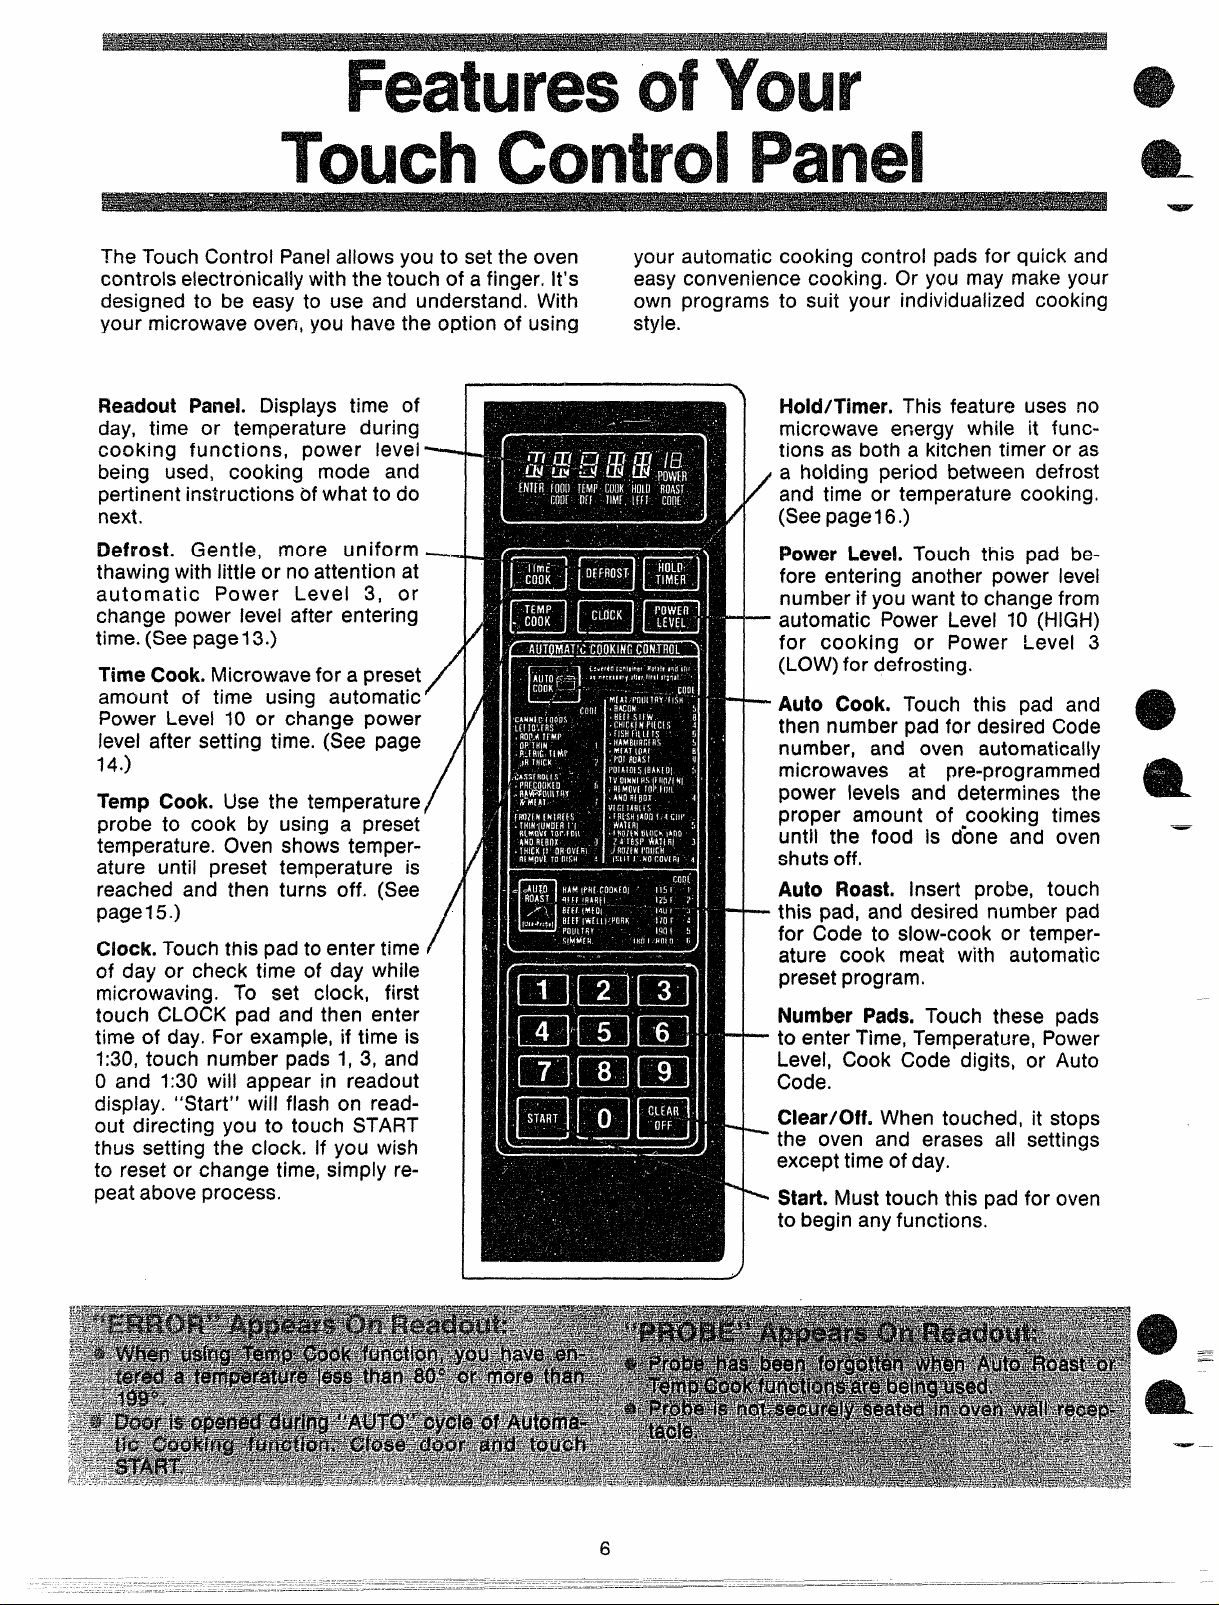
The Touch Control Panel allows you to set the oven
controls electronically with the touch of a finger. It’s
designed to be easy to use and understand, With
your_microwave ov{n, you have the option of using
your automatic cooking control pads for quick and
easy convenience cooking. Or yau may make your
own programs to suit your individualized cooking
style. -
Readout Panel. Displays time of
day, time or temperature during
cooking functions, power !evel ~
being used, cooking mode and
pertinent instructions of what to do
next.
Defrost. Gentle, more uniform ~
thawing with little or no attention at
automatic Power Level 3, or
change power level after entering
time. (See pagel 3.)
T{me Cook. Microwave for a preset
amount of time using automatic
Power Level 10 or change power
level after setting time. (See page )
14.)
Temp Cook. Use the temperature/
probe to cook by using a preset
temperature. Oven shows temperature until preset temperature is
reached and then turns off. (See
pagel 5.)
Clock. Touch this pad to enter time i
of day or check time of day while
microwaving. To set clock, first
touch CLOCK pad and then enter
time of day. For example, if time is
1:30, touch number pads 1, 3, and
0 and 1:30 will appear in readout
display. “Start” will flash on readout directing you to touch START
thus setting the clock. If you wish
to reset or change time, simply repeat above process.
/
/
Hold/Timer, This feature uses no
microwave energy while it functions as both a kitchen timer or as
a holding period between defrost
/
and time or temperature cooking.
(See page16.)
Power LeveL Touch this pad be-
fore entering another power level
number if you want to change from
— automatic Power Level 10 (HIGH)
for cooking or Power Level 3
(LOW) for defrosting.
- Auto Cook. Touch this pad and
then number pad for desired Code
number, and oven automatically
microwaves at pre-programmed
power levels and determines the
proper amount of
until the food is done and oven
shuts off.
Auto Roast. Insert probe, touch
-- this pad, and desired number pad
for Code to slow-cook or temperature cook meat with automatic
preset program.
Number Pads, Touch these pads
- to enter Time, Temperature, Power
Level, Cook Code digits, or Auto
Code.
Clear/Off. When touched, it stops
- the oven and erases all settings
except time of day.
~ Stati, Must touch this pad for oven
to begin any functions.
●cooking times
— .
6
Page 7
Do
—
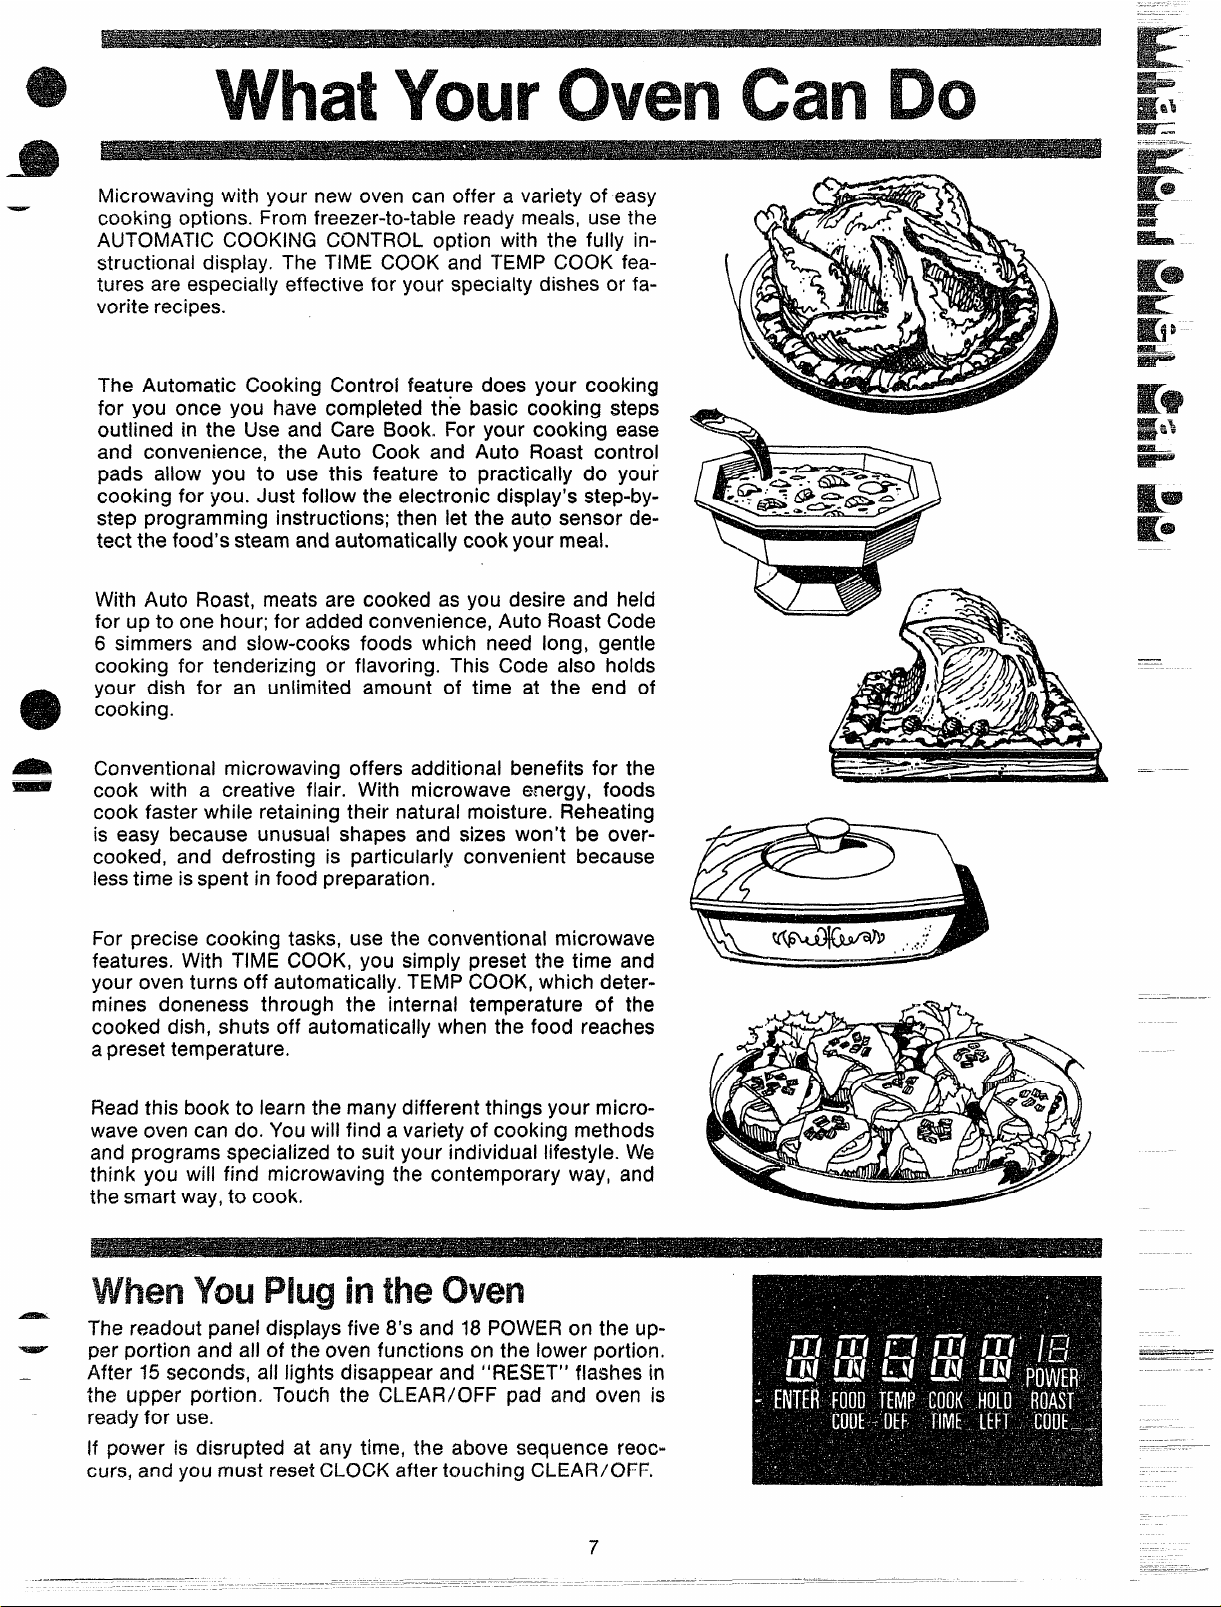
Microwaving with your new oven can offer a variety of easy
cooking options. From freezer-to-table ready meals, use the
AUTOMATIC COOKING CONTROL option with the fully instructional display. The TIME COOK and TEMP COOK features are especially effective for your specialty dishes or favorite recipes.
The Automatic Cooking Controi feature does your cooking
for you once you have completed the basic cooking steps
outlined in the Use and Care Book. For your cooking ease
and convenience, the Auto Cook and Auto Roast control
pads allow you to use this feature to practically do your
cooking for you. Just follow the electronic display’s step-bystep programming instructions; then let the auto sensor detect the food’s steam and automatically cook your meal.
With Auto Roast, meats are cooked as you desire and held
for up to one hour; for added convenience, Auto Roast Code
6 simmers and slow-cooks foods which need long, gentle
cooking for tenderizing or flavoring. This Code also holds
your dish for an unlimited amount of time at the end of
cooking.
Conventional microwaving offers additional benefits for the
cook with a creative flair. With microwave energy, foods
cook faster while retaining their natural moisture. Reheating
is easy because unusual shapes and sizes won’t be overcooked, and defrosting is particularly convenient because
lesstime is spent in food preparation.
—
—
——
For precise cooking tasks, use the conventional microwave
features. With TIME COOK, you simply preset the time and
your oven turns off automatically. TEMP COOK, which determines doneness through the internal temperature of the
cooked dish, shuts off automatically when the food reaches
apreset temperature.
Read this book to iearn the many different things your microwave oven can do. You wiii find a variety of cooking methods
and programs specialized to suit your individual iifestyie. We
think you wiii find microwaving the contemporary way, and
the smart way, to cook.
The readout panei dispiays five 8’s and 18 POWER on the up-
per portion and aii of the oven functions on the iower portion.
After 15 seconds, aii iights disappear and “RESET” fiashes in
the upper portion. Touch the CLEARJOFF pad and oven is
ready for use.
if power is disrupted at any time, the above sequence reoc~
curs, and you must reset CLOCK after touching CLEAR jOFF.
7
Page 8
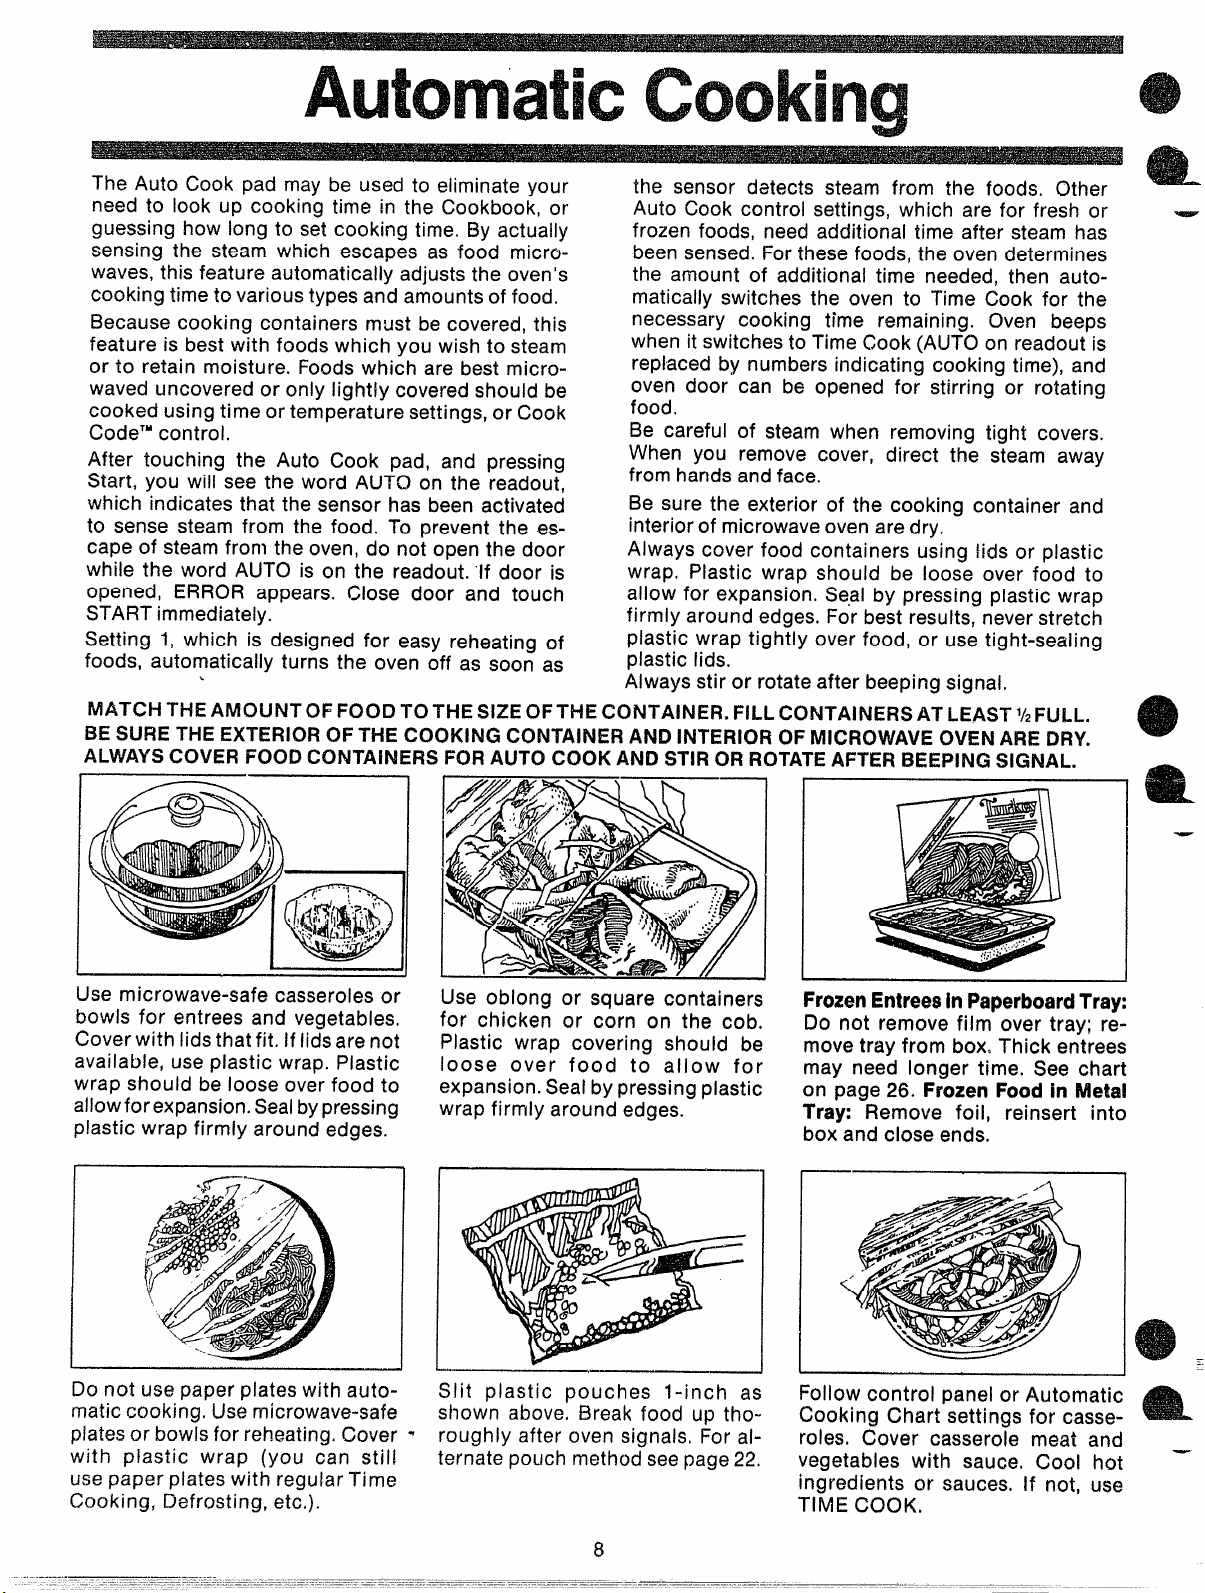
The ALNO Cook pad may be used to eliminate your
—
—
need to look up cooking time in the Cookbook, or
guessing how long to set cooking time. By actually
sensing the steam which escapes as food microwaves, this feature automatically adjusts the oven’s
cooking time to various types and amounts of food.
Because cooking containers must be covered, this
feature is best with foods which you wish to steam
or to retain moisture. Foods which are best microwaved uncovered or only lightly covered should be
cooked using time or temperature settings, or Cook
Code’” control.
After touching the Auto Cook pad, and pressing
Start, you will see the word AUTO on the readout,
which indicates that the sensor has been activated
to sense steam from the food. To prevent the escape of steam from the oven, do not open the door
the sensor detects steam from the foods. Other
Auto Cook control settings, which are for fresh or
frozen foods, need additional time after steam has
been sensed. For these foods, the oven determines
the amount of additional time needed, then automatically switches the oven to Time Cook for the
necessary cooking time remaining. Oven beeps
when it switches to Time Cook (AUTO on readout is
replaced by numbers indicating cooking time), and
oven door can be opened for stirring or rotating
food,
Be careful of steam when removing tight covers.
When you remove cover, direct the steam away
from hands and face.
Be sure the exterior of the cooking container and
interior of microwave oven are dry,
Always cover food containers using lids or plastic
while the word AUTO is on the readout. If door is wrap. Plastic wrap should be loose over food to
opened, ERROR appears. Close door and touch allow for expansion. Seal by pressing plastic wrap
START immediately.
Setting 1, which is designed for easy reheating of
foods, automatically turns the oven off as soon as
.
MATCH THE AMOUNT OF FOOD TO THE SIZE OF THE CONTAINER. FILL CONTAINERS AT LEAST
firmly around edges. For best results, never stretch
plastic wrap tightly over food, or use tight-sealing
plastic lids.
Always stir or rotate after beeping signal,
.
1/2FULL.
BESURE THE EXTERIOR OF THE COOKING CONTAINER AND INTERIOR OF MICROWAVE OVEN ARE DRY.
ALWAYSCOVER FOOD CONTAINERS FOR AUTO COOK AND STIR OR ROTATEAFTER i3EEPlNG SIGNAL.
~
~
I
5 q
Use microwave-safe casseroles or
bowls for entrees and vegetables,
Cover with lids that fit. If lids are not
available, use plastic wrap. Plastic
wrap should be loose over food to
allow for expansion. Sealbypressing
plastic wrap firmly around edges.
1
Do not use paper plates with auto-
matic cooking, Use microwave-safe
plates or bowls for reheating, Cover with plastic wrap (you can still
use paper plates with regular Time
Cooking, Defrosting, etc.).
Use oblong or square containers
for chicken or corn on the cob.
Plastic wrap covering should be
loose over food to allow for
expansion. Seal by pressing plastic
wrap firmly around edges.
Slit plastic pouches l-inch as
shown above, Break food up thoroughly after oven signals, For alternate pouch method see page 22.
FrozenEntreesin PaperboardTray:
Do not remove film over tray; remove tray from box, Thick entrees
may need longer time. See chart
on page 26. Frozen Food in Nletai
Tray: Remove foil, reinsert into
box and close ends.
Follow control panel or Automatic
Cookinq Chart settings for casse-
roles. ~over casserole meat and —
vegetables with sauce. COOI hot
ingredients or sauces, If not, use
TlfiE COOK,
-
8
Page 9
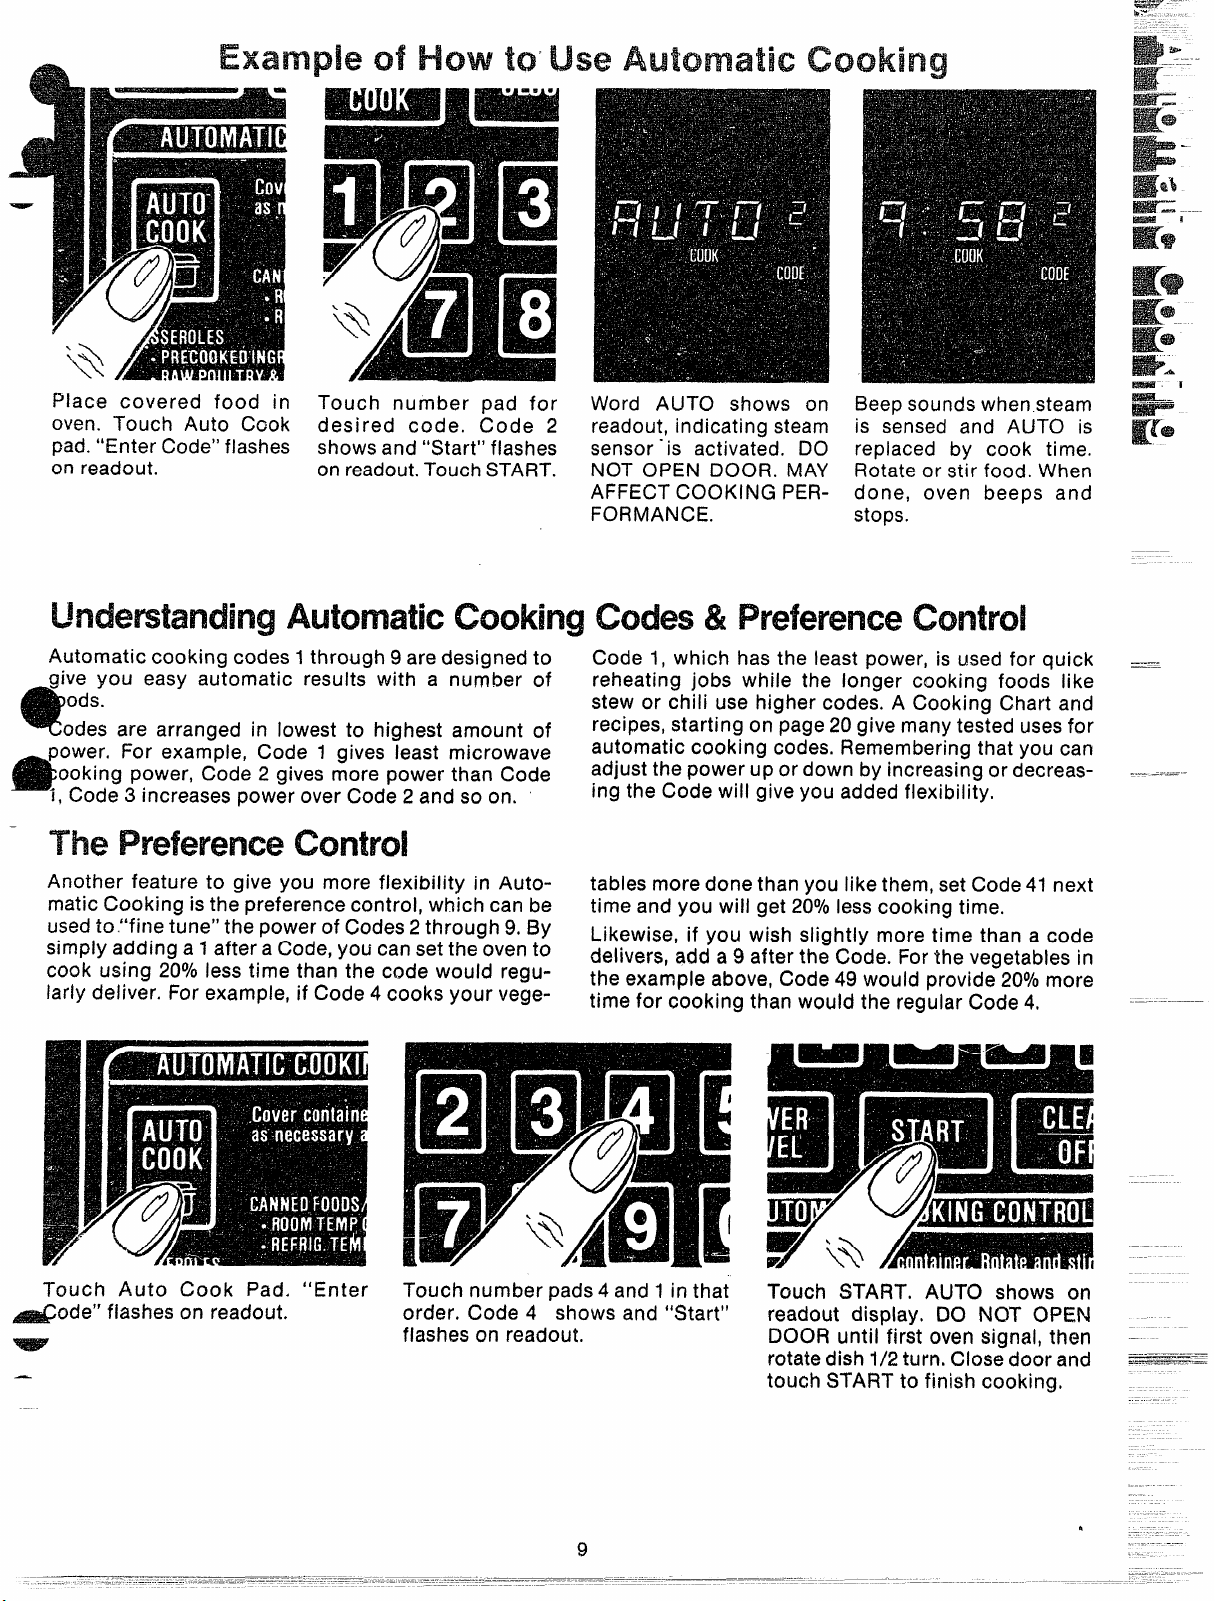
Place covered food in
oven. Touch Auto Ccok
pad. “Enter Code” flashes
on readout.
Touch number pad for
desired code. Code 2
shows and “Start” flashes
on readout. Touch START.
Word AUTO shows on
readout, indicating steam
sensor” is activated. DO
NOT OPEN DOOR. MAY
AFFECT COOKING PERFORMANCE.
Cocks&
Beep sounds when .steam
is sensed and AUTO is
replaced by cook time.
Rotate or stir food. When
done, oven beeps and
stops.
Automatic cooking codes 1through 9 are designed to Code 1, which
—give you easy automatic results with a number of
ods.
odes are arranged in lowest to highest amount of
power, For example, Code 1 gives least microwave
ooking power, Code 2 gives more power than Code
1,Code 3 increases power over Code 2 and so on.
—
reheating jobs
stew or chili use higher codes. A Cooking Chart and
recipes, starting on page 20 give many tested uses for
automatic cooking codes. Remembering that you can
adjust the power up or down by increasing or decreas-
ing the Code will give you added flexibility,
The
Another feature to give you more flexibility in Automatic Cooking is the preference control, which can be
used to.’’fine tune” the power of Codes 2 through 9, By
simply adding a 1after a Code, you can set the oven to
cook using 20°/0less time than the code would regu-
. . . ..
Iarly deliver. For example, if Code 4 cooks your vege-
.. - . .
tables more done than you like them, set Code 41 next
time and you will get 20°/0less cooking time,
Likewise, if you wish slightly more time than a code
delivers, add a 9 after the Code. For the vegetables in
the example above, Code 49 would provide 20°/0more
time for ;ooking than would the regular Code 4,
has the least power, is used for quick
while the longer cooking foods like
—-—
Touch Auto Cook Pad. “Enter
-ode” flashes on readout.
—
Touch number pads 4 and 1 in that
order. Code 4 shows and “Start”
flashes on readout.
9
Touch START. AUTO shows on
readout display, DC) NOT OPEN
DOOR until first oven signal, then
rotate dish 1/2 turn, Close door and
touch START to finish cooking,
Page 10

Auto Roast uses the temperature probe to cook to
the desired serving temperature, Uniike Temp Cook,
which uses a singie power ievei, Auto Roast uses
up to 3 power settings which automatically switch
during roasting, thus providing even tender cooking
resuits without overcooking.
Just as in conventional roasting, only tender roasts
shouid be Auto Roasted untii specified internai temperatures are reached. Less tender roasts shouid
be microwaved by time, according to the Cookbook
which comes with your oven. Compiete information
on preparing roasts for microwaving is in your
b
Piace tender beef roasts on trivet
in microwave safe dish. Insert
probe from front horizontally into
center meaty area not ,touching
bone or fat. Cover with wax paper.
. .
i
Pouitry, pork or ham roasts need
no trivet. Add % cup water to roast
dish, cover with piastic wrap. (For
cooking bag method, see cookbook.) Insert probe into center
meaty area.
~0
RoastBeefto
/ >.&
Touch AU
T(l) ROAST Pad. Readout fiashes “Enter
Roast Code”. Touch number pad 2. “START” fiashes.
Touch START. Readout shows AUTC).
Piace meat with probe in oven. Insert cabie end of probe firmiy into
receptacle on oven wali.
----
At 80°, readout switches to show meat’s internai
temperature. Turn roast over and restart oven- by
touching START.
Oven monitors internal temperature, automatically
switching to iawer power as meat’s temperature
rises, This prevents toughening or overcooking,
-8
After temperature is reached, oven switches to
I-K)LD for 1 hr,, then shuts off, Hold prevents cwercooking Whiiekeeping meat warm.
Page 11

Use containers and coverings as directed at left, Place probe correctly in roast before cooking,
—.——...
s Turn over when 80° (except pork) has been reached.
—
—
!35??21
Tender Roast
Rare
Medium 3
Well
l’vleatloaf 4
(loaf or round)
Pork
Loin Roast
Precooked Ham 1
Poultry
Whole Chicken 5
(3ib.)
Whole Turkey
(Up tO 12 Ibs.)
(insert probe into- meatiest area of inner thigh from below end and parallel to leg.)
Turkey Breast 4 80° 170°
Insert probe horizontality into meatiest area.)
-Recommended standing time before servin9.
2
4
4
5
80°
80° -140°
80° 170°
No Turn 170°
Over
120°
80° 115°
80°
80° 190°
125°
170°
190°
12-14
14-16
17-18
30-40
18-20
17-19
13-15
13-15
13-15
5-1o
10-15
30
5-1o
20
5-1o
20
20
20
Your Cookbook has a chapter on Automatic Simmering, including charts and recipes. Refer to this
chapter for additional techniques and cooking time.
Set Auto Simmer like Auto Roast,
e~am Ple left. Readout shows
AUTO until food is 80°, then
switches to show food temperature until 180°.
—
Oven switches to HOLD at 180°
unti\ you remove food and turn off
oven. If stirring is recommended,
you can reset oven by retouching
START, Touch CLEAR/OFF after
cooking.
RoastCode6)
Total time includes time to bring food to 180° and
hold at that temperature until done.
AutomaticSimmer
(Auto RoastCode 6)
Beef
Pot Roast* 6-8
Stew
Chili 11”13
Chicken*
Stewing
Broiler/Fryer 4-6
i-lam or Pork
Roast 4-6
soup
Stock/Vegetable 3-6
Split Pea
‘For frozen,add2to 3 hours.
6-8
11-12
13-15
-11
Page 12

Answers
Q. Why does my oven autornaticallyQcut off after the
AUTO cycle when using Auto Cook Control Code 1
w-henit does no?for other settings?
A. When using Code 1, there is no second phase of
minutes counting down. All the cooking is completed in the first phase or AUTO.
Q. H my food is not completely cooked after using
the suggested Auto Cook Centrol Code, what
ShOUki ! do?
A. Thick starchy or dense foods may require some
additional time cooking. Use TIME COOK and
Power Level 10for a few minutes until completion,
C?.Do al! fresh or frozen vegetables require a
standing period after cooking with AUTO COOK?
A. Most vegetables are cooked to a crisp state dur-
ing Auto Cook, just as in regular microwaving,
Therefore, i! is recommended that you let the vegetables stand for up to 5 minutes depending on size
and density of pieces. This standing time also enhances the overall flavor and appearance of most
vegetables.
Q. What if ! don’t
cook?
A. Oven senses steam too quickly which shortens
the cooking time thus leaving undercooked dish,
Recover tightly and reset Auto Cook,
Q. Do the shapes and sizes of food make a differ=
ence when using Auto Cook?
A. Yes, in some cases, larger pieces will require ad-
ditional Time Cooking. Be sure to check suggested
arrangement of pieces in the dish, since proper arrangement is often a successful tip in regular micro-
waving,
Q. Should I use Auto Cook to cook pudding or
sauces?
A. Most pudding and sauce recipes require stirring
many times during cooking; therefore, Time Cook is
recommended since you should not open the door
during the AUTO phase of cooking without affecting end cooking results,
IQ. My scalloped potatoes were not completely
cooked when I removed the dish after Auto Cook.
What iswrong?
A. if you prepared the sauce in the oven prior to
combining the sauce with potatoes, there may have
been too much remaining moisture in the oven,
Make sure you dry the oven completely before using Auto Cook since this function operates properly
by sensing steam in the oven. Also, starting Auto
Cook with hot foods creates steam in the oven too
soon, and decreases the first sensing cycle,
Q. Are there any other foods which are best Time
Cooked, rather than Auto Cooked?
A. Bakery foods, candies, melted chocolate or
foods when a dry or crisp surface is desirable, are
cooked best by Time Cook.
fully cover the dish in Auto
Q. Do fresh or frozen vegetables require water
when using Auto Cook?
A. Yes, Add water as recommended on chart to the
vegetables and cover well for even, complete
cooking.
Q. Would my plastic containers with very tight fit-
ting lids be appropriate for Automatic Cooking?
A. No, most types of plastic storage dishes, butter
tubs, etc. with tight fitting lids are not recommended
for microwaving, Also tight fitting plastic lids may
prevent. adequate steam from escaping and food
may not cook properly during Automatic Cooking.
Q. I tried to warm some chow mein noodles using
Auto Cook. Why didn’t this work?
A. Food must havesome moisture in orderto create
steam which helps the auto sensor function.
Extremely dry foods such as chow mein noodles,
potato chips and other such foods do not have
enough moisture.
Q. May I use Auto Cook when I am cooking many
foods in more than one dish or casserole?
A. No, because ofdifferent food densities, attention
needed during cooking, and food amounts, it is best
to use TIME COOK when cooking many foods.
Q. Why was my roast not fully cooked even though
the temperature on the readout was correct and
Auto Roastcompleted?
A. When cooking with Auto Roast, the temperature
probe must be inserted properly as fully described
in the Cookbook, After turning meat over or rotating, the probe should be checked to make sure it
hasn’t slipped or changed position.
Q. Last time I used Auto Roast I removed the roast
from the oven to turn Hover. When I replaced roast
in oven and reconnected the meat probe, AUTO
reappeared. Why?
A. The oven and roast may have cooled to below
80°, or probe may have been repositioned. Continue roasting and numbers will soon reappear,
Q. Are there any particular trivets that work better
than others?
A. Yes, flat glass trivets such as lids or dish covers
give more even cooking results than plastic trivets.
Also, ceramic ridge-bottomed roasting dishes work
well. Plastic trivets require meat to be turned over
more frequently because the grid design and legs
allow the bottom of the meat to stay cooler as it
cooks, than glass trivets do,
CLWhy doesn’t the roast continue cooking during
the standing or holding time?
A, The oven automatically reaches finished temper-
ature and then decreases to a lower power level to
prevent overcooking, Thus an even temperature is
maintained,
-
12
Page 13

to
The Defrost setting is designed for
even thawing necessary for large
amounts of food and is one of the
most important advantages of a
microwave oven, making defrosting quick and easy with little attefition. Power Level 3 is automatically
set for defrosting, but you may
change this for more flexibility, See
your Cookbook for the complete
defrosting chart.
To become better acquainted with
your Defrost function, defrost frozen pork chops by following the
steps below.
Step 1: Place package of frozen
chops in the oven and close door,
Step 2: Touch DEFROST. Display
reads :0 and Power 3. “Enter Def
Time” flashes.
Step 3: Touch 8, 0, and Ofor 8 min-
utes, “Def Time”, 8:00 and Power
3 are displayed.
Step ,4: Touch START. “Def Time
Left” shows and time counts down
on display. When cycle is completed, “END” flashes, the oven
signals and automatically shuts
off.
-rips
@ Foods frozen in paper or plastic
can be defrosted in the package,
@ For even defrosting, many foods
need to be turned over, rotated, or
broken up part of the way through
the defrosting time.
e Homemade dinners can be frozen in shallow foil trays and heated
for later use. Select foods which
microwave well,
@ Pre-packaged frozen dinners
can be defrosted and microwave
cooked.
1
.—
—.
and/h’RBWWS
2. When I press START, I hear a
~ull~humping noise. What iSit9
h.This sound is normal. It is letting
tou know the oven is using a
~ower Level lower than HIGH”
2=Can I Defrost small items in a
}urry?
L Yes, but they will need more fre-
~uent attention than usual. Raise
he Power Level after entering the
irne by touching POWER LEVEL
md 7 or 10, Power Level 7 cuts the
ime in %; Power Level 10 cuts the
me to %. During either, rotate or
tir food frequently.
Step 5: Turn package over, close
door and repeat Steps 2,3 and 4.
Step & When oven signals, “END”
flashes and oven shuts off. Remove package and separate chops
to finish defrosting.
Q. Can I open the door during DEFROST to check on the progress
of my food?
A. Yes, You may open the door at
any time during microwaving, To
resume defrosting, close the door
and press START,
Q. Why don’t the defrosting times
in the Cookbook seem right for my
food?
A. Cookbook times are average,
Defrosting time can vary according
to the temperature in yaur freezer,
Set your oven for the time indicated in your Cookbook, If your
food is still not completely thawed
at the end of that time, re-set your
oven and adjust the time accordingly,
@ Check your Cookbook for other
defrosting tips.
Q. Can I select a Power Level other
than automatic Power Level 3 for
defrosting?
A. Yes, Some smaller foods may be
defrosted quicker on higher Power
Levels but for even, carefree defrosting, Power Level 3 is suggested. Check the chart in the
Cookbook for specific times and
Power Levels,
13
Page 14

Time Cooking, or cooking your food according to a pre-
——
.—
14
determined amount of time, is probably familiar to you from
conventional cooking. With your microwave oven, however,
you preset the time and the oven turns off automatically.
to
~
Follow the cooking
help you learn to Time Cook
properly.
steps below to
Ni
(-
9
+’ /L—-————
J+
Step 1: Fill a cup % full of water
and 1 teaspoon of freeze dried coffee. Use a cup that has no metal
decoration. Place cup in oven and
close door.
Step 2: Touch TIME COOK, The
read-out panel shows :0 and
Power 10.
flashes,
>
“Enter Cook Time”
—
Step 3: Select your time. Touch 1,
2, and Ofor a minute and 20 seconds. “Cook Time”, Power 10, and
1:20 appear on the display. ,If another Power Level is desired touch
POWER LEVEL and the number althpugh Power Level 10 (HIGH) is
preferred for this cup of coffee,
Step 4: Touch START, “Cook Time
Left”, Power 10, and time counting
down show on display.
Step 5: When time is up, oven
sounds 3 times, Display flashes
“END”. Oven, light, and fan shut
off.
Tips
a Make sure all utensils used in
your microwave oven are labeled
“suitable for microwaving”. Check
your Cookbook for specific test to
determine “microwave-safe” utensils.
e Paper towels, wax paper, and
‘plastic wrap can be used to cover
dishes in order to retain moisture
and prevent spattering.
@ Most microwaved foods require
stirring, rotating, or rearranging.
Check your Cookbook for specific
instructions for the food you are
microwaving,
@Some foods such as unshelled
eggs and hot dogs must be
pricked to allow steam to escape
during cooking.
Q. I set my oven for the time called
for in the recipe but at the end of
the time ajlowed, my dish wasn’t
done. What happened?
A. Since house power varies due
to time or location, many Time
Cook recjpes give you a time range
to prevent overcooking, Set the
oven for minimum time, test the
food for doneness, and cook your
dish a little longer, if necessary,
Q. I want to cook” my dish on a
Power Level other than HIGH, what
do I need to do?
A. To change the Power Level,
touch the POWER LEVEL pad,
“Enter Power”” flashes on the display panel, Enter the desired
number,
Q. Can I interrupt my Time Cook
function to check the food?
A. Yes, To resume cooking, simply
close the door and touch START.
NOTE: Microwave power will not
come cm until you are ready, You
must touch S-TARTfor cooking to
begin.
Q. I touched the number pads and
selected my power level. When I
touched START, however, my oven
didn’t come on. Why not?
A. The TIME COOK pad must be
touched before setting the number
pads or else your oven will not begin cooking.
—
Page 15

For many foods, internal temperature is the best gauges the internal temperature of your food; it
—
test of doneness.
Roasts or poultry are cooked to perfection when
temperature cooking, Heating or reheating foods
accurately to a serving temperature you desire is
simple and easy.
TEMP COOK takes the guesswork out of cooking
because the oven shuts off automatically when the
food is done.
The Temperature
The temperature probe is a food thermometer that
Probe
must be used when using TEMP COOK or AUTO
ROAST. To utilize your temperature probe properly,
follow the directions for use and insertion in this
book in the section entitled “HOWto Auto Roast”.
HANDLE
SENSOR
CLIP
Step 1: Insert temperature probe
as directed in Cookbook and attach probe securely in oven wall.
Close the door.
- step z: Touch TEMP COOK.The
display panel shows F and Power
—
10. “Enter Temp” flashes.
~~m
Step 3: Touch 1, 3, 0 for 130°.
“Temp”, 130 F and Power 10 show
on display.
and
Q. After I followed the steps and
touched START, “ERROR” flashed
in the display and a signal
sounded. What is wrong?
— A. “ERROR” flashes on display if
ciu set the temperature either be-
— low 80° or greater than 199°. The
oven tells you between the flashing of
correct entry was that you set, To
re-ertter, touch CLEAR/OFF pad
and begin step$ again.
“ERROR” what the in-
Step 4: Touch POWER LEVEL pad.
“Enter Power” flashes. Touch 5 for
MEDIUM power. “Temp”, 130 F
and Power 5 shows on display,
Step 5: Touch START. If internal
temperature of the roast is less
than 80°, display will show
“COOL” or if temperature is 80° or
above, display shows temperature
counting up.
Step 6: When 130° is reached, the
oven will sound and automatically
shut off, Remove probe and food
from the oven.
Q. Are there any foods I can’t
TEMP COOK?
A. Yes, Delicate butter icings, ice
cream, frozen whipped toppings,
etc., soften rapidly at warm temperatures. Batters and doughs as
well as frozen foods are also difficult to cook precisely with the
probe. It is best to TIME COOK
these foods.
Q+ Why did “PROBE” flash on the
display after I touched Wart?
A. “PROBE” will flash on the dis-
play if you have not securely
seated the end of the probe into
the receptacle in the oven wall or if
you touch TEMP COOK and have
forgotten to use the probe,
choking Tips
@Where you have a choice of
Power Levels, use a lower setting;
it will heat more evenly even
though requiring more time.
@ Be sure frozen food has been
completely defrosted before inserting probe. Probe may break off
if used in frozen foods,
@ Always insert probe into the
center of meaty areas; take care
not to touch the fat or the bone.
@ Insert probe as horizontally as
possible into foods as directed in
the recipes. Make sure the handle
does not touch the food. The probe
is easiest to use when inserted
from the front,
@ Usethe clip to keep the probe in
place while heating.
@ Cover foods as directed in
Cookbook for moisture control and
quick, even heating,
Q. Can 1 leave my probe in the
oven if it’s not inserted in the food?
A. No. If the probe is left inside the
oven, touching the oven wall, and
not inserted in food, you may dam-
age the oven.
Q. Can I TEMP COOK different
portions of food at different
temperatures?
A, Yes. The temperature probe
gives you the freedom to cook different portions of food at different
temperatures to suit individual eating styles, Simply place the probe
in the food and change the temperature setting as needed,
15
*
Page 16

.r..........
Your HC?LD/TIMEFi, which operates without microwave energy,
has three timing functions.
It operates as a Minute Timer, it
can be set to delay cooking or may
be used as a hold setting after defrosting. i-icdd/Timer can be set up
to 99 minutes.
Step 1: Touch HOLD/T!MER pad.
The read-out panel shows :0, “Enter Time” flashes.
Step 2: Select the amount of time
you desire. Touch the appropriate
number pads. If, for example, you
are timing a three minute phone
call, touch 3, 0 and 0. The readout
panel shows 3:00 and “HOLD”
appears on display.
Step 3: Touch START. The readout
display shows the time as it counts
down, and “i-iold Time Left”,
Step 4: When time is up, oven
sounds. The readout flashes “END”
and the timer turns off,
The HOLD/TIMER can also be
used to program “standing time”
between microwave cooking func-
tions. The time can range from one
second to 99 minutes and 99 seconds. A HOLD, or “standing” time
may be found in some of your own
recipes or Cookbook.
To set the oven to delay cooking
up to 99 minutes follow Steps 1
and 2 to enter hold time, then set
time or temperature desired before
pressing START.When holding before temperature cooking, be sure
probe is in food before pressing
START.
to Defrost-Ho!d/Time–Time Cook
To heip you become acquainted with the HOLD/TIMER feature as used with Time Cook or Temp Cook follow
Steps below to defrost a frozen casserole for 15 minutes, then hold 10 minutes and then cook 25 minutes. If using Temp Cook after Hold/Timer, be sure to insert probe correctly as shown in Temp Cook section of this book.
Step 1: Remove casserole from the
freezer and place in oven. Touch
the DEFROST pad. The readout
panel shows “Enter Def Time”, :0,
and Power 3.
Step 5: Touch the TIME COOK
pad. The display shows “Enter
:0, and Power 10
Step 2: Touch 1, 5, 0 and O for
defrosting time. Def Time, 15:00,
and Power 3 appear on the display
panel. (Defrosting is automatically
set on Power Level 3 but can be
changed by touching POWER
LEVEL pad and the new Power
Level.)
Step 3: Set standing or hold time
by touching HOLD/TIMER. “Enter
Time” and :0 appear on display.
Step 4: Touch 1, 0, 0, and Oto hold
for ten minutes, 10:00 and “HOLD”
appear on the display,
Cook Time”,
(HIGH).
Step 6: Touch 2, 5, 0, and O for
twenty-five minutes of cooking
time.
Power 10 appear on the display panel,
Step 7: Touch START, “Def Time
Left”, Power 3, and 15:00 counting
down show on display, As each
function is automatically performed oven display shows entered information.
“Cook Time”, 25:00, and
—
Q. What will happen if I accidentally reverse the instructions?
A. If you accidentally reverse the
sequence of programming instruc-
tions, your oven automatically
rearranges your program. i3efrcmting always comes first, then hold,
and then the cooking function,
(3. Can I Defrost-Hold oniy on my
oven?
A. Sometimes you may want to defrost a food, hoid it, and refrigerate
it to be cooked iater, Aii you need
to do is program in Defrost and
amount of time. Then program
Hoid and amount of time. Put your
thawed dish in the refrigerator and
cook iater at a convenient time,
NOTE: Aiiow foods to remain at
room temperature cmiy as iong as
safe. Times wiii vary,
16
Q. i programmed my oven for a
specific defrosting time but it defrosted longer than necessary.
What happened?
A, When instructions conflict, the
oven carries out the iast instruction. You may have set the oven to
Defrost for 4 minutes, Hold/Time
for 2 minutes, and then Defhost for
6 minutes, in this case, the oven
would Defrost for 6 minutes and
Fioid/Time for 2 minutes.
Page 17

YourNew Microwave Oven is a Valuable Appliance,
—.————
ProtectIt From Misuse ByFollowing These Rules:
~ Keep your oven ciean and sweet-smelling.
Opening the oven door a few minutes after cooking
heips “air-out” the interior. An occasional thorough
wiping with a solution of baking soda arid water
keeps the interior fresh.
@ Don’t use sharp-edged utensils with your oven.
The interior and exterior oven walls can be
scratched. The control panel can be damaged,
e Don’t remove the cover over the “stirrer” at the
top of the oven (microwave feature 4 on page 5),
You will damage the oven.
BE CERTAIN POWER 1SOFF BEFORE CLEANING ANY PART IOFTHIS OVEN.
.
to the
Walls,floor and plasticcover. Because there is little
heat except in the food, or sometimes in the utensils, spills and spatters are easy to remove. Some
spatters are easy to remove. Some spatters can be
removed with a paper towel, others may require a
damp cloth. Remove greasy spatters with a sudsy
cloth, then rinse and dry. Do not use abrasive
cleaners on oven walls. NEVER USE A COMMERCIAL OVEN CLEANER Of’d ANY PART OF
YOUR MICROWAVE OVEN.
Door-inside. Glass: Wipe up spatters daily, wash
when soiled, with a minimum of sudsy warm water.
Rinse thoroughly and dry,
Metal and plastic parts on door: Wipe frequently
with a damp cloth to remove all soil. DO NOT USE
ABRASIVES, SUCH AS CLEANING POWDERS OR
STEEL AND PLASTIC PADS. THEY WILL MAR THE
SURFACE,
Special note when using Brown ‘N Sear Dish: High
heat generated on bottom of Brown ‘N Sear Dish
can cause scorched appearing stains to bake onto
the oven shelf if grease is present, These may be removed with Delete” Polishing Cleanser by the
Drackett Products Co.
After using Delete, rinse and dry thoroughly, following instructions on can. Do not use Delete on the
painted surfaces such as walls. It will scratch the
paint.
Delete may be purchased from your local dealer or
from your Authorized Service Center, Check the
“yellow pages” for location and phone number,
Delete may be sold in grocery or hardware stores,
or in the housewares section of some department
stores.
Accessory Shel$. Your shelf accessory is made of
polysulfone, one of the strongest microwave ovenproof plastics. It is designed for use in a microwave
oven oniy; do not use it in a conventional oven, Do
Not operate your microwave oven with the shelf in
place unless you also have food in the oven,
Never use a microwave browning dish with the
shelf. Heat from browning dish can damage the
shelf, The easy to clean shelf is dishwasher safe, or
may be washed in hot water with a mild detergent.
Do not use abrasive cleansers or scouring pads.
Automatic Temperature Probe. Probe is sturdy, but
care should be taken in handling. Do not twist or
bend; avoid dropping temperature probe,
Clean as soon after using as possible. To clean,
wipe with sudsy cloth, then rub lightly with plastic
scouring ball if necessary. Rinse and dry, (Or wash
in dishwasher.) -
HowtoCleanthe
Case. Clean the outside of your oven with soap and
water, then rinse and dry. The outer pane of the
window is glass. Just wipe clean with a damp cloth,
Chrome trim is best wiped with a damp cloth and
then with a dry towel.
ControlPanel. Clean the control panel of your microwave only with lightly dampened cloth. DO NOT
USE cleaning sprays or large amounts of soap and
water. These can cause problems with the control
mechanisms,
Cord. (f the cord becomes soiled, unplug and wash
with damp cloth. For stubborn spots, sudsy water
may be used, but be certain to rinse and dry thoroughly before plugging cord into outlet,
Oven Lamp I?eplacement. First, unplug the oven,
Then remove lamp compartment cover by removing
screw which holds cover in place, Cover is located
at the rear of outer case, see location on page 5.
To remove bulb, push it inward gently and turn it to
the left or counter clockwise; then pull outward out
of the socket, Replace with lamp number 25T8DC,
(It is available in drug and hardware stores,) Replace compartment cover. Plug in the oven,
——.—.
Page 18

CM:
@ Main circuit breaker is tripped.
@ One of house fuses has blbwn.
s 3-prong plug isn’t fully inserted into wall recep-
tacle.
Panel Y(Xoven
Nc$tstart:
Make sure you touched START button.
Door is not securely closed.
You have already entered another program and
not touched CLEAR/OFF to cancel it.
Temperature Probe not inserted properly or not
being used during Auto Roast or Temp Cook.
You have not entered numbers after Time Cook.
You have not entered desired finished temperature after Temp Cook.
CLEAR/OFF was touched accidentally.
After touching Auto Cook, or Auto Roast pads,
no code numb-erwas entered.
When using Temp Cook function, you have entered a temperature less than 80° or more than
199°.
Door is opened during “AUTO” cycle of Automa-
tic Cooking functio~, Close door and touch
START.
FcmdsMe
@
Not enough time set when using Time Cook function because of variance of starting food temperatures.
@
The density and amount of foods will vary and
thus may need more time for completion.
69
Dish not completely covered as directed for Auto
Cook.
64
Previous microwaving left humidity or moisture in
oven thus lessening the cooking time in Auto
Cook function.
@
Certain vegetables that are cooked using Auto
Cook need a standing period after cooking. Check
Automatic Cooking Chart.
s
Probe not inserted properly into meat or dish.
Check Cookbook and Auto Roast section in this
book for specific probe placement.
@
Incorrect Power Level entered.
@
Dish was not rotated, turned or stirred if these instructions were given in recipe.
@
Oven was ooened durirw “AUTO” cycle of Auto
Cook function.
@
Too many dishes in oven at same time.
Check Cookbook for food placement when using
Double-DutyTMshelf.
or
.
w
On
s probehas
Temp Cook functions are being used.
@ probe is not securely seated in oven wall recep-
tacle.
been forgotten when Auto Roast or
18
Page 19

—-
--
w
Automatic Cooking Control is a tutly automatic
eiectrunic controi system that lets your microwave
oven do the cooking for you. The charts and
rec!pes in this section are designed to help you
make the most of this truly new feature.
Standard cooking techniques require setting the
size to the size of the food being cooked, Coverings
such
as plastic wrap secured on al~sides, the lid
that came with the container, or microwave-safe
plastic domes are ideal. For exampies of containers
and coverings, see page 8 and the following recipe
section of this book.
oven for a specified cooking time or a selected finished temperature. And that means looking up
recipes in a cookbook. . trying to convert
old
recipes for microwave cooking, . .or just resorting
to guesswork. This control method works on an
entirely different basis—with a special electronic
sensor that detects steam from cooking food. The
oven “knows” how the food is cooking; so it can
automatically set the correct cooking time and
maintain the proper power level for different types
With Preference Control, you can adjust the AWomatic Cooking Feature to your individual taste by
adding ehher “l” or “9” after Code number. If after
trying the suggested Code, you would prefer less
cooking time, simply add the number “1” after the
Code and the oven automatically lessens the cook-
ing time by XIO/O,{f
“9” after the Code to increase cooking time by
you wish more cooking time, add,
20°/0.
and amounts of food. And it’s adjustable to suit
your individual taste.
Easy to use
Simply touch two control pads–AUTO COOK and
the desired Code number—and then START, A
chart on the oven control panel gives a complete
list of Codes for frequently prepared foods. The
readout display shows AUTO until steam is sensed
and then signals, and displays time counting down.
During AUTO, oven should not be opened, but
when oven signals, most foods should be turned,
-
stirred, or rotated. Check the Automatic Cooking
Chart for suggestions.
Appropriate containers and coverings help assure
good cooking results. Containers should match in
Automatic Roasting uses the temperature probe
rather than the electronic sensbr to cook meats
evenly to the desired degree of doneness. The oven
continually monito,rs the food’s internal temperature. Unlike ordinary Temperature Cooking, the
oven changes power levels two or three times
depending on the degree of doneness during cooking to give you the best results automatically. Meat
is cooked evenly, without toughening because lower
power Ieve!s are used asthe meat temperature rises
thus cooking meats evenly while retaining the natural juices. After cooking, the oven switches automatically to Hold for an hour. Food stays warm
without overcooking.
A wide variety of foods including meats, fish, casseroles,
Veg~tabIeS, !eftovers, and corwenience foods can be Auto
C;oked. Match container size with the food, cover
securely, and do not open door during AUTO cycle,
When oven signajs, turn, rotate or stir as recommended in
~OGkbOQkor chart on pages 26 and 27.
Recipes and foods which must be cooked -
unc&uiwed, or which require constant attenticm, or adding ingredients during cooking
ahould be microwaved by TIME CC)(3K, For
foods that microwave best using temperature
probe, use TEMP COOK or AUTO ROAST.
Foods rwqulring a dry or crisp surface after
cooking cook best with TIME COOK,
Page 20

The benefit is automatic setting ~Nd ~ontr~i of cooking, but just like conventional mi~r~waving Wu must
check the food after the AUTO cycle (oven beeps and cook time begi rtsto count down orI display) and turn,
rotate Q-rstir as recommended,
For meat and fishloaves use either
the round or loaf microwave-safe
containers. Fish loaves made with
precooked or canned fish use Auto
Cook Code 4. Beef loaf uses Auto
Cook Code 8. Cover with plastic
wrap and rotate M turn after oven
signals. See the chart on foliowing
page for -recipes.
Fish fil!ets, whole fish or seafood
pieces should be in single layer in
flat pie plate or oblong dish to fit,
Cover with plastic wrap or corltainer lid, Use Auto Cook Code 6
for fillets and Auto Cook Code 1
for seafood pieces.
Whole chicken, chicken breasts
and pieces, or turkey parts should
be placed in a microwave-safe 8-in.
square dish, 8 x 12 x 2-in. dish or
3 qt. casserole. Cover securely with
plastic wrap or container lid. If
cooking bag is used for whole
chicken, shield breast bone with
small strip of foil, Rotate dish
1A turn when oven Si$jnals. ‘se
Auto Cook Code 4.
I
Chuck or rump roasts should be
placed in a cooking bag with %
cup water or marinade (see marinade recipes on page 100 in
Cookbook) and placed in a microwave-safe dish. Cut bag to fit close
to the size of the roast and tie open
end securely. Cut a 1-1 %“ slit near
the tie. Use Auto Cook Code 9 for
cooking.
Pork chops automatically cook well
in 8 x 12 x 2-in, dish, cwered with
plastic wrap. Add barbeque sauce
or other sauce on each chop.
Microwave using Auto Cook Code
49 which is Code 4 with the added
digit 9 giving the Code 20°/0more
time, [See page 9.)
1
Spare ribs and brisket should be
automatically cooked in round
glass container with lid or plastic
wrap. Make sure liquid cxwersmeat.
After oven signals, turn over or
rearrange meats often.
Use the fo\lowing step-by-step instructions and tips when adapting your casserole recipes for Automatic
Choking,
topped casseroles, remove cover after oven sig-
nals and add topping, then continue cooking
uncovered.
Allow precooked ingredients or hot sauces to
cool slightly before adding othor Ingredients,
Meats and vegetables
liquid.
After oven signals, rotate dish M turn and stir
covering all Ingredients with I{quid,
should be submerged in
Page 21

——.......——————.——————.—. -_—..—.——————
—
—
—..—.—_-.—--
-
At4kI Ctmk CXxh 6 [Appmx.
% !b@ chuck
ICmking T’hne--35 min.)
. . . . . .. . . . . . . .In large mixing bawl, place meat, bread crumbs, pepper, salt, chili
Makes 6 to 8 Servings
1/2 cup dry bread crumbs powder, onion and egg. Mix well and form into 12balls. Arrange balls
%/8!teaspoon pepper
in a circle in 2 qt, casserole, Set aside.
1/2 teaspoon salt
1 teaspoon chili powder
2 tablespoonsdry rnhwed onions
3 egg
1/2 cup regular rice . . . . . . . . . . . . . . . In small mixing bowl place rice, beans, tomatoes and chili powder.
# can [15% 02,) kidney beans
[undraSned)
Mix well and pour in center of casserole and over meatballs. Cover
and microwave at Auto Cook Code 6. Rotate 1/2 turn when oven
1 can (16 oz.) tomafoes, chopped signals and time remaining appears on readout.
and ufidrained
1 tablespoon chili powder
AW3 CCw3kCXxie4 (Approx. Cooking Time–29 min.)
f/4 cup soy sauce. . . . . . . . . . . . . . . . .
f/3 cup honey
%/3cup sherry
in 2-cup glass measure, place soy sauce, honey and sherry. Stir until
blended. Add cornstarch; mix well. Microwave at HIGH (10) for 3 to
3-1/2 minutes, stirring every minute until thickened. Tie chicken legs
Makes 4 Servings
.-.
4 teaspoons cornstarch and place in 12 X 8 X 2-in. microwave-safe dish, breast side up. Brush
with half of sauce (reserve half for later use.) Microwave on Auto
1 whole chicken (about 3 lb.) Cook Code 4. When oven signals and time remaining appears on
readout, apply remaining sauce, recover and continue cooking.
—
‘If breast bone seems prominent, a 1“ strip of foil may be placed over bone to prevent splitting of wrap,
Auto Cook Code 7’@pprox. Cooking l“ime--l hr. 15 min.)
f can (10-1/2 oz.) condensed
., .In small mixing bowl mix soup and milk; reserve 1/2 cup of the
Makes 6 Servings
cream of mushroom soup mixture. Blend remaining soup mixture, rice, mushrooms and half of
1-1/4 cups milk (1 soupcan full)
the onion soup mix. Pour into 12X 8 x 2-in, glass dish.
3/4 cup regular rice, uncooked
1 can [4
oz.) rnmhmoms, stems
and pieces
1 pkg. (1-1/2 02,) dry onion soup mix
1 cutup chicken (about 3 lb.)
.,. Place chicken pieces on rice mixture, arranging with meatiest pieces
to outside of dish, Pour reserved soup mixture over chicken and
sprinkle with remaining soup mix, Cover with plastic wrap, no vent.
Microwave at Auto Cook Code 7, rotate 1/2 turn when oven signals
and time remaining appears on readout,
m?dfx?
Page No.
Recipe
Page No.
“AJ$$C:OR’
- n
111
86
94
93
138
717
129
Sweet & Sour Ham
Chicken & Dressing
Round Salmon Loaf
f3eef f3urger Straganoff
EBQ Franks
Ch@eseStuffed Meatloaf
Polynesian Swiss Steak
Chow Mein
124
138
162
84
129
93
99
118
a
5
4
4
7
2
8
8
6
.-
—
21
Page 22

.,.
—
,,#[???.<
w
VVhoieor large halves of vegetaIbiessuch as cauliflower or squash
use Auto Cook Code 5. Use round
or square container close to the
size of vegetable. Add Mcup water.
Cover with lid or plastic wrap. Turn
cauliflower over after oven signals.
For other vegetables, rotate %turn
when oven signals.
I%=czen
Pieces or slices of vegdabies
require M to YZcup of w{ter. Use
appropriate size covered container,
Stir or rotate after oven signals.
Use Auto Cook Code 5.
r,
Precooked/canned vegetables
should be placed in round con-
tainer similar in size to amount
being cooked ‘(at least half full).
Cover and stir we]! after AUTO
cycle. Use Auto Cook Code 1.
!3hxk or hxxw pieces of frozen
vegetables should be placed in suit-
able size container (at leasthalf full)
with lid or plastic wrap, Add 1 or 2
tab\espcxms water, Stir after oven
signa{s, Use Auto Cook Code 3.
Pouches of frozen vegetables
should be slit 1“ in center before
placing directly on oven floor. Use
Auto Cook Code 4. After oven sig-
nals, rearrange vegetable and rotate
pouch ‘Aturn.
22
Alternately, frozen vegetables in
pouches can be slit with an “X”
shaped slit and placed in glass
container with “X” downward. After
cooking, pick up pouch and empty
food into dish through “X” opening,
-=w-
Page 23

f“%;.?%~ ~ ;=. ~
~~ : g$wi
Auto Ccmk Code 5 (Approx. CCN2khgTime—-l6 min.)
g’- ,% *2 $; $-g ~ -
@
1 01!
Makes 4 Servings
. . . . . .. .. .. . . . .. . . .Toss vegetables with oil and butter in 2 qt. microwave-safe cassxwole.
1 tablespoon soft bUtteF Cover. Microwave on Automatic Cook Code 5 stirring vA! when oven
3 onions, quatiered signals and time remaining appears on readout. Serve immediately,
1 small green pepper, cut In
l/4-hn. wide strips
2 CWPSthin#y-slicedcabbage
2/3 cup carrots,stieeddiagonally
?/4 cup (fl bunch) sliced green onions
1 cup broccoli flowerets
1 cup cauliflower f!owerets
2 staiks celery, siicecidiagonally
Auto Cook Code–-Pasta 1 @pprox, Cooking Thne--f3 min.)
Spinach ~ @pprox. Cooking Time—+ min.)
Lasagna2 (Approx. Cooking Time—25 min.)
6 lasagna noodles(1/3 pkg.)
—
. . . . . . . Place noodles, water and oil into a 13 X 9 X 2-in. dish, Cover with
Makes 6-8 Servings
cups water plastic wrap. Microwave on Auto Cook Code 1, Allow to stand while
tablespoon vegetable oil preparing remaining ingredients.
pkg. (3Ooz.) frozen chopped
. . . ..Remove paper wrapping from box. Place unopened box into oven and
spinach microwave on Auto Cook Code 1. Drain well.
can @oz.) tomatosauce
. . . . . . . . . In large bowl mix together tomato sauce, tomato paste, mushrooms,
can [8 oz.) tomato paste onion, oregano, basil, salt and garlic powder.
jar (4 oz.) sliced mushrooms
(drained)
.
cup chopped onion
teaspoon leaf oregano
teaspoon basil
1 teaspoon sait
1/4 teaspoon gariic powder
2 cups (l-pt.) smali curd cottage
. . .In a 13 X 9 X 2-in. dish iayer well drained lasagn~ noodles, 1 cup
cheese cottage cheese, 1/2 pkg. spinach and 1/2 of tomato sauce, Repeat.
8 cm.grated mozzarella cheese
Sprinkle mozzarella cheese over top. Cover with plastic wrap, Microwave on Auto Cook Code 2, Rotating and removing wrap when oven
siqnals and remainina time wmears on readout.
Auto Cook Code–See Recipe (Approx. Cooking Time—22 to 25 min.)
~ pkg. (10oz.)frozen
. . . .. . .. . . . . . .Place box of spinach in microwave oven and partiaily cook on Auto
Makes 4-6 Servings
chopped spinach Cook Code 1. Remove from box and drain well. Set aside, In
3/2 eup rice
a cup Watw’
2 qt. casserole place rice and water, Cover. Microwave at Auto Cook
Code 6. To cooked rice, add butter, onion, milk, egg, sait and cheese.
1/4 cup butter, meited Mix well, Cover and microwave at Auto Cook Code 2. Rotate 1/4 turn
1/4 cup fineiy chopped onion when oven signals and time remaining appears on readout, Let stand
1 ctip milk 5 minutes covered before serving,
1 egg, beaten
1/2 -teaspoon salt
1 CUDshredded cheddar cheese
Ftedpe
—
Cabbage Rolls Italian Style
Stuffed Peppers
23
Pagt?F&3.
w
84
85
Page 24

w
Pineappk Casserole is a tangy
dessert or meat accompaniment.
In 12 x 8 x 2-in. dish spread 2 cans
(20 oz. ea.) drained pineapple
chunks, 1 cup sugar and % cup
flour. Cover and microwave on
Auto Cook Code 2. When oven
signals and time remaining appears
on readout, remove covering and
top with mixture of 2 cups bu?teryflavored cracker crumbs and U cup
melted butter. Do not recover.
Touch “Start” and finish cooking.
After preparing the ingredients for the individual recipe as shown below the picture, follow these steps
for cooking.
Step 1: Cover with plastic wrap and use Auto Cook
Code 3. down) the Nut Cake and Cornbread, Invert Caramel
Step 2: When oven signals and time remaining
appears on readout, remove covering and rotate dish minutes before serving.
Baked Apples automatic cook well
using Auto Cook Code 2. Match
number of apples to size of microwave-safe covered container (see
page 240 in Microwave Guide and
Cookbook). Use Auto Cook Code
2 for Baked Pears and Applesauce
also.
Step 3: When cooking is finished, turn out (upside
Biscuit Ring and let dish stand over ring a few
Sewed Fruit and Fruit Compotes
should bestirred well before microwaving, especially if sugar is added.
Cover; use Auto Cook Code 2 and
stir once or twice after oven signals and time appears on readout.
Tou6h “Start” and finish cooking.
-
‘NM Topped Cakes are easy to cook
- automatically. Grease bottom and
sides of microwave-safe fluted cake
container and sprinkle bottom even-
ly with 1/3 cup chopped nuts or
Caramel Biscuit f%infjuses Auto
Cook Code 3, Spread ~ cup melted
butter and M cup brown sugar in
8-irt. round glass dish, Sprinkle
with cinnamon and IAcup chopped
nuts if desired. Arrange 1 can
(10oz.) refrigerated biscuits around
wfges and place drinking glass,
open end up, in center, See Steps
above for Autoimalic Ceddng. “
A
24
.. . <..!
,.,
,-
,?..,.,. -.,-
F
hii<;~
“., ,
Bacon and Cheese Topped Cm=n-
bread: Distribute M cu~ chopped
crisp fried bacon and 1tablespoon
Parmesan cheese in greased tl=in.
round glass dish. Carefully pour
batter from 1
bread mix or use batter from ccJrnbread ring page ‘226, over above -ingredients. See Steps above for
A~tomatic Cooking,
———..
pkg. (81Acm) cxxn-
......
----,.
.,.
.!
.. ”,:+$.,
‘j
.!:,
,:”/”
.,.
=-=:
Page 25

Wi#@
Am? &x3i6 Kxme 3 ‘(Appmx. ‘cooking TimE%’---l8mh.)
1 pkg. @4ayer size) . . . . . .. .
fudge Cake mix
● ,.. ,
In large bowl place cake mix, eggs, vanilla, oil and water. Blend cm
medium speed of mixer, about 2 minutes,
2 eggs
3 W3spcmnvanilla extract
213cup cooking oil
1“7/4 ‘cupswater
1/4 cup finely chopped pecans. . . . .
Lightly grease a 16 cup plastic microwave fluted or straight-sided ring
mold. Sprinkle chopped nuts evenly over bottom. Pour batter over
nuts.
Cover with plastic wrap and microwave on Auto Cook Code 3. Rotate
dish 1/4 turn and remove wrap when oven signals and remaining time
appears on readout. Touch “Start” and continue coakjng. Let stand in
dish 5 minutes before turning out.
Makes 1(10-in.) Tube Cake
until smooth and creamy.
hate Cook Code 3 @pprox. Cooking Tirne-16 min.)
Makes 6.to 8 Servings
‘i can (20-22 02.) prepared . . . . . . .ln 8-in. square glass dish, spread pie filling.
cherry pie f!liling
2 cups dry yeilow or white . . . . . . . in small bowl, mix together cake mix, butter, nuts, and cinnamon
mix (1 pkg. [9. oz.] or crumbly. Sprinkle evenly over cherries or, in three rows so cherries
cake
fl/2 pkg. [17. oz.])
are visible. Cover with plastic wrap.
until
1/4 cup melted butter
1/2 cup coarsely chopped nuk
Microwave on Auto Cook Code 3 rbtating dish 1/2 turn and removing
1 teaspoon ground cinnamon plastic wrap when oven signals and rema!ning time appears on
readout. Touch “Start” and continue cooking,
“i
-
A@o Cook Code 3 IApprox. Cooidng Time–10 min.)
~/4 cup butter
. . . . .............; . .In 8 in. round dish place butter. Microwave at HIGH (10) for 3/4 to 1
Makes 1 (8-in. round) Cake
1/3 cup brown sugar (packed) minute untjl melted. Sprinkle sugar over butter. Drain pineapple (save
1 can (8-1/4 oz.] pineapp!e slices liquid) on paper towels and arrange in dish. Decorate with cherries.
4 maraschino or candied
cherries, cut in iwif
3/4 cup aii purpose fiour
. . . . . . . . . .in small mixer bowl place fiour, sugar, baking powder, salt, short-
1/2 cup sugar
1-1/2 teaspoonsbaking powder
1/4 teaspoon sah
1/4 cup soft shortening
1 egg
iiquid from pineapple (1/3 c.)
Place a 2“ diameter drinking giass (4” taii) open side up in center of
dish,*
ening, egg, iiquid and vaniila. Beat 3 minutes on iowest mixer speed,
scraping bowi constantly first 1/2 minute. Carefuiiy spread batter over
fruit in dish. Cover with piastic wrap—no vent.
Microwave on Auto
Cook Code 3. Rotate 1/4 turn and remove wrap when oven signais
and time remaining appears on readout. Touch “Start” and continue
cooking.
3/4 teaspoon vaniiia extrac~
“Tip: Use a small drinking glass like the type you buy containing
cheese spreads.
Page No.
228 3
259
259 3
240 9
241 2
‘Wc$C:ok”
3 ‘
Recipe Page No.
Basic E3readPudding
246
Steamed Pudding 265
Streuseled Appies 240
Cornbread Ring
226 3
Steamed Brown Bread 226
‘A.NUxklx:ok”
3
4
2
7
Page 26

D notopen oven door duri~g AUTO cycle. May
effect cooking performance, After first beeping
signal (time appears on readout for codes except
Code 1), stir or rotate food.
Match the amount of the food to the size of the
container. Fill containers at least %full.
Add H-% cup water to fresh vegetables. Stir or
turn over vegetables and meats after first beeping
signs!.
DO NOT USE PAPER PLATES with Automatic
Cooking.
@ Be sure the exterior of the cooking container
and interior of microwave oven are dry.
* Stir or rotaie after ovensignalsandtime appears
on readout.
Approx.
Container
Canned
Room Temp. or thin (small
amounts at retrig. temp. )
Refrig. temp. or thick (large
amounts at room temp.)
Deli Foods
Entrees
Frozen
Thin (under 1“)
Thick (over 1“) 10 oz.
21 oz.
Leftovers
TV Dinner (10-12 oz.) Removefoil topandput backin box. If dinner
Fo6ds
Cocking:
Bacon
[4slices)
Casseroles
‘recooked ingredients
?aw meats& Pouitrv
2hicken
3reasts {4) 41
Microwave-safe container matched to size
of food.
Microwave-safe con-
1
tainer matched to size
of food.
Cook in container.
3
(see comments)
Cookin container.
4
(see comments)
4
Microwave-safe
1
container matched to
size of food.
4
Cook in container.
(see comnlents)
5
12x 8 x 2-in. glass
dishlinedwith paper
towels.Cover with
plasticwrap.
2 qt. casserole with iid
6
or cover with plastic
wrap,
7
12x 8 x 2-in,glass
dish,Cover
Diastic wrap.
II
tf
II
with
Time
2-3 min./cup
4 min./cup
12-14 min.
16-18min.
25-35min.
2-3min,/cup
17-19 rein,
6-8min.
35-45min.
45-55min.
~2.26 min.
NOTE:Make sure
Commen#s
Cover with plastic wrap or lid to dish.
2 or more
amounts.Coverwith plastic wrapor lid,
servingsareconsideredlarge
Cover with’plastic wrapor-!idto dish.
Cook in own
in glasscontainer.NOTE:If entreeis in alum-
container,or for quickercooking,
inumpan,removefrom box,removelid andput
back
in originai closed box. If entree is in papo~
board container, remove from box and micro-
wavewith original plastic covering,
Use bowl with plastic wrap or cover plate with
microwave-safe plastic dome.
has cakeor brownies,removebeforecookinq.
When oven signais, rotate %turn,
Make sure liquid covers ali ingredients. When
ovensignals,stir well.
Noadditionalliquid needed.Whenovensignals,rotate %turn. Notethe preferencecontrol
1is usedwith breaststo decreasecookingtime
for best
results.
meatdoesn’t touch
>asserole
‘ieces
Vhofe { 3 Jbs,)
.—
—.
:overing.
7
4
12x8x
4
~ish or cooking bag.
3over with 2
overlappingplastic
ivrap.
9
13x 9 x 2-in, glass
jish, Put
Jagandsecure with
ie.Slit bag1“ atttop
~ear
12x 8 x 2-in, glass
6
jish, Coverwith
]Iastic wrap.
—c,——.
2
! ql, casserole with
id,
2
2-in. glass
tie.
II
II
piecesof
in cooking
II
60-70min.
2-4min,/piece
42-44rein,
1hr. 30min,1hr.40 min.
20 min.
14-18min.
14-18 min.
When oven signais, stir weli and rotate Yzturn.
N6 additional iiquid needed,
signais,rotate
Put on trivet and sit as straight as possible,
Rotate M turn when oven signals,
Add %cupwater.Whenovensignals,rotate
l/sturn.
Y2 turn,
When oven
Bastewith butt~r andlemonjuice, Whenoven 1
signals,rotate
72 turn.
CoreapplQs,Nowaterneeded,Whenoven
signals,rotate Mturn,
Corepears,Nowaterneeded,Whenoven
* rotateVzturn,
.—
.
Page 27

“MM
cook
Cack
Container Comments
A~prox.
Time
%2tties(4-5)
Pork
Sausage Patties
[’A’$thick—4)
chops
(3!4-;” thick)
Spare Ribs
(Up to 3 lb.)
Rice
Instant (Minute-1
?aw (1 cup)
seafood
2ieces
:1lb. Shrimp or scallops)
ZasseroIe
SwissSteak
1%lb. round steak)
vegetables
‘resh
~rtichokes
—
up to 4 med.)
>arrots (1 lb. sliced)
cauliflower (1 med. head)
isparagus (1 lb. cut spears)
lrussel Sprouts (1 lb.)
‘otatoes *
rozen Block (10 oz.)
lroccoli
russelSprouts
eaf Spinach
Iixed Vecjetabies
mzen Pouch
aby Limas
om
?as
...
:-:>;<(;~.:~j;
7
2 qt. glass dish with
lid.
8
Glass loaf dish. Cover
with plastic wrap.
8“ square dish. Cover
5
with Dlastic wra~.
5
8“ glass square dish.
Cover with plastic
wrap.
12 x 8 x 2-in. glass
49
dish. Cover with
plastic wrap.
45-55 min.
min.
30-40
12-14 min.
8 min.
33-38 min.
Make sure liquid covers all ingredients. When
oven signals, stir well and rctate %turn.
When oven signals, rotate %turn.
When oven signals, rotate %turn.
—
When oven signals, rotate %turn.
Baste with 1 tbsp. barbeque sauce/chop. When
oven signals, rotate
1/2turn.
NOTE: The Preference Control 9 is used for
chops to increase cooking ti~rnefor better
results.
1 hr. 30 min,1 hr. 50 min.
9 min.
24 min.
5-6 min.
35-45 min.
55-60 min.
10-12 min.
13 min.
min.
15
14 min.
11 min.
6-9 min.
14-16 min.
18-20 min.
Meat must be covered with liquid. When oven
signals, rearrange meat making sure it is sub-
merged in liquid. It may be necessary to re-
arrange another time during final cooking.
Follow instructions on package. Cover, When
oven signals, stir.
Use 1cup rice & 2 cups water. When oven sig-
nals, rotate
1/2turn.
.—.
When oven signals, rotate %turn.
Make sure liquid covers all ingredients. When
oven signals, rotate
Cut into pieces. Make sure liquid covers all
meat, When oven sianals, stir & rotate 1Aturn,
Place artichokes in dish stem side down, Add
I/t cup water,
1/2turn or stir.
Flotate dish 1Aturn after oven
signals.
Add %cup water, When oven signals, stir well.
No water needed. Start cooking stem side
down. At signal turn over.
Add M cup water. When oven signals, rotate
1/2turn,
When oven signals, rotate %turn, NOTE: Watch
hot dish & steam!
Add 2 tbsp. water. When oven signals, stir well.
NO”rE: The Preference Control 1 is used for
,,
1/2cups)
9
2 qt. glass dish. Cover
with lid or plastic
wrap.
2
2qt. glass dish with
lid.
6
11/2qt. glass dish with
1
lid.
6
2qt. casserole with lid
or cover with plastic
wraD.
7
3qt. casserole with
id.
2
2qt. glass dish with
id.
5
5
5
12x 8 x 2-in, glass
~ish, Cover with
]Iastic wrap,
11/2qt, glass
5
id,
5
qt. glass dish with
id,
5
?qt. glass dish with
id.
31
1/2qt,glassdishwith
id.
,,
,,
II
dishwith
broccoli to decrease cooking time for better
3
3
3
4
.ay pouch in
~icrowave-safe dish.
Jocover needed,
4
41
4
II
t!
II
16-18 min.
11-13 min.
10-12 rein,
8-10 min.
It
t,
,,
8-10 min.
8-10 rein,
10-12 min.
results,
Add 2 tbsp. water. When oven signals, stir well,
II
11
Make a 1“ slit in pouch, When oven signals,
break up frozen center, and rotate %turn.
NOTE: Watch for hot steam.
!1
Make a 1“ slit in pouch. When oven signals,
break up frozen center, and rotate M turn,
NOTE: Watch for hot steam. NOTE: Preference
Control 1is used for peas to decrease cooking
time for best results.
Make a 1“ slit in pouch, When oven signals,
break up frozen center, and rotate Yaturn,
.—
NC)TE:Watch for hot steam,
l?,
Jej’};dry ~O~aIOeSmay not release enougt-1 moisture to activate sensor. Be sure potatoes are fresh not old
27
Page 28

Need
———
.=—
_—
—
.-
,:4;,+LJ.:&<~
Elfrmtngham -35210
2500 Ciestwoc@ E3cwlevard
(205; 956-0333
{Decatur-l+ untsvl!:e)
‘duntsvil!e -35305
1209 Pu:nam CI:IW
(2(25)830-0150
Mobtle - 36605
1107 Beltline Highway So.
f?05) 471-1451
\-
Phoemx -85031
25 South 51st Avenue
?.0.
BOX 14278
{602) 269-21 2:
Tucson -85705
2015 North Forbes Blvd
Suite 111
(602) 623-8415
ASKAESAS
LltUe Rock - 7220g
8405 New Benton Hwy.
(501) 568-7630
CALIFORNIA
(San Bernardino-Rwerside)
Bloomington -92316
10121 Cactus Avenue
(714) 877-3434
(San Francisco)
Burlingame -94010
1649 Adrian Road
(415) 981-8760
Fresno -93727
1809 North Helm Street
(209) 255-1851
Los Angeies - 90S58
2815 East 46tn Street
(213) 583-1141
Sacramento -95815
1613% Arden Way
(916) 929-2247
San Diego -92101
3554 Kettner Boulevard
(714) 297-3221
San Jose -95123
5763 Winfield Road
(406) 629-3500
Van Nuys -91405
6843 Lennox Avenue
(213) 989-5710
COLORADO
Colorado Springs -80909
1865 bJ.Academy - Suite B
(3Q3)597-8492
Denver -80207
5390 East 39th Avenue
(303) 320-3301
50r4\v ECTla.r-r
BndfaeDort -06604
615 fio”rth Washington Ave.
(203) 367-5311
East Hartford -06108
265 Prestige Park, Piaza 3
(203) 528-9811
.>ELAWAR:
(Brandy wine- -Wilmington)
Glen Milk, PA -19342
Q,D, #2,
Box 210
(215) 358-1500
2 !S7fii CT CF Cr2LUM5\A
Jessup, MD -20794
S201 Stayton Drwe
[301) 953-9130
c:cJ:?~r)A
Fort Lauderdale -33309
f 101 West ?JcNab Road
(305) 974-670~
Fort Meyers -33901
4160 S. Clsve!and Ave.
(213) 939-2312
Jacksorwille -32205
5225 Htghway Avenus
(904) 783-? 330
.,,.. - ;,,,
!e[~p;o’rt~”b~ok~-Look in
J-- 2:-Y.C’iiGEL. Addressesarid telephonenumberssometimes change, And new Centers open, If the numbers change, check your
[Pompano-W. Palm Beach)
Lake Worth -33460
1802 Madrid .Avenue
(305) 655-7040
lMiami -33167
3200 N.W. 110th Street
(305) 685-5144
Orlando -32807
6545 East Colonial Dr.
(305) 273-6370
Tallahassee -32301
1205 South Adams St.
(904) 222-6931
Tampa -33611
5201 S. Westshore Blvd.
F!ox 13708- Interbay Station
(813) 837-1906
GEOR.GIA
Atlanta -30325
1695 Marietta Blvd.
P.O. Box 19917
(404) 897-6400
Savannah -31406
211 Television Circle
(912) 925-0445
HAWAII
Honolulu -96813
404 Cooke Street
(808) 533-7462
l13Af+0
(Boise)
Garden City -83704
5250 Chinden Blvd.
(208) 376-5880
ILLINOiS
Champaign -61820
1205 North Hagen
(217) 359-4088
Chicago -60638
5600 West 73rd Street
(312) 594-2424
Elk Grove Village -60007
10 King Street
(312) 593-2525
Lombard -60148
827-EJ35Westmore .4ve.
(312) 629-8010
peoria -61614
7708 North Crestiine Drive
(309) 692-5070
Rockford -61107
401 North 2nd Street
(815) 962-7200
Springfield -62702
2252 South 15th Street
(217) 753.8088
INDIANA
Evansville -47714
1016-K S.Weinbach Ave.
(812) 476-1341
Fort Wayne -46908
4632 Newaygo Road
(219) 484-9005
Gary -46409
5185 Broadway
(219) 981-2533
Indianapolis -46219
6233 Brookville Road
(317) 356-8861
South Bend -46613
1902 Miami Street
(219) 288-0685
IOWA
Cedar Rapids -52405
118 First Street, N.W.
(319) 366-8579
Davenport -52802
1074 South Dittmer
P.O.
Box 3188
(319) 326-5101
Des Moines -50313
1637 N.E. 58th Avenue
(515) 266-2191
Waterloo -50703
2829 Falls Avenue
(319) 236-1393
KANSAS
Kansas City -66115
2949 Chrysler Road
(913) 371-2242
Wich’ita -67211
820 East Indianapolis
(316) 267-3366
KENTUCKY
Lexington -40505
1144 Floyd Drive
(606) 255-0848
Louisville -40218
4421 Bishop Lane
Box 32130
P.O.
(502) 452-3511
LOUISIANA
Baton Rouge -70814
2935 Crater Lake Drive
(504) 926-5062
(New Orleans)
Harahan -70123
701 Edwards Avenue
(504) 733-7901
Shreveport -71102
1430 Dalzell Street
(318) 425-8654
MAINE
South Portland -04106
54 Darling Avenue
(207) 775-6385
MAFiYLAND
Jessup -20794
8201 Stayton Drive
(301) 953-9130
MASSACHUSETTS
(Cape Cod)
Hyannis -02601
80 Enterprise - Unit 11
(617) 771-5905
Pittsfield -01201
1450 East Street
(413) 499-4391
(!30ston-South)
Wes!wood -02090
346 University Avenue
(617) 329-1250
iBoston-North)
Wilmington -01887
2S1 Main Sf7eet
(617) 944-7500
MICHIGAN
Grand Raoids -49508
350 28th Street, S,E~
(616) 452-9754
Lar%ing -48912
1004 E, Michigan Ave.
(517) 484-2561
Troy
Westland -48185
953 Manufacturer’s Drive
(313) 583-1616
M1l’dFdESOTA
(Minneapolis-St. Paul)
Edina -55435
7450 Metro Boulevard
(6?2) 835-5270
.MISSISSIPPI
Jackson -39209
325 Industrial Drive
(601) 352-3371
MISSOURI
Kansas City, KS -66115
2949 Chrysler Road
(913) 371-2242 4630 E. Washington Ave.
W. LOUiS -63178
1355 Warson Road, No,
P.0, Box 14559
(314) 993-6200
Springfield -65807
1334 West Sunshine
(417) 831-0511
3637 Union Road
Route #9-A
(914) 592-4330
(Binghamton)
Johnson City -13790
278 Main Street
(607) 729-9248
Lono Island Citv -11101
49-13 Northern ”Boulevard
(212) 626-9600
(Nassau-Suffolk County)
Melville -11746
336 South Service Road
(516) 694-8600
(Orange County Area)
Newburgh -12550
1135 Union Avenue
(914) 564-2000
Rochester -14622
1900 Ridge Road East
(716) 544-7100
Syracuse -13204
965 West Genesee Stregt
(315) 471-9121
FdORTfi CAROLINA
Charlotte -28234
700 Tuckaseogee Road
P.0,
(704) 372-8810
Greensboro -27406
2918 Baltic Avenue
(919) 272-7153
Raleigh -27611
3300 Bush Avenue
P.0,
(919) 876-5603
OHIO
Akron -44319
2262 S, Arlinaton Road
(216) 773-03~1
the WhitePagesunder“HOTPOlhlT FAGTORY SERVICE”,
NEBRASKA
Lincoln -68503
1145 North 47th St,
(402) 464-9148
Omaha -68117
6636 “F” Street
(402) 331-4045
NEVADA
Las Vegas -89109
3347 S. Highland Dr,
Suite 1 (702) 733-1500Aslzow
Reno -89511
Del Monte Shopping Ctr.
6465 S. Virginia Street
[702) 826-7070
NEW JERSEY
Mount Hollv -08060
Route 38 &-Easlick Ave.
(609) 261-3500
North Caldwell -07006
5 Fairfield Road
(201) 256-8850
(Asbury Park)
Oakhurst -07712
2111 Highway 35
(201) 493-2100
Vineland -08360
749 North Deisea Drive
(609) 696-1506
NEW MEXICO
Albuquerque -87107
3334 Princeton Dr., N.E.
(505) 884-1861
fiEW YORK
Albany -12205
2 Interstate Avenue
(518) 438-3571
Brooklyn -11234
5402 Avenue “N”
(212) 253-8181
Buffalo -14225
(716) 666-2268
(Westchester Co. Area)
Elmsford -10523
Fairview !ndustrial Pk,
Box 34396
BOX 28107
Cincinnati -45242
10001 Alliance Road
(513) 745-5500
Cleveland -44142
20600 Sheldon Road
(216) 362-4200
Columbus -43212
1155 West Fifth Avenue
(614) 294-2561
Dayton -45414
5701 Webster Street
(513) 898-7600
Toledo -43611
3300 Summit Street
(419) 729-1651
C)KLAHQMA
Oklahoma City -73118
3228 North Santa Fe
(405) 528-2381
Tulsa -74112
6913 East 13th
(918) 835-9526
OREGON
(Portland Area)
Beaverton -97005
14305 S.W. Millikan Way
(503) 646-1175
Eugene -97402
1492 West Sixth Street
(503) 342-7285
PENNSYLVANIA
(Brandywine-Wilm ington)
Glen Mills -19342
R.D. #2, Box 210
(215) 358-1500
Johnstown -15905
214 Westwood Shopping P1.
(814) 255-6721
(Harrisburg)
Lemoyne -17043
1059 Columbus Avenue
(717) 761-8185
Monroeville -151.46
150 Seco Road
Monroevillo Industrial Park
(412) 665-3700
Philadelphia -19115
9900 Global Road
(215) 698-3270
(Allentown)
Whitehall -18052
1906 MacArthur Road
(215) 437-9671
RHODE ISLAND
East Providence -02914
1015 Waterman Avenue
(401) 438-0300
SOUTH CAROLINA
Columbia. 29602
825 Bluff Road
Box 1210
(803) 771-7880
(Greenville)
Taylor’s -29687
25 Hampton Village
(803) 292-0830
TENNESSEE
Chattanooga -37403
613 East 1lth Street
(615) 265-8598
Johnson City -37601
2912 Bristol Highway
(615) 282-4545
Knoxville -37919
3250 Mynatt Street, N,W,
(615) 524-7571
Memphis -38118
3770 South Perkins
(901) 363-1141
Nashville -37204
3607 Trousdale
(615) 834-2150
TEXAS
Austin -76704
2810 S. First Street
(512) 442-7893
Corpus Christi -78415
3225 Ayers Street
(512) 884-4897
Dallas -75247
8949 Diplomacy Row
P.O.
BOX 47601
(214) 631-1380
El Paso -79925
7600 Boeing Drive
(915) 778-5361
(Brownsville)
Harlingen -78550
1204 North Seventh
(512) 423-1204
Houston -77207
P.O.
BOX 26837
6126 South Loop East
(713) 641-0311
Lubbock -79490
4623 Loop 28~ West
P.0,
BOX 16288
(808) 793-1620
(Odessa)
Midland -79701
P.O.
Box 6286
Midland Terminal
(915) 563-3483
San Antonio -78216
7822 Jones-Maltsberger
(512) 227-7531
UTAH
Salt Lake City -84125
2425 South 900 West
P,O. Box 30904
(601) 974-4600
VIRGINIA
Fairfax -22031
2810 Dorr Avenue
(703) 280-2020
Norfolk -23502
4552 E. Princess Anne Dr.
(804) 857-5937
Richmond -23228
2910 Hungary Spring Rd. —
(804) 288-6221
WASHINGTON
(Tri-City)
Kennewick -99336
Union Square
Suite 206
101 North Union Street
(509) 783-7493
Seattle -98188
401 Tukwila Parkway
(206) 575-2711
Spokane -99206
9624 E.Montgomery St,
(509) 926-9562
WEST VIRGINIA
(Charleston)
Huntington -25704
1217 Adams Avenue
P,O.
BOX 7518
(304) 529-3307
Wheeling -26003
137 North River Road
(304) 283-8511
WISCONSIN
AppleIon -54911
343 W. Wisconsin Ave.
(414) 731-9514
Madison -53704
(60ft) 241-9321
Milwaukee -53225
11’100W. Silver Spring Rd.
(414) 462-9225
—
28
Page 29

————__..—_—.-.———.
IFULL
(hwhdes Choking Centersand Mkmwave Ovens)
FROM HOTFNliNT TO YOU - This warranty is extended by Hotpoint to the original purchaser and
to any succeeding owner and applies to products purchased in the United States, retained within
;_wem4~;~\ntiguousstates, the state of Hawaii or the District of Columbia, and employed in ordinary
WHAT WE WILL DO - [f your Hotpoint Microwave Range fails because of a manufacturing defect
within one year from the date ef original purchase, we will repair the product without charge to
you. Parts and service labor are included. Service will be provided in the home in the 40 contiguous states, the state of Hawaii or in the District of Columbia.
HOW TO OBTAIN SERVICE - Service will be prcvided by our local Customer Care” factory service organization or by one of our franchised Customer Care servicers during normal business
hours after you notify us of the need for service, Service can be arranged by telephone.
Look for “HOTPOINT FACTORY SERVICE” in the White Pages of your telephone directory or
“HOTPOINT CUSTOMER CARE@SERVICE” in the Yellow Pages or write to the address given
below.
WHATISNOTCOVERED - This warranty does not cover the failure of your Microwave Range if it
is damaged while in your possession, used for commercial purposes, or if the failure is caused by
unreasonable use including failure to provide reasonable and necessary maintenance. IN NO
EVENT SHALL HOTPOINT BE LIABLE FOR CONSEQUENTIAL IDAMAGES.This warranty does
not apply to the state of Alaska nor to the Virgin Islands, Guam, American Samoa, the Canal Zone
or the Commonwealth of Puerto Rico.
Some states do not allow the exclusion or limitation of incidental or consequential damages, so
the above limitation or exclusion may not apply to you. This warranty gives you specific legal
rights, and you may also have other rights which varyfrom state to state.
ADDITIONAL LIMITED FOUR-YEAR.
MAGNETRON TUBE WARRANTY
The magnetron tube is covered in the above full warranty, In addition to that warranty, if the
magnetron tUbefails becauseof amanufacturing defect within the second through the fifth yearfrom
date of the original purchase, we will furnish without charge, a replacement magnetron tube. You
must pay the service labor charge for the home call, diagnostic work, and removal, and reinstallation
of the new magnetron tube.
All other provisions of this additional limited warranty are the same as stated in the full warranty
above.
LIMITED WARRANTY
Applicable {othe State of Alaska
in the state of Alaska free service including parts will be provided to correct manufacturing defects at our nearest service shop location or in your home, but we do not cover the cost of transportation of the product to the shop or for the travel cost of a technician to your home. You are
responsible for those costs. All other provisions of this limited warranty are the same as those
stated in the full and limited warranties above.
WHERE TO GET FURTHER HELP - If you wish further help or information concerning this war-
rantv, contact:
-.
Manager—Consumer Affairs
General Electric Company
Appliance Park, WCE—Room 316
Louisville, Kentucky 40225
WARRANTOR–
General Electric Company
Appliance Park
Louisville, Ky. 40225
 Loading...