

Page 1
Page 2

B UsingYourMicrowave Oven
01981General Electric Co., U.S.A.All rights reserved.
ReadThis Useand Care Bock
Takethetimetoreadthisbookandlearnhowto enjoy
your new MicrowaveOven.Itcontainsdetailedoperatinginstructionsandrecommendedmaintenance,as
wellashandytipstohelpyougainmaximumbenefits
from your MicrowaveOven.Onceyou havereadthe
book,keepit handytoansweranyquestionsyoumay
have.
If you haveany additionalquestionsconcerningthe
‘operationof your MicrowaveOven,write—including
your phonenumber—to:
ConsumerAffairs
Hotpoint
AppliancePark
Louisville,Kentucky40225
IFYOURECEIVEDADAMAGEDOVEN,immediately
contactthe dealer (or builder)from whom you purchased it. They havebeen informed of the proper
procedure to take care of such matters and can
handleit for you.
RegisterYour Oven
R isimportant that we,the manufacturer,know the
locationofyour MicrowaveOvenshouldaneedoccur
for adjustments.
Pleasecheck with your supplier to be sure he has
registeredyou as the owner;alsosend in your PurchaseRecordCard.If you move,or if you arenotthe
original purchaserpleasewrite to us, stating model
and serial numbers.This appliancemustbe regis-
tered.Pieasebecertainthatitis.
Writeto:
Hotpoint
RangeProductService
AP2-21O
AppliancePark
Louisville,Kentucky40225
RecordModelandSerialNumbers
A nameplateon whichisstampedthemodelandserial
numberislocatedeitherinsideovenattop leftside,or
on rearoutsideof case.
Model and serial numbersare also on the Purchase
RecordCardwhich camewith your MicrowaveOven.
Recordthe numbersin thespacesbelow,
Pleasereferto both modelandserialnumbersin any
future correspondenceor product servicecalls concerningyour MicrowaveOven,
ModelNumber
SerialNumber _
IHe f%rdwwd
KEEPPURCHASE RECEIPT–WITHTHIS f300K TO
ESTABLH3HTHEWARRANTYPERIOD.
—.
BeforeYouCdl for!ikrwice
Check“Common Problems”section.(Seepage15.)
It lists many minor causes of operating problems
that you can correct yourself and may saveyou an
unnecessaryservicecall.
If YouNeedService
In many cities, there’s a Hotpoint Factory Service
Center.Call,andaradio-dispatchedtruckwill cometo
your home by appointment—morningor afternoon.
Chargethe work, if you like. All the centersaccept
bothMasterChargeandVisacards.(Seepagel 6.)
Or look for Hotpoint franchised Customer Care@
servicers. You’ll find them in the Yellow Pages
under“HOTPOINTCUSTOMERCARE@SERVICE.”
or“GENERALELECTRIC—HOTPOINTCUSTOMER
CARE@SERVICE”.
If you need serviceliterature,parts!ist$,partsor
accessories,contactoneof the FactoryServiceCen-
ters,a franchisedCustomerCare@serviceror your
Hotpointdealer.
ExtendedSerwiceContractsThe termsof your warranty provide free service covering failures due to
manufacturingdefectsfor adefiniteperiodof time.
After this warranty expires you may purchase an
ExtendedServiceContractwhich will enableyou to
budget
warrantyisavailablefromour FactoryServiceCenters
andfrom manyfranchisedCustomerCare@servicers.
Itisagood ideato applyfor thiscoveragebeforeyour
warrantyexpires.
your serviceneeds.This coverage beyond
Stepsto Followfor FurtherIHelp
First,-contact the people who servicedyour m~crowaveoven.Explainwhy you aredissatisfied.In most
cases,this will solvethe problem.
Next,if you arestill dissatisfied,write all thedetails—
includingy?ur phonenumber—to:
Manager,ConsumerRelations
Hotpoint
WCE-312
AppliancePark
Louisville,Kentucky40225
Finally,if your problemisstillnot resolved,write:
MajorApplianceConsumerActionPanel
20NorthWackerDrive
“Chicago,Illinois60606
This panel, known as MACAP,is a group of inde-
pendentconsumerexpertsunderthe sponsorshipof
severalindustry associations.Itspurposeisto study
practicesand advisethe industryof waysto improve
customerservice.BecauseMACAPis freeof industry
control and influence, it is able to make impartial
recommendations,consideringeachcaseindividually.
2
Page 3

w—
e
TableofContents
E&z*:&?$>yag*-”~
~~-.~a.=+ ._& ..
Before Microwaving
Grounding Instructions & Precautions . ..3
Safety Tips
..........................* ..........
Introduction to Oven
Control Panel–RE946 .......................6
Control Panel–RE947 .......................7
Setthe Clock ..................................7
Automatic Roasting & Chart
. .........................
.........................
—
(RE947only)..8,9
GroundingIlnstrwticms
‘+** -’
2
Time Cook
Defrost
4
5
Quick Set
Temp Cook ................r ........l .. .....c..12
Field/Timer
................................+...
..........................*... ...........
(RE9470n1y),. .. . . . . . . . .. . . . . . . . . . ..ll
....................................
Care of Your Oven
“ ~’..*3i~a~*@vy
,,. .....?. .................
10
11
13
14
Problems and Solutions ...........t .....~..l5
Factory Service Centers ....................l6
Warranty
,,.0,..... ...”...... .......
Back Cover
PREFERREOMETHOD
+.
*
.
Qq
e
IigFn
Figure1
ForPersonalSafety,ThisApplianceMustBe Prop-
erlyGrounded.Th6 powercord of this applianceis
— _ equipped with a three-prong (grounding) plug
—“
e
which mateswith a standard three-prong (ground-
ing) wall receptacle (Fig. 1) to minimizethe possibi!ity of electric shock hazard from this appliance.
The customer should havethe wall receptacle and
circuit checked by a qualified electrician to make
surethe receptacleis properlygrounded.
Where a standard two-prong wall receptacle is encountered, it is the personalresponsibilityandobligation of the customer to have it replaced with a
properlygroundedthree-prongwall receptacle.
Da Not UnderAny CircumstancesCut or Remove
TheThird(Ground)ProngFromThe PowerCord.
A. Usage Situations Where Appliance’s Power
CordWillBeDisconnectedInfrequently.
Because of potential safety hazards under certain
conditions, we strongly reqommendagainstthe use
of an adapter plug. However,if you still electto use
an adapter, where local codes permit, a TEMPO-
\
INSURfPRDPfRGROUND
IxISTSWORfUsf
TEMPORARYMETHOD
(AOWfRPLUGSNOT
IVRMITTEDINCANADA)
“w ‘Gf ‘Gs’QOTs 4 ,
an
@./
Figure2$’~&~JwN[cT’O”
INSUREPRDftRGRDUNO
z)
a‘“
.
RARY CONNECTIONmay be made to a properly
groundedtwo-prong wall receptacleby the useof a
UL listed adapter which is available at most local
hardware stores (Fig. 2). The larger slot in the
adapter must be aligned with the larger slot in the
wall receptacle to provide proper polarity in the
connectionof the powercord.
Caution:Attaching the adapter ground terminal to
the wail receptacle cover screw does not ground
the appliance unlessthe cover screw is metal,and
not insulated, and the wall receptacle is grounded
through the house wiring. The customer should
havethe circuit checkedbyaqualifiedelectricianto
makesurethe receptacleisproperlygrounded.
When disconnecting the power cord from the
adapter,always hold the adapter with one hand. If
this is not done,the adapterground terminalis very
likely to break with repeated use. Should this happen, DO NOT USE the appliance until a proper
ground hasagainbeenestablished.
B,Usage Situations Where Appllance’s Power
CordWillBeDisconnectedFrequently.
Do not use an adapter plug in these situations be-
causedisconnecting of the power cord places undue strainon the adapterandleadsto eventualfail-
ure of the adapter ground terminal. The customer
should havethe two-prong wall receptaclereplaced
with a three-prong (grounding) receptacle by a
qualifiedelectrician beforeusingthe appliance.
—
—“
W&w
-
-
3
Page 4
--
—
—
-—
y
.
into !1sown electrical outlet, to preventflickering of ~
lights,Mowing offuse ortripping of circuit breaker.
2. !&@of extension cords. Because of potential
safetyhazardsundercertainconditions westrongly
mcwr?mendagainst the use of an extension cord.
However,if you still electto useanextension cord,
it isabsolutelynecessarythatit bea LJLlisted3-wire
grounding type appliance extension card and that
the current carrying rating of the cord in amperes
he 15amperesor greater.Suchextension cords are
obtainable through Hotpoint service.If youdo use
an
extension cml with your micro-waveoven, the
interior light may flicker and the blower sound may
vary when ovenis in use.
3. Be certain to place the front surface of the door
three inches or more back from the cotintertop
edge to avoid accidental
normal usage.
4. Use metal ordy as dhwcted in cookbook.
tipping ofthe appliance in
Metal
strips asused on meatroasts are helpful in cooking
food when used as directed. Metal trays may be’
used for TV dinners. However,when using metal in
the microwave oven, keep
away from sides d microwave oven.
metal at least Wnch
5. Do not operate the oven while empty ‘to avoi~
damage to the oven and the danger of fire.
if by a&
cident the oven should run empty a minute or two,
no harm is done. However, try to avoid operating
the oven empty at all times–it saves energy and
prolongs life of the oven.
6.
Cooking utensils may become hot because of
heattransferred from the heatedfood. This is especially true if plastic wrap has been covering the top
and handles of the utensil. Pot holders may be
neededto handlethe utensil.
7.
Sometimes, the oven shelf can become too hot
!Okmch. Be
aftercooking,
8. Do
not use any thermometerin food you are
microwaving unless that thermometer is designed
or recommendedfor useinthe microwaveoven.
9. Fh2rmveha
when not us!ng R to cook
probe insidethe ovenwithout inserting it in food or
liquid, and turn on microwaveenergy, it can create
electrica! arcing in the oven, and damage oven
Waf!s.
10. R@move
bags before placing in oven. Twist-ties sometimes
catise bagto heat,andmaycausefire,
?1.Dcm’tdefrost
Imtlk%especiallycai’bormteclones, Evenif the con?aineris opened, pressure can build up, This can
ca:~sfithe
12. EMm+’?Cwef’eww. E%4x3ssh@QvefcoQking dehy52’s%%$MIRMCM?%Yand may CZwe$ethem M UMW-Ifife
:;=~<j:;;~,
‘ g !%3mage.
careful touching the shelf during and
&mperatwe probe from the oven
with. If you ieave the
wire twist-ties cm paper and plastic
frozen beverages in narrow necked
container to burst, resulting in injury,
powerat thefusecircuit breakerpar@.
14,Boiling eggs @ andoutof shell) is not u3X3rnrnendec!
for microwavecooking. Pressurecan build
up insideegg yolk and maycauseit to burst, resultingininjury.
15. Foods
with unbroken outer “skin” such as po-
tatoes, hot dogs or sausages, tomatoes, apples,
chicken livers and other giblets, and eggs (see
above)should be pierced to allowsteamto escape
duringcooking.
16.’’E3oUab!e”
plastic bags
cooking pouches and tightly dosed
should beslit, prickedor vented as directed in Cookbook. If they are not, plastic could
burst during or immediatelyafter cooking,:possibly
resulting in injury. Also, plastic storage containers
shouldbeat leastpartially uncoveredbecausethey
form a tight seal. When cooking with containers
tightly covered with plastic wrap, removecovering
carefully and direct steam away from hands and
face.
174 Do not pop popcorn in your microwave oven
unless in a special microwave popcorn accessory
or unlessyou usepopcorn labeledfor usein microwaveovens.Becauseof the heatgeneratedwithout
theseprecautions,the containercouldcatch fire.
18. PiasticUtensils–Plastic utensils designed for
microwavecooking are very useful, but should be
used carefully.Evenmicrowave plastic maynot be
as tolerant of overcooking conditions as are glass
or ceramic materialsand maysoften or char if subjectedto short periodsof overcooking.Inlongerexposures to overcooking, the food and utensils
could ignite. For these reasons:1) Use microwave
plastics only “and use them” in strict compliance
with the utensil manufacturer’s recommendations.
2) Do not subjectempty utensilsto microwaving.3)
Do not permit children to use plastic
uten$iis with-
outcompletesupervision.
19. Do
not use your microwave oven to dry rBews-
papers.Ifoverheated,they cancatch fire.
20. Use
of Shelf Accessory. To position shelf so
that it issecurely “seated,” insert into theovencavity aboveshelf supports andcompletelyto the back
oven wall. Drop into place so that the recessed
areasare over the shelf supports.To removeshelf,
!ift shelf above supports and then pull forward and
out. Do not place food cmshe{funlessit issecurely
“seated” on thesupports.
Donot p!aceBrown ‘N SearDishonshelf,Shelf will
bedamaged.
2,1,Whenccd+dngpark either conventionally or in
the microwave oven, foilow our directions
and always cook
the meat to at least 170°, This
exactly
assuresthat, in the ixwrmtepossibility that trichina
may be present in tho meat, it will be killed and
meatwill be saf8b eat,
.
4
Page 5
Introductionto
—
YourMicrowaveOven
e~
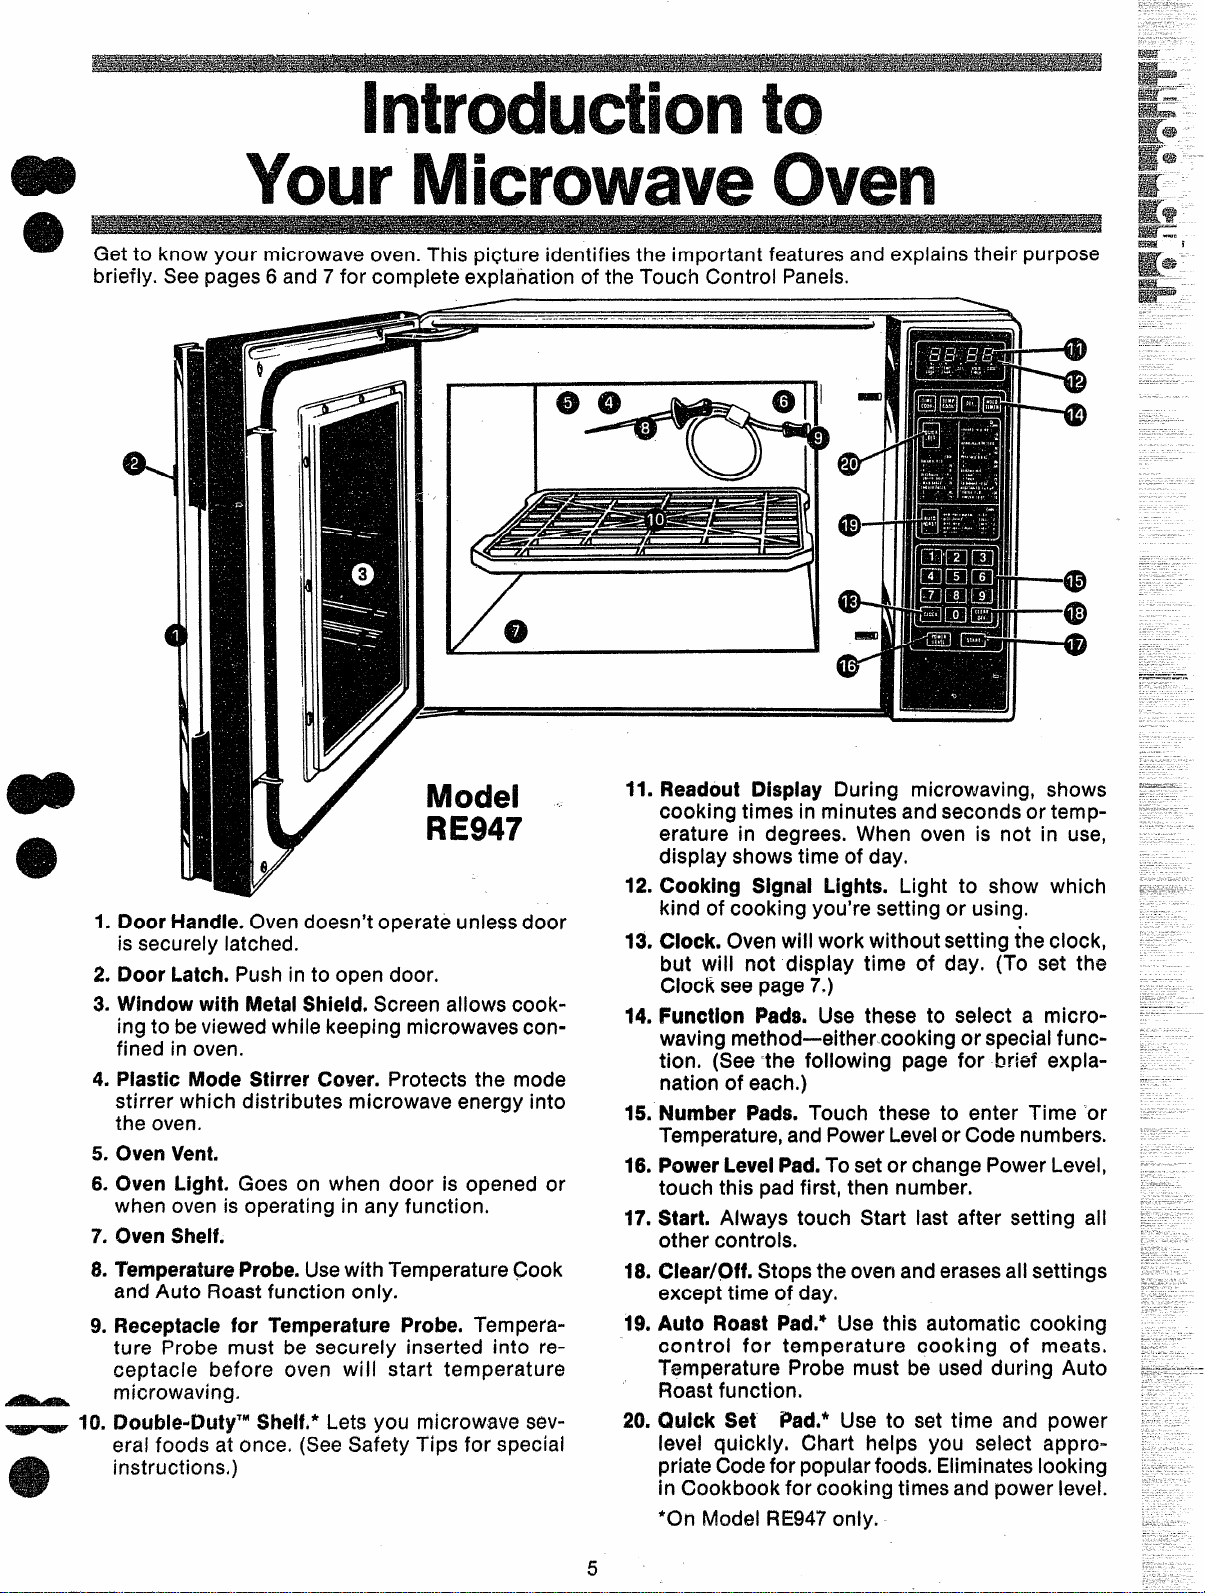
Getto know your microwaveoven.This piqture identifiesthe important featuresand explainstheir purpose
briefly. Seepages6 and7for complete explanation of the Touch Control Panels.
stirrer which distributes microwave energy into
the oven.
when oven is operating in any function.
OvenShelf.
I’”emperatureProbe.Usewith Temperature~ook
andAuto Roastfunction only.
Receptaclefor TemperatureProbe. Tempera-
ture Probe must be securely inserted into receptacle before oven will start temperature
microwaving.
KWuble-f3uty’MShelf.*Lets you microwave several foods at once. (SeeSafety Tips for special
instructions,
/;---
9
Model
RE947
Y’
Door Handle.Ovendoesn’t operate unlessdoor
is securely latched.
Door Latch. Pushinto open door.
WindowwithMetalShield.Screenallows cook-
ingto beviewedwhile keeping microwavesconfined inoven.
PlasticMode StirrerCover. Protects the mode
OvenVent.
Oven Light. Goes on when door is opened or
11.
Readout Display During microwaving, shows
cooking times in minutes and secondsor temperature in degrees. When oven is not in use,
display shows time of day.
12.
Cooking Signal Lights. Light to show which
kind of cooking you’re setting or using.
13.
Clock.Ovenwill work without setting ~heclock,
but wiii not display time of day. (To set the
Clock seepage7.)
Function Pads. Use these to select a micro-
14.
waving method—eithercooking or specialfunction. (See‘the foilowing page for brief explanation of each.)
Number Pads. Touch these to enter Time ‘or
15.
Temperature,andPowerLevelorCode numbers.
PowerLevelPad,Tosetor change PowerLevel,
16.
touch this padfirst, then number.
Start. Always touch Start last after setting all
17,
other controls.
18,
Clear/Off.Stopsthe ovenanderasesall settings
excepttime of day.
Auto Roast Pad.* Use this automatic cooking
19.
control for temperature cooking of meats.
Temperature Probe must be used during Auto
Roastfunction.
Quick Set Pad.* Use to set time and power
20.
level quickly. Chart helps you select appropriateCodefor popularfoods.Eliminateslooking
in Cookbook for cooking timesand power level.
‘On Model RE947only.
5
Page 6
FeaturesofYour
—-–-”’+R
.-—-----...-.-.-————.—.—.—.=....—-.—-=.—........
.—.....—.
...
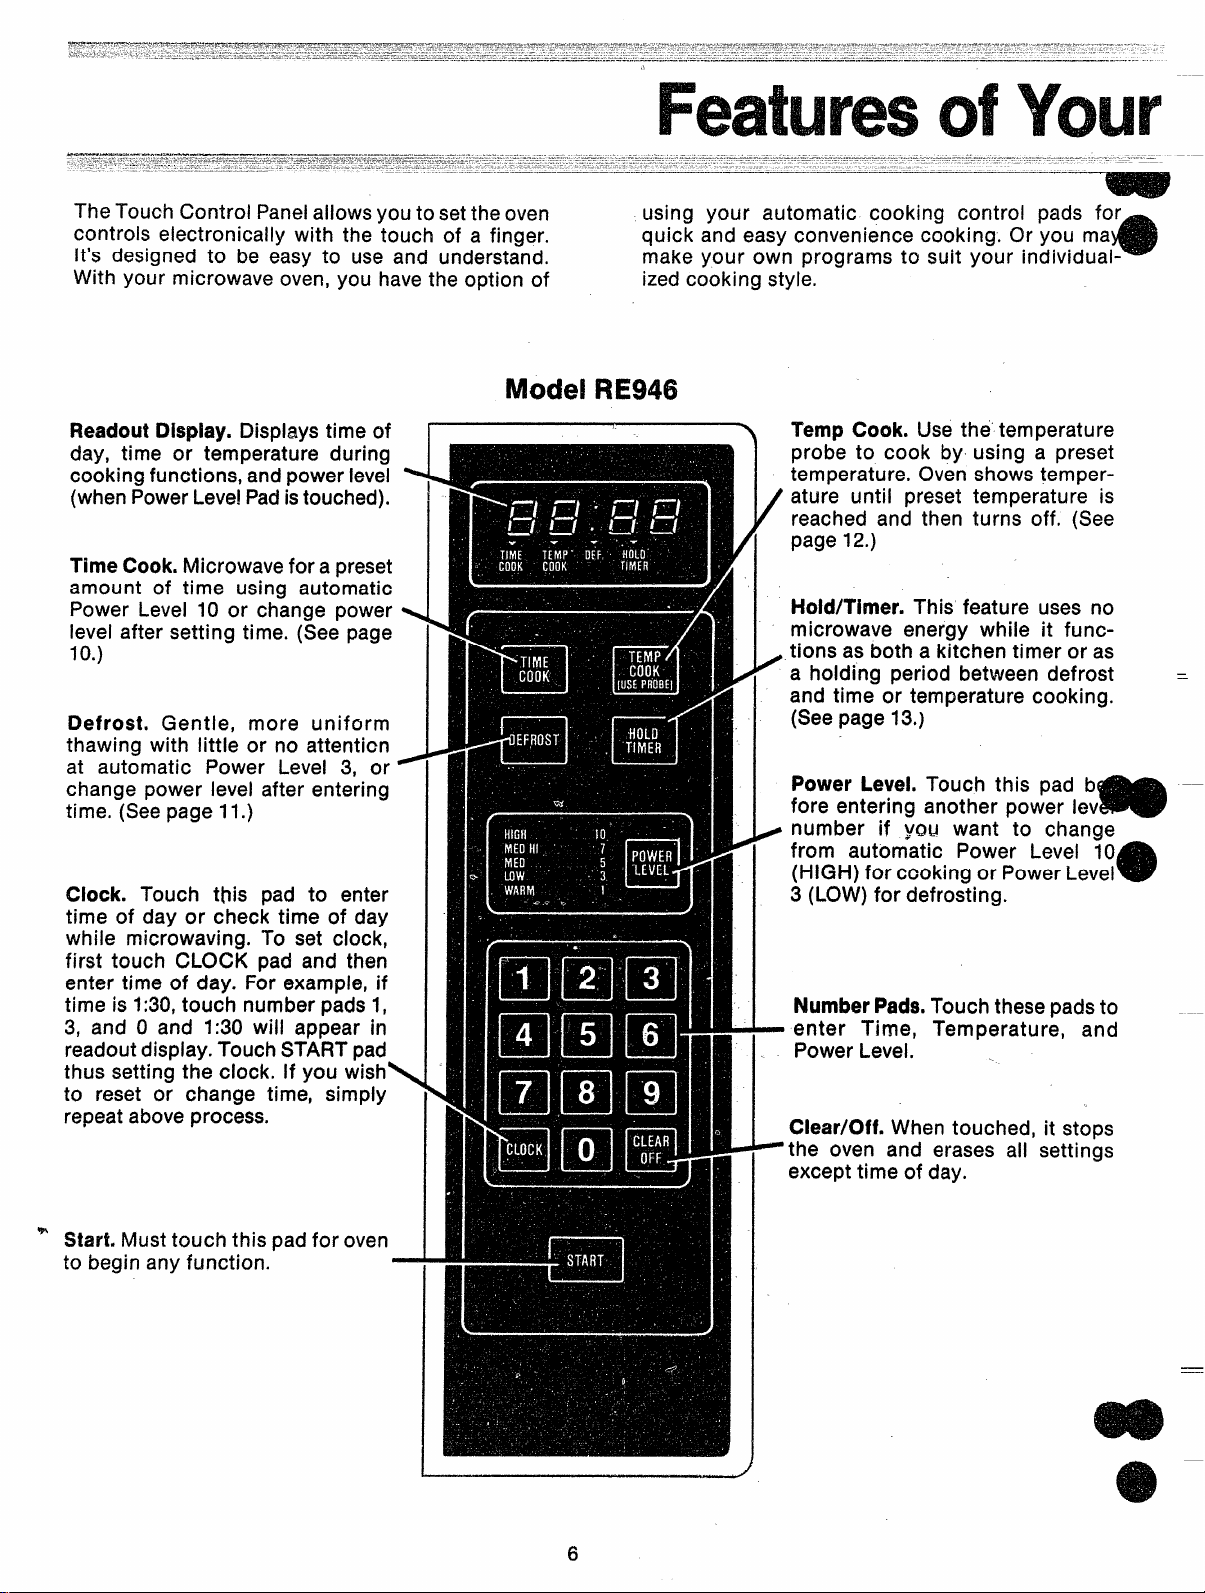
TheTouchControl Panelallows you to setthe oven
controls electronically with the touch of a finger. quick and easy convenience cooking. Or you ma
it’s designed to be easy to use and understand.
With your microwave oven,you havethe option of
.-.—...-.—-.-..
--
....
.———
-——-...—-........
--
—.
-.
.—
.—
....-.-—
...-
.-
-.
--—-
fwkxidFIE946
.. .—
—r-—:— ‘- __—_.._-.. _.
—
using your automatic cooking control pads for
make your own programs to suit your individual-
izedcooking style.
.-.-
—
—
—
-.
e
ReadoutDisplay.Displaystime of
day, time or temperature during
cookingfunctions,andpower level
(whenPowerLeve!Padistouched).
TimeCook.Microwavefor apreset
amount of time using automatic
Power Level 10 or change power
level after setting time. (See page
lo.)
Defrost. Gentle, more uniform
thawing with little or no attenticn
at automatic Power Level 3, or
change power level after entering
time. (Seepage 11.)
Clock. Touch this pad to enter
time of day or check time of day
while microwaving. To set clock,
first touch CLOCK pad and then
enter time of day. For example,if
time is 1:30,touch number pads 1,
3, and Oand 1:30 will appear in
readoutdisplay.TouchSTARTpad
thus setting the clock. If you wish<
to reset or change time, simply
repeataboveprocess.
Temp Cook. Use the temperature
probe to cook by using a preset
temperature. Ovenshows temperature until preset temperature is
reached and then turns off. (See
page12.)
Hold/Timer.This feature uses no
microwave energy whi[e it functions as both a kitchen timer or as
a holding period between defrost =
and time or temperature cooking.
(Seepage13.)
Power Level.Touch this pad b
fore entering another power Iev
number if ycm want to change
from automatic Power Level 10
(HIGH) for ccoking or PowerLevel
3 (LOW)for defrosting.
NumberPads.Touch thesepadsto
- enter Time, Temperature, and
PowerLevel. .
Clear/Off.When touched, it stops
L
the oven and erases all settings
excepttime of day.
I
m
—
a
‘“ Start. Musttouch this padfor oven
to begin any function.
-
*“
6
Page 7

[-ouchcontrolPanels
Model FW47
ReadoutOispiay.Displaystime of
day, time or temperature during
cookingfunctions, and powerlevel
(whenPowerLevelPadistouched).
TimeCook.Microwavefor apreset
amount of time using automatic
Power Level 10 or change power
levelafter setting time. (Seepage
!0.)
Quick Set .
short-cut method for”entering
eking time, and power level.
e page11.)
*
uto Roast. Insert Probe, touch
his pad, and desired number pad
for Codeto temperaturecook meat
with automatic preset program.
Ciock. Touch this pad to enter
time of day or check time of day
while microwaving. To set clock,
first t~uch
enter time of day. For example, if
time is 1:30,touch number pads1,
3, and O and 1:30 will appear in
readoutdisplay.Touch STARTpad
thus setting the clock. If you wish
to reset or change time, simply
repeatabove process.
Use this pad as a
CLOCK pad and then
Defrost. Gentle, more uniform
thawing with little or no attention
at automatic Power Level 3, or
change power level after entering
/
time. (Seepage 11.)
Hoid/Timer.This feature uses no
microwave energy while it func-
_ tions as both a kitchen timer or ae
a holding period between defrost
and time or temperature cooking.
(Seepage 13.)
Temp Cook,
probe to cook by using a preset
\ temperature. Ovenshows temper-
ature until preset temperature is
reached and then turns off. (See
page12.)
NumberPads.Touch thesepadsto
enter Time, Temperature, Power
Level, Quick Set digits or Auto
/
RoastCode.
Ciear/Off.When touched, it stops
the oven and erases all settings
0’
excepttime of day,
Start.Musttouch this padfor oven
= to
begin any functiOn.
Use the temperature
Power Level. Touch this pad before entering another power level
number if you want to change
from automatic Power Level 10
(HIGH}for cooking or PowerLevel
0~) for defro~ing.
a
7
Page 8

AutomaticRoasting”
Auto Roast usesthe temperatureprobe to cook to
thedesired servingtemperature.UnlikeTempCook,
which uses a single power level, Auto Roast uses
up to 3 power settings which automatically switch
during roasting,thus providingeventender cooking
resultswithout overcooking.
IIPreparingRoastsforAutoRoasting
Placetender beef roasts on trivet
in microwave safe dish. Insert
probe from front horizontally into
csnter meaty area not touching
boneor fat.Coverwith waxpaper.
Poultry, pork or ham roasts need
no trivet. Add %cupwater to roast
dish, cover with plastic wrap. (For
cooking bag method, see cookbook.) Insert probe into center
meatyarea.
Justasin conventional roasting,only tender roasts
shouldbeAuto Roasteduntilspecifiedinternalternperatures are reached. Less tender roasts should o
bemicrowavedby time,accordingto the Cookbook
which comeswith youroven. Completeinformation
on preparing roasts for microwaving is in your
Cookbook.
Placemeatwith probe in oven. In- sert cable end of probe firmly into
receptacleon ovenwall.
l-lowtoAutoRoastBeefto Medium
Touch AUTO ROAST Pad. Cooking signal light
over Code flashes. Touch number pad 3. Touch
START.
Oven monitors internal temperature, automatically
switching to lower power as meat’s temperature
rises.This prevents toughening or’overcooking,
Light over Code shows on display. Readout displays internal food temperature.
After temperature is reached,ovensignals andthen
shuts off.
“
on Model RE947only.
@
8
Page 9

AutoRoastChart
.
.
Usecontainers andcoverings asdirectedatleft, Placeprobecorrectly in roastbeforecooking.
Turnoverwhen 80° (exceptpork) hasbeenreached,
a
Beef
TenderRoast
Rare
Medium
Well
Meatloaf
(loaf or round)
Pork
Loin Roast 4
PrecookedHam 1
Poultry
WholeChicken
(31b.)
WholeTurkey
(lip to 12tbs.)
(Insertprobe into meatiestareaof ,innerthigh from below endand parallel to leg.)
Turkey Breast 4
m
e
sert probe horizontally into meatiestarea.)
*Recommendedstanding time beforeserving.
2
3
4
4
.
5 80° 190°
5
80° 125°
80”
80° 170°
No Turn
Over
120°
80° 115°
80° 190°
80° , 170°
140° 14-16 70-15
170° 30-40
170° 18-20
12-14
17-18
17-19
13-15
13-15
13-15
5-1o
30
5-1o
20
5-1o
20
20
20
Questions
andAnswers
Q. Are there any particular trivets
that work better than others?
A. Yes, flat glass trivets such as
lids or dish covers give more even
cooking resultsthan plastictrivets.
Also,ceramicridge-bottomedroast-
ingdisheswork well. Plastictrivets
require meat to be turned over
more frequently because the grid
design and iegs allow the bottom
of the meat to stay cooler as it
cooks,than glasstrivets do.
Q. Is it necessaryto always cover
foods during Auto Roast?
A. No, but a loose covering helps
prevent spattering and hold moisture in food.
Q. Why was my roast not fully
cooked eventhough the temperature on the readout was correct
and Auto Roastc~mpleted?
A. Whencooking with Auto Roast,
the temperature probe must be
insertedproperly asfully described
inthe Cookbook,Afterturning meat
over or rotating, the probe should
be checked to makesure it hasn’t
slipped or changed position,
9
Q. Last time I used Auto Roast
I removed the roast from the oven
to turn it over. When I replaced
roast in ovenand reconnected the
meat probe, a lower temperature
appeared.Why?
A. The oven and roast may have
cooled to below the temperature
when you removed it, or probe
may havebeen repositioned. Continue roasting and numbers will
soon count upwardagain.
Page 10

HowtoTimeCook
-—
Time Cooking, or cooking your food according to a predetermined amount of time, is probably familiar to you from
conventional cooking. With your microwaveoven, however,
youpresetthe timeand the oventurns off automatically.
UsingYourOvento Time Cook
e
Follow the cooking steps below to
help you learn to Time Cook
properly.
Step 1: Fill a cup 2/3 full of water
and ~ teaspoon of freeze dried
coffee.Useacup thathasno metal
decoration. Placecup in oven and
closedoor.
Step 2: Touch TIME COOK. The
display shows :0. Signal light
aboveTIME COOKflashes.Power
Level 10 is automatically set in
oven, but does not appear in
display.
Step 3: Select your time. Touch
1,2 and Ofor a minute and 20sec-
onds. 1:20 and signal light above
TIME COOK appearon display. If
another Power Level is desired
touch POWER LEVEL and the
number, although Power Level 10
(HIGH) is preferred for this
coffee. ‘
Step 4: Touch START. Time
counting down showson display.
cup of
Step 5:
sounds
shut off,
When time is up, oven
and oven, light, and fan
Microwaving‘Tips
Make sure all utensils used in
o
your microwave oven are labeled .
“suitable for microwaving”. Check
your Cookbook for specific test to
determine“microwave-safe” utensils.
.
Paper towels, wax paper, and
plastic wrap can be usedto cover
dishes in order to retain moisture
andpreventspattering.
. Most microwavedfoods require
stirring, rotating, or rearranging.
Check your Cookbook for specific
instructions for the food you are
microwaving,
6 Some foods such as unshelled
eggs and hot dogs must be
pricked to allow steam to escape
during cooking.
-
e
Questions
aridAnswers
Q. Iset my ovenfor the time called
for in the recipe but at the end of
the time allowed, my dish wasn’t
done. Whathappened?
A, Since house power varies due
to time or location, many Time
Cook recipesgive you atime range
to prevent overcooking. Set the
oven for minimum time, test the
food for doneness, and cook your
disha little longer, ifnecessary.
Q. I want to cook my dish on a
PowerLevelotherthanHIGH,what
do I needto do?
A. To change the Power Level,
touch the POWERLEVELpadafter
entering desired cooking time,
Enterthe desired number andthen
touch START.
Q. Can I interrupt my Time Cook
function to checkthefood?
A, Yes.To resumecooking, simply
close the door and touch START.
NOTE: Microwave power will not
come on until you are ready. You
must touch STARTfor cooking to
begin.
10
Q. I touched the numberpadsand
selected my power level. When I
touched START,however,myoven
didn’t come on.Why not?
A. The TIME COOK pad must be
touched beforesetting the number
pads or elseyour oven will not begincooking,
Q. I tried to change Power Level
but the display changed back to
cooking time.Why?
A. After touching PowerLeveipad
you only have 4 seconds to ente
the number. Try setting controls
again.
-
*
Page 11

QuickSet& DefrostControls
bookfor specific codes.
To understand the Quick Set control, it is impor-
tantto know whatthe numbersmeanand what the
sequenceis.The first and second numbers, if setting athree digit Code, indicatethe amount of time
you desire;the last control entry number isalways Step3:TouchSTART,SignallightaboveTIMECOOK
the Power Level. For example, 125means 12 min-
Howto ~eh$t
TheDefrostsetting is designedfor
eventhawing necessaryfor large
amounts cf food and is one of the
most important advantages of a
microwave oven, making defrost-
ingquick andeasywith little atten~n, PowerLevel3isautomatically
~~i for defrosting, but you may
changethisfor moreflexibility. See
your Cookbook for the complete
defrosting chart.
e
To become better acquainted with
your Defrost function, defrost frozen pork chops by foilowing the
stepsbelow.
Step 1: Place package of frozen
chops in the ovenand close door.
Step2: Touch DEFROST.Display
reads:0.PowerLevel3is automatically set in oven but does not
appear on readout. Signal Light
aboveDEF.flashes.
w YU*
LAr
Step3:Touch 8,0, andOfor 8min-
utes. 8:00 and signal light above
DEF. are displayed. If you wish to
change PowerLevel,touch Power
Levelpadandthen new number.
Step4:Touch START.Timecounts
down on display. When cycle is
completed, the oven signals and
automatically shutsoff,
Step 5: Turn package over, close
door and repeatSteps2,3 and 4.
mm
flashes.
!Nep 2: Enter the proper code into Quick Set con-
trot. For example, a recipe calling for 12 minutes
cooking time at Power Level10would be 120.120
appearson the display.
showsas well astime counting down on display.
Step 6: When oven signals and
shutsoff, removepackageandseparatechops to finish defrosting.
DefrostingTips
Foodsfrozen in paper or plastic
o
can be defrosted in the package.
@Forevendefrosting, manyfoods
needto be turned over, rotated,or
broken up part of the way through
thedefrostingtime.
e Pre-packaged frozen dinners
can be defrosted and microwave
cooked.
@Check your Cookbook for other
defrostingtips.
Questions
arid
Q.
dullthumping noise.Whatisit?
A.This soundis normal. it is letting
you know the oven is using a
PowerLevellowerthan HIGH.
Q.Can i Defrost small items in a
hurry?
A.Yes,but they will needmorefrequent attention than usual. Raise
the Power Levelafter entering the
~~ma by touching POWER LEVEL
~ ~ime
time to k. During either, rotate or
stirfood frequently.
e
Answers
When I press START,I hear a
.S7or 10+PowerLevel7 cuts the
in ?L’2;Power Level 10 MS the
Q.Can I open the door during DEFROSTto check on the progress
of myfood?
A. Yes.You may open the door at
any time during microwaving. To
resumedefrosting, close the door
andpressSTART.
Q.Why don’t the defrosting times
in the Cookbook seemright for my
food?
A. Cookbook times are average.
Defrostingtime canvaryaccording
to the temperaturein your freezer.
Set your oven for the time in-
dicated in your Cookbook. if your
food is still not completely thawed
at the end of that time, re-set your
oven and adjust the time accordingly.
11
Q, When I enter a fourth digit
using Quick Set control, nothing
happens.Whatwentwrong?
A.The oven will take only 2 or 3
numbers.If morearepressed,oven
doesnotrespond.Touch Clear/Off
and beginagain.
Q.CanIselecta PowerLevelother
than automatic Power Level 3 for
defrosting?
A. Yes.Somesmallerfoods maybe
defrosted quicker on higher Power
Levels but for even, carefree defrosting, Power Level 3
gested, Check the chart in the
Cookbook for specific times and
PowerLevels.
is sug-
Page 12

HowtoTempCook
For many foods, internal temperature is the best
testof doneness.
Roasts or poultry are cooked to perfection when
temperature cooking. Heating or reheating foods
accurately to a serving temperature you desire is
simpleand easy.
TEMP COOK takes the guesswork out of cooking
becausethe oven shuts off auto~atically when the
food is done.
~~~
‘Temperature Probe
The temperature probe is a food thermometerthat
gauges the internal temperature of your food; it
must be used when using TEMP COOK or AUTO
ROAST.To utilizeyour temperatureprobe properly,
follow the directions for use and insertion in this
book in the section entitled “Automatic Roasting”.
HANDLE
SENSOR
ciw
Howto ?’empCooka RolledBeefRibRoastto IVledium
Step 1: Insert temperature probe
as directed in Cookbook and attach probe securely in oven wall.
Closethe door.
Step 2: Touch TEMP COOK. The
readoutdisplayshowsOandsignal
light aboveTEMPCOOKflashes,
I .m*B
h
mmm
Step3: Touch 1, 3, 0 or 130°.130
shows on display. Power Level 10
is automatically set in oven but
does not appearon readout.
Step4:TouchPGWERLEVELpad.
Touch 5 for MEDIUM power.
shows
reverts back to set finished
temperature.
Step 5: Touch START. Display
shows temperature of food counting up.
Step6:When 130° is reached,the
oven will sound and automatically
shut off, Removeprobe and food
from the oven,
on displayand thendisplay
P-5
cookingTips
~ Where you have a choice of
PowerLevels, use a lower setting;
it will heat more evenly even
though requiring moretimet
o Be sure frozen food has been
completely defrosted before inserting probe.Probemay breakoff
ifusedin frozenfoods.
o Always insert probe into the
center of meaty areas; take care
notto touchthe fator the bone.
● Insert probe as horizontally as
possible into foods as directed in
the recipes. Makesure the handle
doesnottouchthe food.The probe
is easiest to use when inserted
from the front.
o Use the clip to keepthe probe in
placewhile heating.
o Cover foods as directed in
Cookbookfor moisturecontrol and
quick,even heating.
e
—
- ‘-
e
Questions
andAnswers
Q. Are there any foods I can’t
TEMPCOOK?
A. Yes.Delicate butter icings, ice
cream, frozen whipped toppings,
etc., soften rapidly at warm temperatures, Batters and doughs as
well as frozen
cult to cook precisely
probe. it is best to TIME COOK
thesefoods.
foods are alsodiffi-
with the
,
Q. After I followed the steps and
touched START,a signal sounded
and oven did not start. What is
wrong?
A. If you setthetemperatureeither
below 80° or greaterthan 199°the
oven will not start. To re-enter,
touch CLEAR/OFF pad and begin
stepsagain.
Q. Oven sounded and would not
start although 1entered the temperature correctly. What is wrong?
A. If you havenot securely seated
the end of the probe into the
receptacle in the oven wall, if you
touch TEMP COOK and haveforgotten to use the probe or if the
actual food temperature is higher
12
than set temperature, oven will
sound and notstart.
Q. Can I leave my probe in the
ovenif it%not insertedin thefood?
A. No. Ifthe probe is left insidethe
oven, touching the oven wall, and
not insertedin food, you maydamagethe oven.
Q. How do I know what temperature to set?
A. Your Cookbook contains sections on all types of foods showing
the temperatures needed to cook
the foods to different degrees of
doneness, For reheating, refer to _
Reheating Charts in the front
of the Cookbook for specific
temperatures,
m
e
Page 13

\
-———..
HowtoUsetheHold/Timer
Your HOLDITIMER, which oper-
ates without microwave energy,
has three timing functions.
e
it operates as a Minute Timer, it
canbesetto delay
be used as a hold setting after de-
frosting. Hold/Timer can be set
to99minutes.
Step1: Touch tiOLEVTIMERpad.
The display shows :0. Signal light
aboveHOLD/TIMERflashes.
Step 2: Select the amount of time
you desire.
number pads.If, for example,you
Touch the appropriate
cooking or may display shows the time as it counts
●
are timing a three minute phcme
call, touch 3,0, and0.Thedisplay
shows 3:00.
Step3:Touch START,Thereadout
down.
up
Step4: When time is up, a signal
soundsandthe timer turns off.
The HOLD/TIMER can also be
used to program “standing time”
betweenmicrowavecooking func-
tions.Thetimecan rangefrom one
secondto
ends, A HOLD, or “standing” time
maybefound in someof yourown
recipes or Cookbook.
To set the oven to delay cooking
up to 99 minutes follow Steps 1
and 2 to enter hold time, then set
Time Cook and time, or Temp
Cook and temperature desired
before pressing START. When
holding before temperature
cooking, be sure probe is in food
beforepressingSTART.
99 minutes and 99 sec-
Itlowto Defrost-HcWTime-Time Cook
To help you becomeacquainted with the HOLD/TIMER featureas usedwith Time Cook or Temp Cook follow
Steps below to defrostafrozencasserolefor 15minutes, then hold 10minutesandthen cook 25minutes.Ifusing
TempCook after Hold/Timer, besureto insertprobecorrectly asshown inTempCooksectionof this book,after
HOLDtime.
Step1:
freezer and place in oven.
the DEFROST pad. The readout
panel shows :0 and signal light
T
Step 2: Touch 1, 5, 0 and O for
defrosting time. 15:00appears on
display panel, (Defrosting is auto-
matically seton Power Level3 but
can be changed by touching
POWERLEVEL pad and the new
PowerLevel.)
Remove casserole from the
hovei3EF.
m~
flashes.
Touch
Step 3: Set standing or hold time
by touching HOLD/TIMER. :0 ap-
pearsondisplay.Signallight above
HOLD/TIMERflashes.
Step4:Touc!h1,0,0 and Oto hold
for ten minutes. 10:00appears on
..
display.
Step 5: Touch the TIME COOK
pad. This display shows :0 and
signal light above TIME COOK
flashes.
Step 6: Touch 2, 5, 0 and Ofor
twenty-five minutes of cooking
time. 25:00appearson display.
Step
7: Touch START. 15:00count-
ing down shows on display. As
eachfunction isautomatically performedovendisplayshowsentered
information and light above that
function comeson.Whilecooking,
you maytouch appropriate pad to
‘~ecalltimesyou set.
Questions
andAnswers
Q. What will happen if I acciden-
tallyreversethe irmtructicms?
A. if you accidentally reverse the
sequenceof programming instruc-
‘ens, your oven automatically
earranges your program. Defrost-
ing aiways comes first, then hold,
and then the cooking function.
m
—
Q. I programmed my oven for a
specific defrosting time but it defrosted longer than necessary.
Whathappened?
A. When instructions conflict, the
oven carries out the last instruction. Youmayhavesetthe oven to
Defrost for 4 minutes, Hold/Time
for 2 minutes,and then Defrostfor
6 minutes. {n this case, the oven
would Defrost for 6 minutes and
Hold/Time for 2 minutes,
13
Q. Can I Defrost-Holdonly on my
oven?
A. Yes,for foods you don’t want
to cook, like frozen fruit, frozen
whipped topping, etc.—refer to
Cookbook.
NOTE: Allow foods to remain at
room temperatureonly as long as
safe.Timeswill vary.
Page 14

CareforYourMi6rowaveOven
..—
Your New MicrowaveOven is a Valuable Appliance,
Protectit FromMisuse ByFollowingThese Rules:
@ Keep your oven clean and sweet-smelling.
Opening the oven door a few minutes after cooking
helps “air-out” the interior. An occasional thorough
wiping with a solution of baking soda and water
keeps the interior fresh.
e Don’t use sharp-edged utensils with your oven.
The interior and exterior oven walls can be
scratched. The control panel can be damaged,
@Don’t remove the cover over the “stirrer”
top of the oven (microwave feature 4 on page 5.)
You may damage the oven.
at the
BE CERTAIN POWER IS OFF BEFORE
How to cleanthe Inskte
Waiis,floor and piasticcover. Because there is little
heat except in the food, or sometimes in the utensils, spills and spatters are easy to remove. Some
spatters are easy to remove. Some spatters can be
removed with a paper towel, others may require a
damp cloth, Remove greasy spatters with a sudsy
cloth, then rinse and dry. Do not use abrasive
cleaners on oven walls. NEVER USE A COfvlNIERCIAL OVEN CLEANER C)N ANY PART OF
YOUR MICROWAVE OVEN.
Door-inside. Glass: Wipe up spatters daily, wash
when soiled, with a minimum of sudsy warm water.
Rinse thoroughly and dry.
Metal and plastic parts on door: Wipe frequently
with a damp cloth to remove all soil, DO NOT USE
ABRASIVES, SUCH AS CLEANING POWDERS OR
STEEL AND PLASTIC PADS. THEY WILL MAR THE
SURFACE,
Speciai note when using Brown ‘N Sear Dish: High
heat generated on bottom of Brown ‘N Sear Dish
can cause scorched appearing stains to bake onto
the oven shelf if grease is present. These may be removed with Delete” Polishing Cleanser by the
Drackett Products Co.
After using Delete, rinse and dry thoroughly, following instructions on can, Do not use Delete on the
painted surfaces such
paint.
Delete may be purchased from your local dealer or
from your Authorized Service Center, Check the
“yellow pages” for location and phone number,
Delete may be sold in grocery or hardware stores,
or in the housewares section of some department
stores.
Accessory Sheif. Your shelf accessory is made of
polysulfone, one of the strongest microwave cwen-
proof plastics. [t is designed for use in a microwave
as walls. it will scratch the
ICLEANINGANY PARTOF THIS OVEN.
oven only; do not use it in a conventional oven. Do
Not operate your microwave oven with the shelf in
place unless you also have food in the oven.
Never use a microwave browning dish with the
shelf. Heat from browning dish can damage the
shelf. The easy to clean shelf is dishwasher safe, or
may be washed in hot water with a mild detergent,
Do not use abrasive cleansers or scouring pads.
AutomaticTemperatureProbe.Probe is sturdy, but
care should be taken in handling. Do not twist or
bend;avoiddroppingtemperatureprobe,
Clean as soon after using as possible. To clean,
wipe with
scouring ball if necessary. Rinse and dry. (Or wash
in dishwasher,)
sudsy cloth, then rub lightly with plastic
How to Cleanthe outside
Case. Clean the outside of your oven with soap anti
water, then rinse and dry, The outer pane of the
window is glass. Just wipe clean with a damp cloth.
Chrome trim is best wiped with a damp cloth and
then with a dry towel,
Control Panei, Wipe with a damp cloth, Dry thoroughly, Do not use abrasives or sharp objects on
the panel. They can damage it.
Cord. If the cord becomes soiled, unplug and wash
with damp cloth, For stubborn spots, sudsy water
may be used, but be certain to rinse and dry thoroughly before plugging cord into outlet.
Lamp Replacement.First, unplug the oven,
Oven
Then remove lamp compartment cover by removing
screw which holds cover in place. Cover is located
at the rear of outer case.
To remove bulb, push it inward gently and turn it to
the left or counter clockwise; then pull outward out
of the socket. Replace with lamp number 25T8DC.
(It Is available in drug and hardware stores.) Replace compartment cover. Plug in the oven,
w
e
m
e
14
Page 15

.
—_—T”---
.-
-—
--—-A -.—..—..—-———
— .-
. . . .
-. -.
. ..- . . . . . . . . .-.— . -— . . . . . . --
—
—
—
. — -... . . . .
._— ———......... .
-..__
.— —.—
commonProblemsandEasysolutions
—
-- .-
—.—-.
——. . . ..— -- .-—-. . .—- . . ..—. .-. .- . ..—. -—.-...- .—— -
—.
.—..-.----.-_____.-.____~~~~~_...==_--___=-_ _._—.==—.-.---,=.--
—
-.
.
—.
.
.- —. —--.— .— - . ..-—.. —.. ..-. . . . . . . . . ..-.--. ..—
.-
-.. . . . . .. —- —.— .. . .
.—~~.-.-.—-.—-mb=e~
WCM?n will Not corm?m:
@ Main circuit breaker is tripped.
@One e! house fuses has blown.
~ 3-prong plug isn’t fully inserted into wall recep-
tacle.
ControlPanel Lighted,YetOvenWill
Notstart:
Make sure you touched START button.
Door is not securely closed.
You have already entered another program and
not touched CLEAR/OFF to cancel it.
Temperature Probe not inserted properly or not
being used during Auto Roast or Temp Cook.
You have not entered numbers after Time Cook.
You have not entered desired finished temperature after Temp Cook.
CLEAR/OFF was touched accidentally.
Aftertouching Quick Set’”or Auto Roastpads,no
codenumberwasentered.
IFcxxtsAre EitherOvercookedor
Lhxkrcxmkect:
Not enough time set when using Time Cook function because of variance of starting food temperatures.
The density and amount of foods will vary and
thus may need more time for completion.
Probe not inserted properly into meat or dish.
Check Cookbook and Auto Roast section in this
book for specific probe placement.
Incorrect Quick Set7Mnumbers entered.
Incorrect Power Level entered.
Dish was not rotated, turned or stirred if these
instructions were given in recipe.
Too many dishes in oven at same time.
You did not enter a different Power Level as suggested in recipe.
“IT” Appears (h Readout:
@ When 6v6n is first plugged in.
~ When power to oven has been interrupted,
then is resumed. Touching CLEAFVOFF erases
“PF” and clock must be reset.
and
lEv’i
K, ‘-
—
—
—
—
15
Page 16

NeedSewice?
.——
——.— ....
———
You’llfind It-h3tpdntFactory Service C%ntersinall these cities
ALABAMA
Birmingham -35210
2500 CXestwood Boulevard
(205) 956-0333
{Decatur-Huntsville)
Huntmrille-35805
1209 Putnam Drive
{205) 830-0150
Mobile -36609
1107BeltlineHighwaySo.
{205)471-1451
ARIZQNA
Phoenix -85031
25 South 51st
P.O.
(602)269-2121
Tucson-65705
*
2015NorthForbesBlvd,
Suite 111
(602) 623-8415
ARKANSAS
Little
8405NewBentonHwy.
{501)568-7630
CALIFORNIA
{SanBernardino-Riverside)
Bloomington-92316
10121CactusAvenue
[714) 877-3434
fSan Francisco)
EWrlingame-94010
1649AdrianRoad
:415)961-8780
Frasno-93727
1809North
!209) 255-1851
LosAngeles -90058
2615 East
(213) 563-1141
Sacramento -95815
15131AArden Way
(916) 929-2247
SanDiego-92101
3554 Ke!tner Boulevard
f714) 297-3221
SanJose-95123
5763WinfieldRoad
{408)629-3500
VanNuys-91405
6843LennoxAvenue
t213)989-5710
COLORADO
ColoradoSprings-60909
1865N.Academy- SuiteB
{303)597-6492
Denver-60207
5390East39thAvenue
{303)320-3301
CONNECTICUT
Bridgeport-06604
615NorthWashingtonAve.
[203)367-5311
EastHartford-06108
265PrestigePark.Plaze3
(203)528-9811
DELAWARE
{Brandywine--Wilmington)
GlenMills, PA-19342
R.D,#2,
{215)358-1500
DISTRICTOFCOLUMBIA
&L%W , MD-20794
(301)953-9130
FLORIDA
FortLsuderdale-33309
$tOlWestMcNabRoad
@05)974-6708
FortMeyers-33901
4T60S,ClevelandAve,
(313)939-2812
Jacksonville-32205
5226HighwayAvenue
(904)783-1330
~?ompano-W.PalmBeach)
Lake Worth -33460
1902 Madrid Avenue
[305) 655-7040
Avenue
Box 14278
Rock-72209
Helm Street
46thStreet
BOX 210
16201 taytonDrive
Miami-33167
3200N.W,11OthStreet
(305)685-5144
Orlando-32807
6545EastColonial
(305) 273-6370
Tallahassee -32301
1205 South Adams St.
(904) 222-6931
Tampa-33611
5201S.WestshoreBlvd.
Box13708-InterbavStation
(813)637-1906 “
GEORGIA
Atlanta-30325
1695Marietta
P.o.Box19917
(404) 897-6400
Savannah -31406
211TelevisionCircle
(912)925-0445
HAWAII Houston-77207
Honolulu -96813
404 Cooke Street
(808) 533.7462
IDAHO
(Boise)
GardenCity-83704
52S0ChindenBlvd.
(208)376-5880
ILLINOIS
Champaign-61820
1205NorthHagen
(217)359-4086
Chicago-60638
5600West73rdStreet
(312)594-2424
Elk’GroveVillage-60007
10KingStreet
(312)593-2525
Lombard-60146
627-B35WestmoreAve.
(312)629-8010
Peoria-61614
7708NorthCrestlineDrive
(309)692-5070
Rockford-61107
401North2ndStreet
(815)962-7200
Springfield-62702
2252South15thStreet
(217)753-8088
INDIANA
Evansville-47714
1016-KS,WeinbachAve.
(812)476-1341
FortWayne-46808
4832NewaygoRoad
(219)484.9005
Gary-46400
5185Broadway
(219)981-2533
Indianapolis-46219
6233BrookvilleRoad
(317)356-8861
SouthBend-46813
1902MiamiStreet
(219)288-0885
IOWA
CedarRapids-52405
118FirstStreet,N.W.
(319)386-8579
Davenporl-52802
1074SouthDittmer
FI.O.BOX3188
(319)326-5101
DesMoines-50313
1637N.E.56thAvenue
(515)265-2191
Waterloo-50703
2829FallsAvenue
(319)236-1393
KANSAS
KansasCity-66115
2949ChryslerRoad
(913)371-2242
Dr.
Blvd.
Wichita-67211
820EastIndianapolis
(316)267-3366
KENTUCKY
Lexington-40505
1144FloydDrivo
(606)255-0846
Louisville-40218
4421BishopLane
BOX 32130
P.0.
(502)452-3511
LOtJISIANA 8949DiplomacyRow
BatonRouge-70814
2935CraterLakeDrive
(504)928-5062
(NewOrleans)
Harahan-70123
701EdwardsAvenue
(504)733-7901
Shreveport-71102
1430Dalzell Street
(318)425-8654
MAINE
SouthPortland-04106
54DarlingAvenue
(!207)775-6385
MARYLAND
Falisbury-21801
TwillyCentre
329Unit#7
(301)742-3900
Jessup-20794
8201StaytonDrive
(301)953-9130
MASSACHUSETTS
(CapeCod)
Hyannis-02601
80Enterprise- Unit11
(617)771-5905
Pittsfield-01201
1450EastStreet
(413)499-4391
(e.:;e.:;ou;;&90
346UniversityAvenutr
(617)329-1250
@oiton-N0rt5)
Wilmin ton -01867
(617)944-7500
MICHIGAN
GrandRapids-49508
35028thStreet,S,E,
(616)452-9754
Lansing-46912
1004E,MichiganAve.
(517)484-2561
Troy
Westlanct-48165
953Manufachmsr’aDrive
(313)583.1816
MINNESOTA
(Minneapolis-St,Paul)
Edina-55435
7450MetroBoulevard
(612)835-5270
MISSISSIPPI
Jackson-39209
325IndustrialDrive
(601)352-3371
MISSOURI
KansasCity,KS-66115
2949ChryslerRoad
(913)371-2242
St, LOUiS-83178
1355 Warson Road, No.
P.O. Box 14559
(314) 993-6200
S~rincrfield -65807
1334 west Sunshine
(417) r331-0511
NEBRASKA
Lincoln-88503
1145North47thSt,
(402)464-9146
Civic Avenue
.
?281ManStreet
Omaha-68117
6636“F” Street
(402)331-4045
NEVADA
LasVegas-89109
3347S,HighlandDr.
Suite1
(702)733-1500
Reno-89511
DelMonteShoppingCtr,
6465S,VirginiaStreet
(702)826-7070
NEWJERSEY
Mountl-folly-06060
Route38& EaslickAve.
(609)261-3500
NorthCaldwell-07006
5FairfieldRoad
(201)256-6650
&A@Jl#$arJ;712
2111High~ay35
(201)493-2100
Vineland -08360
749NorthDelseaDrive
(609)696-1506
NEW MEXICO
Albuquerque-87107
3334PrincetonDr.,N,E.
(505)884-1861
NEWYORK
Albany-12205
2InterstateAvenue
(518)438-3571
Brooklyn-11234
5402Avenue“N”
(212)253-8181
Buffalo-14225
3637UnionRoad
(716)808-2266
(WestchesterCo,Area)
Elmsford-10523
FairViewIndustrialPk.
Route#9-A
(914)592-4330
Flushing-11354
133-3039thAvenue
(212)888-5600
(Binghamton)
JohnsonCity-13790
278MainStreet
(607)729-9248
(Nas!Jau-SuffolkCounty)
Melville-11747
336SouthServiceRoad
(516)694-8600
(OrangeCount Area)
flNt?wburh-1250
1135UnonAvenue
(914)584-2000
Rochoster-14622
1900RidgeRoadEast
(718)544.7100
Ronkonkoma-11779
62UnionAvenue
(518)467-7700
Syracuse-13204
965WestGeneseeStreet
(315)471-9121
NORTHCAROLINA
Charlotte-28234
700TuckaseegeeReed
BOX 34396
P,O.
(704)372-8810
Greensboro-27406
2918BalticAvenue
(919)272-7153
Raleigh-27604
2013NewHope
ChurchRoad
(919)878-5603
OHIO
Akron. 44319
2262S,Arlin ton R6ad
8(218)773-031
WATCHFORCHANGES. Addressesand telephone numbers sometimes change, And new Centers opt?ntIfthe numbers change, check your
:elephone
book. Look in the WhitePagesunder“HOTPOiNT FACTORYSEF!VICE”.
Cincinnati -45242
10001AllianceRoad
(513)745-5500
Cleveland-44142
20600SheldonRoad
(216)362-4200
Columbus-43212
1155WestFifthAvenue
(614)294-2561
Dayton-45414
5701WebsterStreet
(513)696-7600
~Ob3d0 -43611
3300SummitStreet
(419)729-1651
OKLAHOMA
OklahomaCity -73116
3228NorthSantaFe
(405)528-2381
Tulsa-74112
6913East13th
(916)635:9526
OREGON
(PortlandArea)
Beaverton-97005
14305S.W.MlllikanWay
(503)646-1176
Eugene-97402
1492WestSixthStreet
(503)342-7285
PENNSYLVANIA
(Brendywine-Wilmington)
GlenMills-19342
BOX 210
R.t.l #2,
(215)358-1500
Johnstown-15905
214WestwoodShoppingP1.
(814)255-6721
[Haia:s;:rg~7043
r!-1059 olumbusAvenue
(717)761-8105
Monroeville-15146
150SecoRoad
MonroevllleIndustrialPark
(412)685-3700
Philadelphia-19116
9900GlobalReed
(215)698-3270
(Allentown)
Whitehall-18052
1906MacArthurRoad
(215)437-9871
RHODEISLAND
EastProvidanca-02914
1015WatermanAvenue
(401)438-0300
SOUTHCAROLINA
Columbia-29602
::? f3iLI/j Road
(803)771-7880
N,Charleston-29405
7325-BAssociateDrive
PepperdanIndustrialPark
(803)552-5193
MyrtleBaach-29577
702SeaBoardStreet
SeaBoardindustrialPark
(803)626-7411
(Greenville)
Taylors-29687
25HamptonVillage
(803)292-0830
iENkEs5EE
Chattanooga-37403
613East1lth Street
(615)265-6596
JohnsonCity-37601
2912BristolHighway
(615)282-4545
Knoxville-37919
3250MynattStreet,N,W,
(615)524-7671
Memphis-361t8
3770SouthPerkins
(901)363-1141
Nashville-37204
3607Trousdale
(615)834-2150
TEXAS
Austin-78704
2610S.FlratStreet
(512)442-7693
CorpusChristi-78415
3225AyersStreet
(512)884-4897
Dallas-75247
P.0,
Box 47601
(214)631-1380
ElPaso-79925
7600BoeingDrive
(915)776-5361
(Brownsville)
Harlingen-76550
1%04NorthSeventh
(512)423-1204
Box 26837
PoO,
2425BroadStreet
(713)641-0311
Lubbock-79490
4623Loop289West
BOX 16268
P,O.
(806)793-1620
(Odessa)
Midland-73701
BOX 6286
P.O.
MidlandTerminal
(915)563-3483
SanAntonio-78216
7622Jones-Maltsberger
(512)227-7531
UTAH
SaltLakeCity-64125
2425South900West
P.O.Box30904
(801)974-4600
VIRGINIA
Fairfax-22031
2810DorrAvenue
(703)280-2020
Norfolk-23502
4552E,PrincessAnneDr
(804)857-5937
Richmond-23228
2910HungarySpringRd.
(604)286-6221
WASH{NGTON
(Tri-City)
Kennewick-99336
UnionSquere
Suite206
101NorthUnionStreet
(509)783-7403
Seattle-98188
401TukwilaParkway
(206)!i75.2711
Spokane-99206
9624E.MontgomerySt.
(509)926-9562
WESTVIRGNWA
(Charleston)
Huntington-25704 ‘
1217AdamsAvenue
P.O.
BOX 7518
(304)529-3307
Wheeling-26003
137NorthRiverRoad
(304)283-8511
WISCONSIN
Appleton-54911
343W.WisconsinAve.
(414)731-9514
Madison-53704
4630E,WashingtonAve.
(608)241-9321
Milwaukee-53225
1I1OOW.SilverSpringR(
(414)462-9225
i
16
Page 17

QuicksetGuide
Detach and Tape to tlnsideCabinet Dow or Other Prominent Place
The Quick Set feature gives you an easy automatic
way to accurately set microwave time for foods
requiring only one power level and little attention
during cooking. The Chart below shows frequently
prepared foods and the suggested Quick Set Code to
use with each. For specific information on stirring,
turning or rotating, check the Microwave Guide and
Appetizers(Warming)
Dip (Cream Cheese)
‘/2 cup 25
1 cup 45
Dips (Sour Cream)
‘/2cup 13
1 cup 43
Pastry Bites (Reheating)
2 Servings 17
4 Servings
10
BreadsandDesserts
Apples
(2)
Bran Muffins
(5-6)
Brownies (Mix)
Cakes (Mix)
(16 cup fluted mold)
Cheese Bread, Yeast
(1 loaf)
Chocolate Chip Bars
Nut Bread (Mix)
(1 Joaf)
Pudding Mix ( 3 oz. pkg.)
40
37
60
110
105
50
97
60
Beverages
Coffeef Soup
(1 cup)
Milk Bases
cup)
(1
10
27
FrozenFoods(Defrost)
Note: Times given below are for entire defrost
cycle. Usually food must be rotated, broken up or
turned over while defrosting.
specific information.
Cake, Whole Iced
Check Cookbook for
23
Chicken, Cut-Up
(2%3% tbs.)
143
DessertTopping, Whipped 13
130ughutsor Pastries
(2-4) 13
FishFillets
(1 lb.)
83
Hamburgers
(2 Ibs.)
123
Pie,Fruit Filling
(Whole)
83
Roast
(4-5 Ibs.) 403
Weakor Chops
(2 Ibs.)
83
Cookbook which comes with your microwave oven.
Always use microwave-safe containers and micro- ~
wave techniques as described in the Cookbook.
To set Quick Set for many other foods or recipes refer —
to page 11 in this Use and Care Book. Quick Set
Codes given are for minimum time. Check and add
time if necessary to complete cooking.
e
Meats/MainDishes
Bacon
2 Slices
4 Slices
28
30
BeefStew
(2 tbs.)
607
Chicken
8-10pieces
2 pieces
4 pieces
108
40
70
Chuck Roast
(3Ibs.)
605
Eggs,Baked
2 Eggs
25
Eggs,Scrambled
2 Eggs
20
Entrees,Frozen
8
OZ.
16OZ.
2 Ibs.
FishFillets
(1lb.)
50
110
200
60
m
Franks(in bun)
2
4
10
30
e
MeatLoaf
(1%ibs.)
150
Sausage(Raw)
4 Patties
4 Links
30
20
SwissSteak
(2 Ibs.)
706
FrozenTV Dinner
(lo Ozo)
107
Vegetables(Fresh)
Beans, Green
(1 lb,)
150
Broccoli
(1%-11Atbs.)
Spears 157
cut 120
Cauliflower, Head 137
Corn on Cob
(4)
120
Potatoes
(4)
120
Squash
(1 lb.)
100
Zucchini
(1 lb,)
100
Vegetables(Frozen]
1002,
pkg.
70
Page 18

~m”~~”~~-~~q
i a
%iIw!7
-----
-------.,=
~pJ$.-‘
llL
.——
!
i
i
~
k[
s wwu m o sw H w WHEW 9 BWfl BVEIWWWAWlb %M#!f Kmm6W/ITHi#WUS -
?%!
_c
.@u
-~.~w-,2
WARRANm— ‘=—m
(includesmicrowavecookingcentersandovens)
Saveproofof originalpurchasedatesuchasyour sales slip or cancelled check to establish warranty period.
t,
II:!!._
II:–
!!~=x
II=
;:p-——
..
WHATIS COVERED
FULLONE=YEARWARRANTY
Foroneyearfromdateof original
purchase, we will provide,
freeof
charge,partsandservicelaborin
yourhometo repairor replace
part of the microwave oven/range
thatfailsbecauseofamanufac-
turingdefect.
LIMITEDADDITIONAL
f%NR=YEARWARRANTY
thesecondthroughfifth year
For
fromdateof originalpurchase,
wewill provide,freeof charge,a
replacement
magnetron tube if the
magnetrontubefails becauseof a
manufacturingdefect,Youpayfor
theservicetrip to yourhomeand
servicelaborcharges.
WHATB NOTCOVERED . Servicetripsto yourhometo
teachyouhowto usetheproduct.
ReadyourUseandCarematerial.
If youthenhaveanyquestions
aboutoperatingthe product,
pleasecontactyourdealerorour
ConsumerAffairsoffice atthe
addressbelow.
eImproperinstallation.
Ifyouhaveaninstallationproblem,
contactyourdealeror installer.
Youareresponsiblefor providing
adequateelectrical,exhausting
andotherconnectingfacilities.
Thiswarrantyisextendedto the
originalpurchaserandany
succeed-
ingownerfor productspurchased
forordinaryhomeuseinthe48
any
mainlandstates,Hawaiiand
Washington,D.C.inAlaskathe
warrantyisthesameexceptthat it
is LIMITEDbecauseyoumustpay
to shiptheproductto theservice
shopor for theservicetechnician’s
travelcoststo yourhome.
All warrantyservicewill beprovided
byourFactoryServiceCentersor
byourfranchisedCustomerCare@
servicersduringnormalworking
hours.ChecktheWhitePagesfor
HC)TPOINTFACTORYSERVICE.
Lookin theYellow Pagesfor
HOTPOINTCUSTOMERCARE”
SERVICEor GENERALELECTRIC- ~~~
HOTPOINTCUSTOMERCAREO
SERVICE.
● Replacementof housefuses
or resettingofcircuitbreakers.
. Failureof theproductif it is
usedfor otherthanits intended
purposeor usedcommercially.
s Damage toproductcaused
byaccident,fire,floodsor acts
of God.
WARRANTORISNOTRESPONSIBLEFORCONSEQUENTIAL
DAMAGES.
~
-
—_
— -
—x
—=
H :–
!! ._
IIL
II —
,!, =
!! ~
,i.—
,,
,..
Hz-
!! ._
!!&
,,-=
II =
11,. —
,. .
,. -
~!*
,,rx
In=
11-—-
,,—
...
11:-
,,L
j g
ll&——
—J!!!&
—.—
_!!._
——
!:~
..-.
II=XR
II=
—
So,mestatesdo not allowtheexclusionor limitationof incidentalorconsequentialdamages,sotheabovelimitationorexclusion
naynotapplyto you.Thiswarrantygivesyouspecificlegalrights,andyoumayalso haveotherrights
Toknowwhatyourlegalrightsarein your state, consultyourlocalorstateconsumeraffairsoffice oryourstate’sAttorneyGeneral.,,m11>=
Warrantor:General Electric Company
If further
Manager–Consumer Affairs, General Electric Company,AppliancePark,Louisville,KY40225
I PartNo. 862A724P28 I
i Pub.No.39-4455 I
helpis neededconcerning this warranty,contact:
+
+
n~”+~
A QUALITYP!?ODUCTOr
GENERALELECTRICCOMPANY
which vary from state to state. !!~-:
,$: _
. r—
11=6
T!._
.—
iib
!,=
,,.=
..—
II—
::*
II:Y
llm-
!!C=
..—
..—.—
,..
11=6
!gL_
11—
Ilk
!,=
11=X
11=-
::y-
;:,——Ilxc
 Loading...