

Page 1
—.
ee sectionentitled
“EMOBWYIN.!cd Rx
on page28.
Page 2
.—
+
— ——
ReadTM useand cm?molt
Takethe time to read this book and learn how to
enjoyyour newMicrowave Oven.it contains detailed
operating instructions and recommended maintenance,as wei! as handy tips to help you gain maximum benefits from your Microwave Oven. Once
you have read
any questions you may have.
if you have any additional questions concerning
the operation of your Microwave Oven, write–
including your phonenumber—to:
IFYOURECEIVEDA DAMAGEDOVEN,immediately
contact the dealer (or builder) from whom you purchased it, They have beeninformed of the proper
procedure to take care of such matters and can
handleit for you.
thebook,keep it handy to answer
ConsumerAffairs
Hotpoint
Appliance Park
Louisville, Kentucky 40225
RegisterYourOven
]t is important that we,the manufacturer, know the
location of your Microwave Oven should a need
occur for adjustments.
Pleasecheck with your supplier to be sure hehas
registered you asthe owner; also send in your Purchase RecordCard. If you move, or if you are not
the original purchaser please write to us, stating
model and serial numbers. This appliance must be
registered. Pleasebecertain that it is.
Write to:
Hotpoint
RangeProduct Service
AP2-21O
Appliance Park
Louisville, Kentucky 40225
Bekwe You
Check“Before YouCall for Service” section in the
back of the book. Many minor causes of operating
problems that you can correct yourself are
explained. This may save you an unnecessary service call.
If You Need service
in many cities, there’s a Hotpoint Factory Service
Center.Call andaradio-dispatched truck will come
to your home by appointment–mornin9 or afternoon. Chargethe work, if you like. All the centers
accept both Master Chargeand Visacards.
Or look for the tiotpoint Franchised Customer
Care@servicers. You’ll find them in the Yellow
Pages under
SERVICE.”
If youneedserviceliterature,partslists,partsoraccm-
sorie$,contact oneoftheFactory ServiceCenters,a
franchised Customer Care@ Servicer or your
Hotpoint dea!er.
ExtendedServiceContracts:Theterms of your war-
ranty provide free service covering failures duet
manufacturing defects for a definite period of time.
After this warrant expires you ma purchase an
ExtendedService ontractwhichwii enableyouto
budget your service needs.This mvera9ebeYond :
warranty is availabie from our Factory Service
Centersandfrom manyfranchised CustomerCare@
servicers. It is a good idea to apply for this coveragebeforeyour warranty expires.
call forSw’hxl:
“HOTPOINT CUSI”OME!3 CARZ@
1
Y
StepstoFollow forFwther I14elp
First, contact the peopie who serviced your Microwave Oven. Explain why you are dissatisfied. in
most cases, this wiil solve the problem.
Next, if you are still dissatisfied, write all the
details+ ncluding your phonenumber–to:
Manager,ConsumerRelations
Hot omt
WC~-312
Appliance Park
Louisville, Kentucky 40225
Finaiiy,if your problem is still not resolved, write:
MajorApplianceConsumerAction Panel
20North Wacker Drive
Chicago,Illinois 60606
This panel, known as MACAP,is a group of inde-
pendent consumer experts under the sponsorship
of several industry associations. Its purpose is to
study practices and advise the industry of ways to
improve customer service. BecauseMACAPis free
of Industry control and influence, it is able to mak
im artial recommendations andconsidereachcase
f
in ividually.
“
——
Page 3
—. —.—..—.——.—...——.-.......—.- ——-——.———-————_
—
—-
——.—..—-—...-— —.—.—..-—————
Mode! i?E.945 shbwn
——..——
isfar
I!?s?im
I&
——-==
—
/
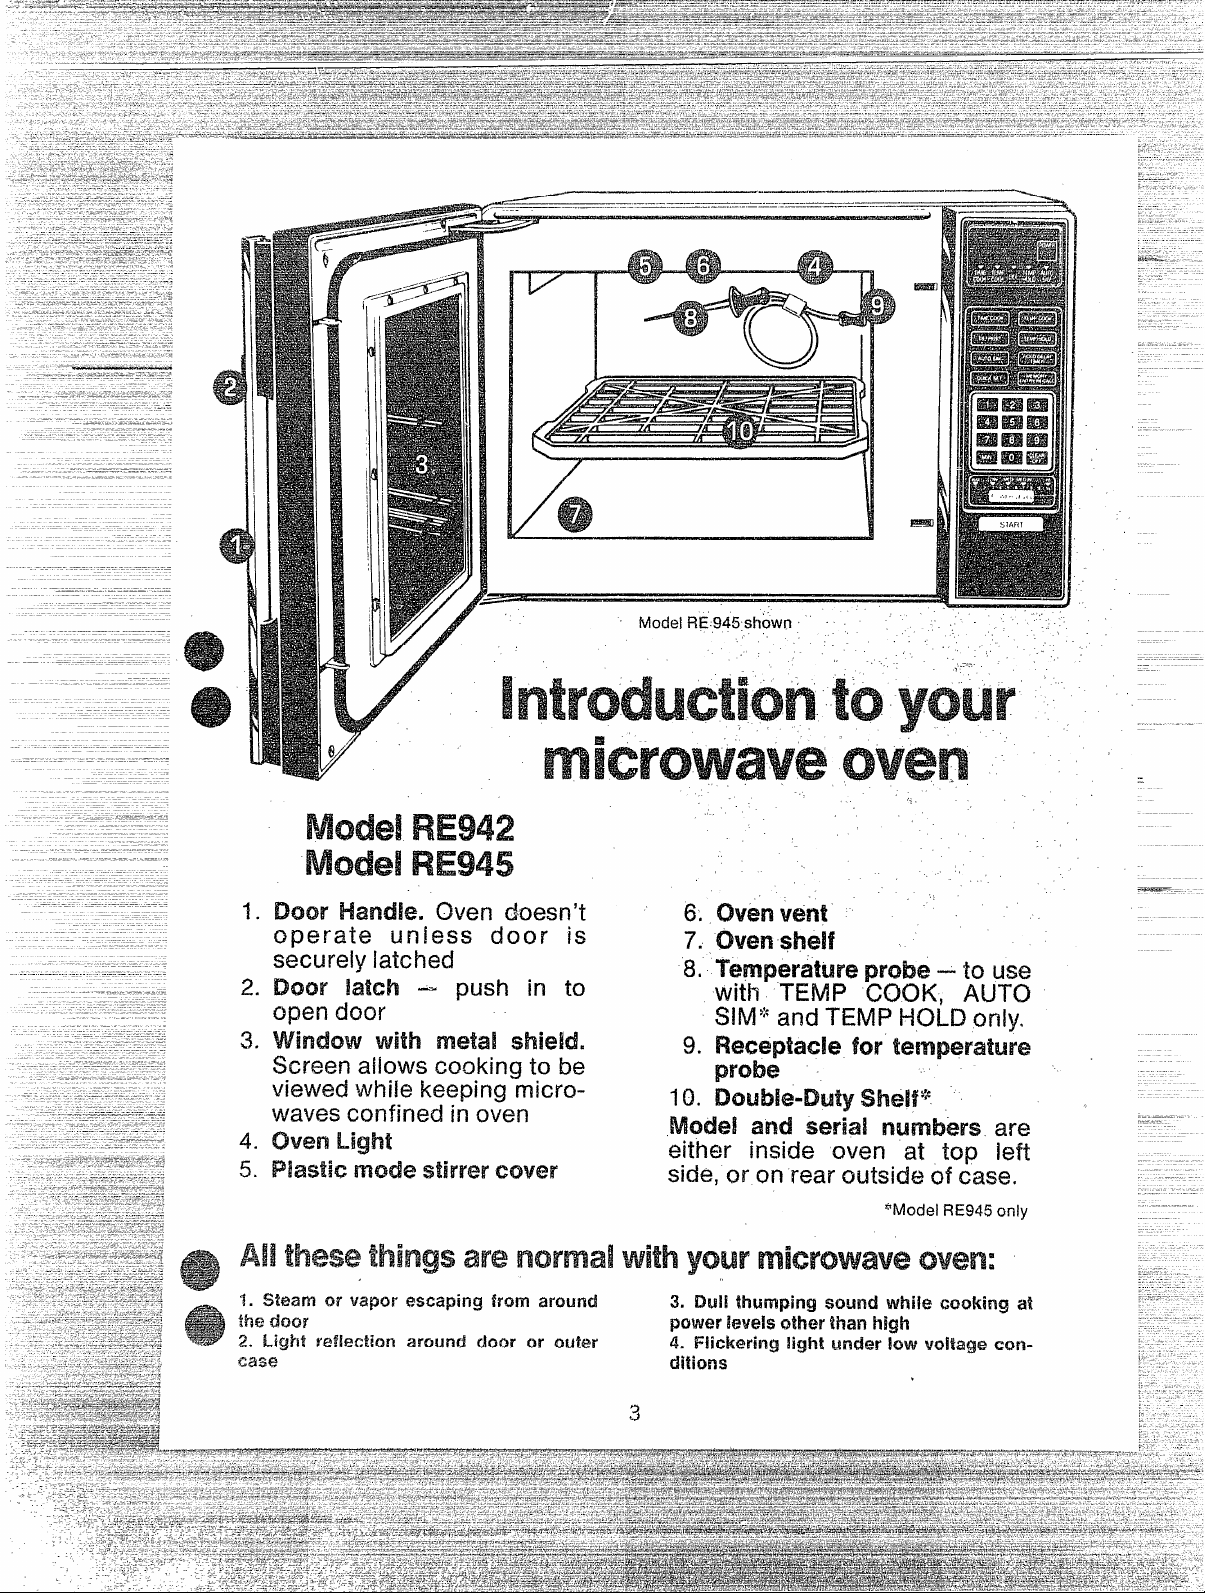
1.
DCKMSHandle. Oven doesn’t
operate wdess door
securely latched
2.
Door Ik3tdll -
O~(m
door
?b,.
push
metal shield.
Screen allows cooking to be
viewed vvhi[ekeeping microw-
aves confined in oven
4.
Chum
!5.
nwxm stirrer COWwr
in tO
is
,,
----
,!
/.
60CJvenvent
7. oven shdf
8. probe – to use
with TEMP (XXX, AUTO
f$llvl’;’and TEMP HOLD Qrdy.
9. RecqNade! for
probe
10. shelf’%
and .serid are
either inside oven at top left
side, or m rear outside d case.
*Model RE945 cmly
—
?. %xa3wiw vapor escaping fromm.wiml
WEfhw
2, Light
ffMEMkm around Chxwor (3UM’
3. Dull thumping wxmd
poww k?weis
4. F!ickw’ing iigflt Under low Voitaqe ctXl-
tmww%ilarlhkJh
while waking at
Page 4
h-lp’fmi-ltfwM.x?
“ . . .
s . , . . P , . . . . . . . . . . . . . * . . . “ . , . . , , , . .’. s . . , . . . . , . . “ . . , . . . . ,. . . . . . . . “ : . . . . . J . . . . - “ . . . . . . . ●
toY@k” ‘
A!! the thh-lgs
n-knywP?m we!? -“. - ~ .
Grounding’lnstruat~ofis‘‘
p~~~fl~~kliw hcsafe ~~f?~ < ,
~~f~~~’-npq,“ ,- “
l%sy rekx-emxiq.h.ie-tothe ccmtid parid ‘ “
s&~inzJ tg
SWjng k) rni&wwnRiiQqbi@mm.ire ‘ ‘ ‘“ -“ ‘“
yixl !%iin da VI/iii-l)/clQr
&. . . . . . . . . ● :. , . . , . , . . . . . . . . . . . . . . . . . , . . . * . . . . . . . . . . . . . . . “ . a * , . . . . “ . . . . , . .. . . . . . . . . . . .: . . . * . . . . . . .
.-. -.
–--rh’nf?m@@?$J:::..-
–~effo& , : - r , :
- .. . ,. . . ... ..:
–~o\&?~~j~y
–Teinpemiifipr$km
–-Tynpe!%iw’e, mckh-lg
willIi@
settingto ~~w~~~~ -
p$,utcjfnatk siminw
F%3@mmIinCJwith temperature
Men-mryentry’ - ‘ -
.Defrost as Cw3king function
ivkxmy l’%xx$H
Aim-wfiatic setting
F%fxki !wxmmefided Vwj piiobe
f%JfJ(j~ r-iclt WKh probe
Q1..lesticms and ai-lw.Nws
...“.....‘.. .
“ , . . .
,-
......,..“’.“ . , . . . . . . . , . . . . * , , . . , . . r . . . . . . . . * “ * r . * .
.................:.*,.,..........
● “ ,-. , , . , ‘ , . . . . . . . . . . , . “ . . . . “ , . . . 0 . . . < # . . .,* . . * . . * . . . . . . . . . ● . . . . . J * ● *
......
,,
“ “ . . . . . . . . . . . . . . . . . . . . , ● ,. . ‘.. s “.. . . . .“* . . . . . . . . . . . . . . . . . . . . . . . . . . . . . . .
,. ~
s . . , . . . . “ ,- .,” . , , . . . . . . . . . . . . u .) . . . ● . . . - . . . . :-. .
c
, . ‘.
,)
.....i........
A,....,.?.s o . . .- s . m. . . . . . .
.,
,,,
13y”wfw ~ “ ‘“ . ‘ ‘-- :-. ~
$ . . . . . . . . ● . , , , . . . . . . . . . *,. . 4 , “ . . . . . . . . . * . . . . , . . , , w . . . ● .’. . . . . . . . . . , .-. L
~~~&-!~~• ‘“ “’ - . ~ ‘1~
,-
“ . . , . . . . . . * . . . , ● . . . , * . , . . . . . . . . . . . . . . # ● . b .
. . .. .
.,
. . . . . . . . . . *
,,
..
$ . . . . . . . . . . . “ . “ . “ . . ● . . . . . . . . . . . . . . . * . . . “ ● , ● . , . . . . . . . . ..:. . . .
.......,,*..’,. ......i.....“.,.*...“..,.........>.......... ........,...P...
s . . 0 ● . , “ . . . . . . . . . . , . . . . . . . . . . , , , .:. . e . , ● . . . . . . . . . , . .’. . ; . ● , . , . ? . . . . * . .
● . , . . ● ● , , , . . ‘ . . , . . . . . . . . . . .’. . . , , , “ . . . . , , . . . . . . . . . . . . . “ a + . . . . * . . . , . . . . . . . . s . .
. . . “ . . . . . . . . . ,, . . , .
... ... ... ... .d. ..*l. ... *.. ... ... ... .@. *.. ..*** . *`"t."!".".."."`."
“ . . ● . . . . 0 , .-. . . ● .’. . . ‘. . ... , . . , . . . . . . . . . , . ~. . . . . . . . . . ● .
......,.............
“.. , ● . ● - . . . . , , . . . .’. . . . . , . . , * , . , , . . . . .
......,...................
e . . : . ● . . . ‘-i . . . . . . .
.....................................................
. . . . . . . . . .
● . . , . * , , . . . , * . . . . . . . . . . . . . * .,. . . . . > ● . . ●,* . . . , . . . . . .
● . s . . , . . . . . . 6 . . . . . . . . . . . . , , . . . . ‘ . 8 . . . . . . . . . . . . . . , . .
. . . . . . A . . . . . . . . . . . . . . . . . s . . . . . . . . . . . .
. c, . . . . . s . . . . “ . . . “ . . . . . . . . . . . . . h . .,*
...
,,
. . .. .
“ . . . . . . r . . . “ . . ●
.,
3
;,
,,
, :<
“i4-m
, “:
22”23
● . . ,“ , . ● . . . . . . .
● . * . . . . . : .
2
3
~
‘5
6’
8
7
‘ 8
-II !gl/
-12
“‘1’3’
. . .
15 ‘
: 37
qfj
19
20
.21
24
~~
25
g~?’g? of y(l?.. jr Ch7fw-1
~~ffJ~~ ‘{gj~ ~g3”[\ ‘for Sei’vicx$ . . . .
f=pJQ~y $J=jfy~~~ ~&jtefs . . . . . . . . . . . . . . . . . . . . . . . ;, . . . . . . . “
%Lwmnty . . . . . . . . . . . . . . . . .
● ., * . + ., . . ., ., .,....., ., .,. “ . . ‘ ‘ “ . . . . ‘ “ ‘ “ “ ‘ ‘ “
. . . . . . . . . . . . . . . . . . . . . . . . . . . . . . . . . . . . . . . . . . .
. , , , . . . , , . . . . . . . . . . . ., . . . . . . + . . . . . * . . . . . “ . . . . . . . ?-..
● . . * . . . . . . ~ ,.. ‘ c ‘ . “ 29-30 ,-.2
Ehiwk C2Ner - :
~~.~’~
98
.’*&
@
~%
:&3
F
. .
,-
Page 5
Cookingversatility.Cook bytime,by temperature, with
temperature
thecookingto thefood.
Fast, familiar cooking by time. You’ll find
mostof your new microwavemeals.willprob-
ablybecooked bytime.Usetime cooking for
most casseroles, vegetables, appetizers,
snacks, and smali, individual foods, like potatoes, hot dogs, hamburgersand meatballs.
H’shandy,too, for pie crust, cakesand other
batterfoods.
Usetemperaturecookingwhenyoucan’!afford guesswork.The solid-state microwave
thermometer te!ls you the internal temperature of food . . .
Ideal for big roasts, turkey, and other foods
that need a specific temperature“for proper
doneness.
Temperature cooking takes the guesswork
out of reheating,too. You can cook unusual
shapes, sizes and amounts of food without
the riskofovercooking.
Theautomaticsimmeringfeature*br!ngsout
deep-downflavorand tendernessthe microwaveway.Useall your favorite old-fashioned
slow-cooking recipes, with a difference. The
kitchenstayscool. Andthe automatictemperaturecontrol keepstabsonthe temperature.
Letyourfood simmerall day,ify6uwant. With
the automatic simmer feature, the oven
doesn’t shut off automatically,as it does with
timecookingandtemp~raturecooking. Itsimmersslowlyuntilyou’rereadyfbrthefood.
Temp qold lets you hold foods at perfect
servingtemperature.No need to let foods
losetheir “just-cooked” freshness.Holdthem
at the most appetizing serving temperature
for latecomers,
Defrosta turkeythe afternoonof the feast.
Thespecial Defrostsetting is designed especiallyfor bulkyfoods.
Timea phonecall.‘TheHOLD/DELAYTIMER
setting letsyou do this, with solid-statepreci-
sion. . . . Becausethe timer worksseparately,
just likethetimer on your conventionalrange.
Microwavea meal withoutbeing there!The
Memory setting lets
hould be cooked,
automatic slow cooking, or with
hold. Your oven lets you tailor
a reassuringway to cook.
you decide-how dinner
Then it remembersfor
you. Someone else can press STARTlater,
and the meal is cooked just the way you
wanted,withoutyou beingthere.
Use your oventhis morning,whi!e it’s re-
memberinghowto microwavetonight’sdinner. Using the Memory Entrj/Reca!l* only
storesinstructions.It doesn’t affect cooking.
You’re free to use the oven for any type
microwaving,while it’s rememberinginstructionsfor later.
Microwavemore than one way, withoutresetting.Your newovenletsyou,defrost-hold-
and-cook for a preset time. For extra flex-
ibility, you can defrost-and-co6kalso, with
timesettings.Oryou candelay-and-cookwith
timeortemperaturesettings.
&tjustthepoweroftheovenatthetouchofa
finger.Ten PowerLevelsgive.you extra con-
trol over what’s cooking. E3utthe oven stays
on full power (HIGH) unless you want a
change.
Enjoya wealthof newrecipeIdeas.The big
Microwave Guide and Cookbook included
with your oven tells you everythingyou need
to know to use your oven properlyand successfully.Microlessonstake you step-by-step
through all the basics. And 445 recipes and
41chartskeepmealtimesinteresting.
Two-shelfco6king* letsyoumicrowaveseveralfoodsat once-even full meals!Referto
specialinstructions.
The controls are easyto use
The controlsare arrangedthe wayyou use
them,in top-to-bottom order, Start at the top,
and select a cooking pad, Then the number
settingsyou want. Next a PowerLevel.Then
pressSTART,
When you want to erase an instruction, the
CLEAR/OFF pad is clearly marked for you.
There’sevenashortcut!Whenrecipescallfor
whole minutes, just touch ~lhl, instead of
touching thezeropadtwice.
Eachtimeyougivetheovenaninstruction,it
responds.Just listen for the signals. If you
heara short signal, the oven is saying“OK,”
A longer,3-secondsignaltells youthat you’re
givingthe oveninstructionsit can’t carryout.
models equipped with this feature.
‘IOrI
5
Page 6
FORPERsONALSAFETY, THISAPpLiANCE
MUST BE PROPERLY GROUNDED. The
powercord of this applianceis equippedwith
a three-prong(grounding) plug”which mates
with a standardthree-prong(grounding) wall
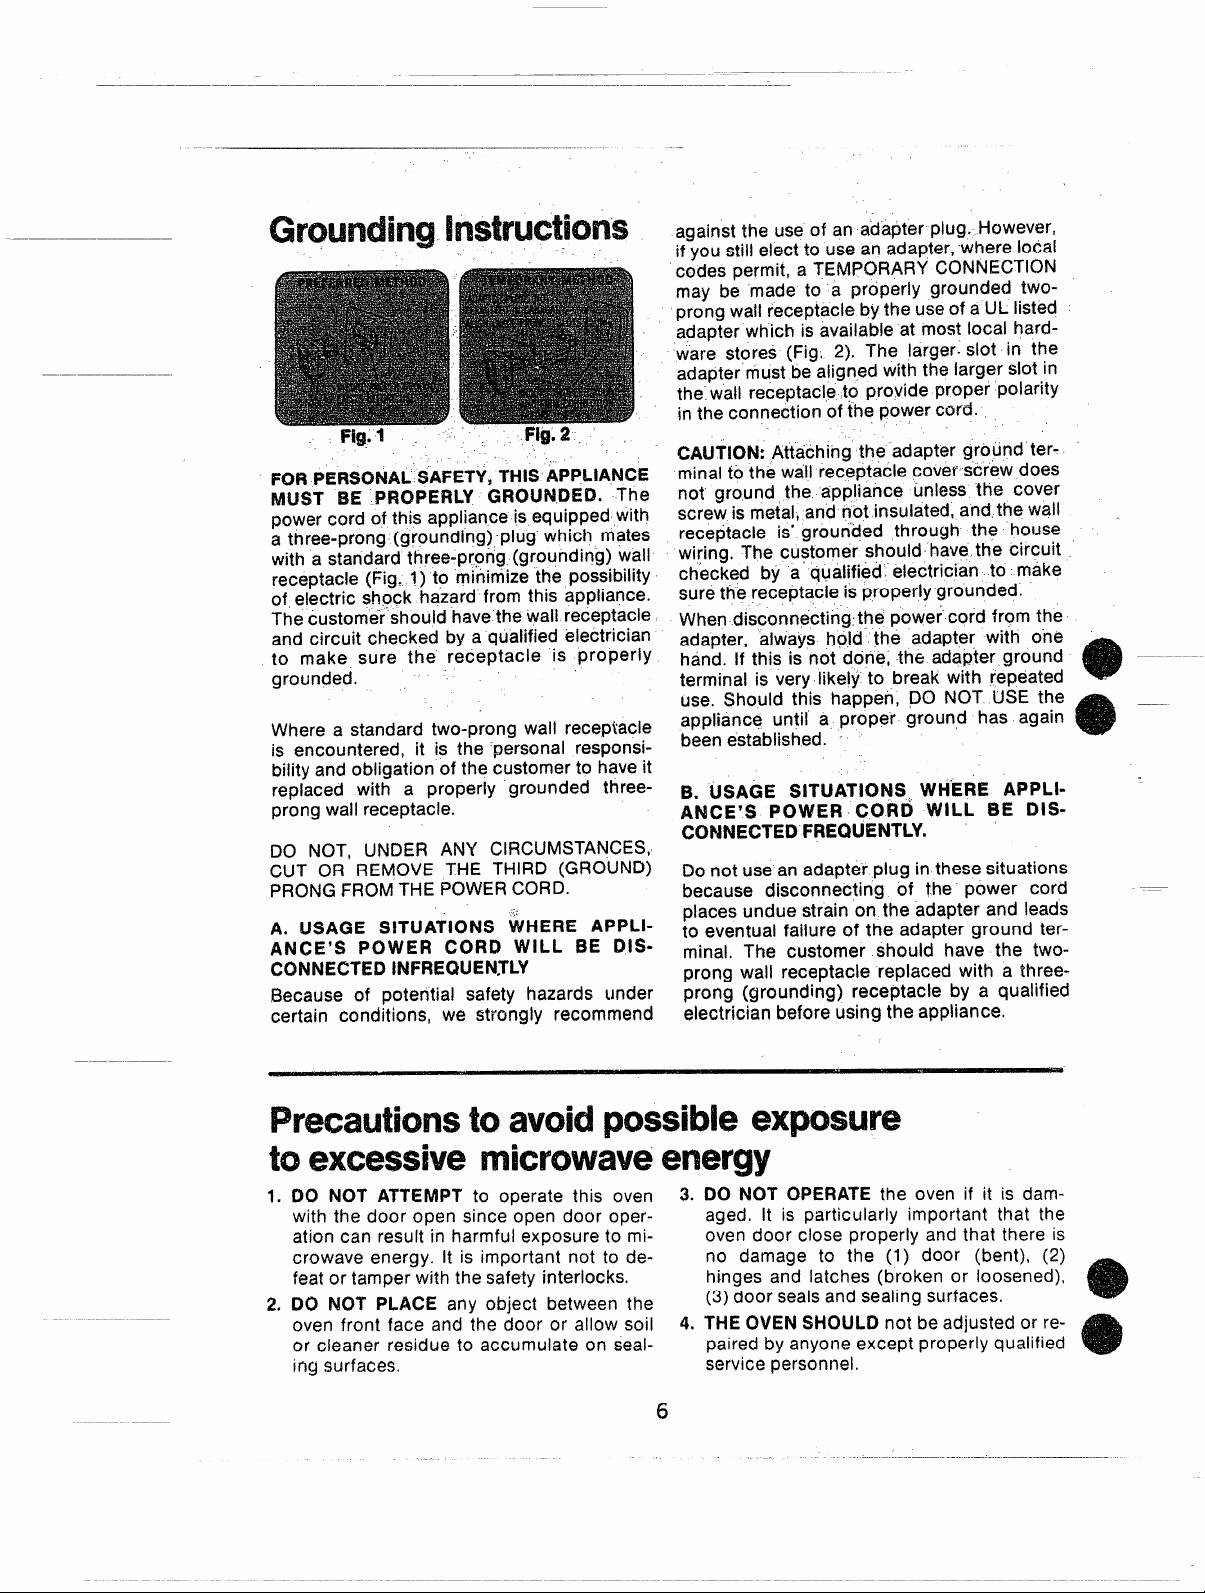
receptacle(Fig. 1) to minimizethe possibility
of.electric shpck hazardfrom this appliance.
Thecustomershouldhavethe wall receptacle
and circuit checked by a qualifiedelectrician
to make sure the receptacle is properly
grounded.
Wherea standard two-prong wall receptacle
is encountered, it is the personal responsi-
bilityandobligation of the customerto haveit
replaced with a properly grounded threeprongwall receptacle.
DO NOT, UNDER ANY CIRCUMSTANCES,
CUT OR REMOVE THE THIRD (GROUND)
PRONGFROMTHEPOWERCORD.
A. IUSAGE S!TUA’I’IONS WHERE APPLlANCE’S POWER CORD WILL BE DIS-
CONNECTEDINFREQUENTLY
Because of potential safety hazards under
certain conditions, we strongly recommend
againstthe useof an adapterplug. However,
if youstill electto useanadapter,where local
codespermit,a TEMPORARYCONNECTION
may be made to a properly grounded twoprongwall receptaclebytheuseof a ULlisted
adapterwhich is availableat mostlocal hard-
ware stores (Fig. 2). The larger.slot in the
adaptermustbealignedwith the largerslotin
the wall receptacleto provide proper polarity
in the connectionof the powercord.
CAUTION:Attaching the adapterground ter-
minalto the wallreceptaclecover-screwdoes
not ground the appliance unless the cover
screwismetal,and not insulated,andthewa14
receptacle is”groun’dedthrough the house
wiring, The customer should havethe circuit
checked by a qualified”electrician to make
surethe receptacleis properlygrounded.
Whendisconnectingthe powercord frpm the
adapter, always hold the adapter with one
hand. If this is not done, the ada@erground
terminal is very likely to breakwith repeated -
use. Should this happen, ,DONOT USE the
appliance until a proper ground has again
beenestablished.
B. USAGE SITUATiOh@>WHERE APPLI- ‘
ANCE’S POWER CORD WILL BE DIS-
CONNECTEDFREQUENTLY.
Donot useanadapterplug in thesesituations
because disconnecting of the power cord
placesundue strain on the adapterand leads
to eventual failure of the adapter ground ter-
minal. The customer should have the twoprong wall receptacle replaced with a threeprong (grounding) receptacle by a qualified
electricianbeforeusingthe appliance.
‘---
toavoid possible exposure
toexcessive microwave energy
1. 00 NOT ATTEMPT to operate this oven 3.
with the door open since open door operation can result in harmfulexposureto microwaveenergy. It is important not to defeatortamperwith the safetyinterlocks.
2. DO NOT PLACE any object between the
oven front face and the door or allow soil 4.
or cleaner residue to accumulateon seal-
ing surfaces.
DO NOT OPERATEthe oven if it is dam-
THEOVENSHOULDnot beadjustedor re-
6
aged, It is particularly important that the
ovendoor close properly andthat there is
no damage to the (1) door (bent), (2)
hinges and latches (broken or loosened),
(3)door sealsandsealingsurfaces.
pairedby anyoneexceptproperlyqualified
servicepersonnel.
Page 7
“!. For pwsortai safety the oven must be properly
grounded, See
this baok. For best operation, plug this appliance into
its own e{ectrica] out!et, to prevent flickering of lights,
blowing of fuse or tripping of circuit breaker.
2. Use of Extension Cords. SeCause of potgntia! -----
-safetyhazards under certain coridition~ we strongiy
recommend against the use of an ,extension=bo~@,.,,...
However, if youstiil elect to use an exterrsion-c~rd, it
is absolutely necessary that it be a LfL listed 3vwire
grounding type appliance extension cord and that the
current carrying rating of the cord in ,&rn”peres-be 15
amperes cmgreater..Such extension
ablethroughHotpolntservice.Ifyoudouseanexten-
cord with ybadrmicrowave oven,the interior light
skm
may flicker and the
is in use. . ,
3. Se certain to place fhe front surface of the door
three inches or more back from the countertop edge
to avoid accidental tipping ofthe
usage.
4. Use metal oniy as directed in cookbook. Metal
trips as used cm meat rogsts are helpful in cooking
food when used as directed. Metal trays may be used
for TV dinners. However, when using metal in the
microwave oven, keep metal at least l-inch away.
fromsides of
5. Do not operatethe oven while emptyto avoiddam-
age to the oven and the danger of fire. If by accident
the oven should run empty a minute or two, n,oharm is
done, Ffowewer,try to avoid operating the oven enipty
at ail times—it saves energy and prolongs life of the
oven.
6, Cooking Merwiis may become hot because of heat
transferred from the heated food. This is especially
true if plastic wrap has been ‘covering the top and
handles of the utensil. Pot holders may-be needed to
handle the utensil.
7. Sometimes, the oven sheif can become too hot to
touch. Be carefui touching the shelf during and after
cooking.
8, DO not use any thermometer in food you are
microwaving unless that thermometer is designed or
recommended for use in the microwave oven.
9, Remove
when not using it@
inside the oven without inserting it in food or liquid,
and turn on microwave energy, it can create electrical
arcing in the oven, and damage oven walis.
10. $Wnove wire twist-tik% cmpaper and plastic bags
before placing in ovrm “~wist-ties sometimes cause
dag to heat, and n-mycause fire.
gm,mding h@rw2tk3ns f3n p~~e”6 Of
cordsare,obtain-
blowerscyndmayvarywhen ,ovefi
., ~
. .
applianceinnorm-al
microwaveoven.
“,!,
the temperature probe from the oven
cook with. If you leave the probe
--ciost%.f. Turn M the Dower -Inwnw,fiate!v:Touch
~ power at the fuse circuit b~eakerpanei. . ~ ~
14, i3011klgeggs
mended for microwave cooking: “Pressure can build ‘
up inside egg
,tatoes, hot dogs or sausages, -to~atoes~ applps,
chicken livers and other gibiets,a,~~ eggs (see above)
should be pierced to allow steam tci escape ‘during
cooking. ., ~
76. “Boilable” cooking pouc%s and tightly’ closed
plastic bags, or plastic wrap tightly covering containers should be slit, pricked or-vented as otherwise dk
rected in, Cookbook. if they are not, plastic could
burst during or immediately after cooking, resulting. in
injury. Also, plastic storage containers sh~uld bb at
least partially uncovered because they form such a
tight seal, ~
17. Do not pop popcorn in your microwave oven unless in q special microwave popcorn accessory or un-
less you use popcorn labeled for use in microwave
ovens. Because of the heat generated without these
precautions, the container could catch fire,
18. Piastic Utensiis–Plastic utensils designed for microwave cooking are very usefui, but should be used
carefully. Even microwave plastic may not be as tolerant of overcooking conditions as are giass or ceramic
materials and may soften or char if subjected to short
periods of overcooking. in longer exposures to overcooking, the food and utensils could ignite, For these
reasons: 1) Use microwave plastics -only “and use
them”
turer’s recommendations. 2) Do not subject empty
utensils to microwaving. 3) Do not permit children to
use plastic utensils without complete supervision.
19, Do no! use your microwave oven to dry news-
papers. If overheated, they can catch fire.
20. Use of Shelf AccessoryXt.Toposit,ion shelf so that
it is securely “seated,”
ebove shelf supports and completely to the back oven
wall. Dro~ !nto place so that the recessed areas are
over the” shelf supports. To remove shelf, lift shelf
above supports and then pull forward and out, Do not
olace food on shelf unless it is securelv “seated” cm
11. !30n’t cWrost frozen liquids-especially carbonated ones-in the oven, Even if the “container is
opened, pressure can build up. This can cause the ,
container to burst, resulting in injury,
12. Don’t overcook food. Ex~essive overcooking
dries fodd out, and may caus~ ~t th ignite in some
~a~e~. .-..=.-..,=..:=-..... --!- -----
13. It tood should ever ]gnik?:Keep the oven door ‘
CLEAf3/C)FF or disconr;ect powei ‘cord o; shut off
(in and out of shell] k not recOrn-
.,
,.,
yolkandmay cause it tb burst, resultirig
,,
----
.,
instrictcompliancewith the utensil manufac-
insert into the oven cavity
--——..—..—
.—_—...—
Page 8
on
—-.
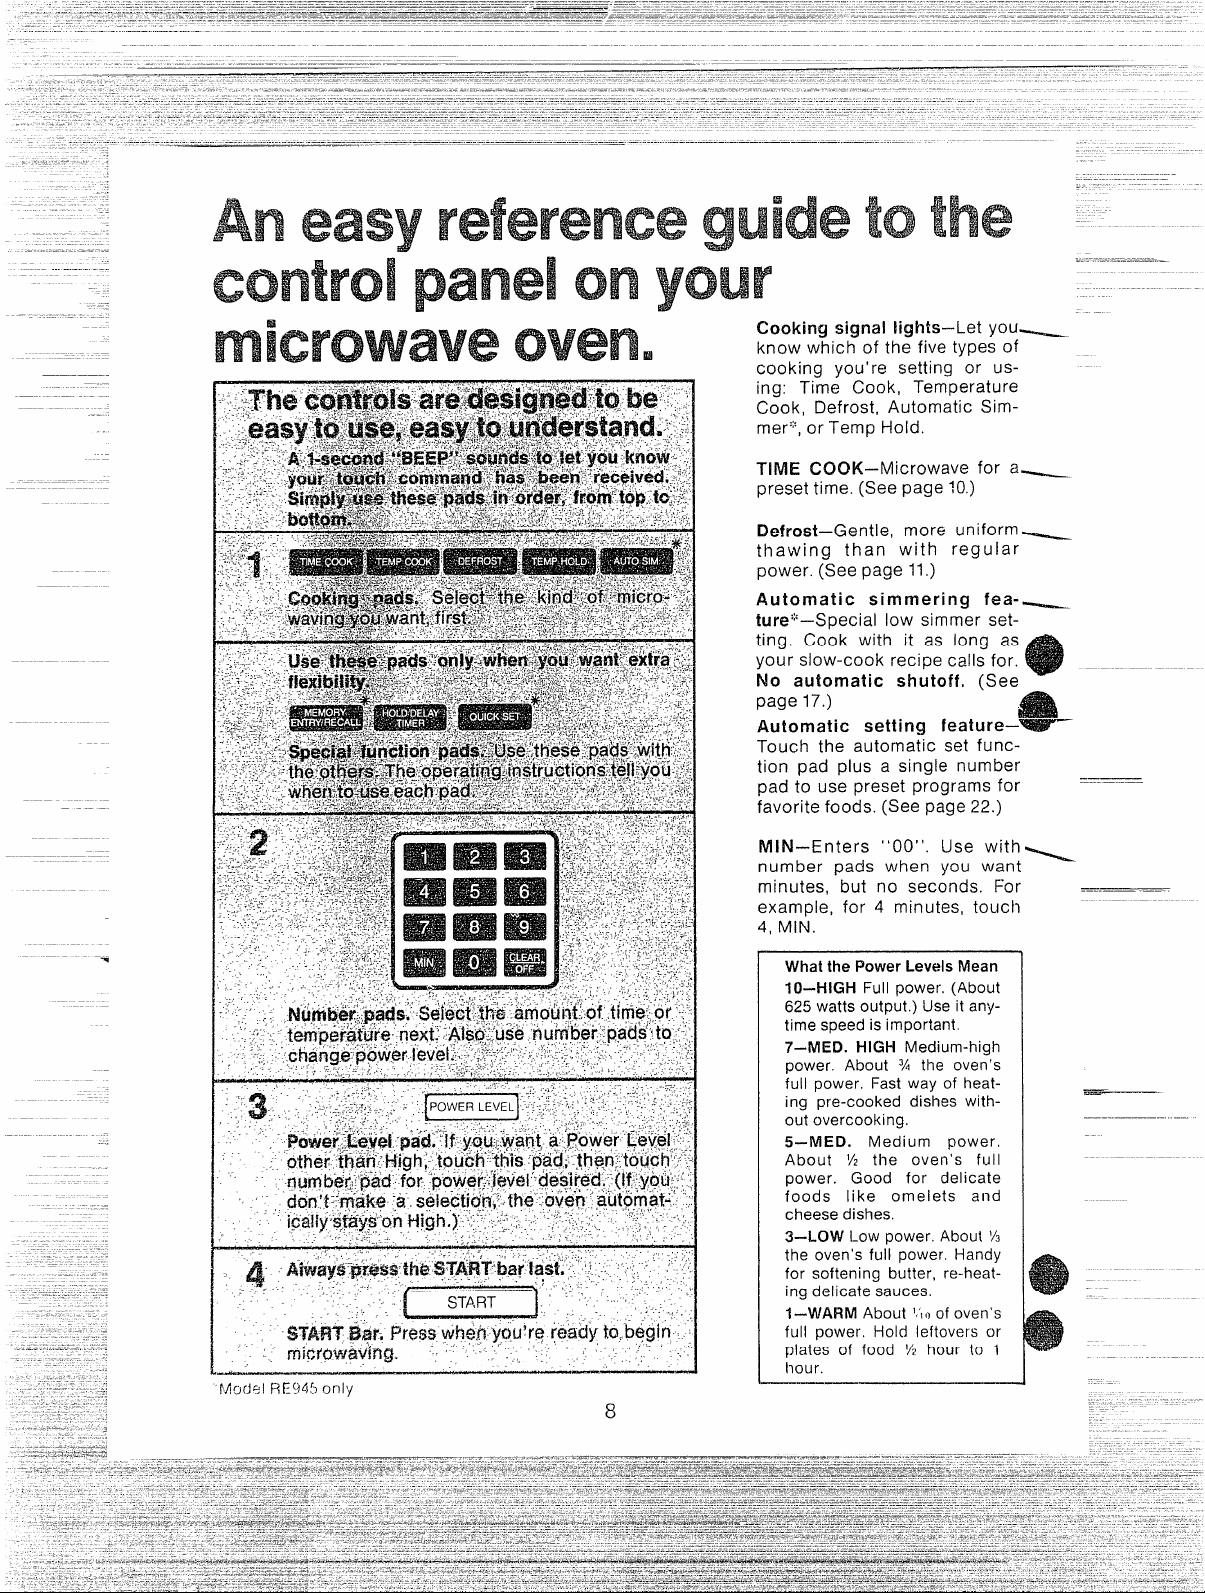
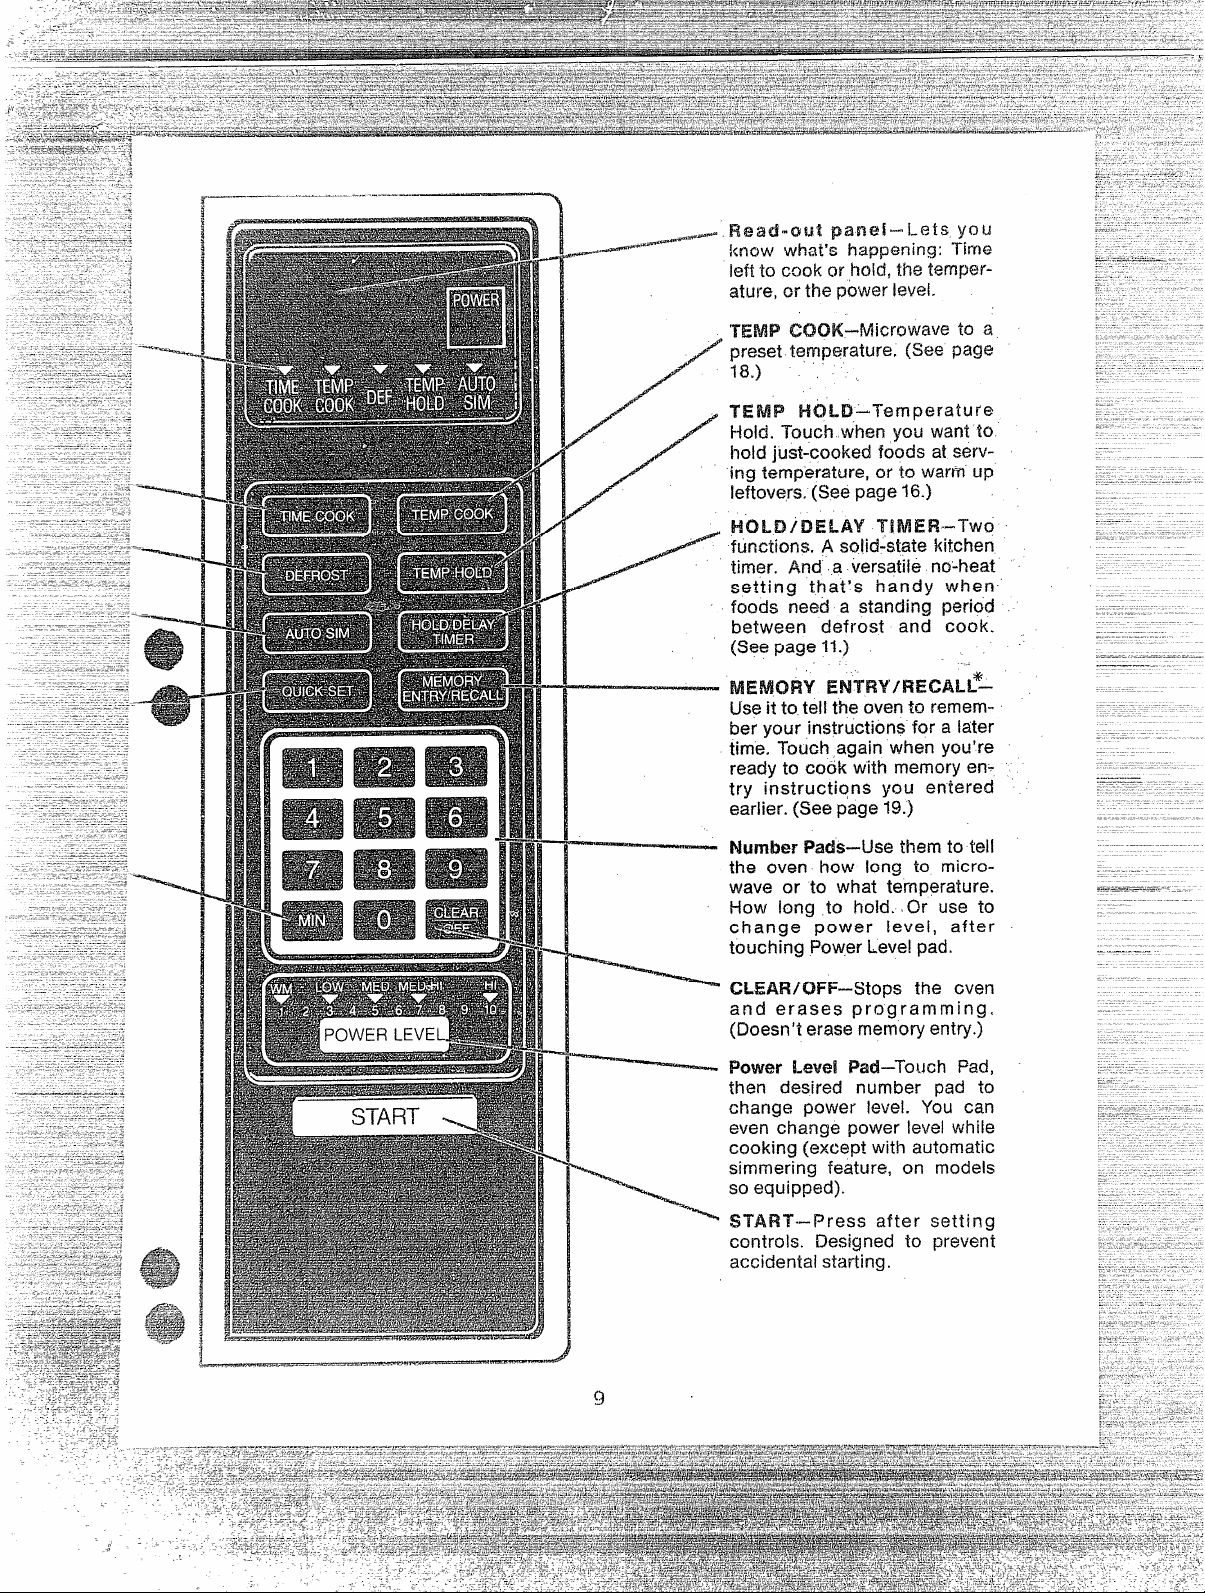
Cooking signal lights–Let you~
know which of the five types of
cooking you’ re setting or using: Time Cook, Temperature
Cook, Defrost, Automatic Simmer:;:,or Temp Hold.
TIME COOK—Microwave for a~
preset time. (See page 10.)
Defrost–Gentle, more uniform~
thawing than with reg uIar
power. (See page 11,)
Automatic simmering fea-....__
ture’;’–Special low simmer setting. Cook with it as long as
your slow-cook recipe calls for.
No automatic shutoff. (See
page 17.)
Automatic setting feature–WIBY_
Touch the automatic set function pad plus a single number
pad to use preset programs for
favorite foods. (See page 22.)
.
-..
‘-
———
.
IMIN-Enters “00”.
number pads when you want
minutes, but no seconds. For
example, for 4 minutes, touch
4, MIN.
What the Power Levels Mean
IO–HIGH Full power. (About
625 watts output.) Use it any-
speedisimportant.
time
7–MED. HIGH Medium-high
power. About 3A the oven’s
full power. Fast way of heating pre-cooked dishes with-
.-
out overcooking.
5-M ED. Medium power.
About YZ the oven’s full
power. Goocf for delicate
foods like omelets and
cheese dishes.
3–LOW Low power. About YS
the oven’s full power. Handy
for softening butter, re-heating delicate sauces.
1-WARM About “III of oven’s
full power, Hold leftovers or
plates of food Yzhour to 1
hour.
Use with=
—
Page 9
——.
-’+
#@-—’——————
HC)LD/DELAY TiMER-T’wc)
ff..mctions.
timer. And a versatile no-heat
setting that’s handy when
foods need a standing period
between defrost and cook.
(Seepage~1.)
Useit to tell theovento remem-
your instructions for a later
ber
time. Touch,againwhenyou’re
readyto cook with memoryentry irtstructiqns you entered
earlier.(Seepage19.)
A solid-state kitchen
ENTFW/REC=$-L–
“-*
NumberPads–use themto tell
the oven how long to microwave or to what temperature.
How long to hold.~€•à•ÀOr use to
change power level, after
touching PowerLevelpad.
tXEAF#/OFF-Stops the cveri
and erases programming.
(Doesn’terasernernoryentry.)
Power Level Pad–Touch Pad,
then desired number pad to
change
power level. You can
even change power level while
cooking (except with automatic
simmering feature, on models
soequipped).
START–Press after setting
controis. Designed ‘to prevent
accidentalstarting.
Page 10
——
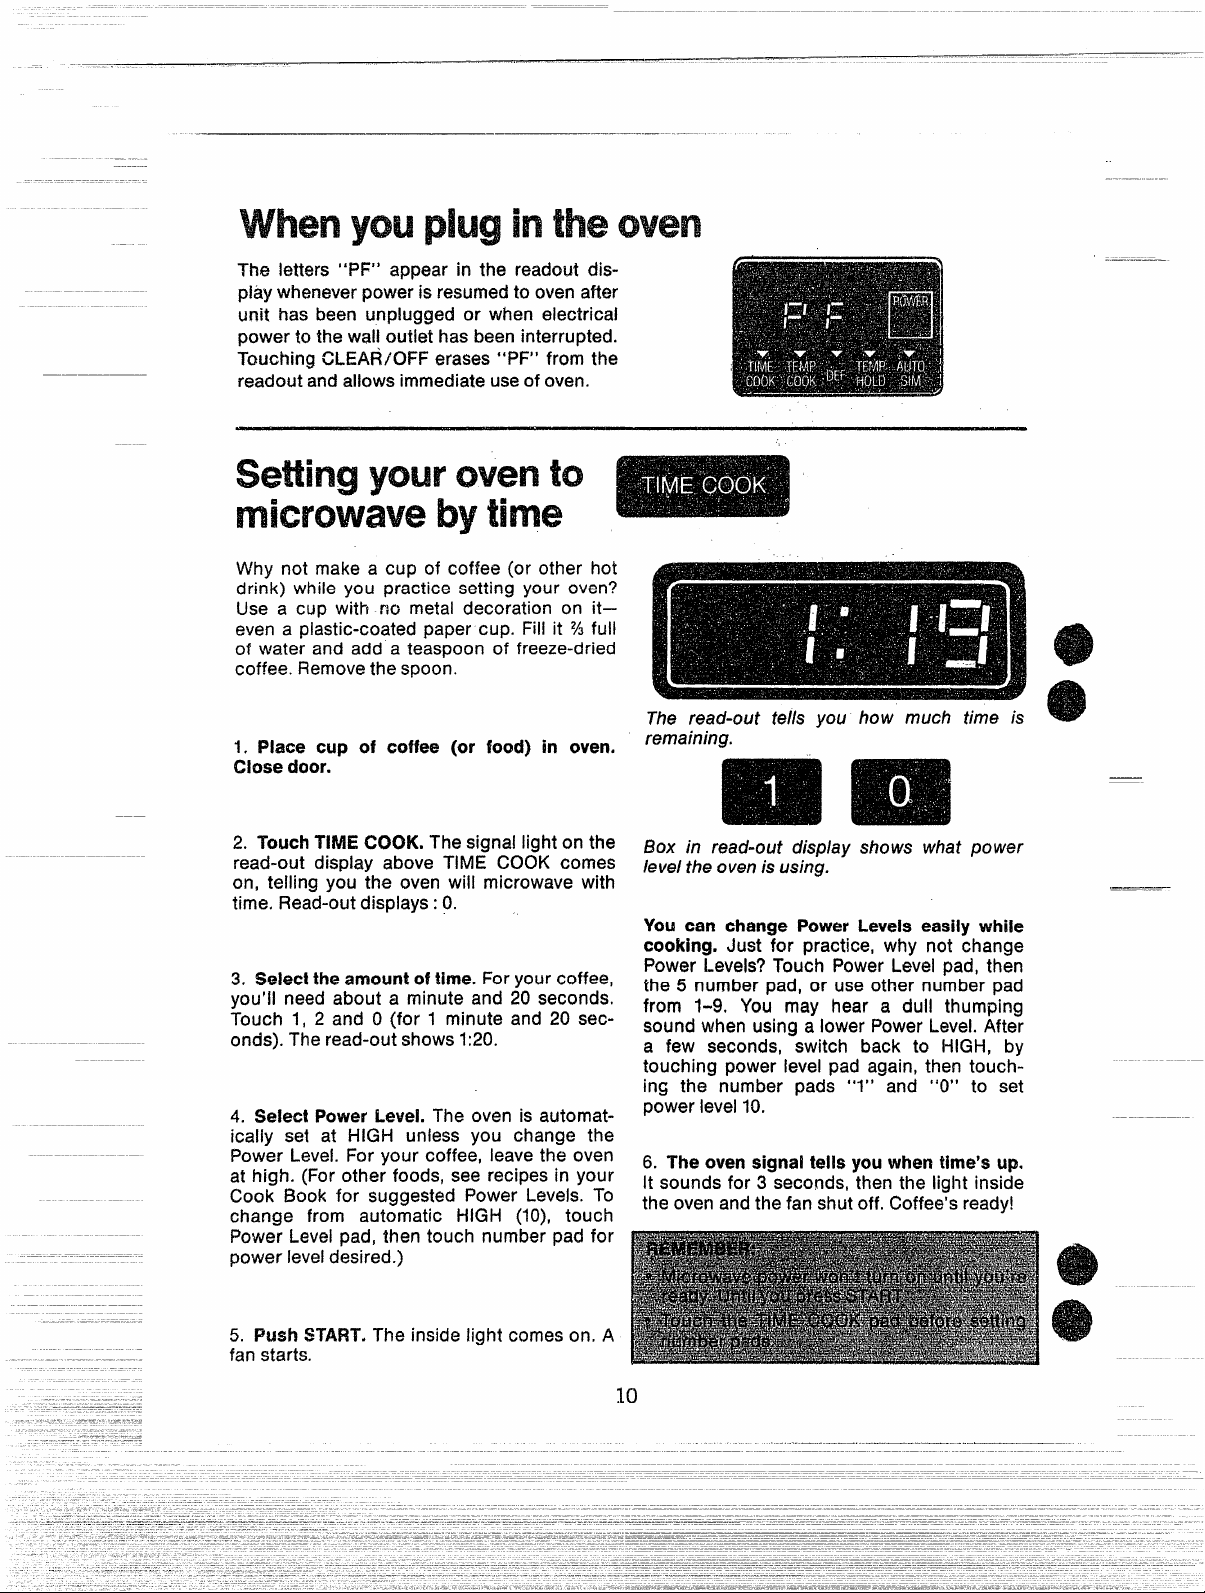
The letters “PF” appear in the readout dis-
piaywhenever
unit has been unplugged or when electrical
powerto thewalloutlet hasbeeninterrupted.
TouchingCLEAR/OFFerases“PF’* from the
readoutandallowsimmediateuseof oven.
power is resumed to oven after
—.————.—...—
tto
by
Why not make a cup of coffee (or other hot
drink) while you
Use a cup with rw metal decoration on it–
even a plastic-coated paper cup.
of water and add a teaspoon of freeze-dried
coffee.Removethe spoon.
practice setting your oven?
Fill it % full
1. Place cup of coffee (or food) in oven.
Closedoor.
2. TouchTIMECOOK.Thesignallighton the
read-out display above TIME COOK comes
on, telling you the oven will microwavewith
time. Read-outdisplays: 0.
3. Selecttheamountoftime.Foryour coffee,
you’ll need about a minute and 20 seconds.
Touch 1, 2 and 0
The read-outshows 1:20.
onds).
4. !Mect PowerLeveLThe oven is automatically set at HiGH
Power Levei.
at high. (Forother foods, see recipesin your
Cook Book for suggested Power
change from automatic HiGH (10), touch
PowerLeveipad,then touch number pad for
powerieveidesired.)
(for 1 minute and 20 sec-
uniess you change the
For your coffee, ieavethe oven
Leveis. To
The read-out tells you how much time is
remaining.
Box in read-out display shows what power
leveltheovenisusing.
Youcan changePowerLevelseasilywhile
cooking.Just for practice, why not change
PowerLevels?Touch PowerLevei pad, then
the 5 number pad, or use other numberpad
from 1-9. You may hear a duii thumping
soundwhenusingaiowerPowerLevei.After
a few seconds, switch back to i-iiGH, by
touching power ievei pad again,then touching the number pads “l” and “O” to set
powerievei10.
6, Theovensignaltells youwhentime’sup.
itsoundsfor 3 seconds,thenthe iigilt inside
the ovenandthe fan shutoff. Coffee’sready!
5. PushSTART.The inside iight comeson, A
Page 11

to
———.. .
1. Place frozen food in a microwave-safe
containerandsetinoven.Closedoor.
2. Touch@EFROST).Thesignal light on the
read-outdisplayaboveDEFROSTpadcomes
on. Read-outdisplays:0.
3. Select theamountoftime.Touchthe num-
berpads.
4. Don’fselecta PowerLevel.The DEFROST
setting has its own, specialPowerLevel.Box
in read-out display shows that DEFROST is
automatically set
5. PushSTART.The insidelight comeson, A
fan starts. You may hear a dull thumping
sound that lets you know that the oven is
usingaPowerLevellowerthan HIGH.
at PowerLevel3.
yew’
to
6. Theovensignaltel!syouwhentime’sup.
Itsoundsfor 3 seconds.Thenthe light inside
theovenandpowershutoff.
The Defrost setting is designed for uniform
thawing necessary for largeramountsof food.
For small amounts of frozen foods you can
also use TIME COOK on the HIGH setting.
HIGHthawsfaster,but you’ll needto turn the
food severaltimes,stir it and rearrangeit to
keepthawing uniform.
BecauseDEFROSTcan be changedfrom its
automaticpowerlevelof 3 to other powerlevels,you can useDEFROSTasthe first step of
atwo-stepautomaticmicrowave
page20.)
setting.(See
The HOLD/DELAY TiMER setting is a soiidstatetimer, No microwavepoweris used.So
you can use it for other things around the
kitchen, iike timing a 3-minute iong distance
phonecaii.
1. Touch HOL13/DELAYTINIER. Read-out
dispiays:O.Nocooking signaiiightshows.
2. Select amountof time,Touch the number
pads.The read-outpaneiteiishowmuchtime
youset.
3. Don’tselecta PowerLevel.You won’t be
usingmicrowavepower.
4. Push START.On some modeis, you may
heara fanandseethe oveninterior iight.
5. Theovensignaltelisyouwhentime’sUP.
itsoundsfor 3 seconds.
Youcan aiso useHOLD/DELAYTiMERcombined with microwavecooking,when reciPes
caiifor standingtime.(Tousewith microwave
cooking,seepage14.)
11
i
Page 12

———
—
to
-.—.
Your rnimbwuawoven has an
automatic temptirature probee
Formanyfoods,temperaturecontrol isimportant. That’s why your microwaveovencomes
with a removableautomatictemperaturesensor. You can microwavefoods like chicken,
turkey, pork and rare roast beef to the temperature you want. The oven shuts off automatically when the food’s done. No guesswork!
The temperatureprobe is handywhen cook-
ing for children,too. Becauseyoucancontrol
the temperatureof each portion individually.
Making soup? Servethe children theirs at a
mild 130”, while the adults get piping hot
at 170°.
soup
Frozen foods ar’en’f recommended to use
with the probe. It’s difficult to Insert the
probe when foods are frozen. Page 24 tells
you which foods work best with the probe.
(kind whichones don’t.)
Mtirig yourmicrowaveoventocookbytem-
peratureiseasy.Theovenhelps!
s The 3-second signal sounds if you set a
temperature outside the oven’s range (be!ow 90” or above 200°) or any temperature
lower than the temperatureof the food.
~The.signal also sounds if you set the oven
to
microwave by temperatureand forget to ,
attach the probe to the receptacle inside
the oven.
o DuringTEMPCOOKyou canrecallthe tem-
peraturethat youset bytouching the TEMP
COOKpad.
Thingsto rememberwhensettingyouroven
tomicrowavewi~htemperature:
Don’t leavethe probe in the oven if it’s not
inserted in food. (Prevents damage to
oven).
Like any food thermometer,the probe may
siip out of place in cooking. Reposition it,
pressSTARTagain, and continue cooking.
If youwaitto hearthe signalsound and find
the probe has slipped out of the food, the
food could be overcooked. Aiso, the oven
could bedamaged.
If you give the oven instructions it can’t
carry out, a 3-second signal sounds when
youpressSTART.
Touch the cooking function pad (TEMP
COOK)beforesettingnumberpads.
Recipesin the Cook Book tell you approx-
imatecooking times as well as temperature
settings. Usethe times as a guide to plan-
ningwhento serv?food.
Page 13

-— .
—————
you start, ihert m probe
Why not try microwavingwiththetemperature
proberightnow?Startwithcoldtapwater.Fill
a microwave-safemug
makeinstantsoup.
1. First,putprobeintofood.Ingeneral,insert
probeintocentermostpartof food (atleastone
inchintofood.)Insertas horizontallyas possible
irik) meats.Insertas directedin otherfoods.
?3 full of water anct
/-’
length of the cable, it also helps preventthe
probefromslipping out of position,
4. CIosti oven door firmly. Make sure the
cableisn’t interferingwiththedoorseal.
To COOK:
1. TouchTEMP COOK.‘The signal light on
the display above TEMP COOK comes on.
Read-outdisplays:O.
2. Select the temperatureyou
for yoursoup.
3. SelectPowerLevel. For now, leave the
oven on HIGH. See recipes and heating in-
structions in your cookbook for suggested
Power Levels for other foods. To change
power level, touch Power Level pad, then
numberpadfor powerleveldesired.
4. Press%TAFW.Theinsicislight comeson. A
fan starts. The read-out automatically indicatestemperature.
5. A minussignintheread-outletsyouknow
that the internal temperatureof the food
hasn’treached90°F.yet.Sincethe water for
your soup came from the cold watertap, it’ll
belessthan90°.
want. Use 170
.—
2. Place foodwith probe into oven.
3. Inseti cable end
walluntil“seated”,
intoreceptacleon oven
BE WRE PROBEIS AT-
TACHED SECURELY TO OVEN RECEPTACLE.(Hprobeis notattachedsecurely,signal wUIsound when you press START.The
oven will not start.)
Use clip on cable to loop cable when needed.
Looping the cable riot only controls the
Theprobe senses temperaturesbetween90”
and 2000E CMce above 90”, the read-out
panel shows you the h?ternaltemperatureof
the food untjl the temperatureyou selectedis
reached. Thenthe ovenshutsoff.
6. The signal tells you when the food
reachesthe temperatureyou selected.The
ovenautomaticallyshutsoff. Soup’sready!
7. Removethe cable end of the probeWorn
the receptacle.Then remove food and temperatureprobetogether.
Page 14

When you’re microwaving with
time, you can cook additional
ways. Without resetting.
Defrost-hold-and-cook–For foods that need
a standing period betweendefrost and cook.
To defrost-hold-and-cook, use the entire
chart. (For foods that don’t need a standing
period between defrost and cook, you can
skiphold-time.)
Hold-start-and-cook-Fortimes when you
can’t be in the kitchen whenit’s time to start
cooking. (The oven holds without resetting
for up to
onlythe areamarkedto hold-start-and-cook.
The chart shows you how to cook al! three
ways
When you’re ready to start, just change the
times listed on the chart for times neededfor
thefood you’recooking. ~
99 minutes and 99 seconds.) Use
-rIli?lgs toKMmm’lber when pro”
cjratmnhg with time:
if you accidentallyreversethe sequenceof
programming instructions, the oven automaticallyrearrangesyourprogram.Defrosting always comes first, then hold, then
cooking.
When instructions conflict, the oven carries
out the last instruction.
set the ovento Defrostfor 4 minutes,f-foldTime for 2 minutes and then Defrost for 6
minutes,the oven would Defrost for 6 minutesand Hold-Timefor 2 minutes.
Forexample,if you
DEFROST-
HOLDANDCOOK
——
HC)LD-STARTAND-COOK
“Allow bock to remain at room temperature only as long as safe, Times very,
Page 15

W-HEN ‘t’Ou THE
>$
—.—..—
OVEN TO 50 THE
Defrostthiscasseroie
Tcwcl-’lTHIS
YOU’LL SEE
cmTl”E
PANEL
.’
Defrost signal iight comes
on. The read-out parwi display$:0. ‘ ‘ ,.
‘.
—
‘,
./
for 15%minutes,then
for 10 minutes
Then cook it for
25minutes
,,
The’Defrost sigriai-iight rernai~$on: 15:3?showsint,hq,
read-out-pinei, .Box,in read-,---
‘ out shows “power lewd has
,.
Time Cbqk sigr?ai light
comes on. ..Th@read-out
,$
=-
-
. .
paneichangesto :0.
.,.,
Time Cook signai iight remains on. 25:00 sim$w in
read-outpanei.
Changepowerieveifrom
automaticHigh(tO)to
medium-highpower(7)
starti-low.
25:00 remains in the read-”
out panei, Time Cooi{signal
remainson.
if you start from defrost,
15:30shows in the read-out
panei,and time startscounting down+ Ali signai iights
except Defrostturn off. (The
oven is nuw defrosting, your
first instruction.)
Page 16

TempHold is an especially handyfeature of
yourmicrowaveoven.It letsyouhoidfoodsat
serving temperature, keeping them “j@cooked” hot andfresh.
WiththeTempHoldfeature:
1. Youcanselecta holdingtemperaturebe-
tween90° and200°F.
2. YoucanseiectanyPowerLevelyouwant.
Becausefoods tend to staymoistandtender
during microwaving,7’empHold isthe perfect
way to keepvegetables,casseroles,andeven
scrambled eggs piping hot and ready to
serve.Roasts,ham and poultry, too, may be
keptjuicy andtable readywiththisfeature.
Youcanevenwarmupleftovers!
Ifyouwant,you can setyour ovento automat-
icallydefrost,hold, time or temperaturecook,
andthen TempHold.Youmustbesure,when
you time cook, that the temperatureprobe is
placed in the food beforestarting the micro-
waveoven.
TempHold keepsa pre-settemperatureIevei
insidethe food for as iong asyou like. If your
ovendoes not haveanautomaticsimmersetting, you canachievethesame’flavorful,slow-
cookedtendernessby setting the TempHold
cycle to 180° and medium (5) power Ievei.
Usethe automatic s$mmerrecipesfrom your
cookbook.
Things to remember when setting
youroven to microwave
Temp HokL
Topreventspoilage,do notholdfoodsexcept solid roasts at temperaturesbelow
150°formorethan
Soiid(notroiied)roastsmaybeheidbeiow
fso”far upto
However, during the microwave roasting
process,agreatamountof heatisstoredin
the roast, Keeping the roast in the warm
ovencavity during TEIVIP/HOLDcan cause
2 hours.
2 hours.
a greater increase in internai temperature
than when aliowing the roastto stand outsidetheovenon a kitchencounter.Temperaturesof upto 20° to 30° above the TiWIP/
HOLDsetting are possibie.Becauseof this
heatstorage,it is not possibleto hold roasts
atararedegreeof doneness.
It is suggestedthat you first removethe roast
from the ovenand let it stand,uncovered,for
about 10 to 15 minutes before returning to
TENIP/HOLD.Or, if you knowbeforecooking
that you intendto hold a soiid roastat serving
temperature, you may compensate for the
stored heat by undercooking the roast. See
yourCookbookfor details.
‘m USE:
-..
1. insertprobeinfood.(If you havejustTemp
Cooked your food, steps one and two are
aireadydone).
2. Attachprobeto o~en,(See probe instructions underTemperatureCooking.)
3. TouchTEMPHOLO.Thesignallight on the
displayaboveTEMPHOLDcomeson. Readout displays:0.
4. Select the hoidingtemperatureyouwant.
Your oven wiil automatically microwavethe
food until it reachesthe pre-settemperature
andkeepsthefoodatthis temperature.
5. Select PowerLevel.Your oven wiil automaticallyuseHigh unlessyou seiect another
ievel. See your cookbook for suggested
powerievelsfor variousfoods.
6. PushSTART.The insidelight comeson. A
fan starts. If you also selecteda TIMECOOK
or TEMP COOK cycie, together with TEMP
HOLDcycle,the oven wili first cook the food
and then automatically go into the TEMP
HOLD cycie. (TiME COOK or TEMP COOK
aiwaysprecedesTEMPHOLD.)
7. Duringthe TENiP HOLD cycle,the oven
wi!inotshutoff untilyoutouchtheCLEAR/
OFFpad.(You can interrupt microwavingby
opening the oven door. The cycie resumes
whenyouciosethedoorandpressSTART,)
16
Page 17

If your oven has the automatic simmer feature, you have extra versatility in microwaving.Thissetting letsyouslow-cookfoods
for extra moistness,extratenderness.It’s like
havingan appliance-within-an-appliance!The
automatic simmersetting brings food rapidly
to a simmer,then holds the simmerat about
180°Ffor aslong asyou want. Perfectfor old-
-fashioned pot roasts, hearty stews, chili,
bakedbeans,evenmulleddrinks.Toautomat-
ically simmer, ym.I can use any microwave-
proof casseroles. But do not use a lid.
Instead, stretch plastic wrap.over the top of
the casserole. Gather the wrap loosely
aroundthe probe$o.allowsteamto escape.
Theautomaticsimmerfeatureletsyou slowcook foods which need long, gentle cooking
to tenderize or develop flavor. Food is
brought to a simmerrapidly,thenthetemperature probe maintains simmering at about
180°for
food is not shown on the read-out during
cooking. However,if you wish to check tem-
perature, touch automatic simmerpad; ten?-
Reratureof food and Powerlevelbeing used
‘willshow on the rea&out as long as-pad is
touched.
as long asyou want. Temperatureof
-mCXX)K
1. Insert$heprobeinliquid inbottomofdish.
(As liquid simmers,steamforms to cook and
tenderizefood.) Coverthe dish.
2. AttacHtheprobeto theoven.(See probe
instructions.)
3. Touchautomaticsimmerpad. The signal
light on the display aboveautoi’naticsimmer
padlightsup.
4. Don’tselectatime.Theovenwill becook-
ing bytemperature,nottime.
5. Don’t select a temperatureor a Power
Level.The automatic simmerfeature is automatically pre-set for the correct temperature
andPowerLevelfor automaticsimmering.
6. PushSTART.The insidelight comeson. A
fan starts.
7. Simmeras longas yourslow-cookrecipe
callsfor. Fivehours, six, eventen hours.The
oven won’t shut off until you touch the
CLEAF1/OFFpad. (You can interrupt micro-
waving by opening the oven door. But it re-
sumes when you close the door and press
START,)
A=--
Use any microwave-proof casserole for
automatic simmer feature. Insert probe in
midd{eof casseroleso thatthetipisrestingin
liquid in the bottom of thedish.Sinceliquid is
necessaryfor this function, steamtenderizes
andbrings out the full flavorof thedish.
Do not usea M on the microwave-proofcasserole that you choose. Instead, use stretch
plastic wrap over the top of the casserole,
Cover tightly with plastic wrap, arranging
/oose/y around the probe to allow steam to
escape.
Page 18

to
when you’re n’mowwawh’lg with ‘mrm
temperature, you can delay cook-
prog~ammingwithtemperature:
toremember I
hlg WIkm’.
Can’t be homewhenit’s time to start dinner?
Let the ovenstart without you. Using a combination of Hold/Delay Timer and TemperatureCooking,the ovencan delaystarting
upto 99minutesand99seconds
WHEN YOU WANT THE
OVEN TO 00 THIS
I’d like this cooked roast re-
heated in time for dinner,
but not started yet. . . It
wouid be ready too soon.
(Firstinsertthe probe in the
cookedroast,and attachthe
to theoven.)
probe
for
TOUCH THIS
:$::~::”tesbefores’art-15:00
AlthoughAutomaticSimmeris a temper-
ature setting, it can’t be programmed.
UnlikeregularTemperatureCooking,the
automaticsimmerfeature will not shut off
whenit reachesapresettemperature.
YOU’LL SEE THIS HAP-
PENING ON THE CONTROL
PANEL
7,
The read-outdisplays:0.No
signallight turns on.
The read-out panel shows
.
when
~ --l
ycwre
Thenheatit
to about 130°F–just the way
welikeit. . .
Doitjust intime for dinner
m~:;$g:~$~rn~:i
*iA//o~ foods to f~mfijnaf room fempefatufe on/y ag /ong8s sdfa,Times vary.
.
18
The read-out panel shows
:0. The signal light on the
display above TEMP COOK
comeson.
The TEtvlP COOK signal
light remamson. The readoutpanelshows130.
The read-out panel shows
.
Page 19

—.
mp$mff~~g+
The !vlemoryEntry/Recall pad allows you to
store complete 2, 3, or 4-step programs or
any l-step cooking function which requires
the entry of time or temperature.Just set the
ovenand pressthe MemoryEntry/Recali pad
insteadof start.As MemoryEntry/Recall pad
is pressed,readoutbecomesblank,indicating
that oven can now be used for other
programs.
DC)THIS
Setthe control panelfor the wayyou
ward the food” cooked. But don’t
pressSTART.Usea single setting or
oneof theprogramson pages14and
16.Defrost,cook by time or temperature . . . any settings but the
automaticsimmerfunction work with
memory.
TOIJCHTHIS
Whenthe pre-setcooking function is needed,
touching the MemoryEntry/Recall pad once
again will set the oven automaticallyfor the
cooking function(s) you previouslystored in
memory. Touch start and the oven begins
microwavingthis presetprogram.
YOU’LLSEETHISHAPPENING
ONTHECONTROLPANEL
Beforeyoutouch MemoryEntry/Recall, signal lights on the read-out
abovethe function that you setcome
on. Lights go off assoon as memory
padistouched.
Leave these s!mple Instrtmfkmswith the babysitter’:
SHE’LLSEETHISHAPPENING
DOTHIS
Put the food in oven and close the
door. Insertprobe if TEMPCOOKor
TEMPHOLDhasbeenselected.
TOUCHTHE
O?dTHECONTROLPANSL
Signal lights show what kind of
microwavingyou selected. (No light
showswhenusingHOLD/TIMER.)
>
The oven will cook dinner
the way the children like it
Just asif Motherwerethere.
Change your mind? It’s easy to clear the
Memory.Just enter a new program, and the
old instruction areautomaticallyerased.The
ovenisreadyto remembernewinstructions.
Remember:If you haveanycookingprogram
set in the oven, messing the Memory Entry/
Recall Pad wi~l“
oven’s memory,
memory.
store [hat program- in the
and will er&e ?he previous
Useyourovenwhileit’sremembering.Using
the Memory Entry only stores instructions.
You’re free to use the oven for any type
microwaving.Only when you touch Memory
Recall and START does the oven start
carryingout the storedinstructions.
19
———..-.—-
Page 20

. ———
..———.—-—.
asi%
—.—
—
In any cooking program,information entered
under the Defrost setting alwaysoccurs first
in the cookingcycie,andtheTimeCookentry
occurs last.Sjnceyou canchangethe Power
WHENYOUWANTTHE
OVENTODOTHIS
I wish to make a hearty Vegetable
Beef Soup (recipe in Cookbook,
44) but don’t want to be there
page
to turn the powerleveldownafterthe
initial boilingperiod.
TOUCHTHIS
EEEEl
Bringto aboilfor one houratHIGH.
Then automaticallyswitchto simmer
for 99 minutes. . .
Levelof both the Defrost and the TimeCook
cycles,you can use Defrost to cook at one
powerlevel,then automaticallyswitchto Time
Cook to cookatanotherpowerlevel.
YOU’LLSEETHISHAPPENING
ONTHECONTROLPANEL
Signal Ijght on the display above
DEFROSTcomes on. Read-outdisplays 60:00. Box in read-out panel
showsautomaticdefrostsettingof3.
Powerlevelchangesfrom3to 10
Signal light on the display above
TIMECOOKcomeson. Read-outdisplays 99:00. Box in read-out panel
showspowerlevel10.
at power level 5 (MEDIUM)
PushSTART.
[
!Hereare some other examples of
automatic
● You can cook dried beansat High for 20 to
30 minutes, then simmerthem until tender
at Medium.
. Microwave a meatloaf at Medium High
(power level 7) for 22 minutes, then let it
2-step cooking:
Power level changes from 10 to 5.
Appropriate signal lights show that
START
s Or cook the meatloaf at HIGH(power level
Forcompletecooking instructionandrecipes,
seethe cookbookthatcamewithyouroven.
ovenis carrying out the 2-stepcook-
1
ingautomatically.
stand using the no-heat Hold/Delay Timer
until readyto serve.
10),let it stand and then keep it at WARM
(powerlevel1)until you’re ready.
20
Page 21

———.
WNt?’new Ifnkx’c)waveoven winremindyou d ‘what’sioCmll’tee
Suppose you programmedthe oven“in the
morning to defrost, hold, then cook. You
stored the information for later. During the
day, whileyou were using the oven for other
things,you forgot whatprogramyou e~tered.
ASK BEFORE Y(XJ START
‘?13
TO ASK WHILE
MKXKWAWW:
1. TouchMEMORYENTRY/RECALL , Signal
lights light up to show you which type of
cookingyouselected.
2. Touchthecookhzgfunctionpadsyouwant
toknowabout.
1. The read-outpanei and cooking signai
iightst~iiyouhowtheovenism!cro~avingat
themoment.
2, Touch the other cooking functionpads
youwantto knowabout.
3. Theanswersappearintheread-outpanei.
YOU’RE
3. Theanswersappearintheread-outpaneL
WHENYOUWANTTOASKTHIS
I entered a program this morning.
Whatcookingdid it caiifor?
HOWlongwiiidefrostingbe?
Howlongwillcookingbe?
Did I ask for any hoid-time in
between?
TOUCHTHIS
YOU’LLSEETi+iSANSWERONTHE
CONTROLPANEL
The signai lights on the dispiay
above TiME COOK and DEFROST
comeon.
The read-out panel shows the
amount of totai time for defrosting.
(TheDefrostsignailight slayson until touching TIME COOK in the instruction below.)
The read-out panel shows the
amount of totai’ time for cooking.
(The Defrost signal iight, goes off.)
The Time Cook signai light comes
on,
The read-out panei shows the
amount of HOLD time, (No signal
lightsareon.)
.—
—.
Page 22

—
.- -.
——
——-.
-.—-.
————
—
a
The automatic setting
hasit, offersyouaquickwayto set youroven
to cook some of your most frequently Pre-
paredfoods.Insteadof havingto setatime or
tem~eratureandDowerlevel,Youcan usethe
aut~matic settin~, feature tb autOmatiCa!iy
choosefrom 10
predeterminedcooking com-
feature, if your oven
—-
binations.Ifyouwantto reheatcoffee,warma
babybottle, bake potatoes, or any of a wide
varietyof other microwavingfunctions,simply
choosethe automaticsettingcycleandselect
the proper number, from “1” to “0”, for the
automaticprogramyouwish.
To USE:
7.
Piacefoodin oven.
Forsettings“9” or “O”, placetemperature
probein food andconnectreceptacleend.
2.
Touchautomaticsettingpad.
The signal light on the display abovethe
automatic setting function comes on.
Read-outdisplays:0.
3.
Touch number pad which corresponds to
food youaremicrowaving.
Alwaysbesure to set a singledigit setting. If
though yousetTIMECOOK.
See chart next page. Read-out display
showsthe automaticsettingyouhavechosen by displayingtime to cook or temperature selection (depending on setting).
Signal light on read-out above TIME
COOKor TEMP COOK (whicheveris ap-
propriate)comeson.
4,
Touch STARTfor oven to carry out cook-
ingprogramshownondisplay,
YOUset two’digits or more,the ovenwill function as
22
...-.-.—-—
-.
Page 23

.-
Touse the automaticsettingfeaturefor foods
not listed below, select a setting for a food
similarto theoneyouwishto microwave.
——
-.
AutoSet
Setting
—.
:X#illy
Temperature
1
1min.
Power
Level
10 Reheat1cup of coffee,2 sandwichesorwei-
suggested
Foods
ners;cook1slicebacon;meltYZcup butter.
2
2 min.
8
Reheatbabybottleor1mugcoffee,
4 sand-
wichesor weiners,an8oz.canvegetables;cook
2slicesbacon.
3
3 min.
8 Reheat1pieceofchicken,2cupscoffee,1 ham-
burgerpattieor 1cupsoup;cookcereals.
4
4 min.
8 Reheat1plateleftovers,largecan ofvegetables;
cook1 potato.
5
5 min.
8
Reheat3 piecesof chicken,4cupscoffee,1cup
sauceor 1can of soup.
6
6 min.
10 Reheat9piecesofchickenor 4 hamburgerpat-
ties;cook 6slicesof bacon.
7
7 min.
10 Reheat2 bowlssoup;cook8slicesof bacon,4
ears corn, 10oz.frozenvegetables.
8
8 min.
10
Reheat2 platesIeft-overs;cook4carrots,cauliflower,frozengreenbeans,squashor 2
potatoes.
9
145°
7 Temperaturecook mediumdonebeef,cream
soupsor chowders.
o
160°
10
Temperatureiook hotbeverages,casseroles,
soups,vealandreheatleftovers.
23
Page 24

.-”.
—
-——
.
1. Casseroles–15Q0-1600 internal temper-
aturegivesbest donenesson mixtureof
cooked foods heated together into a main
dish. Rawfoods such as hamburgeror other
meat, vegetables and sauces starting from
“scratch” should be precooked before combining together into a casserole heated to
above temperature. The advantage of the
temperatureprobe: it tells you when casserole is at correct temperature for serving,
withoutchecking,peekingor guessing.
2. Reheatingleftovers-thistype of food is
excellentto heat with temperatureprobe be-
causeoftenthe amountof leftoverfood is not
known, therefore, time to cook is only a
guess.Cookingto a presettemperature(usually 155°)elifiinates the guesswork.UseHigh
or MediumHighPowerLevel.
3. Platesof Food–in general, place temperature probe in largest piece of food, then
cover plate with wax paper (or lightly with
plastic wrap). A preset temperature of 160°
gives piping hot food. Use High or Medium
HighPowerLevel.
4. Beveragesandsoups-useclip on cableof
probeto helpstabilizeprobein liquids.A preset temperatureof 130° is “warm to drink,”
about170°is“steaminghot.” .
pre-
5. Beef, lamb and ham loaves–be sure to
place probe as horizontally as possible, and
use clip to stabilizeprobeinmeatmixture.
6. RoastsandPotRoasts-cook roasts.using
your choice of power settings. Veryspecific
instructions are included in the Cook Book.
Pot roasted sirloin tip and rump roasts are
succulent and tender when cooked with automatic simmer(orI modelswiththis feature)
ortemp/hold features.
7. Dips–hot dips are a popular appetizer.
UsingLow or MediumPower,an internaltem-
perature of 90-130° (depending on the in-
gredients)isjust right to serveguests.
8. Slow-cooldngrecipes–any foodsthat you
can cook in a slow-cooking appliance, you
can microwavewith the Automatic Simmer*
setting,usinganovenwarecasserele.
9. Stewingandsimmering-thistypeofcook-
ing involves bringing food to a simmering
temperature and automatically maintaining
that temperaturefor a long period of time. We
recommend the Automatic Simmer* setting
onyourmicrowaveovenfor,moststewing,pot
roastingandotherslow-simmeredcooking.
—
not for use
the Probe
1. Delicatebuttericings,ice cream, frozen
whippedtopping,etc.–these softenrapidlyat
warm temperatures. Lowest setting on tem-
peratureprobeis900.
2. Manyfoodsin the frozenstate–because
temperatureprobe should not be forced into
rockhardfoods,
defrosting, many conveniencefoods may be
heatedwith the probe to the precisetemperaturefor serving.
3. Jndivldualfoods cooked in batches–in
cooking with microwaveenergy, differences
from one food to another, even of the same
type of food can result in different cooking
times of foods in the samebatch.A variation
in size (such as in cup cakes, sandwiches,
etc.) or moisturecontent (suchasin potatoes
*~n mOde~~
it could break.However,after
quippedwiththisfeature.
and other vegetables)can cause variation in
cooking speed. Temperature probe in one
food in a batch might not correctly indicate
internal temperature of all foods cooked
together.
4, Starchyvegetables–potatoeswhich cook
to steamy hot temperatures tend to stick to
temperature probe due to starchy nature of
interior. (Clean immediatelywith soapy cloth,
then rub lightly with plastic scouring ball if
necessary.)
5. Battersanddoughswhicharebaked.This
type of food should be observedwhencooking to best judge when done. Also, periodic
turning of the dish is usually required on
thesedelicatefoodtypes.
24
Page 25

—-
-—
.. .-—
Q. The defrosting times in the Cook Book don’t
seemto be rigM formy food.
/4. Cook book times are averages. Defrosting time
can vary according to the temperature in your
freezer. Foods from freezers set at the coldest set-
tings may take longer to thaw. Foods stored in the
freezer section of some single-door refrigerators
may be at a higher temperature. They may take less
time to defrost.
Q. Can I settheoventocook, then hold?
A. Yes, if you usethe C5EFROSTpad for your cook-
ing setting. See page 20. The microwave oven is
automatically programmed to go from a defrost, to
hoid cooking program. You can also add a second
cooking program after hold, by using TiME COOK
as the third cooking step..The oven will automatiealiy transpose your instructions. It wiii hold first,
hen cook, since this is a more usefui combinative!?.if
you want to use Hoid/Deiay Timer after cooking,
ait to hear the signal at the end of cooking. Then
t the HOLD/DELAY TIMER.
Q. Can I use the automatic simmer setting for
timed cc~kifig?
A. No. You need to use the probe. The probe cooks
bytemperature oniy.
Q. What happens ifI accidentally leave the probe In
theoven whenI’m setting timecooking?
A. Nothing, if the probe is in food. (When you accidentally instruct the oven to cook by both time and
temperature, the oven uses the last instruction programmed.) if the probe is left inside, touching an
oven wali, and not inserted in food you may damage
the oven.
Q. The signal soundsas soon as the START button
ispressed, butthe ovenisn’t cooking.
A. Read the section on programming again. The
signal will sound if your program can’t be carried
out. if you’re using the probe, check to make sure
it’s inserted properiy.
Q. Can! change PowerLevels while cooking?
A Yes, if you’re using TIME COOK or TEMP COOK
pads. Just touch the power level pad then the num-
berpadfor the Power Level you want.
Q. Can 1program for a roast to be cooked at high
heat,then finished at lowerheat?
A. Yes, by
funotion. See page 2L.
Q. Efow long does the automatic simmer setting
cook?
A. Untii you shut it off by touching CLEAR/CIFF.
using DEFROST as the first cooking
This way, you can ”simmer foods as iong as with a
slow cooker, without affecting the microwave timer.
Some slow-cooking recipes call for simmering 5 to
10 hours. Regular microwave settings always use
much shorter times.
Q.
Whathappensif Itelltheoventocookfirst,then
defrost’?
The oven only cooks in correct sequence. (t
A.
automaticailay unscrambles your message. It defrosts first.
Q. May I use the memory setting to delay temper-
aturecooking?
A. Yes, Just follow the stepson page 18.
Q. Can 1 get the same results as the Automatic
Simmersetting by puttingfood in a crock and using
the LowPower setting?
A. With the Low Power setting, you are iimited to
the amount of time on the microwave timer. Also,
you’dbe cooking with time, you couidn’t-”con-
since
trol the temperature of the food. Even with regular
temperature cooking, you can’t get the same results
as with Automatic Simmer*. With temperature cook-
ing, the oven automatically shuts off when it reaches
the preset temperature. Automatic Simmer main-
tains asimmer temperature for as long as you want.
You can manually set Temp/Hold to automatically
simmer, using recipes in your Microwave Cookbook.
See page 16 for instructions.
Q. Can I combine cooking by time and by temper-
ature?
A. Yes, you can combine time and temperature
microwaving by using Defrost as a first cooking
function (see page 20) in combination with Temp.
Cook. You can also set a combination of Time Cook
and Temp Hold.
Q. How is the shorter Mgnal different from the 3-
secondsignal?
A. The shorter signal is a “GO” sign. Your instruc-
tion is confirmed. The 3-second signai is a “STOP”
sign. h can mean any of these things:
1. Microwaving is complete.
2. You set the oven to microwave by temperature,
and the probe isn’t inserted securely in the oven.
You’regivingtheoveninstructionsit can’t carry
3.
out.
4. Youpressed
tions.
Q. How can I erasea memory Instruction?
A. A new program automatically erases the old one.
START without setting any instruc-
—
.—
25
Page 26

—-——
Tipsto your atits
Your new microwave oven is a vakmbie appkmce--
protect itfrom misuse by followingthese rules:
e !(+2 yow ovencleanand sweet-smel~ingt
Openingthe ovendoor a few minutesafter
cooking helps
occasionalthoroughwiping with a solution
of bakingsodaand waterkeepsthe interior
fresh.
Don’t use sharp-edgedutensilswith your
*
“air out” the interior. An
oven.The interior and exterior oven walls
canbescratched.Thecontrolpanelcan be
damaged.
@Don’tremovethecoveroverthe“stirrer”at
thetopoftheoven(microwavefeatureno.
5on
page 3.)Youwill damagetheoven.
13ecertain isoff
anypartofthisOVen.
Walk, floor a~cl plastic cover
Becausethere islittle heatexcept inthefood,
or sometimesin the utensils,spillsand spat-
ters are easyto remove. Some spatters can
be removedwith a paper towel, others may
requireadampcloth. Removegreasyspatters
with a sudsycloth, then rinse,anddry.
useabrasivecleanerson oven walls. NEVER
USE A COMMERCIALOVEN CLEANERON
ANYPARTOFYOURMICROWAVEOVEN,
Do not
Door-inside
Glass–wipe up spatters daily, wash when
soiled with a minimum of sudsy warmwater.
Rinsethoroughlyanddry.
Metal and Plastic Parts on Door-wipe frequently with a damp cloth to removeall soil.
DONOTUSEABRASIVES,SUCHASCLEAN-
ING POWDERSOR STEEL AND PLASTIC
PADS.THEY WILL MAR THE SURFACEOF
THESEPARTS.
SpecialnotewhenusingBrown‘N SearDish
withMicrowaveoven.
Scorched-app@arin9stains on the sheif of
your microwave oven, usually caused by
grease baking onto shelf while preheating
Brown ‘N Sear Dish, may be removed with
13elet@cleanser, a product of Drackett Co.
(Note: Grease does not normally bake onto
oven interior in microwave operation, how-
ever, high heats generated on bottom of
Brown‘NSear Dishcan causebaked-oncon-
dition on shelfonly, if greaseis present.)
‘on models
equipped with this feature.
Deletecleansermay be purchasedfrom your
local dealer or from your Authorized Service
Center. Check the “yellow pages” for location andphonenumber.
Deletecleansertnayalso besoldat localgrocery or hardware stores, or at houseware
stores,or at housewaresdepartmentof some
departmentstores.
Accessory Shelf*
Yourshelf accessory is madeof polysulfone,
one of the strongest microwave oven-proof
plastics.It is designedfor usein a microwave
oven oniy; do not use it in a conventional
Do No$operate your microwaveoven
oven.
with the shelf in place uniess you also have
foodintheoven.
NeverU$e a microwave browning dish with
the shelf. Heatfrom browning dish can damagethe shelf.
Theeasyto cleanshelfisdishwashersafe,or
maybewashedin hot waterwithamilddeter-
Do not useabrasivecleansersor scour-
gent.
ingpads.
Automatic Temperature Probe
Probe is sturdy, but care should be taken in
handling. Do not twist or bend; avoid droppingtemperatureprobe.
Clean as soon after using as possible. To
clean,wipe with sudsy cloth, then rub lightly
with plastic scouring ball if necessary.Rinse
anddry.(Orwashin dishwasher.)
26
—
——
Page 27

case
The outsidesurfaceis woodgrainvinyl. Clean
frequentlywithsoapandwater,thenrinseanddry.
Wipecleanthe outerpaneof the windowwitha
dampcloth.Donotuseabrasivesorsharpobjects
onthe outsidesurfaces.
If dust accumulation becomes a problem,
wipe surface of the outer pane with a weak
solution of liquid dishpan detergent (2 teaspoons detergent per quart of water). USE
SPECIALCAUTIONNOTTO SCRATCHTHIS
SURFACE.
Chrometrim is best wiped with a damp towel
or cloth, then wiped immediately with a ‘dry
towel.Cleaneddailythisway,chromewill stay
and spot-free.
shiny
Cmtmti panel ,
WipF with a damp cloth. Dry thoroughly. Do
not use abrasivesor sharp objects on panel.
Theycan damageit.
(3x$
if the cord becomessui:ed, unplug and wash
with damp cloth. For stubborn spots, sudsy
water may be used, but be certain to rinse
and dry thoroughly before plugging cord into
outlet.
How toreplace light bulb
First,unplugthe oven.Then removelight bulb
compartmentcoverbyremovingscrewwhich
holdscoverinplaceon rearofoutercase,
To remove bulb, push it inward gently and
turn it to the left or counter ciockwise; then
pull outward out of the socket. Replacewith
lamp number 25T8DC.(His availablein drug
and hardwarestores.) Replacecompartment
cover.Plug in the oven.
27
—...
Page 28

-.
—..-
Readthe book to be certain YOUunderstand
how the oven operates. Review “All these
thingsare normalwith your microwaveoven”
on page 3. In several other locations in the
booktherearepointsto checkon howto de-
terrnineifyouneedservice.
ltl ‘fp~yq ~~~~~~~ On lt~~
Powerhas been interrupted.TouchC!-EAR/
OFF.Resetthe controls.Instructionsstoredin
theoven’smemorywillhaveto bereplaced,
Microwave Energy Goes (M
.-lf
read-out
-.
If no cooking takes place after ‘Before ‘et ‘ime ‘as “a~sed
START MM is pressed:
If signaldoesn’tsound:MakesurepowerIs
qn.Checkfirst to seethat the 3-prong plug is
insertedfirmly into a properreceptacle.Isthe
wali receptacle wcwking properly or has it
failedandwon’t work until a fuseisreplaced?
Youcancheck that easilyat the control box.
Check to be certain the door is securely
closed.
door seems closed, it actually may not be
firmly closed.Unlessthe door is closedto en-
gage the safety interlocks, the microwave
energycannotcomeintotheoven.
If signalsounds:Checksetting directions. If
you’re using the temperature probe, make
surecable end issecurely“seated” into oven
receptacle. With TEMP COOK, make sure
temperature setting falls between 90° and
200°,Makesuretemperaturesettingishigher
than actual temperatureof food in oven. (If
food has reached or exceeds temperature
setting, oven won’t microwave because the
temperature you set has already been
reached.)
If a dish touches the door when the
Check to be certain the fuse or circuitbreakerprotectingthe receptacle into which
cord is plugged is operating. If fuse has not
blownand powercontinuesto go off, this signalsaproblem,socallserviceman,
If Oven Light Burnsout
SeeCareSection,pagetwenty-seven,regard-
ina replacement.The oven can be operated
w~houtthe light in place, but it should be replacedfor conveniencein seeingtheoveninterior, and alsofor safety’ssakebecausethe
socketshouldnotbeleftopen. Hotpointservicedoes not stocktheselights.
TV-Radio l!nterference
SomeTVand radiointerferencemightbenoticed while operating the microwaveoven. It
is similarto the interferencecausedby other
small appliances such as vacuum cleaners,
mixers, etc, H does not indicate
withyouroven.
a problem
28
.—- ——...—.a—.——
Page 29

YQU9H!find Hdpdnt IFadtxy ServiceCenters in M these cities.
ALAt3Ak?A
Birmingham-35’210
CrestwoodBoulevard
2500
{205}956-0333
(Decatur-Huntsville)
Huntsville-35805
1209f’utnam Drive
(205] 630-0150
Mobile-36609
1107BeltlineHighwaySouth
471-1451
(205)
Ai?6zu?dA
Phoenix-850$1
25South51stAvenue
80)( 14278
P.O.
(602)269-2121
TuCSOrr -85705
2015NorthForbesBoulevard
Suite111
(602)623-8415
NSAS
Rock-72209
NewBenton Highway
1]568-7630
—
ORNfA
ernardino-fiiverside)
orninaton-92316
10121C~ctusAvenue
(714)877-3434
(SanFrancisco)
Burlingame -94010
1649Adrian Road
(415)981-8760
Fresno-93727
1809NorthHelmStreet
(209)255-1851
LosAngeles-90058
2815East46thStreet
(213)583-1141
Sacramento-95815
16131:;ArdenWay
(916)929-2247
SanDiego-92101
3554KeHnerBoulevard
(714)297-3221
SanJose-95123
5763WinfieldRoad
(408)629-3500
Van?4uys-91405
6843LennoxAvenue
(213)989-5710
COLORADO
ColoradoSprings-80909
?865N.Academy- SuiteB
(303]597-8492
wwer-80207
East39thAvenue
)320’3301
CONNE~TICUT
Bridgeport-06604
615NorthWashingtonAve.
(203)367-5311
EastHartford-06108
265PrestigePark,Plaza3
{203)528-9811
tl~LAW/lRE
(Brandywine--Wilmington)
GlenMilk%PA-19342
R,D.#2.Box210
(215)358-1500
DISTRICTOFCQLUM~lA
Jessup,MD-20794
8201StaytonDrive
(301)953”9130
FLOMDA
FortLauderdale-3330~
WestMeNabRoad
1101
(305)974-6708
Foil Meyers-33901
4160S.ClevelandAvenue
(813)939-2812
Jacksonville-32205
5226HighwayAverrue
(904)783-1330
(Pompano-W.PalmBeach)
LakeWorth-33460
1802MadridAvenue
(305)655-7040
Miami-33167
3200N.W.1IOthStreet
(305)685-5144
Orlando-32807
6545EastColonial Drive
(305)273-6370
Tallahassee- 32S81
1205SouthAdamsStreet
(904)222-6931
Tampa-33611
5201StWeStShOreSoulevard
Box13708- InterbayStation
(813)837-1905
GEORGIA
Atlanta-30325
1695MariettaBoulevard
P.o. Box19917
(404)897-6400
Savannah-31406
211TelevisionCircle
(912)925-0445
HAWAII
Honolulu-96813
404CookeStreet
(808)533-7462
it)Af40
(Boise)
GardenCity -83704
5250Chinden Boulevard
(208)376-5880
ILLIOK.MS
Champaign-61820
1205NorthHagen
(217)359-4088
Chicago-60638
5600West73rdStreet
(312)594-2424
ElkGroveVillage-60007
10KingStreet
(312)593-2525
Lombard-60148
827-B35WestmoreAvenue
(312)629-8010
Peoria-61614
7708NorthCrestlineDrive
(309)692-5070
Rockford-61107
401North2ndStreet
(815)962-7200
Springfield-62702
2252South15thStreet
(217)753-8088
INDIANA
Evansville-47714
1016-KS,WeinbachAvenue
(812)476-1341
FortWayne-46808
4632NewaygoRoad
(219)484-9005
Gary-46409
5185Broadway
(219)981-2533
Indianapolis-46219
6233BrookvilleRoad
(317)356-8861
SouthBend-46613
1902MiamiStreet
(219)288-0685
IOWA
CedarRapids-52405
118FirstStreet,N.W.
(319)366-8579
Davenport-52802
1074SouthDittmer
BOX 3188
P,C).
(319)326-51O’I
DesMoines-50313
1637N.E.58thAvenue
(515)266-2191
Waterloo-50703
2829FallsAvenue
(319)236-1393
KANSAS
KansasCity-66115
2949ChryslerRoad
(913)371-2242
Wichita-67211
820EastIndianapolis
(316)267-3366
KENTUCKY
Lexington-40505
1144FloydDrive
(606)255-0848
Louisville-40218
4421BishopLane
P.O.
60X 32130
(502)452-3511
LOUISIANA
BatonRouge-70814
2935CraterLakeDrive
(504)926-5062
(NewOrleans)
Harahan-70123
701EdwardsAvenue
(504)733-?901
Shreveport-71102
1430DalzeliStreet
(318)425-8654
MAINE
SouthPortland-04106
54DarlingAvenue
(207)775-6385
MARYLAND
Jessup-20794
8201StayIon Drive
(301)953”9130
MASSACHUSETTS
(CapeCod)
Hyannis-02601
80Enterprise- Unit 11
(617)’77?-5905
Pittsfield-01201
1450EastStreet
(413)499-4391
(80ston-South)
Westwood-02090
346UniversityAvenue
(617)329-1250
(Boston-North)
Wilmington-01887
281Main Street
(617)944-7500
MICHIGAN
GrandRapids-49508
35028thStreet,S.E.
(616)452-9754
Lansing-48912
1004E.MichiganAvenue
(517)484-2561
Troy
Westland-48185
953Manufacturer’sDrive
(313)583-1616
MINNESOTA
(Minneapolis-St.Paul)
Edina-55435
7450MetroBoulevard
(612)835-5270
29
Page 30

.—.-
-.
——-——
—
——
Rlissws!lwi
Jackson-39209
325IndustrialDrive
(601)352-3371
?41ssQLfRl
Kansas Citv. KS-66115
2949 Chry;ikr Road
{913)371-2242
LOUiS -63178
St.
?355WarsonRoad,North
P,Q.80X14559
~314)993-6200
Springfield -65807
1334 WestSunshine
{417)831-0511
NEBRASKA
Lincoln-68503
1145North47thStreet
{402) 464-9148
Omaha-68117
6636“F” Street
(402)331-4045
NEVADA
LasVegas-89109
3347 S. HighlandDrive
Suite1
(702)733-1500
Reno-89511
DelMonteShoppingCenter
6465S.VirginiaStreet
(702)826-7070
NEWJERSEY
MountHolly -08060
Route38& EaslickAvenue
(609)261-3500
NorthCaldwell-07006
5Fairfield Road
(201)256-8850
(AsburyPark)
Oakhurst-07712
2111Highway35
(201)493-2100
Vineland-08360
749North DeiseaDrive
(609)696-1506
NEWMEXICO
Altiuquerque -87107
3334PrincetonDrive,N.E.
(505)864-1861
NEWYCJRK
Albany-12205
2 InterstateAvenue
(518)438-3571
8rooklyn -11234
5402Avenue“N”
(212)253-8181
Buffalo -14225
3637Union Road
(716)686-2268
(WestchesterCountyArea)
Elmsford-10523
Fairviewindustrial
Route#9-A
/914)592-4330
(Binghamton)
JohnsonCity -13790
278Mairi Stfeet
[507)729-9248
Park
LongIslandCity-11101
49-10Northern 8ouievard
(212)626-9600
(Nassau-SuffolkCounty)
Melville-11746
336SouthServiceRoad
(516)694-8600
(OrangeCountyArea)
Newburgh-12550
1135UnionAvenue
(914)564-2000
Rochester-14622
1900RidgeRoadEast
(716)544-7100
Syracuse-13204
965WestGeneseeStreet
(315)471-9121
NORTHCAROLINA
Charlotte-28234
700TuckaseegeeRoad
P.O.Box 34396
(704)372-8810
Greensboro-27406
2918Baltic Avenue
(919)272-7153
Raleigh-27611
33008ushAvenue
P.O.80X28107
(919)876-5603
0Hlt3
Akron-44319
2262S,Arlington Road
(216)773-0361
Cincinnati -45242
10001 AllianceRoad
(513)745-5500
Cleveland-44142
20600SheldonRoad
(216)362-4200
Columbus-43212
1155WestFifth Avenue
(614)294-2561
Dayton-45414
5701WebsterStreet
(513)898-7600
Toledo-43611
3300SummitStreet
(419)729-1651
(lKLAHOMA
OklahomaCity -73118
3228North SantaFe
(405)528-2381
Tulsa-74112
6913East13th
(918)835-9526
OREGON
(PortlandArea)
Beavertorf-97005
14305S.W.MillikanWay
(503)646-1176
Eugene-97402
1492WestSixth Street
(503)342-7285
PENNSYLVANIA
(Brandywine-Wilmington)
Glen Miils-19342
R,D,#2,80% 210
(215)358-1500
Johnstown-‘15905
214WestwoodShoppingPlaza
(814)255-6721
(Harrisburg)
Lemoyne-17043
1059ColumbusAvenue
(717)761-8185
Monroeville-15146
150SecoRoad
MonroevilleIndustrialPark
(412)665-3700
Philadelphia-19115
9900GlobalRoad
(215)698-3270
(Allentown)
Whitehall-18052
1906MacArthurRoad
(215)437-9671
RHODE!SLAND
EastProvidence-02914
1015WatermanAvenue
(401)438-0300
SOUTHCAROLINA
Columbia-29602
82!;f3:;;Road
(803)771-7880
(Greenville)
Taylors-29687
25HamptonVillage
(803)292-0830
TENNESSEE
Chattanooga-37403
613East1 Ith Street
(615)265-8598
JohnsonCity-37601
2912BristolHighway
(615)282-4545
Knoxville-37919
3250MynattStreet,N.W.
(615)524-7571
Memphis-38118
3770South Perkins
(901)363-1141
.Nashviile-37204
3607Trousdale
(615)834-2150
TEXAS
Austin -78704
2810S. FirstStreet
(512)442-7893
CorpusChristi-78415
3225AyersStreet
(512)884-4897
Dallas-75247
8949DiplomacyRow
P.O.80X 47601
(214)631-1380
El Paso-79925
7600BoeingDrive
(915)778-5361
(Brownsville)
Harliflgen-78550
1204 NorthSeventh
(512)423-1204
Houston-77207
P,O,
BOX 26837
6126SouthLoofIEast
(713)641-0311
Lubbock-79490
4623Loop289West
BOX 16288
P.0,
(806)793-1620
(Odessa)
Midiancf-79701
BOX 6286
P.0,
MidlandTerminai
(915)563-3483
SanAntonio -78216
7822Jones-Maltsberger
(512)227-7531
UTAH
SaltLakeCity -84125
2425South900West
P.o$Box30904
(801)974-4600
VIRGINIA
Fairfax-22031
2810DorrAvenue
(703)280-2020
Norfolk-23502
4552E,PrincessA r.
(804)857-5937
Richmond-23228
2910HungarySpringRd.
(804)288-6221
WASHINGTON
(Tri-City)
Kennewick-99336
UnionSquare
Suite206
101NorthUnionStreet
(509)783-7403
Seattle-98188
401TukwilaParkway
(206)575-2711
Spokane-99206
9624E.MontgomerySt.
(509)926-9562
WESTVIRGINIA
(Charleston)
Huntington-25704
1217AdamsAvenue
P,O.80X7518
(304)529-3307
Wheeling-26003
137NorthRiverRoad
(304)283-8511
WISCONSIN
Appleton-54911
343W.WisconsinAve.
(414)731-9514
Madison-53704
4630E.WashingtonAve.
(608)241-9321Milwaukee-53225
11100W.SilverSprin d.
(414)462-9225
WATCH FOR CHANGES. Addresses and telephone numbers sometimes change, And new Centers ot3en. If the numbers
change, check your telephone book. Look in the White Pagesunder “H(3TPOINT FACTORY
SERVICE”. “
30
Page 31

~,,
FLLL
il-KYTPo!NT
(hmludesCookingCentersandMicrowave(lvens)
FROM HOTPO!NTTO YOU -- ThiswarrantyisextendedbyI-Mpoint to the original purchaser and S&
to any
succeeding owner and applies fo proclucts Purch=ed in the United States, retainedwithin =;
\~em4~;~>ntiguousstates,thestateofHawaiiortheDistrictofColumbia,andemployedinordinary ~i
WHATWE
within one year from the date of origjn~l purchase, we will repair the product without charge to ~:
you. Parts and service labor are included.
tiguous states,thestateof Hawaiior in the District of Columbia.
~< HOWTOOBTAINSERVICE- Servicewillbeprovidedby our locai CustomerCarenfactory serv- ~~
a
ice organization or by one of our franchised Customer Care servicers during normal business ~
~~ hours after you notify usof the need for service.Servicecan be arrangedbytelephone. -‘> Look for
‘ja!EJ
“HOTPOINTCUSTOMERCARE@S,ERVICE”in the Yellow Pagesor write to the address given ~:
:= below.
:=
WHATISNOTCOVERED-This warrantydoesnotcoverthefailure of your Microwave Range!f it ~
.=
is damagedwhile in your possession,usedfor commercial purposes,or if the failure is caused by S&
“k
unreasonable use including failure to provide reasonable and necessary maintenance, IN NC) ~;
‘%
EVENTSHALL HOTPOlblT BE LIABLE FCHI CONSEQUENTiAL DANIAGES. This warranty does ~.
j=
not
“k
‘.-
or the Commonwealthof Puerto Rico.
:.,= Some states do not allow the exclusion or limitation of incidental orconsequential damaggs, so ?:
= the above limitation or exclusion may not apply to you. This warrarity gives you specific legal =)
:.-
a
rights, and you may also haveother rights which varyfrom stateto state.
-
:---
H
p
&
:..-
The magnetron tube is covered in the above full warranty. In addition to that warranty, if the ~~
‘~
-
magnetrontubefails becauseof a manufsicturingdefect within thesecondthrough thefifth yearfrom ~:
‘= date of the original purchase,we will furnish without charge, a replacementmagnetrontube. You ~~
:.-
mustpaytheservicelaborchargeforthe homecall,diagnosticwork, andremoval,andreinstallation ~
a
of the newmagnetrontube. ~
~ Al&her
;=
a
X*
::-
a
:.-
m
In the state of Alaska free service including parts will be provided to correct manufacturing de- $$
‘~
:%.
~ fects at our nearestservice shop location or in your home, but we do not cover the cost of trans- ~
‘>=
portation of the product to the shop or for the trave~cost of a technician to your home. You are ~~
a
responsible for those costs. All other provisions of this limited warranty are the same as those =(
stated inthefull andlimited warrantiesabove.
‘~
~~
WHERETOGET FURTHER HELP - If you wish further help or information coricerning this war- ?:
rarity, contact:
‘;=
H
:.-
A
‘%lys~!!J!!l:!f!l ?j!!/lP/!p!lP:.! fJJPjRt!lt!J!!A?!Jl:ll!!t!! n!lt!J?!!P:?P!!!:lB:fl!!l!:!P:lf!! l!!t!Nt;lf:! I?!.!):.!tj;t.
A
bili of safe,canceiiecfcheck or other paymentrecord should be kept to verify the
.
WKL 50 -if your l-lotpoirtt Microwave Range fails because of a manufacturing defect ~:
Servicewill be provided in the home in the 48 con- !!!?.
“HOTPOINT FACTC)RY SERVICE” in the White Pagesof your telephone directory or =’.
apply to the state of Alaska nor to the Virgin Islands, Guam,American Samoa,the Canal?on!3 =:,
AI)OITJONAL
LIMITEDFOUR-YEAR
MAGNETRONTUBEWARRANTY
provisions of this additional limited warranty are the sameasstatedin the full warrantY ~~,
LINVTEDWARRANTY
Applicableto theStateofAlaska
Manager—ConsumerAffairs
GeneralElectric Company
AppliancePark,WCE–Room316
Louisville, Kentucky 40225
WARRANTOR-
GeneralElectricCompany
AppliancePark
Louisville, Ky.40225
z:
-“
z:
w:
G\,
z:
-i
%:
w.
. .:
w.
-...
-.
z:
- .:
a
-,’
ix:
~{
y.
w
Q.:
-.
- .:
-
-.
%.
e.
&J
a
m.
——
originalpurchasedateand toestablishthewarrantyperiod.
RANGEMARKETINGOPERATION
GENERALELECTRICCOMPANY
Appliance Park,Louisville,Kentucky40225
*
+
A QUALITY PROOUCT OF
GENERAL ELECTRIC COMPANY
.
Pub. No. 39”4401“Rev.2 ~,~,PartNo, 862A299PIO0
.......-.—-k-_”.—..—— ._
 Loading...