

Page 1
+-
Countertop
Microwave Oven
Model RE943
JIEHUTHISBOOK
toget
BESTPERFORMANCE
your
MICROWAVEOVEN
SAVE TIME AND
$ee Section entitled
..
3
b
SAVE THESEINSTRUCTIONSFORBOOIC
MONEY
“Before You Call For
on page 28.
Pub##=rfiFi a\
Dwg#
Page 2
Add “to microwave”
[Oyour
vocabulary.
Your new microwave oven does so many things that you’ll
find this new “verb” handy. If you take a look at the Cook
Book, you’ll see the verb “microwave” often. Sometimes it
means to bake. Sometimes, to roast. It’s also used to mean
reheating, warming, even defrosting. In other words, all the
things your new microwave oven can do.
Microwaving is a whole new world of cooking. We think”
you’ll like it.
Manager–Consumers Institute
Hotpoint
Appliance Park 2/235
Louisville, KY 40225
Your microwave oven
is a registered product
Itis important that we the manufacturer know the location of the microwave
oven you are now using should a need occur for adjustments.
Please check with your supplier to be sure he has registered you as the owner. If
you move; or if you are not the original purchaser, please write to us, stating
mode/ and seria/ numbers. Write to:
4%
k.
%.S”
Hotpoint Product Service Section
General Electric Company
Range Marketing Department
AP 2-210
Appliance Park
Louisville, Kentucky 40225
This appliance must be registered-please be certain that it is.
Your Hotpoint microwave oven has a nameplate on which is stamped the model
number and serial number. Nameplate may be located either inside oven at top
left side, or on rear outside of case.
Model and serial numbers are also on the Purchase Record Card which came
with your microwave oven. Before sending in this card, please record the numbers in the space below, or get them from the nameplate described above, and
record here:
Model Number
Please reference both these numbers in any future correspondence or prod-
uct service calls concerning your microwave oven.
Serial Number
2
,...
Page 3
—. —
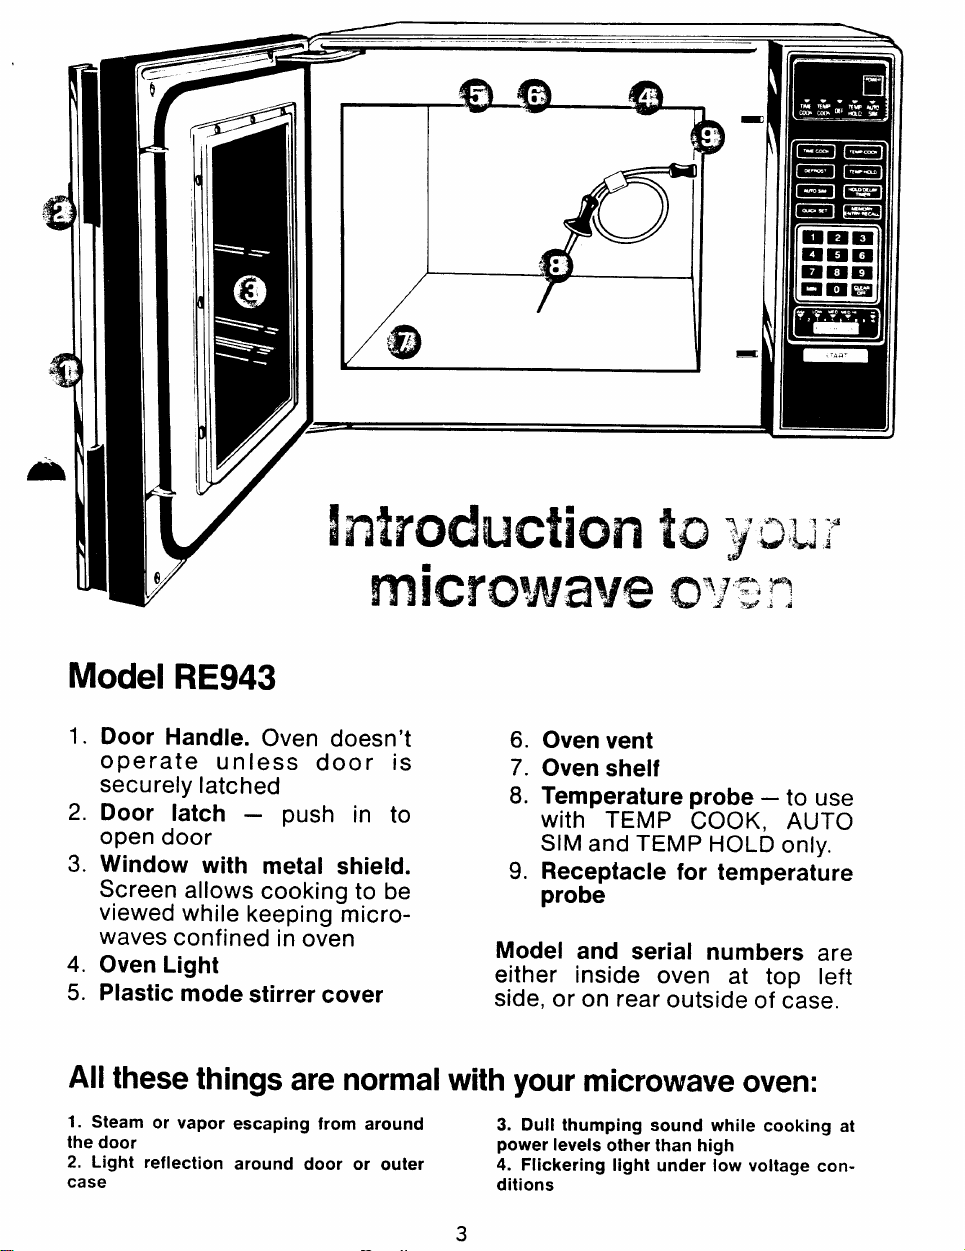
Model RE943
1.
Door Handle. Oven doesn’t
operate unless door is
securely latched
2.
Door latch –
push in to
open door
3.
Window with metal shield.
Screen allows cooking to be
viewed while keeping microwaves confined in o~en
4.
Oven Light
5.
Plastic mode stirrer cover
All these things are normal with your microwave oven:
1. Steam or vapo~
the door
2. Light reflection
case
escaping from around
around
door or outer
6.
Oven vent
7.
Oven shelf
8.
Temperature probe – to use
with TEMP COOK, AUTO
SIM and TEMP HOLD only.
Receptacle for temperature
9.
probe
Model and serial numbers are
either inside oven at top left
side, or on rear outside of case.
3. Dull thumping sound while cooking at
power levels other than high
4. Flickering light under low voltage conditions
3
Page 4
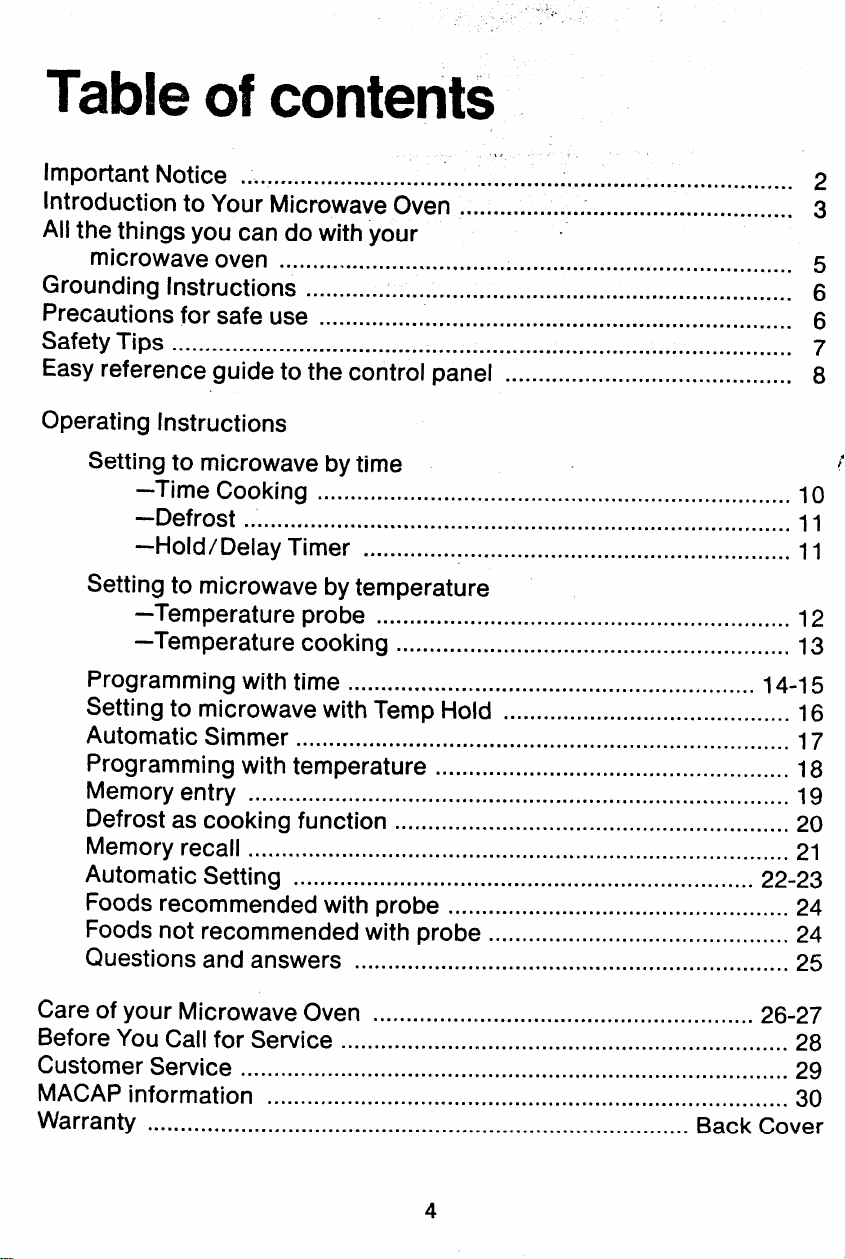
Table of contents
Important Notice
Introduction to Your Microwave Oven
All the things you can do with your
microwave oven
Grounding Instructions
Precautions for safe use
Safety Tips
...........
Easy reference guide to the control panel
Operating Instructions
Setting to microwave by time
–Time Cooking
–Defrost ..................................................................................
–Hold/Delay Timer
Setting to microwave by temperature
–Temperature probe
–Temperature cooking
......*...... .......................................
..................................................
............................*.... ..........................*...... ...........
.........................................................................
...................................................*...................
● .......*.........................................................................
...................*...................................................
● ............................................................... 11
..............................................................
...........................................................
,.
● .............................O
...........................................
L
3
5
6
6
7
8
10
11
12
13
Programming with time
Setting to microwave with Temp Hold
Automatic Simmer
.............................................................
...........................................
.............,*.....*..........*.......................................... 17
Programming with temperature ................................*....................
Memory entry
................................................................................. 19
Defrost as cooking function ........................................................... 20
Memory recall
Automatic Setting
Foods recommended with probe
Foods not recommended with probe
Questions and answers
Care of your Microwave Oven
Before You Call for Service
Customer Service
MACAP information
Warranty
...............................................’.... ..........................
................................................................................. 21
.....................................................................
................................................... 24
.............................................
.....................................*...... .....................
.........................................................
...................................................................
..................................................................................
........*.....................................................................
● .*
Back Cover
14-15
16
18
22-23
24
25
26-27
28
29
30
Page 5

AH the things you can do with
your new microwave oven.
Cooking versatility. Cook by time, by temperature, with automatic slow cooking, or with
temperature hold. Your oven lets you tailor
the cooking to the food. .
Fast, familiar cooking by time. You’ll find
most of your new microwave meals will probably be cooked by time. Use time cooking for
most casseroles, vegetables, appetizers,
snacks, and small, individual foods, like potatoes, hot dogs, hamburgers and meatballs.
It’s handy, too, for pie crust, cakes and other
batter foods.
Use temperature cooking when you can’t afford guesswork. The solid-state microwave
thermometer tells you the internal temperature of food . . .@a reassuring way to cook.
;deal for big roasts, turkey, and other foods
that need a specific temperature for proper
doneness.
Temperature cooking takes the guesswork
out of reheating, too. You can cook unusual
shapes, sizes and amounts of food without
the risk of overcooking.
The automatic simmering feature brings out
deep-down flavor and tenderness the microwave way. Use all your favorite old-fashioned
slow-cooking recipes, with a difference. The
kitchen stays cool. And the automatic temperature control keeps tabs on the temperature.
Let your food simmer all day, if you want. With
the automatic simmer feature, the oven
doesn’t shut off automatically, as it does with
time cooking and temperature cooking. it sim-
mers slowly until you’re ready for the food.
Temp Hold lets you hold foods at perfect
serving temperature. No need to let foods
lose their “just-cooked” freshness. Hold them
at the most appetizing serving temperature
for latecomers.
Defrost a turkey the afternoon of the feast.
The special Defrost setting is designed especially for bulky foods.
Time a phone call. The HOLD/DELAY TIMER
setting lets you do this, with solid-state preci-
sion. . . .
‘ust like the timer on your conventional range.
t
-~icrowave a meal without being there! The
Memory setting lets you decide how dinner
should be cooked. Then it remembers for
Because the timer works separately,
you. Someone else can press START later,
and the meal is cooked just the way you
wanted, without you being there.
Use your oven this morning, while it’s remembering how to microwave tonight’s din-
ner. Using’ the Memory Entry/Recall only
stores instructions. H doesn’t affect cooking.
You ‘re free to use the oven for any type
microwaving, while it’s remembering instruc-
tions for later.
Microwave more than one way, without re-
setting. Your new oven lets you defrost-holdand-cook for a preset time. For extra flexibility, you can defrost-and-cook also, with
time settings. Or you can delay-and-cook with
time or temperature settings.
Adjust the power of the oven at the touch of a
finger. Ten Power Levels give you extra control over what’s cooking. But the oven stays
on full power (HIGH) unless you want a
change.
Enjoy a wealth of new recipe ideas. The big
Microwave Guide and Cookbook included
with your oven tells you everything you need
to know to use your oven properly and successfully. Microlessons take you step-by-step
through all the basics. And 445 recipes and
41 charts keep mealtimes interesting.
The controls are easy to use
The controls are arranged the way you use
them, in top-to-bottom order. Start at the top,
and select a cooking pad. Then the number
settings you want. Next a Power Level. Then
press START.
When you want to erase an instruction, the
CLEAR/OFF pad is clearly marked for you.
There’s even a shortcut! When recipes call for
whole minutes, just touch MIN, instead of
touching the zero pad twice.
Each time you give the oven an instruction, it
responds. Just listen for the signals. If you
hear a short signal, the oven is saying “OK.”
A longer, 3-second signal tells you that you’re
giving the oven instructions it can’t carry out.
5
.,.
Page 6
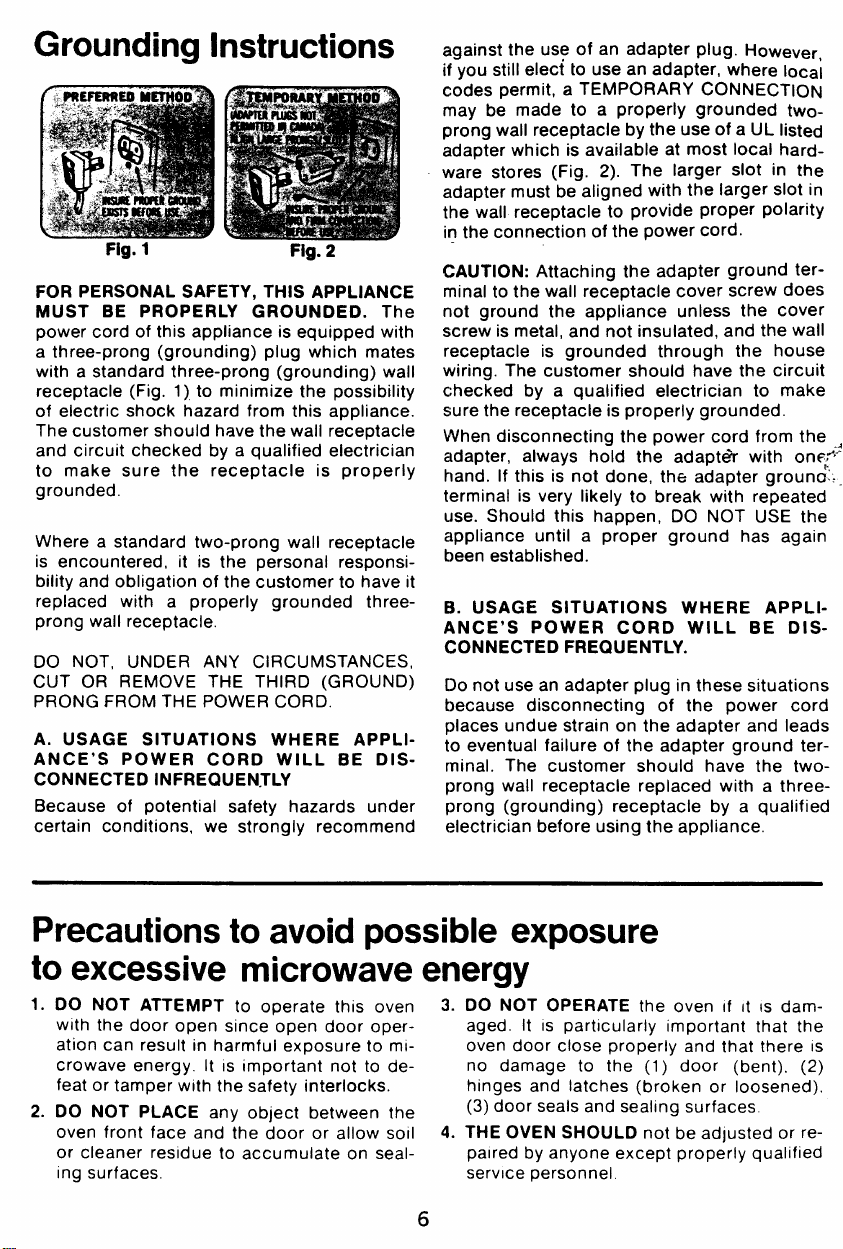
Grounding Instructions
Fig. 1
FOR PERSONAL SAFETY, THIS APPLIANCE
MUST BE PROPERLY GROUNDED. The
power cord of this appliance is equipped with
a three-prong (grounding) plug which mates
with a standard three-prong (grounding) wall
receptacle (Fig. 1) to minimize the possibility
of electric shock hazard from this appliance.
The customer should have the wall receptacle
and circuit checked by a qualified electrician
to make sure the receptacle is properly
grounded.
Where a standard two-prong wall receptacle
is encountered, it is the personal responsibility and obligation of the customer to have it
replaced with a properly grounded threeprong wall receptacle.
DO NOT, UNDER ANY CIRCUMSTANCES,
CUT OR REMOVE THE THIRD (GROUND)
PRONG FROM THE POWER CORD.
A. USAGE SITUATIONS WHERE APPLl-
ANCE’S POWER CORD WILL BE DISCONNECTED 1NFREQUENTL%
Because of potential safety hazards under
certain conditions, we strongly recommend
Fig. 2
against the use of an adapter plug. However,
if you still elect to use an adapter, where local
codes permit,
may be made to a properly grounded twoprong wall receptacle by the use of a UL listed
adapter which is available at most local hardware stores (Fig. 2). The larger slot in the
adapter must be aligned with the larger slot
the wall receptacle to provide proper polarity
in the connection of the power cord.
CAUTION: Attaching the adapter ground terminal to the wail receptacle cover screw does
not ground the appliance unless the cover
screw is metal, and not insulated, and the wall
receptacle is grounded through the house
wiring. The customer should have the circuit
checked by a qualified electrician to make
sure the receptacle is properly grounded.
When disconnecting the power cord from the
adapter, always
hand. If this is
terminal is very likely to break with repeated
use. Should this happen, DO NOT USE the
appliance until a proper ground has again
been established.
B. USAGE SITUATIONS WHERE APPLl-
ANCE’S POWER CORD WILL BE DIS-
CONNECTED FREQUENTLY.
Do not use an adapter plug in these situations
because disconnecting of the power cord
places undue strain on the adapter and leads
to eventual failure of the adapter ground terminal. The customer should have the twoprong wall receptacle replaced with a threeprong (grounding) receptacle by a qualified
electrician before using the appliance.
aTEMPoRAR’fcoNNECWoN
hold the adaptdr with on~fl>a’,.$
not done, the adapter groun&l, _,:.
in
Precautions to avoid possible exposure
to excessive microwave energy
1.
DO NOT ATTEMPT
with the door open since open door oper-
ation can result in harmful exposure to microwave energy. It IS important not to defeat or tamper with the safety interlocks.
2.
DO NOT PLACE any object between the
oven front face and the door or allow soIl 4.
or cleaner residue to accumulate on sealing surfaces,
to operate this oven 3.
6
DO NOT OPERATE the oven If It IS dam-
aged. It IS particularly Important that the
oven door close properly and that there
no damage to the (1) door (bent), (2)
hinges and latches (broken or loosened),
(3) door seals and seallng surfaces.
THE OVEN SHOULD not be adjusted or re-
paired by anyone except properly qualified
service personnel,
IS
Page 7
Safe~ tips -
1. For personal safety the oven must be properly
grounded. See grounding
this book. For best operation, plug this appliance into
its own electrical outiet, to prevent flickering of iights,
blowing of fuse or tripping of circuit breaker.
2. Use of Extension Cords. Because” of potentiai
safety hazards under certain conditions we strongly
recommend against the use of an extension cord.
However, if you still elect to use an extension cord, it
is absolutely necessary that it be a UL iisted 3-wire
grounding type appiiance extension cord and that the
current carrying rating of the cord in amperes be 15
amperes or greater. Such extension cords are obtainable through Hotpoint service. if you do use an extension cord with your microwave oven, the interior iight
may flicker and the biower sound may vary when oven
is in use.
3. Be certain to piace the front surface of the door
*hree inches or more back from the countertop edge
&void accidental tipping of the appiiance in normai
f
age.
4. Use metai oniy as directed in cookbook. Metal
strips as used on meat roasts are helpful in cooking
food when used as directed. Metal trays may be used
for TV dinners. However, when using metal in the
microwave oven, keep metai at ieast l-inch away
from sides of microwave oven.
5. Do not operate the oven whiie empty to avoid damage to the oven and the danger of fire. if by accident
the oven should run empty a minute or two, no harm is
done. However, try to avoid operating the oven empty
at ali times—it saves energy and proiongs life of the
oven.
6. Cooking utensiis may become hot because of heat
transferred from the heated food. This is especially
true if plastic wrap has been ‘covering the top and
handles of the utensil. Pot holders may be needed to
handle the utensil.
7. Sometimes, the oven sheif can become too hot to
touch. Be careful touching the shelf during and after
cooking.
8. Do not use any thermometer in food you
microwaving uniess that thermometer is designed or
recommended for use in the microwave oven.
9. Remove the temperature probe from the oven
when not using it to cook with. If you leave the probe
inside the oven without inserting it in food or iiquid,
‘d turn on rr,icrowave energy, it can create electrical
, ing in the oven, and damage oven walls.
#
instructions on page 6 of
10. Removewire twist-ties on paper and plastic bags
before piacing in oven. Twist-ties sometimes cause
bag to heat, and may cause fire.
11. Don’t defrost frozen iiquids–especially carbo-
nated ones—in the oven. Even if the container is
opened, pressure can build up. This can cause the
ccmtainer to burst, resulting in injury.
12. Don’t overcook food. Excessive overcooking
dries food out, and may cause it to ignite in some
cases.
13. if food shouid ever ignite: Keep the oven door
ciosed. Turn off the power immediately: Touch
CLEAR/OFF or disconnect power cord or shut off
power at the fuse circuit breaker panel.
14. Boiiing eggs (in and out of sheii) is not recommended for microwave cooking. Pressure can build
up inside egg yolk and may cause it to burst, resulting
in injury.
15. Foods with unbroken outer “skin” such as potatoes, hot dogs or sausages, tomatoes, apples,
chicken livers and other giblets, and eggs (see above)
shouid be pierced to allow steam to escape during
cooking.
16. “Boiiabie” cooking pouches and tightly closed
plastic bags or piastic wrap tightly covering containers should be slit, pricked or vented as otherwise di-
rected in Cookbook. If they are not, plastic could
burst during or immediately after cooking, resulting in
injury. Also, plastic storage containers should be at
ieast partiaily uncovered because they form such a
tight seai.
17. Do not pop popcorn in your microwave oven unless in a special microwave popcorn accessory or unless you use popcorn labeled for
ovens. Because of the heat generated without these
precautions. the container couid catch fire.
18. Piastic Utensiis–Piastic utenslis designed for mi-
crowave cooking are very useful, but shouid be used
carefuily. Even microwave plastic may not be as tolerant of overcooking conditions as are glass or ceramic
materials and may soften or char if subjected to short
periods of overcooking. In ionger exposures to over-
are
cooking, the food and utensiis could ignite. For these
reasons: 1) Use microwave plastics only “’and use
them” in strict compliance with the utensil manufacturer’s recommendations. 2) Do not subject empty
utensils to microwaving. 3) Do not permit chlidren to
use plastic utensils without complete supervision.
19. Do not use your microwave oven to dry newspapers. If overheated, they can catch fire.
use in microwave
7
Page 8
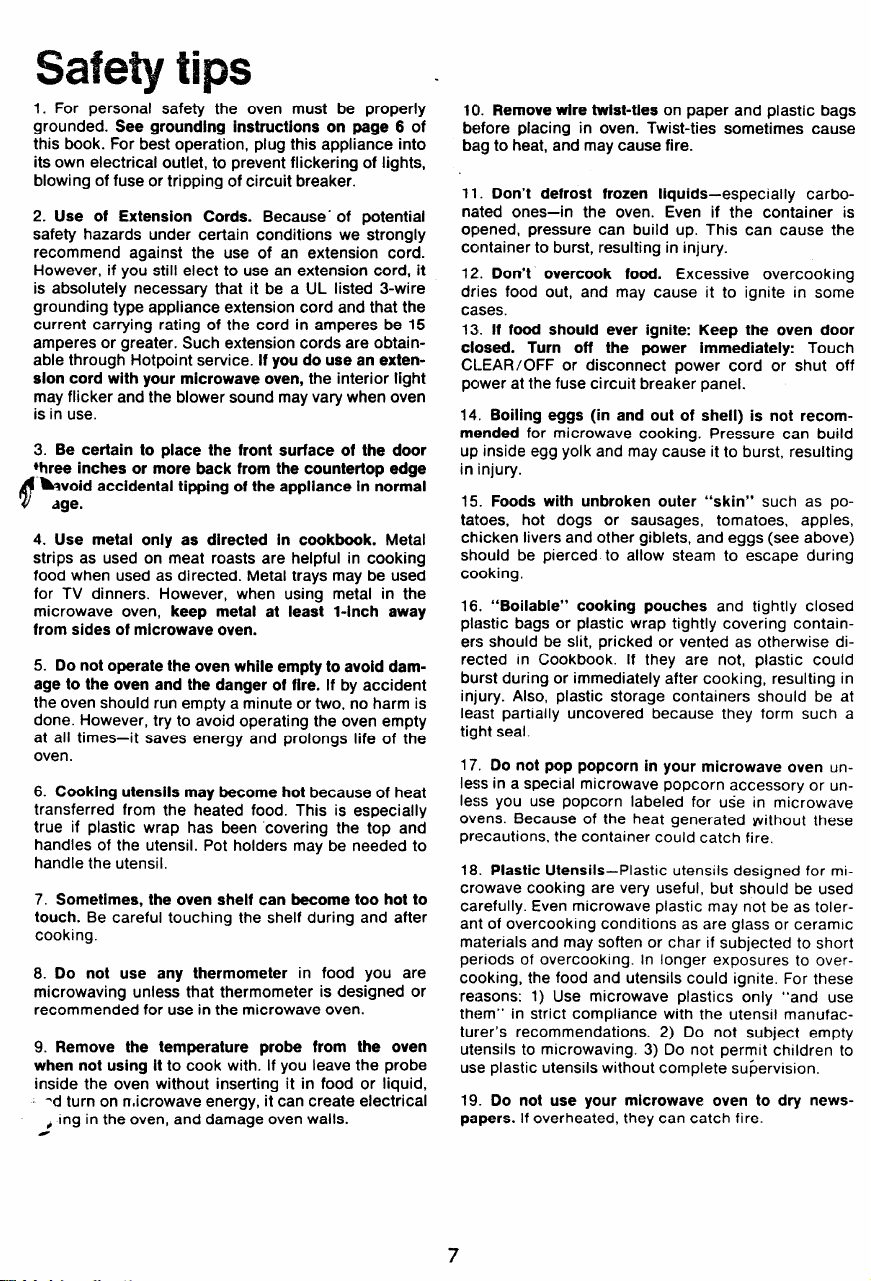
An easy reference guide to the
control panel on your
Cooking signai iights–Let you ~
microwave oven.
The controls are’&dgriM to be”
easy to use, easy to understand..
A l-second “BEEP” sound;>~ #~ou know’
your touch corn
simply use these pads In
bottom.
1
Cooking pads. Select the:kln$’ ;uf micro-
waving you want~e~rst.
Use these pads only when-”~~u ‘want extra
flexibility. ‘,,; ,.;:;,..+ ‘.; ,w%~ ~~~’~..-.,, .:,<.,,,,
Speciai function pads, Use these pads “with
the others. The operating instructions teli you
when to use each pad. :,,-,T?~T;;,;.$,..-1, ~‘
*. ,J-~.&>,,$%.$*.pi~‘;.#.%@>$a
, ,-
;.,
mm
.,
+$:~*
,.,,*
“?-’ *,..
.,:3+.&@~&.:p$*%’**+*,*,4,+-
m :::$2:;;”$ “;,” ,
Z,@J.~~.,y;+.;..,.;,..
:%’~g~$f~:g”::;.-+jj:( ;- ‘“
. ..... , .,,.’%;...,
,, ,k,.),?”?‘y‘~’“;
2
‘o-m
~~~
m-m
‘
#Hmfll151
~ ‘
Number pads. Select the ‘amount of ‘time or
temperature next. Aiso use number pads to
change power ievei. ., \.&;+.,j-.: .
3
Power Levei pad. if you want a Power Level
other than High, touch this pad, then touch
number pad for power ievei desired. (if you
don’t make a seiection, the oven automatically stays on High.) ,
4 Aivuayspress the START bar last. “
START Bar. Press when you’re ready to begin
microwaving.
= -“ ~~~“
‘m”” ~
-.’~
“+,:45...,.
●
“<:-?;”“
:;, “ ~
“:”“ ‘“
know which of the five types
cooking you’re setting or us-
ing: Time Cook, Temperature
Cook, Defrost, Automatic Simmer , or Temp Hold.
TiME COOK–Microwave for a~
preset time. (See page 10.)
Defrost–Gentle, more uniform ~
thawing than with regular
power. (See page 11.)
Automatic
–Special low simmer se$l~
ture
ting. Cook with it as long ;’T7,’
your slow-cook recipe calls foi:--fi
No automatic shutoff. (See
Paqe 17.)
.-
Automatic setting feature–~
Touch the automatic set function pad plus a single number
pad to use preset programs for
favorite foods. (See page 22.)
MiN–Enters
number pads when you want
minutes, but no seconds. For
example, for 4 minutes, touch
4, MIN.
What the Power Levels Mean
1O-HIGH Full power, (About
625 watts -output.) Use it anytime speed is important.
7-MED. HIGH Medium-high
power. About ?4’ the oven’s
full power. Fast way of heating pre-cooked dishes without overcooking.
S-M ED. Medium power.
About % the oven’s full
power. Good for delicate
foods like omelets and
cheese dishes.
3-LOW Low power. About Ya
the oven’s full power. Handy
for softening butter, re-heating delicate sauces.
1-WARM About ‘Ao of oven’s
full power. Hold leftovers or
plates of food YZ hour to 1
hour. ‘
simmering fea-~
.
t~oo)) Use with%
of
8
Page 9
.“
/< ‘-.*, .% . *
,.>”.’. .
,
$+”’.:%“ ‘“ * ~~r
,%m+,~t’yI;, #
.,2,.,. .~-
$.
., .3.;,, ,$ -...
, , ..’,-“
\,,+i.~ ~..-,,, . >-
. . .. . .
y
.:. ’~.-
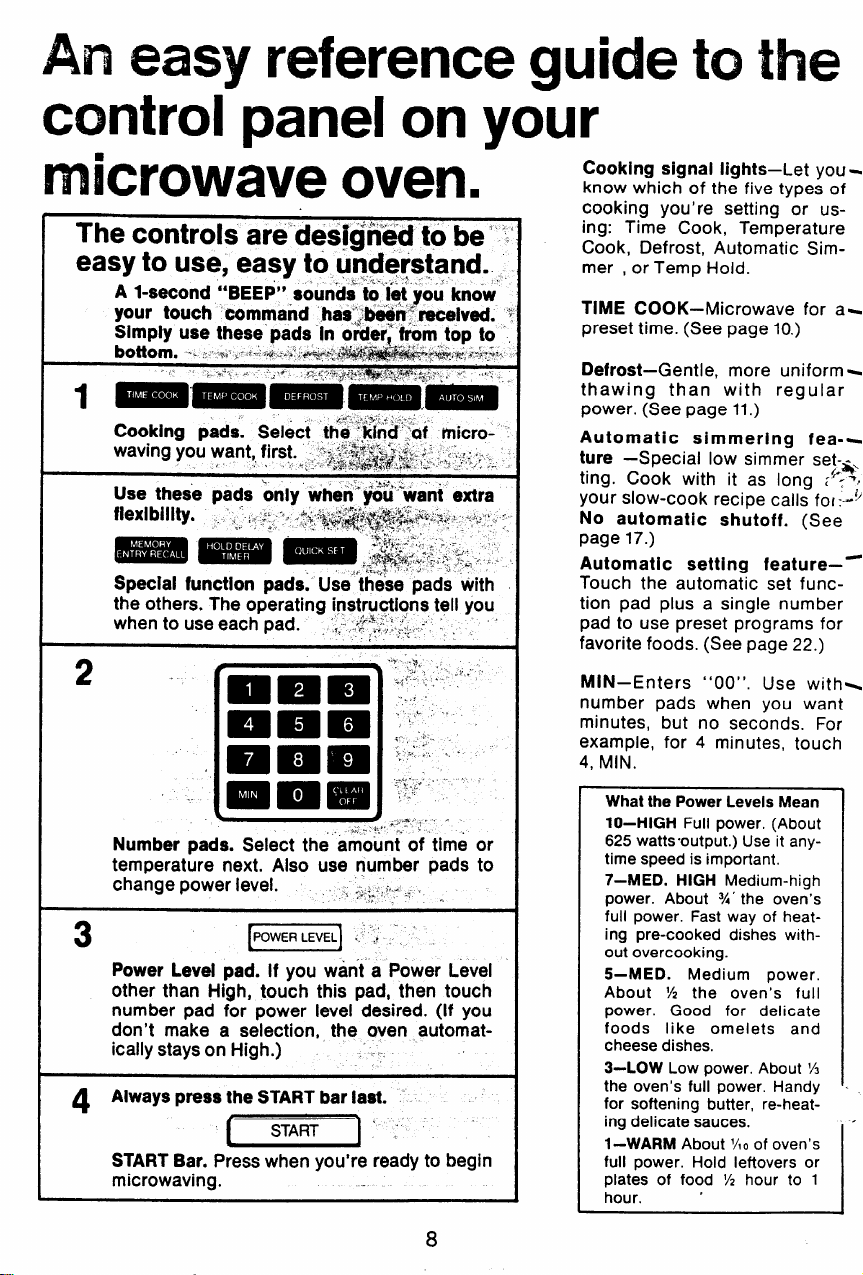
- MEMORY ENTRY/RECALL–
‘,.
%~ “’.
%be.>.:..%<
., .
+’3+:+:’. ..,“
‘,,
.---,~,>,&
J
-
~;,
,,
:,,<
... . ,.
,“
~
,.. ,
.
..$ *
,.
,-..
..
,.. ,,
~~setting that’s handy when
.“~foods need a standing period
-- : between defrost and cook.
.,.+(S* page 11.)
‘* -h,. . .
..
., Use it to tell the oven to remem-
‘ ‘ ber your instructions for a later
A
time. Touch again when you’re
ready to cook with memory entry instructions you entered
earlier. (See page 19.)
Number Pads–Use them to tell
the oven how long to microwave or to what temperature.
How long to hold. Or use to
change power level, after
,’q
touching Power Level pad.
CLEAR/OFF-Stops the oven
and erases programming.
(Doesn’t erase memory entry.)
,.’
..... . . . “
_ Power= Level Number Pads–
“‘ Touch desired Pad to change
power level. You can even
change power level while cook-
,..
ing (except with automatic sim-
~-~~~~~saft
..,
“.
,.” . ,
., . .
controls. Designed to prevent
accidental starting.
.
9
. . ..
Page 10
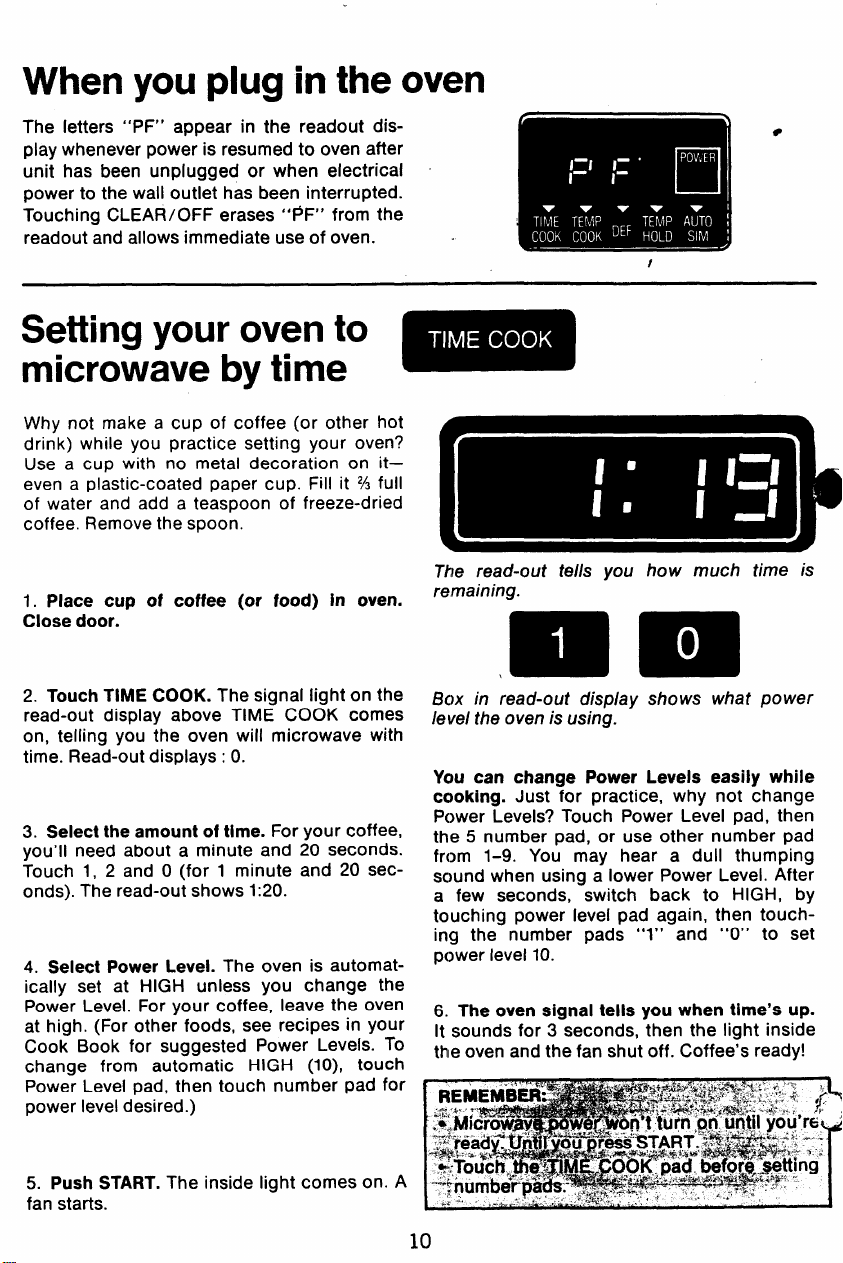
When you plug in the oven
The letters “PF” appear in the readout dis-
play whenever power is resumed to oven after
unit has been unplugged or when electrical
power to the wall outlet has been interrupted.
Touching CLEAR/OFF erases “~F” from the
readout and allows immediate use of oven.
Setting your oven to
microwave by time
Why not make a cup of coffee (or other hot
drink) while you practice setting your oven?
Use a cup with no metal decoration on it–
even a plastic-coated paper cup. Fill it % full
of water and add a teaspoon of freeze-dried
coffee. Remove the spoon.
The read-out tells you how much time is
1. Place cup of coffee (or food) in oven.
Close door.
remaining.
2. Touch TIME COOK. The signal light on the
read-out display above TIME COOK comes
on, telling you the oven will microwave with
time. Read-out displays: O.
3. Select the amount of time. For your coffee,
you’ll need about a minute and 20 seconds.
Touch 1, 2 and O (for 1 minute and 20 seconds). The read-out shows 1:20.
4. Select Power Level. The oven is automat-
ically set at HIGH unless you change the
Power Level. For your coffee, leave the oven
at high. (For other foods, see recipes in your
Cook Book for suggested Power Levels. To
change from automatic HIGH (10), touch
Power Level pad, then touch number pad for
power level desired.)
5. Push START. The inside light comes on. A
fan starts.
Box in read-out disp/ay shows what power
level the oven is using.
You can change Power Levels easily while
cooking. Just for practice, why not change
Power Levels? Touch Power Level pad, then
the 5 number pad, or use other number pad
from 1-9. You may hear a dull thumping
scmnd when using a lower Power Level. After
a few seconds, switch back to HIGH, by
touching power level pad again, then touching the number pads “l” and “O” to set
power level 10.
6. The oven signal tells you when time’s up.
It sounds for 3 seconds, then the light inside
thleoven and the fan shut off. Coffee’s ready!
10
Page 11

Setting your
microwave oven
to defrost
m
1. Place frozen food in a microwave-safe
container and set in oven. Close door.
2. Touch (DEFROST). The signal light on the
readout display above DEFR-OST ~omes on.
Readout displays :0.
3. Select the amount of time. Touch the number pads.
4. Don’t select a Power Level. The DEFROST
setting has its own, special Power Level. Box
in read-out display shows that DEFROST is
automatically set at Power Level 3.
5. Push START. The inside light comes on. A
fan starts. You may hear a dull thumping
sound that lets you know that the oven is
using a Power Level lower than HIGH.
Setting your
oven to
hold-time
6. The oven signal tells you when time’s up.
Itsounds for 3 seconds. Then the light inside
the oven and power shut off.
The Defrost setting is designed for uniform
thawing necessary for larger amounts of food.
For small amounts of frozen foods you can
also use l-IME COOK on the HIGH setting.
HIGH thaws faster, but you’ll need to turn the
food several times, stir it and rearrange it to
keep thawing uniform.
Because DEFROST can be changed from its
automatic power level of 3 to other power levels, you can use DEFROST as the first step of
a two-step automatic microwave setting. (See
page 20.)
The HOLD/DELAY TIMER setting is a solidstate timer. No microwave power is used. So
can use it for other things around the
you
kitchen, like timing a 3-minute long distance
phone call.
1. Touch HOLD/DELAY TIMER. Read-out
displays: O. No cooking signal light shows.
2. Select amount of time. Touch the number
pads. The read-out panel tells how much time
you set.
3. Don’t select a Power Level. You won’t be
using microwave power.
Push START. On some models, you may
4.
hear a fan and see the oven interior light.
5. The oven signal tells you when time’s up.
It sounds far 3 seconds.
You can also use HOLD/DELAY TIMER combined with microwave cooking, when recipes
call for standing time. (To use with microwave
cooking, see page 14.)
11
Page 12

Setting your oven
to microwave
by temperature
Your microwave oven has an
automatic temperature probe.
For many foods, temperature control is important. That’s why your microwave oven comes
with a removable automatic temperature sensor. You can microwave foods like chicken,
turkey, pork and rare roast beef to the temperature you want. The oven shuts off automatically when the food’s done. No guesswork!
The temperature probe is handy when cooking for children, too. Because you can control
the temperature of each portion individually.
Making soup? Serve the children theirs at a
130°, while the adults get piping hot
mild
soup at 170”.
Frozen foods aren ‘t recommended to use
with the probe. It’s cf/ffjcM to insert the
probe when foods are frozen. Page 24 te//s
you which foods work best with the probe.
(And which ones don’t.)
Setting your microwave oven to cook by tem-
perature is easy. The oven helps!
The 3-second signal sounds if you set a
temperature outside the oven’s range (below 90° or above
lower than the temperature of the food.
200°) or any temperature
● The signal also sounds if you set the oven
to microwave by temperature and forget to
attach the probe to the receptacle inside
the oven.
● During TEMP COOK you can recall the tem-
perature that you set by touching the TEMP
COOK pad.
Things to remember when setting your oven
to microwave with temperature:
●
Don’t leave the probe in the oven if it’s not
inserted in food. (Prevents damage to
oven).
●
Like any food thermometer, the probe may
slip out of place in cooking. Reposition it,
press START again, and continue cooking.
If you wait to hear the signal sound and find
the probe has slipped out of the food, the
food could be overcooked. Also, the oven
could be damaged.
●
If you give the oven instructions it can’t
carry out, a 3-second signal sounds when
you press START.
●
Touch the cooking function pad (TEMP
COOK) before setting number pads.
●
Recipes in the Cook Book tell you approx- J
imate cooking times as well as temperature
settings. Use the times as a guide to planning when to serve food.
w
i “\
2
12
Page 13

Before you start, insert the probe
Why not try microwaving with the temperature
probe right now? Start with cold tap water. Fill
a microwave-safe mug 2A full of water and
make instant soup.
/
1. First, put probe into food.
probe into centermost part of food (at least one
inch into food.) Insert as horizontally as possible
into meats. Insert as directed in other foods.
H=-
In general, inseti
length of the cable, it also helps prevent the
probe from slipping out of position.
4. Ciose oven door firmiy. Make sure the
cable isn’t interfering with the door seal.
TO COOK:
1. Touch TEMP COOK. The signal light on
the display above TEMP COOK comes on.
Read-cJut displays: O.
2. Seiect the temperature you want. Use 170
for your soup.
3. Select Power Level. For now, leave the
oven cm HIGH. See recipes and heating instructions in your cookbook for suggested
Power Levels for other foods. To change
power level, touch Power Level pad, then
number pad for power level desired.
4. Press START. The inside light comes on. A
fan starts. The read-out automatically indicates temperature.
5. A minus sign in the read-out iets you know
that the internai temperature of the food
hasn’t reached 90”F. yet. Since the water for
your soup came from the cold water tap, it’ll
be less than 90°.
2. Place food with probe into oven,
‘.
*
9
=7
3. Insert cable end into receptacle on oven
wail until “seated”. BE SURE PROBE IS ATTACHED SECURELY TO OVEN RECEPTACLE. (If probe is not attached securely, sig-
nal will sound when you press START. The
oven will not start.)
Use clip on cable to loop cable when needed.
Looping the cable not only controls the
The probe senses temperatures between 90°
and 2’OO”F. Once above 90°, the read-out
panel shows you the internal temperature of
the food until the temperature you se/ected is
reached. Then the oven shuts off.
6. The signai teiis you when the food
reaches the temperature you seiected. The
oven automatically shuts off. Soup’s ready!
7. Remove the cabie end of the probe from
the receptacle. Then remove food and tem-
perature probe together.
13
Page 14

Programming your oven to defrost,
then time cook, automatically
When you’re microwaving with
time, you can cook additional
ways. Without resetting.
Defrost-hold-and-cook–For foods that need
a standing period between defrost and cook.
TO defrost-hold-and-cook, use the entire
chart. (For foods that don’t need a standing
period between defrost and cook, you can
skip hold-time.)
Hold-start-and-cook-For times when you
can’t be in the kitchen when it’s time to start
cooking. (The
for up to 99 minutes and 99 seconds.) Use
only the area marked to hold-start-and-cook.
The chart shows you how to cook all thr-
ways
When you’re ready to start, just change the
times listed on the chart for times needed for
the food you’re cooking.
oven holds without resetting
DEFROSTHOLDANDCOOK
HOLD-START-
AND-COOK
Things to remember when pro-
gramming with time:
● If you accidentally reverse the sequence of
programming instructions, the oven auto-
matically rearranges your program. Defrosting always comes first, then hold, then
cooking.
● When instructions conflict, the oven carries
out the last instruction. For example, if you
set the oven to Defrost for 4 minutes, HoldTime for 2 minutes and then Defrost for 6
minutes, the oven would Defrost for 6 min-
utes and Hold-Time for 2 minutes.
Allow foods to remam at room temperature only as long assafe Times vary
1.4
Page 15

tiHEN You WANT THE
OVEN TO DO THIS .
Defrost this casserole
fer 15% minutes, then
. m~w’fi ‘nw%B;:;~
TOUCH THIS “ “ ~
w:;?”!:i:f’~~~~g~~~”
~ YOU’LL-SEE THIS HAP-
. .
.- -~ . “>
~ The Defrost signal light re-
PENING ON THE CONTROL
- PANEL
been automatically set at :3.
$
‘ let the casserole stand
for 10 minutes
Then cook it for
25 minutes
Change power level from
automatic High (10) to
medium-high power (7) ,
:0 shows in read-out panel.
No signal light shows.
10-00 shows in read-out
m-m pane,.osigna,,ightshow
Time Cook signal light
comes on. The read-out
panel changes to :0.
Time Cook signal light remains on 25:00 shows in
==’- read-outpane(.
- ~ ;;f;rn;~:::::=i
j#
Start now.
Allow foods to rema]n at r~om tenlpefature only as tong as safe Times vary
[~];gg~:
15
first instruction.)
Page 16

Setting your oven
to microwave
with
Temp Hold is an especially handy feature of
your microwave oven. It lets you hold foods at
serving temperature, keeping them “justcooked” hot and fresh.
With the Temp Hold feature:
1. You can select a holding temperature btween 90° and 2000F.
2. You can select any Power Level you want.
Because foods tend to stay moist and tender
during microwaving, Temp Hold is the perfect
way to keep vegetables, casseroles, and even
scrambled eggs piping hot and ready to
serve. Roasts, ham and poultry, too, may be
kept juicy and table ready with this feature.
You can even warm up leftovers!
If you want, you can set your oven to automat-
ically defrost, hold, time or temperature cook,
and then Temp Hold. You must be sure, when
you time cook, that the temperature probe is
placed in the food before starting the microwave oven.
Temp Hold keeps a pre-set temperature level
inside the food for as long as you like. If your
oven does not have an automatic simmer setting, you can achieve the same flavorful, slow-
cooked tenderness by setting the Temp Hold
cycle to 180° and medium (5) power level.
Use the automatic simmer recipes from your
cookbook.
Temp Hold
Things to remember when setting
your oven to microwave
Temp Hold.
To prevent spoilage, do not hold foods except solid roasts at temperatures below
150° for more than 2 hours.
Solid (not rolled) roasts may be held below
150° for up to 2 hours.
However, during the microwave roasting
process, a great amount of heat is stored in
the roast. Keeping the roast in the warm
oven cavity during TEMP/HOLD can cause
a greater
than when allowing the roast to stand outside the oven on a kitchen counter. Temperatures of up to 20° to 30° above the TEMP/
HOLD setting are possible. Because of this
heat storage, it is not possible to hold roasts
at a rare degree of doneness.
[t is suggested that you first remove the roast
frc}m the oven and let it stand, uncovered, for
about 10 to 15 minutes before returning to
TEMP/HOLD. Or, if you know before cooking
that you intend to hold a solid roast at serving
temperature, you may compensate for the
stc)red heat by undercooking the roast. See
your Cookbook for details.
TO USE:
1. Insert probe in food. (If you have just Temp
Cooked your food, steps one and two are
already done).
2. Attach probe to oven. (See probe instructions under Temperature Cooking.)
3. Touch TEMP HOLD. The signal light on the
display above TEMP HOLD comes on. Readout displays :0.
4. Select the holding temperature you want.
Your oven will automatically microwave the
food until it reaches the pre-set temperature
and keeps the food at this temperature.
5. Select Power Level. Your oven will automatically use High unless you select another
level. See your cookbook for suggested
power levels for various foods.
6. Push START. The inside light comes on. A
fan starts. If you also selected a TIME COOK
or TEMP COOK cycle, together with TEMP
HOLD cycle, the oven will first cook the food
ancl then automatically go, into the TEMP
HOLD cycle. (TIME COOK or TEMP COOK
always precedes TEMP HOLD.)
7. During the TEMP HOLD cycle, the oven ~J
will not shut off until you touch the CLEAR/ 4’
OFF pad. (You can interrupt microwaving by
opening the oven door. The cycle resumes
when you close the door and press START.)
increase in internal temperature
@
16
Page 17

Setting your oven
to microwave
with
This setting lets you slow-cook foods for extra
moistness, extra tenderness. It’s like having
an appliance-wit hin-an-appliance! The
automatic simmer setting brings food rapidly
to a simmer, then holds the simmer at about
180°F for as long as you want. Perfect for old-
-fashioned pot roasts, hearty stews, chili,
baked beans, even mulled drinks, To automat-
ically simmer, you can use any microwaveproof casseroles. But do not use a lid.
Instead, stretch plastic wrap over the top of
the casserole. Gather the wrap loosely
around the probe to allow steam to escape.
Automatic Simmer
TO COOK:
1. Insert the probe in liquid in bottom of dish.
(As liquid simmers, steam forms to cook and
tenderize food.) Cover the dish.
2. Attach the probe to the oven. (See probe
instructions.)
3. Touch automatic simmer pad. The signal
light on the display above Auto Sim lights up.
4. Don’t select a time. The oven will be cooking by temperature, not time.
The automatic simmer feature lets you slowcook foods which need long, gentle cooking
to tenderize or develop flavor. Food is
brought to a simmer rapidly, then the temperature probe maintains simmering at about
180” for as long as you want. Temperature of
food is not shown on the read-out during
cooking. However, if you wish to check tem-
perature, touch automatic simmer pad; temperature of food and power level being used
will show on the read-out as long as pad is
touched.
Use any microwave-proof casserole for
automatic simmer feature. Insert probe in
middle of casserole so that the tip is resting in
liquid in the bottom of the dish. Since liquid is
necessary for this function, steam tenderizes
and brings out the full flavor of the dish.
5. Don’t select a temperature or a Power
Level. The automatic simmer feature is automatically pre-set for the correct temperature
and Power Level for automatic simmering.
6. Push START. The inside light comes on. A
fan starts.
7. Simmer as long as your slow-cook recipe
calls for. Five hours, six, even ten hours. The
oven won’t shut off until you touch the
@
CLEAR /OFF pad. (You can interrupt microwaving by opening the oven door. But it resumes when you close the door and press
START.)
Do not use a lid on the microwave-proof cas-
serole that you choose. instead, use stretch
plastic wrap over the top of the casserole.
Cover tightly with plastic wrap, arranging
loosely around the probe to allow steam to
escape.
Page 18

Programming your
oven to temperature
cook automatically
When you’re microwaving with
temperature, you can delay cook-
Things to remember when you’re
programming with temperature:
ing till later.
Can’t be home when it’s time to start dinner?
Let the oven start without you. Using a combination of Hold/Delay Timer and Temperature Cooking, the oven can delay starting for
up to 99 minutes and 99 seconds .
WHEN YOU WANT THE
OVEN TO DO THIS
like this cooked roast re-
I’d
heated in time for dinner,
but not started yet. . . It The read-out displays :0. No
would be ready too soon.
(First insert the probe in the
cooked roast, and attach the
probe to the oven.)
Wait 15 minutes before start-
ing to heat.
m~m ~~;flad-out p~nel shows
TOUCH THIS
Although Automatic Simmer is a temperature setting, it can’t be programmed.
Unlike regular Temperature Cooking, the
automatic simmer feature will not shut off
when it reaches a preset temperature.
YOU’LL SEE THIS HAPPENING ON THE CONTROL i
PANEL
signal light turns on.
@
Then heat it
to about 130°F-just the way
we like it . . .
Do it just in time for dinner
* *AIIO w foods to remam at room temperature only aslong as Safe. Timf)s vafy
o-m ~;~pMjfl:-::i:::
m::;g~:~:f~$’
18
..... . ......... .
-...----,, --- -..
The read-out panel shows
:0. The signal light on the
display above TEMP COOK
comes on.
The read-out panel shows
Page 19

Your microwave oven
has a memorv
.:... rf
The Memory Entry/Recall pad allows you to
store complete 2, 3, or 4-step programs or
any l-step cooking function which requires
the entry of time or temperature. Just set the
oven and press the Memory Entry/Recall pad
instead of start. As Memory Entry/Recall
is pressed, readout becomes blank, indicating
that oven can now be used for other
programs.
DO THIS
Set the
want the
press START. Use a single setting or
one of the programs on pages 14 and
18. Defrost, cook by time or temperature . . .
automatic simmer function work with
memory.
control panel for theway you
food cooked. But don’t
any settings but the
TOUCH THIS
When the pre-set cooking function is needed,
touching the Memory Entry/Recall pad once
again will set the oven automatically for the
cooking function(s) you previously stored in
memory. Touch start and the oven begins
pad
micrchvaving this’ preset program.
.’
YOU’LL SEE THIS HAPPENING
. ON THE CONTROL PANEL
Before you touch Memory Entry/Recall, signal lights on the read-out
above the function that you set come
on. Lights go off as soon as memory
pad is touched.
Leave these simple instructions with the baby sitter:
DO THIS
Put the food in oven and close the
door. Insert probe if TEMP COOK or
TEMP HOLD has been selected.
TOUCH THIS
SHE’LL SEE THIS HAPPENING
ON THE CONTROL PANEL
Signal lights show what kind of
microwaving you selected. (No light
shows when using HOLD/TIMER.)
The oven will cook dinner
the way the children like it.
Just as if Mother were there.
Change your mind? It’s easy to clear the
Memory. Just enter a new program, and the
old instructions are automatically erased. The
oven is ready to remember new instructions.
Remember: {f you
@
set in the oven, pressing the Memory Entry/
Recall Pad will store that program in the
oven’s memory, and will erase the previous
memory.
have any cooking program
m
All signal lights go off, except the one that confirms
your first instruction. The
oven carries out the cooking
program.
Use your oven while it’s remembering. Using
the Memory Entry only stores instructions.
You’re free to use the oven for any type
microwaving. Only when you touch Memory
Recall and START does the oven start
carrying out the stored instructions.
Page 20

Using Defrost as a
Cooking Function
mm‘-
..
In any cooking programr information entered
under the Defrost setting always occurs first cycles, you can use Defrost to cook at one
in the cooking cycle, and the Time Cook entry
occurs last. Since you can change the Power Cook to cook at another power level.
WHEN YOU WANT THE
OVEN TO DO THIS
I wish to make a hearty Vegetable
Beef Soup (recipe in Cookbook,
page 44) but don’t want to be there
to turn the power level down after the
initial boiling period.
Bring to a boil for one hour at HIGH.
Then automatically switch to simmer
for 99 minutes . . .
mm-
-mm
“Level of both the Defrost andthe Time Cook
power level, then automatically switch to
TOUCH THIS
mm
YOU’LL SEE THIS HAPPENING
ON THE CONTROL PANEL
Signal light on the display above
DEFROST comes on. Read-out displays 60:00. Box in read-out panel
shows automatic defrost setting of 3.
Power level changes from 3 to 10
Signal light on the display above
TIME COOK comes on. Read-out displays 99:00. Box in read-out panel
shows power level 10.
Time
at power level 5 (MEDIUM)
Push START. oven is carrying out the 2-step cook-
Here are some other examples of stand using the no-heat Hold/Delay Timer
automatic 2-step cooking:
c You can cook dried beans at High for 20 to
30 minutes, then simmer them until tender 10), let it stand and then keep it at WARM
at Medium.
c Microwave a meatloaf at Medium High For complete cooking instruction and recipes,
(power level 7) for 22 minutes, then let it see the cookbook that came with your oven.
m
En
. Or cook the meatloaf at HIGH (power level
Power level changes from 10 to 5.
Appropriate signal lights show that
ing automatically.
until ready to serve.
(power level 1) until you’re ready.
20
. . . . .
Page 21

Forget what you
programmed the
oven
to do? Just ask.
Your new microwave oven
Suppose you programmed the oven in the
morning to defrost, hold,
stored the information for later. During the
day, while you were using the oven for other
things, you forgot what program you entered.
then cook. You
TO ASK BEFORE YOU START
MICROWAVING:
TOuch fwmotw ENTRY/RECALL . Signal
1.
lights light up to show you which type of
cooking you selected.
2. Touch the cooking function pads you want
to know about.
3, The answers appear in the read-out panel.
WHEN YOU WANT TO ASK THIS
I entered a program this morning,
What cooking did it call for?
will remind you of what’s to come.
TOUCH THIS
TO ASK WHILE YOU’RE
MICROWAVING:
The read-out panel and cooking signal
1.
lights tell you how the oven is microwaving at
the moment.
2. Touch the other cooking function pads
you want to know about.
3. The answers appear in the read-out panel.
YOU’LL SEE THIS ANSWER ON THE
CONTROL PANEL
The signal lights on the display
above TIME COOK and DEFROST
come on.
How long will defrosting be?
HOW long will cooking be?
Did I ask for any hold-time in
between?
The read-out panel shows the
amount of total time for defrosting.
(The Defrost signal light stays on until touching TIME COOK in the instruction below.)
The read-out panel shows the
amount of total time for cooking.
(The Defrost signal light. goes off.)
The Time Cook signal light comes
on.
The read-out panel shows the
amount of HOLD time. (No signal
lights are on.)
21
Page 22

Your Microwave Oven
.
Has
a Convenient
Automatic Setting Feature
The automatic setting feature offers you a
quick way to set your oven to cook some of
your most frequently prepared foods. Instead
of having to set a time or temperature and
power level, you can use the automatic setting feature to automatically choose from 10
predetermined cooking combinations. If you
TO USE:
1.
Place food in oven.
For settings “9” or “O”, place temperature
probe in food and connect receptacle end.
2.
Touch automatic setting pad.
Read-out displays :0.
3.
Touch number pad which corresponds to
food you are microwaving.
want to reheat coffee, warm a baby bottle,
bake potatoes, or any of a wide variety of
other microwaving functions, simply choose
the automatic setting cycle and select the
proper number, from
tomatic program you wish.
4. Touch START for oven to carry out cook-
“l” to “O”, for the au-
@
See chart next page. Read-out display
shows the automatic setting you have chosen by displaying time to cook or temperature selection (depending on setting).
Signal light on read-out above TIME
COOK or TEMP COOK (whichever is appropriate) comes on.
ing program shown on display.
J
REMEMBER:
Always be sure to set a single digit setting. If you set two digits or more, the oven will function as
though you set TIME COOK.
Page 23

AUTOMATIC SEITING
To use the automatic setting feature for foods
not listed below, select a ~etting for a food
similar to the one you wish to microwave.
FOOD CHART
Autoset
Setting
Temperature Levei
1 1 min. 10
2 2 min.
(,
!(
(Q
\\\
$Oo:i;;
3
4
5
6
3 min. 8
4 min. 8
5 min.
6 min.
Power
8
8
10
Suggested
mods
Reheat 1 cup of coffee, 2 sandwiches or weiners; cook 1 slice bacon; melt % cup butter.
Reheat baby bottle or 1 mug coffee, 4 sandwithes or weiners, an 8 oz. can vegetables; cook
2 slices bacon.
Reheat 1 piece of chicken, 2 cups coffee, 1 hamburger pattie or 1 cup soup; cook cereals.
Reheat 1 plate leftovers, large can of vegetables;
cook 1 potato.
Reheat 3 pieces of chicken, 4 cups coffee, 1 cup
sauce or 1 can of soup.
Reheat 9 pieces of chicken or 4 hamburger patties; (cook 6 slices of bacon.
(
0
7
8
9
o
7 min. 10
8 min.
145° 7
160°
10
10
Reheat 2 bowls soup; cook 8 slices of bacon, 4
ears corn, 10 oz. frozen vegetables.
Reheat 2 plates Ieft-overs; cook 4,carrots, cauliflower, frozen green beans, squash or 2
potatoes.
Temperature cook medium done beef, cream
soups or chowders.
Temperature cook hot beverages, casseroles,
soups, veal and reheat leftovers.
23
Page 24

.-——— -
Cook these recommended foods
with Automatic Temperature Probe
.s
1. Casseroles–150°-1600 “internal temperature gives best doneness on mixture of precooked foods heated together into a main
dish. Raw foods such as hamburger or other
meat, vegetables and sauces starting from
“scratch” should be precooked before com-
bining together into a casserole heated to
above temperature. The advantage of the
temperature probe: it tells you when casse-
role is at correct temperature for serving,
without checking, peeking or guessing.
2. Reheating leftovers-this type of food is
excellent to heat with temperature probe because often the amount of leftover food is not
known, therefore, time to cook is only a
guess. Cooking to a preset temperature (usually 155°) eliminates the guesswork. Use High
or Medium High Power Level.
3. Plates of Food–in general, place temperature probe in largest piece of food, then
cover plate with wax paper (or lightly with
plastic wrap). A preset temperature of 160°
gives piping hot food. Use High or Medium
High Power Level.
4. Beverages and soups-use clip on cable of
probe to help stabilize probe in liquids. A preset temperature of 130° is “warm to drink,”
about 170° is “steaming hot.”
5. Beef, lamb and ham loaves–be sure to
place probe as horizontally as possible, and
use clip to stabilize probe in meat mixture.
6. Roasts and Pot Roasts-cook roasts using ‘
your choice of power settings. Very specific
instructions are included in the Cook Book.
Pot roasted sirloin tip and rump roasts are
succulent and tender when cooked with automatic simmer (on models with this feature)
or temp/hold features.
7. Dips-hot dips are a popular appetizer.
Using Low or Medium Power, an internal temperature of 90-130° (depending on the ingredients) is just right to serve guests.
8. Slow-cooking recipes-any foods that you
can cook in a slow-cooking appliance, you ‘ ~
can microwave with the Automatic Simmer*
setting, using an ovenware casserole.
9. Stewing and simmering–this type of cooking involves bringing food to a simmering
temperature and automatically maintaining
that temperature for a long period of time. We
recommend the Automatic Simmer
on your microwave oven for most stewing, pot
roasting and other slow-simmered cooking.
e
setting
Food not recommended for use
with the Temperature Probe
1. Delicate butter Icings, ice cream, frozen
whipped topping, etc.
warm temperatures. Lowest setting on tem-
perature probe is 90°.
2. Many foods in the frozen state-because
temperature probe should not be forced into
rockhard foods, it could break. However, after
defrosting, many convenience foods may be
heated with the probe to the precise temperature for serving.
3. Individual foods cooked in batches–in
cooking with microwave energy, differences
from one food to another, even of the same
type of food can result in different cooking
times of foods in the same batch. A variation
in size (such as in cup cakes, sandwiches,
etc.) or moisture content (such as in potatoes
-these soften rapidly at
and other vegetables) can cause variation in
cooking speed. Temperature probe in one
food in a batch might not correctly indicate
internal temperature of all foods cooked
together.
4. Starchy vegetables-potatoes which cook
to steamy hot temperatures tend to stick to
temperature probe due to starchy nature of
interior. (Clean immediately with soapy cloth,
then rub lightly with plastic scouring ball if
necessary.)
5. Batters and doughs which are baked. This ,‘
type of food should ~e observed when cook- ‘
ing to best judge when done. Also, periodic
turning .of the dish is usually required on
these delicate food types.
24
c
Page 25

Questions and Answers
.
Q. The defrosting times in the Cook Book don’t
seem to be right for my food.
A. Cook book times are averages. Defrosting time
can vary according to the temperature in your
freezer. Foods from freezers set at the coldest settings may take longer to thaw. Foods stored in the
freezer section of some singledoor refrigerators
may be at a higher temperature. They may take less
time to defrost.
Q.
Can I setthe ovento cook, then hold?
A. Yes,
ing setting. See page 20. The microwave oven is
automatically programmed to go from a defrost, to
hold cooking program. You can also add a second
cooking program after hold, by using TIME COOK
‘),
*
you want to use Hold/Delay Timer after cooking,
wait to hear the signal at the end of cooking. Then
set the HOLD/DELAY TIMER.
Q.
timed cooking?
A. No. You need to use the probe. The probe cooks
by temperature only.
Q.
the ovenwhen I’msetting
A. Nothing, if the probe is in food. (When you accidentally instruct the oven to cook by both time and
temperature, the oven uses the last instruction pro-
grammed.) If the probe is left inside, touching an
oven wall, and not inserted in food you may damage
the oven.
Q.
Is pressed, butthe ovenIsn’t cooking.
.
A. Read
if you use the DEFROST pad for your cook-
s the third cooking step. The oven will automat-
ally transpose your instructions. It will hold first,
en cook, since this is a more useful combination. If
Can I use the automatic simmer setting for
What happens ifI accidentally leave the probein
time cooking?
The signal soundsas soon as the START button
the section on programming again. The
signal will sound if your program can’t be carried
out. If you’re
it’s inserted properly.
Q. Can I
A. Yes, if you’re using TIME COOK or TEMP COOK
pads. Just touch the power level pad then the num-
ber pad for the Power Level you want.
Q.
Can I program for a roast to be cooked at high
heat, then finished at lower heat?
A. Yes, by using DEFROST as the first cooking
function. See page 20.
How long does the automatic simmer setting
i
ok?
4)
A. Until you shut it off by touching CLEAR/OFF.
using the probe, check to make sure
change Power Levels while cooking?
This way, you can simmer foods as long as with a
slow cooker, without affecting the microwave timer.
Some slow-cooking recipes call for simmering 5 to
10 hours. Regular microwave settings always use
much shorter times.
Q. mat happens ii I tell the oven to cook first then
defrost? .
L The oven only cooks in correct sequence. It
automatically unscrambles your message. It defrosts
first.
Q. May I use the memory setting to delay temperature cooking?
A. Yes. Just follow the stepson page 18.
Q. Can I get the same results as the Automatic
Simmer setting by putting food In a crock and using
the Low Power setting?
A. With the Low Power setting, you are limited to
the amount of time on the microwave timer. Also,
since you’d be cooking with time, you couldn’t control the temperature of the food. Even with regular
temperature cooking, you can’t get the same results
as with Automatic Simmer . With temperature cook-
ing, the oven automatically shuts off when it reaches
the preset temperature. Automatic Simmer maintains a simmer temperature for as long as you want.
You can manually set Temp/Hold to automatically
simmer, using recipes in your Microwave Cookbook.
See page 16 for instructions.
Q. Can I combine cooking by time and by temper-
ature?
A. Yes, you can combine time and temperature
micrc~waving by using Defrost as a first cooking
function (see page 20) in combination with Temp
Cook. You can also set a combination of Time Cook
and Temp Hold.
Q. How Is the shorter signal different from the 3-
second signal?
A. The shorter signal is a “GO” sign. Your instruc-
tion is confirmed. The 3-second signal is a “STOP”
sign. It can mean any of these things:
1, Microwaving is complete.
2. Ycw set the oven to microwave by temperature,
and the probe isn’t inserted securely in the oven.
3. Ycm’re giving the oven instructions it can’t carry
out.
4. YCNJpressed START without setting any instruc-
tions
Q. How can I erase a memory instruction?
A. A new program automatically erases the old one.
25
Page 26

Care of
your microwave oven
Tips to keep
your oven at its best -
Your new microwave oven is a valuable appliance-
protect it from misuse by following these rules:
. Keep your oven clean and sweet-smelling.
Opening the oven door a few minutes after
cooking helps
occasional thorough wiping with a solution
of baking soda and water keeps the interior .
fresh.
Don’t use sharp-edged utensils with your
c
“air out” the interior. An
oven. The interior and exterior oven walls
tan be scratched. The control panel can be
damaged.
Don’t remove the cover over the “stirrer” at
the top of the oven (microwave feature no.
5 on page 3.) You will damage the oven.
Be certain power is off before
cleaning any part of this oven.
INTERIOR
Walls, floor and plastic cover
Because there is little heat except in the food,
or sometimes in the utensils, spills and spatters are easy to remove. Some spatters can
be removed with a paper towel, others may
require a damp cloth, Remove greasy spatters
with a sudsy cloth, then rinse, and dry. Do not
use abrasive cleaners on oven walls. NEVER
USE A COMMERCIAL OVEN CLEANER ON
ANY PART OF YOUR MICROWAVE OVEN.
Door-inside
Glass–wipe up spatters daily, wash when
soiled with a
Rinse thoroughly and dry.
Metal and Plastic Parts on Door–wipe
quently with a damp cloth to remove all soil.
DO NOT USE ABRASIVES, SUCH AS CLEANING POWDERS OR STEEL AND PLASTIC
PADS. THEY WILL MAR THE SURFACE OF
THESE PARTS.
Speciai note when using Brown ‘N Sear Dish
with Microwave oven.
Scorched-appearing stains on the shelf of
your microwave oven, usually caused by
grease baking onto shelf while preheating
minimum of sudsy warm water.
fre-
Brown ‘N Sear Dish, may be removed with
Delete@ cleanser, a product of Drackett Co.
(Note: Grease does not normally bake onto
oven interior in microwave operation, how-
ever, high heats generated on bottom of
Brown ‘N Sear Dish can cause baked-on con-
dition on shelf only, if grease is present.)
Delete cleanser may be purchased from your
local dealer or from your Authorized Service
Center. Check the “yellow pages” for location and phone number.
Delete cleanser may also be sold at local grocery or hardware stores, or at houseware
stores, or at housewares department of some
department stores.
Automatic Temperature Probe
Probe is sturdy, but care should be taken in
handling. Do not twist or bend; avoid dropping temperature probe.
Clean as soon after using as possible. T ‘.
clean, wipe with sudsy cloth, then rub lightly ‘ -t
with plastic scouring ball if necessary. Rinse
and dry. (Or wash in dishwasher.)
Q
26
Page 27

EXTERIOR
Case
The outside surface is woodgrain vinyl. Clean
frequently with soap and water, then rinse and dry.
Wipe clean the outer pane of the window with a
damp cloth,
on the outside surfaces.
If dust accumulation becomes a problem,
wipe surface of the outer pane with a weak
solution of liquid dishpan detergent (2 teaspoons detergent per quart of water). USE
SPECIAL CAUTION NOT TO SCRATCH THIS
SURFACE.
Chrome trim is best wiped with a damp towel
or cloth, then wiped immediately with a dry
towel. Cleaned daily this way, chrome will stay
shiny and spot-free.
~ontrol panel
ipe with a damp cloth. Dry thoroughly. Do
not use abrasives or sharp objects on panel.
They can damage it.
Cord
If the cord becomes soiled, unplug and wash
with damp cloth.
water may be used, but be certain to rinse
and dry thoroughly before plugging cord into
outlet.
DO riot use abrasiv& or sharp objects
For stubborn spots, sudsy
.
How to replace light bulb
First, unplug the oven. Then remove lamp
compartment cover by removing screw which
holds cover in place. Cover is located at the
rear of outer case.
To remove bulb: push it inward gently and
turn it to the left or counter clockwise; then
pull outward out of the socket. Replace with
lamp number 25T8DC. (It isavailable in drug
and hardware stores.) Replace compartment
cover. Plug in the oven.
\
27
Page 28

Before your call for ,semice
.
Read the book to be certain you understand
how the oven operates. Review “All these
things are normal with your microwave oven”
on page 3. In several other locations in the
book there are points to check on how to de-
termine if you need service.
If no cooking takes place after
START button is pressed:
If signal doesn’t sound: Make sure power is
~n. Check first to see that the 3-prong plug is
inserted firmly into a proper receptacle. Is the
wall receptacle working properly or has it
failed and won’t work until a fuse is replaced?
You can check that easily at the control box.
Check to be certain the door is securely
closed. If a dish touches the door when the
door seems closed, it actually may not be
firmly closed, Unless the door is closed to engage the safety interlocks, the microwave
energy cannot come into the oven.
If signal sounds: Check setting directions. If
you’re using the temperature probe, make
sure cable end is securely “seated” into oven
receptacle. With TEMP COOK, make sure
temperature setting falls between 90° and
200°. Make sure temperature setting is higher
than actual temperature of food in oven, (If
food has reached or exceeds temperature
setting, oven won’t microwave because the
temperature you set has already been
reached.)
If “PF” appears on the read-out
Power has been interrupted. Touch CLEAR/
OFF. Reset the controls. Instructions stored in
the oven’s memory will have to be replaced.
If Microwave Energy Goes Off
Before Set Time Has Elapsed
Check to be certain the fuse or circuitbreaker protecting the receptacle into which
cord is plugged is operating. If fuse has not
blown and power continues to go off, this signals a problem, so call serviceman.
If Oven Light Burns Out
See Care Section, page twenty-seven, regarding replacement. The oven can be operated
without the light in place, but it should be replaced for convenience in seeing the oven interior, and also for safety’s sake because the
socket should not be left open. Hotpoint serv-
ice does not stock these lights.
TV-Radio Interference
Some TV and radio interference might be no-
ticed while operating the microwave oven. It
is similar to the interference caused by other
small appliances such as vacuum cleaners,
mixers, etc. It does not indicate a problem
with your oven.
28
Page 29

Customer Care Service
.
Your Hotpoint microwave oven is outstand-
ing in features and has been well-designed,
with the help
homemaker in mind. You will find it depend-
able, precision-built and reliable in performance.
of home economists, with the
Similarly, intensive efforts have establishect
tm efficient, well trained, nationwide product
service organization. No matter where you
live—or move—the network of thousands of
Hotpoint franchised distributors, dealers and
service technicians are happy to serve you
and make doubly sure your new microwave
oven gives you continued, satisfactory
performance.
For service after the warranty
period:
Even the finest precision-built appliances
may require service from time to time. In
some areas, franchised Customer Care’@
service organizations offer service contracts, beyond the original warranty period,
which enable you to budget for such possible occurrences.
Contact your local franchised Customer
Care service organization to ascertain
whether service contracts are available in
your area, and to learn the details of their
plan and its terms and conditions.
When You Call Hotpoint For
Service
help get prompt service by:
1. Giving an accurate description of the
trouble.
2. Giving the complete model and serial
number of your oven. This information is located on a metal rating plate either inside
oven at tOp left side, or on
rear outside of case.
Notice to Owner
For Professional Maintenance, call Hotpoint
Franchised Service—
phone number from your dealer or the “yellow pages” and write it here.
Telephone number
it’s nearby. Get tele-
29
Page 30

A spe6ial
~e~$age
.
Hotpoint wants you to be pleased with your new
Hotpoint Appliance. Part of our commitment to
keeping you pleased is providing the best possible service we can.
Should your Hotpoint appliance need
your local dealer. He may provide the serv-
call
ice himself, or refer you to a qualified servicer
In your area.
If you do not have a servicing dealer, call the
Factory Service office in your area. A list of
these offices and telephone numbers is included with your appliance.
If the service you receive is not to your satisfaction, here are three steps you should follow
to make it right:
servicing,
1.First, contact the people who serviced your
fiotpoint appliance. Explain your point of view
and why you are displeased. In most cases,
this first step will solve most problems.
2. If you still have not resolved your problem,
write all details, including your telephone number and the model and serial number to Hot-
point direct. The address is:
MANAGER— CUSTOMER RELATIONS
HOTPOINT
WAITERSON CITY EAST 312
APPLIANCE PARK, LOUISVILLE, KY. 40225
3. If you are dissatisfied with the action taken,
the final step would be to send full information
to: MAJOR APPLIANCE
CONSUMER ACTION PANEL
20 NORTH WACKER DRIVE,
CHICAGO, ILL. 60606
This panel, known as MACAP, is a group of independent consumer experts under the sponsorship of several industry associations. Its
purpose is
advise the industry of ways to improve cus-
tomer service.
Free of industry control and influence, MACAP
is able to make impartial recommendations,
considering each case individually.
to study industry practices and to
30
Page 31

,.
.-
.
‘,.
31
Page 32

HOTPOINT MICROWAVE RANGE ~
(Includes Cooking Centers and Microwave Ovens)
FULL ONE-YEAR WARRANTY “
FROM HOTPOINT TO YOU - This warranty is extended by Hotpoint to the original purchaser and
to any succeeding owner and applies to products purchased in the United States, retained within
them4~;~entiguous states, the state of Hawaii or the District of Columbia, and employed in ordinary
WHAT WE WILL DO -If your Hotpoint Microwave Range fails because of a manufacturing defect
within one year from the date of original purchase, we will repair the product without charge to
you. Parts and service labor are included. Service will be provided in the home in the 48 con-
tiguous states, the state of Hawaii or in the District of Columbia.
HOW TO OBTAIN SERVICE - Service will be provided by our local Customer Care@ factory service organization or by one of our franchised Customer Care servicers during normal business
hours after you notify us of the need for service. Service can be arranged by telephone.
Look up “Hotpoint Factory Service” in the White pages of your telephone directory or “Hotpoint
Customer Care Service” in the Yellow pages or write to the address given below.
WHAT IS NOT COVERED - This warranty does not cover the failure of your Microwave Range if it
is damaged while in your possession, used for commercial purc)oses, or if the failure is caused by
unreasonable use including failure to provide reasonable and necessary maintenance. In no ‘.
event shall Hotpoint be liable for consequential damages. This warranty does not apply to the ‘:
state of Alaska nor to the Virgin Islands, Guam, American Samoa, the Canal Zone or the Com-
monwealth of Puerto Rico.
Some states do not allow the exclusion or limitation of incidental or consequential damages, so
the above limitation or exclusion may not apply to you.
rights, and you may also have other rights which vary from state
This warranty gives you specific legal ~
to state.
ADDITIONAL LIMITED FOUR-YEAR
MAGNETRON TUBE WARRANTY
The magnetron tube is covered in the above full warranty. In addition to that warranty, if the mag-
netron tube fails because of a manufacturing defect within the second through fifth year from date
of the original purchase, we will furnish without charge, a replacement magnetron tube. You must
pay the service labor charge for the home call, diagnostic work, and removal, and reinstallation of
the new magnetron tube.
Nlo;~er provisions of this additional limited warranty are the same as stated in the full warranty ~
LIMITED WARRANTY
Applicable to the State of Alaska
In the state of Alaska free service including parts will be provided to correct manufacturing defects at our nearest service shop location or in your home, but we do not cover the cost of trans- ~
portation of the product to the shop or for the travel cost of a technician to your home. You
responsible for those costs. All other provisions of this limited warranty are the same as those
stated in the full and limited warranties above.
WHERE TO GET FURTHER HELP - [f you wish further help or information concerning this warranty, contact:
Manager–Customer Relations
General Electric Company
Appliance Park, WCE-Room 316
Louisville, Kentucky 40225
WARRAhlTOR-
General Electric Company
Appliance Park
Louisville, Ky. 40225
are
@
~
s
$
3
~
3
s
s
q
5
~
s
3
z
.
.
Pub. No. 39-4421
I Part No. 862A299PI16 [
 Loading...