

Page 1
Page 2
B UsitigYour
-.
ReadThisUseandCareBook
Takethetimeto readthisbookandlearnhowto enjoy
your newMicrowaveOven.It containsdetailedoperatinginstructionsandrecommendedmaintenance,as
wellashandytipsto helpyougainmaximumbenefits
from your MicrowaveOven.Onceyou havereadthe
book,keepit handyto answeranyquestionsyoumay
have.
If you haveany additionalquestionsconcerningthe
operationof your MicrowaveOven,write—including
your phonenumber—to:
ConsumerAffairs
Hotpoint
AppliancePark
Louisville,Kentucky40225
IFYOURECEIVEDA DAMAGEDOVEN,immediately
contactthe dealer (or builder)from whom you purchased it. They have been informed of the proper
procedure to take care of such matters and can
handleitfor you.
RegisterYourOven-
It is important that we, the manufacturer,know the
locationof yourMicrowaveOvenshoulda needoccur
for adjustments.
Pleasecheck with your supplier to be sure he has
registeredyou as the owner;also send in your PurchaseRecordCard.If youmove,or ifyou arenotthe
original purchaserpleasewrite to us, stating model
and serial numbers.This appliancemustbe regis-
tered.Pleasebecertainthatitis.
Writeto:
Hotpoint
RangeProductService
AP2-210
AppliancePark
Louisville,Kentucky40225
RecordModelandSerialNumbers
Anameplateonwhichisstampedthemodelandserial
I
numberis locatedeitherinsideovenattop leftside,or
on rearoutsideof case.
Model and serial numbersare also on the Purchase
RecordCardwhich camewith your MicrowaveOven.
Recordthenumbersin thespacesbelow.
Pleasereferto both modelandserialnumbersin any
future correspondenceor product servicecalls concerningyour MicrowaveOven.
ModelNumber
-SerialNumber
Me Purchased
KEEPPURCHASERECEIPTWITH THIS BOOKT“
ES7’’ABLISHTHEWARRANTYPERIOD.
BeforeYouCallforService
See“BeforeYouCall for Service”section.(Seepage
10.)It listsmanyminor causesof operatingproblems
that you can correct yourself and may saveyou an
unnecessaryservicecall.
IfYouNeedService
In many cities, there’s a Hotpoirit Factory Service
Center.Call,andaradio-dispatchedtruckwill cometo
your home by appointment—morningor afternoon.
Charge the work, if you like. All the centersaccept
bothMasterChargeandVisacards.(Seepage11.)
Or lookfor HotpointfranchisedCustomerCare@servicers.You’ll find them in the Yellow Pagesunder
“HOTPOINTCUSTOMERCARE@SERVICE”.
If you need serviceliterature,partslists,partsor
accessories,contactone of the FactoryServiceCen-
ters, a franchisedCustomerCare@servicer or your
Hotpointdealer.
ExtendedServiceContracts:The termsof your war-
ranty provide free servicecovering failures due to
~manufacturingdefectsfora definiteperiodoftime.
, After this warranty expires you may purchasean
ExtendedServiceContractwhich will enableyou to
budget your service needs.This coveragebeyond
warrantyisavailablefrom our FactoryServiceCenters
andfrom manyfranchisedCustomerCare@servicers.
Itisagood ideato applyfor thiscoveragebeforeyour
warrantyexpires.
Stepsto FollowforFurtherHelp
First,-contactthe people who servicedyour micro-
waveoven.Explainwhy you aredissatisfied.In most
cases,this will solvethe problem.
Next,if you arestill dissatisfied,write allthe detaiis—
includingyour phonenumber—to:
Ma-nager,ConsumerRelations
Hotpoint
WCE-312
AppliancePark
Louisville,Kentucky40225
Finally,if your problemisstill not resolved,write:
MajorApplianceConsumerActionPanel
20NorthWackerDrive
Chicago,Illinois60606
This panel, known as MACAP,is a group of inde-
pendentconsumerexpertsunderthe sponsorshipof
severalindustryassociations.Its purposeis to study
practicesandadvisethe industryof waysto improve
customerservice.BecauseMACAPisfreeof industry
control and influence, it is able to make irnparti~l
recommendations,consideringeachcaseindividually.
n
@198~General Electric CM,,U.S.A.All rights reserved. ~
z
Page 3
of
Safety Tips ........................
lntrociuction to Oven . ...........
TimeCook. .................. .....
13efrosto,...........................
Temp Cook .......................
Care of Your Oven ...............
BeforeYouCall for Service ....
Factory Service Centers.. ......
Warranty ...........................
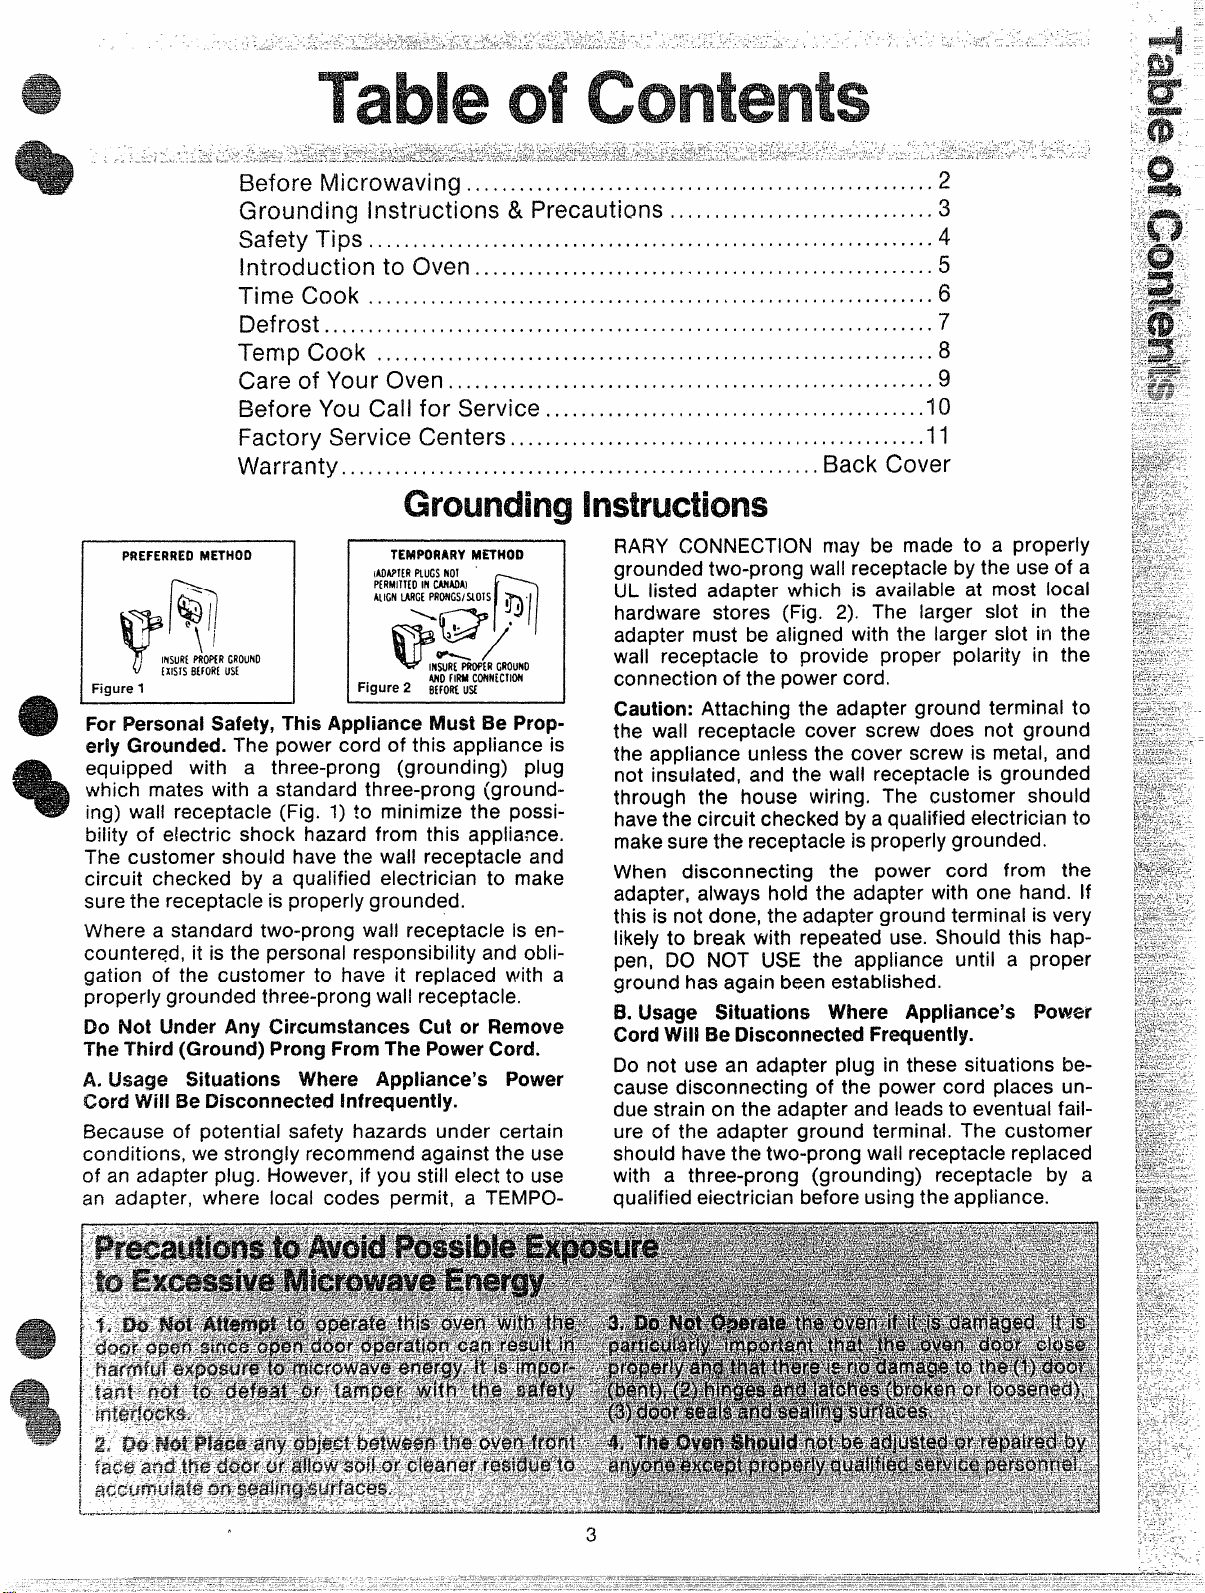
PREFERRED METHOO
Figure 1
I I
For Personal Safety, This Appliance Must Be Properly Grounded. The power cord of this appliance is
equipped with a three-prong (grounding) plug
which mates with a standard three-prong (grounding) wall receptacle (Fig. 1) ?Ominimize the possi-
bility of electric shock hazard from this appliance.
The customer should have the wall receptacle and
circuit checked by a qualified electrician to make
sure the receptacle is properly grounded.
Where a standard two-prong wall receptacle is encountered, it is the personal responsibility and obligation of the customer to have it replaced with a
properly grounded three-prong wall receptacle.
Do Not Under Any Circumstances ICutor Remove
The Third (Ground) Prong FromThe PowerCord.
A. L&age Situations Where Appliance’s Power
Cord WiHBe Disconnected infrequently.
Because of potential safety hazards under certain
conditions, we strongly recommend against the use
of an adapter plug. However, if you still elect to use
an adapter, where local codes permit, a TEMPO-
TEMPORARY METHOO
(AOAP1[RPLuGSNOI
PERMITIfO
IN CINMAI
‘“GN ‘RGE‘RmGs’MOTs I , “
D17
a“”
@./
INSUREPNWERGROUNO
Figure 2 BEFOREusE
1
Iwo FIRMCofwclloti
n
●
........ . . .. . .... . ..... . . . .. . .. . . .. . . . ..
4
........................................5
,..O.... $..,,. ..........................
6
........................................7
.................................,., ,.. .
8
....,..,, ...............................9
.......................................10
........................,..,, . .........
11
...........................Back Cover
RARY CONNECTION may be made to a properly
grounded two-prong wall receptacle by the use of a
UL listed adapter which is available at most local
hardware stores (Fig. 2). The larger slot in the
adapter must be aligned with the larger slot in the
wall receptacle to provide proper polarity in the
connection of the power cord.
I
Caution: Attaching the adapter ground terminal to
the wall receptacle cover screw does not ground
the appliance unless the cover screw is metal, and
not insulated, and the wall receptacle is grounded
through the house wiring. The customer should
have the circuit checked by a qualified electrician to
make sure the receptacle is properly grounded.
When disconnecting the power cord from the
adapter, always hold the adapter with one hand. [f
this is not done, the adapter ground terminal is very
likely to break with repeated use. Should this happen, DO NOT USE the appliance until a proper
ground has again been established.
Usage Situations Where Appliance% Power
8.
Cord Will Be Disconnected Frequently.
Do not use an adapter plug in these situations because disconnecting of the power cord places undue strain on the adapter and leads to eventual failure of the adapter ground terminal. The customer
should have the two-prong wall receptacle replaced
with a three-prong (grounding) receptacle by a
qualified electrician before using the appliance.
Page 4
Page 5

Get to know your microwave oven. This picture identifiesthe importantfeaturesand explainstheir purpose
.
briefly.
\
@
[
Model RE932
/
1. Door Handle.
securely latched.
is
2. Door Latch.
WindowwithMetalShield.Screenallows cook-
3.
ing to beviewedwhile keepingmicrowavescon-
fined in oven.
PlasticMode StirrerCover. Protectsthe mode
4.
Ovendoesn’toperateunlessdoor
Push into open door,
/
Timer Control. Set timer to desired cooking
‘ 12.
time for TIME COOK.Timer goes upto 60 min-
utes. The first 10 minutes is expanded into 1
minute increments.
TemperatureControl.Setdesiredfinished tem-
13.
peratureby dialing knob. If actual internal temperature of food is morethan temperatureset,
ovenwill not start.
VariablePowerControl.This control can beset
14.
from levels 1to 10.Youcan varythe amount of
microwave power in the ovenas suggestedfor
recipes in the Cookbook. SeeChart below for
further explanation of power level.
stirrer which distributes microwaveenergy into
the oven.
!5.
Oven Vent.
6.
Oven Light. Goes on when door is opened or
when oven isoperating in any function.
7.
Oven Shelf.
MicroTherrnometer’”TemperatureProbe. Use
8.
with Temperature.
Receptacle for Temperature Probe. Tempera-
%
ture Probe must be securely inserted into receptacle before oven will start temperature
microwaving.
Dauble-13uty7”Shelf. Lets you microwave several foods at once, (SeeSafety Tips for special
instructh?rw.)
Thne/7empSwitch.To cook by
then set timer. To cook by Temperature, push
down, then setdial.
Time, push up,
1!5.Start Button. Push after all controls are set to
startcooking opera~ions.
5
Page 6

Y-+-~~Wi~~
—
,
Time Cooking, or cooking your food according to a predetermined amount of time, is probably familiar to you from
conventional cooking. With your microwaveoven, however,
you presetthe timeandthe oventurns off automatically.
Lkhg Your(lven to TimeCook
Follow the cooking stepsbelow to
help you learn
properly.
Step 1: Fill a cup 2/3 full of water
and 1 teaspoon of freeze dried
coffee.Useacup thathasno metal
decoration. Placecup in ovenand
closedoor.
Step 2: Turn Variable Power Control to 10 (HIGH). Forthis cup of
coffee, this power level is recommended, but YOUwill use other
levelsas recipescall for their use.
to Time Cook
Step 3: Push TIME/TEMP Switch
up toTIME Position.
Step 4: Set Time Control. For
coffee set at 1 minute and 20 to
30 seconds. Timer may be reset
during cooking if needed.
Step5: Push START button. inte-
rior light and fan come on to tell
you oven isoperating.
Step 6: Whentime is up, ovensig-
nalsand shutsoff automatically.
MicrowavingTips
o Make sure all utensils used in
your microwave oven are labeled
“suitable for microwaving”. Check
your Cookbook for specific testto
determine “microwave-safe” utensits.
* Paper towels, wax paper, and
cdasticwrap can
dishes in o-rderto retain moisture
and preventspattering.
o Most microwavedfoods require
stirring, rotating, or rearranging.
Check your Cookbookfor specific
instructions for the food you are
microwaving.
● Some foods such as unshelled
eggs and hot dogs must be
pricked to allow steam to escape
during cooking.
be used to cover
Questions
Zu’MlAnswers
Q. Isetmy ovenfor the time called
for in the recipe but at the end of
the time allowed, my dish wasn’t
done. Whathappened?
A. Since house power varies due
to time or location many Time
Cook recipesgiveyouatime range
to prevent overcooking. Set the
oven for minimum time, test the
food for doneness, and cook your
dish a little longer, if necessary.
Q. I want to cook my dish on a
Power Level other than HIGH,
what do I needto do?
A. To change the Power Level,
simply turn Variable Power Control to desirednumbersetting.
Q. Can I interrupt my Time Cook
function to check the food?
A. Yes.To resumecooking, simply
close the door and push START.
NOTE: Microwave power will not
come on until you are ready. You
must push START for cooking to
begin.
6
Q. Must I change the Power Ccmtrol every time I cook?
A. You must turn the Power Control to desired Power Level. If,
however, it is already on level
needed, it is not necessary to
change.
Page 7

HOWto Defrost
The Defrost setting is designedfor
even thawing necessary for large
amounts
most important advantages of a
microwave oven, making defrosting quick and easy with little
attention. Power Level 3 is the
recommended setting for most
defrosting, but you may use other
settings for more flexibility. See
your Cookbook for the complete
defrosting chart.
To become better acquainted with
defrosting in your oven, defrost
frozen pork chops
stepsbelow.
Step 1: Place package of frozen
_ chops in the ovenand closedoor.
of food and is one of the
by following the
—
Step 3: Push TlfvlE/TEMPSwitch
up to TIME.
—
Step4: Turn Timer to 8 minutes.
DefrostingTips
@Foods frozen in paper or plastic
can be defrosted in the package.
o Foreven defrosting, many foods
need to be turned over, rotated, or
broken up part of the way through
the defrosting time,
o Pre-packaged
can be defrosted
cooked,
frozen dinners
and microwave
Step2: Turn VariablePower Control to 3 (DEF).
Questions
and Answers
Q. Can 1Defrost small items in a
hurry?
A. Yes, but they will need more
— frequent attention than usual.
Raise the Power Level after
— entering the time by turning Vari-
—
able Power Control to 7 or 10.
power Level 7 cuts the time in 1/2;
awer Level 10 cuts the time to
1/3, During either, rotate or stir
food frequently.
Step5: PushSTARTbutton.
Step 6: When oven turns off, turn
package over, close door, and
repeatSteps4 and 5.
Q. When I press START, I hear a
dull thumping noise.What is it?
A, This sound is normal, It is iet-
ting you know the ovenis using a
PowerLevellower than HIGH.
Q. Why don’t the defrosting times
in the Cookbook seemright for my
food?
A. Cookbook times are average.
Defrostingtime canvaryaccording
to thetemperature in
your freezer,
Set your oven for the time indi-
cated in your Cookbook, if your
food is still not completely thawed
at the end of that time, re-set your
oven and adjust the time accordingly,
.
. Check
your Cookbookfor other
defrostingtips.
Q. Can I open the door during
defrosting to check on the progressof myfood?
A. Yes.You may open the door at
any time during microwaving.
To
resumedefrosting, close the door
and pressSTART.
Q.Can Iselecta PowerLevelother
than Power Level3 for defrosting?
A. Yes.Somesmallerfoods maybe
defrostedquicker on higher Power
Levels but for even, carefree
defrosting, Power Level 3 is suggested, Check the chart in the
Cookbook for specific times and
PowerLevels.
.
7
Page 8

How
For many foods, internal temperature is the best gauges the internal temperature of your ‘food; it
test of doneness.
Roasts or poultry
temperature cooking. Heating or reheating foods
accurately to a serving temperature you desire is
simple and easy.
Temperature C-ooking takes the guesswork out of
are cooked to perfection when
must be used
Check with your
probe in specific foods.
cooking because the oven shuts off automatically
whenthe food isdone.
The Temperature
The temperature probe is a food thermometerthat
Probe
SENSOR
HowtoTempCooka RolledBeefRibRoastto Medium
Step 1: Insert temperature probe
as directed in Cookbook and attach probe securely in oven wall.
Closethe door.
Step 3: Push TIME/TEfvlP Switch
down to TEMP position.
90
Step 4: Turn Temperature Knob
tO i30,
Step5: Push START button. inte-
rior light and fan come on to tell
you oven is operating,
6: When 130 degrees is
Step
reached,oven automatically turns
off. Remove probe and food from
the oven,
300
when using Temperature Cooking. -
Cookbookfor proper placement of
HANDLE
ciw
cookingTips
@Where you have a choice of
PowerLevels,usea lower setting;
it will heat more evenly even
though requiring
. Be sure frozen food has been
completely defrosted before inserting probe.Probemaybreakoff
ifusedin frozenfoods.
@Always insert probe into the
center of meaty areas; take care
notto touch thefator the bone.
o Insert probe as horizontally as
possible into foods as directed in
the recipes.Makesure the handle
does not touch the food. The
probe is easiest to use when
insertedfrom the front.
@Usethe clip to keepthe probe in
placewhile heating.
o Cover foods as directed in
Cookbookfor moisturecontrol and
quick,evenheating.
moretime.
Questions
andAnswers
Q. Is temperature cooking better
than time cooking for reheating
ieftovers?
A. Yes,this type of food is excellentto heatwith theprobebecause
often the amount of food is not
known, therefore cooking time is
only a guess.Cooking to a preset
temperature (usually 150°) eliminatesthe auesswork.
Q. After setting Power Level and
temperature, I pushed START but
the ovendid not comeon. Why?
A. You mustpush the TIME/TEMP
Switch to TEMPwhentemperature
cooking. Also if probe is not
securely seatedor forgotten, oven
will not start. Make sure all con-
trols aresetproperly.
Q. Are there any foods I can’t
TemperatureCook?
A. Yes.Delicate butter icings, ice
cream, frozen whipped toppings,
etc., soften rapidly at warm tem-
peratures, Batters and doughs as
well as frozen foods are also difficult to cook precisely with the
probe. It is best to TIME CC)OK
thesefoods,
8
Q. Can I leave my probe in the
ovenif it’s not insertedin thefood?
A. No. Ifthe probeis left insidethe
oven,touching the ovenwall, and
not inserted in food, you may
damagethe oven.
Q. How do I know what tempera-
ture to set?
A. Your Cookbook contains sec-
tions on all typesof foods showing
the temperatures needed to cook
the foods to different
doneness, For reheating, refer to
Reheating Charts in the front
of the Cookbook
temperatures.
degrees of
for specific
Page 9

YourNew Microwave Oven is a Valuable Appliance,
Protect It FromMisuse ByFollowingThese Rules:
@ Keep your oven clean and sweet-smelling.
Opening the oven door a few minutes after cooking
helps “air-out” the interior. An occasional thorough
wiping with a solution of baking soda and water
keeps the interior fresh.
@ Don’t use sharp-edged utensils with your oven.
The interior and exterior oven walls can be
scratched. The control panel can be damaged.
@Don’t remove the cover over the “stirrer” at the
top of the oven (microwave feature 4 on page 5.)
You may damage the oven.
SE CERTAIN POWER IS OFF BEFORECLEANING ANY PART OF THIS OVEN.
.
.
,“
..
.
,
$
BAKINGSODA
/-
E5
How to Cleanthe Inside
Walls, floor and plastic cover. Because there is little
heat except in the food, or sometimes in the utensils, spills and spatters are easy to remove. Some
spatters are easy to remove. Some spatters can be
removed with a paper towel, others may require a
damp cloth. Remove greasy spatters with a sudsy
cloth, then rinse and dry. Do not use abrasive
cleaners on oven walls. NEVER USE A COM-
MERCIAL OVEN CLEANER ON ANY PART OF
YOUR MICROWAVE OVEN.
Door-inside. Glass: Wipe up spatters daily, wash
when soiled, with a minimum of sudsy warm water.
I
Rinse thoroughly and dry,
I
Metal and plastic parts on door: Wipe frequently
with a damp cloth to remove ail soil, DO NOT USE
4BRASIVES, SUCH AS CLEANING POWDERS OR
STEEL AND PLASTIC PADS, THEY WILL MAR THE
SURFACE,
special note when
Teat generated on bottom of Brown ‘N Sear Dish
;an cause scorched appearing stains to bake onto
he oven shelf if grease is present. These may be renoved with Delete’t Polishing Cleanser by the
lrackett Products Co.
$fter using Delete, rinse and dry thoroughly, follow-
ing instructions on can. Do not use Delete on the
~ainted surfaces such as walls. It will scratch the
I
oaint.
I
[
3elete may be purchased from your local dealer or
f
‘rem your Authorized Service Center. Check the
‘yellow pages” for location and phone number,
>elete may be sold in grocery or hardware stores,
x in the housewares section of some department
;tores.
kccessory Shelf. Your shelf accessory is made of
]olysulfone, one of the strongest microwave oven]roof plastics, It is designed for use in a microwave
usingBrown‘N Sear Dish: High
oven only; do not use it in a conventional oven. Do
Not operate your microwave oven with the shelf in
place unless you also have food in the oven.
Never use a microwave browning dish with the
shelf. Heat from browning dish can damage the
shelf. The easy to clean shelf is dishwasher safe, or
may be washed in hot water with a mild detergent.
Do not use abrasive cleansers or scouring pads.
AutomaticTemperatureProbe.Probe is sturdy, but
care should be taken in handling. De not twist or
bend; avoid dropping temperature probe.
Clean as soon after using as possible. To clean,
wipe with sudsy cloth, then rub lightly with plastic
scouring ball if necessary, Rinse arid dry, (Or wash
in dishwasher.)
Iliowto Clean the Outside
Ca$e.Clean the outsideof your oven with soap and
water, then rinse and dry. The outer pane of the
window is glass, Just wipe clean with a damp cloth.
Chrome trim is best wiped with a damp cloth and
then with a dry towel.
Control Panel. Wipe with a damp cloth. Dry thoroughly. Do not use abrasives or sharp objects on
the panel, They can damage it.
Cord. If the cord becomes soiled, unplug and wash
with damp cloth. For stubborn spots, sudsy water
may be used, but be certain to rinse and dry thoroughly before plugging cord into outlet.
Lamp Replacement,First, unplug the oven,
Oven
Then remove lamp compartment cover by removing
screw which holds cover in place. Cover is located
at the rear of outer case.
To remove bulb, push it inward gently and turn it to
the left or counter clockwise; then pull outward out
of the socket. Replace with lamp number 25T8DC.
(It is available in drug and hardware stores.) Replace compartment cover. Plug in the oven.
9
Page 10

IF, WHEN COOKING WITI+ AUTOMATIC TEMPERATUREPROBE,NO COOKING TAKES PLACEAFTER “START”
BUTTONHAS BEENPRESSED:
A. Checkto be sureTIME/TEMP Switch issetatTEMP.if setatTIME, andTimer isat “O,”no cooking takesplace.(If time
remainsonTimer, ovenwill operateuntil time reaches“O,”then go off.)
B. Checkto makesureTIME/TEMP switchiscorrectlyset.
C. Checkto besurecableend of probe issecurely“seated”into oven receptacle,If it is not securely“seated,”andoven is
otherwisesetfor TemperatureCooking,ovenwill notstart,This indicatesthat afirm connectionhasnot been made.
D. Check to be sure temperatureset on dial is higher than actual temperatureof food in oven, If food has reached or
exceededtemperatureset on dial, ovenwill not start.
IF THE OVEN DOESN’TSEEMTO WORKATALL
Checkfirstto seethat the3-prongpiug isinsertedfirmly into a properreceptacle,ISthewall receptacleworkingproperlyor
hasit failedand won’t work until a fuse is replaced?Youcancheckthat easilyat thecontrol box.
IF THE MICROWAVEPOWERWON’TCOME ON
Checkto becertainthe door issecurelyclosed, and the timer set.Ifadishtouchesthedoor whenthe door seemsclosed,it
actually maynot befirmly closed.Unlessthe door isclosedto engagethe safetyinterlocks,the microwaveenergycannot
come intothe oven.Checkto becertainthat TIME/TEMPswitch ispushedallthe way
should beavoided.
WMICROWAVEENERGYGOES OFF BEFORESETTIME HASELAPSED
Check to be certainthe fuseprotecting the receptacleinto which cord isplugged is operating. If fusehas not blown and
power continuesto go M, this signalsa problem,so callserviceman.
IF LAMP BURNSOUT
See Care Section, page9, regarding replacement.The ovencan beoperatedwithout the lamp in place,but it should be
replacedfor conveniencein seeingthe oveninterior!andalsofor safety’ssakebecausethe socketshould not be leftopen.
TV-RADIO INTERFERENCE
Some TV and radio interferencemight be noticed while operating the microwave oven. It is similar to the interference
causedby other small appliancessuch asvacuumcleanem,mixers,etc.It doesnot indicatea problemwith your oven.
upor down.An “in-between”setting
.
—
Page 11

ALABAMA
Birmingham -35210
2500 Crestwood Boulevard
(205) 956-0333
(Decatur-Huntsville)
Huntsville -35805
1209 Putnam
(205) 830-0150
Mobile - 36&)9
1107 Beltline Highway So,
(205) 471-1451
ARIZONA
phoenix -85031
25 South 51st Avenue
p O.
BOX 14278
0302) 269-2121
Tucson -85705
2015 North Forbes Blvd.
Suite 111
(502) 623-8415
ARKANSAS
L!ttle Rock -72209
8405 New Benton Hwy.
(501) 568-7630
CALIFORNIA
[San Bernardino-Riverside)
Bloomington -92316
10~21 Cactus Avenue
(714) 877-3434
(San Francisco)
Burlingame -94010
1649 Adrian Road
{415) 981-8760
Fresno -93727
1809 North Helm Street
(209) 255-1351
Los Angeles -90058
815 East 46th Street
213) 583-1141
Sacramento -95815
1613% Arden Wav
(916) 929-2247 ‘
San Diego -92101
4 Kettner Boule\
) 297-322I
n Jose -95123
5763 Wmf@d Road
(488) 629-3500
Van Nuys -91405
6643 Lennox Avenue
(213) 989-5710
COLORADO
Colorado Springs -80909
1865 N. Academy - Suite B
(303) 597-8492
Denver -80207
S390 East 39th Avenue
(303) 320-3301
CONNECTICUT
Bridgeport - 06S04
615 North Washington Ave.
(~03) 367.5311
East Hartford -06108
265 PFestige Park, Plaza 3
(203) 528-9811
DELAWAF?E
(Brandy wine- -Wilmington)
Glen Mills, PA -19342
R 0 lt2.
BOX 210
(215) 358-1500
DISTRICT OF COLUMBIA
J@3SUp,MD -20794
8201 Stayton Drwe
(301) 953-9130
FLOR!DA
Fort Lauderdale -33309
1101 West McNab Road
(305) 974-6708
RN% Meyers -33901
4160 S. Cleveland Ave.
($13) 939-2812
Jacksonville -32205
5X26 Highway Avenue
~9W) 783-f 330
icw’11find Hot&IhtFactorykmke Centers in all these’cities.
Cinc!nna!i -45242
10001 Alliance Road
(513) 745-5500
Cleveland -44142
20600 Sheldon Road
(216) 362-4200
Columbus -43212
1155 West Fifth Avenue
(614) 294-2561
Dayton -45414
5701 Webster Street
(513) 898-7600
Toledo -43611
3300 Summit Street
(419) 729-1651
OKLAHOMA
Oklahoma City -73118
3228 North Sanla Fe
(405) 528-2381
Tuisa -74112
6913 East 13th
(918) 835-9526
OREGON
(Portland Area)
Beaverton -97005
14305 S.W. Millikan Way
(503) 646-1176
Eugene -97402
1492 West Sixth Street
(503) 342-7285
PENNSYLVANIA
(Brandywine-Wilmington)
Glen Mills -19342
R,D, #2,
BOX 210
(215) 358-1500
Johnstown -15905
214 Westwood Shopping PI,
(814) 255-6721
(Harrisburg)
Lcmoyne -17043
1059 Columbus Avenue
(717) 761-8185
Monrooville -15146
Seco Road
150
Monrooville Industrial Park
(412) 665-3700
Philadelphia -19115
9900 Global Road
(215) 696-3270
(Allentown)
Whitehall -18052
1906 MacArthur Road
(215) 437-9671
RHODE ISLAND
East Providenctr -02914
1015 Waterman Avenue
(401) 438-0300
SOUTH CAROLINA
Columbia -2$602
LW#M#40nd
(8031 771=7060
(Greenville)
Taylors -29867
25 Hampton Village
(803) 292-0830
TENNESSEE
Chattanooga -37403
613 East 1lth Street
(615) 265-8598
Johnson City -37601
2912 Bristol Highway
(615) 262-4545
Knoxville -37919
3250 Mynatt Strttet, N.W,
(615) 524-7571
Memphis -38118
3770 South Perkins
(901) 363-1141
Nashville -37204
3607 Trousdale
(615) 834-2150
Drive
lard
(Pompano-W. Palm Beach)
Lake Worth -33460
1802 Mactnd Avenue
(305) 655-7040
Miami -33167
3200 N.W. llOth Street
(305) 685-5144
Orlando -32807
6545 East Colonial Dr.
(305) 273-6370
Tallahassee- 32301
1205 South Adams St,
(904) 222-6931
Tampa -33611
5201 S. Westshore Blvd.
Box 13708- Interbay Station
(813) 837-1906
GEORGIA
Atlanta -30325
1695 Marietta Blvd.
P.O. Box 19917
(404) 897-6400
Savannah -31406
211 Television Circle
(912) 925-0445
HAWAII
Honolulu -96813
404 Cooke Street
(808) 533-7462
IDAHO
(Boise)
Garden City -83704
5250 Chinden Blvd.
(208) 376-5880
ILLINOIS
Champaign -61820
1205 North Hagen
(217) 359-4088
Chicago -60638
5600 West 73rd Street
(312) 594-2424
Elk Grove Village -60007
10 King Street
(312) 593-2525
Lombard -60148
827-035 Westmore Ave.
(312) 629-8010
Peoria -61614
7708 North Crestline Drive
(309) 692-5070
Rockford -61107
401 North 2nd Street
(815) 962-7200
Springfield -62702
2252 South 15th Street
(217) 753-8088
INDIANA
Evansville -47714
1016-K S: Wolnbach Ave.
(812) 476-1341
Fort Wayne -46808
4632 Newaygo Road
(219)484-9005
Gary -48409
5185 Broadway
(219) 9!31-2533
Indianapolis -46219
6233 Brookville Road
(317) 356-8861
South Bend -46613
1902 Miami Street
(219) 288-0685
IOWA
Cedar Ra ids -52405
118 First treet, N,W.
!
(319) 366-8579
Davenport -52802
1074 South Dittmer
P,O.
80x 3188
(319) 328-5101
Des Moines -50313
1637 N.E, 56th Avenue
(515) 266-2191
Waterloo -50703
2629 Falls Avenue
(319) 236-1393
KANSAS
Kansas City -66115
2949 Chrysler Road
(913) 371-2242
Wichita -67211
820 East Indianapolis
(316) 267-3366
KENTUCKY
Lexington -40505
1144 Floyd Drive
{606) 255-0848
Louisville -40218
4421 Bishop Lane
P.0,
BOX 32130
(502) 452-3511
LOUISIANA
Baton Rouge -70814
2935 Crater Lake Drive
(504) 926-5062
(New Orleans)
Harahan -70123
701 Edwards Avenue
(504) 733-7901
Shreveport -71102
1430 Dalzell Street
(318) 425-8654
MAINE
South Portland - G4106
54 Darling Avenue
(207) 775-6385
MARYLAND
Jessup -20794
8201 Stayton Drive
(301) 953-9130
MASSACHUSETTS
(Cape Cod)
Hyannis -02601
80 Enterprise - Unit 11
(617) 771-5905
Pittsfield -01201
1450 East Street
(413) 499-4391
(Boston-South)
Westwood -02090
346 University Avenue
(617) 329-1250
(Boston-North)
Wilmington -01887
281 Main Street
(617) 944-7500
MICHIGAN
Grand Rapids -49508
350 28th Street, S,E,
(616) 452-9754
Lansing -48912
1004 E, Michigan Ave,
(517) 484-2561
Troy
Wcrstlend -48165
953 Manufacturer’a Drive
(313) 583-1616
MINNESOTA
(Minneapolis-St. Paul)
Edirra -55435
7450 Metro Boulevard
(612) 835-5270
MISSISSIPPI
Jackson -39209
325 Industrial Drive
(601) 352-337!
MISSOURI
Kansas City, KS -66115
2949 Chrysler Road
(913) 371-2242
St, Louis -63178
1355 Warson Road, No.
P.O. Box 14559
(314) 993-62oo
Springfield -65807
1334 West Sunshine
(417) 831-0511
NEBRASKA
Lincoln -66503
1145 North 47th St.
(402) 464-9148
Omaha -68117
6636 “F” $3treet
(402) 331-4045
NEVADA
Las Vegas -89109
3347 S.Highland Dr.
Suite 1 (702) 733-1500
Reno -89511
Del Monte Shopping Ctr.
6465 S.Virginia Street
(702) 628-7070
NEW JERSEY
Mounl Holly -08060
Rsute 38 & Easlick Ave.
(609) 261-3500
North Caldwell -07008
5 Fairfield Road
(201) 256-8850
(Asbury Park)
Oakhurst -07712
2111 Highway 35
(201) 493-2100
Vineland -08360
749 North Deisea Drive
(609) 696-1506
NEW MEXICO
Albuquerque -87107
3334 Princeton Dr., N.E.
(505) 884-1861
NEW YORK
Albany -12205
2 Interstate Avenue
(516) 438-3571
Brooklyn -11234
5402 Avenue ‘oN”
(212) 253-8181
Buffalo -14225
3637 Union Road
(716) 666-2268
(WestchesterCotArea)
Elmsford -10523
Fairwew Industrial Pk.
Route #9-A
(914) 592-4330
(Binghamton)
Johnson City -13790
278 Main Street
(607) 729-9248
Long island City -11101
49-10 Northern 9oulevard
(212) 626-9600
(Nassau-Suffolk County)
Molvillo -11746
336 South Servlee Road
(516) 694-8600
(Orange County Area)
Newbur h -12550
7
1125 Un on Avenue
(914) S64-2000
Rochester -14622
1900 Ridge Road East
(716) 544-7100
Syracuse -13204
985 West Genesee Street
(315) 471-9121
NORTH CAROLINA
Charlotte -28234
700 Tuckaaeegee Road
P,O,
BoX 34398
(704) 372-6810
Greensboro -27406
2918 Baltic Avenue
(919) 272-7153
Raleigh -27611
3300 Bush Avenue
P,O.
BOX 26107
(919) 876-5603
OHIO
Akron -44319
2262 S. Arilngton Road
(216) 773.0361
TEXAS
Austin -78704
2810 S. First Street
(512) 442-7893
Corpus Christi -78415
3225 Ayers Street
(512) 884-4897
Dallas -75247
8949 Diplomacy Row
BOX 47601
PO.
(214) 631-1380
El Paso -79925
7600 Boeing Drive
(915) 778.5361
(Brownsville)
Harhngen -78550
1204 North Seventh
(512) 423-1204
Houston -77207
P.0,
BOX 26837
6126 South LoorI East
(713) 641-0311 “
Lubbock -79490
4623 Loop 289 West
P,O,
BOX 16288
(806) 793.1620
(Odessa)
Midland -79701
P.O.
BOX 6286
Midland Terminal
(915) 563-3483
San Antonio -78216
7822 Jones-Maltsberger
(512) 227-7531
UTAH
Salt Lake City -84125
2425 South 900 West
P.o. Box 30904
(801) 974-4600
VIRGINIA
Fairfax -22031
2810 Dorr Avenue
(703) 280-2020
Norfolk -23502
4552 E, Princess Anne Dr.
(804) 857-5937
Richmond -23228
2910 Hungary Spring Rd.
(804) 288-6221
WASHINGTON
(Tri-City)
Kennewick -99336
Union Square
Suite 206
101 North Union Street
(509) 783-7403
Soottle -98188
401 Tukwila Pnrkway
(206) 575-2?11
S90kane -99206
9624 E. Montgomery St.
(50S; 926-9S62
WEST VIRGINIA
(Charleston)
Huntington -25704
1217 Adams Avenue
BOX 7518
P.0,
(304) 529-3307
Wheeling -26003
137 North River Road
(304) 283-8511
WISCONSIN
Appleton -54911
343 W. Wisconsin Ave.
[414) 731-9514
Madison -53704
4630 E. Washlng!on Ave.
(608) 241-9321
Milwaukee -53225
11100 W. Silver Spring Rd.
(414) 462-9225
— WATCHPORCHANGES.~ddrw+s~sand telephone numbers sometimes chitncte. Andnew Centers oDen,If the numbers change, check your
!:;:.:;< book. Look in the White Pages under “HOTPOINT FACTORYSERVTCE”,
11
Page 12

.
IWLL CNWWEAR
IFKY’YPO!NTMICROWAVERANGE
(IncludesCookingCentersand MicrowaveOvens)
FROMI+OTPOINTTO YOU- Thiswarrantyis extendedbyHotpointto theoriginal purchaserand
to anysucceedingowner andappliesto products purchasedin the UnitedStates,retainedwithin
~~em4~ucs~ntiguousstates,the stateof Hawaiior theDistrictof Columbia,andemployedin ordinary
WHATWEWILLDO- If your Hotpoint Microwave Rangefailsbecauseof amanufacturing defect
within oneyearfrom the date of original purchase,we will repairthe product without chargeto
you. Partsand service labor are included. Servicewill be providedin the home in the 48 contiguousstates,thestateof Hawaiior inthe Districtof Columbia.
HOWTO OBTAINSERVICE-==Servicewill beprovidedbyour local CustomerCareRfactoryservice organizationor by one of our franchisedCustomerCareservicersduring normal business
hoursafter younotify usof the needfor service,Servicecanbearrangedbytelephone.
Look for 4’HOTPOINTFACTORYSERVICE”in the White Pagesof your telephone directory or
“HOTPOINT CUSTOMERCARE@SERVICE”in the YellowPagesor write to the addressgiven
below.
WHATiS NOTCOVERED- Thiswarrantydoesnotcoverthe failureof yourMicrowaveRangeif it
isdamagedwhilein your possession,usedfor commercialpurposes,or if the failureis causedby
unreasonableuse including failure to provide reasonableand necessarymaintenance.IN NO
EVENTSHALLHOTPOINTBE LIABLE FORCONSEQUENTIALDAMAGES.This warrantydoes
not applyto the stateof Alaskanorto the Virgin Islands,Guam,AmericanSamoa,the CanalZone
or the Commonwealthof PuertoRico.
Somestatesdo not allow the exclusionor limitationof incidentalor consequentialdamages,so
the above limitation or exclusion maynot apply to you. This warrantygives you specific legal
rights,andyoumayalsohaveotherrightswhichvary from statetostate,
Ai)DITiONALLIMITEDFOUR-YEAR
MAGNETRONTUBEWARRANTY
The magnetron tube is covered in the abovefull warranty. In addition to that warranty,if the
magnetrontubefailsbecauseof amanufacturingdefectwithinthesecondthroughthefifth yearfrom
dateof theoriginal purchase,we will furnish without charge,a replacementmagnetrontube.You
mustpaytheservicelaborcharge for thehomecall,diagnosticwork,andremoval,andreinstallation
of the newmagnetrontube.
#lo;~her provisionsof this additional limited warrantyarethe sameasstatedin the full warranty
.
imsmtai
—-
LIMITERWARRANTY
ApplicabletotheStateofAlaska
In the stateof Alaskafree serviceincluding partswill be providedto correct manufacturingde-
fects at our nearestserviceshop location or inyour home,but wedo not coverthe cost of transportation of the product to the shopor for the travelcost of a technician to your home,Youare
responsiblefor those costs, All other provisions of this limited warrantyare the sameas those
statedin the full and limitedwarrantiesabove,
WHERETOGETFURTHERHELP- If you wish further helpor informationconcerning this warranty,contact:
Manager—ConsumerAffairs
GeneralElectric Company
Appliance Park,WCE–Room 316
Louisville,Kentucky40225
---==
-iiiiiiiiii4Lm@AQm!!mm-t
m ---- -–-
WARRANTOR-
GeneralElectricCompany
AppliancePark
Louisville,Ky,40225
L-.
—
-.
— ——
—.
--.-—-..——
—
—..——.—:.—.-.———
——.-_—
—
..
-———-———————
—— — ———
-.ly --——
—
—-—--~ .=~~===-=.=. =———-—==.—
——=====
-===5!5=. =.- ——————-————
——————.-———-———————
—
—
 Loading...