

Page 1
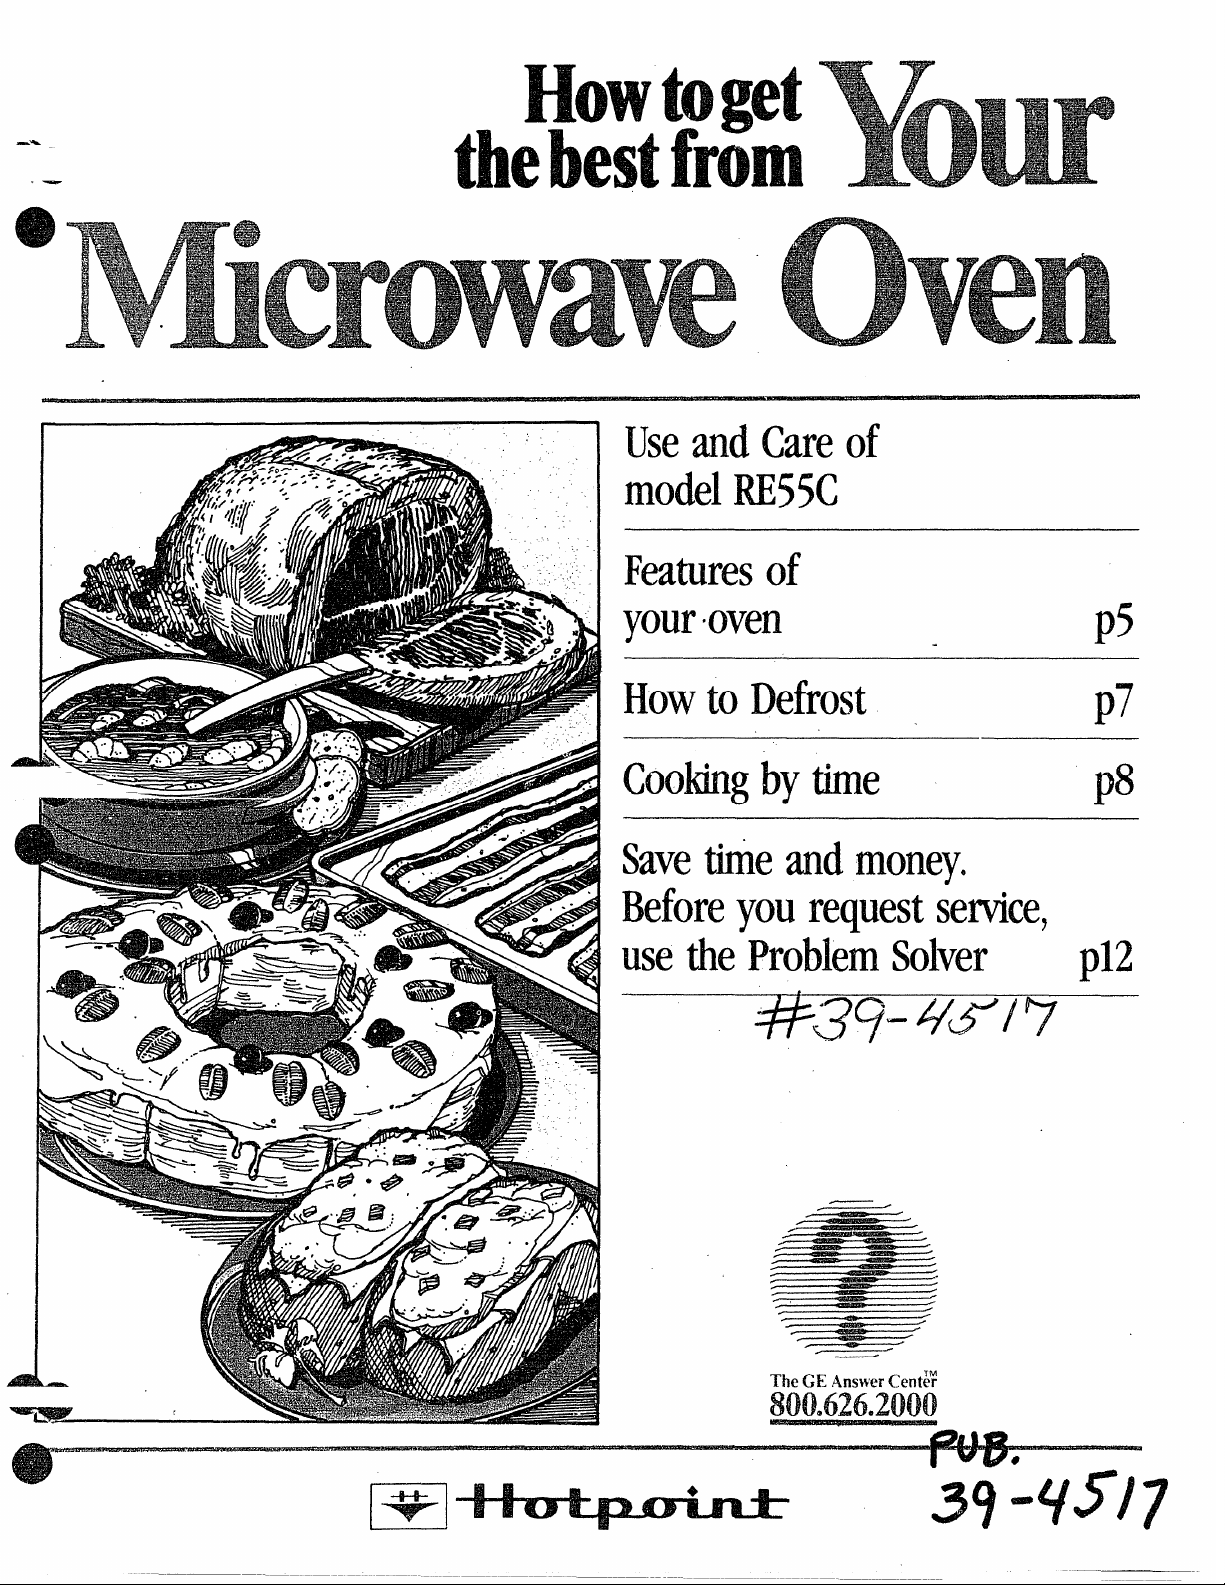
H
-m
-—
thebestfrom
UseandCareof
model
RE55C
Featuresof
your
HowtoDefrost
●ven
p5
p’7
Cookingbytime
Savetinieandmoney.
Beforeyourequestservice,
use theproblemSolver
7(YpY2$d/!7
---
TheGE AnswerCek$
800.626.2000
p$
p12
39-45/7
Page 2
Readthisbookcarefully.
itwill help you operate and maintain your new Microwave Oven
properly.
Keep it handy for answersto your
questions.
If you don’t understand something
or need more help. . .
Call, toll free:
The GE Answer’Center’”
800.626.2000
consumer information service
or write: (include your phone
number);
Consumer Affairs
Hotpoint
Appliance Park
Louisville, KY 40225
Writedownthe modeland
serialnumbers,
You’ll find them on a label inside
the oven.
These numbers are also on the
Consumer Product Ownership
Registration Card that came with
your Microwave Oven. Before
sending in this card, pleasewrite
these numbers here:
Model No.
Be sure your Microwave
Ovenis registered.
is important that we,the manu-
H
facturer, know the location of your
Microwave Oven should a need
occur for adjustments.
Your supplier is responsible for
registering you as the owner.
Pleasecheck with your supplier to
be sure he has done so; also send
in your Consumer Product Owner- “
ship Registration Card. If you move;
or if you are not the original purchaser please write to us, stating
model and serial numbers. This
appliancemustbe registered.
Pleasebecertainthat it is.
Write to:
Hotpoint
Range Product Service
Appliance Park
Louisville, KY 40225
If you receiveda damaged
oven.. .
immediately contact the dealer (or
builder) that sold you the Microwave Oven.
Savetime and money.
Beforeyourequestservice,check
the ProblemSolveron page 12. It
lists minor causes of operating
problems that you can correct
yourself.
(a) Do NotAttemptto operate this
oven with the door open since open
door operation can result in harmful
exposure to microwave energy. It is
important not to defeat or tamper”
with the safety interlocks. ,
(b) Do Not Placeany object
between the oven front face and the
door or allow soil or cleaner residue
to accumulate on sealing surfaces. ‘
(c) Do Not Operatethe oven if it is
damaged. It is particularly important
that the oven door close properly
and that there is no damage to the:
(1) door (bent)
(2) hinges and latches (broken or _
loosened)
(3) door sealsand sealing surfaces.
(d) The OvenShouldnot be
adjusted or repaired by anyone
except properly qualified service
personnel.
e
Serial No.
Usethese numbers in any
correspondence or servicecalls
concerning your Microwave Oven.
“
2
Page 3
-.,,.’
:
:..
.MrFIEm’ts
BeforeMicrowaving . . . . . . . . . . . . 2
Safety Instructions . . . . . . . . . ...3-4
—-\_
~::_iresofYourOven ,.. . ., ,. ,0 5
~
Touch Control Panel .. . . . . . . . . . 6
et the Clock . . . . . . . . . . . . . . . . ..6
e
Defrosting . . .. . . . . . . . . . . . . . . . ..7
Time Cook . . . . . . . . . . . . . . . . . . . .8
MIN/SECTimer . . . . . . . . . . . . . . ..9
Care of YourOven . . . . . . . . . . . .10
Grounding Instructions . . . . . . . . 11
Useof Extension Cords . . . . . . . . 11
The Problem Solver . . . . . . . . . . . 12
Consumer Services.. . . .. . ..o. . 15
Warranty . . . . . . . . . . . ..13ack Cover
s+Make sure all utensils usedin
your microwave oven are labeled
“suitableformicrowaving”. Check
yourCookbook for specific test
to determine ’’microwave-safe”
utensils.
- ~apertowels, wax paper, and
—
–==iic wrap can beused tocover
dishes In order to retain moisture
nd prevent spattering.
—
~ Many microwaved foods require
stirring, rotating, or rearranging.
Check your Cookbook for specific
instructions.
a Steam builds up pressure in
foods which are tightly covered by
a skin or membrane. Pierce potatoes, egg yolks and chicken livers
to prevent bursting.
a All recipes utilize high power
unlessotherwise indicated.
~>Whole poultry and roasts may
require turning or rotating for even
cooking results. Seecookbook for
specific instructions.
~ When microwaving casseroles,
best results are achieved with
recipes that can be stirred.
——
!~i4PORTANTSAFETY[F4STRUCT!ONS
Readall instructionsbeforeusingthisappliance.
When using electrical appliances
basic safety precautions should
be followed, including the .
following:
WARNING—TOreduce the risk
of burns, electric shock, fire,
injury to persons or exposure to
excessivemicrowave energy:
a Usethis appliance only for its
intended use as described in this
manual.
a Readand follow the specific
“PRECAUTIONS TO AVOID
POSSIBLE EXPOSURETO
EXCESSIVEMICROWAVE
ENERGY” found on page 2.
~ Thisappliance must be
grounded. Connect only to
properly grounded outlet. See
“GROUNDING INSTRUCTIONS”
found on page 11.
e For best operation, plug this
appliance into its own electrical
outlet, to prevent flickering of
lights, blowing of fuse or-tripping of circuit breaker.
a Install or locate this appliance
only in accordance with the provided installation instructions.
~ IBecertainto placethe front
surfaceof the door three inches
or morebackfrom the countertop edge to avoidaccidentaltippingof the appliancein normal
usage.
~ Do not cover or block any
openings on the appliance.
a Do not use outdoors.
a Do not immerse power cord
or plug in water.
~ Keep power cord away from
heated surfaces.
~ Do not let power cord hang “
over edge of table or counter. ,
a Do not operate this appliance
if it has a damaged power cord
or plug, if it is not working properly, or if it has been damaged
or dropped.
Q See door surface cleaning
instructions on page 10.
~ This appliance should be serviced only by qualified service
personnel. Contact nearest
authorized service facility for
examination, repair or
adjustment.
~ As with any appliance, close
supervision is necessarywhen
used by children.
~ To reduce the risk of fire in
the oven cavity:
—Do not overcook food. Carefully attend appliance if paper,
plastic, or other combustible
materials are placed inside the
oven to facilitate cooking.
—Remove wire twist-ties from
paper or plastic bags before
placing bag in oven.
—Do not use your microwave
oven to dry newspapers.
—Papertowelsandnapkins,
wax paper.Recycled paper
products can contain metal
flecks which may cause arcing
or ignite. Paper products con-
taining nylon or nylon filaments
should be avoided, as they may
also ignite.
—Do not pop popcornin your
microwaveovenunless in a special microwave popcorn accessory or unless you use popcorn
labeled for use in microwave
ovens.
—Do not operatethe ovenwhile
emptyto avoiddamageto the
ovenand the danger of fire. If by
accident the oven should run
empty a minute or two, no harm
is done. However, try to avoid
operating the oven empty at all
times—it saves energy and pro-
longs life of the oven.
—If materials inside the oven
should ignite, keep oven door
closed, turn oven off, and disconnect the power cord, or shut
off power at the fuse or circuit
breaker panel.
,
(continued next page)
3
Page 4
(continued)
Some products such as
::
whole eggs and sealed con-
tainers—for example, closed
glass jars—may explode and
should not be heated in this
oven.
a Avoidheatingbabyfood in
glass jars, even without their
lids; especially meat and egg
mixtures.
a Don’tdefrostfrozenbever-
ages in narrow necked bottles;
especially carbonated ones.
Even if the container is opened,
pressure can build up. This can
cause the container to burst,
resulting in injury.
a Use metalonly as directedin
Cookbook. Metal strips as used
on meat roasts are helpful when
used as shown in Cookbook.
TV dinners maybe cooked in
metal trays. However, when
using metal in microwave oven,
keep metalat leastl-inch away
from sidesofoven.
3? Cooking utensilsmay
becomehot because of heat
transferred from the heated
food. This is especially true if
plastic wrap has been covering
the top and handles of the
utensil. Potholders may be
needed to handle the utensil.
:* Sometimes,the cookingtray
can becometoo hot to touch.
Be careful handling the cooking
tray during and after cooking.
~~Do not useanythermometer
in food you are microwaving
unlessthat thermometer is
designed or recommended for
use in the microwave oven.
~ PlasticUtensils—Plastic
utensils designed for microwave
cooking are very useful, but
should be used carefully. Even
microwave plastic may not be as
tolerant of overcooking condi-
tions as are glass or ceramic
materials and may soften or
char if subjected to short periods
of overcooking. In longer exposures to overcooking, the food
and utensils could ignite. For
these reasons: 1) Use micro-
wave plastics only “and use
them” in strict compliance with
the utensil manufacturer’s
recommendations. 2) Do not
subject empty utensils to microwaving. 3) Do not permit children
to use plastic utensils without
complete supervision.
s When cookingporkfollow
our directions exactly and
always cook the meat to at least
170°. This assuresthat, in the
remote possibility that trichina
may be present in the meat, it
will be killed and meat will be
safeto eat.
o Boilinge~gs(in and out of
shell)isnot recommendedfor
microwave cooking. Pressure
can build up inside egg yolk and
may cause it to burst, resulting
in injury.
c~Foodswith unbrokenouter
“skin”such as potatoes, hot
dogs or sausages,tomatoes,
apples,chicken livers and other
giblets, and eggs (see previous
caution) should be pierced to
allow steam to escapeduring
cooking.
a “Boilable”cookingpouches
and tightlyclosedplasticbags
should be slit, pierced or vented
as directed in Cookbook. If they
are not, plastic could burst dur-
ing or immediately after cooking,
possibly resulting in injury. Also,
plastic storage containers should
beat leastpartially uncovered
becausethey form a tight seal. ‘
When cooking with containers
tightly covered with plastic wrap,
remove covering carefully and
direct steam away from hands
and face.
SAVETHESE
—-—-
Page 5
WiY
r-
—@
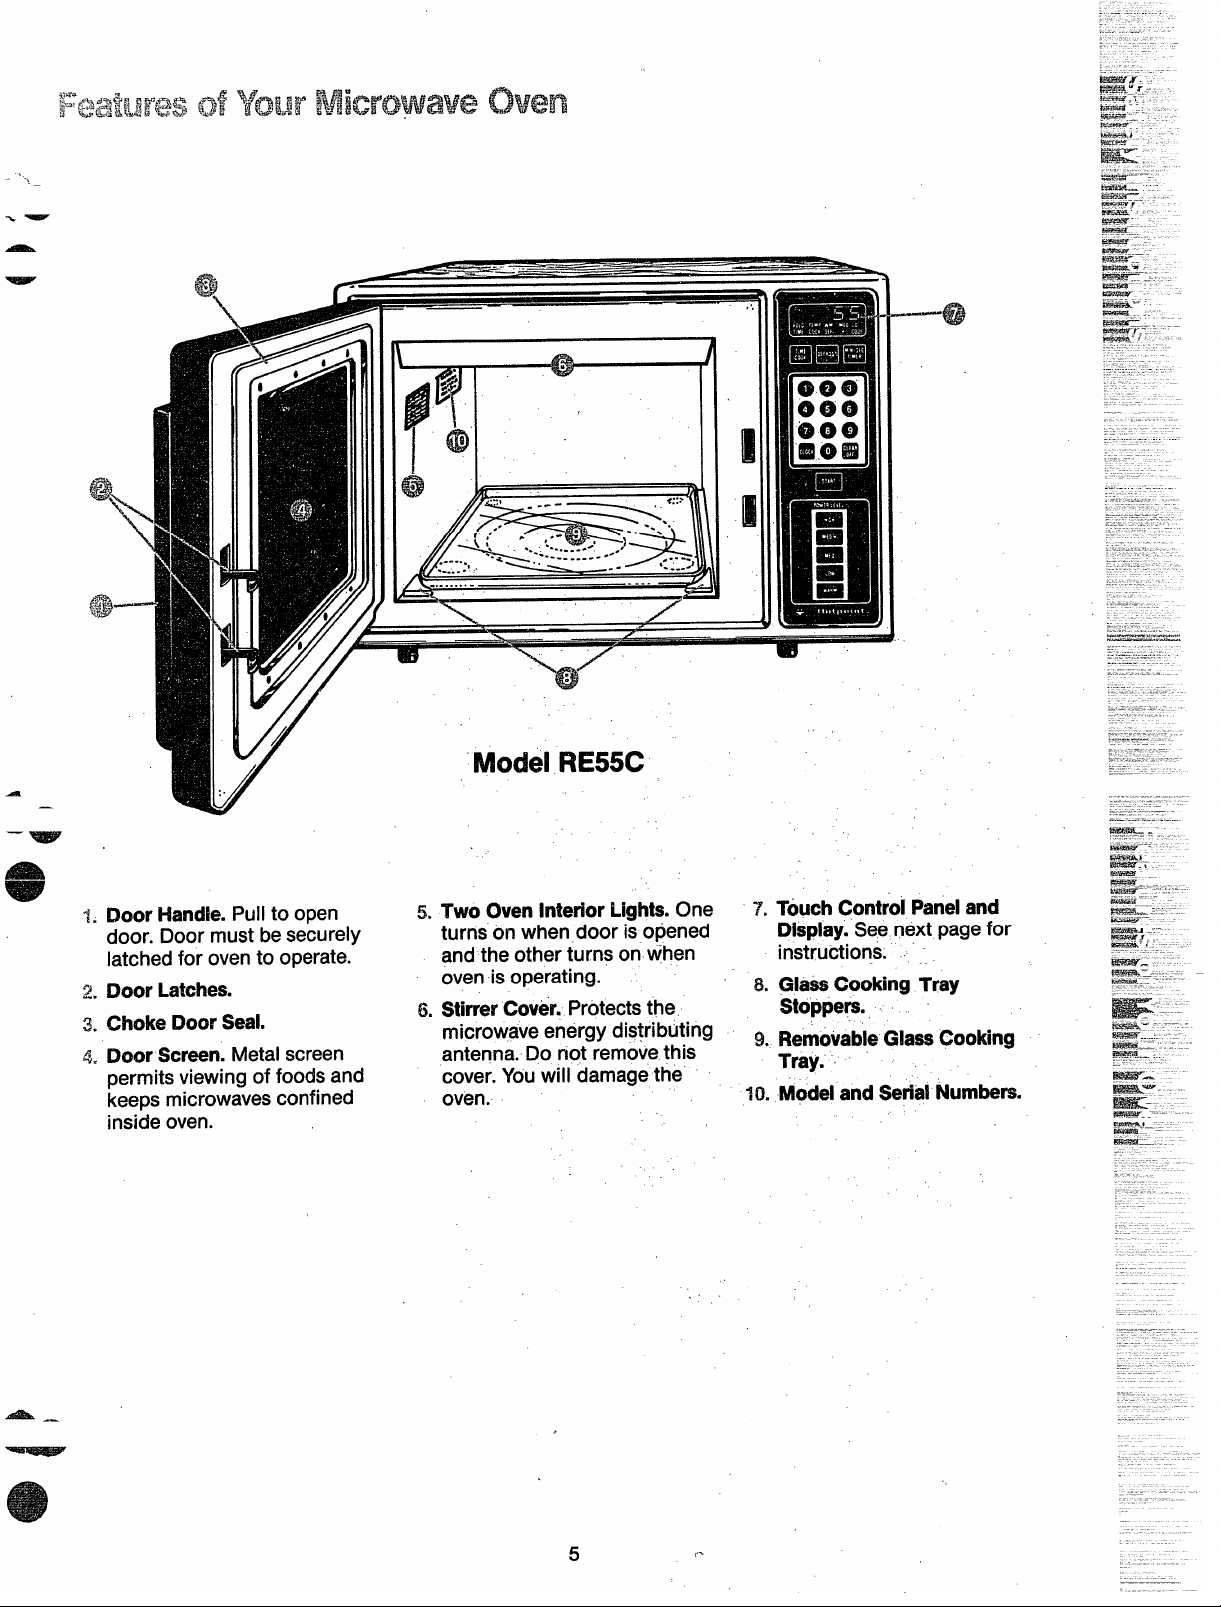
Iwkxk?lFE55C
Ala A__
7. Door Handle.Pull to
door. Door must be securely
latched for oven to operate.
2. Door Latches.
3, Choke Door Seal.
& Door Screen.Metal
open
screen
permitsviewingof foodsand
keeps microwaves confined
inside oven.
Two Oven ln8eriorLights.One
5$.
turnson whendoor is opened
and the other turns on when
oven is operating.
StirrerCover. Protects the
&
microwave energy dis~ributing
antenna. Do not removethis
cover. You will damage the
oven.
TouchControlPaneland
7.
Display.Seenext page for
instructions.
GlassCooking Tray
8.
Stoppers.,
RemovableGIassCooking
9.
Tray.
Modeland
10.
SerialNumbers.
5
Page 6

Features ofYourcontrolPanel
The Touch Control Panelallows
you to set the oven controls electronically with the touch of a finger.
It’s designed to be easyto use and
understand.
DISPLAY.Displays time of day and
time counting down during
functions (or power level when
Power Level Pad istouched). ~
TIME COOK. Microwaves for a
preset amount of time using auto-
matic Power Level 10 (or change .
power levelafter entering cooking
time. ,Seepage 8.)
DEFROST. Gentle, generally uniform thawing at automatic Power
Level LOW, (or change power level
after entering defrosting time. See
page 7.)
CLOCK. Touch this pad to enter
time of day or check time of day
while microwaving. To set clock,
first touch CLOCK pad and then
enter time of day. For example, if
time is 1:30,touch number pads 1,
3, and Oand 1:30will appear in display. Touch START pad. To reset or
change time, simply repeat above
process.
START. After all selections are <
made, touch this pad to start oven.
cooking
/
/
/
/
/
,
,
MIN/SEC TIMER. This feature uses
no microwave energy. It functions
as either a kitchen timer, asa hold-
= ing period after defrost or asa delay
timer before time cooking. (See
page 9.)
NUMBER PADS.Touch these pads
to enter cooking/defrosting time,
/“ time of day or Power Level.
CLEAR/OFF. When touched, it
shuts off the oven and erasesall
/
/
settings (except time of day).
POWERLEVEL.Touch the desired
pad if you want to change from
/automatic Power Level HIGH for
cooking or Power Level LOWfor
defrosting.
#
6
Page 7

Microwave
.The Defrostsettingisdesignedfor
--thawingnecessaryforlarge
WKJUI tia of foodand isone of the
.
_most importantadvantagesof a
.
_~~-atia oven.
‘* Power Level LOW is automatically
setfor defrosting, but you may
changethis for more flexibility.
* Seeyour Cookbook for defrosting
help.
To become better acquainted with
the defrost functions, defrost frozen
chopsusingthefollowing
pork
steps.
~iept: Placepackage
chops in the oven and close door.
—
~t~~ ~: Touch DEFROST. Display
—.
:+:0and Power Level LOW is
- %&GomaticalIyset in the oven but
Ane= not appear on display. DEF.
‘r flashes.
@@
of frozen
e
e
sie~4: Touch START.Time counts
down on display. When cycle is
completed, the oven signals and
flashes “End” then automatically
shuts off.
step5: T-m package OVer~CIOSe
door and repeat Steps 2,3 and 4.
Step & Open door and remove
package and separate chops to
finish defrosting.
Defrosting-rips
~ Foods frozen in paper or plastic
can be defrosted in the package.
@Foreven defrosting, many foods
need to be broke~ up or separated
part of the way through the defrosting time.
LSHomemade dinners can be frozen
in shallow foil trays and heated for
later use. Select foods that microwave wel1.
@Pre-packaged frozen dinners can
be defrosted and microwave
cooked.
@Check your Cookbook for other
defrosting tips.
andAIWWW$
Q. Why don’t the defrosting times in
the Cookbook seem right for my
food?
A. Cookbook times are average.
Defrosting time can vary according
to the temperature in your freezer.
Set your oven for the time indicated
in your Cookbook. If your food is
still not completely thawed at the
end of that time, re-setyour oven
and adjust the time accordingly.
Q. Should all foods be completely
thawed before cooking?
A. Some foods should not be completely thawed before cooking. For
example, fish cooks so quickly it is
better to begin cooking while it is
still slightly frozen.
Q. Can I open the door during
defrosting to check on the progress
of my food?
A. Yes.You may open the door at
any time during microwaving. To
resume defrosting, close the door
and pressthe START pad. The oven
begins operating if time is left on
timer. If not, reset time.
Q. How do I determine the amount
of time needed for defrosting
foods?
A.’Defrost according to defrost
chart found in your cookbook.
Note, however,that in your microwave oven, there are no extra
defrost functions. So,special tech-
niques may be necessary.
Step 3: Touch 8, 0 and Ofor 8 minutes. DEF. TIME and 8:00 are dis-
played. If you wish to change
Power Level, touch desired power
levelpad.
.
——
.
Page 8

CookingbvTimeinYour MicrowaveOven
I@
The Time Cookingfeatureallows
youto presetthe cookingtime.
The oven shuts off automatically.
Power Level High is recommended
for most time cooking, but you may
change this
your Cookbook.
To become better acquainted with
time cooking, make
by following the steps below.
Step I: Fill a cup 2/3 full of water
and add 1 teaspoon of freeze dried
coffee. Usea cup that has no metal ,
decoration. Place cup in oven and
close door.
for moreflexibility.See
acupof coffee
-
Step 3:
and
TIME COOK and 1:20aredisplayed.
If another Power Levelis desired,
touch desired power level pad. Although Power LevelHIGH is pre-
ferred for this cup of coffee.
Selectyourtime.Touch1,2,
Ofor a minute and 20seconds.
Questions
am!Answers
Q. I set my oven for the time called
for in the recipe, but at the end of
the time allowed, my dish wasn’t
done, What happened?
A. Since house power variesdue to
time or location many Time Cook
recipes give you a time range to
prevent overcooking. Set the oven
for minimum time, test the food for
doneness,and cook your dish a
little longer, if necessary.
Q. What happens if I accidentally
operate the microwave oven with
out food in it?
A. Accidental use for short period$
of time does not damage the Mag-
netron, but, it is not recommended.
Q. Can I interrupt my Time Cook
function to check the food?
A. Yes.To resume cooking, simply
close the door and pressSTART
Bar. The timer must be set for”
c“oc?kingto resume unless ti”meis
remain;ng on timer.
m
o
Step 2: Touch
display shows:0 and Hi. TIME
COOK flashes. Power Level HIGH
is automatically set,
TIMECOOK. The
Step4: Touch
START.Time
countingdownshowson display.
Step5:Whentimeisup,theoven
signalsandflashes
shuts off.
“End” then
Step& Openthe door.
8
Page 9

,
How to Use the Minute/SecondTimerinYour
The NWWSECTIMER hasthree
ingfunctions
* It operatesasa minutetimer.
* Itcan be setto delaycooking.
e
@It
can be usedasa holdsetting
afterdefrosting.
The MIN/SEC TIMER operates
without microwave energy.
!+ovv tO ~hme a
3-Minute
Ph$wlecall
Touch MIN/SEC TIMER pad. The
1.
display shows:0 and ENTERTIME
flashes.
2. Touch number pads 3,0 and O
(for 3 minutes and no seconds).
Display shows 3:00.
3. Touch START. Display shows
time counting down.
4. When
and display shows time of day.
timeis up,ovensignals
Programminga !Hoki“mm?
The Minute/Second Timer can also
usedto program“holdtime”
be
etween microwavecooking func-
ns.
The time can range from one
secondto 99 minutes and $?9
seconds. A HOLD, or “standing”
e
time may be found in some of your
recjpesor Cookbook.
own
To set the oven to delay cooking up
to 99 minutes follow Steps 1 and 2
to enter hold time. Then touch
COOKpadandentertime
TIME
beforepressingSTART.
Hcw toDefr’cwt,Hold and
T%TieCxmk
Let’ssay you want to defrost a
frozen casserole for 15 minutes,
hold for 10 minutes and then
Cookfor 25minutes.Here’show
to do it:
Stept: Takecasserolefromfreezer
and
place it in the oven.
Time
Thedisplayshows:0andC)EF.
TIMEflashes.
Step
3: Touch pads 1,5,0 and Ofor
15minutes defrosting time. 15:00
appearson display. (Defrosting is+
automatically set on Power Level
LOW but can be changed by touching the desired power level pad.
Step 4: Set standing or hold time by
touching MIN/SEC TIMER. :0
appearson display and TIME ~
flashes.
Step 5: Touch 1,0,0 and Oto hold
for ten minutes. 10:00appearson
display.
Step 6: Touch TIME COOK pad.
The display shows:0 and COOK
TIME flashes.
Step 7: Touch 2,5,0 and Ofor
twenty-five minutes of cooking
time. 25:00appears on display.
Microwave
Step & Touch START. 15:00count-
ing down shows on display. As each
function is automatically performed
oven display shows instructions
entered and the function. While
cooking, you mdy touch appropriate pad to recall times you set.
Step 9: When time is up, the oven
signals and flashes “End”.
Step 10: Open the door.
Questionsand Answers
What will happenifi’accidentally
Q.
reversemy defrost,holdancfcook
instructions?
A. The oven automatically rear-
rangesyour program. Defrosting
always comes first, then hold, and
then the cooking function. \
Q. Can i defrostandholdon!y?
A. Yes.Sometimes you may only
want to defrost a food, hold it, and
cook it later. Ail Youneed to do is
program in Defrost and amount of
time. Then program Hold and the
amount of time. Be sure to put the
_thawed dish”in the refrigerator
promptly.
NOTE: Let foods remain at room .
temperature only as long as safe.
Times will vary.
Q. 1programmedmyovenfor a
specific defrosting time but it
defrosted longer than necessary.
Whathappened?
A. When instructions conflict, the
oven carries out the last instruction.
You may haveset the oven to
defrost for 4 minutes, hold for
2 minutes, and then defrost for
6 minutes. In this case,the oven
would defrost for 6 minutes and
hold for 2 minutes and ignore your
~ first defrost instruction.
—
—
——
—.——.
-
—
—
—
-
—
_-
-_—
—,
—-
———.-
.-
.-
9
Page 10

YourNewMicrowaveOvenisa
ValuableAppliance,ProtectIt From
MisuseByFollowingThese Rules:
a Keepyourovencleanand
sweet-smelling.Opening the oven
door a few minutes after cooking
helps “air-out” the interior. An
occasional thorough wiping with a
solution of baking soda and water
keeps the interior fresh.
@ Don’t usesharp-edgedutensils
withyouroven.The interior and ex-
terior oven walls can be scratched.
The control panel can be damaged.
a Don’tremovethe stirrercoverat
the top of the oven (microwave feature 6 on page 5). Youwill damage
the oven.
BE CERTAIN POWER K OFF
BEFORE CLEANING ANY
PART OF THE OVEN.
RemovableGlassCookingTray. It
is occasionally necessaryto remove
the cooking tray for cleaning of the
tray or oven. To prevent breakage,
do not place tray into water just
after cooking. The tray can be
broken if dropped. Wash it carefully
in warm, sudsy water or in the
dishwasher.
SpecialnotewhenusingBrown
‘N Sear Dish:If greaseis present,,
the high heat generated on the
bottom of a Brown ‘N Sear dish
may cause the greaseto burn onto
the oven tray.
This may be removed with a
cleanser such as Bar Keepers .
Friend@Cleanser by SerVaas
Laboratories, Inc.
After using Bar KeepersFriend@
Cleanser, rinse and dry thoroughly,
following instructions on’can.’Do
not use Bar Keepers Friend@
Cleanser on the painted surfaces
suchas the walls. it may scratch the
paint.
Bar Keepers Friend@Cleanseris
sold in many grocery, hardware,
and department stores.
Fk3vvtoCk?anme outside
Case.Clean the outside of your
oven with soap and damp cloth,
then rinse and dry. The outer pane
of the window is glass.Just wipe
clean with a damp cloth. Chrome
trim is best wiped with a damp cloth
and then with a dry towel.
ControlPanel.Wipe with a damp
cloth. Dry thoroughly. Do not use
abrasivesor sharp objects on the
panel.They can damage it.
DoorSurface.When cleaning surfaces of door and oven that come
together on closing the door, use
only mild, non-abrasivesoapsor
detergents applied with a sponge
or soft cloth.
Powei Cord. If the cord becomes
soiled, unplug and wash with damp
cloth. For stubborn spots, sudsy
water may be used, but be certain
to rinse and dry thoroughly before
plugging cord into outlet.
OvenLamp Replacement.First
unplug the oven.Then remove lamp
compartment cover by removing
screws which hold cover in place.
Cover is located on the side of
the outer case. Replacedefective
bulb with 25 watt armliance bulb.
Replacecompartment cover. Plug
in the oven.
m
*
..
e
e
HOWtock?anthe inside
Walls,floorand plasticcover.Because there is little heat except in
the food, or sometimes in the utensils, spills and spatters are easy to
remove. Some spatters can be removed with a paper towel, others
may require a damp cloth. Remove
greasy spatters with a sudsy cloth,
then rinse and dry. Do not use
abrasive cleaners on oven walls.
NEVER USE A COMMERCIAL
OVEN CLEANER ON ANY PART
OF YOUR MICROWAVEOVEN.
Door-inside.Glass:Wipe up spatters
daily, wash when
imum of sudsy warm water. Rinse
thoroughly and dry.
Metal and plastic parts on door:
Wipe frequently with a damp cloth
to remove all soil. DO NOT USE
ABRASIVES, SUCH AS CLEANING
POWDERS OR STEEL AND PLAS-
TIC PADS. THEY MAY MAR THE
SUf?FACE.
soiled,with a min-
10
Page 11

GROUNDING !NSTRUCTIONS
~This appliance must be grounded.
the event of an electrical short
~rcuit, grounding reducesthe risk
of electric shock by providing an
scape wire for the electric current.
his appliance is equipped with a
power cord having a grounding
wire with a grounding plug. The
plug must be plugged into an outlet
that is properly installed and
grounded. (Fig. 1)
WARNING—improper use of the
grounding plug can result in a risk
of electric shock.
PREFERRED
klETIKID
-% ,
ah
Fig.1
Consult a qualified electrician or
serviceman if the grounding instructions are not completely under-
stood, or if doubt exists as to
‘-~:=:-:-the appliance is properly
‘Wunded.
herea standard two-prong wall
eceptacle is encountered, it isyour
w
personal responsibility and obligation to have it replaced with a properly grounded three-prong wall
receptacle.
Not Under Any Circum-
IDo
stancesCut or Removethe
Third (Ground) Prong From
The PowerCord.
lo[
\
INSUREPROPER GROUND
EXISTS BEFORE USE ,
IJsed AdapterPlugs
UsageSituationsWhere
Appliance’sPowerCord
WillBe Disconnected
Infrequently.
Becauseof potential safety haza~ds
under certain conditions, we
stronglyrecommend
useofanadapter
if you still elect to use an adapter,
where local codes permit, a TEM-
PORARYCONNECTION may be
madeto a properly grounded two-
prong wall receptacle by the use of
a UL listed adapter (Fig. 2) which is
available at most local hardware
stores.
TE~PORARYMETHOD
(ADAPTERPLUGSNOT
PERMITTEDINCANADA)
Fig.2
The larger slot in the adapter must
be aligned with the larger slot in the
wall receptacle to provide proper
polarity in the connection of the
power cord.
Caution:Attaching the adapter
ground terminal to the wall receptacle cover screw does not ground
the appliance unless
screw is metal, and not insulated, ‘
and the wall receptacle is grounded
through the house wiring. You
should havethe circuit checked by
a qualified electrician to make sure
the receptacle is properly grounded.
againstthe
plug. However,
\
/
INSUREPROPERGROUND
AND FIRM CONNECTION
BEFOREUSE
thecover
UsageSituationsWhere
Appliance’sPowerCord
WillBe Disconnected
Frequently.
Do notuseanadapterplug in these
situations becausedisconnecting of
the power cord placesundue strain
on the adapter and leadsto eventual failure of the adapter ground
terminal. Youshould havethe twoprong wall receptacle replaced with
athree-prong (grounding) receptacle by a qualified electrician
before using the appliance.
useofExtension Chrckl
Becauseof potential safety hazards
under certain conditions westrongly
recommend against the use of an
extension cord. However, if it is
necessaryto use an extension cord,
useonly a 3-wire extension cord
that has a 3-blade grounding plug,
and a-3-slot receptacle that will
accept the plug on the appliance.
The marked rating of the extension
cord shall be equal to or greater
than the electrical rating of the
appliance (15amperes.)
Such extension cords are obtainable
through Hotpoint service.If you do
useanextensioncordwithyour
microwaveoven,the interior light
may flicker and the blower sound
may vary when oven is in use.
Ea%Ka
E#Em.w
m=w_-–
-?.
—. _-
izAzs.–
—,
i?wEssJ=_
—.– –-
w4ia?&–
_.
-..
e-— ---
—
mm=––
-.
-..
*–<
&41sliL_”.
E_-....
—.
B.
~.i_
When disconnecting the power
cord from the adapter, always hold
the adapter with one hand. If this is
not done, the adapter ground terminal is very likely to break with
repeated use. Should this happen,
DO NOT USE the appliance until
a proper ground has again been
established.
11
Page 12

To SaveTime and Money—
before.yourequestservice,
checkthe ProblemSolver
If you havea problem, it may be
minor. You may be able to correct
it yourself. Just usethis Problem
Solver to locate
thenfollowthesuggested
recommendations.
yourproblemand
on YourNlicrotiaveOven:
@Steamor vaporescapingfrom
aroundthe door.
@Lightreflectionaround
outercase.
@Dimmingovenlightandchange
in blowersound
operatingat powerlevelsotherthan
high.
mayoccurwhile
dooror
PROBLEM POSSIBLE CAUSE AND REMEDY
. DUII thumpingsoundwhileoper
stingat powerlevelsotherthan
high.
● SomeTV-Radiointerference
mightbe noticed
microwaveoven.It’ssimilarto the
interferencecausedby othersma(l
appliancesanddoesnot indicatea
problemwith youroven.
whileusingyour
e
OVENWILL NOT COME ON
A fuse in your home may be blown or the circuit breaker tripped.
Replacefuseor resetcircuitbreaker.
Makesure3-prongplugon ovenisfullyinsertedintowail.receptacle.
CONTROLPANELLIGHTED, ‘ Doornotsecurelyclosed.
YET OVEN WILL NOT START
FOODS ARE EITHER OverCOOKED OR UNDERCOOKED
STARTmustbe touchedafterenteringcookingselection.
‘AnotherselectionenteredalreadyinovenandCLEAR/OFFnottouched
to cancelit.
MIN/SEC pad may havebeentouched. “
Makesureyou haveenteredcookingtimeaftertouchingTIMECOOK.
CLEAFVOFF was touched accidentally. Reset cooking program and
touchSTART.
cooking times may vary becauseof starting
densityor amountof
cooking time for completion. ‘ ,
foodsin oven.TouchTIME-COOKandadditional
Incorrect Power Levelentered.Check Cookbook”’forrecommended
PowerLevelor changinglevelsduringcookingif necessary. ‘
Qishwas not rotated,-turned or stirred.Somedishes‘requirespecific
instruction.
Toom,anydishesinovenatsametime. Cooking~irnemustbe increased
when cooking more than one fooditem. Check,Cookbookfor recommendationon increasingtime.
CheckCookbookor recipefortheseinstructions,
food temperature,food
“EEEE”APPEARSON invalidtime of day or Cook Time entered. ‘
DISPLAY
‘PF”APPEARSON
91SPLAY
When usingClock,you havenotentereda validclocktime.
Appearswhen oven isfirstpluggedin.This is normal.
Appearswhen powerto ovenhasbeen interrupted,and then resumed.
Touch CLEAR/OFF to erase“PF”.Clock mustbe reset.
12
Page 13

—.—..——.
1-
i
$
i
I
-.,
1
i
.——
h
a–
__C.:
#--&-”
‘-
%2<*:AT-q?.W~
%.+3+=;*?-’
‘%y
&j
] Consumer Services
!
~m~.w,..%. .J7ss ---------- -
-1
.- —.+. . . . --- --— --., .,
——7wa=~-
At Hotpointwe’recommittedto providingyouwith the bestapplianceswe know how
to build and we knowthat you want yourappliancesto giveyou manyyearsof dependable
service.
OurConsumerServicesaredesignedwith your needsand wants in mind.
--
-.=
,?Ks=#---
~——..+w-----
.—, —
.,&f?%%
f#f&#!$!q
~&&.~
,qj~.N-J
*.=:
.&
i
..m.
-.
““; H youhaveawrittenwarrantytoprotectyou.
Warranty Protection
Yournewapplianceis a well designedandengineered Seethewarrantyon the backpageof this bookfor
product.Beforeit leftthefactory,it wentthrough
rigorousteststodetectmanufacturingdefects.And
PromptServiceatyourConvenience
Whetheryourapplianceis in or out of warranty,
you’rejust a phonecallawayfromour nationwide
networkof FactoryTrainedServiceprofessionals.
Simplycallour Hotpointserviceorganization.
You’llfindthem in the White Pagesunder“Hotpoint
FactoryService;’andin the YellowPagesunder
“HotpointCustomerCare@Service.”
Serviceisscheduledat yourconvenienceandthe
techniciandrivesa fully-stockedparts servicetruck
sothat, in most cases,therepaircan becompleted
in onevisit.
We’reproudof our serviceandwant youto be
pleased,but if for somereasonyouarenot happy
with theserviceyoureceive,herearethreestepsto
follow forfurther help.
ServiceContracts
Fortrouble=freeservicebeyond
writtenwarrantyperiod.
the
If you preferto budgetyourrepairexpenditure
insteadof beingsurprisedbythem, Hotpoint
offersservicecontractsfor varyinglengthsof
time on all Hotpoint major appliances.With a
details.
,
FIRST,contact the peoplewhoservicedyour
appliance.Explainwhyyouarenot pleased.Inmost
cases,this will solvetheproblem.
NEXT,if you arestill not pleasedwrite all the details
.
includingyourphonenumberto:
Manager,ConsumerRelations
Hotpoint
AppliancePark
Louisville,Kentucky40225
FINALLY,if your problemisstill not resolved,write:
MajorApplianceConsumerAction Panel
20NorthWackerDrive
ChicagojIllinois60606
tract we’ll keepyourappliancein good
cratingcondition duringthe contract period
noadditionalcharge.Servicecontracts
letyou paytoday’spricesfor servicea
month,a year,orseveralyearsfrom now.
And,you’ll receiveservicefrom Hotpoint
trainedservice techniciansusingonly
GenuineHotpoint parts.
41a#l&-
--
“-+s$+
TheQuickFix@System
You cansavemoneyandtime
bydoingit yourself.
Fordo-it-yourselferswho would prefer
to fix Hotpointmajorappliances
themselves...Hotpointoffers an
industryfirst, the QuickFix@System.
HelpforYouByPhone
Shouldyouneedhelpin the selectionand
purchaseof newappliances,orhave
questionsaboutthe operationof the Hotpoint ~
appliancesyounowown—or haveanyother ‘~~questionsabout our consumerproductsor
servicesyou areonlya TOLL-FREEcall away.
15
@l!lB
TheGEAnswerCen[e!
800.626.2000 youanytime”
~A programfor do-it-yourselfappliancerepair,
the systemincludesstep-by-steprepair
manua/sfor refrigerators,mostnon-microwave
electric ranges,dishwashers,andstandard
and largecapacitywashersand dryers,plus
speciallypackagedreplacementparts,and
technical helpwith a to// free800numbefi
TheGEAnswerCenterT~800.626.2000
consumerinformationserviceis open24
hoursa day,sevendaysa week.
~
Ourstaff of expertsstandsreadyto assist
Page 14

I
——
~
8
RI
.%
WHATisCOVERED
LIMITED ONE=YEARWARRANTY
Forone year fromdateof original
purchase,wewill provide,freeof
charge,partsand
repair or replace anypartof the
microwave over)that failsbecause
of a manufacturingdefect.
LIMITEDADDITIONAL
FOUR=YEARWARRANTY
thesecondthroughfifthyear
For
service labor to
fromdateof originalpurchase,
wewill provide,freeofcharge,a
replacementmagnetrontubeif the
magnetrontubefails becauseofa
manufacturingdefect.Youpayfor
service labor charges.
Foreach of the abovewarranties:
Toavoid any trip charges,you must
take the microwaveovento a
Hotpoint Factory ServiceCenteror
a Hotpoint CustomerCare@
Servicerand pick it up following
service.In-homeserviceis also
available,but you must pay for the
servicetechnician’s travel costs to
your home.
This warranty is extendedto the
original purchaserandanysucceed-
ing owner for products purchased
for ordinary home use in the 48
mainland states, Alaska, Hawaii
and Washington, D.C.
All warrantyservicewill be provided
by our Factory Service Centers or
by our authorized Customer Care”
servicersduring normal working
hours.
Look in the White or Yellow Pages
of your telephone directory for
HOTPOIINTFACTORYSERVICE,
GENERALELECTRIC-HOTPOINT
FACTORYSERVICEor HOTPOINT
CUSTOMERCARE” SERVICE.
-“p -
,.r ——
——
xx
!!p:-
..—
,..
II ~_—
lfg—
,. -
,,-=
!!p=”
.-—
,.r ——
In&—_—
II c—
,,=. –-
,,-X
!!~:”
,.r ——
 Loading...