

Page 1

t
Feam’es of?ikm’ 4
u d
oven 8“11
How
‘..
useThe 15
to Yc)w
f Service
Page 2
It is designed to help you operate and maintain your
new Flangeproperly.
Keep it handy for answers to your questions
if you don’t understand something or need more
help. . .
Write to: (include your phone number);
Consumer Affairs
Hotpoint
Appliance Park
Louisville, KY 40225
Your Range has a nameplate on which is stamped
the model and serial numbers. (Seepage 4.)
These numbers are also on the Purchase Record
Card that came with your Range. Before sending in
this card, please write these numbers here:
Model No.
Serial No.
Use these numbers in any correspondence or ser-
vice calls concerning your Range.
if
YCNJ a
Immediately contact the dealer (or builder) that
sold you the Flange.
Save and ..
C f
Check the Problem Solver (page 15). It lists minor
causes of operating problems that you can correct
yourself.
It could saveyou an unnecessary service call.
-,
1. Use cooking utensils of medium weight aluminum, tight-fitting covers, and flat bottoms which
completely cover the heated portion of the surface
unit.
2. Cook fresh vegetables with a minimum amount
of water in a covered pan.
3, “Keep an eye”
quickly to cooking temperatures at HIGH heat.
When food reaches cooking temperature, reduce
heat immediately to lowest setting that will keep it
cooking.
4. Use residual heat with surface cooking when-
ever possible. For example, when cooking eggs in
the shell, bring water to boil, then turn to OFF position to complete the cooking.
!5. Use correct heat for cooking task high heats
to start cooking (If time allows, do not use HIGH
heat to start), 7—quick brown trigs, 4—SIOWfrying.
2—flnlsh cooking most quantltles, simmer—double
boiler heat, finish cooking, and special for sfmall
quant(t/es
6. When boll ing water for tea or coffee,
the amount needed It ts not economical to boil a
container fuII of water for onIy one or two cLIps.
on foods when bringing them
heai only
1. Preheat the oven only when necessary. Most :
foods will cook satisfactorily without preheating. if :you find preheating is necessary, keep an eye on ~
the indicator light, and put food in the oven
promptly after the light goes out.
2. Always turn oven OFF before removing food.
3. During baking, avoid frequent door openings.
Keep door open as short a time as possible when it
is opened.
4. Be sure to wipe up excess spillage before selfclean ing operation.
5. Cook complete oven meals instead of just one
food item. Potatoes, other vegetables, and some
desserts will cook together with a main-dish casserole, meat loaf, chicken or roast Choose foods that
cook at the same temperature and in approximately I
the same time.
6. Use residual heat in oven whenever possible tol.,.-~
finish cooking casseroles, oven meals, etc. Also{- ~
add rolIs or precooked desserts to warm oven,‘--=’
using residual heat to warm them.
/.-->l
[, /
‘..
..
L
:
.
~
7
f
\
,
.
~
f
I
/
1
~
~’j 9Q2GeneraI EIectric Co., U.S.A. AII rights reserved
Page 3
.‘ . . .... . ... . . ... . Inside Front co~~r
.. . ... . .. . . ... . . .
Safety Tips . . .. . .. . .. . ... . ... . . . . . . .. .. ... ... ... ....O .g..~-~
Features ofYour Range ... . .. . . .. . .... . ... . .6.... .........0 ~
Automatic Timer and Clock .. . . . . . . . . . . . . . . . . . .. . . . . . . . . . . 5
Flow To Use Your Range Top...... .... . .. . .. . .. . . . .. . . . . . . . 6
Care of Your Range Top .. . .. . .. . . .... . .. . . . . . . . . . . . . . . . . . . 7
Using Your Oven ... . .. . ... .. . .... .... . .. . .. . .. .. . .. . .. . . . . 8
How To Bake and Time Bake. . . ... . ... . .. . .. . .. .. . . . . . . . . . . 9
How To Roast.. . . . . .. . ... . . . ... . .. . . . . . . . . . . . . . . . . . . . . . . . lo
How To Broil... .. . . . . . . .;....... .. . . .. . .. . .. . . . .. .. . .. .. . ~~
How To Self-Clean Your Range .. . .. . .. . .. . .. . .. .. . . . . . . 12-13
● ●
1
The Problem Solver .. . .. . . . .. . .. . .. . .. . .. . .. . . . . . .. . . . . . . 15
.. .. . .. . .. . .
Range Top Cooking Chart . . .. ... .. . . .. . . . . . . . . . . . . . . . . ~a-~g
Baking Chart . . . . . . .. . .. . .. . . .. . .. ... . . . .. . . . . . . . .. . . . . . . 20
Roasting Chart... . . . . . . . . . . . . . . . . . .. . . . . . . . . . . . . . . . . . . . . . 21
BroilingChart .. . . . . . . . .. . .. .. . . . ... .. . . . .. . . . . . . . . . . . . . . 22
ifyou Need Service . . . . .. .. . . . .. .. . . . . .. .. . . . . .. . . . .. . 24-25
Warranty . . . . . .. . . . .. . . . . . . . . . .. . . . . . . . . . . . . ... ..Back Cover
Page 4
!.
..... ....... - — . - -
..
.- -.—
..:
sheet or flat tray. gu’ease clt.!t-
alpan be putou~by with
Side
stxk or, if a muHi-
purpose dry or from.
D t
I
...
.-’
Rmded where a range
kwe children or
or opera-
t seriously burned.
---
~.. .
hang
‘They could
tip it over causing
injury.
on the door, drawer or tope
anyone stand
damage range and even
To IN
A OR ON THE E3AcK-
A
u Ri o
n
touch heating elements or i
I
personal
or
D
flammable materials in an
oven or
D grease or other
Never leave surface areas
heat saltings.
o
t o
o
o
o i
o
t
o
i D
D
a o
To
bums, ignition of flam-
I
(
o a b s
i i o
t
a o a
o
Foods for be as dry as
o o
o t
u o
o
o
spiII i~
6
Page 5
If a combination of oils or fats VV~llbe
LJsed in frying,
heating, or as fats melt s19wly.
Always beat fat and watch as it
heats,
Use deep fat
~OsSi~le to
beyond the smoking point.
Use Proper Pan
whenever
a
Emn’t heat f(xld in
owe!’!. up
the
Icmnki burst an
i
o i
i
t a i
i i b
b t
Don’t use
o t
foil anywhere on
a i
i a
1
fan off. ‘The fan, if operating,
my
M
a
a
nc
-
/-.
Clean with caution.If a wet
a
o oven door. - a or steam
escapes can cause
f eyes.
i &
i a
b t o
N
I
o
o b
o o
a
o 1
t o
o i i
i
b t a
—.
a o
a
R
a
hot .SUr-faces Of
ing
h
.
Page 6
.
.!! ,.. -— A*,. -..—A*,%.,.A*, ----- -,----
----
—..
- ———-—— ---
.— .- .——
————-.——
>;=:, -,-
?.
..-” ..
.
4
i.
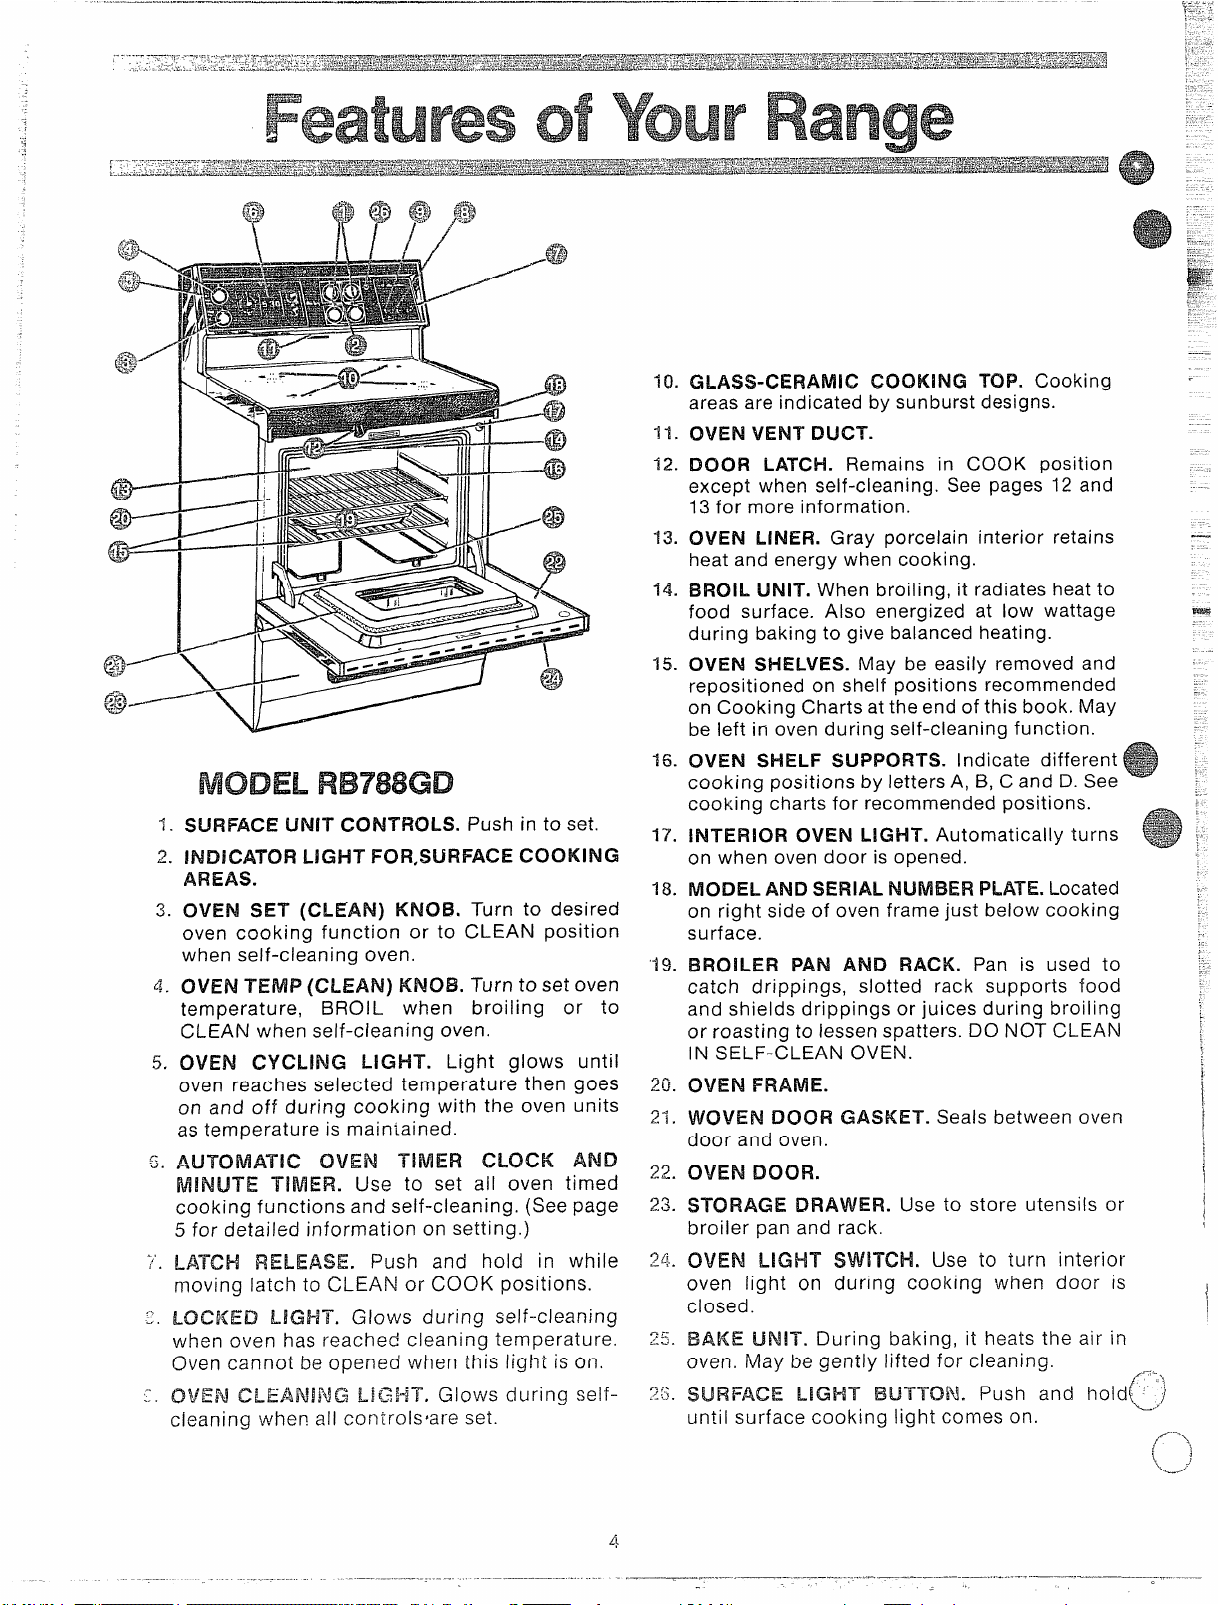
SURFACE UNIT CONTROLS. Push in to set.
9
&.
LIGHT SL6FIFACE
AREAS.
3.
OVEN SET (CLEAN) KNOB. Turn to desired
oven cooking function or to CLEAN position
when self-cleaning oven.
g.
OVEN (CLEAN) KNOB. Turn to set oven
temperature,
BROIL when broiling or to
CLEAN when self-cleaning oven.
.5.
OVEN C’%’CL!NG LIGHT. Light glows until
oven reaches selected temperature then goes
on and off during cooking with the oven units
as temperature is maintained.
~:
u.
OVEN TIMER CLOCK AND
TIMER. Use to set all oven timed
cooking functions and self-cleaning. (See page
5 for detailed information on setting.)
.,
. .
LATCH RELEASE. Push and hold in while
moving latch to CLEAN or COOK positions.
.-.
-.
LOCKED LIGHT. Glows during self-cleaning
when oven has reached cleaning temperature.
Oven cannot be opened when this light is on.
-.
.. .
2VEN! LiG!4T. Glows during self:Ieaning when all controls$are set.
f Range
GLASS-CERAMIC COOKING TOP. Cooking
areas are indicated by sunburst designs.
OVEN VENT DUCT’.
DOOR LATCH. Remains in COOK position
except when self-cleaning. See pages 12 and
13for more information.
OVEN LINER. Gray porcelain interior retains
heat and energy when cooking.
BROIL UNIT. When broiling, it radiates heat to
food surface. Also energized at low wattage
during baking to give balanced heating.
OVEN SHELVES. May be easily removed and
repositioned on shelf positions recommended
on Cooking Charts at the end of this book. May
be left in oven during self-cleaning function.
OVEN SHELF SUPPORTS. Indicate different
cooking positions by letters A, B, C and D. See
cooking charts for recommended positions.
INTER!OR OVEN LIGHT. Automatically turns
on when oven door is opened.
MODEL AND SERIAL PLATE.Located
on right side of oven frame just below cooking
surface.
BROILER PAN AND RACK. Pan is used to
catch drippings, slotted rack supports food
and shields drippings or juices during broiling
or roasting to lessen spatters. DO NOT CLEAN
IN SELF-CLEAN OVEN.
FRAME.
WOVEN DOOR GASKET. Seals between oven
door and oven.
STORAGE DRAWER. Use to store utensils or
broiler pan and rack.
OVEN LIGHT SWITCH. Use to turn interior
oven light on during cooking when door is
closed.
BAKE UNIT. During baking, it heats the air in
oven. May be gently lifted for cleaning.
SURFACE LIGHT B!JTTON. Push and hold[>~
until surface cooking light comes on.
/.-:.%,
,/”---’\
i
I
[
!
1
,
!
1
Page 7
TIME EMKEAND
AND ~~~~~
cJ~~
SELF-CL .AN SET
f
I
T
~ ~
~
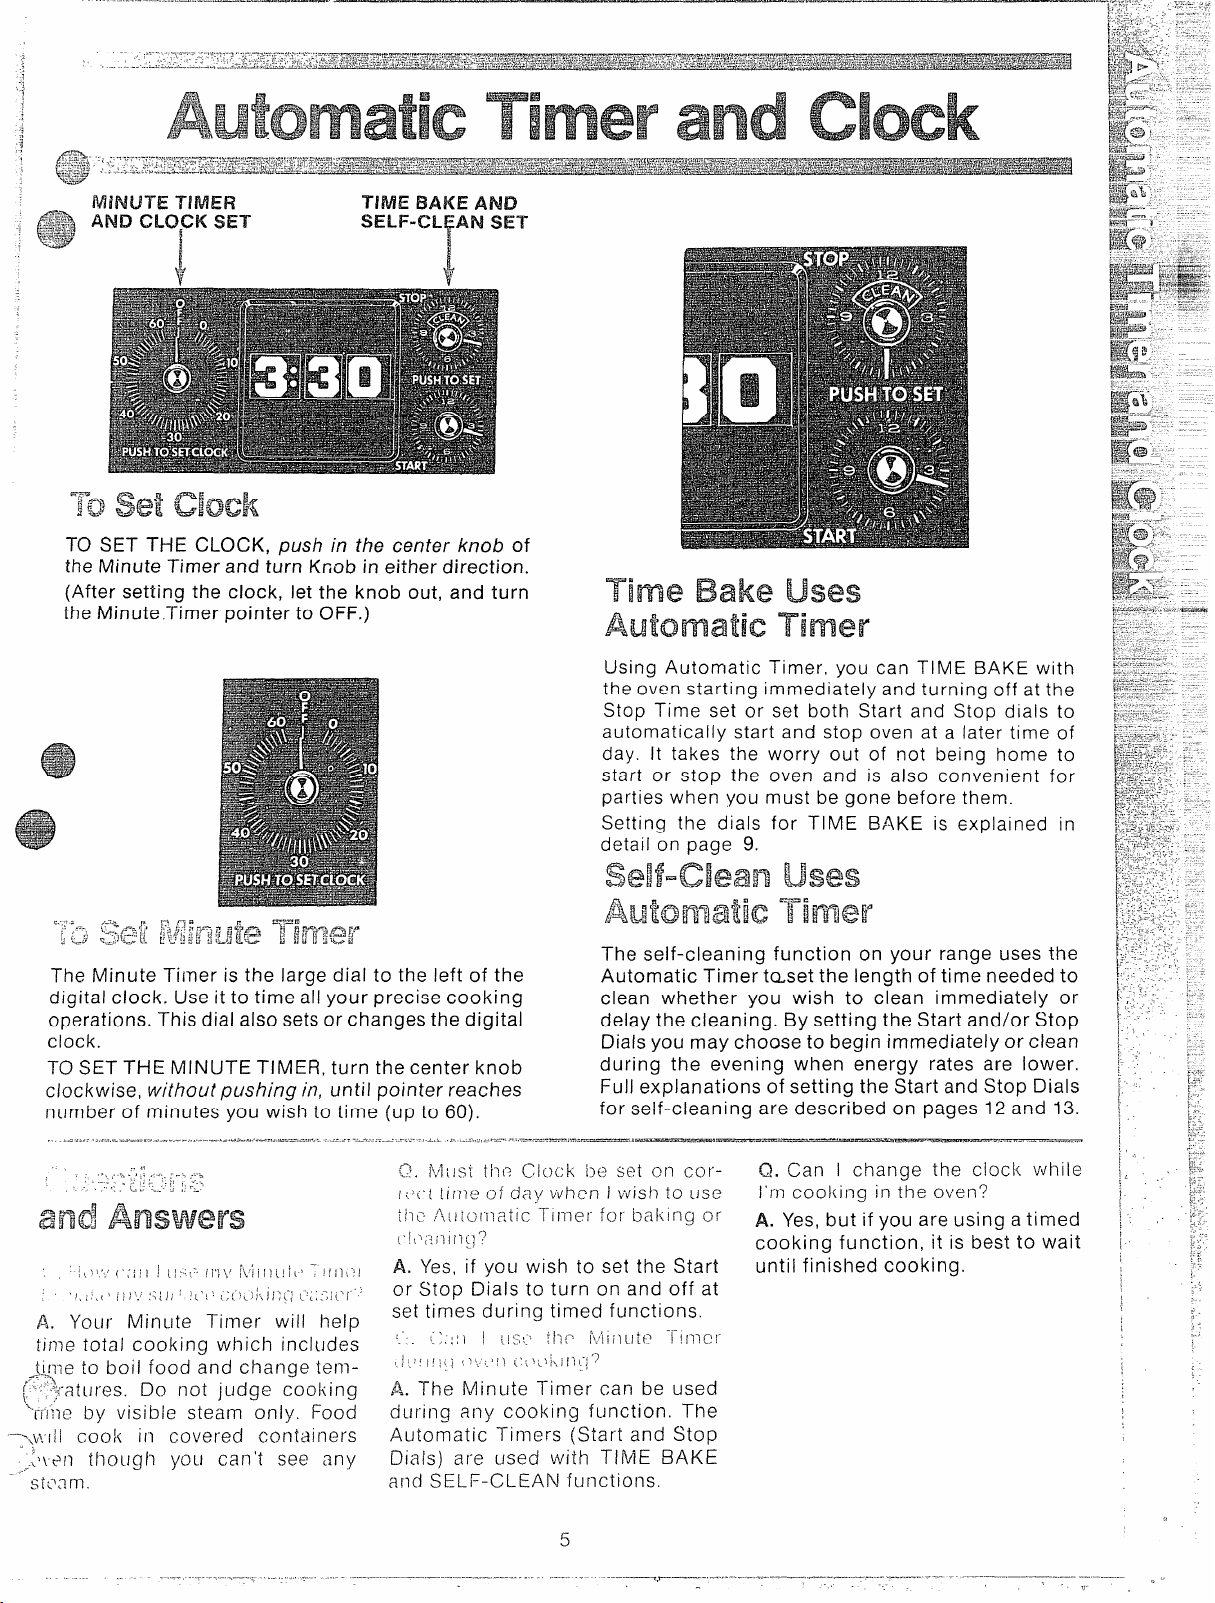
TO SET THE CLOCK, push in the center knob of
the Minute Timer and turn Kriob in either direction.
(After setting the clock, let the knob out, and turn
the Minute .Timer pointer to OFF.)
v
T
Using Automatic Timer, you can TIME BAKE with
the oven
Stop Time
automatically start and stop oven at a later time of
day. It takes the
start or stop the oven and is also convenient for
parties when you must be gone before them.
Setting the dials
detail on page 9.
starting immediately and turning off at the
set or set both Start and Stop dials to
worry out of not being home to
for TIME BAKE is explained in
The Minute Timer is the large dial to the left of the
digital clock. Use it to time all your precise
operations.
clock.
TO SET THE MINUTE TIMER, turn the center knob
clockwise, without pushing in, until pointer reaches
number of minutes you wish to time (up to 60).
This dial also sets or changes the digital
cooking
~~.The Minute Timer can be used
during any cooking function. The
Automatic Timers (Start and Stop
Dials) are used with TIME BAKE
arid SELF-CLEAN functions.
The self-cleaning function on your range uses the
Automatic Timer t~set the length of time needed to
clean whether you wish to clean immediately or
delay the cleaning. By setting the Start and/or Stop
Dials you may choose to begin immediately or clean
during the evening when energy rates are lower.
Full explanations of setting the Start and Stop Dials
for self-cleaning are described on pages 12 and 13.
Q. Can I change the clock while
l’rn cooking in the o~jen?
A. Yes, but if you are using a timed
cooking function, it is best to wait
until finished cooking.
5
Page 8
—.
—.-,-—
Your rsnge top is designed to give you the flexibility
of boiling, steaming, sauteing, browning, frying,
canning, or pressure cooking. The heat is transferred from a heating element below the surface,
through the ceramic top, to the bottom of the
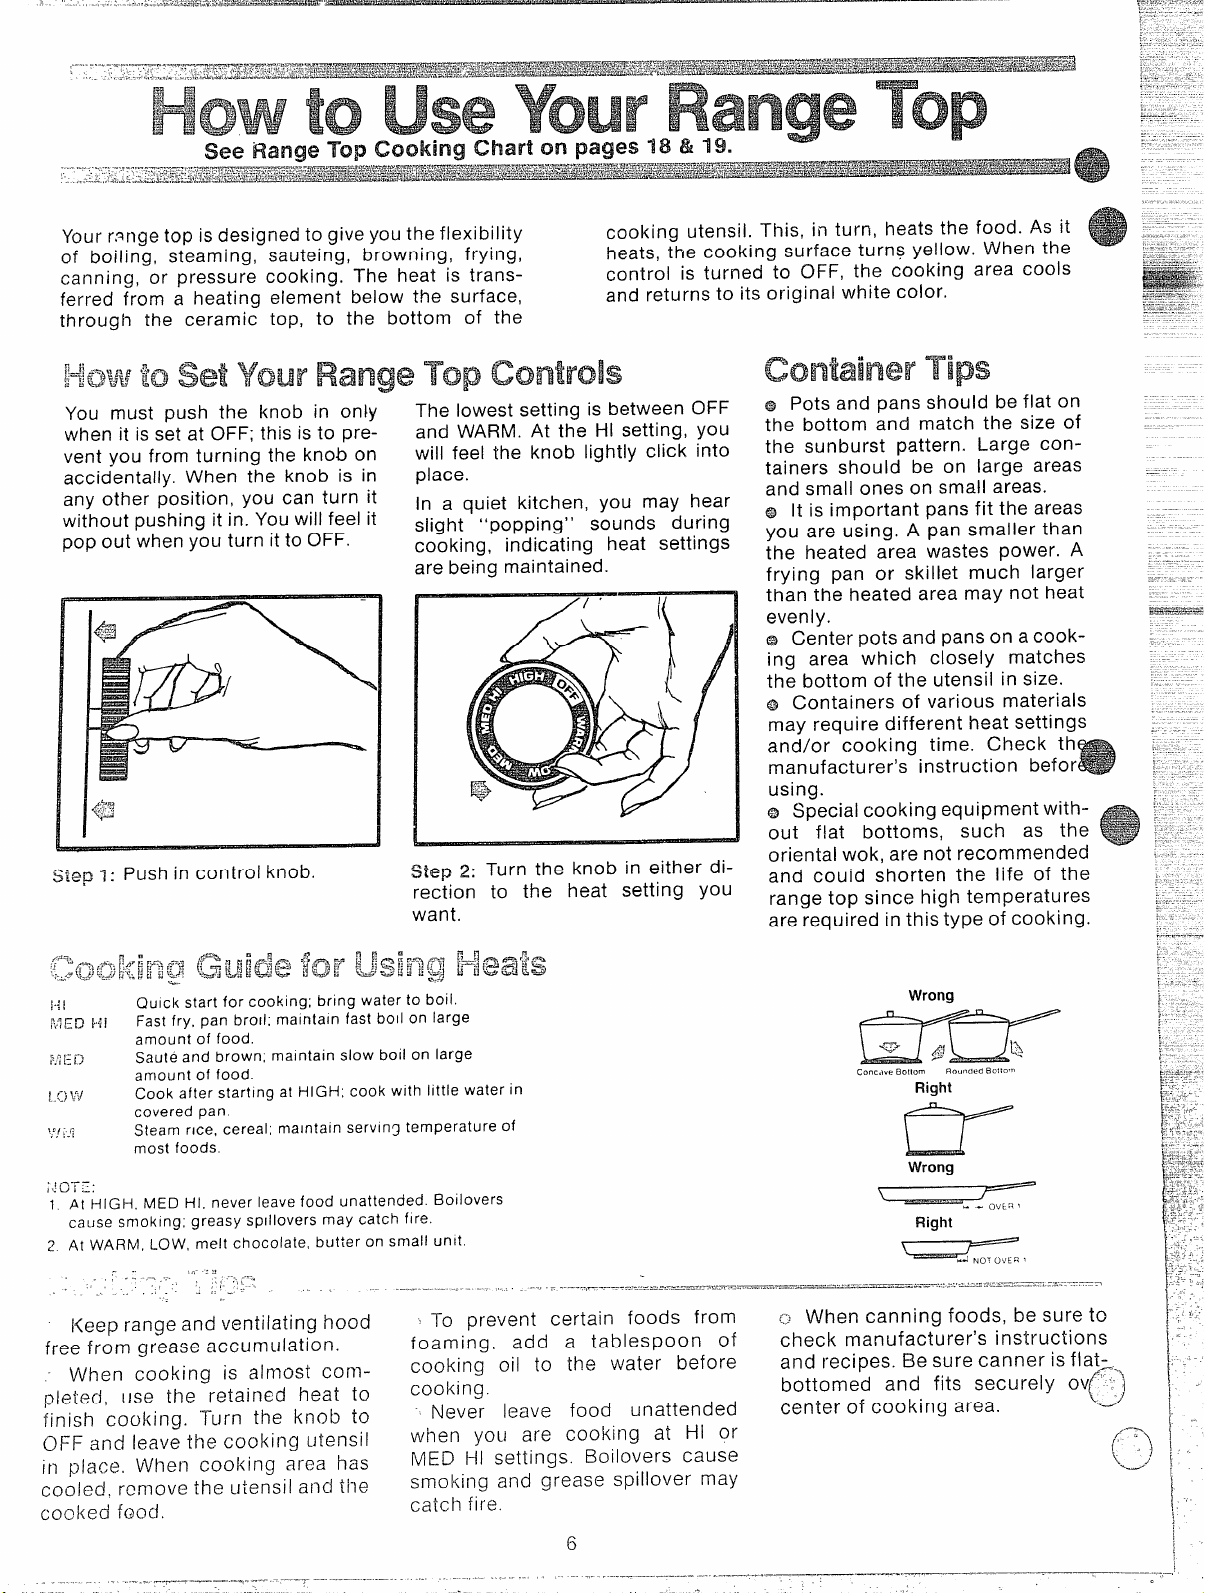
You must push the knob in only
when it is set at OFF; this is to prevent you from turning the knob on
accidentally. When the knob is in
any other position, you can turn it
without pushing it in. You will feel it
pop out when yOLJturn it to OFF.
The lowest setting is between OFF
and WARM. At the HI setting, you
will feel the knob lightly click into
place.
In a quiet kitchen, you may hear
slight “popping’
cooking, indicating heat settings
are bei~g maintained.
WET Push control knob.
2: Turn the kIIOb
rection to the heat setting you
want,
cooking utensil. This, in turn, heats the food. As it
heats, the cooking surface turn: yellow. When the
control is turned to OFF, the cooking area cools
and returns to its original white color.
@ Pots and pans should be flat on
the bottom and match the size of
the sunburst pattern. Large containers should be on large areas
and small ones on small areas.
sounds during
ea It is important pans fit the areas
you are using. A pan smaller than
the heated area wastes power. A
frying pan or skillet much larger
than the heated area may not heat
evenly.
@ Center pots and pans on a cook-
ing area which closely matches
the bottom of the utensil in size.
@ Containers of various materials
may require different heat settings
and/or cooking time. Check th
manufacturer’s instruction befor
using.
~ Special cooking equipment without flat bottoms, such as the
i
oriental wok, are not recommended —
and couid shorten the life of the
range top since high temperatures
are required in this type of cooking.
--
—.
..-.-.—
—.—... .
——.
.—-.
—------.
.—
.-
L:
1
;:
;,!!i=--J~.$j
!,,r-;.3
8-,tci/
I i) \eJ
.... 7-
:,:,/!:;
.! P.-r: .
! ~. u 1 L.
Quick start for cooking: bring water to boil.
Fast fry, pan broil: malntaln fast boil on large
amount of food.
Saute and brown, maintain slow boil on large
amount of food.
Cook after starting at
covered pan
Steam rice, cereal: maintain serving temperature of
most foods.
HIGH;cook wtth little water in
1 At HIGH,MEDHt.never leave food unattended. Boilovers
cause smokIng: greasy sptllovers may catch flre.
2 At WARM, LOW, melt chocolate, butter on small unit.
Keep range and ventilating hood
free from grease accum uIation.
When cooking is almost conl-
pleted, use the retained heat to
fin ish cooking. Turn the knob to
OFF and leave the cooking utemsil
in place, When cooking area has
cooled, remove the utensi Iand the
cooked food.
~To prevent certain foods from
foam ing.
cooking oil to the water before
cooking.
Never leave food unattended
when YOLI are cooking at HI or
MED ~1 settings. Boilovers cause
smoking and grease spillover may
catch fire.
Conc,>ve Boltum
—-—--,.—---—-:,..,”. -”..”.-=-,=.=--.==- -.-. -.. .=--=-=- =--==,~~=: ~,,””,””-” .’
o When canning foods, be sure to
add a tablespoon of
check manufacturer’s instructions
and recipes. Be sure canner is flat;>
bottomed and fits securely OV[’JI
center of cooking area.
6
Wrong
Right
Wrong
\
Right
[, .-f —
Ro,, !lded BotlOr~l
L. - OVLR1
NOT Wt ~, ~
-
-..-: ”.::. =:>—=.=---- . -a-i--------n
—.. _
,-=.
,/
‘ \
( . ) \
‘--’
i
t - “
\-
\-
1
[
\
i
~
\
I
Page 9
u
—
-=---=.
..........
g:~j?-;
; [-’=!$
,-.:-~:7-
~
-.
-:
.L
of y
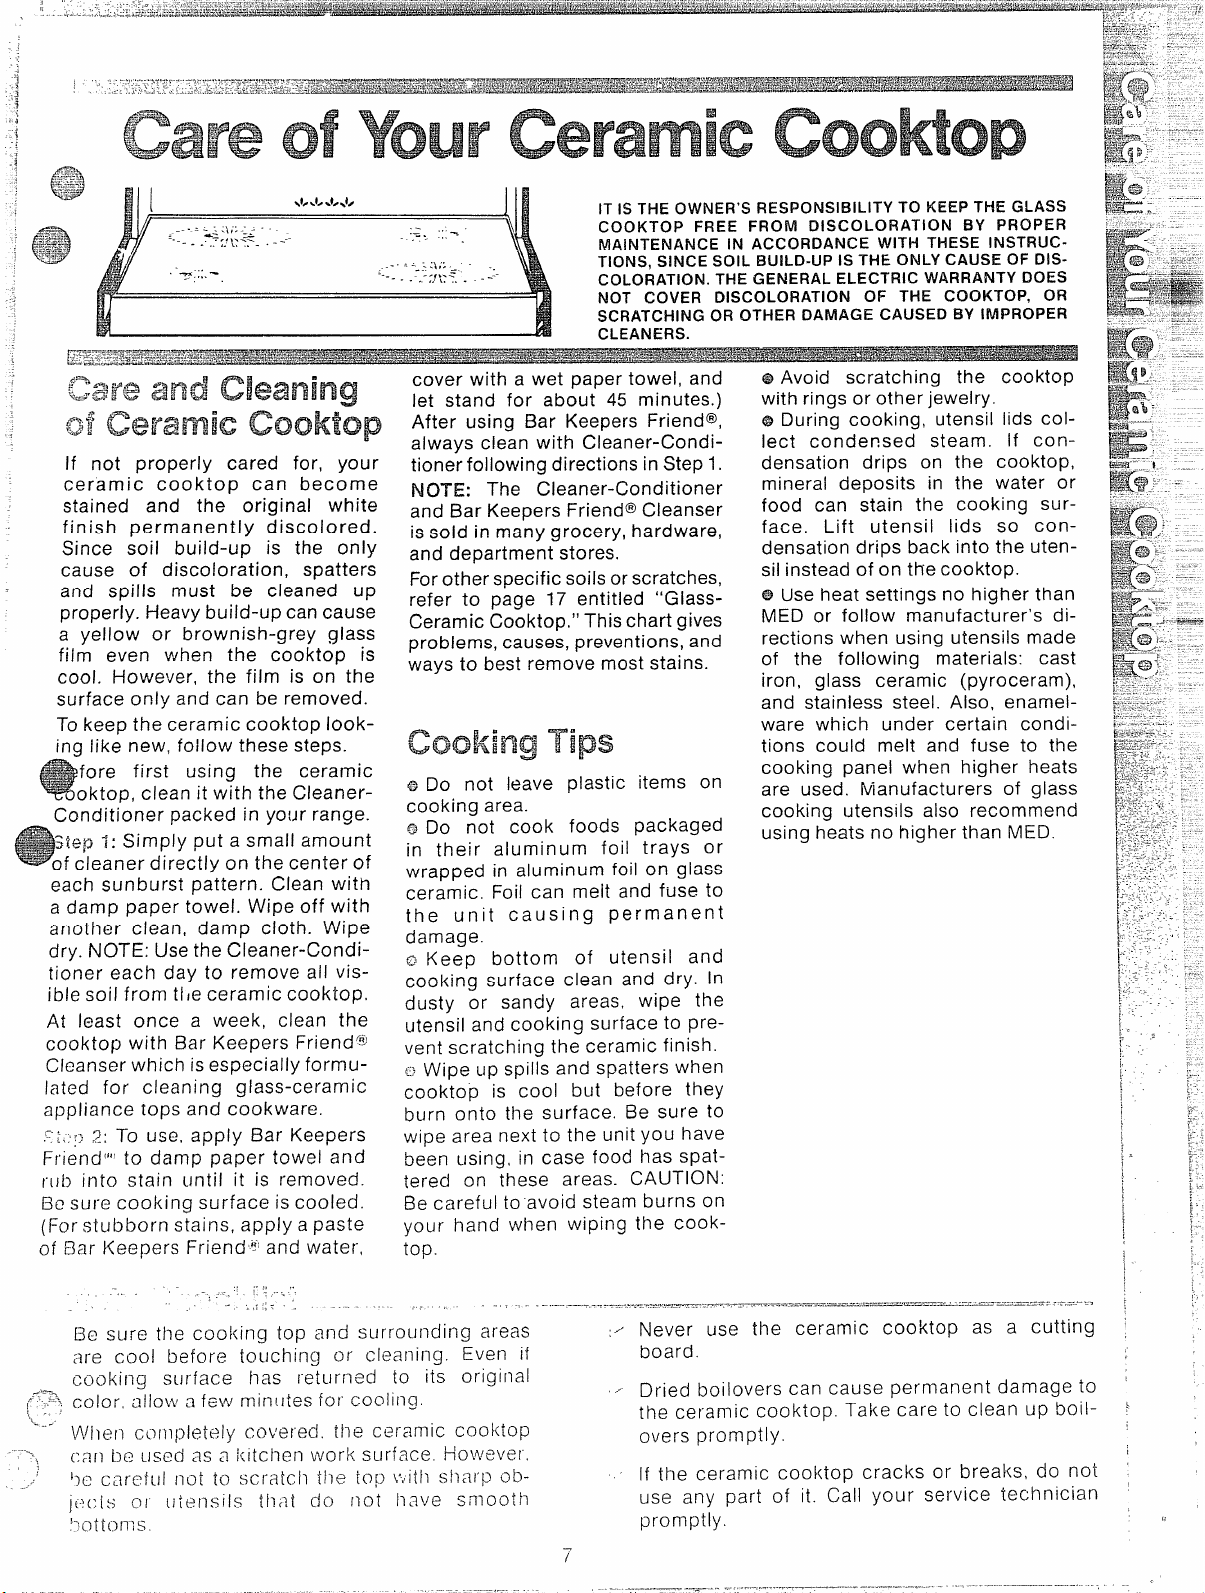
IT IS THE OWNER’S RESPONSIBILITY TO KEEP THE GLASS
COOKTOP FREE FROM DISCOLORATION BY PROPER
MAINTENANCE IN ACCORDANCE WITH THESE INSTRUCTIONS, SINCE SOIL BUILD-UP IS THE ONLY CAUSE OF DISCOLORATION. THE GENERAL ELECTRIC WARRANTY DOES
NOT COVER DISCOLORATION OF THE COOKTOP, OR
SCRATCHING OR OTHER DAMAGE CAUSED BY IMPROPER
CLEANERS.
If not properly cared for, your
ceramic cooktop can become
stained and the original white
finish permanently discolored.
Since soil build-up is the only
cause of discoloration, spatters
and spills must be cleaned up
properly. Heavy build-up cancause
a yellow or brown ish-grey glass
film even when the cooktop is
cool. However, the film is on the
surface only and can be removed.
Tokeep the ceramic cooktop looking like new, follow these steps.
fore first using the ceramic
oktop, clean it with the Cleaner-
Conditioner packed in your range.
:iep I: Simply put a small amount
f cleaner directly on the center of
each sunburst pattern. Clean with
a damp paper towel. Wipe off with
another clean, damp cloth. Wipe
dry. NOTE: Usethe Cleaner-Conditioner each day to remove all vis-
ible soil from tl Ie ceramic cooktop.
At least once a week, clean the
cooktop with Bar Keepers Friend’@
Cleanser which isespecially formulated for cleaning glass-ceramic
appliance tops and cookware.
-.,
,-
~: To use, apply Bar Keepers
Lt.’~.’:
Friend [’”to damp paper towel and
r[Jb into stain until it is removed.
Be sure cooking surface is cooled.
(f:or stubborn stains, apply a paste
of Bar Keepers Friend~’ and water,
cover with a wet paper towel, and
let stand for about 45 minutes.)
After using Bar Keepers Friend@,
always clean with Cleaner-Conditioner following directions in Step 1.
NOTE: The Cleaner-Conditioner
and Bar Keepers Friend@Cleanser
is sold in many grocery, hardware,
and department stores.
Forother specific soils or scratches,
refer to page 17 entitled “GiassCeramic Cooktop.” This chart gives
problems, causes, preventions, and
ways to best remove most stains.
o Do not leave plastic items on
cooking area.
QDo not cook foods packaged
in their alum in urn foil trays or
wrapped in aluminum foil on glass
ceramic. Foil can meit and fuse to
the unit causing permanent
damage.
L2Keep bottom of utensil and
cooking surface clean and dry In
dusty or sandy areas, wipe the
utensil and cooking surface to prevent scratching the ceramic finish.
v Wipe up spills and spatters when
cooktop is cool but before they
burn onto the surface. Be sure to
wipe area next to the unit you have
been using, in case food has spattered on these areas. CAUTION:
Be careful to avoid steam burns on
your hand when wiping the cooktop.
@Avoid scratching the cooktop
with rings or other jewelry.
@During cooking, utensil lids collect conder?sed steam. If condensation drips on the cooktop,
mineral deposits in the water or
food can stain the cooking surface. Lift utensil lids so condensation drips back into the utensil instead of on the cooktop.
@Useheat settings no higher than
or follow manufacturer’s di-
MED
rections
of the following materials: cast
iron, glass ceramic (pyroceram),
and stainless steel. Also, enamelware which under certain conditions could melt and
cooking panel
are used. Nianufacturers of glass
cooking utensils also recommend
using heats no higher than MED.
when using utensils made
fuse to the
when higher heats
Never use the ceramic cooktop as a
board.
Dried boilovers can cause permanent damage to
the ceramic cooktop. Take care to clean up boil- *
overs promptly.
If the ceramic cooktop cracks or breaks, do not
use any part of it. Call your service technician
promptly.
cutting ~
(,
Page 10

‘I. Look at the controls. Be sure you
understand how to set them properly. Readoverthe directions for the
Automatic Oven Timer so you
understand its usewith thecontrols.
2. Check oven interior. Look at t@
shelves. Take a practice run at removing and replacing them prop-
erly, to givesuresturdy support.
~. Read over information and tips
that follow.
4. Keep this book handy sa you can
refer to it, especially during the first
weeks of getting acquainted with
your oven.
OVEN TEMP maintains the temperature you
set from WARM
(150°) to BROIL (550°) and also at
CLEAN (880°). The Oven Cycling
Light glows until oven reaches the
selected temperature, then goes
off and on with the oven unit(s)
during cooking. PRE-HEATINGthe
oven, even to high temperature
settings, is speedy—rarely more
than about 10 minutes. Preheat the
oven only when necessary. Most
foods will cook satisfactorily without preheating. If YOUfind preheating is necessary, keep an eye
on the indicator light and put food
in the oven promptly after light
goes out.
Index
Marker ‘*
’63
The shelves are designed with
stop-locks so that when placed
correctly on the shelf supports, (a)
will stop before coming com-
pletely from the oven, (b) will not
tilt when removing food nor when
placing food on them.
TO REMOVE shelves from the
oven, when cool, lift up rear of
shelf, pull forward with stop-locks
(curved extension under shelf)
along top of shelf supports.
TO REPLACE shelves in oven,
insert shelf with stop-locks resting
on shelf supPOrts. push shelf
toward rear of oven; it will fall into
place. When shelf is in proper
position, stop-locks on shelf will
run under shelf support when shelf
is pulled forward.
l-he controls for the oven are
marked OVEN SET and OVEN
TEMP. OVEN SET has settings for
BAKE, TIME BAKE, BROIL, CLEOAN
and OFF. When you turn the knob
to the desired setting, the proper
heating units are then activated for
that operation.
Pointer
Oven Temp Settin9 for Normal Cookin9
control has a blue pointer that is
used only for CLEAN. For normal
cooking, line up the desired temperatures (marked on the outer
edge of the control knob) with the
index marker located immediately
above the control.
For CLEAN, rotate the knob to the
right until blue pointer is pointing
up, toward Index Marker. When
position is reached, knob should
snap into position.
~
The light comes on automatically
when the door is opened. Use
switch to turn light on and off
when door is closed.
Switch is in horizontal position on
right side of door under handle.
Lamp may be lighted by pressing
the lamp switch button. Be sure to
hold button depressed until light
comes on.
e
\
—..-.-.
(
G.-
-, ..
(-’
‘..
-.--=’
Page 11

~~., When cooking a food for the first
. . ... ...- -.
$~~”time in your new oven, use time
@
given on recipes as a guide. Oven
thermostats,
over a period of
years, may “drift” from the factory
setting and differences in timing
between an old and a new oven of
5 to 10 minutes are not unusual
and you may be inclined to think
that the new oven is not
per-
forming correctly. However, your
new oven has been set correctly at
the factory and is more apt to be
accurate than the oven it replaced.
you set it to turn off automat ical”ly)
or Delay Start and Stop (setting
the oven to turn on automatically
at a later time and turn off at a
preset stop time) will bedescribed.
H set
S
NOTE: Before beginning make
sure the range clock shows the
correct time of day.
Immediate Start is simply setting
oven to start baking now and
turning off at a later time autoinatically. Remember, foods continue
cooking after controls are off.
Delay Start and Stop is setting the
oven timer to turn the oven on and
off automatically at a later time
than the present time of day.
Step
1: To set start time, push in
knob on START dial and turn
pointer to time you want oven to
turn on, for example 3:30.
- ~fi=~-j:
Place food in oven, being
cer~ain to leave about l-inch of
space between pans and walls of
oven for good circulation of heat.
Close oven door. During baking,
avoid frequent door openings to
prevent undesirable results.
‘:; ;-in & Turn OVEN SET Knob to
.4..-;
BAKE and OVEN TEMP Knob to
temperature on recipe or on Baking
Chart.
‘:..‘...:-,fJ.
Check food for doneness.. .,.,; .
at minimum time on recipe. C-ook
longer if necessary.
Switch off
heat and remove foods.
SteP f: TOset Stop Time, push in
knob on STOP dial and turn
pointer to time you want oven to
turn off, for example 6:00. The
Start Dial should be at the same
position as the time of day on
clock.
CJfp ~m f>-
L-.
Turn OVEN SET Knob to
TIM<E BAKE. Turn OVEN TEMP
Knob to oven temperature, for
example 250° .
Step 2: To set Stop Time, push in
knob on STOP dial and turn
pointer to time you want oven to
turn off, for example 6:00. This
means your recipe called for two
and one-half hours of baking time.
FjOTE: Time on Stop Dial must be
later than time shown on range
clock and Start Dial.
%tep 2: Turn OVEN SET Knob to
TIME BAKE. Turn OVEN TEMP
Knob to 250° or recommended
temperature.
Place food in oven, close the door
and automatically the oven will be
turned on and off at the times you
have set. Turn OVEN SET to OFF
and remove food from oven.
:, , -:..
,,” ,
. ., . . .
When setting oven for
Delay Start, Oven Indicator Light
comes on cm!y when oven turns on.
Page 12

see chart on page 21.
-..
Roasting is cooking by dry heat. Tender meat or
pouitry car? be roasted uncovered
Roasting temperatures, which should be low and
steady, keep spattering to a minimum. When
roasting, it is not necessary to sear, baste, cover, or
add water to
~-—.—
your meat.
—
————
in your oven.
—-----l
Step 1: Check weight of meat, and
place, fat side
in a shallow pan. (Broiler pan with
rack is a good pan for this, )
broiler
when using pan
cooking with fruits, cooking heavily
cured meats, or for basting food
during cooking. Avoid spilling
these materials
door.
Step 2: Place in oven on shelf in A
or B position. No preheating is
necessary,
up, on roasting rack
Line
pan with aluminum foil
for marinating,
on oven liner or
Step 3: Turn OVEN SET to BAKE
and OVEN TEMP to 325°. Small
poultry may be cooked at 375° for
best browning.
Step 4: Most meats continue to
cook slightly while standing after
being removed from the oven. For
rare or medium internal doneness,
if meat is to stand 10-20 minutes
while making gravy or for easier
carving, you may wish to rermove
meat from oven when internal
Roasting is really a baking procedure used for
meats. Therefore, oven controls are set to BAKE.
(Youmay hear aslight clicking noise to indicate the
oven is working properly. ) Roasting is easy, just
follow these steps:
temperature is 5-10° F below tem-
perature suggested on chart.
standing” is planned, cook meat to
suggested temperature on chart
on page 21.
NOTE:
BAKE as described on preceding
page to turn oven on and off
automaticallyy.
@
@
You may wish to use TIME
Frozen roasts of beef, pork,
lamb,etc.,can bestarted without
thawing, but allow 10-25 min-
utes per pound additional time
(10 min. per pound for roasts
under 5 pounds, more time for
larger roasts).
Thaw most frozen poultry before
roasting to ensure even doneness. Some commercial frozen
poultry can be cooked successfully without thawing. Follow directions given on packer’s label.
If no
&
-5”
o
\-
~t
( ‘) ~
1
A. Seallng the foil will steam the <“”’-’; ~.
meat. Leav!ng It unsealed aIlows ‘----~~ ~
the alr to circulate and brown the ...... [
meat.
io
-
Page 13

F3roiling is cooking food by intense
—..—
—.-—.—-.—....---.. . .... ---
—-—.—.-
‘%3.$s;
:%*
radiant heat from the upper unit in
...
CJ
the oven. Most fish and tender cuts
of meat can be broiled. Follow
these steps to keep spattering and
smoking to a minimum.
step 3: position shelf on recom-
mended shelf position as suggested on Broiling Chart on page
22. Most broiling is done on C
position, but if your range is connected to 208 volts, you may wish
to use D position. -
step 1: If meat has fat or gristle
near edge, cut vertical slashes
through. both about 2-in. apart. If
desiredfat may betrimmed, leaving
layer about %-in. thick.
Step 2: place meat on broiler rack
in broiler pan which comes with
range. Always use rack so fat drips
to broiler pan: otherwise juices
ay become hot enough to catch
fire. Aluminum foil may be used to
line broiler pan and rack. But, be
CERTAIN to cut opening in foil, to
correspond with rack so fat drips
into pan below.
OVEN TEMP Knob to BROIL. Pre-
heating unit is not necessary
except in areas of low power voltage. (See notes on Broiling Chart
page 22.)
Step 6: Turn food only once during
cooking. Time foods for first side
as on BroiIing Chart page 22. T’urn
food, then use times given for
second side as a guide to preferred doneness. (Wheretwo thick-
nessesand times aregiventogether,
use first times given for thinnest
food. )
Step 7’: Turn OVEN SET Knob to
OFF. Servefood immediately, leave
pan outside oven to cool during
meal for easiest cleaning.
Q. Should I salt
ro IIIn:j 7
h
the meat before
A. No. Salt draws out the juices
and allows them to evaporate.
Always salt after cooking. Turn
meat with tongs; piercing meat
with a fork also allows juices to
escape. When broiling poultry or
fish, brush each side often with
butter.
~:. \,>\J},~:[] ~J/“(-J1IIn g IG
.-
,:!‘,,\,’,:\,:: [J~~>,~[,:(:!~
II [12ceSS3.ry to
‘~
i I 1 I !1 L? ~1 ~ n‘2
A. Yes. Using the rack suspends
the meat over the pam As the meat
cooks, the juices fal I into the pan
LIS keeping meat dryer. Juices
th
are protected by the rack and stay
COOICI”. thLIS f3t”f2V~t7~ing (2XC(2SSiVe
sp:ltter and smoking.
1
Q. Do I need to g lease my broi lel-
rack to prevent meat from stick irig’?
A. No.
The broiler rack is designed
to reflect broiler heat thus keeping
the surface cool enOUghto prevent
meat sticking to the surface.
Q. Why at-e my meats not turi7i ng
oLItas brown
as they s houId~
A. In some areas, the power (voltage) to the range may be low. In
these cases, preheat the broil unit
for 10 minutes before placing
broiler pan with food in oven.
Check to see if you are using the
recommended shelf position. Broil
for the longest period of time indicated in the Broil Chart in this
book. Turn food only once during
broiling.
Page 14

While you are becoming acquainted with your self-
_.........—--------. ...
——.———...—.
—-.—...—.,
/.
\
~
!
I
[
....—.———————
-.-.—.---.-—
——. ...-—
-.--.—.
.----
ckaning oven, we recommend 2 hours for the mod-
soil condition, but in some cases a longer
crate
cleaning time, up to 3 hours may be necessary. In
order to
judge the degree of soil, look at the oven
Close oven door and make sure
oven light (D) is off.
STEP 1:
Remove broiler pan, rack and
other cookware from the oven.
(Oven shelves may be Iefl in oven.)
floor and waiis. Light spatter and thinner spills
would generally need only 2 hours cleaning. Heavy
greasy spills and spatter on the oven interior would
need
up to 3 hours.
2
Pushand hold in LATCH RELEASE
BUTTON while sliding LATCH
HANDLE to the right until it is in
CLEAN position.
Wipe
up heavy soil on oven
bottom.
L..
A. Cheri i$mni Frame
2. CM?n Door Gasket
?;,, Clpenings
oven Light
i!!,,
r.,
-.~.
---- ~,
Cle;n spatters or spills on oven
front frame
: ,. i
..’ ,
=:3 .
in Door
(A) and oven door outside gasket (B) with a dampened
cloth. Polish with a dry cloth. Do
not cIea n gasket (B). Do not aIIow
\vater to run
down th roucjh open-
Ings in top of door (C). Never use a
com mereial oven cleaner in and
3ro LInd self-clean ing oven.
STEP
TurnOVENSETandOVENTEMP
Imob dochvise tQICLEAN.
trols will snap into final position
when the CLEAN location is
reached.
12
Con-
Set the ahmatic oven timer:
~:i
Make sure both the range clock
and the START dial show the :
correct time of day.
c1
Decide on cleaning hours necessary—two hours for moderate
soil or three hours for heavy
soil.
t?
Add these hours to present time
of day, then push in and turn
STOP (CLEAN) dial clockwise
to desired time. CLEANING
Light glows showing cleani~g is-~
starting.
In about 30 minutes the LOCKED ~-.,
Light glows indicating oven is ( ~
hot and door cannot be opened. “’-->’”
Oven door and window get hot
during self-cleaning. DO NO-[
TOUCH .
i
i
t
.-
~)
-..~,~
Page 15

When LOCKED Light is off, push
and hold in LATCH RELEASE
Button wh iIe SIid ing LATCH
STEP 3:
Turn OVEN TEMP Knob to WARM,
HANDLE to the left until it is in
COOK position.
NOTE: If you wish to “start” and “stop”cleaning at a later time than shown on clock, push in and turn START
dial to time you wish to “start”. Add the hours needed for cleaning to this ‘(start” time, then push in and turn
STOP (CLEAN) dial to the desired time. Oven will automatically turn on and off at the set times.
After hav!ng ju.st used the oven,
. P
LOCKED Light came on and I
COu /d not move the LATCH
ht glowing indi-
cates that oven is hot. Open oven
door to cool the internal cavity.
After a short period of time, set up
controls for cleaning again.
‘What shou Id I do if excessive
C:.
smoking
occurs during clean!ng?
A. This is caused by excessive soil
and you should switch the OVEN
SET Knob to OFF. Open windows
to rid room of smoke. Allow the
oven to cool for at
!east one hour
before opening the door. Wipe up
the excess soil and reset the clean
cycle.
,., .
!s ‘ii?e“crack Iirlg“ so~jHtd1/-/ea/’
~;!;~i~]q ~~~+~,ning norm~.I7
A. Yes. This is the metal heating
and cooling during both the cooking and cleaning functions.
\‘\/11\,/
V.(()I1‘:
, ;:+(fj:1~~-,I),/ {
.;Ii
.:(’.
.... .
( -- 1
\.l
,.-..
-.i-~i.~I is set to the same time as
,~
;~ANGE CLOCK. Also check to be
SLIi d LATCH HANDLE is in CLEAR!
‘~-
t>clsition,
1.
[/-1(j ~j/11C
${.iI)(‘7
~;
-Check to be sure your START
f[]\j
(jifI:;~-j (;I(?;;!]
>[/(-?i) {/IL>!.!(.1h
:~~,~ f./’>n-
...
., LL.I
I ;7!:V(;
j,,:!L}~j:;
Q. If my oven clock is not working
I still self-clean my oven?
can
A. No. Your Automatic Oven Timer
uses the range clock to help start
and stop your self-cleaning cycle.
Q. Can I
around
clean the Woven Gasket
the oven door?
A. No, this gasket is essential for a
good oven seal and care must be
taken not to rub, damage or move
this gasket.
G. \~/hat causes
on the enameled su !-face of my
oven ?
A.
This is a normal condition
the hair-1 ike Iines
resulting from heating and cooling
during cleaning. They do not
affect how your oven performs.
Id.
~hOUld t17et5
“
d url IIg [he clean Ing ?
Yes, there may be a slight odor
$$.
be any odor
during the first few cleanings.
Failure to wipe out excessive soij
might also cause an odor when
clean ing.
.-
.,
--r-l!,, -.
LI, ,J; .,! t.. ::-J. . ..
.
[\{.-1!:,;,-:\‘?
Yes. After marry cleanings, the
i%
~,,1~;]</1~~~
[i.,iy ~>~1r,‘“
:.,,,
f
have beco[ne
‘\/:3i ”’7 ~ ~ i:~-f] ~rigs, /s ~his
shelves may lose some luster and
discolor to a deep gray color.
Q. Can I use commercial oven
cleaners on any part of my selfcleaning oven?
A. No cleaners or coatings should
be used around any part of this
oven. If you do use them and do
not wipe the oven absolutely
clean, the residue can scar the
oven surface and damage metal
parts the next time the oven is
automatically cleaned.
Q. Why do I have asl~ left in my
oven after clean ing’?
A. Some types of soil will leave a
deposit which is ash. It can be re-
moved with a damp sponge or
cloth.
Q. My
east Iy. What IS the matter?
oven shelves do no~ slide
A. After many cleanings, oven
shelves may become so clean they
do not slide easily. If you wish
shelves to SIide more easily,
dampen fingertips with a small
amount of cooking oil and rub
lightly over sides of shelf where
they contact shelf supports.
.& Yes. The noise you hear is a fan
running during cleaning.
.
...........--.—....-_-.,.,..-—..
Page 16

The porcelain enamel finish is
sturdy but breakabie if misused.
This finish is acid resistant. However, any acid foods spilled (such
as fruit juices, tomato, or vinegar)
should not be permitted to remain
on the finish.
]1 OVENVENTOUC’T
P -
Your oven is vented through an
opening located under the center
of the control panel.
During most operations it is normal
to observe moisture and/or vapor
emitting from opening. Clean this
area frequently.
INOTE:NEVER COVER OR BLOCK
VENT OPENING. TO DO SO PREVENTS THE OVEN VENT FROM
FUNCTIONING PROPERLY DURING COOKING OR SELF-CLEANING OPERATIONS.
CAUTION: Before replacing your
oven bulb, disconnect the electrical power for your range at the
main fuse or circuit breaker panel
or pull plug. Be sure to let the lamp
cover and bulb cool completely
before removing or replacing.
.
.
To Remove:
@Remove the 3 slotted screws in
the lamp cover as shown in
diagram.
Q Detach lamp cover and remove
bulb.
To Replace:
Put in a new 40-watt appliance
bulb.
Install lamp cover. Replace 3
screws and tighten, making sure
cover fits flush with oven wall.
Reconnect electrical power to
the range.
WHEN CHANGING A COOKTOP
LAMP, DO NOT TOUCH THE
METAL AT ENDS OF LAMP.
a. Remove Phillips head screws at
each end of cover.
b. Place fingers on top near each
end of lamp. Press down and roll
top of lamp gently toward front of
range until it stops. Remove.
c. Check type and wattage of
lamp;
Hold lamp near each end and insert prongs into sockets. Gently
roll top of lamp toward rear of
range until it stops.
d. Replace lamp cover and screws.
e. Connect electric power to range.
replace with same kind.
Use time given on recipe when
cooking first time. Oven thermostats, in time, may “drift” from the
factory setting and differences in
timing between an old and a new
oven of 5 to 10 minutes are not
unusual. Your oven has been set
correctly at the factory and is more
apt to be accurate than the oven
which it replaced. However, if you
find that your foods consistently
brown too little or too much, you
may make a simple adjustment in
the thermostat (Oven Temp) knob.
PULL KNOB OFFOFSHAFT, LOOK
AT BACK OF KNOB AND NOTE
CURRENT SETTING, BEFORE
MAKING ANY ADJUSTMENT,
f
4
1. Hold knob skirt, or tab, firmly in
one hand so pointer is at top.
.2. With other hand, loosen 2screws
and move pointer one notch in the
desired direction. Adjust pointer
toward RAISE to increase temper-
ature; toward LOWER to decrease
temperature. Each notch changes
oven temperature 10degrees. Oven
temperature can be raised by 20
degrees or iowered by 30 degrees.
Tighten the screws.
~ Return knob to range, matching
~at area on knob and shaft. Recheck oven performance before
making an additional adjustment.
(
.-..,,
,)
.....
;
Page 17

[f you have a problem, it may be minor. ~~u may be able to correct it yourself, Just usethis Problem .sOIVE?r tO
locate your problem and then follow the suggested recommendations.
!~lif~ f~ Q p gjj’”~ i i Q n
$3
:~?”ffyj~kjf~~~~~g-j~~lf’j~~<:
L3
Plug on range is not completely inserted in the
outlet receptacle.
Q The circuit breaker in your house has been
tripped, or a fuse has been blown.
~ Oven controls are not properly set.
~ Door left in locked position after cleaning.
~~~~ ~Q~~ ~*&a~ ~Qf ~J~~~:
Light bulb is loose.
@
~ Bulb is defective.
~ Switch operating oven light is broken.
~~~~ jj~~~ $+$cj~ B E’oii ;F%qxw!y:
c OVEN TEMP not set at BROIL.
o Improper shelf position is being used.
Q Necessary preheating was not done.
,,--’ Utensils are not suited for broiling.
e
Q Aluminum foil used on the broil pan rack has not
been fitted properly and slit.
~o~fj !s Fljiclt t i %
q aa s! ing Pro pe l“ly’:
OVEN SET Knob not set on BAKE.
Oven Temperature not set correctly.
Shelf position is incorrect.
Roasting pan is too small.
Improper cookware is being used.
A foil tent was not used when needed to slow
down browning.
BAKE controls not set properly.
@
Oven shelf is not level.
63
Rack is not on correct shelf position
@
The wrong cookware is being used.
@
Too many utensils in the oven.
@
Temperature setting is incorrect.
Failure to set Automatic Timer dial/dials. The
STOP dial must be set and advanced beyond the
time noted on range clock.
The STOP dial was not advanced for long enough
time.
Both OVEN SET and OVEN TEMP must be at
CLEAN,setting.
A thick pile of spillover when cleaned leaves a
heavy layer of ash in spots which could have insulated the area from further heat.
~lj~n DQQr won’t Latch:
o Turn OVEN SET Knob to CLEAN. Glowing
Locked Light after knob is turned shows oven is
too hot from previous oven use and door won’t
latch. Open door wide so oven can cool, then
latch can be moved.
o OVEN SET Knob must be at CLEAN or OFF
before latch can be moved.
...----
15
,.
i
Page 18

,,
Your Range is cleaned two ways; manually and by
using the automatic self-cleaning function. This
chart describes parts of your range, cleaning mate-
cleaning. Besure to follow these directions carefully
to assure maximum use of your range. NOTE: Let
range parts cool before cleaning manually.
rials to use on each part, and general directions for
Per% Mtww’iak% to use
Do not clean the bake unit or broil unit. Any soil will burn off
when the unit is heated. NOTE: The bake unit is hinged and can
be lifted gently to clean the oven floor. If spillover, residue, or ash
accumulates around the bake unit, gently wipe around the unit
with warm water.
@Soap and Water
@Soap-Filled Scouring Pad
0 Plastic Scouring Pad
@Mild Soap and Water
~ Soap and Water
Metal, including Brushed
@Soap and Water
Chrome and Cooktop
Porcelain Enamel*
~ Paper Towel
~ Dry Cloth
$Soap and W’ater
~Soap and Water
I
-.,,-:.L; ~ .- ,-:,-.., ,
- , . . . .
-,. -,
. ..— - --
!. *
. -,. .
(See Self-Cleaning Oven
~ Soap and Water
~ Soap and Water
Directions)
,. . - .
. r ..
:.
—— -..
‘“:’
.——-
QSoap and Water For cleaning, remove drawer by pulling it all the way open, tilt up
“Spillage of marinades, fruit juices, and basting materials containing acids may cause discoloration. Spill overs shbuld be cleaned up
Imediately with a paper towel. When the surface is cool, clean and ririse.
Drain fat, cool pan and rack slightly. (Do not let soiled pan and
rack stand in oven to cool). Sprinkle on detergent. Fill the pan
with warm water and spread cloth or paper towel over the rack.
Let pan and rack stand for a few minutes. Wash; scour if neces-
sary. Rinse and dry. OPTION: The broiler pan and rack may also
be cleaned in a dishwasher.
Pull off knobs. Wash gently but do not soak. Dry and return con-
trols to range making sure to match flat area on the knob and
shaft.
Wash all glass with cloth dampened in soapy water, Rinse and
polish with a dry cloth. If knobs are removed, do not let water run
down inside surface of glass.
Wash, rinse then polish with dry cloth. DO NOT USE steel wool,
abrasives, ammonia, acids or commercial oven cleaners which
may damage finish.
Avoid cleaning powders or harsh abrasives which may scratch the
enamel.
If acids should spill on the range while it is hot, use a dry paper
towel or cloth to wipe up right away. When the surface has
cooled, wash and rinse.
For other spills, such as fat smatterings, etc., wash with soap and
water when cooled and then rinse. Poiish with a dry cloth.
On self-cleaning oven, clean ONLYthe door liner outside the
gasket, The door is automatically cleaned if the oven is in the selfcleaning cycle. If spillover or spattering should occur in cooking
function, wipe the door with soap and water. DO NOT rub or
damage gasket. Avoid getting soap and water on the gasket or in
the slots on the door.
Avoid getting ANY cleaning materials on the gasket.
Cool before cleaning. Frequent wiping with mild soap and water
will prolong the time between major cleanings. Be sure to rinse
thoroughly. For heavy soiling, use your self-cleaning cycle often.
Yourshelves can be cleaned with the self-cleaning function in the
oven. For heavy soil, clean by hand using any and all mentioned
materials. R!nse thoroughly to remove all materials after cleaning.
the front and lift out. Wipe with damp cloth or sponge and
replace. Never use harsh abrasives or scouring pads.
\
Page 19

Brown streaks
and specks
Blackened
Burned-on
sDots
Fine “brown
!!nes’ (tiny
scratches or
Cleaning with a sponge or
dishcloth that has been used
for other kitchen cleaning
tasks and maycontain soilIaden detergent water.
Spatters or spillovers
which contact hot
cooking area.
Accidental melting of a
plastic film such as a
bread bag or similar
items.
Coarse particles (salt,
sand, sugar or grit)
caught between bottom
)f cookware and cooktop
hat are not removed
~efore cooking.
Jsing incorrect cleaning
naterlals.
Use Cleaner-Conditioner only
with
clean, damp paper towel,
Whenever possible, wipe
spatters and food spills as
they occur.
Select correct heat settings
and large enough cookware to
eliminate boilovers and
spattering.
CAUTION: Be careful to avoid
steam burns.
Be sure unit is cool before
putting these items on
cooking surface.
Normal daily use of CleanerConditioner.
In area where there is an
abundance of sand or dust,
sure to wipe cooktop
~e
Oeforeusing.
Jse only cleaning materials
‘commended in this manual.
Usea light application of Cleaner-Conditioner
with clean, damp paper towel.
When area has cooled:
Use Cleaner-Conditioner with damp paper towel
to remove as much burn-on aspossible.
Use Cleaner-Conditioner with nonimpregnated
plastic nylon pads, such as: Dobie scouring pad,
Skruffy scouring brush, Tuffy plastic mesh ball.
If burn-on persists,
single-edge razor blade. Hold blade so edge is
completely flat on cooktop and blade is a 30°
angle.
Tiny scratches are not removable but can be
minimized by continual use of CleanerConditioner. Such scratches do not affect
CAREFULLY scrape with a
cooking performance.
!.!etal marking
(gray or black
marks)
Pl:ting or
saalling
.—..——
-...
~iiding or scraping metal
~tensilsor oven shelf
acks across cooktop.
loilover of sugar syrup
lnd adherence of sugar
syrup to hot cooktop.
II
I cooking, condensation
ften collects and drips
o
VI
/hen covers are removed.
T
he minerals found in the
w
later-supply and in foods
lay cause mineral deposits
:
) turn a gray or brown color
T
he layer ISso
S(
eems to be in or under
le cooklnq surface and
It
tt71n it often
cannot readily be felt
-— ---
10 not slide racks or other
;harp metal objects across
:ooktop.
select correct heat setting and
arge enough cookware to
?1iminate boilovers and
~pattering.
Vatch sugar syrup carefully
oavoid boilover.
$,
; Daily use of Cleaner-
Conditioner applied with a
clean, damp paper towel will
help to keep the glass-ceramic
surface free from hardwater
mineral deposits.
Apply Cleaner-Conditioner with dampened paper
towel to cooled surface.
While unit is still hot turn to OFF;wrap several
damp paper towels around spatula or pancake
turner and use to remove sugar syrup spill from
hot cooktop immediately.
CAUTION: Sugar syrup is very hot so be careful
not to burn yourself.
Scrape off remainder of burn with single-edge
razor blade while unit is still warm—before
cooling down completely. Hold blade so edge is
completely flat on cooktop and blade is at a 30°
angle.
Mix a small amount of Bar Keepers Friend@
Cleanser with tap water to form a thick, wet
paste.
Apply this mixture to stain area.
Let it stand 45 minutes.
Scrub with clean, damp paper towel.
After stain is removed:
{
Wipe up remaining paste with damp paper towel
Apply dab of Cleanser-Conditioner and polish
with paper towel.
“f7
,
Page 20

[=]&fy.j@ ‘~”~ps
-:’ . =?b
‘i. Make sure bottom of utensil and cooking panel
are clean and dry. In dusty or sandy areas, wipe
❑
cooking panel and utensil before using to prevent
scratching the glass ceramic finish.
~ Center utensil on a cooking area which most
-.
nearly matches bottom of utensil in size.
3, Utensils should be flat on bottom and should
match size of cooking area (large pans on large
areas, small pans on small areas). Utensils should
rest level on the cooking area with or without food
in them or covers on them, and entire bottom
of
pan should touch heated area evenly to eliminate
“hot spots.”
4. Use small cooking areas for small utensils, large
cooking areas for large utensils. The use of a
utensil smaller than the size of the cooking areawill
expose a portion of the heated area to direct con-
tact by the user. This condition could result in
Food Container
to Start Cooking
H1.Stir together water or
milk, cocoa ingredients.
Bring just to a boil.
H1.Cover eggs with cool
water. Cover pan, cook
until steaming.
MED H1. Melt butter, add
eggs and cover skillet.
,4
Poached
Scrambled or omelets ~- Uncovered !’ H1.Heat butter until light
.,.,;*..
‘ t. , .
. . ..
,.
~~ Covered
;: Skillet ~~ water to a boll.
f.
><
~j Skillet ~ golden In color.
!:
.,
.; Covered ;: HI, In covered pan bring
~~ Saucepan
i-
j,
HI. In covered pan bring
,,
;1
,,
fruit and water to boil.
{
,-
‘“, ,- , ~ ‘ ~- .> -
.. . - .
, . .. .
Braised Pot roasts of Skillet
beef, Iamb or vea1, brown meat. Add water or
pt~rksteaks :lI)d
(nh(?ps
Ied Tender
P,in-f!
~tl~~s, t/1 In S[ea kS
~Cl.’/4-In ,
s [ 0:1 k s , n a nl b u i CJc I s ,
f f LI II ii S , <i 11d SJ U$cl \/t2
[ ! 1I 11 f I s tl i !Iit~t s
fTl I n LJt ~
LJ p
—..
Covered HI. Melt fat then add meat.
LJn
COVt?t“ed
Sk IIlet
tO MED H I to
Switch
other IIquid.
H I
Preheat sktllet, then
grease Ilghtly,
Cooking
LOWor WM, then add
cereal. Finish timing
according to package
directions.
MED, to cook 1 or 2min.
to completely blend
ingredients.
LOW to maintain gentle
but steady perk.
LOW. Cook only 3 to 4
min. for soft cooked; 15
min. for hard cooked.
Continue cooking at MED
HI until whites are just set,
about 3 to 5 min.
LOW, then add eggs.
When bottoms of eggs
have just set, carefully
turn over to cook other
side.
LOW. Carefully add eggs.
Cook uncovered about 5
min. at MED Hi.
MED. Add egg mixture.
Cook., stirring to desired
doneness.
LOW. Stir occasionally
and check for sticking.
LOW. Simmer until fork
tender.
MED HI or MED. Brown
and cook to desired
doneness, turn!ng over as
needed.
—.
-——
comments
Cereals bubble and expand as
they cook; use large enough
saucepan to prevent boilover.
Milk boils over rapidly. Watch
as boiling point approaches.
Percolate 8 to 10 min. for 8
cups, less for fewer cups.
If you do not cover skillet,
baste eggs with fat to cook
tops evenly.
Remove cooked eggs with
slotted spoon or pancake
turner.
Eggs continue to set slightly
after cooking. For omelet do
not stir last few minutes.
When set fold in half.
Fresh fruit: Use M to 1/2cup
water per pound of fruit.
Dried fruit: Use
water as
package directs. Time
depends on whether fruit has
been presoaked. If not, allow
more cooking time.
Meat can be seasoned and
floured before it is browned, if
desired.
Liquid variations for flavor
could be wine, fruit or tomato
juice or meat broth.
Timing: Steaks 1 to 2-in.: 1to
2 hrs. Beef Stew: 2 to 3 hrs.
Pot roast: 2%to 4 hrs.
Pan frying IS best for thin
steaks and chops If rare
~“”-.i
IS
,.kr<f
desired, preheat skillet before .-=
adding meat.
()
‘...-..~
‘..
,0
-:
Id
Page 21

...
,.. /-,.- j.:(;”; ;:~
,.,
.-4.
.
,) <-T, J ,1.~...[j ;/
:-::-ml
j (mr-mwcq
serious burns or clothing ignition accidents.
‘. Use heat setti~gs no higher than
.-..
tnanufacturer’s directions
.%%&lade of the following materials: cast
L
“’-=~-yceramic (pyroceram), and stainless steel. Also,
enamelware
&&&%
~~:, melt and fuse to the cooking panel when higher
k7
“m heats are used. Manufacturers of glass cooking
which under certain conditions could
when using utensils
MED or foliow
iron, glass
utensils also recommend using heats no higher
than MED.
w
RaGHT
I
,7 -..
. .
—.
Fod
Fried Chicken
Pan broiled bacon
Sauteed: Less tender
thin steaks (chuCk,
round, etc.); liver;
thick or whole fish
Simmered or stewed
meat; chicken; come
beef; smoked pork;
stewing beef; tongue,
etc.
?;.,:~.-,..
?.<s
,.-,?
Noodles or spaghetti
,
—*.—-———-—
~ Saucepan
-.
container
Covered
Skillet
Uncovered
Skillet
Covered
Skillet
Covered
Dutch Oven,
Kettle or
Large
Saucepan
Small
C-overed
saucepan.
Use small
surface unit
Skillet or
Sriddle
;overed ~
-arge Kettle ~
r Pot ~
Pressure ‘
Cooker or
Canner ;
——.
Uncovered ,“
Saucepan ‘
Covered
m$’edtiiom $md
to start cooking
Ht. Melt fat. Switch to MED
HI to brown chicken.
Ht. In cold skillet arrange
bacon slices. Cook just
until statting to sizzle.
Hi. Melt fat. Switch to MED
to brown slowly.
H1.Cover meat with water
and cover pan or kettle.
Cook until steaming.
WM. Allow 10 to 15 min. to
melt through. Stir to
smooth.
MED H1.Heat skillet 8 to
10 min. Grease lightly.
~
H!, In covered kettle, bring
salted water to a boil,
uncover and add pasta
I
slowly so boiling does not
L
I
stop.
Hi. Heat until first jiggle
heard.
—
H1.Bring just to boil. ~
H1.Measure ‘/2to 1-in.
water in saucepan. Add
salt and prepared vegetable. In covered saucepan
bring to boll.
Ht. Measure water and salt
as above. Add frozen block
of vegetable. In covered
saucepan bring to boil.
t-{I In skillet melt fat.
. .—..-.—.———
—.———
H1,Btlng salted water to a
borl
.—..——.——-———...—.—
setting
LOW. Cover skillet and
cook until tender.
Uncover last few minutes.
MED H1.Cook, turning
over as needed.
LOW. Cover and cook
until tender.
LOW. Cook until fork
tender. (Water should
slowly boil). For very large
loads medium heat may
be needed.
Cook 2 to 3 min. per side.
MED H1.Cook uncovered
until tender. For large
amounts HI may be
needed to keep water at
rolling boil throughout
entire cooking time.
MED HI for foods cooking
IS
10 min. or less. MED for
foods over 10 min.
I
LOW. To finish cooking.
1
MED. Cook 1-lb. 10 to 30
more min., depending on
tenderness of vegetable.
LOW. Cook according to
time on package.
MED. Add vegetable.
Cook until desired ten-
derness ISreached.
—
\NM, Cover and COOk
according to time.
—— —
For crisp dry chicken, cover
on!y after switching to LOW
for 10 min. Uncover and cook
turning occasionally 10 to 20
min.
A more attention-free method
is to start and cook at MED.
Meat may be breaded or marinated in sauce before frying.
Add salt or other seasoning
before cooking if meat has not
been smoked or otherwise
cured.
When melting marshmallows,
add milk or water.
Thick batter takes slightly
longer time. Turn over pancakes when bubbles rise to
surface.
Use large enough kettle to
prevent boilover. Pastadoubles in size when cooked.
Cooker should jiggle 2 to 3
times per minute.
Stir frequently to prevent
sticking.
Uncovered pan requires more
water and longer time.
Break up or stir as needed
while cooking.
Turn over or stir vegetable as
necessary for even browning.
—
- Triples In volume after
cooking. Time at WM. Rice. 1
cup rice and 2 cups water—25
mlns. G rlts: 1 cup grits and 4
cups water—40 min.
t
I
Page 22

$. Aluminum pans sonduct heat quickly. For most conventional
!,aklng Iioht shiny finishes give best results because they Prevent overbrown ing In the time it takes for heat to cook the center
areas, Dull (satin-finish) bottom surfaces of pans are recommended for cake pans and pie plates to be sure those areas
brown completely.
2. Dark or non-shiny finishes, also glass and pyroceram, absorb
heat which may result in dry, crisp crusts. Reduce oven heat 25°
Container
Bread
Biscuits (l/z-in.thick)
Coffee cake
Corn bread or muffins
Gingerbread
Muffins
Popovers
Quick Loaf Bread
Yeastbread (2 loaves)
Plain rolls
Sweet rolls
shiny Cookie Sheet
Shiny Metal Pan with
Satin-finish bottom
Cast Iron or Glass
Shiny Metal Pan with
Satin-finish bottom
Shiny Metal Muffin Pans
Deep Glass or Cast Iron Cups
Metal or Glass Loaf Pans
Metal or Glass Loaf Pans
Shiny Oblong or Muffin Pans
Shiny Oblong of Muffin Pans
Cal;<ei;
(without shortening)
Angel food
Jelly roll
Sponge
Aluminum Tube Pan
Metal Jelly Roll Pan
Metal or Ceramic Pan
~ $.Jf<@fi;
Bundt cakes
Cupcakes
Fruit cakes
Layer
Layer, Chocolate
Loaf
Metal or Ceramic Pan
Shiny Metal Muffin Pans
Metal or Glass Loaf or
Tube Pan
I
i
Shiny Metal Pan with
/
Satin-finish bottom
i
Shiny Metal Pan with
1
SatIn-fin ish bottom
r
Metal or Glass Loaf Pans
shelf
Position
B, C
B, A
B
B
A, B
B
B
A, B
A, B
B, A
A
B
A
A, B
B
A, B
B
3
3
if lighter crusts are desired. Preheat cast iron for baking some
foods for rapid browning when food is added.
3. Preheating the oven IS not always necessary, especially for
foods which cook longer than 30 or 40 minutes, For food with
short cooking times, preheating gives best appearance and
cris-pness.
~M Open the oven door to check food as iittie as possible to
prevent uneven heating and to saveenergy.
Ch4en
Tamp.
400°-4750
Time,
twin.i%%od
15-20
Comments
—...
Canned refrigerated biscuits take
2-4 min. less time.
350°-4000
400°-4500
350°
400°-4250
375°
20-30
20-40
45-55
20-30
45-60
Preheat pan for crisp crust.
Decrease about 5 min. for muffin
mix. Or bake at 450° for 25 min.,
then at 350° for 10-15 min.
350°-3750
375°-4250
45-60
45-60
Dark metal or glass give deepest
browning.
375°-42!50
350°-3750
325°-3750
375°-4000
325’ -350°
325°-3500
350°-3750
10-25
20-30
30-55
10-15
45-60
45-65
20-25
For thin rolls, Shelf B may be used.
For thin rolls, Shelf B may be used.
Two piece pan is convenient.
Line pan with waxed paper.
Paper liners produce more moist
crusts.
275°-3000
2-4hrs.
Use 300° and Shelf B for small or
individual cakes.
350°-3750
350°-3750
350°
20-35
25-30
40-60
vletal or Glass Pans
:ook ie Sheet
Refrigerator
Rolled or sllced ~! Cookie Sheet
-;~-.~;~ .-
, k .., :
;-:.”. [-. . ,,. ~’ .->, - a- ----- -
:, , , - . --- .- - ,.> . : . -
———X
!. Cookie Sheet
;i
Baked apples “ Glass or Metal
Custard Glass
CLIStard Cups or ~
1
I
I
3, c
3, c
3, c
3, c
4,B, C
3
325°-350°
350°-4000
$00°-4250
375°-4000
350°-4000
100°-3500
Casserole (set In pan of ,;
hot water)
Puddings, Rtce and
CLIStard
———-,-...————-
Glass Custard Cups or
Casserole
B
325°
Frozcn Foil Pan on Cookie Sheet A 100°-4250
Merl ngue
cr(Jst G18ss or .Sat!n-flnlsh Metal A, B
017(?
Two crust
Pastry Shell
. . . .. . . . . . ..—. -————-— ———.——.. .—--- . . .
.
..
Spread to crust edges
Glass or”Satin-flnlsh Metal
Glass or Sail n-flnlsh Metal
B, A
B
B 450°
125°-3500
100°-4250
400° -425°
Baked polotocs Set on O~en Shelf A, B, C 325°-4000
SLXII()(X!IJdIshes
SL3(1ffl(’s G 1,1SS B 300”-350”
—.— - _.-.. .—
Glass or Metal A, B, C I325°-3750
25-35
10-20
6-12
7-12
30-60
30-60
50-90
45-70
1
45-60
40-60
12-15
60-90
30-60
30-75
Bar cookies from mix use same
time. Use Shelf C and increase
temp. 25-50° for more browning.
Reduce temp. to 300° for large
custard. Cook bread or rice pudding
with custard base 80 to 90 minutes.
I.arge pies use 400° and increase
time.
To quickly brown meringue use
400° for 8-10
Custard fillings require lower temp.,
longer time.
min.
Increase time for large amount or
size,
.7-X
if
\
‘k ‘“~
./
(-’)
;
---/
Page 23

:
@g~j~&
I@&: at
7
---’
t . Pcsltion oven shelf at B for small-size roasts (3 to 7 Ibs. ) and
A for larger roasts.
2. Place meat fat side up or poultry breast-side up on broiler
pan or other shallow pan with trivet. Do not cover. Do not stuff ature rise, if desired, remove roast from oven at 5° to 10° less
poultry until just before roasting. Use meat probe, for most than temperature on chart.
accurate doneness. Control signals when food has reached set
temperature.
2. Remove fat and drippings asnecessary. Baste asdesired. ated, (1O min. per lb. for roasts under 5-lbs.) Defrost poultry
(Do not place probe in stuff ing.) to 25 min. per pound more time then given in chart for refriger-
4. $H.amd iing #grm$j recoin mended
allow roast to firm up and
about 5° to 10° intern aItemperature; to compensate for temper-
3, Frc+=xenmMM@ can be conventionally roasted by adding 10
before roasting.
for roasts is 10to 20 min. to
make it easier to carve. It will rise
Tendercuts: rib, high quality
sirlointip, rump or top round*
Lamb Leg or bone-in shoulder*
Vealshoulder,leg or Io!n’
PorkIotn,nb or shoulder*
Ham,pre-cooked
Ham, raw
“For boneless rolled roasts over 6-m th
oven
Temp.
325°
325°
325°
325°
325’
325°
<,add 5 to 10ml
325°
375°
325°
fhrneness
Rare:
Medium:
Well Done:
Rare:
Medium:
Well Done:
Well Done:
Well Done:
ToWarm:
Well Done:
>erlb.to times g}
Well Done:
Well Done:
Well Done:
Approximate RoastingTime,
in Minu8esper Pound
380 S&lb.
24-30
30-35
35-45
21-25
25-30
30-35
35-45
35-45
10 reins. per lb. (any weight)
Under 104bs.
20-30
] above.
380 5“lb$s*
35-40
35-40
10to15-HXL
20-25
6 to 8.MBS.
18-22
22-25
28-33
20-23
24-28
28-33
30-40
30-40
to to Is.[bs.
17-20
‘OWer5-lbs.
30-35
154bs.
CWer
15-20
Ilmterna!
Temp. “F
130°-1400
1500-160°
170°-185”
130°-140°
150”-160°
170°-1850
170°-1800
1700-180°
125°-130°
160°
185°-190°
185°-190°
In thigh:
185°-190°
?
,,
1
~.
‘4
1
.— -
(
21
Page 24

1. ,?Iwaysuse broiIerpan and rack that comes with your oven, It
designed to minimize smoking and spattering by trapping
IS
juices in the sh!elded lower part of the pan.
2. Oven door should be ajar for most foods; there is a special
position
S,.For steaks and chops, slash fat evenly around outside edges
of meat. To slash, cut crosswise through outer fat surface just to
the edge of the meat. Use tongs to turn meat over to prevent
piercing meat and loosing juices.
4. If desired, marinate meats or chicken before broiIing. Or,
brush with barbecue sauce last 5to 10 minutes only.
on door which holds door open correctly.
CMH9my
snd/or
Thickness
%-1b. (about 8
thin slices
l-lb. (4 patties)
‘/2to 3/a-in.thick
sheaf
Position
First ski%?
Time, Mirh
c
c
c
c
3%
7
6
5
5. When arranging food on pan, do not let fatty edges hang over
sides, which could soil oven with fat dripping.
6.
Broiler does not need to be preheated. However, for very thin
foods or to increase browning, preheat if desired.
7. IFrozen S&aalm can be conventionally broiled by posi-
tioning the oven shelf at next lowest shelf position and
increasing cooking time given inthis chart 1‘/2times per side.
8. If your range is connected to 208 Volts rare steaks may be
broiled by preheating the broil heater and positioning the oven
shelf one position higher.
Sl?c.mnd side
‘Time, Mira.
3% Arrange in single layer.
4-5
6
5
Chm’anmerm
Space evenly.
Up to 8 patties take about same
time.
—
J. ... ~ , .. . . ,.
—-.-
. . .= , ! .,
Well Done
—.—
-. . .. :.:L ,. ‘L
MeclI
Well
J ..
U rn
Done
1 inch thick
1/2 Ibs.)
(1-1
%-in. thick
1
(2-21/2tbs.)
1whole
(2 to 2’/Abs.),
split lengthwise
2-4 sllces
1 pkg. (2)
2-spilt
2-4
1-lb, fillets Vato
‘/Z-In,thtck
c
c
B
c
——.——.—.
2 (12inct7) c
2 (1-In. thick)
about 1 lb,
2 (1 Inctl) c 8
atlo LJt 1o-12
Oz
B 13
c
7
9
13
10
15
25
35
1‘/2-2
3-4
13-16
5 5
8
10
10
7
9
13
7-8
14-16
20-25
10-15A
‘/2
(Do not
turn
over)
8
10
13
4-7
10
Steaks less than l-in. cook through
before browning. Panfrying is
recommended. .
Slash fat.
Reduce times about 5-10 min. per
side for cut-up chicken. Brush each
side with melted butter. Broil “with
skin side down first and broil with
door closed.
Space evenly. Place English muffins
cut-side-up and brush with butter, if
desired.
Cut through back of shell. Spread
open. Brush with melted butter
before and after half time.
Handle and turn very carefully.
Brush with lemon butter before and
during cooking if desired. Preheat
broiler to increase browning.
Increase times 5-10 m!n. per side
for 1%-in. thick or home cured.
Slash fat.
Slash fat.
*
?F-“
-
Q
Pr~COOk12CiSil~lSilg(>S,
a 17d sI ITII Ia r l-lb pkg ( 10) c 6
br,itWIJ rst
.. .——
.....---
——.————
—,..—
-...... ———
——- .—
22
1-2
If desired, spilt sausages in half
~ lengthwise Into 5 to 6-in. pieces.
—
s-a
(] ~
/- -“’., }
(
[Q
/
\
)!
I
1
Page 25

A?JA
ALA3.
Birmingham -35210
2500 Crestwood Boulevard
(205) 956-0333
(Decatur-H untsvdle)
Huntswlle -35805
1209 Putnam Drive
(205) 830-0150
Mobile -36606
1107 Beltlme H!ghway So.
(205) 471-1451
A!4!2!ONA
Phoemx -85031
25 South 51st Avenue
P.O.
80x 14278
(602) 272-9345
Tucson -85705
2015 North Forbes Blvd.
Suite 111
{602) 623-8415
~~~~gsfl,s
Little Rock -72209
8405 New Benton Hwy.
(501) 568-7630
CALIFORNIA
(San Bernardino-Rwerslde)
Bloomington -92316
10121 Cactus Avenue
(714) 877-3434
(San Francisco)
Burlmgame -94010
1649 Adrian Road
(415) 981-8760
Fresno -93727
1809 North Helm Street
(209) 255-1851
Los Angeles -90056
2815 East 46th Street
(213) 586-5480
Sacramento -95825
1721 Bell Street
(916) 929-2247
San Diego -92101
3554 Kettner Boulevard
(714) 297-3221
San Jose -95123
5761-B Wlnfleld Blvd.
(408) 629-3500
Van Nuys -91405
6843 Lennox Avenue
(213) 986-5710
Cc)L~,$?A!3L’
Colorado Springs -80909
1865 f~.Academy - Suite B
(303)’%97-8492
Dri+;ver -80207
5390 East 39th Avenue
(3o3) 320-3301
cc f4r!Ec’rlcuT
Brldgeporf -06604
615 North Washington Ave.
(203) 367-5311
East Hartford -06108
265 PrestigO Park, Plaza 3
(203) 526-9811
!l’J:,~,;,. f;::
(Brandywlno - Wllmtngton)
Glen MIIIs, PA - f 9342
RD. /$2.
BOX 210
(215) 358-1500
:, ;.,,-:::,---!-.;: {;,-, : IJ, f::
Jessup, MD - 20i9~-01~0
8201 Stayton Drive
P.0.
80% 127
(301) 953-9130
,.
L.’,,::
Fort Laudwdalo -33309
1101 West McNab Road
(305) 974-6708
Fort
Mayors-33901
1910 cOLJrtney Dr
(813) 939-2612
Jncksonvllle -32205
5226 Highway Avcnuo
(s?04)783-1330
(Pompano-W Palm 13e?ch)
Lako Worth -33460
1802 Madrid Avonuo
(305) 555-7040
kliami-33167
3200NW.110th
(305) 685-5144
Orlando -32807
6545 East Colonial Dr.
(305) 273-6370
Tallahassee -32301
1205 South Adams St.
(904) 222-6931
Tampa -33611
5201 S.Westshore Blvd.
Box 13708- Interbay Station
(813) 637-1906
GEORGIA
Atlanta -30325
1695 Marietta Blvd.
P.O. Box 19917
(404) 352-6000
Savannah -31406
211 Television Circle
(912) 925-0445
HAWAII
Honolulu -96613
404 Cooke Street
(806) 533-7462
IDAHO
(Boise)
Garden City -83704
5250 Chinden Blvd.
(208) 376-5860
ILLINOIS
Champaign -61820
1205 North Hagen
(217) 358-4086
Chicago -60638
5600 West 73rd Street
(312) 594-2424
Elk Grove Village -60007
10 King Street
(312) 593-2525
Lombard-60148
837-B35 Westmore Ave.
(312) 629-8010
Peoria -61614
7708 Norih Crestline Drive
(309) 692-5070
Rockford -611G7
401 North 2nd Street
(615) 962-7200
Springfield -62702
2252 South 15th Street
(217) 753-8088
IN?21?(fl:.
Evansville -47714
11116-KS.Weinbach Ave.
(812) 476-1341
Fort Wayne -46806
4632 Newaygo Road
(219) 484-9005
Gary -46409
5185 Brondway
(219) 981-2533
Indianapolis -46219
6233 Brookville Road
(317)356-8661
South Bond -46613
1902 Mtaml StreeI
(219) 286-0685
J(-)~,~,,,,,
Cedar Rapids -52405
118 Flrsl Street, NW
(319) 366-8579
Davenport -52602
1074 South Dlttmer
P 0.
BOX 3188
(319) 326-5101
Des Motnes -50313
1637 N.E. 58th Avenue
(515) 266-2191
Watt3rloo -50703
2829 Falls Avenue
(319) 236-1393
;
I;ansas CIIy -66115
2949 Chrysler Road
(913) 371-~24~
Street
~~A~yLAf’.jQ
Salisbury -21801
Twilly Centre
329 Civic Avenue
Jessup -20794-0110
8201 Stayton Drive
P.O.
(301) 953-9130
MASSACHUSETTS
(Cape Cod)
Hyannis -02601
80 Enterprise - Unit 11
(617) 771-5905
Pittsfield -01201
1450 East Street
(413) 499-4391
(Boston-South)
Westwood -02090
346 University Avenue
(617) 329-1250
(Boston-North)
Woburn -01801
57 Commerce Way
(617) 944-7500
Ml CHIGAN
Grand Rapids -49506
350 28th Street, S.E.
(616) 452-9754
Lansing -46912
1004 E. Michigan Ave.
(517) 484-2561
Troy -48064
1150 Rankin
(313) 583-1616
Westland -46165
953 Manufacturer’s Drive
(313) 564-5190
,,=1AIt: z,’ (j”;,:,
,...LJ..LJ
(Minneapolis-St. Paul)
Ed!na -55435
7450 Metro Boulevard
(612) 635-5270
‘ ~‘‘:~.l’~‘=i~P1
Jackson -39209
325 Industrial Drive
(601) 352-3371
Kansas City, KS -66115
2949 Chrysler Road
(913) 371-2242
St.
1355 Warson Road, No.
PO. Box 14559
(314) 993-6200
Swlngfwld -65807
1334 West Sunshine
(417) 831-0511
Lfncoln -68503
1I 45 North 47th St
(402) 364-9148
Addresses and telephone numbers sometlnles change. And new Centef’s open. If the numbers chan9e! check ~’---’
your telephone book. Look in the White Pages under
Wichita -67211
820 East Indianapolis
(316) 267-3366
KEW7-UCKY
Lexington -40505
1144 Floyd Drive
(606) 255-0848
Louisville -40218
4421 Bishop Lane
P.O.
BOX 32130
(502) 452-3511
LOUISIANA
Baton Rouge -70814
2935 Crater Lake Drive
(504) 926-5062
(New Orleans)
Harahan -70123
701 Edwards Avenue
(504) 733-7901
Shreveport -71102
1430 Dalzell Street
(318) 425-6654
MAINE
South Portland -04106
54 Darling Avenue
(207) 775-6385
(301) 742-3900
BOX 127
!,....,...
:{;LOL’E !
LOUIS -63178
Omaha -68117
6636 “F”Street
(402) 331-4045
NEVADA
Las Vegas - t39109
~~f7”;. Highland Dr.
(702) 733-1500
Reno -89511
6465 S. Virginia Street
(702) 852-7070
NEW JERSEY
Mount Holly -08060
Route 38 & Easlick Ave.
(609) 261-3500
North Caldwell -07006
5 Fairfield Road
(201) 256-8850
(Asbury Park)
Oakhurat -07712
2111 Highway 35
(201) 493-2100
Vineland -06360
749 North Delsea Drive
(609) 696-1506
NEW MEXICO
Albuquerque -87107
3334 Princeton Dr., N.E.
(505) 884-1861
NEW YORK
Albany -12205
2 Interstate Avenue
(518) 436-3571
Brooklyn -11234
5402 Avenue “N”
(212) 253-8161
Buffalo -14225
3637 Union Road
(716) 686-2268
(Westchester Co. Area)
Elmsford -10523
Fairview Industrial Pk.
Route #9-A
(914) 592-4330
Flushing -11354
133-30 39th Avenue
(212) 886-5600
(Binghamton)
Johnson City -13790
276 Main Street
(607) 729-9248
(Nassau-Suffolk County)
Melville -11747
336 South Serv,ice Road
(516) 293-0700
(Orange County Area)
Newburgh -12550
1135 Union Avenue
(914) 564-2000
Rochester -14622
1900 Ridge Road East
(716) 544-7100
Ronkonkoma -11779
76 Union Avenue
(516) 467-7700
Syracuse -13204
965 West Genesee Street
(315) 471-9121
,;OL?Tt?CAF?QL!NA
Charlotte -28234
700 Tuckaseegee Road
P.O.
80X 34396
(704) 372-8810
Greensboro -27406
2918 Baltic Avenue
(919) 272-7153
Raleigh -27604
2013 New Hope
Church Road
(919) 876-5603
2262 S. Arlington Road
(216) 773-0361
“HO I-P(21NT FACTORY SERVICE.”
Cincinnati-45242
10001 Alllance Road
(513) 745-5500
Cleveland -44142
20600 Sheldon Road
(216) 362-4200
Columbus-43212
1155 West FifthAvenue
(614) 294-2561
Dayton -45414
5701 Webster Street
(513) 896-7600
Toledo -43611
3300 Summit Street
(419) 729-1651
OKLAHOMA
Oklahoma City -73118
3228 North Santa Fe
P.O.
Box 16669
(405) 528-2381
Tulsa -74112
6913 East 13th
(918) 835-9526
OREGON
(Portland Area)
Beaverton -97005
14305 S.W. Millikan Way
(503) 646-1176
Eugene -97402
1492 West Sixth Street
(503) 342-7285
PENNSYLVANIA
(Brandywina-Wilmington)
Glen Mills -19342
R.D. #2,
BOX 210
(215) 356-1500
Johnstown -15905
214 Westwood Shopping Pi.
(814) 255-6721
(Harrisburg)
Camp Hill -17011
2133 Market Street
(717) 761-8185
Monroeville -15146
150 Seco Road
Monroeville Industrial Park
(412) 665-3700
Philadelphia -19115
9900 Global Road
(215) 696-3270
(Allentown)
Whitehall -18052
1906 MacArthur Road
(215) 437-9671
RHODE tSLANt3
East Providence -02914
1015 Waterman Avenue
(401) 438-0300
SOUTH CAROLINA
Columbia -29602
;;; L31u;;Road
(603) 771-7860
Myrtle Beach -29577
702 Sea Board Street
Sea Board Industrial Park
(603) 626-7411
N. Charleston -29405
7325-B Associate Driv6
Pepperdan Industrial Park
(603) 552-5193
(Greenville)
Taylors -29687
25 Hampton Village
(803) 292-0830
-i-fI?!!NzssEE
Chattanooga -37403
613 East 1lth Street
(615) 265-8598
Johnson City -37601
2912 Bristol Highway
(615) 282-4545
Knoxville -37919
3250 Mynatt Street, N.W
(615) 524-7571
Memphis -38118
3770 South Perkins
(901) 363-1141
Nashville -37204
3607 Trowsdale
(615) 834-2150
TEXAS
Austin -78704
2810 S. First Street
(512) 442-7893
Corpus Christi -78415
3225 Ayera Street
(512) 664-4897
Dallas -75247
8949 Diplomacy ROW
P.O.
BOX 47601
(214) 631-1380
El Paso -79925
7600 130eingDrive
(915) 778-5361
(Brownsville)
Harlingen -76550
1204 North Seventh
(512) 423-1204
Houston -77207
BOX 26837
P.O.
2425 Broad Street
(713) 641-0311
Lubbock -79490
4623 Loop 289 West
P.O.
BOX 16286
(806) 793-1620
(Odessa)
Midland -79701
P.O.
BOX 6286
Midland Terminal
(915) 563-3483
San Antonio -78216
7822 Jones-Maltsberger
{JTA1-f
Salt Lake City -84125
2425 South 900
P.O. Box 30904
(801) 974-4600
VIRGINIA
Fairfax -22031
2810 Dorr Avenue
(703) 280-2020
Norfolk -23502
4552 E. Princess Anne Dr
(804) 657-5937
Richmond -23228
2910 Hungary Spring Rd.
(804) 288-6221
Union Square
Suite 206
101 North Union Street
(509) 783-7403
Seattle -98186
401 Tukwila Parkway
(206) 575-2711
Spokane -99206
9624 E. Montgomery St.
(509) 926-9562
~.j~~-r l~:;;~~~~~,n,
(Charleston)
Huntington -25704
1217 Adams Avenue
P.O.
(304) 529-3307
Wheeling -26003
137 North River Road
(304) 283-6511
\<./~Q<;~i,,!$~~!!
Appleton -54911
343 W. Wisconsin Ave.
(414) 731-9514
Milwaukee -53225
11100 W. Silver Spring Rd.
(414) 462-9225
West
BOX 7518
1,
‘.--..,
I
I
)
Page 26

. .
=-—
.->:,i.>~,$,
.-,
id. ~tz.(
, ~
3 r ,?FaZ-=F ~,+. P-
~.
r+ @k ;=,{= j“Q[p@jf’ :E-Jj~p&
.+ ,J.
.5 .=* ~fjfq~*Q# ~&jg~lj
-7,@-
?.VJ %,2LA La . L w- $,
ii
,$
1
‘T’OLJrnew raiS a well designed
L$%%ndengineered product. Before it
y+~p
‘Wieft the factory, it went through
rigorous tests, just to
-&sS4
it was as detect-free as possible.
E{:<j@F,
Y&9 And you have a warranty to pro-
tect you against any manufac-
turing
defects during the early
makesure
period of your range’s life.
Now you can have the same
trouble-free and surprise-free service for as long as you own your
range. You can buy a Fiotpoint
Service Contract. For one low
fee.
. .usualiy just pennies a day
Hotpoint will take care of any
. . .
repairs your range needs—both
parts and labor. You are protected
for the length of your contract.
Even when costs go up, you
nothing more.
Want more
no obligation.
information? There’s
You can get infor-
mation on Service Contracts any
time. Just write your name and
address, date of installation, and
the model and serial number of
your appliance and send to:
anager, Service Contracts
pay
If you’re the kind of person who
likes to do-it-yOurself-–0r if you’re
interested in saving money on
out-of-warranty repairs—Hotpoint
now offers some real help:
Step-by-Step Repair
You can use this manual to solve
common repair problems.
Hotpoint makes it easy because
your manual contains important
do-it-yourself information:
dm”ts !hdp you Umigrmse
probk?ms
easy to understand instructions
step-bydep photos with
repair
procedures
a skill lewd index
the recommended took needed
repairs
Parts
When repairing
your appliance, be
sure to use authorized Hotpoint
replacement parts. Each part is
packaged in a color coded box
Where
Repair
t Purchase Step-by-Step
Manuals and Parts
You can purchase I-iotpoint repair
manuals and replacement parts
for your appliance from autho-
rized participating I+otpoint
dealers.
NOTE: Of course, repairs should
be attempted only by individuals
possessing adequate backgrounds of electrical, electronic
and mechanical experience. Any
attempt to repair a major
appliance may result in personal
injury and property damage.
WCE-315
in many cities, there’s a Hotpoint
Factory Service Center. Call, and
a radio-dispatched truck will
come to your home by appointment—morn ing or afternoon.
Charge the work, if you like. All
the centers accept both Master
Card arfd Visa cards. (See page 24
Or look for Hotpoint franchised
Customer Care@servicers. You’ll
find them in the Yellow Pages
under “HOTPOINT CUSTOMER
CAHE@SERVICE” or “GENERAL
ELECTRIC—HOT~O INT CUS-
TOMER CARE@SERVICE”.
parts Or accessories, contact one
,---s.the Factory Service Genters, a=’-
.
.anc~ ised Custonler Care@ ser-
i,
“-ficer or your F-lotpoint dealer.
--
/ \
1
--%----
if you are dissatisfied with the
service you received, here are
three steps you should follow:
WUN,contact the people who serviced your range. Explain why you
are dissatisfied. In most cases,
this will solve the problem.
Next, if you are still dissatisfied,
write all the details—including
your phone number—to:
Manager, Consumer Relations
Hotpoint
WCE-312
Appliance Park
Louisville, Kentucky 40225
Finally, if your problem is still not
resolved, write:
Major Appliance
Consumer Action Panel
20 North Wacker Drive
Chicago, Illinois 60606
This panel, known as MACAP, is a
group of independent consumer
experts under the sponsorship of
several industry associations. its
purpose is to study practices and
advise the industry of ways to
improve customer service.
Because NIACAP is free of
industry control and influence, it
is able to make impartial recommendations and consider each
case individually.
Page 27

,.——————.
Save proof of original purchase date such as your sales slip or cancel led check to establish warranty period.
.——
————.———
—%::: :--.:
.
—--~~j-:- -.
——------2%%%%.+, :.- ---
- ....~- -
,jyn:;r
,,~-=-..
!1:=’= --
II+ :-.11~: ---
,,r=-----
‘&’F#,
X!%
w>%~:ti
~i~ ;——
y::{%j
;jlJl:
+$,
1
-.3*+JI
.’>.=
z~q)l
-“*.7
i-f-
.-..-
7
>/.-..
1
\.-1+
–e.<.,
I
,-
-.
d
,@f
.#(:+:
1
is
FULL
For one year from date of original
purchase, we will provide,free of
charge, parts and service labor in
your home to repair or replace any
part d the range that fails because ‘ashingt?n) ‘-c. ‘n ‘Iaska ‘he
of a manufacturing defect.
This warranty is extended to the
original purchaserand anysucceed- —’-
ing owner for products purchased
for ordinary home use in the 48
mainland states, Hawaii and
warranty ISthe same except that it
is LIMITEDbecause you must pay
to ship the product to the service ~~<shop or for the service technician’s
travel costs to your home.
All warranty service will be provided ;;>.
by our Factory Service Centers or
by our franchised Customer Care@
servicers during normal working
hours. Check the White Pages for
140TPOINTFACTORYSERVICE.
Look in the Yellow Pages for
HOTPOINTCUSTOMERCARE@
SERVICEor GENERAL ELECTRIC-
HOTPOINTCUSTOMERCARE”
SERVICE.
~~ ~~~ ~Service trips to your home to
teach you how to use the product.
Read your Use and Care material.
If you then have any questions
about operating the product,
please contact your dealer or our
Consumer Affairs office at the
address below.
~ Improper installation.
If you have an installation problem,
contact your dealer or installer.
You are responsible for providing
adequate electrical, exhausting
~ Replacement of house fuses
or resetting of circuit breakers.
~ Failure of the product if it is
used for other than its intended
purpose or used commercially.
~ Damage to product caused
by accident, fire, floods or acts
of God.
WARRANTORIS NOT RESPONSIBLE FOR CONSEQUENTIAL
DAMAGES.
and other connecting facilities.
Some states do not allow the exclusion or limitation of incidental or consequential damages, so the above limitation or exclusion
may not apply to you. This warranty gives you specific legal rights, and you may also have other rights which vary from state to state.
1-0know what your legal rights are in your state, consult your local or state consumer affairs office or your state’s Attorney General.
Genera! EMxWic
Company
If further he!p is needed concerning this warranty, contact:
Affairs, General Electric Company, Park, Louisville, KY 40225
~:~x:,–
—!!~
.....—.—
.-.-..=
-_.--=--—-—-
—--&-x—.-
--k=,-,
II rx
~~~g;:
——
..——....
li><:<=
II&—.-
//:=.
.-=
~!;W
Ii&
II a-
II F=
II -%-’=--:
II;=
II&
IIa
~~u==
Ii>
,,r–
115:
~~::
.W
,, .-
II x
1!8=-
,,.
IIT=
i~$-===
II =–
II s=
II =
;{n—–—
,;,—
11:-..
4!%:
Q%;:-
~~
II5X:.-
#&
+,-:A.)
<...
q
,,&f3
I
..
.+i ,i,
II
~];~j:-
K&f
)=$jj
$$$
,,&J;
1$1$
K-:3!
Ig:)$
I
‘+.–-,.
 Loading...