

Page 1

b.lb
How to
get
the best from
Your&nge
Contents
41unlinum F(>il
4n[i-Tip Device
Appli:lnce Registratic~n
Autolniltic
Care and Cleaning
Cc)nsunler
lmp(~rtant Phone
Features
Model :lnd Seriill
Oven
Btiking
Broiling
C(~ntr(Jl
Lift-Olf
Timers &
Services
Settings
Oven
R()~isting
Sel{-Cleaning
Clock
Numbers
Numbers
Dt~(~r
4, 18,22
3,
8,30
27–29
35
35
6.7
15-23
16–19
7? 7J
LA.
--
Z(), ~ 1
24–26
14
15
~~
Shelves
Timed
2
2
Preparation
Problem Solver
Thermostat
D()
Remov~tl (}f
Safety
Surface Cooking
W;~rriinty
GE
Answer Center”
800.626.2000”
B~lking
11
R)lll.v(’lf
Packaging Tape
Instructions
Canning
Control”
C(~(~kware
Surface
Tips
Settings
Tips
Cleilning
Adjustment-
15.16,27
18,
31-33
I ()-12
Back
cover
19
30
19
2
3-5”
9
12
9
13
Use
and
Care
Guide
mlw
MNU138
Rev
1
Page 2
HELP US HELP YOU...
Before using your range, read this guide
carefully.
It is intended to help you operate
new range properly.
Keep it handy
It’
you don’t understand something or need more help,
write
(inc!Llde
for
answers to your
your phone
nLlmber):
Consumer Affairs
Flotpoint
Appli~rtce
Park
Louisville. KY 40225
and
maintain your
quesliorts.
Remove the packaging tape before
turning on the surface units or the oven.
The
safest way to
packagitlg tape
~i;lIIlagc
is
done
application
detergent,
mineral oil or
sot.t cloth ~~nd
an
appliance polish to thoroughly
[he
Slll”f21~~.
NOTE:
The
the chrome
it is
baked
on.
remove
on new
to the
of: u
household I
adhesive
appli~~ll~es ~(~ ~ssLlre no
finish of the
iquid dishw, ashi ng
cookirtg oil.
allow to soak. Wipe
plastic tape
trim on
range
thtlt
paI-tS
Iel’t from
product is an
Apply with a
dry
and then
cle:in and
is not
renlo~ed from
canll~~t be le[ll~~~’~~
protect
apply
if
Write down the model and serial
numbers.
You’ II
behind the stortlge
These numbers are
Ownership Registration Card that came with your
range. Before
numbers
Model Number
Serial Number
Use
cal
find
them on a
drawer.
iilso
sending in this
here:
these
numbers in any
Is concerning your
label
on
[he tront
of
the
range
on the Consumer Product
ciu”d. plefise
correspondcll~e or
write
service
ronge.
these
If you received a damaged range...
Inimcdiately contact the dealer (or builder) that sold
yoLi
the rall:e.
Save time and money.
Before you request service . . .
Check
It lists
can
the
Problem
causes
of minor operating
correct yourself.
Solver
in
[he back (JI
(his
pr(~blenls [hat
guide.
you
IF YOU NEED SERVICE...
To obtain service, see the Consumer Services
in
the
back of this
Were 1)1.OLILt
pleased. If for
the service
for
you receive. here
t’Lll”thel help.
guide.
of
OLII.
service
some reason you
tind
want
ore
not happy with
are
three steps to
yoLl
to
be
p;lge
tollow
FIRST,
appliance. Explain why
In most
NEXT,
cont:lct
CLISCS,
(his will
il.
you
are
the
people
who serviced your
yoLl
are not pleased.
solve the
still not pleased,
problem.
write
all
dc{ails-including your phone number-to:
Manager. Consumer
tiotpoirlt
Appliance
Louisville, KY
FINALLY.
Park
il. your problem
Major Appliance
z() N(~r(h w~l~kel-
Chicago. IL
60606”
Rclatic)tls
40225
is
still n~>t I-csolved. write:
C(~rlsurner Action Panel
Drive
the
2
Page 3

WORTANT
—
IIWPORTANT
●
The
California Safe Drinking Water and Toxic
Enforcement Act
Read dl
instmctions
SAFETY NOTICE
requires the Governor of
SAFETY
before using
California to publish a list of substances known to
the state to cause birth defects or other
reproductive harm, and requires businesses to
warn customers of potential exposure to such
substances.
●
The
fiberglass insulation in self-clean ovens
gives off a very small amount of carbon
monoxide during the cleaning cycle. Exposure
can be minimized by venting with an open
window or using a ventilation fan or hood.
When using electrical appliances, basic safety
precautions should be followed, including the
following:
●
Use this appliance only for its intended use
as described in this guide.
●
Be sure your appliance is properly instilled
and grounded by a qualified technician in
accordance with the provided Installation
-
Instructions.
Jo
not attempt to repair or replace any part
of your range unless it is specifically
recommended in this guide. All other servicing
should be referred to a qualified technician.
c
Before performing any service, DISCONNECT
THE RANGE POWER SUPPLY AT THE
HOUSEHOLD DISTRIBUTION PANEL BY
REMOVING THE FUSE OR SWITCHING OFF
THE CIRCUIT BREAKER.
WARNING—A1l
iniurv
could result. To
““
ranges can tip and
prevent
accidental
tipping of the range from
abnormal usage, including excess
loading of the oven door, attach it
to the wall or floor by installing
the Anti-Tip device supplied. To
check if the device is installed
and engaged properly, carefully
tip the range forward until it
engages the device.
If you pull the range out from the
wall
for any reason,
—+he
range when you push the range back. Please
;fer
to the Anti-Tip device information in this
rnaki
sure the device engages
book. Failure to take this precaution could result in
tipping of the range and injury.
~STRUCTIONS
tfi
appliance.
●
Do not leave children
not be left alone or unattended in an area where an
appliance is in use. They should never be allowed
to sit or stand on any
s
CAUTION: ITEMS OF INTEREST TO
CHILDREN SHOULD NOT BE STORED IN
CABINETS ABOVE A RANGE OR ON THE
BACKSPLASH OF A RANGE—CHILDREN
CLIMBING ON THE RANGE TO REACH
ITEMS COULD BE
●
Teach children not to play with the controls
or any other part of the range.
●
Never leave the oven door open when you are
not watching the range.
●
Always keep combustible
curtains or drapes a safe distance from your
ran~.
●
Do not allow anyone to climb, stand or hang
on the door, drawer or range top. They could
damage the range and even tip it over, causing
severe personal injury.
●
Never wear loose-fitting or hanging garments
while using the appliance. Be careful when
reaching for items stored in cabinets over the
range. Flammable material could be ignited if
brought in contact with hot surface units or
heating elements and may cause severe burns.
c
Use only dry pot holders—moist or
damp pot holders on hot surfaces may
result in bums from steam. Do not let
pot holders touch hot surface units or heating
elements. Do not use a towel or other bulky cloth.
Such cloths can catch fire on a hot surface unit or
heating element.
●
Always keep dish towels, dish cloths, pot
holders and other linens a safe distance from
your range.
●
A1ways
keep wooden and plastic utensils
and canned food a safe distance away from
your range.
●
For your safety, never use your appliance for
warming or heating the room.
●
DO NOT STORE OR USE COMBUSTIBLE
MATERIALS, GASOLINE OR OTHER
FLAMMABLE VAPORS AND LIQUIDS
IN THE VICINITY OF THIS OR ANY
OTHER APPLIANCE.
alon=hildren
part
of the appliance.
should
SER1OUSLY ~W~D.
wall
coverings,
(cotttinue(i tlext pcige)
3
—
Page 4

WORTANT
SAFETY
(continued)
●
Keep hood and grease filters clean to maintain
good venting and to avoid grease fires.
●
Do not let cooking grease or other flammable
materials accumulate in or near the range.
●
Do not use water on grease fires.
.’
Never pick up a flaming pan. Smother
e
flaming
pan
on the surface unit by
covering pan completely with a well-fitting lid,
cookie sheet or flat tray, or if available, use dry
chemical or foam-type extinguisher.
Flaming grease outside a pan can be put out
by covering with baking soda or, if available,
a multi-purpose dry chemical or a foam-type fire
extinguisher.
Flame in the oven can be smothered completely
by closing the oven door and turning the oven
control to OFF or use a chemical or foam-type
extinguisher.
c
Do
not touch the surface units, heating
elements or interior surface of oven.
These
surfaces may be hot enough to burn even though
they are dark in color. During and after use, do not
touch, or let clothing or other flammable materials
contact the surface units, areas nearby the surface
units or any interior area of the oven; allow
sufficient time for cooling, first.
Potentially hot surfaces include the
areas facing the
cooktop,
the oven vent opening
cooktop
and
and surfaces near the opening, crevices around the
oven door, the edges of the door window and
metal trim parts above the door.
Remember: The inside surface of the oven may
be hot when the door is opened.
●
When cooking pork, follow the directions
exactly and always cook the meat to an internal
170°F.
temperature of at least
This assures that, in
the remote possibility that trichina may be present
will
in the meat, it
be killed and the meat will be
safe to eat.
Oven
●
Stand away from the range when opening the
oven door. Hot air or steam which escapes can
cause burns to hands, face
●
Do not heat unopened food containers.
Pressure could build up and the container
burst$
could
causing an injury.
antior
eyes.
~STRUCTIONS
●
Keep the oven vent duct unobstructed.
●
Keep the oven free from grease buildup.
●
Place the oven shelf in the desired position
while the oven is cool. If the shelves must be
handled when hot, do not let pot holder contact
the heating elements.
●
Pulling out the shelf to the shelf stop is a
convenience in lifting heavy foods. It is also a
precaution against burns from touching the
hot surfaces of the door or oven
●
When using cooking or roasting bags in the
oven, follow the manufacturer’s directions.
●
Do not use your oven to dry newspapers.
If overheated, they can catch on fire.
●
Do not use oven for a storage area.
Items stored in an oven can ignite.
●
Do not leave paper products, cooking
or food in the oven when not in use.
●
After broiling, always take the broiler pan out of
the range and clean it. Leftover grease in the broiler
pan can catch on fire the next time you use the pan.
●
Never leave jars or cans of fat drippings on
or near your range.
Self-cleaning Oven
●
Do not clean the door gasket. The door gasket is
essential for a good seal. Care should be taken not
to rub, damage or move the gasket.
●
Do not use oven cleaners. No commercial oven
cleaner or oven liner protective coating of any kind
should be used in or around any part of the oven.
Residue from oven cleaners will damage the inside
of the oven when the self-clean cycle is used.
“
Clean
Care Guide.
●
Before self-cleaning the oven, remove the broiler
pan and other cookware.
●
Do not use aluminum foil to line oven
bottoms, except as suggested in this guide.
Improper installation of these liners may result
in a risk of electric shock or fire.
●
Be sure to wipe up excess spillage before
starting
. If the self-cleaning mode malfunctions, turn off
and disconnect the power supply. Have it serviced
by a qualified technician.
only
parts listed in this Use and
the
self-cleaning operation.
walls.
utensils!
4
Page 5
-ooktop
●
IJse
and Radiant Surface Units
proper pan
siz*This
appliance is
equipped with different size surface units. Select
cookware having flat bottoms large enough to
cover the selected surface unit heating element.
The use of undersized cookware will expose a
portion of the heating element to direct contact
and may result in ignition of clothing, Proper
relationship of cookware to surface units will
also improve efficiency.
●
Clean the
cooktop
with caution. If a wet
sponge or cloth is used to wipe spills on a hot
surface unit, be careful to avoid steam burns.
Some cleansers can produce noxious fumes if
applied to a hot surface. When the
cool, use only Cook Top Cleaning
cleaner to clean the
●
Use care when touching the
The glass surface of the
cooktop.
cooktop
after the controls have been turned
Q
Never leave the surface units unattended at
– high heat settings.
~reasy spillovers
D
●
Do not operate the radiant surface units if
the glass is broken.
Boilovers
cause smoking and
that may catch on fire.
Spil]overs
solution may penetrate a broken
cooktop
Creme
is
brand
cooktop.
will retain heat
off.
or cleaning
cooktop and
create a risk of electrical shock. Contact a
qualified technician immediately should your
glass
cooktop
●
Avoid scratching the glass
become broken.
cooktop
surface with
sharp instruments, or with rings or other jewelry.
●
Never use the glass
cooktop
surface as a
cutting board.
●
Do not place or store items on top of the
cooktop
●
Be careful when placing spoons or other
stirring utensils on glass
surface when it is not in use.
cooktop
surface
glass
when it is in use. They may become hot and
could cause burns.
●
To
minimize the possibility of burns,
ignition of
flammable materials, and spillage, the handle of a
container should be turned toward the center of the
range without extending over nearby surface units.
●
Always turn the surface units to OFF
before removing cookware.
●
Keep an eye on foods being fried at HI or
Medium High heat settings.
●
When flaming foods are under the hood, turn
the fan off. The fan, if operating, may spread the
flame.
●
Foods for frying should be as dry as possible.
Frost on frozen foods or moisture on fresh foods
can cause hot fat to bubble up and over the sides
of pan.
●
Use
little
fat for effective shallow or deep-fat
frying. Filling the pan too full of fat can cause
spillovers
●
If a combination of oils or fats will be used in
when food is added.
frying, stir together before heating, or as fats
melt slowly.
●
Always heat fat slowly, and watch as it heats.
●
Use a deep fat thermometer whenever
possible to prevent overheating fat beyond the
smoking point.
●
Never try to move a pan of hot fat, especially a
deep fat fryer. Wait until the fat is cool.
●
To avoid possible damage to the cooking
surface, do not apply Cook Top Cleaning
Creme
to the glass surface when it is hot.
●
After cleaning, use a dry cloth or paper towel to
remove
●
Read and follow all instructions and warnings
on Cook Top Cleaning
all
Cook Top Cleaning
Creme
Creme
residue.
labels.
SAVE THESE
INSTRUCTIONS
5 “
Page 6
FEATUWS OF YOUR RANGE
6
1
\
-+
@
\
/
—
Page 7

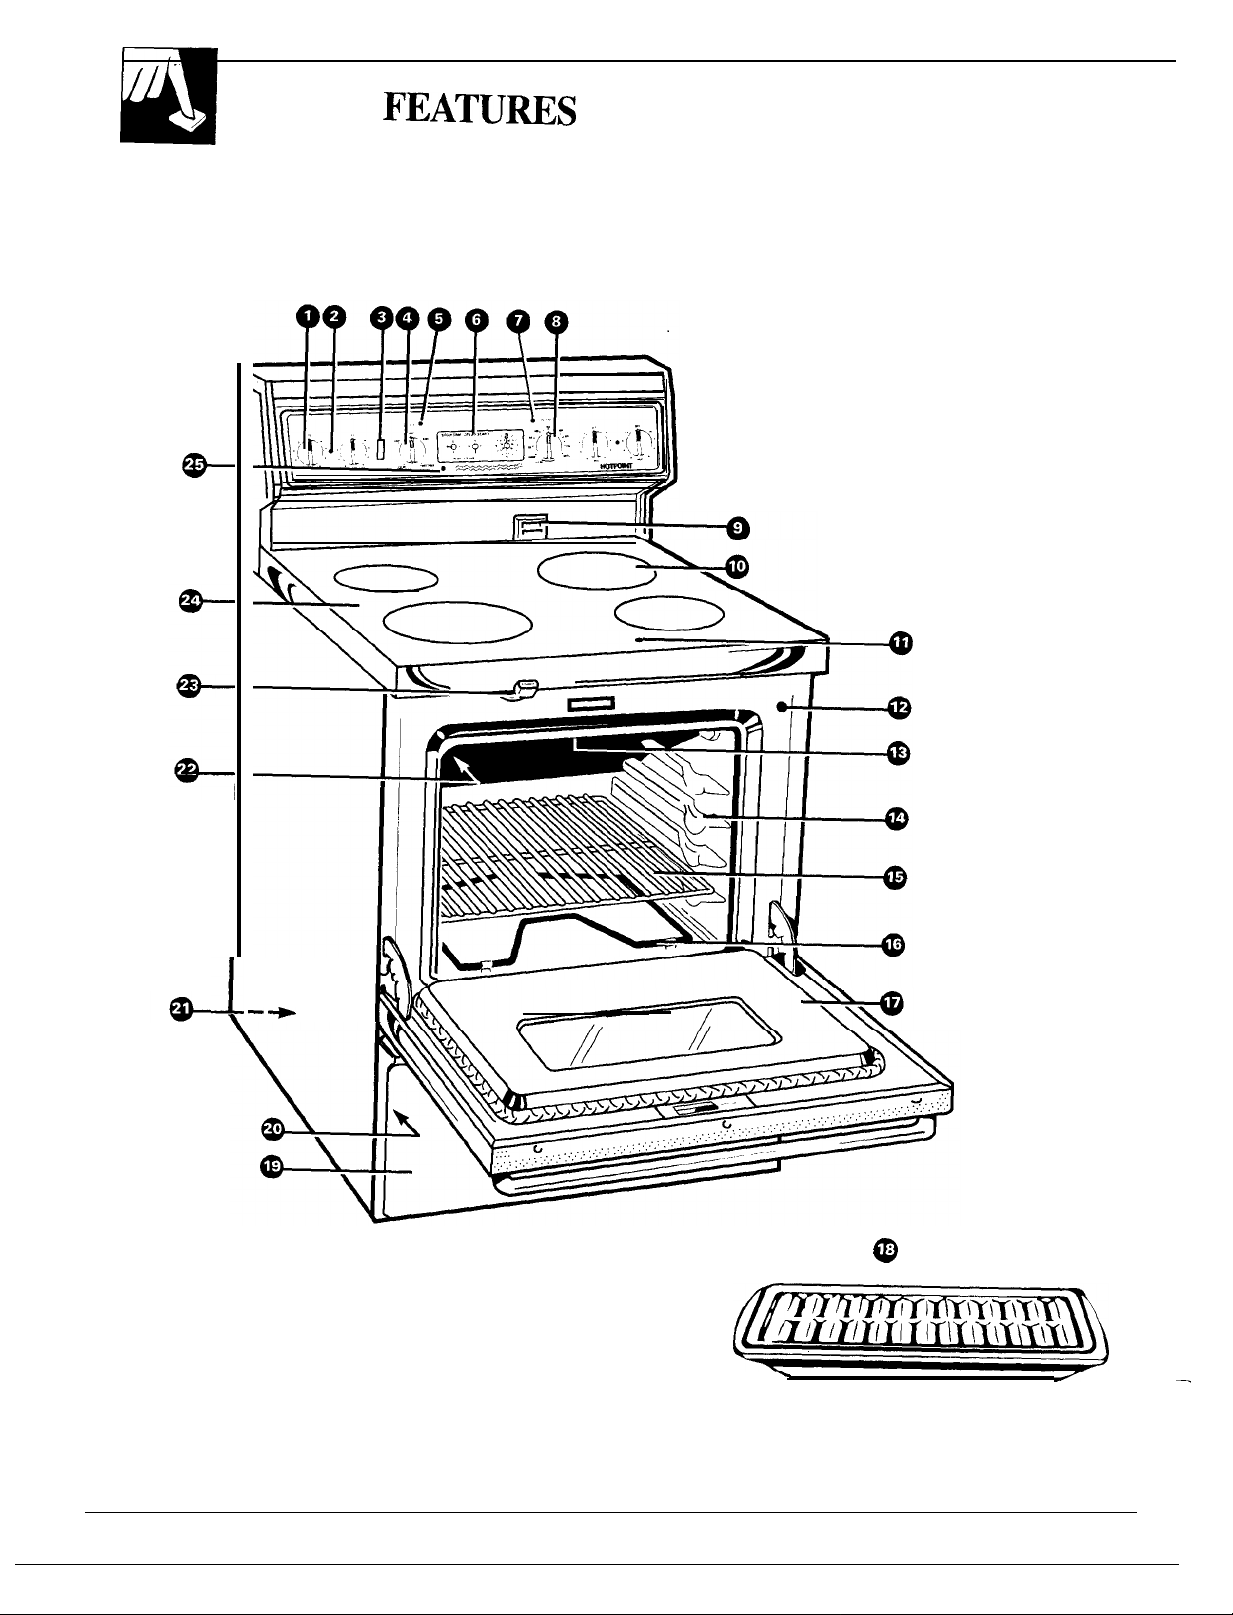
Feature Index
1 Surface Unit Controls
2
Surface Unit “ON” Indicator Light
Explained
on page
I
5,9,27
3
Oven Light Switch
4 OVEN SET Knob
5 oven Set
(>
Automatic Timers and
7 Oven
8
OVEN
~
oven
Light
Temp [,ight
TEMP
vent
Duct
Knob
Clock
10 (;ookto~ Surface Units
1 I
Hot
Surface Light
Light will glow wll~n the ~()()kt()p is h[)[ [() [hc IOLlch.
I?
Automatic Oven Light Switch
3
Broil Unit
14
oven Shelf Supports
Shelf’
positions”
ilre su~gcsted
in
the
B~ikinK, R(~~isting ~~nd Broilin~ sectit~ns.
15 oven Shelf with Stop-Locks
1(>
Bake Unit
M~Iy be
lifted
gently tot”
wiping
the oven Jloor.”
I
I
15, 16.18-20
I
22,25,26
I
15
14
!5, 16, 18, 25
15,
16.
I
8–20,
~~, 25
~g
5.
9–12
9
15
14
16
15.
Is,
16.27
24
17
Lift-Off Oven Door with Broil Stop Position
18
Broiler Pan and Rack
Dc) not clcLIn
in
the selt-clc:in (JVCI1.
I 9 Storage Drawer
to
Model and
2
I Anti-Tip
JZ
oven Interior Light
Conies
23
oven Door Latch
Use
24
(;iass Ceramic
~,s
oven C]eaning
serial Numbers
Device
on
Llutonlutically
ior
self-cletln only.
Cooktop
Light
when the d(>(~r
is
t~pened.
4,
3.8.30
20,
22.28
15.29
lo,
13
Page 8
INSTALLING YOUR RANGE
.
Your range, like many other household items, is
heavy and can settle into soft floor coverings such as
cushioned vinyl or carpeting.
range on
a l/4-inch-thick sheet
as follows:
t}?c~ /.(I/I<Y(~,
built
the floor
moved
information, see
this type of
Wlzefz
the area that the range will rest on should be
up with plywood to the same level or higher than
covering. This will
for
cleaning or servicing. For complete
tlooring,
of plywood (or similar material)
t}lc jl(~ol- (ol’(!t-illg
the
Installation Instructions.
When moving the
it should be installed on
c’11(1.s (It tlte ,j;-ollt (?/’
allow
the range to be
Leveling the Range
Leveling screws are located on each corner of the
base of the range. Remove the bottom drawer and
yOLI
can
level
the
range
on an uneven
use of a
To remove drawer,
up
[T]ides ~lt
e
Lift drawer if necessary to insert easily. Let
drawer
nutdriver.
pull
the drawer
the front and
back of drawer beyond stop on range glides.
down, then push in to close.
take it out. To replace drawer, insert
floor
out
all
with the
the way, tilt
front
of
Please check your
materials and protective tape covering are removed
from
areas, such as the
caps, etc.,
One of the
Tip
device (allow
Allow a minimum
and the leveling screw that is to be installed into
Anti-Tip device.
before
retir
range
to
ensure qll
door
trim,
cooktop
using.
leveling screws will
for
some side to side
cleurance
of 1/8” between the
packaging
frame,
engage
the
acijustment).
end
Anti-
range
the
8
Page 9

SURFACE UNIT CONTROLS
~rface
At both OFF
so control “clicks’.
word
the word LO. In a
“cl
ickin:”
settings selected
Cooking with Infinite Heat Controls
and
HI
HI
marks
positions,”
tit
those positions;
the highest setting; the lowest setting is
quiet
kitchen you
st)unds during
:Irc
being
there is a slight
.’click”
muy hear slight
cooking, indicating
nl~lintiiined.
niche
on the
heat
How to Set the Controls
1. Push
2. Turn either clockwise or
Cooking Guide for Using Heat Settings
—
Medium
MED) F~lst
ltlrge
MkID-S:lutc
l:lrge :Inlounts
Medium 1,ow-(Setting
LO)
i n covered
IJ()—Stctlnl rice. cere:ll: nlllint;lins serlin:
tcnlpcr~lture
simmering.
Cooktop
of surface
turned on, surface temperatures are
careful when touching ihe
indicator
is off’ until the surface is cool enough to touch.
the control knob
in.
counterclockwise to the
desired
hcilt
setting.
I*
l—Qllick st;lrt for
I+igh—(Setting h:llfw~iy
try,
:Inlounts
C()()k ~llter s[:uting ilt H]; cooks”
p:In.
01
temperatures increase with the number
units
light
cooking;
brings wtltcr
between HI
p:ln broil: nl:iint~lins LI f:is[ b(>il ~)n
of
I()()cl.
:lnd
()[
brown:
lood.”
m;lint;iins ii slow
h~~ltwiiy hetwcen MED Llnci
most
I’()()ds.
Slow coc)kin: Lincl
that are on. With 3 or 4 units
cooktop.
Th; ’hot surface
will remain lit after the surface unit
1111
to ii boil.
:ln(l
boil on
with Iittlc wiiter
high
so be
Switching
quicker change than switching
he:lts to
higher settings
to
tilways
shows
lower settings.
a
The control must be pushed in to set only from
the OFF position. When the control is in any
position other than OFF, it may be turned without
pushing in.
Be
sure
yOLI
turn
the control to OFF when
yOLI
I.inish cooking.
An indicator light will glow when ANY surface
unit is on.
r
E:
Nor
● At HI,
● At
butter on sm:ill suri.:ice
● When
~
scc
SLIrfLIcc
●
surt;lce on
Medium
unilttended.
High settin:s, never
Boil
overs C:lUSC smoking: gre~isy
spillc)vers nl:ly cutch
Mccl
i
LInl
Low, LO
;1
sLIrf’;Ice LIn
seen
glowing
(,I(~\k
\\i I I
turn c)n :Ind off
sclcctcci he:lt
i’requent
tl:lt cookw[lre”
C(~okw~lre
1
t
is silt’e
to
the
it is
red within 2L
setting, With
cycling
will minimize the cycling.
Tips
pl:lce
hot
gl:Iss cerilnlic
leave food
on
I.ire.
sctt ings. melt chocol:ltc tin~l
unit.
tLlrned
few
(cycling) to
poor co(~kw[lre,
of’
the unit
on, the
seconcis. The
Llnit Ctln
m:lint;li
off and (~n.
yoLI
Good.
See the
section.
C()()kw:u-c l“rom
sLIri:lcc
the
oven or
when it is cool.
be
red
n the
wil
I
OFF
LO
●
**
Medium
Low
Appeiu-:lnce may vtIry.
a
o
● ●
MED
●
‘m
Medium
High
9“
Page 10

SUWACE COOKWAm
–
TIPS
Types of
Type
of
Cooktop
Cooktops
Radiant
(Glass Ceramic)
Cooktop
o
Induction
h:lectric
Solid Disk
(;as
,<\,,
@
, -...
~
‘
o
Burners
*
Coil
,/’
Description
Electric
under a glassccratnic cooktop.
High
ind Llctiun
under
Sul.f:lce.
Fla[[cncd
tubing
electric resis[tince
wire
()\cr
Sc)lid casl
disk se:ded (o the
cookt[)p” sLlrftice.
RCgLl12U” 01. SeJICd
gas
either LP gas
01”
coils
freqLlency
coils
a
glass
tne(al
containing
SLISPC1ldCd
:L
drip pan.
iron
burners
Ila[Llral ::1s.
LISC
How it Works
Hctit
travels [o
bottotn for
the
continue cooking
you want
mLlst
Pans
produced by a
away ond changes heat settings
cc)ntr~~l off,
right
away,
He:~ts
by
cookini
warped p:]ns than radiant or solid disks. Heats
heut settings as qLlickly as
continue
Hea[s by direct cuntact with the p:u]. so pans
couking
disk
frotn
Flatncs heat the pdns directly,
pans should bc well balanced. Giis burners heat the p:ul
heat settings
resLllts, use good
results, Heuts
st:iys hut enough tu continue cooking”
the
the glass
gond cooking results. The gl~ss
cooking
be tnade of ferrous
tnugnelic
the glass c[)oktop” is hot
direct
contact with the pun atld by heating
cooking for a
solid
disk if you want the
right
surface and [hen
aflcr il
is
tU1.nCLl (~ff. Retn(>ve
to stop.
circL]i( bc(wccn the
qLIa] ily
:as or
short
tinle LIf(er
LIp
arid
away. When
nle(~Ils (nletal
right
:Iway, 1 ikc a
fronl
pans.
indLlctinn. Electric
cools” down nlore slowly
cooking
P:In
flatness is not critical
yoLI
[() (he
cookware,” so pans tnust be I]a[ on
c(~c)ktup
the pan fr(>ln the surface unit if
that at[rilcts o tnagnct). Heat is
coil LInd
the pan. Heats up
g:Is
(hc hca[ of the pan. but
(I1c
~lcctric coils aI”e
LIp
quickly but docs not change
they arc tLlrncd
nlLlst be flat
afler it
is
(LIrned off, Rcnlovc
to stop.
turn the
contr(~] (Jff,
stays hot
cc)ok(op,
air under the p:ln. For best
Inore forgiving
coils
oft.
[han electric coils. The
I() co(~kin:
right
cnc)LIgh
to
right
After turtling (I1c
cooking
st:ly
llc~( en(>ugh tc)
on the bo(t~)nl I’or
away and
cooking” stops
s(ops
of
tbc p:in
results,
ch:ln:e
g(~(~d
bLl(
right
away.
Types of Cookware
The following information will help you choose
cookware which will give good performance.
Stainless Steel:
Especially
sundw ich bottom cc)nlbines the
steel (appearance,
advantages
even
heat distribution).
Aluminum: ll[cllj
Good
conductivity, Aluminum
appear as
removed if
I{)w melting point,
be
used.
Ili,qlll> f-<~c<)Ii7111efIcle[/
g(~~)d
with a sandwich clad
bottom. The
benefits of stainless
durabi] ity,
c)f
aluminum or
~~’(’i<yllr r.<~cc)IlzIl?c~II[/ccl
scratches on
and stability) with
copper
(heat
residues
the cc~c)ktop,
but can be
sometimes
cleaned immediately. Because
thin
weight
aluminum
the
cc)nduction,
{)1’
its
should nc)t
Copper Bottom:
Good
performance,
which can appear as scratches.
rem(>ved. as Ic)ng us
immediately.
Overhctitcd metal
An
t)verheated c~)ppel” p(~t wiI] Ietive
will permanently stain
bLlt
copper may leave
the
co(~ktop”
However, do nor
can
bond to
the co[)k[op.
glass
Porcelaitienamel:
Gc)(~d
performance
bottom.
fuse to
Avoid b(~iling
the
surface.
Class-ceramic:
Poor performance. May
onty
with a
dry, as
1?()( /c~chttps://manualmachine.com/~t/}~cJ/r~/cJ~/
scratch surface.
not recommended.
Stoneware:
P()()I.
perfortnance.
Cast Iron:
P()()I-
performance.
ilot t-(~(oiiltti(’ll(li’(l
Will scratch the surface.
I)of
tc~coilittl(~tl(l((l
Witl
scratch
residLles
The
residues can be
is
cleuned
let these
pots boil
dry.
cot)ktops.”
a
residue
that
thick, tlat,
stno(~th
p(lrcetain can Inelt and
Ustiblc, bu[
the sLlrface.
10
Page 11

n
,, >
. . . .
.
,.
>“
i
m
●
Do not use pans with rounded
bottoms. They don’t have
enough
unit to
● Use pans with bottoms that
●
For best cooking results, you
contact with the
cook
properly.
not
extend
do
sLlrface unit.
should use a
correctly
well-fitted
beyond the
pan
that is sized
for
the recipes. with
lid to
avoid
evaporation loss, and
as
little water or
If
the pan is
wasted
onto the
and spillage can
glass
fat
too
small,
cooking
surface
cook
as possible.
energy
flow
sLIrface.
with
is
●
Pltice
only dry pans
surface units.
lids
on
particularly
● We recommend that
only a
Do
the surface units.
wet lids.
flat-bottome~l
on
the
not place
you
wok.
use
They are available at your
local retail store.
a
of the wok should have the
same diameter as the surface
The bottom
unit to ensure proper contact.
● Do not use woks that have
support rings. This type of
wok
WIII
not heat on radiant
*
SUfa.eunts
How
to Check Pan Performance
.Jse
of correct cookware can
affect
the cooking
performance and cleaning of your cooktop.
The correct cookwure
the
cooktop surtacc
spi
I
l(~vcrs
burning onto
}70U
must use pans with perfectly flat bottoms.
SOI1lC ~3:lllS
111:1}’ be W:ll.13CLt. It’ yoLl :11.C LIIISLII’C
your
pans
Ill:ly haVe
yoLI
may do this
reduces
and minimizes the
[he temperature
[hc c(~oklop.
CLll”VCLi
01-
loLIIldCCi
Of
thC ilatllcss
quick
test.
chance of
bOt[OlllS
Turn your pan upside
down 011
place a
the
bottom”
straight
should
TUI”I1
Sp:lCC
(he
Collniertop.
ruler
fla(
a:ainsl
17LI11 \lll-faCC.
fit flush against cacti
the
between the
()[’
the
edge of
I“LIICI.
The
1>2111
and Itlc
tll~
I“lllel’
a IuII
300” Li~:l~~s. ch~~kln: f(~l
I“LIICI.
,.l.
@
o[hcr
and the
,
al I
bottom
u
[hc wa)
Of the
of
01”
0[’
across.
anY
[?:111.
● Some special
cookware
etc.
All cookware must
correct size.
if applicable to the cooking process.
u-
Pans
with
arc not
Atlothct-
ac’t”oss
in
location c~l
hat cookware will have
over the
localized
uney’ctl
hc:lt
Usc
unit.
the
sLIrfacc
reconlnlcndcd.
the
[he pan.
contact
ttallSfel” or an
pans tha[ match the diameter of
Cookin:
cookware is either smaller or
cookin&
sLlch as pressure cookers, deep
procedures require specific
have tlat
The cookware shoLl]d also be covered.
rounded, curved,
simple
COOkWa
Bring
bubbles as
bo(totn
in
only
-.
ridycd
(esl
to determine
I-C bottom is to put one inch of water
the water to a boil and observe
the
water starts to boil. Good
an even
surface
a portion of
of
the pan to the
LlnSLIitab~e
perfornlallc~
distribution of bubbles
area
01
[he
the
bottom
pall.
will not bc as
unit.
fat
fryers,
bottoms and be the
-
or
warped
even
heat distribution
pun. Bubbles
sLlrtacc Llnit, lln~~’en
the
larger
bottoms
indica~c
surface
g~~od
than the
(hc
if
CAUTION
● Never cook
AIWayS
-
Always
place the
surface
directly on
Llse
cookware.
unit you
the
pan in the
are cooking on.
glass.
center
of the
● Do not
can scratch the
s] ide
cookware
gltiss.
not scratch-proof.
● Do not use
the
surface us a cutting board.
The
ucross
the
cooktop
glass
is scratch resistant,
([()/tf;/fl((,(/ /l(.\’/ /)(/,Y[’)
because it
11
Page 12

SUmACE COOKWAm
(continued)
TIPS
—
Deep Fat Frying
Do not overfill cookware with
when
Watch
adding food.
food
FI.OSty foods bubble vigorously,
frying at
high temperatures. Keep the
range and hood clean from grease.
fat
that may spill over
HOME CANNING TIPS
Canning should be done on the cooktop only.
pots thi,t ~x[end b~y~nd 1
circle
are not recommended for most surface cooking.
However, when canning with water-bath or pressure
canner,
because boiling
pressure)
larger-diameter pots may be used. This is
water ten]peraturcs (even
arc
not harmful to the cooktop surfaces
surrounding the surface units.
Observe the Following Points in Canning
1. Be sure the canner fits over the center of the
surface unit. If your
does
not allow
surface unit, use smaller diameter pots for
canning results.
2. Flat-bottomed canners must be
canners with flanged or rippled bottoms (often
found in enamelware) because they don’t make
enough contatt with the surface units
too
long
RIGHT
Flat-bottomed canners are recommended.
the canner to be centered on the
to boil water.
inch of the surface Unit
cooktop
or its
used.
WRONG
under
locdtion
Do
not
and
good
use
take
Wok Cooking
We recommend that
a
tlat-bottomed
only
They are available at
retail
store.
HOWEVER, DO NOT USE LARGE DIAMETER
CAN~’~RS
FOR FRYING OR
THAN WATER. Most syrup or
u]]
types of frying-cook at temperatures much higher
OR OTHER LARGE DIAMETER
BOtLING
FOODS OTHER
saLIce
than boiling water. Such temperatures
eventual ly harm the
3. When canning, use recipes
glass cooktop
and
sLlrfaces.
procedures
reputable sources. Reliable recipes and procedures
are available from the manufacturer
manufacturers of glass jars for canning. such as
Ball
and Kerr; and the United States Department of
Agl”iCLr]tLrre
Extension service.
4. Remember that canning is o process that generates
Itir”ge
amounts of steam. To
or heat, be careful when
NOTE:
take
have been carefully followed.
If your house has low voltage,
longer
than expected. even
avoid
burns from
cann
i
n:.
though
The
process time will
be shortened by:
(
1 )
Llsing
a
pressLrre
(2)
star-tin: with HOT
of
large
quantities
canner,
(ap
water
01. water.
and
for Iastes[ hea[ing
yoLI
use
wok,
yoLIr
local
p~TS
mixtures-and
coLIICi
from
of
your canner;
steam
c~nning
may
directions
—
CAUTION:
Safe canning requires that harmful micro-organisms
are destroyed and that the jars are sealed
completely. When canning foods in a water-bath
canner, a gentle but steady boil must be maintained
fbr
the required time. When canning foods in a
pressure canner, the pressure must be maintained
for the required time.
After
you have adjusted the controls, it is very
important to make sure the prescribed boil or
pressure levels are maintained for the required time.
12
cooktop surface units have temperature
The
limiters that prevent the glass
too hot. If the bottom of your
cooktop from getting
canner is not flat, the
surface unit can overheat, triggering the
temperature limiters to turn the unit
off
for a time.
This will stop the boil or reduce the pressure in
the canner.
Since
yo!l
must make sure to process the canning
jars for the prescribed time, with no interruption
in processing time, you cannot can on any of
the
cooktop surface units if your canner is not
flat enough.
Page 13

~lass
Ceramic
Cooktop
SUWACE
Cleaning
CLEANING
Cleaning of glass ceramic
cooktops
is different
cleaning a standard porcelain finish. To maintain
protect
follow these
the surface of your
basic
steps.
new
glass ceramic
DAILY CLEANING:
Use only Cook
Top
Cleaning
Creme
on
(;lass Ceramic.
For normal, light soil:
1.
Rub a
few
drops (less is better) of Cook Top
Cleaning
paper
removed. Frequent cleaning
coating which is
and
2.
Cletin the
after
Creme
towel.
onto the
Wipe anti]
soiled areti
all soil
leaves ir
esscntitil
in preventing scratches
abrasions.
surface with Cook Top Cleaning
each use.
using a
and creme
protective
For heavy, burned on soil:
1. Apply a
the (ct)ol)
2.
Using
on
require
3. Carefully
—
scraper, Hold
ceramic
4.
II’
For
rcmovcd.
i’cw drops
soiled
a dry
area.
As with any burned on spill, this may
some good
scrape
of Cook Top
Cleaning Creme (o
area.
paper
towel. rub
old fashioned
crcme
into
elbow
remaining soil with the razor
the
scraper at a
300 Lalglc
surface.
a[ly soil
1“CITlilillS.
additional
polish the entire
]~l)~ilt
the
protcc[ion, alter
sul.1’i\~~
steps I i
all soil has
wi(h
the
grease.
against
st~d :Ibov~.
the Cook
Top Cl~i\tlitlg CI~III~.
5.
Buf[ with :1 ({l-y J?ill>C1- toWC1.
NOTE:
●
Usi Ilg
if th~
30[
●
Bc
SUI.C
[>()
110[ LISC
●
Store the
il l.ilzOl’
”
illl~lC
10
LISC :1
il dLlll [)1
razor
SCl”:lpC1.
Will Ilot d:llllllg~ the Sill-f:lCC
is
lllililllilillCLf.
IICW, Shill”ll
IliCkCd blildC.
scraper out of
l-i17.t)l’ SC1.:i~?~l..
reach
of’ children.
from
cooktop
dly
are
Creme
burned
been
and
the
Special Care:
Sugary
syrups) or
spillovers
melted plastics
surface of your
unless the spill is removed while still hot.
(such as jellies, fudge, candy
can cause pitting of’ the
cooktop (not covered by the warranty)
Special
care should be taken when removing hot
substances.
Follow these instructions carefully and
remove the soil while the spill is still hot.
1.
Turn
off
all the surface units affected by the
spil]over.
2. Wearing an oven mitt, hold the razor
scraper at
and
Remove hot pans.
a
300
angle
to the cooktop
scrape the hot spill to a COOI
area -
--~1
‘:-*
outside the surface unit.
3.
With
the spill
remove
be left
Do not
of
the
under Heilvy Soil
in a
coo] area,
iln)’
excess. Any
un[il
the surface of the
use a dry paper towel to
spillover
cooktop
continue to use the soiled
spillover
has been removed. Follow the steps
to continue the cleaning process.
remaining
has cooled.
surface
unit
should
until al]
(;eneral Information:
As
~he
Cook Top Cleaning Creme cleans, it
leaves
a
This
coatin:
deposits
projective coating on the
helps to prevent build-up of mineral
(water spots) and will make
cooktop
future
surface.
cleaning
easier. Dishwashing detergents remove this protective
coating
suscep~ibie (o
and
therefore make the
staining.
cooktop
more
To conveniently order more creme and)or
scrapers for cleaning your radiant
range,
please call our toll free number:
National Parts Center
Cl”cnlc 1007.”
Scraper
CI”CI1lC ilnd SCl”dpCl”
kit
800-626-2002
#
WB02X8273
#
WX5X 1614
#
WB64X5027
PRECAUTIONS
●
MOSI
cleaners contain
abrilsives
cooktop.
f’or
which
Use only the Cook Top Cleaning
proper cleaning and protection of your
ceramic surface.
●
!
f
yoLI
s]
ide
aluminum or copper cookware across
the
surface of your
markings which appear as scratches. [f this should
happen.
-.
rcmove
residues
●
Water
using Cook
usc
the razor scraper
these markings.
illllll~diiltely Illay Icave
Stilin
S (mineral deposits)
Top
white vinegar.
:I]lll]loniii. ~h~tlli~itls i~nd
can
damage the surface
cooktop, they
may
and
Failure
to
are
Cteaning Creme
or
of
yoLIr
leave
metal
Cleaning
remove
pC1.lllilIleIlt
these
removable
futl
strength
Creme
Creme to
lllillkS.
glass
.
● If pots with
or enamel are allowed to hoi
bond with the
Llis~ol~)tiitiotl.”
before
p~l”lllilllent.
●
Use
of
on
the cooktop.
remove
Read and follow
d
thin overlay
glass
This
shoutd
ot’
aluminum, copper.
I
dry, the overlay Intiy
ceramic
and
leave a
be removed immediately
heating again or the discoloration
window cleaner
Cook Top
may Ie:ive
an iridescent fi 1 m
Cteaning Creme
this discoloration.
all
instructions and warnings
on Cook Top Cleaning Creme labels.
black
muy
will
be
13
Page 14

The
automatic timers
your
range
are helpful devices that
serve several purposes.
and
AUTOMATIC
T~ERS Am
To Set the Clock
clock on
To
set the clock,
knob in and turn the clock hands
the correct time.
NOTE: The minute timer
will move
und
turn the timer pointer to OFF.
push the center
OISO;
let the knob
pointer
out
CLOCK
to
9
To Set
The
clock.
(~per:ltions. You
pointer which is different in
clock h:lnds.
the Minute Timer
minute timer
Use it to time
has
been
Llll y(~ur
will recognize
combined
precise cooking
c(>lor and shape th~n
with the
the
minute timer
range
:ls
the number of minutes
the
To
set the minute timer,
without pushing in,
marked, LIp to
At
the end
time is Lip. Turn
the pc~inter rc:lcbes OFI; :~nd
of
60, in
the
set time, a buzzer
[he knc~b. without
Self-Cleaning and Timed Baking Uses the Automatic Timers
The self-cleaning
r;lnge
uses the
set the
clean whether you wish
immediately
until low
during
the Self-Cleaning Oven section.
length
energy times such
the night. See the Operating
function on
iutonlatic tinlel-s
of time needed
t(>
clean
or
delay the cleaning
as
your
t.
to
Using
the
:Iutonlatic
DELAY
dials), you
turn on
the Timed
NOTE:
Baking
sure the oven
c(~rrect
START and
can
and
otf
Baking
Before
or
Self-Cle;lning, nl~lke
time of
timers (the
STOP TIME
set
your oven
:~Lltol~l:ltic:illy.
section.
beginning
clock
shows the
dtiy.
Timed
to
See
[urn
the
ccntcr
until’ the
y~~u
the center
$2’;:
pointer
wish to
STOP TIME DELAY START
“,
//
,,
time.
ring 011 the clock. )
the
buzzer st(>ps.
,y, ,,\\’:
PUSH TO TURN
kn~~b,
re:iches the
(Minutes
sounds [o
pushing in,
$%?
/
/,
//, ,,yl
tell you
,
,\\”
are
until
~.
Questions and Answers
~.
How can
surface cooking easier?
A.
The minu[e (imer
~~[li~h i nc]lldes
tempcratllres.
Q.
Nlust
day when 1 wish to use the automatic timers
for baking’?
A. Yes,
STOP TIME
during
I use the minute timer to make the
will help
time to
the clock be set on correct time of
it’
you wish to set
di:ds
to turn on
timed
tunctions.
you
time
tot;ll cooking,”
b(>i
I
food []nd change
the
DELAY START or
:uld
olf at set
14
times
Q. Can
A.
Q.
A. The time
I use the minute timer
oven
cooking?
The minute
function. The ilutom:itic
:ind
STOP TIME
BAKE
Can
I’m Time
changed
timer.
un[
i I
timer
function.
I
change
You must
they ZU.C
the time of day on the
Baking
{)1’ dtiy on the clock sh(~u]d not be
durin:! :lny progr:im thilt
finished
durin~
.
CLIn bc Liscd during :lny co(]king
timers (DELAY START
di~lls) Lu-e used with the
in the
either stc)p those pro:r~lnls (JI. w:lit
oven’?
uses
before chLIn:
i n:
TIME
clock
while
t!le oven
the
t i
me.
—
Page 15

USING YOUR OVEN
~efore
1.
Using
Look at
to set them properly.
the controls. Be sure you understand how
Your
Oven
Read
over
the Automatic Oven Timers
s(> yOLI
use with the controls.
2.
Check
the oven interior. Look at
Take
a
practice
them properly to
3.
Read over the information
I“un tit
removing
give
sure, sturdy support.
and
tips
Oven Controls
The
c~)ntt-ols for the
marked
OVEN SET
TEMP.
The OVEN SET knob has settings
fol
BAKE. TIMED BAKE,
CLEAN, BROIL and OFF. When
you turn
the
knob to the desired
setting, the proper heating units are
then activated
oven are
and
OVEN
for
that operation.
the
directions
for
understand their
[he
shelves.
and r~pla~ing
that
follow.
The
OVEN
the temperature
WARM (
and also at Cl
The Oven Set
TEMP
knob maintains
yoLI
1500F.)
to BROIL
,EAN
I.ight :1OWS when
set.
the knob is turned to BROIL.
BAKE, TIMED BAKE or CLEAN.
The Oven
the
oven reaches your selected
tetnpera[urc.
and on
Ternp I.ight glows
then will cycle off
unt i]
the oven is
4. Keep this
especially during the
new
NOTE: You
the first
normal in a new oven
time. To
for a
minimum
guide handy
range.
may
few
times
speed the
so you can
first weeks
notice a “burning” or
yOLI
turn your oven
and
will disappear in a short
process, set a self-clean
of. 3
hours.
See
Self-Cleaning Oven section,
BR~lL
CLEAi
@
OVLN S! :
oFF
o
from
(5500F.)
until
turned of’f..
refer to
it,
of using your
“oily”
on.
This is
cycle
the Operating the
OVEN
300. .
250.
,00: @.
WARM*
@
T;MEO
B~KE
BAKE
smell
IEMP
350
● ,
/500
.400
. ,650
“8R01L
—
Oven Shelves
‘l’he shelves
stop-locks so when
correctly on the shelf supports,
they will stop before coming
completely out of
will not tilt when
removing
placing food on them.
When
placing cookware on a shelf.
pu]]
the shelf
position.
the shelf,
into the
reaching intt>
are
designed with
placed
the
you
food
from them or
OLlt
to
the ‘stop.’
Place
the
co(~kwarc on
then slide
t~vcn.
the
the shelf
This w i II eliminate
h~~t ~)vcn.
oven and
are
Oven Light
The
light
when
‘- Use the
,>ancl
to turn
the
door is closed.
comes on
the
oven door is opened.
switch on the control
the
light on
:\Lltol~l:\tic:llt~
when
back
To remove the shelves from
ok”cn,
pull theln towal”d
flOllt ~lld
To replace,
shelf
(curved
facing Llp
oven.
shelf’
ll]lti I
watt.
shelf.
LlpW211”d
place the
support with
extension of the
and
Till
up
toward
it goes past
Then
!oWCI’
and push it all the
towal”d
fl”oIlt illld
the
:Uld PLI[l
shelf on the
the
stop-locks
the
back of
.’stop..
the
f.t”ont of
yoLI,
th~lll t)ll(.
shclo
rear of
pLIsh
th~
the
on
the OVCI1
way hack.
the
tilt
tllc
OVC1l
the
Shelf Positions
The oven has four shelf supports
idcn[it’ied
A (bottom). B,
Shelf
suggested
and Broil
in this i I
posit io[ls
in
the
in: sections.
Iustration
C tind
for cooking
as
D (top).
arc
Baking, Roasting
“- ~::$+?
-p
>?4
7
*
H
(-
..- ~~~
I ....*
rl
..!:~:ti::%
. .
\
‘-”+<
~..,
&
‘
.
\
I
J
fif-j
...G
11
w’
?:>fj’
‘.~,v
lb
//
L
w
m.
,
~
~
15“
—
Page 16

BAKING
—
—
Do not lock the oven door with the door
latch during baking. The latch is used for
self-
cleaning only.
NOTE: When the
surfaces of
the range get hot (()().
c)ven
is
h{~t. the (C)p :ind t)utside
How to Set Your Range for Baking
To avoid possible burns,
Corl”ect pt~sition befc~re yoLl tul”n
1. Turn
the
OVEN SET
OVEN TEMP knob to
The Oven Set ~uld Oven Tenlp Lights glow
the oven
the
the oven
continues (() glow
2. Check
( inle on the
reaches your selected
Oven
Tenlp
Light will
is turned
when
tood” f(~r
doneness
recipe.
plticc the
knob to
the
the
BAKE
desired
shelves in
oven on.
tenlperature,
cycle off :u)d on
off.
The Oven Set Light
the oven
Cook longer if
~lt
the
is
tnininlunl
necessary.
and the
tetnpertiture.
until
then
until
on.
Oven Shelves
the
Your oven tenlperature
using an
you operate
becolne fanlili;ir
If you
the Oven
Yf~~{}-,~e~/’
oven c(~ntr(]l s}steln. We reconlnlend that
the c~ven ft)r:1 nunlber (lf weeks to
think
tin tidjLlstnlen[
Therlnosttit
instructions on
with
is
your new
section. 1[
3. Turn the OVEN SET
then
renlove the i’t)(~d trotn (he t)\cn.
OVtN
S[1
OFF
“?@KE
CLEAk TIMED
BAKE
:!@:::
Appe:lr:ince In;ly vfiry
c(~ntr(~lled
oven’s
is
nccess:lry, sec
gives
how to adjust
knob tc~
OVEN TFMP
~LEAN—
OFF
350
very accurately
perfortnance.
the Adjust
easy
D() It
the
thertnos[;lt.
:ind
Arrange the oven
shelf or shelves in
(he
desired
while the (}ven
cool.”
shcl
t
depends
(J1’ l.t)od and
br(~wning
As :1
pl:lce-nlost lo~)ds
sbel f p(}sitiorls
shcl f
posit ions.”
The
correct
positi(~n
t~n the
desired.
gener~d
locations
is
kind
the
rule,
in the
B or C.
tniddle
of
[he oven, on
either
Sce (he chart for suggested
Preheating
Preheat
nleans
tenlperilture bei’ure
set
21 higher tenlperature dt~cs not shorten preheot tinle.
the
oven if
bringing the
the oven ;lt
the recipe
oven
up
putting in the feud.
the
correct
telnperature-select
calls for
(()
the
it. Preheat
spccilied
T(J
preheat,
ing
16
Type of Food
Angel food cake
Biscuits
Cookies or
(Jr nluffins
cupc:lkes
Brownies
L;lyer cukes
Bundt
or
p(>und c~lkes
Pies
c)r
pie shells
Frozen pies
Casseroles
Rc)asting
Preheating is necessary
cakes, cookies,” pastry :Ind
and ro;lsts, prehetit
without a
I ()
food
heat
preheat i nd
tninutes.
in the
fronl
escaping.
i ng is
Aiter
oven Lls
ic:ltor
the oven
quickly
Shelf Position
A
B or C
B or C
B
or
C
B or C
A or
B
B or C
A
(on cookie”
B
or
C
A
(Jr
B
[or good”
breads.
results when
F(~r nl[)st casseroles
not necess:u.y. For ovens
light
(Jt- tone, preheat
is
prehetited, place
tls possible to
prevent
sheet)
b:lking
the
Page 17

Jaking
Pans
1’
Page 18

Aluminum Foil
Never entire]y cover L1 sbc]f with ;Iiunlinunl [Ui[.
‘[’his
will
clisturh the he:lt circulation iuld result
pot)t b~iking.
to cutch :L spi]luver
A
snlilller sheet IJ( foil tntiy be
by
pl;~cing
se\eriil inches bet(~w the f(~od.
Don’t Peek
it
c~n Li l(~wer
in
used
shelf
BAKING
(c{)ntinued)
—
Set the titner for
not open
provide
the
nlininluin :lnd nlilxitnulll baking titnes
the
(loot.” to
estitn:lted c~~c~king tinle ;ind do
look” lit
:\s .’b:lke 30-40” [ninutes..
your food.” Most
recipes
such
DO NOT
tninitnunl tinle.
during cooking” utlows he:l[ tt~ csc~lpc iind nl:lkcs
b:~kin:
;\tso be
TIMED BAKING
How to Time Bake
Y(>ur oven
NOTE: Bet[)re
shows the c(~rrect titne
How to Set Immediate Start and Automatic Stop
‘ro avoid
c(~rrec[ pt)siti~)n bel.orc y~~u [urn the (Jven on.
‘rhe oven witt
SC
NOTEI: M:\ke
START
[)
FJI.AY STAJ<T cli~ll
..p(~p’. into plilcc
I“e:lcllc(l.
1.
‘Ii) set the Stc)p Titnc. pllsb
STOP TIME
yoLl
18
c~ln be set
to
turn on
beginning.
of cloy.
possible
l~urlls, p]tice the
turn on
illltncdi:ltely, c~)(~k for ;l
ICCLCCI length (~t’ tinle. then
SLII-C
both the clock :ind the
cli:il show the
correct
is pushed in
when
[hc ii]lle sb(~wn
cli:~l iincl IU1-n (he pointer ((~ the [inlc
W2111(
[tlC OVCll to tlll”ll
,, ,, ,,:
,, .,;,,
..
and off ilut(~lnfltic~ltly.
tn;lke
sure the
oven ct(~ck
shel\es in
turn
(~tt’ :lLit(>lll:l(ic:llt}.
DELAY
tinle ot” d:ly.
When the
:incl turnccl. it
on
the ctock
in the
ott’: [’01”
CX:I1llP]C
2. Turn
ICll]pcl
Ck:llllple
kn[)b on the
IIIC
OVEN
:Itlll”c.
250’’1”’.
the
will
[):()().
!’01”
--—.
To
h:lnds tc~
is
~. ‘rLII’11
NOTI1: [:()()~is th;lt spoit c:lsil).
I’ish. s(utt’illgs. poultry itllcl pork stl~)~llct Ilol bc :lttowc~l
(() si,l t’or Illorc IIl:in ollc Ilt)lir Ilcl’t)rc
[<()()111
13:ILlcri:I.
t’ronl (IIC
——
op~ll the ~ioor” to check
Opening
tinles tonger.
YOLII-
the oven cio~>r Irec]uen(ty
bilking
Llnril
I.
:ltfecteci.
set the clock,
the
The O\en
Llntit
ttlc oven re:lchcs your selcctcLt (Cnlpcr:lturc.
then
the
unt iJ the LJ\’en
continues to
The
()\cn
cook” t’(~r [hc
StlLlt oil”
the’
tile l’()()ci
Ict’(
in
the oven c(~n[inue cookiny” :11’lcr the con[rols”
push
correct tinle.
Set :ind the
Oven Tctnp
is
gl(~w when
witl
st~irt
progr~inl
~lutonl~ltic;ll
OVEN s~;’”1’
t’l”olll the
the knob
lurnc~i ol’i.
inlnledi~ltely. continue
Iy.
()\’cn.
in
:Lnd
O\en
Tenlp 1,ights wilt gl(~w
Light wilt cycle (Jlt :Inci on
The
(l\cn Set Li~tlt
the
oven
is
mcLi
iInlount ()1’ t
knob to
ot;f; :Ill(t [htll 1“CIIIOVC
Rcnlt>[~lb~’r. I’()()(ls thilt ;II’C
lit-e ol’t’.
such
01-
IL’lllperil(ul”c pl’onloit’s” [tlL’ :!l”(l\\’(11 01”
13c:
sure
b~llb
th:it the ()\en
\\ill
S])CCCI Il:lri)lt’ul h:lc[[ri~l groLlttl,
I
igtl[ ii
the
CSUI(S
InLIy
turn (he
ct(~ck
on.
to
i IIIC.
[bcn
:IS nlilk. cgys.
:11’(cr cook”
tl:trllll’111
oft”
t3cc;lLlsc hc:lt
in:.
—
—
Page 19

How to Set Delay Start and Automatic Stop
To
avoid possible burns,
correct
You
automatically,
turn
NOTE: You
1. To set
2.
posi[iort
can set (he oven
off
:ll[tolll:ilic:llly.
DELAY
yoLI
waIlt the oven to
To set (he Stop Time, push in the knob on the
STOP TIME dial
you
wan( the oven
This
means
btiking time.
NOTE: The
be later than the time shown on the range
and
the DELAY START dial.
before you turn the
cook for a
mLISt L]se
the St~rt Time,
START
your recipe
time on the STOP TIME dial must
place
the shelves in the
oven
on.
control to turn
specific length of
the TIMED BAKE setting.
push in
di;il
and turn the pointer to
tU1.n
on,
and
turn the pointer to the time
to
(urn off. for
called for 2Y hours
the
oven
the
knob on the
for
eX:Utlp]e ~:~().
example
on
time and
[he
time
6:()().
of
clock
3. Turn the OVEN SET knob to TIMED BAKE. Turn
the OVEN TEMP knob to the desired temperature.
The
oven
will
start
automatically, continue to
for the
programmed
dLltonlatically.
4. Turn the OVEN SET
the
food from
left
in
the
are off.
NOTE:
●
Foods that spoil easily, such
stuffings,
sit for more than one hour before or after cooking.
Room
temperature promotes the growth of harmful
bucteria.
heot
from
●
The oven indicator light(s) at the TIMED BAKE
setting
BAKE setting.
mtiy
the oven. Remember,
oven continue cooking
poultry and pork should not be allowed
Be sure
the
bulb will speed harmful
work differently than they do at the
amount
that the
knob
oven
of
time,
to OFF
as
milk,
light
then
ztnd
then
f{)ods that are
otter
the controls
eggs, fish,
is
off
bacteri~~ grow’th.
cook
shut off
remo~e
beU;lLISC
to
ADJUST THE OVEN
(Do It
You may feel that your new oven cooks differently
than the one it replaced. We recommend
use
your new oven for a
familiar with it, following the
recipes as a gLlide.
If you think your new oven is too hot or too
you
can
adjust the thermostat
!10(.
adjust
it is too
yOLl
think it is 100
ii ho(tcr.
We
do not recommend the
thermotneters,
tO
CtlCCk [tlC
These
To Adjust the Thermostat:
1. pult
thC1-lllolllCtCl”s
the
off
the
shaft. look at the back
of
the
knob
current setting
an}
adjustment.
the
such as
IClllpC1’:ltLll”C
OV13N TEMP
and note
few weeks
thermost~lt to make it cooler.
cool, :LL\jLISt
those foutld
Settill~ of
Ill:ly
VLII”>’ ~()~(~ LtC~lCeS.
knob
the
before making
to become more
times
given in
yoursetf. If
[he
tllcrnlostllt
usc
of inexpensive
in grocery
yoL1l. lleW’ OV~ll.
(hat
yOLI
yoLIr
cold,
YOU think
If
to
make
stol”es,
m
,
n
(n
o
THE~OSTAT
Yourse~!)
‘ointer e
10
(
w
a
Pointer
1-
q
(
c-
d
o
Pointer
1-
4. After
and
letLll ”ll
StlLlt’t mLlst :L]
2. To
3. if
If you would like
making the
[he knob to ltlc
ign with
make an adjustment,
carefully take out the two screws,
vou
would like the actual
.
oven temperature to be hotter,
lift the back
pointer a notch closer to the word
HOTTER.
the thermostat setting by
approximately
oven temperature to be cooler.
Iit’t
the back ptate and
pointer a notch closer to
C(}I,DER.
deurc:lsc
by
:il>l?l(~xitll:ltely 15°F.
adjustment,
(he flat
ptute
Each
notch wilt raise
15°F.
E~ctl I)otch
the
thermosta[
replact [he screws
rangt-tllc
side ot”
and
plticc the
the actual
place
(I1C w(>rci
will
setting
tlat
side
[he’ hole in
the
of
IIIC
tllc
———
—-.—__—
—.—
19
Page 20

Do not
—
lock the oven door with the latch during
roasting.
Rt)asting
poul;ry can
Rc)asting temperzlrures,
stca~ly.
1.
Place the shelf
A
preheating
2. C’heck
meat.
side-up or
s idc-up. on r[)ast
‘rhe latch
is
c(~c~king
be
is used for self-cleaning
by
dry
heat.
roasted
uncovered in
which
keep spattering to a m in
in
~~r
B
p~~siti(~n. N()
is necessary.
the
weight
of
ihe
Place the meat
fat-
p~~ultry breast-
i ng
rack
Tenc~er meat or
should
irnum.
in a shallow pan. The
nlcltitlg t’at will
meat.
Select a
p(~ssible. (Broiler
this. ) Line the broiler
usin:
pan
ct)~)ki n:
Lluring cooking.” Avoid
inside
the
~.
Turn
the OVEN
S1~T ktlc)b
baste the
pan as close to
the size of the
pan with rack is a
pun
with aluminum
fc)r
marinading,
heavily
curect
cooking”
meats. or basting
spill
ins (hese
(J\en or inside the oven door.
OVF.
N SET
to
OFF
y(~ur oven.
be
low
and
g[)(~d
pan
toil
with fruits,
foocl
materials
O\IIN
IEMP
350
ROASTING
only.
metlt
ft)r
when
as
Roas~ing
Therefore,
BAKE.
4.
,ifter
knob to
Most mca[s ct~ntinue t~~ c(~(~k slightly
at’tcr bc
rccommcncied
al
low’s
ciIrve. Intcrtla]
to colllpcns:lte t(~r IClllperaturc
rem(l\e
tcmpera[ure
shown
i n
N()’I’E2:
●
You ma}) w
[he Baking sectit)n. [c)
:lLltolllilt ica] 1}’.
●
RtIll~Illb~t.
()\’ell
an(t Ihcl”cl’ol’c Sllou
Llcsireci
is
really a haking prt)cedure used i’or
t)ven con[ro]s
Roasting
is easy:
roasting is complete,
are
set to
just Iollc)w
turn the
BAKE
OFF.
i ng
renl(~vecl from the
tot
rt~asts
roasts
to
I’irm
11]>
is
:lllCi
()\en.
1() [L) 20
Illakcs thclll
minutes. This
temperature wilt rise
increase. i 1.
the
roast Irt)nl the (Jlcn when
is 5C to 1
[hc Rt)ast
i sh
that
intcrlla]
i
to
usc
t.c)(~ci w
(c
OOF. less
tlg [;u ic[e.
T1 M
IiD
turn the
i
I I
1(1 bc
Il]peralurc
than
B A K E. as
{~\’ctl on
c(~tlt
i
IIUC t(l cook”
rcnl(l\’eLl Whcll
has been rcac’heel,
(Jr
these
directions:
OVEN
while
S[ancl
i ng [i
easier to
about
5°
(()
~icsircci.
roasts
lcmperaturc
(Icscri bccl
iincl 01’1”
i 11
meats.
TIMED
S[iT
s(allciing
mc
I ()’’F’.:
in[crllal
i n
t]le I1(J[
the
!;iKjN:;Mp’R@K’
nla) bc
cooked” at
350’F. 1’01
brownitlg.
best
(You
in(iicat iny the c)lcn
1;()]-
I:rozell Roasts
l;rO/Cn
roasts (~1’
s[:Ir[ccl
w’i[hout
a~lcl
it
ionai
l)Ci pouncl t’or
1 i me per
I“t):lsts uncler
Iargcl” ro:lsts).
may
is
beet’,
lhawing,
pound
CLEAk
hcur
a
rivEo BAKE
sligh[
clicking
working pr(lperly.
pork.
lamb,
etc..
but
~llt)w
I ()
( 1 () m i
tl~ltcs acicl it ional
5 pounds.
;@:::
~LEAN—
I
s(~un(i,
)
can be
t[) 25 111
i
nu(c>s
1 i
more time tot”
Illc
Thaw Illos[ Irozcn poul[r>
cl’cll doneness.
Some
bcl’orc roastitl:
Com mcrcial I’rozcn pou
he cc~(lkccl succcsst’ully with(lut
clirecti~)ns
gi\en
t)n
the package label.
thawing,
to Ctlsurc
I
try call
I;L)IIOW
the
20
Page 21

Questions and Answers
Q. Is it necessary to check for doneness with a
meat thermometer?
A.
Checking
the completion
if
yOLI
Temperatures are
For roasts
at half-hour intervals
the
finished internal temperature at
of cooking time is recommended
did not use
over 8
a
probe while cooking.
shuwn
in the Roasting Guide.
lbs., check
with thermometer
after ha] f
the cooking time
has passed.
Q.
‘Why is my roast crumbling when I try to
carve
it:)
A.
Ro:ls(s arc easier
20 lllill L1tes after rcmoving
sure
to
CLIt across
to slice if allowed to
them
from
the grtiin
of the meat.
the oven. Be
ROASTING
Oven
Type
—
Meat
Tender
sirloin 1 ip. rLInlp or [op roun(i:;:
Lamh
veal
}>ol.~ loil],
l’talll, precooked”
CLI(S: rih,
leg t)r bone-in shou Idcr::
ShoLt]dC1’. leg 01”
Iii) 01
high
\hOLlldCl:;;
Poultry
Chicken or
Chicken picccs
Turkey
:
~
For boneless I’ollcd roasts ()\’ Cl” 6
‘
“i”rrhc
food
U. S.
poisonini
[~LIc’k
Dcnar(nlcn( of’
org;inisnls
quai
ily
loit):;:
Acricullurc savs “RiIr(>
nl;y
Temperature
lchcs
survive..
325’
3?5°
325”
325”
j~~~
325°
3500
325°
thick. :ldci 5
{SoLIrcc:
Q.
A.
Q.
A. Yes.
Q.
coot
10 to
A. Sealing
GU~E
Approximate Roasting Time
I]oneness
Rare:
Medium:
Well
Done:
Rare:
Medium:
Well
Done:
well
Done:
Well
Done:
T()
Wat.ill:
Well
Done:
Well
Dollc:
Well
D(~nc:
to I () minutes pcr pt)und 10 [inles
heel’ is popul~r. hu[ you should
Salk
F();)d B()()k.-Y()ur
in Minutes per Pound
3 to 5
~q–jj
35–39
40-45
~ I –15
~~–~()
30-35
35–45 30-40”
35–45
17–20
3
to S
35–40
35–40
10 to 15
i N–25
Ki[chcn Guide. USDA Rev. June
Do
I need to preheat my oven each time I cook a
roast or poultry?
It
is rarely necessary to preheat your oven. Preheat
only for very small roasts, which cook a short
length
of
time.
When buying a roast, are there any special tips
that would help me cook it more evenly?
BLIY a
roast as
or
buy rolled roasts.
Can
1 seal the sides of my foil “tent” when
even
in thickness as possible,
roasting a turkey’?
the foil
will
stetim
the meat. Leaving it
unsea]ed allows
the air to circulate and
brown
the melt.
Internal
lbs.
nlinu[c:s
lbs.
lbs.
PCI poLlnd
givco
know’ (hu[
6 to 8
tbS.
1 8–22
~~–~y
30-35
~()–~~
~4_2g
28–33
3040”
(:]ny weight)
Over 5 lbs.
30-35
over 15
Ibs.
15-20
above.
cooking it to only
Temperature
1400-1
1500-1 60°
1700-1 85°
I 400
1 500-I 600
1700-1
I 700-1800
1700-1800
I I 50–1
1850-1900
1 85°– I 900
In thigh:
I 85°–1900
1400F. tneans some
1985.)
-
I
soo”i”
‘F.
500”;”
85°
200
21
Page 22

—
Do
—
not lock
the
oven door with the door
latch during broiling. The latch is used for
self-cleaning only.
BROILING
Broiling is cooking
the upper unit in the oven. Most fish
of meat can be broiled.
keep spattering and smoking to a minimum.
food
by intense radiant heat
and
Follow
these directions
from
tender cuts
to
1. 11’ the meat
vertical slashes
If
desired.
1/8
inches thick.
2. Place
has
fat
or gristle around
throu&h
fat may be
trimmed, leaving layer
both
about
the
edge,
2
inches apart.
the meat on the broiler rack in the broiler
which comes with the range. Always use the rack
so
the
fat drips into the broiler pan; otherwise the
juices
may become
3.
Position the shelf on
position
as suggested in Broiling Guide. Most
broiling is done on C position, but if your
c(~nnected
[o
208
hot enough to catch fire.
the
recommended shelf
runge
volts, you may wish to use
his her position.
4.
I,eave
the door open to the broil stop position.
The door stays open by itself, yet proper
temperature is maintained in the oven.
Use of Aluminum Foil
You
can
use aluminum foil to line
your broiler
However,
pan
and broiler rack.
you must mold the foil
tlgtlt]y (O the rack and cut
i[ jus(
like the rack.
slits in
Without the slits, the
prevent
draining to
juices
catch 01? fire. ] [
SI
its, yoLI
cut
about
pan
is
a
fd(
and
could
are
meat juices
the
broiler pan.
become
frying, not
yOLI do
hot
5.
Turn the OVEN SET
OVEN
not
6.
Turn the food only once
foods
Guide.
TEMP knob to BROIL,. Preheating units is
necesstiry.
(See notes in Broiling Guide, )
for the first side according to the Broiling
TUrn
the
the second side as a guide to
knob
to BROIL.. Turn the
during
broiling.
food.
then use the times given
the
doneness. (Where two thicknesses and
given
together. use the first
thinnest
7.
Turn
the
food.
OVEN
)
knob to OFF. Serve
leave
the pan
outside oven to
SET
the tood
times given for
knt~b an~i the OVEN
immediately,
coo] during
easiest cleaning.
foil wil]
from
en[~ugh to
not cLlt
hroi
I
The
[he
ing.
~+t7\%J\;, ;
~?>,
1
~,
preferred
times
,’
/
)
~/j:
/
Time
are
the
TEMp
tind
meal
the
for
for
Questions & Answers
Q. When hroiting,
rack in the pan?
A.
Yes. Using
pan. As the
‘
[hus
keeping meat drier.
rack and
spa[tcr anci
Q.
Should I salt the meat before
A.
Fdo. S,ilt dr;iws
e\aporate. Always
wi[h
tongs; piercing meat with a fork also
juices
to escape. When broiling poultry or
brush each
is it necessary to always use a
the rack suspends the
meat
cooks, the juices fall into the pan,
Juices
stay
cooler, thus preventing excessive
smoking.
out the juices and
salt tifter
side
often with butter.
22
meut over the
are protected by the
broiting?
altow’s
them
cooking. Turn
meat
allows
fish.
[o
Q.
Why are
nl~
meats not turning out as brown as
they should?
A. In some areas,
may be
for I ()
food
minu(es bet’orc
in oven.
recommended she]
low.
in these
[he
power
Check
(~oltage)
CUSCS.
to the range
preheat
the broil uni[
placing broiler pan
to see if you
f
position.
arc using
Broi
t
tor longcs[
wi(h
the
period of time indicated in the Broiling Guide.
Turn
tiood
only
once during
broiling.
Q. Do I need to grease my broiler rack to prevent
meat from sticking’?
A. No. The broiler
heat, thus keeping the
prevent meat
However, spraying the
vegetable cooking
rack
is designed to
surface
coot enough
from
sticking to the surface.
broiter
rack lightly with a
spray before
cooking will
reflect
broiler
tt)
make
cletin-up e:lsier.
Page 23

BROILING
GU~E
1. Always use the broiler pan
and ruck
that comes
with your oven. It is designed to minimize smoking
and
spattering by trapping juices in the shielded
lower part
2.
The oven door should be open to the broil stop
of
the pan.
position.
3. For steaks and chops, slash
fat
evenly around the
outside edges of the meat. To slash, cut crosswise
through the outer
fat
surface just to the
ed&e
of the
meat. Use tongs to turn meat over to prevent
piercing the meat
4.
If
desired. marinate meats or chicken before
broiling. or brush with barbecue sauce last 5
1 ()
min;ltes
Food
Bacon
Ground
Well
Beef
Rare
McdiLlnl
well
Rare
MediLlnl
Beef
Done
Steaks
Done
well Dollc
Chicken
ond losing juices.
only.
Quantity
Thickness
1/2
lb. (about
thin slices)
1 lb.
I/? to
I inch
( 1
I
Y!
(2
I whole
(2
split
(4 patties)
3/4
thick
(()
I x
Ibs.
inch
thick
to
2Y
to
22:
lbs.
Ien:thwisc
aud/or
8
inch thick
)
Ibs.
)
),
to
Shelf First Side
Position
c
c
c
c
c
c
c
c
A
I
I
Bakery Products
2
to
4
Bread
(To:iso or
Toaster Pastries
English
Mul’1’ins
I.ohster Tails
R“ish
Ham
Slices
(
Drccookcd)”
Pork
(:hops
Well
Done
I,amb Chops
Medium
well DOIIC
Medium
Well
1)OIIC
Wieners
similar prec~)(lkcd
s~LISti~CS,
bl”atwul”st
:Ind
slices
I pkg. (2)
2
(split)
1–4
(6 to
x
01.
Ctlcll)
1
-lb.
I’ille[s
l/~
1 inch
2
(
I/2
2
( 1 inch (hick),
ab(~ut
2
( 1 inch (hick).
ab(l
Lll
2 ( 1 Y
:lboLl[ i
I -lb. pkg. ( 1
1/4
illCll [lli~h
thick
inch
Ihick)
I lb.
1 () 10 12
inch
thick).
lb.
())
to
oz.
c or
c (? I D
B
c
I
B
~
B
c
~.
(:
13
c.
D
I
Time, Minutes
4Y!
10
6
8
]~
10
15
25
35
I y–~
I 3–I(I
s
x
10
13
10
1~
14
17
()
5. When arranging food on the pan, do not let fatty
edges
hang
over the sides. These
could SOil the
oven bottom.
6. The broiler does not need to be preheated.
However, for very thin foods, or to increase
browning, preheat if desired.
7.
Frozen steaks
oven
shelf at next lowest shelf position and
can
be broiled by positioning the
increasing cooking time given in this guide
1
X times per side.
If
your
range
8.
is connected to
may be broiled by
positioning the
Second Side
Time, Minutes
4)?
7
5
6
11
7-8
14-16
20-25
10-15
I
1
1?
3–4
Do
not
1111”11
OVCI”.
5
[
I
?--l 4
[---
x
10
13
~)
10
l?
Preheating
o~~n
shelf
Comments
Arr:mge
Space evenly.
Up to 8 patties take about
Steaks less than I inch thick cook
through before browning. Pan
is recommended.
Slash fat.
Reduce time about 5 to 10
per side
each side with melted butter. Broil
skin-side-down first.
Space evenly. Place English muffins
cut-side-up
if
desired.
throLlgh back of shell. Spread
Cut
open. BrLlsh with melted bLlttcr bel’ore
broil in:
HiIndlc
with lemon butter before tind dLlring
c(~oking. if’ desired. Preheat
incrcasc browning.
lncrcuse
t’or 17,
slash
Sltlsh l’a[.
11’
desired, split
lengthwise;
208
volts, rare
the
broiler Llnd
o~e
position higher.
in single layer.
same time.
nlinLltes
for
cut-up chicken. Brush
and
brLlsh
with butter,
and after half ot’ broiling
and
tLlrn
very carefully.
broiler
time
5 to 10 nlinLlles pcr side
inch thick or home cLIrcd
fat.
saLlsages
cLlt
into S- to 6-inch
in
hall
steaks
frying
titnc.
BrLlsh
to
hum.
pitccs.
7?
--
Page 24

OPEWTING
THE SELF-CLEANING OVEN
Normal
Before a Clean Cycle
The
range must be completely cool in order to set
the self-clean cycle.
to
coo]
before you
1.
Remove the broiler pan, broiler rack,
and
any
aluminum foil from the oven-they can’t
withstand the high cleaning temperatures.
NOTE: The oven shelves may be cleaned in
the self-cleaning oven.
lose their luster and become hard to slide. Wipe the
shelf
supports with cooking oil after self-cleaning
to make shelves slide more easily.
2. Wipe up heavy soil on the oven bottom. If you
use soap. rinse thoroughly before self-cleaning
to prevent staining.
NOTE: Do not clean the bake unit or broil unit. Any
soil wii]
unit
spillover,
unit.
Oven
Oven
front
frame
burn
off
ctin
be
lifted gently
residue, or
gently wipe around
light
,.,,.,.,,
,
You may have
can
slide the door
when
the
to clean the oven
tish
.,
Openings
in door
to
allow
the oven
latch.
all
cookware
However, they will darken,
units are heated. The
Iloor.
bake
If
accumulate around the bake
the unit with
,,
wtirrn water.
Oven door
gasket
Cleaning Time: 3 hour\
3.
Clean spatters or soil on the oven front frame and
the oven door outside the gasket with
cloth. The oven front frame
outside the gasket do not
clean cycle. On these
water or a soap-filled steel
with a vinegar and
prevent a brown residue from forming
oven
is heated.
Do not clean the gasket. Never use a commercial
oven cleaner in or around the self-cleaning oven.
Clean
the top. sides and OLltside
door” with soap and water.
oven cleaners.
Make
sure the oven
Do not rub or clean the door
the fiberglass
extremely low resistance
and we] l-fitting
energy
resLl]ts. f f.
trayed
displaced
-cff’icicnt oven
or damaged in ~ny way or if it h:is
Do not let water run down through openings in
the top of the door. To
ge((illg
i [1 these
:1s far tls it
4. Close
Do not use commercial oven cleaners or
light
is off. If
the ]ifc
burn out
the oven
of
protectors in or near the self-cleaning
A Combination
high
clean-cycle
porcelain finish of the oven.
and
get
cleaned by the
areas,
use
WOOI pad.
wtiter
solution. This will
Buff
these
areas
Do not use abrasives or
light
bulb
ma[erial OF
yoLI notice
on the
oven
dooI”.”
the
[()
abrasion, An
door
gasket
operation and
the
gasket bccom
you shoLlld
help prc~cnt water from
slots when clean
will
go,
door
and make sure the
the
o\en
light
is
the
hLIlb
wiil hc shortened or i[
immedia[cly.
of
any of
these
products p]LIs
temperuturc nla} damage the
a
dampened
the oven
de(crgent
door
and hot
Rinse
when the
with a
co~cr
front of
is in
dry
cloth.
the oven
place,
gasket—
gasket
has atl
in(ac(
is essential for
good”
balking
i ng worn.
become
have i[
rcpiaceLi.
i
tlg. op~il the do(lt.
oven
no( turned L)I’I’.
Inaj
oven
oven.
ttlc
self-
well
help
24
—
Page 25

How
to Set the Oven for Cleaning
Set the automatic oven timers:
1.
Make sure both the clock and the DELAY
START dial show the correct time of day.
When the START knob is pushed in
it will “pop” into
(he clock
pllsh
Stop
is
in
and
Time
for three hours later
of ciay-lk)r
Time- for
BRoIL
.
~):()().
OVEN SET
OFF
place
wh-en the time shown on
reached.
turn the STOP TIME knob. Set the
example, if it is
BAKE
.
250.
6:()()
300. .
.
and
than presenl
now, set the Stop
OVEN
TEMP
3:0
.
.400
.
200
●
.
/
@
CLEAi
2.
Turn the OVEN
CI.EAN. The
TiMEO
BAKE
controls
SET
and OVEN
will
when the CLEAN location is
WARM
snap into
@
~LEAN~
TEMP
reached.
J .~500
final
turned,
time
.
.450
BROIL
knobs to
position
The
Oven Set Light glows when the knob is turned to
CLEAN.
The Oven
Temp
Light glows until the oven
reaches the cleaning temperature, then will cycle
until
and on
3. Close the oven door
cleaning is complete.
tind
slide the latch handle to
the right as far as it will
~~~;:g;~;~;::~e
go.
r
IIIIIIE*
mechanism.
The
Oven Cleaning Light
that
cleaning has started. The oven door
window
get
hot
during
will glow
showing
the self-clean
and
cycle.
DO NOT TOUCH.
NOTE: If the Oven Set, Oven
Cleaning Lights do
all
the automatic oven timers have been set correctly,
not glow,
Temp
and O\en
check to
make sure
See step I.
off
After a Clean Cycle
1.
After cleaning is complete.
the
Oven Cleaning
goes out ~,jl~n [he oven II:ls
fallen
below the locking
temperature. Turn
OVEN SET knob to OFF.
2. Slide
the
to
[he
left as
it
will go
(I1C
door.” It’ yoLl
latch handle
and open
slide the Iatcll,
additional time for
coo]
i
ng.
Never
f’orce
the latch handle. The latch
easi Iy. F.~)rci ng
door lock.
far
as
cannot
allow
the
Light
the
latch handle
BROIL
.
@
CLEA~
may
OVEN SET
OFF
0
damtige
BAKE
.
T;MED
BAKE
slides
the
You may notice some white ash in the oven.
Just
wipe it up with a damp cloth after the oven cools.
If white spots remain,
filled
steel
wool pad. Be sure to rinse thoroughly
with
a vinegar and water mixture. These deposits
are
usually a salt residue that cannot be removed
by
the clean
cycle.
remove them with a
soap-
If the oven is not clean after one clean cycle,
repeat the
cycle.
(1’ollr;lllll,[l
/l(’.\’/
/)[/,?(’)
-—
25
—
Page 26

OPEWTING
THE SELF-CLEANING OVEN
(continued)
How to Delay Start of Cleaning
Follow the
section. Push in and turn the DELAY START dial to
the time you wish to start. Add the hours needed for
cleaning to this Start Time, then push in
STOP TIME dial to this desired Stop Time.
steps 2 and 3 of the How to Set the Oven for Cleaning
section. The oven will automatically turn on and off at
the set times.
directions in the Before a Clean Cycle
and
turn the
Follow
Questions and Answers
~.
If my oven clock is not set to the correct time
of day, can I still self-clean my oven?
A.
If the clock
you
at
a specific time.
Q. Why won’t my oven clean immediately
even though I set
knobs correctly?
A.
Check to be sure the DELAY START dial is
to
the sume
to
be
Q.
Can I
of my self-cleaning oven?
A. No
cleaners or coatings should be used
any part of
not thoroughly rinse the oven with water,
it absolutely clean afterwards, the residue can
the oven
time
Q.
What should I do if excessive smoking occurs
during cleaning?
A. This is
[urn the OVEN
windows to rid the room of smoke. Allow
oven
opening
reset
Q. 1s
the “crackling” or “popping” sound I hear
during cleaning normal?
A. Yes.
both the cooking and cleaning functions.
is not set to the correct time of
will
not be able to set a delay clean to end
all
the time and clean
time as the
sure
latch
handle is moved to the right.
use commercial oven cleaners on any part
[his
oven. If you do use them
surface and damage metal parts the next
the oven is automatically cleaned.
caused by
SET knob to OFF.
to cool until the
[be
door. Wipe up the excess soil
the cletin
This is the metal heating and cooling
cycle.
range
clock. Also check
excessive soil.
latch S1
ides
and
eusily before
you
Open
day
set
around
and do
wiping
scar
should
the
lhe
and
durin:
How to Stop a Clean Cycle
1.
Turn the OVEN SET knob to OFF.
2. Wait until the oven has
temperature to unlatch the door. You will not be
able to open the door right away
temperature is at a safe level.
Q. Should there be any odor during the cleaning?
A. Yes,
Q.
A.
Q.
A. Some
Q. My
A. After many cleanin:s,
Q.
A.
Q. Can I cook food on the
A. Yes. While
[here
will be an odor during the first few
cleanings. Failure to wipe out excessive soil
also cause an odor when cleaning.
What causes the hair-like lines on the enameled
surface of my oven?
This is a normal condition, resulting from
and cooling during cleaning. They do not affect
how your oven performs.
Why do I have ash
after
cleaningt’
types
of soil will
is ash. It
or
the matter?
so
s]
ide
dampen
and rub 1
conlact shelf supports.
NIv
seif-cleaning
Yes.
may lose
is self-cleaning?
the
can be remc}ved
cloth.
oven shelves
clean
they do not
more
easi Iy.
alter
fingers with a small amount of
ightlv
over
oven shelves have become gray
cycle. Is this normal’?
After
the
self-cleaning cycle, the
some luster and discolor to a deep
the oven is
cooktop
just as you normally do.
coo]ed be]ow
unless
left
in my oven
leave
a deposit, which
with a damp sponge
donot
slide easily. What is
oven
shelves may
S1
ide
casi ly. To
each
SC I I.-cleaning cycle.
sides L)I’
shelf where
cooktop
sell’-clcanitlg, you
the
locking
the oven
might
heating
become
make
she Ives
cooking oil
tbcy
af’ter the
sbelvcs
gray,
while the oven
can
LISC
26
Page 27

CA~
~E
SURE ELECTRICAL. POWER IS
OFF BEFORE CLEANING ANY PART
OF THE RANGE.
Proper care and
cooktop will give you efficient
service. If- soil, mineral deposits from evaporated
water spills or metal rub-off from aluminum
cookware is not removed, it will burn on
cooktop
surface and cause permanent discoloration.
cleanin&
are important so your radiant
and
satisfactory
AND CLEANING
(he glass
Control Panel and Knobs
It’s a good idea to wipe the control panel after each
use. Clean with mild soap
wu(er,
rinse with clean water and polish dry with a
Soft
cloth.
Do not use abrasive cleansers, strong liquid
cleansers, plastic scouring pads or oven cleansers
on the control panel—they will
A 50/50 solution of vinegar and hot water solution
works well.
The control knobs may be removed for easier
cleaning.
—
tfore
removing the knobs for cleaning, please
.Iote
that
the
knobs on the
the
right
side are on the
replacing the knobs, check the OFF position to insure
proper placement.
and
water or vinegar
damage the finish.
left
side and the knobs on
proper
OFF position. When
and
FO11
OW
these directions carefully in caring
cooktop
Be sure that the surface unit control knobs are
turned off and that the entire cooktop is cool
before cleaning. Do not use a
hot
health and
The knob stem has
on one side
clear (see illustration). When removing the knob, it
may
handkerchief) or a piece of string under and around
the knob edge and pull up. Check the inside
knob and find the molded rib.
Wash the knobs
hot water solution but do not soak.
to assure safe and proper maintenance.
cooktop
cooktop.
be
Replace the knob by fitting the molded rib inside the
knob into the
The fumes
can
chemically attack the glass surface.
has a
spring clip. The
helpf’ul
to slip a thin
clear
can
be hazardous to your
a
groove in each side. The
other
cloth
(such as a
in soap
and
water or a vinegar
groove on the stem.
for
your
cleaner on a
gl.Oov~
groove is
of
the
and
Oven Shelves
Clean the shelves with an abrasive cleanser.
After cleaning, rinse
and
dry
with a
To remove heavy, burned on soil, use
puds. After
and
dry.
NOTE: The oven shelves may also be cleaned
in
the self-cleaning oven,
darken in color, lose their luster and
slide if cleaned during
scrubbing,
clean
the
shelves with
cloth.
wash with soapy water. rinse
however, the shelves
the
self-cleaning cycle.
clean
water
soupy mc[al
become hurd [o
—
Clear Groove
in Stem
mtiy
Page 28

Broiler Pan and Rack
—
CAW
AND CLEANING
(continued)
After broiling,
Remove the rack
grease froln
rinse the broiler
soap-tilled or
If food has burned on,
detergent while hot and cover with wet
or a dishcloth. Soaking the pan will remove burned
on
foods.
The broiler pan
oven cleaner. Do
remove the broiler
from
the pan. Carefully pour out
the pan into a proper container. Wash and
Dan
and rack in hot water with a
pl~stic
scouring pad.
sprinkle the rack with
may
be cleaned with a commercial
not
use an oven cleaner on the rack.
pan
from
puper
the oven.
towels
Lift-Off Oven Door
The oven door is removable,
but it is
help removing and replacing
(he
the handle. This can cause the
~I:lSS tc) bre~lk
damage to the door.
To remove the door,
few
position that will hold the door
open, CJrtlsp firmly
and
off the hin~es.
No-rE:
●
Be c~~re t’u
and
●
Wh
on the
To
spcc ial s[op
of
door slowly
time. IF
them back out.
heavy.
You
may
need
door. Do not lift the door by
or
can
cause
open it a
inches to the special stop
on each side
] ift the
door straight up and
1 not to place
the
o\en door
back and pinch
i IC working i n the oven
with
towels
pinched fingers
frame.
replace the door,
the door squarely over the hinges. Then lower the
hirlges
fingers,
or
empty
and
position. Position the slots i n the bottom
and
evenly over both hinges
snap back against the oven frame. pull
hands
between the h
J.rame
as
the
hinge
area, cover the
paper towel rolls to prevent
chipping the porcelain
make sure the hinges are in
cou
Id snap
h
tit the some
ingc
ingcs
enamel
the
r
Both the broiler
the dishwasher.
Do
not clean
cleaning oven.
Do
not
store a
in the
range.
TO
CI,EAN THE
Inside
of”
the door:
●
Becuuse the area inside
the self c]etin cycle,
hand. Any soap
s(ains
when
“ The areil (~utsidc the gasket
scouring
● Do not rub or
material
rcsi stance
okcn
door
oven
operation and
no(ice the
in any way or
you
should htlve
NOTE:
bot(om
I
The gusket
to
If=’’’’’’’’’’’’’’’’’’’’’’’:’’’’’”%’
h
(/
pan tind
the broiler
soiled
[he oven
pad,
clean the
of the g:iske(
to
abrasion,
g:tskct
:aske( becoming worn.
ii’
allow’ for proper air
rack can also be cleaned in
pan or
rack in the
broiler pan and
DOOR:
the gasket is
you do not
left
on
the liner
is heated,
can bc
door gasket-tile fiberglass
has an extremely low
An
intact
and we] 1-
is essential
good baking
it has
it replaced.
is
designed
lot” Crle[.gy-ct.l.icie tlt
bcconlc
>
displaced on
with a
circulation.
/
lkY
I
need [0 clean
causes additional
results, If you
1
, Inside Gasket
1
lllL-<’-’-’’’~lll
self-
rack
anywhere
cleaned during
c’leaned
t’rayed
with a
[.itting
or damaged
g:lp
at
this by
the door.
the
28
Outside of the door:
●
Use soap
sides
may also
outside of the door.
●
Spi
11
and
discoloration and should be
When surface is
●
Do not use oven cleaners, cleansing powders or
harsh abrasives on the outside
und
water to thoroughly clean the top,
and
t’rent of the oven
use a
glass
cleaner to
age
of marinades, fruit j u ices, tomato
basting materials
coo],
door, Rinse wel
clean
containillg
clean and rinse.
tic ids
wiped
of the door.
1. You
the glass on
sauces
may cause
up immediately.
the
Page 29

Removable Storage Drawer
The storage
and bakeware.
drawer
is a
good place
to store cookware
Do not store plastics and
tlammable
material in the drawer.
Do not overload the storage drawer.
too heavy, it may slip
off the track when opened. To
[f
the drawer is
open the drawer, grasp the center of the handle and
pull
s~raight
The storage drawer
out.
may
be removed for cleaning under
the range.
Oven Light Bulb
NOTE: The lens
Wetiring
The
Before
latex
light bulb is located on
replacing the bulb, disconnect electrical power
to the range at
or LltJp]Llg
bulb cool completely before
– safety. do not touch a hot bulb with a
ou
do, the bulb will break.
should be removed only when cold.
gloves
may
offer
a better grip.
the
back wall of the oven.
the
main
fuse
or circuit breaker panel
the range
from
the e]ectric:d
renlovin:
it.
damp cloth. If
Olitlet.
For
Let
your
the
To remove:
● Pull the drawer straight out
and lift over the guide stops.
To replace:
●
Lift over the guide stops
and
<
>fi
!
.
,,
.;.
>. :,
,J’
..,.
&
N. Y
.,,’”
slide the drawer into place.
To clean the inside and outside:
●
Wash with soap and water. Rinse well. Do not use
cleansing powders
or
harsh abrasives which may
scratch the surface.
To remove:
Unscrew the cover
and
remove
the bulb.
To replace:
Put in a new 40-watt
appliance bulb.
.<~,~”~~e~Max,
G
Bulb \
‘(
a
Glass Cover
,1
‘\,
a
Length
~.,
,’ !&?
“~”
NOTI;:
●
A 40-watt appliance bulb is smaller than a standard
40-watt household bulb.
●
Install and tighten the cover.
●
Reconnect electrical power to the range.
-a
~
Stainless Steel
Use
the
same cleaning methods as those described
for
the glass ceramic surface. with the exception of using
a scraper. Do not scrape the
[he
metal.
frame as
this wi II damage
Glass Window
To clean the outside of the oven window,
c]eaner. Rinse and
polish with a dry cloth. Do not
allow the water or cleaner to run down inside the
open
ings
in
the
top of the
oven
door while
use a
clean
i
glass
Jig.
Oven Vent Duct
The oven vent is located at the rear of the
Never cover the opening with aluminum foil or any
other material. This would prevent the oven vent from
working properly.
—-.
,..
———
l-’
*3
-.-.-=3
./
‘
cooktop.
29
—
—
Page 30

P~PARATION
—
A
●
All ranges can tip.
●
Injury could result.
WARNING
(
. Install the Anti-tip device
packed with the range.
. See the Installation
Instructions.
STABILITY DEVICE INSTALLATION INSTRUCTIONS FOR BRACKET KIT NO. 342473
Tools tleeded:
●
Phil I
ips head
● I
~~”
open
The
hracke(
right or
be
sure
that the screws do not penetrate electrical
wiring or plumbing.
shorter screws that
~looring.
If the
bracket came with your range, it is shipped
attached to the lower range
the shipping screw that holds the bracket and then
follow
the instructions below.
1.
Decide whether the bracket will be
right
or
2. If
the bracket side of the
cabinet,
cabinet as shown in Figure 1.
If
there is no adjacent cabinet, determine where
the location of the
puncl
edge at ttlis locution and
See Figure
::~a;::t .2
or final
Iocatlon
of
range
5’dc Dane
screwdriver
end or
adjustable wrench
attaches to
left rear leg
Ief(
side of
p]tice
)
mitt
be.
1.
“
the bracket against back
‘\
tloor or wall
leveler. If fastening to the
If
this cannot be determined, use
will
not penetrate through
bock.
the
range location.
range
range
side (painted outside
Place
the bracket with its outside
against the back
‘“
.
to hold either the
Remove
instatled
is adjacent to
Outside edge of
bracket to be flush
with left or right side
of range
,7A
floor,
and
discard
on
a
watl ~ind
wall.
)
the
3. Determine whether yoLI will anchor
the
floor
or wail.
the screws provided. The screws are self-drilling in
wood. plywood, particle and
metal framing. If
SLI
itable
screws
a masonry
4.
Using
the wrench,
teast
two turns. See the Installation Instructions for
more level ing
5. Slide the
leveler fully engages the slot in the bracket, It
the range
the rear
bracket forward os
in the new location,
Screw must enter wood
range
cannot be
leg leveter
or metal
Fasten
the bracket securely with
atttiching
find
anchors at
dri II
to drill the required
information before positioning
into
to enter the bracket,
l“equired
-1
to masonry you can buy
back
out the foLIr
place. Be
moved back
sure the
and attach to the hoot
Attachment to wall
the brucket
chip boord. and
hardw~u-e
far
stores. Use
holes.
leg leveters
rear leg
enough
move the
Wall Plate
most
range,
for
to
at
Make sure
Ieq
leveler
e~gages
slot
30
\\.
Z
/0
w
‘\w
Wall behind
v
range
‘igl
Page 31

—
QUESTIONS?
USE THIS PROBLEM SOLVER
●
PROBLEM
OVEN
WLL
NOT WORK
OVEN LIGHT
DOES NOT WORK
FOOD DOES NOT
BROIL PROPERLY
FOOD
DOES NOT
ROAST OR BAKE
PROPERLY
POSSIBLE CAUSE
● Delay start timer has been accident~ly set.
●
Plug on range is not completely inserted in the electrical outlet.
●
The circuit breaker in your house has been tripped, or a fuse has been blown.
●
Oven controls not properly set.
●
Light bulb is loose or defective. Tighten or replace.
●
Switch operating oven light is broken.
● OVEN SET and OVEN TEMP knobs not set at BROIL.
●
Door not left open to the broil stop position as recommended.
●
Improper shelf position being used. See the Broiling Guide.
Q
Food is being cooked on hot pan.
“
Cookware is not suited for broiling.
●
Aluminum foil used on the broil pan rack has not been fitted properly and
Call
for service.
slit as recommended.
● OVEN SET knob not set at BAKE.
● OVEN TEMP knob not set correctly.
●
Shelf position is incorrect. See the Roasting or Baking sections.
● Incorrect cookware or cookware of improper size is being used.
● The oven thermostat needs adjustment. See the Adjust the Oven
Thermostat—Do
●
A foil tent was not used when needed to slow down browning during roasting.
It Yourse~fsection.
OVEN WILL NOT
SELF-CLEAN
OVEN DOOR
WON’T LATCH
OVEN DOOR
ACCIDENTALLY LOCKED
DURING COOKING
OVEN NOT CLEAN
AFTER CLEAN CYCLE
●
If you want to start the self-clean cycle right away, you must make sure
the
clock and the DELAY START dials show the correct time of day. When the
DELAY START dial is pushed in and turned, it will “pop” into place when the
time shown on the clock is reached.
●
Automatic timer dials not set or not set properly. Clock must be set to time of
day and the STOP TIME dial must be set and advanced beyond the time noted
on oven clock.
● The STOP TIME dial was not advanced for long enough.
● Both the OVEN SET and the OVEN TEMP knobs must be set at the
CLEAN setting.
● When the oven is self-cleaned, a thick pile of
of
ash and
●
Door latch handle not moved
● Turn the OVEN SET knob
insulate that
area
from further heat.
all
the way to the right.
to
CLEAN. The glowing Oven Cleaning Light after
spillover
can leave a
heav’y
layer
the knob is turned indicates oven is too hot from previous use and door won’t
latch. To
● Turn the OVEN SET knob to OFF.
the
●
Oven controls not set properly.
●
Heavily soiled ovens require 3 ‘/c to 4-hour Clean Time.
● Heavy
cool
the oven, open the door wide, then the latch will operate.
door latch handle.
spillovers
should be cleaned up before starting the
Allow
the oven to cool. Never force
clean cycl?.
,
Page 32

8
—
THE PROBLEM SOLVER
,(continued)
PROBLEM
SURFACE UNITS WILL NOT
MAINTAIN A ROLLING
BOIL OR FRYING RATE
IS NOT FAST ENOUGH
COOKTOP FEELS HOT
FOODS COOK SLOWLY
SURFACE UNITS DO
NOT WORK PROPERLY
TINY SCRATCHES
(may appear as cracks) OR
ABRASIONS ON RADIANT
COOKTOP
GLASS SURFACE
POSSIBLE CAUSE
●
You
must use pans which are absolutely flat. If 1
ight
can be seen between
the pan bottom and a straight edge, the elements will not transfer heat properly.
“
Pan bottoms should closely match the diameter of the surface unit selected.
●
The glass cooktop surfaces may seem hotter than you are used to.
This is normal.
●
Improper cookware
Make sure flat-bottomed pans are used.
being
used. Pan bottoms should be flat, fairly heavy weight
and the same diameter as the surface unit selected.
●
Difficulty may be in the main distribution panel of your house, caused by a
blown oven-circuit fuse, a tripped oven-circuit breaker, the main fuse or the
main circuit breaker, depending on the nature of the power supply. If a circuit
breaker is involved, reset it.
[f the control box uses fuses, the oven fuse
(a cartridge-type) should be changed, BUT ONLY BY SOMEONE FAMILIAR
WITH ELECTRICAL CIRCUITS. If after performing one of these procedures,
the fuse blows or circuit breaker trips again, call for service.
NOTE: Apartment tenants or condominium owners should ask their building
management to perform this
●
Cooktop surface unit controls are not properly set, or the wrong control knob
is set for the surface unit you are
c
Incorrect cleaning methods have been used, cookware with rough, bottoms
check before calling for service.
using.
has been used, or coarse particles (salt or sand) were between the cookware
and the surface of the
cooktop.
Use recommended cleaning procedures, be sure
cookware bottoms and cookware are clean before use, and use cookware with
smooth bottoms. Tiny scratches are not removable but will become less visible
in time as a result of cleaning.
—
METAL MARKINGS
(may appear
as
scratches)
DARK STREAKS OR SPECKS
AREAS OF
DISCOLORATION
ON COOKTOP
HOT SUGAR MIXTURES/
PLASTIC MELTED TO
THE SURFACE
FREQUENT CYCLING
OFF AND ON OF
SURFACE UNITS
●
Do not s]
ide
aluminum cookware across the surface. Use recommended
cleaning procedure to remove marks.
● Incorrect cleaning materials have been
used,
encrusted
boilovers
or grease
spatters remain on the surface. Use a razor scraper and recommended
cleaning procedure.
●
Use a razor scraper and recommended cleaning procedure,
●
Marks from aluminum and copper pans as well as mineral deposits from water
or food can be removed with Cook Top Cleaning
● See the Glass Ceramic
●
Incorrect cookware used. Use only flat cookware to minimize cycling.
Cooktop
Cleaning section.
Creme.
32
Page 33

●
PROBLEM
OVEN TEMPERATURE
TOOHOTORTOOCOLD
“BURNING” OR “OILY”
ODOR EMITTING FROM
OVEN WHEN TURNED ON
STRONG ODOR
POSSIBLE CAUSE
●
The oven thermostat needs adjustment. See the Adjust the Oven
Thermostat—Do It
. This is normal in a new oven and will disappear in time. To speed the process,
set a self-clean
Self-Cleaning Oven section.
●
An odor from the insulation around the inside of the oven is normal
for the first few times the oven is used. This is temporary.
If you need more help... call, toll free:
GE Answer Center
(
”
800.626.2000
consumer information service
Yourse~section.
cycle for a minimum of 3 hours. See the Operating the
33
Page 34

NOTES
34
Page 35

Wdll
-
Vith
the purchase
.Ieed
Be There
of’y(~ur
infi)rrnation or assistance, we’ll be there. All you have
new Hotpoint” appliance, receive the assurance that if you
In-Home Repair Service
80MEXARES(80M32-2737)
t(> do
is call—toll-free!
eve]-
GEAnswer
Center
8006262000
–1
.-.=-
11
1
--
1--’
kr
‘
Customers With Special Needs...
80~6262000
. . . . .
.,,,,, .,.,.,. ,.,
. . . . .
!..
.4
.,!”..,.
800.(
i2(i.2000.
.H.,,
m
. . . . . . . . . . . . . . . . ..., ”’.’..,,. ,, .,,, ,
Service Contracts
a
80M2&2224
Pafis andAccessories
80@626-2002
—
Individuals qualified to service their
;l\’t Ilt>c’(1(’(1
Ilon]c’.
(;tl)~lillt’
VIS:\,
i); Iris (jr
()\Ir ]):IIIs S}S[(>III
l<cllt’t~iil
hi2is(c’I(;:[r(l :trl(l I)is(()\{]
:I((tss( )ri(>s s~’t) 1 (lirc’ctl~
[)ro~i(lcs :IC(C’SS 10 olc>r
I’;IIIs.
..2111(I iill ;lrt I’IIII? !t:lrr:tll[t(l.
(:litls
owl
appliances
to lht’ir
.47,( )()()
:IIC> ;I((t>])lc’(1.
(;II1
User maintenance instructions contained in this booklet
cover procedures intended to be performed by any user.
Other servicing generally should be referred to qualified
service personnel. Caution must be exercised, since
improper servicing may cause unsafe operation.
I
Page 36

YOUR HOTPOINT ELECTRIC RANGE
WARRANTY
Staple sales slip or
cancelled
check
here. Proof of original purchase date
is
needed to obtain service
II
under
warrantv.
*
1
WHAT IS COVERED
WHAT IS NOT COVERED
[t
some states do not allow the exclusion or limitation of incidental or consequential damages, so the above limitation or exclusion
may not apply to you. This warranty gives you specific legal rights, and you may also
To know what your legal rights are
FULL ONE-YEAR WARRANTY
For one year from date of original
purchase, we will provide, free of
charge, parts and service labor in
your home to repair or replace
any
part of the
because of a manufacturing
defect.
range
that fails
This warranty is extended to
the original purchaser and any
succeeding owner for products
purchased for ordinary
in the 48 mainland states, Hawaii
and Washington,
warranty is the same except that it
is LIMITED because you must pay
to ship the product to the service
shop or for “the service technician’s
costs to your home.
travel
All warranty service will be
provided by our Factory Service
Centers or by our authorized
Customer
normal working hours.
Should your appliance
Care’”’ servicers during
home use
D.C.
In Alaska the
need
service, during warranty period or
beyond, call 800-GE-CARES
(800-432-2737).
●
Service trips to your home to teach
you how to use the product,
your Use and Care material.
Read
If you then have any questions
about operating the product,
please contact your dealer or our
Consumer Affairs office at the
address below, or call, toll free:
GE Answer Center”
800.626.2000
consumer information service
● Improper installation.
● Replacement of house fuses or
resetting of circuit breakers.
o Failure of the product if it is used
for other than its intended purpose
or used commercially,
●
Damage to product caused
by accident, fire, floods or acts
of God.
WARRANTOR IS NOT
RESPONSIBLE FOR
CONSEQUENTIAL DAMAGES,
If you have an installation problem,
contact your dealer or installer.
You are responsible for providing
adequate electrical, gas, exhausting
and other connecting facilities as
described in the Installation
instructions provided with the
product,
have
in your state, consult your local or state consumer affairs office or your state’s Attorney General.
other rights which vary from state to state.
Part
Pub
MNUI
k
9-93
Recycled Paper
No, 164D2588P260
No,
39-4730
38 Rev 1
CG
Warrantor: General Electric Company
If further help is needed concerning this warranty, write:
Manager—Consumer Affairs, GE Appliances, Louisville, KY 40225
RB7”–
Printed in LaFayette,
~,,
 Loading...