

Page 1
togetthe best froIm
RB761G
.
AluminumFoil
Anti-TipBracket
ApplianceRegistration
CanningTips
Care and Cleaning
Clock/Timer
r
Energy-SavingTips
Features
r
InstallationInstructions
I
Leveling
ModeIand SerialNumbers 2
Oven
18
3,5
2 SafetyInstructions
9
22-25
12
5
6,7
5
5
13
ProblemSolver
RepairService
SurfaceCooking
ControlSettings
CookwareTips
Warranty
26,27
27
3,4
8-11
10,11
BackCover
use andcare of
model
8
-e
—-. .
Baking/BakingGuide
Broiling/BroilingGuide
Control Settings
Door Removal
Light; BulbReplacement 22,23
Preheating
Roasting/RoastingGuide 16,17
Self-CleaningInstructions 20,’21
Thermostat Adjustment
VentDuct
I
14,15
18,19
13
22
13
24
22
GE Answer center@
8W.626.2000
Page 2
*.
Imnlediatelycontactthe dealer (or
builder)thatsoldyoutl~erange.
.
If youdon’tunderstandsomething
or need morehelp,write (include
yourphone number):
ConsumerAffairs
Hotpoint
Appliace Rrk
Louisville,KY 40225
Write dom themodel
Ser;alnumbem.
and
You’llfind them on a labelon
the front of the range behindthe
ovendoor.
These numbers are also on the
Consumer Product Ownership
RegistrationCard that came with
yourrange. Beforesendingin this
card, please write these numbers
here:
ModelNumber
Serial Number
Checkthe Problem Solveron
pages26 and~. It listscausesof
minoroperatingproblemsthat you
cm correct yourself.
Use these numbers in any
correspondence or service calls
concerning your range.
Page 3
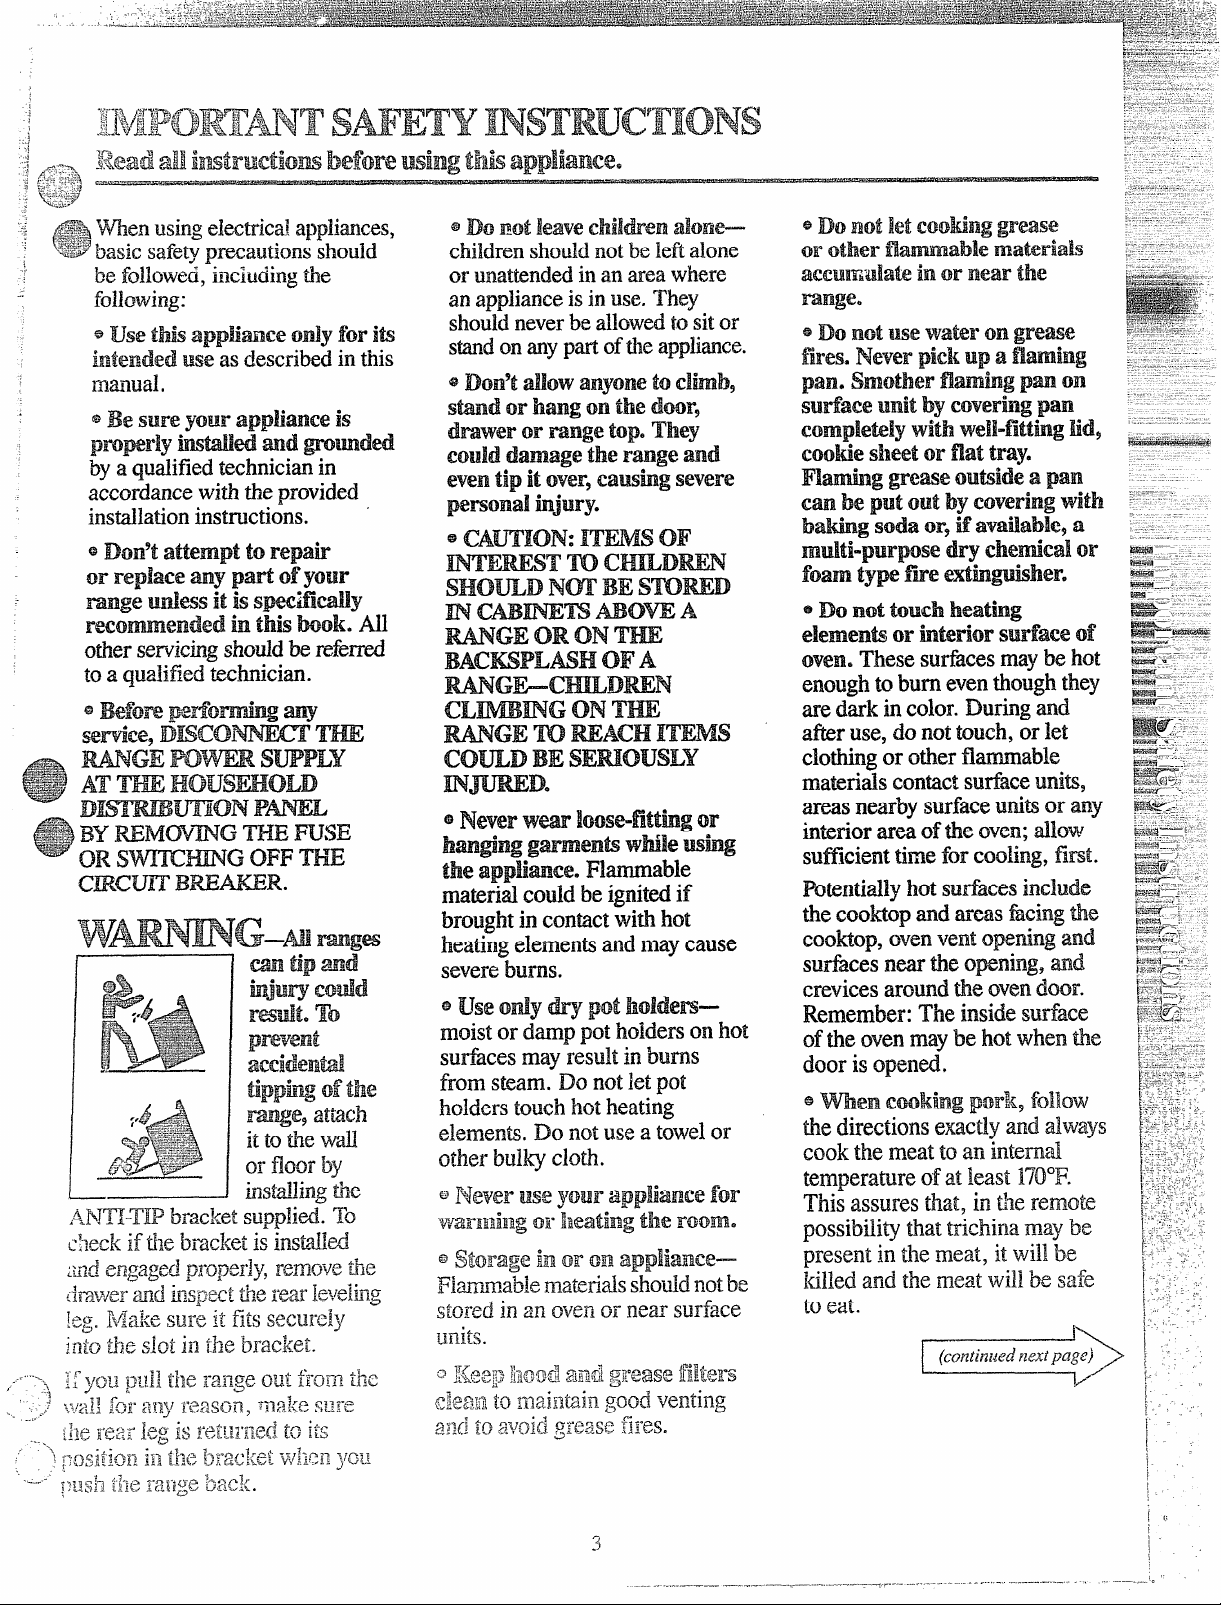
cRcm BmmR.
@Do nottouchbeating
elemenwor htedor surfaceof
oven. Thesesurfacesmaybehot
enoughtoburneventiough they
darkincolor. Durhg md
are
stir use, do not touch, or let
clotig or other flmable
materialscontactsutiace units,
artis near~ sufice utits or any
interiorarea of theoven;allow
su~3cienttimefor cooling, fimt.
W@ntidly hot sufices include
tie cooMopad mess hcing tie
cooMop,ovenvent openingand
sutices near the opning, md
Crevicesaround me ovendmr.
Remember: The
of the oven maybe
inside sutiace
hot when he
door is opened.
cook the meat to an intem~~ “
temperamre of at least 170°F.
Thisassures that, in L4eremote
possibdity hat trichina maybe
present in the meat, it ‘willbe
tilled.and the naeatwill be safe
toeat.
-+
Page 4

e ~M* f~~ fmg Shodd k m
--’
.—.- --
. .
@*
foods or moistureon fresh foods
pwib~e.Frost on fioma ‘
cm causehot fit to bubbleup
and over sidesofpan.
$&~
,.
a
Page 5
onthistype of flooring, usecare,
and itisrecommendedthatthese
simpleand inexpensiveinstructions
befollowed.
Therangeshouldbe installed on
a l/4-inch-thicksheetofplywood
(orsimilarmaterial)as follows:
JWenthefloor coven”ngeds d the
front of the range,
rangewill rest on shouldbebuilt
upwithplywoodto the samelevel
or higher than the floor covering.
ThiswilIallowthe range tobe
movedfor cleaningor servicing.
thearea thatthe
uveIiw the
~x~t Levelingscrewsare located on
~=- each corner of the base ofthe
e
range. Removethe bottomdrawer
andyoucan level the rangeon
an unevenfloor with the useof
a nutdriver.
T’ remove drawer,pulldrawer
outalltheway9tilt up the front
and take it
drawer, insert glides at back of
drawerbeyondstopon rangeglides.
Lif~drawer if necessary to insert
~;isi~y.Let frontofdrawer down,
[henpush in to close.
Oneof the rear levelingscrews
i}~illengagethe ANTI-TIP bracket
(allowfor some side to side
.~djustment).Allowa minimum
~’learaIIceof 1/8”between the range
.~ndthc Ieve]ingscrew that is
installedintotheANTI-TIP
out.To replace
bracket.
tobe
* Use cookwareof medit~mweight
aluminum, with tight-fittingcovers,
and flat bottomswhich completely
covertie heated portionofthe
surfaceunit.
* COOk fresh vegetableswith a
minimumamountof waterin a
coveredpari.
s watch
quictiy to tooting temperaturesat
HI ad MED H heatsettings.men
food reaches cookingtemperature,
reduce heat immediatelyto lowest
settingthatwill keep it tooting.
~Use residual heat wilh surface
cookingwheneverpossible. For
example, when cookingeggsin tie
sheU,bring water and eggsto
foodswhenbringingbem
boil,
thenturntoOFFpositionand
cover with lid to completethe
cooking.
@Use correet heat for cootig task:
Hi—to
allows, do not use high heat to
start).
MED Hi—quick browning.
MED—s1owf~ing.
LO—finishcooking most
quantities, simmer—doubleboiler
heat, finish cooking, and special
for small quantities.
WM—to maintain serving
tem~?eratureof most foods.
@v~hen boiling water for tea or
coffee, heat only amount needed.
It is not economical toboil a
container full of water for one
or $VJOcups.
startcooking(iftime
ovenCaotimg
Preheatovenonly when
@
necessary.Mast foodswill cook
satisfactorilywithoutpreheating.
If youfindpreheating is necessary,
watchthe indicatorlight, md put
foodinovenpromptlyafter the
lightgoesout.
@Alwaysturn ovenoffbefore
removingfood.
@Duringbaking, avoidfrequent
door openings.Keepdoor openas
shorta time aspossibleif it is
opened.
~Besureto wipe up excess spillage
beforestartingthe self-cleaning
operation.
@Cook complete ovenmeals
insteadof just one fooditem.
Potatoes,other vegetables,and
somedesse~ willcooktogether
with a main-dishcasserole, meat
loaf, chicken or roast. Choose
foodsthat cook at the same
tempemture ad in approximately
the same time.
@Use residud heat in the oven
wheneverpossibleto finish
cookingcasseroles, ovenmeals,
etc. Also add rollsor precooked
desserts to warm oven,using
residual heat to warmthem.
‘i
0
Page 6
Page 7
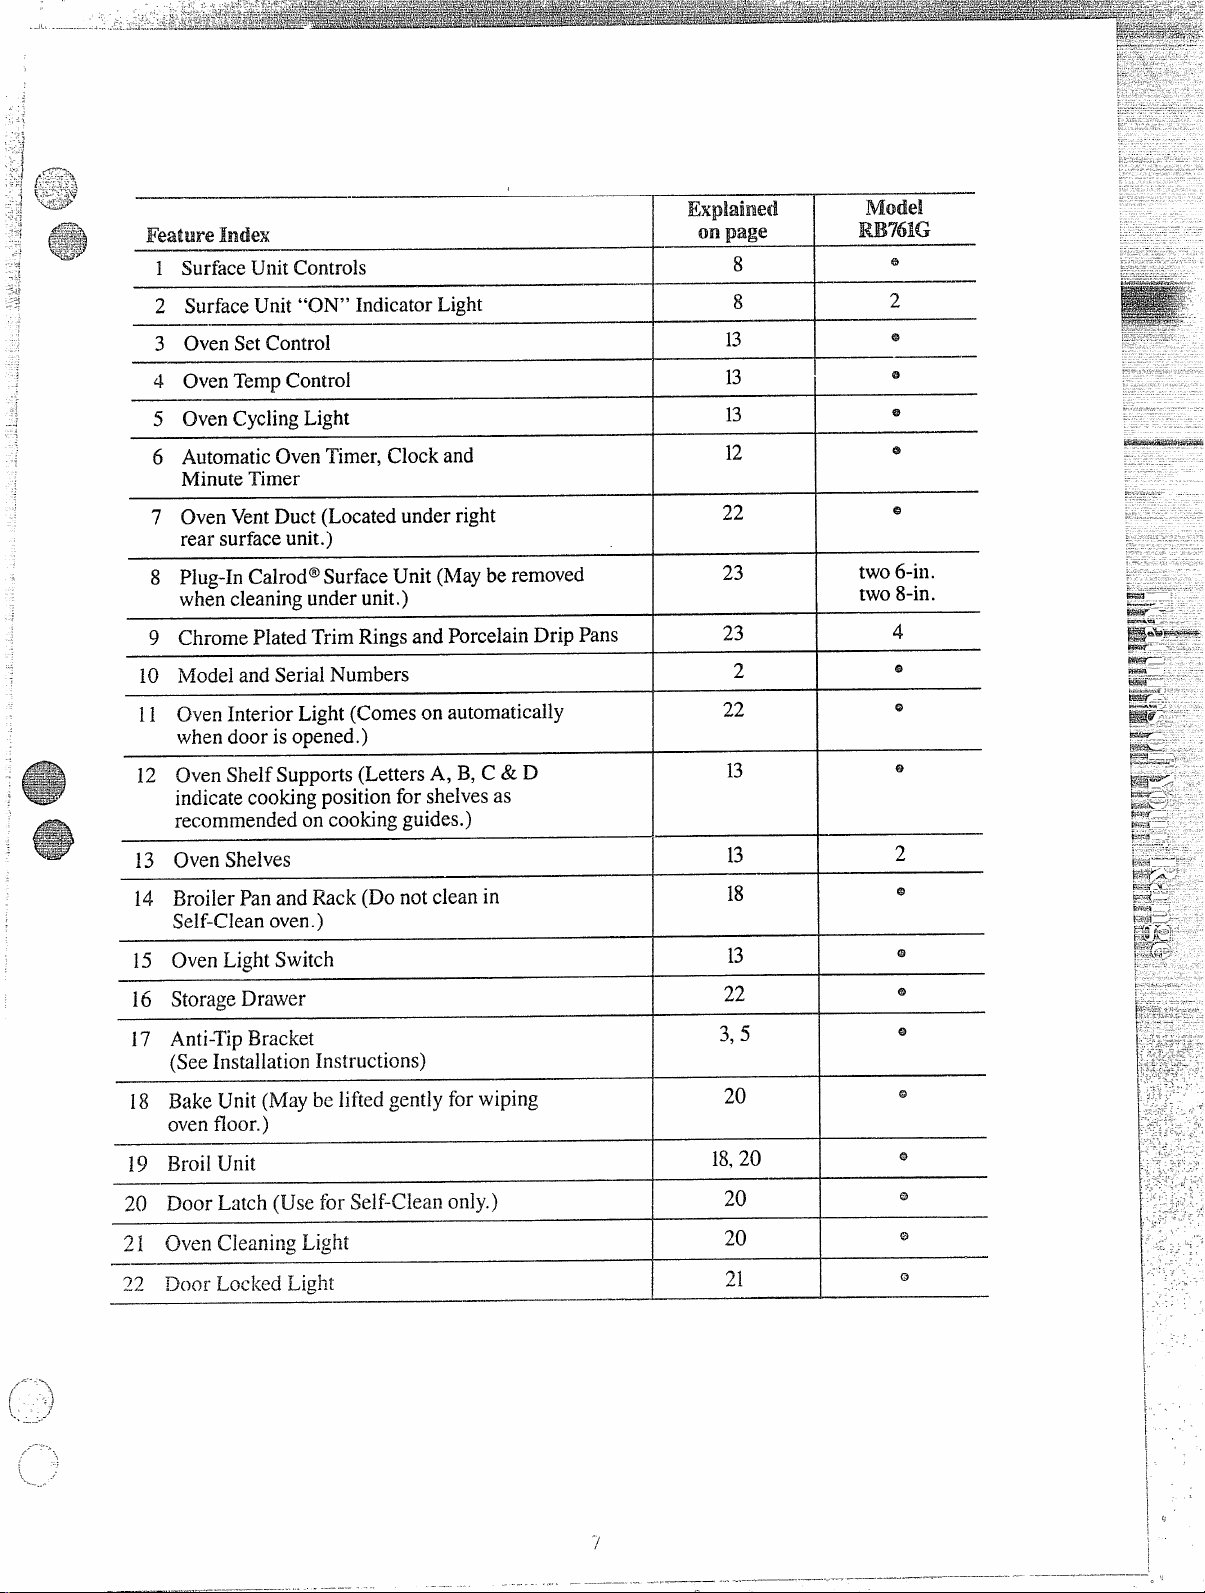
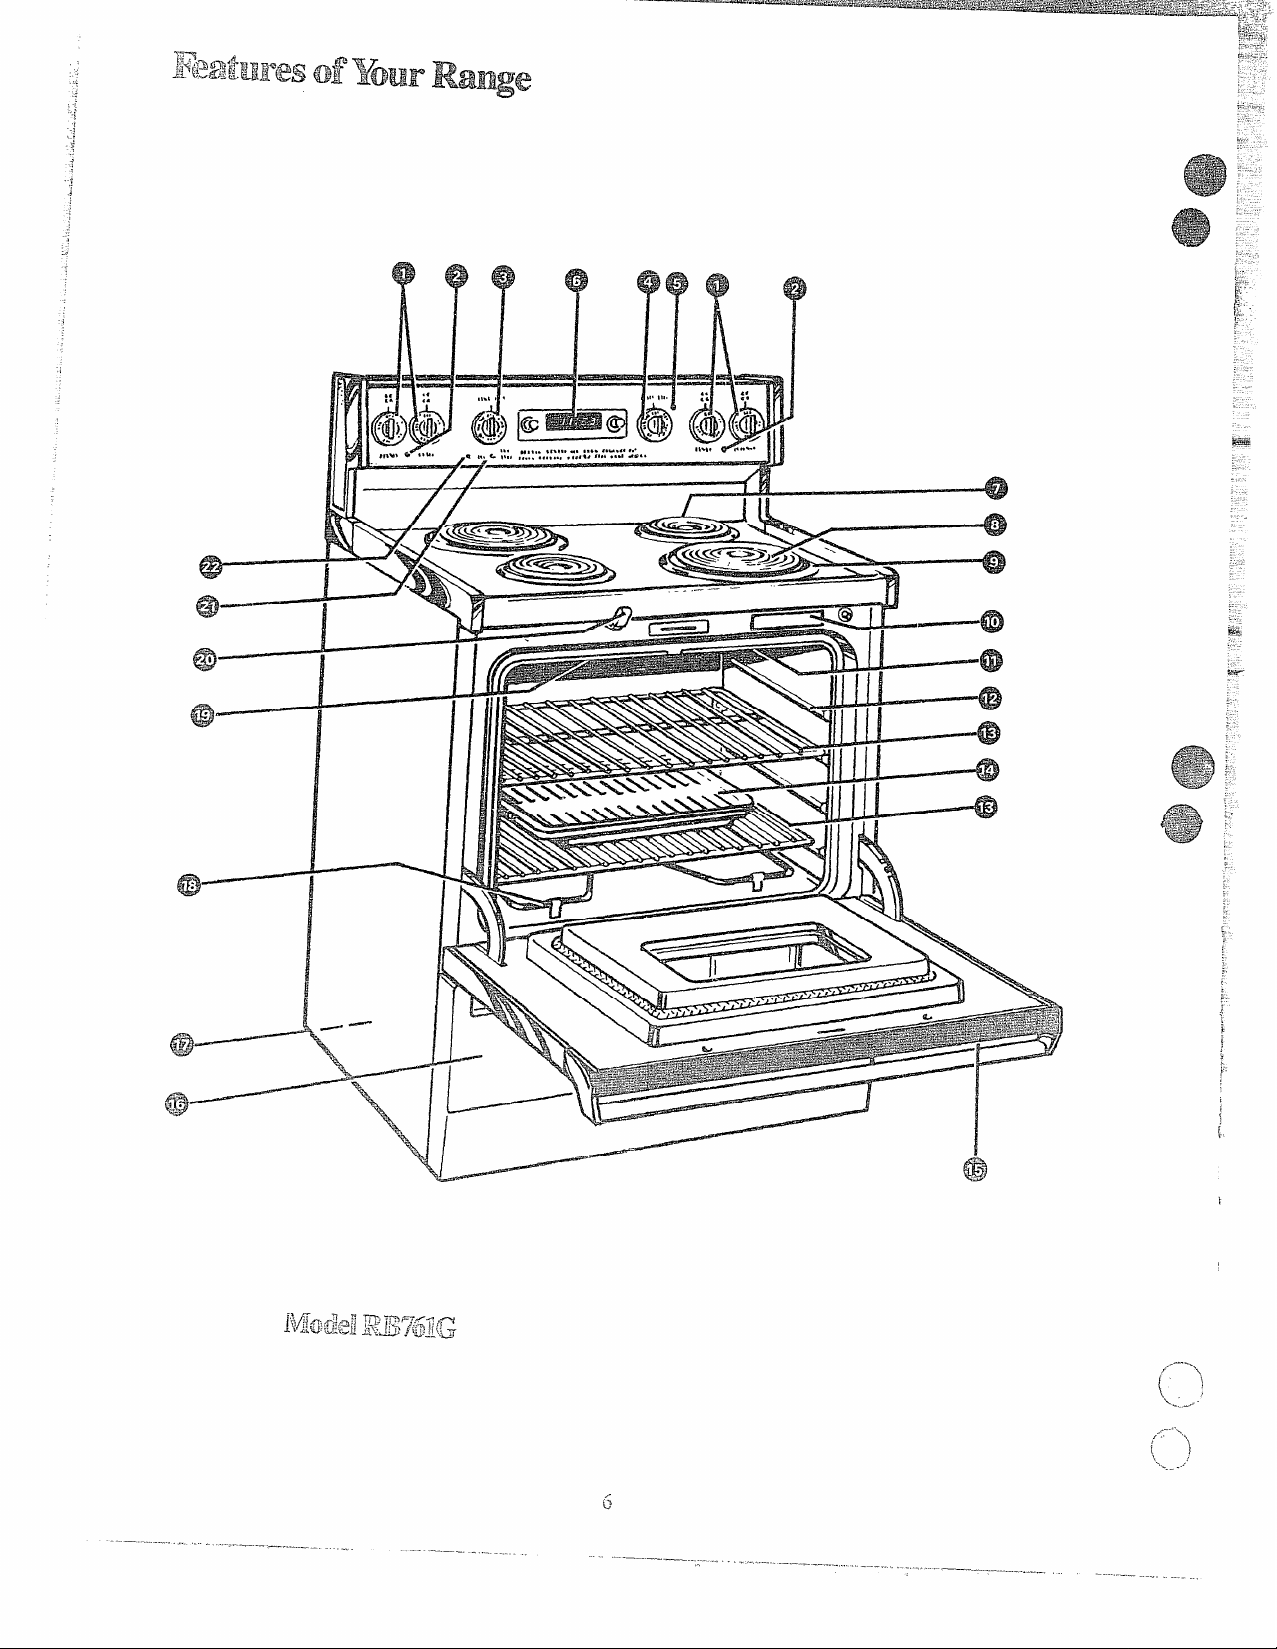
Feature Index
,“,
.,
.....—.—.—.... . ---
1 SurfaceUnit Controls
—
8
2 SurfaceUnit’’ON’’IndicatorLight
3 Oven SetControl
4 OvenTempControl
5 OvenCyclingLight
6 AutomaticOven Timer, Clock and
MinuteTimer
7 OvenVentDuct (Located under right
rear surfaceunit.)
8 Plug-In Calrod” Surface Unit (Maybe removed
when cleaning under unit.)
9 ChromePlatedTrimRingsand PorcelainDrip Pans
10 Modeland Serial Numbers
11 OvenInterior Light (Comes on automatically
whendoor isopened.)
12 OvenShelfSupports(LettersA, B, C & D
indicatecooking positionfor shelvesas
recommended on cookingguides.)
13 Oven Shelves
13
22
23
13
8
2
@
two6-in.
two 8-in.
I
14 Broiler Par-iand ~ck (Do not clean in
Self-Cleanoven.)
15 OvenLight Switch
16 StorageDrawer
i7 Anti-TipBracket
13
22
3,5
e
(See Installation Instructions)
18 Bake Unit (Maybe lifted gently for wiping
20
@
ovenfloor.)
19 Broil Unit
20 Door Latch (Use for Self-Clean only.)
21 Oven Cleani~2gLight
—
q~ Dc~orLocked Light
.-.
1
\
... . -.
.——
.,
18,20
20
20
21
Q
Page 8
surfaceCOQMWtith
-.
...... . -—------—--
..
Infini& HeatComtmk
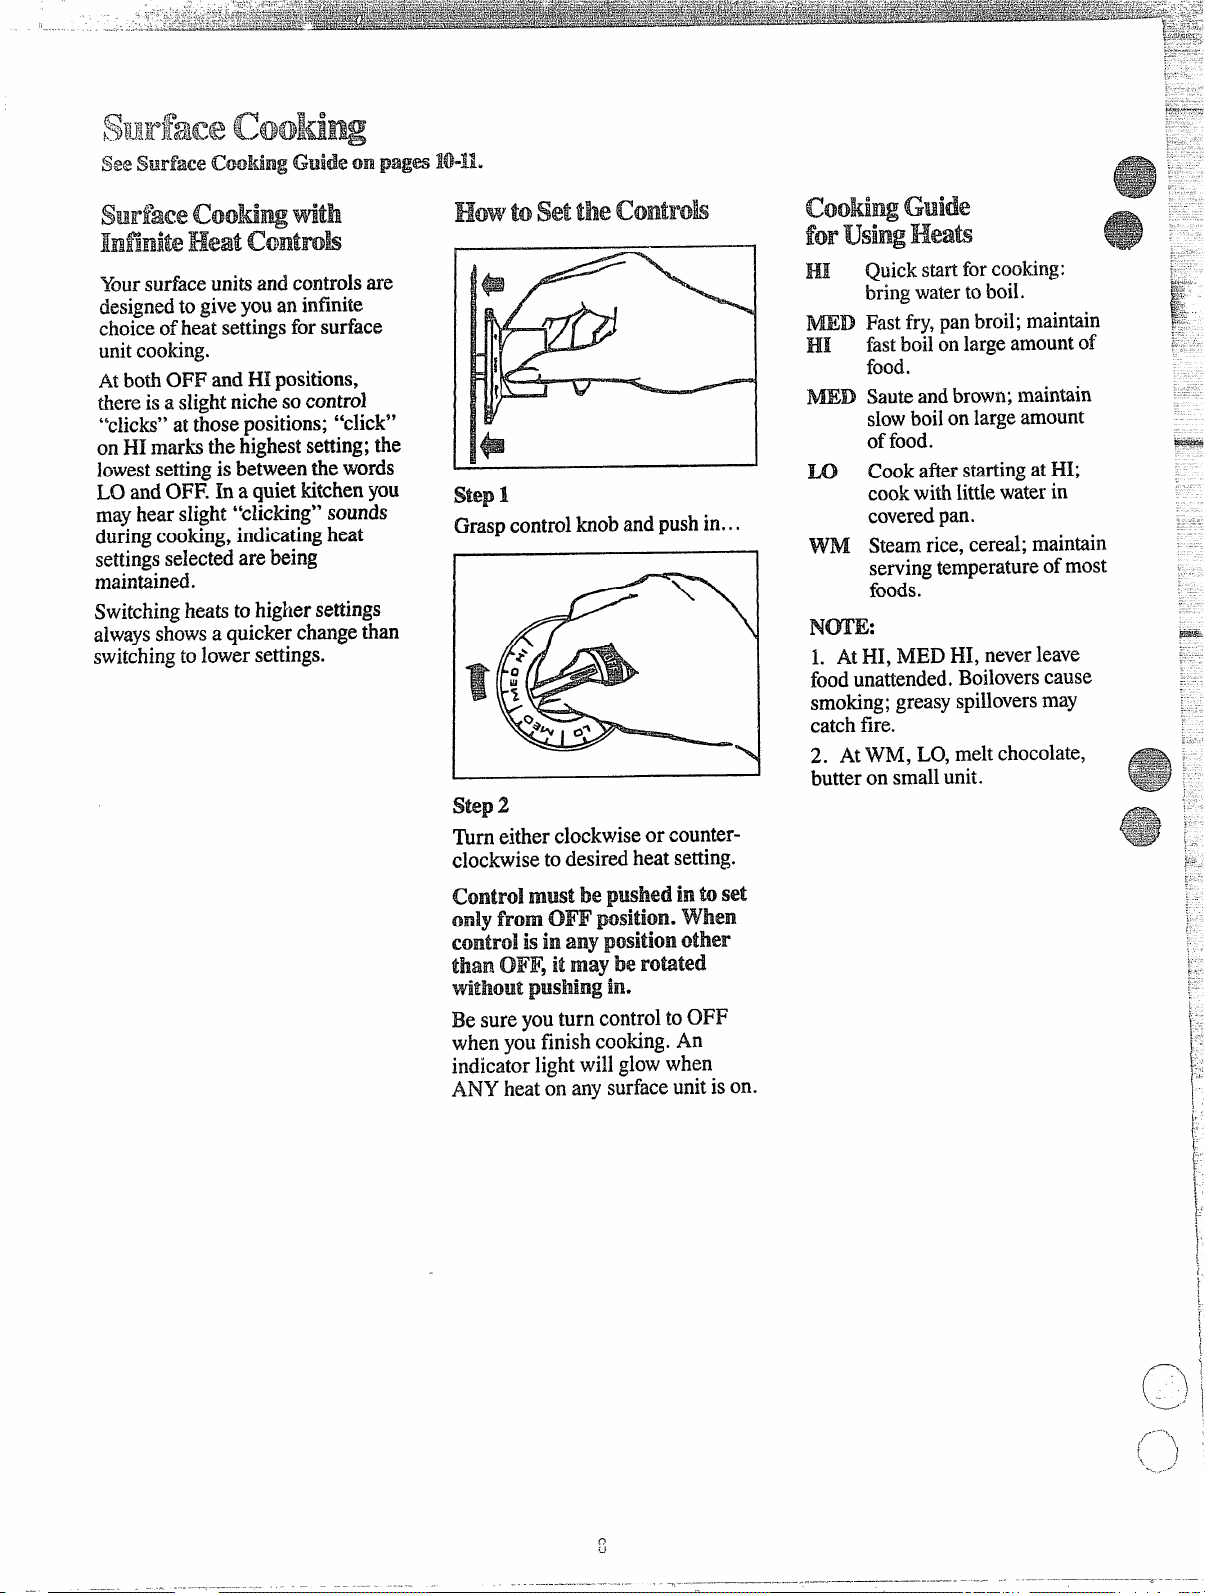
Yoursurfaceunitsand controlsme
designedto giveyou an infinite
choiceofheat settingsfor surface
unitcooking.
Atboti OFF md HI positions,
thereisa slightnichesocontrol
“clicks”attiose positions; “click”
on HI marks the highest setting;the
lowestsettingis betw=n the words
LO andOFF. In a quiet kitchenyou
mayhear slight “clicting” sounds
during cooking,indicatingheat
settingsselectedare being
maintained.
Switchingheatsto higher settings
alwaysshowsa quicker change than
switchingto lower settings.
.
step1
Grasp control knob and push in...
Shp 2
~rn either clockwiseor counter-
clockwise to desired heat setting.
HI Quickstar’tforcooking:
bringwatfirto boil.
WD Fastfry, panbroil; maintain ~~
HI fastboilonlargeamountof
food.
mD
I
1
Sauteandbrown;maintain
slowboilon largeamount
offood.
Cookafterstartingat HI;
m
cookwith Iittiewater in
coveredpan.
WM
Steamrice, cereal; maintain
servingtemperatureofmost
foods.
1. At HI, MED HI, neverleave
foodunattended.Boiloverscause
smoking;greasy spilloversmay
catch fire.
2. AtWM, LO, melt chocolate, ==- I
butter on smallunit.
.*.::-.
i
<*2 ~
M_=.-~,.
.—-
0,
.4-;.-
‘~-.
GF--
w
contro~mustbe pushedintoset
fromOm psition. when
only
Contro;is
thanOm, itmay beroated
%’tithout
Be sureyou turn control toOFF
when youfinish cooking. An
indicator light will glowwhen
ANY heat on any surfaceunitison.
inany positionother
pustingin.
Page 9
-.
..——.—----. .-.- -
. —.
.. ..O
..+
.
.-“
themanufacturer’sinstructionsand
recipesfor preservingfoods. Be
surecannerisfiat-bottomedand
fitsoverthe centerofyoursurface
unit. Sincecanning g;nerates large
amounts of steam, be carefulto
avoidbums from steamor heat.
Canningshouldonlybe doneon
surfaceunits.
Q.
canI Cover my drip pans with
foil?
A. No. Clean as recommendedin
CleaningGuide.
canI usespecialci)oki~lg
Q.
equipment,likeanoriental WOIL,
onany
A. Cookwarewithoutfla~surfaces
isnotrecommended.TIIelifeof
yoursurfaceunitcan be shortened
andtherangetop canbe damaged
fromthehigh heat neededforthis
typeofCooting.
Q. why am 1not getting the beat
I need from my surface Unib
eventhough I have the knobs on
the right
A.
andmakingsureitiscool, check to
makesurethatyour plug-inunits
are securely fastenedintothe
surfaceconnection.
surfaceulli~?
setting?
Afierturningsurfaceunit off
Q.lvl?ydoesEnycookwaretilt
WlaenI placeitonthesMtiaceUtit?
A. B&causethe surfaceunitis
notflat. Makesurethatthe “feet”
ollyoursurfaceunitsare sitting
tightlyin the range top indentation
andthe reflectorringis flat on the
rangesurface.
Q. why is the porcelain finish on
my ‘cookwarecoming off?
A. If youset your surfaceunit
higherthanrequiredforthe
cookwarematerial, and leaveit,
the finishmay smoke,crack, pop,
or bum dependingon the pot or
pan. Also, a toohighheat forlong
periods, and smallamountsofdry
food, may damagethefinish.
Potsthat extendbeyond 1inch of
cookingelement’strim ring are not
recommended formost surface
cooking. However,when canning
with water-bath or pressure canner,
larger-diameterpotsmay be used.
This isbecause boiling water
temperatures (evenunder pressure)
are notharmful to cooktop surfaces
surrounding the surface unit.
observeFoIlowingPoints
inCanniu
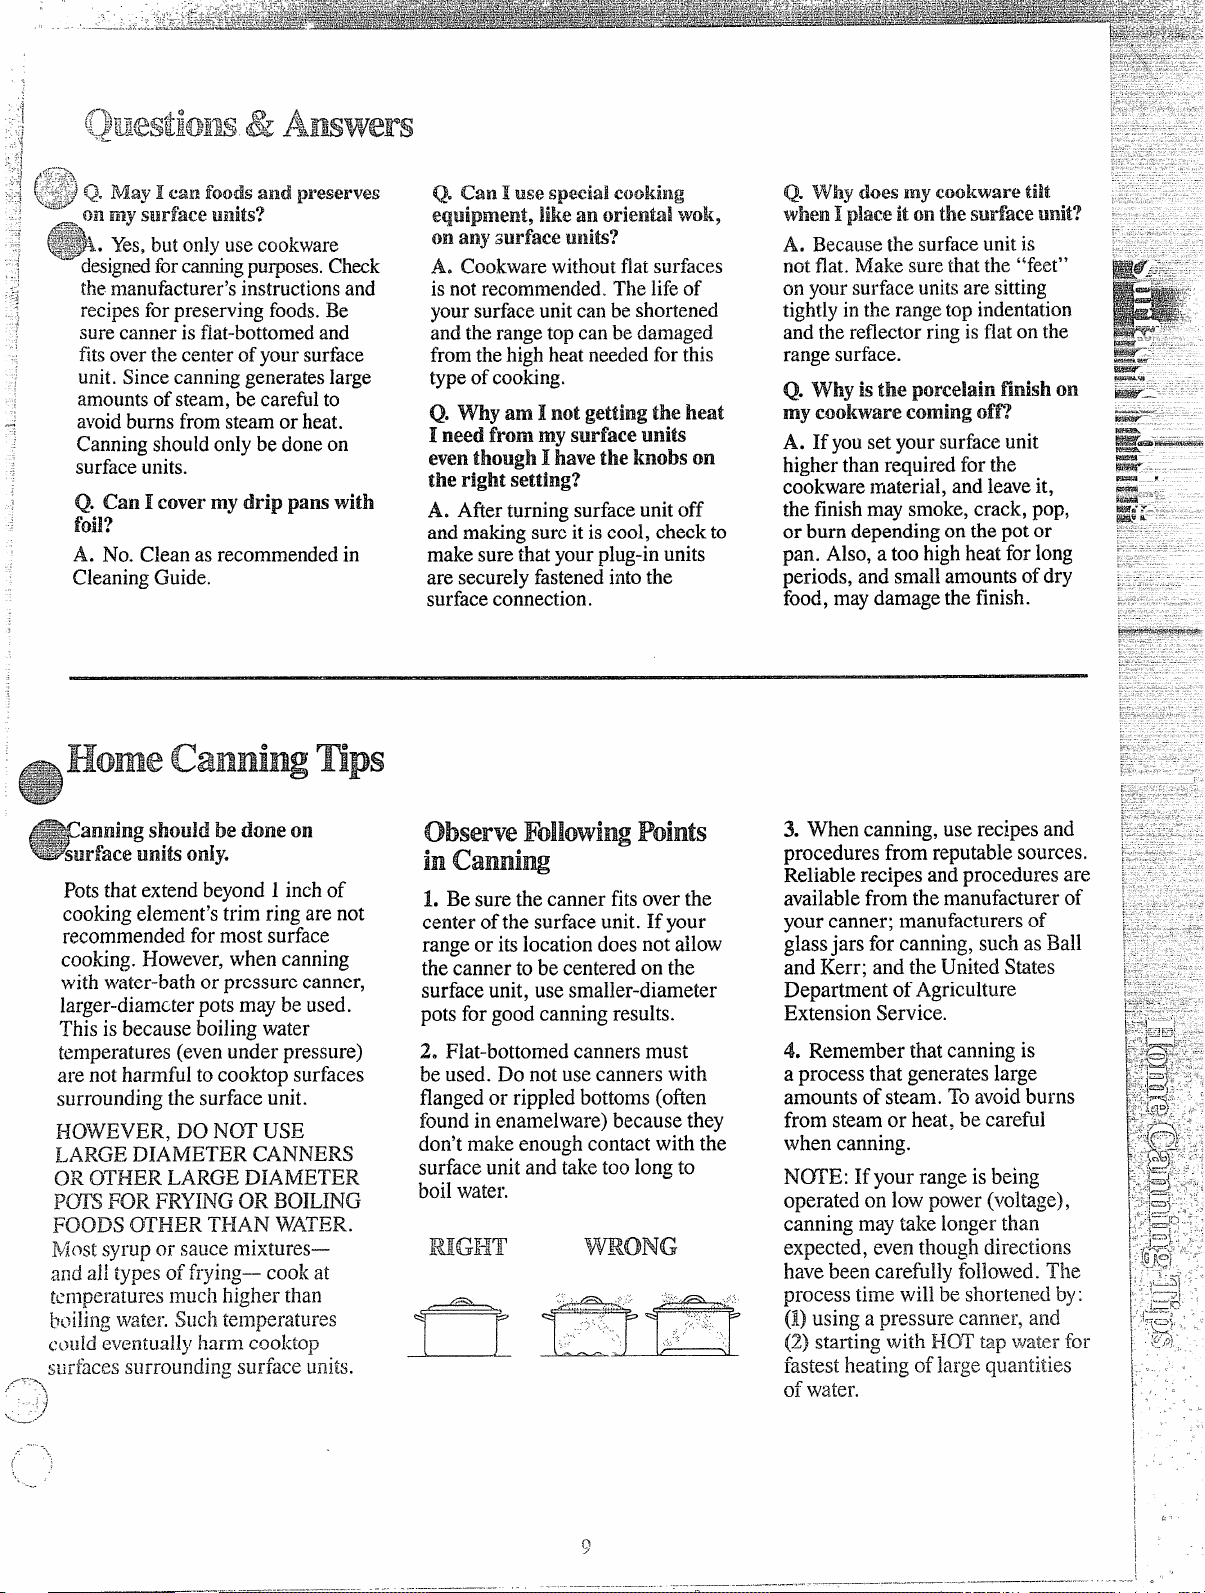
1. Be sure the canner fitsoverthe
center of the surface unit. If your
range or i~ location doesnot allow
the canner to be centered on the
surfaceunit, use smaller-diameter
potsfor good canning results.
2. Flat-bottomed canners must
be used. Do not use canners with
flangedor rippled bottoms(ofien
foundin enamelware) because they
don’tmake enough contact with the
surface unit and take too long to
3. When canning, use recipesand
procedures from reputablesources.
Reliablerecipes and procedures are
availablefrom themanufacturer of
your canner; manufacturers of
glassjars for canning, such asBall
and Kerr; and the United Stites
Department of Agriculture
Extension Service.
4. Remember that canning is
a process that generateslarge
amounts of steam. Toavoid bums
from steam or heat, be careful
when canning.
N~E: If your range is being
operated on low power (voltage),
canning maytake longerthan
expected, even thoughdirections
havebeen carefully followed. The
process time will be shorte]~edby:
(1)using a pressure canne~’,and
(2) stalling with HOT tap WaterfOl-
fastest heating of ]a~gequa~ltities
..’ (
--,
I
I
I
.1
Page 10

1. usemedium”orheavy-weight
cookwars.Aluminumcookware
conductsheat fastertian other
metals.Castiron and coated cast
ironcookwareis slowto absorb
heat, butgenerally cook evenlyat
LO or N!EDsettings.Steel pans
maycookunevenlyifnotcombined
withotherme~s.
2. Toconservethe mostcoating
~Il~~~y, pansshouldbefiatonthe
bottom,havestrtight sidesand tight
fittinglids. Match the size oftie
saucepartto the sizeoftie surface
unit. A pan tiat exteridsmorethan
a inch beyond the edgeof the trim
ring traps heat which causes
discolorationrangingfromblueto
dark gray on
chrometrimrings.
3. Deep Fat F~ing. Do notoverfill
kettlewith fatthat mayspillover
whenaddingfo~. Fros~ foods
bubble
Vi~O~OUS~~.watch fOOdS
fryir~gat fiightetiperatures ?TsJ
keeprangeand hood clean from
accumulakdgrease.
i
i-
Ced
Cornmeal,grits,
oatmeal
Cocoa
Eggs
Cookedinsiteil
Friedsunny-side-up
Friedovereasy
Poached
Scrambiedoromele~
cookware
Covered
Saucepan
Uncovered
Saucepan
Percolator
Covered
Saucepan
Covered
Skillet
Uncovered
Skillet
Covered
Skillet
Uncovered
$killet
Dimtions and%tting
toStart Cooking
HI.Incoveredpanbring
watertoboilbeforeadding
cereal.
HI. Stirtogetherwateror
milk,cocoaingredients.
Bringjusttoaboil.
HI.Atfirstperk,switch
heattoLO.
HI.Covereggswithcool
wawr.Coverpan, cook
untilsteaming.
MEDHI. Meltbutter,add
eggsandcoverskillet.
HI. Meitbuttei.
HI. Incoveredpanbring
watertoaboil.
HI. Heatbutteruntillight
goldenincolor.
LOorWM,thenaddcereal,
Finishtimingaccording
topackagedirections.
MED.tocook1or2 minutes
tocompletelyblendingredients.
LOtomaintaingentiebut
steadyperk.
LO.Cookonly3to4
minutesforsoftcooked;
15minutesforhardcooked.
ContinuecwkingatMEDHI
untilwhitesarejust set,about
3to5momminutes.
LO,thenaddeggs.When
bottomsofeggshavejustset,
carefillyNrnovertocook
otherside.
LO.Carefullyadde~s.
Cookuncoveredabout5
minutesat MEDHI.
MED.Addeggmixture.
Cook,stirringtodesired
doneness.
‘comments
Cerealsbubbleandexpandas
theycook;uselargeenough
saucepantopreventboilover.
Milkboilsoverrapidly.Watchas
boilingpointapproaches.
Percolate8to 10minutesfor
8cups,lessforfewer cups.
Ifyoudonotcoverskillet,baste
eggswithfattocmk topsevenly.
Removecookedeggswithslotted
spoonor pancaketurner.
Eggscontinuetosetslightlyafter
cooking.Foromleletdo notstir
lastfewminutes.Whenset,fold
inhalf.
Fruits
I%feats,multry
Braised:%t roastsof
beef,lamborveal;
porksteaksand
chops
~overed
iaucepsn
;overed
killet
..—.———. .
H1.incoveredpanbring
fruitandwatertoboil.
HI.Meltfat,thenaddmeat.
SwitchtoMEDHI
]rownmeat.Addwateror
)therliquid.
tO
LO,Stiroccasionallyand
checkforsticking.
LO.Simmeruntilfork
tender.
MEDHIor MED.Brownand
cooktodesireddoneness,
turningoverasneeded.
Freshfruit:Use1/4to 1/2cup
waterperpoundoffruit.
Driedfruit:Usewateraspackage
directs.T~medependsonwhether
fruithasbeenpresoaked.Ifnot,
allowmorecoolcingtime.
Meatcanbeseasonedandfloured
beforeit isbrowned,if desired.
Liquidvariationsforflavorcould
bewine,fruitor tomatojuice or
meatbroth,
Timing:Steaks1to2-inches:1to
2hours,BeefStev~:2to3hours.
PotRoast:2VZto4-hours.
Pan
f~yi~gisbestforthinsteaks
andchops.If ~are isdesired,pre- ,
heatskilletbeforeaddingmeat.
—a.—.—-..__
..-—.—.—.
1’”””>
()
~. --
/’F‘‘.-\
(
\
\ ,.’
...- ~,-
j
1
Page 11

OVER 1“
Food
FriedChicken
Panfried bacon
Sauteed:Lesstender
thinsteaks(chuck,
round,etc.);liver;
thickorwholefish
Simmeredorstewed
meat;chicken;corned
bees smokedpork;
s[ewingbeet tongue;
etc.
I%leltlngchwoiate~
butter,marshmallows
Pancakesor
Mta
Noodlesor spaghetti
Cwkwre
Covered
Skillet
Uncovered
Skillet
Covered
Skillet
Covered
DutchOven,
Kettleor
Large
Saucepan
Small
Uncovered
Saucepan.
Usesmall
surfaceunit
Skilletor
Griddle
Covered
LargeKettle
orPot
HI.Meltfat.SwitchtoMED
HItobrownchicken.
I-i]. Incoldskillet,arrange
baconslices.Cookjust
untilstartingtosizzle.
HI.Meltfat,SwitchtoMED
tobrownslowly.
HI.Covermeatwithwater
andcoverpanorkettle.
Cookuntilsteaming.
wM.AuowmtofiminuKto
meltthrough.Stirtosmooth.
MEDHI. Heatskillet8 to
10minutes.Greaselightly.
141.Incoveredkettle,bring
saltedwatertoa boil,uncover
andaddpastaslowlyso
boilingdoesnotstop.
settingtocomplete
cooking
LC).Coverskilletand
cookuntiltender.
Uncoverlastfewminutes.
MEDHI. Cook,turning
overasneeded.
LO.Coverandcook
untiltender.
LO.Cookuntilfork
tender.(Watershould
slowlyboil).Forverylarge
loads,mediumheatmay
beneeded.
I
MEDHI.Cookuncovered
untiltender.Forlarge
amounts,HImaybe
neededtokeepwater at
rollingboilthroughout
entirecookingtime.
comments
Addsaltorotherseasoning
beforecookingifmeathasnot
beensmokedorotherwise
cured.
Whenmeltingmarshmallows,add
milkorwater.
Thickbattertakesslightlylonger
time.Turnoverpancakeswhen
bubbIesrisetosurface.
Uselargeenoughkettleto
preventboilover,Pastadoubles
insizewhencooked.
PressureCooking
Frozen
-----
>
-.—..-..—....—.—.....--—..—..—-
-.—
‘rcssure
:ookeror
;anner
Jncovered
aucepan
;overed
aucepan
‘overed
aucepan
ncovcrcd
{illet
_..—
Oy,ered
iucepan
— .—..-——.
HI.Heatuntilfirstjiggleis
heard.
HI,Bringjust toboil.
H1.Measure1/2to 1inch
~vaterinsaucepan,Add
;altandprepa~d vegetable.
[ncoveredsaucepanbring
oboil.
31,Measure waterandsalt
isabove.Addfrozenblock
)fvegetable.Incovered
i~ucepanbringtoboil.
41.Inskilletmeltfat.
MEDHIforfoodscooking
10minutesor1=. MEDfor
foodsover10minutes.
LO.Tofinishcooking.
MED.Cook 1pound10
to30or moreminutes,
dependingontenderness
ofvegetable.
LO.Cookaccordingto
timeonpackage.
MED.Addvegetable.
Cookuntildesired
, tendernessisreached.
WM.Coverandcook
accordingtotime.
Cookerstlouldji~le 2to3times
perminute.
Stirfrequentlytoprevent
sticking.
Uncoveredpanrequiresmore
waterandlongertime.
Breakupor stirasneededwhile
cooking,
Turnoverorstirvegetableas
necessaryforevenbrowl]ing.
Tripleinvolumeaftercooking.
TimeatWM.Rice: 1cupriceand
2cupswater--25minutes.Grits: 1
cupgritsand4.cupswatei-40minutes.
.—-—-..—
Page 12

..:
.,-
.
‘--
.
~
,,
~
~
~
t1
[
i
,
i
~
TIME
Four “$’s”are displayedandsignal
lights glowoverwordsidentioing
theoperationsyou can programthe
automatictimerto control.Afier 15
seconds,the8’sgo out and “PF’>
appearsalongwith a flashingsignal
lightabove the word CLOCK. Set
the clock and “PF>’isreplacedby
time ofday.Now youcanprogram
the timer with thetouchofa button
and a turnof a knob.
If powerisdisruptedatanytime,
the abovesequencerecursandyou
mustresettheclock beforeyoucan
proceed to program thetimer.
SKi.ECT
MllJ/SECCOOK STOP C1OCK$L:J~
TIMER“~~;fN TIME
Hfl/MIN
o0....,,
2. TurntheTIME SELE~ knob
untilthe number ofminutesa~d
secondsyouwanttotime (up to
99:00)appearsinthedisplay—for
example,
“1:30”for 1minuteand
30 seconds.
Timer thenbeginscountingdown
automatically4 secondslater, or
immediately-ifyoupushand release
the PROGWM SELE~ button.
Beepssoundcontinuouslywhen set
How can I use my Minute/
Q.
Swond mmer
cooking easier?
A. YourMinute/SecondTimer
willhelptimetotalcookingwhich !=.
toma~temy SUrfac
.U
<.
g..
,r,
includes time toboil foodand
changetemperatures.Do notjudge
cookingtimebyvisiblesteamonly.
Foodwillcookincoveredcontainers
eventhoughyouc(an’tseeanysteam. . .
Q. Must the clock be
wish touse the Automatic Tnmer
setwhen I
.
forbaking?
A. Yes,if you wish to set the
Timer to turn theovenon and off
atpresettimes.
time has elapsed. Tosilence the
beeps, push and release the
PROGWM SELE~ button.
A. Yes,the Minute/SecondTimer
can be usedduringany cooking
finction. It doesnotturn theoven
on and off.
Q. canI Changethe clock while
I’mTime cooking inthe oven?
A. No. The Clock cannot be
changedduring any program that - ~
usesthe AutomaticTimer. You.
must either stopthoseprograms
or waituntiltheyare finished
beforechangin~time.
Q. How ‘canI $ancel a timed ‘
function?
A. Push md releasetie PROGW
SELE~ buttonuntilthe signal
lightappears over the appropriate
function. Then, to cancel a S~P
TIME, turntheTIME SELE~ bob
counterclockwise until present tin~e \
ofday appears in the di~play...
or to cancel a hJINUTE/SECONTD
TIMER setting, COOK TIME or
CLEAN TIME, turn
theTIhflE
SELE~ knob countercloclcwise
until” :00” appears in the display.
.9” :
o
.
..
..
[
i
/
1. Push and release the
PROGWM SELE~ buttonuntil
the signallightappears abovethe
word CLOCK.
2. Turn theTIME SELE~ knob
in either direction to set theClock
numeralstothecorrecttime,Timing
then beginsautomatically4 seconds
later,or immedia~lyifyoupushand
release the PROGRAM SELE~
button.
mme Bake
uses
Automaticmmer
Using the AutomaticTimer, you
can TIME BAKEwiththe oven
startingimmediatelyand turning
off at the S~P TIME set, starting
immediatelyand cookingfor the
lengthofCOOK TIME set.. .or you
can setboth COOK and S~P
TIMES to automaticallystart and
stopovenat a later time of day.It
takesthe wor~ outof not being
home to start or stopthe oven.
Settingthe Timer for TIME BAKE
is explained in detailon page 14.
self-clean uses
Alltomatic mmer
The self-cleaning function on your
range uses the Automatic Timer to
set the length of time needed to
clean, whether you wish to clean
im.rnediatelyor delay the operation
to clea]]at low
energytimes during
tilenight.
An explanation of setting the Timer
fo; self-clea]lingappears on pages
20 and 21.
Page 13

“-Y ~roperly.Readoverthe directions
————— . .. . . . . . .. . . .- . - . - -—-—— —--— --—-—-——
fortheAutomaticOvenTimerso
youunderstanditsuse with the
controls.
2. Check oveninterior. Look at
fheshelves.Takeapracticerun at
removingandreplacingthemproperly,
togivesure, sturdy support.
3. Read overinformationandtips
thatfollow.
4. Keep thisbook handy so youcan
referto-it, especiallyduringthe
first weeksof gettingacquainted
withyourrange.
OVENSET
The controls for theovenare
marked OVEN SET and OVEN
TEMP. The OVEN SET controlhas
settingsforBAKE, TIME BAKE,
BROIL, CLEAN and OFF. When
youturn the knob to the desired
setting, theproper heating unitsare
then activated for that operation.
TheOVENTEMP controlmaintains
the temperature you set, from
WARIU(150°F.)to BROIL (550”F.)
and also at CLEAN (880”F.).
PREHEATINGtheoven,evento
hightemperaturesettings,isspedy
—rarelymorethanabout10minutes.
Preheattheovenonly when
necessary.Mostfoods will cook
satisfactorilywithoutpreheating.
If youfindpreheatingis necessary,
keepan eyeon the indicatorlight
and putfoodintheovenpromptly
afier the lightgoesout.
oven Inkrior
The shelvesare designedwith stop-
she~ves
Iocksso that when placedcorr~tly
on the shelfsupports,they(a)will
stopbeforecomingcomp~etely
from the oven, and (b) till not tilt
when removingfoodfrom or
placingfood.on them.
Toremove shelffrom the oven,lift
up rear of shelf, pull forwardwith
stop-locks(curvedextensionunder
shel~ alongtop of shelf supports.
Becertain that shelfiscoolbefore
touching.
To replace shelf inoven,insert
shelf with stop-locks resting on
shelf supports. Push shelftoward
rear ofoven;it will fall intoplace.
When shelf is inproper position,
stop-lockson shelfwill run under
shelf support when shelf is pulled
forward.
Theovenhasfourshelf supports–
A (bottom),B, C andD (top).
Shelfpositionsfor cookingfood
are suggestedon Baking, Roasting
andBroilingpages.
oven Li@t
Thelightcomes onautomatically
when the door is opened. Use
switchon front of door toturn light
on and offwhen door is closed.
Tile ove~l cycling Light glows
u~ti]tileQ~~~
t~~~~T~~UT@9
with fhe oven unit(s)duringtooting.
2.1,
-,
.$””
.
E=dC~l= ~0~ S~]a&~
then goes off and on
I
,
I
!
o
Page 14

1. inlacefoodinoven,beingsure to
leaveabout 1“ betweenpans and
ovenwallsforgoodcirculationof
heat. Closeovendoor,and avoid
frequentdoor openingsduring
bakingtopreventundesirableresults.
2. Turn OVEN SET’knobto BAKE
andOl~ENTE~ knobtotempemture
on recipe or BakingGuide.
3. Check foodfordonenessat
minimumtime on recipe.Cook
longerifnecessary.Switchoffheat
and removefoods.
HowtommeBake
The oventimer controlsare
designedtoturn theoven on and off
automaticallyat specifictimesyou
wantbakingto startandstop.
How
tosetTimerforImmediate
s@l”t&Automatic
StopTme Fwturm.
right
away, cooks for preset length
oftime,andturnsoff automatically.)
1. Push and release PROGRAM
SELE~ button until signal light in
display appears abovethe words
STOP TIME. Display will show
present time of day—forexample,
“1:00” o’clock.
stop usingthe
(Oventurnson
HowtosetTiunerforImmediate
start& AutQKnatiestopusing
the CookTimeFeatures.(Oven
turnson rightaway,cooks for
presetleng~hoftime,andturnsoff
automaticallyat presetStopTime.)
1. Push and releasethe PROGWM
SELE~ buttonuntil the signal
lightappearsabovethe words
COOK TIME, Thedispiaywill
show“0:00?’
2. Turn the TIME SELE~ knob
untilthe lengthoftimeyou want
foodsto cool appears; ~orexample,
“2:30” for2 hours, 30 minutes.
3. Turn OVEN SET knob to TIME
BAKE.Turn OVENTEMP knobto
desiredoventemperature.Foodwill
cook for 2 hours and 30 minutes,
the ovenwill turn off, and 4 beeps
will sound.
4. Turn OVEN SET to OFF and
removefoodfrom oven.
How ‘to
Start & Stop.(Oven automatically
turns on later, cooksfor preset
Icngthof time and turns off at
preset StopTime.)
setTimer forDelay
——
MIN/SECCOOK STOP C1OCK C+fi~~
TI$AER lIME TltJE
I HRl~AIN HR/MiN
L
Q ;
TIME
SELECT
0
I
I ---
I
.
3. Turn the TIME SELE~ knob
untilthe lengthoftimeyouwant
foodto cook appears;for example,
“2:30” for 2 ~~ursand 30 min~tes.
4. Push and releasethePROGWM
SELE~ buttonuntilthe signal
lightappears abovethe words
S~P TIME. The displaywill
showthe sum ofthe present time of
dayplusthe setCOOK TIME.
I TIME
clockwiseuntilthetime you want
foodto stop cooking appears in the
display;forexample,“6:00” o’clock.
Note:Youcannotdiala StopTi~ne
thatkmorethan11hoursa)td59
~ninuteslaterthantheprcserttti~?~c
ofday onyourrangeclock.Ifyou
shouldatten~p~todoso, ntitnera[s
andsigncl lightsinthedisplaywill
jlash onandofland a continuous
tonewillsounduntilyouturnthe
TIMESELEfldial toa~zacceptable
Stop?’i~ne.
6. Turn OVE~q SETknob to TIME
BAKE. Turn OVEFITEMP bob
to desired oventemperature.
ovenwill turnon automatically
at3:30.At6:00o’clockoven will
shutoff automatically, and.4 beeps
will sot~nd.Tin~eof day will be
displayed.
,.-
I
.,----‘-.,
( ‘\
:.,:
,.,
Page 15

quickly.For mostconventional glasscookwaregenerallyabsorb necessary,e~peciallyforfoods
bating, light,shinyfinishesgivebest heat, which mayresultindry,crisp whichcooklongerthan 30 to 40
resultsbecausetheyhelpprevent crusts.ReduceovenIIeat25°F.if minutes.For foodwith sl~ort
overbrowning.Forbestbrowning lightercrests are desired. Rapid.
results,we recommend dullbottom
browningof some foodscan be
surfacesforcakepansand pieplates. achievedbypreheatingcastiron
cookware.
cookingtimes, preheatinggive’
bestappearanceand crispness.
4. Opentheoven door tocheck
foodas littleas possible to prevent
unevenheatingand to saveenergy.
Food
Bread
Biscuits(fi-in.thick)
Coffeecake
Cornbreadormuffins
Gingerbread
Muffins
Popoven
Quickloafbread
Yeastbread(2loaves)
Plainrolls
sweetrolis
Cakes
:withoutshortening)
Angelfood
Ie]jy roll
~Ponge
:akes
3undtcakes
:upcakes
‘ruitcakes
,ayer
,ayer,chocolate
oaf
‘ookies
rownies
rop
t~”rigcrator
ollcciorsliced
Container
ShinyCookieSheet
ShinyMetalPanwith
satin-finishbottom
CastIronorGlass
ShinyMetalPanwith
satin-finishbottom
ShinyMetalMuffinPans
DeepGlassorCastIronCups
Metal orGlassLoafPans
MetalorGlassLoafPans
ShinyOblongorMuffinPans
ShinyOblongorMuffinPans
AluminumTubePan
MetalJellyRollPan
MetalorCeramic Pan
MetalorCeramic Pan
;hinyMetalMuffinPans
detalor GlassLoafor
:ubcPan
ihinyMctalPanwith
atin-finishbottom
;hinyMetalPanwith
atin-finishbottom
MetalorGlassLoafPans
Metalor Gl:issRins
Cookie Sheet
Cookie Sheet
Cookie Sllcc(
Shelf
POsition
B,C
B,A
B
B
A,B
B
B
A,B
A, B
B,A
A
B
A
A,B
B
A,B
B
B
B
B,C
B,C
B,C
B,C
Oven
Tempemture
400°-4750
350°-4000
400°-4500
350°
400°-4250
375°
350°-375”
375°-4250
375”-425°
350=-3750
325°-3750
375°-4000
325”-350°
325°-3500
350°-3750
275°-3000
350°-3750
350°-3750
350°
325°-3500
350°-4000
400°-4250
375°-400”
-me,
Rlinutes
15-20
20-30
20-40
45-55
20-30
45-60
45-60
45-60
10-25
20-30
30-55
10-15
45-60
45-65
20-25
hrs.
2-4
20-35
25-30
40-60
25-35
10-20
6-12
7-12
COmments
Canned,refrigeratedbiscuitstake
2to4 minuteslesstime.
Preheatcastironpanforcrispcrust.
Decreaseabout5minutesformuffin
mix,orbakeat450°F.for25minutes,
thenat350°F.
for 10to 15minutes.
Darkmetalorglassgivedeepest
browning.
Forthinrolls,ShelfBmaybeused.
Forthinrolls,ShelfBmaybeused.
Two-piecepanisconvenient.
Linepanwithwaxedpaper.
Paperlinersproducemoremoist
crusts.
Use300°F.andShelfBforsmailor
individualcakes.
Barcookiesfrommixusesametime.
UseShelfCand increasetemp.
25°F.to50”F.formorebrowning.
—
Gl;iss(>rMct21Pan
Glass CustardCups or Casserole
inp7nofhot water)
(set
GlassCi!stardCupsor
Casserole
A, B,C
B
B
350°-4000
300°-3500
325°
400°-4250
325°-3500
400°-4250
400°-4250
450°
3~5”-4~”
325°-375”
300°-3500
30-60
30-60
50-90
45-70
15-25
40-60
40.60
12-15
60-90
30-60
30-75
Reducetemp.to300°F.forlarge
custard.Cookbreadorricepudding
withcustardbase80to90minutes.
Largepiesuse400”F.andincrease
time.
Toquicklybrownmeringue,use
~O~°F,for~to 10minutes.
Custardiillingsrecluirelower
temperatlire,longertirnc.
Incre2setime forlarge amount
or size.
~——— .. ..
.—
I
Page 16

Roastingis cooking by dryheat.
Tendermeator poultrycanbe
roasteduncoveredinyouroven.
Roastingtemperatures,which
shouldbelow andsteady,keep
spatteringtoaminimum.Jvhen
roasting,itisnotnecessaryto
sear,baste,coveror addwater
toyourmeat.
Roastingisreallyabaking
.!
procedureusedformeats.Therefore,
ovencontrolsare settoBAKEor
TIME BAKE. (Youmayhear a
slightclickingsound,indicatingthe
ovenisworkingproperly.)Roasting
iseasy;just followthesesteps:
Step4: Mostmeatscontinueto
cookslightly whilestanding,after
beingremovedfromtheoven.
Standingtimerecommendedfor
roasts is 10to20minutestoallow
roasttofirm up andmakeiteasierto
carve.Internaltemperaturewillrise
about 5“to IO”F.;to compensatefor
temperaturerise, ifdesired, remove
roastfromovenat5°to 10”F.less
thantemperatureonguide.
N~E: YoumaywishtouseTIME
BAKE,asdescribedonpage 14,to
turnovenon andoffautomatically.
Rememberthatfoodwillcontinue
tocookinthehotovenandtherefore
shouldberemovedwhenthedesired
Step 1:Checkweightofmeat, and
place, fatsideup,on roastingrack
ina shallowpan. (Broilerpan with
rack isagoodpan forthis.) Line
broilerpan withaluminumfoilwhen
usingpan formarinating,cooking
with fruits,cookingheavilycured
meats,or for bastingfoodduring
cooking.Avoidspilling these
materialsonovenlineror door.
Step 2: Placeinoven on shelf in
A or Bposition..
necessary.
OVENSET
NOpfeheatin~ is
OVENTEMP
II
internal temperature hasbeen
reached.
For Wozen
Frozenroastsofbeef, pork,
s
lamb,etc., canbestartedwithout
thawing,butallow 10to25 minutes
per poundadditional time (10
minutesper pound forroastsunder
5pounds, more timeforlarger
roasts).
~Thawmostfrozenpoultry before
roastingto ensureevendoneness.
Somecommercial frozenpoultry
can be cooked successfullywithout
thawing.Followdirectionsgiven
on packer’slabel.
Roask
A. Checkingthe finishedint~:,]al
temperatureat the completion of
tooting time isrecommended.
TemperaturesareshowninRoasting
Guideon opposite page. For roasts
over8 Ibs., cookedat 300”F.with
reducd time,chinkwiththermometer
at half-hourintervalsafter half the
timehas passed.
~. why is my roast
crumbling
whenI try to carveit?
Roastsare easier tosliceif
A.
allowedto cool 10to 20 minutes
afier removingfrom oven.Besure
to cut across the grain ofthe meat.
Q. Do 1 need to preheat my
oven
eachtimeI cookaroast
orpoultry?
A. It is rarely necessary to preheat
youroven, only for very small
roasts, whichcook a short length
oftime.
Q. when buying a roast, are
there any special tips that would
help Xnecook it more evenly?
A. Yes.Buya roast as evenin
thickness as possible, or buy rolled
roasts.
Qecan I seal the sides of my foii
“tent9’when roasting a turlKey?
A. Sealing the foilwill steam the
meat. bajing it unsealedallowsthe
air to circulate and brown the meat.
-
Page 17

just beforeroasting.Uskmeat temperaturerise, if desired,remove
thermometerfor more accurate
doneness. (Do notplace
roastfromovenat5°to IO°F.less
thantemperatureon guide.
thermometerin stuffing.)
ApproximateRoastingTime,
inMinutesper~und
3tO
5-ibs.
24-30
30-35
21-25
25-30
10minutesperpound(anyweight)
Under10-lbs.
3to5-lbs.
3540
35-40
10to 15-lbs.
20-25
NW
oven
nm~rature
Doneness
Meat
Tendercuts;rib,highqt.lalitysirlointip,
rumportop round*
Lamblegorbone-inshoulder*
Vealshoulder,legor loin*
Porkloin,ribor shoulder*
Ham,precooked
Ham,raw
‘Forbonelessrolledroastsover6-inchesthick,add5to 10minutesperpoundto timesgivenabove.
%u!try
;hickenorDuck
;hickenpieces
tirkey
325°
325° Rare:
325°
325°
325°
325°
325°
375°
325°
Rare:
Medium:
WellDone: 35-45
Medium:
WellDone: 30-35
WellDone: 35-45
Well Done: 35-45
ToWarm:
Well Done: 20-30
~,~e]lDone:
Well Done:
Well Done:
6to8-lbs.
18-22
22-25
28-33
20-23
24-28
28-33
30-40
30-40
10to15-lbs.
17-20
oYer 5-!bso
30-35
OverK-lbs.
15-20
Internal
Temperature
130°-1400
150°-160°
1700-185°
130°-1400
150°-1600
170°-1850
170°-180°
170°-180°
125°-1300
170°
185°-1900
185°-1900
Inthigh:
185°-190°
‘F
Page 18

~roilin~ ij cookingfoodbyintense
radiant heat fr~rn theupperunitin
theoven.Mostfishandtendercuts
ofrneatcanbebroiled. Followthese
stepsto keepspatteringand
smokingtoaminimum.
Step 1:If meathas fatorgristlenear
edge,cutverticalslashesthrough
bothabout2“apart. Ifdesired,fat
maybetrimmed, leavinglayer
about 1/8“thick.
Step 2: Placemeat onbroilerrack
inbroiler panwhichcomeswith
range.Alwaysuse rack sofatdrips
intobroilerpan;otherwisejuices
maybecomehotenoughtocatchfire.
Step3:Positionshelfonrecommended
sheifpositionassuggestedinBroiling
Guideonpage19.Mostbroilingis
done on C position,butifyour
rangeisconnectedto208volts,you
maywishtousehigherposition.
Step 6: Turnfoodonly onceduring
cooking. Timefoodsforfirstside
perBroilingGuide,
T’urnfood,thenuse timesgivenfor
secondsideasaguidetopreferred
doneness.(Wheretwothicknesses
andtimesaregiventogether, use
firsttimesgivenforthinnestfood.)
Mep %TurnOVENSETknob
toOFF.Servefoodimmediately,
andleavepanoutsideoventocool
duringmeal foreasiestcleaning.
use of Aluminum Foil
A. Chickenistheonly food
recommendedfor closed-door
broiling.This isbecausechickenis
relativelythickerthan otherfoods
youbroil. Closeddoorholdsmore
heatinoven,sochickenmaybe
broiledbut well-doneinside.
Q. whe~l broiling, is it necessary
to always usea rack in the pan?
A. Yes.Usingtherack suspends
themeatoverthepan. As the meat
cooks,thejuices fallintothepan,
thuskeepingmeatdrier. Juices
are protectedbythe rack and stay
cooler,thuspreventingexcessive
spatterand smoking.
Q. should I salt the meat before
broiling?
A. No. Saltdrawsoutthejuices
and al!owsthem to evaporate.
Alwayssalt after cooking. Turn
meatwith tongs;piercingmeat
with a fork also allowsjuices to
escape. When broilingpoultry
or fish, brush each sideoften
with butter.
~~eP ~: Le~}/c~~or-ajara fewinches
(exceptwhenbroilingchicken).
The door staysopen by
itself, yet the
propertenlpera~ureismaintainedin
—.——-.
—.
1. Ifdesired, broilerpan maybe
linedwithfoilandbroilerrackmay
becoveredwith foilforbroiling.
ALVdAYSBECERTAINTOMOLD
FOIL THOROUGHLY TO
BROILER RACK, AND SLIT
FOIL To coNI~oRM WITH
SLITSIN RACK. Broilerrackis
designedtominimizesmokingand
spattering, and to keepdrippings
coolduring broiling. Stoppingfa~
and meatjuices fromdraining10
thebroiler pan preventsrack from
serving itspurpose, andjuices may
become hot enoughtocatchfire.
A. In some areas, the power
(voltage)to the rangemaybe low.
In thesecases, preheat the broil
unit for 10minutesbefore placing
broiler pan with food in ove~l.
Check to see ifyou are using the
recommended shelfposition. Broil
for longestperiod oftime indicated
in the BroilingGuide. Turn food
only once d~~ringbroili~~g.
Page 19

2. Ovendoorsl]o~lldbe ajar for all
i
foodsexceptchicken;thereisa
specialpositionon door which
holdsdoor open correctiy.
~. For steaksandchops, slash fat
evenlyaroundoutsideedgesofmeat.
Toslash, cut crosswisetl~rough
outerfatsurfacejl~stto the edgeof
tl]emeat, Usetongs to tt}rnmeat
overto preventpiercirtgmeat and
iosingjuices.
4. If desired, marinatemeatsor
chicke~beforebroili~~g.Or brush
with barbecue saucelast5 to 10
minutesonly.
5. When arrangingfood on pan,
do riotlet fattyedgeshangover
sides, which could soilovenwith
fatdripping.
6. Broilerdoesnotneedtobe
preheated,However,forverythin
foods,or to increasebrowning,
preheatif desirecl.
7. Erozen Steak can be
conventio]lallybroiledby
positioningthe ovenshelfat next
lowestshelfpositionand increasing
cookingtime givenin this guide
1Yztimesper side.
8. Ifyourrangeis connectedto
208Volfi,raresteaksmaybe broiled
bypreheatingbroilheaterand
positioningthe ovenshelfone
positionhigher.
‘ToasterPds:ries
EnglishMuffins
IAbstcr
(6
Fisk
E3[~IIISlices
(precooked)
Pork<:ili}~}s
welll.)one
~
~q;j]l)(;%()[}!;
hdedium
F
! WeiiDone
..—.,
{’-
{
[
.k_,-.e’ 1 V:&l\
...4
Mcdit]ln
“)
/ ~-l.... ,
., \/,33.3~.
,,.~i$ba-~ii~id
-.
]>rc[:ookcciS2{JS!.L,..<.7,
~roiv:urj!
_..—— .-—
Food
Bacon
GroundBeef
WellDone
BeefSteaks
Raie
Medium
WellDone
Rare
Medillm
WellDone
Chicken
BakeryProdllct.s
Bread(Toast)or
——
Tails
to8-wz.each)
.—
__ —...——
Dent:
__ —.. ..
si~nil:ar
-Q{;+’.
......-.——
Quantityandlor shelf
Thickness
I
Yz-lb.(about8
thinslices)
I
1-lb.(4patties)
‘/2to %-in.thick
l-inchthick
(1to lfi-lbs.)
1%-in.thick
(2to2fi-lbs.)
1whole
(2
to 2M-lbs.),
splitlengthwise
2to4slices
1pkg. (2)
2(split)
I
2-4
l-lb.fillets!4to
‘jz-in.thick
l-in.thick
—-
2(11~inch) c
2(1-ii~.!hi~k)
about1lb.
1
2 (1iilcll)
al?otitltl[C)12oz.
2 (1Y2inch)
“!lbout1lb.
.. .- ....---...--.--- ~”—-—————
i-Ib. p!{g.
1
__A, ,,............-—......-.-
(10)
IL
Wsition
T~me,NIinutes
I
c
I
c
c
c
c
c
c
c
A
c
c
B
c
B
B 13
~
c
?.
!X
B
F,
1 ~;-
. —..—
Rmt
Side
3%
SecondSide
T~me,Minutes
I
7
7
9
13
10
15
25
35
1
%-2
3-4
13-16 Donot
5
8
10
8
iO
+
turnover.
——
3%
4-5
7
9
13
7-8
14-16
20-25
10-15
‘/2
5
8
10
13
4~7
IJp to8pattiestakeaboutsatnetime.
~
Steakslessthan1inchcookthrough
beforebrowning.Panfryingis
recommended.
Slashfat.
Reducetimesabout5to 10minutesper
sideforcut-upchicken.Brusheachside
withmeltedbutter.Broilwithskin
downfirstandbroilwithdoorclosed.
Spaceevenly.PlaceEnglishmuffins
cut-side-upandbrushwithbutter, if
desired. -
Cutthroughbackofshell.Spread
open.Brushwithmeltedbutter
beforeand afterhalftime.
Handleandturnverycarefully.
Brushwithlemonbutterbeforeand
duringcookingifdesired.Preheat
broilertoii~creasebrowning.
Increasetimes5 to 10minutesperside
for11/’2-inchthickorhomecured.
Slashfat.
Slashfat.
Ifdesired,splitsal~ssgesinhalf
lengthwise;cutinto5to6-inchpieces. ~
I
I
I
i
\
11, ,“
F
IL
Page 20

Beforesettingoven
Controk,checkThese
TlliEgs:
1:
step
Removebroilerpan, broilerrack
andother cookwarefrom the oven.
(Ovenshelvesmay be leftinoven.
Note: Shelveswilldiscolorafier
theself-cleancycle.)
step 2:
Wipeup heavysoilon oven
bottom.If youuse soap,rinse
thoroughlybeforeself-cleaning,to
preventstaining.
A. oven Front Erame
B. oven Door Gasket
c. openings in Door
De01’en Light
step 3:
QClean spattersor spills on oven
front frame (A) and ovendoor
outsidegasket (B) with a dampened
cloth. Polish with a dry cloth. Do
not clean gasket (B). Do not allow
waterto run downthroughopenings
in top of door (C). NTeveruse a
commercial ovencleaner in or
a~oundself-cleaning oven.
~Cleantop,sidesand outside fio~ltof
ove~~with soap and water, Do not
use abrasives or oven c~eaners.
q,L@
/?*
bLwp‘:*
close Ovendoor and make sure
OVcl]light (D) is off.
step5:
The porcelain-enameleddrip pans
thatcamewithyourrangecanb~
cleanedautomaticallyin the selfc~caningoven.Wipeoffboilovers
that are notstuckon beforeplacing
twopans,
upsidedown,oneach
ovenshelf.
Caution: Chrometrim rings
aroundthesurfaceunitsshould
neverbe c~eanedinthe self-
cleaningoven.Neither should
reflectorpans of foilor shiny
chrome.
How to set oven
for Cleaniw
step 1:
mrn OWN
TEm knobstOCLEN.
SET andOWN
Controls
will snapintofinalpositionwhen
the CLEAN location is reached.
OVENSET
OVENTEMP
Slidethe LA~H HANDLE to the
right as far as it will go.
Numerals’3:00 for 3 hours cleaning
time will start countingdowninthe
display,andtie si~d lightWUappear
overthe wordsCLEAN TIME.
The automaticallyprogrammed
cleaningtime fora heavily-soiled
ovenwith heavy,greasy spillsand
spatteris3 hours.Therecommended
cleaningtie fora modera~ly-soilti
ovenwith thin spillsand light
spatteris2 hours. If less than 3
hours cleaningtime is desired, turn
theME SELE~ knobaccordingly.
ToShrt self-cleaning later, follow
precedinginstructions. Then
program S~P TIME as follows:
step 3:
Push and release the PROGMM
SELE~ buttonuntilthe signal
lightappears above tie wordsS~P
~E. Numeds in tie displaywtil
be the sum of the present Time of
Day plus the set Clean Time.
step 4:
Turn the TIME SELE~ hob
clockwise until thetime youwant
cleaningto stop appears.
If you had set the TIME SELEH
knob for 2 hours cleaningtime and
programmed cleaning to stopat
midnight, the self-cleaning
operation would automatically SMII
at
10:00p.m.
Note:men dialingastopTimeto
these~-cleaningoperation,
delay
youcarlnolseta StopTime
~ZO~~
than~]hoursatzd~~HZinUfCS
later
thanthepresentTimeOf~ay
onyourrarlgec!oc~c.Ifyo@atte$Ept
todo so, fzEw.erGlsaF7dSigizal[ights
in thedisplay will~ash ol~ando)~
contif2tiob:3tone will So?ri?td
andG
yo~~ ~~ ~~ ~~g ~~=p{j.pd~),.~;<,~<~, j!
~~tqf~[
dial 10 QB acce{ltcblc %Op :G;?le.
f)20~h
‘ “fl - 77’ ~f~’w
i. ‘
.-”
Page 21

.
,,- ...)
Qae$ti@mandAmwers
SET k~~obtoOFF.Openwindows
torid roomofsmoke.Allowthe
Q*$VllyWongtmlyOven‘cRean
~
-,
.:
doorwill stay-lockedfintilthe oven
coolsand the LOCKED lightgoes
off. This‘~kesabout30minutes.
all #bethe and cleanknobs
Carrwtly?
A. Check to be surethe LA~H
HANDLE ismovedto the right.
Q. Hmy ovenClwkisnot Worwg,
call I still seBf-cleanmy oven?
A. No. YourAutomaticOven
Timerusestherangeclocktohelp
startand stopyourself-cleaning
cycle.
immediately eventhough I
set
oventocoolforat leRst one hour
beforeopeningthedoor.Wipeup
theex~esssoiland resettheCIPGII
cycle.
Q. 1sthe
6ccrackling39soundI
hear duringcleaningnormal?
Yes.This isthemetalheating
A,
andcoolingduringboth the
cookingand cleaningfunctions.
Q. should there be any odor
during the ‘cleaning?
A. Yes,theremaybe a slightodor
Wh~nLOC~D lightis off, slide
theLAXH HANDLE to the Iefias
far as itwillgo and open the door.
OVENTEMP
Q. can I use commercial oven
Claner’s on any part of my
self*leaning oven?
A. No cleaners or coatings should
be used around anypart ofthis
oven.If youdo use them and do not
wipe the ovenabsolutely clean, the
residuecan scarthe ovensurface
and damage metalpartsthe next
time the ovenis automatically
cleaned.
duringthefirst fewcleanings.
Failureto wipeoutexcessivesoil
mightalsocausean odorwhen
cleaning.
Q. what causes the hair-like
lines on the enameled Sunrface
of my oven?
A. This is a normal condition
resultingfrom heatingand cooling
duringcleaning.They do notaffect
howyour ovenperforms.
Q. can I Cleanthe woven Gasket
Q. why do I have ash left in my
ovenafter Cleaning?
A. Sometypesofsoilwill leave a
depositwhich is ash. It can be
removedwith a damp spongeor
cloth.
Q. My oven shelves do motSiide
easily. what is the nlatter?
A. After many cleanings, oven
shelvesmay become so clean they
do not slide easily.If you wisl~
shelvesto slide more easily,
dampen fingerswith a small
amount of cooking oil and rub
lightlyoversides of sl~elfwhere
they contact shelfsupports.
Q. My oven shelves ITavebecolne
gray after the seMf-cleanCycieeIs
this nol”mal?
A. 1%s.Afier the self-cloa~~cycle,
the shelves-maylose some l~]ster
and discolor to a deep gray color.
I
I
step2:
‘ruinOVENSET knob tOOFF.
step 3:
~Urn OV~N TEMP knobtoW-.
around the oven door?
A. No, this gasketis essential for
a good oven seal, and care must be
taken notto rub, damage or move
this gasket.
Q. After having just used the
Ovengthe LOCKED light Came
on and I Couldnot move the
LATCH HAmLE.a why?
A. After severalcontinuoushigh-
temperature bakingsor broilings,
the LOCKED light may come on.
The ovendoor can’t be latched for
self-cleaning while the LOCKED
lightis on. If thishappens, let the
ovencool until the LOCKED light
goes off. Then the oven door can
be latched for self-cleaning.
Q. TJ411atShotlld Edo if excessive
sn~okimgoccurs during cleaning?
A. Tl~isis caused b:’ excessive soil,
and yoi~sl~ouldswitchthe QVEIN
Page 22

::
{:;ailrsandfcleaning
(St?ecleaniIlgGlzideonpage 25.)
Propercareandcleaningare
importantso your rangewillgive
youefficientaridsatisfactory
service.Followthesedirections
carefi~llyin caring foryourrange10
assuresafeand proper maintenance.
mmkhes
Theporcelainenamelfinishis
sturdybut breakableifmisused.
Thisfinishis acid-resistant.
However,anyacid foodsspilled
(suchas fruitjuices, tomatoor
vinegar)shouldnotbepermitted
toremainon the finish.
cleati~ under the Rawe
Theareaunderthe rangecan
bereachedeasilyforcleaningby
removingthebottom drawer.To
remove,pulldrawerout allthe way,
tiltupthefrontand remove it. To
replace, insertglides atbackof
drawerbeyondstoponrangeglides.
Liftdrawerifnecessarytoinsert
easily.Letfrontofdrawerdown,
thenpushinto close.
Removable oven Door
Yourrangeisventedthrougha duct
locatedunder the rightrear
CalrodQunit. Cleantheductoften.
Toremove:
e Make sureunitisCOOI.
~Liftup right rear surfaceunit.
~Removetrim ring anddrip pan.
~Lifi out oven vent c?uct.
Toreplace:
~Place the part overthe ovenvent
locatedbelowthe cooktopwith
openingoftheductunder the round
openingin the reflector pan. It is
importantthatthe ductis in the
correct position so moisture and
vaporsfrom the ovencan be
released during ovenuse. N~E:
Never cover the hole in the oven
ventduct with aluminumfoilor
any other material. This prevents
the ovenventfrom working
properly during anycookingcycle.
OvenDamp Replacement
CAUF~ION:Beforereplacingyol]r
ovenbulb,disconnecttheelectrical
powe:foryourrangeat tilemai.a
fuseor circuitbreaker panel. Be
sureto let[helampcoverandbulb
coolcompletely.
The ovenlamp (bulb)iscovered
with a glass removable coverwhich
isheld in place witha bail-shaped
wire.Removeovendoor,ifdesired,
to reach covereasily.
Toremove:
* Hold hand under cover so it
doesn’tfa~~when released, With
fingersofsamehand, firmly push
back wirebail untilit clears cover.
Lifi off cover.DO N~ REMOVE
ANY
SCREWSm REMOVE
COVER.
~Replacebulbwitfi 40-watthome
appliancebulb.
Toreplace
~~ac~it intogroove Ofiamp
@
receptacle.Pull wire bail forward
to center of coveruntil it snaps into
place. When in place, wire holds
cover firmly. Be certain wire bail is
in depression in center of cover.
Cover:
ToREMO(Edoor,open to BROIL
position, or where you feelhinge
catch slightly.Grasp door at sides;
~iftdoor up a~]dawayfrom hinges.
‘O REFI.ACE, grasp door at sides.
A
Line up door with hinges a~adpush
doo~firmly into place.
QConnect electric power
torange.
Page 23

especiallygrease,maycatch fire.
.. ...
..-————.-—..
.—.——...-. .-
.____-..-—..
Tomakecleaningeasier, theplugin unitsare removable.
caution: Be suRreall controls are
turIEedto OFF and surface Unik
are coolbeforeattemptingtoBift
renlove them.
or
After liftingthe tilt-lockunit or
removingaplug-inunit, remove
the drip pan/ringsundertheplug-in
unitsand clean them accordingto
directionsinthe Cleaning Guideon
page25. Wipearound theedgesof
the surface unit opening. Clean the
areabelowthe unit. Rinsedl washed
areas witha damp cloth or sponge.
Plug-inunitscanbe removed.
Lifia plug-inunitabout 1“above
thetrim ring—justenoughtograsp
it—andyou can pull it out.
Repeatedliftingofthe plug”in
R.nnitmorethan l“abovethe
trim
Fingcanpermanentlydamage
therecepmcle.
Terminals
~Firstplacethe drip pan, then the
trim ring intothe surfaceunitcavity
foundontopofthe cooktop so the
unitrecep~cle can be seen through
the openinginthepan.
I
Donotlift a piug-inunitmore
than 1!’If you
flat on
thetrimringwhen you
plugit back
do, it maynotlie
in.
~Insert theterminalsof the plug-in
unitthroughthe openingin the drip
pan and intothereceptacle.
~Guidethe surfaceunit intoplace
so it fits evenlyinto the trim ring.
CAUTION
~Do notattemptto clean plug-in
surface uni~ in an automatic
dishwasher.
~Do not immerseplug-insurface
unitsin liquidsofanykind.
@Do not bend the plug-in surface
unitplugterminals.
QDo not attemptto clean, adjust
or in any wayrepair the plug-in
23
---
Page 24

Ad~lMtiBlgOvenThermosbt
c
Usetimegiven on recipewhen
cooti~lgfor first time. Oven
thermostatsmay “drift” fromthe
factorysetting over the years, and
5 to 10-rninutedifferencesin timing
betweenm old.and anewovenare
riotunusual. Yourovenhasbeen set
correctly at the factoryandismore
aptto be accurate tian the oven
which it replaced. However,ifyou
findfiat your foodsconsistently
browntoolitileor too much, you
maym~e a simple adjustirnentin
theOVENTEMP thermostatbob.
PULL ~OB OFF Sm. L~K
AT
BACKOFWOB ANDN~E
CURWNT sETTmG BEFOW
MmNG ANY
ADJUSTMENT.
Toincreasetem~rature, turn
towardHIorWSE; todecrease,
tumtowardLO or LOWR. Each
notchchanges
Follow
rightto
appropriateinstmctionsat
adjustyour oventhermostat.
temperature IO”F.
1. Ml]offbob. Loosenboth
screwsonbackofbob.
2. Movepointeronenotchin
desireddirection.Tightenscrews.
3. Returntiob tooven,matching
flatareaofbob toshaft.
Recheckovenprforma.ncebefore
mting a additionaladjustment.
Page 25

0 SoapandWater
~Soap-FilledScouringPad
@PlasticScouringPad
e Dishwasher
control Knobs: @MildSoapandWater
~nge Topand Oven
Outside
Glass Finish
@Soapand Water
#
Nletal, including @Soap andWater
Chrome Side Trims
and ~iin Strips
PorceIainEname!
surface*
o
PaperTowel
~Dry cIoth
@SoapandWater
QSoapandWater
Oven
VentDuct
~SoapandWater
I
Shelves
(SeeSelf-Cleaning
OvenDirections)
StorageDmwer
@SoapandWater
e SoapandVlater
GENERALDIRECTIONS
notclean the bakeunit or broil unit. Anysoil will burnoffwhenthe unit is
Do
heated. NOTE:Bakeunit is hingedand canbe lifted gentlytoclean ovenfloor.
If spillover,residueor ash accumulatesaroundbake unit, gentlywipearourid
unit withwarm water,
Drain fat, cool panand rack slightly.(Do notlet soiled panand rack
sund in
—
oventocool.)Sprinkleon detergent.Fillpanwithwarmwaterandspreadcloth
orpapertoweloverrack.Letpanandrackstandfora fewminutes.Wash;scour
ifnecessary.Rinseanddry.O~ION: Cleanpanandrackindishwasher.
Pulloffbobs. Washgentlybutdonotsoak.Dryandreturncontrolstorange,
makingsuretomatchflatareaonknobandshaft.
Cleanoutsideofcooledblackglassdoorwithaglasscleanerthatdoesnot
containammonia.Washotherglasswithclothdampenedinsoapywater,Rinse
andpolishwithadrycloth.Ifknobsareremoved,do notallowwatertorun
downinsidesurfaceof giasswhilecleaning.
Wash,rinse,andthenpolishwithadrycloth.DON~ USEsteelwool,
abrasives,ammonia,acids,orcommercialovencleanerswhichmaydamage
thefinish.
Avoidcleaningpowdersorharshabrasiveswhichmayscratchtheenamel.
Ifacidsshouldspillontherangewhi~eit ishot,use a drypapertowelorcloth
towipeup rightaway.Whenthesurfacehascoold, washandrinse.
Forotherspills,suchasfit smatterings,etc.,washwithsoapandwaterwhen
cooledandthenrinse.Polishwithadrycloth.
Usea mildsolutionofsoapandwater.Do notuseanyharshabrasivesor
cleaningpowderswhichmayscratchormarsurface.
CleanONLYthedoorlineroutsidethegasket,Thedoorisautomatically
cleanedwhentheovenisintheself-cleaningcycle.Ifspilloverorspattering
shouldoccurincooking,wipethedoorwithsoapandwater.DON~ rubor
damagegasket.
AvoidgettingANYcleaningmaterialson thegasket.
Coolbeforecleaning.Frequentwipingwithmildsoapandwaterwillprolong
thetimebetweenmajorcleanings.Besuretorinsethoroughly.
RemovetheOvenVentDuctfoundundertherightrearsurticeunit.Washin
hot,soapywater,dryandreplace.(Openingshouldmatchopeningindrippan.)
Sheivti w becleanedin%M-Cleafingovenor dishwasher,or byhand,
using soap andwater.-e thoroughlytoremovesoapaftercleaning.
For cleaning,removedrawerbypullingitallthewayopen,tiltinguptie front
andthenlifiingthedrawerout.Wipewithadampclothorspongeandreplace
thedrawer.Neveruseharshabrasivesorscouringpads.
Spattersand spillsburnawaywhencoilsareheated.Aftermeal,removeall
cookwarefromsurfaceunitsandheatsoiledunitsatHI. Letsoilburnoffabouta
minuteandswitchunitstoOFF.Trynottogetcleaningmaterialsoncoils.Ifyou
do,wipeoffwithdamppapertowel
beforeheatingsurface~lnit.
DON~ handletheunitbeforecompletelycooled.
DON~ attempttocleantheplug-inunitsintheself-cleaningoven.
DON~ irninerseplug-inunitsinanykind ofliquid.
DON~ washindishwasher.
:lean asdescribedbeloworindishwasher.DON~ CLE~ INSELF-
CLEAmG OVEN.Ringswilldiscolor.Wipeaftereachcookingsourinoticed
spatterwillnot“burnon” nexttimeyoucook.Toremove“burned-on”spatters,
~seanyor allcleaningmaterialsmentioned.Rublightlywithscouringpadto
2reventscratchingof the surface.
Gfia~an~can be ~leamedinseifwleam;mgovenairdishw~her orby IIand-–
.
lfierpanscoo]slightly,sprirddeon detergent,washor
scoi.ir with hot water,
}-“
Page 26

Questiom?
useThisProblenl
PROBLEM
OVENWILL N~ WORK
OVEN LIGHT
DOESNm
WOK
FOODDOES N~
BROILPROPERLY
FOODDOESNm ROAST
ORBAKEPROPERLY
POSSIBLECAUSEANDmNIEDY
Plugon rangeis not completelyinserted-intheele~tricaloutlet.
The circuitbreakerin yourl~ousehas been tripped, or a fuse hasbeenblown.
Ovencontrolsnotproperlyset.
Door leftin lockedpositionafiercleaning.
Lightbulb islooseor defective.Tightenor replace.
Switchoperatingovenlightisbroken. Call for service.
OVENSET knob not set at BROIL.
OVENTEMP bob not set at BROIL.
Door notleft ajar asrecommended.
Improper shelf positionbeing used. Check BroilingGuide.
Necessary preheating wasnotdone.
Foodisbeingcookedonhotpan.
Cookwareisnot suitedforbroiling.
Aluminumgfoilon broilpan rack not fitted properly and slitasrecommended.
Clocknotset.ClockmustbesetbeforeyoucanprogramTimeBaking/Roasting.
Insufficientcookingtimeprogrammedwhensettingtimerfordelayedbaking
orroasting.TimedifferencebetweenStopTimeandTimeofDayonrange
clockmustbe equaltoor greaterthantheprogrammedCookTime—otierwise
theovenwillnotcookaslongasyouwantitto.
OVENSETknobnot setonBME.
OVEN TEMPknobnotsetcorrectly.
Shelfpositionisincorrect.CheckRoastingor BakingGuides.
Ovenshelfisnotlevel.
Incorrectcookwareor cookwareofimpropersizeisbeingused.
A foiltentwasnotusedwhenneededtoslowdownbrowningduringroasting.
CALRODQSURFACE UNITS
Nm FuNmIoNING
PROPERLY
—
Surfaceunitsare notpluggedinsolidly.
Trimringsanddrippansarenotsetsecurelyintherangetop.
Surfaceunitcontrolsarenot properlyset,
~~ocknot~et+Clock~lustbesetbefore
~~~sufficientcleaning time programmed when setting timer for de~~~ed
uleaning.Time difference between Stop Time and Time ofDay on range clock
mustbe equal to or greater tilan the programmed
nve!lwillnotclean
3QthD~.EhiSET and OVEN TEMP t~obs must be set at CLEAN setting.
~.thick pile of spillovez, when cleaned, leaves a heavy
as longas you want it to.
you can p~~gra~ cleaning time.
CleanTime—otherwisethe
layerofash ifispots
~~]hichci)uldhaveinsulatedtheareafromfurtk]erlleai.
L2ici”iII{vtmo’Jedto thel“igllt,
.—..—..
Page 27

If YouNeedSertice
-—.——
+~:,––.
.——
~::j:-:
..>..>
~y?i:-
-.=/~_
,
,,~,,~g-
‘]~’)
‘:~til
:,+l&.
l-(~.
“%$
-:Z:(
-... .,
-..
——.——-—.-—. _——.. _—. _._. _—_——. ...-. ..
.’
~-. .
=:
-.
~
--
-.
-.
...
————--—-—-------
Toobtin service,see yourw~ty
onthebackpageofthisbook.
We’reproudofourserviceand
wantyoutobepleased.If forsome
reasonyouarenothappywiththe
serviceyoureceive,herearethree
stepstofollowforfirther help.
FIRST,contactthepeoplewho
servicedyourappliance.Explain
whyyouarenot pleased.In most
cases,this willsolvetheproblem.
NEXT,ifyouarestillnotpleased,
writeallthe details-including
yourphonenumber—to:
Manager,ConsumerRelations
Hotpoint
AppliancePark
Louisville,Kentucky40225
FINALLY,if yourproblemis still
notresolved,wrke:
MajorAppliance
ConsumerActionPanel
20NortiIWackerDrive
Chicago,IIIinois60606
fir
:/
>
.-
—.
.-.
—
.
..
“.
;..-:
~
.
P
~._..
~:
—.
$.:
;~{~.;
-:-I*[
1
~:;q’
<;g;
-“..~~
.
1-
;
:
I
[’
~
[ ~$’
)
“+
F
i.
~’
!
! r ‘.
~’
1’
\ .“
~’
(;
~
,.
1
Page 28

.--m-.-..=h-.-.-.m-.
, .—-———
I
i
~—
.
T
WARRAN
Save proof of original purchase datesuch asyoursalesslip or cancelledcheckto establishwarrantyperiod.
TY
WHATISCOVERED
For one year from dateoforiginal
purchase,we wil! provide,freeof
charge,parts and servicelabor
inyourhometo repairor replace
anypati of the range thatfails
becauseof a manufacturingdefect.
W~~~ ~S NOT ~~~~~~~ ~Servicetrips to your hometo
teach you howto usethe product.
yourUseand Cammaterial.
Read
if youthen haveany questions
about operatingthe product,
pleasecontact your dealer orour
Consumer Affairs office atthe
address below,orcall, toll free:
GE Answer Center@
800.626.2000
consumer information service
@Improper installation.
Thiswarrantyisextendedto
the original purchaserand any
succeedingownerfor products
purchasedforordinaryhomeuse
inthe48 mainlandstates,Hawaii
andWashington,D.C.InAlaskathe
warrantyisthe sameexceptthat it is
LIMITEDbecauseyoumustpayto
shipthe producttotheserviceshop
orforthe servicetechnician’s travel
coststo your home.
All warrantyservicewill be provided
byourFactory ServiceCentersor
byour authorizedCustomerCare”
servicersduring normalworking
hours.
Lookinthe White or YellowPages
ofyourtelephone directoryfor
HOTPOINTFACTORYSERVICE,
GENERAL ELECTRIC-HOTPOINT
FACTORYSERVICEor HOTPOINT
CUSTOMERCARE” SERVICE.
@Replacementof housefusesor
resettingof circuit breakers.
~ Failureofthe product if it is used
for other than its intended purpose
or usedcommercially.
~ Damageto product caused
byaccident, fire, floods or acts
of God.
WARRANTORISNOTRESPONSIBLE
FORCONSEQUENTIAL DAMAGES.
If you havean installation problem,
contact your dealer or installer.
Youareresponsible for providing
adequateelectrical,gas,exhausting
and other connecting facilities.
Some states do notallowthe exclusion or limitationofincidental orconsequential damages, so the above limitation or exclusion
may not apply to you. This warranty gives you specific legal rights, and you may also have other rights which varyfrom stateto state.
Toknowwhat your !egalrights are in your state, consult your local orstate consumer affairs office or yourstate’sAttorney General.
E&afYantor: Genera! Electric company
i-i futiiler help is needed Concerning this B$farmnay, write:
~J~g~~g~~
–Goil$amer Atiairs, GE Appliances,
Louisville, }KY40225
 Loading...