

Page 1
getthebest from
—
I
.
--,-
.--J
Conknfi
AluminumFoil
Anti-TipBracket
AppIianceRegistration
CanningTips
Care and Cleaning
Clock/Timer
Energy-SavingTips
Features
Instillation Instructions
Leveling
Model and SerialNumbers
Oven
Baking,BakingGuide
Broiling,BroilingGuide 18,19
ContinuousCleming
Control Settings
Door Removal
Light Bulb Replacement 20
Roasting,RoastingGuide 16,17
Thermostat Adjustment
20-23
14,E
4, 18
3,5
12
6,7
5
5
2
13
22
13
20
US~
2
9
5
andCareof
models
m632GJ
m636J
M647GJ
i
,~--,,
. . ..
VentDuct
Problem Solver
I ~cpair Service
SafetyInstructions
Surface Coolting
Control Settings
..
j
20
24
27
3,4
8-11
8
r
.
Page 2
1: isintendedto help you operate
c
andmaintainyournew range
properly.
If you received
a damagedrange.@@
Immediatelycontactthedealer (or
builder)that soldyouthe range.
I<eep ithandy for answerstoyour
questions.
Ifyoudon’tunderstandsomething
or needmore help, write (include
yourphone number):
ConsumerAffairs
Hotpoint
AppliancePark
Louisville,KY40225
writedownthemodel
andserialnumbers.
You’11findthem on a label on
thefront ofthe rangebehindthe
ovendoor.
These numbersare also on the
Consumer Product Ownership
RegistrationCard that came with
yourrange. Beforesendingin this
card, pleasewrite these numbers
here:
Sa%’etimeandmoney.
Beforeyou request
Sertice.00
Check the Problem Solveron
page24. It listsminor causesof
operatingproblemsthatyoucan
correct yourself.
-
ftiodel INumber
Serial N~/mber
~sc these numbers in any
correspondence or service ctilis
c~lnccrningyour range.
.
,
Page 3
%~l~enusing electricalappliances,
-—
basicsafetyprecautions Should
befollowed,includingthe
following:
usethis appliance Onlyforib
s
intended use as describedin this
manual.
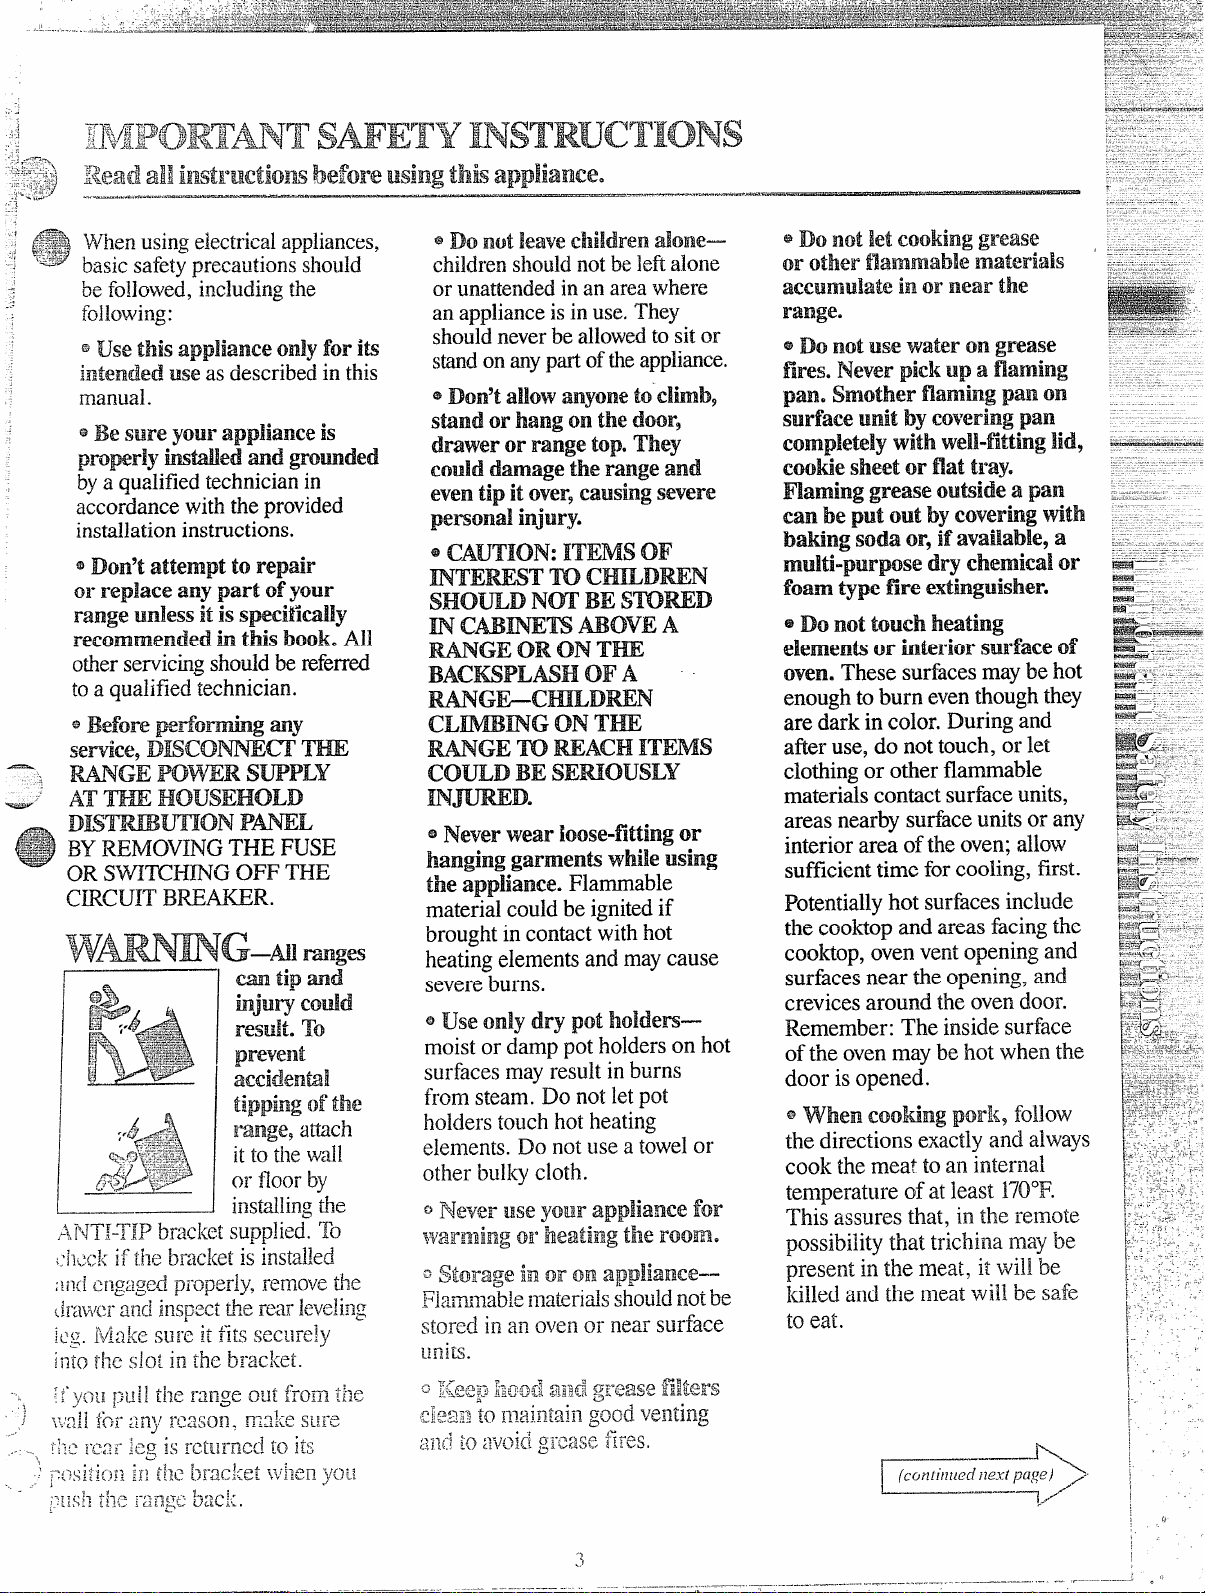
=Be stir%?your appliance is
pmprly kwed md gmmded
a qualifiedtechnicianin
by
accordancewiththe provided
i~s~]a~ion inst~~~ions,
) Don’t attempt to repair
)r replace anypart ofyour
ange unIess it is speeiiid~y
‘commended in this book. All
servicing should be ~femed
~ther
J a
qualifiedtechnician.
@Do not use water on grease
fires.Never pick up a fialning
smother fianling panon
pane
surface
unitby coveringpan
completely with well-fittinglid9
cootiesheet or fiatt~”aye
~aminggrease oubide a pan
canbe put out
bating
soda or,if available, a
multi-purpse drychemical or
foam ty~ fire extinguisher.
@Do not touch heating
elemen~ or hterior surface
oven. These surfacesmaybe hot
enoughto burn eventhough they
are dark in color. During and
after use, do not touch, or let
clothingor otherflammable
materialscontactsurface units,
areas nearbysurfaceunitsor any
interiorarea of the oven;allow
sufficienttime for cooling,first.
Potentiallyhot surfaces include
the cooktop and areas facingthe
cooktop,ovenventopeningand
surfacesnear theopening, and
crevicesaround the ovendoor.
Remember: The insidesurface
ofthe ovenmaybe hot when the
door isopened.
by coveringwith
of
@~~~n CooMng pQrl(9follow
the directions exact~yand always
cook the meat toan internal
temperatu~eof at least 170”F.
This assures that, inthe remote
possibilitythat trichina maybe
present in the meal, it will be
killed and the meatwill be safe
to eat.
Page 4
@~~~p ~y~~ free from grmse
+
,
~
p
,
~
buildup.
@Place
oven shelf h deshed
posit;onw’MIeoven k Cool.If
shelvesmust be handledwhen
hot, do not let potholder contact
heathg units in the oven.
@men usingCookkgor
roasting bags in oven~follow
the manufacturer’sdirections.
SarfaceCootiw Utifi
useproper pan stie-This
@
appliance is equipped with one
or more surfaceunitsofdifferent
she. Selectutensilshavingflat
bottomslargeenoughto cover
tie surfaceunitheatingeieme~t.
The use of undersked utensils
willexposea portionofthe
heatingelementto directcontact
and may resultin ignitionof
clothing.Proper relationshipof
utensilto burner will also
improveefficiency.
@Never leavesurface Uifi
mmndd at M hat w-.
Boflovercausessmoting and
greasyspflloversthatmaycatch
on ~me.
-.
@Be sure hip pans and vent
duck are not covered md are
ti place. Their absenceduring
cookingcould damagerange
parts and wiring.
@Don’t use aldnm foil to
Bhe&ip pm or anywherein
the ovenexceptas described i~~
this book. Misusecould result in
a shock, fire hurd or damage
to the range.
@only Cerhin ty~s of glass9
glass/ceramic9
other glazed cQn@iners are
Suihble for rmge-top Serti’ce;
others may break because of the
sudden change in tempera~re.
(See section on “Surface
CooKng” for suggestions.)
o ~Q~~~~~e burns9 ignition
of flammable materials, and
spillage, tie handle of a
container shouidbe turned
towardthe ce~lteroftie range
~~:i~~out
~x~en~ing over ~~earb~
surface Illli$s.
earthenware or
@
Don9timmeme or soak
removable surface ~Ini@.Do119t
put them iHR.a dishwasher.
@roo*forfrying shouldbe w
&y as pssibleo
Frost on frozen
foodsor moistureon fresh foods
can causehot fatto bubbleup
.—..
and oversides ofpan.
@If a Combkationofoils or
..
fab till be usedinfrying,stir
togetherbeforeheating, or as fats ;
melt slowly.
Q Always heat fat slowly9 and
watchas it heats.
.-
--
.
f~#Aj:zJQ~~tid{rnsurface Mnti$0
..:-1>~nm;!=,m.T,n,.,-
L,#[,+i:~[ij.sl,dle i tiu~~
-—— .
‘“.=’”$?~:;irigPdteusiBe
..
Page 5
,
.-..——.—..... ... .. .--------—--------
—
.—
.—..——....
..—,———
.——.... ...
cansettleintosoftnoor coverings
such as
Cushioxledvinylor
earpeti~~g.When movingtherange
on this type of flooring, usecare,
andit is recommended thatthese
simpleand inexpensiveinstructions
befollowed.
The rangeshouldbe installedon
a sheetof plywood(or similar
material) as follows:W.elZthe
floor coveting ends at the,front of
the range, thearea that therange
willrest on should be builtup with
plywoodto the same levelor higher
than the floor covering. This will
allowthe range to be movedfor
cleaningor servicing.
Uvelingthe
Range
Levelingscrewsare located on
each corner of the base of the
range. Removethe bottomdrawer
and you can levelthe range on
an uneven floor with the useof
a nutdriver.
drawer beyondstopon rangeglides.
surfacecooiti~lg
@Usecookwareof mediumweight
aluminum, with tight-fittingcovers,
and flat bottomswhichcompletely
coverthe heatedportionofthe
surfaceunit.
@Cookfresh vegebbles with a
minimumamountof waterin a
coveredpan.
@Watchfoodswhen bringingthem
quicMyto cookingtemperaturesat
HIGH heat. When foodreaches
cookingtemperature, reduceheat
immediatelyto lowestsettingthat
will keep it cooking.
~Use residualheat with surface
cookingwheneverpossible. For
example,when cookingeggsin the
shell, bring water andeggsto boil,
thenturn to OFF positionand cover
with lid to completethe cooking.
@Use correct heat for cookingtask:
HIGH—to start cooking(if time
allows,do notuse HIGH heat to
start).
MEDIUM HI—quickbrowning.
MEDIUM—SIOWfrying.
LOW-finish cookingmost
quantities, simmer-double boiler
heat, finish cooking, and special
for small quantities.
WARM—tomaintain serving
temperature of most foc~ds.
OvenC(}otixlg
Preheatovenonlywheri
@
necessary.Most foodswill COCJK
satisfactorilywithoutpreheating.
If youfind preheatingis necessary,
watchthe indicatorlight, and put
foodinovenpromptlyafier the
lightgoesout.
@Alwaysturn ovenOFF before
removingfood.
@Duringbaking, avoidfrequent
door openings.Keepdoor open as
short a time as possibleif it is
opened.
~Cook completeovenmeals
insteadofjust one fooditem.
Potatoes,other vegetables,and
somedesserts will cooktogether
with a main-dish casserole, meat
loaf, chickenor roast. Choose
foodsthat cook at the same
temperature and in approximately
the same time.
@Use residual heat in the oven
wheneverpossibleto finish
cookingcasseroles, ovenmeals,
etc. Also add rolls or precooked
desserts to warm oven, using
residualheat to warm them.
--------
-1
:
“.
.. .
.. ,
,
.. ,
‘1
QWhen boiling water for tea or
coffee, heat onlyamount needed.
It is not economical to boil a
container full of water for one
or twocups.
-.
r -———--—- - -
Page 6
,’
.,
Page 7
:~
.
,___
.’
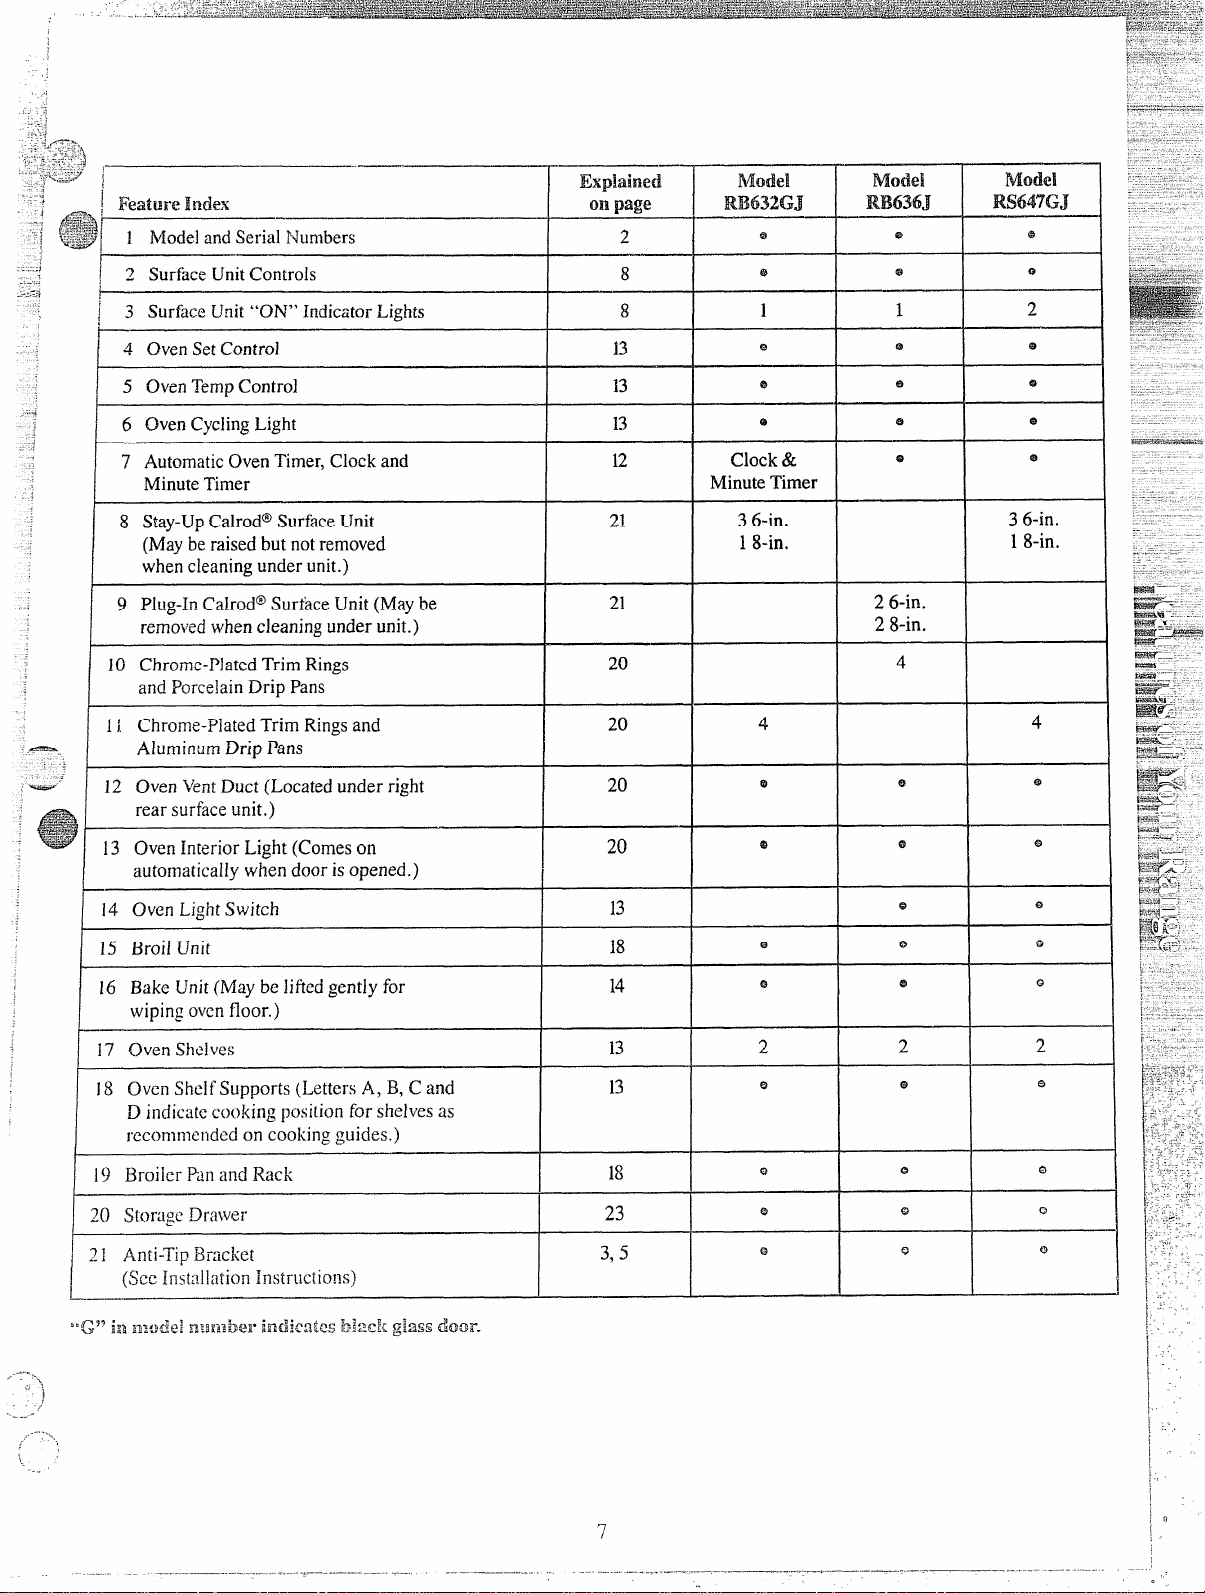
2 SurfaceUnitCon[roIs
;6
3 SurfaceUnit“ON”IndicatorLights
~
1
4 OvenSetControl
13
Mode!
RB632GJ
9
8
8
1
e
@
1
Model
RS647GJ
2
5 OvenTernpControl
6 ovenCyclingLight
7 AutomaticOvenTimer,Clockand
MinuteTimer
8 S@y-UpCalrod”SurfaceUnit
(Mayberaisedbut notremoved
whencleaningunderunit.)
9 Plug-InCalrod@SurfaceUnit(Maybe
removedwhencleaningunderunit.)
10 Chrome-PlatedTrimRings
andPorcelainDripPans
1~ Chrome-PlatedTrimRingsand
AluminumDripPans
I
I 12 OvenVentDuct(Locatedunderright
rearsurfaceunit.)
13 ovenInteriorLight(Comeson
automaticallywhendoorisopened.)
I
—
14 OvenLightSwitch
I
/ 15 BroiiUnit
13
13
12
Clock&
e
Sb
MinuteTimer
21
21
36-in.
18-in.
26-in.
36-in.
18-in.
2 8-in.
20
20
20
I
20
13
4
4
e
e
Q
@
Q
e
4 ‘..,
.
~
16 BakeUnit(Maybeliftedgentiyfor
17 OvenShelves
I
18 OvenShelfSupports(LettersA, B,C and
19 BroilerPail andRack
I
20 StorageDrawer
I
.-.,
wipingovenfloor.)
Dindicatecooking”positionforshelvesas
recommendedon cookingguides.)
14
13
13
I
I
18
23
7
/
Q
2
,“
... .. . —
Page 8
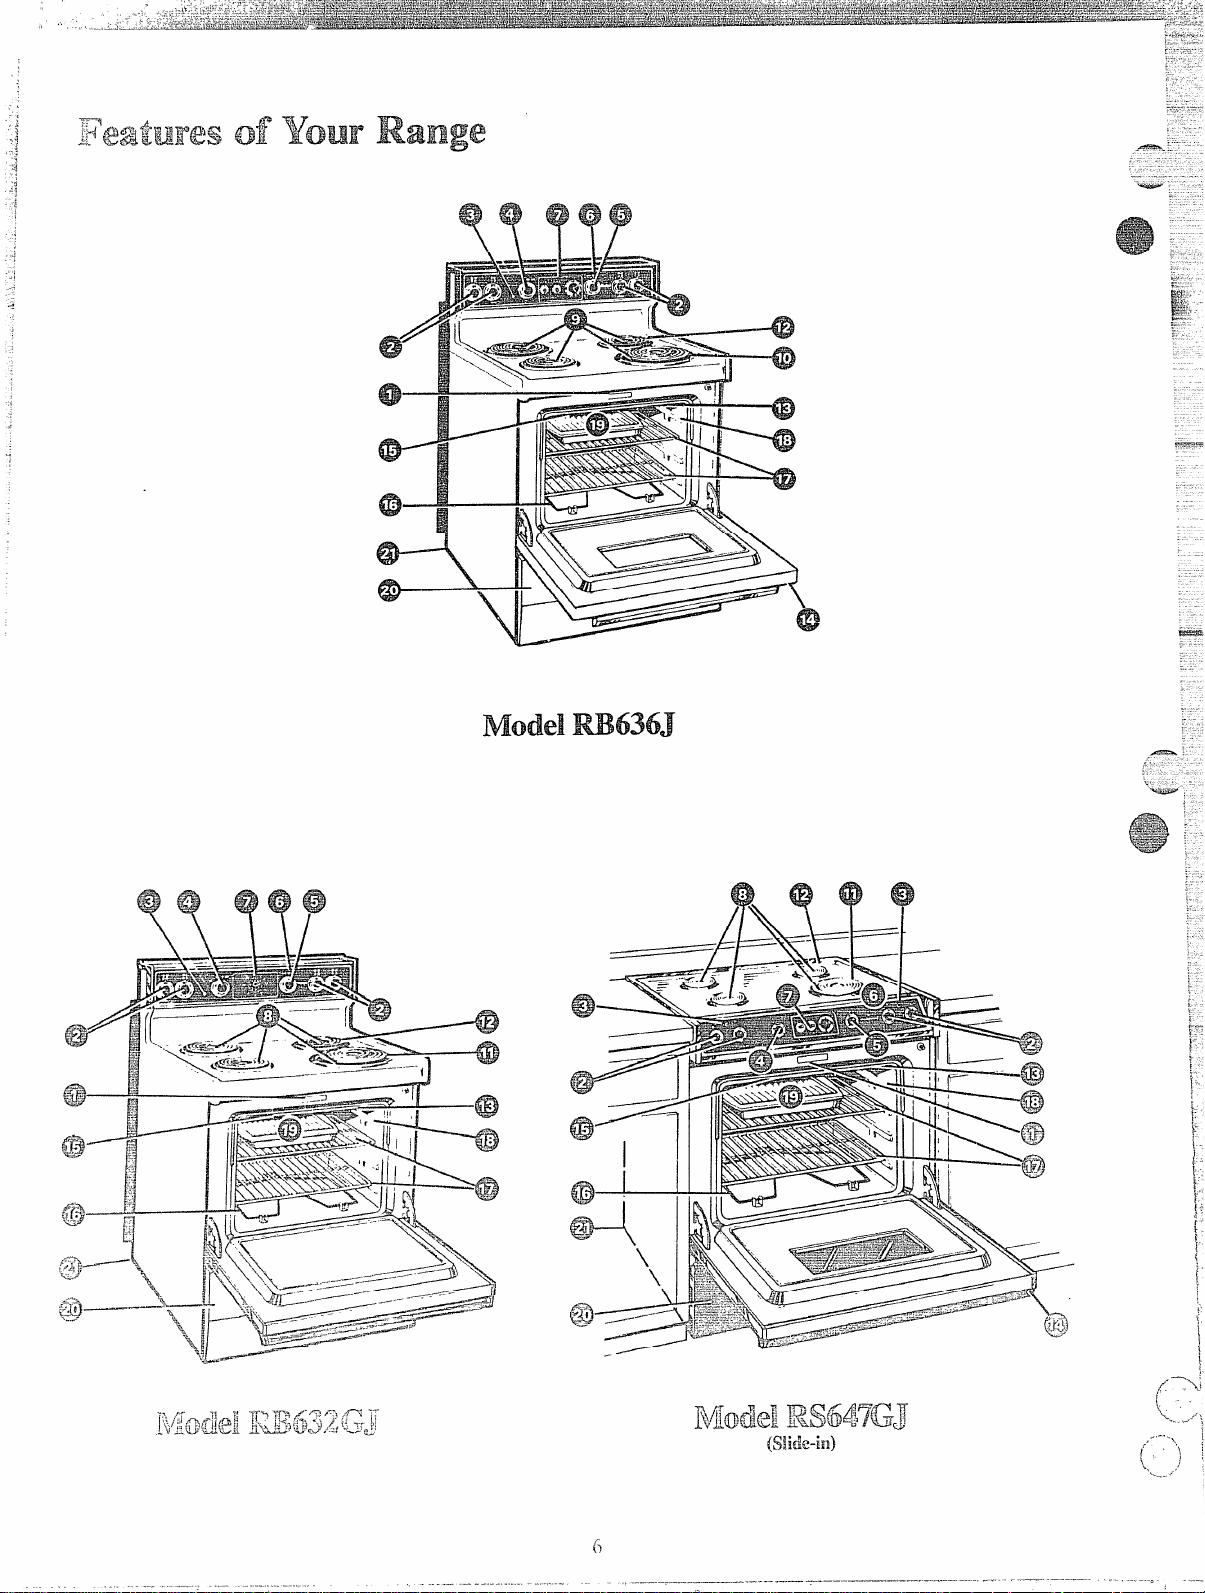
Features
.. . ..... . .—..——.-—
..-----. .
......
.. ——-——-.
----.“. -. . . . . .- L.-.——
-.-......
------
——...———
.—..—.-..-.-— . ...-..——=. _
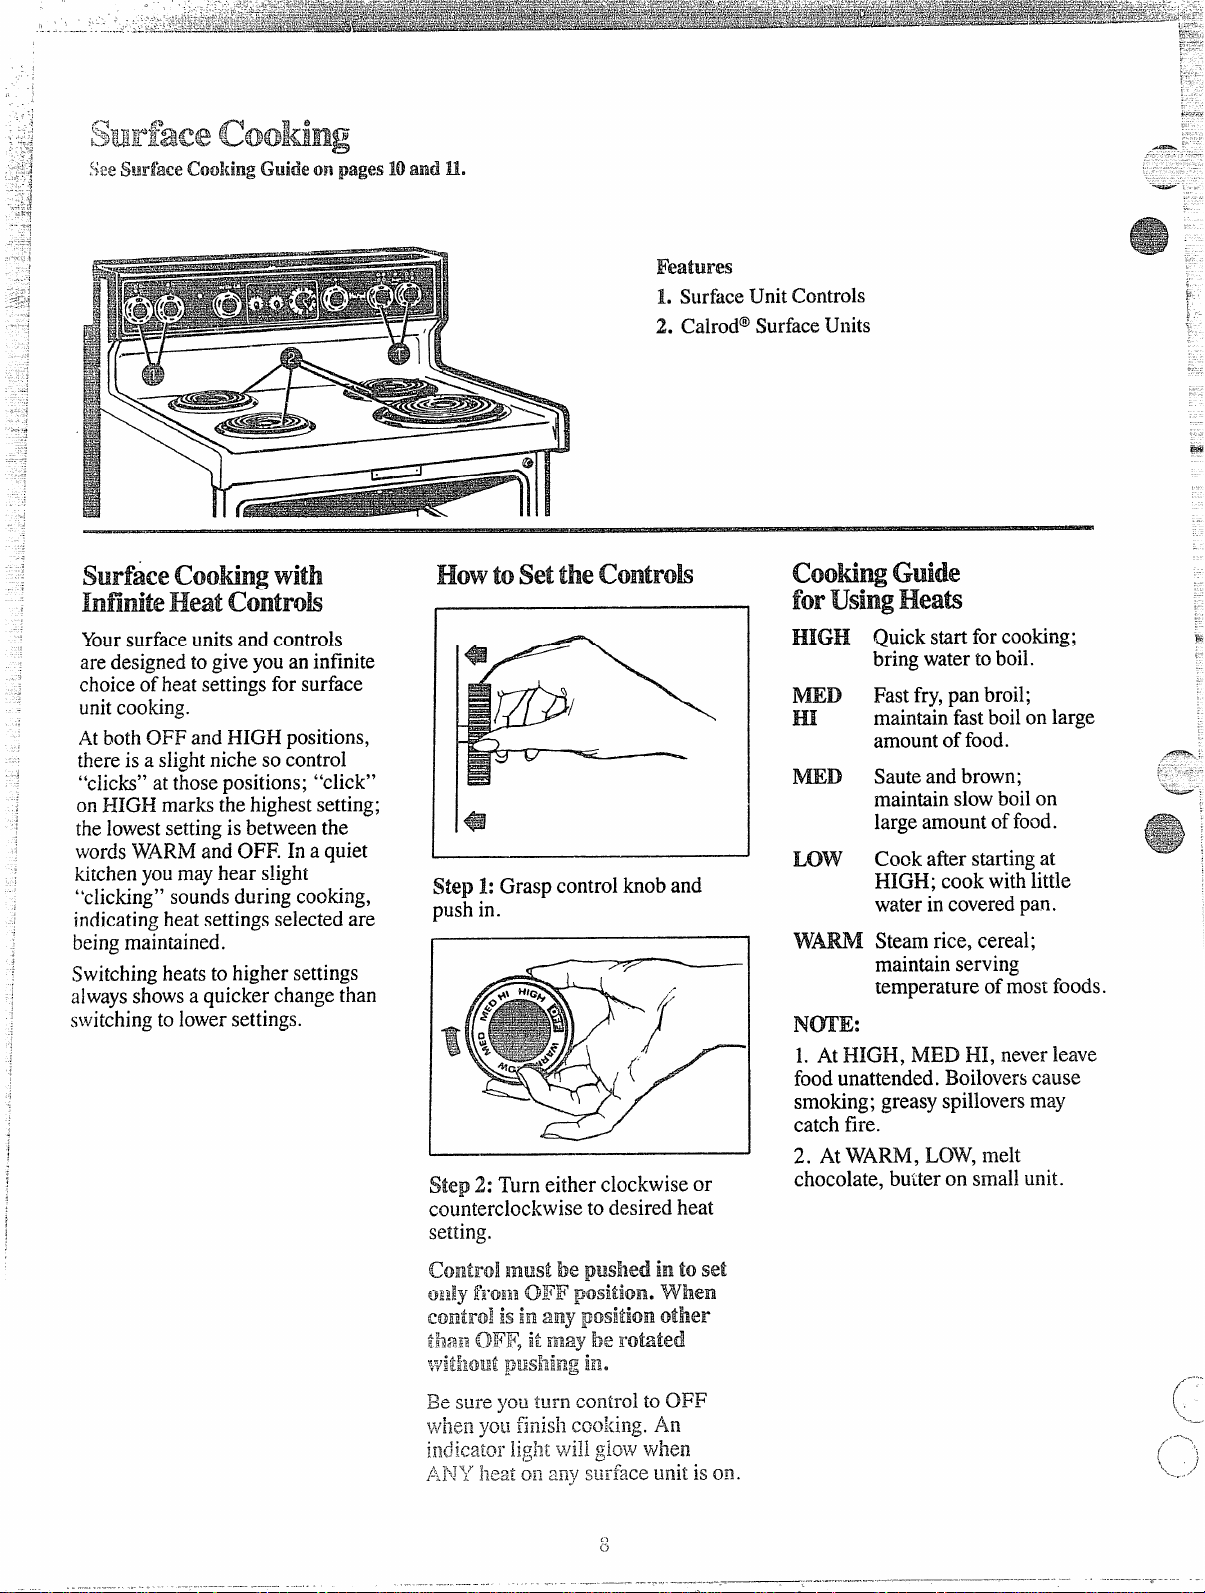
1. SurfaceUnit Controls
2. Calrod” SurfaceUnits
SurfticeCoowg with
hfitite HeatControk
Yoursurfaceunitsand controls
are designedtogiveyouan infinite
choiceof heatsettingsfor surface
unitcooking.
Atboth OFF andHIGH positions,
thereis a slightniche so control
“clicks”at those positions; “click”
on HIGH marksthe highestsetting;
thelowestsettingis between the
wordsWARMand OFF. In a quiet
kitchenyou mayhear s!ight
“clicking” soundsduring cooking,
indicatingheat settingsselectedare
beingrnainnined.
Switchingheatsto higher settings
alwaysshowsa quicker change than
switchingto lowersettings.
HowtosettheControb
Step 1: Graspcontrolknoband
pushin.
Step 2: Turn either clockwise or
counterclockwise to desired heat
setting.
Quick start forcooking;
bring watertoboil.
Fastfry,pan broil;
maintainfastboilon large
amountoffood.
Sauteandbrown;
maintainslowboilon
largeamount of food.
Cook after startingat
HIGH; cook with-little
water incoveredpan.
WM Steamrice, cereal;
maintainserving
temperature ofmost foods.
Nmw:
1. At HIGH, MED HI, neverleave
food unattended. Boiloverscause
smoking; greasy spilloversmay
catch fire.
2. AtWARM, LOW,melt
chocolate, butter on smallunit.
. ...+
(’- ‘i
$
1.,.,,’
-. .,
1
Page 9

themanufacturer’sinstructionsand
-.
-’~---::
--:
~
~\flyL
~.
~.:.,~f’:”
~iz-!~
--
.$:Q~--
‘-,-’:3
>...,,..>..—.—..- .——------ .
...
..——-—... ——..
recipesforpreserving foods.Be
surecanner is ilat-bottomed and
fitsoverthecenterof yourCalrod@
unit. Sincecanninggenerateslarge
amountsofsteam, be carefulto
avoidburnsfrom steamor heat.
Canningshouldonly be done on
surfaceunits.
Q. Can I covermy drippans Jvith
foil?
A. No. Cleanas recommendedin
CleaningGuide.
~
-----HomeCanning~ps
Canning should be doneon
CooktopOll]y.
In surface cooking of’foodsother
than canning, the use of 1argediameter pots (extendingmore
than l-inchbeyondedgeof trim ring)
isnot rccon]mended.However,when
canningwith water-bathor pressure
canner, large-diameter pots may be
Llsed.This isbecause boilingwater
temperatures (even under pressure)
are not harmful to cooktop surfaces
surrounding heating unit.
FiOVJEVER,DO NOT USE
LARGE DIAMETER CANNERS
OR OTHER LARGE DIAMETE1?
P{TS FOR FRI’ING OR BOILING
FClODS~IflER THAN ‘WATER.
N!ostsyrupor saucemixtures;lr]dall typesof fiyillg-c{~okat
temperaturesmuch higherthan
boilingwater.Such ~ernperat~]Yes
couldeventuallyharm cookiop
s~Irfi3cess~trroufidii?,gheatingunits.
-.
i,
\___
Q. can I use special
cooking
equipment? likean oriental Wok$
on any surPdeeunits?
A. Cookwarewithoutflatsurfaces
isnotrecommended.The lifeof
yoursurfaceunitcan beshortened
and the rangetopcan be damaged
fromthehigh heat neededforthis
typeofcooking.
Q. Why am I notgetti~lgthe heat
I need from my unitseventhough
I have the knobs on the right
setting?
A. Afterturning surface unitoff
and makingsureit is cool, checkto
makesure that yourplug-inunits
are securely fastenedintothe
surfaceconnection.
1. Bringwaterto boilon HIGH
heat, then afterboilinghasbegun,
adjust heat to lowestsettingto
maintainboil (savesenergyand best
usessurfaceunit.)
2. Besurecanner fitsovercenterof
surfaceunit. If yourrangedoesnot
allowcannerto be centeredon
surfaceunit, use smaller-diameter
potsfor good canningresults.
3. Flat-bottomedcannersgivebest
canningresults.Be surebottomof
canner is flator slightindentation
fitssnuglyoversurfaceunit.
Cannerswith flangedor rippled
bottoms(oftenfoundin enamelware)
are ncltrecommended.
Q. why doesmy Cookwfiretilt
!VhenI placethelllon
thesurface
unit?
A. Becausethe surfaceunitis
notflat. Makesurethatthe “fevc”
orIyourCalrod@unitsare sitting
tightlyinthe range top indentation
andthereflectorring is fiat on the
rangesurface.
Q. why isthe porcelain finish on
my eQolKwarecoming off?
A. IfyousetyourCalrod@unit
higherthanr~uired forthecookware
material, and leaveit, thefinish
maysmoke, crack, pop, or burn
dependingon the pot or pan. Also,
atoo high heat for longperiods,
and small amountsofdry food,
maydamagethe finish. -
—
--
—-
.—-----.-
.
.-
. ..
4. When canning, use recipes from ~ .:--reputablesources. Reliablerecipes ~
are availablefromthe manufacturer . .. . .
ofyour canner; manufacturersof : --glass jars for canning, such as Bali ;.- “”
andKerr; and the United States ;‘ _-=_ -
Department ofAgriculture
Extension Service.
5. Remember, in followingthe
recipes, that canning is a process s‘=
that generates largeamountsof
steam. Be careful while canning
preventburns from steam or heat. ‘~~:~:
NOTE: If your range isbeing
:..-
:..
k“:.t~=
1
~ -~.
~;q:.::
-,.;+=7‘
1
%-
[..
tO .P~ -
! LO)
~>-
operated on lowpower (voltage),
canning may takelonger than
expected, even though directions
havebeen carefully followed. The
process may be improvedby:
(1)using a pressure canner, and , J4(2) fof fastestheating of Iafge
water quantities, begin with
HOT tap water.
~‘
, .i$~}~
~
f-“r.q ‘
[~*~
F:fi
1
}
(Z
,1
~
l-’
I
!“
[
-.‘
.
!
Page 10

}Surfiacecooking Guide
Coeli%varemos
1.Use medium-or heavy-weight
cookware.Aluminumcookware
conducts heat fasterthan other
mefals.Cast ironand coatedcast
ironcookware is
heat, butgenerallycooksevenlyat
LOWor IvlEDsettings.Steelpans
maycook unevenly ii notcom-bined
wi~h othermetals.-
Food
Cereal
Cornmeal, grits,
oatmeal
Coffee
Eggs
Cookedin sheil
Friedsunny-side-up
Friedovereasy
Poached
Scrumblcdor omelets
p,~l)-frie(l:Tender
(’hops;thin stt:aks
!L)
3/4-inch; minute
s!caks; hamblirgcrs;
I“ranks~nd sausage;
thin fisil tiiic(s
—. —..
S1OW to absorb
Cookware
Covered
Saucepan
Uncovered
Saucepan
Percolator
Covered
Saucepan
Covered
Skiiiet
Uncovered
Skiiiet
Covered
Skiiiet
Uncovered
Skiilet
Covered
Saucepan
up
——-. ..
Use non-stickor coatedmetal
cookware.FlatgrounclPyrocerdm@)
saucepansor skille[scoatedon the
bottomwith aluminumgenerally
cookevenly.
2. Toconservethe mostcooking
energy,pans shouldbe flat on the
bottom, havestraight sidesandtight
Directionsand Setting
toStart Cooking
HIGH.Incovered pan
bringwaterto boiibefore
addingcereai.
HIGH. Stir togetherwater
or miik, cocoaingredients.
Bringjust to a bofi.
HIGH. At first perk,
switchheatto LOW.
HIGH. Covereggswith
cool water. Coverpan,
cook untilsteaming.
MED HI. Meit butter, add
eggsandcoverskiiiet.
HIGH. Meltbut!er.
HIGH. In coveredpan
bring waterto a boii.
HIGH. Heat butter untii
iight golden in coior.
HIGH. In covcrcd pan
bring fruit and water to
boil.
HIGH, Melt fat, thenadd
meat. Switch to MED HI to
brownmea!. Addwater or
[)therIic]ui(i.
HIGH. Preheat si:illct,
then grease
.
ligh[l~.
fittinglids.Matchthe sizeof the
saucepantothe sizeofthe surface
unit. A pan that extends more than
an inchbeyond the edgeof the trim
ringtrapsheatwhichcauses
“crazing” (fine hairlinecracks)on
porcelain,and discoloration
rangingfromblueto dark grayon
chrometrim rings.
Settingto Complete
Cooking
LOWor WARM,then add
cereai. Finishtimingaccording
topackage directions.
MED, to cook 1or 2 minutes
tocompletelyblendingredients.
LOWtomaintaingentiebut
steadyperk.
LOW.Cook only3 to4
minutesforsoftcooked:
15minutesforhardcooked.
Continuecooking at MED HI
untii whites are just set, about
3to 5 more minutes.
LOW,then addeg<s.When
bottomsofeggshavejust set,
carefuiiy turn overto cook
other side.
LOW.Carefully addeggs.
Cook uncoveredabout 5
minutesat MED HI.
MED. Adde= mixture.
Cook, stirring todesire(i
doneness.
LOW.Stir occasionallyand
check forsticking.
LOW.Simmer untii fork
tender.
MEDHIorMED.Brownand
cook todesired doneness,
turning overas needed.
. .
Comments
Cereaisbubbleandexpandas
they cook; use largeenough
saucepanto preventboiiover.
Milk boilsoverrapidly.Watchas
boiiingpoint approaches.
Percolate8 to 10minutesfor
8cups, iessfor fewercups.
Ifyou donotcoverskiliet, baste
eggswithfatto cook tops evenly.
Removecookedeggswith slotted
spoonor pancake turner.
Eggs continueto set siightiyafter
cooking. Foromelet do not stir
iast few minutes. When set, foid
in haif.
Fresh fruit: Use 1/4to 1/2cup
water per poundof fruit.
Driecifruit: Usewater as packoge
directs. Timedepends on whether
fruit hasbeen presoaked. If not.
aliow more cooking time.
Meat can be seasonedand ilourcd
beforeit is browned, ifdesireci.
Liquid variations for ilavor could
be wine. fruit or tomatojuice or
meat broth.
Timing: Steaks 1 to 2-inciles: 1to
2 hours. BeefStewl:2 to 3 hours.
Pot Roast:2YIto4 ilours.
Pan frying isbest for thin steaks
and chops. If rare is desired, preheat skillet beforeadding meat.
Page 11

.. ...
‘,
--;
--e,a,
fryingat ~11~~temperaturesand
keeprangeand hoodclean froin
accu~nulatedgrease.
[=
OVER 1“
&.& WRONG
A
Food
FriedChicken
Panfriedbacon
Sauteed:Less tender
thinsteaks(chuck,
round,etc.); liver;
thickor whole fish
Simmeredor stewed
meat: chicken: corned
beefi smcked pork:
stewingbecfitongue:
etc.
Nfeltingchocolate,
butter,marshmallows
Pr-csstlreCooking
—
l’uddings, SilUCCS,
Cookware
Covered
Skillet
Uncovered
Skillet
Covered
Skillet
Covered
DutchOven,
Kettleor
Large
Saucepan
Small
Uncovered
Saucepan.
Usesmall
surfaceunit
Skillet or
Griddle
Covered
Lorgekettle
or Pot
l)rts!lurc
Cooker or
C~inner
Directionsand Setting
toS@rtCooking
HIGH. Melt fat. Switch to
tobrown chicken.
MED HI
HIGH. Incold skillet, arrange
baconslices. Cookjust
untilstartingto sizzle.
HIGH. Melt fat. Switchto
MED to brown slowly.
HIGH. Covermeatwith water
and coverpan or kettle.
Cook until steaming.
wm. Allow10tobIninu@to
melt through. Stir to smooth.
MED HI. Heat skiilet8 to
10minutes. Grease lightly.
HIGH, h-icoveredkettle, bring
saltedw:iterto a boil, uncover
andadd pastoslowlyso
boilingdoes not stop.
[+IGH.Bring just tc)boil.
Settingto Complete
Cooking
LOW.Coverskilletand
cookuntil tender.
Uncoverlast fewminutes.
MED HI. Cook, turning
over as needed.
LOW.Coverand cook
until tender.
LOW.Cookuntil fork
tender. (Watershould
slowlyboil). For very large
loads, mediumheat may
be needed.
Cook2to3minutesperside.
MED HI. Cook uncovered
until tender. For large
amounts, HIGH maybe
neededto keepwater at
rolling boil throughout
entire cookingtime.
MED HI for foodscooking
10minutesor less. NIEDfor
foodsover 10minutes.
LOW.Tofinishcoolcing.
MED. Cook 1pound IO
to 30 or more minutes,
dependingon tenderness
ofvegetable.
Comments
Forcrispdrychicken,coveronly
afterswitchingtoLOWfor10
minutes.Uncoverandcook,turning
occasionally10to20minutes,
Amoreattention-freemethod
istostartandcookatMED.
Meat maybebreadedor
marinatedin sauce beforefrying.
Add salt or other seasoning
before cookingif meat hasnot
been smoked or otherwise
cured.
When meltingmarshmallows,add
milkor water.
Thick batter takesslightlylonger
tirre. firn overpancakes when
bubbles rise to surface.
Use largeenoughkettle to
preventboilover.Pastadoubles
in sizewhencooked.
Cooker shouldjiggle 2 to 3 times
per minute.
Stir frequentlyto prevent
sticking.
Uncoveredpan requires more
water and longertime.
—.
.-————.. -
.-.——.—. .
..
..—.—
LOW. Cook according to
time on package.
ltiED. Addvegetable.
Cook until desired
tenderness is reached.
~JAR~I, Coverand cook
accorciingto time.
..:
1:
Breakup or stir as needed while
cooking.
Turn overor stir vegetableas
necessary forevenbrowning.
Triple in volumeafter cooking.
Time at WrARIti.Rice: 1cup rice
and’2 cups water-25 minutes.
Grits: 1 cup grits and 4 cups
water-40 minutes.
I
Page 12

,.
Theautomatictimer and clockon
yourrangeare helpful devicesthat
serveseveralpurposes,Tileknob
locationson somerangemodels
mayvaryand willlook likeone of
thetwosetsoftimers below.
Models: RB636J, RS647GJ
Tosetclock
TOSET THE CLOCK, push the
center knob in and turn theclock
handsto the correcttime. (The
MinuteTimer pointer wil~move
also,let knob out, turn theTimer
pointerto OFF.)
To set Minute mmer
The Minute Timerhas been
combinedwith therange clock.
Useit to time allyour precise
cookingoperations. You’ll
recognizethe MinuteTimer as the
pointerwhich is different in color
and shapethan the clock hands.
TOSET THE MINUTE TIMER,
turnthe cen~erknob, without
pushing in, untilpointer reaches
numberof minutesyou wish to
time. (Minutes are marked, upto
60. in the ccntcr ringon theclock, )
Atthe enciof the set time, a buzzer
soundsto tell you time is up. Turn
knob,witbollt pushi~lgi~l,until
~l~)interreaches OFF and buzzer
S[(lps.
mmeBakeUses
Auto.mnticm~ner
UsingAutomaticTimer,youcan
TIME BAKEwith the ovenstarting
immediatelyandturningoffatthe
StopTime set or setboth DELAY
START(somemodelsmaysay
START)and STOP’dialsto
automaticallystartand stop oven
ata later time ofday.It takesthe
worry outof notbeinghome to
startor stopthe oven.
Settingthe dials for TIME BAKE
isexplainedindetailon page 14.
Model
clock and Mnute mmer
This modelhas a time of day clock
and minute timer but does not have
STARTand STOPdials needed for
TIME BAKEfunction.
W632GJ
QuestioIwandAnswers
Q.Howcan I use my Minuk
mmer tomake
cooking easier?
A. YourMinuteTimer willhelp
timetotalcookingwhich includes
timeto boilfoodand change
temperatures.Donotjudgecooking
timebyvisiblesteamonly.Food
willcook in coveredcontainers
eventhoughyoucan’tsee any
steam.
Q. Must the clock be set on
correct lime Qfdaywhen I wish
to use the AutomaticTBmerfor
baking?
A. Yes,if you wish to setthe
DELAYSTARTor STOPdialsto
turn on and off at set times during
timed functions.
Q. CanI use the Minute Miner
during ovenCooking?
A. The Minute Timer canbe used
during any cooking function. The
AutomaticTimers(DELAYSTART
and S~P dials) are usedwith
TIME BAKEfunctiononly.
Q. can I change the clock while
I’m Time cooking in theoven?
A. No.The clockcannotbechanged
during any program that uses the
oventimer. Youmust either stop
those programs or waituntil they
are finished before changingtime.
nly surface
Page 13

1>
——
,1 ,
... . .
~ L* 1. Look at thecontrols.Besure
- ~ =“ Yotlunderstandhowto setthem
..j
. .
...zJ-
~roperly.Readover the directions
forthe AutomaticOven Timerso
youunderstanditsuse with the
controls.
2. Check oveninterior. Look at
theshelves,Takeapracticerun at
removingandreplacingthemproperly,
togive sure, sturdysupport.
3. Readoverinformationand tips
thatfollow.
4. Keep this bookhandy so youcan
referto it, especiallyduringthe
firstweeksofgettingacquainted
withyour range.
oven Controk
ovenInteriorshe~ves
The shelve(s)are designedwith
stop-lockssothat when placed
correctly on the shelfsupports,
they(a)will stopbeforecoming
completelyfromthe oven,and (b)
wil~nottiltwhen removingfood
fromorplacingfoodon them.
~ ~MO~ shelve(s)fromthe
oven,liftup rmr ofshelf, pull
forwardwithstop-locksalongtop
ofshelfsupports.Be certainthat
shelfis coolbefore touching.
~ WPLACE shelve(s)inoven,
insertshelfwith stop-locksresting
on shelfsupports.Pushshelftoward
rear ofove;~ it willfdl into place.
When shelfis in properposition,
stop-lockson shelfwillrun under
shelfsupportwhen shelfis pulled
forward.
~
—
l-=.
m
I
rhe controls for the oven(s) are
narked OVEN SET and OVEN
rEMR OVENSET has settingsfor
3AKE,TIME BAKE(on modelsso
:quipped),BROIL and OFF. When
,Iouturn the knobto the desired
shelfPositiom
The ovenhas four shelfsupports
marked A (bottom),B, C andD
(top). Shelfpositionsfor cooking
foodare suggestedon Baking,
Roastingand Broilingpages.
[
Page 14

.?
W’hcncookinga food for the first
timein your newoven, use time
givenon recipesasa guide. OverI
thermostats,overa period ofyears,
may“drift” fromthe factorysetting
anddifferencesin timing between
an old and a newovenof5 to 10
minutes are not unusualand you
maybe inclinedtothinkthatthenew
ovenisnot performing correctly.
However,yournewovenhas been
setcorrectly atthe factoryandis
moreapt to be accurate thanthe
ovenitreplaced.
HowtosetYourRa~e
forBaking
Step 1:Place food in oven, being
certain to leaveabout 1 inch of
spacebetween pans and wallsof
ovenfor good circulation ofheat.
Closeovendoor. During baking,
avoidfrequent door openingsto
preventundesirable results.
Stei~2: Turn OVEN SET knob to
BAKEand OVENTEMP knobto
temper~turcon recipe or on Baking
Guide.
Step 3: Check food for doneness
:~tminimum tirnc on recipe. Cook
](~llgerif necessary. Switch off heat
:lIldr~IJIOV~f(lOCiS.
that youset. E.mmplesofImrnediatc
Start(oventurnson nowand you
setit to turn offautomatically)or
DelayStartand Stop(settingthe
oventoturn on automaticallyat a
latertimeandturn offat a preset
stoptime) will be described.
How b set betiak
sm* and Au@matic stop
N~E: Beforebeginning,make
surethe hands of the rangeclock
showthe correct time ofday.
ImmediateStart is simplysetting
oventostartbakingnowandturning
offat a later time automatically.
Remember,foodscontinuecooking
after controlsare off.
StepI1:Toset Stop Time,push in
knobon STOP dial and turn pointer
to time youwant ovento turn off;
for example6:00. The DELAY
STARTdial (some modelsmay say
START)should beat the same
positionas thetimeof dayonclock.
Step 1:Tosetstarttime, push in
knobonDELAYSTARTdial(some
modelsmaysaySTART)andturn
pointerto time youwantovento
turn on, forexample3:30.
Step 2: Toset StopTime, push in
knobon STOPdial and turn pointer
totime you wantoventoturn off,
forexample6:00. This means your
recipecalled fortwoand one-half
hoursofbakingtime.
N~E: Time on STOPdial must
be laterthan time shownoilrange
clock and DELAYSTARTdial.
Step 3: Turn OVEN SET knobto
TIME BAKE. TurriOVEN TEMP
knob to 250”F.or recommended
temperature.
Place food in oven. close the door
and automatically the ovenwill be
turned on and off at the times you
haveset. Turn OVEN SET to OFF
and remove food from oven.
OVEININDICA~R LIGHT(s) :U
TIME BAKE settingmay work
differently than theydo at BAI<E
setting. Carefully recheck the steps
gi-venabove. If alloperatit~~~sa;e
done as explained, <~tienwill
operate as it should.
:::Q1?*..7.’ ‘~ “
>..fiie~~~.e~s
‘~~+~E ~pa~<~e “
‘“ u=.”-fl~ ‘+.’,i~::,~~
~~;t~h~d~>+ti
-,17
Page 15

,>,
——.—..-...... _._—
._
- -i
....
-“::: ~9:&&
..1
,d
.
-.
i
----
___
quickly.For niostconventional
~~~$$baking,light,shinyfinishesgenerally
givebest results. They prevent
overbrowningin the time ittakes
forheatto cook the center areas.
Dull(satin-finish)bottom.surfaces
ofpans are recommendedforcake
pansand pie platesto be sure those
areasbrowncompletely.
Container
Bread
Biscuits(M-in. thick)
Coffeecake
Corn breador muffins
Gingerbread
Muffi~s
Popovers
Quick !oafbread
Yeastbread (2loaves)
Plain rolls
Sweet rolls
Cakes
(without shortening)
Angelfood
.7ellyroll
Sponge
Cakes
Bundt cakes
Cupcakes
Fruit c:ikes
I,ayer
Layer,cbocolatc
Lost
Cookies
13rownies
I Drop
Rcfrigci-ator
Rolledor sliced
Fruits,
O:ker Desserts
3ak(:dapples
?ustard
lDuddiri~;s,Rice
and Ctlst;~rd
.. ....—
p;~s
[:l”(~?~il
ShinyCookie Sheet
ShinyMetalPan with
satin-finishbottom
CastIron or Glass
ShinyMetal Panwith
satin-finishbottom
ShinyMetal MuffinPans
DeepGlass or Cast Iron Cups
Metalor Glass Loaf Pans
Metal or Glass Loaf Pans
ShinyOblongor Muffin Pans
ShinyOblongor Muffin Pans
AluminumTube Pan
MetalJellyRoll Pan
Metalor Ceramic Pan
Metalor Ceramic Pan
ShinyMetal Muffin Pans
Metalor Glass Loaf or
rllbcPan
ihiny Metal Panwith
,atin-finishbotfom
;hinyMetal Piinwith
atil].-finishbottom
dctal (jr Glass Loaf Pans
Cot)kicSheet
I
E
Glass or JMetalRm
Glass Custard Cups or Casserolc
(set in pan of 130[water)
Glass Custard Cups or
C:isscrolc
Ft~il13}1]on C’(>okicSheet
2. Dark or non-shinyilnishes,
glassandPyroceram@cookware,
generallyabsorb heat, whichmay
whichcook longer than 30 to 40
minutes.For foodwith short
cookingtimes, preheatinggives
resultindry,crisp crusts.Reduce bestap~earanceandcrispness.
ovenheat25”F.if lightercrusts are
desired. Preheat cast iron for
bakingsome foodsforrapid
browningwhen foodisadded.
4. Openthe ovendoorto check
foodaslittleaspossibleto prevent
unevenheatingandto saveenergy.
3. Preheatingthe ovenisnotalways
necessary,especiallyfor foods
Shelf
Position
B,
B, A
A, B
A, B
A, B
B, A
A, B
A, B
B,C
I B,C
B,
B, C
A, B, C
B
B
Oven
Temperature
c
B
B
B
B
A
B
A
B
B
B
B
c
400°-475”
350°-4000
400°-4500
350°
400°-4250
375°
350°-3750
375°-4250
375°-4250
350°-3750
325°-3750
375°-4000
325°-3500
325°-3500
350°-3750
275°-3000
350°-375”
350°-3750
350°
325°-3500
350°-4000
400°-4250
375°-4000
350°-4000
300°-3500
325°
400°-4250
3~50-3500
400°-4250
400°-4250
~j(j”
Time,
Minutes
—
20-30
20-40
45-55
20-30
45-60
45-60
45-60
20-30
30-55
45-60
45-65
20-25
2-4 hrs.
20-35
25-30
40-60
25-35
30-60
30-60
50-90
40-60
40-60
15-20
10-25
10-15
10-20
6-12
7-12
45-70
15-25
12-15
Comments
:anned, refrigeratedbiscuitstake
~to4 minu~$]esstime.
Preheatcast iron pan for crisp crust.
Decreaseabout 5 minutesfor muffin
mix,orbakeat450”F.for25minutes,
ien at 350”F.for 10to 15minutes.
Darkmetalorglass give deepest
browning.
Forthinrolls, ShelfB maybe used.
Forthinrolls. ShelfB maybe used.
Two-piecepanis convenient.
Linepanwith waxedpaper.
Paperliners produce more moist
crusts.
Use 300”F.andShelfB for smallor
individualcakes.
Bar cookiesfrom mix use same time.
Use Shelf C and increase temp.
25”F.to50°F.for more browning.
Reducetemp. to300°F. for large
custard. Cook bread or rice pudding
with custardbase 80 to 90 minutes.
Large pies usc400”F.and increase
time.
Toquickly brownmeringue. use
400°F. for 8 to 10minutes.
Custard fillings require lower
temperature, longertime.
395”..4G:)Q
.-
3250-37.5°
300”-350°
...—
.-
j:
60-90
30-60
30-75
Increase time for largeamount
or size.
~.—-—. ..
—— . . . .
_ ..
I
,’
. .
Page 16

....
.... ......... --
—- .- ----——-.—.—---- - - -.- -————--—----
I+oastingiscookingbydry heat.
Tendermeatorpoultrycanbe
r~jasteduncoveredinyouroven.
I<oastingtemperatures,which
shouldbelow andsteady,keep
spatteringtoaminimum.When
roasting,itisnotnecessaryto
sear,baste,coveroradd water
toyour meat.
Roastingisreallya baking
procedureusedformeats.Therefore,
ovencontrolsaresetto BAKE
or
TIMEBAKE. (Youmay heara
slightclickingsound,indicatingthe
ovenisworkingproperly.)Roasting
iseasy;just followthesesteps:
Step 1:Check weightofmeat, and
p!ace,fatside up,on roastingrack
inashallowpan. (Broiler panwith
rackisa good pan forthis.) Line
broilerpanwithaluminumfoil when
usingpan for marinating, cooking
withfruits, cookingheavilycured
meats,or for bastingfoodduring
cooking.Avoiclspillingthese
materialson ovenliner or door.
Step 2: Place inovenon shelfin
Aor Bposition. Nopreheating is
necessary.
Ste~ 4: Most meatscontinue to
coo-kslightly while standing,after
being removedfrom the oven.
Standingtimerecommendedfor
roastsis 10to20 minutesto allow
roastto firm up and makeit easier
tocarve. Internaltemperaturewill
riseabout5°to 10°F.;tocompensate
for temperature rise, ifdesired,
removeroastfrom ovenat5°to 10°F.
less than temperature on guide.
N~E: Youmay wish touse TIME
BA~, asdescribed on page 14,to
turn ovenon and off automatically.
Remember that food willcontinue
to cook in thehot ovenandtherefore
shouldberemovedwhenthe desired
internal temperature has been
reached.
For frozen Roa*
~Frozen roasts of beef, pork,
lamb, etc., can be startedwithout
thawing, but allow 10to 25 minutes
per pound additionaltime (10
minutesper pound for roasts under
5 pounds, more time forlarger
roasts).
@Thaw most frozen poultrybefore
roasting to ensure even doneness.
Some commercial frozenpoultry
can be cooked successfully without
thawing. Followdirections given
on pacl<er’slabel.
Questiom& Answers
Q.k itnecessarytocheekfor
dollenmwithameatthermome@r?
A, Checkingthe finishedinternal
temperatureatthe completionof
cookingtimeisrecommended.
Temperaturesareshownon Roasting
Guideonoppositepage.For roasts
over8 lbs., cookedat300°F. with
reducedtime,checkwiththermometer
athalf-hourintervalsafter halfthe
timehaspassed.
Q. Whyis my roastcrumbling
when I try tocarveit?
A. Roastsare easierto sliceif
allowedto cool 10to 20 minutes
after removingfromoven.Be sure
to cut acrossthe grain of the meat.
Q. Do 1need.topreheatmy
oveneachtime I cook a roast
or poultry?
A.
Itis rarely necessary to preheat
your oven,only forvery small
roasts, whichcook a short length
oftime.
Q. when bt!ying a roast, are
there any special tips that would
help me cook it more evenly?
A. Yes.Buy a roast as even in
thicknessas possible,or buy rolled
roasts.
Q. Can 1seal the sides of my foil
“tent39when roasting a turkey?
A. Sealingthe foilwill steamthe
meat. Leavingitunsealedallowsthe
air to circulate and brown the meat.
Page 17

,
—----
————-. -------. . .—.—.— -- .. . . ..-.
._ -_-—-. .. . ..
—..— ------.-.-——-——-
. ..
,-
~~~$1.Positionovenshelfat B for
,2
‘+~~”small-sizeroasts(3 to 7 lbs.)and
at.4
for largerroasts.
2. Place meat fat-sideup, or poultry
breast-sideup,on broiler pan or
othershallow pan with trivet. Do
notcover.Do not stuffpoultryuntil
just beforeroasting. Use meat
probeformore accuratedoneness.
Controlsignalswhen foodhas
reachedset temperature. (Do not
place
probeinstuffing.)
Ww
L~eat
Tendercuts; rib, highquality sirloil~tip,
rumpor top round*
Lamb Leg or bone-inshouider*
Vealshoulder,legor loin*
Pork loin, rib or shoulder*
Ham, precooked
Ham, raw
*Forboneless rolled roastsover6-inchesthick, add 5 to 10minutesper poundto times givenabove.
3. Removefatand drippingsas
necessary.Basteas desired.
4. Stinding time recommendedfor
roastsis 10to20minutestoallowroast
to firm up and make it easierto
carve. Internaltemperaturewillrise
about5° to 10”F.;to compensatefor
temperaturerise, if desired,remove
roastfrom ovenat 5° to 10”F.less
than temperatureon guide.
Oven
Temperature
325°
325°
325°
325°
325°
325°
Doneness
Rare:
Medium:
WellDone:
Rare:
Medium:
WellDone:
WellDone:
WellDone:
ToWarm:
WellDone:
5.Frozen roas@can be
conventionallyroastedbyadding
10to25 minu~esper poufidmore
timethan giveninguidefor
refrigeratedroasts. (10minutes
perpound forromtsunder5 pounds.)
Defrostpoultry beforeroasting.
.4pproximateRoastingTime,
in Minutesper Pound
tO ~-lbs.
3 to5-lbs.
24-30
30-35
35-45
21-25
25-30
30-35
35-45
35-45
10minutesper pound (anyweight)
U~lder10-lbs.
20-30
6
18-22
22-25
28-33
20-23
24-28
28-33
30-40
30-40
10to 15-lbs.
17-20
Internal
Temperature‘F
130°-1400
150°-1600
170°-1850
130°-140°
150°-160°
170°-i85°
170°-180°
170°-180°
125°-1300
160°
Poultry
Chickenor Duck
Chickenpieces
Turkey
325°
375°
325°
WellDone:
WellDone.
WellDone:
3 to 5-lbs.
35-40
35-40
10to 15-lbs.
20-25
Over5-lbs.
30-35
Over15-lbs.
15-20
185°-190°
185°-1900
In thigh:
185°-1900
‘ -.. -
II
o
Page 18

. .
Broilingiscookingfoodbyintense
radiantheatfrom.the upperunitin
theoven.Mostilshandtendercuts
of meatcanbebroiled. Followthese
stepstokeepspattering and
smokingtoa minimum.
Step ~:~fmeathasfator gristlenear
edge,cutverticalslashesthrough
bothabout 2“apart. Ifdesired,fat
maybetrimmed, leavinglayer
about1/8”thick.
Step2: Placemeaton broilerrack
inbroilerpanwhichcomeswith
range.Alwaysuserack sofat drips
intobroiler
maybecomehotenoughtocatchfire.
S@p3:Positionshe~on ~ommended
shelfpositionassuggestedinBroiling
Guideonpage19.Most broilingis
done on C position,butifyourrange
isconnect~dto208volts,youmay
wishto usehigherposition.
i
I
pan; otherwisejuices
Step 6:Turnfoodonly onceduring
cooking. Timefoodsforfirst side
perBroilingGuide.
Turnfood,thenusetimesgivenfor
secondsideasaguidetopreferred
doneness.(Wheretwothicknesses
andtimesaregiventogether,use
firsttimesgivenforthinnestfood.)
Step %TurnOVENSETknob
toOFF.Servefoodimmediately,
andleavepanoutsideoventocool
duringmeal foreasiestcleaning.
use of Aluminum Foil
I
/ I
Questiolw& Am%’ers
Q. why shouldI leavethedoor
closed%Ilenbroiling Chicken?
A. Chickenis the onlyfood
recommendedforclosed-door
broiling.This isbecause chickenis
relativelythickerthan other foods
youbroil. Closingthe door holds
moreheat in the oven,which
allowschickento cook evenly
throughout.
Q. when broiling, isit necessary
to alwaysuse a.rackin the pan?
A. Yes.Using the rack suspends
the meat overthe pan. Asthemeat
cooks,thejuices fallinto the pan,
thuskeepingmeatdrier. Juices
are protectedbythe rack andstay
cooler,thus preventingexcessive
spatterand smoking,
Q. Should 1salt
broiling?
A. No. Salt drawsout thejuices
1
and allowsthem to evaporate.
Alwayssalt after cooking. Turn
meat with tongs;piercing meat
with a fork also allowsjuices to
escape. When broilingpoultry
or fish, brush each side often
with butter.
themeat before
—
L
StSp4: Le:~vedoorajar a fewinches
(exceptwhen broilingchicken).
Thecioor staysopen by itself, yetthe
properten~pcrattlrcismaintainedin
[heoven.
1. Ifdesired, broiler panmaybe
linedwithfoiland broilerrack may
becoveredwith foilforbroiling.
ALWAYSBE CERTAIN~ MOLD
FOIL THOROUGHLY ~
BROILER RACK, AND SLIT
FOIL TO CONFORM WITH
SLITSIN RACK. Broilerrack is
designedto minimizesmokingand
spattering, and tokeepdrippings
coolduring broiling. Stoppingfat
and rneatjuices from drainingto
thebroiler pan preventsrack from
serving itspurpose, a~~djuicesmay
become hote[~oughtocatch fi~e.
2. DO PJOTplacea si~eetof
aluminum foilo]~shelf, Todo so
r]~ayresultin improperly cooked
fo(lds,damageto ovenf~nishand
incrczsc i~li~c~ton outsidesurfaces
r,~
()~”~;~f:~;l;lt:n.
Q. why are my meats not tur~ling
out asbrown asthey should?
A. In some areas, thepower
(voltage)to the rangemaybe low.
In these cases, preheat the broil
unit for 10minutesbefore placing
broiler pan with food in oven.
Checktoseeifyou are usingthe
recommendedshelfposition.Broil
forlongestperiodoftimeindicated
intheBroilingGuide.Turnfood
onlyonceduringbroiling.
Q.DoI needto grease lny b~oiler
meiitopreventmwt fl”oimSticlting?
A. ~G. Thebroilerrackis designed
toreflectbroile~heat, thus keepi~~g
thesurfacecooleI~ougl~.toprevent
meatstickingtothesurface.However,
s~~rayingthebroilerracklig!~tiywith
a vegetablecookingspraybe!ere
cooking wil}make Cleafiu.peasic~.
Page 19

K+7%.1. Alwaysusebroiler pan andrack
~,
o
3
~~.$thatcomes with your oven.It is
designedtominimizesmoking and
spat~erirtgby trappingjuices in the
shieldedlowerpart ofthe pan.
2. overt doorshouldbe ajarfor all
foodsexceptchicken;thereis a
specialpositionon door which
holdsdoor opencorrectly.
3. For steaksand chops, slashfat
evenlyaroundoutsideedgesofmeat.
Toslash,cutcrosswisethrough
outerfatsurfacejust tothe edgeof
themeat. Use tongstoturn meat
overtopreventpierci~~gt-neatand
losingjuices.
4. If desired,marinatemeafior
chickenbeforebroiling. Or brush
withbarbecuesaucelast5 to 10
minutes on~y.
5.
Whenarrangingfoodonpan,
do notletfattyedgeshangover
sides, which could soilovenwith
fatdripping.
6. ~rc}ilerdoes notneedto be
preheated.However,forvery thin
foods,or to increasebrowning,
preheatif desired.
7. BrozemSteak can be
conventionallybroiledby
positioningthe ovenshelf at next
lowestshelfpositionand increasing
cookingtimegivenin this guide
1%timesper side.
8. Ifyourrangeisconnectedto
208Volts,rare steaksmaybebrofied
bypreheatingbroilheater and
positioningthe ovenshelfone
positionhigher.
~.
~
I
, Food
Bacon
I
GroundBeef
WellDone
Beef’Stea#5
Rare
Medium
WellDone
Rare
Medium (2to 2%-lbs.)
I WellDone
Chicken
Bal(eryProducts
Bread(Toast)or
ToasterPastries 1pkg. (2)
EnglishNluffins
b]bster Tails
(6lo8-wL.each)
Quantityandlor
Thickness Position
I
~2.1b.(about8
thin slices)
I
l-lb.(4patties)
1Ato %-in. thick
I
l-inch thick
(1to 1%-lbs.)
1%-in.thick
I
1
1whole
(2 to2%-lbs.),
split lengthwise
2to4slices
2 (split)
2-4
‘A-in.thick
I
I
I
Ic
Shelf
c
c
c
c
c
c
c
A
c
c
B
FirstSide
Time, Mnutes Time,~nutis
3%
7
7
9
13
10
15
25
35
1 ~-z
3-4
13-16
5
8
10
13
SeeondSide
3%
4-5
7
9
13
7-8
14-16
20-25
10-15
‘/2
Donot
turnover.
5
8
10
13
Comments
Arrangein single layer.
Spaceevenly.
Upto8pattiestakeaboutsametime.
Steakslessthan1inchcookthrough
beforebrowning,Panfryingis
recommended.
Slashfat.
Reduce times about5 to 10minutesper
side for cut-upchicken. Brusheach side
with meltedbutter. Broilwith skin
downfirstandbroilwithdoorclosed.
Spaceevenly.PlaceEnglishmuffins
cut-side-upandbrushwithbutter,if
desired.
Cutthroughbackofshell.Spread
open.Brushwithmeltedbutter
beforeandafterhalftime.
Handleandturnverycarefully.
Brushwithlemonbutterbeforeand
duringcookingifdesired.Preheat
broilertoincreasebrowning.
Increase times5to10minutesperside
for l’h-inchthickorhomecured.
Slashfat.
—-
. ..
c
I
c
8 4-7
10
10
17
6 1-2
10
4-6
12-14
Slashfat.
If desired, split sausa:es inhalf
lengthwise; cut into5 to 6-inch pieces.
1
Page 20

Propercareandcleaningare
i.~p~~~n~so
youefficientandsatisfactory
service.Followthesedirections
carefullyincaring foryourrangeto
assuresafeandproper maintenance.
Finkhes
Theporcelainenamel finishis
sturdybut breakableif misused.
Thisfinishis acid-resistant.
However,any acid foods spilled
(suchas fruitjuices, tomatoor
vinegar)shouldnot be permitted
toremain on the finish.
yOUr range willgive
cleaningundertheRaue
Thearea underthe range ofmodels
equippedwith a bottom drawer can
be reached easily for cleaningby
removingthe bottom drawer. To
remove,pull drawerout all the way,
tiltup the frontand remove it. To
replace, insert glides at back of
drawerbeyondstopon rangeglides.
Lifidrawer if necessary toinsert
easily.Let frontof drawer down,
~henpush into close.
ovenventDuct
Yourrangeisventedthroughaduct
locatedundertherightrearsurface
unit. Cleanthe duct often.
t
“w
Toremove:
~Make sure unit iscool.
~
Liftup right rear surfaceunit.
~Removedrippanandring.
@Lifi out ovenvent duct.
Toreplace:
~Place the part over the ovenvent
locatedbelowthe cooktopwith
openingofthe duct underthe round
openingin the drip pan. It is
importantthat the duct isin the
correct position so moistureand
vaporsfrom the ovencan be
released during ovenuse. N~E:
Never coverthe holein the oven
ventduct with aluminumfoilor
anyother material. This prevents
the ovenventfrom working
properly during anycookingcycle.
LampReplacement
CAUT1ON: Before replacing
your oven
the electricpowerfor your range
at the nlainfuse or circuit
brealier panel. Be
lamp coverand bulb cool
completely before removing or
replacing them.
lamp bulb, disconnect
sureto let the
The ovenlamp (bulb)iscovered
witha glass r;movablecoverwhich
isheld in place with a bail-shaped
wire.Removeovendoor, if desired,
to reach covereasily.
ToJreBnove:
~Hold hand undercover soit
doesn’tfallwhen released. With
fingersof same hand, firmly push
backwire bail untilit clears cover.
Lifioffcover.DO N~ REMOVE
ANY SCWWS.
@Replacebulb with 40-watthome
appliancebulb.
Toreplace cover:
@Placeit intogrooveof lamp
receptacle. Pull wire bail forward
to center of coveruntil it snapsinto
place. When in place, wire holds
coverfirmly. Be certain wire bail is
in depression in center of cover.
e Connect electric
Clean theareaunderthedrippans
power tO ra~g~.
often.Built-upsoil,especially
grease,maycatchfire.Tomake
cleaningeasier,stay-upunitslifi
upandlockintheup position,
andplug-inunitsareremovable.
caution: Besure allcontrols are
turned to OFF and surface Umiw
are coolbefore’
or removethem.1
Afier IiRingthe stay-upunits or
removingplug-in units, removethe
trim ringsand drip pans under the
unitsand clean them
attemptingtolift
accordingto
directionsin tl~eCleaningGuideon
page23.Wipearoundtheedgesof
thesurfaceunitopenings.C~ea~
theareabelow tileu~litso~~ilse:Llll
washedareaswitha dampclotil
or spQnge.
Page 21

Youcan lift a stay-upunit upward
about6“and it willlock inthe up
position.
Toreposition the shy-up unit:
@Replacethedrip pan andtrim
ringinto the recess in the cooktop.
@Putthe trim ringin place overthe
drip pan. The drip pan must be
under the trim ring.
@Guide the surface unit intoplace
Do notlift a plug-inUInitmore
than 1!’ If you do, it may not lie
flat onthe trim ringwhen you
plug it backin.
Repeatedlifting of tile plug-in
unit more than 1“abovethe trim
ring can permanentlydamage
the recephcle.
R
R
Toreplace a plug-inunit:
@First place the drip pan, then the
trim ring into the surfaceunit cavity
foundon top ofthe cooktop so the
unit receptacle can be seenthrough
the openingin the pan.
AdjustingovenThermosmt
Usetimegivenon recipewhen
cookingfirsttime.Oventhermostats,
in time, may “drift” fromthe
factorysettinganddifferencesin
timingbetweenanold and a new
ovenof5 to 10minutes are not
unusual,Yourovenhas been set
correctlyat the factoryandis more
aptto be accuratethan the oven
which it replaced. However,ifyou
findthat yourfoodsconsistently
browntoolittleor toomuch, you
maymakea simpleadjustmentin
the thermostat(OvenTemp)knob.
PULL KNO~ OFF OF SHAFT,
LOOK ATBACKOF KNOBAND
NOTE CURRENT SETTING
BEFORE MAKING ANY
ADJUSTMENT.
Toincreasetemperature,turn toward
HI or WISE; to decrease turn
towardLO or LOWER. Each notch
changestemperature 10degrees.
Plug-inunitscan bc removed.
.-..
-.,
\
j
.L -
... .
-,
i
—
~Insert the terminals ofthe plug-in
unitthrough the openingin the drip
pan and intothe receptacle.
@Guide the surface unit into place
so it fits evenlyinto the trim ring.
Note: The drip pan must be under
the trim ring.
~Do not attempt to clean plug-in
surface units in an automatic
dishwasher.
@Donot immerseplug-insurface
unitsin liquidsofanykind.
~Do not bend the pIug-inunit
terminals.
@Do not attempt to clean, adjust
or in any wayrepair the plug-in
receptacle.
1. Pull offknob. Loosenboth
screwson back ofknob. 2. Move
pointeronenotchindesird direction.
Tightenscrews. 3, Return knob to
range, matching flat area of bob to
shaft. Recheck ovenperformance
beforemaking an additional
adjustment.
Page 22

Thetop,bottom, sides, andbackof
.—.—.
...——... ........ ————-—-.—.—- --,--———--—-——-—-
. -
theovenliner, anddoor innerliner
arefinishedwitha
whichcannotbecleaned in the
usual manner with soap, detergents,
commercialovencleaners, coarse
abrasivepads or coarsebrushes.
TheUSeof such cleaners and/or the
useof ovensprayswill cause
permanentdamage.
The
specialcoalingis aporous
ceramicmaterial
colorand feelsslightlyroughto the
touch. If magnified, the surface
wouldappear aspeaks, valleys,and
sub-surface“tunnels7’This rough
finishtendsto preventgrease
spattersfrom forminglittlebeads
or droplets which run down the
sidewallsof a hard-surface oven
linerleavingunsightlystreaksthat
requirehand cleaning. Instead,
when spatter hitsthe
itisdispersed and is partially
absorbed. Thisdispersalaction
increasesthe exposureof ovensoil
toheated air, which results in
oxidationof soil. This finish also
reducesthe visualeffect of residual
soil, It may notdisappear
completelyand at some time after
extendedusage, stainsmayappear.
The
.~pecialcoatingworksbest on
smallamounts of spatter. It does
notwork well with larger spills,
especially sugars, egg, or dairy
mixtures. For thisreason, the oven
isequipped with a removable,
replaceable aluminum foiloven
bottomliner which protects the
specialcoating
which isdark in
porousjnish,
}?orou~finislzon the bottomofthe
ovenfromspillovers.Avoidspills
oninside surfaceof’theovendoor.
Thisspecialfinishis notusedon
ovenshelves.Shelvesare
removableandcanbemkentothe
sink for cieaning. See “Cleaning
C7uide”on page 23 for cleaning
directions.
Tocleanoven:
Use the followingstepswhen
cleaningyourContinuous-Clean
Oven.
1. Let rangeparts coolbefore
handling.It is recommendedthat
rubber gloves be worn when
cleaningrangeparts manually.
2. Removeall cookingutensils
includingthebroiler pan and rack.
3. Removeovenshelvesand clean
them manually with scouringpads
or mild abrasive.
4. Removeexcessspillsand
boilovers from aluminumfoil oven
bottomliner before removingliner
from oven. This is to prevent
excessliquidsfrom spilling onto
theporous finish. Then remove
aluminumfoilbottomliner and
clean manually. (Beforecleaning or
removingthe aluminum foilliner,
lifibake unit out ofthe way.)
5.
Cleanovenwindow.Use mild
non-scratching cleanser and damp
cloth. Avoidspilling water or
cleaner on porous surface.
6. Soil visibility maybe reduced by
operating oven at 4000P.Close
door, set oven temperature control
to 4-OO°F.Time for at least 4-hours.
.Repeatedcyclesmay be necessary
before improvement in appearance
is a.pparentjparticularly on oven
door. For moderate to ileavy soiling
of oven
jilitem(7)beforerunning4000P.
cycle.The
to ~Gj~trQ~the~Jl~IeautornaticaIIyat
dOOF,usemethod described
GVentimerc~n.be used
atimeconvenientforyou. Some
slightsmokingmayoccur, similar
to that which mayoccur during
TimeBakecooking.
~~m~~~~~~: ~URIN~ T~~
~~>~~~~~~N ~~ T~~ ~~~N,
T~~ ~OOR, WIN~OW AND
OT~~R RAN~~ SURFACES
WILL ~~T ~OT ~NO~~~ ~
CAUSEBURNS. ~0 N~
T’O~C~o LET THE WNGE
COOL BEPORE REPLACING
ALUMINUM FOIL OVEN
BOT~M AND OVENSHELVES
IF THEY WERE REMOVED.
7. If a spilloveror heavysoiling
occurson the
soonas
removeas much ofthe soil as
possibleusing a smallamount
of water and a stiffbristle nylon
brush. When usingwater, use it
sparinglyand changeit frequently,
keepingit as clean as possible, and
be sure to blot it up with paper
towels,cloths, or sponges.Do
ruborscrub
cloths~r sponges, sincethese will
leaveunsightlylint on the oven
finish. If water leavesa white ring
on the finish asit dries, apply water
againand
porous su~ace, as
the ovenhascooled,
not
with paper towels,
blotitwitha cleansponge,
startingattheedgeoftheringand
workingtowardthecenter.
Use care inremovingandreplacing
aluminumfoilovenbottomliner
andshelvesandinplacingand
removingdishesandfoodtoavoid
scratching,rubbingor otherwise
damagingtheporousjnish onthe
ovenwallsanddoor.
DOnotusesoap,detergent,
commercialovencleaner,silicone
ovensprays,coarsesteelpadsor
coarsebrushesontheporo~~s
surface.
clog, and mar the
These products will spot,
porous surface
andreduceitsabilitytowork.
Page 23

control Knobs: ~MildSoap andWater
&nge Topand oven
Ou@ideG1assFinish
fife~l, including
Brushed Chrome and
Cooktop
Porcelain Enamel
E
–~
‘“v=
Surface
Inside Oven Door*
.—
Aluminum
Oven Bottom Liner
1oven ventDuct
1
shelves
Foil
QSoapand
I
~SoapandWater
~PaperTowel
o Dry Cloth
@Soap
andWater
@
SoapandWater
Soapand Water
~
~Damp Cloth
~
Soapand Water
I
e Soapand Water
Water
GENERAL DIWC~IONS
Donot clean the bakeunitor broil unit. Anysoil willburn off whenthe unit is
heated. NOTE: Thebake
floor.If spillover,residue, or ash accumulates arouridthe bakeunit, gentlywipe
aroundthe unit withwarm water,
Drain fat, cool panand rack slightly.(Do not let soiledpan and rack stand in ovento
cool.)Sprinkleon detergent.Fillthepanwithwarmwaterandspreadclothorpapertowel
overthe rack. Let pan and rack standfor a fewminutes. Wash;scour if necessary.
Rinseandally.OWIQN: Thebroiler panandrackmayalsobecleanedinadishwasher.
Pull offknobs. Washgently but do not soak. Dry and return controlsto range,
makingsure to matchflat area on the knoband shaft.
Washall glass with clothdampened in soapywater. Rinse andpolish with a dry
cloth. If knobs are removed,do not allow waterto run downinsidethe surface of
glass while cleaning.
Wash,rinse, andthenpolish with a dry cloth. DO N~ USE steel wool, abrasives,
ammonia, acids, or commercial ovencleaners whichmaydamagethe finish.
Avoidcleaningpowdersor harsh abrasives whichmay scratch the enamel.
If acids should spillon the range while it is hot, use a dry paper towelor cloth to
wipeup right away.Whenthe surface has cooled, wash and rinse.
For other spills, suchas fat smatterings,etc.,
and then rinse. Polishwith a dry cloth.
Use a mild solutionof soap and water. Do notuse anyharsh abrasives or cleaning
powderswhich mayscratch or mar surface.
To clean ovendoor; removebyopeningto BROILpositionand graspingdoor at sides.
Lift door up and awayfrom hinges. Clean with soap and water. Replace bygrasping
door at sides and liningup door with hinges. Push door firmly into place.
Ordya damp cloth maybe usd to clean aluminum foil ovenbottomliner.
Aluminumfoil ovenbottom liner may be replaced with heavy weight aluminum foil
cut to the size of the original liner. Be sure to removethis liner fromovenbottom
beforecleaning oven.
Removethe OvenVentDuct foundunder the right rear surface unit. Washin hot,
soat)vwater and drv and replace. (Opening shouldmatch opening in drip pan.)
L.1
Yourshelves can be cleaned byhand, usingany and all mentioned materials. Rinse
thoroughly to removeall materials after cleaning.
Spatters and spills burn awaywhen the coils are heated. Atthe end of a meal,
removeall utensils from the Calrod” unit and heat the soiled units at HI, Let the
soil burn off about a minute and switch the units to OFF. Avoidgetting cleaning
materials on the coils. Wipe off any cleaning materials with a damp paper towel
beforeheating the Calrod” unit.
DO N(YI’handle theunit before completely cooled.
DO NOT immerse plug-in units in any kind of liquid.
For cleaning, removedrawer by pulling it all the way open, tilt up the front and lift
out. Wipe with damp cloth or sponge and replace. Never use harsh abrasives or
scouring pads.
Clean as described belowor in the dishwasher. Wipe all rings after each cookingso
unitishingedandcan be liftedgently toclean the oven
washwith soap and water when cooled
.
.-
.
. .
.
I
,,
i,
Page 24

.—...
{-,.
. ——..—
—...=-—.
.f-gg$gzQ$aestiom?
-m. *-— -
———— .-—.- -.
POSS$BLECAUSEAND REIMEDY
/ OVENWILL NOT WORK
i
I
OVENLIGHT
DOES NOT WORK
FOOD DOES NOT
BROILPROPERLY
FOODDOESNOTROAST
I
ORBAKE
PROPERLY
1
?lug on rangeisnotcompletely insertedin the electrical outlet.
The circuit breaker in yourhouseI]asbeen tripped, or a fusehas been blown.
Ovencontrols notproperly set.
Lightbulb isloose.
Bulbis defective.Replace.
Switchoperatingovenlightisbroken. Callfor service.
OVENSET knob notsetat BROIL.
OVENTEMP knobnot setat BROIL.
Door not lefiajar as recommended.
Improper shelfpositionbeingused. CheckBroilingGuide.
Necessary preheating was notdone.
Foodis beingcookedon hotpan.
Utensilsare notsuitedfor broiling.
Aluminum foil used on the broilpan rackhas not been fitted properly and slit
asrecommended.
OVEN SET knob not set on BAKE.
OVEN TEMP hob not setcorrectly.
Shelfposition is incorrect. Check Roastingor Ba’tingGuides.
Oven shelf is not level.
Incorrect cookware or cookware of improper size is being used.
A foiltent was not used when needed to slowdownbrowningduring roasting.
CALROD(3JSURFACEUNITS
NoT FuNmIoNING
PROPERLY
I
1
Surfaceunitsarenotpluggedin solidly.
Trimrings/drippansarenot setsecurelyintherangetop.
Surfaceunitcontrolsarenot properlyset.
Page 25

1,, ,
-_,.-.
NEXT, if you are stillnotpleased,
writeall the details-including
yourphone number—to:
Manager, Consumer Relations
Hotpoint
AppliancePark
Louisville,Kentucky40225
FINALLY,if your problem is still
notresolved, write:
Major Appliance
Consumer ActionPanel
20 North Wacker Drive
Chicago,Illinois60606
---
-.
.,
-r
‘1
..
Page 26

YOURHoTPolh]TRANGE
WARRANTY
Saveproofof original purchasedatesuch asyour salesslip or cancelledcheck to establishwarrantyperiod.
—..——
—. —.
._——_=
—.-
iwHAT!s COVERED
W~~T ~S Na ~~~ER~D ~ Servicetripstoyourhometo
FULL ONE-YEARWARRANTY
Foroneyear from date of original
purchase,Wewillprovide,freeof
charge,parts and servicelabor
inyour hometo repairor replace
anypafi of the range that fails
becauseof a manufacturingdefect.
teachyouhowtousethe product.
ReadyourUseandCam materia!.
If you thenhave anyquestions
aboutoperatingtheproduct,
pleasecontactyour dealeror our
Consumer Affairs officeat the
address below,or call, toll free:
GE Answer CenteP
800.626.2000
consumer information service
@Improper installation.
Thiswarrantyisextendedto
the original
succeedingownerfor products
purchasedforordinaryhomeuse
inthe
andWashington,D.C.InAlaskathe
warrantyis the sameexceptthat itis
LIMITEDbecauseyoumustpayto
shiptheproductto-theserviceshop
orfortheservicetechnician’stravel
coststoyourhome.
Allwarrantyservicewillbeprovided
byourFactoryServiceCentersor
byourauthorizedCustomerCare”
servicersduringnormalworking
hours.
LookintheWhiteorYellowPages
ofyourtelephonedirectoryfor
HOTPOINTFA~ORY SERV!CE,
GENERALELE~RIC-HOTPOINT
FACTORYSERVICEor HOTPOINT
CUSTOMERCARE@SERVICE.
~ Replacementofhousefusesor
resettingofcircuitbreakers.
~ Failureoftheproductif itisused
forotherthanitsintendedpurpose
orusedcommercially.
5 Damagetoproductcaused
byaccident,fire,floodsoracts
Of God.
WARRAPl~R IS NOTRESPONSIBLE
FORCONSEQUENTIAL DAMAGES.
purchaserand any
48 mainlandstates,Hawaii
4
yOLIhavean installation problem,
If
contact your dealer or installer.
Youare responsible for providing
adequateelectrical, gas,exhausting
and other connecting facilities.
...-..—... . . ...——
...—..-.—
Some states do not allow the exclusion or limitation of incidental or consequential damages, so the above limitation or exclusion
may not apply toyou. This warranty gives you specific legal rights, and you may also have other rights which vary from state to state.
Toknow ‘){hat your legal rights arein your state, consult your local or state consumer affairs office oryour state’sAttorney General.
_.-—..—
—
 Loading...