

Page 1
Howtogetthebesthorn
Continuous
Contents
Ahminurn Foil 4,14,17,18
Anti-1’lpDevice 3,21,27,29
ApplianceR@stration 2
Care and Cleaning
Clockmi 10,11 Oven Vent 26
Cmmrncr services 31 Problem Solver 30
~ Phone Numbers 31
I?dxllx!$
InataIktion W&uctiomJ 27-29 S8fkty ImWucikna
Leveling 29 Surface Contmk
Model & Serial Numbers 2 canning Tips
oven 11-20 control Stttings
-
Broiling 19,20 cookware
COnthmous Cleaning
LifkOfYDoor 24
Lighc Replacement la 23 GE Answer Centd
Preheating 13,19 8oo&6.2ooo
21-26 rimed Baking
(47
12-14
25
Roaating 17,18
shelves
Storage Drawer
Tkmoatat Adjustment-
Do ItYme~ 16
Cooktop COmpamO“n
T’@
warranty
4,11,13,23
Back Cover
26
15,16
3-5
8-1o
10
Useand Care
&hlstaua
Instructionsfor
Standard
Ckanmodels
8
8
9
tion
RB524
RB525
R13526
RB532
RB533
RB534
l’unPo9NT
RB536
Ckanmodels
Part no. 164D2966P076
Pub. no. 394740-1
12-94
#pJ~ ~ f
AS
Page 2
Hm4’pusHELPYou...
Before using your range,
read this guide carefhIly.
It is intended to help you
operate and maintain your new
range properly.
Keep it handy for answers to
your questions.
If you don’t understand something
or need more help, write (include
your phone number)
Consumer Afhirs
Hotpoint
Appliance Park
Louisville, KY 40225
W tedownthe model
an serial mlmbersO
t
Y
‘llfidtional*l
be the range door or behind
the torage drawer.
?
The#enumbersare alsoonthe
umer Product Ownership
Re
yo range. Before sending in
F
this ~ please write these
nunibers here:
sf)f@Nulnbeu
Use these numbers in any
+
“onCard that came with
ndence or service calls
If you received
a
Immediately contact the dealer (or
builder) that sold
Save time and money.
Before you request
services..
Check the Problem Solver in the
back of this guide. It lists
minor operating problems that you
can correct yourself.
~g yourrange.
IFYOU NEED SEIWICE
~
-9A:’
damaged range...
you the range.
UUSeS of
To obtain servi~ see the Consumer Serviceq page in
the backofthisguidee
We’re proud of our service and want you to bp
pleased If for some reason you are not-with the
seMce you receive, here are 3 steps to follou/ for
filrther help.
FIRST, contact the people who seMced your
appliance. Explain why you are not phased. @most
~ this will solve the
problem
NEXT,ifyou are stiIl not pleasec$ write all the
&tails-including your phone number-to:
Manager, Consumer Relations
Hotpoint
Appliance Park
LOuidle, KY 40225
FINALLY,if your problem is still not resolve~ write:
Major Appliance Cunsumer Action Panel
20 North Wacker Drive
Chicago, IL 60606
.m~
&~)
2
,
r
Page 3
●
Readall
hstr@ioIss beftm
usingthisappliance
IMl?0KE4Nf’SAFETYINSTRUCTIONS
‘.&
whenusingd-~bask
precautionsshouldbefbbw* indudng
folluwin&
Wsethisap@aacedyforits~M
asdedbedinthis guide.
●emyoiglr
grounded by
e!g$!%?i
ispmpedy
withtheprovidedinstaationinsmctions+
d)onomtuiapttorepdror
yamrramgeunk!ams
M#isguidedmtherserviagahould
re$ixredtoactechniciam
recyclethefhxwent
P
r“
locd#ateandfederalcode&
lightbillbiaxdiqgto
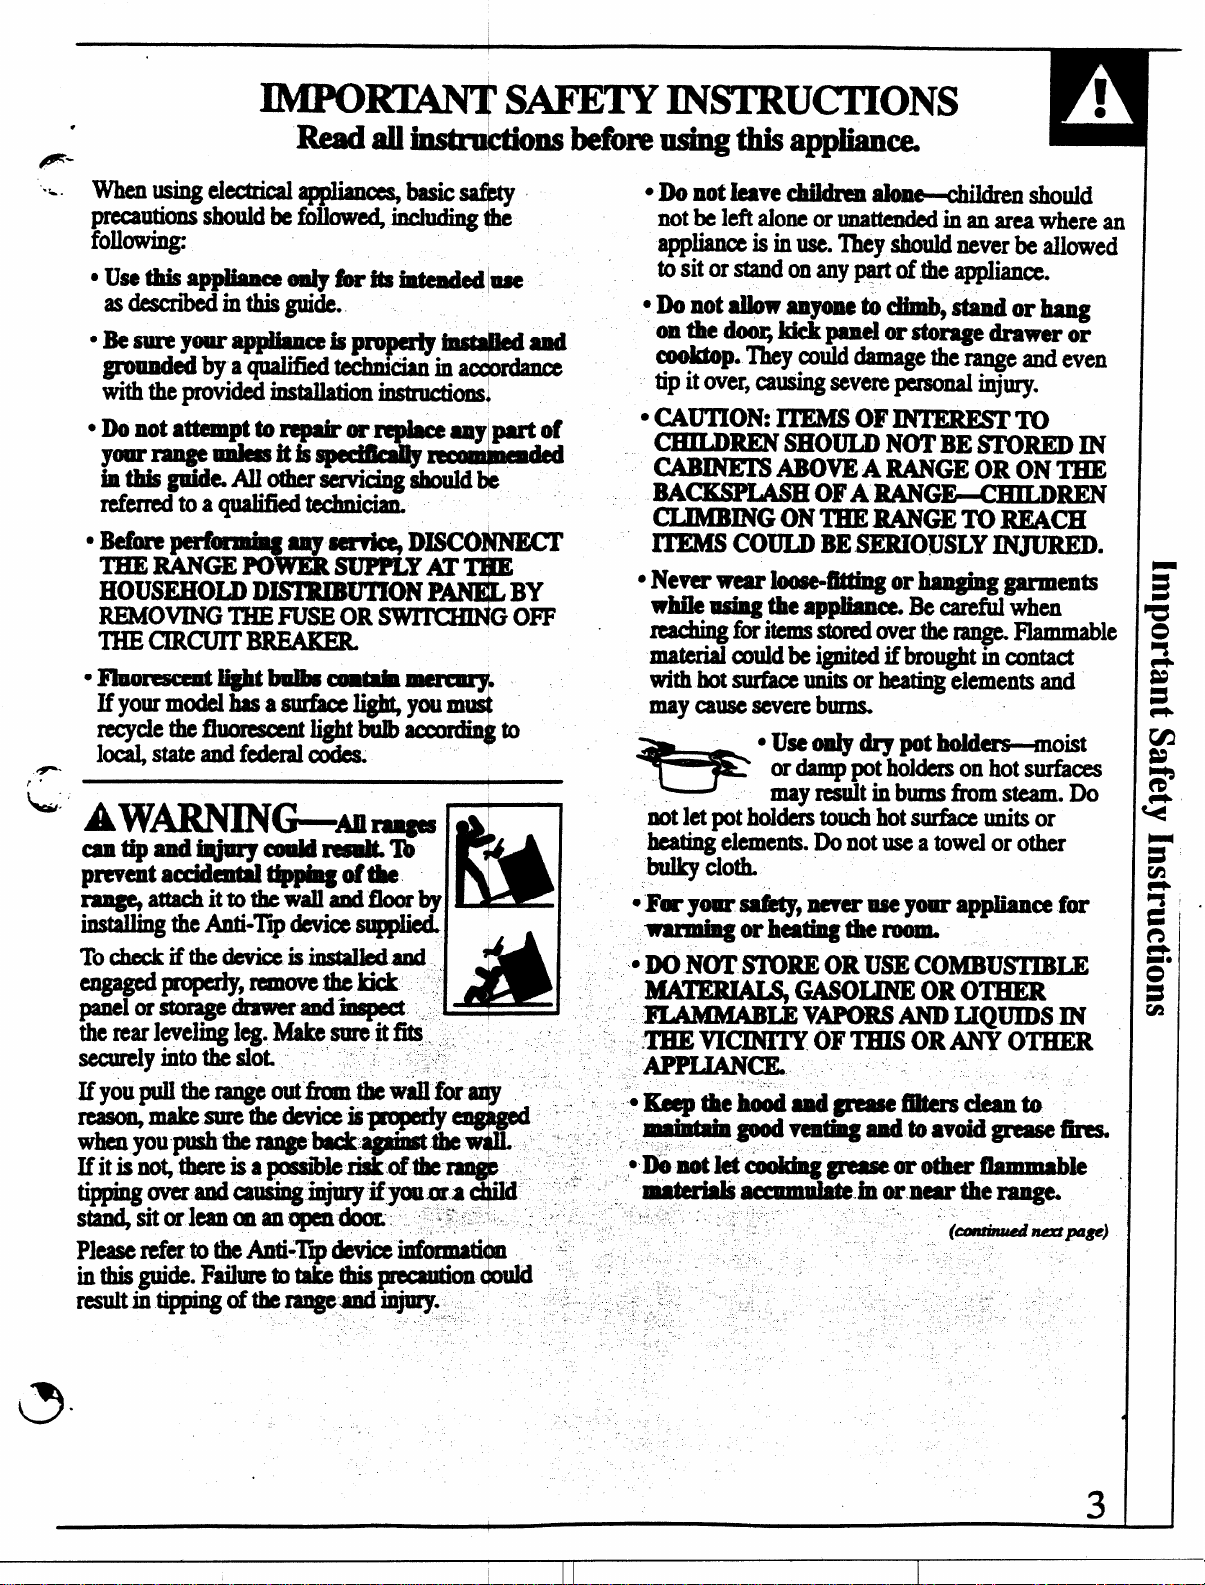
“ AWMING-AQramgw
Cantipandiqjurycouldtin-
preventaecidti - ofthe
raagc+attachittothewauandfborby
.
mtdling theAnti-Tq devicesqpIiwL
Tocheckifthedevice isinstakdand
propedy,reanovethekick
%Iorsmragedrawerand”- !
•onotkave~~
*
notbe leftfdoneorunattendedinan areawherean
apphce is inuse.‘.h!y shouldneverbe
to sit or
standonanypartoftheappliance.
●
n should
allowed
●lMaotaUOwan~ to_, _or~
omthe~=pmwlorsto~kwwor
cOOldOp.They could damage the range and even
tip itover,causingsevere
•~~()~m()F~~
CHILDRENSHOULDNOTBESTOREDIN
UBINETSABOVEARNWE ORONTHE
MQMPLMH
OFARANGl&CHILDREN
CLIMBINGONTHERANGETO REACH
ITEMS COULDBESERIOUSLYINJURED.
● Never wear loose-Sttiugor
whileasimgthe appliance.Becarefulwhen
mach@foritemsstoredovertherange.Flammable
mabrial amldbe ignited if brought in contact
with hot surfhce units or heating elements and
my cause
SWeI’ebuns
dhmdydlypdhdders—m
ordamppotholderson hotsurf&xs
%
mayresultinburnsfkomsteam.Do
notlet potholderstouchhotsurke units
heating elements. Do not use a towel or other
bllllty Cloti
a
● FOPyoursalkty,neveruseyourappliance for
prsonaI injury.
ha3@xqJgarInents
Oist
or
Page 4
the
KE4N’11Si41?ETYINSTRU~ONS
•~on@~~***-*~
elements or the
~ese
SUd~ IIMybe hot
thoughtheyaredarkinmkx.
do nottoti or let clothingorother
materialscontacttheSurfke units,the*
nearbythesurhce unitsor anyinteriorar+aofthe
oww allowsuilkknt timeforooo~ @.
Potentially hot surfaces include the coo
facingthecooktop ovenvent_
neartheopeningdxevicesmundti
theedgesofthe doorwindow~metibp
abovethedoor.
Rexnexn& The* surfaceof theovclnmay
be hotwhenthe dooris opened.
●DontimwatHIJgmaseb
i!!!!f-
onasurfacx unitbycoveringthepancum etely
witha well-fittinglid,cookiesheetorflat y.Use
a multi-puqmsedrychemkalor f-- fire
-her”
Fkmillggreaseoutsideapancanbeput by
coveringit withbakingsodaW ifavailab%by
usingaamulti-m drychemical or f -type
fm extqudm
Flameintheovencanbesmotheredcom*tCly
byclosingthe owndoordbtiqmoff
or byusinga
typefireextmpsk
oven
StandawayfMmtheq~
themndoor.Hbttim-wM
causeburnstohanc&faceandor eyes.
●
Do
not heatunopenedfoodcmtake=
RessurecouldbWq titie~
b= causinganinjury.
Keepthe oven
Keepthemn-*~-p+
4
interior
Neverpicknpa
themntrds off.Smothera “ pan
‘r
●
m~ti-e dry clwmical @ f--
vent duct umMm@d.
pan+mrn
J
*=
“ @uld
(continued)
● Placetheovenshelfinthedesiredpositionwhik
whenhogdonotIetpotholdercontacttheheating
● PuUingoutthesheMtotheshelfstop40ck
is aconvenienceinMing heavyfti.
Itisalsoaprecautionagainstburnsfromtouching
hot surfiwes of the door or oven walls.
●~*mk@~-
ovq foIlowthemanufWur8z’sdirections.
● DoIlotuseyourovento drynewspapers.
Ifoverhea* theycancatchfire.
dkmotusetheovenf orastorageamao
Itemsstoredinanovencanignite.
● Donotleavepaperproductsscookingutensils
m foodintheovenwhennotin use.
● For ~~WUS dean IIBO&&dOltOt US ova
Cleanersonany Continuo=
Smfhce&amtinumscleaningsurfacescanbe
identifiedbytheirroughsurke -k
Surthcecookingunits
bthg elCmCXlt.
Willexposeaportionofthesm tittiti
contactandmayresultin ignitionof clothing.
Properrelationshipof~ tosurf&xunit
willalsoimproveefficiency.
● Nevm~mveha bee ~ts unattended at
highheatsettiup
m Spiuovmthatmaycatchonfire.
•~m~~~~~tdudmnot
,.
coveAandarWi@MSIl@*nm&ng
cookingcould
.DO~otuseahuAx- f611tolinetie*P
oranywhe=inthtwmu~=des-k
titisgukkhdisuseco uld-tkash~ti
hazardordamage tofheq.
4alycertaimtype$of#=%t@=lc==@
earthenwareorothergiaaedcontainemare
suitablefm cooktop- o~e~ ~Y br~ _
becauseofthesuddendung
•~~~e
Ilammabiematerialsandspinqp$
contabershouldbetumed-ti-~roftie
range
As
theovenis COOLIf theshelvesmustbehandled ‘”
elements.
“ bagsrnthe
cleaning
● UseproperpansHekct
cookwarehavingflatbottomslarge
enoughtocoverthesurfkceunit
w
‘fileuse ofundersizedcookware
~flOVerScausesmokingand
-vP-d*g”
c in temperature.
poadbwy
without extending
“ Overtheneal’by surfa=tim
of- ignitionof
thehandleofa
:&
f
Page 5
.P---
!,
,.
b
‘%-
● Toavoidthepossibilityof aburnorek@ric
sh~ alwayibecertah that thecontrolsfor
allsurfaceunits areattheoffpitionda
coilsarecoolbeforeattemptingtoliftor ~ernove
a unk
Whenfkmingf*arem*tieh~-
thefanoff. T’hehJfq~my~d
theflame.
●
Donotimm-=-*~*-f=
Unit&Donotputtheinha-*
●
Keepaneyeonfb -Mat~m
mediumhighheats
●
Foodsforfryingshddh8$@=~k
Frostonfrozenf- ormoistureonikesi$fcancausehotfatto bubbleupandoverthpsides
ofthepm
●
UseIittk tit fm efktive shalloworde@kt
_FMtie~~Mloftit-~~
Spilloverswhenf@ isadded.
●
IfacombinatiomofOikOrfWtik~
infryin&
meltslowly.
stir mgfxhef befm hea~ or $Sfa~
AlwaysheatM slowly,andwatchasit h@s.
. . .
1
Page 6
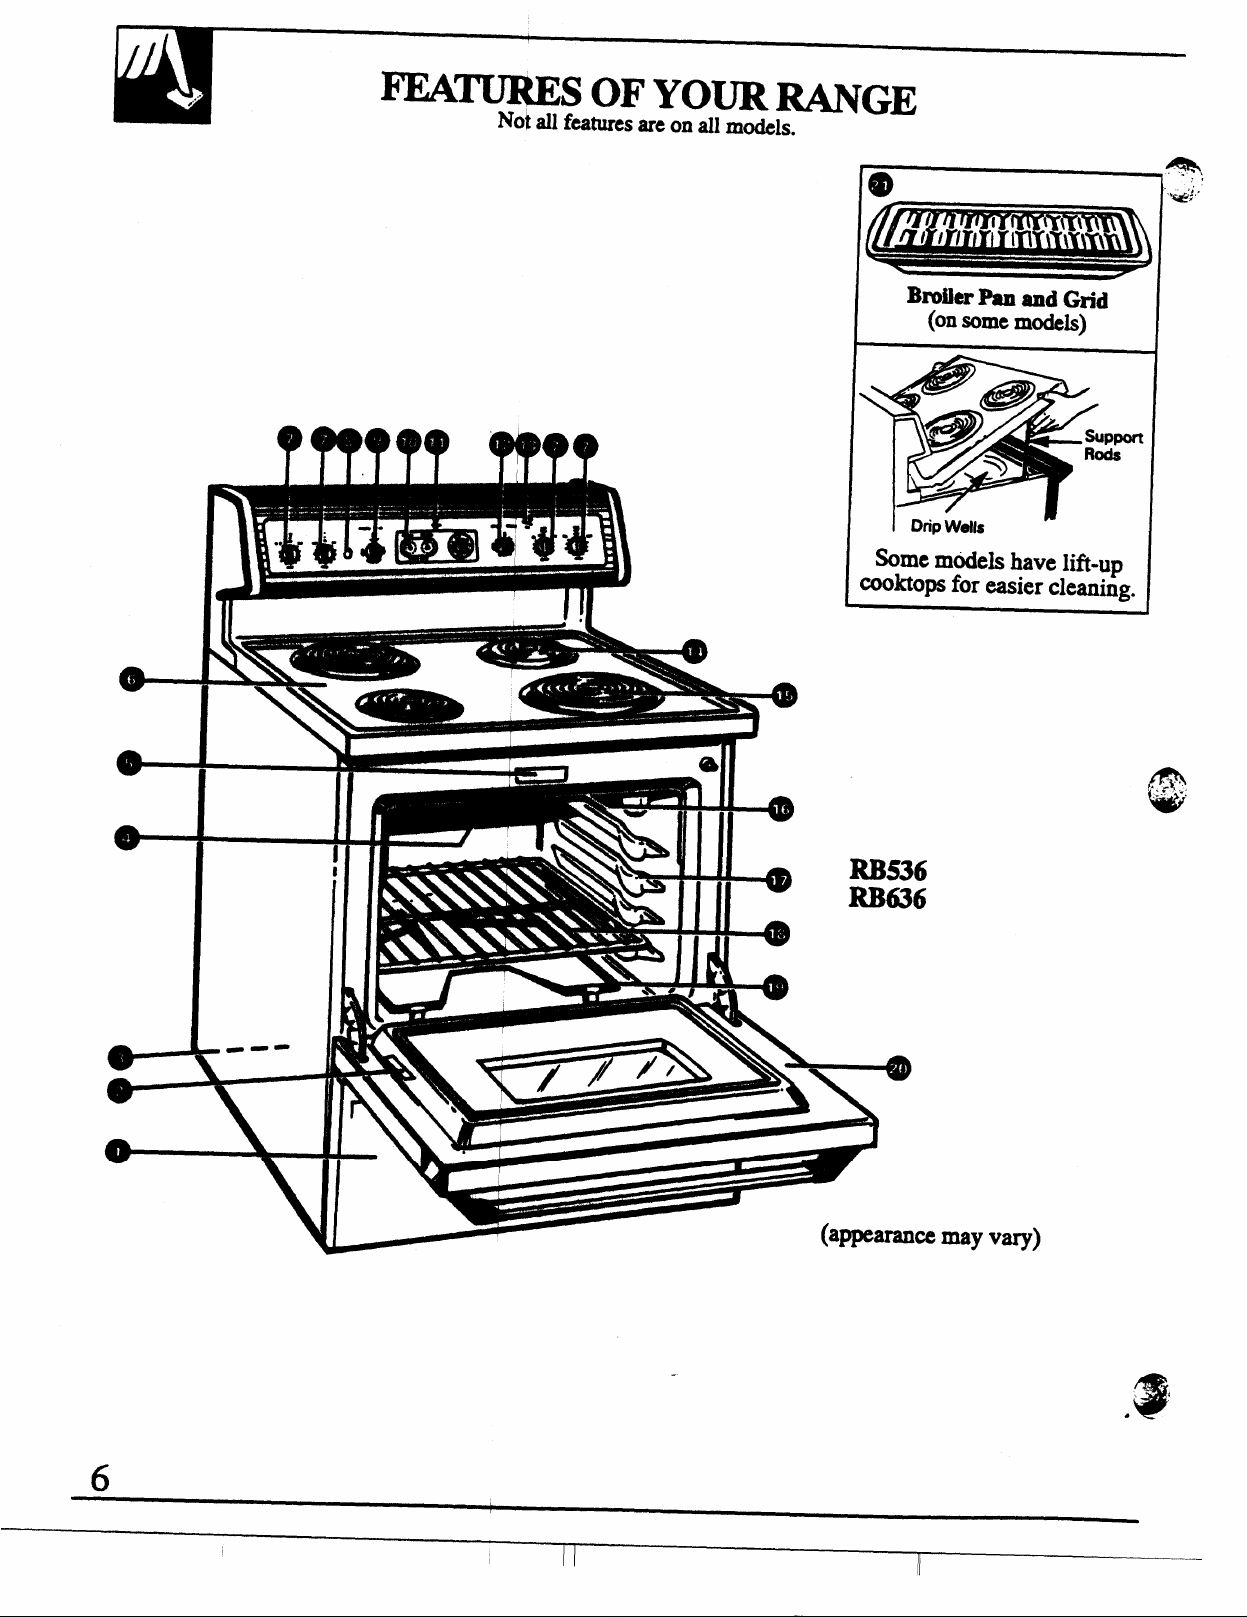
-TURES OF YOUR RANGE
Not all f~tures are on all models.
Some mcideh have lift-up
Cooktops for easier cleantig.
Bmilm Pan and Grid
(on some modeis)
.
J
i
1[1
RB536
RB636
ce may vary)
6
Page 7
p.
t.
%..-
I’M’M’?!’
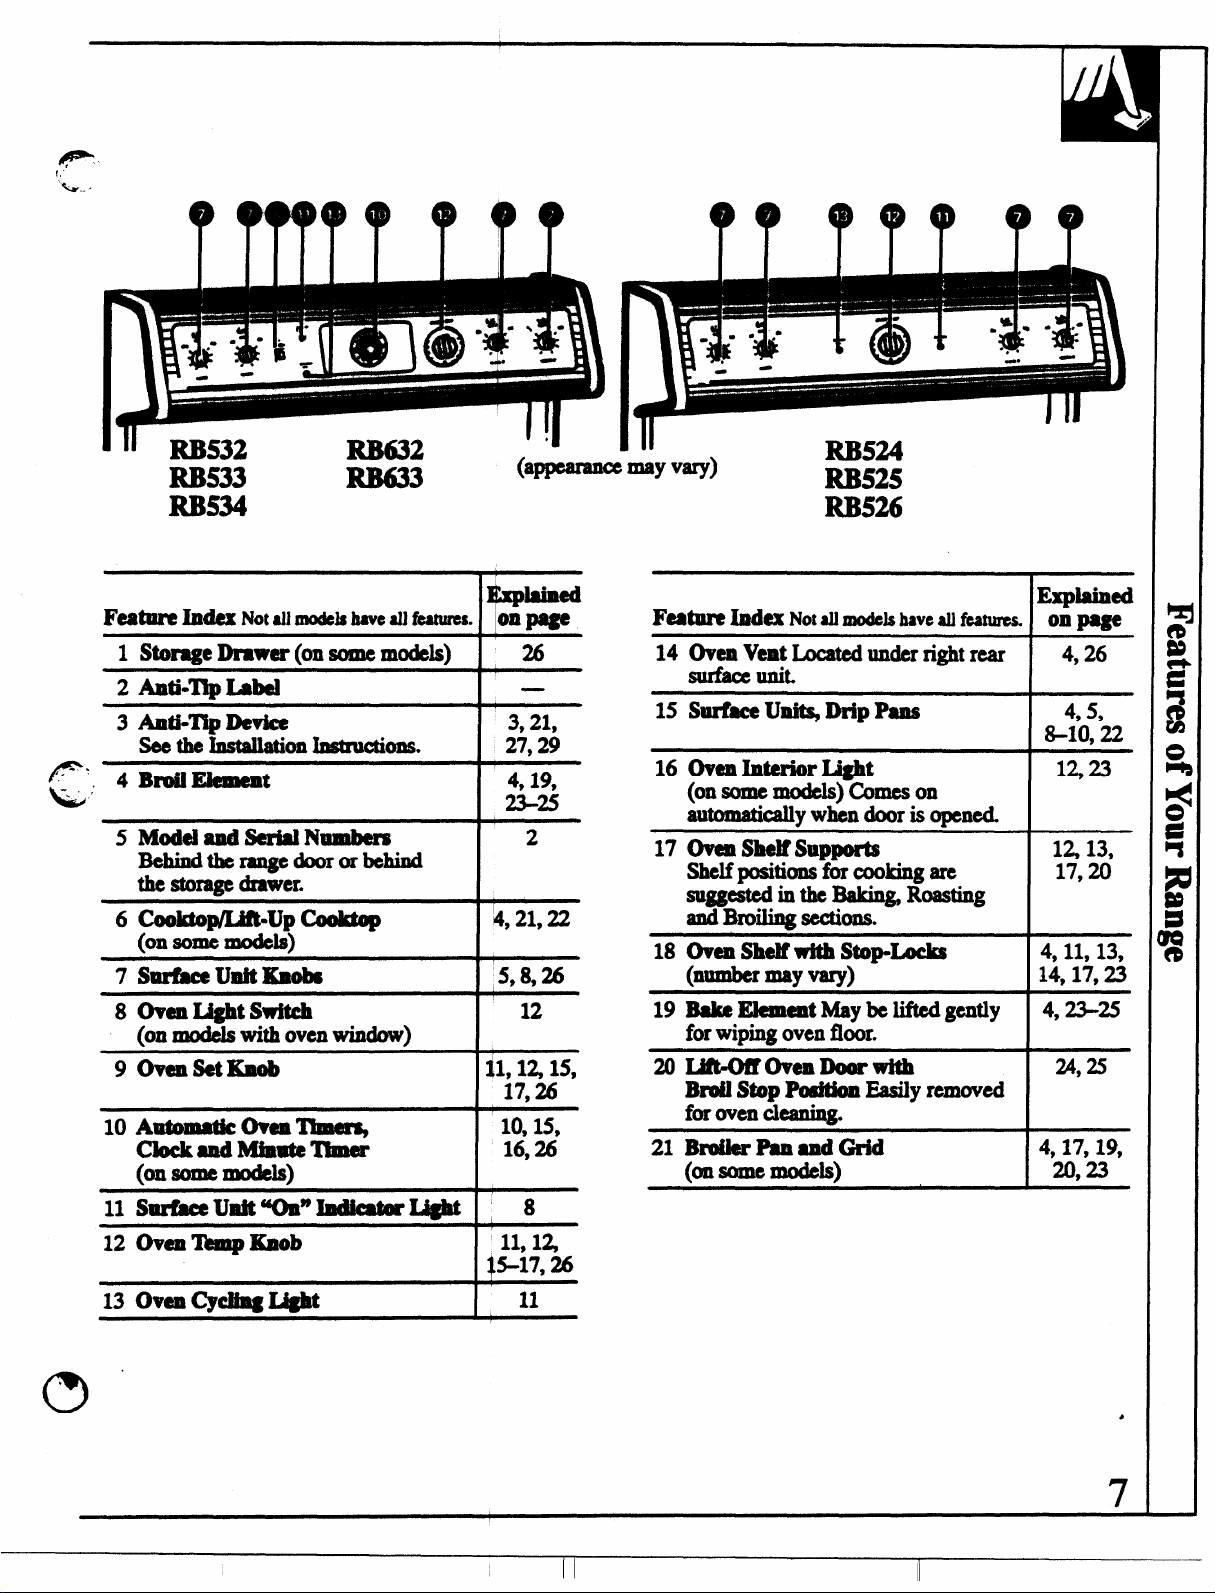
Featwe Index
1 Stomge Dr8wer (on some models) 14 OvemVent Located under right rear
2 Aati-’np Labal
3 Antmp Device
sccw!hlsmationkmc&Mla.
f:- ‘
4 Bti Element 4,19,
5 WdelandSaiaiNumbem
BAindthcrangedloororbebind
the storage drawer.
6 Cookto@Afk-Up Cool@op
(on aornc mo&ls)
7
Smfkceudthoba 5,8,26
8 Oven Light Switch
[onmociel$withoven window)
9 Ovensetmlob
10 AutomatkOwn~
cbck81kdMilB8temmer
(on- Imxkla)
11
slBr!hceudtwSl”h@atorL@t
RB632
RB633
~otaumows haveaukatum
‘ ‘s
.
qxp18ined
Ionpage
26
—
3,21,
27,29
23-25
2
k, 21,22
12
il, la 15,
17,26
10,15,
16,26
8
RB524
.— ——.
RB525
RB526
* unit.
15 sUrfkceU* DripP8n$
16 Oven Interior Li@t
(on some rnodcla) Comes on
automatically when door is opened
17 (hem Slwlfsupports
Shclfpoaitiona for cooking arc
suggested in the_ Routing
and Broiling sections.
18 Oven SIMMwith Stop-Locks
(number may vary)
19 B8ke E3emmt May be lifted gently
for wiping oven floor.
20 Lm4M?oveml)oorwith
BmiI Stop Poaitim Easily removed
for oven Clcanhlg.
21 Brxtiler Panand Gdd
(on some models)
Explained
on page
4,26
4,5,
8-10,22
1213,
17,20
4,11,13,
14,17,23
4,23-25
24,25
4,17,19,
20,23
*
(9
12 oven lkmp Ebob
13 ova C@@ L#gbt
11, 1%
15-17,26
—
Page 8
HOW DOES
T
To OUR OLD ONE?
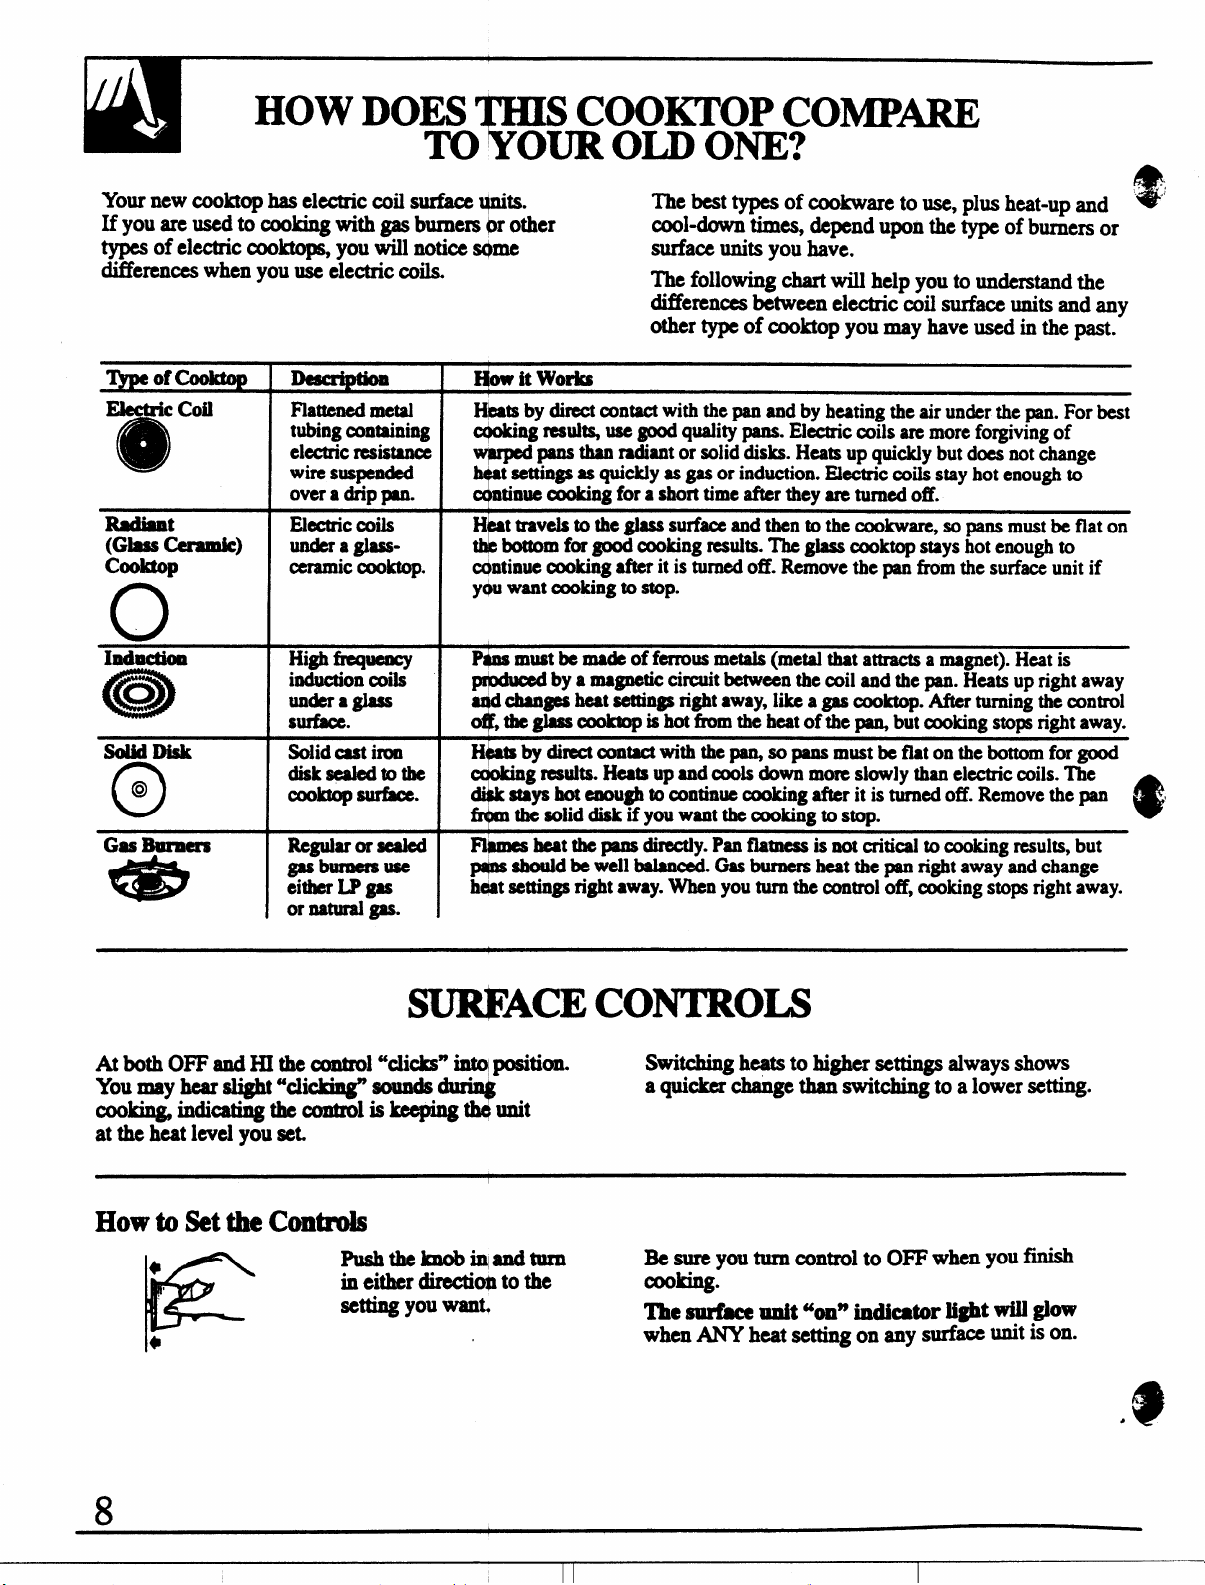
Your new cooktop has electric coil surface @a.
If you are used to cooking with gas burners@ other cool-down times, depend upon the type of burners
of electric coo- you wiIl notice @me surface units you have.
types
~erences when you ~ electric coik
COOKTOP COMP!!!!
The best types of cookare to use, plus heat-up and *
.
The following chart will heln you to understand the
differences l%twcen electric”c%ilsurface units and any
other type of cooktop you may have used in the past.
e...
or
lypeof Cooktop
coil
s
Rsdiant
(Glass Ceramic)
Cooktop
n
Inductioo
0
o
Solidmsk
@
o
Gas Burners
eiiB5
1~ I
Flattenedmetal
tubing containing
electric resistsIMx
suspended
wire
over a drip pan.
Electriccds
under aglassceramic cooktop.
Iiiplfieq~
underaglass
Surfhcc.
Solid ast iron
disksealedmthe
- -*
Regular or add Fl~ heat the pans directly. Pan fiatness is not critical to cooking results, but
gas burlwrs use
either IX gas
or natural gas.
*it Worlul
H@s by direct contact with the pan and by heating the air under the pan. For best
WV fGS~* usc @ q~ity PM. El-c coils arc more forgiving of
S ~ * ~~t or =lid
aemngsasqwcklyas gas or
tinuecookingfor a short time after they are turned off.
z
H t travelsto the glass surfaceandthen tothe cookware,sopans must be flat on
bottom
$
cdntinue *ng * it is tuti off. Rcrnove the pan
yQUwant cooking to stop.
P@a must be made of ferrous metais (metal that attracts a magnet). Heat is
#pducd by a magnetic circuit between the coil and the pan. Heats up right away
a@ changes heat
0$ the glass cooktop is hot fhxn the heat of the - but cooking stops right away.
H~~&ti-=titi ti~m~muthfit ontie_for~
“ stays hot enough to continue cooking after it is turned off. Remove the pan ,
r
fr(xn the solid disk if
p+s should be well balancd
hdat settings right
fw goodcooking results. The #ass cooktop stays hot enough to
settingsrightaway,likea gas cooktop. After turning the control
‘ g resuhs. Heats up and cools down more slowly than electric coils. The
youwantthecookingto stop.
away.Whenyouturnthe control off, cooking stops right away.
@ks. H** Upquicklybut does notchange
induction. Electric coils stay hot enough to
fkomthesurfaceunit if
Gas burners heat the pan right away and change
@
-ACE CONTROLS
At both OFF and HI the control “clicks” *I position.
Youmayhearslight Wking’’aoundsdurill$
cookingJndicatingt hecontroli skeepingthOnit
at the heat level you set.
How to Set the Contmb
4
*
F
Puahtheknob iqandturn
in either &ectio@ to the
setting you want,
8
StitChillg heats
a quicker change than switching to a lower setting.
*sure you turn control to OFF when you finish
cooking.
‘l’h@surfhce unit ‘onw indbtor light wiIl gbw
when ANY heat setting on
tO higher Settings idWiiJTS ahoWS
any surface unit is on.
n
Page 9
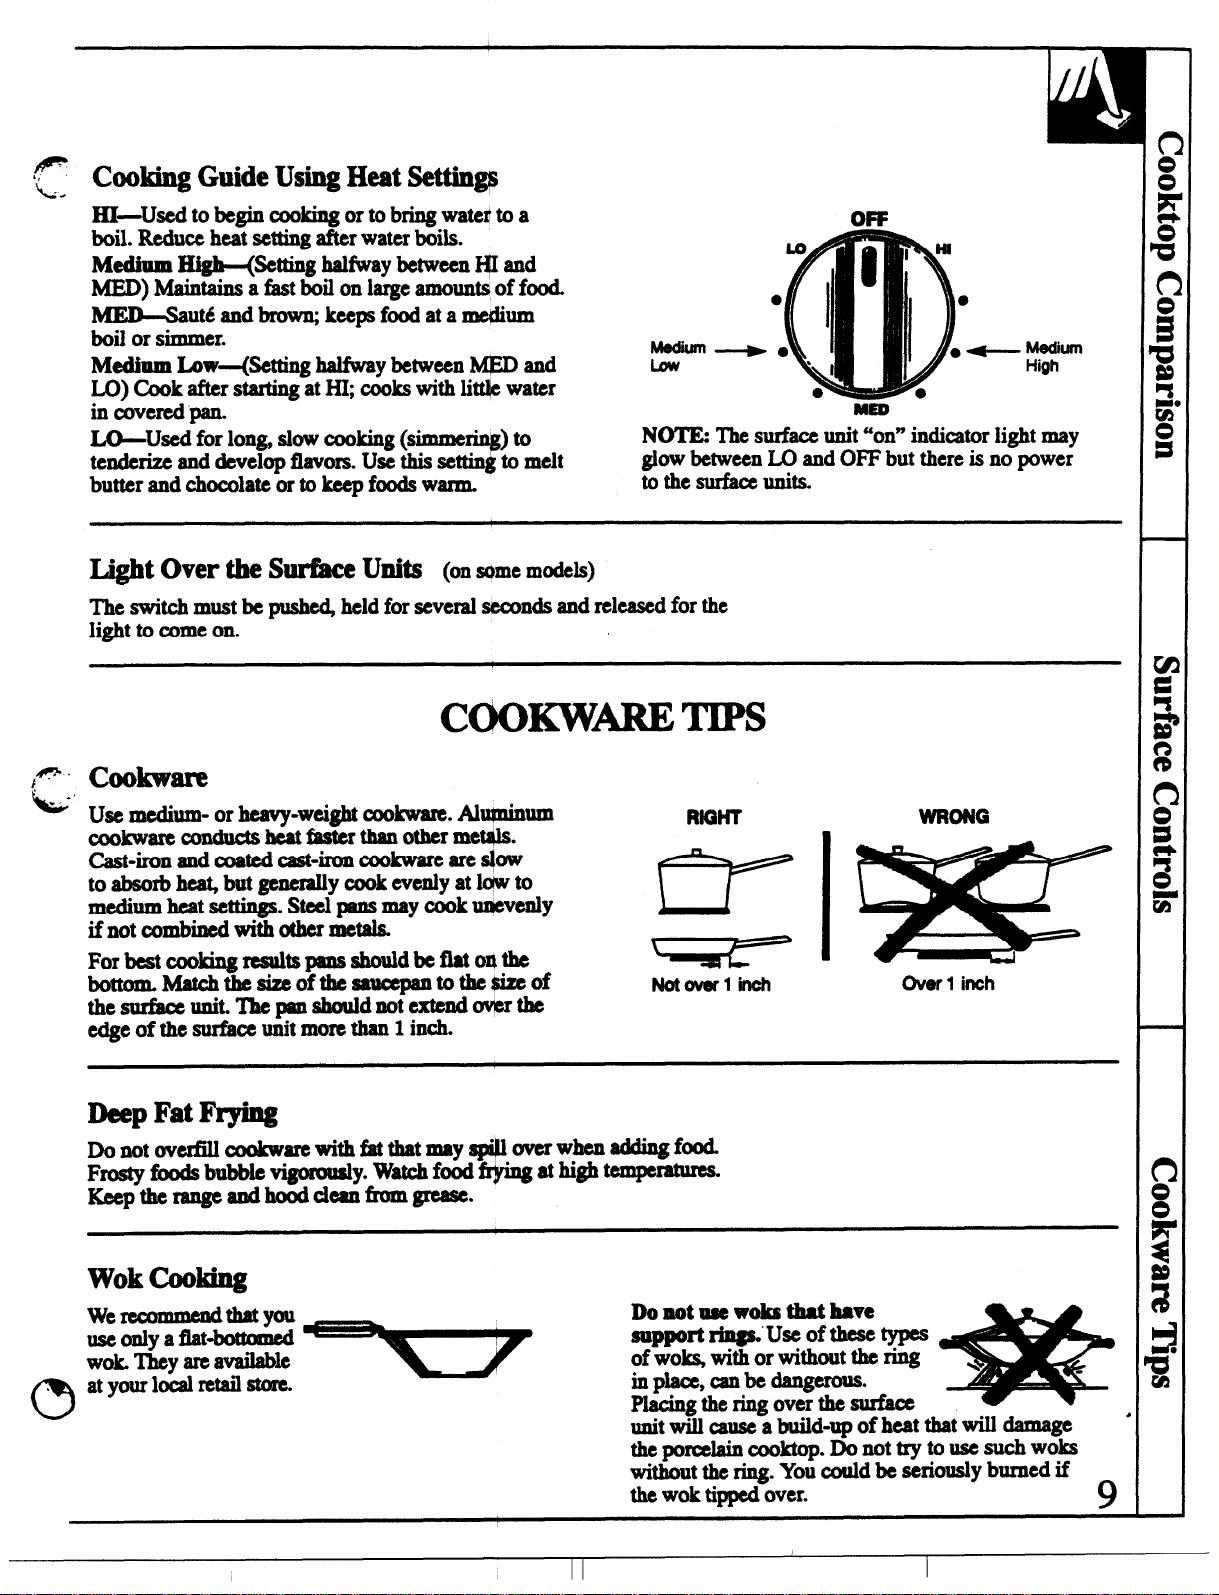
CookingGuideUsing Heat Settings
HI-Used to begin cooking or to bring water to a
boil. Reduce hetil setting *r water kils.
Medium High-@etting hal~ay between ~ and
MEI)) Maintains a fast boil on large amounts of food.
MEIkSaut6 and_ keeps food at a me@urn
boil or simmer.
Medium Low-(Setting haMuay between @ and
LO) Cook after starting at HI; cooks with li~ water
mdiunl~g
inciwered pan. -
LO-Used-for long slow cooking (sirnrnerir$) to
tenderize and develop flavors. Use this se- to melt
butter and chocolate or to keep foods warm.
Light Over the S-e hits (onstlme models)
The switch must be push@ held for sevmal stmmds and released for the
light to come o~
NOTE The surface unit “on” indicator light may
glow between LO and OFF but there is no power
to the surface units.
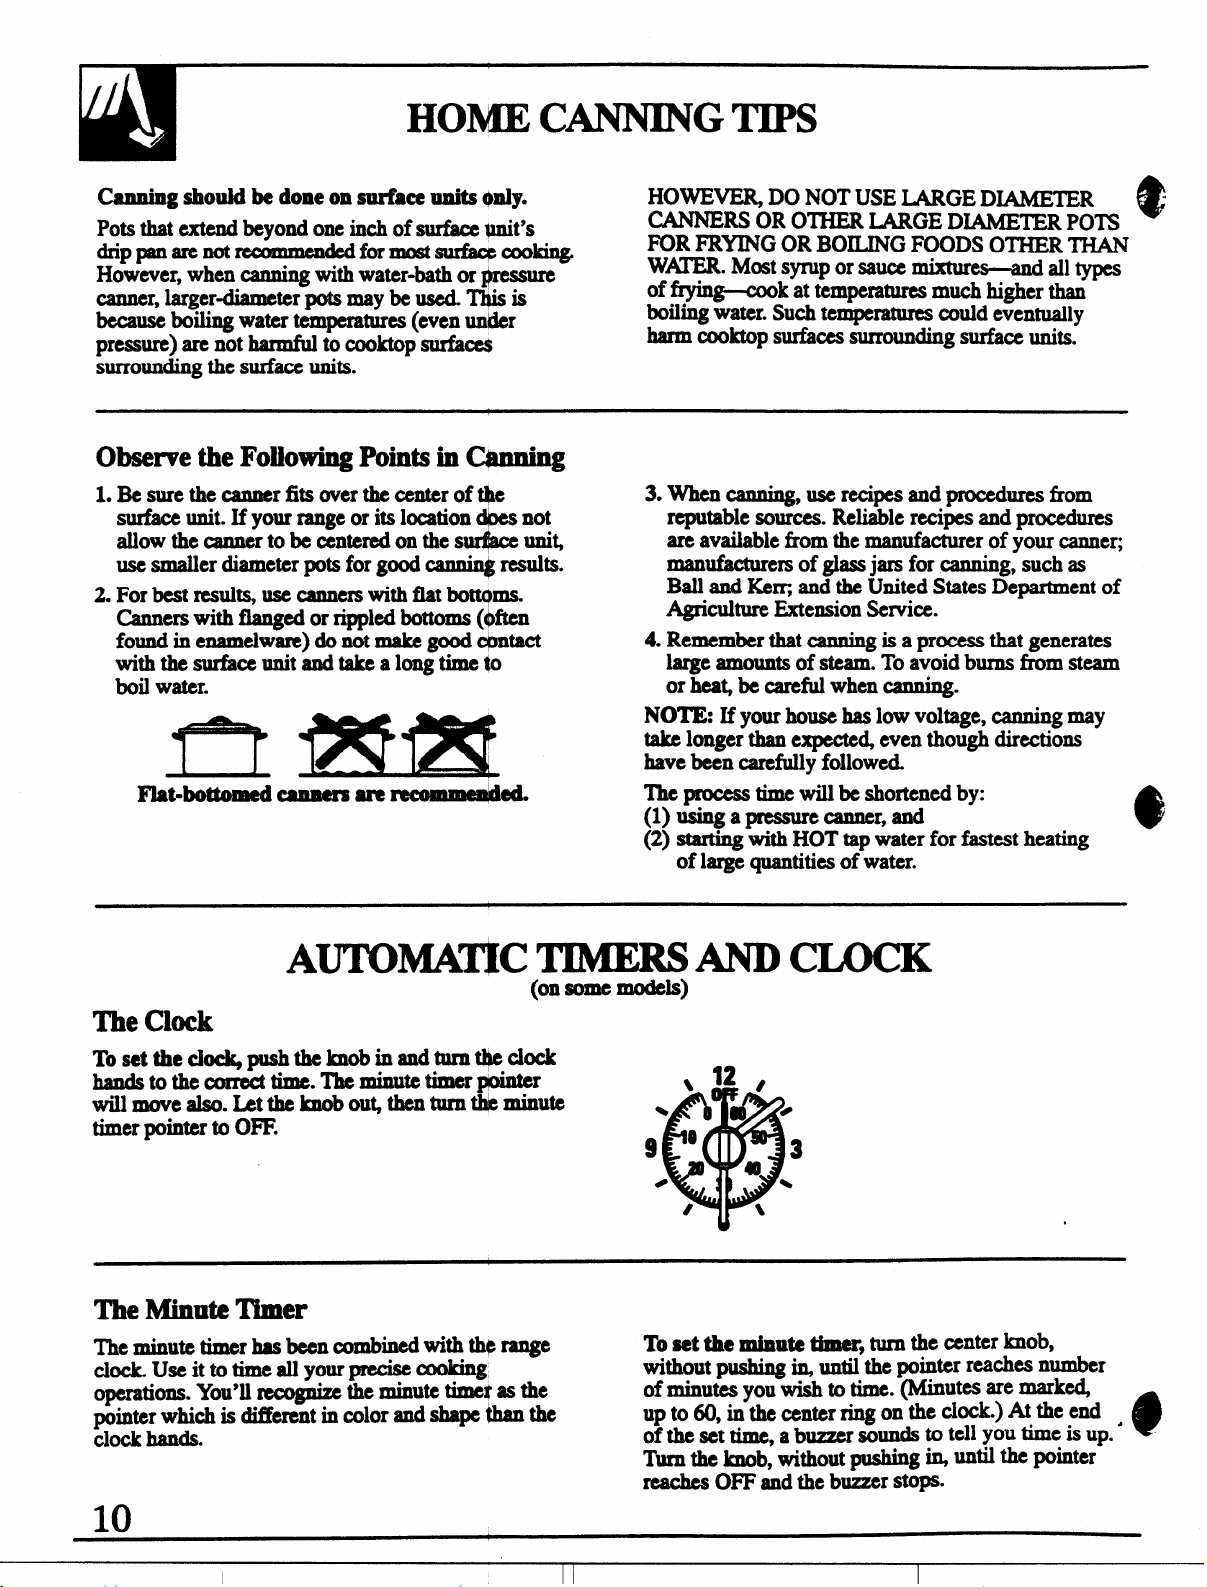
COOIKVVAREm
Cookwm
OFF
Lo - ““
●
r
I
i
● II
\
●
Mm
Medium
High
Use medium- or heavy-weight cookware. Alu@inum
cookware cmduc$s heat
Cast-iron and coated cast-iron cookware are s@w
to absorb he@ but generally cook evenly at low to
medium heat se-. Steal ~ my cook uX&vCIdy
if not combined with other metak
For beatcookingredts pnsshould~Moqti
faster than other met#ls.
bottom.MatcMxesizeoftheSau=pantothe$izeof
thesurfaoeunit.’I’ hepaaahoddn otextendowti
edge
ofthesurfkceunitmorethan1 inch.
Deep
DonotovGrfill coCdm?arewithfat thatmayap@mwb*fd
Frosty foods bubble_
Kceptherange andtid-ti~.
Fat Frying
y. W* food frjing at high temperatures.
Wok Coding
WerecOmmdtMtyOu
use oniy a flat—b@Omed
wok They are available
at your local retail store.
R#GHT
Notoverlinch
Do not uae woks tkt have
support rhgs.
of wok with or without the ring .
in place, can be dangerous.
Placiu the MjZ over the surhcc
unitwiilcauseibuild-upof heat that will damage
the porcelain cooktop. Do not try to use such woks
without the ring. You could be seriously burned if
the wok tipped over.
useof these types
WRONG
Over 1 inch
*
9
Page 10
HOIMECANNINGTIPS
Canning should be done on surface @@ @ly.
Pots that extend beyond one inch of surface @it’s
dlippanarenot
However, when canning with water-bath or #ressum
canner, larger-diameter pots may be used Ti+isis
because boiling watertemperatures(even unkier
pressure) are not harmful to cooktop surface$
surrounding the surface units.
rwmmdedformostsurfacp coo~
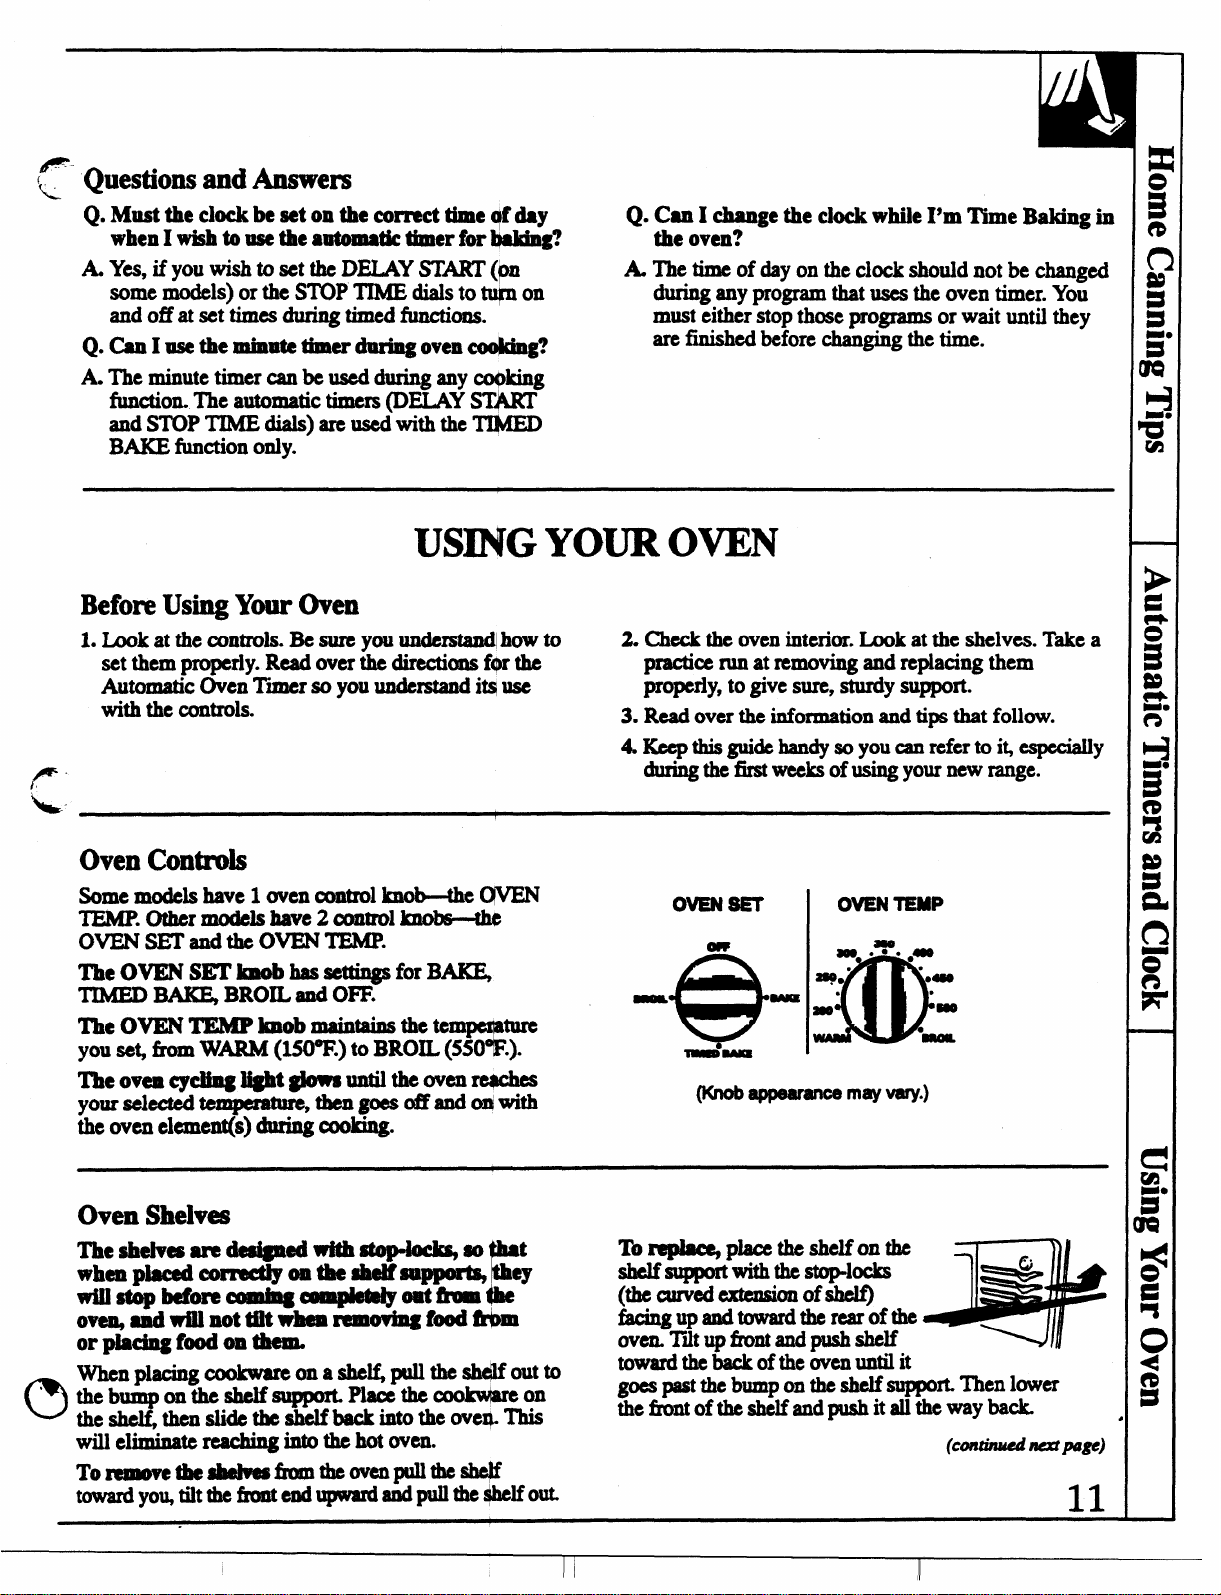
Observethe Following Points in C@ming
l. Besurethecanncr fitsoverthecenter of*
surface unit. If your range or its location
allow the canner to be centered on thes Unig
use sxnailer diameter pots for good cannin$ results.
2. For best resul~ use canners with tit bottqms.
Canners with flanged or rippled bottoms (+ften
found in enamelware) do not make good cfmtact
withthesurfkce unitandtakc a longtimeto
boil water.
not
s
n i2!!fu2!!!!l
Flat-bottomedCaIuwm am mumnddd
HOWEVER, DO NOT USE LARGE DIAMETER “
CANNERS
FOR FRYING OR BOILING FOODS OTHER THAN
W-. Most syrup or sauce “
of “~k at temperatures much higher than
boiling water. Such temperatures could eventually
harm Cooktop surfaces
3. When_ usc recipes and procedures fkom
reputable sources. Reliable recipes and produres
are available horn the manufacturer of your canneq
manufacturers of glass jam for canning, such as
Ball and Kerq and the United States Department of
Agriculture Extension Service.
4. Remember that canning is a process that generates
large amounts of steam. To avoid bums from steam
or hea~ be careful when canning.
NOTE If
take longer than expecte~ even though directions
have been carefully followed.
The process time will be shortened by:
(1) using a pressure canner, and
(2) startkg with HOT tap water for fhstest heating
of large quantities of water.
OR OTHER LARGE DIAMETER POTS
mutum+dalltypes
surrounding surface units.
your house has low voltage, canning may
e’
@
AUTONfik~C TIMERS
(onsome models)
The Clock
Tosetthecl~push theknobinandtum tl)eckk
hands tothecOrrect time. TheminUte*@r
willmovealso. LcMheknoboutJhenturnthleminute
timer pointer to OFF.
The MinuteTimer
Theminutetimerhas beencOmMnedwith*~
clock. Useittotimeall your-*g
operations. You’ll mcognke the minute timq as the
pointer which is -erent in color and shape than the
clock hands.
AND CLOCK
12
‘u-’
%A
,
To aet the minute timer, turn the center knob,
without pushing & wtil the pointer reaches number
of minutes you wish to time. (Minutes are mark~
up to 60, in the center ring on the clc@.) At the end
of the set time, a buzzer sounds to tell you time is up.’
Turn the knob, without pushing h ~~ ~ pinter
reaches OFF and the buzzer stops.
e
Page 11
“ Questions and Answers
Q.Must the clock beseton the correct time $clay
when I wish to use the sutomatk timer fw i$aking?
tLYes, ifyouwishtoset the DELAY START(pn
some models) or the SlllP TIME dials to ~ on
and Offat set times during timed functions.
Q. Can I use the minute timer&wing oven co@ng?
A. The minute timer can be used during any c@dng
function. The automatic them (DELAY STJ%RT
and STOP TIMEdials) areusedwith the TI$#ED
BAKE function only.
USINGYOUR OVEN
Before Using Y-Oven
L
Look at the controls. Be sure you understaz@how to 2. Check the oven interior. Look at the shelves. Take a
set them properly. Read over the directions f~ the
Automatic Oven T-r so you understand itq use
with the controls.
Q. Can I change the clock while I’m ‘1’imeBaking in
the oven?
A. The time of day on the clock should not be changed
during any program that uses the oven timer. You
must either stop those programs or wait until they
are finished before changing the time.
practice run at removing and replacing them
properly, to give sure, sturdy support.
3. Read over the information and tips that follow.
4Keepthisguide handy soyoucanreferto i~espdally
during the iirst weeksof using your new range.
Oven Controls
Somemodels
TEMP.Othermodels have2c0ntrol knobs—@
ovENsETandthe oVENTEJUP.
The OVEN SETimObhasseUings for~
TIMED ~ BROIL and OFF.
The OVEN IXhSPlmobmaintains thete ture
TheovencycMnglight @owauntiltheowmre4che$
yoursekctedtempemtuMhengo$sabldo!With
the oven
have 1 oven control
clement(s) during cooking.
~w
?you sc$ h W- (MO’’F.)to BROIL (550 .).
Oven Shelves
l%eshdvesare d$dgned-~so t
whenpkedcormctiy ontheshdfsu- ey
Wiustopbefimecmnbgc-pbtdyoatikolnthe
oven@uiVrillnottiitwhenrem ovbgfd@”bm
or placing food on -
when placing
dub
?
theshe thenslidethe shelf backintothe over$.lllis
willehiinatemachi
To m!movethe8helWafrolnkWenpullthesheJf
towardyouJiltthefmntendupwardandpullth e$helfow
cookwamona she~ptdlthe shclifoutto
~thesheifsuppmL Plaoethecookwbmon
ngintothehotwm.
r
-m
m
“e”
W-
---
Toreplac qpiaceth eshelfonthe
shelf supportwiththestop-locks
(the curvedextension of sh@
-W=d-timofti
overLTitupfront andpushshelf
toward thebackofthcovcnuntilit
W F@ tie b~p on the shelf suppofi Then lower
thcfrontoftheshelf andpushitallthe wayback
OVENTEMP
~ .7. ●
2q, “
.
#@
.
●489
8
m!!
may vary.)
(Continwinmplge)
11
I
Page 12

USINGYOUR OVEN
Shelf Positions
Theoven b four ahclf supports identified in this
illustration as A (bottom), B, C and D (top).
Shelf positions
Baking Roaating and Broiling sections.
Oven Light (on some models)
The light comeson a@matkWy when**
door is opemed On modelswith anoven wh$dow,
Utie*ti~=tieli@tadoffwMnti
door is closed.
forcookingaresuggcs!edin@e
(continued)
BAKING
Your oven temperature k cOntmWd very acqbmtely
uainganovcn mlltrolsyatem. wmcomme@that
you operate the raqe faa numberofwcekmaing the
timegivcnon recipeaasa guide to become f+miliar
with your new oven’s @ormmce
adjua@wnt is mxxsary,
Thmo@ataectiorL Itgiveseaay Dolt Y~~
instr@ions onhuwtoa@lsttWhe rmoatat
acethe Adjust the Olwm
Howto SetY-Rm@brMdq
To ●void poaaible b- place the shelv= @h
Correctposition bcfomyollturn theovaon=
l. TumtheovBN SETknob(onsomcmod@a)
to BAKEandthe OVBNTEMPknobtotiie
tempmture ya desire.
2*Checkfoodfordonemas at~tim
recipe. cook longer if ncccaaq.
3. Turnthe OVEN SETlmob(onaOmC_)
andtheovBNTEMPknob tooRFdt4cJJ
remove foods.
.Ifyouth@an
NOTE When the oven is ho~ the top and outside
surfacea of the range get hot too.
TEMP
OWENSET
@ob appcwance -y V@
OVEN
a@O*.%%
280.” ●480
●
aoOm
WAA
@
●400
●
●
●-
●i
u
Page 13

Oven Shelves
II II
Arrange the oven
shelf or shelves in
the desired locations
while the oven ia
cool. The correct
shelf position
depends on the kind
of fd and the
browning desird
As a general rule,
place-most foods in the middle of the ove~ on eithm
;helf position B or C. See the chart for sugges~
shelf pOSitiOIXLB will be used more than C
Preheating
Preheat theoven iftherecipe calls fiiLPrehei$rneans
bringing the oven up to the specified ~e bcfm
putting foodintheoven. Topre~scttheoveln atthe
~-~~a~b~
doesnotsh&tenpreheat time.- - -
I Shelf Position
IAngel food cake
I
Biscuits or muffins
I
cookies or cupcakes
IBrownies
1A
I BorC
I BorC
I
BorC
ILayer cakes I BorC
IBundt or pound cakes
I Picsorpksheils
i Frozen pies
I casseroles
Roaating
Preheating is nwessary for good results when baking
cakesLcookies, pastry and breads. For most casseroles
and roas@ preheating is not neceswy. For ovens
without a preheat indicator light or tone, preheat
10 minuk Mter the oven is-@heat@ place the food
in the oven as quickly as possible to prevent heat
flom escapkg.
1 AorB
I BorC
I A (on cookie sheet) I
I BorC
Aor B
I
I
I
I
I
I
I
I
I
I
I
Baking Pans
Uaethepmperbakingpadh etypeoffiniah the
pandeterminesthe amoantofbmwning that “loccuz
“Dar~rough ordullpansabaorb heatresultin$ina
browner, crisper mat. Uaethis type for pica.
“Shiny,brightandamoothpansreflewwting
infighter, moreM*-ocakea*
Cookiesrequire thistypeofpam
● G~
baking diahesalaoabaOrbheat WhenM
inglaaabaking diahe&mducethe —pemtu@
by 25%
v%
Pan Placement
For even cooking and proper browning there must be
enough room for air circulation in the oven. Baking
reaukswillbebetterifbakingp ansarecenteredas
much as possible rather than being placed to the tint
Ortotheback of theovm
Pam should not touch each other or the walls of the
overLAllow 1- to M4nch apace between pans as well
asikomtheback of theov~the doorandthesik.
Ifyouneedto uaetwoshelv* Stagger tie~m
one is not directly above the other.
13
Page 14

BAKING
I
(continued)
Baking Guides
When using prepared baking mix= foIlow package recipe or instructions
for the best baking results.
cookies
When baking cookies, flat cookie sheets (w$thout
sides) produce better-looking cookies. CO@ies baked
in a jelly roll pan (short sides all around) *y have
darker edges and pale or light brownin
Do not usc a cookie sheet so large that it toqches the
walls or the door of the oven. Never entirely cover a
shelf with a large cookie sheet.
For best resul@ use only one cookie sheet h the oven
at a time.
g may occur.
.
Pies
For bcstresul~bakepies in@mughordullpans
toproduceabrowner
Pansshotddbe piacedonanaluminum
for baking since the shiny foil pan reflects *t away
fkom the pie ~, the cookie sheet hel~ * it
, crisper crust. Frozen ●CSin foil
“ sheet
&
AluminumFoil
Never entirely cover a shclfwith aluminum foil. This
Willdisturb theheatcirdation andresultiqpoor
baking. Asmallersheetof foilmaybeusedBo ciatia
spilkwer by placing it on a lower shelf seve@ inches
below the food.
When baking ~ warped or bent pans will cause
uneven baking results and pooriy shaped products.
Acakebaked inapanhrgerth antherecipe
recommends will usually be crisper, thinner and drier
thanitshouldbe. If baked inapansmallerthan
recomme~
overflow. Check therecip tomakesure thepansize
usedistheone
it may be undercooked and batter may
recommended
o
Don’t Peek
Setthetimcrforthc estirnatcd-~_mddo
not open the door to look at your fd Most recipes
provide minimum and *- baking tinles such
as “bake 30-40 minutes.”
14
DO NOTopenthc doortoch@@tie
minimum time. Opening the oven door frequently
during cooking allows heat to escape and makes
_ times longer. Your baking results may also ‘
be affected
@
Page 15

TliMEDBAKING
(on some models)
How to Time Bake
Your oven can beset to turn on and off autom@aliy.
NOTE ~fore be@nnin& make sure the OVC4clock
shows the correct time of day.
How to set hnmedbte Start and ~tOJIUItiC stop
u!
To avoid tile ~ #ace the ShChS in
the correct
Theovenwill turnon”
selected length of time. At the end of Cook Tx, the
oven will turn off automatically.
NOTE To start cooking immediately and ~ off
automatically, you must turn the OVEN SET
knob to TIMED BAKE.
LTosetthc St@ Tii, mashintheknobonthe
STOP TIMEaialand-mthe pointer tothe@ne
you want the oven to turn ti, fm example 6@0.
The DEIAYS’MKMialshouldbeatthesqne
position asthetimeofday ontheclock.
position before you turn the oven a.
unmdately, and cook f~ a
mm mvmm
(z (~
?Nllmm
ovENsE’r
I OVENTEMP
3. Remove the food horn the oven. Remember, foods
that arc left in the oven continue cooking after the
controls are off.
NOTE: Foods that are highly perishable, such as
rnil~ e= fi@ stuflh~ poultry and pork should
not be allowed to sit for more than one hour before or
after cooking. Room temperature promotes the growth
of harmful bacteria. Be sure that the oven light is off
because heat fromthebulbwill speed harmful
bacteria growth.
(Cmzinuednmpulgl?)
2.Tllx’ntheovENsBTknobtoTrMBDBAKQ’Ikn
theoV’E?WTE!MPknobtothedeaircdoven
temperate, for
.
unmediwly, continue tocookforthe~
amount of timq tkn shut (m M0matk4y.
example 25(Y’F. The oven I@ @art
ls
Page 16

TIMEDBAKING
(continued)
HOW to&!t Dday Start and Automatic Stop
To avoid possible b- place the shelves in
the correct position before you turn the oven on.
You can set the oven control to &lay-at@ cook for a
specific length of time andthen turnoff automatically.
NOTE: You must use the TIMED BAKE setting.
1. To set the Start Tree, push in the knob on the
DEXAY START dial and turn the pointer to the
time you want the oven to turn o%for example 3:30.
2. To set the Stop Time, push in the knob on the
STOP TIME dial and turn the pointer to the time
you want the oven to turnoff, for example 6:00.
This means your recipe called for 2% hours of
baking time.
The time on the STOP TIME dial must be later
than the time shown on the range clock and the
DEIAY START dial.
3. Turn the OVEN SET knob to TIMED BAKE. Turn
the OVEN TEMP knob to the desired temperature.
4. When cooking is complet~ turn the OVEN SET
knob (on some models) and the OVEN TEMP
knob to OFF and remove the food from the
oven. Remember, foods that are left in the
oven continue cooking after the controls are off.
NOTE:
QFoods that are highly perishable, such as rnil~
e= fish, stuffings, poultry and pork should not
be allowed to sit for more than one hour before or
after rooking. Room temperature promotes the
growth of harmful bacteria. Be sure that the oven
light is off because heat from the bulb wiIl speed
harmfid bacteria growth.
‘ The oven indicator light(s) at the TIMED BAKE
setting may work diHerently than they do at the
BAI@ sehg.
. -
ADJUSTTHE OVEN THERMOSIXT-DO ITYOURSEW!
OVENTEMP OVEN TEMP
s
%
*c@
OFF
r
~
@
es
3ooe.3P.#
2$0.’
●
200°
W&
Frontof OvenTempKnob FrontofOven TempKnob
You may f=l that your new oven cooks differently
than the one it replaced. We recommend that you
use your new oven for a few weeks to become more
familiar with i~ following the times given in your
recipes as a guide.
If you think your new oven is too hot or too col~
you can a@st the temperature yourself. If you
think it is too ho$ adjustthe thermostat to make it
cooler. If you think it is too cool, adjust the thermostat
to make it hotter.
We do not recommend the use of inexpensive
thermomete~ such asthose found in grocery stores,
to check the temperature setting of your new oven.
These thermometers may vary 20=40 degrees.
II
I
o Q
(onsome models) (onsome models)
●
●4s0
●
●=
●~OIL
(ISnobappearance may vary)
Pointer
BackofOven TempKnob
(onsome models)
To A~ust the Thermostat
1. pull the OVEN TEMP knob off the@ look at
the back of the knob and note the current setting
before makingany adjustments.
2. Loosen both screws on the back of the knob.
3. To increase the oven temperature, move the
pointer 1 notch toward the words “MAKE
HOH.”
To decrease the oven temperature, turnthepointer
1 notch toward the words “MAKE COO~R.”
Each notch changes the temperature by 10 degrees
Fahrenheit.
4. Tighten the screws.
5. Replace the knob, matching the
knob to the shaft.
Pointer
BaokofOvenTemoKnob
(onsome modds)
flatareaof the ‘
o
t
16
Page 17

ROASTING
—
Roasting is cooking by dry heat. Tender meat or
poultry can be roasted uncovered in your oven.
Roasting temperatures, which should be low and
steady, keep spattering to a minimum
Roasting is really a baking procedure used for meats.
Therefore, oven controls are set to Baking or Timed
Baking (on some models). (You may hear a slight
clicking soun~ indicating the oven is working
properly.) Timed Baking (on some models) will turn
the oven on and off automatically.
1.Place the shelf in A or B position. No preheating
is necessary.
2. Check the weight
of the meat. Place it fatside-up (or poultry
breast side-up), on a
roasting grid in a
shallow pan. The
melting fat will baste
the meat. Select a pan as
close to the size of the meat as possible. (The
broiler pan with grid is a good pan for this.)
.
,..
.
C
OVENSEr
OFF
OVENTEMP
3s0
Most meats continue to aok slightly while standing,
after being removed from the oven. Standing time
recommended for roasts is 10 to 20 minutes. This
allows roasts to firm up and makes them easier to
carve. Internal temperature will rise about 5° to 10”F.;
to compensate for temperature rise, if desired remove
roast from oven sooner (at 5° to 10”F. less than
temperature in the guide).
Remember that food will continue to cook in the
hot oven and therefore should be removed when
the desired internal temperature has been reached.
3. Turn the OVEN SET knob (on some models) to
BAKE and the OVEN TEMP knob to the
temperature you desire.
4. After roasting is complete, turn the OVEN SET
knob (on some models) and the OVEN TEMP knob
OFF.
to
(Knob appearance may WXY)
Use of Aluminum Foil
You can use aluminum foil to line the broiler pan.
This makes clean-up easier when using the pan for
marinating, cooking with hits, cooking heavily
cured meats or basting food during cooking. Press
the foil tightly around the inside of the pan.
(continued neatpage)
o
17
is
I*
Page 18

Questions and Answers
———_________.
ROASTING
(continued)
Q. Is it necessary to check for doneness with a
meat thermometer?
A. Checking the finished internal temperature at
the completion of cooking time is recommended.
Temperatures are shown in the Roasting Guide.
For roasts over 8 lbs., check with thermometer
at half-hour intexvals after half the cooking time
has passed.
Q. Why is my roast crumbling when I try to
carve it?
A. Roasts are easier to s~iceif allowed to cool 10 to
20 minutes after removing from oven. Be sure to
cut across the grain of the meat.
Q. Do I need to preheat my oven each time I cook
a roast or poultry?
A. It is not necessary to preheat your oven.
Q. When buying a roas~ are there any special tips
that would help me cook it more evenly?
A. Yes. Buy a roast as even in thickness as possible,
or buy rolled roasts.
Q. Can I seal the sides of my foil “tent” when
roasting a turkey?
A Sealing the foil will steam the meat. Leaving it
unsealed allows the air to circulate and brown
the meat.
ROASTINGGUIDE
Frozen Roasts
Frozen roasts of beef, pork lamb, etc., can be started Make surepoultry is thawedbefore roasting. Unthawed
without thawing, but allow 10 to 25 minutes per
pound additional time (10 minutes per pound for
roasts under 5 pounds, more time for larger roasts).
poultry often does not cookevenly. Some umunercial
fkozenpoultry can be rooked successfully without
thawing.Follow the directionsgiven on thepackagelabel.
o
Oven
Temperatum Doneness
Meat
Tendercuts;rib,highquality
sirlointip, rumpor top round*
Lamblegor bone-inshoulder”
Veal shoulder,leg or loin*
Porkloi~ ribor shoulder*
Ham,precooked
Pod@
Chickenor Duck
Chickenpieces
Turkev
*For&eless rolledroastsover6 inchesthick,add 5 to 10minutesper poundtotimesgivenabove.
tThe U.S. Department of Agriculture says “Rare beef is popular, but you should know that cooking it to only 140°F. means
some food poisoning organisms may survive.” (Source: Safe Food Book. Your I@@ Gu
325°
325°
325°
325°
325°
325°
350°
325°
I 1
Rare:
Medium:
WellDone:
Rare:
Medium:
WellDone:
WellDone:
WellDone:
ToWarm:
Well Done:
Well Done:
Done:
Well
ApproximateRoastingTime
in Minutes per Pound Temperatum ‘F.
,
3t051b*
24-33
35-39
40+5
21-25
25-30
3(L35
35-45
3$45
17-20 minutesper pound (anyweight)
3 to5 lbs. Over 5lbs.
35-40 30-35
3540
10to 15lbs.
1s25 15-20
1
.
6to8Ibs.
18-22
22-29
30-35
20-23
X48
2&33
3040
30-40
Over 15 M.
ide. USDA
Rev.June 1985.)
Internal
140°-1500’#’
150°–1600
170°-1850
140°-1500t
150°-1600
170”-185°
170°-1800
170°-1800
115°-1200
185°-1900
185°-1900
In tldglx
185°-1900
18
-———-———
Page 19

BROILING
Broiling is cooking food by intense radiant heat from
the upper element in the oven. Most fish and tender
cuts of meat can be broiled. Follow these directions to
keep spattering and smoking to a minimum.
Turn the food only onw during broiling. Time thefoods
for the firstside according to the Broiling Guide.
1. If themeat has fat or gristle around the edge, cut
vertical slashes through both about 2 inches apart.
If desir~ the fat maybe trirnme~ leaving the layer
about 1/8 inch thick.
2. Place the meat on the broiler grid in the broiler pan.
Always use the grid so the fat drips into the broiler
pm, otherwise the juices may become hot enough to
catch on fire.
3. Position the shelf on the recommended shelf
position as suggested in Broiling Guide.
Turn the foo~ then use
the times given for the
second side as a guide
to the preferred doneness.
4. Leave the door open to
the broil stop position. The
door stays open by itself, yet
the proper temperature is
maintained in the oven.
5. Turn the OVEN SET (on some
models) and the OVEN TEMP knobs to BROIL.
Preheating the elements is not necessary.
6. When finished broiling, turn the OVEN SET knob
(on some models) and the OVEN TEMP knob to
OFF (depending on your model). Serve the food
immediately, leaving the broiler pan and grid outside
the oven to cool during the meal for easiest cleaning.
Use of Aluminum Foil
You can use aluminum foil to line your broiler pan
and the broiler grid. However, you must mold the foil
tightly to the grid and cut slits in itjust like the grid.
Without the slits, the foil will prevent the fat and meat
juices from draining to the broiler pan. The juices
could become hot enough to catch on fire. If you do
not cut the slits, you are frying, not broiling.
Questions & Answem
Q. Should I salt the meat before broiiing?
A. No. Salt draws out the juices and allows them
to evaporate. Always salt after cooking. Turn
the meat with tongs; piercing the meat with a
fork allows juices to escape. When broiling
poultry or fiib brush each side often with butter.
Q.
why are my meats not turning out as brown as
they should?
A Insome area the power (voltage) to the oven may
be low. In these cases, preheat the broil element for
10 minutes before placing the broiler pan with the
food in the oven. Check to see if you are using the
recommended shelf position. Broil for the longest
period of time indicated in the Broiling Guide.
Turn the food only once during broiling.
Q. Do I need to grease my broiler rack to prevent
meat from sticking?
A No. Thebroiler grid is designed to reflect broiler
heat, thus keeping the surface cool enough to
prevent the meat from sticking to the surface.
However, spraying the broiler grid lightly with a
vegetable cooking spray before cooking will make
clean-up easier.
Q. When broiling, is it necessary to always use a
grid in the pan?
A Yes. Using the grid suspends the meat over the
pan. As the meat cooks, the juices fall into the pan,
thus keeping meat drier. Juices are protected by the
grid and stay cooler, thus preventing excessive
spatter and smoking.
(continued ne.xtpuge) ●
19
Page 20

BROILING GUIDE
●
Always use a broiler pan and grid. They are designed
to minimize smoking and spattering by trapping
juices in the shielded lower part of the pan.
●
The oven door should be open to the broil stop
—
position.
●
If desired marimte meats or chicken before
broiling, or brush with barbecue sauce
M 5
to 10 dnutes only.
Food
Bacon
Ground Beef
Well Done
Quantity and/or
‘I%ickness
1/2 lb. (about 8
thin slices)
1 lb. (4 patties)
1/2 to 3/4 inch thick
Shelf
Position
c
c
BeefSteaks
Rare
Medium
WellDone
Rare
Medium
WellDone
1 inch thick
(1 to 1%lbs.)
1%inch thick
(2 to 2?4Ibs.)
1whole
(2 to 2?4Ibs.),
split lengthwise
c
c
c
c
c
c
A 35 l&15
Bakery Products
Bread (Toast) or
Toaster Pastries
Endish MuffIns
bbster Tails
slices
Ham
hecooked)
Pork Chops
WellDone
2 to 4 slices
1 pkg. (2)
2 (sDlit)
\ * ,
24
(6 to 8 oz. each)
l-lb. fillets 1/4 to
1/2 inch thick
1 inch thick B
1/2inch thick)
2(
2(
Linch thick),
ah
lut1 lb.
—
Cor D
Cor D
B
c 5 5
c
B
LambChops
Medium
Well Done
Medium
Well Done
Wienersand
similar precooked
sausages,
bratwurst
2(1 inch thick),
about 10to 12 oz.
2(1% inch thick),
about 1lb.
l-lb. pkg. (10)
c
c
c
B
c
●
When arranging food on pan, do not let fatty
edges hang over the sides. These could soil the
oven bottom.
●
Frozen steaks can be broiled by positioning
the oven shelf at next lowest shelf position and
increasing cooking time given in this guide
1?4times per side.
First Side
Time, Minutes
4%
10
6
8
12
10
15
25
1%=2
3-4
13-16 Do not
8 8
10
13
10
12
14
17
6
Second Side
Time, Minutes
4?4
7
5
6
11
7-8
14-16
20-25
1/2
turn over.
10
13
9
10
12
12-14
1-2
t
Comments
A.nange in single layer.
Space evenly.
Up to 8 patties take about same time.
Steaks less than 1 inch thick cook
through before browning. Pan frying
is recommended.
Slash fat.
Reduce time about 5 to 10 minutes
per side for cut-up chicken. Brush
each side with melted butter. Broil
skin-side-down first.
o
Space evenly. Place English muffhs
cut-side-up and brush with butter,
if desired.
Cut through back of shell. Spread
open. Brush with melted butter before
broilin~ and after half of broilirw time.
Handle and turn very carefully. Brush
with lemon butter before and during
cooking, if desired. Preheat broiler to
increase brownin~.
Increase time 5 to 10 minutes per side
for 1%inch thick or home cured ham.
Slash fat.
Slash fat.
[fdesireG split sausages in half
lengthwise;cut into 5-to 6-inch pieces.
20
Page 21

CARE AND CLEANIN
Proper care and cleaning are important so your range will give you efficient
and satisfactory service. Follow these directions carefully in caring for it to
help assure safe and proper maintenance.
BE SURE ELECTRIC POWER IS OFF BEFORE CLEANING ANY PART
OF THE ILANGE.
If your range is removed for cleaning, servicing or any reason,
A
be sure anti-tip device is re-engaged properly when the range
is replaced. Failure to take this precaution could result in tipping of
the range and cause injury.
LifWp COOktOp (on some models)
Some models have a cooktop that can be lifted up
for easier cleaning. To make cleaning easier, the
entire cooktop may be lifted up and supported in the
up position.
Be sure all surface units are turned off before
raising the cooktop. The surface units and drip pans
do not need to be removed before raising the cooktop,
however, you may remove one to make raising the
cooktop easier. There are two side supports that lock
into position when the cooktop is lifted up.
After cleaning under the cooktop with hot, mild soapy
water and a clean clo@ lower the cooktop. Be careful
not to pinch your fingers.
To lower the cooktop, push the rods back and gently
lower the cooktop until it rests in place.
\EZZZ .
G
.
(J
lb
●
/4
A
~ooktop
When changing a cooktop ligh~ do not touch
the metal at the ends of the lighk
The cdctop light is easily replaced with a fluorescent
tube of the same wattage. Before changing the ligh~
pull the plug to the range or disconnect the power at
the main fuse or circuit breaker panel.
To remove:
cLift the light cover by pulling the bottom edge
toward you and then up.
● Place fingers on top near each end ofthe light.
● Roll the top of the light gently toward the front of
the range and gently pull the light horn the socket,
making sure it does not hit the light cover.
Surface Light (on some models)
To replace:
● Place fingers on the top near each
end of the light.
. Press the light into the slots until it
snaps into place.
. Move light cover down and snap
into place.
(continuednextpge)
●
21
Page 22

CARE AND CLEANNG
Surface Units and Drip Pans
To cleanthe surfaceunits, turn the control to the highest
setting for a minute. The coils will bum off any soil.
CAUTION
● Be sure all the controls are turned to OFF and
surface units are cool before attempting to
remove them.
. Do not immerse the surface units in liquids of any kind
● Do not clean the surface units in a dishwasher.
● Do not bend the surface unit plug terminals.
. Do not attempt to clean, adjust or in any way repair
the plug-in receptacle.
To remove a surface unit:
To remove the drip pans for cleaning, the surface units
must be removed first.
SurfaceUnit
(continued)
To replace a surface unit:
“Replace the drip pan into the recess in the
cooktop. Make sure opening in the pan lines
up with the receptacle.
. Insert the terminals of the surface unit through
the opening in the drip pan and into the receptacle.
. Guide the surface unit into place so it rests evenly.
Drip Pans
Remove the surface units. Then lift out the drip pans.
For best results, clean the drip pans by hand. Place
them in a covered container (or a plastic bag) with
1/4 cup ammonia to loosen the soil. Then scrub with
a soap filled scouring pad if necessary. Rinse with
clean water and polish with a clean soft cloth.
The drip pans may also be cleaned in the dishwasher.
Clean the area under the drip pans often.
Built-up soil, especially grease, may catch fire.
Do not cover the drip pans with foil. Using foil
so close to the receptacle could cause shock fire
or darnage to the range.
Lift the surface unit about 1 inch above the drip pan
and pull it out.
Do not lift the surface unit more than 1 inch.
If you do, it may not lie flat on the drip pan when
you plug it back in.
Repeated lifting of the surface unit more
than 1 inch above the drip pan can permanently
damage the receptacle.
Porcelain Enamel Cooktop
Theporcelainenameliinishis sturdybut
breakableifmisused. This
However, any acidic foods spilled (such as fruit
juices,tomatoor vinegar)
fiish is acid-resistant.
should not be permitted
toremainontheffish.
If acids spill on the cooktop while it is ho$ use a dry
paper towel or cloth to wipe it up right away. When
the surface has coole~ wash with soap and water.
Rinse well.
t
For other spills such as fat smatterings, wash with
soap and water or cleansing powders after the surface
has cooled. Rinse well. Polish with a dry cloth.
Page 23

.
Oven Shelves
.%
C
Clean the shelves with an abrasive cleanser or steel
wool. After cleaning, rinsethe shelves
and dry with a clean cloth.
Broiler Pan and Rack (on some models)
After broiling, remove the broiler pan from the oven.
Remove the grid from the pan. Carefully pour out the
grease from the pan into a proper container. Wash and
rinse the broiler pan and grid in hot water with a soap-
filled or plastic scouring pad.
If food has burned on, sprinkle the grid with
detergent while hot and cover with wet paper
towels or a dishcloth. Soaking the pan will remove
burned-on foods.
The broiler pan may be cleaned with a commercial
oven cleaner. If the grid is grey enamel, it can also be
cleaned with an oven cleaner. If the grid is chrome, do
not use an oven cleaner to clean it.
with clean water
Both the broiler pan and grid can also be cleaned in
the dishwasher.
Do not store a soiled broiler pan and grid anywhere in
the range.
..
Oven Light Replacement (on some models)
.
c
CAUTION: Before replacing your oven light bulb,
disconnect the electrical power to the range at the
main fuse or circuit breaker panel. Be sure to let
the light cover and bulb cool completely.
The oven light bulb is covered with a removable
glass cover that is held in place with a bail-shaped
wire. Remove the oven door, if desire~ to reach
cover easily.
To remove:
1. Hold a hand under the
cover so it doesn’t fall
when released. With
fingers of the same
han~ firmly push back
the wire c-overholder.
Lift off the cover.
q.,,, “~
‘~i
.=’
OQ
Wire coverholder
Oven Heating Elements
Do not clean the bake element or the broil elemenL
Any soil
The bake element can be lifted gently to clean the
oven floor. If spillovers, residue or ash accumulate
around the bake element gently wipe around the
e
element with warm water.
will burn off when the elements are heated.
DO NOT REMOVE ANY SCREWS TO
REMOVE COVER.
2. Do not touch hot bulb with a wet cloth. Replace
bulb with a 40-watt household appliance bulb.
To replace cove~
1. Place it into the groove of the light receptacle. Pull
the wire forward to the center of the cover until it
snaps into place. When in place, the wire holds the
cover firmly. Be certain the wire is in the
depression in the center of the cover.
2. Comect electrical power to the range.
BroilElement
Bake Element
●
(continued nextpage)
23
Page 24

Lift-Off Oven Door
CARE AND CL
(continued)
EWING
4
1<
The oven door is removable, but
it is heavy.You may need help
m
removing and replacing the door.
Do not lift the door by the handle.
This a cause the gl&
to break
m7
‘/.
(on some models) or cause damage
to the door.
To remove the door,
inches to the
special stop position
open it a few
that will hold ~hedoor ~p~n.Grasp firmly on each side
and lift the door straight up and off the hinges.
NOTE: Be careful not to place hands between the
hinge and the oven door frame as the hinge could snap
back and pinch fingers.
To replace the door,
make sure the hinges are in the
special stop position. Position the slots in the bottom
of the door squarely over the hinges then lower the
door slowly and evenly over both hinges at the same
time. If the hinges snap back against the oven fhme,
pull them back out.
TO CLEAN THE DOOR
Inside of doo~
“Soap and water will normally do the job. Heavy
!
spattering or spillovers may require cleaning with a
mild abrasive cleaner. Soapy, wet metal pads may also
be used. Do not allow food spills with a high sugar or
acid content (such as milk, tomatoes, sauerkraut, fruit
juices or pie filling) to remain on the surface. They
may cause a dull spot even after cleaning.
“If necessary, you may use an oven cleaner.
Follow the package directions.
● Clean the inside of the oven window with a mild non-
scratching cleaner and
a damp cloth.
Outside of doo~
● Use soap and water to thoroughly clean the top, sides
and front of the oven door. Rinse well. You may also
use a glass cleaner to clean the glass on the outside of
the door.
. Spillage of marinades, fruit juices, tomato sauces and
basting materials containing acids may cause
d.isc&ation and should b~wiped up-immediately.
When surface is cool, clean and rinse.
. Do not use oven cleaners, cleansing powdem or
harsh abrasives on the outside of the door.
1)
PO~el~ OVeIl ~teriOr (on some models)
With proper care, the porcelain
enamel finish on the inside of
the oven-top, bottom sides,
back and inside of the door—
will stay new-looking for yearn.
—
Let the range cool before
cleaning. We recommend that
~w
you wear rubber gloves when cleaning the range.
Soap and water will normally do thejob. Heavy
spattering or spillovers may require cleaning with a
mild abrasive cleaner. Soapy, wet metal pads may also
be used. Do not allow food spills with a high sugar or
acid content (such as rnil~ tomatoes, sauerkraut, fruit
juices or pie filling) to remain on the surface. They
may cause a dull spot even after cleaning.
Household ammonia may make the cleaning job
easier. Place 1/2 cup in a shallow glass or pottery
container in a cold oven overnight. The ammonia
fumes will help loosen the burned-on grease and food.
If necessary, you may use an oven cleaner.
Follow the package directions.
Cautions about using spray-on oven cleanem:
. Do not spray on the electrical controls and switches
because it could cause a short circuit and result in
sparking or fire.
. Do not allow a film from the cleaner to build up
on the temperature sensor-it could cause the &en
to heat improperly. (The sensor is located at the top
of the oven.) Carefully wipe the sensor clean after
each oven cleaning, being-careful not to move the
sensor as a change in its position could affect how
the oven bakes.
● Do not spray any oven cleaner on the oven
door, handles or any exterior surface of the
ove~ cabinets or painted surfaces. The cleaner
can damage these surfaces.
24
Page 25

Continuous-cleaning oven Interior (on some models)
Special Careof Continuous-Cleaning Oven Interior:
Do not attempt to clean the oven until you have
read this section.
The Continuous-Cleaning Oven cleans itself while
cooking. The oven interior is finished with a special
coating that cannot be cleaned in the usual manner
with soap, detergents, steel wool pads, commercial
oven cleaners, coarse abrasive pads or coarse brushes.
Use of such cleansers and/or the use of oven sprays
will cause permanent damage.
The special coating is a porous ceramic material,
which is dark in color and feels slightly rough to the
touch. If magnifie~ the surface would appear as
peaks, valleys and sub-surface “tunnels.” This rough
finish tends to prevent grease spatters from forming
little beads or droplets that run down the side walls of
a hard-surface oven liner, leaving unsightly streaks
that require hand cleaning. Instea& when spatter hits
the porous finish, it is dispersed and partially
absorbed This spreading action increases the
exposure of oven soil to heated air and makes it
somewhat less noticeable.
Soil may not disappear completely and at some
time after extended usage, stains may appear that
cannot be remove~
The special coating works best on small amounts
of spatter. It does not work well with larger spills,
especially sugars, egg or dairy mixtures. For this
reaso~ the oven is equipped with a removable,
replaceable aluminum foil oven bottom liner which
protects the porous bottom of the oven from spillovers.
This special coating is not used on the oven
shelves or on the inside of the oven door.
These should be removed for cleaning to prevent
damage to the Continuous Cleaning Oven coating.
Use care in removing and replacing the shelves and
in placing and removing dishes and food to avoid
scratching, rubbing or othenvise damaging the porous
finish on the oven walls.
To Clean the Continuous-Cleaning Oven:
1.
Let the range parts cool before handling. We
recommend rubber gloves be worn when cleaning.
2. Remove shelves and cookware, including the
broiler pan and rack.
3. Remove excess spills and boilovers from the
aluminum foil oven bottom liner before
the liner from the oven. This is to prevent excess
liquids from spilling onto the porous finish.
Then remove aluminum foil bottom liner and
clean with a damp cloth. (Before cleaning or
removing the aluminum foil liner, lift the bake
element out of the way.)
4. Soil visibility maybe reduced by operating
the oven at 400”F. Close the door and set
temperature control to 400”F. Time for at least
4 hours. Repeated cycles maybe necessary before
improvement in appearance is apparent.
removing
Remember: During the operation of the oven,
the door, window and other range surfaces will get
hot enough to cause burns. Do not touch. Let the
range cool before replacing the oven shelves and
aluminum foil oven bottom.
5. If a spillover or heavy soiling occurs on the porous
surface, as soon as the oven has coole~ remove as
much of the soil as possible using a small amount of
water and a stiff-bristle nylon brush. Use water
sparingly and change it frequently, keeping it as
clean as possible, and be sure to blot it up with paper
towels, cloths or sponges. Do not rub or scrub with
paper towels, cloths or sponges, since they will leave
unsightly lint on the oven finish. If water leaves a
white ring on the finish as it dries, apply water again
and blot it with a clean sponge, starting at the edge
of the ring and working toward the center.
Do not use soap, detergen~ steel wool pa~
commercial oven cleaner, silicone oven sprays,
coarse pads or coarse brushes on the porous
surface. These products will spot, clog and damage
the porous stice and reduce its ability to work.
Do not scrape the porous surface with a knife
or spatula-they could permanently damage
the finish.
(continued nextpage)
Page 26

CARE AND CL
(continued)
How to Ilernove the storage Drawer or Kick panel to clean Under the Range
The area under the range can be reached easily for
cleaning by removing the botiom drawer (on some
modeis). To remove, puIl the drawer out all the way,
tilt up the front and remove it. To replace, insert glides
at the back of the drawer beyond the stop on range
glides. Lift the drawer if necessary to insert easily. Let
the front of the drawer down, then push in to close.
E4NING
To clean under models with a
front kick panel, remove the
panel by pulling it straight out
at the bottom. To replace the
panel, first hook the top tabs on
and then the bottom tabs.
Control Panel and Knobs
Clean up any spills or spatters with a damp cloth.
Remove heavier soil with warm, soapy water.
Clean the control panel with mild liquid
dish detergent and a soft cloth. Rub tie control
panel lightly.
CAUTION: Do not use abrasives of any kind on the
control panel. The lettering on models with touch
pads is sensitive to abrasives and pressure.
The control knobs may be removed for easier cleaning.
To remove a knob, pull it straight off the stem. Wash
the knobs in soap and water but do
.
~.—————
not soak.
.
Oven Vent
The oven is vented through an opening under the right rear surface unit.
Never cover the opening with aluminum foil or any other material. This
would prevent the oven vent from working properly.
Painted Surfaces
Painted surfaces include the outside oven door, sides,
control panel and drawer front. Clean these with soap
and water or a vinegar and water solution.
Glass Window (on some models) and Glass Surfaces
To clean the outside glass window (on some
models) and glass surfaces, use a glass cleaner.
Rinse and polish with a dry cloth.
Do not use commercial oven cIeaners, cleansing
powders, steel wool or harsh abrasives on any
painted surface.
Metal Parts
I
Do not use steel wool, abrasive%ammonia or
commercial oven cleaners. To safely clean surfaces;
wash, rinse and then dry with a soft cloth.
26
Ij
f
●
Page 27

INST_TtON INSTKXTIONS
R
BEFOREYOU BEGIN
Read these instructions completely
and UUK&d&.
IMPORT- Save these instructions for
the local electrical inspecto~s use.
IMPORTANT: OBSERVE ALL GOVERNING
CODES AND ORDINANCES.
N~ TO INSIXI.LER Leave these
instructions with the appliance after
imtdhtion is completed.
NUI’E ~ CONSUMER Keep this Use and
Care Guide ad Installation Instructions for
filture use.
N~. This appliance must be propedy
-~
TOOLSYOU WILL HEED
● Large blade screwdriver
● Channel lock pliers or small ratchet wrench
with 3/16” socket (for leveling range)
.\
Q1/4” hex head nutdriver
&
6
PREPARETHEOPENING
1?4”spacing is recommended ffom the range to
adjacent vertical walls above cooktop surtice.
Allow30”minimum clearance between surfitce
units and bottom of unprotected wood or metal
top cabinet and 15” minimum between
countertop and adjacent cabinet bottom.
EXCEPTION:Installationof the listed
microwave oven or cooking appliance over
the cooktop shall conform to the installation
instructions packed with that appliance.
To eliminate the risk of burns or fire by reaching
over heated surface units, cabinet storage space
above the surface units should be avoided. If
cabinet storage is to be provided, the risk can be
reduced by installing a range hood that projects
horizontally a min. of 5“ beyond the bottom of
the cabinets. Make sure the wall coverings,
countertops and cabinets around the range can
withstand heat generated by the range, oven or
Cooktop up to 200° E
NOT LESSTHAN
WIDTH OF RANG~
ELECTRICALREQUIREMENTS
CAUTION,FOR PERSONM ~
DO NCYI’USE AN EXI’ENSION CORD WITH
THIS APPLJANCE.
REMOVE HOUSE FUSE OR OPEN
CIRCUIT BREAKER
INSHKLKIION.
l’his appliance must be supplied with the proper
voltage and frequency, and connected to an
individd properly grounded branch circuit
protected by a circuit breaker or time delay fuse, as
noted on the rating plate.
W@ must conform to National Electric Cudes.
Ifthe electric service provided does not meet the
above specifications, it is recommended that a
licensed electrician install an approved outlet
Because range &minds are not accessible aikr
range is in position, flexible service conduit or cord
must be used.
BEFORE BEGINNING
Y
INSTU
OUTLET BOX
ON EITHER
SIDE OF
CORD=
MIN.
I
w,+
BOX4
Anti-TIpBracket
finstallineitherrear corned —
.–
“00= “
+
(!
OF RANGE
‘(continualnatlwd
I
I
d
27
Page 28

PREPARETHE OPENING (cont%l)
Flooring
Your range, like many other household
items, is heavy and can settle into soft
floor coveringssuch as cushionedvinylor
carpeting.
of flooring, use care, and follow these simple and
inexpensive instructions.
The range should be installed on a 1/4 inch thick
sheet of plywood (or similar material) as follows:
Whenthe floor covering endk at thefront of the
range, the area that the range will rest on should
be built up with plpvood to the same level or
higher than the floor covering. This will allow
the range to be moved for cleaning or servicing.
Under the Range
VVhenmovingthe range onthis type
STEP2
PREPAREFOR ELECTRIChl CONNECTION
Use only a 3-conductor, or if required a 4
conductor range cord set as noted below. These
cord sets are provided with ring type terminals.
The electrical rating of the cord must be 125/250
volts minimum, 40 amperes.
NCYI’E:Only a 4conductor cord is to be used
when the appliance is installed in a mobile home
or where local codes do not permit grounding
through the neutral.
STEP3
1. ~cate connector block at the bottom rear of
range and remove rear wiring cover.
2. Directly below the connector block is a hole
with a knockout ring for accommodating conduit
fittings. Brackets provided are used to support
the flexible cord strain relie~ which must be
securely attached to the cord set
STEP4
3-WIRE SYSTEM
Power Cord Installation-Insert screws
through power cord terminals so that the screws
pass through comector block terminals and
engage nuts. Tighten screws securely.
Cable Direct Installation-Clamp bare wires
between the connector block terminals and
movable nuts with screws tightened securely.
1. Copper Wtig
Connectthe neutral or mounded wire of the
supply circuit to the netitral terminal of the
comector block, located in the center. The
power leads must be connected to the outside
(brass colored) terminals.
NEUTRAL
TERMINAL
1)
28
TOR
GROUNDING STRAP
~ I&
W~G: CONNEC’IllR B~CK IS
APPROVED FOR COPPER WIRE
CONNEC.I’ION ONLY.
(GROUNDING TO RANGE)
Page 29

2. AluminumW*
A
Connectlength of copper building wire to
range terminal block,
B. Splice copper wires to aluminum wiring using
special comectors designed and U.L. approved
for joining copper to aluminum, and follow the
comector manufacturer’s recommended
procedure closely
NO’lE W~e used, location and enclosure of
splices, etc., must conform to good wiring
practice and local codes.
WARNING
1. Range must be secured by ANTI-TIP bracket
supplied.
2. See instructions to install (supplied with
bracket).
3. Unless properly installed, range could be
tipped by stepping or sitting on door. Injury
might result from spilled hot liquids or from
range itself.
Typical installation of Anti-Tip bracket
Attachment to Wall
Bracket
STEP 5
4-WIRE SYSTEM
SPECIAL GROUNDING INSTRUCTIONS
W~G:
Frame grounded to neutral of appliance
through a link. If used in a MOBILE HOME or
if LOCAL CODES do not permit grounding
through the neutral
1) disconnect the link from neutral,
2) use grounding terminal or lead to ground
unit in accordance with local codes, and
3) connect neutral terminal or lead to branch
circuit in usual manner.
(If the appliance is to be connected by
means of a cord set, use 4conductor cord
\
GROUND
LUG
STEP6
AKTI-TIP BRACKET INSTALLATION
AN ANT’I-TIP bracketis suppliedwithinstructions
forinstallationinavarietyoflocations.The
instructionsincludeatemplate,apartslistanda
listoftoolsnecessarytocompletethe installation.
Readthe
and the instructions that fit your situation before
beginning installation.
IMPORTANT SAPE’N INSTRUCTIONS
Screw’Must Enter
Wood or Mets/
,
Wa//PIate
STEP7
LEVELING THE MNGE
T’herange
at each corner of the base of the range. Remove
the storage drawer or kick panel (depending on
your model) and using channel locks, rotate the
leveling feet in and out as required to level the
range. (For instructions on how to remove and
replace the storage drawer or the kick panel, see
the Cleaning Under the Range section in Care
and Cleaning.) On some models, there are plastic
covers which may be removed for easy
adjustment (just squeeze and pulI).
One of the rear leveling feet will engage the
ANTI-T’IPbracket (allow for some side to side
adjustment). Allow a minimum clearance of 1/811
between the range and the leveling foot that is to
be installed into the ANTI-TIP bracket
Check the range for proper installation into the
ANTI-TIP bracket (after the range has been
properly installed) by removing the kick panel or
the storage drawer and inspecting the rear leveling
leg. Make sure it fits securely into the slot.
must be level. Leveling feet are located
STEP8
FINAL CHECK
Be sure all switchesare inthe off positionbeforeJ
leavingthe range.
29
Page 30

QUESTIONS?
USE THIS PROBLEM SOLWR
PROBLEM
OVENWiLL
NOT WORK
OVENLIGHT
DOES NOT WORK
FOOD DOES NOT
BROIL PROPERLY ~
FOOD DOES NOT
ROASTOR BAKE
PROPERLY
I POSSIBLE CAUSE
● The plug on the range is not completely inserted in the electrical outlet-
● ‘Ihe circuit breaker in your house has been tripped or a fuse has been blown.
● Oven controls not properly set.
● The light bulb is loose or defective. llghten or replace.
● me switch operatingoven Iight is broken. U for service.
I
I
● The OVEN SET knob not set at BROIL
● The OVEN TEMP knob not set at BROIL
*The door not left open to the broil stop position as recommended.
● Improper shelf position being used See the Broiling Guide.
● Food is being cooked on hot pan.
● Coolmmre is not suited for broiling.
s Aluminum foil used on the broiler pan rack has not been fitted properly and
slit as recommended.
● The OVEN SET knob not set at BAKE.
oThe 0~ TEN@knob not set at proper temperature.
*Shelf position is incorrect Seethe Roasting or the Baking sections..,’
● Incorrect cookware or aokware of improper size is being used.
. A fo~ te~ W= not ~ wh~ needed @
&IW down browning during roasting. t
,,.
ovENTEMP~
TOO HOT OR’100 COLD
SUREACEUNITS:: ‘ ~ ~
NOTFUNCI?ONING’;“’”.,,,
PROPERLY;”.’;::;, ,:.”.;’.;::‘‘
..... .
, ;~,:...
0~ DOOR::i’ ; ~
CROOKED -“’~’”-, ‘“
“,.,;,,
:.
Oven Thermostat-Do
cThe OWN TEMP knob needs adjustment. See the Adjust the
OvenThermostat-Do lt YOume~section.
● The ‘stice units are not plugged in solidly.
● Thedrip pans are not set securely in the cooktop.’ ‘
● Thesurfaceunit controls are not properly set. .
● Because the oven door is removable, it sometimes gets out of position during
installation To straighten the door, pushdown on the high comer.
If you need more help... call, tolI free:
GE Answer Centefl
800.6263000
consumer information service
“The OVEN TEMP knob needs adjustment. See the Adjust the
It Yourselfsection.
30
Page 31

Wdll Be There
With the purchase of your new Hotpoint appliance, receive the assurance that ifyou ever
need information or assistance, we?llbe there. All you have to do is Call-toll-free!
/!mHomeRepakSewice
80iEZ’Mt?ES(80M32-273jy
Our consumer semice professional will provide expert repair service on your
Hotpoint appliance, scheduled at a time that’s convenient for you. Many GE
Consumer Service company-operated locations offer you service today or
tomorrow, or at your convenience (7:00 a.m. to 7:00 p.m. weekdays, 9:00 a.m. to
2:00 p.m. Saturdays). Our factory-trained technicians know your appliance
inside and out-so most repairs can be handled in just one visit.
GEAhswerCkntep
80~62ti2000
Whatever your question about any Hotpoint major appliance, GE Answer
Centere information service is available to help. Your call-and your
question-will be answered promptly and courteously. And you can call any
time. GE Answer Center” service is open 24 hours a day, 7 days a week.
ForCustome~W* SpecialNeeds...
Upon request, we will provide
Braille
HotPoint appliances, and a
brochure to assistin planning a
barrier-free kitchen for persons
I
with limited mobility. To obtain
these items, free of charge, call
800.626.2000.
controls for a variety of
Semitebnlkacts
80W26Z2224
You can have the secure feeling that GE Consumer Sexvice will still be there
after your Hotpoint product warranty expires. Purchase a GE contract while
your wamatyis still in effect and you’ll receive a substantial discount. With
a multipleyear contract, you’re assured of future sexvice at today’s prices.
Pam andAccemoties
80tM2/k2002
Individuals quaMcd to service their ownappliances can
have needed parts or accessories sent directly to their
c’
home. Our parts system provides access to over 47,000
Genuine Renewal Parts...and all are fidly
VISA, MasterCard and Discover cards are accepted.
wamanted.
Consumers with impaired hearing or speech who have
access
to a TDD or a conventional teletypewriter may
call 800-TDD-GEAC (800-833-4322) to’~equest
information or semice.
Usermaintenanee instructions contained in this booklet
eoverproeedures intended to be @O~Cd bya!ly~.
other
~g~~~o~d bCrefkmed to
scmiee
improper suvieing may cause tie opemtion.
peIsOnncl.Caution must be cxcrdsc & Sinec
quaMcd
Page 32

1
Staple sales slip or cancelled check
YOUR HOTPOINT RANGE
here. Proof of original purchase date
is needed to obtain service
WARRAN~
II
under warranty
)
WHAT IS COVERED
WHAT IS NOT COVERED
FUU ONE-YEAR WARRA~
For one year from date of original
purchase, we will protide, free of
charge, parts and service labor in
your home to repair or replace
any
partof therange that fails because
of a manufaduring defect.
● Sewice trips to your home to
teach you howto use the product.
Read your Use and Care material.
Ifyou then have any questions
about operating the product,
please contact your dealer or our
Consumer
address below, or call, toll free:
GE Answer Cente@
800.626.2000
consumer mfofmation service
● Improper installation.
If you have an installation
problem, contact your dealer or
installer. You are responsible for
providing adequate electrical,
exhausting and other connecting
facilities as desctibed in the
Installation Instructions provided
with the product.
Affairs office at the
gas,
This warranty is extended to
the original purchaser and any
succeeding
owner for products
purchased for ordinary home use in
the 48 mainland states, Hawaii and
Washington, D.C. In Alaska the
warranty is the same except that it is
LIMITED because you must pay to
ship the product to the service shop
orfor the setvice technician’s travel
coststo your home.
Allwarranty seMce will be
provided by our Facto~ SeMce
Centers or by our authorized
Customer Care” seticers during
normal working hours.
Should your appliance need
service, during warranty period
or beyond, call 800-GE-CARES
(80042-2737).
● Replacement of house fuses or
resetting of circuit breakers.
● Failure of the product if it is used
for other than its intended
purpose or
● Damage to product caused by
used commercially.-
accident, fire, floods or acts
of God.
WARRANTOR IS NOT
RESPONSIBLE FOR
CONSEQUENTIAL DAMAGES.
Some statesdonotallowthe exclusionorlimitationof incidentalor consequetid damages, so the above limitationorexclusion
maynot
apdytoYou.~is warrm @Vesyouspe~c Iegd rig~, and You may alsohaveotierrightswhichvaryfromstateto state.
knowwhatyourlegalrightsarein yourstate, consultyourlocalor stateconsumeraffairsofficeoryourstate’sAttorneyGeneral.
To
I
If further help is needed concerning this warran~, write:
ManagerAonsumer Affairs, GE Appliances, Louisville, KY 40Z5
This book is printed on recycled paper.
.- —-- —
L
12-94 CG
4
Warrantor: General Electric Company
RB524 RB532 RB536 RB633
RB525 RB533 RB632 RB6- -
RB526 RB534
Printedin Louisville,KY
Page 33

Comoobtener10meiorde
R13633
u
Indite
Aparato anti-volcaduras 3,21,29 Homear
Control de IOSquemadores %11 Parrillas
Ajustes de 10Scontroles
Comparaci6n de cubiertas 8 Puerta del homo removible 24
Consejos para hater
enlatados en la casa 11 del sire
Consejos sobre 10S Instrucciones de insta1aci6n 27-29
implementor para cocinar 10 Instrucciones de seguridad 3-5
Caracterkticas
Cuidado y Iimpieza
Garantia
Guia para resolver problemas 30 Registro del aparato
Ajuste del termostato del hom~ Reloj
Hagalo Ud mismo 16 Servicios al consumidor
Homo 13-20
Asado al fiego directo
Asar al homo 17, 18
Caj6n de almacenamiento 25
Limpieza continua 26 GE Answer Center@
Luz
del homo;
Carnbio de foco 12,23
9
6,7
21
32
19,20 importances
Precalentamiento
Rejilla de venti1aci6n
Nivelaci6n
Ntimeros de modelo y de serie 2
Papel de aluminio
Niimeros telef6nicos
800.626.2000
4, 13, 14,21
4, 15,17,19
14-16
14
4,25
29
12
31
31
Instruccionesde
USO,decuidado
einstalcihpam
Modelosde
limpieza
normal
2
RB525
RB526
RB533
RB534
RB536
Modelosde
lim ieza
● ua
ILcon
HcnPolm
Part no.
Pub. no.
RB632
164D2966P076
39-4740-1
12-94
Page 34

PERMITANOS A~ARLE...
Lea esta guia
cuidadosamente.
Asi podr~ operar y mantener su
nueva estufa. Mant6ngala siempre
a mano para resolver cualquier
duda. Si no comprende algo o
necesita ayu~ escriba a
Consumer Mfairs
Hotpoint
Appliance Park
Louisville, KY 40225
S1NECESITA SERVICIO.. .
Anote 10Sniimeros del
rnodeloy de la serie.
Dependiendo de su estufa,
encontradi 10Sntimeros del modelo
y de la sene en una etiqueta en la
parte delantera de la estufa, detr6s
del panel de protecci6n, del caj6n
de almacenamiento o del caj6n
del asador.
Estos ntimeros tambi6n se
encuentran en la tarjeta de registro
que viene con su estufa. Antes
de enviar dicha tarjet~ anote 10S
nfimeros aqui:
NLmerodel modelo
Ntimerode laserie
Refi&ase a estos ntimeros en
cualquier carta o llarnada
relacionada con su estufa.
En caso de que su estufa ~
resulte daiiada...
P6ngase en contacto
inmediatamente con el
distnbuidor (o fabricate) que
le vendi6 la estufa.
Ahorre
tiempo y dinero.
Antes de solicitar el
servicio...
Consulte la seccion de Guia para
resolver problemas al respaldo de
este manual. AM aparecen 10s
principals problemas de operaci6n
que U& mismo puede corregir.
J
/
.
\
3
F
.,
Vea la secci6n Servicios al cmsumidor al respaldo
de esta guia.
Para obtener refacciones contacte 10Scentros de
servicio GE/Hotmint.
Estamos orgullo~os de nuestro servicio y queremos
complacerlo. Si por alguna raz6n no estiisatisfecho
con el servicio que recibe, he aqui tres pasos que
puede seguir.
PRIMERO, p6ngase en contacto con quien le prest6
el servicio. Expliquele por qu6 no esti satisfecho. En
la mayoria de 10Scases, esto solucionarii el problems.
DESPUES, si aiin no esti satisfecho, escriba todos 10S
detalles, incluyendo su niimero telef6nico, a:
Manager, Consumer Relations
Hotpoint
Appliance Park
Louisville, KY 40225
FINALMENTE, si su problems atin no estii resuelto,
escriba a:
Major Appliance Consumer Action Panel
20 North Wacker Drive
Chicago, IL 60606
Page 35

INSTRUCCIONESIMPo~
DE SEG=AD
instruccionesantesdemar esteaparato. . ~
(
li
Cuando
Leaestas
utiliceaparatosektrico~ debenseguirse
instruccionesb&icasdesegurkk$ queincluyen
las siguientes: ..:-,” ~ . ~ . .
.’u~~ &e ~pb S61O
.<
parael=’ alqtxea
destinado,se@nse describeenesta@a. ~ ~ ~
“Haga queun instaladorcaliticadoinstaley
conectea tierrasuestufadeacuerdoconk
Instrucciones deinstalacibn. ,
QNo trate de reparar o reempkizar ninguna
partedem estufhamenosqueserecomiende
especikunente enestaguk
se debe remitir a un tico
● Antes delIevaracabocuaiquierservia~
DESCONE(71ELAESTtJEkDEL
WMINBTRO DECORRIENTEELECTRICA
EN EL P= DEDISTIUBUCIONDELA
CASAQWIANDO
EMNTERRU’FIORDELCIRCU17X)EIXIWXI.
● ~ f- flao~~~ ~~tienen me-o=
Si SUmodelo tiene estas caracteristicas, se deben
reciclar de acutxdo con tigos locales, del estado
~ y federales.
ELFUSIBLEO AJ?AGANDO ‘
Tti otro servicio ~
deserviciocalificado.
AADVERmNCIA—
Todashis estufmse puedenvolcar
y sepuedenresultardaiios
personages.Para evitar elvokado
imprevistodela estuf&suj&elaala
wired v al sueloinstalando el
Aparatoanti-vokadurasdado.
Para veficar queel aparato
est~instdado ysujetodemanera
come@ C@teel
o el caj(kde alm;cenamiento e inspeccione la pata
posterior niveladora= As@irese de que est~ bien
colocada en la ranum
Sise tirela estufadela paredpor cualquierraz(5w
asegfiresedequeel aparatoest~bienconectado
cuandovuelvaacolocarla estufacontrala pared.
Si no10~ hayriesgoposibledequela estufa
vuelquey causedaiiossi IJd.o unniiiose sub%
se asienteose incIinesobreunapuertaabierk
Favor de consultar la informaci6n sobre el Aparato
anti-volcaduras en esta gufa. La falla de tomar esta
,1 precauci6n podrfa resultar en el volcado de la estufa
y daiio.
-. -..
panel de refierzo
A
●
J
. Nodeje~~~ ~ IMtio~os
fiOS nodeben
qwdarsesoloso sinvigikcia enun&eadonde
seestiiusandoalgtinaparato.Mmcase k ciebe. ~
pimitir quese.sientenoseparenen niiqyna
partedelaparato. ~‘ ~ ‘ .“,: , ~ ‘:. ~
● Nopemnitaquenadiesesub%se p- ‘ “
o’secuelguede Iapuer@deIcaj6nde
ahnacenamientooparaasaro deIacubie~’
deIaestufa.
causando daiio personal ~ve., ,, . . ~ . .,’! ~
● P~~A~CIO~ ~&& DE ~ ..
~
Poclria daiiarse la estuf’a o volcark
.,
,.
ALOS ~OS NO SEI)EBEN GUARDAR
DENTIW DEL(3S
ARMARIOSENCIMADE
UNAESTUEAO SOBRELA COIWOLA’ ~~
POSTERIOR13ELAESTUFA-LOS tiOS
QUESUBENALA ESTUEAPWTOMAR
ALGOPUEDENDJ@IRSE GRAVEMENTE.
. NoIlevemum vestidosdesabrochadoso a“dos ~
almar elaparato.
artfculos guardados en Ios armarios sobre la ~
cubierta Los materials in.flamables se podrfan
encender si tuvieran contacto con llamas o
stqxxficies calientes del homo y
auemaduras maves.
=__—----.._=.
● UtiliceS61Oagarraderasque@%
Tenga cuidado al tomar Ios .
podrian Causar
secas-las agarraderashiixnedaso
mojadasque-entrenen contactocon
superficiescalientespuedenprovocarquemaduras
porelvapor.Nopermitsquelas agarraderas
auedenen contactocon10Sauemadorescalientes
;-con 10Selementoscaietict&es.Nouseuna
toa.llauotratelaabultadiu
●
Para su segurida~ mmca use su aparato para
calentar la habitaci6n.
●
NOGUAIZIMINIUSEMATERIALS
COMBUSTIBLES,GASOLINAU OTROS
VAPORESOLIQUIDOSCERCA DEES’IX
O CUALQUIEROTl10 APARATO.
●
MantengaIimpios10Sfiltrosde lacampana
y IOSdegrasa
para conservar una buena
ventiiaa(inyevitarquela gramse incendie.
●
Nodejequela grasadecocinau otros
materials MIamabksse“acumuIendentro
o cercadelaestuf’
(contirufaen lap@w sigubti)
3
 Loading...