

Page 1
,,
—
!,
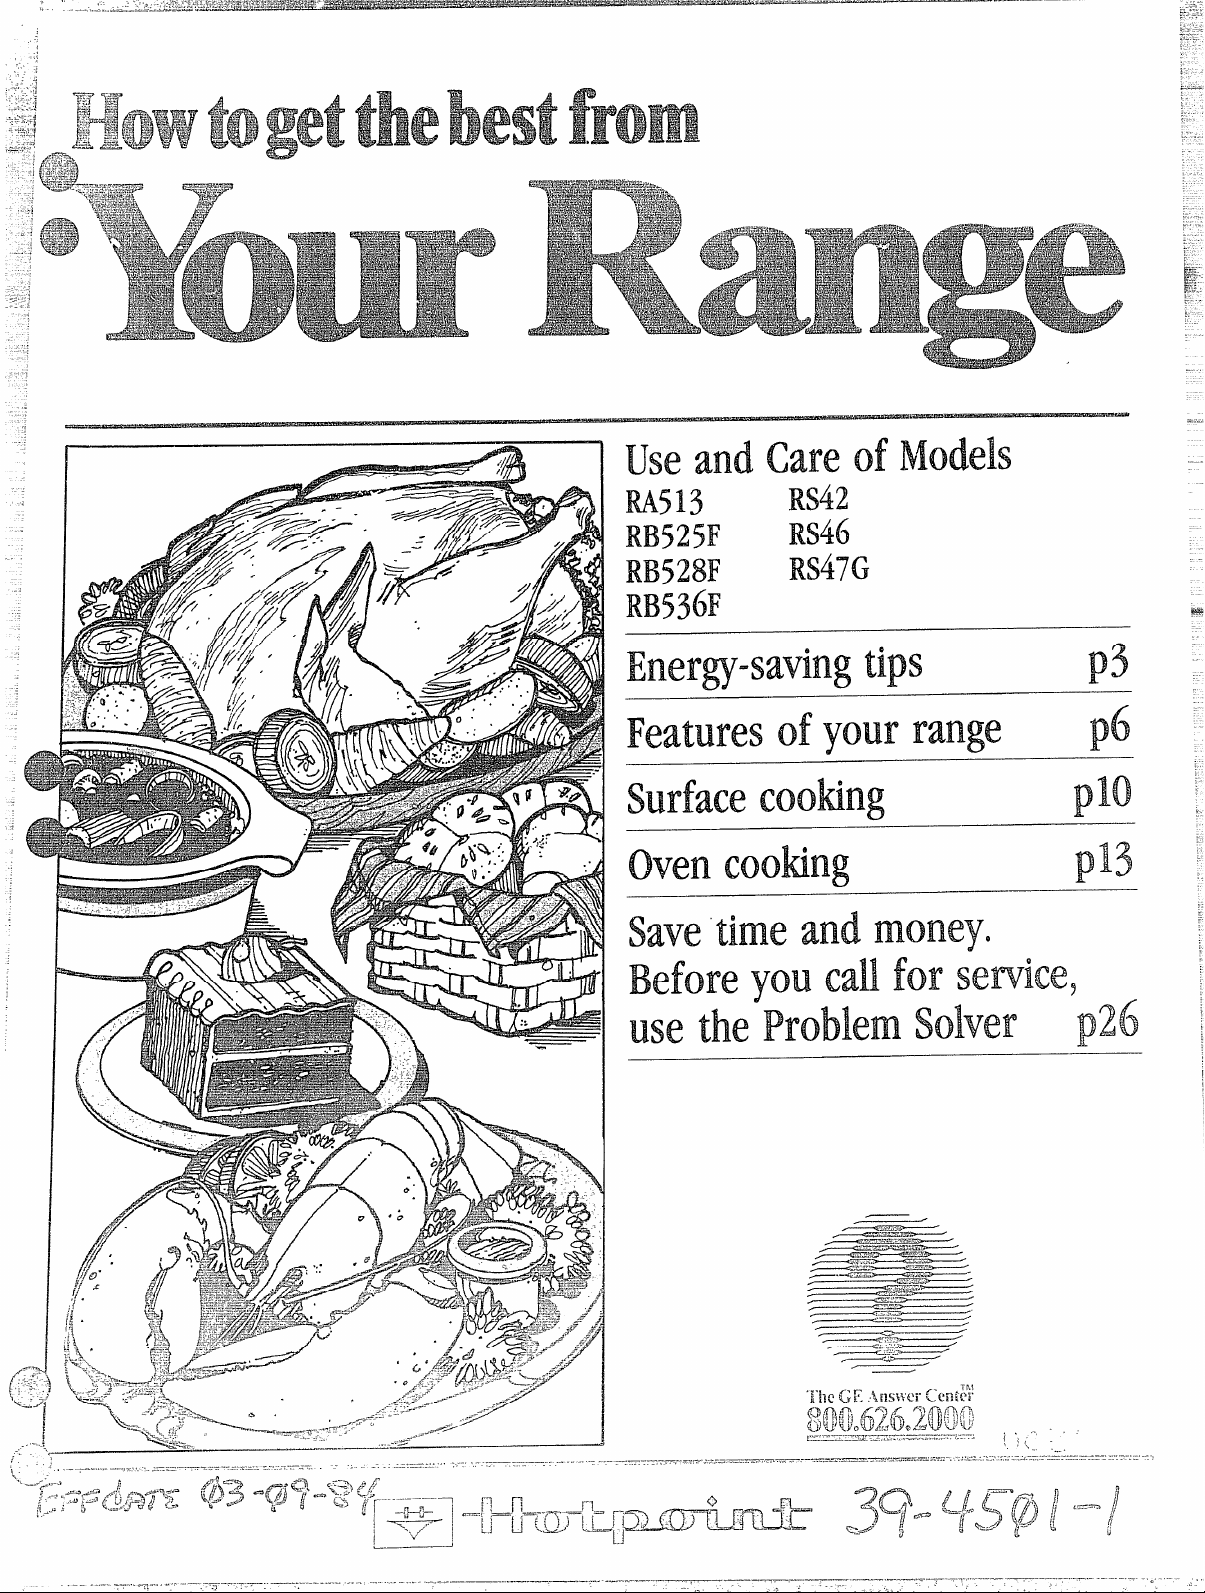
usea-d of
IR.Mmi
RB525F
IN3528F
IRB536F
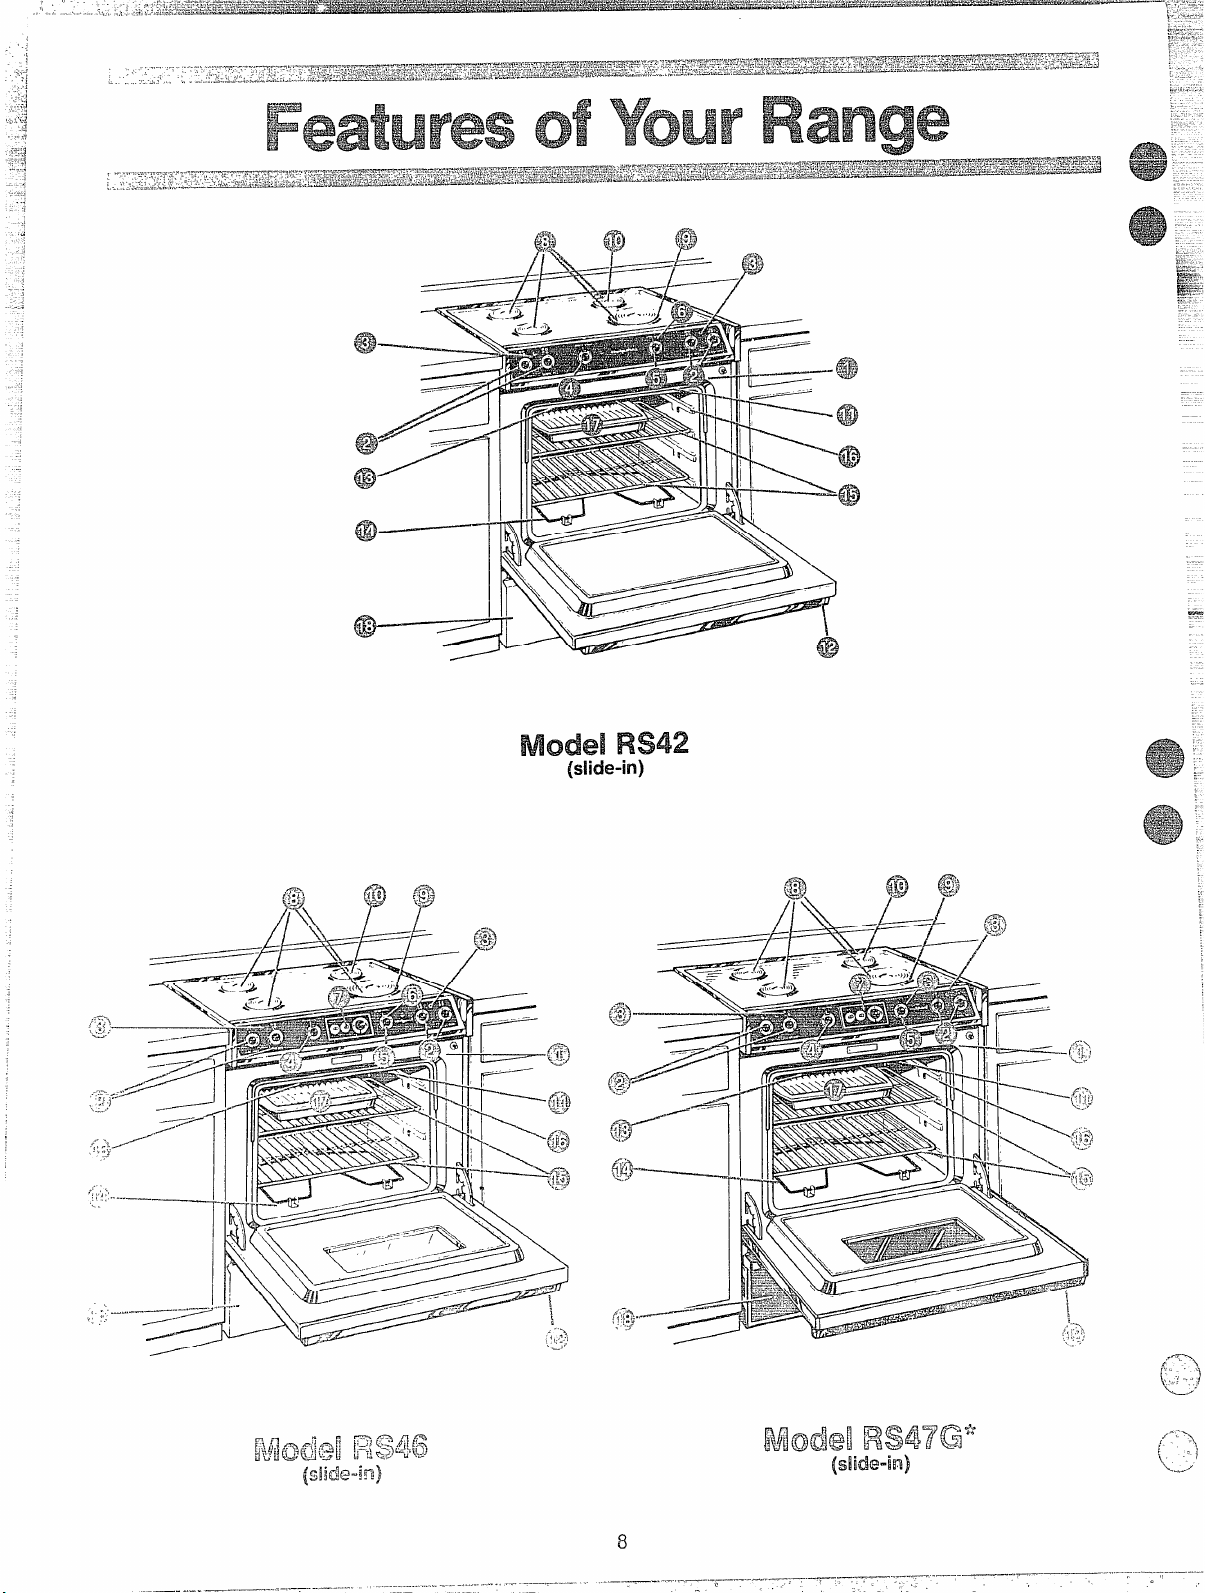
RS42
RS46
RS47G
tips
ofyour
p3
ptii
pm
ppj
1
savetime
W3ethe solver
and
youcdlforservice,
pilti
..-
lt
i
Page 2
..
fk%%d‘This
It is designed to help you operate
and maintain your new Flange
properly.
Keep it handy for answers to your
questions.
If you don’t understand something or need more help. . .
Call, toll free:
The GE Answer CenterTM
800.626.2000
consumer information service
or write: (include your phone
number);
Consumer Affairs
Hotpoint
Appliance Park
Louisville, KY 40225
the and
Serial
You’ll find them on a label on the
front of the Range behind the
oven door.
These numbers are also on the
Consumer Product Ownership
Registration Card that came with
your Range. Before sending in
this card, please write these
numbers here:
Model No.
Serial No.
Use these numbers in any correspondence or service calls concern ing your Range.
MYOU
a
immediately contact the dealer (or
builder) that sold you the Range.
-mm?and m . .
Y!3UJCM for‘sWwim
Check the Problem Solver (page
26), It lists minor causes of operating problems that you can correct yourself.
It could saveyou an unnecessary
service call.
Your range,!W many other h~u~e- ‘= -
,-,.--...
hold items, is #W?a?/yand can SMe :-’-
into soft mxw fmferhlgs such as
viny! of Cak’p$i?m’lg.
When moving the range on this ----
type of flooring, use care, and it i
recommended that these simple
afld inexpensive instructions be
followed.
The range should be installed on W%=
:-..—
.—..,:.
-@.”
;.:,-
“=.
E
a sheet of plywood (or similar
material) as follows: fba
fiocwCow?wh?gIS d W3
front of the range, the area that
the range will rest on should be
built up with plywood to the same
level or higher than the floor covering. This will then allow the
range to be moved for cleaning or
servicing.
(WI FM and FIBfmukk]
Leveling screws may be located
on each corner of the base or on
only the two front corners of the
range depending on the model.
By removing the bottom drawer
you can level the range to an
uneven floor with the use of a
nutdriver.
To remove drawer, pull drawer out ““ :
all the way, tilt up the front and
remove it. To replace, insert glide
at back of drawer beyond stop on
range glides. Lift drawer if necessary to insert easily. Let front of
drawer down, then push in to
close.
I
2
Page 3
j~:~. urface Cooking . . . . . . ... . 10-11
—.-
.
~.:=...~+r
.=-v=.
-a
-- utornatic Timer and Clocks . . 12
Using Your Oven . . . . . . . . . . . . . 13
How To Bake and Time Bake. . 14
How To Roast ., . . . . . . . . . . . . . . 15
How To Broil . . . . . . . . . . . . . . . . . 16
How To Care For
YourRange .. . . . . . . . . ... 17-18
Cleaning Your Range . . . ... . .. 19
Surface Cooking Chart ... . 20-21
!3aking Chart. .. . . . . . . . . . . . . . . 22
Roasting Chart . . . . . . . . . ... . . . 23
Broiling Chart. . . . . . . . . . . . . . . . 24
Home Canning Tips . . . . . . . . . . 25
The Probiem Solver . . . . . . . . . . 26
Consumer Services . . . . . .. . . . . 27
Warranty . . . . . . . . . .. . .Back Cover
63
Usecooking utensils of medium
weight aluminum, tight-fitting
covers, and flat bottoms which
completely cover the heated
portion of the surface unit.
Cook fresh vegetables with a
minimum amount of water in
a covered pan.
“Keep an eye” orI foods when
bringing them quickly to cook-
ing temperatures at HIGH heat.
When food reaches cooking
temperature, reduce heat immediately to lowest setting that
will keep it cooking.
Use residual heat with surface
cooking whenever possible. For
example, when cooking eggs
in the shell, bring water to boil,
then turn to OFF position to
complete the cooking.
63
Use correct heat for cooking
task. . .HIGH—to start cooking
(if time allows, do not use
HIGH heatto start), MEDIUM HI
—quick brownings, MEDIUM—
slow frying, LOW—finish cooking most quantities, simmer
—double boiler heat, finish
cooking, and special for small
quantities.
When boiling water for tea or
coffee, heat only the amount
needed. It is not economical to
boil a container full of water
for only one or two cups.
Preheatthe oven only when
necessary.Mostfoods will cook
satisfactorily without preheating. If you find preheating is
necessary, watch the indicator
light, and put food in the oven
promptly after the light goes
out.
Always turn oven OFF before
removing food.
During bakjng, avoid frequent
door openings. Keepdoor open
asshort atime aspossible when
it is opened.
Cook complete oven meals
instead of just one food item.
Potatoes, other vegetables,
and some desserts will cook
together with a main-dish casserole, meat loaf, chicken or
roast. Choose foods that cook
at the same temperature and in
approximately the same time.
Useresidual heat in oven whenever possible to finish cooking
casseroles, oven meals, etc.
Also add rolls or precooked desserts to warm oven, using residual heat to warm them.
q
.J
Page 4
When using electrical appliances
basicsafety precautions should
befollowed, inciuding the
;Ollowing:
$J Usethis appliance oniy for its
intended useas described in this
manual.
Q Be sureyour appliance is
properly installed and grounded
by a qua~ifiedtechnician in
accordance with the provided
installation instructions.
e Don’t attempt to repair or
replace any part of your range
unless it is specifically recom-
mended in this book. All other
servicing should be referred to
a qualified technician.
s More performing any
service,DISCONNECT THE
RANGE POWERSUPPLYAT
THE HOUSEHOLD DISTRIBUTION PANEL BY REMOVING
THE FUSEOR SWITCHING
OFF THE CiRCUIT BREAKER.
9 DOno%heave ak3ne—
children should not be left alone
or unattended in area where
appliance is in use.They should
never be allowed to sit or stand
on any part of the appliance.
0 ~~n’t anyone to climb,
stand or hang on Me door,
(N’range top. They could
the range and even ?ipit
over causing severe
injury.
~:’ DO NOT
ITEMS OF TO
1?4
.4=4EM3VEA (X3ON ‘THE
(X=A RANGE’–
ON THE
TO REACH ITEMS
BE
@ Loose
fitting or hanging garments
should never be worn while
using the appliance=Flammable
material could be ignited if
brought in contact with hot heating elementsand may cause
severeburns.
@ (JSeonly dry
moist or damp potholders on
hot surfaces may result in burns
from steam. Do not let potholders touch hot heating elements. Do not usea towel or
other bulky cloth.
@ !$&weruse your for
or the room.
@ storage in or on AppWwKx3Flammable materials should not
be stored in an oven or near sur-
face units.
@ Keep hood and greasefilters
clean to maintain good venting
and to avoid greasefires.
a !20 not let cooking grease or
other materials acxx.1+=
mu!ate in the range or neal’Km
o Do not use
fires. Never pick up a W4ming
pan. pan on
w.wface unit by ccwering pan
cookie shed CM?flat tray. Fh’rikig
CJ’ease a pan ‘can be put
out by Cx2v’ewngwith baking
soda or, if a muWpurpose dry dwmkxd w foam.
water on grease
wi!h well M,
oven.Thesesurfacesmay be
hot enough to burn eventhouah
they aredark in color. During and after use,do nottouch, or
let clothing or other flammable
materials contact surfaceunits,
areasnearby surface units or
any interior areaof the oven;
allow sufficient time for cooling,
first.
Potentially hot surfaces include
the cooktop and areasfacing
the cooktop, oven vent opening
and surfaces near the openings,
and crevices around the oven
door.
The inside surface
of the oven may be hot when the
door is opened.
G tXMMN2Jpork follow
our directions exactly and
always cook the meatto at least
170°.This assuresthat, in the
remote possibility that trichina
may be present in the meat, it
will be killed and meatwill be
safeto eat.
Page 5
..
-—..—
,.
.-.
.
-’J+. when Owim dam. The
-...+
:#J*
‘=%--hotmor steam
...,
e
wmicause13wrwto hands, face
eye%
J ERcm’theat kmd
h
w?oven” Pressure
Cxmki up the
bw’st an
I: Keepovenventducts
unobstructed.
‘Jj Keepovenfreefrom grease
build up.
Z’ Placeoven rack in desired
position while oven is cool. If
racks must be handled when
hot,do not let potholder contact
heating units in the oven.
G Pulling out shelf to the shelf
stop is a convenience in lifting
heavyfoods. It is also a precau-
ticmagainst burns from touching
hot su}faces of the door or oven
,-.
When using cookin,gor roast-
ing bags in oven, follow-the
manufacturer’s directions.
. Do not useyour oven to dry
newspapers. If overheated,they
can catch fire.
hjw’y.
..”% -
–%! ‘ q ‘A’E3=2J
Q)$:.b ~&,,@j.o
“-.
‘-’ IAM3PKpM’ Pan Sk--n-k
‘-’”*tJ”+.fi’,q?/r”~~.’’.,~’}’!j-q;”j~fTJ:
Q,=yiQ~*,J ~ E:.,I
.>
appliance is equipped with one
or more surface units of different
size.Selectutensils havingflat
bottoms large enough to cover
the surface
unit heating e!ement.
The useof undersizedutensils
will exposea portion of the
heating element to direct contact and may result in ignition of
clothing. Proper relationship of
utensil to burner will also
improve efficiency.
@ f’q~verleavesurfaceunits
unattended at high heat
Boilover causessmoking and
greasy spillovers that may catch
on fire.
Q Be sure reflector pans and
vent ducts are not coveredand
are in place. Their absence
during cooking could damage
range parts and wiring.
o Don’t use foil to
line reflectorpans or anywhere
in the oven except asdescribed
in this book. Misuse could
result in ashock, fire hazard,
or damage to the range.
Q Only certain types
of glass,
glass/ceramic, ceramic, earthen-
ware, or other glazed con~ainers
are suitable for range-top service; others may break because
of the sudden change in tem-
perature (SeeSection on “Surface Cooking” for suggestions.)
: To minimize burns, ignition of
flammable materials, and spillage; the handle of a container
should be positioned so that it is
turned toward the center of the
range without extending over
nearby surface units.
Don’t CM’soak
SxH%xx2units. Dcm’il
put W5wnin a
f~ turnsurface unitto
OFF
@ Keepaneye on foods being
fried at HIGH or MEDIUM HIGH
heats.
@ TOavQ16jjthe 0?a
burn Or’ $MX2k,
be 0?3rtahllthat w-w for
?3[1surfaceunits are at OFF posi”
tkm and 2411coils arecool before
to removethe unit.
@ foods under
the !Mm2d,turn the fan off. The
fan, if may’spread
the f!ame.
@ Foods for beas
dry as possibk?eFrost on frozen
foods or moisture on fresh foods
can cause hot fat to bubble up
and oversides of pan.
@ Use little fat for effective
shallow or deep-fat frying. Fill-
ing the pan too full of fat can
causespillovers when food is
added.
@ If a combination of oils or
fats will be used in frying, stir
together before heating, or as
fats melt slowly.
D Nways IlwMtat and
watch as it heats.
Q Use deep fat thermometer
I
0
Page 6

.
.—
,\--
.----%
.-
L - ~, ,<*
,--- .
>
,,
1
, ,+—-.:,,-----
(\-
‘f--m,
‘ .
\
-’——.
.—..-.
(
-—--J
f-’””)
‘\J
)
Page 7
t
.——-——,..—...-.—.—-—-.--.-.-..--,.-
————, .-,—.—.
.....,-,.
~,.:-.
-5;
]
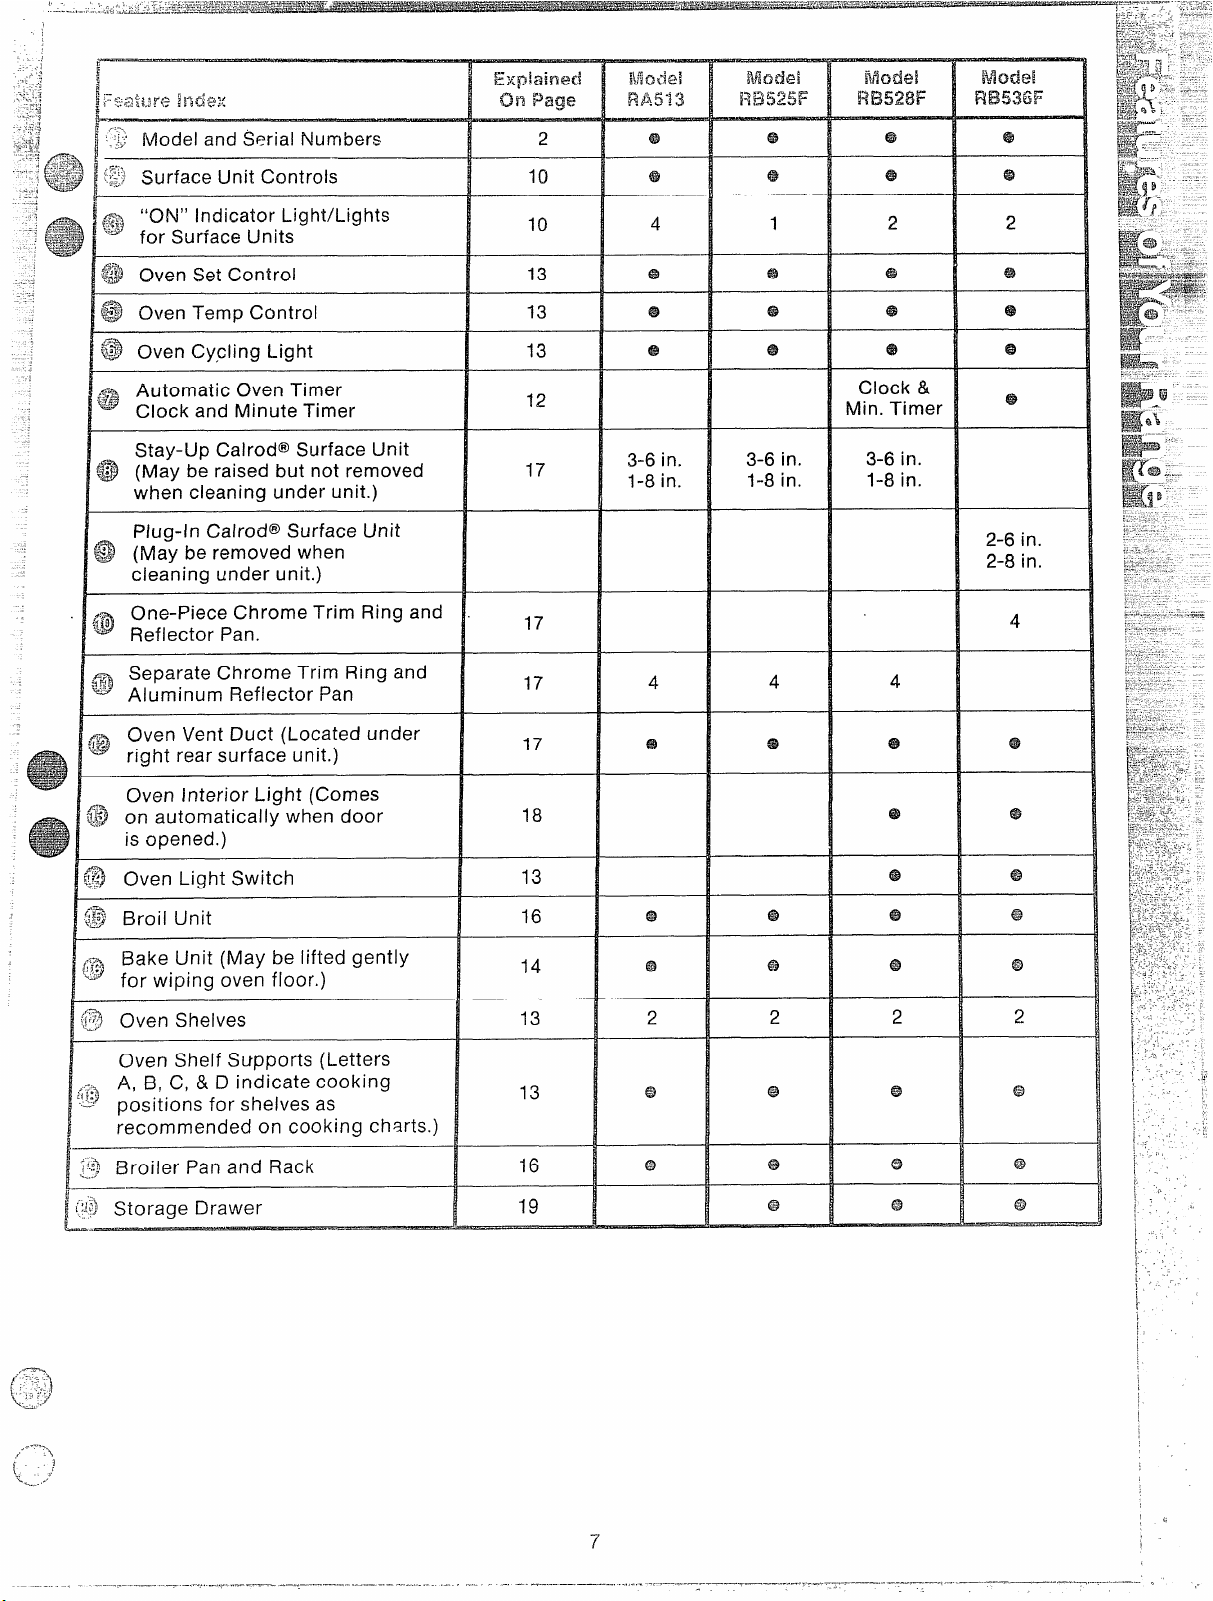
Model and Serial Numbers 2
6$
e
@
-10
;’~=””’’’”””””
...,
““ $$&
01
‘~~ “ON” Indicator Light/Lights
-e;~.
:
for Surface Units
~]1 Oven Set Control
&? Oven Temp Control
$$$Oven Cy,ciing Light
Automatic Oven Timer
@
Clock and Minute Timer
Stay-Up Calrod@Surface Unit
$9 (Maybe raised but not removed
when cleaning under unit.)
Plug-In Calroc@Surface Unit
Q) (May be removed when
cleaning under unit.)
]} One-Piece Chrome Trim Ring and
3
- Reflector Pan.
~ Separate Chrome Trim Ring and
G Aluminum Reflector Pan
Oven Vent Duct (Located under
$# right rear surface unit.)
—
10
13
13
13
12
17
17
17
17
@
4
3-6 in.
1-8 in.
4 4 4
@
1
@
@
3-6 in.
1-8 in.
@
-----+
–2__._.J
@
2
*
e?’
Clock &
Min. Timer
3-6 in.
1-8 in.
69
@
2
@
@
2-6 in.
2-8 in.
4
Oven Interior Light (Comes
~ on automatically when door
is opened. )
~ Oven Light Switch
@ Broil Unit
~ Bake Unit (May be lifted gently
for wiping oven floor. )
~~ Oven Shelves
Oven Shelf Supports (Letters
A, B, C, & D indicate cooking
)
positions for shelves as
recommended on cooking charts. )
~ Broiler Pan and Rack
~ Storage Drawer
—
18
13
16
14
13
13
16
19
62
@
2 2 2 2
@ @
63
@ @
@ @
@
6?3@
@
.......
” ‘\
,,.
{
i% .i
-.-. .-’
i
7
—
-—
Page 8
—
@
I
II IIIi.1
(slide-in)
(fj,
/1\\ /
@@;
,’= ,
==
.L
(@
/.
.-.i,:,--A-——
.
II IIr-% . .-d
Page 9
-.,
.-.———--——.—-
..
-—...—.—————..-.
.-,
.—
—..
.—.—....—-.
.......
-.
1,
.-
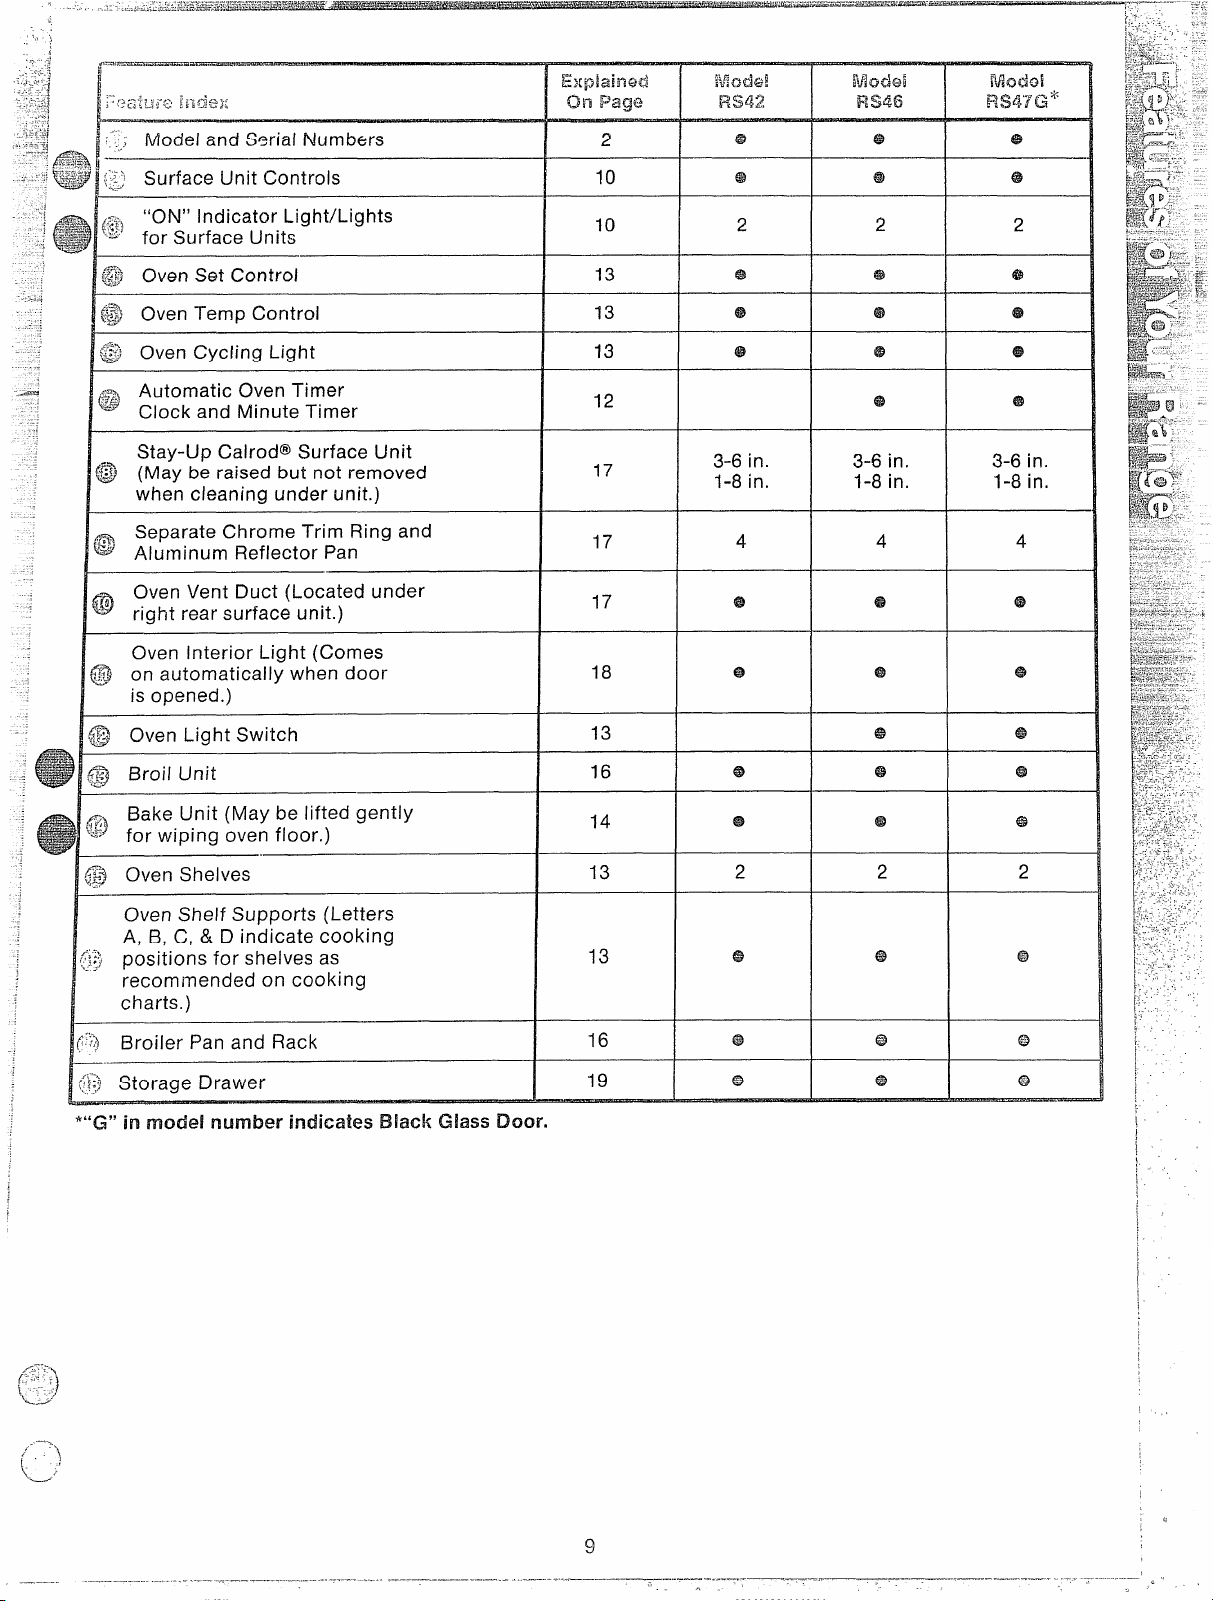
,,, Model and S~rial Numbers
.—
‘~j Surface Unit Controls
‘\
~F~,“ON” Indicator Light/Lights
“2’ for Surface Units
~~ Oven Set Control
$@ Oven Temp Control
@ Oven Cycling Light
~~ Automatic Oven Timer
‘w” Clock and Minute Timer
Stay-Up Calrod@Surface Unit
~ (May be raised but not removed
when cleaning under unit. )
~ Separate Chrome Trim Ring and
~ Aluminum Reflector Pan
,0 Oven Vent Duct (Located under
3
right rear surface unit.)
Oven interior Light (Comes
~ on automatically when door
“’ is opened.)
10
10
13
13
13
12
17
17
17
18
2
@
—
@ @ @
————
69 @
2 2 2
@ @
@
@ @ @
@ @ @
@ @
I
3-6 in. 3-6 in. 3-6 in.
1-8 in.
1-8 in. 1-8 in.
] Oven Light Switch
] Broil Unit
,3 Bake Unit (May be lifted gently
y for wiping oven floor.)
@ Oven Shelves
Oven Shelf Supports (Letters
A, B, C, & D indicate cooking
~~~ positions for shelves as
recommended on cooking
charts. )
‘-~:?Broiler Pan and Rack
.,
*“G” in modei number indicates
Black Gh3ss!Dcx3r.
13
16
14
13
13
16
19
@
@ @
2 2 2
‘a
@ @ @
@ @ @
1
I
—
.—---—r,—T— ---
. . . . . . . . . .
----
I
(,
9
---—
--
.’ ,
Page 10

Surface Unit Controls
Master Indicating Light for Surface Units
Calrod@Surface Units
—.
-—
Your surface units and controls
are designed to give you an infinite
choice of heat settings for surface
unit cooking.
At both OFF and HIGH positions,
there is a slight niche so control
“clicks” at those positions; “click”
on HIGH marks the highest setting; the lowest setting is between
the words WARM and OFF. In a
quiet kitchen you may hear slight
“clicking” sounds during cooking,
indicating heat settings selected
are being maintained.
Switching heats to higher settings
always show aquicker change than
switching to lower settings.
step1
Grasp contol knob and push in. . .
ej::.clk=$ =)
“+.,fib~-~-=
Turn either clockwise or counterclockwise to desired heat setting.
HI
Quick start for cooking;
bring water to boil.
MED
l-$!
Fast fry, pan broil; maintain
fast boil on large amount
Offood.
MED
Saute and brown; maintain
slow boil on large amount
of food.
Low
Cook after starting at HIGH;
cook with little water in
covered pan.
Vvrvl
Steam rice, cereal; maintain
serving temperature of
most foods.
No-m:
“1.At HIGH, MED l-it, never leave
food unattended. Boilovers cause
smoking; greasy spiliovers may
catch fire.
2. At WARM, LOW, melt choco-
late, butter on small unit.
b
Be sure you turn control to OFF
when you finish cooking. An indicator light will glow when ANY heat
on any surface unit is on.
Page 11

Q. Ivlay I can ~oodsanc~preservss
.... .....-...,-————..——...-<—--.-—.. ....
.-..
on my surfacf+units?
A. Yes, but only use utensils designedfor canning purposes.Check
the manufacturer’s instructions and
recipes for preserving foods. Be
sure canner is flat-bottomed and
fits overthe center of your Calrod@
unit. Sincecanning generateslarge
amounts of steam, be careful to
avoid burns from steam or heat.
Canning should only be done on
surface units.
Q. Why do my utensils tilt when I
place them on the surface unit?
A. Because the surface unit is not
flat. Make sure that the “feet” on
your Calrod@
tightly in the range top indentation
and the reflector ring is flat on the
range surface.
Q. Can I use special cooking
equipment like an oriental wok, on
any surface units?
A. Utensils without flat surfaces
are not recommended. The life of
your surface unit can be shortened
and the range top can bedamaged
from the high heat needed for this
type of cooking.
units are sitting
~. Can i cover my reflector pans
witi~f~iI7
A. Yes, but make sure hole in
center is left open
Cl. Why is the porcelain finish on
my containers coming off-?
A. If you set your Calrod@ unit
higher than required for the container material, and leave it, the
finish may smoke, crack POP,or
burn depending on the pot or pan.
Also, a too high heat for long
periods, and small amounts of dry
food, may darnage the finish.
——
----
-
Page 12

The automatic timer and clock on
E%%
ycur Range are helpful devices
that serve several purposes. The
knob locations on some range
models may vary and will look like
one of the two sets of timers below.
!Vbdels: RB536F, IRS46,and RS47G
TO SET THE CLOCK, push the
center knob in and turn the clock
hands to the correct time. (The
Minute Timer pointer will move
also, let knob out, turn the Timer
pointer to OFF.)
The Minute Timer has been com-
bined with the range clock. Use it
to time all your precise cooking
operations. You’ll recognize the
Minute Timer as the pointer which
is different in color and sh~pe than
the clock hands.
TO SET THE MIINUTETIMER,turn
the center knob, without pushing
in, until pointer reaches number of
minutes you wish to time. (Minutes
are marked, up to 60, in the center
ring on the clock. ) At the end of
the set time, a buzzersounds to tell
you time is up. Turn knob, without
pushing in, until pointer reaches
OFF and buzzer stops.
Stop dials to automatically start 2=+
and stop oven at a later time of day.
It takes the worry out of not being ;s:~home to start or stop the oven.
.--,,.e:;
.—
.—
Setting the dials for TIME BAKE is
explained in detail on page 14.
;:;.
[-+(JUI(::~1~ \ LISP I-nyN’11r] utc?TIn7c!I
~~,,11:]~;c r]]~:s1!r“fa~~~00kI
Your Minute Timer will help
A.
!1{]6)HSI~t“<)
time total cooking which includes
time to boil food and change temperatures. Do not judge cooking
time by visible steam only. Food
will cook in covered containers
even though you can’t see any
steam.
Using Automatic Timer, you can
TIME BAKE with the oven starting
immediately and turning off at the
Stop Time set or set both Start and
Q. M UStthe Cloc!< be set on cor-
rect time of day when I wish to use
the Au~onlatic Titmer for baking?
A. Yes, if you wish to set the Start
or Stop Dials to turn on and off at
set times during timed functions.
.-,,
Can / use the IVinute Timer
‘4,.c~uring oven cooki
i7CJ?
A. The Minute Timer can be used
during any cooking function. The
Automatic Timers (Start and Stop
Dials) are used
with TIME BAKE
function only.
This model has atime of day clock
and minute timer but does not have
Start and Stop dials needed for
TIME BAKE function.
Q. Can I change the clock while
1‘rnTime Cooking in the oven?
A. No. The clock cannot be
changed during any program that
uses the oven timer. You must
either stop those programs or wait
until they are finished before
changing time.
Page 13

.,
.O
1. Look at the controls. Besureyou
understand how to set them properly. Readoverthe directions for the
Automatic Oven Timer so you
understand its usewith thecontrols.
2. Check oven interior. Look at the
shelves. Take a practice run at removing and replacing them prop-
erly, to give sure sturdy support.
3. Read over information and tips
that follow.
4. Keepthis book handy so you can
refer to it, especially during the first
weeks of getting acquainted with
your oven.
For normal cooking,
line up the desired temperatures
(marked on the outer edge of the
control knob) with the index
marker located immediately above
the control.
The oven has four shelf supports
marked A (bottom), B, C and D
(top). Shelf positions for cooking
food are suggested on Baking,
Roasting and Broiling pages.
The controls for the oven(s) are
marked OVEN SET and OVEN
TEMP. OVEN SET has settings for
BAKE, TIME BAKE*, BROIL, and
OFF. When you turn the knob to
the desired setting, the proper heating units are then-activated for that
operation.
OVEN TEMP maintains the temperature you
set from WARM
(150°) to BROIL (550°). The Oven
Cycling Light glows until oven
reaches the selected temperature,
then goes off and on with the oven
unit(s) during cooking. PRE-HEATING the oven, even to high tem-
perature settings, is speedy—rarely
more than about 10 minutes. Pre-
heat the oven only when necessary.
[Mostfoods will cook satisfactorily
without preheating. If you find
preheating is necessary, keep an
eye on the indicator light and put
food in the oven promptly after
light goes out.
The shelve(s) are designed with
stop-locks so that when placed
correctly on the shelf supports,
(a) will stop before coming com-
pletely from the oven, (b) will not
tilt when removing food nor when
placing food on them.
TO REMOVE shelve(s) from the
oven, lift up rear of shelf, pull for-
ward with stop-locks along top of
shelf supports.
Be certain that
shelf is cool before touching.
TO REPLACE shelve(s) in oven,
insert shelf with stop-locks rest-
ing on shelf supports. Push shelf
toward rear of oven; it will fall into
place. When shelf is in proper position, stop-locks on shelf will run
under shelf support when shelf is
pulled forward.
(On Models So Equipped)
The light comes on automatically
when the door is opened. (On
models with oven window) use
switch to turn light on and off
when door is closed.
Switch is located on front of door.
}
)
“. ;
,,.,
.’1 .
.
-..
(,
I
Page 14

to
keand Bake
When cooking a food for the first
time in your new oven, use time
given on recipes as a guide, Oven
thermostats,
years, may “drift” from the factory
setting and differences in timing
between an old and a new oven of
5 to ?0 minutes are not unusual
and you may be inclined to think
that the. new oven is not performing correctly. However, your
new oven has been set correctly at
the factory and is more apt to be
accurate than the oven it replaced.
Wep 1: Place food in oven, being
certain to leave about l-inch of
space between pans and walls of
oven for good circulation of heat.
Close oven door. During baking,
avoid frequent door openings to
prevent undesirable results.
Step 2: Turn OVEN SET Knob to
BAKE and OVEN TEMP Knob to
temperature on recipe or on Baking
Chart.
step 3: Check food for doneness
at minimum time on recipe. Cook
longer if necessary. Switch off
heat and remove foods.
The automatic oven timer controls
:3re designed to turn the oven on or
~2ffautornatica J1y at specific tirnes
Ihat you set. ExampIes of Imrmediate Start (even turns 017now and
over a period of
you set it to turn off automatically)
or Delay Start and Stop (setting
the oven to turn on automatically
at a later time and turn off at a
preset stop time) will be described.
NOTE: Before beginning make
sure the hands of the range clock
show the correct time of day.
Immediate Start is simply setting
oven to start baking now and
turning off at a later time automat-
ically. Remember, foods continue
cooking after controls are off.
$Hep1: TOset Stop Time, push in
knob on STOP dial and turn
pointer to time you want oven to
turn off, for example 6:00. The
Start Dial should be at the same
position as the time of day on
clock.
step 2:
TIME BAKE. Turn OVEN TEMP
Knob to oven temperature, for
example 250°
Delay Start and Stop is setting the
oven timer to turn the oven on and
off automatically at a later time
than the present time of day.
‘On Models Equipped with TIME BAKE.
Turn OVEN SET Knob to
Step 1: To set start time, push in
knob on START dial and turn
pointer to time you want oven to
turn on, for example 3:30.
Step 2:
knob on STOP dial and turn
pointer to time you want oven to
turn off, for example 6:00. This
means your recipe called for two
and one-half hours of baking time.
NOTE: Time on Stop Dial must be
later than time shown on range
clock and Start Dial.
Step 3: Turn OVEN SET Knob to
TIME BAKE. Turn OVEN TEMF’
Knob to 250° or recommended
temperature.
Place food in oven, close the door
and automatically the oven will be
turned on and off at the times you
have set. Turn OVEN SET to OFF
and remove food from oven.
OVEN INDICATOR LIGHT(s) at
TIM E BAKE setting may work
differently than they do at BAKE
setting. Carefully recheck the steps
given above. If all operations are
done as explained, oven will operate as it should.
TO set Stop Time, push in
,..---->,
(-)
Page 15

bioasti;g temperatures, which should be low and
-. . .
...... .....—...-...-—.—...—-..—.-..—
———.....—-—-——.—.-————————-—
steady, keep spattering to a minimum. When
roasting, it is not necessaryto sear, baste, cover, or
add water to your meat.
—===
Step 1: Check weight of meat, and
place, fat side up, on roasting rack
in a shallow pan. (Broiler pan with
rack is a good pan for this.) Line
Step 3: Turn OVEN SET to BAKE
and OVEN TEMP to 325°. Small
poultry may be cooked at 375° for
best browning.
broiler pan with aluminum foil
when using pan for marinating,
cooking with fruits, cooking heavily
cured meats, or for basting food
during cooking. Avoid spilling
these materials on oven liner or
door.
Step 2: Place in oven on shelf in A
or E3position. No preheating is
necessary.
Step 4: Most meats continue to
cook slightly while standing after
being removed from the oven. For
rare or medium internal doneness,
if meat is to stand 10-20 minutes
while making gravy or for easier
carving, you may wish to remove
meat from oven when internal
(Youmay hear a slight clicking noise to indicate the
oven is working properly. ) Roasting is easy, just
follow these steps:
temperature is 5-10°F below temperature suggested on chart. If no
standing is planned, cook meat to
suggested temperature on chart
on page 23.
NOTE: You may wish to use TIME
BAKE as described on preceding
page to turn oven on and off
automatically.
FCN”
Frozen roasts of beef, pork,
lamb, etc., can bestartedwithout
thawing, but allow 10-25 minutes per pound additional time
(10 min. per pound for roasts
under 5 pounds, more time for
larger roasts).
Thaw most frozen poultry before
roasting to ensure even doneness. Some commercial frozen
poultry can be cooked success-
fully without thawing. Follow di-
rections given on packer’s label.
“>q p/. -----“f; p, p~ fi
.1,,
‘J~~ñÇ*-J+[,,$ ~r-; ~ ~ ,2
..> -
:.,.J .-= %.
.!. Is ii necessary to check fot-
.ioneness with a
and
t)7e2t thermorneler?
- Checking the finished internal*G.
temperature at the completion of
cooking time is recommended.
Temperatures are shown on Roasting Chart on page 23. For roasts
over 8 lb.s., cooked at 300° with
reduced time, check with ther-
mometer at half-hour interva Is
:~fter%of time has passed.
(3. bVhy is my roast crumbling
when I try to carve it?
A. Roasts are easier to slice if
allowed to cool 10 to 20 minutes
after removing from oven. Be sure
to cut across the grain of the meat.
:!- ~-~,I 17~pd tO pi-eheatmy oV12n
i>[i[;I-1
/:)011
A. It
tI[II(2 I cook a roast or
!~i}’‘)
is rarely necessary to preheat
your oven, only for- very smal I
roasts, which cook a short length
of time.
15
Q. When buying a roast are there
any special tips that wou Id help
me cook it more evenIy?
A. Yes. Buy a roast as even in
thickness as possible, or buy
rolled roasts.
Q. Can I seal the sides of my
when roasting a turkey’?
“tent”
foil
A. Sealing the foil will steam the
meat. Leaving it unsealed allows
the air to circulate and brown the
meat.
1,
r
,
Page 16

Broilinq is cooking food by intense
radiant heat from the upper unit in
the oven. Most fish and tender cuts
of meat can be broiled. Follow
these steps to keep spattering and
smoking to a Iminimum.
:;:e ~> $ .
nea’r edge,
If meat has fat or gristle
cut vertical slashes
through both about 2-in. apart. If
desired fat may betrimmed, leaving
layer about
‘/8-in. thick
Step z: place meat on broiler rack
in broiler pan which comes with
range. Always use rack so fat drips
into broiler pan; otherwise juices
may become hot enough to catch
fire. Aluminum foil may be used to
line broiler pan and rack. But, be
CERTAIN to cut opening in foil, to
correspond with slots in the rack
so fat drips into pan below.
=.&~,.>t.,.I..,..=L-. --==,,. =-=,.-= T.. =.LY=*-... -. -=’-=---==
k-r=-r.. -.,-.
.::” \/?//-/y ~/-lcJ(]/(’jI Ieav(: the door
closed w17en broiling chicken?
A. Chicken is the only food
recommended for closed-door
broiling. This is because chicken
is relatively thicker than other
foodsyou broil. Closed door holds
more heat in oven, so chicken may
be broiled but well-done inside.
.-. \~\~llL:
~{‘\’,’]y:; [,
J?- yes, (Jsi ng the rack
iI hro 1IIr)<], I5 It rlcccss~{ry 10
,+~) ,: I‘]~:j., / [11/-)(. /- C.I,
, ,,~;-)
suspends
the meat over the pan. As the meat
cooks, the juices fall into the pan
thljS keeping meal dryer. Juices
are protected by the rack and stay
cooler, ii] us preventing excessive
spatter and smoking.
Step 3: Position shelf on recommended shelf position as sug-
gested on Broiling Chart on page
24. Most broiling is done on C
position, but if your range is con-nected to 208 volts, you may wish
to use higher position.
Step 4: Leave door ajar about
inches. The door stays open by
itself, yet the proper temperature
is maintained in the oven.
Step .5:Turn OVEN SET Knob and
OVEN TEMP Knob to BROIL. Preheating units is not necessary. (See
notes on Broiling Chart page 24.)
-.--—-..., ------
.=. . .
-“-.-.....-===——--—
Q. Should I salt the meat before
broiIing?
A. No. Salt draws out the juices
and allows them to evaporate.
Always salt after. cooking. Turn
meat with tongs; piercing meat
with a fork also allows juices to
escape. When broiling poultry or
fish, brush each side often with
butter.
~;;.~!~lhy~re my n“ieats not turning
L3ui QS brown as t/7e)’shouId?
A. In some areas, the power (voltage) to the range may be low. In
these cases, preheat the broil unit
for 10 minutes before placing
broiler pan with food in oven.
Cheek to see if you are using the
recommended shelf position. Broil
for the longest period of time indicated in the Broil Chart in this
book. Turn food only once during
broiling.
Step 6: Turn food only once during
co~king. Time foods- for first side
as on Broiling Chart page 24. Turn
food, then usetimes given for second side as a guide to preferred
doneness. (Where two thicknesses
3
and times are given together, use
first times given for thinnest food.)
Step 7: Turn OVEN SET Knob to
OFF. Servefood immediately, leave
pan outside oven to cool during
meal for easiest cleaning.
.
- -. --- -,
..—-—..-...~” —-.--m..-Qa
Q. Do I need to grease my broiler
rack
to pt-eventmeat from stick irig’?
A. No. The broiler rack is designed
to reflect broiler heat thus keeping
the surface cool enough to prevent
meat sticking to the surface.
16
Page 17

6i3$(hen Vent !DL4ct
~
~
~
~
=
,
:
:
~
~
—-—-..—......,..-..-.=—
—..—...-—————..—..--—
Qj ~a~~~d@Surface
@ Oven Lamp
Unit
The porcelain enamel finish is
sturdy but breakable if misused.
This finish is acid resistant. However, any acid foods spilled (such
as fruit juices, tomato, or vinegar)
should not be permitted to remain
on the finish.
(m BE)and Rs nlcdels)
The area under the range of
models equipped with a bottom
drawer can be reached easily for
cleaning by removing the bottom
drawer. To remove, pull drawer out
all the way, tilt up the front and
remove it. To replace, insert glides
at back of drawer beyond stop on
range glides. Lift drawer if necessary to insert easily. Let front of
drawer down,
close.
Your Range is vented through a
duct located under the right rear
surface unit. Clean the duct often.
then push in to
To remove:
e Make sure unit is
Lift up right rear surface unit.
I@
~ Remove reflector pan and ring.
~ Lift out oven vent duct.
To replace:
Q Place the part over the oven vent
located below the cooktop with
opening of the duct under the
round opening in the reflector
pan. It is important that the duct
is in the correct positiorl so moisture and vapors from the oven
can bereleased during oven use.
NOTE: Never cover the hole in
the ovenventduct with aluminum
foil or any other material. This
prevents the oven vent from
working properly during any
cooking cycle.
Stay-Up surface units can be lifted
upward and locked in that position
for cleaning under unit. Be certain
unit is coo! before lifting coil up.
After lifting coil unit, remove trim
ring and reflector pan to clean
under unit. Clean pan and trim
ring as recommended on Cleaning
Chart on page 19.
COOI.
@ Replace reflector pan into recess
in cooktop.
Q put trim ring in place over
reflector pan.
@Guide the surface unit into place
so it fits evenly into trim ring. Pan
mustbe under trim ring
((NI Models so
Clean the area under the reflector ~ ‘-;
pans often. Built-up soil, especially ! ‘I ~
grease, may catch fire. To make i :.--~’
cleaning easier, the plug-in surface !,:,,:.,
units are removable.
To clean:
Wipearoundthe edges of the
o
surface unit opening in the ,
range top. Clean the area below
the unit. Rinse all washed areas :
with a damp cloth or sponge.
Caution: Be sure all controls are
turned OFF before attempting to
clean under the cooktop or removing the Calrod@ units.
1.
.,.,,
~ :;!
~.,.
t
,
f,
Page 18

To remove:
———.—.—... .
.——.--.....-
——.-.--.—
..-—
.
@Raise the unit coil opposite the
receptacle. Lift about one inch
abovethe trim ring andpull away
from the receptacle. Caution: Be
sure the coils are cool before
removing a Calrod@unit.
@After removing the plug-in sur-
face unit, lift the chrome-plated
reflector pan/ring to clean under
the unit.
To replace:
~ Place the chrome-plated reflec-
tor pan and ring in the surface
unit cavity found on top of the
range. Line up the reflector pan
so the unit receptacle can be
seen.
@ Insert the terminals of the plug-
in unit through the opening in
the chrome-plated pan and ring
and into the receptacle.
@Guide the surface unit into place
so it fits evenly and fits snugly
into reflector pan.
e
Do not attempt to clean plug-in
surface units in an automatic
dishwasher.
63
Do not immerse plug-in surface
units in liquids of any kind.
63
Do not bend the plug-in surface
unit plug term inals.
@
Do not attempt to clean, adjust
or in any way”repair the plug-in
receptacle.
(On models so equipped.)
CAUTION: Before replacing your
oven bulb, disconnect the electrical power for your range at the
main fuse or circuit breaker panel
or pull plug. Be sure to let the lamp
cover and bulb cool completely
before removing or replacing.
shaped wire. Removeoven door, if
desired, to reach cover easily.
f. TO REMOVE, hold hand under
cover so it doesn’t fall when
released. With fingers of same
hand, firmly push down wire bail
until it clears cover. Lift off cover.
DO NOT REMOVE ANY SCREWS
TO REMOVE THIS TYPE OF
COVER.
Use time give; on recipe when
cooking first time. Oven thermostats,,in time, may “drift” from the
factory setting and differences in
timing between an old and a new
oven of 5 to 10 minutes are not
unusual. Your oven has been set
correctly at the factory and is more
apt to be accurate than the oven
which it replaced. However, if you
find that your foods consistently
brown too little or too much, you
may make a simple adjustment in
the thermostat {Oven Temp) knob.
PULL KNOB OFF OFSHAFT,LOOK
AT BACK OF KNOB AND NOTE
CURRENT SETTING, BEFORE
MAKING ANY ADJUSTMENT.
To increase temperature, turn
toward HI or RAISE; to decrease
turn toward LO or LOWER. Each
notch changes temperature 10 degrees. Temperature can be raised
by 20 degrees or lowered by 30
2. Replacelamp with 40-watt home
appliance bulb.
3. TO REPLACE cover, place it
into groove oi lamp receptacle. Lift
wire bait up to center of cover until
it snaps into place. When in place,
wire holds cover firmly, but becertain wire bail is not below depression in center of cover.
4. Connect electric power to range.
and lift up end of pointer slightly.
2. After adjustment is made, press
monitor firmly against knob. Return
knob to range, matching flat area
on knob and shaft. Recheck oven
Performance before making an
additional adjustment.
Other Models
1, Pull off knob, loosen both screws
on back of knob holding skirt of
knob firmly. 2. Turn black handle
to move pointer one notch in
desired direction. Tighten screws.
3. Return knob to range, matching
flat area of knob to shaft. Recheck
oven performance before making
an additional adjustment.
~~(pj
~’]~(gjyj~ ~~[~?
[g)~y~+$~]~fJ@~$
.
The oven lamp (bulb) IS covered
17 G CJI~SS, removable cover
wit
C17is held i n place with a bail-
1.v17i
1. Remove knob, and hold so
pointer is at top of knob. Hold
“skirt” of knob firmly in one hand.
With other hand, turn knob to move
pointet” toward Raise or Lower.
Pointer is designed not to move
easily. If it is seated so it is difficult
to move, pointer may be loosened
slightly. Insert a thin screwdriver,
knife blade or sinl ilar irlstrument
To REMOVE door, open to BROIL
POSITION: where you feel hinge
catch slightly. Place hands under
each end of door handle; lift door
up and away from hinges.
To REPLACE, place hands under
each end of door handle, or on
sides of door. Resting door against
knee, line up door with hinges and
slip into p!ace.
---
———---
-—-
Page 19

o
Soap andWater
osOap-Fill~d
Scouring Pad
~PlasticScouringPad
eMildSoapandWater
GmmE4r’s$
Do not clean the bake unit or broil unit. Any soil will burn off
when the unit is heated. NOTE:The bake unit is hinged and can
be lifted gently to clean the oven floor. If sp!llover, residue, or ash
accumulates around the bake unit, gently wipe around the unit
with warm water.
Drain fat, cool pan and rack slightly. (Do not let soiled pan and
rack stand in oven to cool). Sprinkle on detergent. Fill the pan
with warm water and spread cloth or paper towel over the rack.
Let pan and rack stand for a few minutes. Wash; scour if necessary. Rinse and dry. OPTION: The,broiler pan and rack may also
be cleaned in a dishwasher.
Pull off knobs. Wash gently but do not soak. Dry and return controls to range making sure to match flat area on the knob and
shaft.
Metal,including Brushed
ChromeandCooktop
PorcelainEnamel’
painted Surfaces
,
‘ -- -..--- . - >::
- .,L
.
—...
‘spillage of
marinades, fruit juices,
t>e~~ipedup immediately,
~ Soap and Water
~ Soap and Water
~ Paper Towel
~ Dry Cloth
e Soap and
@Soap and Water
e Soap and Water
e Soap and Water
@Soap and Water
e Soap and Water
@Stiff-Bristled Brush
@Soap-Filled Scouring Pad
(Non Metallic)
o Soap and Water
QSoap and Water
——
o Soap-Filled
— ---
Scouring Pad
and basting materials containing acids may cause
Water
Wash all glass with cloth dampened in soapy water. Rinse and
polish with a dry cloth. If knobs are removed, do not iet water run
down inside surface of glass.
Wash, rinse then polish with dry cloth. DO NOT USE steel wool,
abrasives, ammonia, acids or commercial oven cleaners which
may damage finish.
Avoid cleaning powders or harsh abrasives which may scratch the
enamel.
If acids should spill on the range while it is hot, use a dry paper
towel or cloth to wipe up right away. When the surface has
cooled, wash and rinse.
For other spills, such asfat smatterings, etc., wash with soaP and
water when cooled and then rinse. Polish with a dry cloth.
Use a mild solution of soap and water. Do not use any harsh
abrasives or cleaning powders which may scratch or mar
surface.
To clean oven door: remove by opening to i3ROlL position and
grasping door at sides. Lift door up and away from hinges.
with soap and water. Replace by grasping dcor at sides and lining
up door with hinges. Push door firmly into place.
Cool before cleaning. Frequent wiping with mild soap and water
will prolong the time between major cleanings. Be sure to rinse
thoroughly.
Remove the Oven Vent Duct found under the right rear surface
unit. Wash in hot, soapy water and dry and replace.
Clean as described below or in the dishwasher.
Wipe all rings after each cooking so unnoticed spatter will not
“burn on” next time YOUcook. TOremove “burned-on” sPatters
use any or all cleaning materials mentioned. Rub /ighf/y with
scouring pad to prevent scratching of the surface.
Your shelves can be cleaned by hand using any and all mentioned
materials. Rinse thoroughly to remove all materials after cleaning.
Spatters and spills burn away when the coils are heated. At the
end of a meal, remove all utensils from the Calrod@ unit and heat
the soiled units at H1.Let the soil burn off about a minute and
switch the units to OFF. Avoid getting cleaning materials on the
coils. Wipe off any cleaning materials with a damp paper towel
before heating the Calrod@unit. DO NOT handle the unit before
completely cooled.
For cleaning, remove drawer by pulling it all the way open, tilt up
the front and lift out. Wipe with damp cloth or sponge and
replace. Never use harsh abrasives or scouring pads.
Remove pans frequently and rub lightly with scouring ball or
wash in dishwasher.
discoloration. spillo~ers sho~ld
with care being taken to not touch any hot portion of the oven. Whenthe surface is cool,
Clean
—
Page 20

1. Use medium or heavy-weight cooking containers. Aluminum containers generally conduct
heat faster than other metals, Cast iron and coated
cast iron containers are slow to absorb heat, but
generally cook evenly at LOW or MEDIUM settings,
Steel pans may cook unevenly if not combined with
other metals. Use non-stick coated or coated metal
containers. Flat ground pyroceram saucepans or
skillets coated orIthe bottom with aluminum generally cook evenly. Glass saucepans should b; used
with the heat-spreading trivets available for that
purpose.
2. TCIconserve the most cooking energy, pans
should be flat on the bottom, have straight sides
and tight fitting lids. Match the size of the saucepan
to the size of the surface unit. A pan that extends
Food
G6W3EIE
Cornmeal, grits,
oatmeal
Fried sunny-side-up
Fried over easy
Poached
Scrambled or omelets !
f
~
[
f
I
Braised: Pot roasts of ! Skillet
beef, lamb or veal; ::
pork steaks and :,
chops
Pan-fried: Tender ‘
chops; thin stedks up ‘
to 3/,-in , mirrute
steaks: ham burgers;
franks; and sausage:
thin fish fillets,
!“
Uncovered
Skillet
Container
Covered
Saucepan
Uncovered
Saucepan
Percolator
Covered
Saucepan
Covered
Skillet
Uncovered
Skillet
2overed
SkIIlet
Jncovered
~killet
~overed
;aucepan
WrrediemsIwTIdsetting
toSfmwtiG3’aking
Hi. In covered pan bring
water to boil before adding
cereal.
H1.Stir together water or
milk, cocoa ingredients.
Bring just to a boil.
Hi. At first perk, switch
heat to LOW.
HI, Cover eggs with cool
water. Cover pan, cook
until steam ing.
MED H1. Melt butter, add
eggs and cover skillet.
Hi. Melt butter.
Hi. In covered pan bring
water to a boil.
H1.t-{eat butter until light
golden In color.
-il. In covered pan bring
‘ruit and water to boil.
)
.—
‘overed <1.Meit fat then add meat.
;witch to MED HI to
rown meat. Add water or
:,
other Iiqu id.
.,
,,
:1,
‘, HI. Preheat skillet, then
grease lightly.
,!
Setting to CXm@ete
cooking comments
LOW or Wlvf,then add
cereal. Finish timing
according to package
directions.
MED. to cook 1 or 2 min.
to completely blend
ingredients.
LOW to maintain gentle
but steady perk.
LOW. Cook only 3 to 4
min. for soft cooked; 15
min. for hard cooked.
Continue cooking at MED
HI until whites are just set,
about 3 to 5 min.
LOW, then add eggs.
When bottoms of eggs
have just set, carefully
turn over to cook other
side.
LOW. Carefully add eggs.
Cook uncovered about 5
min. at MED H1.
MED. Add egg mixture.
Cook, stirring to desired
doneness.
LOW. Stir occasionally
and check for sticking.
.
I-OW.Simmer until fork
tender.
MED HI or MED. Brown
and cook to desired
doneness, turning over as
needed,
Cereals bubble and expand as
they cook; use large enough
saucepan to prevent boilover.
Milk boils over rapidly. Watch
as boiling point approaches.
Percolate 8 to 10 min. for 8
cups, less for fewer cups.
If you do not cover skillet,
baste eggs with fat to cook
tops evenly.
Remove cooked eggs with
slotted spoon or pancake
turner.
Eggs continue to set slightly
after cooking. For omelet do
not stir last few minutes.
When set fold in half.
Fresh fruit: Use %to %cup
water per pound of fruit.
Dried fruit: Use water as
package directs. Time
depends on whether fruit has
been presoaked. If not, allow
more cooking time.
Meat can be seasoned and
floured before it is browned, If
desired.
Liquid variations for flavor
could be wine, fruit or tomato
juice or meat broth.
Timing: Steaks 1 to 2-in.: 1to
2 hrs. Beef Stew: 2 to 3 hrs.
Pot roast: 21/2to 4 hrs.
Pan frying is best for thin
steaks and chops. If rare is
desired, preheat skillet before
adding meat.
20
Page 21

-.,, >-..
.U
. . .
.:
,,,, . .. . . . ,
f
;
-.
,+
2
.,
1
-$-+
.1,<=nkcracks) on the porcelain and discoloration ranging
j’)~1, ..:~~ ,; ~i
. :
more than one inch beyond the edge of the trim ring
traps heat which causes “era.zing” (fine hairline
‘,. ,..> ,~.,
.
1+!22’
~$$$~$from blue to dark gray onthet,irn rings.
--,
; $%$: that may sPill oier-when adding food. Frosty foods
.2
b,.
z Deep Fat Frying. Do not overfill kettle with fat
,-;-”i..
bub~le vigorously. Watch foods ‘frying at HIGH
Gs
temperatures and keep range and hood clean from
accumulated grease.
WRONG
7>---
‘gGHT m .C,RI.
$%(MJ
Fried Chicken
C%3ratslilner
Covered
Skillet
Pan broiled bacon Uncovered
Skillet
Sauteed: Lesstender
thin steaks {chuck,
round, etc.); liver;
Covered
Skillet
thick or whole fish
Simmered or stewed
meat; chicken; corned
beef; smoked pork;
stewing beef; tongue;
etc.
M!2!~tng c flc$%-+aa.-~
i.wt”zerp
~~:~~“f$53~aa~g;GL“.:’$;
-’-8-+0
Covered
Dutch Oven,
Kettle or
Large
Saucepan
Small
%vered
;aucepan.
Jse small
;Urface unit
;k iIlet or
;riddle
Fsls%a
Noodles or spaghetti
levered
.arge Kettle
Ir Pot
I
.
,
ressure
;ooker or
;anner
Jncovered ~
~aucepan
;overed ;
;aucepan !;
Frozen
;overed
aucepan L
:,
!
Sauteed. OnIons; :” Uncovered
green PePPers: mush-
:ooms; celery, etc.
.~:-.., - ..-,
!. . !!. . . !\..
\-..,.:,.{.
Sklllet
Covered
~Saucepan
-——--——.-,- __...__—-—-
E$arecticms tmd aiming
to stawfi&6dcifwg
Ht. Melt fat. Switch to MED
HI to brown chicken.
HI. In cold skillet arrange
bacon slices. Cook just
until starting to sizzle.
HI, Melt fat. Switch to MED
to brown slowly.
Hi. Cover meat with water
and cover pan or kettle.
Cook until steaming.
WM. Allow 10 to 15min. tc
melt through. Stir to
smooth.
MED HI. Heat skillet 8 to
10 min. Grease lightly.
)
H1.In covered kettle, bring
I
salted water to a boil,
/
uncover and add pasta
;lGwly so boiling does not
\
stop.
1
+1.Heat until first jiggle is
[
?
Ieard.
~
il. Bring just to boil.
,
1
-_--.+ii. Measure %to l-in.
later In saucepan. Add
;; salt and prepared vege~~ table. In covered saucepan
“: bring to boll.
; H1.Measure water and salt
as above. Add frozen block
of vegetable. In covered
saucepan bring to boli.
H1.in sktllet melt fat.
-—.
Hi. Bring salted water to a
~~dboll.
.
LOW. Cover skillet and
cook until tender.
Uncover last few minutes.
MED HI, Cook, turning
over as needed.
LOW. Cover and cook
until tender.
LOW. Cook until fork
tender. (Water should
slowly boil). For very large
loads medium heat may
be needed.
Cook 2 to 3 min. per side.
MED H1.Cook uncovered
until tender. For large
amounts HI may be
needed to keep water at
rolling boil throughout
mti re cooking time.
ulEDHI for foods cooking
10min. or less. MED for
oods over 10 min.
.OW. To finish cooking.
JED. Cook I-ib. 10 to 30
nore min., depending on
enderness of vegetabie.
.OW. Cook according to
Ime on package.
AED.Add vegetable.
;ook until desired tendernessISreached.
VM. Cover and cook
ccordlng to time.
For crisp dry chicken, cover
only after switching to LOW
for 10 min. Uncover and cook
turning occasionally 10 to 20
min.
A more attention-free method
is to start and cook at MED.
Meat may be breaded or marinated in sauce before frying.
Add salt or other seasoning
before cooking if meat has not
been smoked or otherwise
cured.
When melting marshmallows,
add milk or water.
Thick batter takes slightly
longer time. Turn over pancakes when bubbles rise to
surface.
Use large enough kettle to
prevent boilover. Pasta dou-
bles in size when cooked.
Cooker should jiggle 2 to 3
times per minute.
Stir frequently to prevent
sticking.
Uncovered pan requires more
water and longer time.
Break up or stir as needed
while cooking.
Turn over or stir vegetable as
necessary for even brown Ing.
Triples in voiume after
cook!ng. Time at WM. Rice: 1
cup rice and 2 cups water—25
reins. Grits: 1 cup grits and 4
cups water—40 min.
Page 22

f =Alumintim pans generally conduct heat quickly. For most
conventional baking light shiny finishes generally give best
results because they help prevent overbrowning in the time it
takes for heat to cook the center areas. Dull (satin-finish) bottom
surfaces of pans are recommended for cake pans and pie plates
to help those areas brown completely,
22.Dark or non-shiny finishes, also glass and pyroceram, gener-
ally absorb heat which may result in dry, crisp crusts. Reduce
Smwad
Biscuits (kin. thick)
Coffee cake
Shiny Cookie Sheet
Shiny Metal Pan with
Satin-finish bottom
Corn bread or muffins
Gingerbread
Cast Iron or Glass
Shiny Metal Pan with
Satin-finish bottom
Muffins
Popovers
Quick Loaf Bread
Yeastbread (2 loaves)
Plain rolls
Sweet rolls
Shiny Metal Muffin Pans
Deep Glass or Cast Iron Cup:
Metal or Glass Loaf Pans
Metal or Glass Loaf panS
Shiny Oblong or Muffin Pans
Shiny Oblong of Muffin Pans
~~ ~{@~
(without shortening)
Angel food
roll
Jelly
Sponge
‘41uminumTube Pan
VletalJelly Roll Pan
vletal or Ceramic Pan
shelf
Position
B, C
B, A
B
B
A, B
B
B
A, B
A, B
B, A
A
B
A
oven heat 25° if lighter crusts are desired. Preheat cast iron for
baking some foods for rapid browning when food is added.
3. Preheating the oven is not always necessary, especially for
foods which cook longer than 30 or 40 minutes. For food with
short cooking times, preheating gives best appearance and
crispness.
4. Open the oven door to check food as little as possible to
prevent uneven heating and to save energy.
oven
Temp.
400°-4750
——
Time,
Min. commentsFumd
15-20
Canned refrigerated biscuits take
2-4 min. less time.
350°-400°
400°-4500
350°
400°-4250
375°
20-30
20-40
45-55
20-30
45-60
Preheatcast iron pan for crisp crust.
Decrease about 5 min. for muffin
mix. Or bake at 450° for 25 min.,
then at 350° for 10-15 min.
350°-3750
375°-4250
45-60
45-60 Dark metal or glass give deepest
browning.
375°-4250
350°-3750
325°-3750
375°-4000
325°-3500
10-25
20-30
30-55
10-15
45-60
For thin rolls, Shelf B may be used.
For thin rolls, Shelf B may be used.
Two piece pan is convenient,
Line pan with waxed paper.
Aetai or Ceramic Pan
~hiny Metal Muffin Pans
Fruit cakes
Jetal or Glass Loaf or
‘ube Pan
Layer
;hiny Metal Pan with
;atIn-fi nish bottom
Layer, Chocolate
ihlny Metal Pan with
latln-fl nIsh bottom
Loaf
~Q@ ~: ;Q ~
Brown ies
Drop
Refrigerator
Rolled or sliced
Ietal or Glass Loaf Pans
letal or Glass Pans
ookie Sheet
ookle Sheet
ookle Sheet
lass or Metal
lass Custard Cups or
asserole (set In pan of
It water)
Puddings, Rice and
Custard
:. ,-
. ,.. ._>
Frozen
Meringue
one crust
Two crust
Pastry Shel I :! Glass or Satin-fln!sh Metal
.—— ___.-; .
..+. :,,
‘,;
,.$.,..!,,,z ;3:: :’?:2
Elaked potatoes
lass Custard Cups or
i
asseroie
k
1
!
f
“oil Pan on Cookie Sheet
#
~ ~Spread to crust edges
!:
,.
y Glass or Satin-flnlsh Metal
! ; Glass or Satin-flnlsh Metal
! Set on Oven Shelf
Scalloped dishes : ! Glass or Metal
f
~OLJ fft(2S
.. ----...
.—..—
Glass
,
A, B
B
A, B
B
B
B
B, C
B, C
3, c
3, c
4, B, C
3
3
4
3.A
i, B
1
3
B
325°-3500
350°-3750
275°-3000
350°-3750
350°-3750
350°
325°-3500
350°-4000
400°-4250
375°-400°
350°-4000
300°-3500
325°
$00°-4250
325°-3500
$00°-4250
!00°-4250
150°
125°-400”
j~5° -375°
100°-350°
45-65
20-25
Paper liners produce more moist
crusts.
2-4hrs.
Use 300° and Shelf B for small or
individual cakes.
20-35
25-30
40-60
25-35
10-20
Bar cookies from mix use same
time. Use Shelf C and Increase
temp. 25-50° for more browning.
6-12
7-12
30-60
30-60 Reduce temp. to 300° for large
custard. Cool< bread or rice pudding
with custard base 80 to 90 minutes,
50-90
45-70 Large pies use 400” and Increase
time.
15-25
To quickly brown meringue use
400” for 8-10 min.
45-60
40-60
Custard fillings require lower temp.,
longer time,
12-15
60-90
30-60
Increase time for large amount or
size,
30-75
22
—
Page 23

.“--
..=-,>J=7~L.
.~--=+..y.
‘n
.
&:$A=
%.Position oven shelf at B for small-size roasts (3 to 7 Ibs.) and
:g.~bw
at A for Iaraer roasts.
-
R..Place meat fat side uKIor DOUItrv breast-side uo on broiler
pan or other shallow pan’with’ trivet.’ Do not cover. bo not stuff
poultry until just before roasting. Use meat thermometer, for
more accurate doneness. (Do not place thermometer in
stuffing.) to25min.
3. Remove fat and drippings as necessary. Baste as desired.
~. ti$mn recommended for roasts is 10to 20 min. to
allow roast to firm up and make it easier to carve. It will rise
about 5° to 10° intern”altemperature; to compensate for temperature rise, if desired, remove roast from oven at 5° to 10° less
than temperature on chart.
g. ~rogen ~oas~s can be conventionally
roastedWadding1~
per pound more time than given in chart for refrigerated. (1O min. per lb. for roasts under 5-lbs.) Defrost poultry
before roasting.
Type
Me+at
Tendercuts. rib, high quality
sirloin tip, rump or top round*
Lamb Leg or bone-in shoulder*
Vealshoulder, leg or Ioln’
Pork loin, rib or shoulder”
Ham, pre-cooked
l-lam< raw
*For boneless rolled roasts over 6-in tl
Pwiwy
Chicken or Duck
Chicken pieces
Turkey
Owen
Temp.
325°
325°
325°
325°
325°
325°
,,add 5to 10 mll
325°
375°
325°
Doneness
Rare:
Medium:
Well Done:
Rare:
Medium:
Well Done:
Well Done:
Well Done:
ToWarm:
Well Done:
~erlb. to tlmr?sgw
Well Done:
Well Done:
Well Done:
ApproximateI%xmtirng Time,
in Minutes mer Pound
to!5.1B3S.
3
24-30
30-35
35-45
21-25
25-30
30-35
35-45
35-45
10reins.per lb. (
I(blbs.
UJnder
20-30
680 wbs.
18-22
22-25
28-33
20-23
24-28
28-33
30-40
30-40
( weight)
10 to 15-lbs.
17-20
above.
3 to 5=Bbs.
35-40
ova’ 54bs.
30-35
35-40
10to
20-25
15-NM.
over f 5dEwS.
15-20
!hmwma!
Temp. “F
130°-1400
1500-160°
170°-1850
30°-140°
500-160°
70°-1850
70°-1800
70°-1800
25°-1300
160°
185°-190°
185°-190°
thigh:
In
185°-190°
!
I
I
1
Page 24

5. Always use broiler pan and rack that comes with your oven. It
-------
is designed to minimize smoking and spattering by trapping
juices in the shielded lower part of the pan.
2. Oven door should be ajar for most foods; there is a special
position on door which holds door open correctly.
S. For steaks and chops, slash fat evenly around outside edges
of meat, To slash, cut crosswise through outer fat surface just to
the edge of the meat. Use tongs to turn meat over to prevent
piercing meat and loosing juices.
~3.If desired, marinate meats or chicken before broiling. Or,
brush with barbeque sauce last 5 to 10 minutes only.
$5.When arranging food on pan,do not let fatty edges hang over
sides, which could soil oven with dripping fat,
t%.Broiler does not need to be preheated. However, for very thin
foods or to increase browning, preheat if desired.
?. F%CWMM%SMM3ECScan be conventionally broiled by positioning the oven shelf at next lowest shelf position and increasing
cooking time given in this chart 1%times per side.
Q. If your range is connected to 208 Volts rare steaks may be
broiled by preheating the broil heater and positioning the oven
shelf one position higher.
fG6’i3umdExwf,
Well done
Ehhm-y PV’oducfls
Bread (Toast) or
Toaster Pastries
English Muffins ,
LX-JM%’Ft%iis
(6 to 8-oz. each) ~
Well Done
,.
,.,:-;:,;:;/~!<-;::~i~::;
Medium “
Well Done
Medium
—
“,+,-
., ;,-~[:-; c“::
precooked sausages,
bratwurst
and similar :~ l-lb. pkg. (1O) ~ C
shdff
Rx3ii%bra
klb. (about 8
thin slices
l-lb. (4 patties)
%to 3/d-in.thick
1 inch thick
1/2 Ibs.)
(l-1
c
c
c
c
1%-in. thick
(2-21/2Ibs.)
1whole
(2 to 2%-lbs.),
split lengthwise
2-4 slices
1pkg. (2)
2-split
I
t
2-4 B 13-16
[
r
l-lb. fillets %to
IZ-in.thick
-in. thick B
(% inch)
i
;]
(l-in. thick) \
..
~: about 1 lb. ~
i
~; 2 (1 inch)
‘‘ about 10-12 oz. ,
i.
1/2 inch) ~
!~ 2 (1
.,
,1
c
c
c
A
c
c
c 5
I
I
I
c
B
,
I
c
c
c
;,
First Skh
Times !iwln.
3%
7
7
9
13
10
15
25
35
1V2-2
3-4
8
10
13
8
10
10
17Well Done i{ about 1 lb. B
6
Seuxmdside
Time, R#irtl.
3%
4-5
7
9
13
7-8
14-16
20-25
10-15
‘/2
(Do not
turn
over)
5
8
10
13
4-7
Arrange in single layer.
Space evenly.
Up to 8 patties take about same
time.
Steaks less than l-in. cook through
before browning. Pan frying is
recommended.
Slash fat.
Reduce times about 5-10 min. per
side for cut-up chicken. Brush each
side with melted butter. Broil with
skin side down first and broil with
door closed.
Space evenly. Place English muffins
cut-side-up and brush with butter, if
desired.
Cut through back of shell. Spread
open. Brush with melted butter
before and after half time.
Handle and turn very carefully.
Brush with lemon butter before and
during cooking if desired. Preheat
broiler to increase browning.
Increase times 5-10 min. per side
fOr 1%-in. thick or home cured.
Slash fat.
Slash fat.
10
4-6
12-14
1-2 If desired, split sausages in half
lengthwise into 5 to 6-in. pieces.
(--”>
Page 25

—
..—
in surface cooking of foods other
than canning, the use of largediameter utensils (extending more
than l-inch beyond edge of trim
ring) is not recommended. However, when canning with water-
ba~h or pressure canner,
diameter utensils may be used.
This is because boiling water temperatures (even under pressure)
arenot harmful to cooktop surfaces
surrounding heating unit.
HOWEVER, DO NOT USE LARGE
DIAMETER CANNERS OROTHER
LARGE DIAMETER UTENSILS
FORFRYINGOR BOILING FOODS
OTHERTHAN WATER.Most syrup
or sauce mixtures—and all types
of frying—cook at temperatures
much higher than boiling water.
Such temperatures could even-
tually harm cooktop surfaces surroundirm heating units.
large-
?. Bring water to boil on HIGH
heat, then after boiling has begun,
adjust heat to lowest setting to
maintain boil (saves energy and
best usessurface unit.)
2. Be sure canner fits over center
of surface unit. If your model sur-
face section does not allow canner
to be centered on surface unit, use
smaller-diameter containers for
good canning results.
3. Flat-bottomed canners give best
canning results. Besure bottom of
canner is flat or slight indentation
fits snugly over surface unit. Canners with flanged or rippled bottoms (often found in enamel-ware)
are not recommended.
RIGHT
WRONG
m
4. When canning, userecipes from
reputable sources. Reliable recipes
areavailablefrom the manufacturer
of your canner; manufacturers of
glassjars for canning; such as Ball
Kerr; and, the United States
and
Department of Agriculture Exten-
Service.
sion
5. Remember, in following the
recipes, canning is a process that
generates large amounts of steam.
Be careful while canning to prevent burns from steam or heat.
NOTE: If your surface section is
being operated on low power (voltage), canning may take longer
than expected, even though directions have been carefully followed.
The process may be improved by:
(4) using a pressure canner, and
(2] for fastest heating of large
water quantities, begin with HOT
tap water.
25
,
Page 26

TheP
If you have a problem, it may be minor. You may be able to correct it yourself. Just use this Problem Solver to
locate your problem and then follow the suggested recommendations.
PROBLEM
POSSIBLE CAUSE AND REMEDY
—
OVEN WILL NOT WORK Plug on range is not completely inserted in the outlet receptacle.
The circuit breaker in your house has been tripped, or a fuse has
been blown.
Oven controls are not properly set.
OVEN LIGHT
DOES NOT WORK
FOOD DOES
BROIL PROPERLY
‘OOD DOES NOT ROAST
JR BAKE PROPERLY
:ALROD@SURFACE UNITS
NOT FUNCTIONING
PROPERLY
NOT
Light bulb is loose.
Bulb is defective. Replace.
Switch operating oven light is broken. Call for service.
OVEN SET Knob not set at BROIL.
OVEN TEMP Knob not set at BROIL.
Door not left ajar as recommended.
Improper
Necessary preheating was not done.
Food is being cooked on hot pan.
Utensils are not suited
OVEN SET
OVEN TEMP Knob not set correctly.
Shelf position is incorrect. Check Roasting or Baking Charts.
Oven shelf is not level.
Wrong cookware is being used. When roasting, pan is too small.
Surface units are not seated properly in pan trim rings.
Reflector rings/pans are not set securely in the range top.
Surface unit controls are not properly set.
shelf position is being used. Check Broiling Chart.
for broiling.
Knob not set on BAKE.
-.
Page 27

.@/&
&&@
-3
&j
&$4#~
:-*:=; product.
4:3C%$
Z*.
s~?:
9A
service.
Our Consumer Services are designed with your needs and wants in mind.
Yournewappliance
Beforeit left the factory,it wentthrough
is a well designed and engineered Seethe warranty on the back page of this book for
details.
rigoroustests to detectmanufacturingdefects.And
youhavea writtenwarrantyto protectyou.
,$;gg~.~..
%$~$
-m-L&+%
,,;.,—..s,
>+.+J;4:;:) m
&
‘<’%z::g’ &~
%-.
service
Whether your appliance is in or out of warranty,
+&~~:’
H
you’re just a phone call away from our nationwide
network of Factory TrainedService professionals.
Sirrmlv
call our Hotoointserviceorcmnization.
You;il~ind them in the White Page{ under “Hotpoint
Factory Service;’ and in the Yellow Pages under
“Hotpoint Customer Care@Service.”
Service is scheduled at your convenience and the
technician drives a fully%tocked parts service truck
so that, in most cases, the repair can be completed
in one visit.
We’re proud of our service and want you to be
pleased, but if for some reason you are not happy
with the service you receive, here are three steps to
follow for further help.
service
I%
trouble-freeserwicebeyond
the written warranty period.
. If you prefer to budget your repair expenditures “
instead of being surprised by them, Hotpoint
offers service contracts for varying lengths of .:.:~vi’ ‘;a’
time on all Hotpoint major appliances. ‘With a ~
atyour Ccmvenk?me
T’3
,,.,...I*:~ contract we’ll keep your appliance in good
~,m,.
F
FIRST,contactthe people who serviced your
appliance. Explain why you are not pleased. In most
cases, this will solve the problem.
NEXT,if you are still not rdeasedwrite all the details
—
including your phone number to:
Manager,Consumer Relations
Hotpoint
Amiiance Park
L&isville, Kentucky 40225
FINALLY,if your problem is still not resolved,write:
Major Appliance Consumer Action Panel
20 North ‘WackerDrive
Chicago, Illinois 60606
operating condition during the contract period
at no additional charge. Service contracts
let you pay today’s prices for service a
month, a year, or several years from now.
$$
And, you’ll receive service from Hotpoint
trained service technicians using oniy
Genuine Hotpoint parts.
,-,--~~=-:;1 ,---- ;,
k.
:] –’ -- ! ~
~t+L-
.—----
/e-
,’ ~
{
\
\-
---—..”
\
,,
..
The FixTMsysmwn
Youcansavemoney am! time
by doing it yourself.
For do-it-yourselfers who would prefer
to fix Hotpoint major appliances
themselves ...Eiotpoint offers an
industry first, the Quick FixTMSystem.
~~~~~far ‘fQ~j ~~
‘t
......
Should you need help in the selection and —=-~purchase of new appliances, or have
questions about the operation of the f-fotpoint ~“
appliances you now own—or have any other
questions about our consumer products
services you are only a TO!-L-FREEcall away.
or ~
.~
—---=i&==---
—========”=.=
—~
—~—
~f?~
—4,,.,.
“—’-.--—
-::~
The GEAnswerCen[#
....-....=7=.-.
A program for do-it-yourself appliance repair,
the system includes step-by-step repair
manua/s for refrigerators, most non-microwave
electric ranges, dishwashers, and standard
and large capacity washers and dryers, plus
specially packaged replacement parts, and
technical help with a toll free 800 numbefl
....._,-
‘:.—
.-
The GE Answer CenterT’M800.626.2000
consumer information service is open 24
hours a day, seven days a week.
staff of experts stands ready to assist
Our
‘ou anytime”
Page 28

-...-
.—
!,,—=-..=.
@J&k~<
- -’- - x .:.—..~
~Bi-.
Save proof of original purchase date suchasyour sales slip or cancelled check to establish warranty period.
~A~&~~~ ~~
FULL
l%i~ wi3rranty is extf3ncled tO t17e ‘=~~- ‘ing own~~ for ~r~ducts
~urchased -1-. -.
partd therangethat fails because ‘ashington~ ‘“CO‘n ‘Iaska ‘he
is LIMITEDbecauseyou must pay
to ship the product to the service
~h~p or for the servicetechnician’s ,:~
travelcosts to your home.
All warrantyservicewill be provided
our FactoryServiceCentersor ,s~~
by
byour authorizedCustomerCart?” \:~servicersduring normal working
hours.
Look in the White or YellowPages
of your telephone directory for
HOTPOINTFACTORYSERVICE,
GENERALELECTRIC-HOTPOINT ;;;=-
FACTORYSERVICEor HOTPOINT
CUSTOMERCARE@SERVICE.
11:z
--g -.
.-
iiz-f+’’”:--—
[g=:--
!!l=s-
1s-=
\~&-
.
!!::-
,..—
Im& ~
Ill- ‘-
,E-&----
11:=
jg~
p~~
Im:x
~@.--
;:,——
IEi-
!gq-
I!&n---
,,.“.
18zx?-–--jg&=-
ll~,a-. ,
ygw?Ew%’
l~:g–—.
II* ~
,“-––
~=r-—.-
.=
~~~~.l%”~~~ ~()~ @
%
..
,-
,. .
$i!$
‘w
.*
%
p
A&?
#
$4?s
F$s
%XJ
+3,’. J
6
~c a
;3 *
w
#&,q
>f&
&qJ
.-
Q&><
;;yi
$’:~~
,##j,
1
Some states do not allow the exclusion or limitation of incidental or consequential damages, so the above limitation or exclusion
may not apply to you. This warranty gives you specific legal rights, and you may also have other rights which vary from state to state.
To hnow what your legal rights are in your state, consult your local or state consumer affairs office or your state’s Attorney
serViC~tripstOYOUrhOrnetO
teach you how to use the product.
Read your Use and Care material.
If you then haveanyquestions
about operating the product,
please contact your dealeror our
ConsumerAffairs office at the
address below, or call, toll free:
The GE Answer CenterTM
800.626.2000
consumer information service
Improper installation.
0
@Replacementof housefuses
or resetting of circuit breakers.
~ Failure of the product if it is
used for other than its intended
purposeor used commercially.
@Damageto product caused
by accident, fire, floods or acts
of God.
WARRANTORIS NOTRESPON-
SIBLEFORCONSEQUENTIAL
DAMAGES.
If you havean installation problem,
contact your dealer or installer.
Youare responsible for providing
adequate electrical, gas, exhaust-
ing and other connecting facilities.
General.
General Electric Company
if fuE-&M2r
Im4pisneeded this mmtm:
iVlanagw—CQnsL5mwAffaks, General Electric Company,Appiiancx+Park,LCNJIiswi!le,KY MM%%
t$g
cly,..
A Lb-
&:?;
$$$:=
$$&”
~g:
(&J
@$<,
@;@
(“;)
-...
 Loading...