

Page 1
I~OWtO getthebest tiom
—
contents
7
AluminumFoil
Anti-TipDevice
A~~lianceRegistration
C&ningTips”
CareandCleaning 22–25 -~ermostatAdjustment
Clock/Timer
ConsumerServices
Energy-SavingTips
Features
InstallationInstructions
Leveling
Model&SerialNumberLocation2
Oven
Baking/BakingGuide
Broiling/EroilingGuide 19–21
ContinuousCleaning
DoorRemoval
Light;Replacement
14,23,24
19 *Preheating
3,27,29
2 ~Shelves
‘9
12 OvenVent
31
5-
6,7
27–29
29.’
12–21 Warranty
14--16
26
23
‘ Roasting/RoastingGuide
“ StorageDrawer
problemsolver
‘ Sdety Instructions
SurfaceCooking
ControlSettings
CookingGuide
CookwareTips
GEAnswerCenter@
800.626.2000
,,
13,16
17,18
14
~V~
23
’30”
‘2--4 ~
~-1~ . . .“~~~~~ ~~~e~s
-10,11
10,11 ,
BackCover
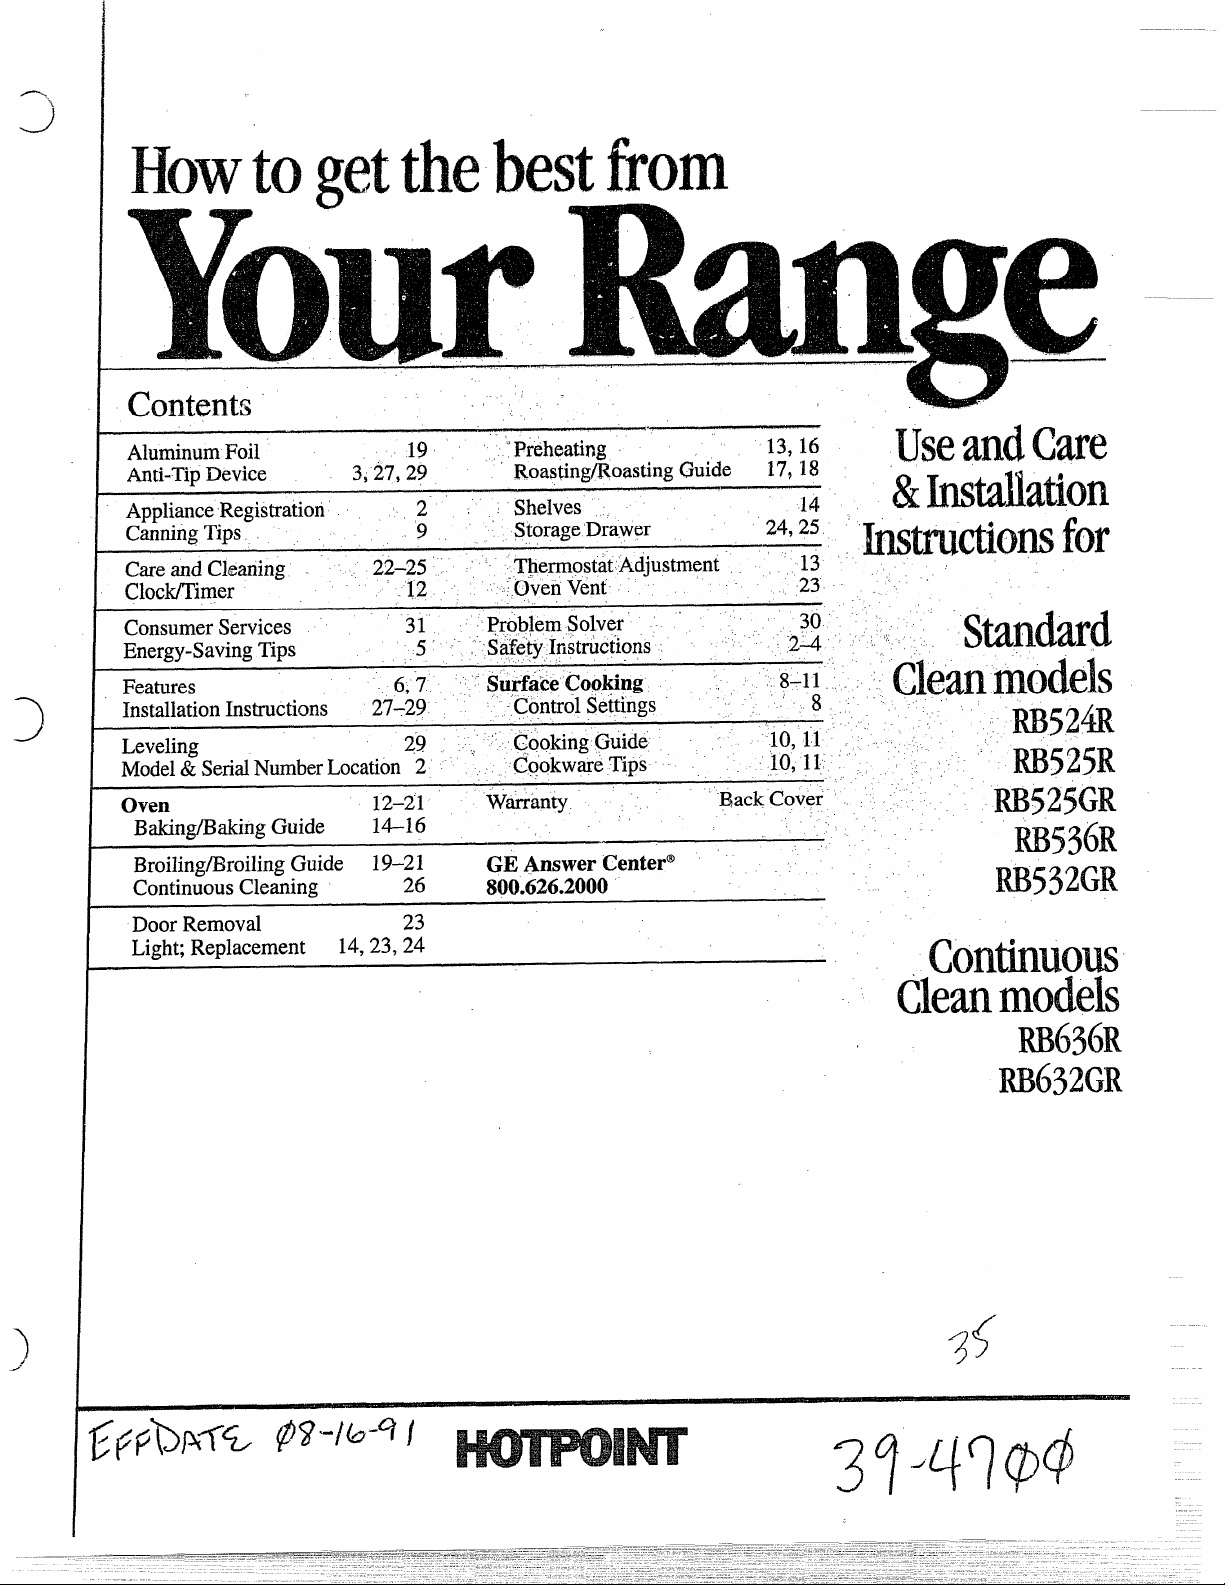
Useand Care
&MtiUation
btm~iowfor
Stindard
m52&
W525R
W525GR
W536R
R$5~2GR
Conmuou
.
I
Cleanmodels
Page 2
mLP usmLP YOU*.O
Writedownthemdel
Itis intendedtohelpyou
operateandmaintainyournew
rangeproperly,
Keepit handyforanswersto
yourquestions.
If youdon$tunderstmdsomething
orneqdmorehelp,write(include
yourphonenumber):
CotisumerAffairs
HotPoint
AppliancePark
Louisville,KY40225
.1
Toobtainservice,seethe
ConsumerServicespagein the
backof this book.
We’reproudof ourserviceand
wantyouto bepleased.If forsome
reasonyouare nothappywiththe
serviceyoureceive,herearethree
stepsto followfor furtherhelp.
You’llfindthemona label
behindtherangedoororbehind
thestoragedrawer.
Thesenumberswe alsoonthe
ConsumerProductOwnership
RegistrationCardthatcamewith
yOPrrange. Beforesendingin
this card,pleasewritethese
numbershere;
ModelNumber
SerialNumber
Usethese numbersinany
correspondenceorservicecalls
concerningyourrange.
FIRST,contactthepeoplewho ~
service~your appliance.Explain
whyyoutie notpleased.Inmost
cases,thiswillsolvetheprobleh.
NEXT,ifyouare stillnotpleased,
writeallthedetails
your phonenumber—to:
Manager,ConsumerRelations
Hotpoint
AppliancePark
Louisville,KY40225
—including
ChecktheProblemSolverinthe
backofthisbook,It listscausesof
~inor operatingproblemsthatyou
cflncorrectyourself.
F~ALL~, if yourproblemis still
notresolved,write:
MajorApplianceConsumer
ActionPanel
20NorthWackerDrive
Chicago,IL 60606
@
. .
instmctions. ~
.,.’,
., ‘.7
,1.. ~,
0Don’tattempttore;air-”brFepiace’any~’artof
rangeudes$it-is~pecficaliyrecommended
your
inthisbook.
toaqualifiedtechnician.
.
Allotherse~icingshouldbereferred
>.
.—
Page 3
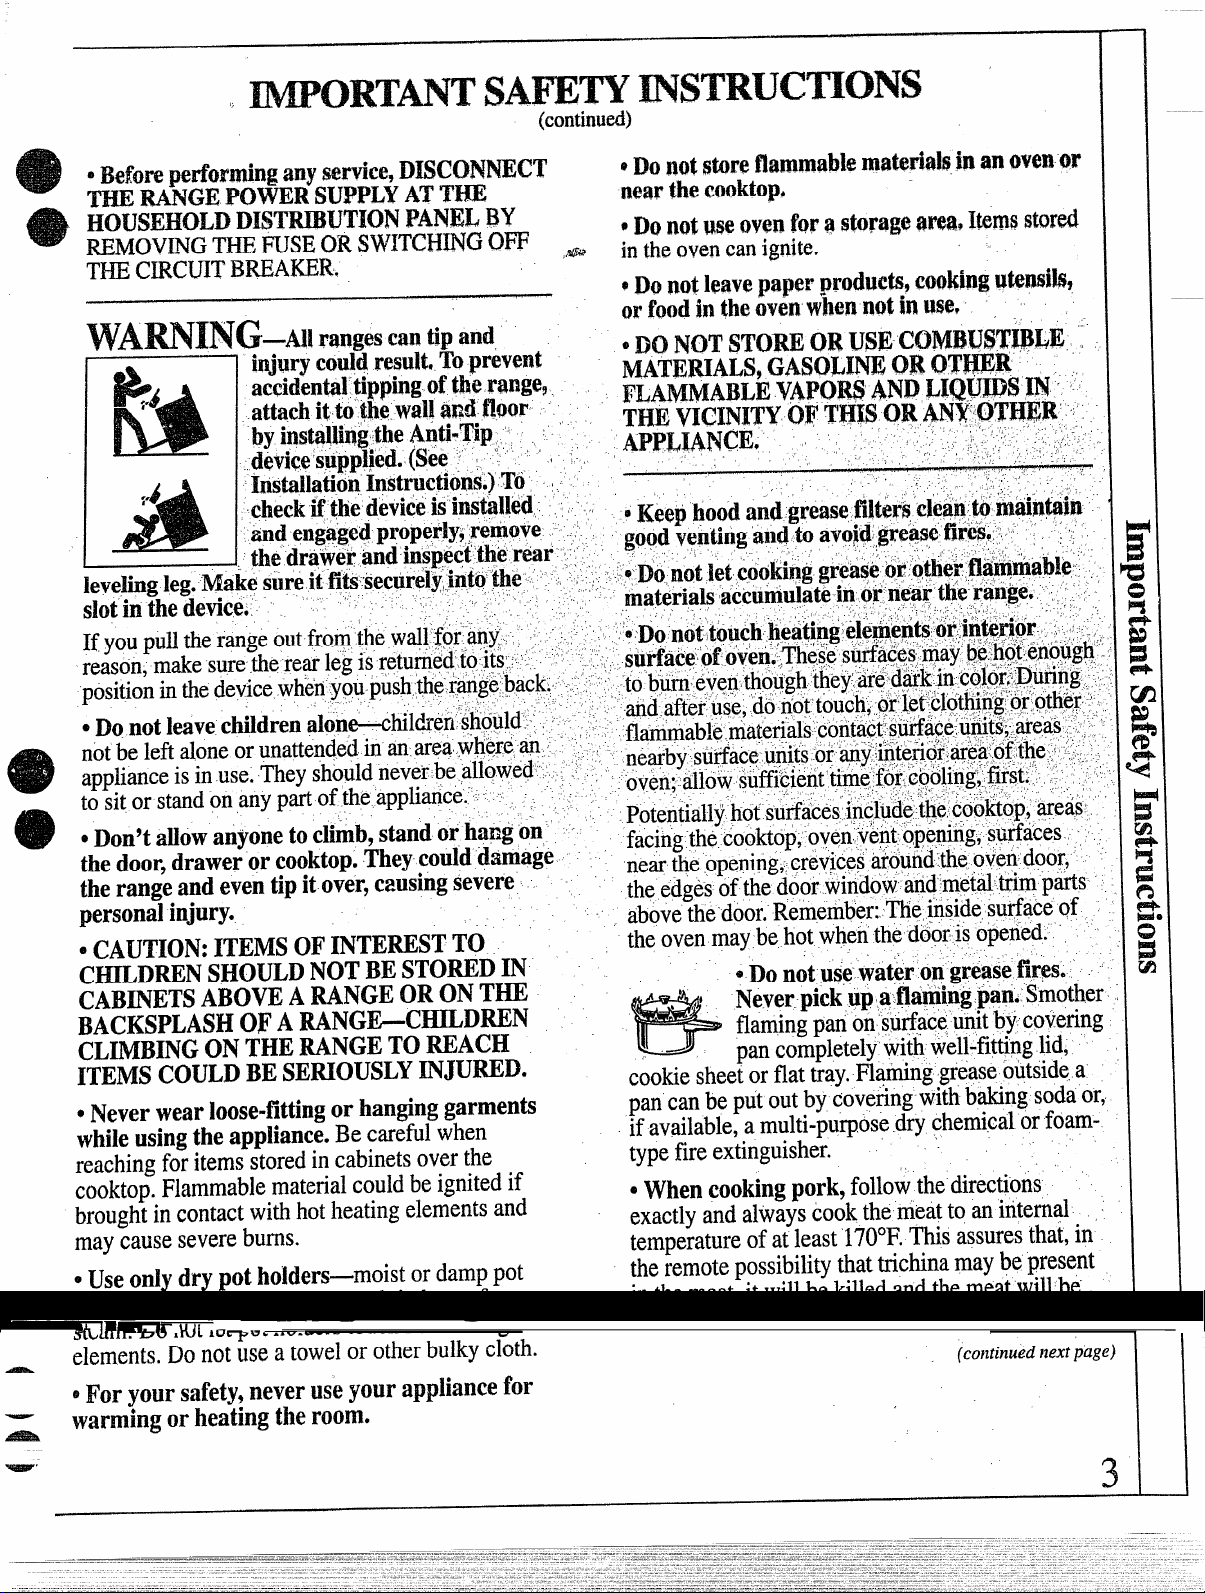
levelingleg.Ma
slotinthedevie
,,, ,- .,. .L
\utiacesinclud~the,Cooktop~‘areas-’
:op,ovenvent
Z,crevices’aroundthe ovendoor,
o,pening,sptiices, , ;
~
—
w’
personalinjury.
e c~~~~o~: 1~’~s OF INTEWSTTO
~bove”tiedoor.
theovenmaybehotwhetithedOOrisopene~~
CHILDRENSHOULDNOTBESTOWDIN
CAB~ETSABOVEARANGEORONTHE
BACKSPLASH
OFAMNG~c~D~N
CLIMBINGONTHERANGETOREACH
ITEMSCOULDBESE~OUSLY~JUWD.
. Never wear
Ioosemfittingor hanginggarments
whileusingtheappliance.Becarefulwhen
reachingforitemsstoredincabinetsoverthe
cookiesheet orflat tray.Flaming greaseoutsidea
pan can be put outby coveringwith baking sodaor,
ifavailable,a multi-pu~.osedrychemicalorfoamtypefireextinguisher. ~ ~~
cooktop.Flammablematerialcouldbeignitedif owhen
broughtincontactwithhotheatingelementsand
maycauseseverebums.
euse onlydry
pot holders—moistordamp pot
holdersonhotsurfacesmayresultinbumsfrom
steam.Donotletpotholderstouchhotheating
exactlyandalwayscookthemeattoan internal ~
temperatureofatleast“170”F.Thisassuresthat,in
theremotepossibilitythattrichinamaybepresent
inthemeat,itwillbekilledandthemeatwillbe
safetoeat.
elements.Donotuseatowelorotherbulkycloth.
~For your
warmingorheatingtheroom.
safety,neveruseyour appliancefor
~ernember:,The,~nsidesurface(?f
*Donotuse’watir
OMgreiSefireS.
Neverpickupafl~~n$~an.: Smother
flamingpanon’iurfaceunitbycovering
pancompletelywiti well-fittinglid,
~ookingpork,followthedirections
(co]t~inuednextpage,
3
Page 4
oven
,—
~S@~dawayfr~~ rang~whenopeningoven
door.Hotairorsteamtihicllescapescancause
bums to
~~~~’~heat ~~”QpQfiedfo~~
oven.Pressurecould
:oMl~burst9causing,aninjury.
‘~Keep
,,
,,, .~1..
e ~~j~e ov~~ s~~if ~~ ‘de~irid positionwhileoven~ ~
ii ~001.
letp”oihplder’:eon~qcth’etitin~tinitsintheov?n. ~”,, ~
‘
d-~fi~g j~t ‘L~~lf,tO$heShelfstop.i~a
‘ e,~hvenience
precautionagainstbyrns~rotitouc~inghot- ‘ ~
. surfacesofthedoor~rovenwalls.;., : . ~ - ,, ~ ,.
. When-
followthemanufacturer’sdirections;‘ ‘ ‘ ~
oDo not useyour OVen
overheated,theycancatch-fire.~ ~
h8nds9faceandlqr?yesq
co~t~inersin the
buildup andthecontainer
ovek?ek~tinob$$ructeda,
*K~@p
If’sh61v6sm-ustbe‘handled‘whenh~tt dOnot.
ov6nf:~d frofi ‘greasebuildup~, , -
, .,
-,. .‘
.,>.
.,...”-
,<
!-
,,
. .
. .,,’
inliftifig~eavjfoo~s.Itiialso a’ .‘ ‘ ‘
using co~kirng’orroasting”bagsinoven9 .
,“
,,
,,
to drynewspa~ers~If’ . ~
.,
,,
,.
cOnly certaintypesofgitiss~glasslceramic$
earthenwareoroth~rglazedcontainersare
suitabloforQooktopservice;others
becauseofthesuddenchangein
(hesectiononSUrfa~e~Q~kingfor~~gg~~tj~~~f
oTo~in~~ige thepossibilityof
flammablema~~~jalstandstijJlag9,theh~~d~eOfa ~
co~tair)ershouldbe$ur~ledtowardthecent~rofIhe ~
rangewithoutextendingovern?~rbysurfaceun~ts.
A~ways ~~~n ~u~f@c@ u~~~ $0 o~fl b~for~
0
refiovin~cookware. ‘
,-
*Keapan~yeonfoodsbeingfri~dat131OF
MEDIUM HIGH heats;
~To~v~idthep~s$ibiji~y
!; ,
shock9altiaystigcertainthatthecoqtro$sfor , ~
all‘stirf~ce,pnits,are.at’OEF.positionandall, ‘‘
coilsarecoolb,eforeattemptil~gtoliftorremove
theunit.,, ~~~ :. , .,’,,, ,
4‘D0ti9timmerseb-rsiakrem:6vahlesutiate ““”;~,
units.DOn3tputt~em i~ a dishwasher. -,
6~~efifla~i~g’
thefanoff.The-fan,ifoperating,may spread
t~efiamec ~ ‘“’ ‘ ~ ,“. , ,’. ,
Waybreak
ternperatur~iSee
*
burns?ignitionof
,!
,~fa ~ur~ ~r’eJeit~~c
foods‘~~e’finderth~hOOd,turk’ . ‘
,-
#-
@
SutiaceCookingUnits
proper~ansize-Thi~
=Use
G
~ sizesurfaceunits. Selectcookware
*
having fiatbottomslarge enoughto cover the
surface unitheatingelement.The use of undersized
cookware willexposea portion of theheating
element todirect contactand mayresult in ignition
ofclothing.Properrelationshipofcookwareto
burnerwillalsoimprov~efficiency.
● N’~ver leave surfaCeuni~ unattendedat high
heatsettings.Roilovercausessmokingandgreasy
spilloversthatmaycatchonfire.
*Besuredfip
andareinplace,
coulddamagerangepartsandwiring.
$~o~9tusea~~m~n~~
anywhereintheovenexceptasdescribedinthis
book.Misusecouldresultinashock,firehazardor
damagetotherange.
applianceis equippedwith different
pans and vent are notcovered
Theirabsenceduringcooking
f~iitolinedrippans or
.
s~oO~sf~rfrji~gsfi~~~~beas
Frost on-frozen foodsor,tioistureon freshfoods ,
can causehot fat tobubbleup and oversides
ofpan.
. use ~itt~efat for eff~~~iy~sh~llbw
frying.
spilloverswhen foodis added.
o
frying, stirtogetherbeforeheating,orasfatsmelt
Fillingthe pantoo full offat“cancause
Ifa ~ornbinationofoi~sorfatswi~~beusedin
d~yis-p6ssibie.
or deep-fat
slowly.
o
Always heat fat slowly, -andwatch as it heats.
~ UsedeePfatthermometerwhenever
possibleto
preventoverheatingfatbeyondthesmokingpoint.
SAVETHESE ~
INSTRUCTIONS
e
4
Page 5
E~RGY=SAmG T~
oven Cooting
o Preheatovenonlywhenne~essary.Mostfoodswill
@
cooksatisfactorilywithoutpreheating,Ifyoufind
preheatingisnecessary,watchtheindicatorlight,
andputfoodinovenpromp$lyaft~rthelight goesout,
*Nways turnovenoffb~f~reremovingfood.
oDuringbaking,avoidfrequentdo~ropenings.Keap
dooropenas shortatimeaspossibleifit isopened.
oCookcompleteovenmealsinsteadofjust onefood
item.Potatoes,~thervegetables,andsornqdesserts
willcooktogetherwithamain-dishcasserole,meat
loaf,chickenorroast.Choosefoodsthatcookat the
sametemperatureand,inapproximatelyfie same
amountoftime.
● Useresidualheatin the ovenwheneverpossibleto
finishcookingcasseroles,ovenmeals,etc,Alsoadd
rollsorprecookeddessertstoa w- oven.using
residualheatto warmthem. -
surface
cooking
*Usecookwareofmedium-weightaluminum,with
tight-fittingcovers,andflatbottomswhichcompletely
coverthe hea~dportionofthesul~aceunit,
~Cookfreshvegetableswitha minimumamountof
waterin acov~redpan,
*Watchfoodswhenbringingthemquicklyto cooking
temperaturesathighheat,Whenfoodreachescooking
temperature,reduceheatimmediatelytolowestsetting
that willkeepitcookiqg.
QUser~sidualheatwithsurfacecookingwhenever
possible.Forexmpl~, whencookingeggsintheshell,
bringwaterandeggs toboil,then turnto OFF
position
andcovercookwarewithlidtocompletethecooking,
~Whenboilingwaterforteaorcoffee,heatonly
amountneeded.Itisnoteconomicalto boila
containerfuHof waterforoneor twocups.
1
I
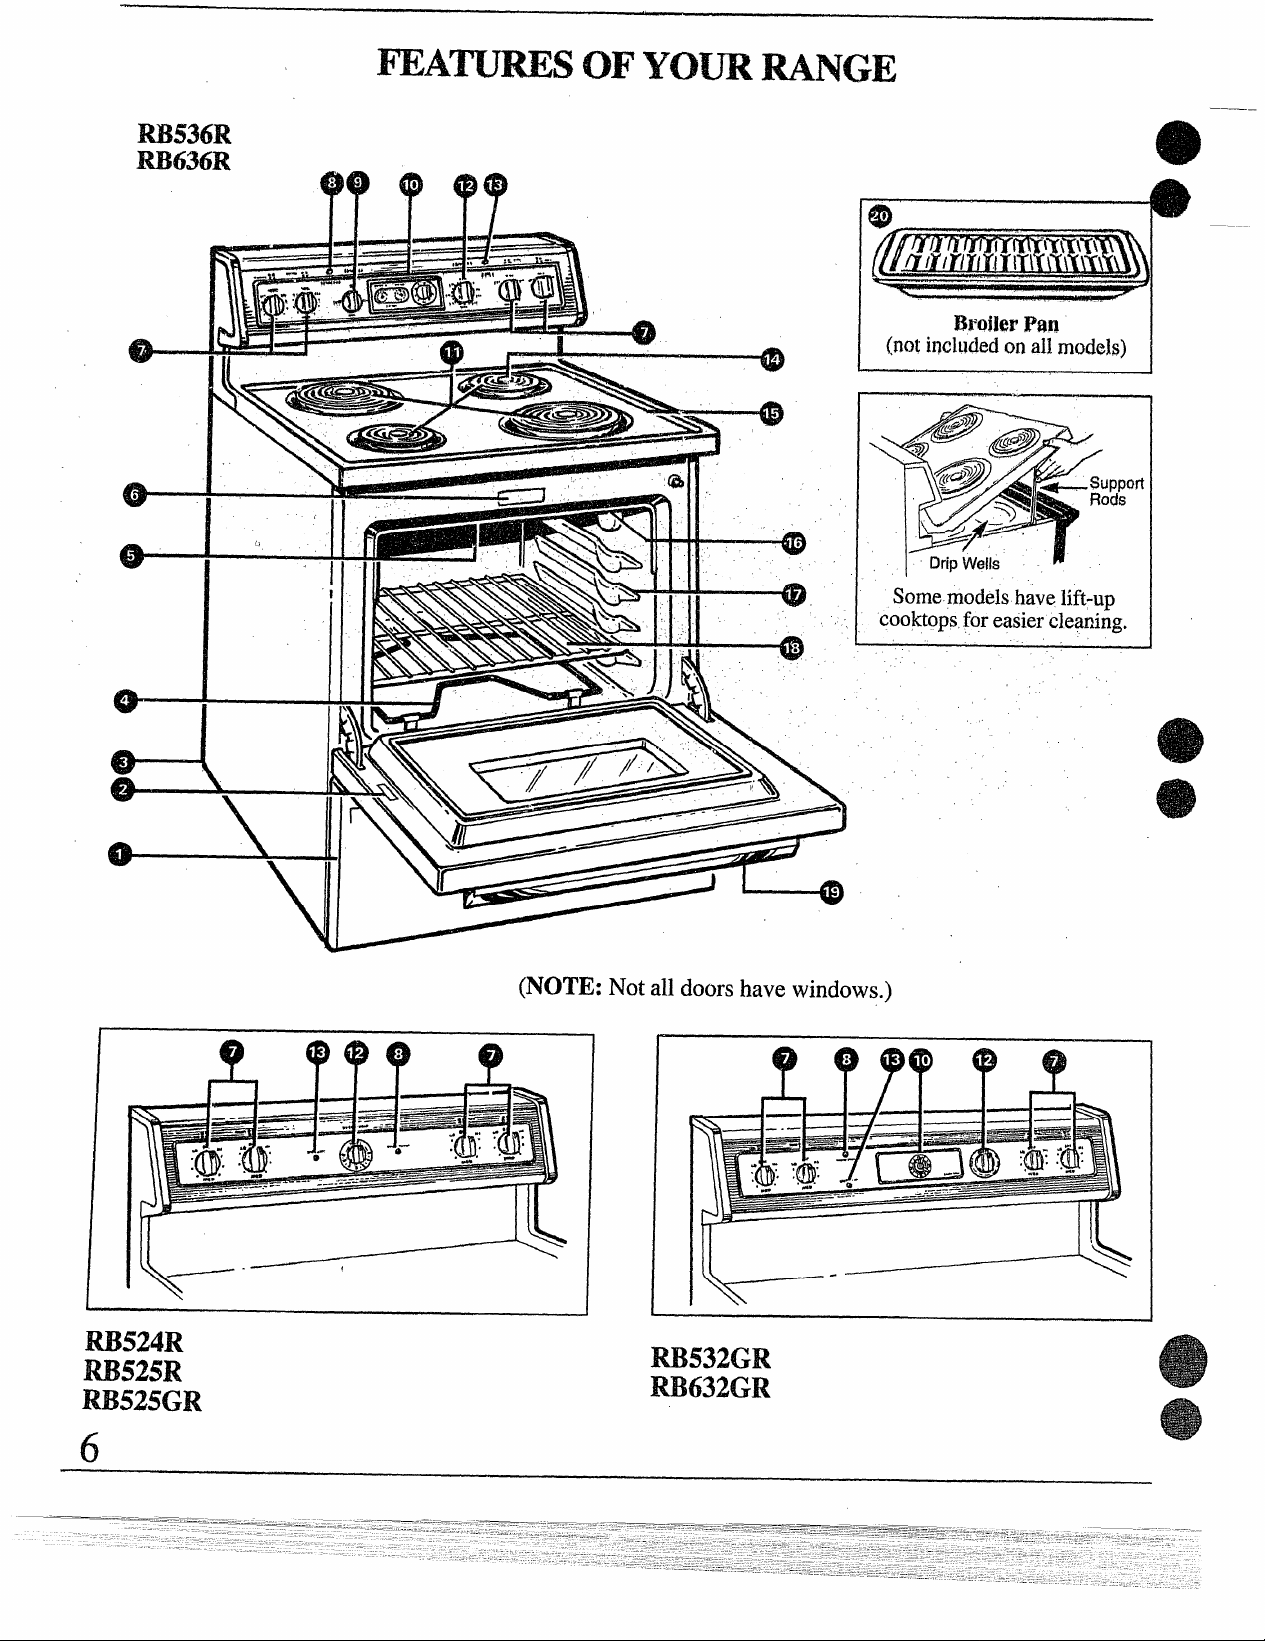
Page 6
-..
(NOTE:
,.
I
Notalldoorshavewindows.)
W532GR
m632GR
Page 7
Explain6d
on
Fea~re bdex
..— —
(Notallmodelshaveallfeatures.)
1 StorageDrawer(on.somemodels)
2 Anti-TipLabel
3 Anti-TipDevice(SeeInstallationIns~ction$.)
4 Bake Unit(Maybeliftedgentlyforwipingovenfloor.)
I
-
5 BroilUnit
6 Modeland~erialNumberLocation
page
24,25
—
3,27,29
25
25
2
(behindtie range doororbehindthestoragedrawer)
7 SurfaceUnitControls‘ >
8 “ON”IndicatorLight/Lightsfor SurfaceUnits
9 OvenSetControl ~
10 AutomaticOvenTimer,ClockandMinuteTimer
,“
8
8
~13
12
(onsomemodels)
11 SurfaceUnits,DripPans
12 OvenTernpControl
13 OvenCyclingLight
14 OvenVent(Locatedunderrightremsurfaceunit.)
15 Lift-UpCooktop(onsomemodels)
16 OvenInteriorLight (on somemodels)
1’
22,25
13
13
23, “
22
14,24
(Comesonautomaticallywhendooris opened.)
.
17 OvenShelfSupports
18 OvenShelf(numbermayvary)
19 OvenLightSwitch(onmodelswithovenwindow)
20 Broiler Panand Rack(onsomemodels)
1“
14
14,25
14
25 ‘
I
.
Page 8
SnACE COOaG
s&SurfacecookingGuide.
Atboth0~ and~ thecontrol“clicks.”Youmayhearslight“clicking”
soundsduringcooking,indicatingtie controliskeepingtheunitattheheat
levelyouset.
Howtoset thecontroIs
Besureyouturnco~~troltoOW whenyoufinj$h
,+ ~ “
~—Used tobegincooking
Reduceheat settingafterwaterboils.
mD~ HIGfi-(Seting halfwaybetween~ ~d
MED)Maintainsafastboilon largeamountsoffood.
MED-Saute andbrown;keepsfood-atamediumor
simmer.
~D~ LOW—(SettinghalfwaybetweenMED
andLO) Cooktier startingatHI; cookswithlittle
waterin coveredpan.
LO—Usedfor long,slowcooking(simmering)to
tenderizeanddevelopflavors.Usethissettingto melt
butter andchocolateor tokeepfoodswarm.
NOTE:SurfaceIndicatorLightmayglowbetween
LOandOFFbutthereisnopowertothesurfaceunits.
or tobringwatertoaboil.
‘~g::::.
setting
youwwt,
cocking,Thesurf~ceunitindi~~~rlightwillglQw
whenANY heatsettingon anysurfaceunitis
MEDIUM
Low
MEDIUM
HIGH
o
.@
on,
WokCooking
Werecommendthatyouuseordya flat-bottomwok.
Theyare availableat yourlocalretailstore
8
Donot usewoksthathavesupportrings.Use ofthese
typeof woks,withor withouttheringin place,can be
dangerous.Placingthering overthesurfaceunitwill
causea build-upofheatthatwilldamagetheporcelain
cooktop.Donottry to usesuchwokswithoutthe ring.
Youcouldbe seriouslyburnedif thewoktippedover.
Page 9

~Om cmmG m
~a~~~ngs~~~ldbedoneonsufiace
Potsthatextendbeyondoneinchof surfaceunit’s
drippanarenotrecommendedformostsurfacecooking.
However,whencanningwithwater-bathorpressure
canner,larger-diameterpotsmaybeused.Thisis
becauseboilingwatertemperatures(evenunder
pressure)arenotharmfultocooktopsurfaces
surroundingthe sufidceunits,
ObservetheFollowingPointsinCanning
I. Besurethecannerfitsover thec~n~~rof the ,
surfaceunit.If yourrangeor itslocationdoesnot
allowthecannertobecenteredonthesurfaceunit,
usesmallerdiameterpots forgoodcanningresults.
2,For bestresultsusecannerswithflatbottoms.
Cannerswithflangedorrippledbottoms(oftenfound
inenamelware)dbn’tmake
surfaceunitandtakealong timeto boilwater.
n
Fiat-bottomcannersarerecommended.
e
good contactwith the ,’
ufits onlY.
HOWEVER,DC)NOTUSELARGEDIAMETER
CANNERSOROTHERLARGEDIAMETER
POTSFORFRYINGORBOILINGFOODSOTHER
THANWATER.Mostsyruporsaucemixtures—
andalltypesoffrying-cook attemperaturesmuch
higherthanboilingwater.Suchtemperaturescould
eventuallyharmcooktopsurfacessurrounding
surfaceupits,
3.Whencanning,userecipesandproceduresfrom
reputablesources.Reliablerecipesandproceduresar~
availablefromthemanufacturerof yourcanner;
manufacturersofglassjarsforcanning,suchas Ball
andKerr;andtheUnitedStatesDepartmentof
AgricultureExtensionService.
4.Rememberthat canningisa processthatgenerates
largeamountsofsteam,Toavoidburnsfromsteamo
heat,be carefulwhencanning.
NOTE: Ifyourhousehaslowvoltage,cannifigmay
takelongerthanexpected,eventhoughdirections
havebeencarefullyfollowed,Theprocesstimewill
beshortenedby: ,
(1)
usinga pressurecanner,and
(2)startingwithHOTtapwaterforfastestheatingof
largequantitiesof water.
—
.
.—
.-
Page 10
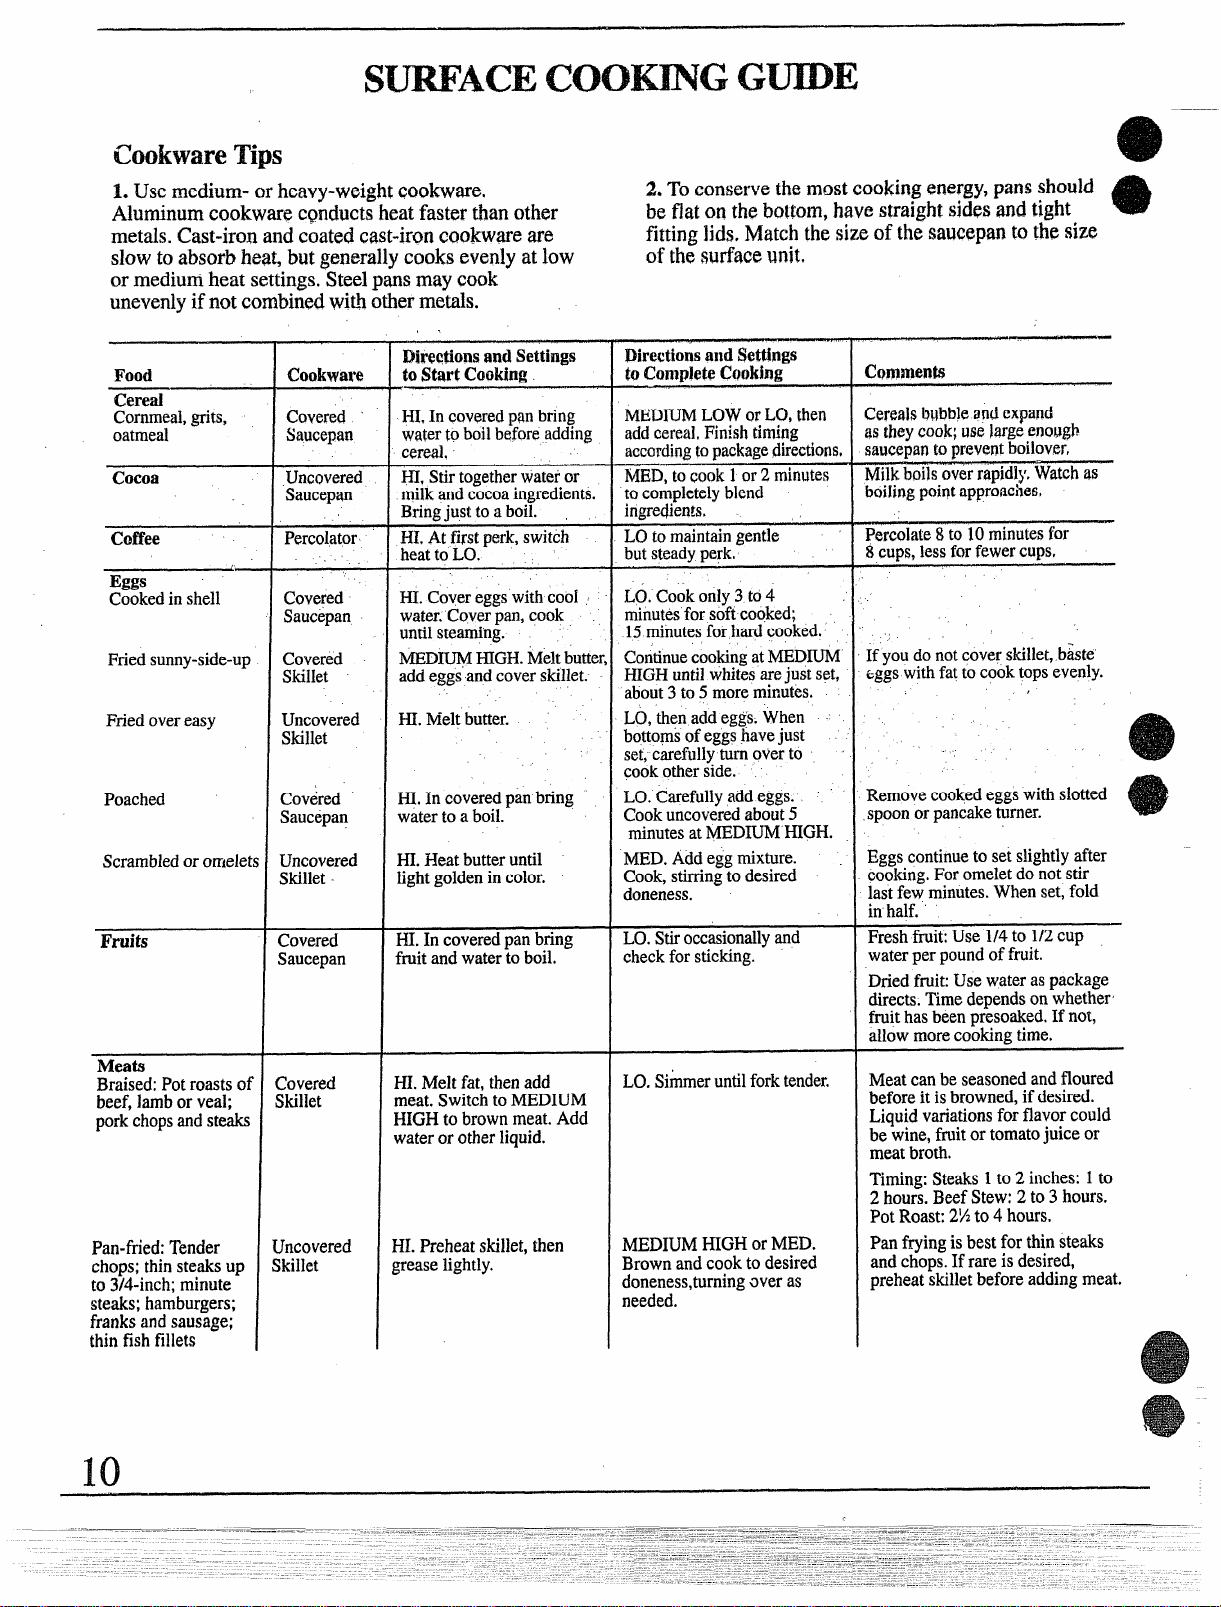
CookwareTips
7.
Use medium-orheavy-weightcQokware.
1.
Aluminumcookwarec~nductsheatfasterthanother
metals.Cast-ironandcoatedcast-ironcookwareare
slowtoabsorbheat,butgenerallycooksevenlyat low
ormediumheatsettings,Steelpansmaycook
unevenlyifnotcombinedwi~hothermetals.
Food
Cereal
Cornmeal,grits,
oatmeal
Cocoa
Coffee
Eggs
Cookedinshell
Friedsunny-side-up
Friedovereasy
Poached
Scrambledoromele
Fruits
Meats
Braised:Potroasts
beef,lambor veal;
porkchopsand steti
Pan-fried:Tender
chops;thinsteaksup
to 3/4-inch;minute
steaks;hamburgers;
franksandsausage;
thinfishfillets
o:
Cookware
Covered ‘
Saucepan
Uncovered
Saucepan
Percolator
Covered
Saucepan
Covered
Skillet
Uncovered
Skillet
Covered
Saucepan
Uncovered
Skillet
~overed
;aucepan
~overed
lkillet
Fncovered
killet
Directionsand Settings
toStartCaokin~
HI,In coveredpanbring
watertoboilbeforeadding
cereal.
HI,Stirtogetherwateror
milkandcocoaingredients.
Bringjust toa boil.
~, Atfirstperk,switch
heattoLO.
HI.Covereggswithcool
water.Coverpan,cook
untilsteaming.
MED~ HIGH.Meltbutte
add eggsand coverskillet.
~. M-eltbutter.
HI.Incoveredpanbring
waterto a boil.
HI.Heatbutteruntil
lightgoldenincolor.
HI,Incoveredpanbring
fruitandwaterto boil.
HI.Meltfat, thenadd
meat.Switchto MEDIUM
HIGHtobrownmeat.Add
wateror
HI.Preheatskillet,then
yease lightly.
..
other liquid.
2.Toconservethe mostcookingenergy,pansshould
beflatonthebottom,have straightsidesandtight
fittinglids.Matchthesizeof thesaucepanIOthesize
ofth; surfaceunit,
c9mmt?nh
MEDIUMLOWorLO,then
addcereal,Finishtiming
accordingtopackagedir~ctions,
MED,tocook1or2minutes
tocompletelyblend
ingredients,
LOtomaintaingentle
butsteadyperk.
LO.Cookonly3 to4
minutesforsoftcooked;
15minutesforhardcooked.
ContinuecookingatMEDIUM
HIGHuntilwhitesarejustset,
about3to5 moreminutes.
LO,thenaddeggs.When
bottomsofeggshavejust
set,carefullyturnoverto
cookotherside.
LO.Carefullyaddeggs.
Cookuncoveredabout5
MED.Addeggmixture.
Cook,stirringto desired
doneness.
LO.Stiroccasionallyand
checkforsticking.
LO.Simmeruntilforktender.
MED~M HIGHorMED.
Brownandcookto desired
doneness,turningoveras
needed.
. .
minutesatMEDIUMHIGH.
Cerealsbubbleandexpand
astheycook;uselargeenough
saucepantopreventboilovert
—
Milkboilsoverrapidly.
boilingpointapproaches,
Percolate8to 10 minutesfor
8CUOS.lessforfewerCUDS.
.,
Ifyoudonotcoverskillet,b&te’
~ggswithfattocooktopsevenly.
Removecookedeggswithslotted
spoonor pancaketurner.
Eggscontinueto setslightlyafter
cooking.For omeletdonotstir
lastfewminutes.Whenset,fold
inhalf.
Freshfruit:Use 1/4to 1/2cup
waterperpoundoffruit.
Driedfruit:Usewateraspackage
directs.Timedependsonwhether
fruithasbeenpresoaked.Ifnot,
allowmorecookingtime.
Meatcanbe seasonedandfloured
beforeit isbrowned,if desired.
Liquidvariationsforflavorcould
bewine,fruitortomatojuice or
meatbroth.
Timing:Steaks1to 2inches:1to
2 hours.BeefStew:2to 3 hours.
PotRoast:2%to4 hours.
Panfryingisbestforthinsteaks
andchops.Ifrare is desired,
preheatskilletbeforeaddingmeat+
WatchaS
.
I
e
e
*
10
Page 11

3.DeepFatFrying,Donotoverfillcookwarewithfat
that mayspilloverwhenaddingfood.Frostyfoods
bubblevigorously.Watchfoodsfryingathigh
temperatures.Keeprangeandhoodcleanfrom
accumulatedgrease.
Right
~
NOTOVER1“
FOod
Cookware
Meats
FriedChicken
Covered
skillet
Pan-friedbacon Uncovered
Skillet
Sauteed:Lesstender .
thinsteaks(chuck,
round,etc.);liver;
;ov::;d
“
“I
thickorwholefish.
Simmeredor stewed Covered
meat;chicken;
cornedbeet smoked
pork;stewingbeefi
DutchOven,
Kettleor
Large
tongue;etc. Saucepan
Pancakesor
Frenchtoast
Skilletor
Griddle
Pasta
Noodlesorspaghetti
Large
Covered
KettleorPot
PressureCooking Pressure
Cookeror
Canner
Puddings,Sauces,
Candies,Frostings
I
IUncovered
Saucepan
Vegetables
Fresh
Covered
Saucepan
Frozen
Covered
Saucepan
Sauteed:Onions;
greenpeppers;
Uncovered
Skillet
mushrooms;celery;etc,
Mce andGrits
Covered
Saucepan
Hi.Meltfat.Switchto
MEDitJMHIGHtobrown
chicken,
HI,Incoldskillet,arrange
baconslices.Cookjust until
startingtosizzle.
HI.Meltfat,SwitchtoMBD
tobrownslowly,
HI.Covermeatwithwater
and coverpanorkettle.
Cookuntilsteaming,
MEDIUMLOW,.Allow10to 15
minutestomeltthrough.Stirto
smooth.
MEDIUMHIGH.Heatskillet
8to 10minutes.Greaselightly.
HI.Incoveredkettle,bring
saltedwatertoa boil,uncover
andaddpastaslowlysoboiling
doesnotstop.
HI.Heatuntilfirstjiggle
isheard.
HI.Bringjust to boil.
.
HI.Measure1/2to 1inch
waterinsaucepan.Addsalt
andpreparedvegetable.
Incoveredsaucepanbring
toboil.
HI.Measurewaterandsalt
asabove,Addfrozenblock
of vegetable.Incovered
saucepanbringto boil.
HI.Inskillet,meltfat.
.
HI.Bringsalted watertoa boil.
DirectionsmadSettingsto
CompleteCooking
Lo, Coverskilletandcook
untiltend~r.Uncoverlast
fewminutes.
MEDIUM~GHt Cook,turning
overas needed.
LO.Coverandcook
untiltender.
LO.Cookuntilforktender.
(Watershouldboilslowly.)
Forverylargeamounts,
mediumheatmaybeneeded.
Usesmallsurfaceunit.
Cook2to3minutesperside.
MED~M HIGH.Cook
uncovereduntiltender.Forlarge
amounts,HImaybe needed
tokeepwaterat rollingboil
throughoutentirecookingtime.
MEDIUMHIGHforfoods
cooking10minutesorless.
MEDforfoodsover 10minutes.
LO.Tofinishcooking.
MED.Cook1pound10to 30
ormoreminutes,depending
~ntendernessof vegetable.
LO.Cookaccordingto time
]npackage.
WED.Addvegetable.
~ookuntildesired
.endernessis reached.
MEDIUMLOW,Coverand
:ookaccordingtotime.
Forcrisp,dlychicken,cover
onlyafterswitchingtoLO
for10rnjnu~es,Uncoverand
cook,Wining
miQdly
for10M20minum.
A moreattention-freemethod
istostartandcookat MED,
Meatmaybebreadedor
marinatedin saucebefore
frying.
Addsaltor otherseasoning
beforecookingif meathas
notbeensmokedor
otherwisecured.
Whenmeltingmarshmallows,
addmilkorwater.
Thickbattertakesslightly
longertime.Turnover
pancakeswhenbubbles
iise to surface.
Uselargeenoughkettleto
preventboilover.Pasta
doublesin sizewhencooked.
Cookershouldjiggle2 to 3
timesperminute.
Stirfrequentlytoprevent
sticking.
Uncoveredpanrequiresmore
waterand longertime.
Breakupor stir as needed
whilecooking. .
Turnoverorstirvegetableas
necessaryforevenbrowning.
Riceandgritstripleinvolume
aftertooting.Timeat
MEDIUMLOW.Rice:1cup
riceand2cupswaterfor25
minutes,Grits:1cupgritsand
4cupswaterfor40minutes.
Page 12

AUTOW~C H
(onsomemodels)
RAm CLOCK
Theautomatictimerandclockserveseveralpurposes.Followthedirections
fortheClockandTmerthatapply@yourmodel.
Minutemmer
TheMinuteTimerhasbeen
combinedwithther~ge ~lo~k~,
Useit totimeallyourprecise
cookingoperations,You’11
recognizethe MinuteTim@rasthe
(onsomemodels)
set the clock
To
Tosettheclock,pushthetiob in
and.turntheclockhandstothe
pointer,whichis diflerentincolor
andshapethantheclockhands,
+
*doe ,,-, ~~
QuestionsandAnswers
Q. Musttheclockbeseton
correcttimeof daywhenI wish
tousetheAutomaticTimer
forbaking?
A.Yes,ifyouwishto setthe
DELAY ST~T (on somemodels)
orSTOPTIMEdialsto turnonand
offat settimesduringtimed
functions.
Q.CanIusethe~~nuteTimer
duringovencooking?
A.TheMinuteTimercanbeused
duringanycookingfunction.The
AutomaticTimers(DELAY
STARTandSTOPTIMEdials)
areusedwithTIMEDBAKE
functiononly
ToSetthe MinuteTimer
TosettheMinuteTimer,turnthe
centerknob,withoutpushingIn?
untilpojnterre~hes numberof
minulesyouwishto time.
(Minuteswe
thecenterringon the~lock.)At
theend ofthe settires,abuzzer
soundstotellyoutimeisUP,
~rn bob,
untilpointerreachesOFFand
buzzerstops.
Q. Should Ichangetheclock
whileI’mTimeCookihgin
theoven?
A.Theclockshouldnotbe
changedd~ng anyprogramthat
usesthe oventimer.Youmust
eitherstopthose programsor wait
untilthey arefinishedbefore
changingtime.
marked,Upto~~,in
withoutp~shingin,
o
e
USmG YOUROVEN
BeforeUsingYourOven
1.Lookat thecontrols.Besureyouunderstandhow
to setthemproperly.Readoverthedirectionsforthe
AutomaticOvenTimersoyou understanditsuse with
thecontrols.
2. Checkoveninterior.Lookat theshelves.Takea
practicerun atremovingandreplacingthemproperly,
togive sure,sturdysupport.
12
3. Readoverinformationandtipsthatfollow.
4. Keepthisbookhandyso youcan referto it,
especiallyduringtheFirstweeksof usingyour
newrange.
“
Page 13

Somemodelshave1ovencontrol
kna&OVEN TEMROthermodels
have2 controlknobs-OVEN
TEMPandOVENSET,TheOVEN
SETknobbassettingsforBAKE,
~MED BAKE,BRQ~, andOFF.
OVENTEMPmaint~insthe
temper~tureyouset,fromWARM
(150°F,)toBROIL(550°F,).
(knobappearancemayvary)
AdjustingOvenThemostit
OVENTEMP
OFF
\
s
%
%@
mm
@
FrontofOvenTempKnob
(onsomemodels)
I
(knobappearancemayVW)
Usethetimegivenin yourrecipewhenusingthe
ovenforthefwsttime.Oventhermostats,in time,may
“drift”fromthefactorysettinganddifferencesin
timingbetweenan oldand anewovenof 5 to 10
minutesarenotunusual.Yourovenhasbeen set
correctlyat the factoryandis morelikelyto be
accuratethanthe ovenwhichit replaced.However,if
you findthatyourfoodsconsistentlybrowntoolittle
ortoo much,youmaymakea simpleadjustmentin
thethermostat(OvenTemp)knob.
FrontofOvenTempKnob
(onsomemodels)
E-
&
TheOven~ycllngLightglows
untiltheovenreachesyour
selectedtempev~ture,thengoes
Qff andon withtheovenunit(s)
duringcoo~ng.
PREHEATINGtheoven,evento
hight~mperatures~ttings,is
speedy,rarelymorethanabout 10
binutes.Preheattheovenonly
whennecessary,
cooksatisfactorilywithout
preheating,If youfindpreheating
isnecessary,keepaneyeon the
indicatorlight~d putfoodinthe
ovenpromptlyafterlight goesout,
BackofOvenTempKnob
(onsomemodels)
TCDadjustthethermostatknob:
1.PulltheOvenTempknoboffthe shaft,lookatthe
backof theknobandnotethecurrentsettingbefore
makinganyadjustments.
2.Loosenbothscrewson thebackoftheknob.
3.Toincreasetheoventemperature,movethe
pointeronenotchtowardthewords“MAKE
HO~ER.” Todecreasetheoventemperature,turn
thepointeronenotchtowardthewords“MAKE
COOLER.”Eachnotchchangesthetemperatureby
10degreesFahrenheit.
4.Tightenthe screws.
5.Replacethe knob,matchingtheflat areaof the
knobto theshaft.
Mostfoodswill
BackofOvenTempKnob
(onsomemodels)
Page 14

usmG Yom Owrd
Oven IntetiorShelves
Theshelvesaredesignedwithst~p-~ockstsothat
whenplacedcorrectlyontheshelfsupports,theywill
stopbeforecomingcompletelyoutfromtheoven,and
willnottiltwhenremovingfoodfromorplacingfood
onthem.
TO REMOVE
THE SHELVES
fromtheovenpull
theshelftoward
you, tiltfrontend
upwardandpull
theshelfout.
,,)
~v~~ ~ight (onsomemodels)
Thelightcomeson automaticallywhenthedooris
opened.Onmodelswithovenwindow,useswitchto
turnlight on andoffwhendooris closed.Theswitch
is locatedonthefrontofthedooron somemodels.
On othermodels,you’llfindit onthecontrolpanel.
(continued)
TOREPI.ACE3placetheshelfonshelfsupportwith
stop-locks(curvedextensionof shelf)facingupand
towardthere~ oftheoven,Tiltupfrontandpush
shelftowardthe backoftheovenuntilit goespast
“stop”on theovenwall,Thenlowerthefrontof the
shelfandpushitallthewayback,
@
Theovenhasfoul’
shelfsuppofismarked
A (bottom),B, Cand
D (top).Shelf
positionsforcooking
foodaresuggestedon
Baking,Roastingand
Broilingpages,
~AmG
Whencookingafoodforthefiist timeinyournew
oven,use timegivenon recipesasa guide.Oven
thermostats,overa periodofyears,may “drift”from
thefactorysettingand a differencein timingbetween
an oldanda newovenof5 to 10minutesis not
How toSetYourRangeforBating
Step1: Placefoodin oven,being
certainto leave about 1inchof
spacebetweenpansand wallsof
ovenfor goodcirculationofheat.
Closeovendoor.Duringbaking,
avoidfrequentdoor openingsto
preventundesirableresults.
appearancemayVNY)
(knob
2: TurnOVENSETknob (on
~te~
somemodels)to BAKEand
OVENTEMPknobto temperature
youdesire.
unusual.Youmaybe inclinedto thinkthatthenew
ovenis not performingcorrectly.However,yournew
ovenhasbeensetcorrectlyatthefactoryandis more
likelyto beaccuratethantheovenitreplaced.
Step3: Checkfoodfordonenessat
minimumtimeon recipe.Cook
longer if necessary.Switchoffheat
andremovefoods.
Page 15

(onsomemodels)
Theautomaticoventimercontrolsaredesignedto turnthe ovenonoroff
a
automaticallyat specifictimesthat youset.(UseTIMEDBA~ onthe
OVENSETknob.)
a.
NOTE: Beforebeginning,make
surethehandsof therangeclock
showthecorrecttimeofday.
Tostartcookingimmediatelyand
turnoff automatically,youmust
turntheOVENSET-knobto
T~ED BAKE.Remember,foods
continuecookingafterthecontrols
areoffbecausetheovenretains
heat,for along time,if the oven
door is notopened. .
How toSet DelayStartandStop
DelayStartandStopis settingthe
oventimerto turntie oven on and
offautomaticallyata latertime
thanthepresenttimeofday.You
mustusetheTIMEDBAKEsetting.
Clock
Step1:
knobon DELAY STARTdialand
turnpointer to timeyou want oven
totum on,forexample3:30.
Tosetstarttime,pushin
Clock
s~o~11~~LI~m~$7A~T
\lllllt
\~~121~(,
><
;9 1:
“/
“’//,,,,J’
T
Step 1:Tos~tStopTime,pushin
knobonSTOPT~E dial andturn
pointertotimeyouwantovento
turnoff,for extiple 6:00.The
DELAYSTARTdialshouldbeat
thesamepositionasthetimeof
Step 2: TosetStopTime,pushin
knobon STOPTIMEdialandturn
pointerto timeyouwantovento
turnoff,for example6:00.This
meansyourrecip; calledfortwo
andone-halfhoursofbakingtime.
Foodsthatarehighlyperishable,
suchasmilk,eggs,fish,stuffings,
poul~ andporkshouldnotbe
allowedto sit out for morethan
onehourbeforeor aftercooking.
Roomtemperaturepromotesthe
growthof htil bacteria.
NOTE:Be surethatovenlightis
off becauseheatfromthebulbwill
speedharmfulbacteriagrowth.
NOTE: Timeon STOPTIMEdial
mustbe laterthantimeshownon
rangeclockandDELAYSTART
dial.
,,.\”\$“/4$,
;9
@
‘/
,?7
PustiTQWRN
PUSHTONRN
G \\\’
“~lll,[li~
34
,:
-u
~~
St@p2: TurnOVENSETknobto
TIMEDBAK.E.TurnOVEN
TEMPknobto oventemperature,
forexample250°F,Theovenwill
startimmediatelyandwillstopat
thetitie youhave‘set,
Step3:fim OVENSETknob to
TIMEDBAKE.TurnOVENTEMP
knobto 250°F.or recommended
ternper~~re.
Placefoodin oven,closethedoor
andautomaticallythe ovenwillbe
turnedon andoffat thetimesyou
haveset.Whencookingis
completed,turnOVENSETto
OFFandremovefoodfromoven.
OVENINDICATORLIGHT(S)at
TIMEDBAKEsettingmaywork
differentlythantheydo atBAKE
setting.Carefullyrecheckthesteps
givenabove.If alloperationsare
done as explained,ovenwill
operateasit should.
I
—
Page 16

1. Aluminumpans conductheatquickly.Formost
conventionalbaking,light,shinyfinishesgenerally
givebestresuhsbecausetheyhelpprevent
overbrowning,For bestbrowningresults,we
recommenddullbottomsurfacesforcakepansand
pie plates.
2.Darkornon-shinyfinishesandglasscookware
~enerallvabsorbheat,w~ch mayresultin dry,crisp
Food
Bread
Biscuits(1/2in.thic~
Coffeecake
Cornbreadormuffins
Gingerbread
MuffIns
Popovers
Quickloafbread
Yeastbread(2loaves)
Plainrolls
Sweetrolls
Cakes
(withoutshortening)
Angelfood
Jellyroll
Sponge
Cakes
E3undtcakes
Cupcakes
Fruitcakes
Layer
Loaf
Cookies
Brownies .
Drop
Refrigerator
Rolledorsliced
Frui@,
OtherDesserts
Bakedapples
Custard
Puddings,Rice
andCustard
Pies
Frozen
Meringue
Onecrust
Wo crusts
Pastryshell
Miscellaneous I
Bakedpot~toes
Scallopeddishes
Souffles
I.,
Cookware
ShinyCookieSheet
ShinyMetalPanwith
satin-finishbottom
Cast-IronorGlassPan
ShinyMetalPanwith
satin-finishbottom
ShinyMetalMuffinPan’~
DeepGlassorCast-IronCups
Metalor GlassLoafPan
MetalorGlassLoafPan
ShinyC)blongorMuffinPan
ShinyOblongorMuffinPan
Aluminum~be Pan
MetalJellyRollPan
Metalor CeramicPan
MetalorCeramicPan
ShinyMetalMuffinPan
l~etalor GlassLoaforTubePan
ShinyMetalPanwith
satin-finishbottom
Metalor GlassLoafPan
MetalorGlassPan
CookieSheet
CookieSheet
CookieSheet
GlassorMetalPan
GlassCustardCupsorCasserole
(setin panofhotwater)
GlassCustardCupsorCasserole
FoilPanonCookieSheet
Spreadtocrustedges
Glassor Satin-finishMetalPan
GlassorSatin-finishMetalPan
GlassorSatin-finishMetalPan
Seton C)venShelf
SlassorMetal Pan
GlassPan
desired.Rapidbrowningofsomefoodscanbe
achievedby preheatingcast-ironcookware.
3.Preheatingtheovenisnotalwaysnecessary,
especiallyforfoodswhichcooklongerthan30to 40
minutes.ForfoodswithshortQookiugtimes,
preheatinggivesbestappearanceandcrispness.
Althoughpreheatingisnotnecessarywithmeats,itis
preferredforbaked~oods,
posfibletopreventunevenheatingandto saveenergy.
B; c
A,B
: ‘ 350°
A, B 400°-4250
B 375°
B
A,B
2;;
A
: 325°-3500”
A,B 325°-3500
ABB 275°-3000
B
B 350°
B,C
B,C
4,B, C 350°-4000
B
B
A!B
A,B
E
400°-4750
350°-400”
400°-4500
350°-3750
375°-4250
375°-4250
350°-3750
325°-3750
375°-4000
350°-3750
350°-3750
325°-3500
350°-4000
400°-4250
375°-400”
300°-3500
I
I
400°-4250
325°-3500
I
400°-4250
400°-4250
325°
450°
L
i, B, C
i, B, C
B
325°-4000
325°-3750
300°-3500
Time,
Minut?s
15-20
20-30
20-40
45-55
20-30
45-60
~5-60
45-60
10-25
20-30
30-55
10-15
45-60
45-65
20-25
hrS.
2-4
20-35
40-60
25-35
10-20
6-12
7-12
30-60
30-60
50-90
45-70
15-25
40-60
40-60
12-15
60-90
30-60
30-75
a
Caiined,refrigerawdbiscuitstake2 to
4 minuteslesstime.
Preheatcast-ironpanfor crispcrust.
Decreaseabout5minutesformuffin
mix,orbakeat450”F.for25minutes,
thenat 350°F.for10to 15minutes.
Darkmetalorglassgivesdeepest
browning, ~
Two-piecepanis convenient.
Linepanwithwaxedpaper. ,
*
Paperlinersproducemoistercrusts.
Use300°F.andShelfBforsmallor
individualcakes.
Ifbakingfourlayers,useShelvesBandD.
Barcookiesfrommixusesametime.
UseShelfC andincreasetemp.25°F.
to50”F.formorebrowning.
Reducetemp.to 300°F.forlarge
custard.
Cookbreadorricepuddingwith
custardbase80to 90minutes.
Largepiesuse400”F.andmoretime.
Toquicklybrownmeringue,use400”F.
for8to 10minutes.
Custardfillingsrequirelower
temperatureandlongertime.
Increasetimeforlargeramount
or size.
16
Page 17

RoAsmG
Roastingiscookingbydryheat.Tendermeator
ooult.rvcanberoasteduncoveredinyouroven.
Roastingtemperatures,whichshouldbslowand
steady,~eep~patteringto aminimum.men roasting,
itis notnecessarytosear,baste,coveroraddwaterto
yourmeat.
Roastingisreallya bakingprocedureusedformeats.
Therefore,ovencontrolsaresettoBAKEor~MED
BA~. (Youmayheara slightclickingsound,
indicatingtheovenis workingproperly,)Roastingis
easy;justfollowthesesteps:
Step1:Check
0
<
>//
k.
‘/
*
Linebroilerpanwithaluminumfoilwhenusingpan
formarinating,cookingwithfruits,cookingheavily
curedmeats,orfor bastingfooddurhigcooking.
Avoidspillingthesematerialsonovenlinerordoor.
Step2:Positionin ovenon shelfinA orB position.
Nopreheatingis necessary.
g~
weightofmeat,
andplace,fptside-up,on
roastingrackin a
shallowpan.
(Broilerpanwith
rackis agood
panfor this.)
OVEN
OVEN SET
I
(Itnobappemancemayvary)
Sten4%Mostmeatscontinuetocookslightlywhile
st~~ding,afterbeingre~movpdfromthe~ve~.
Sandingtimerecommendedforroastsis 10to20
m.inute~,Thisallowsroaststo fim upandmakes
themeasiertocarve,Internaltemperaturewiurise
about5°to 10°F,;to compensatefortemperaturerise,
if desired,removeroastfromovensooner(at5° to
10QF.lessthant~mperaturein the guide).
NOTE:YohmaywishtouseT~D BA~, a~
describedin~e-Howto TimeBakesectionofthis
.book,toturnovenon andoff automatically. ‘
Rememberthat foodwillcontinuetocbokinthehot
ovenandtherefores,houldberemovedwhenthe
desiredinternaltemperaturehasbeenreached.
—
TEMP
Step3:TMrn
OVENSET(on
somemodels)to
BAKEandOVEN
TEMPto325”F.
Smallpoultrymay
becookedat
375°F,forbest
browning,
I
FrozenRoss@
. Frozenroastsof beef,pork,lamb,etc.,canbe started
withoutthawing,butallow10to 25minutesper
pound additionaltime(10minutesperpoundfor
roastsunder 5 pounds,moretimeforlargerroasts).
~Thawmostfrozenpoultrybeforeroastingtoensure
evendoneness.Somecommercialfrozenpoultrycan
becookedsuccessfullywithoutthawing.Follow
directionsgivenonpackagelabel.
QuestionsandAnswers
w
Q.Isitnecessaryto checkfordonenesswitha
meatthermometer?
A. Checkingthe finishedinternaltemperatureatthe
completionof cookingtimeis recommended.
TemperaturesareshowninRoastingGuideon
oppositepage.Forroastsover8 Ibs.,cookedat 300°F.
withreducedtime,checkwiththermometerat half-
hc)urintervalsafterhalfthetimehaspassed.
..-.—
Q.Whyismyroastcrumblingwhen”Itryto carveit?
A, Roastsare easierto sliceif allowedto cool 10to
minutesafterremovingfromoven.Be suretocut
20
acrossthegrainof themeat.
e
Q.Do I needto preheatmy oveneachtimeI cooka
roastorpoultry?
A.Itis unnecessaryto preheatyouroven,
Q. Whenbuying
thatwouldhelpme cookit moreevenly?
A. Yes.Buy aroastas evenin thicknessaspossible,
or buyrolledroasts.
Q.CanI sealthe sidesofmyfoil“tents’when
roastinga turkey?
A. Sealingthe foilwill steamthe meat.Leavingit
unsealedWowsthe airto circulateandbrownthemeat.
a roast,arethereanyspecialtips
~
g
*
E“
m
Page 18

RoAsmG GmE
1.PositionovenshelfatBfor small-sizeroasts[3 to
4.Standingtimerecommendedforro?stsis 10to
7 Ibs.)andat Aforlager roasts. 20min~ites,Thisallowsroaststofirmup andmakes
2.Placemeatfat-sideup,orpoul~ breast-sideup,on
broilerpanor othershallowpanwithtrivat.Donot
cover.Donotstuffpoul~ untiljustbeforeroasting,
Usemeatthermometerformoreaccuratedoneness,
(Donotplacethermometerin stufing,)
—.
3.Removefat anddrippingsasnecessary.Baste
asdesired.
themeasiertoCme$Internalternperatu;ewillrise
about5°to 10°F.;to compensateforkmperatwe
increase,ifdesired}removethe roastfromovensooner
(at5° to 100F,lessthantemperaturein this guide),
~.FrozenroastscanbeconventionallyroastedbY
adding10to25minutesperpoundrnbretimethan
giveninguideforrefrigeratedroasts,(10minutesp~r
poundforroastsunder5 pounds.)Defrostpoultry
beforeroasting,
ApproximateRQflstingTime
inMinutesperPound
tO 8lbs.
3to 5 lhs.
24-30 18-22
30-35
35-45 28-33
21-25
25-30
30-35
35-45 30-40
35-45
[ 10minutesperpound(anyweight)
Under10 lbs.
20-30 17-20
3to5Ibs. Over5lbs.
35-40,,
35-40
10
to15 lbs.
20-25
6
22-25
20-23
24-28
28-33
30-40
~~tO 15lbs.
30-35
Over15lbs.
15-20
Temperature‘F,
.—
130Q-140”
150”-160°
17Q”-185P
130”-140°
150°-1600
170°-185°
~ 170°-1800
70°-1800
25°-1300
170°
185°-1900
185°-1900
In thigh:
185°-1900
Mwt
Tendercutsofbeefirib,highquality
sirlointip,rumportopround*,
Lamblegorbone-inshoulder* ‘
Vealshoulder,legor loin*
Porkloin,riborshoulder*
Ham,precooked
Ham,raw
*Forbonelessrolledroastsover6
inchesthick,add5 to 10 minutesper
poundtotimesgivenabove.
Poultry
ChickenorDuck
Chickenpieces
Turkey
1.)
C)ven
Temperat.urt
>!
325°
325°
325°
325°
325°
325°.
325°
350°
325°
Rare:‘
Medium:
We]}Done:
Rare:
Medium:
WellDone:
WellDone:
WellDone:
ToWarm:
WellDone:
WellDone:
WellDone:
WellDone:
Page 19

BRommG
_.—
—
Broilingiscookingfoodbyintenseradiantheat from
theupperunitintheoven.Mostfishandtendercuts
ofmeatcanbebroiled,Followthesestepstokeep
spatteringandsmokingtoaminimum.
Step 1: Ifmeathasfatorgristlenearedge,cutvertical
slashesthroughbothabout2“ apart,Ifdesired,fatmay
betrimmed,leavinglayerabout1/8”thick.
StepI2: Placemeatonbroilerrackinbroilerpan,
Alwaysuseracksofatdripsintobroilerpan;
otherwisejuicesmaybecomehotenoughtocatchfire.
Step3: Positionshelfonrecommended’shelfposition
as suggestedinBroilingGuide.Mostbroilingisdone
onCposition,butif yourrangeisconnectedto 208
Volts,youmaywishtouseahigherposition.
Step4: Leave
dooropentobroil
stopposition.The
doorstaysopenby ~
itself,yetthe
properternpera~re
ismaintainedin
theoven.
Step5:TurnOVENSET(onsomemodels)and
OVEN TEMPknobstoBROIL.Preheatinguni~is
not necessary.(Seenotesin BroilingGuide,)
Step6:~rn foodonly onceduringbroiling,Time
foodsforfirstsideperBroilingGuide.
Turnfood,thenusetimesgivenforsecondsideasa
guidetopreferreddoneness.(Wheretwothicknesses
andtimesaregiventogether,Nsefirsttimes
thinnestfood,)
Sten7:Whenfinishedbroiling,turnOVENSET(on
sol~emodels)andtheOVEN~EMPknobto OFF
(dependingonyourmodel).Servefood;’~rnediate]y,
leavingthebroilerpanandrackoutsideoventoCOQI
duringtieal foreasiestcleaning,
giy~nfor
UseofAluminumFoil
Youcanusealuminumfoiltolineyourbroilerpan andbroilerrack.
However,youmustmoldthefoiltightlytotherackandcutslitsin itjust
liketherack.
Withoutthe slits,thefoilwillpreventfatandmeatjuicesfromdrainingto
thebroilerpan.Thejuicescouldbecomehotenoughtocatchon fire.If you
do notcuttheslits,youarefrying,notbroiling.
18
I
(co}ztii~ued)~extpage) I
I
—
I
Page 20

(continued)
__
Questiom& Amwers
Q.Whenbroiling,~Sit ~~c~ss8rY~0~lW~Y~usea
rackinthepan?
A.Yes.Usingtheracksuspendsthemeatover the
pan,Asthemeatcooks,thejuicesfallintothepan,
thuskeepingmeatdrier.Juicesareprotectedby the
rackandstaycooler,thuspreventingexcessivespatter
andsmoking.
Q. ShouldIsaltthemeatbeforebroiling?
A.No.Saltdrawsoutthejuicesandall~wsthemto
evaporate.Alwayssaltaftercooking.mm meatwith
tongs;piercingmeatwithafork allowsjuicesto
escape.Whenbroilingpoultryor fish,brusheachside
oftenwithbutter.
‘,
Q.Whyare mymeatinotturningoutasbrownas
theyshould?
A,In someareas,thepower(voltage)totheoven
maybelow,Inthesecases,preheatthebroilunit for
10minutesbeforeplacingbroilerpanwithfoodin
oven,check toseeif you?reusingtherecommended
shelfposition.Broilforlongestperiodoftime
indicatedin the BroilingGuide.Turnfoodonly
onced~riugbroiling,
Q, DoI need,togreasemybroilerracktopre~~n$
meatfromsticking?
A,No,Thebroilerrackis designedto reflectbroiler
heat,thuskeepingthesurfpcecoolenoughtoprevent
meatfromstickipgto thesurfpce,However,spraying
thebroil~rracklightlywitha vegetablecookingspray
beforecookingwillmakecleanupeasier.
e
20
Page 21

BROmmG GmE
.—
I
—
_
1.Alwaysusebroilerpanandrackthat comeswith
youroven.Itis designedtorninirnizesmokingand
spatteringby trappingjuicesin theshieldedlowerpart
ofthepan.
2.Ovendoorshouldbeajarforallfoods.Thereisa
specialpositionondoorwhichholdsdooropen
correctly.
3,For steaksandchops,slashfatevenlyaround
outsideedgesof mea~.Toslash,cutcrosswisethrough
outerfats~rfacejustto theedgeof the meat.Use
tongstoturnmeatovertopreventpiercingmeat~d
losingjuices,
4.If desired.marinatemeatsorchickenbefore ~ theovenshelfonepositionhigher,
broiling,orbrushwithbarbecuesaucelast5 to 10
minutesonly.
Food ( Thickness
Bacon
GroundBeef
WellDone
BeefSteaks
Rare
Medium
WellDone
Rare
Medium
WellDone
Chicken
BakeryProducts
Bread(Toast)or
ToasterPastries
EnglishMuffins
Lobster Tails 2-4
Fish
Ham Slices
(precooked)
Pork Chops
WellDone 2(1 inchthick)
Lamb Chops
Medium
WellDone
Medium
WellDone about1lb,
Wienersandsimilar
precookedsausages,
bratwurst
—
Quantityand/or Shelf
Position
1/2lb.(about8
thinslices)
1lb.(4patties)
1/2to3/4inchthick
1 inchthick
(1to 1%Ibs.)
1Xinchthick
(2to 2Xlbs,)
1whole
(2to2fi lbs.),
splitlengthwise
2to4 slices
1 pkg.(2)
2(split) ‘
(6to8 oz.each)
l-lb. fillets 1/4to
1/2inchthick
1 inchthick
2(1/2inchthick)
about1lb.
2(1 inchthick)
about10to 12oz.
2(1k inchthick)
l-lb.pkg,(10)
5.Whena~angingfoodonpan,do notletfattyedges
hangoversides,whichcoulds~ilovenwith
fatdripping,
6.Broilerdoesnotneedto bepreheated,However,for
verythinfoods,orto increasebrowning,preheatif
desired,
7,Frozenstews canbeconventionallybroiledby
positioningtheovensh~lfatnext lowestshelf positionafidincreasingcookingtimegiveninthis 1
guide 1%timesperside,
8,If yourrangeis conne~tedto 208Volts,rares~aks
maybebroiledbypreheatingbroilerand-positioning
,’
HrstSide SecondSide
Time,Mnutes Time,Minutes
c 3%
c
: 9
c 13
c 10 7-8 ~
:
A
c 1S-2
c 3-4
B 13-16
c
B 8
7 4-5
7 7
15
25
35
5
c 10
B 13
c 8
c 10
c 10
B 17
c 6
3fi -
9
13
14-16
20-25
10-15 -
1/2
Donot
turnover.
5
8
10
13 .
4-7
10
4-6
12-14
1-2
Comments
Arrangeinsinglelayer.
Spaceevenly.
Upto 8pattiestakeaboutsametimb.
Steakslessthan 1inchthickcookthrough
beforebrowning.Panfryingisrecommended.
Slashfat.
Reducetimeabout5to 10minutesper
sideforcut-upchicken,Brusheachside
withmeltedbutter.-Broilskin-side-down
first.
Spaceevenly.PlaceEnglishmuffinscut-sideupand brush withbutter,ifdesired.
Cutthroughbackofshell.Spreadopen.
Brushwithmeltedbutterbeforeand
afterhalfofbroilingtime.
Handleandturnverycarefully,Brushwith
lemonbutterbeforeandduringcookingif
desired.Preheatbroilertoincreasebrowning.
Increasetime5 to 10 minutesperside
for 1%inchthickorhome-cured.
Slashfat.
Slashfat.
Ifdesired,splitsausagesinhalf
lengthwise;cut into5-to 6-inchpieces.
Page 22

Propercareandcleaningareimportantsoyourrangewillgive yc)u?&~cient
andsatisfactoryservice,Followthesedirectionscarefillyincaringforyour
rangetoassuresafeandpropermaintenance,
Cooktop
Theporcelain,enan~elcooktopissturdybut breakable
ifmisused.Thisfinishisacid-resistant.HoweYer,&ny
foodspillswitha highacidcontent(suchasfruit
juices,tomatoorvinegar)shouldIlotbepermittedto
remainonthefinish.
~fi~-~~ ~00~~0~ (onsomemodels) “
o
e
Somemodelshaveacooktopthatcanbeliftedupfor
easiercleaning.Tomakecleaningeasier,theentire
c,
cooktopmaybe lifted
upandsupportedin
the up position. ,
SurfaceUni@andDripPans
Tocleanthesurfaceunits,turnthecontrolto the
highestsettingfor aminute.Thecoilswillburnoff
anysoil.
CAUTION
~Donot immersethesurfaceunitsinMquidsofanykind.
QDo notcleanthe surfaceunits in a dishwasher.
eDo notbendthe surfaceunit plugterminals.
*Do notattemptto clean,adjustor inanywayrepair
theplug-inreceptacle.
ToremoveWedrippansfor cleaning,the surfaceunits
mustberemovedfirst.
SurfaceUnit
Fiecep?acl
DripPan
Besurealllsutiaceunitsare turnedofl before
raisingthecooktop.Therearetwosidesupportsthat
lockintopositionwhenthecooktopisliftedup,The
Calrod@unitsdonotneedtoberemovedbeforelifting.
Aftercleaningunderthecooktopwithhot,mildsoapy
waterand acleancloth,lowerthecooktop.Becareful
nottopinchyourfingers.
Tolowerthecooktop,pushtberodsbackandgently
lowerthecooktopuntilit restsin place.
a
Donot liftthe surfaceunitmorethan1inch.If you
do,itmaynotlieflatonthedrippanwhenyou
plugitbackin.
Repeatedliftingofthe surfaceunitmorethan
1inchabovethe drippancanpermanently
datiage thereceptacle.
Toreplacea surfaceunit:
cReplacethe drippan intotherecessin.thecooktop.
Makesureopeningin thepanlinesup withthe
receptacle.
sInserttheterminalsof thesurfaceunitthrough
theopeningin thedrip panandintothe’receptacle.
● Guidethe surfaceunitintoplacesoit restsevenly.
Q. CanI coverthedrip panswithfoil?
A. No,becauseusingfoilso closeto thereceptacle
couldcauseshock,fireor damageto therange. See
theCleaningGuidefor cleaningsuggestions.
Liftthe surfaceunitabout1inch abovethe drippan
andpullit out.
22
Page 23

I
oven vent
Theovenis ventedthroughan openingundertheright
rearsurfaceunit,Nevercovertheopeningwith
aluminumfoilor anyothermaterial,Thiswould
preventtheovenventfromworkingproperly,
“1
metalattheendsofthelamp,
Thecooktoplightiseasilyreplacedwithafh~orescent
nlbeofthesamewattage,Beforechangingthelamp,
pulltheplugtotherangeor disconnecttie P@werflt,
themainfuseor circuitbreakerpanel.
Toremove:
. Liftthe lampcoverbypullingthe bottomtig~
towardyouandthenup.
UIPlacefingersontopneareachendofthelamp.
*Roll thetopofthelampgentlytowardthefrontof
therangeandgentlypullthelampfromthesocket,
makingSweitdoesnothittheImp cover. ‘
Torep~ace:
~Placefingersonthetopneareachendof thelamp,
e Pressthelampintotheslotsuntilit snapsintoplace.
eMove lampcoverdownandsnapintoplace.
I
—
_ .——————
ControlPanelandKnobs
Cleanup anyspillsor spatterswitha dampcloth.
Removeheaviersoilwithwarm,soapywater.
Cleancontrolpanelwithmildliquiddishdetergent
anda soficloth.Rubcontrolpanellightly.
CAUTION:Do not use abrasivesof anykindon the
controlpanel.Thelettetig onmodelswithtouchpads
issensitivetoabrasivesandpressure.
Thecontrolknobs maybe removedforeasier
cleaning.Toremoveknob, pull itstraightoffthe stem.
Washknobsin soapandwaterbut donotsoak.
RemovableOvenDoor
ToREMOVEdoor,opento BROILposition,or where
youfeelthehingecatch.Holdthedoorsides,lift itup
andawayfromthehinges.
ToREPLACE,lineup thedoorwiththehingesand
pushthe door firmlyintoplace.
23
—-
Page 24

!.)
CAUTION:Beforereplacingyourovenlampbulb,
discamneettheeiectricpowerforyowrrangeat.the
mainfuseorcircuitbr~aksrpanelorpuiltheplug.
Besuretoletthelampcoverandbulbcool
completelybeforeremovingorreplacingthem.When
inuse,,lightbulbscanbecomewarmenoughtobreak
iftouchedwitha moistclothor!OWQI,Wheficleaning,
avoidtouchingwarmlampsw!thcleaningclothsifthe
lampcoverisremoved,
The ovenlamp(bulb)iscoveredwithagfass
removablecoverwhichisheldinpla~ewitha
Removetheovendoor,ifdesired,toreachthe
covereasily,
remove:
To
Holdyourhandunderthecoversoitdoesn’tfall
*
whenreleased.Withfingersofthesamehand,firmly
pushbackthewireuntilitclearsthecover,Liftoff
thecover.
D,qNOTmMOVE ANYSCWWSo
,~Replacebulbwith40-watthomeappliancebulb.
Toreplace&Qv&r:
o Placeitintothegrooveofthelampreceptacle.Pull
thewireforwmdtothe’centerO!COveruntilit snaps‘n ,
place.Wheninplace,thewireholdsthecoverfirmly.
Becertainthewireis inthedepressioninthecenterof
thecover.
~Connectelectricpowertotherange.
wire,
@
e
24
HowtoRemovetheStorageDraweror
KickPaneltoCleanUndertheRange
Theareaundertherangecanbereachedeasilyfor
cleaningbyremovingthebottomdrawer(onsome
models).Toremove,pullthe draweroutalltheway,
tiltup thefrontandremoveit.Toreplace,insertglides
atthebackof thedrawerbeyondthestopon range
glides.Liftthedrawerif necessaryto inserteasily.Let
thefrontofthe drawerdown,thenpushin toclose.
\
Tocleanundermodelswitha frontkickpanel,
removethepanelby pullingit straightoutatthe
bottom.Toreplacethepanel,firsthookthetoptabs
on andthenthebottom tabs.
Page 25

,
o
e
@
OutsideGlassFinish
PorcelainEnamel cPaperTowel
andPainted
Surfaces* sSoapandWater
Removable
AluminumFoil
OvenBottomLiner
Shelves
StandardOven
Interior*
StorageDrawer
PART
BakeUnitand
BroilUnit
Broiler Fan
andRack
calrod@surface
UnitCoils
Chrome-Plated
DripPans
ContinuousClean
OvenInterior*
Controlbobs:
RangeTopandOven
Metal,hcluding
BrushedChrome
Cooktop
OutsideandInside
ofOvenDoor*
,!
cLEmG GmE
MATERIALSTOUSE
*SoapandWater
@Soap-FilledScouringPad
● Dishwasher
~SoapandWater
~Stiff-BristledBrush
~PlasticScouringPad
IDishwasher
~StiflBristleNylonBrush
MildSoapandWater
SoapandWater
~SoapandWater
“SoapandWater
● DryCloth
QDampCloth
{
● SoapandWater
● Soap-FilledScouringPad
● CommercialOvenCleaner
● SoapandWater
● Soap-FilledScouringPad
● CommercialOvenCleaner NOTE:Soapleftonlinercausesadditionalstainswhenovenisreheated.
● SoapandWater
GENERALDIRECTIONS
Do notcleanthebakeunitorbroilunit.Anysoilwillburnoff whentheunitisheated.
NOTE:ThebakeunitishingedandcanbeJif!edgentlytocleantheovenfloor.If
spillover,residue,orashaccumulatesaroundthebake.unit,gentlywipearoundtheunit
withwarmwater,
Drainfat,coolpnnandrackslightly.(Donotletsoiledpartandrackstandinoven@
cool,)Sprinkleondetergent,Fillthepan withwarmwater~ndspreadclothorpaper
towelovertherack.Letpanandrackstandforafewminutes,Wash;scourifnecessary,
Rinseanddry,OPTION;Thebroilerpanandrackmayalsobecleanedinadishwasher.
DO NOTUSEdi~hwmherto
cleanthesurfaceunitcoils,
DONOThandletheunit
beforecompletelycooled,
DONOT
unitsinanykindofliquid.
Wipeallltngsaftereachcookingsounnoticedspatterwillnot“burnon”nexttimeyouc~ok.
~Toremove“burned-on”spattersuseanyorallcleaningmaterialsmentioned,Rt:b
scouringpadtopreventscratchingofthesurface.
Coolbeforecleaning.Ifheavysoilinghasoccurredbntheporous,sv~~ace,removeas
muchofthesoilaspossibleusingasmaliamountofwaterand a stiffbristlenylonbrush.
Usewatersparinglyandchangeitfrequently,keepingit ascleanaspossible,andbesure
toblotit upwithpapertowels,cloths,orsponges,Donot
clothsorsponges,sincethiswillleaveupsightlylintontheovenfinish,Ifwaterleavesa
whiteringonthefinishasit dries,applywateragainandblotit withacleansponge,
startingat”theedgeoftheringand workingtowardthecentqr,Forspecialcieaning
instructions,seetheContinuousCleaningsectionofthisbook.
Pulloffknobs.Washgentlybutdo notsoak,Dryandreturncontrolsto rangemaking
suretomatchflatareaontheknobandshaft.
DONOTUSEsteelwool,
abrasives,ammonia,acids witha drycloth.
orcommercialovencleaners.
DONOTUSEoven
cleaners,cleansing intheCarearidCleaningsectionofthisbook.Usesoap
powdersorharshabrasives.
L
Washallglasswithclothdampenedinsoapywater.Rinseandpolishwithadrycloth.Ifknobs
areremoved,do notallowwatertorundowninsidethesurfaceofglasswhilecleaning.
DONOTUSEoven If acidsshouldspillontherangewhileit ishot,usea dry
cleaners,cleansing
powdersorharsh
abrasives.Thesemight asfatspattering,etc.,washwithsoapandwaterwhen
scratchthesurface.
Onlyadampclothmaybeusedtocleanaluminumfoilovenbottomliner.Aluminumfoil
ovenbottomlinermaybereplacedwithheavyweightaluminumfoilcuttothesizeofthe
originalliner.Besuretoremovethislinerfromovenbottombeforecleaningoven.
Yourshelvescanbecleanedbyusinganyandallmentionedmaterials.Rinsethoroughly
toremoveallmaterialsaftercleaning.NOTE:Somecommercialovencleanerscause
darkeninganddiscoloration.Whenusingfor firsttime,testcleaneronsmallpartofshelfand
checkfordiscolorationbeforecompletelycleaning.
Coolbeforecleaning.FORLIGHTSO~:Frequentwipingwithmildsoapandwater(especially
aftercookingmeat)willprolongthetimebetweenmajorcleaning.Klnsethoroughly.
FORHEAVYSOIL:Choosea non-abrasivecleanerandfollowlabelinstructions,usingathin
layerofcleaner.Use
Rinsewell.Wipeoffanyovencleanerthatgetson thermostatbulb.Whenrinsingovenafter
cleaning,alsowipethermostatbulb.
Forcleaning,removedrawerbyptillingitallthewayopen,tiltupthefrontandliftout.Wipe
withdampclothorspongeandreplace.Neveruseharshabrasivesorscouringpads.
immerseplug-in
,,
ofrubberglovesisrecommended.Wipeor rublightlyonstubbornspots.
,
Sputtersandspillsburnawaywhenthecoilsarel~eated,Atthe
endofa meal, removeallpansfromtheCalrodwunitand
heatthesoiledunits~tHI,Letthesoilburnoffaboutaminute
andswitchtheunf?stoOFF+Avoidgettingcleaningmaterials
onthecoils,Wipeoffanycleaningmaterialswithadamp
papertowelbeforeheatingth~Calrodmu~~it,
rub or scrub withpapertowels,
Tosafelycleansurfaces:wash,rinse,andthenpolish
Toremoveovendoorforeasiercleaning,seeinstructions
andwatertothoroughly-cleanboththeinsideandoutside
ofdoor.Rinsewell.NOTE:Soapleftondoorliner
causesadditionalstainswhentheovenis reheated.
papertowelorclothtowipeuprightaway.Whenthe
surfacehascooled,washandrinse.Forotherspills,such
cooledandthenrinse.Polishwitha drycloth.
.—
,-
lightlywith
*Spillageofmarinades,fruitjuices,
immediately.withcarebeingtakennottotouchanyhotportionof theoven.Whenthesurfaceiscool,cleanandrinse.
tomatosaucesandbastingmaterialscontainingacidsmaycausediscoloration.Spilloversshouidbewipedup
25
Page 26

co~ OUS-CLEAmG OWN CAm
‘ Do notafimpt@elm tieovenufl you Wve -d & section.
Thetop,bottom,sidesandbackof the ovenlinerare
finishedwitha s~ecialcoatingwhichcannotbe
cleanedintheusualreamerwithsoap,d~tergents,
commercialovencleaners,coarseabrasivepadsor
coarsebrushes,Useofsuchcleanersand/ortheuseof
ovensprayswillcausepermanentdamage,
Thespecialtoutingis aporousceramicmatertal
whichis darkin colorandf~~lsslightlyroughto the
touch.~fmagnified,theswfacewouldappearas ~
peaks,valleysandsub-surface“tunnels,”Thisrough
finishtendstopreventgreasespattersfromforming
littlebeadsor droplets,whichrundownthesidewalls
ahard-surfaceovenlinerIeavingunsightly sq~*s
of
thatrequirehandcleaning.Instead,whenspatterhits
theporousfinish, itisdispersedandis partially
ToCleanOven: ‘
Usethefollowingstepswhencleaningyour.
Continuous-CleanOven.
1.Letrangepartscoolbeforehandling.It is
recommendedthatrubberglovesbe wornwhen
cleaningrangep~~smanually.
2. Removedl cookware,includingthebroilerpan
andrack.
3.Removeovenshelvesandcleanthemmanually
withscouringpadsor mildabrasive.
4. Removeexcessspills
andboiloversfrom
aluminumfoiloven
bottomlinerbefore
removinglinerfrom
oven.Thisis toprevent
excessliquidsfrom
spillingontotheporous
finish.Thenremove
aluminumfoilbottom
linerandcleanmanually.
(Beforecleaningor removingthealuminumfoilliner,
lift bakeunitout of theway.)
5. Cleanovenwindow.Use mildnon-scratching
cleanserand dampcloth.The insideof theovendoor
may becleanedwith a commercialovencleaner.Use
thepad typeapplicatorto avoidoverspray.
6. Soilvisibilitymaybe reducedby operatingovenat
400°F.Closedoor,set oventemperaturecontrolto
400°F,Timefor at least4 hours.Repeatedcyclesmay
be necessarybeforeimprovementinappearanceis
apparent,particularlyon ovendoor.For moderateto
heavysoilingof ovendoor,usemethoddescribedin
item(7) belowbeforerunning400”F.cycle.The oven
absorbed.Thisdispersalactionincreasestheexposure
ofovensoilto heatedair,whichresultsinoxidationof
soil.Thisfinishalsoreducesthevisualeffectof
residud soil.Itmaynotdisappearcompletelyandat
sometime”afterextendedusage,stainsmayappear.
ThespecialcoatingworksbestorItin~allamountsof
spatter,It doesnotWorkwellwithlargerspills,
especiallysugars,eggor dafrymixtures.Far this
reason,theovenis equippedwitha removable,
replaceablealuminumfoilovenbottomlinerwhich
protectsthe
fromspillovgrs.Avoidspillsoninsidesurfaceofthe
ovendoor.Thisspeci~lfinishisnotusedo~}oven
shelves,Sh61vesaroremovableandcanbet&en to
thesinkforcleaning.SeetheC1eaningGuidein this
bookfor cleaningdirections,
timer(onsomemodels)canbeusedto contiolthe
cycleautomaticallyata timeconvenientfor you.
Someslightsmokingiqayoccur,similartothatwhich
mayoccurduringT@ed,Bakecooking,
~~~MBER: ‘DU~G THEOPEWTION OF
THEOV~N,T~ DOOR?W~DOW ANDOTHER
RANGESURFACES~L GETHOTENOUGH
TOCA~SEBU~S. ~0’NO’TTOUCH.LETTHE
RANGECOOLBEFOREREPLAC~G
ALUMINUMFOILOVENBOTTOMANDOVEN
SHELVESIF THEYWEREREMOVED.
7. If a spilloverorheavysoilingoccurson theporous
su~ace,as soonas theovenhascooled,removeas
muchof thesoilas possibleusinga smallamountof
wateranda stiff-bristlenylonbrush.Whenusing
water,useit sparinglyandchangeitfrequently,
keepingitas cleanaspossible,andbe suretoblotit
up withpapertowels,cloths or sponges.Do notrub
or scrubwithpapertowels,clothsor sponges,since
thesewillleaveunsightlylintontheovenfinish.If
waterleavesa white~ingon thefinishas itdries,
applywateragainandblot
startingat theedgeof thering andwork~ngtoward
thecenter.
Usecarein removingandreplacingaluminumfoil
ovenbottomlinerand shelvesandin placingand
removingdishesandfoodto avoidscratching,
rubbing;r otherwise damagingtheporousfinish on
theovenwalls.
Do notuse soap,detergent,commercialovencleaner,
siliconeovensprays,coarsesteelpadsor coarse
brusheson theporoussu@ace.Theseproductswill
spot,clog andmartheporoussutiace andreduceits
abilityto work.
porous.flnifih onthebottomoftheoven
itwitha cleansponge,
e
o_
26
Page 27

‘ &ti+fi’Lktiti$:&imucnQNs~ ~‘
!____
1:
.. --=4.-_ ._,-.+
“.’ -----
-,.,-;: -
,--$ —--- ,- .,- ‘
-$ =-,.
IOOLSYouwnLkMEED
kge blade screwdriver
Channellockpfiers or sm~ ratchet wrench tith
7/32”socket (forlevetig range)
.-
.-”.
,___
.-;’,.
:
..
.l ..--=,>
.
1%”spacingis recouended fromtherange to
,,
adjacentverticalwallsabovecooktopsurtie.
MIOW30” minimumclearance be~een surface
units andbottom ofunprotec~d woodor metal
topcabinet, and 15~’minimumbetween
countertop and adjacentcabinetbotlom,
To eliminatethe risk ofburns or fireby reaching
overheated surface u~kits,cabinet~toragespace
above the st.rface units shouldbe av~ided,If
cabinetstorage is to be provided,the risk can be
reduced by installinga range hood that projects
horizontallya min.of 5“beyond the bottom of
the cabinets.
NOTLESSTHAN
WIDTHOFRANGE
1
I
~
REMOVEHOUSEFUSEOROPEN
CRC~ BREAKERBEFOREBEGINNING
IN~U~ON.
Thisappliancemust be suppliedwiththe proper
voltageandfrequency,andconn~ed to an
individual,properlygroundedbranch circuit
protectedbya circuitbreaker ortime delayfuse,as
notedon theratingplate.
Wiringmust conformto NationalElectricCodes.
Ifthe electricserviceprovideddoes notmeet the
abovespecifi~tions,itisrecommendedthat a
licensedelecticia installan approvedoutiet
Becauserangeterminalsarenotaccessibletier
rangeisinposition,flexibleserviceconduitorcord
mustbeused-
—
—
v
INSTALL
OUTLETBOX
ONBTHER
SIDEOF~
(instal/ineitherrearcorner)
MIN.
I
—..
-~
-.
I
I
I
1
.;
~ OFRANGE
AREA
7
i
[
—
27
Page 28

PUME ?HEoPEHHH@(~@n8’*
Hooring Under the Mge
Yom range, We many otier household
ikmsf is heavya.nc%@ setie in~ sOfi
floorcoverings
etiga When movingthe range onthis me
T
of ooring,use care, and followthese simpleand
inexpensive instructions.
me range shouldbe instafledon a 1/4 inchthick
sheet ofplywood(or shnilarmaterial) asfollows:
when the flWFcove~ngendsatthefrontofthe
range,
be builtup with plywoodto the same leveldr higher than the floorcovering.This willallow
the range to be movedfor cleaningor servicing,
Use onlya 3+onductor, or ifrequired a
4-conductorrange cord set asnotedbelow.~ese
cord sets are pi40videdwith ring type terminals.
The electricalrating ofthe cord must be 125/250
voltsmintium, 40amperes.
NOTE:Only a 4conductor cord is to be used
when the applianceis installed ina mobile‘home
or where localcodes do not permit grounding
through the neutral.
1. Locateconnector block atthe bottom rear of
range and remove rear wiringcover.
2.
thearea that the rangewillrest oq should
Directlybelowtheconnectorblockisahole
suchas cushioned vinylor
/.
withaknockoutringforaccommodatingconduit
fittings.Bracketsprovidedareusedtosupport
theflexiblecordstrainrelief,whichmustbe
securelyattachedtothecordset.
PowerCordInstillation-insert screws
throughpowercordterminalssothatthescrews
passthrough
engagenuts. Tighten screws securely
CableDirect lnstiation-Clamp bare wires
~betweenthe connectorblockterntinalsand
movablenutswith screwstightened securely
1. ,Copper
Connectthe neutral or grounded wire ofthe
supplycircuit to the neutral tertinal ofthe
connector block,located in the center. The
powerleads must be connected to the outside
(brass colored) terminals.
connectorblockWtinals and
W&g
1
28
WIRINGCOVER
(SHOWNREMOVED)
~
# n m CONNECTOR
CK
W=NG: CO~E~R B~CK IS
APPROVEDFORCOPPERWm
CONNE~ON ONLY.
Page 29

2.
Ntium wiring
Connectlength ofcopperbuildingwire to
A
range terminalblock,
B. Splicecopper wiresto ~uminum wi~ng using
specialconnectors designedand U,L,approved
forjoiningcopper to aluminum,and followthe
connectormanufacturer’s,recommended
procedure closely.
NOTE:Wire used, locationand enclosure of
spEces,etc.,must conformt? goodwiring
practiceand.localcodes. ~ ~
I
I
,,
STEP5
4“WURESYSTEM ~ ‘
SPECIALCROUMBIHGmisFRucTloHs
W~ING: “- - ‘ “ +
Frame grounded to neutral ofappliance
through a link.If used in a MOBILEHOME or
ifLOCALCODESdo not perniit grounding, .
through the neutral:
1) disconnectthe linkfrom neutial,
Z)use grounding terminal or lead to grbund
unit in accordancewith localcodes, and
3) connect neutral terminal or lead to bratich
cwcuitin usual manner.
(Ifthe appliance ii to be connected by
means ofa cord set, use 4conductor cord
for this purpose.) ~ ,, -,, ~
CONNECTOR
BLOCK
STEP6
AN ANTI-TIP bracketissuppliedwithinstructions
forinstallationinavarietyoflocations.The
instructionsincludeatemplate,apartslistanda
listoftoolsnecessarytocompletetheinstallation.
ReadtheIMPORTANTSAPETYINS’T’RUHIONS
andtheinstructionsthatfityoursituationbefore
beginninginstallation.
wmHiMG
1. Rangemust be secured byANTI-TIPbracket
supplied,
2, See instructionsto install(suppliedwith
bracket).
3. Unlessproperlyinstalled,range couldbe
tippedby steppingor sittingon door,Injury
mightresult from spilledhot liquidsor from
range itself.
?’ypicflfinstallation ofAnti”Tipkracket
Attachment to Wall
Bracket
Screw Must Enter
Vvqrir-la
STEPT
LEVELMH6TiEMNGE
The range must be leveled.Levelingfeet are
locatedat each corner ofthe base ofthe range.
Removethe storage drawer or kick panel
(dependingon your model), and using channel
locks,rotate the levelingfeet in and out as
required to level the range. (For instructions on
howto removeand replace the storage drawer or
the kick panel,-see CleaningU~~derthe Rangein
the Care and Cleaningsection. On some models
there are plasticcovers which maybe removed
for easy adjustment oust squeeze and pull).
One ofthe rear levelingfeet willengage the
ANTI-TIPbracket (allowfor some side to side
adjustment). Allowa minimumclearance of1/8’1
between the range and the levelingfootthat is to
be installed into the ANTI-TIPbracket.
Check the range for proper installationinto the
ANTI-TIPbracket (afterthe range has been
properly installed)by grasping the edges ofthe
REARburner holes and carefullyattempting to
tiltthe range forward.
STEP8
F#NALCMECK
Be sure all switches are in the “off”position”
before leavingthe range.
,
I
1
29
Page 30

Ifyouneedmore help...caBl,toil free:
GE Answer ~enter@
800.626.2000
consumer information service
--
Page 31

.
Our consumerserviceprofessionals
willprovideexpertrepairserviceon
yourHotpointappliance, scheduled
at a time that’s convenient for you.
Many GE Consumer Service companyoperated locations offer you service
today or tomorrow, or at your con-
venience (700 a.m.to 700 p.m. week-
days,9:00a.m.to 2:00p.m.Saturdays).
Our factory-trainedtechniciansknow
yourapplianceinsideandout-so
mostrepairscanbe handledinjust
one visit.
Youcan havethesecurefeelingthat
GEConsumerServicewillstillbe
thereafteryourHotpointproduct
warrantyexpires.PurchaseaGE
contractwhileyourwarrantyisstillin
effectandyou’llreceivea substantial
discount.Witha multiple-yearcontract,you’reassuredof fiture service
attoday’sprices.
-41
I ,,
tb
I
I
Inditidti qu~~ed tosefice tieti
own apphances canhaveneeded
partsor accessoriessentdirectlyto
heir home. TheGEpartssystempro-
videsaccesstoover47,000parts..and
allGEGenuineRenewalPartsare
fullywarranted.VISA,MasterCard
andDiscovercardsareaccepted.
User maintenance titictiom
contained k this boo~et cover procedures titended to be petiomed by
my kaser.Other setihg gener~y
shodd be referred to qtified sertice persomel. Caution must be
exercised,
maycawe mstie operation.
sincei.rnproper sertichg
Upon request,we willprovideBraille
controlsfora varietyof Hotpoint
appliances,anda brochureto assistin
planningabarrier-freekitchenfor
personswithlimitedmobility.To obtaintheseitems,free of charge, call
800.626.2000.
Consumerswithimpairedhearing
or speechwhoIlaveaccesstoa
or a conventionalteletypewritermay
call800-TDD-GEAC(800-833”4322)
to requestinformationor service.
TDD
Page 32

.... .... .
!
~L--
.—
YOURHOTPOIF4TRAr4GE
WARRANTY
Saveproof aforiginalpurchasedatesuchasyour salessliporcancelledchecktoestabiishwarrantyperiod.
-.
WHAT1sCOVERED
WHATisNOTCOVERED
~
FULLONE-YEARWARRANTY
Foroneyearfromdateoforiginal
purchase,we wil! provide,free of
charge,parts and servicelabor In
your hometo repairor replace
any pad of the ~~ngethat fails
becaus~of a manufacturing
defect.
eService trips to your home to
.
teach you how to use the product.
ReadyourUse and Carematerial.
If you then have any questions
about operating the product pl~ase
contact your dealer or our
Consumer Affairs office at the
address below,or call, toll free:
GE Answer CenteF
800.626.2000
consumer information service
oImproper installation.
If you have an installation problem,
contact your dealer or installer.
You are responsible for providing
This warrantyis extendedto
the original purchaserand any
succeedingownerfor products
purchasedfor ordina,~ hQmeuse
Inthe 48 mainlandstates, Hawaii
and Washington,D.C,In Alaskathe
warranty isthe same Qxceptthat it
i~LIMITED becauseyou must pay
to ship the productto the service
All warranty servicewill be
provid~dby our Facto~ Servic@
Centers
orby ourauthorized
CustomerCare”servlqersduring
normalworking
Look inthe White or Yellow Pages
of your telephone directory
GENERAL ELECTRIC COMPANY,
GENERAL ELECTRIC FACTORY
SERVICE, GENERAL ELECTHIC~
HOTPOINT FACTORYSERVICE
or GENERAL ELECTRIC
CUSTOMER CARE@SERVICEm
adequateelectrical,gas,exhausting
and other connecting facilities as
described in the Installation
instructions provided with the
product.
eReplacement of house fuses or
resetting of circuit breakers.
● Failure of the productif it is used
for other than its intended purpose
or usedcommercially.
oDamage to product caused
by accident, fire, floods or acts
of God.
WARRANTOR IS NOT
RESPONSIBLE FOR
CONSEQUENTIAL DAMAGES.
hours,
for
4
4
(
Somestates do notallowtheexclusionor limitationof incidentalorconsequentialdamages,sotheabovelimitationorexclusion
maynotapplytoyou.Thiswarrantygivesyou specificlegalrights,andyou mayalsohaveotherrightswhichvaryfromstateto state.
Toknowwhatyourlegalrightsareinyourstate,consultyourlocalorstateconsumeraffairsofficeoryourstate’sAttorneyGeneral.
Iffurtherhelpis neededc~ncerningthiswarran~, write:
Manager—ConsumerAffairs,GEAppliances,Louisville,KY40225
Thisbookisprintedon recyciedpaper
~
10-91 CG
Warrantor:GeneralElectricCompany
RB525GR
RB532GR
RB632GR
RB636R
I
RB52
RB53
 Loading...