

Page 1

H m
Con@n&
AluminumFoil
Anti-TipBracket
Appliance Registration
Energy-SavingTips
Features
Instillation Instructions
Leveling
I
Model and SerialNumbers
Oven
I
Baking, Bating Guide
BroiJing,BroilingGuide 20,21
Control Settings
Door Removal
I
Light; BulbReplacement 15,22
Roasting, RoastingGuide 18,19
I
Therinostat Adjustment 23
VentDuct
I
Prob[em Solver
Repair Service
I
Safety Instructions
Surface Cooking
I
Control Settings
Cookware Tips
20
3,5
2
5
6-9
5
5
2
E-21
16,17
15
22
22
25
27
3,4
‘10-13
10
12, 13
models
RS46J
U4KJ
Page 2

It isintendedtohelp youoperate
“
*K&
andmaintainyournew range
properly.
Keepit handy for answerstoyour
questions.
Ifyoudon’t understand something
or need more help, write (include
yourphonenumber):
ConsumerAffairs
Hotpoint
AppliancePark
Louisville,KY40225
writedownthemodel
andserialnmbers.
You’llfind them on a label on
thefront of the range behind the
ovendoor.
These numbers are also on the
Consumer Product Ownership
RegistrationCard that came with
yourrange. Beforesending in this
card, please write these numbers
here:
Ifyoureceived
dmaged range...
a
bediately contacttie dealer (or
builder)that sold youtherange.
savetimeandlnonev.
Check the Problem Solveron
page25. It listscausesof minor
operatingproblems that youcan
correct yourself.
.
—
‘k!
.
.-
.
.
ModelNumber
Serial Number
Usethese numbers in any
correspondence or service calls
concerning your range.
Page 3

ANTI-TIP bracket suppfied. To
...-<-----
. ..—.———.......
.... ... .
checkiftie bracketisins’ded
ad engagedproperly,removethe
drawer(on
models so equip@)
andinspecttherearlevelingleg.
M&esureitfitssecurelyinto
theslotinthebracket.
Formodelswithoutastorage
drawer,carefillytiptherange
forwardtoch~k if theANTI~P bracketisengagedwiththe
levelingleg.
If
you pull the rangeoutfromthe
d foranyreason,makesure
therearlegisreturnedtoits
positionintie bracketwhenyou
pushMerwgeback.
@X(eephoodand grease filtem
to maintain good venting
Cleml
and to avoid grease fires.
@Do nottouchhmthg
elemen~ or hterior surface of
oven.Thesesufices maybehot
enoughtobumeventhoughtiey
aredarkMcolor.Duringand
af~r use,donottouch,orlet
clotig orotherflamable
ma&ridscontactsutiaceuti@,
areasnearbysurhceutiworany
interiorareaoftie oven;allow
sufficienttimeforcooling,first.
Potentiallyhotsurfacesinclude
thecooktopandareasticingthe
cooklop,ovenventopeningand
surfacesneartheopening,and.
crevicesaroundtheovendoor.
Remember:TheinsidesLIrfice
oftheovenmaybehotwhentile
doorisopened.
I
---
----
Page 4

surfaceCooItimgUnib
--
;
<
.-!1
t’:;
-?
USEproper~a size—This
@
appliance is equipped with one
or more surface units of different
size. Select cooh~are having flat
bottoms large enough to cover
the surface unit heating element.
The use of undersized cookware
will expose a portion of tie
heating element to direct contact
and may result in ignition of
clothing. Proper relationship of
cookware to burner will also
improve efficiency.
@Never leave SUfiace Utim
mmndd at w kt **S.
Boilover causes smoking and
greasy
onfire.
@BeSmetip pm ad vent
duck are notCoveredmd are
b place.Theirabsenceduring
cookingcoulddamagerange
partsandwiring.
spilloversthatmaycatch
removabiesurfaceUtib. Don’t ‘
.-
putthemh a tishwmher.
~~@ forf@Rg Shoddk as
&y w
foodsormoistureonfreshfotis ‘~ cancausehotfattobubbleup
andoversidesofpan.
xible. Frostonfrozen
-;___
@mn’t usealumtium fotito
Itie dtip pa~ or anywherein
theovenexceptasdescribedin
thisbook.Misusecouldresultin
a shock,firehazardordamage
totherange.
@only Cetiin tyw ofglms9
glms/cetie, eatihenmre or
other glwed Conhinemare
Snitibleforrange-tipSertiee;
othersmaybreakbecauseofthe
suddenchangeintem~rature.
(Seesectionon “Surface
Cooking”forsuggestions.)
@Tomiti.ize the possibility
@fbuTm7ignitionofflammable
materials,and.spfllage,tie
handleofaco~~hinershouldbe
tL3rEedtoward.tie centerofthe
~~~g~w~~?oult&A$endingover
nearby
g?/\“
~>.?~$?-l‘?
!;jf~,jj i~>}iu,,.-
sllrface Ultih.
,$yLz;9)7~<?:fqx-~c~~:
PA2V?c$,yd LL.=.-. ~-:
.,
5$?Q%”,S~~~~-.d\
-*WT=’~~skgcaGlrli~m .
‘“face~dmr~to
@Alwaysheatfatsiowly9 md
watchasitheats.
usedeep fat$Mrmometer
@
wheneverpssible toprevent
overheatingfatbeyondtie
smotig point.
r=. .
e--l
i--. .,.
;..
i=-.-...
{;: ....
[...-
[“
~:’
,.
!-
~;l-’
f-,
)
1
—.
1’
Page 5

ovenCoohg
..,.—.,..—— ---.———-..-,.
~~~~~~g~~~~~~$Oit.floor ioverings
suchas cushionedvinyl or
carpeting. When movingthe range
on thistype of flooring,use care,
and it is recommendedthat these
simple and inexpensiveinstructions
be followed.
The rangeshouldbe instiled on
a sheetofplywood (or similar
material)as follows:l~en the
floor coveting ends at the~ront of
$herange, the area that the range
willrest on shouldbe built up with
plywoodto the samelevelor higher
than the floor covering.This will
allowthe rangeto be movedfor
cleaningor servicing.
velingscrews are located on
each corner of the base of the
range. Removethe bottomdrawer
(on models so equipped) and you
can levelthe rangeon an uneven
floor with the use of a nutdriver.
To remove drawer,pulldrawer
outall theWayy tilt up thefront
andtalie it out.To replace
drawer, insert glides at back of
drawerbeyondstopon range glides.
Lift drawer if necessary to insert
easily.Let front of drawer down,
then push in to C1OSC.
@Use cookwareofmtiium weight
aluminum,with tight-fittingcovers,
and flat bottomswhichcompletely
covertie heatedportion ofthe
sufiaceunit.
@Cookfreshvegetableswitha
minimumamountofwaterin a
coveredpan.
e W“tchfQOdSwhen bringingthem
quicMyto cookingtempera~res at
HGH heat. When food reaches
cootig temperature, rduce heat
immediatelytolowestsettingthat
WWkmp it cootig.
@Use Rsidud heat with sufice
cookingwheneverpossible. For
example,when cookingeggsin the
shell, bring waterad e~s to boti,
then fiJrntoOFF positionand
coverwith lid to completethe
cooking.
~Use correctheatfor cooking task
~GH—to stafl cooking
(iftime
Wows,donotuseWGHheatto
start).
MEDIUM HI—quickbrowning.
MEDIUM—slow frying.
LOW—fitishcooking most
quantities, simmer-double boiler
heat, finish tooting, and special
for srna~lquantities.
}VARM—tomaintain serving
temperature of most foods.
~when boiling water for tea or
coffee,
It is not economical to boil a
col~tainerfullof water forone
or two cups.
heatonly amount needed.
@Preheatovenonlywhen
necessary.Mostfoodswillcook
satisfactorilywitiout preh~ating.
If youfindpreheatingisnecessary,
watchtheindicatorlight, and put
foodin ovenpromptlyaftir the
lightgoesout.
a A]waYsturn OVenOFF before
removingfood.
~
~u~ingbaking,avoidfrequent
door openings.Keepdoor open as
short a time as possibleif it is
opened.
@Cook completeovenmeals
insteadofjust onefooditem.
Potatoes,othervegetables,and
somedessertswill cook together
with a main-dishcasserole, meat
loaf, chicken or roast. Choose
foodsthat cook at the same
temperatureand in approximately
the same time.
~Use residud heat in the oven
wheneverpossibleto finish
cookingcasseroles, ovenrneds,
etc.
Alsoaddrolls or precooked
dessertsto warm oven,using
residud heat to warm them.
.-l a.. .
-.,
.“
.,
.r--,
)
r
..
i
Page 6

.,
.-
*One surface unit ONindicator light on
RA511J,4 on I?A513J(one over each surface
unit control)
**No oven light on RA511J
AF
Page 7

see
page
2 SurfaceUnit Controls
I
3 “ON” IndicatorLight/Lights
forSurfaceUnits
I
\ 4 Oven Set Control 15
2
/ 5 Oven TempControl
I 6 Oven CyclingLight
7 AutomaticOven Timer,
I
Clock and Minute Timer
I
8 Stay-UpCalrod@SurfaceUnit
(Mayberaisedbutnotremoved
whencleaningunderunit.)
9 Plug-InCalrod@SurfaceUnit
(Mayberemovedwhencleaning
—_
—-
~w“
I
\ ~5 Broil Unit
] 16 BakeUnit(Maybe liftedgently
j forwipingovenfloor.)
underunit.)
10 Chrome-PlatedTrimRings
andPorcelainDripPans
11 Chrome-PlatedTrimRingsand
AiuininumDrip Pans
I
12 OvenVentDuct(Locatedunder
rightrear surfaceunit.)
I
13 OvenInteriorLight(Comeson
automaticallywhendooris opened.)
i4 Oven LightSwitch
23
23
22
22
22
22
15
20
16
15
15
14
3 6-in.
18-in.
4 4 4
3 6-in.
18-in. 18-in.
I
I
3 6-in.
I
1
36-in.
18-in.
4
clock &
Min.Timer
3 6-in.
18-in.
4
Q
@
e
2 6-in.
2 8-in.
4
e
e
I !7 Oven Shelves
18 OvenShelfSupports (LettersA, B, C and
D iildicatecookingpositionsforshelvesas
!
rccoinrncndedoncookingg~iides,)
!
..... ..
15
15
20
—.—
2
Q
Q
[,
Q
a
Q Q
-..1
I
,
I
i :
7
.
t
.’
Page 8

“:
*
P
.
Page 9

,,
Explained
on Dage
I
1 ModelandSerialINumbers
2 SurfaceUnitControls
3 “ON” IndicatorLigl~t/Lights 10
for SurfaceUnits
4 OvenSetControl u
...
5 OvenTempControl
6 Oven CyclingLight
7 AutomaticOvenTimer,
Clock and MinuteTimer
8 Stay-UpCalrod@SurfaceUnit
(Maybe raised butnotremoved
when cleaningunder unit.)
9 Chrome-PlatedTrimRingsand
AluminumDrip Pans
10 OvenVentDuct (Locatedunder
right rear surface unit,)
11 OvenInterior Light (Comeson
automaticallywhen door is opened.)
12 OvenLight Switch
+
2
+
15
15
23 3 6-in.
18-in.
22
4
3 6-in.
18-in.
@
3 6-in.II
1g-in.
I
‘-
22
22
15
I 13 BroilUnit
14 BakeUnit (Maybe lified gently
for wiping oven floor.)
I
/ 15 Oven Shelves
16 Oven Shelf Supports (Letters A, B, C and
D indicate cooking positionsfor shelves
as recommended on cookifigguides.)
I
[8 StorageDrawer
I
19 Anti-TipBracket
(See Installation Instructions)
I
20
16
15
20
24
3,5
2
e
2
@
I
I
2
o
.—-..—.......--————..
,,...—— _______.—.._—_______
....
,,
.
Page 10

~~~f~~e coo~ngwith
..
.—-..
.—
.—#.,..
‘=R:’<
.-
Ititik HeatControk
l~ur surfaceunits and controls
aredesignedtogiveyouaninfinite
choiceofheatsettings for surface
unitcooking.
AtbothOFF andHIGH positions,
thereis a slight niche socontrol
“clicks”atthosepositions; “click”
onHIGH marksthehighestsetting;
thelowestsettingisbetweenthe
wordsWA~ and OFF. In aquiet
kitchen,youmayhear slight
ccc~ic~ng”soundsduringcooking,
indicatingheatsettingsselected
arebeingmaintained.
Switchingheatstohigher settings
alwaysshowsa quicker changethan
switchingto lowersettings.
l@
Step 1:Grasp controlknobad
pushin.
I
I
Step 2: Turn eitherclockwiseor
counterclockwisetodesiredheat
setting.
mGH
m~
m
mD
J
mw
Quickstartfor cooking;
bfig watertobofl.
Fastq, pm broil;maintain ~&..
fastboil onlargeamount
---
offood.
Sauteandbrown;maintain
slowboilonlargeamount
offood.
Cookafter startingat
HIGH; cookwithlittle
waterincoverd pan.
WW Steamrice, cereal;
maintainserving
temperatureofmostfoods.
NmE:
1. AtHIGH, MED HI, neverleave
foodunattended.BoiIoverscause
smoking; greasy spilloversmay
catchfire.
2. AtW-, LOW,meltchocolate,
butteronsmallunit.
.—
--
-.
—
..-.—
...-.
-
-$:
w::
.—
control mustbe pushedintoset
OdyfromorF position.when
control
isinany position other
than OFF,it maybe To@ted
withoutpushing
Besureyouturn controltoOFF
when youfinish cooking.An
indicatorlightwillglowwhen
ANY heaton anysurfaceunitison.
in.
I
Page 11

designedforcafiningpurposes.
...” . .
.T———.. . . .
Checkthe manufacturer’s
instructionsand recipes for
preservingfoods. Be sure canner
isflat-bottomedand fitsoverthe
centerofyoursurface unit. Since
canninggenerateslargeamountsof
steam, be carefil to avoidburns
fromsteamor heat. Canningshould
onlybe doneon surfaceunits.
Q. can I Covermy drip parls with
foil?
A. No. Clean as recommended in
CleaningGuide.
Q. can1use specialCooliing
equipment,likean Orientilwok,
011any surfaceUnik?
A. Cookwarewithoutfiatsurfaces
is not recommended. The lifeof
your surfaceunitcan be shortened
and the rangetopcanbe damaged
from the highheatneededfor this
typeofcooking.
Q. why am I not getting the heat
1need from my units even though
I have the knobs an the right
setting?
A. After turning surfaceunitoff
and making sure it is cool, check to
make sure that yourplug-inunits
are securely fastenedinto the
surfaceconnection.
Q. why doesmy Cookware tilt
when I placeit{$Hthe surfacetit?
A. Becausethesurfaceunitis not
flat, Makesure thatthe “feet” on
yoursurfaceunitsaresittingtightlv
i~~therangetop indentationand tne
reflectorring is flaton the range
surface.
Q. why isthe porceIain finish on
my cookware coming offl
A. If yousetyour surfaceunit
higherthan requiredforthe
cookwarematerial, andleaveit,
the finishmaysmoke,crack, pop,
or burn dependingonthe pot or
pan. Also, a too highheat for long
periods, and smallamountsofdry
food, may damagethe finish.
—.
Potsthat extendbeyond 1inch of
cookingelement’strim ring are not
recommended for most surface
cooking. However,when canning
with water-bath or pressure canner,
larger-diameter pots may be used.
This is because boiling water
temperatures (evenunder pressure)
are not harmful to cooktop surfaces
surrounding the surface unit.
HOWEVER, DO N~ USE
LARGE
DIAMETERCANNERS
01{~~~~ LARGE DIAMETER
Pms FOR FRYING OR BOILING
FOODS ~HER
P%’lostsyrup or sauce rnixtures—
THANWATER.
and al~types of frying-—cook at
~emperaturesmuch higher than
1>~~ilillgwater.
Such tempera~ures
cc>uldeventually harm cooktop
--x-.
:~{~rfa.cess~~rro~.]ndi~~gsurface units.
- -)
.. =
.-..--”
..-.,
<’
‘“\
i\--
-,...
observeFollowingPoink
incanting
1. Be sure the canner fits over the
center ofthe surface unit. If your
range or itslocation does not allow
the canner to be centered on the
surface unit, use smaller-diameter
pots for good canning results.
2. Flat-bottomed canners must
be used. Do not use canners with
flanged or rippled bottoms (often
found in enamelware) because they
don’tmake enough contact with the
surface unit and take too long to
boil water.
PdGHT
m
3. When canning, use recipesand
procedures from repumblesources.
Reliablerecipes and procedures are
availablefromthemanufacturer of
your canner; manufacturersof
glassjars for canning, such as Ball
and Kerr; and the United States
Department of Agriculture
Extension Service.
4. Remember that canning is
a process that generateslarge
amountsof steam. Toavoidburx)s
from steam or heat, be careful
when canning.
N~E: If your range is being
operated
onlowpower(voltage),
canning maytake longer than
expected, eve~~though directions
havebeen carefully followed. The
process time will be shortened by:
(1)using a pressure canner, and
(2) starting with I+OTtap water
for
fastest heating of large q~la]ltities
of water.
.. ———.—.
—.—,—— ___________,..- .. ____ . .__-.__..
Page 12

1. Use medium-or heavy-weight
cookware,Aluminumcookware
conductsheat fasterthanother
2. Toconservethe mostcooking 3. Deep FatFrying.Do notoverfill
energy,pansshouldbe flat on the
bottom,havestraightsidesandtight
kettlewith fatthatmay spillover
when addingfood.Frostyfoods
metals.Cast iron and.coatedcast fittinglids. Match thesizeof the bubblevigorously.Watchfoods
ironcookwareisslowtoabsorb
heat, butgenerallycooks evenlyat
LOWor MED settings.Steelpans
maycook unevenlyifnotcombined
withother metals.
saucepanto the sizeof the surface
unit. A pan that extendsmorethan keep rangeand hood clean from
an inch beyondthe edgeof the trim accumulatedgrease.
ring traps heat whichcauses
discolorationrangingfrom blueto
fryingat hightemperaturesand
dark grayon chrome trim rings.
Directionsand Setting
toSW Cooking
Cereal
Cornmeal,grits,
oatmeal
Cocoa
coffee
Eggs
Cookedinshell Covered
Friedsunny-side-up Covered
Friedovereasy HIGH.Meltbutter.
Poached Covered
Scrarnblcd
or omelets HIGH.Heatbutteruntillight
Covered
Saucepan
Uncovered
Sz.icepan
I
Percolator
+
Saucepan
Skillet
Uncovered
Skillet
Skillet
Uncovered
Skillet
HIGH.In coveredpanbring
watertoboilbeforeadding
cereal,
HIGH.Stirtogetherwateror
milk,cocoaingredients.
Bringjtlsttoaboil,
HIGH.Atfirstperk,switch
heattoLOW.
HIGH.Covereggswithcool
water.Coverpan,cook
untilsteaming,
MEDHI.Meltbutter,add
eggsandcoverski]]et.
HIGH.Incoveredpanbring
watertoa boil.
goldenincolor.
.—
Fruits Covered
Saucepan
Covered
Skillet
Uncovcr~d
Skillc!
HIGH,Incoveredpanbring
fnlitandwatertoboil.
~-lIGH,Meltfat,thenaddmeat.
S\vitchtoMED HItobrown
meat..4ddwaterorotherliquid.
SettingtoComplete
cookingCookware
LOWorWARM,thenadd cereal.
Finishtimingaccording
topackagedirections.
MED,tocook1 or 2 minutes
tocompletelyblendin~ients.
LOWtomaintaingentlebut
steadyperk.
LOW.Cookonly3to4
minutesforsoftcooked;
15minutesforhardcooked.
ContinuecookingatMEDHI
untilwhitesurejustset, about
3to5moreminutes.
LOW,thenadde~s. When
bottomsofeggshavejust set,
carefi~llyturnovertocookother
side.
LOW.Carefullyaddeggs,
Cookuncoveredabout5
minutesatMEDHI.
MED.Addeggmixture.
Cook,stirringtodesired
doneness.
LOW.Stiroccasionallyand
checkforsticking.
LOW.Simmeruntilfork
tender.
MEDHIor MED.Brownand
cooktodesireddoneness,
turningoveras needed.
Comments
Cerealsbubbleandexpandas
theycook;uselargeenough
saucepantoPreventboilover.
Milkboilsoverrapidly.Watchas
boilingpointapproaches.
Percolate8to10minutesfor
8 cups,lessforfewercups.
Removecookedeggswithslotted
spoonorpancaketurner.
EMScontinuetosetslightlyafter
cooking.For omeletdonot stir
lastfewminutes.Whenset, fold
inhalf.
Freshfruit:Use 1/4to 1/2cup
water perpoundoffruit.
Driedfruit:Usewateraspackage
directs.Timedependsonwhether
fruithasbeenpresoaked.If not,
allowmorecookingtime,
Meatcanbeseasonedandfloured
beforeit is browned,ifdesired,
Liquidvariationsforflavorcould
bewine,fruitor tomatojuiceor
meatbroth.
Timing:Steaks1to2-inches:1to
2hours.BeefStew:2 to3hours.
PotRoast:21/~to4hours.
Panfryingisbestforthinstca.ks
andchops.Ifrareisdesired,preheatskilletbeforeaddingmeat.
~
... . ..
.—.—.-
...,,.
....
,,<
4
Page 13

Food
FriedChicken
Panfriedbacon Uncovered
Sauteed:Lesstender
thinsteaks(chuck,
round,etc.);liver;
thickorwholefish
Simmeredor stewed
meat;chicken;cored
beet smokedpork;
stewingbeef;tongue;
etc.
Meltingchocolate,
butter,marshmallows
Covered
DutchOven,
Kettleor
Large
Saucepan
Small
Uncovered
Saucepan,
Usesmall
surfaceunit
Wncakesor
Frenchtext
Skilletor
Griddle
RSb
Noodlesorspaghetti
Covered
LargeKettle
orPot
Ressure Cooking ?rcssure
Cookeror
Canner
Uncovered
Candies,Frostings
Fkgetilbles
Fresh
Frozen
Saucepan
Covered
Saucepan
Covered
Saucepan
Uncovered
Skillet
Covered
Saucepan
- ...---.-...-.—..—..—
Cookware
Covered
Skillet
Skillet
Covered
Skillet
~i~tiO~S andSetting
toStartCooking
HIGH.Meltfat,Switchto
MEDHItobrownchicken.
HIGH.Incoldskillet,arrange
baconslices.Cookjust
untilstartingtosizzle.
HIGH.Meltfat.Switchto
MEDtobrownsIowly.
HIGH.
Covermeatwithwater
andcoverpanorkettle.
Cookuntilsteaming.
Ww. Allow10tos minutesto
meltthrough.Stirtosmooth.
MEDHI.Heatskillet8to
10minutes.Greaseiightly.
31GH.Incoveredkettle,bring
;akedwatertoa boil,uncover
indaddpastaslowlyso
}oilingdoesnotstop.
31GH.Heatuntilfirstjiggleis
Ieard.
iIGH.Bringjusttoboil.kddings, Sauces,
IIGH.Measure1/2to 1 inch
/aterinsaucepan,Add
saltandpreparedvegewble.
Incoveredsaucepanbring
toboil.
HIGH.Measure waterandsalt
asabove.Addfrozenblock
ofvegetable.Incovered
saucepanbringtoboil.
HIGH.Inskilletmeltfat.
HIGEI.Bringsaltedwater toa
~ojl.
-“—....——...”..——
—.
SettingtoComplete
Cooking
LOW,Coverskilletand
cookuntiltender.
Uncoverlastfewminutes.
comments
Forcrispdrychicken,coveronly
afterswitchingtoLOWfor10
minutes.Uncoverandcook,turning
occasionally10to 20minutes.
MEDHI.Cook,turning
overasneeded.
LOW.Coverandcook
untiltender.
LOW.Cookuntilfork
tender.water should
slowlyboil),Forverylarge
loads,mediumheatmay
beneeded.
I
Amoreattention-freemethod
istostartandcookatMED.
Meatmaybebreadedor
marinatedinsaucebeforefrying.
Addsaltorotherseasoning
beforecookingifmeathasnot
beensmokedorotherwise
cured.
Whenmeltingmarshmallows,add
milkorwater.
Cook2 to3minutesperside. Thickbattertakesslightlylonger
time.~m overpancakeswhen
bubblesrisetosurface.
MEDHI.Cookuncovered
untiltender.Forlarge
amounts,HIGHmaybe
Uselargeenoughkettleto
preventboilover.Pastadoubles
insize whencooked.
neededtokeepwaterat
rollingboilthroughout
entirecookingtime.
MEDHIforfoodscooking
10minutesor less.MEDfor
Cookershouldjiggle2 to 3times
perminute.
foodsover10minutes.
LOW.Tofinishcooking.
Stirfrequentlytoprevent
sticking.
MED.Cook1pound10
to30or moreminutes,
Uncoveredpanrequiresmore
waterandlongertime,
dependingontenderness
ofvegetable.
LOW.Cookaccordingto
timeonpackage.
MED.Addvegetable.
Cookuntildesired
Breakupor stir as neededwhile
cooking.
Turn
over or stirve,gembieas
necessary
for even browning.
tendernessis reached.
WARM,Coverand cook
accordingtotinle.
Tripleinvolumeaftercooking.
TimeatWARNi,Rice: 1 cuprice
and2 cupswater-25 minu~ss.
Grits: i cupgritsand4CUI)S
w2ter--~,Omimrtes.
-----—-—-....
.’
Page 14

..” .
r
The automatic timer and ciockon
yourrangeare helpfuldevicesthat
serveseveralpurposes.’Theknob
locations on some rangemodels
~nayvaryand willlooklikeone of
thetwosetsoftimersbelow.
Tosetclock
TOs~~ THE CLOCK, ~USh t~I~
c~nt~~ knob in
and turn the clock
handsto the correct time. (The
MinuteTimer pointer willmove
also, let knob out, turn the Timer
pointer to OFF.)
TosetMinutemmer
The Minute Timer has been
combined with the range clock.
Use it to time ail your precise
cooking operations. You’ll
recognizethe Minute Timer as the
pointer which isdifferent in color
and shape than the clock hands.
TO SET THE MINUTE TIMER,
turn the center knob, without
p~Isl~iBIgi~~,untilpointer reaches
number of minutes you wish to
time. (Minutes are marked, up to
60, in the center ring on theclock.)
A[the cnd of the set time, a buzzer
sounds to tell you time is up. Turn
knob. witi30ut pushi~~gin9~~ntii
pointer reaches OFF and buzzer
Si(}ps.
UsingAutomaticTimer,youcan
TIME BAKEwiththe ovenstarting
immediatelyand turningoff at the
StopTimeset or setboth DELAY
START(somemodelsmaysay
START)and STQPdialsto
automaticallystart and stopoven
ata later time ofday.It takesthe
worryout of notbeinghometo
startor stopthe oven.
Settingthe dials forTIME BAKE
isexplainedin detailon page 16.
Model RB532GJ
clock and Minute
mmer
Thismodel has a time of dayclock
andminutetimer but does nothave
START and S~P dials needed for
TIMEBAKEfunction.
QllestionsandAmw’em
Q. Howcan I use my NIinute
Tnmer
tomake mysurface
cookingeasier?
A. ‘{ourMinute Timer willhelp
timetotalcookingwhichincludes
timeto boi~foodandchange
temperatures.Donotjudgecooking
timeby visiblesteamonly.Food
willcook in coveredcon~iners
eventhoughyoucan’tseeany
steam.
Q. Must the Cloel<be set on
correct time of day when I wish
to use the Automatic Timer for
baking?
A. Yes,
DELAYSTARTor
turn on and offat set times during
timed functions.
Q. Can I use the M~nute~mer
during oven cooking?
A. The MinuteTimer can be used.
during anycookingfunction. The
and S~P dials) are used with
TIME BAKEfunctiononly.
Q. Can I Changethe Clockwhile
I’mTinle cookingin the oven?
A. No. The clockcannotbechanged
during any programthat uses the
oventimer. Youmusteither stop
those programs or wait until they
are finishedbeforechanging time.
ifyouwish to setthe
STOPdialsto
&i. i-
.-~@._
o-
t
Page 15

$i-~l.Look at the controls. Be sure
.
.- . ...——.-.—.....——
...-....- ..
@=.-~—:r
,-,
‘=:;sFyoLIunderstandhowto setthem
..
properly.Read overthe directions
fortheAutomaticOven Timerso
youunderstanditsuse with the
controls.
2. Checkoveninterior.Look at
theshelves.Takea practice run at
removingandreplacingthemproperly,
[ogivesure, sturdy support.
3. Readoverinformationandtips
thatfollow.
4. Keep thisbookhandy so youcan
referto it, especially duringthe
firstweeksof getting acquainted
withyour range.
ovenInteriorShelves
The shelve(s)are designedwith
stop-lockssothatwhenplaced
correctly on the shelfsupports,
they(a)willstopbeforecoming
completelyfromtheoven,and (b)
till not tilt when removingfood
fromor placingfoodonthem.
~ mMO~ shelve(s)fromthe
oven,iifiuprmr ofshelf, pull
forwardwithstop-locksalongtop
ofshelfsupports.Becertainthat
shelfis coolbeforetouching.
TO WPLACE shelve(s)in oven,
insertshelfwith stop-loch resting
on shelfsupports.Push shelftoward
rear ofoven;it will fallintoplace.
Men shelfis in proper position,
stop-lockson shelfwill run under
shelfsupportwhen shelfispulled
forward.
shelf Podtiom
ovenLight
(on models so equipped)
I
I
Thelightcomeson automatically =>---whenthedoorisopened.Onmodels
with ovenwindowuseswitchto
turn lighton and offwhen door
is closed.
Switchislocatedon front of door. E=-. -
i - ---
—w–
I
-
w=-. .-. .
w.–
~--—.
d=-,
--------_
-——
~~:: .--..–
-.=- .gw-:
The controls for the oven(s)are
marked OVEN SET and OVEN
TEMR OVENSET has settingsfor
BAKE,TIME BAKE(on modelsso
equipped),BROILand OFF. When
youturn the knobto the desired
setting,the proper heatingunitsare
Ihenactivatedfor that operation.
QVENTEMP maintainsthe
temperature
([50°F.)to BROIL
Tile o~/encycli~lg Light
yOLIset, from WARM
(550”F.).
i~l]tilthe oven reaches your selected
temperature,thengoesoffandonwith
{hcovenunit(s)duril]gcooking.
PREHEATINGtheoven, evento
~~~g~~[el~]perat~lresettings, is speedy
-–rarely moi-cthan about 10minutes.
l~reheatthe ovenonly when
ilLSCeSSaI’y.JViOStfOOdSwill COOk
“..
\
?
s:;tisi’actori~y witlloutpreheating.
,;’
j1.you f~~~dpreheating IS~~e<;ess~.ry,
..-
,c--”~,
~{~cpall ejleoll the illdic’!torlight
+3
1
::i;{i]Jili fi)o[
. .
.-.
::iiiJl
.,
I ill tile oven promptiy
‘.=-a..j~g~ligoes Oui.
The ovenhas four shelfsupports
marked A (bottom), B, C and D
(top). Shelfpositionsfor cooking
food are suggested on Baking,
Roastingand Broilingpages.
glows
-—-—--
.-
----
Page 16

T:% y E3
B–
~.
~,
f;
~
f.
f’
~
[
,
-;,)~
G
(
——....... -.—---—-—.-—---——-- -
‘,= al !+~q~hg:
Jua.hd..
Whencooking
a foodforthefirst
timein your newoven,usetime
givenon recipesas a guide.Oven
thermostats,overape~iodofyears,
may“drift”fromthefactorysetting
anddifferencesin timingbetween
an old and a new ovenof5 to 10
minutes are notunusualand you
maybe inclinedtothinkthatthenew
ovenisnotperformingcorrectly.
However,yournew ovenhasbeen
setcorrectly at the factoryandis
moreaptto be accuratethan the
ovenitreplaced.
How to set Your Range
for Baking
Step 1: Place foodin oven, being
certain to leaveabout 1 inchof
spacebetweenpans and wallsof
ovenfor good circulation ofheat.
Closeovendoor. During baking,
avoidfrequentdoor openingsto
preventundesirable results.
Step 2: TurriOVEN SET knob to
BAKEand OVEN TEMP knob to
temperature on recipe or on Baking
Guide.
Stop 3: Check food for doneness
at minimum time on recipe. Cook
longer if necessary. Switch off heat
and removefoods.
R[o%vto ‘riE2’2@BalLe*
thatyouset.ExamplesofLnmediate
Start
(oven turnsonnowand you
setittoturn offautomatically)or
Delaystart and stop (settingthe
oventoturn on automaticallyata
latertimeand turn offat a preset
stoptime)willbe described.
How h set betik
SW” and Automatic Sbp
N~E: Beforebeginningmake
sure the hands oftherange clock
showthecorrect time of day.
ImmediateStart is simply setting
oventostartbakingnowandturning
off at a later time automatically.
Remember, foodscontinuecooking
after controls are off.
step 1:Toset Stop Time, push in
knob on STOP dial andturn pointer
to time you wantovento turn offi
for example 6:00. The DELAY
STARTdial (some models may say
START)shouldbeat the same
position as the timeof day on clock.
Step 1:Toset starttime, push in ~~
knobon DELAYSTARTdid and
turnpointerto timeyouwantoven
toturn on, forexample3:30.
Step 2: To setStopTime, push in
knobon STOPdial and turn pointer
totimeyouwantoven to turn off,
forexample6:00.This meansyour
recipecalled for twoand one-half
hoursofbakingtime.
N~E: Time on S~P dial must .-. ~.
be later than time shownon range
“-+
clock and DELAYSTARTdial. _ -.
Step 3: Turn OVEN SET knob to
TIME BAKE. Turn OVEN TENIP ~
knob to 250”F.or recommended.
temperature.
Place food in oven, close the door
and automaticallythe oven will be :
turned on and off at tl~etimes you
haveset. Turn OVERJSET to OFF
and remove food from ove~].
OVEN INDICN~OR LIGHT(s) at
TIME BAKE settingmay work
differently than they do at BAI<E
setting. Carefully recheck the steps
given above. If all operations are
done as explained, oven will
operate as it should.
‘~on Ellodels equippsd Y~JitlQ
~~rw~ ‘BFaE<m.
(’”-\\/
{,; “
,.-
/“””:\
(j
‘\ .’
. .
f
\
1
[
I
{
i
\
Page 17

1,Aluminumpansconductheat 2. Dark or no~~-shinyfinishesand
.—— ...—.—
—.
. ,—
—---- —....,.—---.—-.-——......-
quicMy.For mostconventional glasscookwarege~~erallyabsorb
3. Preheatingtheovenisnotalways
necessary,especiallyfor foods
Overbrowning.For-best~~owning
results,werecomend dull bottom
lightercrustsare desired. ~pid
browningofsomefoodscanbe
surfacesforcakepansandpieplates. achievedby preheatingcast iron
cookware.
$heif
Food
Bread
Biscuits(\A-in.thick)
Coffeecake
Cornbreadormuffins
Gingerbread
.Muffins
Popovers
Quickloafbread
Yeastbread(2loaves)
~~]ain~ol]s
/ Swee[rolls
1Cupcakes
I
Fruitcakes
1
Layer
I
Layer,chocoiate
I
Cookies
I
Brownies
Drop
Refrigerator
Roiiedorsiiced
ShinyCookieSheet
ShinyMetalPanwith
satin-finishbottom
CastIronorGlass
ShinyMetalPanwith
satin-finishbottom
ShinyMetalMuffinPans
DeepGlassorCastIronCups
MetalorGlassLoafPans
MetalorGlassLoafPans
lhinyOblongorMuffinPans
ShinyOblongorMuffinPans
AluminumTubePan
MetalJellyRollPan
Metal orCeramicPan
Metal orCeramicPan
ShinyMetal MuffinPans
MetalorGiassLoafor
TubePan
ShinyMetai Panwith
satin-finishbottom
ShinyMetai Panwith
satin-finishbottom
Meml
or GiassLoafPans
Metal orGiassPdns
CookieSheet
CookieSheet
CookieSilect
-+
Position
B,C
B,A
B
B
A, B
B
B
A,B
A,B
B.A
A
B
A
A, B
B
A,B
B
B
Bj Loaf
B,
c
B,C
B,C
B,C
Tempemture
400”-475°
350°-4000
400°-4500
400°-4250
350”-375°
375°-4250
375°-4250
350°-3750
325°-3750
375°-4000
325°-3500
325°-3500
350°-3750
275°-3000
350°-3750
350°-3750
32)0-3500
350°-400”
400°-4250
375°-4000
Oven
350°
375°
350°
cookingtimes,preheatinggives
bestappearance
andcrispness.
4. C?penthe ovendoorto check
foodas littleaspossibletoprevent
unevenheating andto saveenergy.
Bme,
Minutes Comments
E-20
20-30
20-40
45-55
20-30
45-60
45-60
45-60
10-25
20-30
30-55
10-15
45-60
45-65
20-25
2-4
20-35
25-30
40-60
25-35
10-20
6-12
7-12
Canned,refrigeratedbiscuitstake
2to4 minuteslesstime.
Preheatcastironpanforcrispcrust.
Decreaseabout5minutesformuffin
mix,orbakeat450°F.for25minutes,
thenat350°F.for10to15minutes.
Darkmetalorglass givedeepest
browning.
Forthinrolls,ShelfBmaybeused.
Forthinrolls,ShelfB maybeused.
Two-piecepan isconvenient.
Linepanwithwaxedpaper.
Paperliners producemoremoist
crusts.
Use300°F,andShelfBforsmallor
hrs.
individualcakes.
Barcookiesfrommixusesametime.
UseSheifCandincreasetemp.
25°F,to50”F.formorebrowning.
A, B,C
B
B
A
B,A
A, B
B
B
c
A, B.
A, 5, C
~,
.—.—.-—-.,-——.
17
350°-4000
300°-3500
325°
400°-4250
325°-3500
400°-4250
400°-4250
450°
325°-4000
32~0-~750
300°-3500
30-60
30-60
50-90
45-70
15-25
40-60
40-60
12-15
60-90
30-60
30-75
Reducetemp.to300°F.foriarge
custard.Cookbreadorricepudding
withcustardbase80to90minutes.
Largepiest~se400°F.andincrease
time.
Toquicklybrownmeringue,use
400°F,for8to10minutes.
Custardfillingsrequirelower
temperature,longertime.
Increasetimeforlargeamo~lnt
or size.
—.—.—..—
Page 18

_
Roastingis cookingbydry heat.
@
~
-=
:
~
.
~
1
\
Tendermeator poultrycan be
roasteduncoveredinyouroven.
Roastingtemperatures,which
shouldbe lowand steady,keep
spatteringtoa minimum.When
roasting,it is not necessaryto
sear, baste, coveror add water
toyour meat.
Roastingisreally a baking
procedureusedformeats.Therefore,
ovencontrolsare set toBAKE.
(Youmayhear a slightclicking
sound, indicatingthe ovenis
workingproperly.)Roastingis
easy;just followthesesteps:
Step 1:Check weightofmeat, and
place, fatside up, on roastingrack
ina shallowpan. (Broiler pan with
rack is a goodpan for this.) Line
broiIerpanwith aluminum foflwhen
usingpan for marinating, cooking
with fruits, cookingheavilycured
meats, or forbasting foodduring
cooking. Avoidspillingthese
materials on oven liner or door.
Step 2: Place in ovenon shelf in
A or B position. No preheating is
necessary.
Step 4: Most meatscontinueto
cookslightlywl~ilestanding,after
beingremovedfromtheoven.
Standingtime recommendedfor
roastsis 10to20 minutesto allow
roastto firm up and make it easier
to carve. Internal temperaturewill
riseabout5°to 10°F.;~ocompensate
fortemperaturerise, if desired,
removeroastfromovenat 5° to 10”F.
lessthantemperatureon guide.
NOTE: Youmay wish to useTIME
BAKE, as described on page 16,to
turn ovenon and offautomatically.
Rememberthat foodwillcontinue
to cookin the hot ovenandtherefore
shouldbe removedwhenthe desired
internaltemperature has been
reached.
@Frozen roasts ofbeef, pork,
lamb, etc., can be started without
thawing,but allow 10to 25 minutes
per pound additionaltime (10
minutesper pound for roasts under
5 pounds, more time for larger
roasts).
@Thaw most frozen poultry before
roasting to ensure evendoneness.
Some commercial frozen poultry
can be cooked successfullywithout
thawing. Follow directions given
on packer’slabel.
A. Checkingthe finishedinternal
temperatureatthe completionof
cookingtimeisrecommended.
Temperaturesare showninRoasting
Guideon oppositepage. For roasts
over8 pounds, cookedat 300°F.
with reduced time, check with
thermometerathalf-hour intervals
after half the timehas passed.
Q.why ismy
when I try
A. Roastsare easier to sliceif
allowedtocool 10to 20 minutes
after removingfrom oven. Be sure
to cut acrossthegrain of the meat.
Q. Do I need
oven each timeI cook a roast
or poultry?
A. It is rarely necessary to preheat
youroven, only for very small
roasts, which cook a short length ~---.
oftime.
Q. when buying
there any special tips that would
help me eOOk it mOre evenly?
A. Yes.Buy a roast as even in
thickness as possible, or buy rolled
roasts.
Q.
canI seal the sidesofmy foii
roastCrumbling
tocarve it?
to preheat my
m“
~~y
a roast, are
“tent” when roastinga turkey?
A. Sealing the foilwill steamthe
meat. having itunsealedallowstie
air to circulate and brown the meat.
.
;,.
Page 19

thermometerfor more accurate
..-
doneness.(Do notplace
thermometerin stuffing.)
temperaturerise, ifdesir;d, remove
roastfromovenat5°to IO”F.less
thantemperatureon guide.
Oven
Temperature
&feat
Tendercuts;rib,highqualitysirlointip,
rumportopround*
LambLegor bone-insfloulder*
Vealshoulder,legor loin*
Porkioin,riborshouldery
Ham,precooked
‘Forbonelessrolledroastsover6-inchesthick,add5to 10minutesperpoundtotimesgivenabove.
‘oultry
ChickenorDuck
Chickenpieces
Turkey
325°
325”
325°
325°
325°
325°
I
325°
375°
325°
Doneness
Rare:
Medium:
WellDone:
Rare:
Medium:
WellDone:
WellDone:
WellDone:
ToWarm:
Well Done:
WellDone: 35-40
Well Done: 35-40
WellDone:
ApproximateRoastingTime,
inMinutesperFound
3to5-lbs.
24-30
30-35
35-45
21-25
25-30
30-35
35-45 30-40
35-45
10minutesperpound(anyweight)
Under10-lbs.
20-30 17-20
3to5-lbs.
10to M-lbs.
20-25
6to$-lbs.
18-22
22-25
28-33
20-23
24-28
28-33
30-40
10to15-lbs.
Over5-Fbs.
30-35
OverE-lbs.
15-20
Internal
TemwratureT
130°-1400
150°-1600
170°-1850
1300-1400
150°-1600
170°-1850
170°-180°
170°-1800
125°-1300
170°
185°-1900
185°-1900
In thigh:
185°-190°
Page 20

Broilingiscookingfoodbyintense
——.——
—..—.,,-,...—. -----
radiantheatfromthe upperunitin
theoven.Mostf~shandtendercuts
ofmeat can be broiled. Follow
thesestepsto keepspatteringand
smokingtoa minimum.
Step 1:Ifmeathas fatorgristle near
edge,cutverticalslashesthrough
bothabout2“apart. If desired, fat
maybe trimmed, leavinglayer
about 1/8” thick.
Step 2: Place meat on broiler rack
in broiler pan which comes with
range.Alwaysuserack sofatdrips
intobroiler pan; otherwisejuices
maybecomehotenoughto catchfire.
S&p3:Msitionshelfonrecommended
shelfpositionassu~ested inBrofling
Guideon oppositepage. Most
broilingis done on C position, but
ifyour range is connectedto 208
volts,youmay wish to usehigher
position.
Step 4: Leavedoor ajar a fewinches
(exceptwhen broiling chicken).
The door staysopen by itself, yet
theproper teinperatureismaintained
in the oven.
Step 6: ~rn foodonlyonceduring
cooking.Timefoods for firstside
per BroilingGuide.
Turn food, then use timesgivenfor
secondside as a guidetopreferred
doneness.(Wheretwo thichesses
and timesare giventogether,use
firsttimesgivenforthinnestfood.)
Step %Turn OVENSET knob
to OFF. Servefoodimmediately,
and leavepan outsideoventocool
during meal foreasiestcleani~lg.
use of Alminum Fail
I
1. Ifdesired, broilerpan maybe
linedwith foiland broiler rack may
becoveredwithfoilfor broiling.
ALWAYSBECERTAIN~ MOLD
FOIL THOROUGHLY ~
BROILER RACK, AND SLIT
FOIL ~ CONFORM WITH
SLITSIN RACK. Broiler racks are
designedto minimizesmokingand
spattering, and tokeepdrippings
coolduring broiling. Stoppingfat
and meatjuices from drainingto
thebroi~erpan preventsrack from
serving itspurpose, andjuices may
become hot enoughtocatch fire.
2. DO N~ place a sheetof
aluminum foilon shelf. Todo so
/1
mayresultinimproperlycooked
foods,damagetoovenfinishand
increase in heat on outsidesurfaces
ofthe oven.
3. If desired, a sheet ofaluminum
foilmay be used on floor ofthe oven
u~zderthebake unit. BE CERTAIN
FOIL DOES PJOT‘~OUCH
UINJIT.
waymayslightly affecttie browning
ofsome foods. Ci12F~gefoilwhen it
beconles Soiled.
Aluminum foilused in this
BAICE
Questions &Amwers
Q. Wily sbo[~ldI leavetlBedoor
closed&henbroilingChieiken?
A, Chickenistheonlyfood
recommendedforclosed-door
broiling.This isbecause chickenis
relativelythickerthan other foods
youbroil. Closingthedoorholds
moreheatin theovenwhichallows
chickento cookevenlythroughout.
Q. W’henbroiling, is it necessary
to alwaysuse a rack in the pan?
A. Yes.Usingthe rack suspends
themeat overthepan. Asthe meat
cooks,thejuices fallintothe pan,
thuskeepingmeatdrier. Juices
are protectedbythe rack and stay
cooler,thus preventingexcessive
spatterand smoking.
Q. should I salt the meat before
broiling?
A. No. Salt drawsout thejuices
and allowsthemto evaporate.
Alwayssaltafier cooking.Turn
meat with tongs;piercing meat
with a fork also allowsjuices to
escape. When broilingpoultry
or fish, brush each side ofien
with butter.
Q. my ~~emy m=~ ~~t tRR~Bti~g
out as brown as they should?
A. In some areas, the power
(voltage)to the range maybe low.
In these cases, preheat the broil
unit for 10minutes before placing
broiler pan with food in oven.
Check to see ifyouare using the
recommended shelfposition. Broil
for longestperiod oftime indicated
in the Broiling Guide. Turn food
only once during broiling.
Q. Do I need to grease my broi~~r
rack to prevent maa%tfrom stic!hg?
A. No. The broiler rack is designed
to reflect broiler heat, thus keeping
the surface cool enoug]~to prevent
meatstickingto‘hesurface,However,
sprayingtilebroiler rack lightlywith
a vegetablecooking spraj~before
cooking will
makecleanupeasier.
Page 21

~.s
~j.~~::.
;,~ ~~~ ~. AIw~ys use broiler pan and rack
3
-..
.,
____
thatcomes withyouroven.It is
designedtomin{mizesmokingand
spatteringby trappingjuices in the
shieldedlo-werpart of thepan.
2. Ovendoor shouldbe ajar forall
foods exceptchicken;there is a
-----
specialpositionon door which
holdsdoor open correctly,
3. For steaksand chops, slashfat
evenlyaroundoutsideedgesofmeat.
Toslasl~,cut crosswise through
outerfatsurfacejust to theedgeof
themeat. Use toilgstoturn m~al
overtoprevent piercingmeat and
losingjuices.
4.
Ifdesired, marinatemeatsor
chickenbeforebroiling.Or brush
with barbecue sauce last5 to 10
minutesonly.
5. When arrangingfoodon pan,
do not let fatty edgeshangover
sides, which could soilovenwith
fatdripping.
.-
6. Broilerdoesnotneed to bti
preheated.However,forvery thin
conventionallybroiledby
positioningthe ovenshelfat next
lowestshelfpositionandincreasing ~.--. :-..
cookingtime givenin this guide
1%timesper side.
~-m.”A-m.
—...—,_.=
8. If yourovenisconnectedto
208Volts,raresteaksmaybebroild ~..,.,- -bypreheatingbroilheater and ----
Food Thickness %sition
Bacon
I
GroundBeef
We]]Done
BeefSteaiB
,Rare
.Medium
WellDone
Medium
WellDone
Chicken
BakeryProducts
Bread(Toast)or
ToasterPastries
EnglishMuffins
I.oijster‘Fails
(6to8-f~L,each)
Quantityandlor
%-lb.(about8
thinslices)
‘ l-lb.(4patties)
‘hto %-in.thick
l-inchthick
(1to 1%-lbs.)
lfi-in. thick c
(~to2fi-]bso)
1whole
(2(02fi-lbs.),
splitlengthwise
2to4 slices c
1pkg.(2)
2(split) c
2-4 B
l-lb.fillets%to
‘h-in.thick
I
l-in,thick
2 (%inch)
Z
(1-in,thic;k) .
lbour1lb,
—..—
I
I
Ic
I
IB
I
[
Shelf
c
c
c
c
c
c
c
A
c
B
...—
——
I
-1
SecondSide
7
9
13
7-8
i4-16
20-25
10-15
turnover.
10
4-6
]~-14
First Side
Time,Minutes Time,Minutes
+
7
9
13
10
15
25
35
3-4
13-16 Donot
5 5
8 8
10
10
17
--—..--=—— . .—- .
6 i-2
I
—.— ..... .... ...-.---!.. —-— -.
Upto8patties takeaboutsametime.
=
Steakslessthan1inchcookthrough
beforebrowning.Panfryingis
recommended.
Slashfat.Rare
Reducetimesabout5to 10minutesper
sideforcut-upchicken.Brusheachside
withmeltedbutter.Broilwithskin
downfirstandbroilwithdoorclosed.
Spaceevenly.PlaceEnglishmuffins
cut-side-upandbrushwithbutter,if
desired.
Cutthroughbackofshell.Spread
open.Brushwithmeltedbutter
beforeand afterhalftime.
Handleandturnverycarefully.
Brushwithlemonbutterbefortiand
duringcookingifdesired.Preheat
broilertoincrease browning.
Increasetimes5to 10minutesperside I
for 1%-inchthickorhomecured.
Slashfat.
i
Slashfat.
Ifdesired,splitsausages inhalf
lengthwise;cutinto5 to6-inchpieces.
,(.
t
i.8 4-7
I
i’
,
i
I
,:
>
1
1’
Page 22

Propercare andcleaningare
.,
importantso yourrdngewillgive
yot~efficientaridsatisfactory
service.Followthesedirections
carefullyincaring for yourrangeto
assuresafeandpropermaintenance.
ovenventDuct
Yo~~rrangeis ventedthrougha duct
locatedunder the right rear surface
unit. Clean the duct often.
,, .
Theporcelainenamelcooktop is
sturdybutbreakableifmisused.
This finishis acid-resistant.
However,anyacid foodsspilled
(suchas fruitjuices, tomatoor
vinegar)shouldnotbe permitted
toremain on the finish.
cleaningundertheRange
(onnkodelsequippedwith
bottomdrawer)
The area under the rangeofmodels
equippedwith abottomdrawer can
bereached easily for cleaningby
removingthebottomdrawer.TO
remove,pull drawerout allthe way,
ti~tup the front and removeit. To
replace, insertglidesat back of
drawerbeyondstopon rangeglides.
Lift drawer if necessary to insert
easily.Let frontof drawerdown,
then push into close.
RemovableovenDoor
.
Toremove:
~Make sure unit is cool.
@Lifi up right rear surface unit.
~Removedrip pan and ring.
~Lifi outovenvent duct.
Toreplace:
@Place the part over the ovenvent
located below the cooktop with
opening of the duct under the round
opening in the drip pan, It is
important that the duct is in the
correct position so moisture and
vapors from the ovencan be
released during ovenuse. NOTE:
Never cover the hole in the oven
ventduct with aluminum foil or
any other material. This prevents
the oven vent from working
properly during any cooking cycle.
LampReplacement
(on modelssoequipped)
The ovenlamo (bulb)iscovered
with a glass r~inovablecoverwhich
isheld in place with a bail-shaped
wire.Removeovendoor,ifdesird,
to reach covereasily.
To
remove:
~Holdhandunder coverso it
doesn’tfall when released. With
fingersof same hand, firmly push
back wire bail untilit clears cover.
Lift off cover.DO N~ REMOVE
ANY SCREWS.
@Replacebulb with40-watthome
appliancebulb.
To replace
=Place it into groove of lamp
receptacle. Pull
Cover:
wirebailforward
tocenterofcoveruntil it snapsinto
place.Wheninplace,wireholds
coverfirmly.Becertainwirebailis
indepressionincenterofcover.
~Connectelectricpowerto range.
the area under the drip pans
Clean
often. Built-up soil, especially
grease, may catch fire. Tomake
cleaning easier, stay-upunitslift up
and lock in the up position, a~~d
plug-in units are removable.
.-.-.—.-----.
.——
.,_____.“
. ..-—-—
—.—..-.-.-. .
Page 23
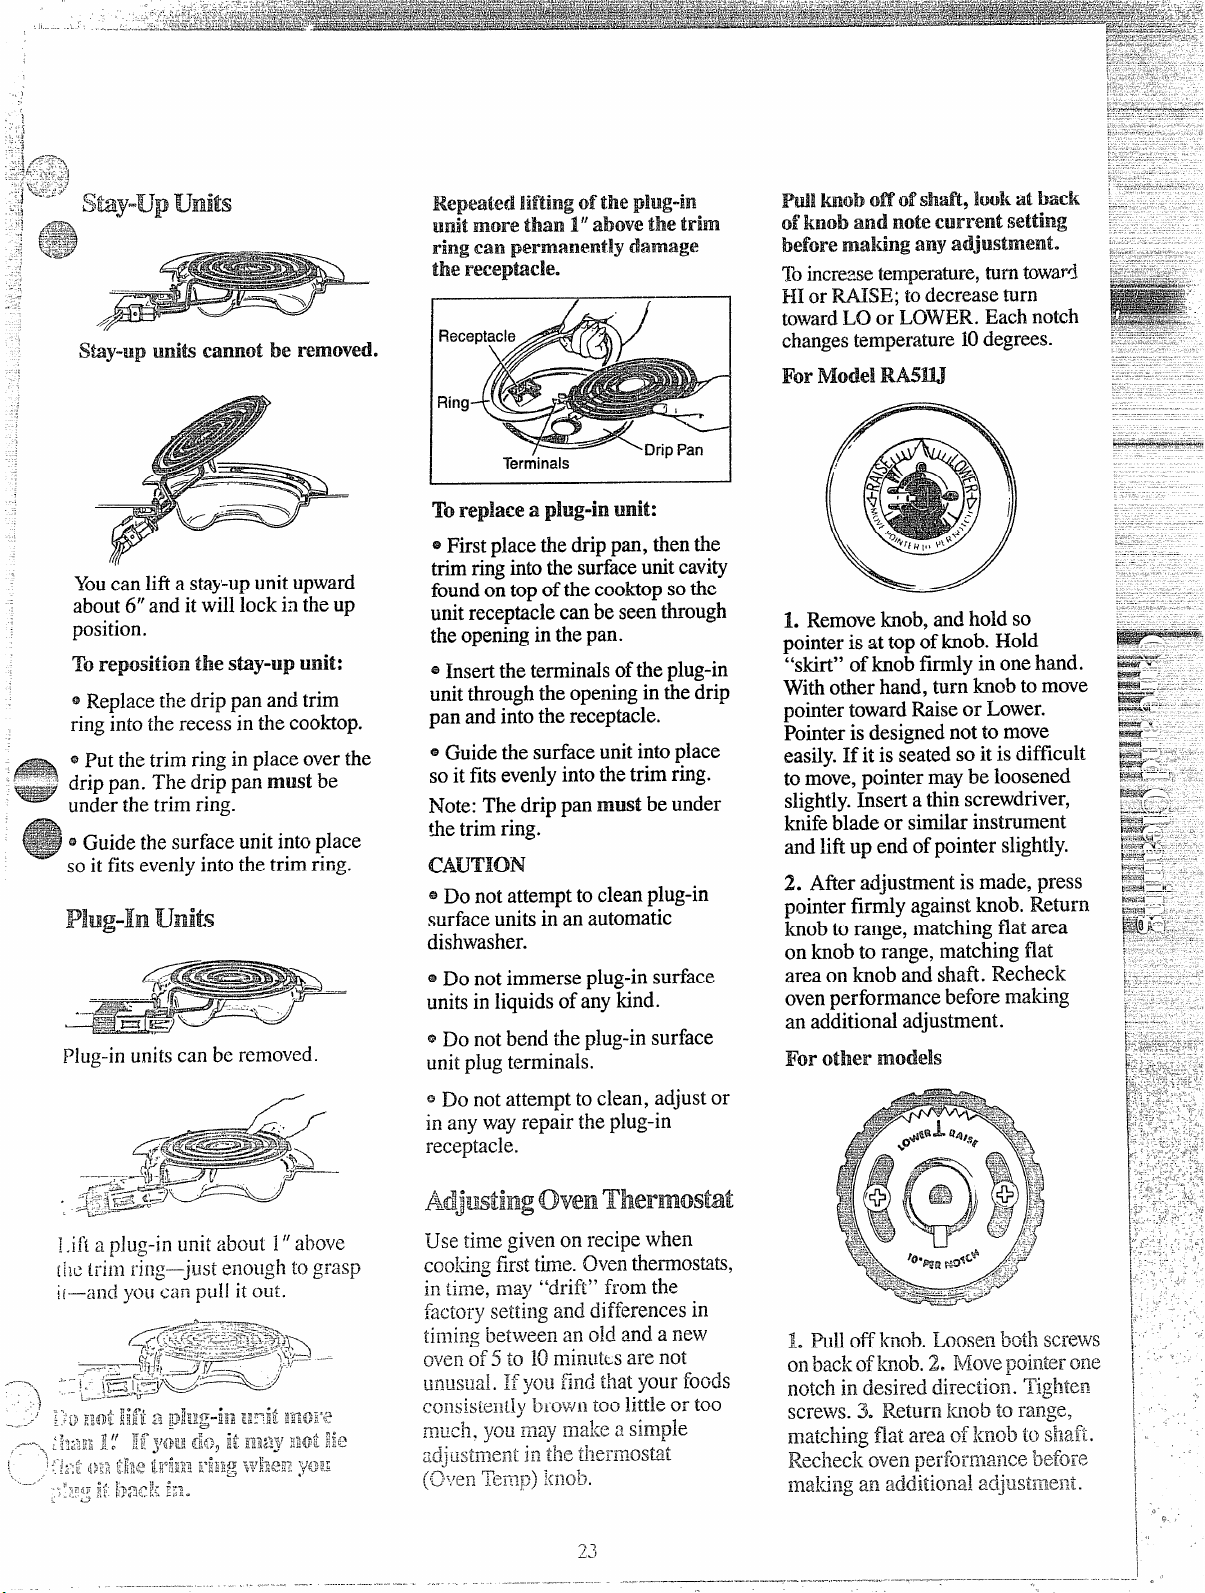
Youcan lifi a stay-up unit upward
-.—............— -,--.—---
---
-.
about6“and it will lock in the up
position.
Toreposition the Say-llp unit:
s Replacethe drip pan and trim
ringinto the recess in the cooktop.
~- @Putthe trim ring in place overthe
- drip pan. The drip pan must be
-
underthe trim ring.
QGuidethe surface unit into place
so it fitsevenlyintothe trim ring.
Plug-inunits can be removed.
Repeated lifting ofthe plug-in
Terminals
replacea plug-inunit:
To
Firstplacethe drip pan, then the
@
trimringintothe sufiaceunitcavity
foundontop ofthe cooktopsothe
unitreceptaclecanbe seenthrough
theopeningin the pan.
@Inserttheterminalsof theplug-in
unitthroughthe openingin the drip
pan and intothereceptacle.
@Guidethe surfaceunit intoplace
so it fitsevenlyintothe trim ring.
Note: The drip pan must be under
the trim ring.
CAUTION
@Do not attemptto clean plug-in
surfaceunitsin an automatic
dishwasher.
@Do not immerse plug-in surface
unitsin liquidsofany kind.
@Do not bend the plug-insurface
unitplugterminals.
Toincre2setempera~re,tu~n@ward
HI or WISE; todecreaseturn
towardLO or LOWER. Each notch
changestemperature10degrees.
1. Removeknob,and hold so
pointeris at top of knob. Hold
“skirt” of knob firmly in one hand.
Withother hand, turn knob to move
pointertowardRise or Lower.
Pointeris designednotto move
easily.If it is seated so it is ditilcult
to move,pointer maybe loosened
slightly.Insert a thin screwdriver,
knifeblade or similar instrument
andliftup end of pointer slightly.
2. After adjustmentis made, press
pointerfirdy againstknob. Return
knobto range, matching flat area
on knob to range, matching flat
area on knob and shaft. Recheck
ovenperformance before making
an additionaladjustment.
For other models
@Do not attempt to clean, adjust or
in any wayrepair the plug-in
receptacle.
Padj”wting oven Thermostat
Use time given on recipe when
ccoldngfirsttime. Oventhermostats,
in lime, may
“drift” from the
factory setting and differences in
timing between an old and a new
e}~enof 5 to 10minut~sare not
gfiusuaj,If you find that your foods
~~~~~i~tentljJbrown too little or too
n~u.cl~.yo~lmay mal<easimple
?.
~k~-~ti~fm.~j~
(F~jl,T(~n ~{::-ln~>):(!~olg.
=-~j= ~1~~j~~:~~~@~
J
..;,/ ...
2?)
Page 24

PART
r
ControlKnobs:
tinge Top and Oven
Outside GlassFinish
Metal,including
BrushedChrome
Cooktop
~melain Enamel
and Wnted Surfac#
OvenLine@
(CAUTION:Wheninuse,
lightbulbscanbecome
warmenoughto break if
touchedwithmoistcloth
or towel.Whencleaning,
avoidtouchingwarm
lampswithc!eaning
clothsif lampcoveris
removed.)
Oven VentDuct
shelves
Storage
Drawer
0SoapandWater
@Soap-FilledScouringPad
eCommercialOvenCleanei
~Dishwasher
=MildSoapandWater
e SoapandWater
@SoapandWater
e PaperTowel
e DryCloth
e SoapandWater
~Soapand Water
e SoapandWater
@Soap-FilledScouringPad
s CommercialOvenCleaner
~SoapandWater
PSoapandWater
ISoap-FilledScouringPad
I CommercialOvenCleaner
Soapand Water
GENERALDlmIoNs
Donotcleanthebakeunitor broilunit.Anysoilwillburnoffwhentheunitis heated.
NOTE:Thebakeunitishingedandcanbe lifiedgentlytocleantheovenfloor.Ifspillover,
residue,orashaccumulatesaroundthebakeunit,gentlywipearoundtheunitwith~ W.’tiIs.
Drainfat, coolpanandrackslightly.(Donotletsoiledpanandrackstandinoventocool.)
Sprinkleondetergent.Fillthepanwithwarmwaterandspreadclothorpapertowe!overthe
rack.Letpanandrackstandfora fewminutes.Wash;scourif necessary,Rinseanddry.
OPTION:Thebroilerpanandrackmayalsobecleanedina dishwasher.
Pulloffknobs.Washgentlybutdonot soak. Dry andreturncontrolstorangemakingsureto
matchflatareaontheknob andshaft.
Washall glasswithclothdampenedinsoapywater. Rinseandpolishwithadrycloth.If
knobsareremoved,donotallowwatertorundowninside’the surfaceofglasswhilecleaning.
Do N~ USE stee!
WOOi,
abrasives,ammoda, acidsor
Tosafelycleansurfaces:wash,rinse,andthenpolishwitha
drycloth.
commercialovencleaners.
DON~ USEovencleaners,
cleansingpowdersorharsh
abrasives.Thesemight
scratchthe surface.
Ifacidsshouldspillon therangewhileitis hot, useadry
papertowelor clothto wipeuprightaway.Whenthe
surtice hascooled,washandrinse. Forotherspills,suchas
tit smatterings,etc., washwithsoapand waterwhencooled
andthenrinse. Polishwithdrycloth.
~ N~ USZovencleane=,
Toremoveovendoorforeasiercleaning,sw instructionson
d-sing powdersor harsh page22. Usesoapandwatertothoroughlycleanboththe
abrasives.
insideandoutsideofdoor.Rinsewell.N-.
on
doorlinercausesaddtimal stim whentheoven
soap left
isrekated.
Coolbeforecleaning.
FORLIGHTSOIL:Frequentwipingwithmildsoapandwater(especiallyafter cooking
meat)willprolongthetimebetweenmajorcleaning.Wnsethoro~My. N~E Soap left OB1
liner causesadditional stains when ovenis reheated.
FOR HEAVYSOIL:Chooseanon-abrasti~ecleanerandfollowlabelinstructions,usingthin
layerofcleaner.Useofrubberglovesis recommend. Wipeor rublightlyon stubborn
spots.Rinsewell.Wipeoffanyovencleanerthatgetsonthermostatbulb.W’henrinsingoven
aftercleaning,alsowipethermostatbulb.
Removethe Oven VentDuctfoundunder the rightrear surfaceunit,Washin hot, soapywater
~nddryand replace. (Openingshouldmatchopeningin drip pan.)
Yourshelvescanbecleanedbyusinganyandall mentionedmaterials,Rinsethoroughly
:0removeall materialsaftercleaning.NOTE:Somecommercialovencleanerscause
iarkeninganddiscoloration.Whenusingforfirsttime,test cleaneronsmallpartofshelf and
:heckfordiscolorationbeforecompletelycleaning.
—
~ N~
USEdishwasherto
:Ieanthe surface unit coils.
DON~ Ilandle the unit
>eforecompletelycooled.
DON~ immerseplug-in
~ni~in ally kind of liquid.
.
Spattersandspillsburnawaywhenthecoils are heated. At
theendofa meal, removeallutensilsfromthe Calrod@unit
andheatthesoiledunitsatHI. Let the soilburn offabouta
minuteandswitchtheunitstoOFF.Avoidgettingcleaning
materialsonthecoils. Wipeoffanycleaningmaterialswith
a damppapertowel
I
before heatingthe Calrod” unit.
~orcleaning,removedrawerbypullingit all the wayopen, tilt up thefrontandlift out. Wipe
withdampclothor spongeandreplace. Neveruse harshabrasivesor scouringpads.
—
UIeanas described belowor in thedishwasher.Wipeall ringsafter eachcookingso unnoticed
;patterwill not “burnon” nexttimeyoucook. Toremove
“burned-on”spattersuse anyor ail
I
Page 25

‘....
‘i
!J
‘)
.3
—=.
“m
.:—_
:w“
! PROBLEM
j OVENWILL NOT WOP&
i
i
I
FOOD DOES Nm
I
, BROILPROPEWY
FOOD DOES N~ ROAST
OR BAKRPROPERLY
I
I
PossIBLE cAusE ANDmm~~
Plugon rangeis notcompletelyinsertedin the electricaloutlet.
The circuitbreaker inyour house hasbeen tripped, or a fuse hasbeen blown.
Ovencontrolsnotproperlyset.
Lightbulb isloose.
Bulbis defective.Replace.
Switchoperatingovenlightisbroken. Callfor service.
OVEN SET knob not set atBROIL.
OVENTEMP hob notsetat BROIL.
Door notieftajar as recommended.
Improper shelf positionbeingused. Check BroifingGuide.
Necessary preheatingwasnotdone.
Foodis beingcookedon hot pan.
Utensilsare not suitedforbroiling.
Aluminumfoilused ORthebroil pan rack has notbeen fitted properly and slit
as recommended.
OVEN SET knob notsetonB-.
OVEN TEMP knob riotsetcorrectly.
Shelf position is incorrect. Check Roastingor Baking Guides.
Oven shelf is not Ievel.
Incorrect cookware or cookwareof improper size is being used.
A foiltent wasnot used when needed to slowdownbrowningduring roasting.
.
—
Surfaceunits are notpluggedin solidly.
Trim rings/drip pans are not set securely in the range top.
Sutiace unit controlsare notproperly set.
1
I
1
Page 26

-..
1,
IfYouNeedService
Toob~in service, seeyourwarranty
on the back pageofthisbook.
We’reproudofour serviceand
wantyouto be pleased. If for some
reasonyouare nothappywiththe
serviceyoureceive,here are three
stepsto followforfurtherhelp.
FIRST,contactthepeoplewho
servicedyour appliance.Explain
whyyou are notpleased. In most
cases, thiswill solvetheproblem.
NEXT, if you are stillnotpleased,
write all the details-including
yourphonenumber—to:
Manager,Consumer Relations
Hotpoint
AppliancePark
Louisville,Kentucky40225
FINALLY, if yourproblem is still
not resolved, write:
Major Appliance
Consumer ActionPanel
20 North WackerDrive
Chicago,Illinois 60606
—..’
‘- =,.
i
]
Page 27

-__ —_ .. . . ..—
!
I
j
/
i
#
~=__.__——_
——-’
YOURHOTPOINTRANGE
\VARRANT~
Save proofoforiginal purchase datesuchasyoursalessliporcanceiledchecktoestab[ishwarrantyperiod.
-—
ONE-YEARWARRANTY
FULL
For one year from date of original
~urchase, we will
provide,freeof
charge,parts andservicelabor
inyour hometo repair or replace
anypart of the range that fails
becauseof a manufacturing defect.
This warrantyis extendedto
the original purchaserand any
succeedingowr]erfor products
purchasedfor ordinaryhomeuse
inthe 48 maif?landstates,Hawaii
andWashington,D.C.InAlaskathe
warrantyis the sameexceptthat it is
LIMITED
because youmust payto
shipthe productto-theserviceshop
the service technician’s travel
or for
coststo your home.
All warrantyservicewill be provided
byour FactoryServiceCentersor
byour authorized CustomerCare”
servicersduring normalworking
hours.
Look inthe White or YellowPages
ofyourtelephone directory for
HOTPOINTFACTORYSERVICE,
GENERAL ELECTRIC-HOTPOINT
FACTORYSERVICEor HOTPOINT
CUSTOMERCARE@SERVICE.
~
A
WHATIS NOTCOVERED
~ Servicetrips to your hometo
teach you how to usethe product.
Read your USe and Care material.
If you then haveany questions
about operating the product,
@Replacement of housefuses or
resetting of circuit breakers.
@Failureof the product if it is used
for otherthan its intended purpose
or usedcommercially.
please contact your dealer or our
Consumer Affairs office at the
address below, or call, toll free:
GE Answer Center”
800.626.2000
consumer information service
~ Damageto product caused
by accident, fire, floods or acts
of God.
WARRANTORISNOTRESPONSIBLE
FORCONSEQUENTIAL DAMAGES.
@Improper installation.
Ifyou havean installation problem,
contact your dealer or installer.
Youare responsible for providing
adequateelectrical, gas,exhausting
and other connecting facilities.
.—--
Some states do not allow the exclusion or limitation of incidental or consequential damages, so the above limitation or exclusion
relaynotapply to you. This warranty gives you specific legal rights, and you may also have other rights which vary from state to state.
Toknowwhat your Ieaal rights are in your stale, consult your local or state consumer affairs office or your state’s Attorney General.
___ .—
-—.—-..
I
;’-~~ j\Jo. -/5’”{920s;
I
_...-... .—
—.-—-
n~q
 Loading...