

Page 1

www.GEAppliances.com
Safety Instru_tions ........ 2-4
Operating Instructions
O_en .................... 6-9
Surface Units ................ 5
Care and Cleaning
Broiler Pan and Grid ........ l l
Cooktop .................. 10
l_mbs .................... 12
Oven Door . ............... 11
Oven Heating Elements ...... 11
Oven Interior .............. 12
Painted Surfaces ............ 19
Shelves ................... 10
Surface Units and Drip Pans ...10
Installation Instruc_tions
Anti-Tip Bracket ......... 13, 19
Dimensions and Clearances ... 14
Electrical Connections ..... 15-18
Flooring .................. 14
Leveling .................. 19
Preparation ................ 14
Tools You Will Need ......... 14
Troubleshooting Tips ....... 20
Consumer Support
Consumer Support... Back Cover
Product Registration ...... 21,22
_&'arranty .................. 23
Write the model and serial
numbers here:
Model #
Serial #
You can find them on a label
behind the bottom kick panel.
GEQualityProduct
RA620
RA624
164D4290P375 49-80223 08-03JR
Page 2

IMPORTANTSAFETYINFORMATION.
READALLINSTRUCTIONSBEFOREUSING.
2
WARNING!
For your safe_, the information in this manual must be followed to minimize the risk of fire or
explosion, electric shock, or to prevent property damage, personal injury, or loss of life.
WARNINGANti-TIPDEVICE
All ranges can tip and injury could result.
Toprevent accidental tipping of the range, attach Rto the floor by installing the Anti--tip device
supplied.
The device engages one of the rear leveling legs (see Installation Instructions).
Tocheck if the device is installed properly, carefully tip the range forward.
If the Anti--tip device supplied with the range does not fit this application, use the universal Anti--fip
device WB2X7909.
If you pull file range Otlt fto111 file wall for any reason, make StlTe the rear leg is returned to
its position in the device when you push the rang_ back.
SAFETYPRECAUtiONS
When using electrical appliances, basic safety precautions should be followed, including the following:
• Use this appliance only fbr its intended • CAUTION: ITEMS OF INTEREST TO
use as described in this manual.
• Be sure your appliance is properly
installed and grounded by a qualified
mchnician in accordance wifl) file
provided installation insuuctions.
• Don't attempt to repair or ieplace any
part of your rang_ unless it is specifically
recommended in this manual. All other
servicing should be refeIxed to a qualified
mchnician.
• Before performing any service
recommended in these instructions,
DISCONNECT THE RANGE POXYER
SUPPI,Y AT THE HOUSEHOI,D
DISTRIBUTION PANEL BY REMOVING
THE FUSE OR SWITCHING OFF THE
CIRCUIT BREAKER.
• Do not leme children alone---<hildren
should not be left alone or unattended in
an area where an appliance is in use. They
should hexer be allowed to sit or stand on
any part of the appliance.
CHILDREN SHOULD NOT BE STORED
IN CABINETS ABOVE A RANGE OR
ON THE BACKSPIASH OF A RANGE--
CHILDREN CLIMBING ON THE
RANGE TO REACH ITEMS COUI,D
BE SERIOUSI,Y IN,JURED.
• Never wear loose-fitting or hanging
gai_nents while using the appliance.
Flammable material could be ig_fimd
if brought in contact with hot heating
elements and may cause se_>re 1)tlills.
• Use only dU pot holders--moist or damp
pot holders on hot surfaces may Iesult in
burns from smam. Do not let pot holders
touch hot heating elements. Do not use a
towel or odler bulky cloth.
• For your safety', hexer use your appliance
fbr wai_ning oi heating the room.
• Storage in or on appliance Flammable
mamiials should not be stored in an oxen
oi" near surt_ace units.
• Don't allow anyone to climb, stand or
hang on fl_e door or rang_ top. They
could damage the rang_ and e\'en tip it
ovel, causing severe personal i,ljm T.
Page 3

vvww.GEAppliances.com
x WARNING!
2 'T. SAFETYPRECAUTIONS
Z-.__ • Kee I) hood and grease fihers clean to
/1' _ _ maintain good xenting and to axoid
grease fires.
• Do not let cooking grease or other
flammable mamrials accumulate ira or
neat the rang>.
• Do trot use wamr on gaease fiaes. Nexer
pick up a flaming pan. Smother flaming
pan on surface unit by coveting pan
completely with well-fitting lid, cookie
sheet or fiat tray. Flaming grease outside a
pan can be put ont b v co\>lJng wiflt
baking soda o5, if available, a mu]ti-
purpose dU chemical or foam-type fire
extinguisher
Do not touch heating elements or interior
surtZace of oven. These surl_aces m W be hot
enough to bum exen though they are dark
ira color During arrd after use, do not
touch, or let clothing or other flammable
mamvia]s contact surthce units, areas
nearby tire surface units or any intet-ior
area of rise oven; allow sufficient time for
cooling first.
Pomntially hot sniPdces include the
cookmp and areas facing dae cookmp,
o\en vent opening and sttrl_aces treat flae
opening, and crevices around the oven
door Remember: The inside surl_ace of rise
ox>n m W be hot when rise door is opened.
COOKMEATANDPOULTRYTHOROUGHLY...
Cookmeat andpoultry thoroughly--meat to at least an iNTERNALtemperatureof 160°Fandpoultry
toat least an INTERNALtemperatureof 180°ECookingto thesetemperaturesusuallypretectsagainst
foodbomeillness.
Stand away from range when opening oven door. Hot air or steam which escapes can cause bums
to hands, face and/or eyes.
• Don't heat unopened food conminet_ ira
the oven. Pressure could build up and the
container could burst, causing an injm T.
• Kee I) oven free fiom grease buildup.
• Place oven shelf ira desired po0fion while
oxen is cool. If shelxes nanst be handled
when hot, do not let pot holder contact
heating elements ira flae o_>n.
• Pulling out shelf to the shelf stop is a
com_nience ira lifting heaxy' foods. It
is also a precaution against bums flom
touching hot surfaces of rise door or
O'_II watts.
• When using cooking or roasting bags in
oxen, tbllow the manufi_cturer's directions.
• Do not use your oxen to dr T newspapers.
If oveflmamd, they can catch fire.
• Kee I) the oxen x_nt ducts unobstrucmd.
3
Page 4
IMPORTANTSAFETYINFORMATION.
READALLINSTRUCTIONSBEFOREUSING.
SURFACECOOKINGUNITS
Use proper pan size--This appfiance is equipped with one or more surface units of different size.
Select cookware having flat bottoms large enough to cover the surface unit heating element. Theuse
of undersized cookware will expose a portion of the heating element to direct contact and may result
in ignitlbn of clothing. Proper relationship of cookware to burner will also improve efficiency.
• Never leax_ surface units unattended at
high heat setting:s. Boilox_r causes smoking
and gxeasy spillox_rs fllat may catch on
fi re.
• Be sure dlJp pans axe in place. Their
absence during cooking could damag>
range parts and wiring.
• Don't use aluminum foil m line drip
pans or anywhexe in file ox>n except as
described in this guide. Misuse could
resuh in a shock, fire hazard or damag>
m the rang>.
• Only certain types of glass, glass/ceramic,
earthenware or oilier glazed containers are
suitable fox rang>-mp sexMce; others may
break because of the sudden change in
temperature.
• To minimize the possibility of bur/Is,
ignition of flammable mamrials, and
q)illage, fl_e handle of a container should
be turned toward file center of the rang>
_,Jfllotlt exmnding ox_r nearby surface
units.
• Alwws aim surface unit to OFFbefore
renloving cookware.
• Kee I) an eye on foods being fried at HI or
MEDIUM HIGH heats.
• To moid d_e possibility of a bum or
electric shock, always be certain that the
controls fox all surl_me units are at OF/:
posiuon and all coils are cool before
atmmpting to lift or remove the unit.
• Don't immerse or soak removable surface
units. Don't put fllem in a dishwashen
• When flaming foods under the hood,
um_ fl_e l_an on.
• Foods fox flTing should be as d U as
possible. Frost on flozen foods or moisture
on fresh foods can cause hot l_atto bubble
up and ox>r sides of pan.
• Use little fat fox effective shallow or deep-
fat flTing. Filling the pan too fill] of fiat can
cause spilloxers when food is added.
• If a combination of oils or fiats will be used
in flTing, stir mg>ther befoxe heaung, or as
fats melt slowly.
• Always heat fat slowly, and watch as it heats.
• Use a deep-fat thel_nometer whenever
possible to prexent ox>flleafing fat beyond
the smoMng point.
• Use exueme caudon when mo_ing a gxease
filled pan or disposing of hot g_ease.
READANDFOLLOWTHISSAFETYINFORMATIONCAREFULLY.
SAVETHESEINSTRUCTIONS
4
Page 5

Usingthe surfaceunits, www.GEAppliances.com
Throughout this manual, features and appearance may vary from your model
Surface CookingControls
Yoursurfaceunitsandcontro/s are designed
togive youa varietyof heatsettings for surface
unit cooking.
M both LO and HI positions, there is
a slight niche so control clicks at those
positions; HI marks tile highest setting;
LO,tile lowest setting.
In a quiet kitchen, you may hear
slight clicking so/mds dining cooking,
indicating heat settings selected are being
maintained.
SMtching heats to higher settings always
shows a quicker change in temperatm'e
than switching to lower settings.
How to Set the Controls
[] Push tile control knob in.
[] Tm'n either clockwise or
cotmterclockwise to desired
heat setting,
Control must be pushed in to set only
fl'om tile OFFposition.
When control is in any position
other than OFF,you can tm'n it without
I)ushing in.
Be sure vou turn control to OFFwhen
you finish cooking, An indicator light
will glow when ANY sm'li_ce refit is on.
OFF
Medium Medium
MED
10w high
Heat Setting Guide
HI- Quick start fin" cooking; bring water
to boil.
MEDIUM HIGH-Fast fi'_; pan broil;
maintain first boil on large amotmt
of food.
MED- Saute and brown; maintain slow
boil on large amotmt of food.
MEDIUM LOW- Steam rice, cereal;
maintain se_Mng temperatm'e of
IIlOSt loo(ls.
LO -Cook after starting at HI; cook with
little water in covered pan.
NOTE"
At HI or MEDIUM HIGH, never leave
ii i
fi)od tmattended. Boih)xe_s cause
smoking; greasy spillovers may
catch fire.
V_ At LO,melt chocolate, butter on
small mfit.
Cooking Tips
• Lrse medium- or heavyweight
cookware. Ahllllintlil/cookware
conducts heat fi_ster than other
metals, Cast-iron and coated cast-iron
cookware is slow to absod) heat,
but generally cooks evenly at low or
medium heat settings. Steel pans may
cook tmevenlv if not combined with
other metals.
• Do not _werfill cookware with tilt
that may spill over when adding fi_od,
Frosty foods bubble vigorously. Watch
foods fl')ing at high temperatures.
Kee I) range and hood clean fl'om
accmmdated grease.
• To conserve tile nlost cooking energry;
pans should be fiat on tile bottom,
have straight sides and tight-fitting
lids. Match the size ot the saucei)an
to tile size of tile surfi_ce unit. A pan
that extends more than an inch
beyond tile edge _fftile drip pan
traps heat, which causes "crazing"
(fine haidine cracks) on porcelain,
and discoloration ranging ti'om blue
to dark gray on chrome drip pans.
5
Page 6
Usingthe oven.
The OVEN TEMPknob is located on the control panel on the front of the range.
Oven TemperatureControl
To use tile oven, simply turn tile knob
to the desired cooking temperatures,
which are marked in 25°F increments
on tile dial. OVEN TEMP maintains tile
temperature you set, fl'om WM to BROIL.
TheOvenCyclingbghtglowsuntiltheoven
reachesyourselectedtemperature,thengoesoff
andonwith theovenunit(s)dunw cooking.
Bump
/
Theoven has 4shelf positions.
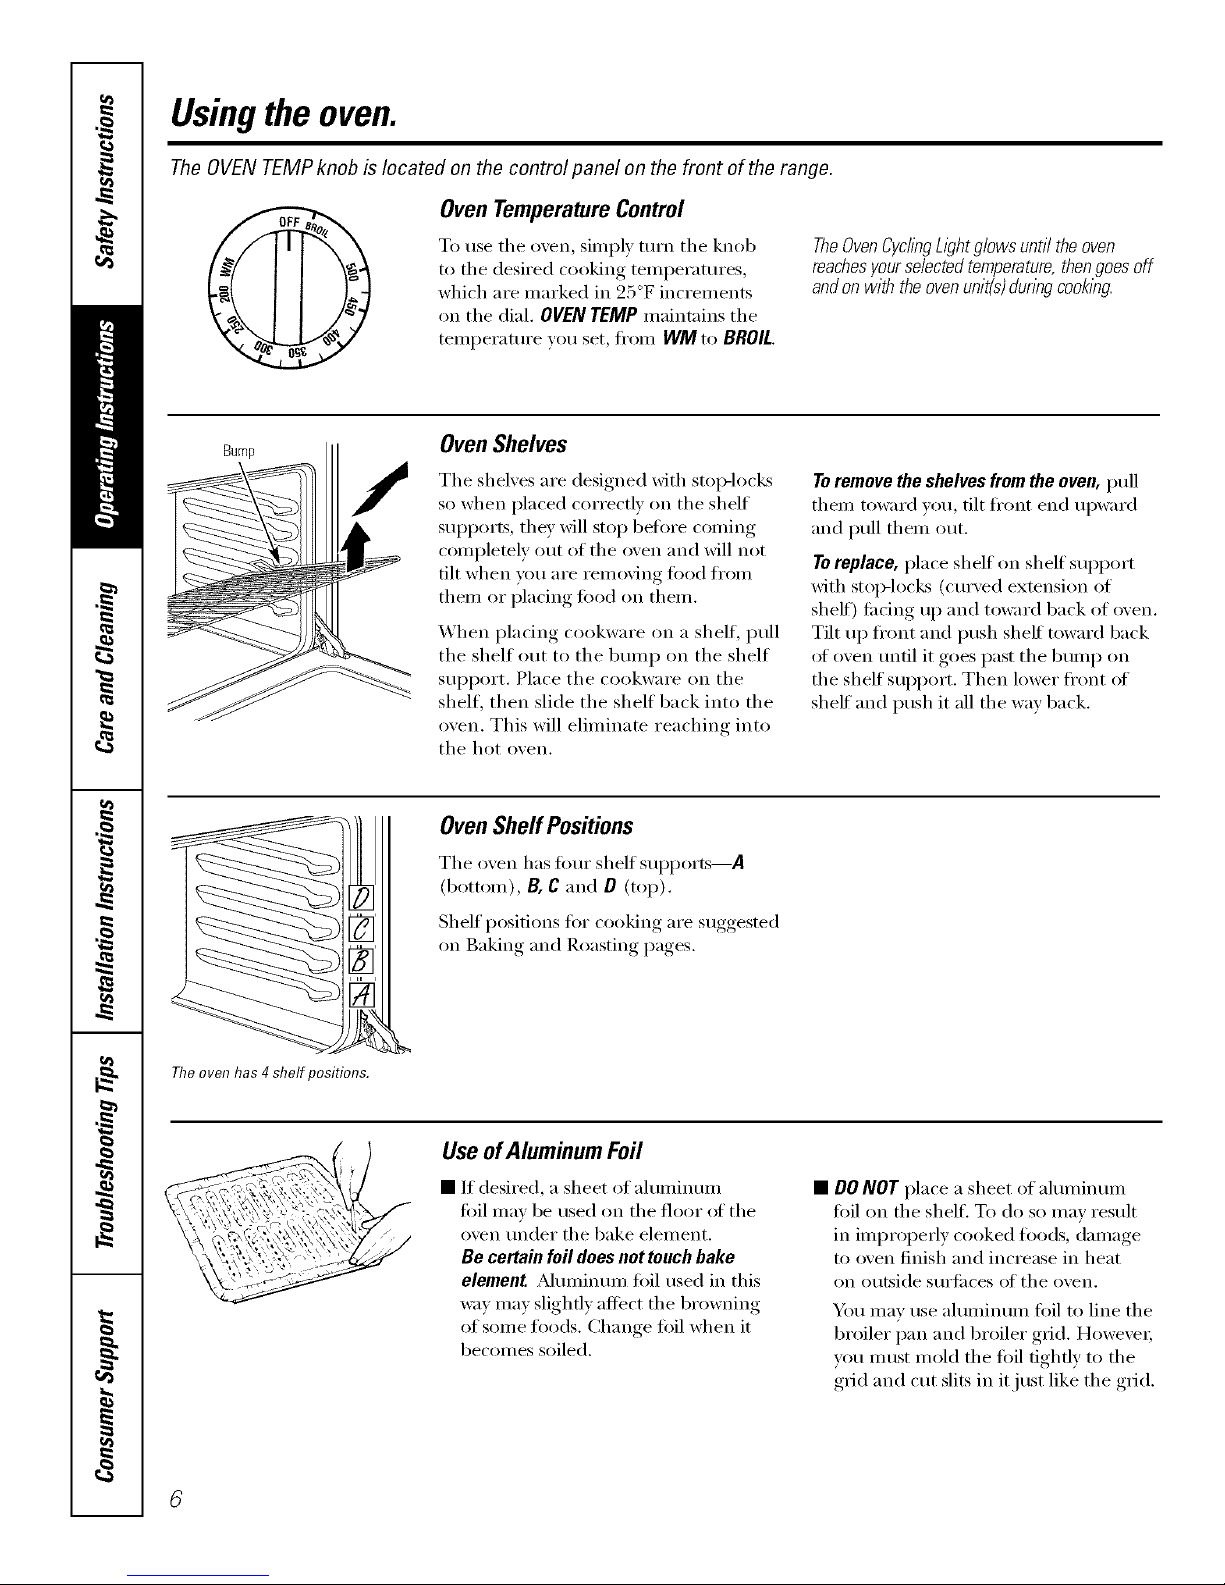
Oven Shelves
Tile shelves are designed with stop-locl<s
so when placed correctly on tile shelf
supports, they will stop before coining
complemly Otlt of tile oven and will not
tilt when um are removing food ti'om
them or placing filed on them.
When pladng cookware on a shelf, pull
tile shelf out to tile bump on tile shelf
support. Place tile cookware on tile
shelf, then slide tile shelf back into tile
oven. This will eliminate reaching into
tile hot oven.
Toremove the shelves from the oven, pull
them toward you, tilt fl'ont end upward
and pull them out.
Toreplace, place shelf on shelf support
with stoI>locEs (curved extension of
shelf) fi_dng up and toward back of oven.
Tilt up ti'ont and push shelf toward back
_ff oven tmtil it goes past tile bump on
the shelf support. Then lower fl'ont of
shelf and push it all the way back.
OvenShelf Positions
Tile oven has tour shell supports_
(bottom), B, C and O (top).
Shelf positions fin" cooking are suggested
on Baking and Roasting pages.
UseofAluminumloft
• If desired, a sheet ot ahlI/lintlIll
fifil may be used on tile floor _ff tile
oven trader the bake element.
Be certain foil does not touch bake
element _Mmninmn foil used in this
way may slightly afli_ct tile browning
of some foods. Change fifil when it
becomes soiled.
• DONOT place a sheet of ahmfinum
ff)il on tile sheik To do so may result
in improperly cooked foods, damage
to oven finish and increase in heat
on outside surfaces _ff tile oven.
You may use ahmfinum fifil to line the
broiler pan and broiler grid. However;
vou must mold tile foil tightly to tile
grid and cut slits in it just like tile grid.
Page 7

Usingthe ovenforbakingor masting. . OEAmia,cescom
Toavoid possible bums, place the shelves in the desired posifion before you turn the oven on.
How to Set Your Oven for Baking or Roasting
[]
[]
Position the sheff or shelves in the
oven. If cooking on two shelves at
the same tilne, stagger the pans for
best heat circulation.
Close o_,en dooi: mlli'n
OVEN TEMP kalob clock_ise to
desired temperature. Preheat oxen
for at least lO minutes if preheating
is necessa i'v.
] Place _:,od in o_,en on center of
shelf. Mlow at least 2 inches between
edge of bakeware and oxen wall or
ac!jacent cookware.
[] Check fl_od fi)r doneness at
nfininmln tilne on recipe. Cook
hmger if necessai_,. Turn OVEN
TEMP knob to OFF and reino',e
_ood.
Sheff Positions
• Most baking is done on the second
sheff position (B) fi'om the bottom.
• X_q_en baking three or fimr itelns, use
two shelxes positioned on the second
and fourth sets of supports (B& D)
ti'oI// bottoII/ of o_,en.
• Bake angel fi)od cakes on filSt shelf
position (A} from bottom of oxen.
• Roasting is usuall} done on the bottom
shelf position (A).
Preheating
• Preheating the oxen takes about 10
minutes.
• Preheat the oven only when necessary
usually for baking
• Most masts Mll cook satisfi_ctorilv
without preheating.
• If you find preheating is necessary,
keep an eve on the indicator light and
put food ill the oven i)rolnptly after
the light goes out. The oven Indicator
i,ight will then cycle on and offwith
the oven themlostat as it cycles to
inaintnin oven telnl)erature.
Bakingand RoastingTips
• Follow a tested recipe and measure the
ingredients cai'efully: If you are using a
package mix, follow label directions.
• Do not open the oven door duIJng
a baking oi_eration--heat will be lost
and the baking tilne inight need to
be extended. This could cause poor
baking results. If you 1//ust open the
dooI; open it l)ai*ially---_mly 3 oi"
4 inches--and close it as quickly
as possible.
• Roasting is cooking by dry heat.
Tender ineat or poultr)' can be roasted
uncovered ill w)ur oven. Roasting
temi_eratures, which should be low
and steady, kee I) spattering to a
nlininluln. _]_en roasting, it is not
necessalx' to seal; baste, cover or add
w_lteI" to VO/II" Illeat.
• Frozen roasts (ff beef, pork, land), etc.,
can be started without thawing, but
allow l 0 to 25 ininutes per pound
additional filne (10 ininutes per pound
li)r i"oasts under 5 l)O/lnds_ 11/oi"e tillle
for linger roasts).
• Thaw most fl'ozen poulti T 1)efore
roasting to enstlI'e e\'en doneness.
Solne conllnercial fl'ozen poultry
can be cooked successfllllv without
thawing. Follow directions given on
package label.
Page 8

Adjust the oven thermostat--Easy to do yourself!
Youmay find that your new oven cooks differently than the one # replaced. Use your new oven for a few weeks to
become more familiar with it. If you still think your new oven is too hot or too cold, you can adjust the thermostat
yourself.
Donot use thermometers, such as those found in grocery stores, to check the temperature setting of your oven.
These thermometers may vary 2_40°F.
NOTE"This adjustment will not affect the broiling temperatures. The adjustment will be retained after a power failure.
[]
Front of OVENTEMPknob
(knob appearance may vary)
Pointer
ToAdjust the Thermostat with this Type of Knob
Pull tile O'_en Temp knob off tile
shaft, look at tile back of tile knob
and note tile current setting before
nla king a ny a(!justIn ents.
[] Tighten tile screws.
[] Replace tile knob, matching tile flat
area of tile knob to tile shaft.
I,oosen both screws on tile back of
tile knob.
] To increasetile oven temperatm'e,
mo_e tile pointer toward tile words
"MAKE HOTTER."
To decreasetile o_en temperatm'e,
ttlFn tile pointer toward tile words
"MAKE COOLER."
Eachnotchchangesthetemperature
bylO°E
Back of OVENTEMPbwb
Thetype ofmargarine will affect bakingperformance!
Most recipes for baking have been
developed using high-fat products such
as butter or margarine (80% fat). If you
decrease the fat, the recipe may not
give the same results as with a higher
fat product.
Recipefaiiurecanresuitffcakes,pies, pastries,
cookiesorcandiesaremadewithiow-fatspreads.
Theiowerthefatcontentofa spreadproduct,the
morenoticeab/ethesedifferencesbecome.
Federal standards require products
labeled "margarine" to contain at least
80% tilt by weight. Ixm_tht spreads, on tile
other hand, contnin less tht and more
water: Tile high moisture content of these
spreads affects tile texture and flavor of
baked goods. For best results with w_m" old
thvofite redpes, rise maigafine, btltter ()r
stick spreads containing at least 70%
vegetable oil.
8
Page 9

Usingthe ovenforbroiling. .---OEamia.cescom
Broiling may be slightly different from any previous broiling you maybe acquainted with, so be sure to read this
section completely.
How to Set Your Oven for Broiling
Broilingiscookbgfoodbybtenseradiantheat
fromtheupperdementintheoven.Mostfish
andtendercutsofmeatcanbebroi/edFo//ow
thesestepstokeepspatteringandsmok/hgto
8 minimum.
[] Place the shelf in l)osition C fiw
most broiling.
Close the dora: Always broil with the
door closed.
[] If the meat has tilt or gristle
around the edge, cut xertical slashes
through both about 2" apart. If
desired, tilt may be trimmed,
leaving a layer about 1/8" thick.
[] Place the meat on the broiler grid
in the broiler pan which comes with
vom" range. Mwa):s use the grid so
the tilt drips into the broiler pan;
otherwise the juices may become
hot enough to catch fire.
[] Turn the OVENTEMPknob
clockwise to BROIL. Y)u will teel
a slight niche at the broil position.
[] Turn fi)od only ()lice durhlg
cooking
[] Turn the OVENTEMPknob to OFF.
Serxe fi)od imlnediately, and leave
the pan outside the oxen to cool
duI_ng the ineal tor easiest cleaning.
Broiling Guide
• If desired, marinate meats or
chicken heft)re broiling, or brush
with barbecue sauce the last 5 to 10
nfilmtes OlflV:
• Frozen steaks can be broiled by
posidoning the oven shelf at the next
lowest shelf posidon and increasing
cooking dine given in this guide 1½
tiln es per side.
• When arranging fl)od on pan, do not
let tiltQ' edges hang over sides because
the dripping tilt will soil the oven.
• If your range is COlmected to 208
voits, rare steaks inav be broiled by
ix'eheafing the broiler and positioning
the oven shelf one position higher:
Food
Bacon
GroundBeef
Beef Steaks
Medium
Chicken
Fish
Amountor
Thickness
1/2 lb.
(about8thin slices)
1 lb.(4 patties)
1/2to 3/4" thick
1" thick
1to 1VzIbs.
1whole
2to 2YzIbs.,
split lengthwise
1 lb.fillets
1/4to 1/2" thick
Shelf
Position
Time In Minutes
First Side Second Side
31/zrain. 3Vzrain.
10rain. 7 rain.
9 rain. 9 rain.
35 rain. 15rain.
5 rain. 5 rain.
Comments
Arrangein single laye
Spaceevenly.
Steakslessthan1"
thickcookthrough
beforebrowning.Pan
fryingisrecommendec
Slashfat.
Reducetime about5
to 10 minutesperside
for cut-upchicken.
Brusheachside with
meltedbutter.Broil
skin-side-downfirst.
Handleandturnvery
carefully.Brushwith
lemonbutterbefore
andduringcooking,
if desired.Pr@eat
broilerto increase
browning.
9
Page 10

Careand cleaning of the range.
Be sure electrical power is off and aft surfaces are cool before cleaning any part of the range.
Proper care and cleaning are important so your range will give you efficient and satisfactory service. Follow these
directions carefully in caring for your range to assure safe and proper maintenance.
If your range is removed for cleaning, servicing or any reason, be sure the anti-tip
device is reengaged properly when the range is replaced. Failure to take this
precaution could result in tipping of the range and cause injury.
Porcelain EnamelCooktop
The porcelain enamel finish is sturdy
but breakable if nlisused, This finish is
acid-resistant. However; any acidic toods
spilled (such as fruit juices, tomato or
vinegar) should not be pemfitted to
remain on the finish.
Oven Shelves
Clean the shelves with an abrasive
cleanser or steel wool.
J_fter cleaning, rinse the shelves with
clean water and (hw with a clean cloth.
Receptacle
Toremove the surface unit, rift it
about I inch above the drippan
and pull it out.
Replace the drip pan flTtothe
recess f17the cooktop.
10
Surface Units and Drip Pans
To clean the surfi_ce traits, mrn the
control to the highest setting fin" a
minute. The coils will bm'n off any soil.
Toremove a surface unit:
To remove the drip pans fin" cleaning,
the Stli_ilce milts i//tlSt be removed fi_t.
Make sure the SUlqfhce units are cool
befin'e touching them.
i,ifl the surlilce unit about 1 inch above
the drip pan and pull it out.
Do not lift thesurface unit more than I inch. If
you do,it maynot fie flat on the dnppan when
youplug it backin.
NOTE."Repeated lifting of the surfi_ce trait
more than 1 inch above the drip pan can
pemmnenfly damage the receptacle.
Toreplace a surface unit
Rel)la(e the drip pan into the recess in
the cooktop. Make sm'e the opening in
the pan lines up with the receptacle.
Insert the temfinals of the surfi_ce unit
through the opening in the drip pan and
into the receptacle.
Guide the sm'ti_ce trait into place so it
rests evenlY;
Toclean the drip pans:
Drip pans can be cleaned in the
dishwasher or bv hand. If w)u use a
scotwing pad, rub lightly to I)revent
scratching.
[] CanI coverthe drip pans with foil?
[] No, because using Ibil so ('lose to
the receptacle could cause shock,
fire or damage to the range.
CAUTION:
• Do not imme_e the surfi_ce traits in
liquids of any kind.
• Do not clean the surti_ce units in a
dishwasher:
• Do not bend the surlilce unit I)lug
temfinals.
• Do not attempt to clean, a(!iust or in
any way repair the plug-in receptacle.
Page 11

www.GEAppliances.com
hingearm
Hinge
hingearm
I
Upper_/_
hingea_ Lower
Lift-OffOvenDoor
Tile oxen door is remoxable, but it is
heavv,. Y_m may, need heli) remoxing, and
re )lacin,, tile dora:
Toremovethedoor:
[] Open tile door to tile flfll open
position.
[] Pull tile hinge locks up oxer tile
hinge hooks on both sides.
[] (;rasp tile door fimfl) on each side,
lift slightly and pull it straight out
and awa_ fi'Olll tile oxen,
Toreplacethedoor:.
[] Fimfl} grasp both sides ot tile door
at tile top.
[] Insert and seat tile upper and lower
hinge ;runs into the oxen slots.
[] Push the hinge locks down from the
hinge hooks.
[] Close tile oxen door and make sm'e
it is working properly. If it is not
working properly, remove and
replace it t01lowing tile above steps.
DONOTATTEMPTTOCLOSETHEDOOR
UNTILTHISSTEPISCOMPLETE.THE
HINGEORDOORCOULDBEDAMAGED.
OvenHeating Elements
Do not clean tile 1)ake element or tile
broil element. Any soil will bm'n offwhen
the elements are heated.
Tile bake element can be lifted gently to
clean tile oven floor: If spillovers, residue
or ash accmmflate arotmd tile bake
element, gently wipe around tile element
with wam/ water:
Boil7the broiler pan and grid can
also be cleaned in the dishwashe_
Broiler Panand Grid
AJier broiling, remove tile broiler pan
fl'om the oven. Renlove tile grid from tile
pan. Careflflly pore" out grease from tile
pan into a proper containe_: _A'_sh and
_inse tile broiler pan and grid in hot
water with a soap-filled or plastic
scorning pad.
If fi_od has burned on, sprinkle tile grid
with detergent while hot and cover Mth
wet paper towels or a dishcloth. Soaking
tile pan Mll remove bm'ned on foods.
Do not store a soiled broi/er pan aM grid
anywhereb therange.
11
Page 12

Careand cleaning ofthe range.
Meld_d Control Knobs
flat area
Thecontrolknobsmayberemovedforeasier
cleaning.
To remove a knob, pull it smfight off
the stem.
_&'_sl_the knobs in soap and water but do
not soak. Avoid getting water down in the
knob stem holes.
Replace the knob by fitting the molded
fiat area inside the knob onto the flat
area of the stein.
Painted Surfaces
Painted smti_ces include the sides,
control panel, door and kick panel.
Clean these with soap and water or a
vinegar and water solution.
Do not usecommercialoven cleaners,cleansing
powders,steel wool or harshabrasivesonany
painted sufface.
Porcelain Oven Interior
With propercare, theporcelain enamel interior
will retain its attractive finish for manyyears.
Soap and water will nommlly do the job.
Hea\ T spattering or spillovei_ may
require cleaning with a mild abrasive
cleanse_: Soapy, wet pads may also be
used. Do not allow fi)od spills with a high
sugar or add content (such as milk,
tomatoes, sauerkraut, fl'tfitj uices or pie
filling) to remain on the SUltilce. They
Inay cause dull spots even after cleaning.
Household ammonia may make the
cleaning job easier: Place 1/2 cup
ammonia in a shallow glass pan and leave
in a cold oven overnight. The ammonia
fim_es will help loosen the burned-on
grease and food.
When necessary, p)tl may use a
commercial oven cleane_: Follow the
package directions.
Cautionsaboutusingspray-onoven
cleanersJ
• Do not spray the oven cleaner on the
electrical controls and switches because
it could cause a short circuit and result
in sparking or fire.
• Do not directly spray oven cleaner
onto the oven heating elements.
• Do not allow a fihn fi'om the
cleaner to remain on the temperature
sensm_it could cause the oven to
heat improperly. (The sensor is located
at the top of the oven.) Careflfllv
wipe the bull) clean after each
oven cleaning, being carefifl not to
i/love the seiisor since a change iil
its position could affect how the oven
bakes.
• Do not spray any oven cleaner on the
outside oven dooI; handles or any
exterior surli_ce of the oven, cabinet
or painted smti_ces. The cleaner can
damage these smti_ces.
12
Page 13

! Ilnstallation 120"and24"Compact
nstructlons Electric Ranges
"_ Questions? Call 800.GE.CARES (800.432.2737) or Visit our Website at: GEAppliances.com I
BEFORE YOU BEGIN
Read these instructions completely
and carefully,
• IMPORTANT - Savethese
instructions for local inspector's use.
• IMPORTANT - Observeall
governing codes and ordinances.
• Note to Installer - Be sure to leave these
instructions with the Consumer.
• Note to Consumer - Keep these
instructions for future reference.
• Skill level - Installation of this appliance
requires basic mechanical skills.
• Completion time - 1 to 3 hours
• Proper installation is the responsibility of
the installer.
• Product failure due to improper installation
is not covered under the Warranty.
-&WARNING - This appliance must
be properly grounded.
FOR YOUR SAFETY:
_WARNING - Before beginning the
installation, switch power off at service panel
and lock the service disconnecting means to
prevent power from being switched on
accidentally. When the service disconnecting
means cannot be locked, securely fasten a
prominent warning device, such as a tag, to
the service panel.
13
FOR YOUR SAFETY:
All rough-in and spacing dimensions must be
met for safe use of your range. Electricity to
the range can be disconnected at the outlet
without moving the range if the outlet is in
the preferred location (remove lower drawer).
To reduce the risk of burns or fire when
reaching over hot surface elements, cabinet
storage space above the cooktop should be
avoided. If cabinet storage space is to be
provided above the cooktop, the risk can
be reduced by installing a range hood that
sticks out at least 5" beyond the front of the
cabinets. Cabinets installed above a cooktop
must be no deeper than 13_'
Be sure your appliance is properly installed
and grounded by a qualified technician.
Make sure the cabinets and wall coverings
around the range can withstand the temperatures
(up to 200°E) generated by the range.
ANTI-TIP DEVICE
AWARNING - Toreducetherisk
of tipping, the appliance must be secured by
properly installed Anti-Tip bracket packed
with this appliance.
If the Anti-Tip device supplied with the range
does not fit this application, use the universal
Anti-Tip device WB2X7909.
AWARNING-
• All ranges can tip
• Injury to persons could result
(_ • Install Anti-Tip bracket packed
with range
• See Installation Instructions
If you pull the range out and away from the
wall for any reason, make sure the Anti-Tip
bracket is engaged when the range is pushed
back against the wall.
Page 14

Installation Instructions
PREPARE TO INSTALL THE RANGE
MATERIALS YOU MAY NEED
Tin Snips Lag Bolts Anchor Sleeves
(For Anti-Tip Bracket Mounted on Concrete Floors Only)
(UL Approved 40 AMP)
4-Wire Cord OR 3-Wire Cord
4' Long 4' Long
Squeeze Connector
(For Conduit
Installations Only)
TOOLS YOU WILL NEED
Drill with 1/8" Bit Safety Glasses
Adjustable Wrench
Tape Measure
Pliers
Grr¢:
Pencil
1/4" Nut Driver Level
Phillips Screwdriver
Flat-blade
Screwdriver
PARTS INCLUDED
Anti-Tip Bracket Kit
Ill REMOVE SHIPPING MATERIALS
Remove packaging materials. Failure to
remove packaging materials could result
in damage to the appliance.
14
_-I PREPARE THE OPENING
• See the illustration below for all rough-in and
spacing dimensions. These dimensions must
be met for safe use of your range.
• The range may be placed with 0" clearance
at the back wall and 2" minimum clearance at
side walls of the range if the front edges of the
range side panels protrude beyond the cabinet
fronts at least 1/4".
• To eliminate the risk of burns or fire when
reaching over hot surface elements, cabinet
storage space above the cooktop should be
avoided. If cabinet storage space is to be
provided above the cooktop, the risk can be
reduced by installing a range hood that
protrudes at least 5" beyond the front of the
cabinets. Cabinets installed above a cooktop
may be no deeper than 13".
From combustible
walls above cooking
surface
_4t_C 26" from
wall to front of
36" max.
Surface
mout_t
outlet
D (depl
with door \
open)
C
Models A B recommended) D
20" Wide 20" 20%" 2" 393/8,,
24" Wide 24" 243/8" 2" 40_&"
Flooring under the range
Your range, like many other household items,
is heaw and can settle into soft floor coverings
such as cushioned vinyl or carpeting.
When moving the range on this type of
flooring, it should be installed on a 1/4"
thick sheet of plywood (or similar material)
as follows:
When the floor covering ends at the front
of the range, the area that the range will
rest on should be built up with plywood
to the same level or higher than the floor
covering. This will allow the range to be
moved for cleaning or servicing.
Page 15

Installation Instructions
ELECTRICAL CONNECTIONS
ELECTRICAL REQUIREMENTS
CAUTION: Forpersonal safety,
do not use an extension cord with this
appliance. Remove house fuse or open circuit
breaker before beginning installation.
This appliance must be supplied with the
proper voltage and frequency, and connected
to an individual properly grounded branch
circuit, protected by a circuit breaker or fuse
having amperage as specified on the rating
plate. The rating plate is located above the
storage drawer on the oven frame.
We recommend you have the electrical wiring
and hookup of your range connected by a
qualified electrician. After installation, have
the electrician show you where your main
range disconnect is located.
Check with your local utilities for electrical
codes which apply in your area. Failure to
wire your oven according to governing codes
could result in a hazardous condition. If there
are no local codes, your range must be wired
and fused to meet the requirements of the
National Electrical Code, ANSI/NFPA No. 70-
Latest Edition. You can get a copy by writing:
National Fire Protection Association
Batterymarch Park
Quincy, MA 02269
Effective January 1, 1996, the National
Electrical Code requires that new construction
(not existing) utilize a 4-conductor connection
to an electric range,
When installing an electric range in new
construction, follow Steps 3 and 5 for 4-wire
connection,
You must use a 3-wire, single-phase A.C.
208Y/120 Volt or 240/120 Volt, 60 hertz
electrical system. If you connect to aluminum
wiring, properly installed connectors
approved for use with aluminum wiring
must be used.
If the electrical service provided does not
meet the above specifications, have a
licensed electrician install an approved outlet.
ALL NEW BRANCH CIRCUIT
INSTALLATIONS, MOBILE
HOMES, RECREATIONAL
VEHICLES AND
INSTALLATIONS WHERE
LOCAL CODES DO NOT
ALLOW GROUNDING
THROUGH NEUTRAL,
REQUIRE A 4-CONDUCTOR
CORD OR CONDUIT
Use only a 3-conductor or a 4-conductor
UL-listed range cord. Terminations must
either be closed loop connectors or open end
spade lugs.
A range cord rated at 40 amps with 125/250
minimum volt range is required. A 50 amp
range cord is not recommended but if used, it
should be marked for use with nominal 13/J"
diameter connection openings. Care should
be taken to center the cable and strain relief
within the knockout hole to keep the edge
from damaging the cable.
• Because range terminals are not accessible
after range is in position, flexible service
conduit or cord must be used.
NOTE: If conduit is being used, go to Step 3D
and then to Step 6 or 7.
• On some models, a filter capacitor may be
connected between the black and white
leads on the junction block.
15
Page 16

Installation Instructions
ELECTRICAL CONNECTIONS (CONT.)
[] POWER CORD AND STRAIN
RELIEF INSTALLATION
[]
[]
Remove the wire cover (on the lower
back of the range) by removing its top
center screw,
Do not discard this screw.
Remove the knockout ring (13/8") located
on bracket directly below the terminal
block. To remove the knockout, use a
pair of pliers to bend the knockout ring
away from the bracket and twist until
ring is removed.
Terminal block
(appearance
may vary)
Knockout ring
in bracket
Knockout
ring removed
[] For power cord installations only (see
the next step if using conduit), assemble
the strain relief in the hole. Insert the
power cord through the strain relief and
tighten. Allow enough slack to easily
attach the cord terminals to the terminal
block. If tabs are present at the end of
the winged strain relief, they can be
removed for better fit.
NOTE: Do not install the power cord
without a strain relief. The strain relief
bracket should be installed before
reinstalling the rear range wiring cover.
Terminal
block
,/
Strain relief
/ l
Power cord Bracket
Skip to Step 4 or 5.
16
[] For conduit installations only, purchase a
squeeze connector matching the diameter
of your conduit and assemble it in the hole.
Insert the conduit through the squeeze
connector and tighten. Allow enough slack to
easily attach the wires to the terminal block.
NOTE: Do not install the conduit without a
squeeze connector. The squeeze connector
should be installed before reinstalling the
rear range wiring cover.
Terminal
block
Squeeze
connector
Conduit
Skip to Step 6 or 7.
\
Bracket
Page 17

Installation Instructions
3-WIRE POWER CORD
INSTALLATION
WARNING: The neutral or ground
wire of the power cord must be connected
to the neutral terminal located in the
center of the terminal block. The power
leads must be connected to the lower left
and the lower right terminals of the
terminal block.
[] Remove the 3 lower terminal screws
from the terminal block. Insert the 3
terminal screws through each power cord
terminal ring and into the lower terminals
of the terminal block. Be certain that the
center wire (white/neutral) is connected
to the center lower position of the
terminal block. Tighten screws securely
into the terminal block.
DO NOT remove the ground strap
connection.
Ground plate
Terminal
block
J€/ (appearance
may vary)
Neutral
terminal
Ground
strap
Power cord
[] Skip to Step 8 and proceed with the
installation.
17
4-WIRE POWER CORD
INSTALLATION
WARNING: The neutralwire of
the supply circuit must be connected to the
neutral terminal located in the lower center
of the terminal block. The power leads must
be connected to the lower left and the lower
right terminals of the terminal block. The 4th
grounding lead must be connected to the
frame of the range with the ground plate
and the ground screw.
[] Remove the 3 lower terminal screws from
the terminal block. Remove the ground
screw and ground plate and retain them.
[] Cut and discard the ground strap. DO NOT
DISCARD ANY SCREWS.
[] Insert the one ground screw into the power
cord ground wire terminal ring, through the
ground plate and into the frame of the range.
[] Insert the 3 terminal screws (removed earlier)
through each power cord terminal ring and
into the lower terminals of the terminal block.
Be certain that the center wire (white/neutral)
is connected to the center lower position of
the terminal block. Tighten screws securely
into the terminal block. Ground strap
Before __ _ _or
After Neutral
terminal
Terminal
block
Ground
screw
Ground
plate
(grounding
to range)
\
%
[] Skip to Step 8 and proceed with the installation.
Page 18

Installation Instructions
ELECTRICAL CONNECTIONS (CONT.)
3-WIRE CONDUIT INSTALLATION
Loosen the 3 lower terminal screws from
the terminal block. Insert the center bare
wire (white/neutral) tip through the bottom
center terminal block opening. On certain
models, the wire will need to be inserted
through the ground strap opening and then
into the bottom center block opening. Insert
the two side bare wire tips into the lower
left and the lower right terminal block
openings. Tighten the screws until the wire
is firmly secure (approximately 35 inch-lbs.),
NOTE: ALUMINUM WIRING:
Aluminum building wire may be used
but it must be rated for the correct
amperage and voltage to make
connection. Connect wires according
to this Step 6 or Step 7 depending on
number of wires.
Terminal
block
Wire tips
Bracket
Conduit
Wire used, location and enclosure
of splices, etc., must conform to good
wiring practices and local codes.
[] Skip to Step 8 and proceed with the
installation.
[] 4-WIRE CONDUIT INSTALLATION
[]
[]
Loosen the three lower terminal screws
from the terminal block. Remove the ground
screw and ground plate and retain them.
Cut and discard the ground strap. DO NOT
DISCARD ANY SCREWS.
Insert the ground bare wire tip between the
range frame and the ground plate (removed
earlier) and secure it in place with the ground
screw (removed earlier), Insert the bare wire
(white/neutral) tip through the bottom center
of the terminal block opening. Insert the two
side bare wire tips into the lower left and the
lower right terminal block openings. Tighten
the screws until the wire is firmly secure
(approximately 35 inch-lbs.).
Before
Terminaly_
block
Cut and discard J
the ground strap
After
Terminal/_
block - _
Wire tips -...........__"
Ground
screw _c
ro_d strap
_._ _or _
_ Niutral
rminal
Ground
plate
_,_ _gr:U:gdi)n g
'_Bracket
[]
Wire used, location and enclosure
of splices, etc., must conform to good
wiring practices and local codes.
Proceed to Step 8.
18
Page 19

Installation Instructions
INSTALL THE RANGE
[] REPLACE THE WIRE COVER
Replace the wire cover on the range back
by sliding its two lower retaining tabs into
the slots and replacing the screw removed
earlier. Make sure that no wires are pinched
between the cover and the range back.
ANTI-TIP DEVICE INSTALLATION
(cont.)
[]
Slide the range back toward the wall, being
careful not to damage the sides or top of
the range, or the adjacent cabinets. Make
sure one of the rear leveling legs securely
engages into the anti-tip bracket.
I-9--IANTI-TIP DEVICE INSTALLATION
.4,WARNING:
• Range must be secured by Anti-'lip
bracket supplied.
• If the Anti-Tip device supplied with the
range does not fit this application, use
the universal Anti-Tip device WB2X7909.
Unless properly installed, the range
could be tipped by stepping or sitting on
the door. Injury may result from spilled
hot liquids or from the range itself.
[]
[]
[]
Anti-tip bracket attaches to the floor to hold
either rear range leg. When fastening to the
floor, be sure that the screws do not penetrate
electrical wiring or plumbing. If you cannot
be sure of this, use shorter screws that will
not penetrate through the flooring.
Decide whether the anti-tip bracket will be
installed on the right or left side of the
range location.
If the bracket side of the range is next to a
cabinet or wall, place the bracket 19,46" from
the cabinet or wall. If there is no adjacent
cabinet, determine where the location of the
range side (painted outside panel) will be.
Place the bracket so that the distance between
the mounting holes (center line) is 1_"
from the side panel. Position the bracket so
the back hole is 27,46" from the back wall.
Screw the bracket securely to the floor with
the screws provided. The screws are self-
drilling in wood, plywood, particle and chip
board, and most metal framing. If attaching
to masonry, you can buy suitable screws
and/or anchors at hardware stores. Use a
J Anti-tip ,,I r
masonry 27/'8 Wall
drill to drill
bracket
theholes,required ii,,____v._
19
[]
[]
LEVEL THE RANGE
For proper cooking and baking, the range
must be leveled. Leveling legs are located
on each corner at the base of the range.
Install the oven shelves _
(see Using the oven
section for instructions).
Put a spirit level or a
glass measuring cup ____,__,,_
partially filled with water
o n one of the ov en _--_../_
shelves.
Turn the legs clockwise
to raise the range and
counterclockwise to
lower the range. Adjust
the leveling legs until
the range is level.
I_] FINAL INSTALLATION CHECKLIST
Check to make sure the circuit breaker is
closed (RESET) or the circuit fuses are
replaced.
Be sure power is in service to the building.
Check to be sure that all packing materials
and tape have been removed. This will
include tape on metal panel under control
knobs (if applicable), adhesive tape, wire
ties, cardboard and protective plastic. Failure
to remove these materials could result in
damage to the appliance once the appliance
has been turned on and surfaces have heated.
Check to make sure that the rear leveling
leg is fully inserted into the Anti-Tip bracket
and that the bracket is securely installed.
Be sure all range controls are in the OFF
position before leaving the range.
Page 20

Before YouCall ForService...
TrOubleshooting -tips
Save time and money! Review the chart on this page
t and you may not need to call for service.
Problem Possible Causes What To Do
Surface uu#s not The surface milts axe * _._]th tile controls off, check to make sure tile surti_(e
functioning properly not plugged hasolidly, unit is plugged completely into tile receptacle.
The surface refit controls * Check to see the correct control is set fin" the stmfi_ce
improperly set. unit xou are usin,
The drip pans are not set •_]th tile controls off, check to make sure tile drip
securely in the cooktop, pan is in tile recess in tile cooktop and that tile
opening in tile pan lines up with tile receptacle.
Ovenwill A fuse in your home may * Replace tile fllse or reset tile drcuit breaker.
not WOrk be blown or the circuit
breaker tripped.
Plug on range is not • Make sure electrical plug is plugged into a live, properly
completely inserted in grounded outlet.
the electrical outlet.
Oven conWol • See tile Using the oven sections.
improperly set.
Food does not Oven control * Make stu'e veil ttlrn tile knob all tile way to tile
broilproperly hnproperly set. BROIL position.
Improper shelf position • See tile Broiling Guide.
being used.
Cookware not suited • Lrse tile broiling pan and grid that came with your range.
for broiling.
Aluminum foil used on the * See tile Use of aluminum foil section.
the broiling pan and grid has
not been fitted properly and
slit as recommended.
Fooddoes not bake Oven control • See tile Using the oven for baking or roasting section.
or roast properly hnproperly set.
Shelf position is incorrect • See tile Using the oven for baking or roasting section.
or the shelf is not level.
Necessary preheating * See the Using the oven for baking or roasting section.
was not done.
• See tile Using the oven forbaking orroasting section.
Incorrect cookwaxe or
cookwaJce of hnproper
size being used.
2O
Page 21

GE Service Protection Plus 'M
GE, a name recognized worldwide %r quality' and dependability, oflers y'ou
Service Protection Plus'_'--comprehensive protection on all y'our appliances--
No Matter What Brand!
Benefits Include:
• Backed by GE
• All brmads covered
• Unlimited service calls
• All parts mad labor costs included
• No out-of-pocket expenses
• No hidden deductibles
• One 800 number to call
We71CoverAnyAppliance.
Anywhere. Anytime.*
You will be completely satisfied with our service protection or you ma} request ,your inone,_ back
on the remaining value of 3our contract. No questions asked. It's that simple.
Protect yore" reffigerat(m dishwasher; washer and dryer; range, TV, VCR and much more--rely brand!
Plus there's no extra charge tot eulergency ser;'ice and low inonthly financing is available. Even icelnaker
coverage and tood spoilage protection is ottered. You can rest eas> knowing that all your valuable
household products are protected against expensive repairs.
Place your confidence in (;E and call us in the IU.S. toll-free at _tllt._Z_.ZZZ_
foY UlOI'e inloi'u/ation.
"*Allbrands cmered, up to 2(}years old. in the contin< nlal I_.S.
_.. (2."._22.............
Please place in envelope and mail to:
General Electric Company
Warranty Registration Department
EO. Box 32150
Louisville, KY 40232-2150
21
Page 22

Consumer Product Ownership Registration
Dear Customer:
Thank you for purchasing our product and thank you for placing your confidence in us.
_A/eare proud to ha_e you as a customer!
Follow these three steps to protect your new appliance investment:
Complete mid mail
your Consumer
Product Ownership
Registration today.
ttaw' tim peace of
mind of knowing w(
call colltact VOl/ ill
tile tmlikely exent era
safi,ly modification.
Atter mailing tile
registration below,
store this document
in a sail. place. It
contains inlormation
you will need should
you require service.
Our selwice number is
800.GE.CARES
(800.432.2737).
Read your Owner's
Manual carefllllv.
It will help you
operate yol/r lle',_
appliance properly.
Model Number Serial Number
, , , , , I I , , , , , , , I
Important: If you did not get a registration card with your
product, detach and return the form below to
ensure that your product is registered, or register
online at www.GEAppliances.com.
.................................................................................................... _l,._ (M111_1-(
Consumer Product Ownership Registration
Model Number Serial Number
I,,,,,, , , , , , I I , , , , , , I
MI: Ms. M*>,. Mix_,
Fir',l I I Lasll
Name I I I I I I I I I Nain(! I I I I I I I I I I I I
_1 r( (!1 I
Addr(ss I I I I I I I I I I I I I I I I I I I I I I I I
22
Ap_.#l, , , , , , , I E-lnailAddress*
1);u(, Pla( ed
Monlh
GEAppliances
BE Consumer Products
General Electric Company
Louisville, Kentlwky
ww_zGE@p/iances, com
* Please provide your eqnail address to receive, via eqnail, discounts, special ottk,l-, and <)tiler important
communications h-ore GE Appliances (GEA).
Check here if you do not want to receixe COlnnmnications fl-om GEA's carefiflly selected partners.
FAILI RE T() COMPI.ETE AND RE'F[ 7RN TttlS CARD DOES NOT DIMINISII YOI R
WARRANT'; RI (;I ITS.
For intormation about GEA's privacy and data usage poll(?; go to _a_v.GEAppliances.com and click
on "Pri_acy Policy" or call 800.626.2224.
Page 23

Electric Range Warranty.
All warranty service provided by our Factory Service Centers, or
an authorized Customer Care®technician. Toschedule service,
on-line, 24 hours a day, visit us at www.GEAppfiances.com, or
carl 800.GE.CARES (800.432.2737).
Staple your receipt here.
Proof of the original purchase
date is needed to obtain service
under the warranty.
For The Period Of."
OneYear
Fromthedate ofthe
originalpurchase
We Will Replace:
Anypatt at the range which tifils due to a detect in materials or workmanship.
During this full one-year warranty, GE will also provide, free of charge, all labor
and in-home service to replace the detecti\'e part,
What is Not Covered:
• Service trips to your home to teach you how to
rise the product.
• hnproper installation, delive U or maintenance.
• Failure at the product if it is abused, misused, or
used tin" other than the intended i)ml)ose or used
commercially;
• Replacement at house fllses or resetting at circuit
breake_.
• Damage to the product caused by accident, fire,
floods or acts of God.
• Incidental or consequential damage caused by possible
defects with this appliance.
• Damage caused atter delivery.
This warranty is extended to the original purchaser and any succeeding owner for products purchased for
home use within the USA. In Alaska, the warranty excludes the cost of shipping or service calls to your home.
Some states do not allow the exclusion or limitation of incidental or consequential damages. This warranty
gives you specific legal rights, and you may also have other rights which vary from state to state. To know
what your legal rights are, consult your local or state consumer affairs office or your state's Attorney General
Warrantor: General Electric Company.Louisville,KY 40225
23
Page 24

ConsumerSupport.
gEAppliancesWebsite www.GEAppliances.com
Have a question or need assistance with your appliance? Try the GE Appliances X4'ebsite 24 hom_ a day,
any day of the year'. For greater convenience and faster service, you can now download Owner's Manuals,
order parts, catalogs, or even schedule service ondine. Y_u can also "_sk Our Team of EN)erts .....
your questions, and so much more...
ScheduleService
www.GEAppliances.com
Expert (;E repair se_Mce is onh one step away fl'om xour doo_: Get on-line and schedule your service at
_our conxenience 24 hom_ any (la_ of the year! Or call 800.GE.CARES (800.432.2737) during n{mnal
business hou_.
RealLifeDesignStudio www.GEAppliances.com
GE SUl_ports the Uni\'e_al Design concel)t--products, services and environments that can be used by
people of all ages, sizes and capabilities. We recognize the need to design fin" a wide range of phDical and
mental abilities and impaimmnts. For details of GE's Universal Design applications, including kitchen
design ideas for people with disabilities, check out our Website today. For the hearing impaired, please call
800.TDD.GEAC (800.833.4322).
ExtendedWarranties www.GEAppliances.com
Purchase a (;E extended warrant_ and learn about special discounts that are axailable while your warranty
is still in effect. You can purchase it on-line an) time, or call 800.626.2224 during nomml business hou_.
GE Consumer Home Serxices will still be there after your warran_ expires.
PartsandAccessories www.GEAppliances.com
Indi\iduals qualified to service their own appliances can have parts or accessories sent directh' to their
homes (VISA, MasterCard and Discover cards are accepted). Order on-line today, 24 hom_ every day or
by phone at 800.626.2002 during nomml business hou_.
Instructions contained in this manual coverprocedures to be performed byany user. Other servicing generally
should be referred to qualified service personnel Cautionmust be exercised, since improper servicing may cause
unsafe operation.
ContactUs www.GEAppliances.com
If you are not satisfied with the service you receive tl"om GE, contact us on our _4'ebsite with all the details
including your phone numbe_; or write to: General Manage_; Customer Relations
GE Appliances, Appliance Park
I,ouisville, KY 40225
RegisterYourAppliance www.GEAppliances.com
Register your new applimlce on-line--at your €onvellience! Tiinel) product registration will allow for
enhanced communication and prompt service tlll(lei" the terms of_otlr warranty should the need arise.
You may also mail in the pre-p_inted registration card included in the I)ackin_*_material.
Printed in Turkey
 Loading...