

Page 1

Owner'sManuel
Part No. 164D3333P184 184-6C097 Pub.No.49-8954-! 02-01JR
Page 2

Safety Information
Anti-TipDevice ............ 3
SafetyPrecautions....... 3,4
Oven .................... 4
SurfaceCookingUnits ...... 5
Operating Instructions
Usingthe SurfaceUnits ..... 6
Usingthe Oven ......... 7-10
Careand Cleaning
SurfaceUnits& DripPans... 11
Lift-Off OvenDoor ......... 12
BroilerPan& grid ......... 12
PorcelainOvenbterior ...... 13
Installation Instructions
ToolsYouWill Need ....... 14
ElectricalConnection .... 15, 16
Dimensions& Clearances .. 17
InstallingtheBackguard .... 18
Levelingthe Range ........ 19
Congratulations/.
YouAre Now Partof OurFamily.
Welcome to the tamily. We're proud of our quality products and we are committed
to providing dependable servi( e. You'll see it in this easy-to-use Owner's Manual and
you'll hear it in the fliendly voi( es of our customer secvi(e department.
Best of all, you'll experience these values each time you use your range. That's
important, be(ause your new range will be part of your f_mfily for many years.
And we hope you will be pat't of OllI'SfoI"a long time to (ome.
We thank you fi)r buying our product. We appreciate your purchase, and hope you
_dll (ontinue to rely on us whenever you need quality applian(es fi)r your home.
A Service Partnership.
IMPORTANT!
Fill out and return the ( onsumer Produ(t Regisuation Card
that is pa(ked wifll tiffs produ(t,
FORYOURRECORDS
Write the model and serial numbershere:
#
#
You can lind them on a label under the (ooktop on the right
side wall.
Staple sales slip or cancelled check here.
Proof of the original purchase date is needed to obtain set,ice
under the warranty.
Troubleshootingtips
Before YouCall
ForService .............. 20
READTHISMANUAL
Inside you will lind many helpfifl hints on how to use and maintain
y_)urrange properly.Just a little preventive cme on your pm't can save
you a great deal of time and money over the lite of your range.
Customer Service
Warranty................ 23
ServiceTelephone
Numbers ......... BackCover
IFYOUNEEDSERVICE
You'll lind many answers to common problems in the Before Yougaff
ForService section. If you review our chmt of TroubleshootingTips
first, you may not need to call fi)r se_-ice at all.
If you do need se_x,i(:e,you can relax knowing help is only a phone
call away. A list of toll-fiee customer se_dce numbers is included in
the back section of this manual.
2
Page 3
IMPORTANTSAFETYINFORMATION.
READALLINSTRUCTIONSBEFOREUSING.
it WARNING!
Foryoursafe_ the informationin thismanualmustbefollowed tominimizetheriskof fire or
explosion,electric shock,or topreventpropertydamage,personalinjury,or lossoflife.
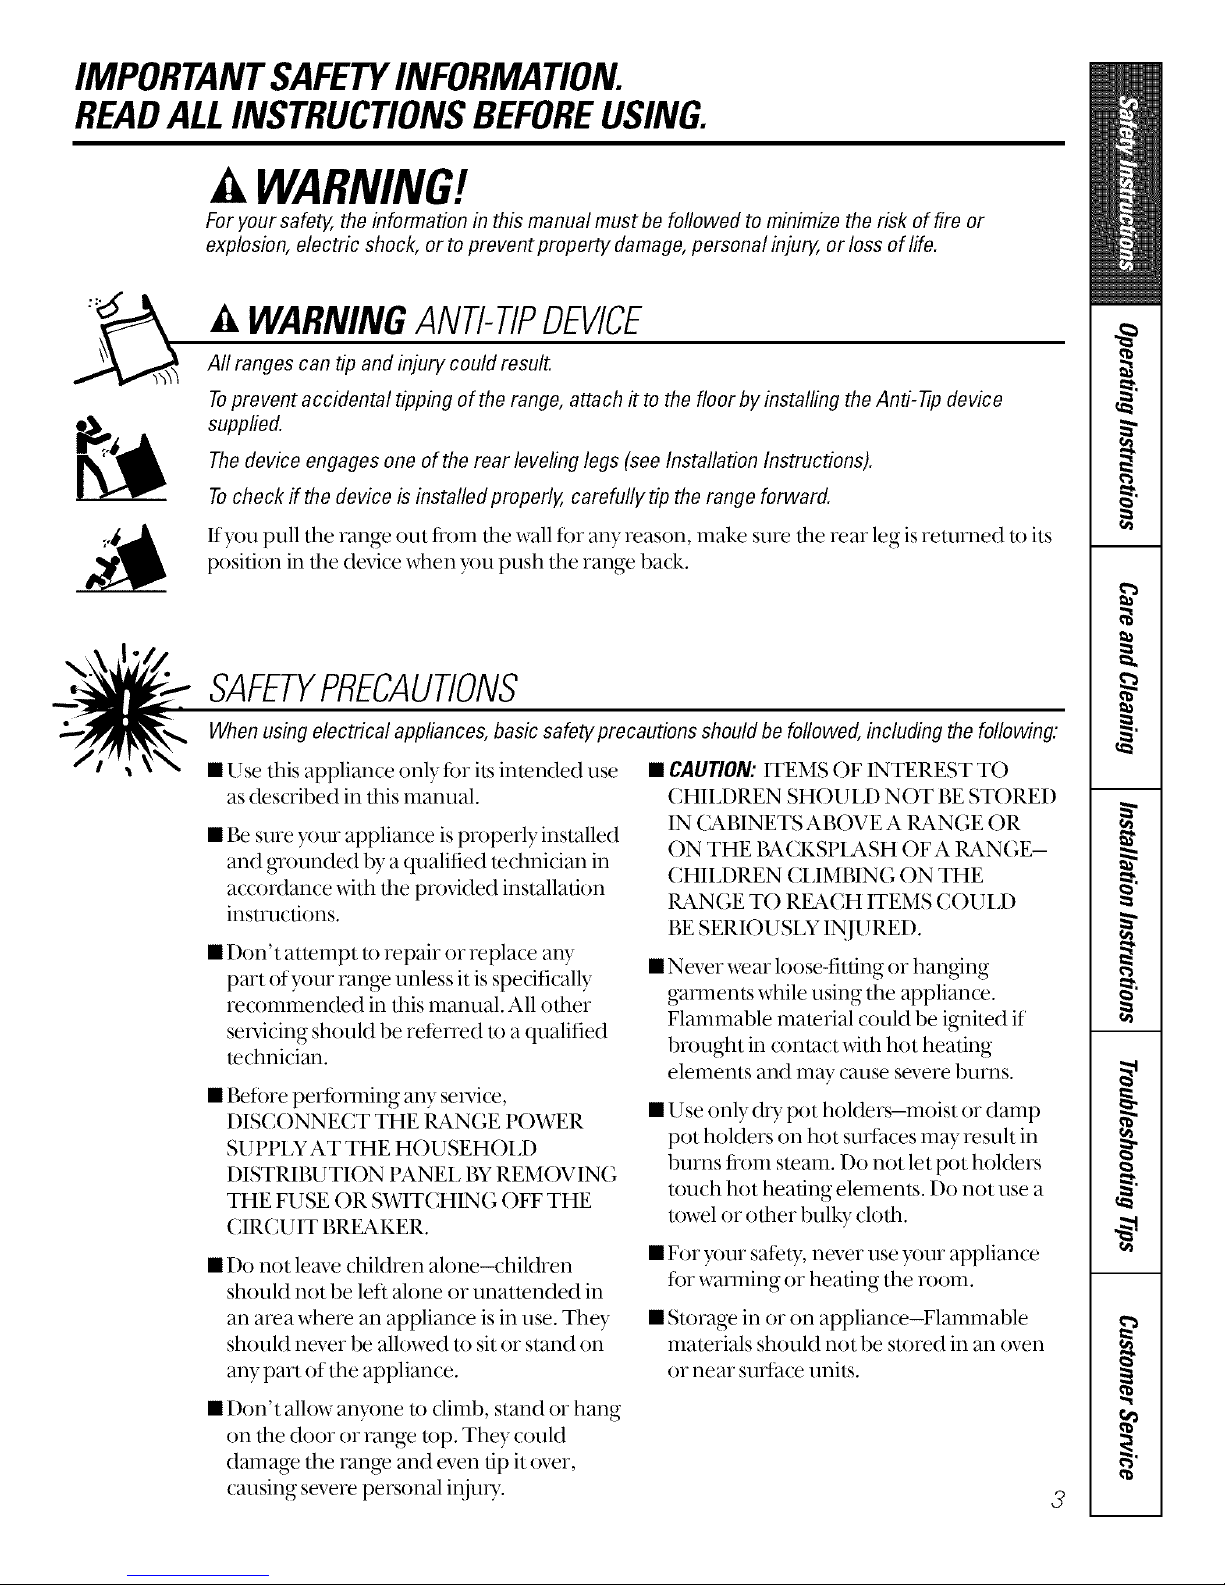
WARNINGANTI-TIPDEVICE
Aft ranges can tip and injury could result.
Toprevent accidental tipping of the range, attach it to the floor by installing the Anti--tip device
supplied.
The device engages one of the rear levelinglegs (see Installation Instructions).
Tocheck if the device is installed propefly, carefullytip the range forward.
If_)n pull tile range out fi_)m dm wall for any reason, make sure dm rear leg is returned to its
position in the device when you push the range back.
SAFETYPRECAUTIONS
Whenusingelectricalappliances,basicsafeQ/precautionsshouldbefollowed,includingthe following:
• Use this appliance only for iLsintended use • CAUTION:ITEMS OF INTEREST TO
as described in this manual. CHILDREN SHOUI,D NOT BE STORED
• Be sure _mr appliance is properly installed
and g_mnded by a qualified technician in
accoMance with the provided installation
instructions.
• Don't attempt to repair or replace any
part of your range unless it is specifically
recommended in this manual. All other
se,_'icing should be refe,_ed to a qualified
technician.
• Before perf6,Tning any se_'ice,
DISCONNECT THE RANGE POWER
SU PPI _YAT THE HO USE HOI,[)
DISTRIBUTION PANEl, IW REM(WING
THE FUSE OR SWITCHING OFF THE
CIRCUIT BREAKER.
• Do not leave chikhen alone-chil(ken
should not be left alone or unattended in
an area where an appliance is in use. They
should never be allowed m sit or stand on
any part of the appliance.
IN C,ABINETS ABOVE A RANGE OR
ON THE BACKSPIASH OFA RANGE-
CHILDREN CI,IMBING ON THE
RANGE TO REACH ITEMS COUI,D
BE SERIOUSLY IN,] URED.
• Never x_ar loose-fitting or hanging
gammnts while using the appliance.
Flammable material could be ignited it
brought in contact with hot heating
elements and may cause severe burns.
• Use only (hT pot holders-moist or damp
pot holders on hot suitaces m W result in
bums tiom steam. Do not let pot holders
touch hot heating elements. Do not use a
towel or other bulky cloth.
• For your safety, never use >mr appliance
for warming or healing the room.
• Storage in or on appliance-Flammable
materials should notbe stored in an oven
or near stwlhce unils.
• Don't allow an_)ne to climb, stand or hang
on the door or range top. They could
damage the range and even tip it over,
causing severe personal injuL__.
3
Page 4

IMPORTANTSAFETYINFORMATION.
READALLINSTRUCTIONSBEFOREUSING.
x WARNING!
2 "T SAFETYPRECAUTIONS
Z..-__ • Keep hood and gTease filters dean to
/ l" _ _ maintain good venting and to avoid
g_ease fires.
• Do not let cooking g_ease or other
flammable materials accumulate in or
near the range.
• Do not use water on g_ease fires. Never pick
up a flaming pan. Smother flaming pan on
SUlthceunit by covering pan completely
with well4hting lid, cookie sheet or flat tray.
Flaming gTease outside a pan can be put
out by covering with baking soda or, if
available, a multi-purpose dU chemical or
fkmm t_i-)efire extinglfisher.
• Do not touch heating elements or interior
surface of oven. These surfaces may be hot
enough m bum even though they are dark
in color. During and after use, do not
touch, or let clothing or other flammable
materials contact surface uniLs, areas
neafl)y sui-lhce units or aW interior area
of the oven; allow s/dticient time for
cooling first.
Potentially hot surfaces include the
cooktop and areas facing the cooktop,
oven vent opening and smthces near the
opening, and c,evices around the oven
door. Remember: The inside SUlthce of the
oven may be hot when the door is opened.
COOKMEATANDPOULTRYTHOROUGHLY...
Cookmeat andpoultrythoroughly--meat to at leastan iNTERNALtemperatureof 160°Eandpoultry
toat least an INTERNALtemperatureof 180°ECookingto thesetemperaturesusuallyprotectsagainst
foodbomeillness.
OVEN
Stand away from range when opening oven door. Hot air or steam which escapes can cause bums
to hands, face and/or eyes.
• Don't heat unopened ff)od containers in
the oven. Pressure could buiM up and the
container couM burst, causing ml in juU.
• Keep oven flee fi_ml gTease buildup.
• Place oven shelf in desired position while
oven is cool. If shekes must be bandied
wheil hot, (Mnot let pot holder contact
heating uniLsin the oven.
• Pulling out shelf to tim shelf stop is a
convenience in lifting heaW foods. It is also
a precaution against burns fl_ml touching
hot smthces of the door or oven walls.
• _qmn using cooking or roasting bags in
oven, follow the manufactn,er's directions.
• Do not use your oven u_dU newspapers.
If overheated, they can catch fire.
4
Page 5

SURFACECOOKINGUNITS
Use proper pan size--This appfiance is equipped with one or more surface units of different size.
Select cookware having fiat bottoms large enough to cover the surface unit heating element. The use
of undersized cookware will expose a portion of the heating element to direct contact and may result
in ignition of clothing. Proper relationship of cookware to burner will also improve efficiency.
• Never leave surface units unattended at
high heat settings, l_)ilover causes smoking
and g_,easyspillovers that may catch on fire.
• Be sure drip pans ar,e in place. Their
absence (hwing cooking could damage
range parts and wiring.
• Don't use aluminum foil to line drip
pans or an}_iaer,e in the oven except as
described in this gafide. Misuse could
result in a shock, fire haza_,l or damage
m the range.
• Only certain b?es of glass, glass/ceramic,
earthenware or other glazed containers are
suitable for range-u)p sersice; others mW
break because of the sudden change in
temperature.
• To minimize the possibility of burns,
ignition of flammable materials, and
spillag,e, the handle of a container should
be turned towar,1 tire center oftim range
without extending over neafl)y stuihce units.
• Alx_%vsturn smi_u:e unit to OFFbeR)r,e
removing cookwar,e.
• Keep an eye on foods being fried at HIor
MEDIUMHIGHbeats.
• To avoid the possibility of a burn or elecuic
shock, aM_,s be certain that fire controls
for all surface units are at OFFposition and
all coils are cool bef6r,e attempting m lift or
remove the unit.
• Don't immerse or soak removable sub:race
units. Don't put them in a dishwasher.
• _qren flaming foods under the hood,
mrn the fan on.
• Foods for fiTing should be as (h 7 as
possible. Frost on frozen foods or moisture
on fiesh foods can cause hot fat to bubble
up and over sides of pan.
• Use little fat for eftecfive shallow or deep-
fat fiTing. Filling tire pan u_o tidl off_tt can
cause spillovers when food is added.
• If a (:ombinafion of oils or fats will be used
in fiTing, stir u)gether 1)efi)re heating, or as
fats melt slowly.
• Always heat fat slowly, and watch as it heats.
• Use deep fat thermomemr whenever
possible u_ prevent overheating fat beyond
the smoking point.
Readandfollow this SafetyInformationcarefully.
SAVETHESEINSTRUCTIONS
5
Page 6
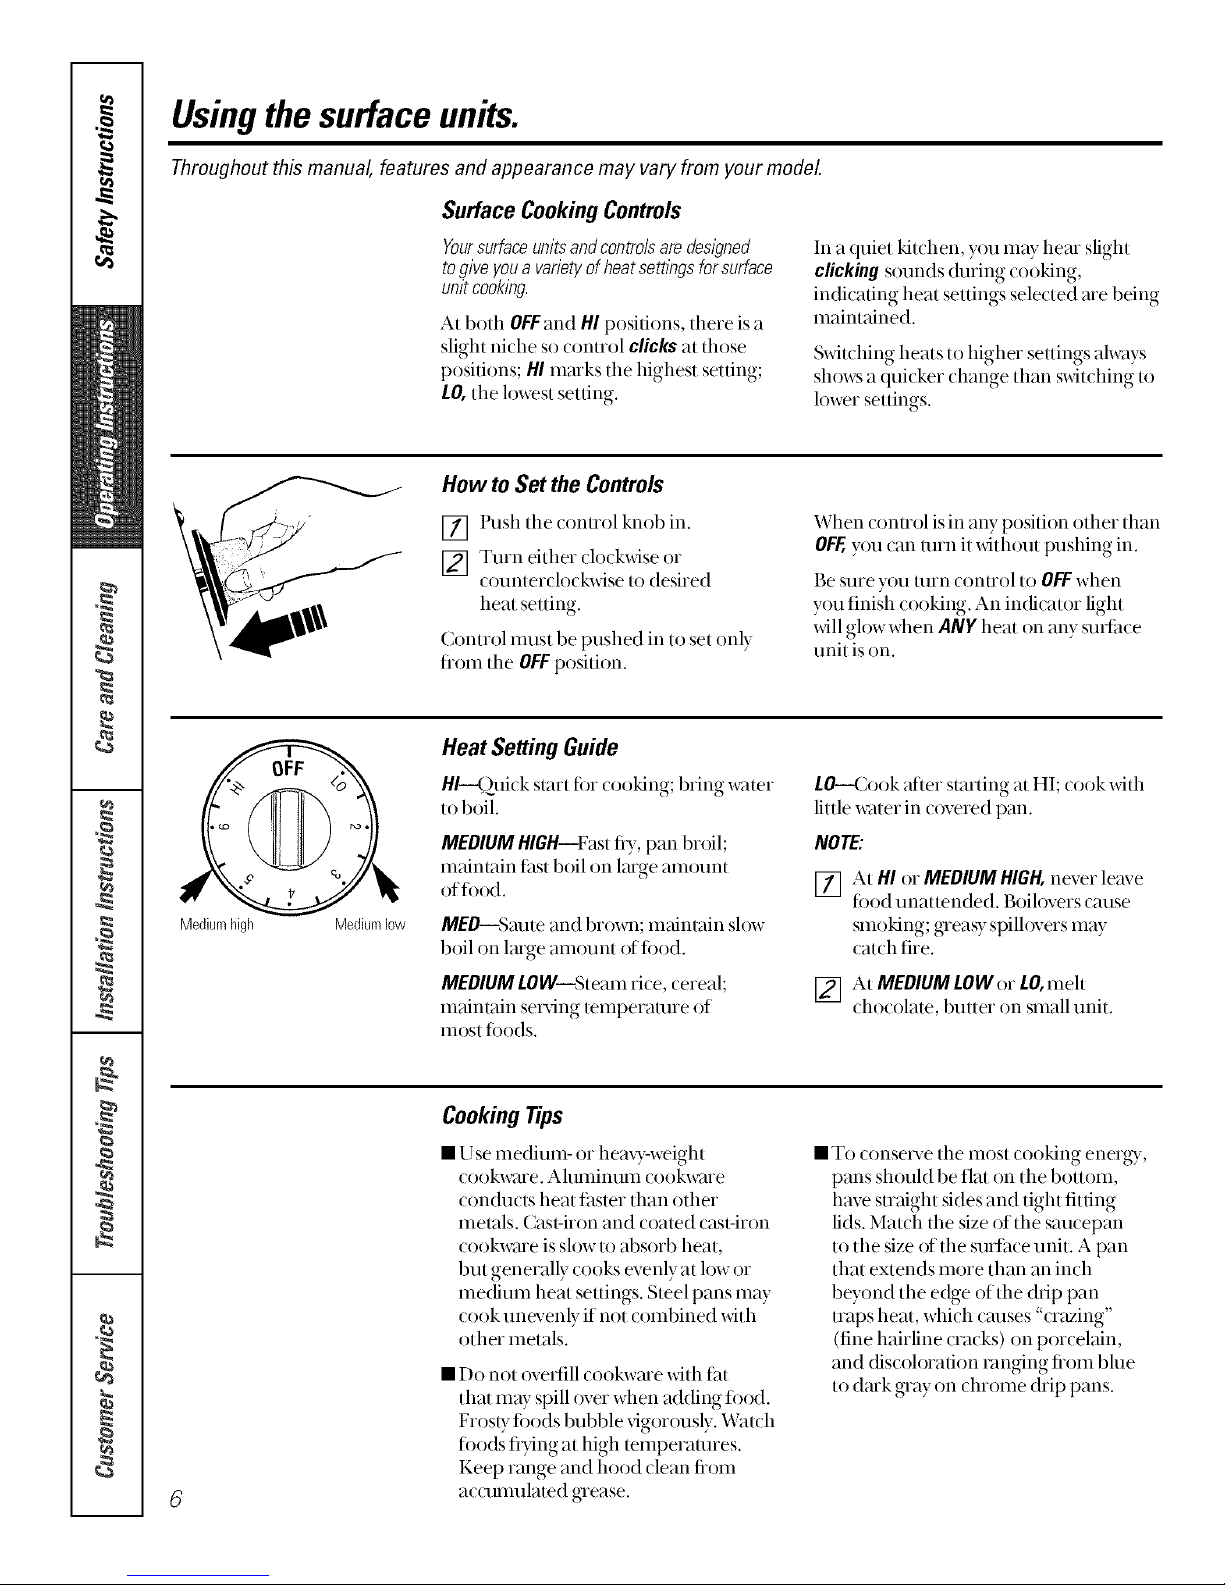
Usingthesurfaceunits.
Throughout this manual, features and appearance may vary from your model
Surface CookingControls
Yoursurfaceunitsandcontrolsaredesigned
togiveyoua varietyofheatsettingsforsurface
unitcooking.
At both OFFand HIpositions, there is a
slight niche so control clicks at those
positions; HImarks the highest setting;
LO,the lowest setting.
In a quiet kitchen, you may hear slight
clickingsounds during cooking,
indicating heat settings selected are being
maintained.
Sxdtching heats to lfigher settings always
shows a quk ker dmnge than switdfing to
lower settings.
How to Set the Controls
[] Push the conuol knob in.
[] Turn either clockwise or
counterclockwise to desired
heat setting.
Control nmst be pushed in to set only
fiom the OFFposition.
When conuol is in any position other than
OFF,you can mrn it xdthout pushing in.
Be sure you mrn conuol to OFFwhen
you finish cooking. An indicator light
will glow when ANY heat on any sudi_ce
unit is on.
Mediumhigh Medium10w
Heat SettingGuide
HI--O.ui( k start fin (ooking; 1)ring water
to boil.
MEDIUMHIGH--Fastfi7, pan broil;
maintain fhst boil on largealnount
offi)od.
MED--Sm_te and brown; maintain slow
boil on large amount of food.
MEDIUMLOW--Steam rice, cereal;
maintain serving temperature of
most foods.
LO--(]ook after starting at HI; cook xdth
little water in covered pan.
NOTE:
[7] At HI or MEDIUMHIGH,never leave
food unattended. Boilovers (ause
smoking; greasy spillovers may
(at(h fire.
[] At MEDIUMLOWor LO,meh
chocolate, butter on slnall unit.
Cookingtips
• Use medium- or heaxT-weight
cookwme. Ahmfinum cookwme
conducts heat fitster than other
metals. Cast-iron and coamd cast-iron
cookwme is slow m absorb heat,
but generally cooks evenly at low or
medium heat settings. Steel pans may
cook unevenly if not combined with
other metals.
• Do not overfill cookwme with flit
that may spill over when adding fi)od.
Frosty fi)ods bubble vigorously. Watch
fi)ods hying at high temperatures.
Keep range and hood clean fiom
accumulated grease.
• To conserve the most cooking energT,
pans should be fiat on the bottom,
have straight sides and tight fitting
lids. Match the size of the saucepan
to the size (ff the sudhce unit. A pan
that extends more than an inch
beyond the edge of the drip pan
traps heat, which cm_ses "crazing"
(fine haMine cracks) on porcelain,
and discoloration ranging fiom blue
to dmk gray on chrome drip pans.
Page 7
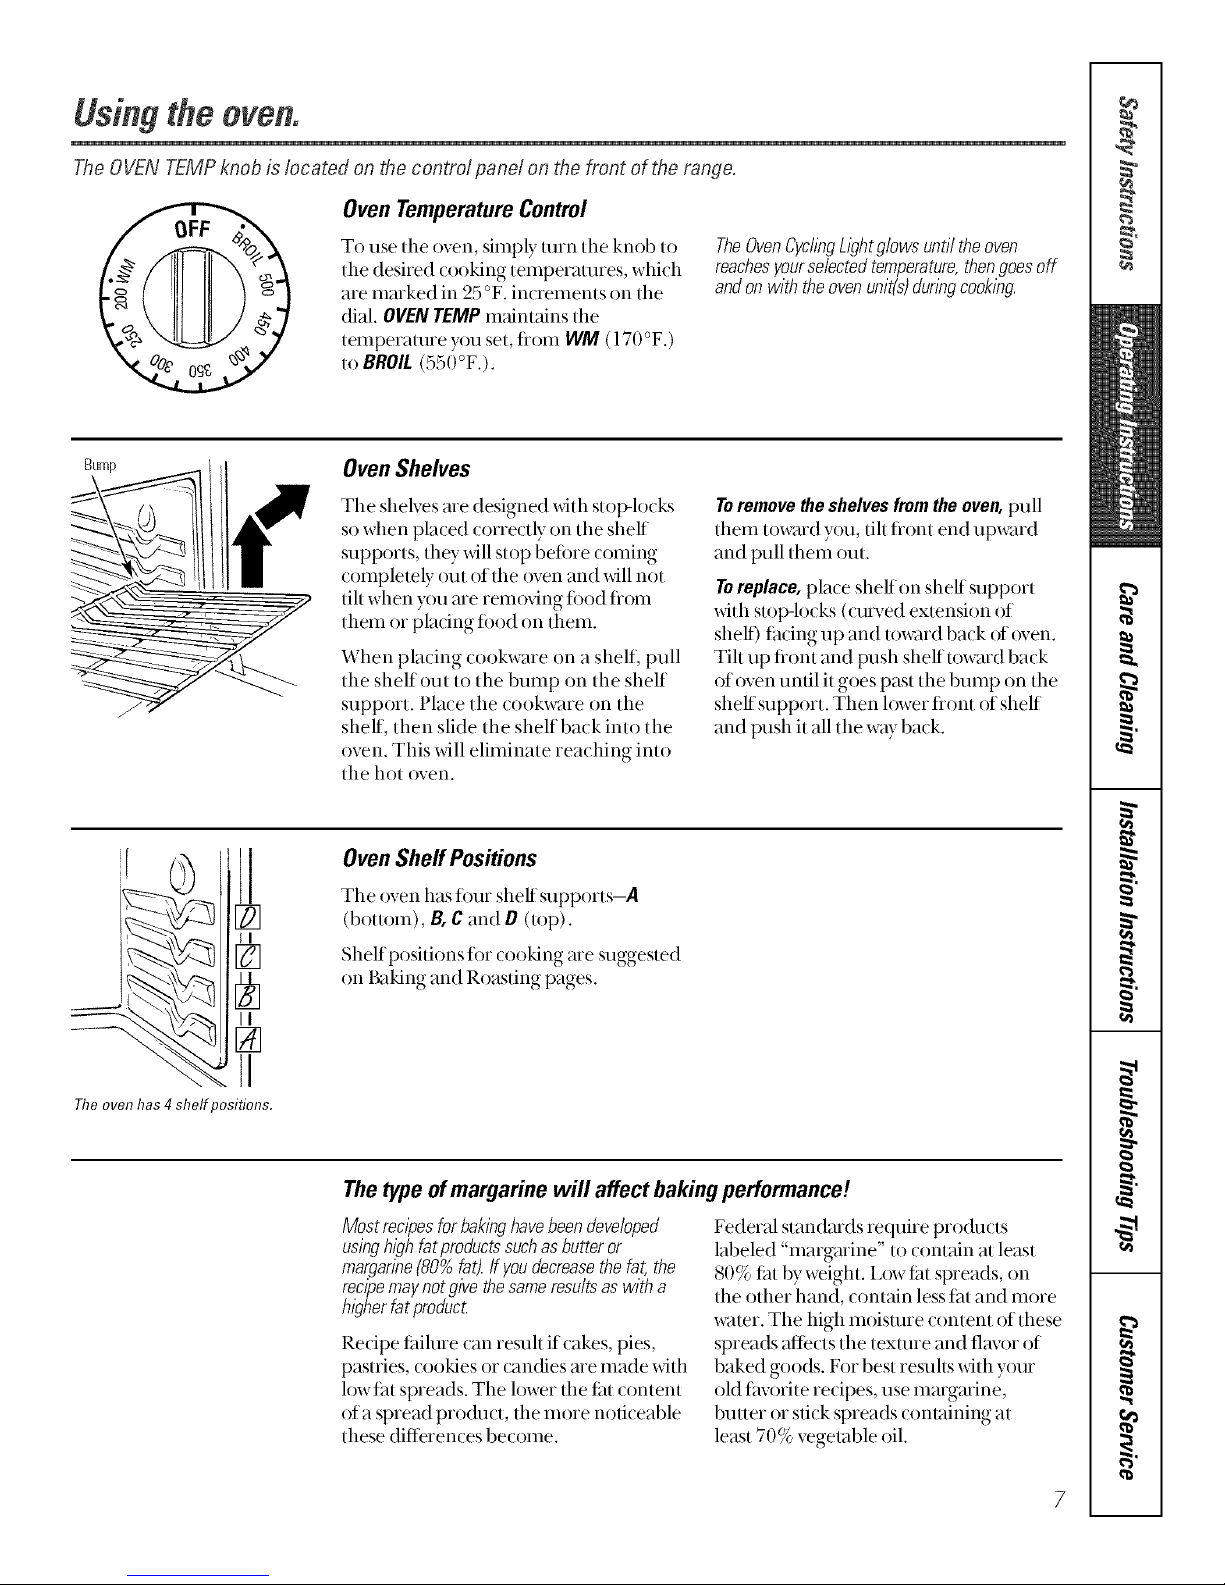
Usingtheoven.
The 0 VEN TEMP/(nob is iocated on _hecontrol pane/on the front of the range.
Oven TemperatureControl
To use the oven, simply unn the knob to
the desired cooking temperaunes, which
are marked in 25°F. increments on tile
dial. OVEN rEM¢ maintains the
temperaune you set, fiom I/I/M(170 °F.)
to BROIL(550°F.).
TheOvenCycl/bgbght glows until the oven
reachesyourselected temperature,thengoes off
and on with the ovenunit(s)dunbg cooklbg.
OvenShelves
Tile shelves me designed with stop-locks
so when placed correctly on the shelf
supports, they will stop befi)re coming
completely out of the oven and will not
tilt when you me rem()ving ti)od flom
them or placing ti)od on them.
When placing cookware on a shell pull
the shelf out to the bump on the shelf
support, Place the cookware on the
shelf, then slide the shelf back into the
oven, This will eliminate reaching into
tile hot oven.
Toremove the shelves fromthe oven, pull
them toward you, tilt fl'ont end upward
and pull them out.
Toreplace, place shelf on shelf support
with stop-locks (cuvved extension of
shell) tacing up and toward back of oven.
Tilt up fiont and push shelf toward back
of oven until it goes past the bump on the
shelf support. Then h)wer flont of shelf
and push it all the way back.
Theoven has 4shell _osifions.
OvenSheffPositions
The oven has four shelf supports-,4
(bottom), B,Cand D (top).
Shelf positions for cooking are suggested
on I'_lking and Roasting pages.
Thetypeof margarine will affect bakingperformance!
Mostraclpesforbakinghavebeendeve/oped
usinghighfatproductssuchasbutteror
margarine(80%fat).ffyoudecreasethe fat,the
recipemaynotgivethesameresuitsaswitha
higherfatproduc_
Redpe tailure can resuh if cakes, pies,
pastries, cookies or candies me made with
lowtat spreads. Tile lower tile tilt content
of a spread pro&lct, the more noticeable
these differences become.
Federal standmds require pro(hlcls
labeled "margarine" to contain at least
80% tat byweight. I,ow lilt spreads, on
the other hand, contain less tht and more
water. The high moislure content of these
spreads afliects the tex/ure and flavor of
baked goo(g. For best resuhs with your
old titvorite recipes, use mmgmine,
butter or stick spreads containing at
least 70% vegetable oil.
Page 8

Usingtheovenforbaking or masting.
Toavoid possible bums, place the shelves in the desired position before you turn the oven on.
How to Set Your Oven for Baking or Roasting
[] Position tim shelf or shelves in tim
oven. If cooking on two shelves at the
same time, stagger the pans for best
heat circulation.
[] Place food in oven on center of shelf.
Allow at least 2 inches between edge
of bakeware and oven wall or
a({ja(ent (ookware.
[] Close oven door. Turn OVENTEMP
knob clockwise to desired temperature.
Preheat oven fi)r at least 10 minutes
if preheating is ne( essaU.
[] Checkii)odfor doneness at
nfininmm time on recipe. Cook
hmger ifne( essa U. Turn OVENTEMP
knob to OFFand remove food.
Shelf Positions
• Most baking is done on the second
sheff position (B)fi'om the bottotn.
• When baking flnee or fi)ur items, use
two shelves positioned on the second
and fourth sets of supports (B & D)
fl-on_ bottoin of oven.
• Bake angel food cakes on first slieR
position (A)fl'otn bottotn of oven.
• Roasting is usually done on the bottom
slmlf position (,4).
Preheating
• Preheating the oven takesabout 10
minutes.
• Preheat tile oven only when necessat) _,
usually fi)r baking.
• Most roasts xfill cook satislilctorily
whhout preheating.
• If you find preheating is necessmy,
keep an eye on the indicator light and
put tbod in the oven promptly after
light goes out.
VERYIMPORTANTNOTE:
When baking or roasting, NEVER
turn the OVENTEMPknob to
BROILand back to the desired
temperature. TumflTgthe OVEN
TEMP knob to BROILsets the
thermostat f17a BROILmode. See
the BroilflTg section f17this guide.
Toreset the thermostat to Rake,
turn the OVENTEMPknob to OFF
then back to the desired
Rake/Roast temperature.
8
Baking and RoastingTips
• Follow a tested redpe and measure the
ingredients (arefiflly. Ifyou are using a
pa&sNe mix, ti)lh)w label dire(tions.
• Do not open the oven door during
a baking operation-heat will be lost
and the baking time might need to
be extended. This c{nfld cause poor
baking resuhs, lfy(tu nmst open the
door, open it prodally-only 3 or
4inches-and close it as quickly
as possible.
• Roasting is cooking by &y heat.
Tender meat or pouluy can be roasted
unc()vered in your ()yen. Roasting
temperatures, which sh{nfld be low and
steady, keep spattering to a minimum.
When roasting, it is not necessmy to sere,
baste, c{txvr or add water to your meat.
• Frozen roasts ofbeeL pork, lamb, etc.,
can be started without thawing, but
allow 10 to 25 minutes pet pound
additional time (10 minutes pet pound
tin roasts under 5 pounds, more time
tin lmger roasts).
• Thaw most fiozen pouluy betore
roasting to ensure even doneness.
Some commercial fiozen pouluy
can be cooked successflflly without
thmdng. Folh)w (firecfions given on
package label.
Page 9

Usingtheovenforbroiling.
Broiling may be slightly different from any previous broiling you may be acquainted with, so be sure to read this
section completely,
VERYIMPORTANTNOTE:
Toreset the oven for Baking you
must turn the OVEN TEMP knob to
OFF.This gets it out of the BROIL
mode.
How to Set Your Oven for Broiling
Broilingis cookingfood by intense radiant heat []
from the upper dement in the oven.Most fish
andtendercuts ofmeat canbe broiled Follow
thesesteps to keep spattering and smoking to []
aminimum.
[]
Ifthe meat has tht or gristle around
the edge, cut vertical slashes through
both about 2" apart. If desired, fat
may be trimmed, leax4ng layer about
l/S thick.
[]
Place the meat on the broiler grid in
the broiler pan whi(h comes with
y(nn range. Alwws use the grid so
the fltt drips into the broiler pan;
otherwise the juices m W become hot
enough m catch fire.
[]
[]
Close the door. Always broil with the
door dosed.
Turn tlle OVENTEMPknol)
clockxdse to BROILYou xdll feel
a slight niche at tlle broil position.
You may then turn the knob
counterclockwise to broil at a
lower temperature.
Turn food only once during
cooking.
Turn the OVENTEMPknob to OFF.
Serve fl)od immediately, and leave
the pan outside the oven to cool
during the meal for easiest cleaning.
[] Place tile shelf in position C for most
broiling.
U
_" >'_. ",, t, \'<
;7
Use of Aluminum Foil
• You can use ahnninum ti)il/o line your
broiler pan and broiler grid. However,
y_)unmst mold the fl)il tightly to the
grid and cut sli/s in itjust like the grid.
Without the slits, the fl)il will prevent
tat and meat juices flom draining to the
broiler pan. The juices could become
hot enough to cawh on fire. If you do
not (ut the slits, you are flying, not
broiling.
• DONOTplace a sheet of ahmfinum fl)il
on the shelf. To do so may resuh in
improperly cooked fl)ods, damage to
oven finish and increase in heat on
()utside SUltitces of the ()yen.
• If desired, a sheet of ahnninum tbil may
be used on floor of the oven under the
bake element. Becertain foildoesnot
touchbakeelement.Ahnninum fi)il
used in this way may slightly aflbct the
bro_I_ing of some fl)ods. ( hange fl)il
when it becomes soiled.
Page 10

Usingtheovenforbroiling.
QuestionsandAnswers
[]
[]
[]
[]
When broiling, is it necessary to
always use a grid in the pan?
Yes. Using the grid suspends the
meat over tile pan. As tile meat
cooks, the juices tall into the pan,
thus keeping meat (hier.Juices me
protected by the grid and stW cooler,
thus preventing excessive spatter and
smoking.
Should I salt the meat before
broiling?
[]
[]
[]
No. Salt draws out the juices and
allows them to evaporate. Ahvays sah
after cooking. Turn meat xdth tongs; []
pierdng meat with a fork also allows
.juk es to es{ape. When broiling
pouluy or fish, brush each side often
xdth butter.
Why are my meats not turning out as
brown as they should?
In some areas, tile power (vohage) to
tile range tnay be low. In these _ases,
preheat the broil element tor 10
minutes beti)re pladng broiler pan
_dth tood in oven. Check to see ifyou
are using the recommended shelf
position. Brdl fin longest period of
time indicated in the Broiling Guide.
Turn tood only once &ning broiling.
Do I need to grease my broiler grid
to prevent meat from sticking?
Yes. Tile broiler grid is designed to
absorb broiler heat. Spra)dng the
broiler grid lighdy _dth a vegetable
cooking spray befi)re cooking _dll
make cleanup easier.
10
Broiling Guide
• If desired, marinate meats or chicken
befi)re broiling, or brush with barbe(ue
sau(e last 5 to l0 nfinutes only.
• Frozen steaks can be broiled by
positioning the oven shelf at next
lowest shelf position and increasing
cooking time ,given in this guide 11/_,
times pet side.
• When arranging tood on pan, do not
let fatty edges hang over sides because
the dripping fat xfillsoil tile oven.
• If your range is connected to 208
volts, rme steaks may be broiled by
preheating the broiler and positioning
the oven shelf one position higher.
Food
Bacon
GroundBeef
Beef Steaks
Medium
Chicken
Fish
Amountor
Thickness
1/2 lb.
(about8tldn slices)
1 lb.(4 patties)
1/2to 3/4" thick
1" tbick
1to 17LIbs.
1whole
2to 2_AIbs.,
split lengtbwise
1 lb.fillets
1/4to I/2" thick
Shelf
Position
Time In Minutes
First Side Second Side
3YLrain 3YLmin
7 rain. 5 rain.
g rain. g rain.
35 min. 15rain.
5 min. 5 rain.
Comments
Arrangeinsingle layer
Spaceevenly.
Steakslessthan 1"
thickcookthrougb
beforebrowning. Pan
fryingisrecommended.
Slashfat.
Reducetime about5
to 10minutesperside
for cut-upcbicken.
Brusheachsidewitb
meltedbutter.Broil
skin-side-downfirst.
Handleandturnvery
carefully.Brushwitb
lemonbutterbefore
andduring cooking,
if desired.Preheat
broilerto increase
browning.
Page 11

Careand cleaningoftherange.
Be sure electrical power is off and all surfaces are cool before cleaning any part of the range.
Proper care and cleaning are important so your range will give you efficient and satisfactory service. Follow these
directions carefully in caring for your range to assure safe and proper maintenance.
If your range is removed for cleaning, servicing or any reason, be sure the anti-tip
device is re-engaged properly when the range is replaced. Failure to take this
precaution could result in tipping of the range and cause injury.
Porcelain EnamelCooktop
The porcelain enmnel finish is sundy but
breakable if misused. This finish is ad&
resistant. H_)wever, any addic toods
spilled (such as fl_uitjuices, tomato or
xinegm) should not be permitted to
remain on tile finish.
__ OvenShelves
(lean tile shelves with an abrasive
cleanser or steel wool.
After cleaning, rinse tile shelves with
(lean water and (hT _dth a (lean (h)th.
Receptacle
Toremove the surface unit, lift it
about I inch above the drip pat?
and puff it out.
Replace fl?edrip pat?into fl?e
recess it?the cooktop.
Surface Units and Drip Pans
To (lean tile surfa(e units, turn tile
control to tile highest setting fi)r a
minute. Tile coils will burn off any soil.
Toremoveasurfaceunit:
To remove tile &ip pans for cleaning,
tile suffa( e tlnits mtlst be removed first.
IJfi tile sudace unit about 1 inch aboxv
tile &ip pan and pull it out.
Do not lift thesurface unit more than I inch.If
youdo, it maynot fie fiat on the drippan when
youplug it backin.
NOTE:Repeated lifting of tile surfhce unit
more than l inch above tile drip pan can
permanently (hmage tile receptacle.
Toreplace a surface unit:
Replace tile (kip pan into tile recess in
tile (ooktop. Make sure tile opening in
tile pan lines up with tile receptacle.
Insert tile terminals of tile surface unit
through the opening in the (kip pan and
into the receptacle.
Guide tile sm{hce unit into place so it
rests evenly.
Toclean the drip pans:
Drip pans can be cleaned in tile
dishwasher or by hand. Ifyou use a
scouring pad, rub lightly to prevent
scrauhing.
[] CanI coverthedrippanswith foil?
[] No, be(ause using foil so (h)se to tile
receptade couM cause shock, fire or
damage to the range.
CAUTION:
• Do not immerse tile surlitce units in
liquids of any kind.
• Do not clean the sur[hce units in a
dishwasher.
• 1)o not bend tile surlilce unit plug
terminals.
• Do not attempt to clean, a(!just or in
any way repair the plug-in receptacle.
11
Page 12

Careand cleaning ofthe range.
Lockingmechanismlever
To,oc \\\
app,yforoe./<
Tounlockapplyforce
Lift-OffOvenDoortonsomemodels)
The oven door is relnovable (on seine
models) but it is heax% You may need
help remoxdng and repladng tile door.
Toremove the door:
[] Open the door to tile fifll open
position.
[] Raise the hxking mechanism by
appl)dng torce to tlle lo( king
mechanism lever.
[] Close tile door until it stops against
tile locking inecllanisin.
[] Grasp firefly on each side and lift the
door straight up and offthe hinges.
Toreplace the door:
[]
Position the sh)ts in tile bottom of
the door squarely over tile hinges.
Then h)wer the door sh)wly and
evenly over both hinges at tile
same tilne.
[]
Open tile door to tile flfll open
position and press tile h)cking
mechanism back into its original
position.
DONOTATTEMPTTOCLOSETHEDOOR
UNTILTHISSTEPISCOMPLETE.THE
HINGEORDOORCOULDBEDAMAGED.
OvenHeating Elements
Do not clean tile bake element or tile
broil element. Any soil _fillbtlI'n offwhen
the elements are heated.
Tile bake element can be lifted gently to
dean the oven floor. If spillovers, residue
0I"ash a((ulilulate around tile bake
element gently xdpe around the element
_dt h warm w;it er.
Both the broiler pan and grid can
also be cleaned in the dishwashe_
Broiler Pan and Grid
After broiling, rem{)ve tile broiler pan
fl'om the oven. Rem_)ve tile grid flom tile
pan. ( mefiflly pour out grease flom the
pan into a proper container. Wash and
rinse the broiler pan and grid in hot water
xdth a soap-filled or plastic scouring pad.
If food has burned on, sprinkle the grid
_dth detergent while hot and o)ver _dth
wet paper towels or a dishcloth, Soaking
the pan xdll remove burned on ti)o(ls.
Donot storea soiiedbroiier pan and grid
anywherein the range.
12
Page 13

Control Knobs
Thecontrolknobsmay be removedfor easier
cleaning.
Beti)re rem(Mng tile knobs tot cleaning,
please note that the knobs me in the
proper OFFposition. When repladng the
knobs, check the OFFposition to insure
proper placement.
To rem{)ve a knob, pull it suaight off the
stem,
Wash tile knobs in soap and water but do
not soak. Avoid getting water down in the
knob stem holes.
PaintedSurfaces
Paimed sufiaces include tile sides and
kick panel. Clean these with soap and
water or a vinegm and water solution.
Donotusecommercialovencleaners,c/eansin_
powders,steelwoolorharshabrasivesonany
palhtedsurface.
Porcelain Oven Interior
With propercare,the porcelain enamelinterior
will retain its attractive _bish for manyyears.
Soap and water will normally do tile.job.
Hem T spattering or spillovers may
require cleaning xdth a miM abrasive
cleanser. Soap), wet pads may also be
used. Do not allow ti)od spills with a high
sugm or add content (such as milk,
tomatoes, sauerkraut, trait juices or pie
filling) to remain on the surlace. They
may cause dull spots even after cleaning.
HousehoM _unmonia may make the
cleaning job easier. Place 1/2 cup
ammonia in a shallow glass pan and leave
in acoM oven overnight. Tile mnmonia
flnnes will help loosen the burned-on
grease and ti)od.
When necessm), you inay use a
commerdal {)ven cleaner. Folh)w tile
package directions.
Cautionsaboutusingspray-onoven
cleaners:
• Do not spray tile oven cleaner on the
elecuical controls and switches because
it couM cause a short circuit and resuh
in sparking or fire.
• Do not allow a fihn flom the cleaner
to remain on the temperature sensor-
it couM cause tile oven to heat
improperly. (Tile sensor is located at
tile top of the oven.) Cmeflflly wipe the
bulb clean after each oven cleaning,
being cmefifl not/o m_)ve tile sensor
as a change in i/s position couM affect
how the oven bakes.
Do not spray any ()ven cleaner on tile
ou/side oven (loot, handles or aW
exterior sufihce of the oven, cabinet
or painted surlaces. The cleaner can
dmnage these surlaces.
13
Page 14

Installationof the range.
Read these instructions completely and carefully.
WARNING!
Anti-Tip Bracket
• ALL RANGES CAN TIP
• INJURY COULDRESULT
• INSTALLANTI-TIP DEVICE
PACKEDWITH RANGE
• SEEINSTRUCTIONS
%
ToolsYouWill Need
• Phillips head s(rew(hiver
• 1:!/_"or a(!iustable wren(h
• Flat 1)lade s(rew(hiver
Anti-TipBracketInstallationInstructions
Anti-t}9bracketattachestothefloortoholdeitherrear
rangeleg.Whenfasteningtothefloor,besurethatthe
screwdoesnotpenetrateelectricalwklbgorplumbing.If
youcannotbesureofthis,useashorterscrewthatwillnot
penetratethroughthefloonbg
[] Dedde whether the anti-tip bracket will be
installed on the right or le_t side of the range
h)(afion.
[] Screw tim bracket securely to tim floor wifll
the screw provided. The screw is self drilling
in w()od, pl)_vood, pmticle and chip bornd,
and most metal fiaming. If attaching to
mason U, )_u can Ng suitable screws and/or
anchoI's }Ithardw:ue stores. Use a IllasonI)"
drill m &'ill the required holes.
[] If tile bracket side of the range isnext to a
(abinet, pla(e tile bra( ket against ba(k wall
and cal)inet.
If there isno ac!jacent cabinet, determine
where the location of the range side (painted
outside panel) will be. Place the bracket with
its outside edge at this location and against
the back wall.
Outsideedgeofbracket
shouldbeflushwith the
outsideoftbe range
Adjacentcabinet
orfinal location
of rangesidepanel
Wallbehindrange
Anti-tipbracket / Wail
[] Using the wrench, back out tile fi)ur range
legs at least two turns. I,evel tile range. See
tile Protect YourFIoorand Levelingthe Range
inlbrmafion in tile Installation therange
se( tion of tiffsmanual fi)r leveling
intormafion.
[] Slide tile range into place.
14
Page 15

Read theseinstructionscompletely and carefully.
Electrical Connection
Werecommendthat youhave the electrical hookupof your
rangedoneby aqualified electnc/an.Have the electric/an
show youwhere yourrange disconnectislocated
(;all your Elecuic Company and ask which codes
apply in your area. If there me no codes, }_)unmst
fi)llow the NATIONAl. EIIE( TRICAI. (ODE,
ANSI/NFI'A NO. 70, latest edition. You can get a
coW bywriting:
National Fire lhotecfion Association
i_atte_Tm_uch Park
Ojfino, , MA 02269
If you tifil to wire your range in accordance _dth
governing (odes, yOll Illay (reate a ll;:lz_/rdolls
condition.
You must use a three-wire, single-phase A(
208/240 Volt, 60 Hertz elecuical system to
operate your range.
Use #8 wire and 40 Amp fl_se or circuit breaker
for 240 Voh and 208 Voh systems.
Do not use aluminum wMng to (onne(t your
range to the household dr(tilt.
ToMake Electrical Connection
[] Remove the junction block access cover
(on range ba(k).
[] EffectiveJanuaryI, 1996theNational
ElectricalCoderequiresthatnewconstruction
(notexisting)utilizea 4-conductorconnection
toanelectricrange.
Use only 3-conductor or 4-conductor U.I.. listed
range cord. You must use the suain relief clamp
provided with the range to hold the cord.
Use a range cord rated at 40ampswith 125/250
mininmm volt range and closed loop terminals.
(me should be token to center cable and strain
relief within knockout hole to keep the edge flom
dmnaging the cable.
NOTE:A 4-conductor cord is to be used when the
appliance is installed in a mobile home or when
local codes do not permit grounding through the
neuual.
HardWirbg
The power cord 1)racket also incorporates a 7/8"
diameter opening fi)r hard wMng (rerooted
cable, flexible conduit, romex _dre, etc.).
If this/ype of wire is used, rem{)ve the suain relief
clmnp and bracket and reposition the bracket so
the 7/8" diameter hole is at the bottom to accept
the hmd wMng.
/5
Page 16

Installationof the range.
Read these instructions completely and carefully.
Three-Wire CordConnection
Black
onrange back
ff localcodesrequireanungroundedneutral:
Follow steps1through 5.
Topnut
Ground
strap
Blacklead
Redlead
Strain relief
clamp
[] Remove the top nuts on the.junction
block studs.
[] Tighten tile ba(k nuts.
[_] Install the three xdre lord and the strain
relief in the hole in the strain relief bra(ket.
[_] Connect the red and bla(k leads to the
'LLJ
outer temfinals and the white lead to the
(enter terminal.
Black
block
onrange back
Red
Topnut Groundwire
Ground
strap White lead
Blacklead
Redlead
Strain relief
clamp
Then loosen tile S(TeWfrom the ground strap and
fasten a #10 copper wire to the range. Secure the
other end of the wire to a gr_unded coM wa/er
pipe or use another appr_)ved grounding
method.
[] Push the cordupward (to relieve suain),
while tightening the strain relief(lamp.
16
Four-Wire CordConnection
Black
Blacklead
Ground
screw
White lead
_ roundstrap
removed
[] Remove the top mlts on the junction
block smds.
[] Tighten the balk nuts.
] Removethegrounds(rew; thenremove
the ground strap.
[] Install the four wire cord and strain reliefin
file hole in the strain reliefbra(ket.
[] ( (mnect the red and bla(k leads t()the
outside terminals and the white lead t() the
(enter temfinal.
[] Aua(h tlle green lead below the jun(tion
blo(k with the ground screw tllat was
removed earlier (step 3).
[] Push tile strain relief upward (to relim_e
strain) while tightening tlle strain relief
clamp.
Page 17

Read theseinstructionscompletely and carefully.
Dimensionsand Clearances
IMPORTANT."Save these instructions for the
local electrical inspector's use.
• See the illusuation below for all rough-in and
spa(ing dimensions. These dimensions must be
met fi)r sate use of your range.
• Tile range may be placed with I_Y,"clemance at
the back wall and 0" clemance (flush) at side
w:dls of the range if the fiont edges of the range
side panels stick {)utbeyond the cabinet fionts
at least 1/4".
• To eliminate tile risk ofbmns or fire when
reaching over hot suflilce elements, cabinet
storage space ab()ve the cooklop should be
avoided. If cabinet storage space is to be
provided ab()ve tile cooktop, the risk can be
reduced by installing a range hood that sticks
out at least 5" be)x md the fiont of the cabinets.
Cabinets installed ab_)ve a cooktop may be no
deeper than 13".
36**
Flush
mount
outlet
Models A B C
20" Wide 20" 20_/¢" 2"
24" Wide 24" 243/¢" O"
_Deptbincludinghandle:25SAs".
Depthtofrontofcontrolknobs:26W'.
40W'
Surface 5V4"
mount
outlet
Fromb
ofrange to \
strainrelief '_
clamp 401/4"
Fromcombustible
wails abovecooking
surface
y C 25W'from
wail tofront
panel
Preparation
• Rem()ve all tape and pa(kaging.
• Take the accessot Tpack out of the (_ven,
• Check to be sure that no range paris have come
loose during shipping.
17
Page 18

Installationof the range.
Read these instructions completely and carefully.
Protect YourFloor
Yourrange, like many other household items, is
heavy and can settle intosoft floor coverings such as
cushioned vinyl or carpeting. When m(Mng tile
range on this type of flooring, use cme, and it is
recommended that these siinple and inexpensive
insU_ucfions be fi)llowed.
The range should be installed on a sheet of
pl)wood (or similm material) as fi)llows: When
the floor o)vering ends at the fiont of the range,
the mea that the range will rest on should be buih
up with pl)_vood to the same level or higher than
the floor o)vering. This will all()w the range u) be
m()ved tot cleaning or servicing.
Installing theBackguard
[] Pla(e the ba(kgu_ud on top ofthe end panels
at the rear of the range.
[] Insert two machine screws through the holes
at the bottom of each end cap. Secure the
screws to the range flame with the hex nuts
provided.
] Insert two ina(hine screws through the fiont
of the backguard at each end. Se(ure the
screws to the range fi_mm with the hex nuts
prox4ded.
18
Page 19

For proper cooking and baking the range must be
leveled, I,eveling legs are lo(ated on ea(h (orner
at the base of the range.
Install the oven shelves (see use and care section
for instructions). Put a spirit level or a glass
measuring (up partially filled with water on
one of the oven shelves.
Use a 1%" open end _Tench or an a¢!justable
x_Tenchm back out the fi)ur leveling legs/w{t
or three turns each. Now use the x_Tenchto a_!just
the leveling legs until the range is level.
Slide range back towards the wall being carefifl
not to damage the sides or top of the range,
or the a(!ja(ent {abinets.
18
Page 20

Before YouCallForService...
TrOubleshooting -tips
Save time and money! Review the chart onthis page
t and you may not need to call for service.
Problem Possible Causes What To Do
Surface units not The surface units are • With the controls off, check to make sure tile sur[hce
functioningproperly not plugged in solidly, unit is plugged completely into the recep/acle.
The surface unit controls • (heck to see the correct control is set tin the sur[ilce
improperly set. unit you are using.
The drip pans are not set • With the controls off, check to make sure the drip
securely in the cooktop, pan is in the recess in the cooktop and that the
opening in the pan lines up with the receptacle.
Oven will A fuse in your home may • Replace the fi_se or reset the circuit breaker.
not work be blown or the circuit
breaker tripped.
Plug on range is not * Make sure elecuical plug is plugged into a live, properly
completely inserted in grounded outlet.
the electrical outlet.
Oven control • See the Using the oven sections.
improperly set.
Food does not Oven control • Make sure you mrn the knob all the way/o the
broilproperly improperly set. BROIL position.
Improper shelf position • See the Broiling Guide.
being used.
Cookware not suited • Use the broiling pan and grid that came with your range.
for broifing.
Aluminum foil used on the • See the Using the oven for broiling section.
the broiling pan and grid has
not been fitted properly and
slit as recommended.
Fooddoes not bake Oven control • See the Using the oven for baking or roasting section.
or roast properly improperly set.
OVEN TEMP knob was • Turn the knob to OFFand then/o the bake temperature.
turned to BROIL before
being set at a baking
temperature
Shelf position is incorrect • See the Using the oven for baking or roasting section.
or the shelf is not level.
Necessarypreheating • See the Using the oven for baking or roasting section.
was not done.
• See the Using the oven for baking or roasting section.
• See the Using the oven for baking or roasting section.
Incorrect cookware or
cookware of improper
size being used.
A foil tent was not
used when needed
to slow down browning
during roasting.
2O
Page 21

Notes_
21
Page 22

Notes,
22
Page 23

Electric Range Warranty.
_ II warranty service provided by our Factory Service Centers
or an authorized Customer Care®technician. For service,
call 800-GE-CARES.
For The Period Of'. We Will Replace, At No Charge To You:
OneFear
Fromthedate ofthe
originalpurchase
Anypartof tile range which filils (h_e to a detect in materials or workmanship.
During this fullone-year warranty,we xdll also pr{Mde, free of charge, all labor
and in-home service to replace the detective part.
What is Not Covered:
• Service uips to your home to teach you how to
use the pro(h_ct.
• hnproper installation.
• Failure of the product if it is abused, misused, or
used tor other than the inmnded purpose or used
cotntnetdally.
• Replacement of house fi_ses or resetting of drofit
breakers.
• Dmnage to the pro&_ct cm_sed by accident, fire,
floods or acts of God.
• lnddental or consequential dmnage to personal
property cm_sed by possible detecls with this appliance.
This warranty is extended to the original purchaser and any succeeding owner for products purchased for
home use within the USA. In Alaska, the warranty excludes the cost of shipping or service calls to your home.
Some states do not allow the exclusion or limitation of incidental or consequential damages. This warranty
gives you specific legal rights, and you may also have other rights which vary from state to state. Toknow
what your legal rights are, consult your local or state consumer affairs office or your state's Attorney General.
Warrantor: General Electric Company.Louisville, lot"40225
23
Page 24

ConsumerSupport.
GEAppliancesWebsite vvvvvv.GEAppliances.com
Have a question or need assistance xdth your appliance? TU tile GE Appliances Website 24 hours a day,
any day of the yem! For greater comvnience and taster sevfice, yt)u can m)w download Owner's Manuals,
order pmts, catalogs, or even sche&fle sevvice on-line. Y_nlcan also "Ask Our Temn of Experts ......
your questions, and so much more...
ScheduleService
vvvvvv.GEAppliances.com
Expert GE repair se_x,iceis only one step away fiom your door. Get on-line and schedule your se_x,iceat
your(onvenien(e 24hoursanydayoftheyear!Or(al1800-(;E-(;ARES 800-432-2737) during normal
business hours.
RealLifeDesignStudio
vvvvvv.GEAppliances.com
GE supports the Universal Design concept-products, sevvices and environments that can be used by
people of all ages, sizes and capabilities. We recognize the need to design tina wide range of physical and
mental abilities and impairments. For details of GE's U niversal Design applications, including kitchen
design ideas tin people with disabilities, check out our Website today. For the heming impaired, please call
80(!-TDD-GEAC (800-833-4322).
ExtendedWarranties
vvvvvv.GEAppliances.com
Purchase a GE extended warranty and learn about special discounts that are available while your warranty
is still in efl>ct. You can purchase it on-line anytime, or call 800-626-2224 during normal business hours.
(;E ( onsumer Home Sev_4(es _dll still be there after your warranty expires.
PartsandAccessories
vvvvvv.GEAppliances.com
ln(fixdduals qualified to sev_dcetheir o_1 appliances can have parts or accessories sent directly to their homes
(VISA, MasterCard and Dis(over (ards are a((epted). Order on-line today, 24 hours m,e_yday or by phone at
800-626-2002 during normal business hours.
Instructions contained in this manual cover procedures to be performed by any user. Other servicing generally
should be referred to qualified service personnel Caution must be exercised, since improper servicing may cause
unsafe operation.
ContactUs
www. GEAppliances.com
If you are not satistied with tile service you receive flom GE,contact us on our Website with all the details
includingyour phone number, orx_Tite to: Genera[ Manager, Customer Relations
GE Appliances, Appliance Park
I,ouisville, KY 40225
RegisterYourAppliance vvvvvv.GEAppliances.com
Register your new appliance on-line--at your convenience! Timely produ(t registration will allow for
enhanced (ommuni(ation and prompt sev_dceunder the terms of your warranty, should tile need arise.
You may also mail in the pre-printed registration card included in the packing material, or detach and
use the ti)rm in this Owner's Manual.
Printed in flTeUnited States
 Loading...