

Page 1

GEApplia nces.c orn
og
W
i
i
ol
U
0
0
im
0
Safety Instructions ............................ 2-s
Operating Instructions
Kitchen Timer .......................................... 21
Oven ............................................... 14-35
Adjust Oven Thermostat .............................. 22
Baking or Roasting .................................... 17
Broiling, Broiling Guide ................................ 18
Controls ........................................... 14, 15
Convection Oven ................................. 23-26
|
|
Lower Oven Drawer .................................. 35
Preheating ............................................ 17
Probe ................................................. 20
Sabbath Feature ...................................... 33
Self-Cleaning ...................................... 29, 30
SlowCook,Warming and Proofing Features.......... 27, 28
Special Features .................................. 31, 32
Timed Baking and Roasting ........................... 19
Warming Drawer ..................................... 34
Surface Units ........................................ 6-13
Cookware .............................................. 7
Griddle ............................................ 12, 13
Knob-Controlled Models .......................... 10, 11
Touch Pad-Controlled Models ....................... 8, 9
Quick Set V,
Quick Set VI and
Next Step Control
!
Care and Cleaning
Aluminum Foil ............................ 3, 5, 16, 34
Control Knobs ......................................... 36
Control Panel ......................................... 36
Glass Cooktop ..................................... 42, 43
Lift-Off Oven Door .................................. 37, 38
Light ............................................... 40, 41
Oven Floor ............................................. 39
Oven Heating Elements ................................ 41
Racks ................................................. 58
RemovableWarming Drawer/Lower OvenDrawer Pan.... 59
Storage Drawer ....................................... 59
Surfaces .............................................. 56
Vent ................................................... 39
In Canada:
www. GEAppliances.ca
Printed in the United States 49-80627-1 01-11 GE
Troubleshooting Tips......................... 44-48
Accessories ........................................ 5o
Consumer Support
Consumer Support .................................... 52
Warranty .............................................. 51
Write the model and serial
numbers here:
Model #
Serial #
You can find them on a label
behind the drawer or behind the
lower oven door on the front of
the range frame.
@
Printed on
Recycled Paper
Page 2

IMPORTANT SAFETY INFORMATION.
READ ALL INSTRUCTIONS BEFORE USING.
WARNING ]
Read all safety instructions before using the product. Failure to follow these instructions may result in fire, electric shock,
serious injury or death.
ANTI-TIP DEVICE
Toreduce the risk of tipping the range,the range must besecured by a
properly installed anti-tip bracket.Seeinstallation instructionsshipped with
the bracketfor complete detailsbefore attempting to install
• All ranges can tip.
• BURNS or other SERIOUS
INJURIES can result.
• INSTALL and CHECK the
ANTI-TIP bracket following
the instructions supplied
with the bracket.
ForFreestanding Ranges:
Tocheck if the bracket is installedand engaged properly,remove the storage
drawer or kickpanel and look underneath the range
to see that the levelinglegisengaged in the bracket.Onmodelswithout a
storage drawer or kick panel,carefullytip the range forward. Thebracket
should stop the range within 4 inches.Ifit
does not,the bracket must be reinstalled.If the range is pulled from the wall
for any reason,always repeatthis procedure to verify the range is properly
secured bythe anti-tip bracket.
Never completely remove the levelinglegs or the range will not besecured to
the anti-tip deviceproperly.
ForSlide-In Ranges:
Tocheck if the bracket is installed and engaged properly, remove the
storage drawer or kick panel and look underneath the range to seethat the
levelingleg isengaged inthe bracket.
ForDrop-In Ranges:
Tocheck if the bracket is installed and engaged properly, lower the oven
door and gently apply medium force at the handle end until movement
of the range isdetected. Continue pressinguntilthe anti-tip bracket is
engaged and movement stops.A small amount of movement isacceptable
at the back of the range top, but it should be stable and not tip once the
anti-tip bracket isengaged. If it does not, the bracket must be reinstalled.
Ifyou did not receive an anti-tip bracket with your purchase,
call !.800.626.8774to receiveone at no cost (inCanada, call
!.800.561.3344).Forinstallation instructions of the bracket,
visit GEAppliances.com(in Canada,GEAppliances.ca).
iA WARNING i IMPORTANT SAFETYNOTICE
TheCaliforniaSafeDrinking Water and ToxicEnforcementAct requires the Governorof Californiato publish a list of substances
known to thestate to causecancer,birth defectsor other reproductive harm, and requiresbusinessestowarn customers ofpotential
exposure tosuchsubstances.
Thefiberglassinsulation in self-cleanovens givesoff a very small amount of carbon monoxide during the cleaning cycle.Exposurecan
be minimized by venting with an open window or usinga ventilation fan or hood.
Page 3
j-& WARNING ] GENERAL SAFETYINSTRUCTIONS
GEAppliances.com
Usethis appliancefor its intended purposeasdescribedinthis
Owner'sManual.
Besureyour applianceisproperlyinstalledand grounded
bya qualifiedinstallerinaccordancewith the provided
installationinstructions.
Donot attempt to repairor replaceany part ofyour rangeunless
it isspecificallyrecommendedinthis manual.Allotherservicing
shouldbetransferred to a qualifiedtechnician.
Beforeperformingany service,unplugthe rangeor disconnect
the power supplyat the householddistributionpanel by
removingthefuseorswitching off the circuit breaker.
Donot leavechildrenalone-children shouldnot be left alone
or unattendedin an area wherean applianceis in use.They
shouldnever beallowedto climb,sit or stand on anypart of the
appliance.
CAUTION :Donotstoreitemsofinteresttochildren
abovea rangeor on the backguardofa range-children climbing
onthe rangeto reachitemscould beseriouslyinjured.
Useonlydry pot holders-moist or damp pot holderson
hotsurfacesmayresultin burnsfrom steam.Donot letpot
holderstouch hot surfaceunitsor heatingelements.Donot usea
towel or other bulkycloth in placeof pot holders.
Neveruseyour appliancefor warming or heatingthe room.
Donot touch the surfaceunits,the heatingelementsor
the interiorsurfaceofthe oven.Thesesurfacesmay behot
enoughto burn eventhough they are dark in color.During
and after use,do not touch,orletclothing or other flammable
materialscontact thesurface units,areasnearbythe surface
units or anyinteriorareaof the oven;allowsufficienttime for
coolingfirst. Othersurfacesof the appliancemay becomehot
enoughto causeburns.Potentiallyhot surfacesincludethe
cooktop,areasfacing the cooktop,oven vent opening,surfaces
near theopeningand crevicesaround the oven door.
iiiiii_,
Donot heat unopenedfoodcontainers.Pressurecouldbuild up
and the containercouldburst,causingan injury.
iiiiii_,
Donot usealuminumfoil to linethe drip pans.Foilcantrap heat
or melt,resultingindamageto the productand ashockor fire
hazard.
Avoidscratchingorimpactingglassdoors,cooktopsorcontrol
panels.Doingso may leadto glassbreakage.Donotcook on a
productwith broken glass.Shock,fire or cutsmayoccur.
Cookmeat and poultrythoroughly-meat to at leastaninternal
temperatureof Z60°Fandpoultryto at leastan internal
temperatureof Z80°F.Cookingto thesetemperatures usually
protectsagainstfoodborne illness.
Donot usealuminumfoil to linethe oven bottom.Foilcantrap
heator melt,resultingindamageto the product and a shockor
fire hazard.
l_a,WARNING
] KEEPFLAMMABLE MATERIALSAWAY FROM
THERANGE.
Donot storeor useflammablematerialsinan ovenornear
the cooktop,including paper,plastic,pot holders,linens,wall
coverings,curtains,drapesand gasolineor otherflammable
vaporsand liquids.
Neverwearloose-fittingorhanging garmentswhile using
the appliance.Thesegarmentsmay igniteifthey contact hot
surfaces,causingsevereburns.
I^ I
In WARNING I IN THE EVENTOF A FIRE,TAKETHE FOLLOWING
STEPSTOPREVENT THEFIREFROM SPREADING:
Donot usewater on greasefires.Neverpickupaflamingpan.
Turnthe controlsoff.Smothera flaming pan on a surfaceunitby
coveringthe pancompletelywith awell-fitting lid,cookiesheet
or flat tray.Useamulti-purposedry chemicalor foam-type fire
extinguisher.
If thereisa firein theovenduring baking,smotherthe fireby
closingthe oven door and turningthe ovenoff or by usinga
multi-purposedry chemicalorfoam-type fire extinguisher.
iii_,Donotletcookinggreaseor other flammable materials
accumulatein or nearthe range.Greaseinthe oven or onthe
cooktopmay ignite.
Cleanventilatinghoodsfrequently.Greaseshould notbeallowed
to accumulate onthe hoodorfilter.
Ifthere isa fire inthe oven duringself-clean,turnthe oven
off andwait for the fireto go out. Do notforcethedoor open.
Introductionoffreshairatself-cleantemperatures mayleadto
a burstof flame from the oven.Failureto follow this instruction
may resultin severeburns.
Page 4

IMPORTANT SAFETY INFORMATION.
READ ALL INSTRUCTIONS BEFORE USING.
WARNING j COOKTOPSAFETYINSTRUCTIONS
Never leave the surface units unattended at medium or
high heat settings. Boilovers cause smoking and greasy
spillovers that may catch
on fire.
Never leave oil unattended while frying. If allowed to
heat beyond its smoking point, oil may ignite, resulting
in fire that may spread to surrounding cabinets. Use a
deep fat thermometer whenever possible to monitor oil
temperature.
To avoid oil spillover and fire, use a minimum amount of
oil when shallow pan-frying and avoid cooking frozen
foods with excessive amounts of ice.
Use proper pan size-select cookware having flat
bottoms large enough to cover the surface heating
element. The use of undersized cookware will expose
a portion of the surface unit to direct contact and may
result in ignition of clothing. Proper relationship of
cookware to surface unit will also improve efficiency.
iiiiiiiiiiii_i;i
Onlycertain typesof glass,glass/ceramic, earthenware
or other glazed containers are suitablefor cooktop
service;others may break becauseof the sudden
change in temperature.
iiiiiiiiiiii_i;i
To minimize the possibility of burns, ignition of
flammable materials and spillage, the handle of a
container should be turned toward the center of the
range without extending over nearby surface units.
iiiiiiiiiiii_i;i
When preparing flaming foods under a hood, turn the
fan on.
j-& WARNING l RADIANT COOKTOP SAFETYINSTRUCTIONS
(some models)
Use care when touching the cooktop. The glass surface
of the cooktop will retain heat after the controls have
been turned off.
Do not cook on a broken cooktop. If glass cooktop
should break, cleaning solutions and spillovers
may penetrate the broken cooktop and create a
risk of electric shock. Contact a qualified technician
immediately.
Avoid scratching the glass cooktop. The cooktop can be
scratched with items such as knives, sharp instruments,
rings or other jewelry and rivets on clothing.
Do not place or store items that can melt or catch fire
on the glass cooktop, even when it is not being used. If
the cooktop is inadvertently turned on, they may ignite.
Heat from the cooktop or oven vent after it is turned off
may cause them to ignite also.
iiiiiiiiiiii_i;i
Use CERAMA BRYTE®ceramic Cooktop Cleaner and
CERAMABRYTE®Cleaning Pad to clean the cooktop.
Wait until the cooktop cools and the indicator light
goes out before cleaning. A wet sponge or cloth on a
hot surface can cause steam burns. Some cleaners
can produce noxious fumes if applied to a hot surface.
NOTE: Sugar spills are an exception. They should be
scraped off while still hot using an oven mitt and a
scraper. See the Cleaning the glass cooktop section for
detailed instructions.
Read and follow all instructions and warnings on the
cleaning cream label.
i-&WARNING i COILCOOKTOPSAFETYINSTRUCTIONS
(some models)
Do not immerse or soak the removable surface units.
Do not put them in a dishwasher. Do not self-clean the
surface units in an oven. Doing so may cause them to
fail, presenting a burn or fire hazard.
To avoid the possibility of a burn or electric shock, always
be certain that the controls for all surface units are at the
OFFposition and all coils are cool before attempting to lift
or remove a coil surface unit.
i Be sure the drip pans are not covered and are in place.
Their absence during cooking could damage range
parts and wiring.
Page 5

[ WARNING [OVEN SAFETYINSTRUCTIONS
GEAppliances.com
Stand away from the range when opening the oven
door. Hot air or steam which escapes can cause burns
to hands, face and/or eyes.
Keep the oven vent unobstructed.
Keep the oven free from grease buildup. Grease in the
oven may ignite.
Place oven racks in desired location while oven is cool.
If rock must be moved while oven is hot, do not let pot
holder contact hot heating element in oven.
When using cooking or roasting bags in the oven, follow
the manufacturer's directions.
Pull the oven rack to the stop-lock position when
loading and unloading food from the oven. This helps
prevent burns from touching hot surfaces of the door
and oven walls.
Do not leave items such as paper, cooking utensils or
food in the oven when not in use. Items stored in on
oven con ignite.
Do not use aluminum foil to line the oven bottom. Foil
can trap heat or or melt, resulting in damage to the
product and a shock or fire hazard.
Never place cooking utensils or any other items on the
oven floor. There is a heating element beneath the oven
floor. Placing items on the oven floor may cause the
oven to overheat, resulting in damage to the oven and
risk of damage or fire to cabinets.
WARNING JSELF-CLEANING OVEN SAFETYINSTRUCTIONS
(Some models)
The self-cleaning feature operates the oven at temperatures high enough to burn away food soils in the oven.
Follow these instructions for safe operation.
Before operating the self-clean cycle, remove pans,
shiny metal oven racks and other utensils from the
oven. Only gray porcelain-coated oven racks may be
left in the oven. Do not use self-clean to clean other
parts, such us drip puns or bowls.
Before operating the self-clean cycle, wipe grease and
food soils from the oven. Excessive amount of grease
may ignite, leading to smoke damage to your home.
Do not clean the door gasket. The door gasket is
essential for a good seal. Care should be taken not to
rub, damage or move the gasket.
Do not use oven cleaners. No commercial oven cleaner
or oven liner protective coating of any kind should be
used in or around any port of the oven.
If the self-cleaning mode malfunctions, turn the oven off
and disconnect the power supply. Have it serviced by o
qualified technician.
iA i
WARNING 1WARMING DRAWER/LOWER OVEN DRAWER SAFETY
INSTRUCTIONS(somemode sl
The purpose of the warming drawer isto hold hot
cooked foods at serving temperature. Bacteria will grow
in food while it is below 140°F. Do not put cold food
in warming drawer. Do not heat food for more than 2
hours. Failure to follow these instructions may result in
foodborne illness.
Do not leave paper products, plastics, canned food or
combustible materials in the drawer. They may ignite.
Do not touch the heating element or the interior surface
of the drawer. These surfaces may be hot enough to
cause burns.
Usecare when opening the drawer.Open the drawer a
crack and let hot airor steam escape before removing
or replacing food. Hot airor steam that escapescan
cause burns to hands,face and/or eyes.
Do not use aluminum foil to line the lower drawer. The
foil will trap heat below, and upset the performance
of the oven. Foilcon melt and permanently damage
the drawer bottom. Damage from improper use of
aluminum foil is not covered by the product warranty.
Page 6

For models with a lass cooktop.
WARNING orhighsettings.Keenf/ommob/eitemsawayfromthecool<ton.Turnafro//contro/s
[_ll, FIREHAZARD: Never leave the range unattended with the cool<top on medium
when done cooking. Failure to follow these instructions can result in
fire, serious injury or death.
NOTE:Throughoutthis manua!,features and appearancemay vary from your model.
About the radiant surface units
i iil
Never cook directly on the glass.
Always use cookware.
Always place the pan inthe center
of the surface unit you are cooking on.
Do not slidecookware across the
control or cooktop surface because
it can scratch the glass. The glass is
scratch-resistant, not scrotchproof
The radiant cooktop features heating units
beneath a smooth glasssurface.
Cooktoptemperatures increase with the
number of surface units that are on. With 3or 4
units turned on,surface temperatures are high.
Always use caution when touching the cooktop.
An indicator light will come on when the
surface unit is turned on.
The appropriate HOTSURFACEindicator
light will glow when its corresponding radiant
element isturned onand will remain on until
the surface has cooled below !50%.
NOTE."
Hot surface indicator light will:
Stay on evenafter the unit is turned off.
Glow brightly until the unit hascooled below
150°K
NOTE:Aslight odor isnormal when a new
cooktop is usedfor the firsttime. It iscaused
bythe heating of new parts and insulating
materials and will disappear in a shorttime.
NOTE:Onmodels with light-colored glass
cooktops,it is normal for the cookingzones to
change color when hot or cooling down. Thisis
temporary and will disappear as theglasscools
to room temperature.
It issafeto place hot cookware from the oven
or surface on the glass cooktop when the
surface iscool.
Evenafter the surface units are turned off, the
glass cooktop retainsenough heat to continue
cooking.To avoid overcooking, remove pans
from the surface units when the food iscooked.
Avoid placing anything onthe surface unit until
it hascooled completely.
Water stains(mineral deposits)areremovable
usingthe cleaning cream or full strength
white vinegar.
Useof window cleanermay leavean
iridescentfilm on the cooktop.Thecleaning
cream will remove this discoloration.
Don't store heavy items above the cooktop. If
they drop onto the cooktop,they can cause
damage.
Donot usethe surfaceas a cutting board.
Page 7
Selecting types of cookwure
models. Connon-indu ion GEAppliances.com
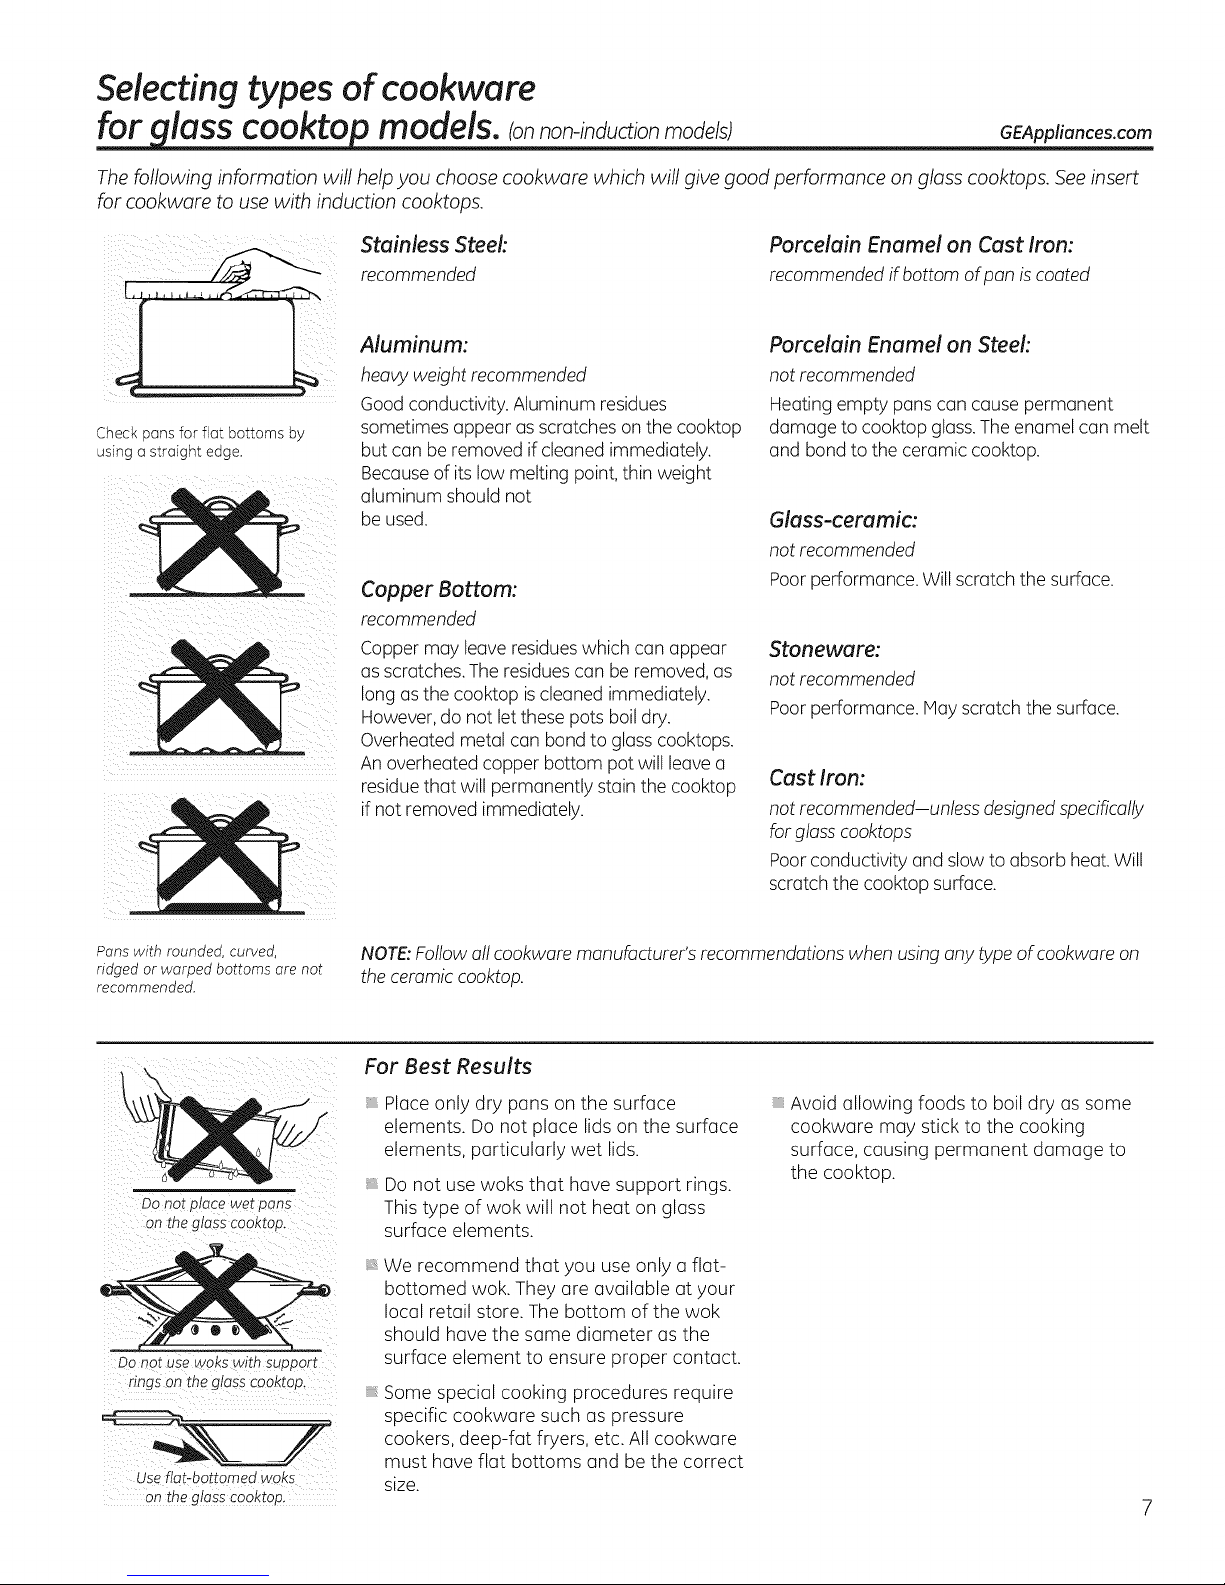
The following information will help you choose cookware which will give good performance on glass cooktops. See insert
for cookware to use with induction cooktops.
Check pans for flat bottoms by
using o straight edge.
Stainless Steel:
recommended
Aluminum:
heavy weight recommended
Good conductivity. Aluminum residues
sometimes appear asscratches on the cooktop
but can be removed ifcleaned immediately.
Becauseof its low melting point, thin weight
aluminum should not
be used.
Copper Bottom:
recommended
Copper may leaveresidueswhich can appear
as scratches.The residuescan be removed, as
long asthe cooktop is cleaned immediately.
However, do not let these pots boil dry.
Overheated metal can bond to glass cooktops.
An overheated copper bottom pot will leave a
residuethat will permanently stain the cooktop
if not removed immediately.
Porcelain Enamel on Cast Iron:
recommended if bottom of pan is coated
Porcelain Enamel on Steel:
not recommended
Heating empty pans can cause permanent
damage to cooktop glass. The enamel can melt
and bond to the ceramic cooktop.
Glass-ceramic:
not recommended
Poor performance. Willscratch the surface.
Stoneware:
not recommended
Poor performance, lay scratch the surface.
Cast Iron:
not recommended-unless designed specifically
for glass cooktops
Poor conductivity and slow to absorb heat. Will
scratch the cooktop surface.
Pans with rounded, curved,
ridged or warped bottoms are not
recommended.
DO not place wet pans
on the glass cooktop.
Use fiat-bottomed woks
Onthe glaSS€ooktop,
NOTE:Followall cookware manufacturer's recommendations when using any type of cookware on
the ceramic cooktop.
For Best Results
_t
Place only dry pans on the surface
elements. Do not place lids on the surface
elements, particularly wet lids.
Do not use woks that have support rings.
This type of wok will not heat on glass
surface elements.
We recommend that you use only aflat-
bottomed wok. They are available at your
local retail store. The bottom of the wok
should have the same diameter as the
surface element to ensure proper contact.
Some special cooking procedures require
specific cookware such as pressure
cookers, deep-fat fryers, etc. All cookware
must have flat bottoms and be the correct
size.
Avoid allowing foods to boil dry as some
cookware may stick to the cooking
surface, causing permanent damage to
the cooktop.
Page 8
Using the surface units--Touch pad-controlled models.
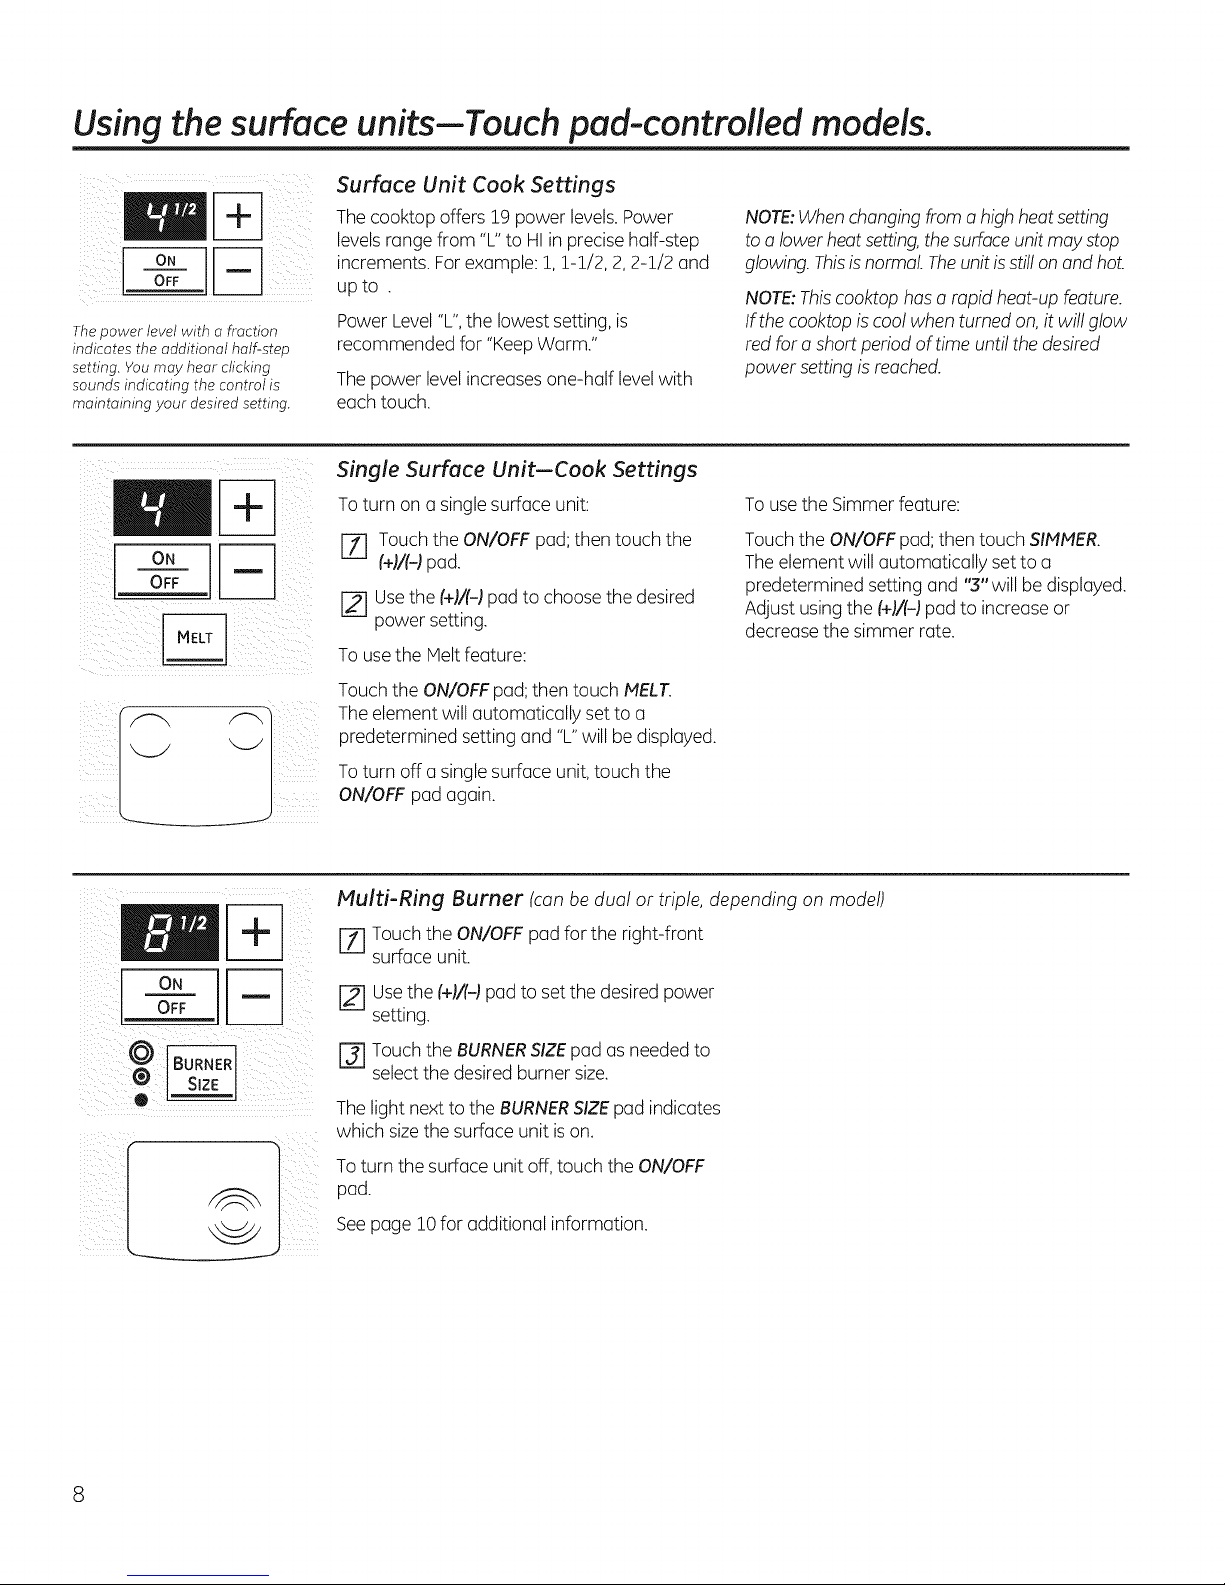
Surface Unit Cook Settings
Thecookopoffers19powerlevelsPower
levels range from "L"to HI in precise half-step
ON r-_ increments. Forexample: 1,1-1/2, 2,2-1/2 and
OFF upto .
Thepower level with o fraction
indicates the additional half-step recommended for "KeepWarm."
setting. You may hear clicking
sounds indicating the control is Thepower level increasesone-half level with
maintaining your desired setting, each touch.
Power Level"L",the lowest setting, is
Single Surface Unit--Cook Settings
To turn on a single surface unit:
NOTE:When changing from a high heat setting
to a lower heat setting, the surface unit may stop
glowing. Thisis normal. The unit is stillon and hot.
NOTE:Thiscooktop has a rapid heat-up feature.
If the cooktop is cool when turned on,it will glow
red for a short period of time until the desired
power setting is reached.
Touse the Simmer feature:
I
®
oN
OFF
r-f1 Touch the ON/OFF pad; then touch the
(+1/(-1pad.
[] Usethe (+1/(-1pad to choose the desired
power setting.
To use the Melt feature:
Touch the ON/OFFpad;then touch MELT.
The element will automatically set to a
predetermined setting and "L"will be displayed.
Toturn off esinglesurface unit,touch the
ON/OFF pad again.
Multi-Ring Burner (can be dual or triple, depending on model)
[Z] Touch the ON/OFF pad for the right-front
surface unit.
Usethe (+)/(-)pad to set the desiredpower
setting.
r_ Touchthe BURNERSIZEpad as needed to
selectthe desired burner size.
Thelight next to the BURNERSIZEpad indicates
which sizethe surface unit ison.
Touch the ON/OFF pad; then touch SIMMER.
Theelement will automatically setto a
predetermined setting and "3" will be displayed.
Adjust using the (+F(d pad to increase or
decrease the simmer rate.
Toturn the surface unit off,touch the ON/OFF
pad.
Seepage i0 for additional information.
Page 9

GEAppliances.com
[A WARNING I OOD POISONHAZARD: Bacteria may grow in food at temperatures below 140°F.
o0o
©@
WARMING ZONE
SELECT
ON
OFF
• Always start with hot food. Do not use warm settings to heat cold food.
• Do not warm food for more than 2 hours.
Failure to follow these instructions may result in foodborne illness.
Using the Warming Zone (on some models)
The WARMINGZONEislocated inthe back
center of the glass surface.
To use the WARMINGZONE:
[Z] Touch the WARMINGZONEON/OFFpad.
[] To selectthe desired control setting, touch
the SELECTpad oncefor LO,twice for MED
or three times for HI.
To turn off the WARMINGZONE:
Touch the WARMINGZONEON/OFFpad.
Forbest results,all foods on the WARMING
ZONEshould becoveredwith a lid or aluminum
foil.
Always use pot holders or oven mitts when
removing food from the WARMINGZONE,as
cookware will behot.
Donot use plasticwrap to cover food. Plastic
may melt onto the surface and be very
difficult to clean.
Useonly cookware recommended for top-of-
range cooking.
Using the Warming Zone (onsomemodels)
TheWARMINGZONEis located in the back Donot use plastic wrap to coverfood. Plastic
ON / OFF
SETWARMIN6 ZONE
....
center of the glass surface, may melt onto the surfaceand bevery difficult
Touse the WARMINGZONE:
[-_ Touchthe WARMINGZONEON/OFFpad.
Touchthe 1 (LOJ,2 (MEDIor .5(HI)padto
selectthe desired control setting.
to clean.
Useonlycookware recommended for top-of-
range cooking.
@
[-_ Touch the START pad. "WARMER ON" will
be in the control display.
To turn off the WARMING ZONE:
Touch the WARMING ZONE ON/OFF pad.
NOTE: The CLEAR/OFF pad will not turn off the
WARMING ZONE.
Forbest results,all foods on the WARMING
ZONEshould be covered with a lid or aluminum
foil.
Always use pot holdersor oven mitts when
removing food from the WARMINGZONE,as
cookware will be hot.
Page 10

Using the surface units-Knob-controlled models.
Throughout this manual, features and appearance may vary from your model.
How to Set
Pushthe knob in and turn in either direction to
the setting you want.
Forglass cooktop surfaces:
A HOTCOOKTOPindicator light, on the
cooktop, will glow when any radiant element is
turned on. It will remain on until the surface is
!i ii s; ili
cooledto approximately 150°F.
Atboth OFFand HI the control clicks
into position. Youmay hear slight
clicking sounds during cooking,
indicating the control is maintaining
your desiredsetting.
Besure you turn the control knob to
OFFwhen you finish cooking.
sMAL!. LARGE
BUR_ER _ BURNER
OFF
On some models.
SMALL LARGE
BURNER OFF BUBNEB
Indicator light will:
Comeon when the unitis turned on or hot to
the touch.
Stay on evenafter the unit is turned off.
Glow until the unit iscooled to approximately
!50°F.
Dual and Triple Surface Units and Control Knobs (onsomemodels)
Thesurface unit has 2 or 5cooking sizesto
selectfrom soyou can match thesizeof the unit
to the size of thecookwareyou are using.
o
Modelswith a Triple Surface Unit only.
off
Hi _ Lo
o
4_\\11/116
LD 2
On some models.
Temperature Limiter
Everyradiant surface unit has
a temperature limiter.
Thetemperature limiter protects the glass
cooktop from getting too hot. It is normal for it
to cyclewhen the cooktop is in use.
10
Modelswith a Triple Surface Unit only.
Thetemperature limiter may cycle the units off
more frequently for a time if:
Thepan boilsdry.
Thepan bottom is not flat.
Thepan is off-center.
Thereis no pan on the uniL
Page 11

Throughout this manual, features and appearance may vary from your model.
GEAppliances.com
Modelswith a Bridge Burner only:
FRONT _ BRIDGE
BURNER _/ BURNER
I I
p
4\_Z4
LO LO
FRONT
J
Using the Bridge Burner (onsome models)
To use the bridge burner,turn the left-front
control knob to the BRIDGEBURNERsettings.
Forfull bridge surface unit operation, also turn
on the left-rear surface unit.
To use only the front surface unit, turn the
control knob to the FRONTBURNERsettings.
Home Canning Tips
Be sure the canner is centered over the surface
unit.
Hake sure the canner is flat on the bottom.
To prevent burns from steam or heat, use
caution when canning.
Userecipes and procedures from reputable
sources.Theseare available from
manufacturers such as Ball®and Kerr®and the
Department of Agriculture ExtensionService.
Flat-bottomed canners are recommended. Use
of water bath canners with rippled bottoms
may extend the time required to bring the
water to a boil.
Wok Cooking
We recommend that you use only a flat-
bottomed wok. They are available atyour local
retailstore.
Do not use woks that have support rings.
Use only flat-bottomed woks.
Donot use round-bottom woks.You could be
seriously burned ifthe wok tipped over.
11
Page 12
USING THE GRIDDLE.
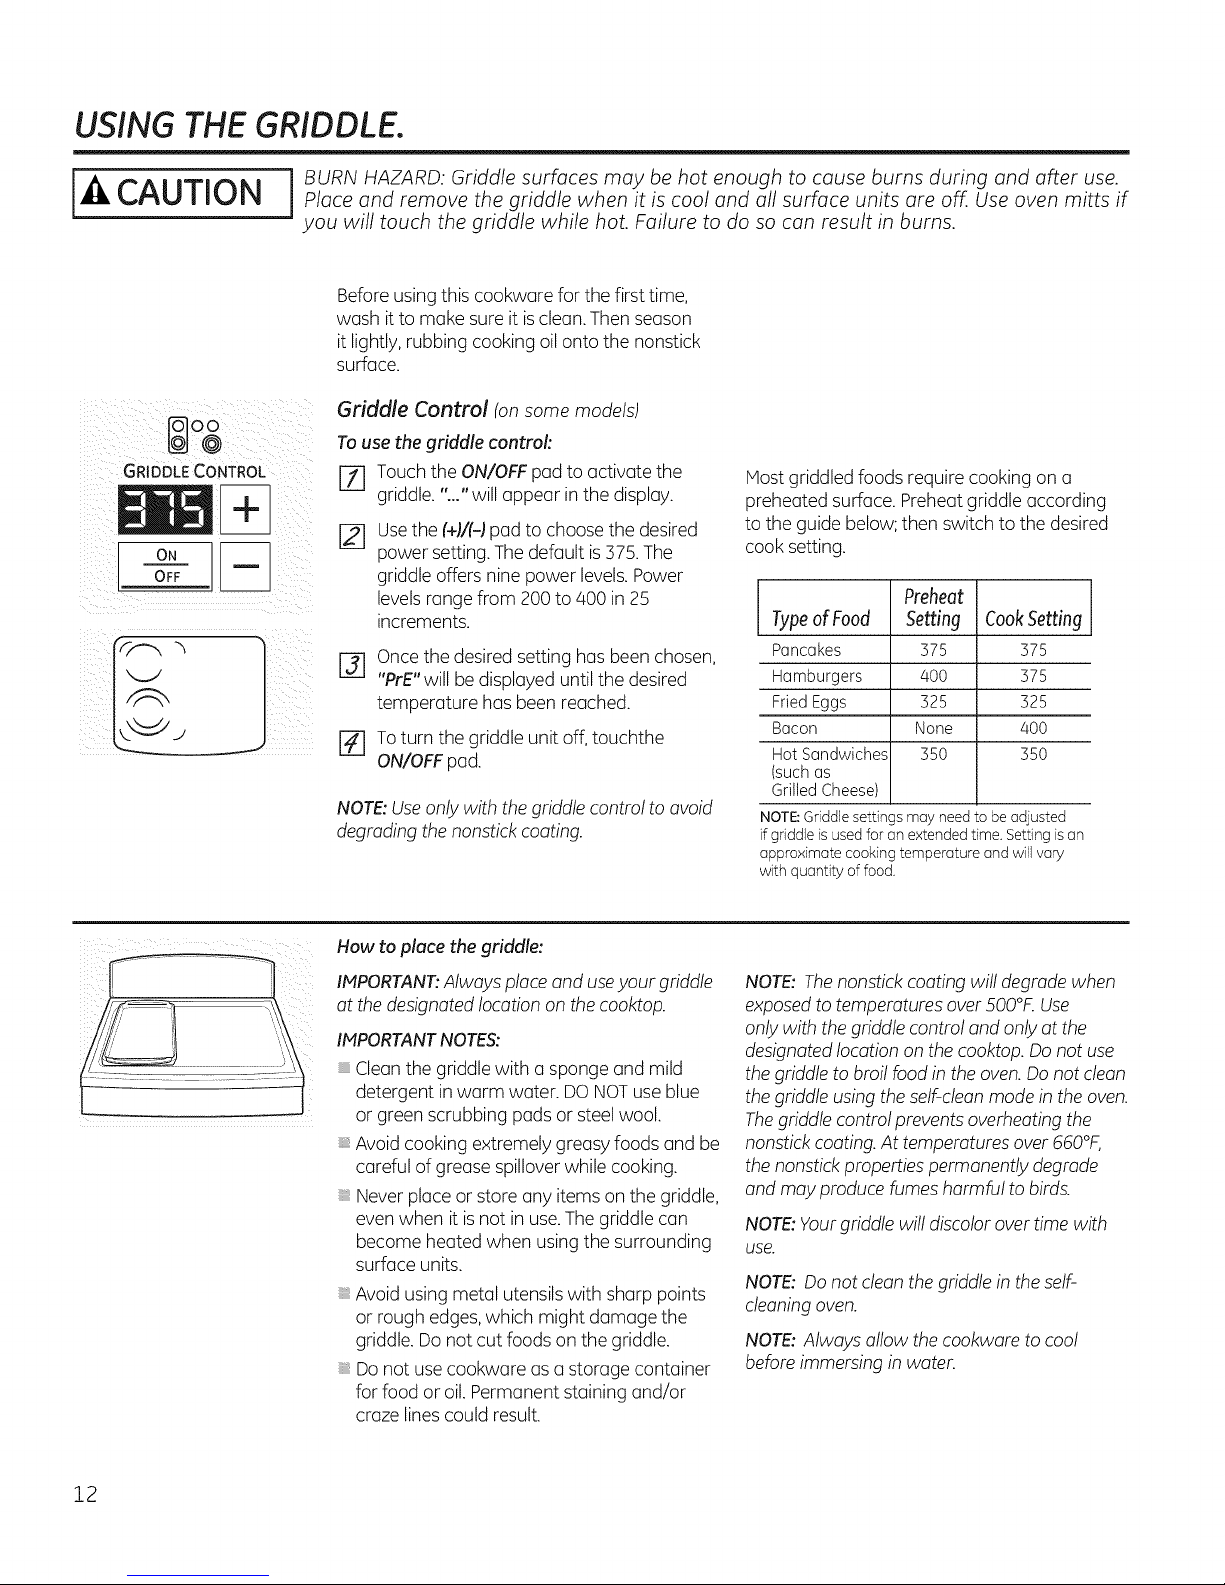
CAUTION p/ace and remove the griddle when it is cool and all surface units are off. Use oven mitts if
you will touch the griddle while hot. Failure to do so can result in burns.
Before using this cookware for the first time,
wash it to make sure it is clean.Then season
it lightly, rubbing cooking oil onto the nonstick
surface.
Griddle Control (on some models)
To use the griddle control:
GRIDDLE CONTROL
°,I= 1OFF
J
J
[] Touch the ON/OFF pad to activate the
griddle. "..." will appear in the display.
Usethe (+)#-)padto choose the desired
[]
power setting.The default is375. The
griddle offers nine power levels.Power
levels range from 200 to 400 in 25
increments.
Oncethe desired setting has been chosen,
@
"PrE"will be displayed untilthe desired
temperature has been reached.
[_ Toturn the griddle unit off,touchthe
ON/OFFpad.
NOTE:Useonly with thegriddle control to avoid
degrading the nonstick coating.
Host griddledfoods require cooking on a
preheated surface.Preheatgriddle according
to the guide below; then switch to the desired
cook setting.
Typeof Food Setting CookSetting
Pancakes 375 375
Hamburgers 400 375
Fried Eggs 325 325
Bacon None 400
Hot Sandwiches 350 350
(such as
Grilled Cheese)
NOTE:Griddle settings may need to be adjusted
if griddle is used for an extended time. Setting isan
approximate cooking temperature and will vary
with quantity of food.
Preheat J
12
How to plaee the griddle:
IMPORTANT'.Always place and useyour griddle
at the designated location on thecooktop.
IMPORTANTNOTES:
Cleanthe griddle with asponge and mild
detergent in warm water. DONOTuseblue
or green scrubbing pads or steel wool,
Avoid cooking extremelygreasy foods and be
careful of grease spillover while cooking.
Never place or store any items on the griddle,
evenwhen it isnot inuse.Thegriddle can
become heated when usingthe surrounding
surface units.
Avoid using metal utensilswith sharp points
or rough edges,which might damage the
griddle.Do not cut foodson the griddle.
Donot use cookware asa storage container
for food or oil.Permanent stainingand/or
craze linescould result.
NOTE: Thenonstick coating will degrade when
exposedto temperatures over500°£ Use
only with the griddle control andonly at the
designated location on the cooktop. Do not use
the griddle to broil food in the oven.Do not clean
the griddle using the self-cleanmode in the oven.
Thegriddle controlpreventsoverheating the
nonstick coating.At temperatures over 660°F,
the nonstickpropertiespermanently degrade
and may produce fumes harmful to birds.
NOTE:Yourgriddle will discolor over time with
use.
NOTE: Do not clean the griddle in the self-
cleaningoven.
NOTE:Always allow the cookware to cool
beforeimmersing in water.
Page 13

GEAppliances.com
Preparing Quality Steak, Easy
!. Bring steak to room temperature.
NOTE.Always use safe food practiceswhen handling meat.
2. Season both sidesto taste and coat with olive oil or similar.
3.
Preheatthe oven to BAKEat 425°, with the oven rack in center position "C."
4.
Placeyour griddle on the designated area ofthe cooktop and then preheat the griddle
to 400°F.
CAUTION:The griddle will be VERYHOT!Useoven mitts.
.
Searsteak on each side for 2 minutes or until the desired browning isachieved.
NOTE.Therewill be "smoke";ensurethere isproper ventilation.
6.
Insertthe meat probethat came with your range into the center of the steak,making sure that the tip
ofthe probe isin the center of the steak.
7.
Plugthe probe intothe outlet (located on the upper front side of the oven),slidethe rackbuck into the
ovenand close the door.
8.
PressPROBEon your control, enter the desired internaltemp, and pressSTART.
.
Allow steak to finish cooking inthe oven.The range control will beep and turn off when
the steak reaches the desired internal temperature.
NOTES.
After searing,your steak could possiblyalready be at the desiredtemperature, depending on size,
cut and desired doneness.
For thinner steaks it may not be possible to achieve u Rare or Medium Rare doneness.
asl, 2,3:
Byfirst searingyour meat with a very high heat,you are creating a browning reaction known asthe Maillard Reaction.
Thisreaction unlocksthe fuller,more intenseflavor from themeat, which occurswhen cooking meat at a high heat.
13
Page 14
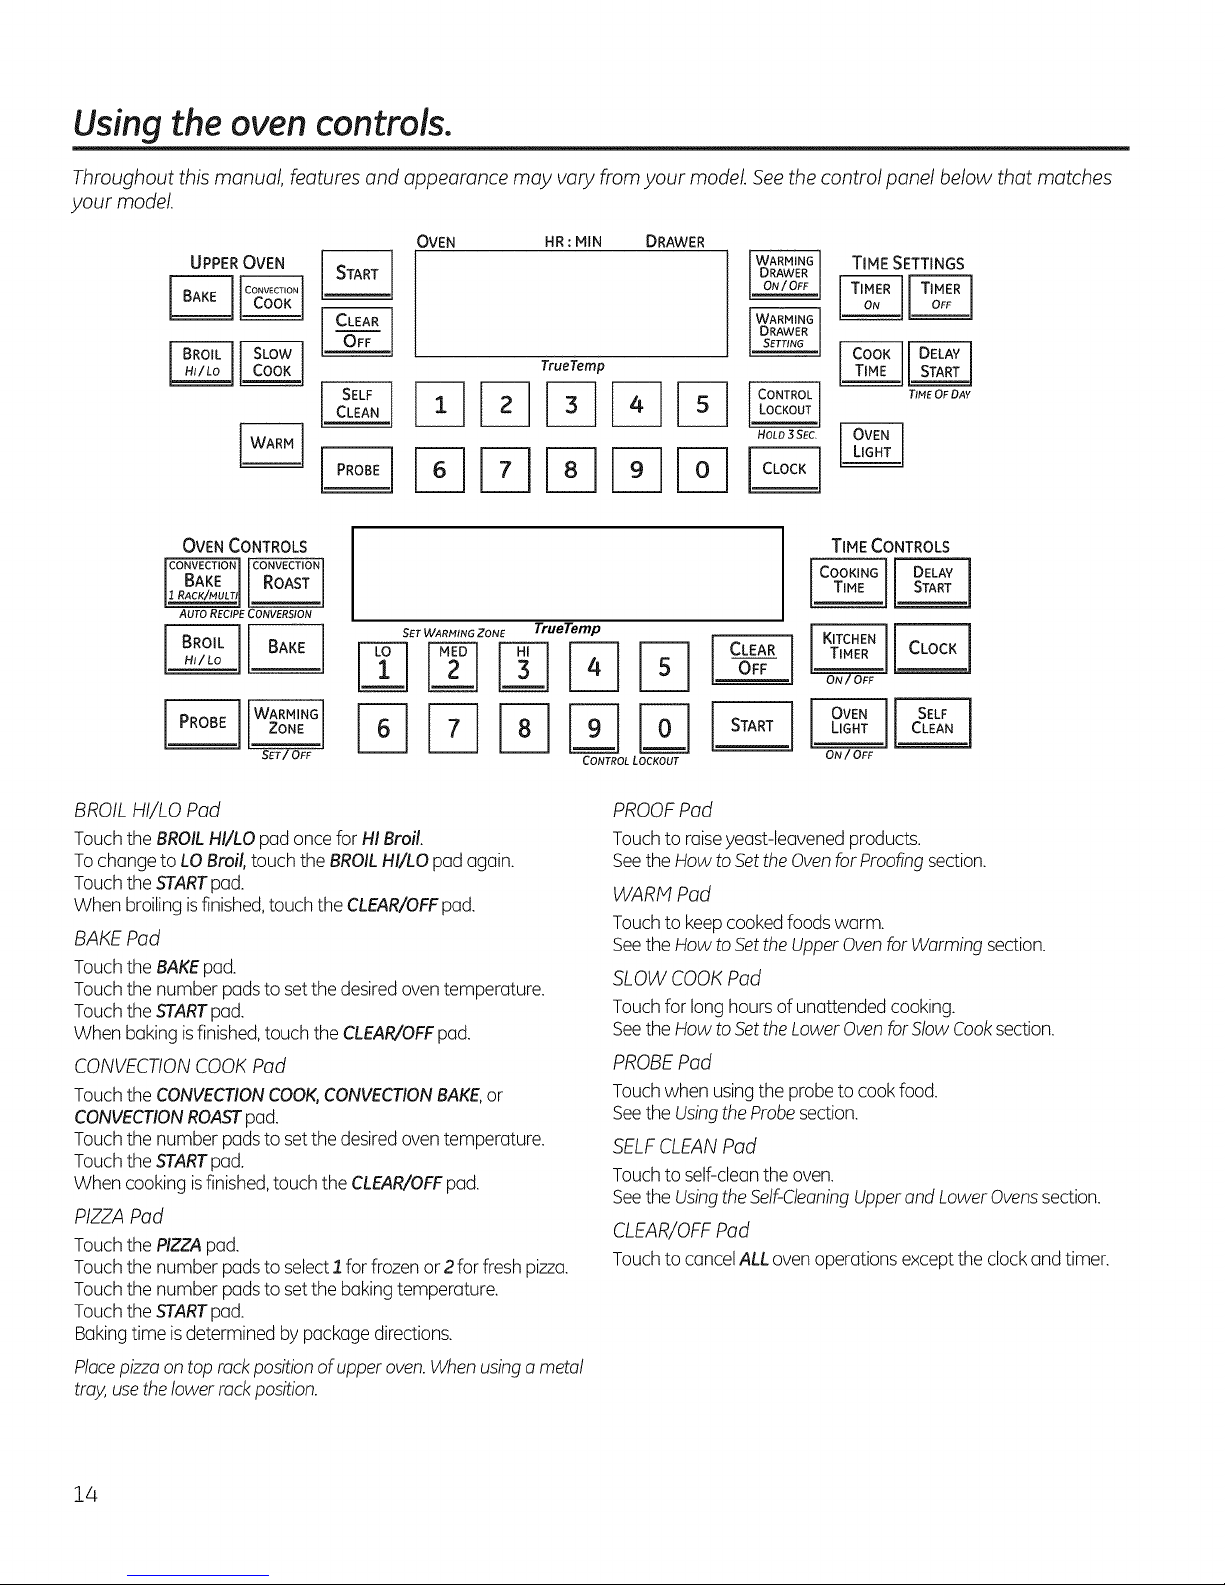
Usingthe oven controls.
Throughout this manual, features and appearance may vary from your model. Seethe control panel below that matches
your model.
OVEN HR : MIN DRAWER
TIME SETTINGS
TrueTemp
OVEN CONTROLS
AUTO RECIPE CONVERSION
SET WARMING ZONE TrueTemp
BROIL HI/LO Pad
Touchthe BROILHI/LO pad once forHI Broil.
Tochange to LOBroil,touch theBROILHI/LO pad again.
Touchthe STARTpad.
When broilingisfinished,touch the CLEAR/OFFpad.
BAKE Pad
Touchthe BAKEpad.
Touchthe number pads to setthe desiredoven temperature.
Touchthe STARTpad.
When baking isfinished,touch the CLEAR/OFFpad.
CONVECTIONCOOKPad
Touchthe CONVECTIONCOOK,CONVECTIONBAKE,or
CONVECTIONROASTpad.
Touchthe number pads to setthe desiredoven temperature.
Touchthe STARTpad.
Whencooking isfinished,touch the CLEAR/OFFpad.
PIZZA Pad
Touchthe PIZZApad.
Touchthe number pads to select1for frozenor 2 for fresh pizza.
Touchthe number pads to setthe bakingtemperature.
Touchthe STARTpad.
Bakingtime isdetermined by package directions.
Placepizzaontop rackpositionof upperoven.Whenusinga metal
tray,usethelower rackposition.
TIME CONTROLS
CONTROL LOCKOUT
ON/OFF
PROOFPad
Touchto raiseyeast-leavenedproducts.
Seethe How to SettheOvenforProofingsection.
WARM Pad
Touchto keepcookedfoodswarm.
Seethe How to SettheUpperOvenforWarmingsection.
SLOW COOK Pad
Touchfor long hoursof unattended cooking.
Seethe How to SettheLowerOvenforSlowCooksection.
PROBEPad
Touchwhen usingthe probeto cook food.
Seethe Usingthe Probesection.
SELFCLEAN Pad
Touchto self-cleanthe oven.
Seethe Usingthe Self-CleaningUpper and LowerOvenssection.
CLEAR/OFFPad
Touchto cancelALLovenoperationsexceptthe clock and timer.
14
Page 15

GEAppliances.com
STARTPod
Mustbe touched to start any cooking or cleaningfunction.
OVENLIGHT Pod
Touchto turn the ovenlightson or off.
TIMERON/OFF Pod(s)/KITCHEN TIMERPod
Touchto setthe kitchentimer.
Seethe Usingthe KitchenTimersection.
COOKTIME/COOKING TIME Pod
Touchthis pad and then touch the number padsto setthe
amount oftime you want your food to cook.Theovenwill shut off
when the cookingtime hasrun out.
DELAYSTARTPod
Usealong with the COOKTIMEor SELFCLEANpads to set
the oven to startand stop automaticallyat a time you set.
CLOCKPod
NOTE:Whensettingtimes,you are settinghoursand minutes only.
Thelowest timeyou cansetisoneminute.
Touchthe CLOCKpad.
Touchthe number pads.
TouchtheSTARTpad.
Theclock must be setto the correct time of day for the automatic
oventiming functions to work properly.The time of day cannot be
changedduring a timed bakingorself-cleaningcycle.
Ifyour oven wus set for u timed oven operution und u power
outuge occurred, the clock and all programmed functions must
be reset. The time of duy will flush in the displuy when there hus
been u power outuge.
CONTROLLOCKOUTPod
Yourcontrolwill allowyou to lockout the touch padsand the
cooktop sothey cannot be activated when touched.
Tolockthe controlsandcooktop:
Touchand hold the CONTROLLOCKOUTpad for 3 seconds.
Theoven displaywill show "on Locon."
Tounlockthe controls:
Touchand hold the CONTROLLOCKOUTpad for 3 seconds.
TheCONTROLLOCKOUTmode affectsalltouch pads.
Notouch padswill work when this feature isactivated.
WARMING DRAWER
Thewarming drawer will keephot, cookedfoods at serving
temperature.Alwaysstart with hot food.
Touchthe WARNINGDRAWERpad."WARMERON"and"1"
are litonthe displayand "Set"beginsto blink.On the number
pads,touch I for Low,2 for Hedium or 3 for High.Thedisplay"1"
changes correspondingto the number pad selected.Thewarming
drawer starts automatically offer you touch 1,2 or 3."WARMER
ON"and the number remainlit."Set"stopsblinking.Onsome
models,pressSTART.
Onsome models - toggle between settingsbytouching the
WARMINGDRAWERpad.
Tocancel,touch the WARNINGDRAWERpad.
NOTE:Touchingthe CLEAR/OFFpad doesnot turn off the
warming drawer.
WARMING ZONE
Touchto keephot,cookedfood warm. Seethe UsingtheWarming
Zonesection.
15
Page 16

Usingthe oven.
To avoid possibleburns,placethe racksinthe desiredposition beforeyou turn on theoven.
Before you begin...
Theracks have stops,so that when placed
correctly on the supports, they will stop before
coming completely out and will not tilt.
When placing and removing cookware, pull the
rack out until itstops.
On some models,the bake heating element is
under the oven floor. Do not place foods onthe
oven bottom for cooking.
Toremove a rack, pull it toward you, tilt the
front end up and pull it out.
The number of rack positions may
vary by model.
Aluminum Foil
Toreplace, place the end of the rack
(stop-locks)on the support,tilt up the front and
push the rack in.
CAUTION
Whenyou are usinga rack in the lowest position
(A),you will need to usecaution when pulling
the rack out. Werecommend that you pull the
rack out several inchesand then, using two pot
holders,pull the rack out byholding thesides of
it. Therack is low and you couldbeburned ifyou
placeyour hand in the middle of the rack and
pull all the way out. Be very careful not to bum
your hand on the door when usingthe rack in
the lowest position (A).
Do not use aluminum foil to line oven bottoms.
Thefoil will trap heat below and upset the
performance of the oven. Foilcan melt
and permanently damage the oven bottom.
Damage from improper useof aluminum foil is
not covered by the product warranty.
Foilmay be usedto catch spills by placing a
sheet on a lower rack,severalinches below
the food .Do not usemore foilthan necessary
andneverentirelycoveran ovenrackwith
aluminum foil. Keepfoil at least !-!/2" from
oven walls to prevent poor heat circulation.
16
Page 17

To avoid possible burns, place the racks in the desired position before you turn on the oven.
Preheating and Pan Placement
Toavoid possible burns, place the racks in the
desired position before you turn on the oven.
Preheattheoveniftherecipecallsforit.Preheating
isnecessaryfor goodresultswhenbakingcakes,
cookies,pastriesandbreads.
ifbakingfourcakelayersatthesametime,place
two layersonrackCandtwo layersonrackE.
Staggerpansonthe racksooneisnot directly
abovetheother.
Bakingresultswillbebetteriffoodiscenteredin
theovenasmuchaspossible.Angelfoodcakeis
theexceptionandshouldbeplacedonthebottom
ovenrack(positionA).Followpackagedirectionson
prepackagedandfrozenfoodsfor panplacement.
Pansshouldnottoucheachotherorthe wallsof
theoven.tf/ou needto usetworacks,staggerthe
panssooneisnotdirectlyabovetheother.Leave
approximately1½"betweenpansandfromthe
front,backandsidesofovenwall.
How to Set the Oven for Baking or Roasting
GEAppliances.com
[Z] TouchtheBAKEpad.
[] Touchthenumberpadsuntilthedesired
temperatureisdisplayed.
[-31 TouchtheSTARTpad.
Theovenwillstart automatically.Thedisplaywill
showPrEwhilepreheating.Whentheovenreaches
theselectedtemperature,theovencontrolwillbeep
severaltimesandthedisplaywillshowtheoven
temperature.
NOTE:Youwill hear the convection fan (on
some models)while theoven is preheating. The
fan will stop after the ovenispreheated and
the displayshowsyour set temperature. Thisis
normal
Tochangetheoventemperatureduringthe BAKE
cycle,touchtheBAKEpadandthenthenumberpads
togetthenewtemperature.
[] Checkfoodfor donenessatthe minimumtime
ontherecipe.Cooklongerifnecessary.
[] Touchthe CLEAR/OFFpadwhenbakingis
finished,andthenremovethefoodfromthe
oven.
17
Page 18

Usingthe oven.
How to Set the Oven for Broiling
Leavethe door opento thebroil stop
position. Thedoor stays open by
itseff,yet the proper temperature is
maintained in the oven.
Thesize,weight, thickness,
starting temperature
and your preference
of doneness will affect
broiling times.This guide
is based on meats at
refrigerator temperature.
f The U.S.Department of
Agriculture says "Rarebeef is
popular, butyou should know that
cooking it to only 140°F means
some food poisoning organisms
may survive." (Source:Safe Food
Book. YourKitchen Guide. USDA
Rev.June 1985.)
Ifyour range is connected to 208 volts, rare
steaks may be broiled by preheating the
broiler and positioning the oven rack one
position higher.
[-_ Touch the BROILHI/LO pad once for HI
Broil.
Tochange to LOBroil, touch the
BROILHI/LO pad again.
Use LOBroil to cook foods such as poultry
or thick cuts of meat thoroughly without
overbrowning them.
[Z] Placethe meat or fish on a broilergrid in a
[] Touch the STARTpad.
[-_ When broilingisfinished, touch the
CLEAR/OFFpad.
broiler pan designedfor broiling.
[] Followsuggested rack positions in the
Broiling Guide.
Broiling Guide
Preheatthe broiler for 2 minutes to improve performance.
Type or
Doneness
Beef
Chicken Breast, boneless C(foodshould be 8"
Fish Fillets D or E (food should be5" Handle and turn very
Pork Chops Well Done (170°F, D (food should be 6" To prevent curling of
Rare (140°F)
Medium (160°F)
Well Done (170°F,
*Userack position A for the smaller,2-rack-position oven.
ThicknessFood
Steaks - Steaks lessthan 1"
1" thick thick are difficult to
Steaks - E(food should be3" through before browning
5/4" to 1" thick to 4" from broil element) To prevent curling of
Steaks- D or E (food should be3" intervals.
5/4" to 1" thick to 5" from broil element)
or Ground Beef Patties
Breast, bone-in
1/2" to 1" thick
5/4" thick
Rack Position*
E or F (foodshould be 1"
to 5" from broil element)
to 9" from broil element)
C(foodshould be 7"
to 8" from broil element)
to 6" from broil element) carefully.
to 7" from broil element) meat, slash fat at 1"
Comments
_aok rare. They cook
meat, slash fat at 1"
Broil skin-side-down
first.
intervals.
18
Page 19

Usingthe timed baking and roasting features./onsomemo elsJ GEApp,iancos.com
NOTE: Foods that spoil easily-such as milk, eggs, fish, stuffings, poultry and pork-should not be allowed to sit for more
than 1 hour before or after cooking. Room temperature promotes the growth of harmful bacteria. Be sure that the oven
light isoff because heat from the bulb will speed harmful bacteria growth.
How to Set an Immediate Start and Automatic Stop
Theoven will turn on immediately and cook for a NOTE:An attentiontonewill soundifyou areusing
i/il ¸
selected length of time. At the end of the cooking
time the oven will turn off automatically.
[] Touch the BAKE pad.
[] Touch the number pads to set the desired
oven temperature.
[] Touch the COOKTIMEpad.
NOTE:Ifyour reciperequirespreheating,you
may need to add additional time to the length of
the cooking time.
r_ Touch the number pads to set the desired
length of cooking time. Theminimum
cooking time you can set is I minute.
Theoven temperature that you set and
the cookingtime that you entered will be
in the display.
[] Touch the START pad.
timed bakinganddonot touch the STARTpad.
Theoven willturn ON,and the displaywill show
the cookingtimecountdown and the changing
temperature starting at IO0°F.(Thetemperature
displaywillstart to changeoncethe oven
temperature reachesIO0°F.)When the oven
reachesthe temperatureyou set,3 beepswill
sound.
Theoven will continue to cook for the set
amount oftime, then turn off automatically,
unlessthe WARN feature was set. Seethe How
to Setthe UpperOvenfor Warming section.
@ Touch the CLEAR/OFFpad to clear the
display ifnecessary.Remove the food from
the oven. Remember,eventhough the
oven turns off automatically, food left in
the oven will continue cooking after the
oven turns off.
[][][][]D
How to Set a Delayed Start and Automatic Stop
Theoven will turn on at the time of dayyou set,
cook for a specificlength of time andthen turn
off automatically.
IVlakesure the clock shows the correct time of
day.
[71 Touch the BAKEpad.
Touch the number pads to set the desired
oven temperature.
r3] Touch the COOKTIMEpad.
NOTE:Ifyour reciperequirespreheating,you
may need to add additional time to the length of
the cooking time.
Touch the number pads to set the desired
length of cooking time. Theminimum
cooking time you can set is i minute.
Theoven temperature that you set and
the cooking time that you entered will be
in the display.
Touch the DELAY START pad.
@
Touch the number pads to set the time of
@
day you want the oven to turn on and
start cooking.
NOTE:An attentiontonewillsoundifyou areusing
timed bakinganddonot touch the STARTpad.
NOTE:Ifyou would liketo checkthe times
you haveset, touch the DELAYSTARTpad to
checkthe start timeyou have set or touch the
COOKTIMEpad to checkthe length of cooking
timeyou have set.
When the oventurns ONat the time of day
you set,the displaywill show the cooking time
countdown and the changing temperature
starting at IO0°F.(Thetemperature displaywill
start to change oncethe oven temperature
reaches IO0°F.)When the oven reaches the
temperature you set,beepswill sound.
Theoven will continue to cook for the set
amount of time, then turn off automatically.
Touch the CLEAR/OFFpad to clear the
display ifnecessary.Remove the food from
the oven. Remember,eventhough the
oven turns off automatically, food left in
the oven will continue cooking after the
oven turns off.
JZ] Touch the START pad.
19
Page 20

Using the probe, consomemode sI
For many foods, especially roasts and poultry, internal food temperature is the best test for doneness. The temperature
probe takes the guesswork out of roasting by cooking foods to the exact alonenessyou want.
The temperature probe has a
skewer-like probe at one end and a
plug at the other end that goes into
the outlet in the oven.
<
iI£ '_J_'_ i!_i!_i!_
[A CAUTION
Topreventburns,donot unplugthe probe from
theoven outlet untiltheoven hascooled.
Use of probes other than the one provided with
this product may result in damage to the probe
or oven control.
Usethe handlesof the probe and plug when
inserting and removing them from the food and
outlet.
Toavoid damaging your probe,do not use
tongs to pull on the cable when removing it.
i: Toavoid breakingtheprobe, make sure food
iscompletely defrosted before inserting.
After preparing the meat and placing
it on atrivet ora broiler pan grid, follow these
directions for proper probeplacement.
Insert the probe completely into the meet. It
should not touch bone, fat or gristle.
NOTE:Failureto fully insert the probe into the
meat may result in poorcookingperformance
becausetheprobe will sensethe ovenair vs.the
food temperature.
Plug
and remove label
Never leaveyour probe insidethe oven during
a self-cleaningor broil cycle.
Do not store the probe in the oven.
Forroasts with no bone, insert the probe into
the meatiest part of the roast. For bone-in ham
or lamb, insert the probe into the center of the
lowest largemuscle.
Insertthe probe into the center of dishes such
as meat loaf or casseroles,
Insertthe probe into the meatiest part of the
inner thigh from below and parallel to the leg of
a whole turkey.
NOTE:Self-cleanand Broil settings will not work
if the temperature probe isplugged in.
D[][][]D
DD[] D
DD ED
20
How to Set the Oven For Baking/Roasting When Using the Probe (onsome models)
Insertthe probe fully intothe food.
%
Plugthe probe into the outlet in the oven.
Hake sure it's pushed all the way in.Close
the oven door. Hake sure the probe cable
is not touching the broil element.
[-_ Touch the PROBEpad. Displaywill show
"Set Probe,"
r_ Touch the number pads to set the desired
internal food or meat temperature. The
maximum internal temperature for the
food that you can set is200°F.
[] Touch the BAKEpad.
r_ Touch the number pads to set the desired
oven temperature.
[] Touch the STARTpad.
Thedisplay will flash if the probe is inserted
into the outlet and you havenot set a probe
temperature and touchedthe STARTpad.
After the internal temperature of the food
reaches 100°F,the changing internal
temperature will beshown in the display.
r_ When the internal temperature ofthe food
reaches the number you have set,the
probe and the oven turn off and the oven
control signals.To stop the signal,touch
the CLEAR/OFFpad.Use hot pads to
remove the probe from the food.Do not
usetongs to pullon it-they might
damage it.
If theprobe isremoved from the ovenwhile
probe cooking,theoven will not automatically
turn off.
Tochange the oventemperature during the
Bake/Roastcycle,touch the BAKEpad and then
the number pads to set the new temperature.
Youcan usethe Kitchen Nmer eventhough
you cannot usetimed ovenoperationswhile
usingthe probe.
Page 21

Using the kitchen timer. GEApplioncescom
To Set the Kitchen Timer
i¸¸¸¸ i ! i
Consome models)
TIMER TIMER
ON OFF
(on some models)
TheKitchenTimer isin hours and
minutes.
The Kitchen Timer does not control
oven operations, The maximum
setting on the Kitchen Timer is9
hours and 59 minutes.
Touch the KITCHENTIMERON/OFFor
%
TIMERON pad (depending on model).
Touch the number pads untilthe amount
[]
of time you want shows in the display. For
example,to set 2 hours and 45 minutes,
touch 2, 4 and 5 in that order. If you make
a mistake,touch the KITCHENTIMERON/
OFFor TIMEROFFpad (dependingon
model)and begin again.
r_ Touch the STARTpad.
To Reset the Kitchen Timer
After touching theSTARTpad, SETdisappears;
this tellsyou the time iscounting down,although
the display does not change until one minute
haspassed.Secondswill not be shown in the
display until the last minute iscounting down.
r_ When the kitchentimer reaches:00,the
control will beep 3 timesfollowed by one
beep every 6 seconds untilthe KITCHEN
TIMERON/OFFor TIMEROFFpad
(depending on model)is touched.
The6-second tone con be cancelledby
following the stepsinthe Specialfeatures of
your oven control section under Tonesat the
Endof a TimedCycle.
(on some models)
TIMER TIMER
ON OFF
(on some models)
If the displayisstill showing the time remaining,
you may change it by touching the KITCHEN
TIMERON/OFFor TIMERON pad (depending
on model),then touch the number pads until
the time you want appears inthe display.
To Cancel the Kitchen Timer
Touch the KITCHENTIMERON/OFF or TIMER
ON pad (depending on model) twice or touch
TIMEROFF.
1
If the remaining time isnot in the display (clock,
delay start or cooking time are inthe display),
recall the remaining time by touching the
KITCHENTIMERON/OFFor TIMERON pad
(depending on model)and then touching the
number pads to enter the new time you want.
21
Page 22

Adjust the oven thermostat--Do it yourself!
You may find that your new oven cooks differently than the one it replaced. Useyour new oven for a few weeks to become
more familiar with it. Ifyou still think your new oven is too hot or too cold, you can adjust the thermostat yourself.
Do not use thermometers, such as those found in grocery stores, to check the temperature setting of your oven. These
thermometers may vary 20-40 degrees.
NOTE: This adjustment will only affect baking and roasting temperatures; it will not affect broiling or self-cleaning
temperatures. The adjustment will be retained in memory after apower failure.
To Adjust the Thermostat
[-_ Touch the BROILHI/LO and BAKEpadsat
the same time until the display shows SF.
_ii___i_i_ii_[-_ _ _} !i
[_ Touch the BAKE pad.Atwo-digit number
_f}rqD D [B¸El_
(on some models)
CDGGGG ¸
CDC)CDGCD
iil l ii i i
shows in the display.
Touch BAKEagain to alternate between
increasing and decreasing the oven
temperature.
Toadjust the upper oven thermostat,
touch the upper oven BAKE pad.Toadjust
the lower oventhermostat, touch the
lower oven BAKE pad.
Theoven temperature can be adjusted up
@
to (+)35% hotter or (-)35% cooler.Touch
the number padsthe same way you read
them. Forexample, to change the oven
temperature 15%,touch 1 and 5.
Whenyou have made the adjustment,
%
touch theSTARTpadto go back to the time
of day display.Useyour oven as you would
normally.
(on some models)
Thetype of margarine will affect baking performance!
Host recipes for baking have been developed using high-fat products such as butter or margarine (80% @t).If you
decrease the fat, the recipe may not give the same results as with a higher-fat product.
Recipe failure can result if cokes, pies, pastries, cookies or candies are made with low-fat spreads. The lower the fat
content of a spread product, the more noticeable these differences become.
Federalstandards require products labeled"margarine" to contain at least 80% fat by weight. Low-fat spreads,onthe other hand,
contain lessfat and more water. The high moisture content of these spreads affects the texture and flavor of bakedgoods. Forbest
results with your old favorite recipes,use margarine, butter orstick spreads containing at least 70% vegetable oil.
22
Page 23

Usinq the convection oven. somemodelsj
Convection Cook (onsome models)
co.vEc.,o.
! cook Theconvectionovencomesw thone
Multi-rack position.
convection cook mode and can be used
for !-Rack Convection Baking or Multi-Rack
Convection Baking.
Convection Fan Operation
In a convection oven, a fan circulates hot air
over, under and around the food.
This circulating hot air is evenly distributed
throughout the oven cavity.As a result, foods are
evenly cooked and browned-often in less time
with convection heat.
Multi-Rack Convection Baking
[] Becauseheated air iscirculated evenly
throughout the oven,foods can be baked with
[] excellent resultsusing multiple racks.
Multi-rack baking may increase cook times
slightly for some foods but the overall result
istime saved.Cookies,muffins, biscuits and
other quickbreuds givevery good results with
multi-rack baking.
GEAppliances.com
NOTE:To maximize cooking evenness,the fan
isdesigned to rotate inboth directions,with u
pause in between. Thisis normal.
Theconvection fun shuts off when the oven
door isopened. DONOTleavethe door open
for long periods of time while using convection
cooking or you may shorten the lifeof the
convection heating element.
When baking on 3 racks,place one rack in the
second (B)position,another rack inthe fourth
(D)position and the third rack inthe sixth (F)
position.
Fortwo-rack baking, placeone rack in the
second (B)rack position.Placethe other rack in
the fifth (E)rack position.
1-Rack Convection Baking
When convection baking with only 1 rack, place
the food so that it is centered in the oven.
Adapting Recipes...
Youcan use your favorite recipes in the
convection oven.
Usepan size recommended.
Somepackage instructionsfor frozen
casserolesor main disheshave been
developedusing commercial convection
ovens.For bestresults in this oven,preheat
the oven and use the temperature on the
package.
23
Page 24

Usingthe convection oven.Consomemode s
Grid
Broiler pan
(on some models)
oR
iCD(Z)(E)CDCD¸
iC)GGGC)
i i iii
(onsomemodels) mode.SeeAuto RecipeT"Conversionin the
Convection Roast (on some models)
Good for large tender cuts of meat,
uncovered.
Theconvection fan circulates the heated air
evenly over and around the food. Heat and
poultry are browned on all sidesas if they were
cooked on a rotisserie.The heated air sealsin
juices quicklyfor a moist and tender product
while, at the same time, creating a rich golden
brown exterior.
How to Set the Oven for Convection Baking or Roasting
F-f] Touch the CONVECTIONCOOK or Tochange the oven temperature, touch the
CONVECTIONBAKEpad once for multi-rack CONVECTIONCOOK,CONVECTIONBAKEor
convection baking.Thismode isused for
cookingfood items on more than one rack
(i.e.,2,3 or more racks)at the sametime in
convection bake.Seethe Multi-Rack
ConvectionBaking sectionfor more
information.
Touchthe CONVECTIONCOOKor
CONVECTIONBAKEpad twice for one-rack
convectionbaking.Thismode isusedfor
cookingfood itemson only one rack in
convectionbake.
Touch the CONVECTIONROASTpad for
convection roasting (onsomemodels).
r_ Touch the number pads to set the oven
temperature.
r_ Touch the STARTpad.
NOTE:Ifthe Auto RecipeT"ConversionFeature
ison, it will automatically reduce thesetregular
baking temperature by25 Fto the appropriate
convection temperature in convectionbake
SpecialFeaturessection.
When you are convection roasting,it is
important that you use a broiler pan and grid
for bestconvection roasting results.The pan is
usedto catch grease spillsand the grid is used
to prevent greasespatters.
CONVECTIONROAST pad and then the number
pads to set the new temperature.
When the oven starts to heat, the changing
temperature, starting at !O0°F, willbe displayed.
When oven reaches the temperature you set, 3
beeps will sound.
[] Touch CLEAR/OFFpad when finished.
Youwill hear a fan while cooking with
convection.Thefan will stop when the door is
opened,but the heat will not turn off.
Youmay hear the oven clickingduring baking.
Thisis normal.
Inconvectionbakemodes,formaximum
cooking evenness, the fan is designed to rotate
in both directions, with a pause in between.
Thisisnormal.
Cookwure for Convection Cooking
When baking cookies, you will get
the best results if you use a flat
cookie sheet instead of a pan with
low sides.
24
Beforeusing your convection oven,check to see
ifyour cookware leavesroom for air circulation
in the oven. Ifyou are bakingwith severalpans,
leavespace between them. Also,besurethe
puns do not touch each other or the walls of the
oven.
Paper and Plastic
Heat-resistant paper and plastic containers that
are recommended for use in regular baking can
alsobe usedfor convection baking but should
not beusedat temperatures higherthan the
temperature recommended by the cookware
manufacturer. Plasticcookware that is heat-
resistant to temperatures of 400°Fcan also be
used.
Metal and Glass
Anytype of cookware will work in your
convection oven; however, metal pans heat the
fastest and are recommended for convection
baking.
Darkened or matte-finished pans will bake
faster than shiny pans.
Glassor ceramic pans cook moreslowly.
Forrecipes likeoven-baked chicken, usea pan
with low sides.Hot air cannot circulate well
around food in a pan with high sides.
Page 25
Using the timed features
for convection cooking, consomemode_s_ GEAppliances.com
You will hear a fan while cooking with these features. Thefan will stop when the door is opened, but the heat will not
turn off.
NOTE:Foods that spoil easily-such as milk, eggs, fish, stuffings, poultry and pork-should not be allowed to sit for more
than 1 hour before or after cooking. Room temperature promotes the growth of harmful bacteria. Be sure that the oven
light is off because heat from the bulb will speed harmful bacteria growth.
CONVECTION
cook
CONVECTION
cook
How to Set an Immediate Start and Automatic Stop
Pressdesiredconvectionfunction.Proceedto
step2 of Howto Seton ImmediateStartand
AutomaticStopinUsingthetimed bakingand
roostingfeaturessection.
How to Set a Delayed Start and Automatic Stop
Pressdesired convection function. Proceed to step
2 of Howto Seto DelayStartand Automatic Stop
in Usingthe timed bakingand roostingfeatures
section.
25
Page 26

Usingthe convection oven.consomemode s
How to Set the Oven for Convection Roasting when Using the Probe
For best results when roasting
large turkeys and roasts, we
recommend using the probe
included in the convection oven.
D[][][]D
D[][][]D
To change the oven temperature
during the Convection Roast cycle,
touch the CONVECTION COOK
pad and then touch the number
pads to set the new desired
temperature.
CAUTION 1-81When the internal temperature ofthe
Toprevent burns,do not unplug the probe from
the oven outlet until the ovenhas cooled.
Placethe oven rack in the position that
EZ]
centers the food between the top and
bottom of the oven. Insert the probe into
the meat. Makesure it ispushed allthe
way in.
Plugthe probe into the outlet in the oven.
[]
meat reaches the number you have set,
the probeand the oven turn off and the
oven control signals.To stop the signal,
touch the CLEAR/OFFpad. Use hot pads
to removethe probefrom the food. Donot
usetongs to pullon it-they might
damage it.
NOTE:Ifthe probe is removed from the
oven while probe cooking, the oven will not
automatically turn off.
Makesure it is pushed all the way in.Close
the oven door.
[] Touch the PROBE pad.
NOTES:
Youwill hear a fan while cooking with this
feature.Thefan will stop when the door is
r_ Touch the number pads to set the desired
internal meat temperature.
NOTE:Themaximum internal temperature for
the food that you can set is200°F.
[] Touch the CONVECTIONCOOK pad.
[] Touch the number pads to set the desired
oven temperature.
Thedisplay will flash PROBEand the oven
control will signal if the probe isinserted intothe
outlet,andyou have notseta probetemperature
opened,but the heat will not turn off.
Youcan usethe Kitchen Timereven though
you cannot usetimed ovenoperations.
Never leaveyour probe insidethe oven during
a self-cleaningcycle.
Do not store the probe in the oven.
Probeisnotfor useinBroilor Self-Clean
functions.
Fanonly rotatesinonedirection.
and pressedthe STARTpad.
[Z] Touch the STARTpad.
When the oven starts to heat, the word LO
will be inthe display.
After the internal temperature ofthe meat
reaches !00°F, the changing internal
temperature will be shown inthe display.
Convection Roasting Guide
Meat Oven Temp.
Beef
Pork
Lamb
Poultry
*Stuffed birds generally require 30-45 minutes additional roasting time. Shield le
overbrowning and doling of skin.
Rib Roast (4 to 8 Ibs.) Rare 325°F
Bone-In and Boneless Medium 325°F
Beef Tenderloin (4 to 6 Ibs.) Rare 425°F
Beef Tenderloin (2 to 3 Ibs.) Rare 425°F
Bone-In, Boneless (3 to 5 Ib';.) 325°F
Bone-In (5 to 9 ]bs.) Medium 325°F
Boneless (4to 7 Ibs.) Medium 375°F
Whole Chicken 15to 7 Ibs.) 350°F
Turkey, Whole*
Unstuffed (10 to 16 Ibs.) 325°F
Unstuffed (18 to 24 Ibs.) 325°F
Turkey Breast (4 to 6 Ibs.) 325°F
26
InternalTemp.
145°F
160°F
145°F
145°F
160°F
165°F
165°F
170°F
170°-180°F
170°-180°F
170°F
s and breast with foil to prevent
Page 27

Usingthe slow cook,pizza,warming
and proofing features.
FOOD POISON HAZARD: Bacteria may grow in food at temperatures below 140°E
[_AWARNING
r-qEEE3rq
-qE3E3EEEE
-qE3E]E3EE
Slow Cook Guide
Food
Beef
Chuck Roast
Beef Ribs
Poultry
Whole Chicken
Chicken Pieces
Pork
Boneless Blade
Roast
Country Style
Pork Ribs
Pork Chops
Soup
Vegetable Beef
Soup
Chili
Quantity
3-3½ Ibs.
3½-4 Ibs.
4 Ibs.
8 pieces
oppro×. 5 Ibs.)
3-4 Ibs.
3½-4 Ibs.
4-8 Ibs.
4 quarts
4 quarts
• Always start with hot food. Do not use warm settings to heat cold food.
• Do not warm food for more than 2 hours.
Failure to follow these instructions may result in foodborne illness.
How to Set the Lower Oven For Slow Cook
Slow Cook is designed for long hours of unattended [] Touch the START pad.
cooking.
Z] Touch the SLOW COOK pad. NOTE: Ifa power outage occurs while the oven is in
['_--] Touch the number pads to select the desired
setting - 1 for Poultry or 2 for Meats. Use
2-Meats if you are unsure which setting to use.
rj] Touchthe number pads to set the desired
length of cooking time. The cooking time must
beat least 3 hours, up to !! hours 59 minutes.
Rack
Position
Food Time
Setting (Hours)
2-Meats HI 5-6 hrs.
2-Meats HI 3-4 hrs.
C
1-Poult5 HI 4-5 hrs.
C
1-Poult5 HI 5-4 hrs.
2-Meats HI 5-6 hrs.
c
2-Meats HI 5-4 hrs.
c
2-Meats HI 5-4 hrs.
c
2-Meats HI 4-5 hrs.
c
2-Meats HI 5-4 hrs.
c
LO 8-10 hrs.
LO6-8 hrs.
LO 7-9 hrs.
LO 5-6 hrs.
LO 8-10 hrs.
LO6-8 hrs.
LO6-8 hrs.
LO 8-10 hrs.
LO6-8 hrs.
Comments
iAdd 1/2 cup liquid.
Place ribs in a single layer
lAdd 1/2 cup liquid.
Best submerged under a
isauce to prevent surface
drying,
Add 1/2-1 cup liquid,
Place ribs in a single layer
i Place chops in a single
Ioyer.
Make sure beef chunks
are submerged.
i Submerge beons
to prevent surface drying.
GEAppliances.com
Stow Cook, the range will shut off.
Guideline Tips
The slow cook program uses a complex series of
temperature cycling to obtain the best results. For this
reason, it is recommended that the slow cook program
be allowed to run without cancelling or restarting.
Restarting the slow cook feature while it is in progress
may result in overcooked meat.
Forjuicy and tender meat, choose cuts of meat such
as chuck roast or a boneless blade roost. Leaner cuts
of meat, such as top round, are drier and may need
additional liquid.
Use only glass and ceramic dishes. Metal pots and
pans tend to transfer the heat into the foods too
quickly.
Match the quantity of food to the sizepan. Fillthe pan
about 3/4 full for best results.Too large a pot allows the
steam to escape,causing foods to dry out.
Alwayscover the pot with a lidor aluminum foil.
Awide range of recipes may be used in the slow cook
feature. Forbest results some adjustments may need
to be made.Forsmaller sizedrecipes, begin checking
at minimum time. Forlarge recipesor when doubling
recipes,foods may be cooked for longer periods of
time.
When the slow cook feature completes, the oven will
automatically switch to "worm" mode. If additional slow
cook time isdesired,this warm mode may be usedto
obtain the extra time.
How to Set the Upper Oven For Pizza
Adjust rock position for type of pizza tray being used
(see chart).
r_ Touch the PIZZA pad.
[21 Touch the number padsto select
! for fresh or 2for frozen pizza.
r_l Touch the number pods to set
the baking temperature.
I-_ Touch the STARTpad.
Bakingtime is determined by package directions.
Type of Pizza Tray Rack Position
Tray supplied with fresh pizza B
Pizzaplaced directly on rack B
Metaltray A
27
Page 28

Using the slow cook,pizza, warming and proofing features.
How to Set the Upper Oven For Warming
i_i ii _ i ii I
iil)i i!i _i i PROOF il _iiii i _i
The WARMfeature keeps cooked foods hot.
Thisfeature is not designedto reheat cold food.
Touse the WARMfeature, touch the WARM pad
and then the STARTpad.
Touse the WARMfeature after Timed Baking,
follow these steps:
rT] Touch the bake mode of cooking.
[] Touch the number pads to set the oven
temperature.
r_ Touch the COOKTIMEpad.
[] Touch the number pads to set
the desired length of cooking time.
[] Touch the WARHpad.
r6] Touch the STARTpad.
How to Set the Oven For Proofing (onsome models)
The proofing feature maintains o worm environment useful for rising yeast-leavened
products.
NOTE:Plasticcontainers,lidsorplastic wrap will
melt ifplaced in the oven. Meltedplastic may
not be removable and isnot coveredunderyour
warranty.
I
T MER
/on some models)
(on some models)
E2_]Place the covered dough in a dishin the
oven on rack Bor C.
NOTE:For bestresults,cover the dough with a
cloth or with greasedplastic wrap (theplastic
may needto beanchored underneath the
container so the oven fan will not blow it off).
r_ Touch the PROOFpad and then the START
pad.
Thedisplay will read PrF(proof).
Theoven interior light turns on and remains on
during proofing.
Theproofing feature automatically provides the
optimum temperature for the proofing process,
and therefore does not have a temperature
adjustment.
r3] set the Timer for the minimum proof time.
F_ When proofing isfinished,touch the
CLEAR/OFFpad.
Toavoid lowering the oventemperature and
lengtheningproofing time, do not open the
ovendoor unnecessarily.
Checkbread products early to avoid
overproofing.
NOTES:
Donot use theproofing mode for warming
food or keeping food hot. Theproofing oven
temperature is not hot enough to hold foods
at safe temperatures. Usethe WARMfeature
to keep food warm.
Proofing will not operate when oven is above
!25°K "HOT"will show in the display.
28
Page 29

Usin the self-cleanin u erand lower ovens. GEAppliances.com
Before a Clean Cycle
Donot cleanthegasket.Thefiberglassmaterialof
theovendoorgasketcannotwithstandabrasion,it is
essentialforthe gasketto remainintact,tfyou notice
it becomingwornorfrayed,replaceit.
Makesuretheovenlightbulbcoveris inplaceand
theovenlightisoff.
IMPORTANT:Thehealthofsomebirdsisextremely
sensitivetothefumesgivenoff duringtheself-
cleaningcycleof anyrange.Hovebirdstoanother
well-ventilatedroom.
Neverplacecookingutensilsor anyotheritemson
theovenfloor.Thereisa heatingelementbeneath
theovenfloor.Placingitemsontheovenfloor may
causethe ovento overheat,resultingindamageto
theovenandriskof damageorfireto cabinets.
DoubleOvenand CanadianModelsOnly:
Thesurfaceunitsareautomaticallydisabledduring
theself-cleancycle.Hakesurethatallsurface
unitcontrolsareturnedoff at alltimesduringthe
self-cleancycle.Anysurfaceunitthat issettoan
"on"positionwhiletheself-cleancycleisoperating
willautomaticallycomeonaftertheself-cleancycle
isfinished,andcouldresultinan "on"unattended
surfaceunit.Waituntiltheself-cleancycleisfinished
tosetandusethesurfaceunits.
Wipe up heavy soil on the oven
bottom.
[-4,WARNING
FIREHAZARD:Wipegreaseandheavysoilfromthe
ovenbottombeforeself-cleaning.Failureto dosomay
resultinanovenfire.
Werecommendventingyour kitchenwith anopen
windowor usingaventilationfan or hoodduringthe
firstself-cleancycle.
Removeanybroilerpan,broilergrid,probe,all
cookwareandanyaluminumfoilfromtheoven.
NOTE:
tfyourovenisequippedwith shiny,silver-colored
ovenracks,removethembeforeyoubeginthe
self-cleancycle.
Theshiny,silver-coloredovenracks(onsome
models)canbeself-cleaned,buttheywill darken,
losetheirlusterandbecomehardtoslide.
tfyourovenisequippedwith grayporcelain-
coatedovenracks,theymaybe leftinthe oven
duringtheself-cleancycle.
Soilonthe front frameofthe rangeandoutside
thegasketonthedoorwillneedto becleanedby
hand.Cleantheseareaswith hotwater,soap-filled
steel-woolpadsorcleanserssuchasSoftScrub_.
Rinsewellwith cleanwateranddry.
ITIIElE]13]IEI
I3]FI [] ITIo--I
How to Set the Oven for Cleaning
Theovendoorsmustbeclosedandallcontrolsset
correctlyforthecycletoworkproperly.
[-il TouchtheSELFCLEANpad.
A 3-hourself-cleantime isrecommendedfor
usewhencleaningsmall,containedspills.A
self-cleantimeof 5hoursisrecommendedfor
a dirtieroven.
[] tfa timeotherthan5hoursor ] hoursis
needed,usethenumberpadsandenterthe
desiredcleantime.
Youcanchangethecleantimeto anytime between
3 hoursand5hours,dependingonhowdirtyyour
ovenis.
I-_ TouchtheSTARTpad.
Theupperandlowerovendoorslockautomatically.
Thecooktopelementsarealsolockedoutduring
self-clean.Thedisplaywill showthecleantime
remaining,it willnotbe possibleto openthe oven
doorsorusethecooktopuntilthetemperaturedrops
belowthe locktemperatureandLOCKED/DOOR
goesoffinthecontroldisplay.
WhenLOCKED/DOOR_ goesoff,you willbeable
toopenthedoors.
ThewordLOCKED/DOOR_ willflashandthe
worddoorwilldisplayifyousetthecleancycle
andforgetto closethe ovendoors.
:: Tostopa cleancycle,touchtheCLEAR/OFFpad.
WhenLOCKED/DOOR_ goesoff,indicatingthe
ovenshavecooledbelowthelockingtemperature,
youwill beabletoopenthedoors.
Double Ovens:
Youcansetacleancycleinbothovensatthe
sametime;however,theywillnotself-cleanatthe
sametime.Thelastovensetwillautomatically
delayitsstart untilthe endofthefirst oven'sclean
cycle.
Whenanovenissetto self-clean,bothovendoors
willlockandthe cooktopcontrolswill lockout.The
ovensandcooktopcannotbeusedwhenanoven
issetto self-clean.
29
Page 30

Usingthe self-cleaning upper and lower ovens.
The oven doors must be closed and all controls set correctly for the cycle to work properly.
How to Delay the Start of Cleaning
Theupper and lower oven doors lock
automatically. Thecooktop elements are also
locked out during self-clean.Thedisplay will
show the start time. It will not be possible
to open the oven doors or use the cooktop
until the temperature drops belowthe lock
temperature and LOCKED/DOOR_ goesoff in
the control display.
When LOCKED/DOOR_ goes off, you will be
able to openthe doors.
[][][][]D
[]DDDD
[Z] Touch the SELFCLEANpad.
A 3-hour self-cleantime isrecommended
for usewhen cleaning small,contained
spills.A self-clean time of 5 hours is
recommended for a dirtier oven.
Ifa time other than 5 hours or :3hours is
needed,use the number pads and enter
the desired cleantime.
Youcan change the clean time to any time
between 3 hours and 5 hours, depending on
how dirtyyour oven is.
[] Touch the DELAYSTARTpad.
[] Usingthe number pads, enter the time of
day you want the clean cycle to start.
[] Touch the STARTpad.
After a Clean Cycle
You may notice some white ash in the oven.
Wipe it up with a damp cloth after the oven
cools.
If white spots remain, remove them with a
soap-filledsteel wool pad and rinsethoroughly
with a vinegar and water mixture.
Thesedepositsare usually a salt residue that
cannot be removed by the clean cycle.
If the oven is not clean after one clean cycle,
repeat the cycle.
You cannot set the ovenfor cooking or
another self-clean cycle until the oven iscool
enough for the door to unlock.
While the oven isself-cleaning,you can touch
the CLOCKpadto displaythe time of day.
To return to the clean countdown, touch the
SELFCLEANpad.
If the racks become hard to slide,apply a
small amount of cooking oil to a paper towel
and wipe the edges of the oven rackswith
the papertowel.
30
Page 31

Special features ofyour oven control. GEApp,°.coscom
Your new touch pad control has additional features that you may choose to use. The following are the features and how
you may activate them.
The special Feature modes can only be activated while the display is showing the time of day. They remain in the control's
memory until the steps are repeated.
To enter a special feature for either oven, you must first touch the upper oven BROIL HI/LO and BAKE pads at the same
time. The lower oven BROIL HI/LO and BAKE pads will not activate special features.
When the display shows your choice, touch the STARTpad. The special features will remain in memory after apower
failure, except for the Sabbath feature, which will have to be reset.
I DElAyl
i i i
i_IIi _iiiii_illii_ _!ii_i_i!_iii_ii
i Z _ i i i
,_i_i_i_i_:i_iii_i_ii_i_i_IL_ iIII__iiii_iiili
! _ i¸
(on some models)
With this feature, should you forget and leave
the oven on,the control will automatically
turn offthe oven after 12 hours during baking
functions or after 3 hours during a broil
function.
If you wish to turn OFF this feature, follow the
steps below.
r_ Touch the upper oven BROILHI/LO and
BAKE padsat the same time until the
display shows SF.
Fuhrenheit or Celsius Temperuture Selection
Your ovencontrol isset to usethe Fahrenheit
temperature selections,but you may change
this to usethe Celsiusselections.
[Z] Touch the upper oven BROILHI/LO and
BAKE padsat the same time until the
display shows SF.
Tones ot the End of o Timed Cycle
At the end of a timed cycle,3short beepswill
sound followed by one beepevery6 seconds
until the CLEAR/OFFpad is touched. This
continual 6-second beep may be cancelled.
Tocancel the 6-second beep:
[71 Touch the upper oven BROILHI/LO and
BAKEpadsat the same time until the
display shows SF.
Touchthe BROILpad.Thedisplay shows
CONTIBEEP(continuousbeep).Touchthe
BROILpad again.Thedisplayshows
SINGLEBEEP.(Thiscancelsthe one beep
every 6 seconds.)
[] Touch the DELAYSTARTpad until no shdn
r3] Touch the STARTpad to activate the no
[_ Touch the COOKTIMEand BROILHI/LO
I-_ Touch the COOKTIMEand BROILHI/LO
r_ Touch the START pad.
[] Touch the START pad.
(no shut-off) appears inthe display.
shut-off and leavethe control set in this
special features mode.
pads at the same time. Thedisplaywill
show F (Fahrenheit).
pads again at the same time. Thedisplay
will show C (Celsius).
OR
Touch the KITCHENlINER ON/OFF pad.
Thedisplay shows CONBEEP(continual
beep).Touchthe KITCHENlINER ON/OFF
pad again.Thedisplay shows BEEP.(This
cancelsthe one beep every 6 seconds.)
(on some models)
31
Page 32

Special features ofyour oven control.
Tone Volume (on some models)
Cook
TIMF
Thisfeature allows you to adjust the tone
volumes to a more acceptable volume.There
are three possiblevolume levels.
[Z] Touch the upper oven BROILHI/LO and
BAKEpadsat the same time until the
display shows SF.
r_ Touch the COOKTIMEpad. Thedisplay will
show 2 BEEP.This isthe middlevolume
level.
Touch the COOKTIHEpad again.The
display will show 3 BEEP.Thisisthe loudest
volume level.
22-Hour, 24-Hour or Clock Blackout
Your control is set to usea 12-hour clock.
If you would prefer to have o 24-hour military
time clock or black out the clock display,follow
the steps below.
I-_ Touch the upper oven BROIL HI/LO and
BAKE pads at the same time until the
display shows SF.
Touch the CLOCKpad once.Thedisplay
[]
will show !2 hr. If this isthe choice you
want, touch the STARTpad.
Touch the COOKTIMEpod again.The
display will show 1 BEEP.Thisisthe
quietest volume level.
Foreach time the level ischanged, a tone
will sound to provide an indication of the
volume level.
Choosethe desiredsound level (1BEEF),2
@
BEEF),3 BEEP).
Touch the STARTpad to activate the level
r#]
shown.
Touch the CLOCKpod again to change to the
24-hour military time clock.Thedisplay will
show 24 hr. If this is the choiceyou want, touch
the STARTpad.
Touch the CLOCKpad again to black out the
clock display.The display will show OFF.If this is
the choice you want, touch the STARTpad.
NOTE:Ifthe clock isin the black-out mode,you
will not be able to usethe Delay Start function.
32
Auto Recipe TM Conversion (on some models)
When using convection bake,the Auto Recipe'"
Conversion feature will automatically convert
entered regular baking temperatures to
convection baking temperatures.
Thisfeature is activated sothat the display
will showthe actual converted (reduced)
temperature. Forexample, ifyou enter a
regular recipetemperature of 350°F and touch
the STARTpad,the display will show CONand
the converted temperature of 325%.
Cook and Hold (onsomemodels)
Your new control hasa cook-and-hold feature
that keeps cooked foods warm for up to 3
hoursafter the cooking function isfinished.
Toactivate this feature, follow the steps
below.
[] Touch the BAKEand BROILHI/LO pads at
the sametime untilthe display shows SF.
To deactivate the feature:
Touch the upper oven BAKE and BROIL
%
HI/LO pods at the same time until the
display shows SF.
Touch the CONVECTIONCOOKpad. The
display will show CONON.Touch the
CONVECTIONCOOKpad again. The
display will show CONOFF.
r_ Touch the STARTpad.
Toreactivate the feature, repeat steps 1-3
above but touch the STARTpad when CONON
isin the display.
Touch the COOKINGTIMEpad.The
display will show Hid OFF.
Touch the COOKINGTIMEpad again to
activate the feature.The display will show
Hid ON.
Touch the STARTpad to activate the cook-
@
and-hold feature and leavethe control set
in this special features mode.
Page 33

Using the Sabbath feature. Cupperand/owerov ns
IDesignedfor useon theJewish Sabbath and Holidays) (onsomemodels) GEAppliances.com
The Sabbath feature can be used for baking/roasting only. Itcannot be used for convection, broiling, self-cleaning or
Delay Start cooking.
NOTBTheovenlightcomesonautomaticallyIonsomemodels)whenthedoorisopenedandgoesoffwhenthedoorisclosed.Thebulbmayberemoved.See
theOvenLightReplacementsection.Onmodelswithalightswitchonthecontrolpanel,theovenlightmaybeturnedonandlefton.
How to Set for Regular Baking/Roasting
i ¸I-qIZ]HIEEFI
ill i i iiiii iiii
When the display shows D, the
oven is set in Sabbath. When the
display shows DC, the oven is
baking/roasting.
Hake sure the clock shows the correct time of day
and the oven is off.
[-_ Touch and hold both the upper oven BROILHI/
LOand BAKE pads,at the same time, until the
display shows SF.
NOTE:Ifbake or broil appears in the display,the
BROILHI/LO and BAKEpads were not touched
at the same time. Touch the CLEAR/OFFpad
and begin again.
F_ Tap the DELAYSTARTpad untilSAbbAtH
appears in the display.
F_ Touch the STARTpad and D will appear in the
display. Bothovens are now inSabbath mode.
[-_ Touch the BAKE pad on the upper or lower
oven.No signal will be given.
r_ Using the number pads, enter the desired
temperature between !70°F and 550°F.
No signal or temperature will be given.There is
no default temperature.
r_l Touch the STARTpad on the corresponding
oveR.
After a random delay period of approximately
zlzjj
30seconds to ! minute, Dc will appear in the
displayindicatingthat the oven is baking/
roasting. If Dc doesn'tappear in the display,
start again at Step4.
r_To bake in the other oven,start at Step 4 (on
some models).
Toadjust the oventemperature, touch the BAKEpad,
enter the new temperature using the number pads
and touch theSTARTpad.
NOTE:TheCLEAR/OFFandCOOKTIMEpads are
active during the Sabbath feature.
DDD[]HI
HI[]HIHIHI
How to Set for Timed Baking
NOTE:Thisprocedure must take place BEFOREthe
Sabbath begins to be able to use the Timed Bake
feature during the Sabbath (the unit should NOT be
put into Sabbath mode during a Time Bake.
Make sure the clock shows the correct time of day
and the oven is off.
Touch and hold both the upper oven BROILHI/
LOand BAKE pads,at the same time, until the
display shows SF.
NOTE:Ifbake or broil appears in the display, the
BROILHI/LO and BAKEpads were not touched
at the same time. Touch the CLEAR/OFFpad
and begin again.
[-_ Pressthe BROILHI/LO pad to change the
beeper setting to bEEP(the default setting is
Continuous Beep,which shows in the display as
ConbEEP).
r-_ Press the START pad to save the changes.
r_ Press the BAKE pad.
How to Exit the Sabbath Feature
Z] Touch the CLEAR/OFFpad.
Ifthe oven is cooking, wait for a random delay
period of approximately 50 seconds to 1
minute, until only D is in the display.
Touch and hold both the BROILHI/LO and
BAKEpads,at the same time, until the display
showsSF.
Tap the DELAYSTARTpad until 12 shdn or no
shdn appears in the display.
r_ Using the number pads, enterthe desired
temperature.
r_ Pressthe STARTpad on the corresponding
oven.
In] PressCOOKTIMEFORthe corresponding oven.
[_ Pressthe number padsto set the desired length
of cooking time between 1 minute and 9 hours
and 59 minutes.
[-9---]Pressthe STARTpad.
Pressthe CLOCKpad to display the current
[]
time of day.Thisis to display the time of day
instead of the countdown cook timer. The oven
will operate at the set temperature for the set
amount of time, and then it will shut off. At the
time the oven shuts off, the beeper will beep 3
times.
r_ Choose 12shdn, indicating that the ovenwill
automatically turn off after 12hours or no
shdn, indicating that the oven will not
automatically turn off after 12 hours.
r_ PressSTARTwhen the option that you want is
in the display (12shdn or no shdn).
NOTE:Ifa power outage occurred while the oven
was in Sabbath,the oven will automatically turn off
and stay off even when the power returns.Theoven
control must be reset.Some models will resume
Sabbath mode; however, opening the door will
activate the oven light.
33
Page 34

Using the warming drawer, consomemode sl
WARNING .AlwaysstartwithhotfoodDonotusewarmsettingstoheatcoldfood
[ _tl, FOODPOISONHAZARD.Bacteriamay grow in food at temperatures below !40°K
, Do not warm food for more than 2 hours.
Failure to follow these instructions may result in foodborne illness.
The warming drawer will keep hot, cooked foods at serving temperature. Always start with hot food. Do not useto heat cold
food other than crisping crackers, chips or dry cereal.
WARMINGDRAWER To Use the Warming Drawer
Pushand turn the control knobto anydesired
setting.
Thewarmingdrawerwillkeephot,cookedfoodsat
servingtemperature.Alwaysstartwithhot food.
Touchthe WARHINGDRAWERpad."WARMER
ON"and ":]."are litonthe displayand "Set"begins
toblink Onthe numberpads,touch 1for Low,2
forHediumor3forHigh.Thedisplay":]."changes
correspondingtothenumber padselected.The
warmingdrawerstartsautomaticallyafteryou
When Using the Warming Drawer
Thewarmingdrawerwillkeephot,cookedfoods
warm.Alwaysstartwith hotfood. Donotuseto
heatcold foodother thancrispingcrackers,chipsor
drycereal.
Do not line the warming drawer or pan with
aluminum foil.Foilis an excellent heat insulator
and willtrap heat beneathit. Thiswill upsetthe
performanceof the drawerandcoulddamagethe
interior finish.
Allowapproximately25minutesforthe warming
drawerto preheat.
Donot put liquidorwaterinthewarmingdrawer.
touch1,2or3."WARMERON"andthe number
remainlit."Set"stopsblinking.Onsomemodels
pressSTART.
Onsomemodels- togglebetweensettingsby
touchingtheWARMINGDRAWERpad.
Tocancel,touchthe WARHINGDRAWERpad.
NOTE:TouchingtheCLEAR/OFFpaddoesnotturn
offthewarmingdrawer.
;;,,Allfoodsplacedinthewarmingdrawershould
becoveredwith a lidor aluminumfoil.When
warming pastriesor breads,the covershouldbe
ventedtoallowmoistureto escape.
Foodshouldbekepthotinitscookingcontainer
ortransferredtoa heat-safeservingdish.
NOTE:Plasticcontainersorplasticwrapwillmeltifin
directcontactwith thedrawer,panorahotutensil
Meltedplasticmaynotberemovableand isnot
coveredunderyourwarranty.
;;_,Removeservingspoons,etc.,beforeplacing
containersin warmingdrawer.
34
Temperature Selection Chart
Tokeepseveraldifferentfoodshot,setthe controlto
thefood needingthehighestsetting.
Thetemperature,type andamountof food,and
thetime heldwillaffectthe qualityof thefood.
Repeatedopeningof the drawerallowsthe hot
air toescapeandthe foodto cool.
With largeloadsit may be necessaryto usea
higherwarming drawersettingandcoversome
ofthe cookedfood items.
To Crisp Stale Items
;;,,Placefood in low-sideddishesor pans.
Preheaton LO/! setting.
To Warm Serving Bowls and Plates
CAUTION]
Disheswill behot.Usepot holdersor mittswhen
removinghot dishes.
Towarm servingbowlsand plates,setthecontrol
on LO/!.
;;_,Donotuseplasticcontainersor plasticwrap.
Food Type Control Setting
Casserole HED/2
Chili HI/5
Pizza HED/2
Potatoes,baked HI/5
Tortilla Chips LO/:]_
Waffles LO/:]_
;;_,Checkcrispnessafter 45 minutes.Addtime as
needed.
Useonly heat-safedishes.
Ifyou want to heatfine china,pleasecheck
with the manufacturer ofthe dishesfor their
maximum heattolerance.
Youmaywarm empty servingdisheswhile
preheatingthe drawer.
Page 35

Using the lower oven drawer, ransome models) GEAppliances.com
The lower oven drawer may be used to bake foods using the same times and temperatures as a standard oven. Foods
ideal for baking in the lower oven drawer include pizza, frozen foods, casseroles, biscuits, rolls and many desserts.
LOWER
OVEN
O
°=;J°\\ If II/)
300 • 350 • 400
HEATING
®
Push in and turn the lower oven
drawer knob to any desired setting.
To Use the Lower Oven Drawer
171 Pushin and turn the lower oven drawer
knob to any desiredsetting.
[] Allowthe lower ovendrawer to preheat.
TheON signal light is located above the
knoband glows when the knob isinthe
ONposition. It remains ONuntil the knob is
moved to the OFFposition.
The"Heating" signal light islocated below the
knoband glows when the heating elements
are active. Preheatiscomplete after the
"Heating"signal hasturned
off for the first time after the knob is turned
on.
NOTES:
Always use the includeddrawer rack when
usingthe lower oven drawer.
Thelower oven drawer cannot be used during
a self-cleancycle of the upper oven.
Donot put food,foil or cookware directlyon
thebottom of the lower oven drawer.Always
usethe included drawer rack.
iiiiiiiiii
Iffoods require a cover, use only
foilor lids able to withstand baking
temperatures. Do not use plastic.
iiiiiiiiii
Maximum height of foods that can be baked
in the lower oven drawer is 31/2".
iiiiiiiiii
Donot put liquid or water in the lower oven
drawer.
Neverplaceplastics,paper, cannedfoods
or combustible material in the lower oven
drawer.
Thelower oven drawer uses lessenergy than the upper oven.
Allowthe following approximate times for preheating:
Desired Lower Preheat
Oven Temperature Time
WARN 10 minutes
350°F 15 minutes
425°F 25 minutes
When Using the Lower Oven Drawer Warm Setting
TheWARN SETTINGof the lower ovendrawer
can beusedto keephot,cookedfoodsatserving
temperatures.Always start with hot food. Donot
usethe WARN SETTINGto heat cold food other
than crisping crackers,chips or drycereal.
NOTE:Thebeginning temperature of the
food, theamount of food, the type of food, the
container and the amount of time the foodis
in the drawer will affect thequality and ending
temperature of the food.
Pushin and turn the control knob
to the warm setting.
35
Page 36

Care and cleaning of the range,
Be sure all controls are off and all surfaces are cool before cleaning any part of the range.
[ WARNING j fyour range isremoved for cleaning, servicing or any reason, be
How to Remove Protective Shipping Film
Carefullygrasp a corner ofthe protective shipping
filmwithyour fingers and slowlypeel itfrom the
appliance surface. Donot use any sharp itemsto
remove the film.Removeallof the filmbefore using
the appliance for the first time.
sure the anti-tip deviceis reengaged properly when the range is
replaced. Failure to take thisprecaution could result in tipping of
the range and cause injury.
and Packaging Tape
To ensure no damage is done to the finishofthe
product,the safest way to remove the adhesive from
packaging tape on new appliances isan application
ofa household liquiddishwashing detergent. Apply
witha soft clothand allowto soak.
NOTE:Theadhesivemustberemovedfromallparts.
Itcannotberemovedif it isbakedon.
Control Knobs
Thecontrolknobsmayberemovedforeasier
cleaning.
MakesuretheknobsareintheOFFpositionsand
pullthemstraightoffthestemsforcleaning.
Theknobscanbecleanedina dishwasherorthey
mayalsobewashedwith soapandwater.Hake
suretheinsideoftheknobsaredrybeforereplacing.
Replacethe knobs,inthe OFFpositionto ensure
properplacement.
Control Panel
Ifdesired,the touchpadsmaybedeactivatedbefore
cleaning.
SeetheControlLockoutinformationintheUsingthe
clockkitchentimerandcontrollockoutsectioninthis
manual.
Cleanupsplatterswith a dampcloth.
Youmayalsousea glasscleaner.
Removeheaviersoilwithwarm,soapywater.
Donot useabrasivesofanykind.
Reactivatethetouch _adsaftercleaning.
36
Painted Surfaces
Paintedsurfacesincludethesidesof the rangeand
thedoor,topofcontrolpanelandthe drawerfront.
Cleanthesewithsoapandwateroravinegarand
water solution.
Stainless Steel Surfaces (on some models)
Do not use a steel wool pad; it will scratch the
surface.
Toclean the stainless steelsurface, usewarm,
sudsywater or a stainless steelcleaner or
polish.Always wipe the surface in the direction
of the grain. Followthe cleaner instructions for
cleaning the stainless steel surface.
Porcelain Enamel Cooktop (onsome models)
The porcelain enamel finish is sturdy but
breakable if misused.Thisfinish isacid-
resistant. However,any acidic foods spilled
(suchasfruit juices,tomato or vinegar) should
not bepermitted to remain on the finish.
If acids spillon the cooktop while it is hot, use
a dry paper towel or clothto wipe it up right
Donot usecommercialovencleaners,cleaning
powders,steelwool or harshabrasivesonany
paintedsurface.
Toinquire about purchasingstainlesssteel
appliance cleaner or polishor to find the
location of a dealer nearest you, pleasecall our
toll-free number:
National Parts Center 1.800.626.2002
GEAppliances.com
away. When the surface hascooled,wash with
soap and water. Rinsewell.
Forother spillssuch as fat spatterings, wash
with soap and water or cleansing powders
after the surface hascooled.Rinsewell. Polish
with a dry cloth.
Page 37

Thegasketis designedwith agap
at the bottom to allowfor proper air
circulation.
Donot rub or clean the door gasket-it
has anextremely low resistance to
abrasion.
Ifyou notice the gasketbecoming
worn,frayed or damaged in any way
or if it has becomedisplaced on the
door,you should haveit replaced.
Cleaning the Oven Door
Toclean the inside of the door:
Becausetheareainsidethegasketiscleaned
duringtheself-cleancycle,youdonotneedto
cleanthisby hand.
Theareaoutsidethegasketandthe doorlinercan
becleanedwitha soap-filledor plasticscouring
pad,hotwater anddetergent.Rinsewellwitha
vinegarandwatersolution.
Toclean the outside ofthe doon
Usesoapandwaterto thoroughlycleanthe top,
sidesandfront ofthe ovendoor.Rinsewell.You
mayalsouseaglasscleanertocleantheglasson
theoutsideofthedoor.Donotletwaterdrip into
theventopenings.
Lift-Off Oven Door (onsome models)
GEAppliances.com
'_ tf anystainon thedoorventtrimispersistent,use
a softabrasivecleanerandasponge-scrubberfor
bestresults.
Spillageofmarinades,fruitjuices,tomatosauces
andbastingmaterialscontainingacidsmay
causediscolorationandshouldbewipedup
immediately.Whensurfaceiscool,cleanand
rinse.
': Donotuseovencleaners,cleaningpowdersor
harshabrasivesonthe outsideofthedoor.
::: sot_J ¸:::
iii iiii :
Pull hinge locks down to unlock.
Removal position
Thedooris veryheavy.Becarefulwhenremoving
andlifting the door.
Donot liftthe doorby the handle.
Toremove the doon
[] Fullyopenthe door.
[] Pullthe hingelocksdowntowardthe door
frame,tothe unlockedposition.Atool,suchas
a smallflat-bladescrewdriver,mayberequired.
I-_ Firmlygraspbothsidesofthedooratthe top.
[] Closedoorto thedoorremovalposition,which
ishalfwaybetweenthe broilstoppositionand
fullyclosed.
[] Liftdoorupandout untilthehingearm isclear
ofthe slot.
Toreplace the doon
[Z] Firmlygrasp both sides ofthe door at the top.
Withthedoorat Bottom Hingearm
thesameangle edgeof
asthe removal slot
\
position,seatthe
indentationof thehinge
armintothebottomedge
ofthe hingeslot.The
notchinthehingearm
mustbefullyseatedinto
thebottomoftheslot.
Fullyopenthedoor.tfthedoorwillnotfully
@
open,theindentationisnotseatedcorrectlyin
thebottomedgeoftheslot.
[] Pushthe hingelocksupagainstthefrontframe
ofthe ovencavitytothe lockedposition.
Hin_
lock
Hinge
arm
Push hinge locks up to lock.
Closetheovendoor.
@
37
Page 38

Care and cleaning of the range,
Lift-Off Upper Oven Door (on some models)
To remove the door',
To replace the door'.
Door
Release
OU_OnS
_, i_lPull down
[Z] Fullyopen the door.
r21 Lift up on the hinge lock toward the oven
frame until they stop.
r_ Closethe door to 45 degrees (youwill feel
the doorstop).The hinge lock will contact
the ovenframe.
r_ on both sidesof the door, pressdown on
the releasebuttons on each hinge.
r_ Lift door up until it isclear of the hinge.
r_ Pullon hinge arms slightly to relieve
pressureon the locking tabs.
[] Pushthe hingelocksdown onto the hinge.
r_] Pushthe hingesintoward the unit sothey
are closed.
rT] Pullthe hinges down away from the oven
frame to the fully open position.
[] Lift up on the hinge lockstoward
the ovenframe until they stop.
r_ The hinges will release to the
45-degree position.The hinge locks will
contact the oven frame.
r_ Slidethe door back onto the hinges. Make
sure the buttons pop back out.
[] Fullyopen the door.
[] Pushthe hingelocksdown onto
the hinge.
JZ] Closethe oven door.
Fiatrack
2 -- "7,'-_r- 2 : --
Handles
Use the rack with the two front
handles in the upper oven.
Use the rock without the two front
handles in the lower oven.
38
Oven Racks
All oven racks may be cleaned by hand with an
abrasive cleaner or steel wool. After cleaning,
rinsethe racks with cleanwater and dry with a
clean cloth. Gray porcelain-coated oven racks
may remain in the oven during the self-cleaning
cyclewithout being damaged. Thenickel-plated
oven racks may remain in the oven during the
self-cleaning cycle, but they will losetheir luster
and become hard to slide. Itwill be necessary
to grease all oven rack sideedgeswith a light
coating of vegetable oil after cleaning them by
hand or inthe oven.This will help maintain the
easeof sliding the racks in and out of the oven.
Page 39

Removable Oven Floor (onsome models)
To remove the oven floor:
Removethe oven door usingthe
F_q
instructions inthe Lift-OffOvenDoor
section.
GEAppliances.com
r_ Clean the oven floor with warm soapy
water.
r4] When reinstalling the oven floor, be sure to
slideit all the way to the back of the oven.
Press down and pull out.
[] Pressdown and pull out the removable
ovenfloor.
Oven Vent on Radiant Glass Cooktops
Theovenvent islocatedbehindtherightrear
surfaceunit.Ondoubleovens,theupperovenventis
behindthe left rearsurfaceunit.
Ondoubleovens,theupperovenvent isbehindthe
leftrearsurfaceunit.
Thisareacouldbecomehotduringovenuse.
Oven Vent (onsome models)
Theoven vent isabove the left side of the door.
This area could become hot during
oven use.
Storage Drawer Removal (onsomemodels)
To remove the drawer'.
IMPORTANT:Always replacethe removable
floor before the next use.
ttisnormalforsteamtocomeoutof thevent,and
moisturemaycollectunderneathitwhentheoven
isin use.
Theventisimportantfor properaircirculation.Never
blockthisvent.
It is normal for steam to come out of
the vent.
Thevent isimportant for proper air circulation.
Never block this vent.
To replace the drawer'.
Rail Stop guide
r_ Pullthe drawer out until itstops,
Liftthe front of the drawer until
[Z] Placethe drawer rails on the guides.
Pushthe drawer back until itstops.
the stops clear the guides.
r_ Liftthe front of the drawer and push back
J-_ Removethe drawer.
until the stops clearthe guides.
r_ Lower the front of the drawer and push
back until it closes.
Removable Warming Drawer/Lower Oven Drawer Pan (on some models)
NOTE:Formodels with anelectric
warming drawer or lower ovendrawer,
beforeperforming any adjustments,
cleaningor service,disconnect therange
electricalpower supply at the household
distribution panel byremoving thefuse or
switching off the circuit breaker.Makesure
the drawer heating elementis cool.
Never place, useorself-clean the drawer pan
in the upperoven.
B Warming drawer or lower oven drawer has a
removable pan for easy cleaning. Cleanwith
hot, soapy water and asponge or dishtowel.
Drywith a clean cloth. Replacethe pan in the
warming drawer or lower oven drawer.
NOTE:Allow warming drawer or lower oven
drawer to cool before removing pan.
NOTE:Wipe spills promptly after each use.
39
Page 40

Care and cleaning of the range,
I ] SHOCK ORBURN HAZARD: Before replacing oven light bulb, disconnect
WARNING Itheelectricalpowertotherangeatthemainfuseorcircuitbreakerpanel.
Failure to do so may result in electric shock or burn.
I-4,CAUTION
Receo_ac_e Socket
Glass cover
Dnsome moaels
Receo]:acle
Socket
I BURN HAZARD: The glass cover and bulb should be removed when cool.Touching hot glass with bare hands or a damp cloth can cause burns.
Oven Light Replacement (on some models)
To remove:
[_ Turnthe glasscover counterclockwise 1/4
turn until the tabs of the glass cover clear
the grooves of the socket.Wearing latex
gloves may offer a better grip.
[] Usinggloves or a dry cloth, remove the
bulb by pulling it straight out.
To replace:
[Z] use a new 120/130-volt halogen bulb, not
to exceed 50watts. Replacethe bulb with
the same type of bulb that was removed.
Your model will have one of the two types
shown on the left.Todetermine the
correct replacement bulb,check the bulb
terminals. Bulbswith 2 straight pin
terminals areG6.35bulbs.Bulbswith 2
looped terminals are G9bulbs. (Do not
interchange.) Besurethe replacement
bulb israted 120volts or 130volts (NOT12
volts).
Usinggloves or a dry cloth, remove the
bulb from its packaging. Do not touch the
bulb with bare fingers.Oilfrom skinwill
damage the bulband shorten its life.
[] Pushthe bulb straight into the receptacle
all the way.
[_ Placethe tabs of the glass cover into the
grooves of the socket.Turn the glass cover
clockwise 1/4 turn.
Forimproved lighting insidethe oven,
clean the glass cover frequently using a
wet cloth.Thisshould be done when the
oven iscompletely cool.
@
Reconnectelectrical power to the oven.
gtoves0 r
c!oth
/
Glass cover
(on some models!
_ii_i_ _ _ii:i_:__ i iiiii? i_
Wire cover holder
40
Oven Light Replacement (on some models)
Be sureto let the light cover and bulb cool
completely.
Toremove the cover:
Holda hand under the cover so it doesn't
%
fall when released.With fingers of the
same hand,firmly push back the wire
cover holder. Liftoff the cover.
Do not remove any screws to remove the cover.
r_ Replacebulbwith a 40-watt appliance
bulb.
Toreplace the cover:
j-_ Place it into groove of the light receptacle.
Pullwire forward to the center of the
cover until it snaps into place.
Connect electrical power to the range.
Page 41

GEAppliances.com
[_AWARNING
SHOCK OR BURN HAZARD: Before replacing oven light bulb, disconnect the electricalpower to the range at the main fuse or circuit breaker panel. Failure to do so may result
in electric shock or burn.
Oven Light Replacement (on some models)
Besure to let the light cover and bulb cool
completely.
To remove the coven
[Z] Twist lenscounterclockwise about a
quarter turn to remove.
Do not remove any screws to remove the cover.
[2-1 Replacebulb with a 40-watt appliance
bulb or two-prong halogen bulb,as
appropriate.
Oven Heating Elements (on some models)
Do not clean the bake element orthe broil
element.Any soil will burn off when the
elements are heated.
To replace the coven
[7-1 Line up tabs of lens in front of tabs
on housing and rotate clockwise
to engage.
Toclean the oven floor, gently lift the bake
element.Clean with warm, soapy water.
Wipe up heavy soil on the oven
bottom.
Oven Heating Elements (on some models)
Do not clean the broil element. Any soil will burn
off when the element is heated. Clean the oven
floor with warm, soapy water.
On some models, the bake element is not
exposed and is under the oven floor.Ifspillovers,
residue or ash accumulate on the oven floor,
wipe up before self-cleaning.
Ifthe element is above the oven floor,gently lift
the bake element and clean with warm, soapy
water.
41
Page 42

Cleaningthe glass cooktop, consomemodels;
Normal Daily Use Cleaning
ONLYuseCERANABRYTE®Ceramic Cooktop
Cleaneron the glasscooktop. Other creams
may not be aseffective.
To maintain and protect the surface of your
glasscooktop, follow thesesteps:
Beforeusing the cooktop for the first time,
%
clean itwith CERAMABRYTE®Ceramic
Cooktop Cleaner.Thishelps protect the
Clean your cooktop after
each spill. Use CERAHA
BRYTE®Ceramic Cooktop
Cleaner.
top and makes cleanup easier.
r_ Daily useof CERAMABRYTE®Ceramic
Cooktop Cleaner will help keepthe
cooktop lookingnew.
Burned-On Residue
r3] Shakethe cleaning cream well. Apply a
few drops of CERAMABRYTE®Ceramic
CooktopCleaner directly to the cooktop.
[] Usea papertowel or CERAMABRYTE®
CleaningPadfor Ceramic Cooktops to
cleanthe entire cooktop surface.
[] Use a dry cloth or paper towel to
remove all cleaning residue. No need to
rinse.
NOTE:It is very important that you DO NOT
heat the cooktop until it has been cleaned
thoroughly.
Use a CERAMABRYTE®Cleaning
Pad for Ceramic Cooktops.
\
The CERAMABRYTE®Ceramic
Cooktop Scraper and all
recommended supplies are
available through our Parts
Center. See instructions under "To
Order Parts" section on next page.
NOTE:Do not use a dull or
nicked blade.
NOTE:DAMAGEto your glass surface may
occur ifyou use scrub pads other than those
recommended.
rT] Allow the cooktop to cool.
[] Spread a few drops of CERAiVlABRY1-E®
Ceramic Cooktop Cleaneron the entire
burned residuearea.
Using the included CERAIVlABRYTE®
@
Cleaning Padfor Ceramic Cooktops,rub
the residue area, applying pressure as
needed.
Heavy, Burned-On Residue
Allow the cooktop to cool.
%
Use a single-edge razor blade scraper
[21
at approximately a 45° angle against
the glass surface and scrape the soil. It
will be necessary to apply pressure to
the razor scraper in order to remove
the residue.
After scraping with the razor scraper,
%
spread a few drops of CERAMABRYTE®
CeramicCooktop Cleaner on the entire
burned residuearea. Use the CERAMA
BRYTE®Cleaning Padto remove any
remaining residue.
If any residue remains, repeat
%
the steps listed above as needed.
For additional protection, after all
@
residue has been removed, polish the
entire surface with CERAMABRYTE®
Ceramic Cooktop Cleaner and a paper
towel.
For additional protection, after all
residue has been removed, polish the
entire surface with CERAMABRYTE®
CeramicCooktop Cleaner and a paper
towel.
42
Page 43

Metal Marks and Scratches
GEAppliances.com
r_ Be careful not to slide pots and pans
across your cooktop. It will leave metal
markings on the cooktop surface,
These marks are removable using the
CERAMABRYTE®Ceramic Cooktop Cleaner
with the CERAHABRYTE®CleaningPad
for Ceramic Cooktops.
r_ if pots with a thin overlay of aluminum
or copper are allowed to boil dry, the
overlay may leave black discoloration
on the cooktop.
Cooktop Seal
To clean the cooktop seal around the edges
of the glass, lay a wet cloth on it for a few
Glass surface--potential for permanent damage.
Sugary spillovers (such
asjellies, fudge, candy,
syrups} or melted plastics
can cause pitting of the
surface of your cooktop (not
covered by the warranty}
unless the spill is removed
while still hot. Special care
should be token when
removing hot substances.
Be sure to use a new, sharp
razor scraper.
Do not use u dull or nicked
blade.
Damage from Sugary Spills and Melted Plastic
Turn off all surface units. Remove hot
pans.
[] Wearing an oven mitt:
a. Use a single-edge razor blade
scraper (CERAMABRYTE®Ceramic
Cooktop Scraper) to move the spill to
a cool area on the cooktop.
b. Remove the spill with paper towels.
This should be removed immediately
before heating again or the
discoloration may be permanent.
NOTE:Carefully check the bottom of pans for
roughness that would scratch the cooktop.
minutes, then wipe clean with nonabrasive
cleaners.
r_ Any remaining spillover should be left
until the surface of the cooktop has
cooled.
r_ Don't use the surface units again until
all of the residue has been completely
removed.
NOTE: If pitting or indentation in the glass
surface has already occurred, the cooktop
glass will have to be replaced. In this case,
service will be necessary.
To Order Parts
To order CERAMABRYTE®Ceramic Cooktop
Cleanerand the cooktop scraper, please call
our toll-free number:
National Parts Center 800.626.2002
CERAtfA BRYTE ®Ceramic
Cooktop Cleaner .......... #WX! OXSO0
CERAMA BRYTE®Ceramic
Cooktop Scraper .......... #WX10X0302
Kit ........................ #WB64X5027
(Kitincludes cream and cooktop scraped
CERAMABRYTE®Cleaning Pads for
Ceramic Cooktops ....... #WX!OX550
43
Page 44

Before You Call ForService...
Troubleshooting Tips
Save time and money! Review the charts on the following
pages first and you may not need to call for service.
Possible Causes What To Do
Surface units will not Improper cookware • Use pans which are flat and match the diameter of
maintain a rolling boil being used. the surface unit selected.
or cooking is not
fast enough (voltage} may be low.
Surface units do Afuse inyour home may be • Replacethe fuse or reset the circuit breaker.
not work properly blown or the circuit breaker
Surface unit stops This isnormal. The unit
glowing when turned is still on and hot.
to alowersetting
Scratches (may appear Incorrect cleaning . Scratches are not removable.Tiny scratches will become
as cracks) on cooktop methods being used. lessvisible in time as a resultof cleaning.
glass surface Cookware with rough bottoms * Toavoid scratches, usethe recommended cleaning
Areas of discoloration Food spillovers not cleaned • See the Cleaning the glass cooktop section.
on thecooktop beforenextuse.
Plastic melted to Hot cooktop came into . See the Glass surface-potential for permanent damage
the surface contact with plastic placed section in the Cleaning the glass cooktop section.
Pitting (or indentation) Hot sugar mixture spilled . Call a qualified technician for replacement.
ofthecooktop on the cooktop.
Frequent cycling Improper cookware . Useonly flat cookware to minimize cycling.
offend on of being used.
surface units
In some areas, the power . Cover pan with a lid until desired heat is obtained.
tripped.
Cooktop controls . Check to see the correct control is set for the surface
improperly set. unit you are using.
being used or coarse particles procedures. Make surebottoms of cookware areclean
Isalt or sand} were between before use,and use cookware with smooth bottoms.
the cookware and the surface
of the cooktop.
Cookware has been slid
across the cooktop surface.
Hot surface on a model . This isnormal. The surface may appear discolored
with a light-colored cooktop, when it is hot. This istemporary and will disappear
as the glass cools.
on the hot cooktop.
Ovenlight does Light bulb is loose. . Tightenor replacethe bulb.
not work
Oven will not work Plug on range is not completely . Makesure electrical plug is plugged into a live,properly
inserted in the electrical outlet, grounded outlet.
A fuse in your home may * Replacethe fuse orresetthe circuit breaker.
be blown or the circuit
breaker tripped.
Oven controls improperly set. * See the Using the oven section.
Oven too hot. * Allow the oven to cool to below locking temperature.
44
Page 45

Causes What To Do
Food does not bake Oven controls improperly set. • See the Using the oven section.
or roast properly
Rack position is incorrect • See the Using the oven section.
or the rack is not level.
Incorrect cookware or • See the Using the oven section.
cookware of improper
size being used.
Oven thermostat needs , See the Adjust the oven thermostat Do it yourself!
adjustment, section.
Food does not Oven controls improperly set. • Hake sure you touch the BROIL HI/LO pad.
broil properly Improper rack position • See the Broiling Guide.
being used.
Cookware not suited • Forbest results,useo pan designed for broiling.
for broiling.
The probe isplugged • Unplug and remove the probe from the oven.
into the outlet in the oven.
Ion some models}
GEAppliances.com
In some areas the power . Preheatthe broil element for 10 minutes.
Ivoltage) may be low.
. Broil for the longest period of time recommended
in the Broiling Guide.
Oven temperature Oven thermostat . See the Adjust the oven thermostat Do it yourself!
too hot or too cold needs adjustment, section.
Storage drawer Rear drawer support is , Reposition the drawer. Seethe Storage Drawer
is crooked on top of the guide rail. Removal instructions in the Care and cleaning of the
range section.
Check to make sure drawer is properly seated
if removed.
Storage drawer
won't close
Power cordmay be
obstructingdrawer
inthelowerback
• Repositionthe drawer and power cord. Seethe
StorageDrawer Removalinstructions in the Careand
cleaningof the range section.
oftherange.
Rear drawer support is
on top of the guide rail.
, Reposition the drawer. Seethe Storage Drawer
Removal instructions in the Care and cleaning of the
range section.
Ovendoor is crooked
The door is out of position. . Becausethe oven door isremovable, it sometimes gets out
of position during installation. Tostraighten the door, push
down onthe high corner.
45
Page 46

Before YouCall For Service...
Troubleshooting Tips
Possible Causes What To Do
Clockand timer do Plug onrange is not completely , Hake sure electrical plug is plugged into a live,properly
not work inserted in the electrical outlet, grounded outlet.
A fuse in your home , Replacethe fuse or reset the circuit breaker.
may be blown or the
circuit breaker tripped.
Oven controls improperly set. , See the Using the kitchen timer section.
Oven will not self-clean The oven temperature is • Allowthe range to cool and resetthe controls.
too high to set o self-clean
operation.
Oven controls improperly set. • Seethe Using the self-cleaningupperand lower ovens
The probe is plugged into , Remove the probe from the oven.
the outlet in the oven.
(on some modelsl
section.
"Crackling" or This is the sound of the , This isnormal.
"popping" sound metal heating and cooling
during both the cooking and
cleaning functions.
Excessive smoking Excessive soil. , Touch the CLEAR/OFFpad. Open the windows to
during a clean cycle rid the room of smoke. Wait until LOCKED/DOOR
goes off. After the oven cools, wipe up the
excess soil and reset the clean cycle.
Oven door will not Oven too hot. , Allow the oven to cool below locking temperature.
openafter a clean cycle
Ovennot clean after a Oven controlsnot properly set. • Seethe Using theself-cleaning upper and lower ovens clean
section.
Oven was heavily soiled. , Clean up heavy spillovers before starting the clean
"LOCKED" flashes The self-cleon cycle has been , Closethe oven door.
in the display selected but the door is not
closed.
"L ED" _ --
OCK n_uH The oven door is locked , Touch the CLEAR/OFFpad. Allow the oven to cool.
when you want because the temperature
to cook inside the oven has not
dropped below the
locking temperature.
cycle. Heavily soiled ovens may need to self-clean
again or for u longer period of time.
1, _s r
F-- anda numbe You hove a function error code. , Disconnect all power to the range for at least
or letter flash 30 seconds and then reconnect power. If the function
in the display error code repeats, call for service.
46
Page 47

GEAppliances.com
Possible Causes What To Do
Range Locked or LOC The controls have . See the Control Lockout section to unlock.
On appears in the oven been locked.
display or LC appears
in the surface display"
Control signals after You forgot to enter a . Touch the BAKE pad and desired temperature or
entering cooking time bake temperature or the SELF CLEAN pad and desired clean time.
or start time cleaning time.
Display goes blank A fuse in your home may be . Replace the fuse or reset the circuit breaker.
blown or the circuit
breaker tripped.
The clock is in the . See the Special features ofyour oven control section.
black-out mode.
Display flashes Power failure. . Reset the clock.
Unable to get the Oven control pads were . The BROIL HI/LO and BAKE pads must be touched at
display to show "SF" not touched properly, the same time and held for 3 seconds.
"Probe" appears in This is reminding you to . Enter a probe temperature.
the display enter a probe temperature
(on some models) after plugging in the probe.
Power outage, Power outage or surge. . Reset the clock. Ifthe oven was in use, you must reset
clock flashes it by touching the CLEAR/OFF pad, setting the clock
and resetting any cooking function.
Steam from the vent When using the ovens, . This is normal.
it is normal to see steam
coming out of the oven
vents. As the number of racks
or amount of food being
cooked increases, the amount
of visible steam will increase.
"B " " " " " hi
urmng or ally T s is normal in a new oven . To speed the process, set a self-clean cycle for a
odor emitting from and will disappear in time. minimum of 3 hours. See the Using the self-cleaning
the vent upper and lower ovens section.
An odor from the insulation . This is temporary.
around the inside of the oven
is normal for the first few times
the oven is used.
Fan noise A convection fan may . This is normal. To maximize cooking evenness,
automatically turn on the fan is designed to operate in both directions,
and off. with a pause in between.
A cooling fan may . This is normal. The cooling fan will turn off and on
automatically turn on and off. to cool internal parts. It may run after the oven is
The convection fan will operate during preheat
of the bake cycle. The fan will turn off after the oven
is heated to the set temperature. This is normal.
turned off.
47
Page 48

Before You Call ForService...
Troubleshooting Tips
Possible Causes What To Do
Oven racks are The shiny, silver-colored . Apply a small amount of vegetable oil to a paper
difficult to slide racks were cleaned in a towel and wipe the edges of the oven racks with
self-clean cycle, the paper towel. Do not spray with Pam®or other
lubricant sprays.
Drawer does not slide The drawer is out * Fully extend the drawer and push it all the way in.
smoothly or drags of alignment. See the Care and cleaning of the range section.
Drawer is over-loaded or * Reduce weight. Redistribute drawer contents.
load is unbalanced.
Warming drawer or A fuse in your home may be • Replacethe fuse or reset the circuit breaker.
lower oven drawer blown or the circuit breaker
will not work tripped.
Controls improperly set. . See the Using the warming drawer section.
Excessive condensation Liquid in drawer. • Remove liquid.
in the drawer
Uncovered foods. • Cover food with lid or aluminum foil.
Temperature setting too high. . Reduce temperature setting.
Food dries out in the Moisture escaping. • Cover food with lid or aluminum foil.
warming drawer Drawer not fully closed. . Push drawer in until latch engages.
Griddleisnothot
enough
Griddle overloaded.
Griddle removed from burners
during operation.
.Turn griddle off.
.Touch + and - together for 3 seconds.
After the beep, restart the griddle.
48
Page 49

Notes. GEAppliances.com
49
Page 50

Accessories.
Looking For Something More?
You can find these accessories and many more at GEAppliunces.com (U.S.) or www.GEAppliunces.
ca (Canada), or call 800.626.2002 (U.S.) or 800.661.1616 (Canada) (during normal business hours). Have
your model number ready.
Grates Surface Burner Heads and Caps
Oven Racks Oven Elements
Light Bulbs
Experience these other great products to keep your kitchen looking great!
Cooktop Cleaning Wipes Appliance Polish
Cleaning Kit. Wipes
Includes cleonec
scraper and pod
WX10Xll 7GCS WX10X305 WX10X10001
Appliance
Cleaner
Stainless Steel
plVllOX]11
Get the most out of your Broiler Pan! (Not for use with Broiler Drawer models.)
Useyour pan and grid coverto broil hamburgers, seafood,steaks, vegetables, bacon, chops and so much
more! The pan below catches the excessfats and oils.
, GenuineGEPart
, EasyToClean
, One-YearWarranty
Limited Time Offer! Free Shipping!
When you order your broiler pan within 30 days of purchasing your GEcooking product.
Small
U.S. Part # WB48X10055
Dimensions
* Thelarge (standard)broil pan does not fit in 20"/24" ranges.
** The XLpan does not fit in 24" wall ovens, 27" drop-ins or 20"/24" ranges.
To place your order, call 800.626.2002 (U.SJ, 800.661.1616 (Canada) or mail this form to:
In the U.S.: GE Parts, P.O. Box221027, Memphis, TN 38122-1027. In Canada: GE Parts, 1 Factory Lane, Moncton, N.B. EIC 9M3
8-3/4" Wx 1-1/4" H x 13-1/2" D
12-3/4"Wxl-1/4"Hx15-1/4"D 15-1/2"Wxl-1/4"Hxlg"D
Large* XL**
WB48X1005d WB48X10057
Quantity
t4odel Number
First Name
Address
City
Phone
Check
Call 800.626.2002 in the U.S. or 800.661.6161 in Canada for current pricing. All credit card orders must be called in.
Money Order
Serial Number Brand Date of Purchase
50
Broiler Pan Order Form
Part Number
Last Name
State Zip Code
E-Mail
Page 51

GEElectric RangeWarranty. GEAppliances.com
All warranty service provided by our Factory Service Centers,
or an authorized Customer Care® technician. To schedule service,
visit us on-line at GEAppliances.com, or call 800.GE.CARES
(800.432.2737). Please have serial number
and model number available when calling for service.
GE Will Provide:
Any part of the range which fails due to adefect inmaterials or workmanship.
Fromthe dote of the
originai purehase
Service trips to your home to teach you how to use
the product.
Improper installation, delivery or maintenance.
Product damage or failure of the product if it is abused,
misused, modified, usedfor other than the intended
purpose, or used commercially.
Damage to the glass cooktop caused by use of cleaners
other than the recommended cleaning creams and pads.
Damage to the glass cooktop caused by hardened spills
of sugary materials or melted plastic that are not cleaned
according to the directions in the Owner's Manual.
Replacement of house fuses or resetting of circuit breakers.
Duringthis limited one-year warranty, GEwill also provide,free of charge, all labor
and in-home serviceto replace the defective part.
Stapleyour receipt here.
Proof of the original purchase
date is needed to obtain service
under the warranty.
Damage to the product caused by accident, fire, floods or
acts of God.
Incidental or consequential damage caused by possible
defects with this appliance.
Damage caused after delivery.
Product not accessible to provide required service.
EXCLUSION OF IMPLIED WARRANTIES--Your sole and exclusive remedy is product repair as provided in this Limited
Warranty. Any implied warranties, including the implied warranties of merchantability or fitness for a particular purpose,
are limited to one year or the shortest period allowed by law.
This warranty is extended to the original purchaser and any succeeding owner for products purchased for home
use within the USA. If the product islocated in an area where service by a GEAuthorized Servicer is not available, you
may be responsible for a trip charge or you may be required to bring the product to an Authorized GEService location for
service. In Alaska, the warranty excludes the cost of shipping or service calls to your home.
Some states do not allow the exclusion or limitation of incidental or consequential damages. This warranty gives
you specific legal rights, and you may also have other rights which vary from state to state. To know what your
legal rights are, consult your local or state consumer affairs office or your state's Attorney General.
Warranton General Electric Company. Louisville, KY40225
51
Page 52

Consumer Support.
GEAppliances Website GEAppliances.com
Have a question or needassistancewith your appliance? Try the GEAppliancesWebsite 24 hours a day,
any day of the year! Forgreater convenience and faster service,you can now download Owner's Manuals,
order parts oreven schedule serviceon-line.
Schedule Service GEAppliances.com
Expert GErepair service isonly one stepaway from your door. Get on-line and schedule your serviceat
your convenience any day of the year! Or call 800.GE.CARES(800./432.2737)during normal businesshours.
RealLifeDesignStudio GEAppliances.com
GEsupports the Universal Designconcept-products, servicesand environments that can be used by
people of allages,sizesand capabilities. We recognizethe need to designfor awide rangeof physical and
mental abilities and impairments. For details of GE'sUniversalDesignapplications, including kitchen design
ideasfor people with disabilities,check out our Website today. Forthe hearing impaired, pleasecall 800.TDD.
GEAC(800.833.4322).
ExtendedWarranties
Purchase a GEextended warranty and learn about specialdiscounts that are available while your warranty
isstill ineffect. You can purchase it on-line anytime, or call 800.626.2224during normal businesshours.
GEConsumer Home Serviceswillstill be there after your warranty expires.
Partsand Accessories
Individuals qualified to servicetheir own appliances can have parts or accessoriessent directly to their homes
(VISA,MasterCard and Discovercards are accepted).Order on-line today, 24 hours every day or by phone at
800.626.2002during normal businesshours.
Instructions contained in this manual cover procedures to be performed by any user. Other servicing
generally should be referred to qualified service personnel. Caution must be exercised, since improper
servicing may cause unsafe operation.
Contact Us
If you are not satisfied with the serviceyou receivefrom GE,contact uson ourWebsite with allthe details
including your phone number,orwrite to: General Manager, Customer Relations
GEAppliances,Appliance Park
Louisville,KY40225
GEAppliances.com
GEAppliances.com
GEAppliances.com
] RegisterYourAppliance GEAppliances.com
communication and prompt service under the terms of your warranty, should the need arise.
Registeryaur new appliance an-line-at your convenience! Timely product registration will allow for enhanced
You may also mail inthe pre-printed registration card included in the packing material.
52
 Loading...