

GE PZS23KSEEFSS, PZS23KSEDFSS, PSE29KSECCSS, PSE26KSEGESS, PSE26KGEGEWW Owner’s Manual
...
GEAppliances.corn
(1)
"(3
o
L/3
Safety Instructions ............ 2-4
Operating Instructions
Automatic Ice maker ........... 15, 16
Care and Cleaning ............. 18, 19
ClimoteKeeper2 TM.................... 6
Crispers and Pans .................. 14
CustomCooF" . .................... 7, 9
Ice and Water Dispenser ....... 17-18
Quick Ice ........................... 17
Refrigerotor Doors ................. 13
Replocing the Light Bulbs ........... 20
Set Feotures ........................ 6
Shelves and Bins ............... 11, 12
Temperature Controls ............... 5
TurboCooF _ . ........................ 6
Water Filter ........................ 10
Installation Instructions
Installing the Refrigerator ....... 30-33
Having the Refrigerator ........ 28-29
Preparing to Install
the Refrigerator .................... 25
Trim Kits and Ponds ............ 21-24
Water Line Installation ......... 34-36
Models 22, 23, 25, 26, 27 and 29
Profile C6te 6 C6te
J
r$
La section frangaise commence _ la page 47
Profile Lado a Lado
Refrigeradores
La secci6n en espaflol empieza en la pSgina 93
0_
Troubleshooting Tips ...... 38-4o
Normal Operating Sounds .......... 37
Consumer Support
Performance Data Sheet ........ 43,44
State of California Water
Treatment Device Certificate ........ 46
Warranty (Canadian) ............... 41
Warranty (U.S.) ..................... 42
Write the model and serial numbers
here:
Model #
Serial #
Findthese numbers on (] I(]bel inside
the refrigerator comportment (it the
top on the right side.
200D8074P052 49-60647-3 03-14 GE
IMPORTANT SAFETY INFORMATION.
READ ALL INSTRUCTIONS BEFORE USING.
WARNING!
Use this appliance only for its intended purpose as described in this Owner's Manual
SAFETYPRECAUTIONS
When using electrical appliances, basic safety precautions should be followed, including the following:
, This refrigerator must beproperly installed and located in
accordance with the Installation Instructions before it is used.
, Do not allow children to climb,stand or hang on the shelves
in the refrigerator.Theycould damage the refrigerator and
seriouslyinjurethemselves.
, Do not touch the cold surfaces in the freezer compartment
when handsare damp or wet.
Skinmaystickto these extremely cold surfaces.
, Do not store or usegasoline or other flammable vapors and
liquidsinthe vicinity of this or any other appliance.
, In refrigerators with automatic ice makers,avoid contact
with the moving parts of the ejector mechanism, or with the
heating element located on the bottom of the ice maker.
Do not placefingers or hands on the automatic icemaking
mechanism while the refrigerator is plugged in.
Keepfingers out of the "pinch point" areas; clearances
between the doors and between the doors and cabinet are
necessarilysmall. Becareful closing doors when children are
inthe area.
, Unplug the refrigerator before cleaning and making repairs.
NOTE:We strongly recommend that any servicingbe
performed by a qualified individual
, Non-LCO models: Setting either or both controls to 0 [ofg
does not remove power to the light circuit.
, LCDmodels: Turning the cooling system off does not remove
power to the light circuit.
, Donot refreezefrozen foods which have thawed completely.
, Always clean the CustomCool'" Tray after thawing food.
A DANGER! RISK OF CHILD ENTRAPMENT
PROPERDISPOSAL OF THE REFRIGERATOR
GEAppliances.com
Childentrapment and suffocation are not problems of the past.
Junked or abandoned refrigerators are still dangerous...evenif
they will sit for 'lust a few days." Ifyou are getting rid of your old
refrigerator, pleasefollow the instructions below to help prevent
accidents.
Before You Throw Awuy Your Old Refrigerutor or
Freezer'.
Takeoff the doors.
Leavethe shelvesin placeso that children may not easily
climb inside.
Refrigerants
All refrigeration products contain refrigerants, which under
federal law must be removed prior to product disposal. If you
are getting rid of an old refrigeration product, check with the
company handling the disposal about what to do.
USEOF EXTENSION CORDS
Because of potential safety hazards under certain conditions, we strongly recommend against the use of on extension
cord.
However, ifyou must use an extension cord, it is absolutely necessary that it be a UL-listed(inthe United States)or a CSA-listed (in
Canada), 3-wire grounding type appliance extension cord having a grounding type plug and outlet and that the electrical rating of
the cord be !5 amperes (minimum) and !20 volts.
IMPORTANT SAFETY INFORMATION.
READ ALL INSTRUCTIONS BEFORE USING.
A WARNING!
HOW TOCONNECTELECTRICITY
Do not, under any circumstances,cut or remove the third [ground)prong from the power cord.Forpersonal safety,this
appliance must beproperly grounded.
The power cord of this appliance is equipped with a :S-prong
(grounding) plug which mates with a standard :S-prong
(grounding) wall outlet to minimizethe possibility of electric
shock hazard from thisappliance.
Havethe wall outlet and circuit checked bya qualified
electrician to make surethe outlet isproperly grounded.
Ifthe outlet isa standard 2-prong outlet, it isyour personal
responsibility and obligation to have it replaced with a properly
grounded 3-prong wall outlet.
The refrigerator should always be plugged into its own individual
electrical outlet which has a voltage rating that matches the
rating plate.
Thisprovides the best performance and also prevents
overloading housewiring circuits which could cause a fire
hazard from overheated wires.
Neverunplug your refrigerator by pulling on the power cord.
Alwaysgrip plug firmly and pull straight out from the outlet.
Repairor replace immediately all power cords that have
become frayed or otherwise damaged. Donot use acord that
shows cracks or abrasion damage along its length or at either
end.
When moving the refrigerator away from the wall, be careful not
to roll over or damage the power cord.
READAND FOLLOWTHISSAFETYINFORMATIONCAREFULLY.
SAVETHESEINSTRUCTIONS
About the temperature controls. GEAppliances.com
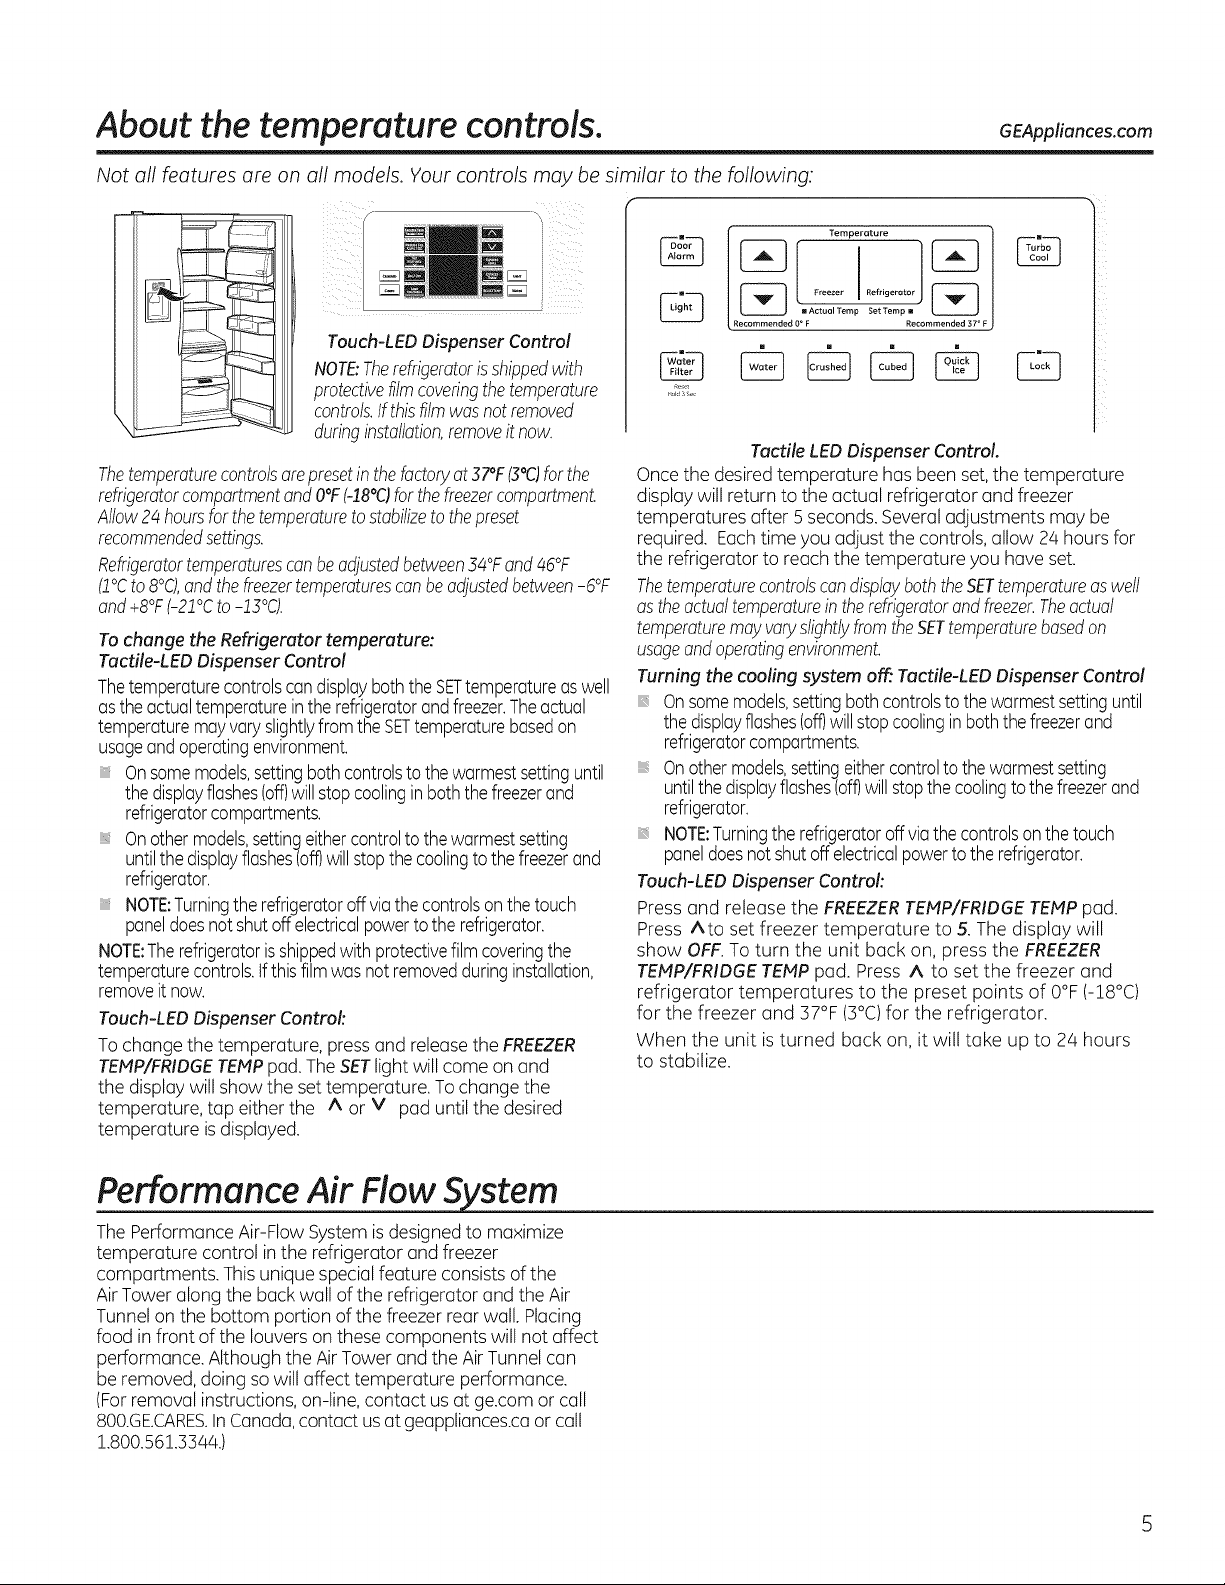
Not all features are on all models. Your controls may be similar to the following:
J
E
f
Temperature
L
Touch-LED Dispenser Control
NOTE:Therefrigeratorisshippedwith
protective filmcoveringthe temperature
controls.If thisfilmwasnotremoved
duringinstallation,removeit now.
Thetemperaturecontrolsarepresetinthe factoryat 37°F(3°C)forthe
refrigeratorcompartmentandO°F(-!8°C)forthefreezercompartment
Allow24 hoursforthetemperaturetostabilizetothepreset
recommendedsettings.
Refrigeratortemperaturescanbeadjustedbetween34°Fand46°F
(1°Cto8°0,andthefreezertemperaturescanbeadjustedbetween-6%
and+8°F(-21°Cto-13°0.
To change the Refrigerator temperature:
Tactile-LED Dispenser Control
Thetemperaturecontrolscandisplayboththe SETtemperatureaswell
asthe actualtemperatureinthe refrigeratorandfreezer.Theactual
temperaturemayvaryslightlyfromtheSETtemperaturebasedon
usageandoperatingenvironment.
Onsomemodels,settingbothcontrolstothewarmestsettinguntil
thedisplayflashes(off)will stopcoolinginboth thefreezerand
refrigeratorcompartments.
Onothermodels,settingeithercontroltothe warmestsetting
untilthedisplayflashes(off)willstopthecoolingtothefreezerand
refrigerator.
NOTE:Turningtherefrigeratoroffvia thecontrolsonthetouch
paneldoesnot shutoffelectricalpowertothe refrigerator.
NOTE:Therefrigeratorisshippedwith protectivefilmcoveringthe
temperaturecontrols,ifthisfilmwasnot removedduringinstallation,
removeit now.
Touch-LEDDispenser Control'.
Tochange the temperature, press and releasethe FREEZER
TEHP/FRIDGETEMPpad.TheSETlight will come on and
the display will show the settemperature. Tochange the
temperature, tap either the A or V pad until the desired
temperature isdisplayed.
Recommended 0 o F Recommended 37 ° F
m ActuelTemp Set Tamp a
Tactile LED Dispenser Control.
Oncethe desired temperature has been set,the temperature
display will return to the actual refrigerator and freezer
temperatures after 5 seconds.Severaladjustments may be
required. Eachtimeyou adjust the controls, allow 2/4hours for
the refrigerator to reach the temperature you have set.
Thetemperaturecontrolscandisplayboth theSETtemperatureaswell
asthe actualtemperatureintherefrigeratorandfreezer.Theactual
temperaturemayvaryslightlyfromtheSETtemperaturebasedon
usageandoperatingenvironment.
Turning the cooling system off:Tactile-LEDDispenser Control
Onsomemodels,settingbothcontrolstothewarmestsettinguntil
thedisplayflashes(off)will stopcoolinginboth thefreezerand
refrigeratorcompartments.
Onothermodels,settingeithercontroltothe warmestsetting
untilthedisplayflashes(off)willstopthecoolingtothefreezerand
refrigerator.
NOTE:Turningtherefrigeratoroffvia thecontrolsonthetouch
paneldoesnotshutoffelectricalpowertothe refrigerator.
Touch-LEDDispenser Control:
Press and release the FREEZERTEHP/FRIDGETEHP pad.
Press Ato set freezer temperature to 5. The display will
show OFF.To turn the unit back on, press the FREEZER
TEHP/FRIDGETEtffP pad. Press A to set the freezer and
refrigerator temperatures to the preset points of 0°F (-18°C)
for the freezer and 37°F (3°C)for the refrigerator.
When the unit isturned back on, it will take up to 24 hours
to stabilize.
Performance Air Flow S stem
ThePerformance Air-Flow System isdesignedto maximize
temperature control in the refrigerator and freezer
compartments. This unique special feature consists ofthe
AirTower along the back wall of the refrigerator and the Air
Tunnelon the bottom portion ofthe freezer rear wall. Placing
food in front of the louvers on these components will not affect
performance. Although the AirTower and the AirTunnel can
be removed, doing sowill affect temperature performance.
(Forremoval instructions, on-line, contact usat ge.com or call
800.GECARES.InCanada,contact us at geappliances.caor call
1.800.561.3344.)
About Set Features.
Thispad is usedto selectthe following features:
TurboCool, Quick Ice,Door Alarm and Water
Filter.
About TurboCool.TM
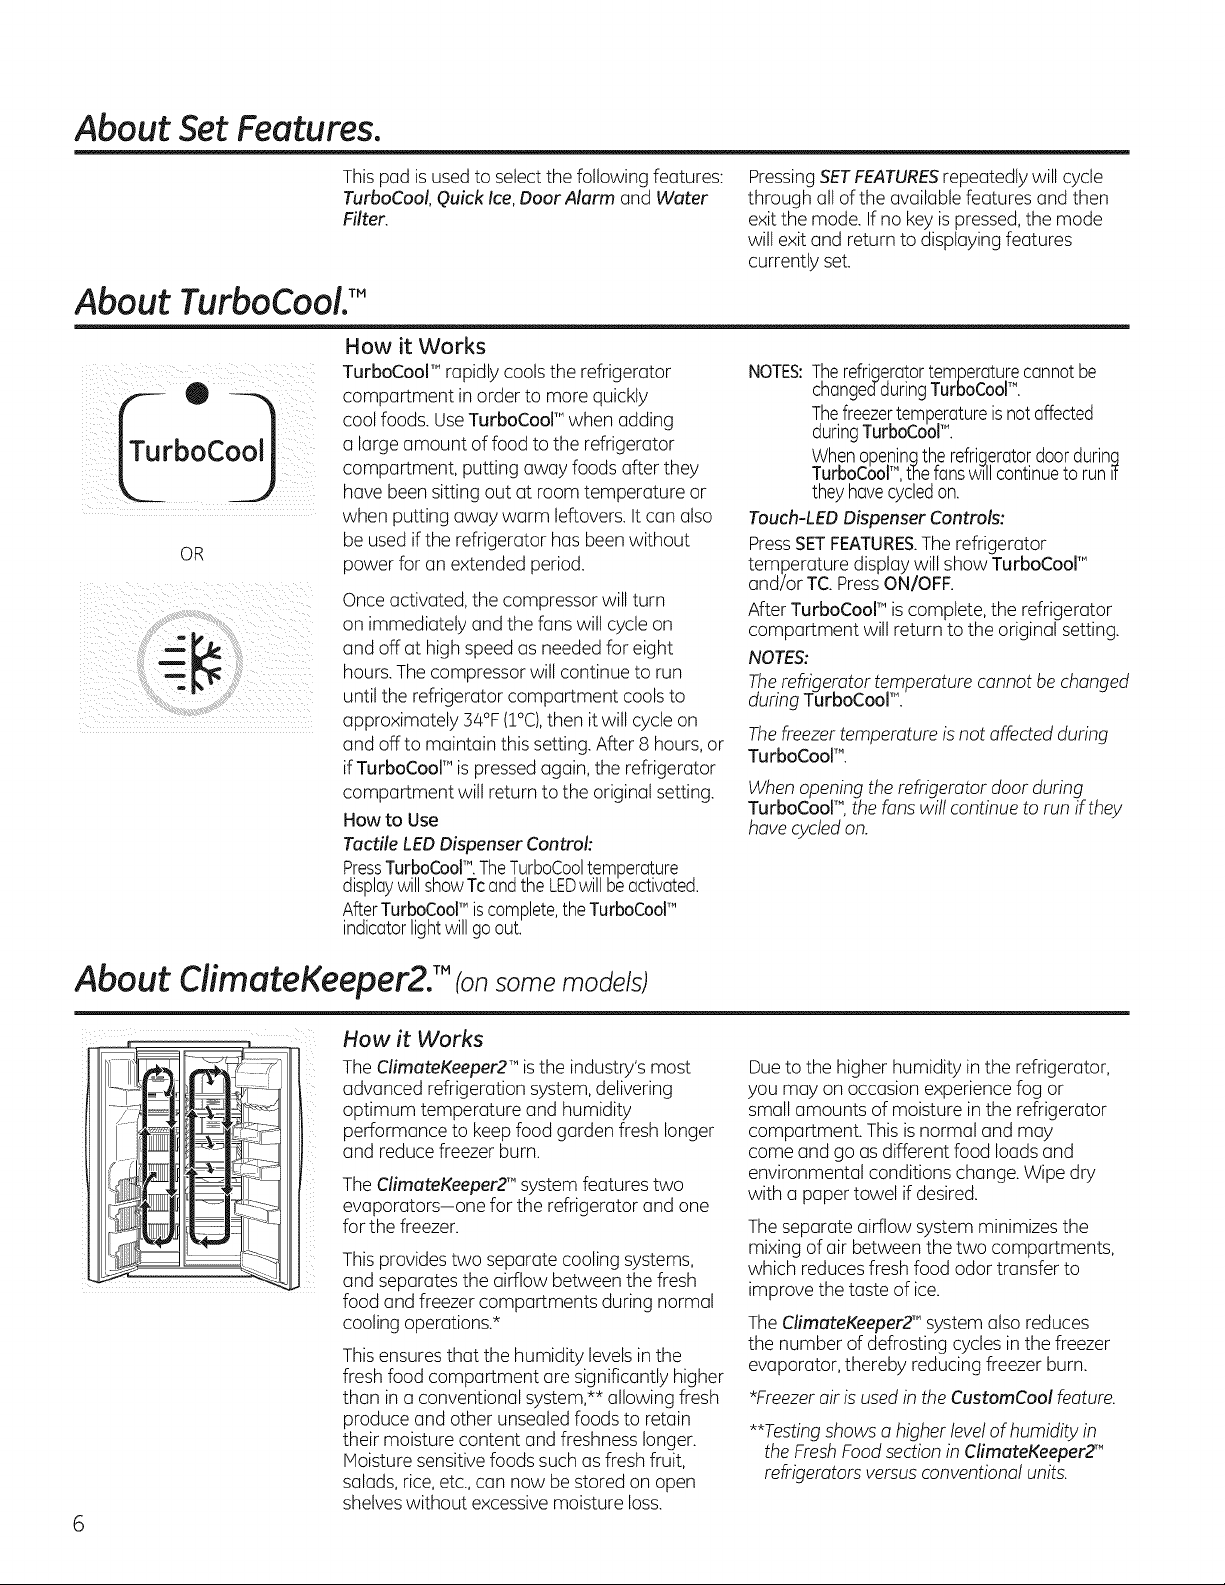
How it Works
TurboCool T"rapidly coolsthe refrigerator
compartment in order to more quickly
cool foods. UseTurboCoolT"when adding
a large amount of food to the refrigerator
comportment, putting away foods after they
have been sitting out at room temperature or
when putting away warm leftovers. It can also
OR
be usedif the refrigerator has been without
power for an extended period.
Onceactivated, the compressor will turn
on immediately and the fans will cycle on
and off at high speed as needed for eight
hours. Thecompressor will continue to run
until the refrigerator compartment cools to
approximately 34% (I°C),then it will cycleon
and off to maintain thissetting.After 8 hours,or
if TurboCool" is pressedagain, the refrigerator
compartment will return to the original setting.
How to Use
Tactile LEDDispenser Control:
PressTurboCoolTM. TheTu.rboCooltemperuture .
displaywillshowTcandthe LEDwillbeactivated.
AfterTurboCooPiscomplete,theTurboCooP
indicatorlightwill goout.
PressingSETFEATURESrepeatedlywill cycle
through all of the available features and then
exit the mode. If no keyis pressed,the mode
will exit and return to displaying features
currently set.
NOTES:Therefriqerutortemperuturecunnotbe
chungedduringTurboCooP.
Thefreezertemperatureisnotuffected
duringTurboCool_".
Wh.enope.ninqtherefrigerutordoorduring
TurboCooF",tTqefunswill continuetorunIt
they hovecycledon.
Touch-LEDDispenser Controls:
PressSETFEATURES.Therefrigerator
temperature display will show TurboCool_"
and/or TC. PressON/OFF.
After TurboCooP iscomplete, the refrigerator
compartment will return to the original setting.
NOTES:
Therefrigerator temperature cannot bechanged
during TurboCool_".
The freezer temperature is not affected during
TurboCooF".
Whenopening the refrigerator door during
TurboCooF', the fans will continue to run ifthey
havecycled on.
About ClimateKeeper2;" Ionsome models)
How it Works
TheClimateKeeper2 TM isthe industry's most
advanced refrigeration system,delivering
optimum temperature and humidity
performance to keepfood garden fresh longer
and reduce freezer burn.
TheClimateKeeperZ" system features two
evaporators-one for the refrigerator and one
for the freezer.
Thisprovides two separate cooling systems,
and separates the airflow between the fresh
food and freezer compartments during normal
cooling operations.*
Thisensures that the humidity levelsin the
fresh food compartment are significantly higher
than in a conventional system,** allowing fresh
produce and other unsealed foods to retain
their moisture content and freshness longer.
Hoisture sensitivefoods such as fresh fruit,
salads,rice,etc.,can now be stored on open
shelveswithout excessive moisture loss.
Dueto the higher humidity in the refrigerator,
you may on occasion experiencefog or
small amounts of moisture in the refrigerator
compartment. This isnormal and may
come and go as different food loads and
environmental conditions change. Wipe dry
with a paper towel if desired.
Theseparate airflow system minimizesthe
mixing of air between the two compartments,
which reduces fresh food odor transfer to
improve the taste of ice.
TheClimateKeeper2_"system also reduces
the number of defrosting cycles inthe freezer
evaporator, thereby reducing freezer burn.
*Freezer air is used in the CustomCool feature.
**Testingshows a higher levelof humidity in
theFreshFood sectioninClimateKeeperZ"
refrigeratorsversus conventional units.
About CustomCoolf(onsome models) GEAppliances.com
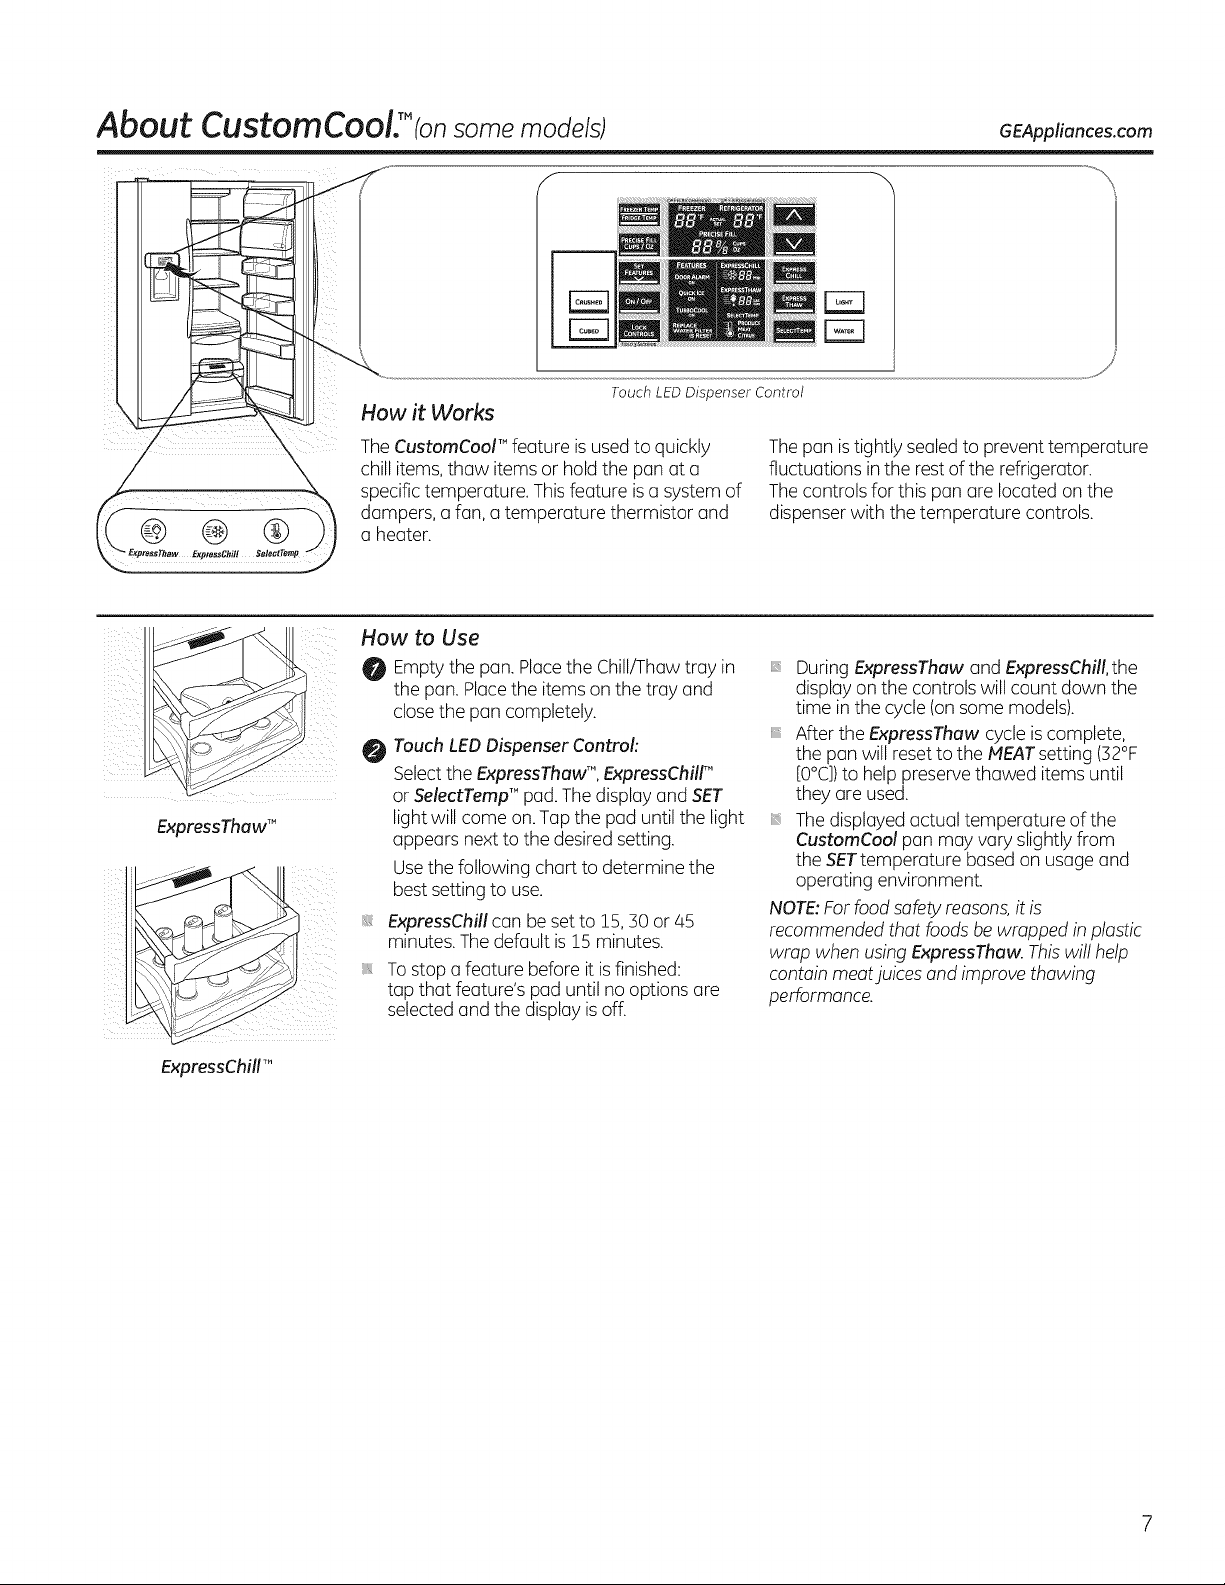
_ HowitWorks To_chL_o°,spenserCon_ro,
X TheCustomCool'" feature isusedto quickly Thepan istightly sealedto prevent temperature
specific temperature. Thisfeature isa system of The controls for this pan are located on the
dampers, u fun, u temperature thermistor and dispenser with the temperature controls.
u heater.
chill items,thaw items or hold the pan at u fluctuations inthe rest of the refrigerator.
How to Use
DuringExpressThaw and ExpressChill,the
display on the controls will count down the
time inthe cycle (onsome models).
After the ExpressThaw cycle is complete,
the pan will resetto the PLEATsetting (32%
[0°C])to help preserve thawed items until
they are used.
Thedisplayed actual temperature of the
CustomCool pan may vary slightly from
the SETtemperature based on usage and
operating environment.
NOTE:Forfood safety reasons,it is
recommended that foods be wrapped in plastic
wrap when usingExpressThaw. Thiswill help
contain meatjuices and improve thawing
performance.
_i__i__ _i_5_iii_I_
ExpressThawTM
Emptythe pan. Placethe Chill/Thaw tray in
the pan. Placethe itemson the tray and
close the pan completely.
Touch LEDDispenser Control:
O
Selectthe ExpressThawTM, ExpressChilr'_
or SelectTemp'" pad.The display and SET
light will come on. Tap the pad until the light
appears next to the desired setting.
Usethe following chart to determine the
best setting to use.
ExpressChill can be set to 15,30 or/45
minutes.Thedefault is15 minutes.
Tostop a feature before it isfinished:
tap that feature's pad until no options are
selected and the display is off.
ExpressChillm.
About ExpressChillT%nsome models)
..........................................................• SET
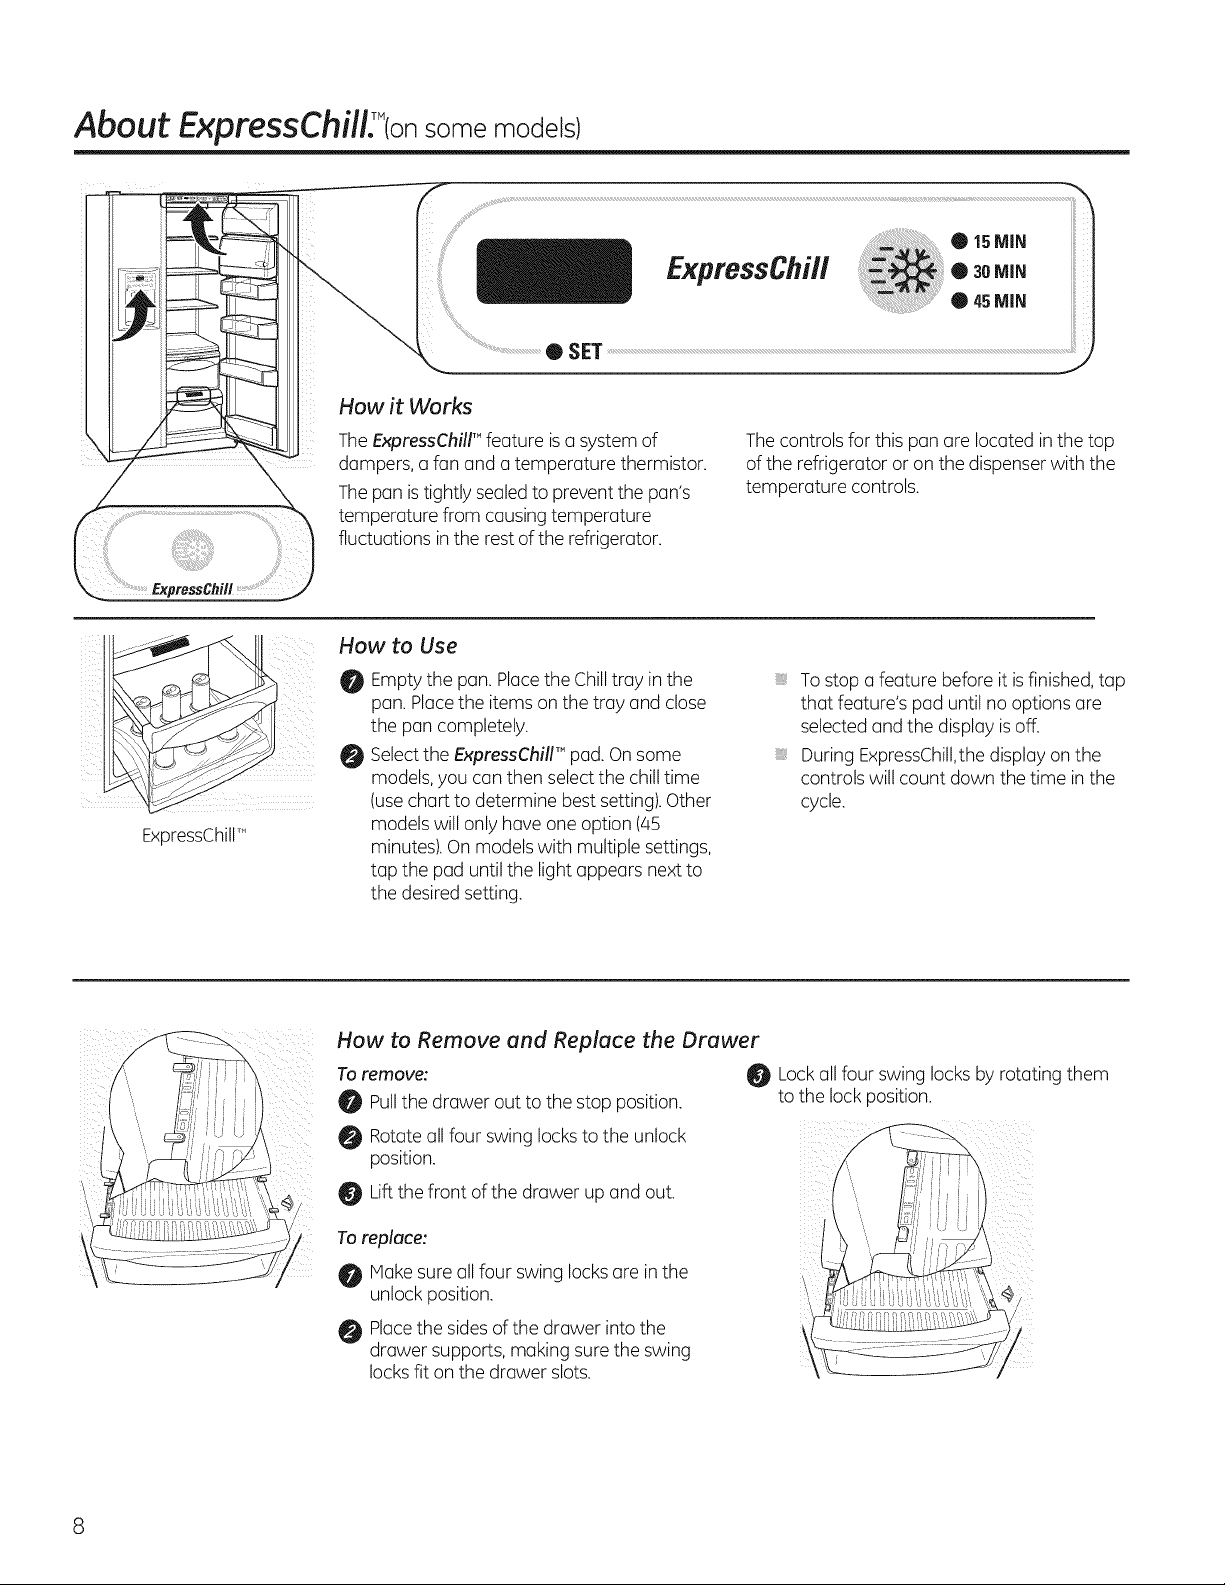
How if: Works
ExpressChil/
ExpressChillTM
TheExpressChill'"feature isasystem of
dampers, a fan and a temperature thermistor.
Thepan istightly sealedto prevent the pan's
temperature from causing temperature
fluctuations inthe rest of the refrigerator.
How to Use
Emptythe pun. Placethe Chilltray in the
pan.Placethe items on the tray and close
the pan completely.
Selectthe ExpressChillTM pad.Onsome
O
@
models,you can then select the chilltime
(usechart to determine best setting).Other
models will only have one option (45
minutes).On models with multiple settings,
tap the pad until the light appears next to
the desired setting.
Thecontrols for this pan are located in the top
of the refrigerator or on the dispenserwith the
temperature controls.
, To stop a feature before it isfinished,tap
that feature's pad until no options are
selectedand the display isoff.
, During ExpressChill,thedisplay on the
controls will count down the time inthe
cycle.
How to Remove end Replace the Drawer
Toremove:
0 Pullthe drawer out to the stop position.
0 Rotateall four swing locksto the unlock
position.
Liftthe front of the drawer up and out.
Toreplace:
Hake sure all four swing locksare inthe
unlock position.
Placethe sides of the drawer into the
drawer supports, making surethe swing
locksfit on the drawer slots.
Lockall four swing locksby rotating them
to the lock position.
About CustomCoolF(onsome models) GEAppliances.com
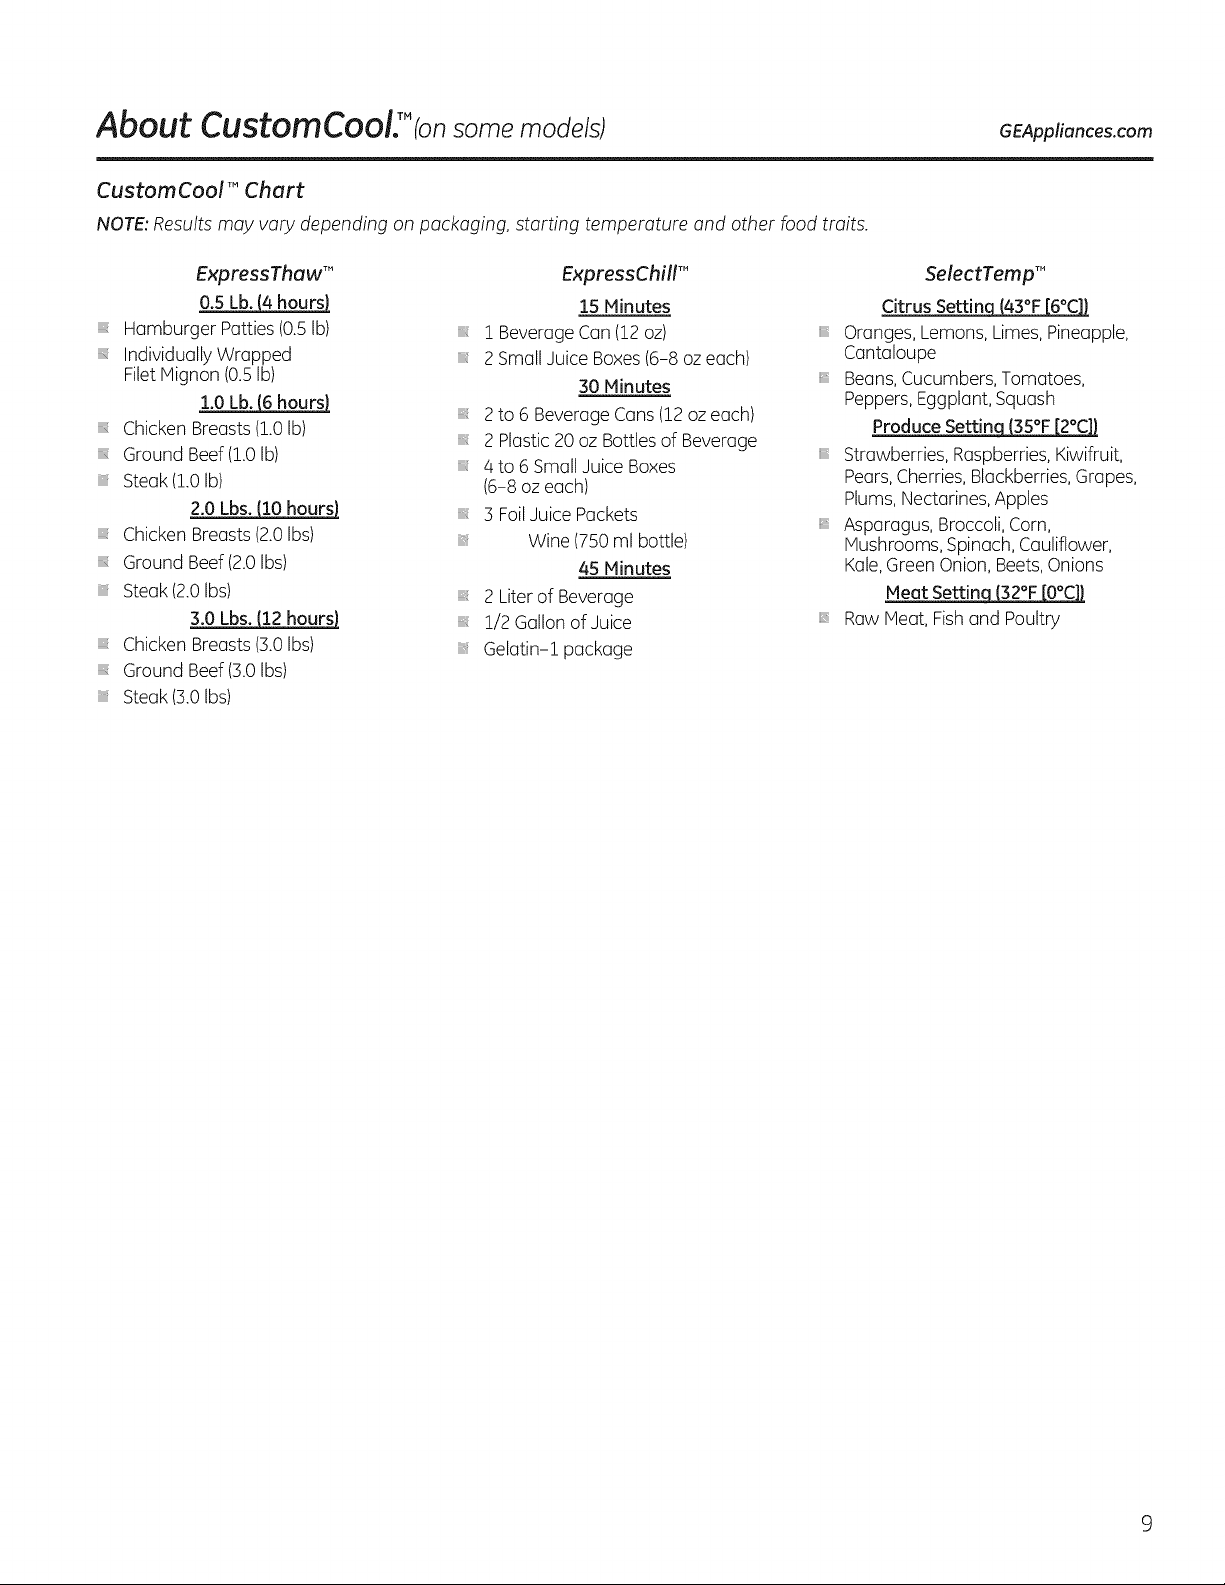
CustomCool TM Chart
NOTE:Results may vary depending on packaging, starting temperature and other food traits.
Express Thaw" ExpressChill'"
0.5 Lb. (4 hours) 15 Minutes
Hamburger Patties(0.5Ib) ! BeverageCan(12 oz)
IndividuallyWrapped 2 SmallJuice Boxes(6-8 ozeach)
FiletMignon (0.5Ib) 30 Minutes
Chicken Breasts(1.0Ib)
Ground Beef(1.0Ib)
Steak (1.0Ib) (6-8 oz each)
Chicken Breasts(2.0Ibs) Wine (750ml bottle)
Ground Beef(2.0Ibs) 45 Minutes
Steak (2.0Ibs) 2 Literof Beverage
Chicken Breasts(3.0Ibs) Gelatin-1 package
Ground Beef(3.0Ibs)
Steak (3.0Ibs)
1.OLb.16hours} 2to 6 BeverageCans(12oz each)
2 Plastic20 oz Bottlesof Beverage
a to 6 SmallJuice Boxes
2.0 Lbs.!10 hours} 3 FoilJuice Packets
3.0 Lbs.(12 hours} 1/2 Gallon of Juice
SelectTemp T"
Citrus Settinq (43°F[6°C])
Oranges, Lemons,Limes,Pineapple,
Cantaloupe
Beans,Cucumbers,Tomatoes,
Peppers,Eggplant,Squash
Produce Settinq (35°F[2°C]}
Strawberries, Raspberries,Kiwifruit,
Pears,Cherries,Blackberries,Grapes,
Plums,Nectarines, Apples
Asparagus, Broccoli,Corn,
Mushrooms,Spinach,Cauliflower,
Kale,GreenOnion, Beets,Onions
Meat Settinq (32°F[O°C])
Raw Meat,Fishand Poultry

About the water filter, (onsome models)
Water Filter Cartridge
Thewater filter cartridge islocated in the back upper right
corner of the refrigerator compartment.
When to Replace the Filter on Models With a
Replacement Indicator Light
Thereis a replacement indicator light for the water filter
cartridge on the dispenser.Thislight will turn orange to tellyou
that you need to replacethe filter soon.
Thefilter cartridge should be replaced when the replacement
indicator light turns red or ifthe flow of water to the dispenser or
ice maker decreases.
When to Replace the Filter on Models Without a
Replacement Indicator Light
Thefilter cartridge should be replaced every six months or
earlier if the flow of water to the water dispenseror icemaker
decreases.
Removing the Filter Cartridge
If you are replacing the cartridge, first remove the old one by
slowly turning it to the left.Do not pull down on the cartridge. A
small amount of water may drip down.
Installing the Filter Cartridge
0 Ifyou are replacing a SmartWater cartridge with an
adapter, itmust be removed before installing the cartridge.
To remove the adapter, turn it to the left about !/a, turn.
If you are replacing a Water by Culligancartridge, leavethe
adapter in place.Thisadapter will stay in the refrigerator when
you replace future cartridges.
[
Cartridge
Holder
Runwater from the dispenser I-i/2gallons (aboutthree
minutes)to clear the system and prevent sputtering.
Pressand hold the WATERFILTERpad (onsome models)on
the dispenser for 3 seconds.
Reset
Hold 3 Sec
NOTE:A newly-installed water filter cartridge may cause water
to spurt from the dispenser upon first use.
Filter Bypass Plug
You must use the filter bypassplug when a replacement filter
cartridge is not available. The dispenser and the icemaker will
not operate without the filter or filter bypass plug.
ypass ,,,j
SmartWater
Water by Culligan
Some models
W_thadapter W_thout adapter water
(appearance may vary)
O On models without a replacement indicator light, apply the
month and year sticker to the new cartridge to remind you
to replacethe filter insix months.
Fillthe replacement cartridge with water from the tap to
allow for better flow from the dispenser immediately after
installation.
Lineup the arrow on the cartridge and the cartridge holder.
Placethe top of the new cartridge up insidethe holder. Do
not push it up into the holder.
Slowlyturn itto the right until the filter cartridge stops.
DONOT OVERTIGHTEN.Asyou turn the cartridge, it will
automatically raise itself into position.The cartridge will
move about 1/2 turn.
10
use this _Peer.Of
Touse the filter bypassplug on Water by Culligan models,you
must first remove the filter adapter from the cartridge holder by
turning it to the left.
Forthe maximum benefit of your filtration system, GE
recommends the useof GEbranded SmartWater filters only.
Using GEbranded filters in GEand Hotpoint refrigerators
provides optimal performance and reliability.GEbranded
SmartWater filters are always the right choice because they
are patented and designed specifically for GEproducts. GE
SmartWater filters meet rigorous industry NSFstandards for
safety and quality that are important for products that are
filtering your water. GEhas not qualified non-GEbranded
filters for use in GEand Hotpoint refrigerators and there isno
assurance that non-GEbranded filters meet GE'sstandards for
quality, performance and reliability.
If you have questions-visit our Websiteat GEAppliances.com,or
call !.800.GE.CARES(1.800.4322737).
Replacement filters:
To order additional filter cartridges in the United States,
visit our Website at GEAppliances.com, or call GEParts and
Accessories, 800.626.2002.
See filter label for type of filterto order (PIWFor kISWF).
Customers in Canada should consult the yellow pages for the
nearest Mabe Service Center.
About the shelves and bins.
Not all features are on all models.
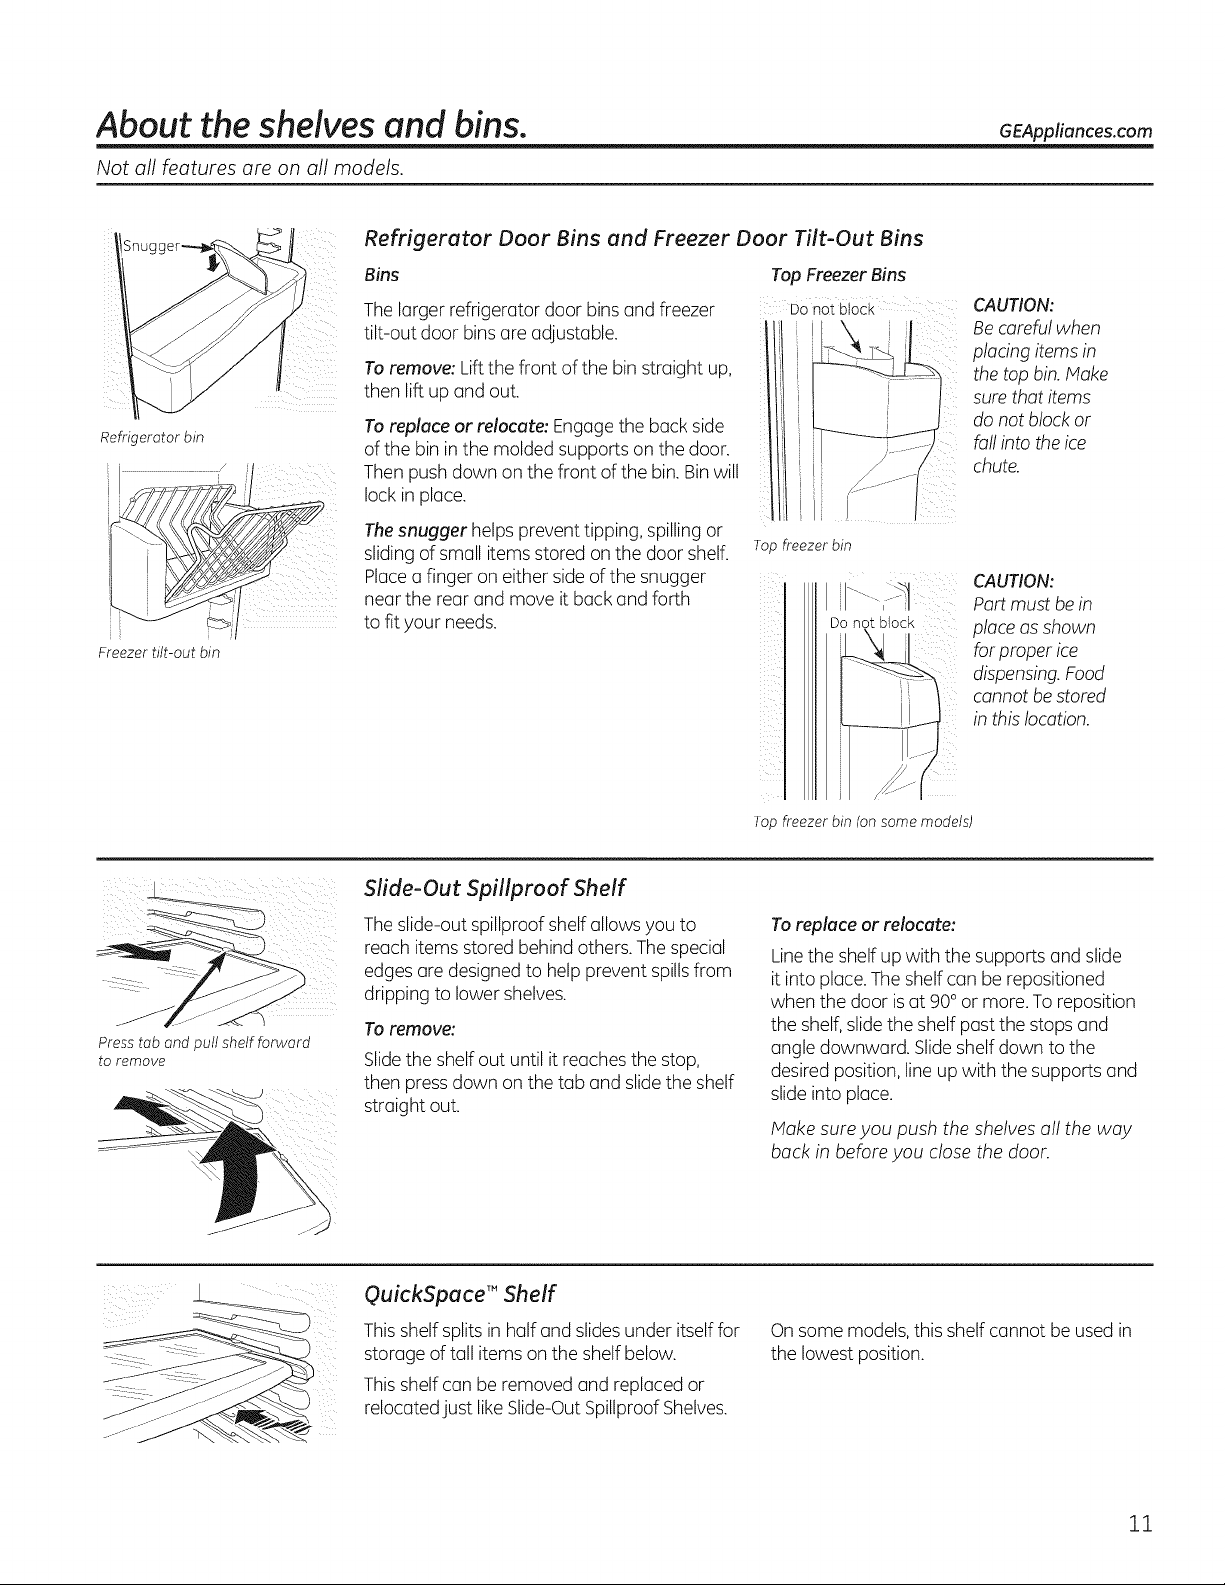
Refrigerator Door Bins end Freezer Door Tilt-Out Bins
Bins
The larger refrigerator door bins and freezer
tilt-out door bins are adjustable.
Toremove: Liftthe front of the bin straight up,
then lift up and out.
Refrigerator am
\\
Freezer tilt-out am
To replace or relocate: Engage the back side
of the bin in the molded supports on the door.
Then push down on the front of the bin. Binwill
lock in place.
Thesnugger helps prevent tipping, spilling or
slidingof small items stored on the door shelf.
Placea finger on either side of the snugger
near the rear and move it buck and forth
to fit your needs.
Top Freezer Bins
DOnot btock
Top freezer bin
Do not block
iii
GEAppliances.com
CAUTION:
Be careful when
placing items in
the top bin. Make
sure that items
do not block or
fall into the ice
chute.
CAUTION:
Partmust be in
placeas shown
for proper ice
dispensing.Food
cannot be stored
in this location.
Press tab and pull shelf forward
to remove
Slide-Out Spillproof Shelf
Theslide-out spillproof shelf allows you to
reach items stored behind others. Thespecial
edgesare designedto help prevent spillsfrom
dripping to lower shelves.
To remove:
Slidethe shelf out until it reaches the stop,
then press down on the tub and slidethe shelf
straight out.
QuickSpace'" Shelf
This shelf splitsin half and slidesunder itself for
storage oftall items on the shelf below.
This shelf can be removed and replaced or
relocated just likeSlide-OutSpillproofShelves.
Top freezer bin (on some models)
Toreplace or relocate:
Linethe shelf up with the supports and slide
it into place. Theshelfcan be repositioned
when the door isat 90° or more. Toreposition
the shelf, slidethe shelf past the stops and
angle downward. Slideshelf down to the
desired position, line up with the supports and
slideinto place.
Make sure you push the shelves all the way
back in before you close the door.
On some models,this shelf cannot be used in
the lowest position.
11
About the shelves and bins.
Not all features are on all models.
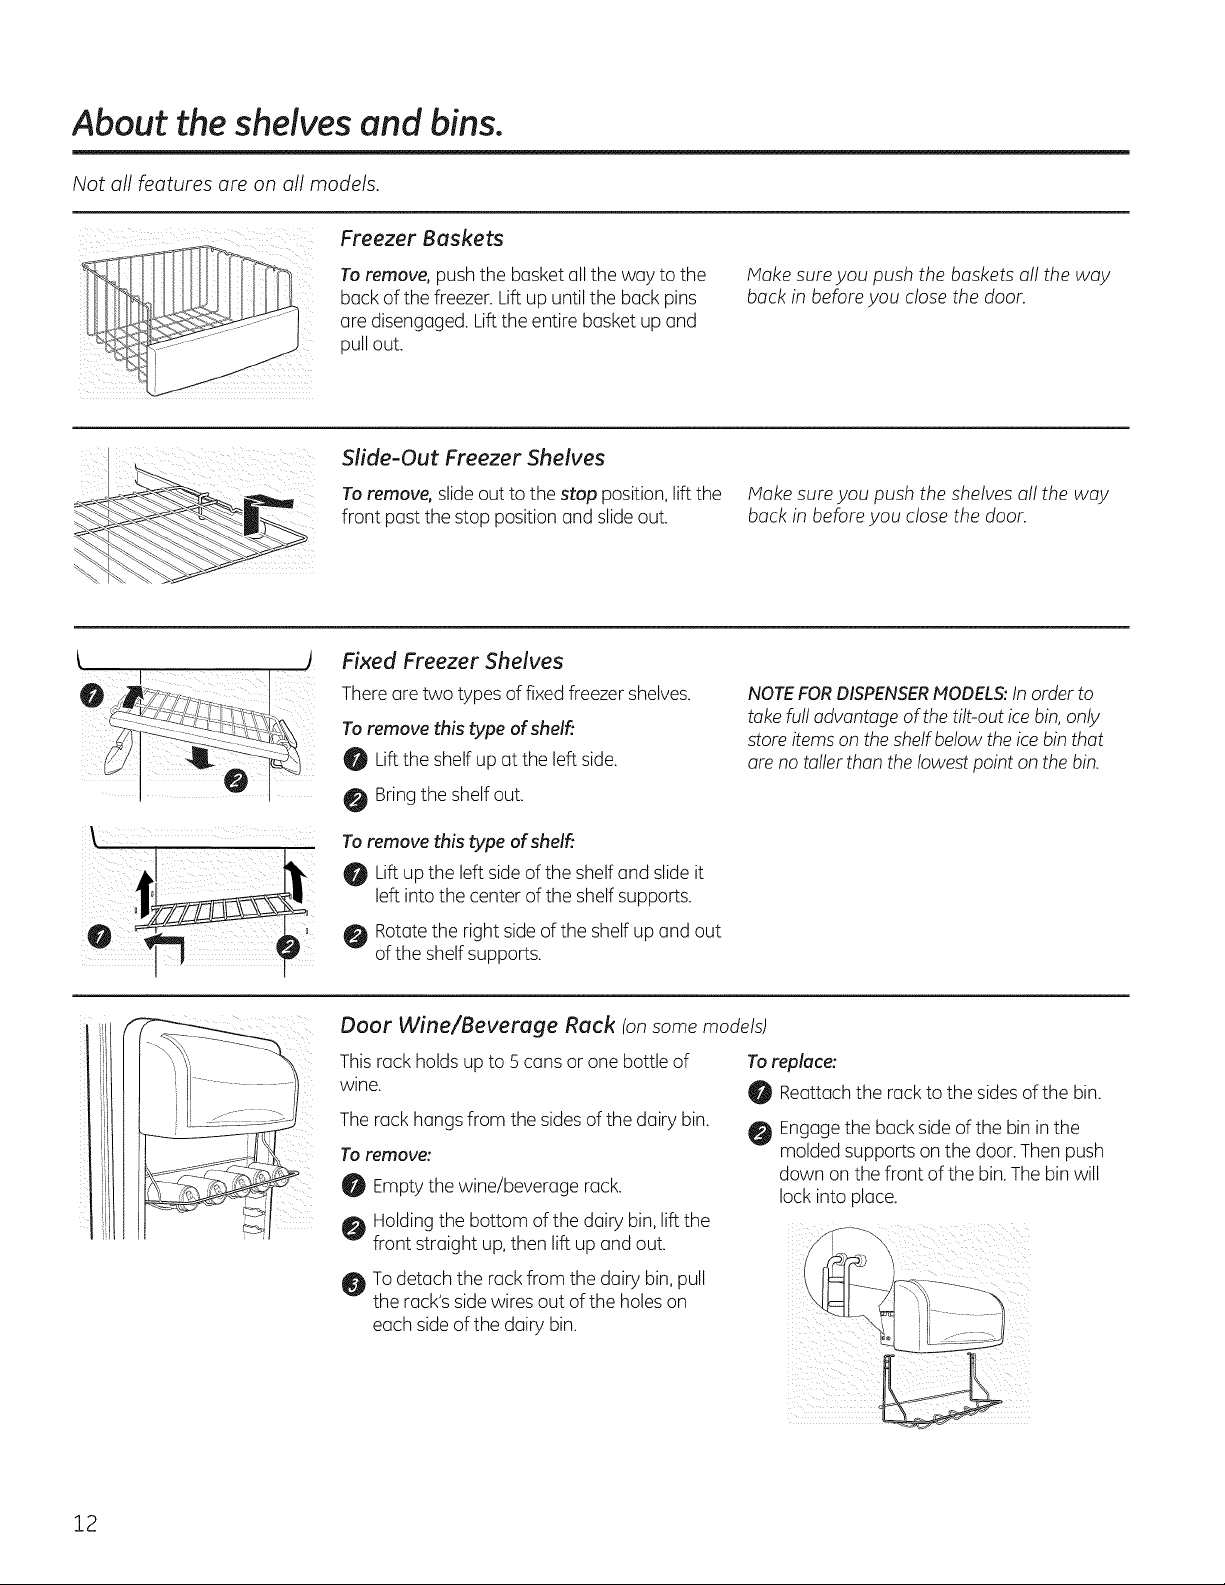
Freezer Baskets
¸ ¸¸¸¸¸¸4:5!
Toremove, push the basket oil the way to the
buck of the freezer. Lift up untilthe buck pins
ore disengaged. Liftthe entire basket up and
pull out.
Slide-Out Freezer Shelves
Toremove, slide out to the stop position, lift the
front post the stop position and slideout.
Fixed Freezer Shelves
There ore two types of fixed freezer shelves.
Toremove this type of shelf:
0 Lift the shelf up at the left side.
0 Bring the shelf out.
Toremove this type of shelf:
Lift up the left sideof the shelfand slide it
left into the center of the shelf supports.
Make sure you push the baskets all the way
back in before you close the door.
Make sure you push the shelves all the way
back in before you close the door.
NOTE FOR DISPENSER MODELS: In order to
take full advantage of the tilt-out ice bin, only
store items on the shelf below the ice bin that
are no taller than the lowest point on the bin.
Rotatethe right side of the shelf up and out
of the shelf supports.
Door Wine/Beverage Rack (onsome models)
This rock holdsup to 5 cons or one bottle of
wine.
The rock hangs from the sides of the dairy bin.
Toremove:
Empty the wine/beverage rock.
Holding the bottom of the dairy bin, lift the
front straight up, then lift up and out.
Todetach the rock from the dairy bin,pull
the rock'ssidewires out of the holeson
each side of the dairy bin.
Toreplace:
Reottochthe rock to the sidesof the bin.
Engagethe buck sideof the bin in the
molded supports on the door.Then push
down on the front of the bin.The bin will
lock into place.
12
About the refrigerator doors. GEAppliances.com
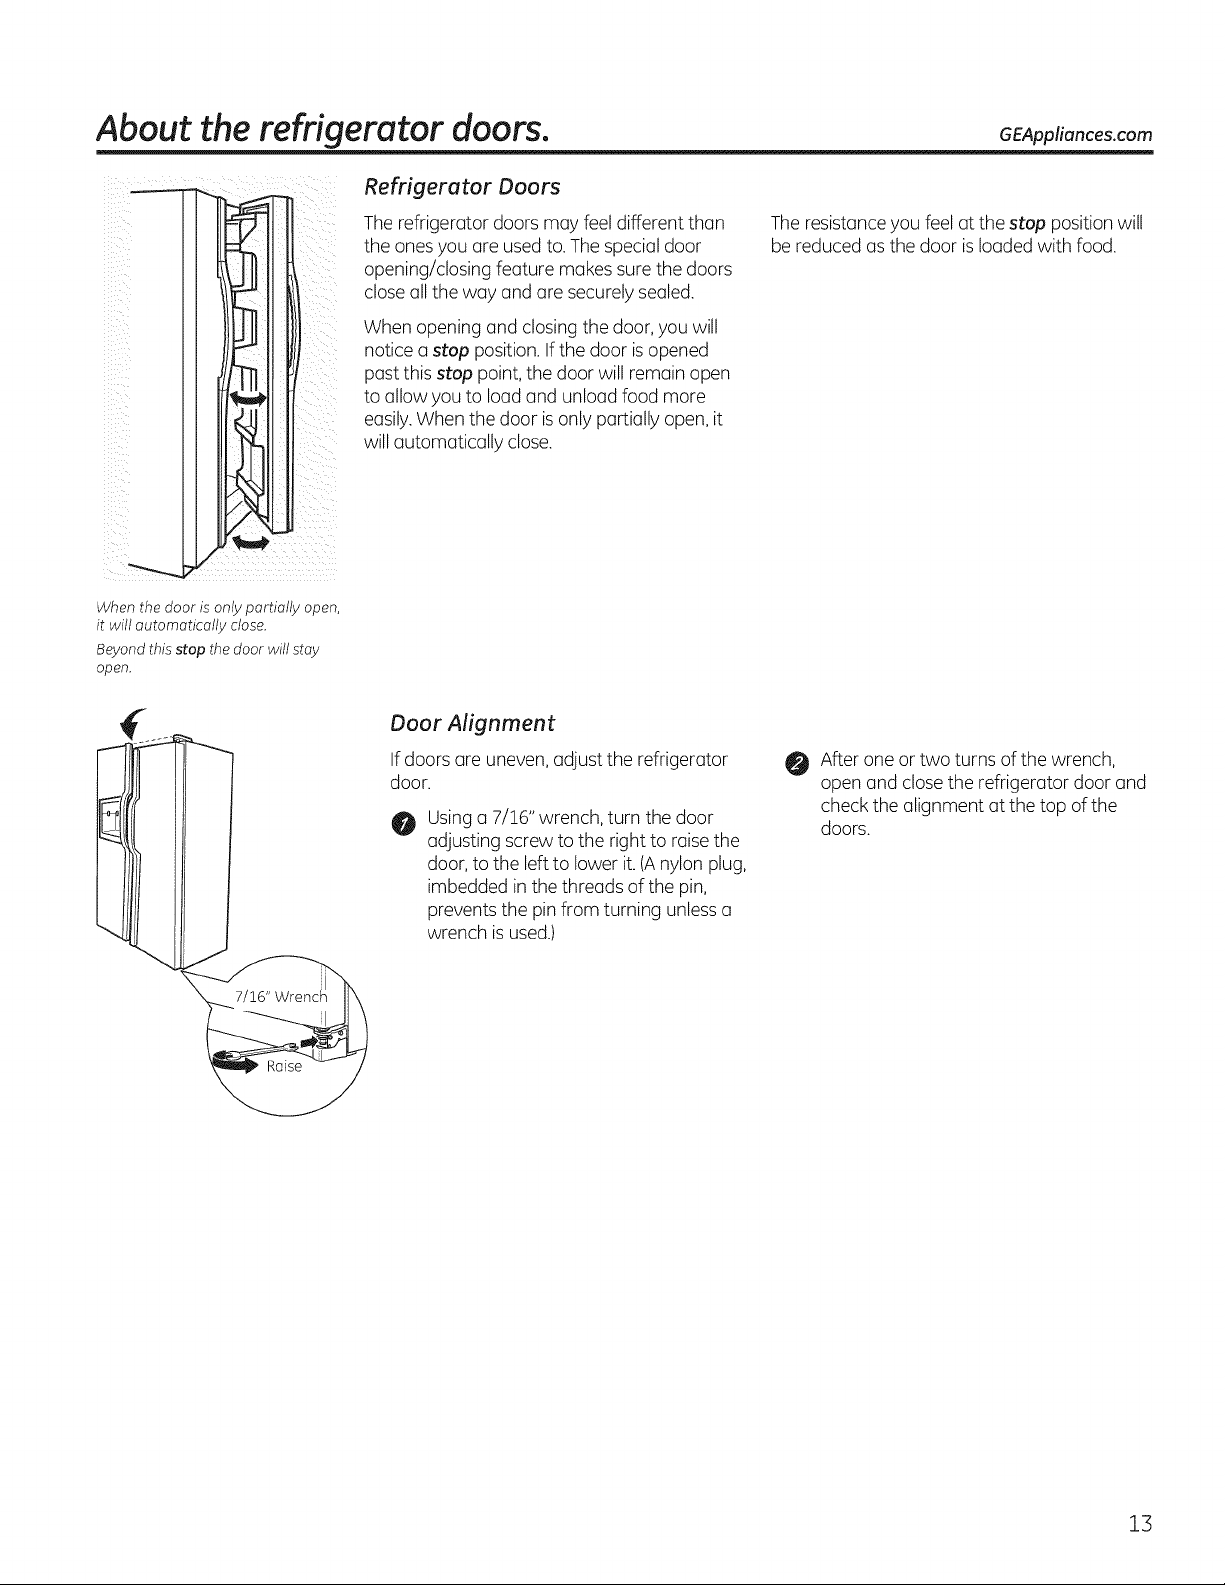
Refrigerator Doors
When the door is only partially open,
it will automatically close.
Beyond this stop the door will stay
open.
The refrigerator doors may feel different than
the onesyou are used to.The special door
opening/closing feature makes sure the doors
closeall the way and are securely sealed.
When opening and closing the door,you will
notice a stop position.If the door isopened
past this stop point,the door will remain open
to allow you to load and unload food more
easily.When the door is only partially open,it
will automatically close.
Door Alignment
If doors are uneven,adjust the refrigerator
door.
Usinga 7/16" wrench, turn the door
O
adjusting screw to the right to raisethe
door, to the left to lower it. (Anylon plug,
imbedded in the threads of the pin,
preventsthe pin from turning unlessa
wrench is used.)
Theresistanceyou feel at the stop position will
be reduced as the door is loaded with food.
O After one or two turns of the wrench,
open and close the refrigerator door and
check the alignment at the top of the
doors.
13
About the crispers and pans.
Not all features are on all models.
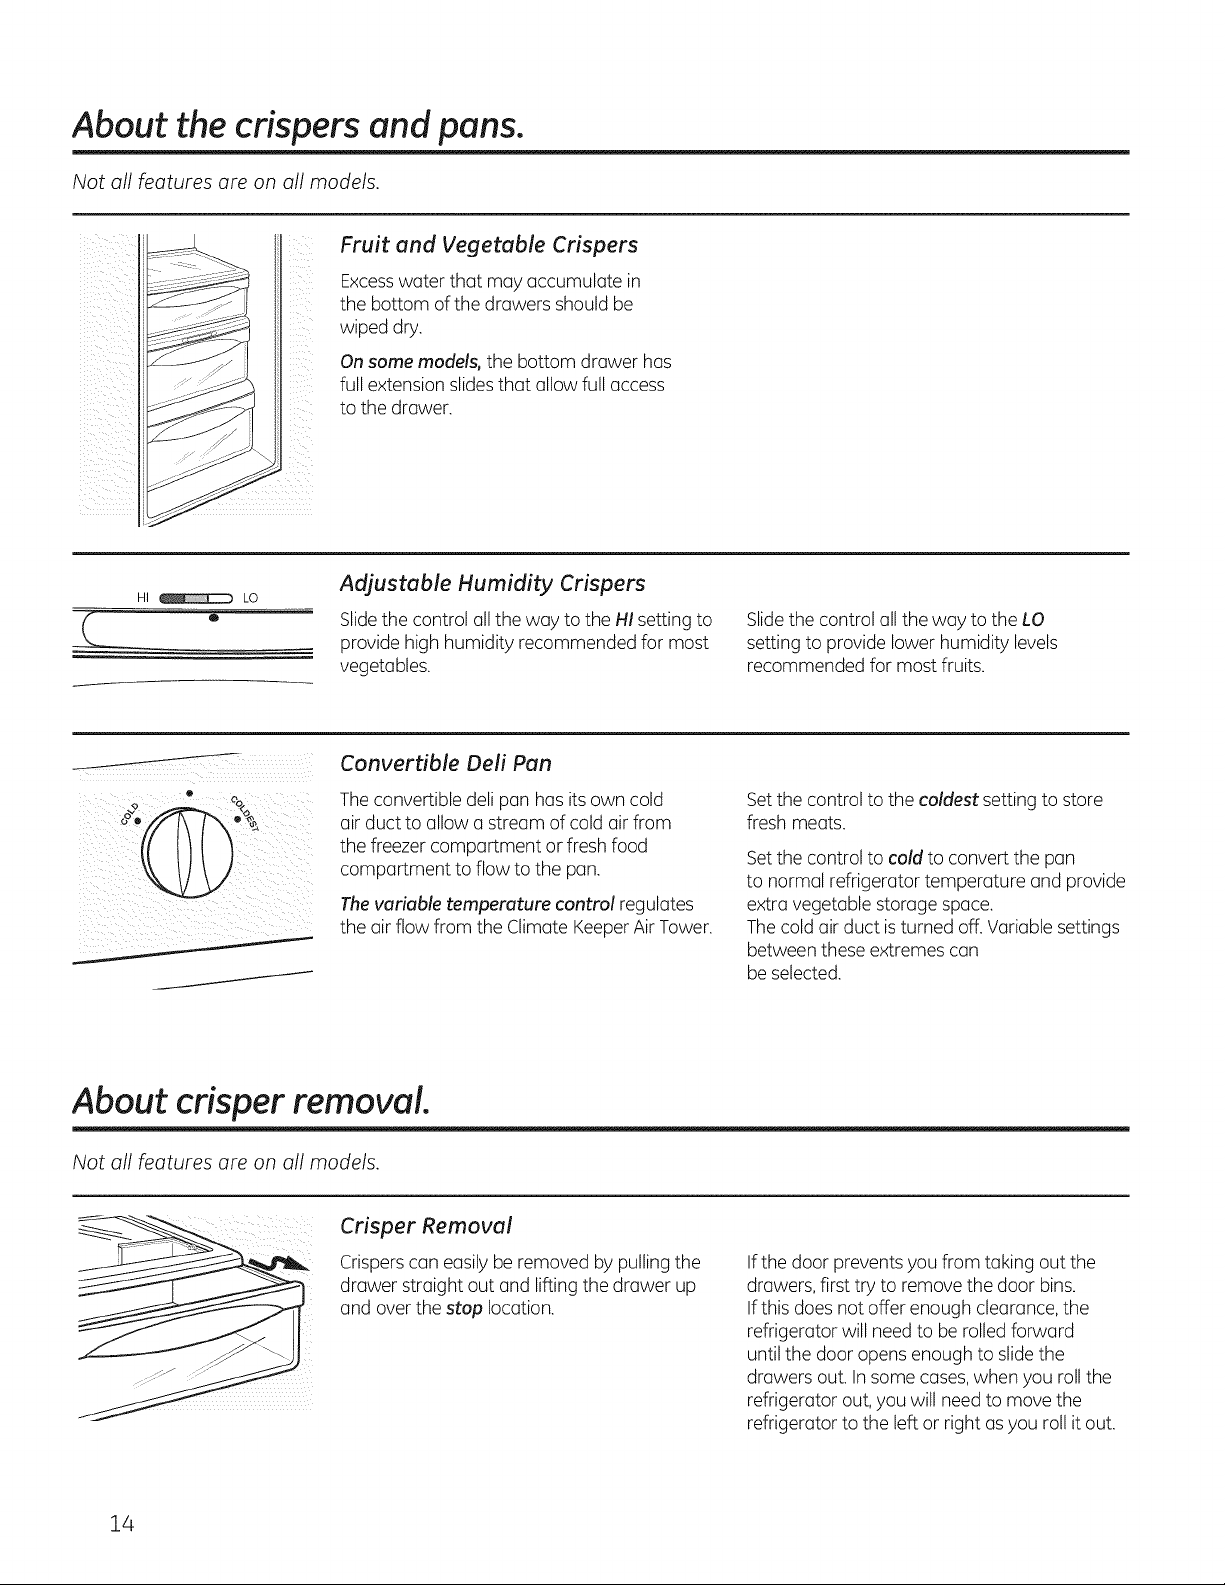
Fruit and Vegetable Crispers
Excess water that may accumulate in
the bottom of the drawers should be
wiped dry.
On some models, the bottom drawer has
full extensionslidesthat allow full access
to the drawer.
HI _ LO
2_ "
Adjustable Humidity Crispers
Slidethe control all the way to the HI setting to
provide high humidity recommended for most
vegetables.
Convertible Deli Pan
Theconvertible deli pan has its own cold
air duct to allow a stream of cold air from
the freezer compartment or fresh food
compartment to flow to the pan.
Thevariable temperature control regulates
the air flow from the Climate KeeperAir Tower.
About crisper removal.
Not all features are on all models.
Slidethe control all the way to the LO
setting to provide lower humidity levels
recommended for most fruits.
Setthe control to the coldest setting to store
fresh meats.
Setthe control to cold to convert the pan
to normal refrigerator temperature and provide
extra vegetable storage space.
Thecold air duct isturned off. Variable settings
between these extremes can
be selected.
14
Crisper Removal
Crisperscan easily be removed by pulling the
drawer straight out and lifting the drawer up
and overthe stop location.
If the door prevents you from taking out the
drawers,first try to remove the door bins.
If this does not offer enough clearance, the
refrigerator will need to be rolled forward
until the door opens enough to slidethe
drawers out. In some cases,when you roll the
refrigerator out, you will need to move the
refrigerator to the left or right asyou roll it out.
About the automatic ice maker. GEAppliances.com
A newly installed refrigerator may take 12 to 24 hours to begin making ice.
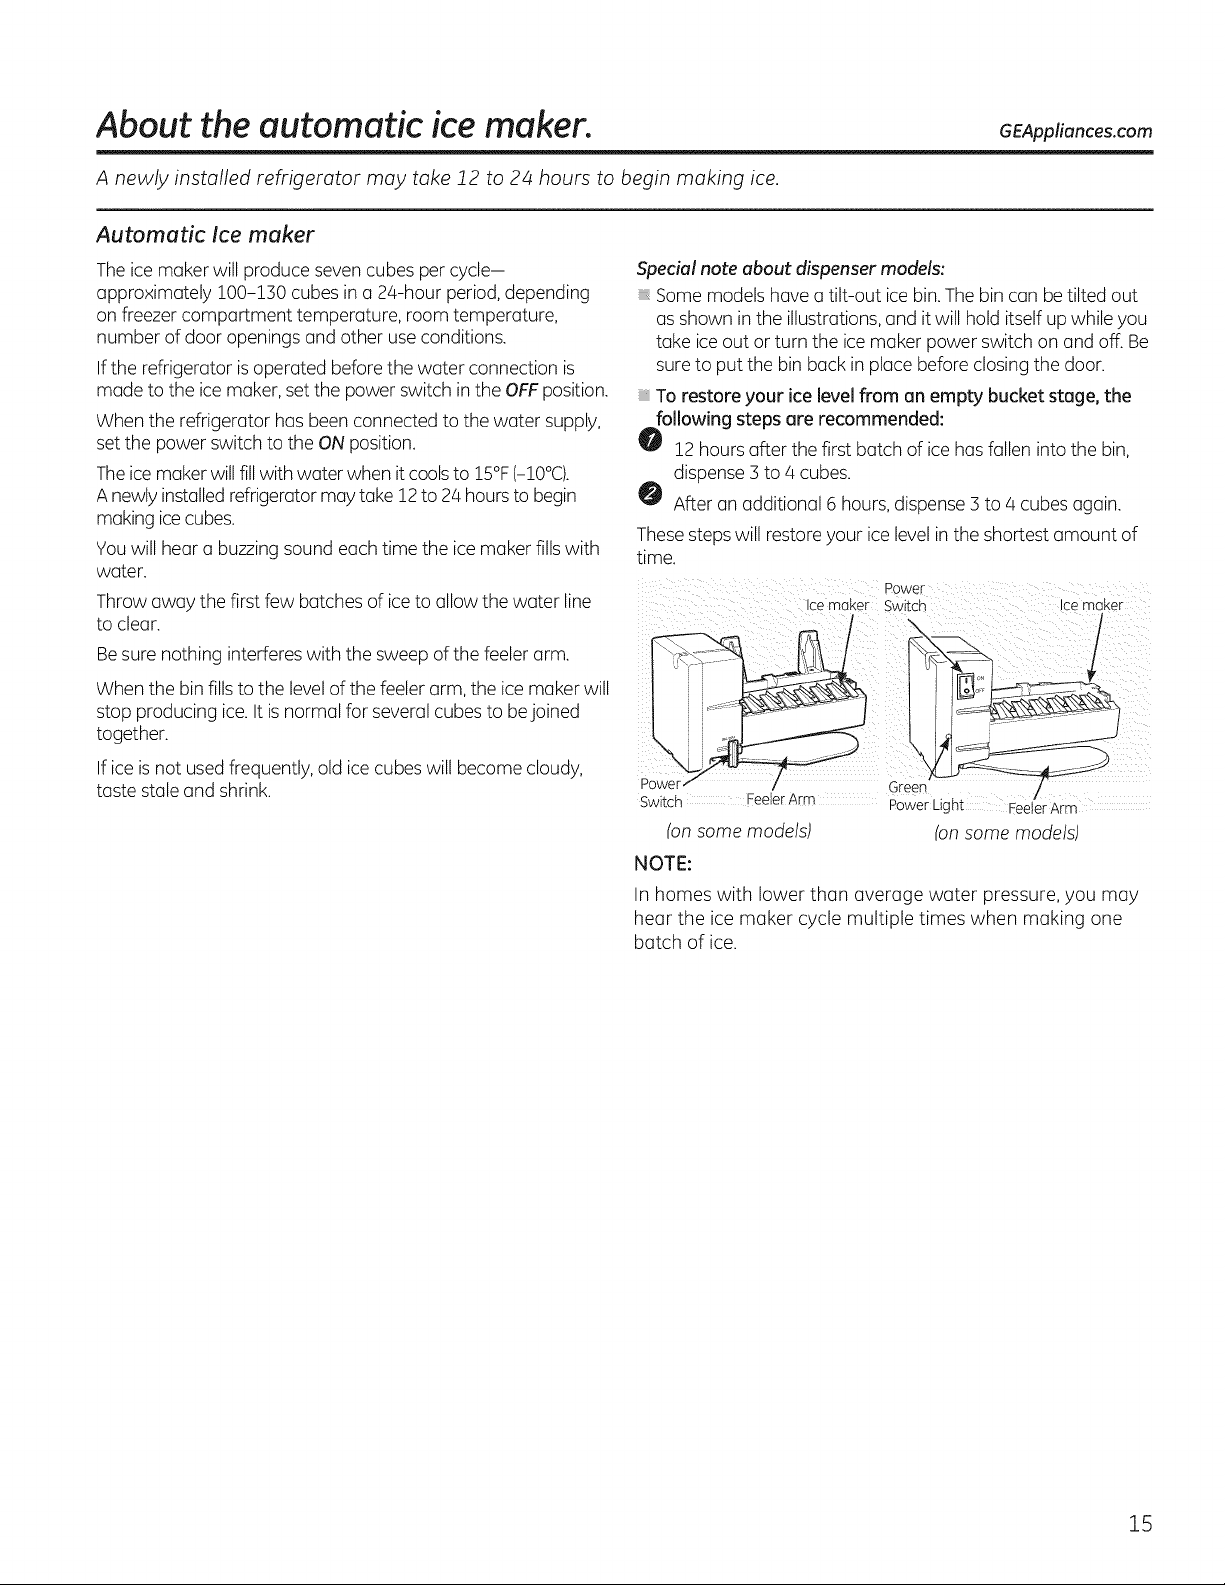
Automatic Ice maker
Theice maker will produce seven cubes per cycle-
approximately 100-!30 cubes in a 24-hour period,depending
on freezer comportment temperature, room temperature,
number of door openings and other useconditions.
If the refrigerator isoperated before the water connection is
made to the ice maker, setthe power switch in the OFFposition.
When the refrigerator has been connected to the water supply,
set the power switch to the ON position.
Theice maker willfill with water when itcoolsto 15°F(-10°O.
A newly installedrefrigerator may take !2 to 24 hoursto begin
making icecubes.
Youwill hear o buzzing sound each time the ice maker fills with
woter.
Throw away the first few botches of iceto allow the water line
to clear.
Besure nothing interfereswith the sweep of the feeler arm.
When the bin fillsto the levelof the feelerarm, the ice maker will
stop producing ice.It is normal for several cubes to bejoined
together.
If ice is not usedfrequently, old ice cubes will become cloudy,
taste stole and shrink.
Special note about dispenser models:
, Somemodels have o tilt-out icebin. Thebin con be tilted out
asshown in the illustrations,and it will hold itself up while you
take ice out or turn the ice maker power switch on and off. Be
sureto put the bin back in place before closing the door.
, To restore your ice level from an empty bucket stage, the
following steps are recommended:
O !2 hours after the first batch of ice hasfallen into the bin,
dispense 3 to/4 cubes.
O After on additional 6 hours, dispense3 to 4 cubes again.
Thesestepswill restoreyour ice levelinthe shortest amount of
time.
Ice maker
Switch ceeler Arm
(on some models)
Power
Switch
\
Green
. !
Power Light FeelerArm
(onsome models)
ice maker
/
/
NOTE:
In homes with lower than average water pressure, you may
hear the ice maker cycle multiple times when making one
batch of ice.
15
About the automatic ice maker. (cant)
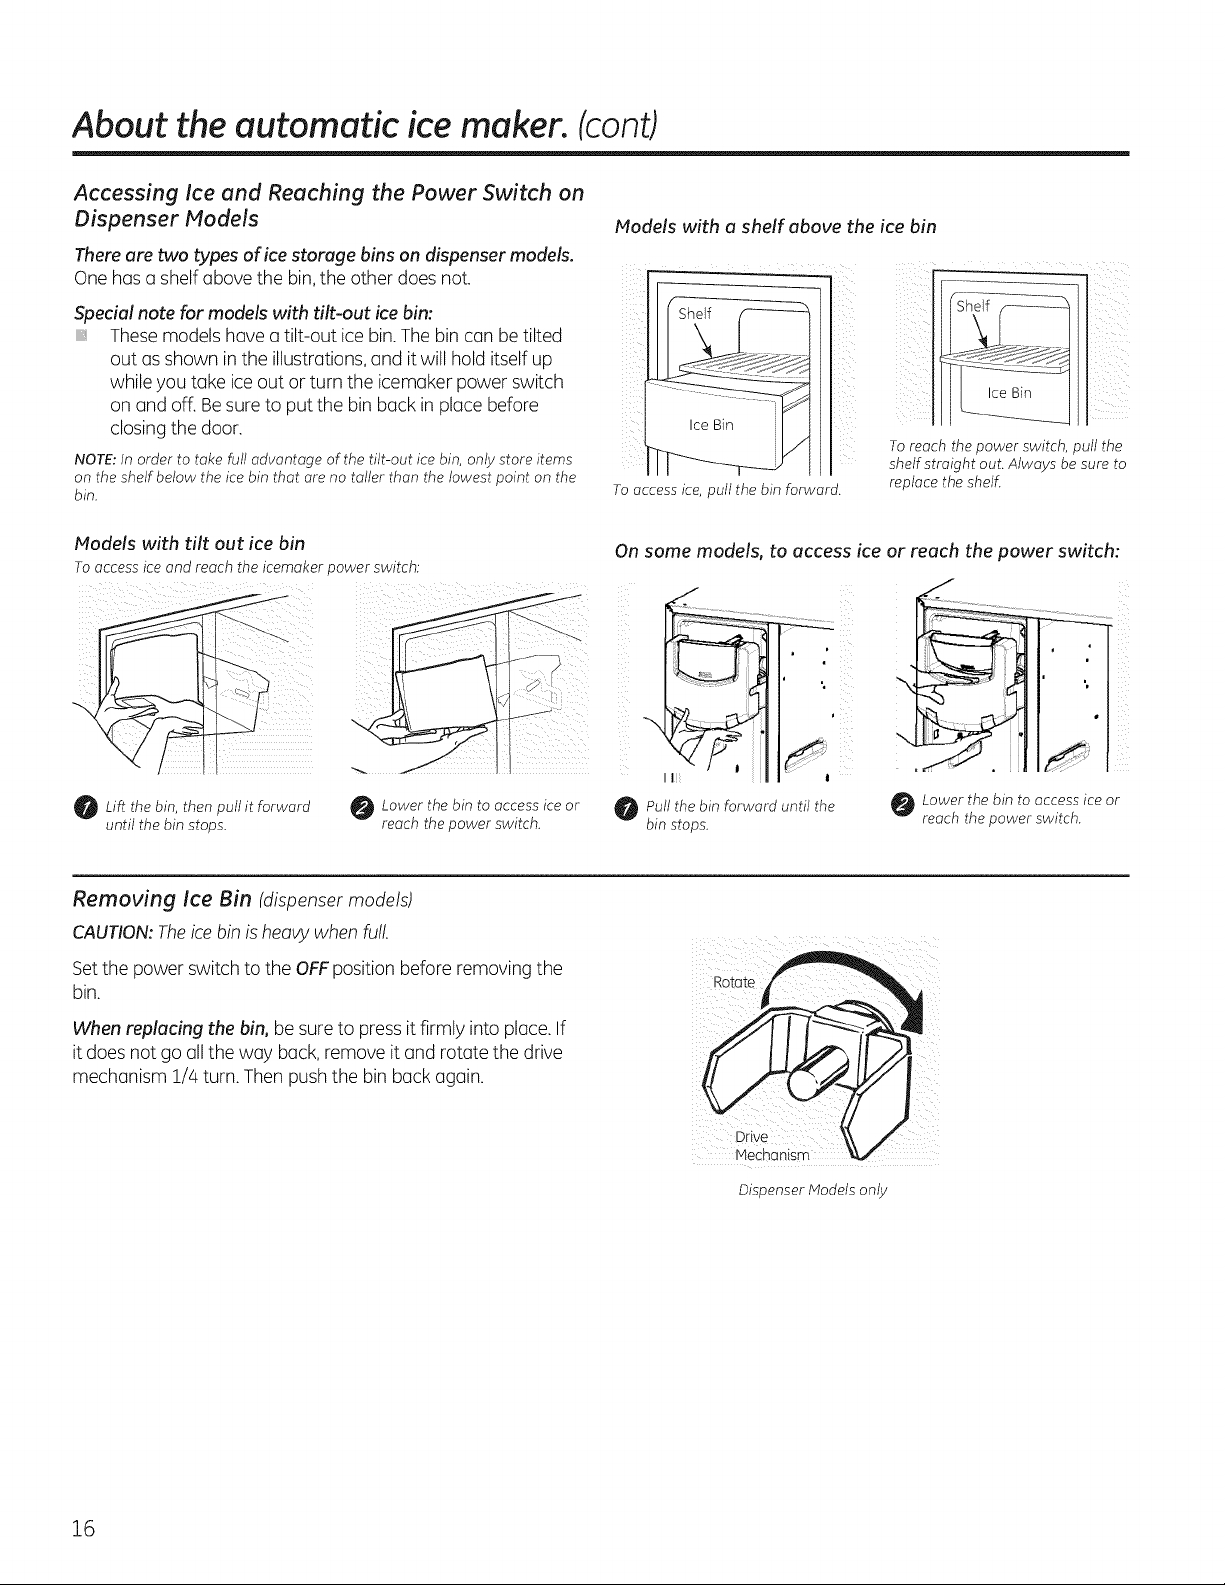
Accessing Ice and Reaching the Power Switch on
Dispenser Models
Thereare two types of ice storage bins on dispenser models.
One hasa shelf above the bin,the other does not.
Models with a shelf above the ice bin
i ill
Special note for models with tilt-out ice bin: (Sh_Thesemodels havea tilt-out ice bin. Thebin can be tilted
out usshown in the illustrations,and it will hold itself up •
while you take ice out or turn the icemaker power switch
closing thedoor.anand off. Besureto put the bin back in place before l__ _, .._
NOTE: In order to take full advantage of the tilt-out ice bin, only store items
on the shelf below the ice bin that are no taller than the lowest point on the
bin.
Models with tilt out ice bin
To access ice and reach the icemaker power switch:
Lift the 5in, then it forward
until the bin stops.
pull
Lower the bin to access ice or
reach the power switch.
To access ice, pull the 5in forward.
On some models, to access
Pull the bin forward until the
5in stops.
Removing Ice Bin (dispenser models)
CAUTION:Theice bin is heavy when full.
!!
To reach the power switch, pull the
shelf straight out. Always be sure to
replace the shelf.
ice or reach the power switch:
\
Lower the bin to access ice or
reach the power switch.
iI
Setthe power switch to the OFFposition before removing the
bin.
When replacing the bin, be sureto press it firmly into place. If
it does not go all the way back, remove it and rotate the drive
mechanism !/4 turn. Then pushthe bin back again.
16
Rotate
Drive
Mechanism
Dispenser Models only
About the ice and water dispenser. (on some mode/s) GEAppliances.com
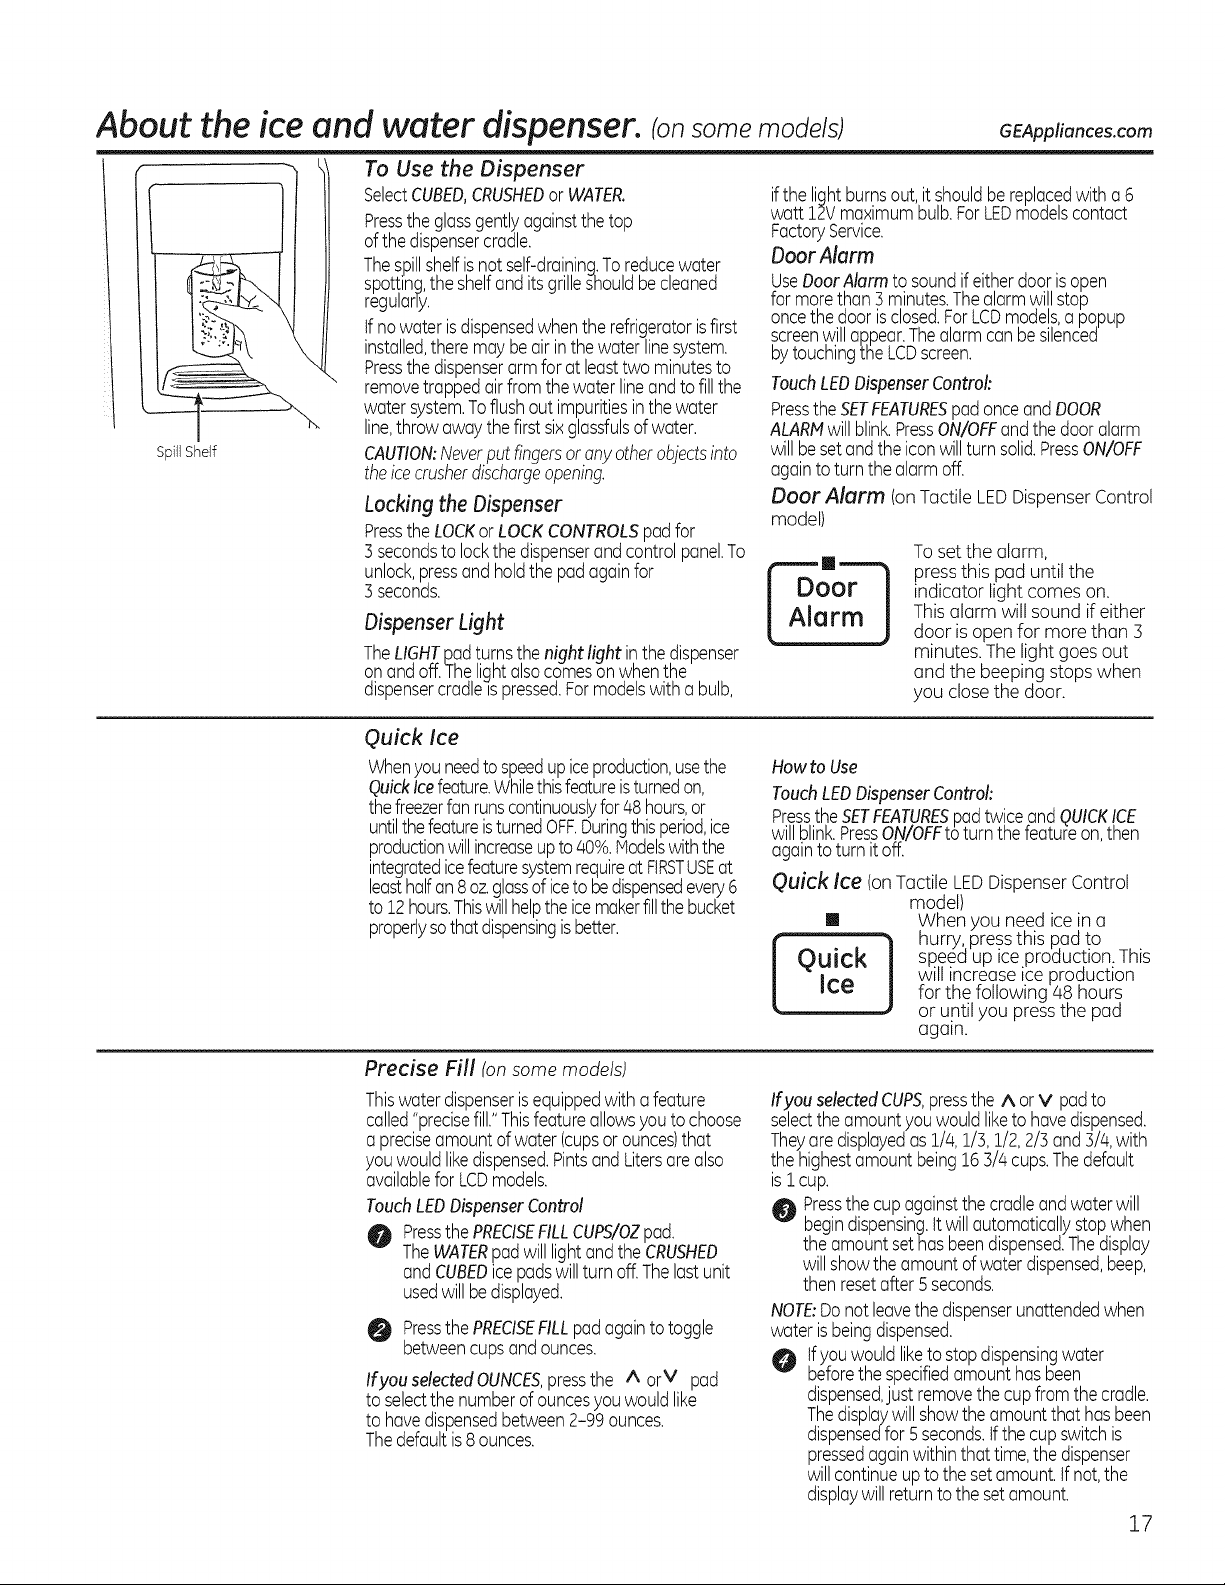
To Use the Dispenser
SpillShelf
SelectCUBED,CRUSHEDorWATER.
Pressthe glassgentlyagainstthe top
ofthedispensercradle.
Thespillshelfisnot self-draining.Toreducewater
spot!ing,the shelfand itsgrilleshouldbecleaned
regulany.
tfnowater isdispensedwhenthe refrigeratorisfirst
installed,theremaybeair inthewater linesystem.
Pressthe dispenserarmforat leasttwo minutesto
removetrappedairfromthe waterlineandto fillthe
water system.Toflushoutimpuritiesin thewater
line,throwawaythefirstsixglassfulsofwater.
CAUTION:Neverput fingersor anyotherobjects into
theicecrusherdischargeopening.
Locking the Dispenser
Pressthe LOCKorLOCKCONTROLSpadfor
3secondsto lockthedispenserandcontrolpanel.To
unlock,pressand holdthepadagainfor
3seconds.
DispenserLight
TheLIGHTpadturnsthenight light inthe#spenser
onandoff.Thelightalsocomesonwhenthe
dispensercradleispressed.Formodelswitha bulb,
ifthe lightburnsout,itshouldbereplacedwith a 6
watt 12Vmaximumbulb.ForLEDmodelscontact
FactoryService.
OoorAlarm
UseDoorAlarm to soundifeitherdoorisopen
formorethan3minutes.Thealarmwillstop
oncethedoor isclosed.ForLCDmodels,a popup
screenwillaRpear.Thealarmcanbesilenced
bytouchingtheLCDscreen.
TouchLEDDispenserControl:
Pressthe SETFEATURESpadonceandDOOR
ALARMwill blink.PressON/OFFandthedooralarm
willbesetandtheiconwillturnsolid.PressON/OFF
againtoturn thealarmoff.
Door Alarm (onTactile LEDDispenserControl
model)
Toset the alarm,
press this pad until the
indicator light comes on.
Thisalarm will sound if either
door is open for more than 3
minutes. The light goesout
and the beeping stops when
you closethe door.
Quick Ice
Whenyouneedtospeedupiceproduction,usethe
QuickIcefeature.Whilethisfeatureisturnedon,
thefreezerfanrunscontinuouslyfor48hours,or
untilthefeatureisturnedOFF.Duringthisperiod,ice
productionwillincreaseupto40%.Modelswiththe
integratedicefeaturesystemrequireat FIRSTUSEat
leasthalfan8oz.glassof icetobedispensedevery6
to12hours.Thiswillhelptheicemakerfillthebucket
properlysothatdispensingisbetter.
Precise Fill (on some models)
Thiswaterdispenserisequippedwitha feature
called"precisefill."Thisfeatureallowsyoutochoose
a preciseamountof water(cupsor ounces)that
youwouldlikedispensed.Pintsand Litersarealso
availableforLCDmodels.
TouchLEDDispenserControl
O Pressthe PRECISEFILLCUPS/OZpad.
TheWATERpadwilllightandtheCRUSHED
andCUBEDicepadswillturn off.Thelastunit
usedwillbedisplayed.
0 Pressthe PRECISEFILLpadagaintotoggle
betweencupsandounces.
Ifyou selectedOUNCES,pressthe A arM pad
to selectthenumberofouncesyouwouldlike
to havedispensedbetween2-99ounces.
Thedefaultis 8ounces.
Howto Use
TouchLEDDispenserControl:
PresstheSETFEATURESpadtwicegndQUICK!CE
willblink.PressON/OFFtoturntheteatureon then
ago ntoturn t off.
Quick Ice (onTactile LEDDispenserControl
model)
[] When you need icein a
I '_ hurry, pressthis pad tO .
Quick J speed up ice production.This
_Ce tar the following 48 hours
will increase ice production
or until you pressthe pad
again.
Ifyou selected CUPS,pressthe A or V pad to
select the amount you would liketo have dispensed.
They are displayed as 1/4, 1/3, 1/2, 2/3 and 5/4, with
the highest amount being 16 ]/4 cups.The default
is i cup.
O Pressthe cup against the cradle and water will
begindispensing. It will automatically stop when
the amount sethas beendispensed. The display
will show the amount of water dispensed,beep,
then resetafter 5seconds.
NOTE:Do not leavethe dispenser unattended when
water isbeing dispensed.
Ifyou would liketo stop dispensing water
before the specified amount has been
dispensed,just remove the cup from the cradle.
Thedisplay will show the amount that has been
dispensed for 5 seconds. Ifthe cup switch is
pressed again within that time, the dispenser
will continue up to the setamount. If not,the
display will return to the set amount.
17
About the ice and water dispenser. Consome models)
important Facts About Your Dispenser
Do not add ice from trays or bags to
the storage drawer. It may not crush or
dispense well.
Avoid overfilling glass with ice and use
of narrow glasses. Backed-up ice can
jam the chute or cause the door in the
chute to freeze shut. If ice is blocking
the chute, poke it through with a
wooden spoon.
Beverages and foods should not be
quick-chilled in the ice storage drawer.
Cans, bottles or food packages in the
storage drawer may cause the ice
maker or auger to jam.
To keep dispensed ice from missing the
glass, put the glass close to, but not
touching, the dispenser opening.
Some crushed ice may be dispensed
even though you selected CUBED.
This happens occasionally when a few
cubes accidentally get directed to
the crusher.
After crushed ice is dispensed, some
water may drip from the chute.
Sometimes a small mound of snow
will form on the door in the ice chute.
This condition is normal and usually
occurs when you have dispensed
crushed ice repeatedly. The snow
will eventually evaporate.
Care and cleaning of the refrigerator.
Cleaning the Outside
Thestainless steel panels and door handles
(onsome models)can be cleanedwith
a commercially available stainless steel
cleaner.A spray-on stainless steel cleaner
works best.
Do not useappliance wax or polish
on the stainless steel.
Keepthe outside clean. Wipe with a
clean cloth lightly dampened with kitchen
appliancewax or mild liquid dishdetergent.
Dry and polishwith a clean, soft cloth.
Do not wipe the refrigerator with a soiled
dish cloth or wet towel. These may leave
a residue that can erode the paint. Do not
usescouring pads, powdered cleaners,
bleach or cleaners containing bleach
because these products can scratch and
weaken the paint finish.
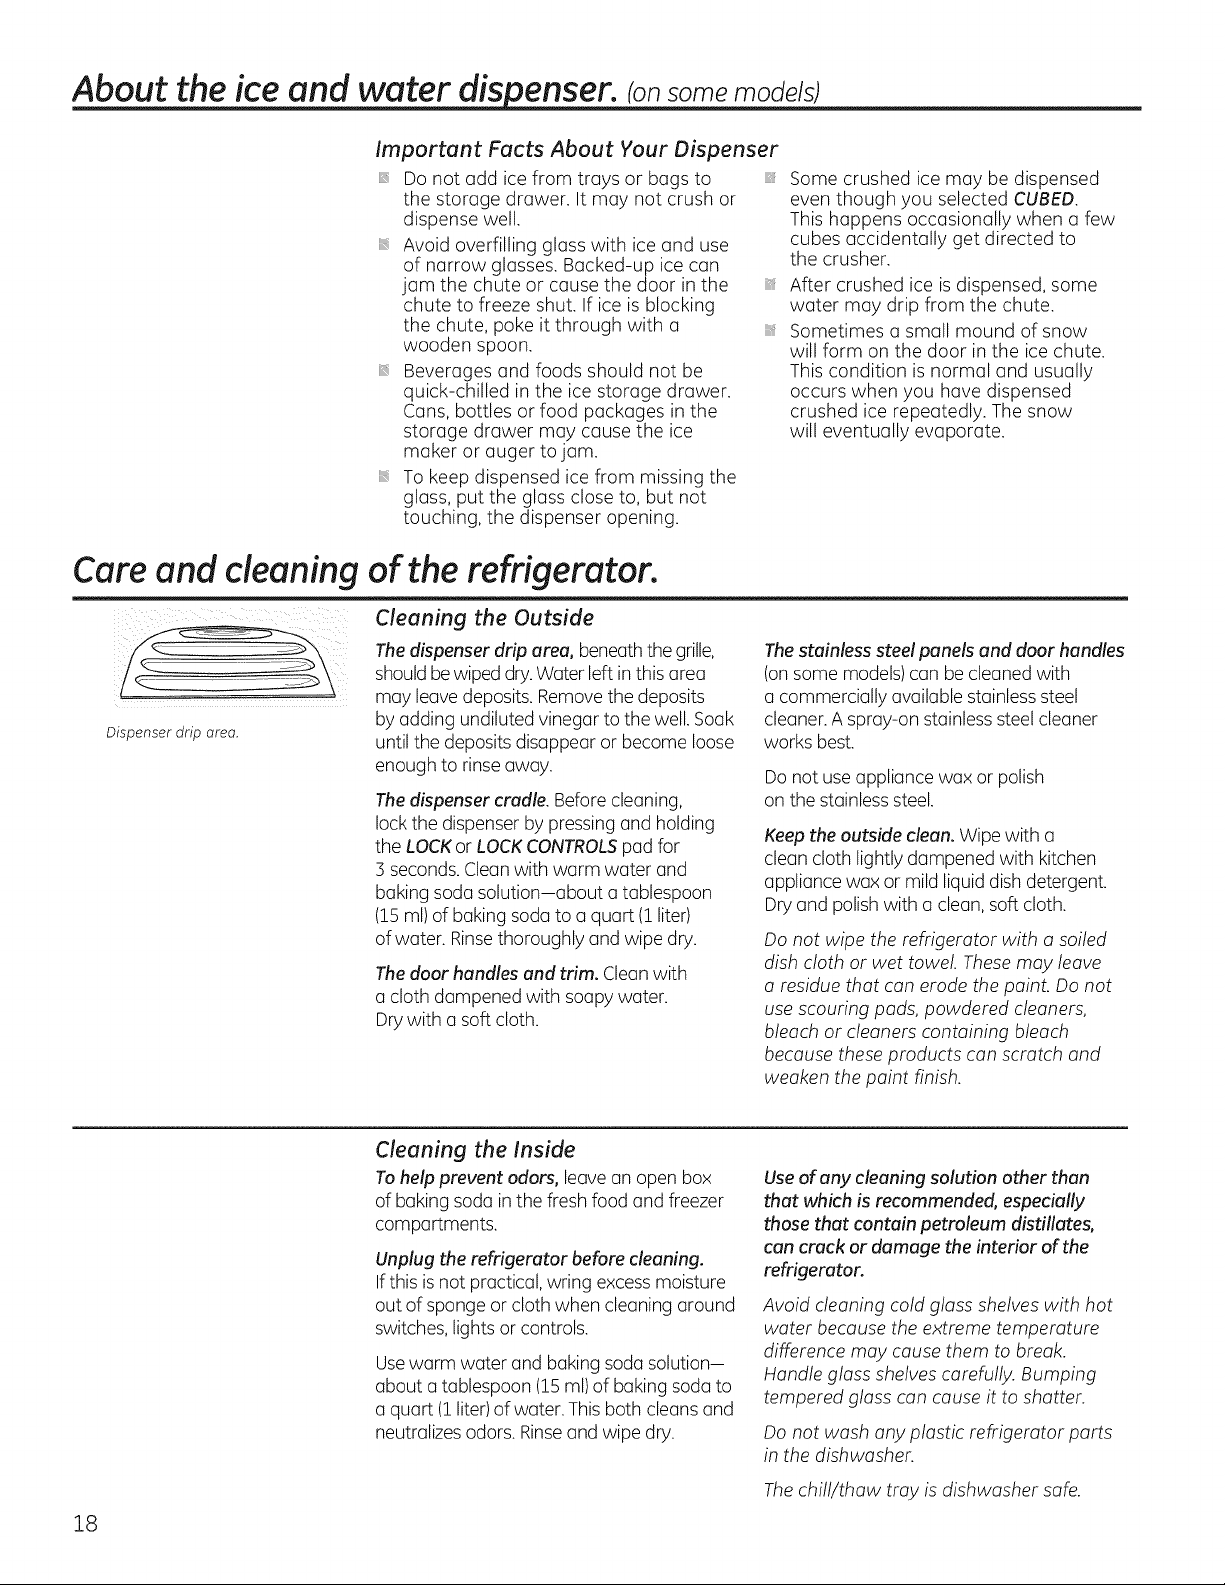
Dispenser drip area.
Thedispenser drip area, beneath thegrille,shouldbewiped dry.Water left in this area
may leave deposits. Removethe deposits
by adding undiluted vinegar to the well. Soak
until the deposits disappear or become loose
enough to rinseaway.
Thedispenser cradle. Before cleaning,
lock the dispenser by pressing and holding
the LOCKor LOCKCONTROLSpad for
3 seconds.Cleanwith warm water and
baking soda solution-about a tablespoon
(15 ml)of baking soda to a quart (Zliter)
of water. Rinsethoroughly and wipe dry.
Thedoor handles and trim. Clean with
a cloth dampened with soapy water.
Drywith a soft cloth.
18
Cleaning the inside
Tohelp prevent odors, leavean open box
of baking soda in the fresh food and freezer
compartments,
Unplug the refrigerator before cleaning.
Ifthis isnot practical, wring excessmoisture
out of sponge or cloth when cleaning around
switches, lights or controls.
Usewarm water and baking soda solution-
about a tablespoon (lS ml)of baking sodato
a quart (1liter)of water. This both cleans and
neutralizes odors. Rinseand wipe dry.
Use of any cleaning solution other than
that which is recommended, especially
those that contain petroleum distillates,
can crock or damage the interior of the
refrigerator.
Avoid cleaning cold glass shelves with hot
water because the extreme temperature
difference may cause them to break.
Handle glass shelves carefully. Bumping
tempered glass can cause it to shatter.
Do not wash any plastic refrigerator parts
in the dishwasher.
Thechill/thaw tray is dishwasher safe.
Behind the Refrigerator
Becareful when moving the refrigerator away
from the wall. All types of floor coverings can
be damaged, particularly cushioned coverings
and those with embossedsurfaces.
Pullthe refrigerator straight out and return it
to position by pushing it straight in.Movingthe
refrigerator in a side direction may result in
damage to the floor covering or refrigerator.
Preparing for Vacation
Forlong vacations or absences,remove food
and unplug the refrigerator. Cleanthe interior
with a baking soda solution of one tablespoon
(15 ml)of baking soda to one quart (! liter) of
water. Leavethe doors open.
Setthe ice maker power switch to the 0 (off)
position and shut offthe water supply to the
refrigerator.
GEAppliances.com
When pushing the refrigerator back, make
sureyou don't roll over the power cord or ice
maker supply line.
Ifthe temperature can drop below freezing,
have a qualified servicer drain the water
supply systemto prevent serious property
damage due to flooding.
Preparing to Move
Secureall looseitems such as shelvesand
drawers by taping them securely in placeto
prevent damage.
When usinga hand truck to move the
refrigerator, do not rest the front or back of the
refrigerator against the hand truck. This could
damage the refrigerator. Handle only from the
sides of the refrigerator.
Be sure the refrigerator stays in an upright
position during moving.
19
Replacing the light bulbs.consome models)
NOTE: Turning the refrigerator off via the controls on the touch panel does not shut off electrical power to the refrigerator
or to the light circuit.
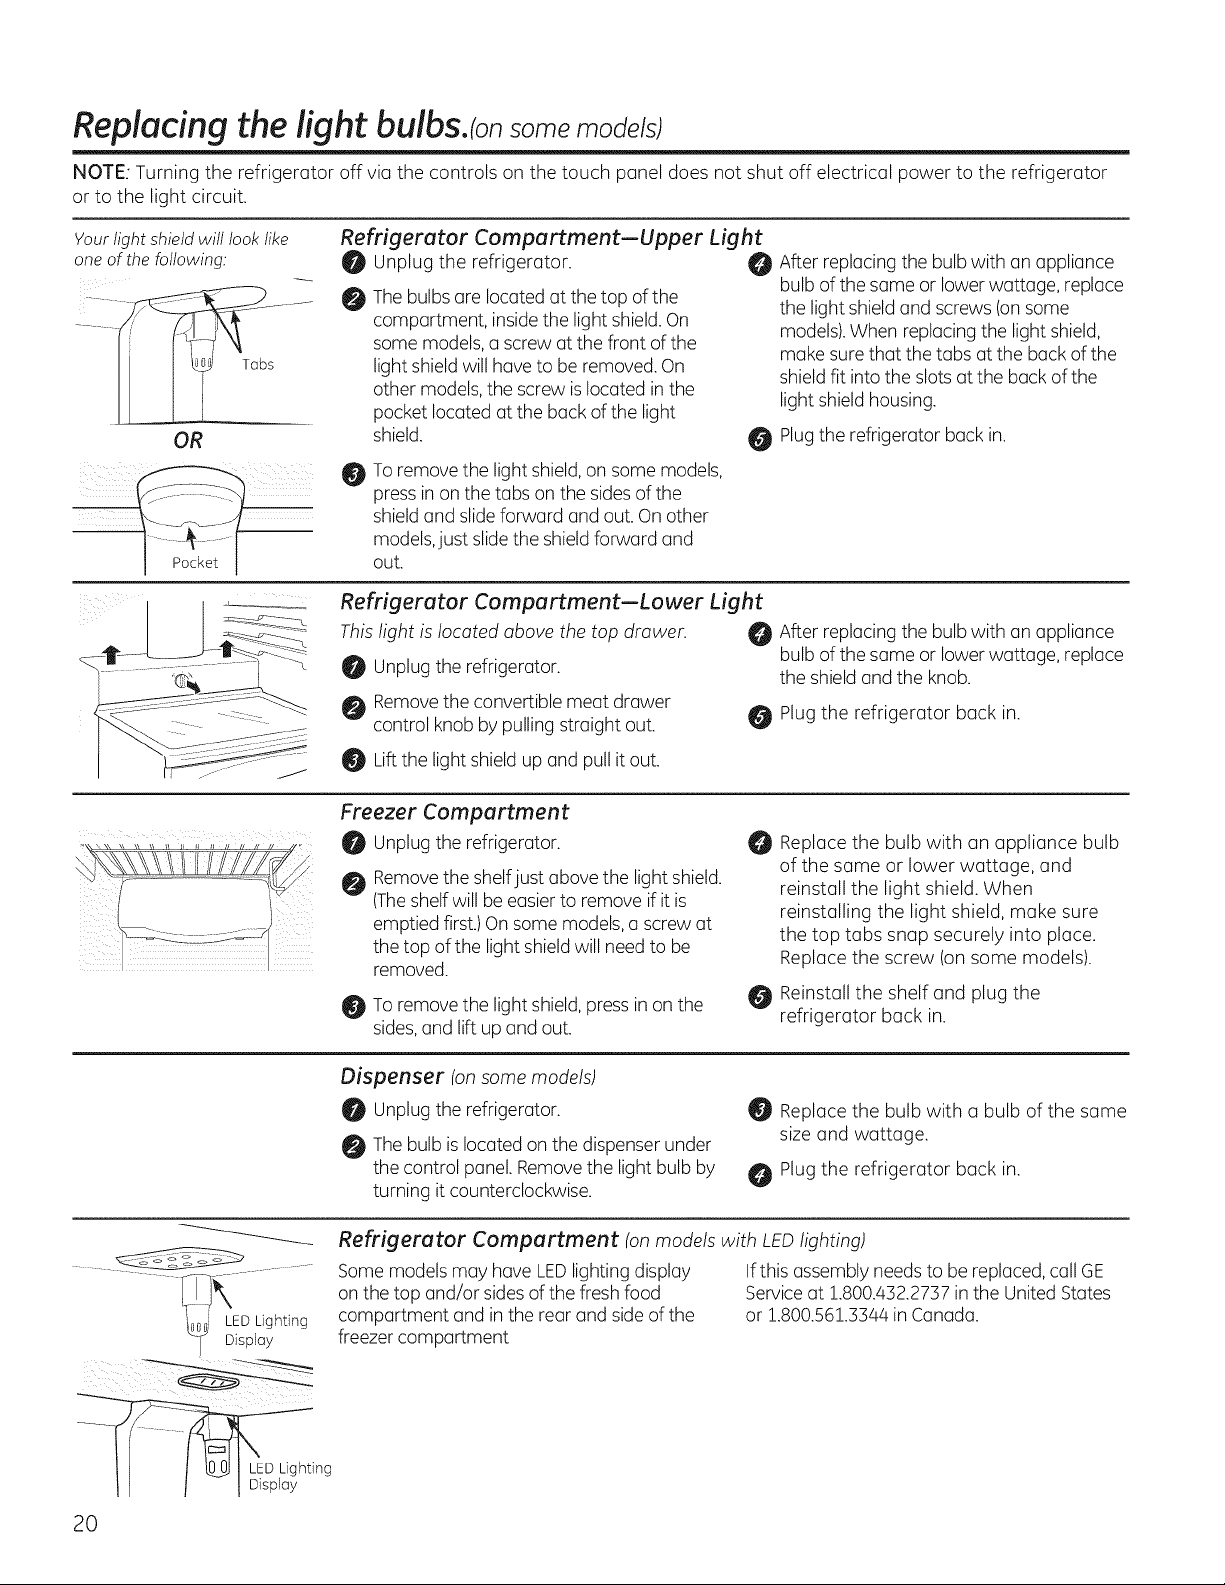
Your light shield will look like
one of the following:
Tabs
Refrigerator Compartment--Upper Light
0 Unplug the refrigerator.
0 Thebulbs are located at the top ofthe
OR
! Sj %¸¸¸¸¸;¸¸¸¸¸¸¸¸¸¸¸[¸¸¸¸O
Refrigerator Compartment--Lower Light
This light islocated above the top drawer. _ After replacing the bulb with an appliance
j 0 Liftthe light shield up and pull it out.
Freezer Compartment
¸¸
After replacing the bulb with an appliance
bulb of the same or lower wattage, replace
compartment, inside the light shield.On
some models,a screw at the front of the
light shield will have to be removed. On
other models,the screw islocated in the
pocket located at the back of the light
shield.
Toremove the light shield, on some models,
press in on the tabs on the sidesof the
shieldand slideforward and out. On other
models,just slidethe shieldforward and
out.
Unplugthe refrigerator, the shieldand the knob.
Removethe convertible meat drawer
control knob by pulling straight out. _ Plugthe refrigerator back in.
Unplugthe refrigerator.
Removethe shelfjust above the light shield.
(Theshelf will be easierto remove if it is
emptied first.)On some models, a screw at
the top of the light shieldwill need to be
removed.
Toremove the light shield, press in on the
sides,and lift up and out.
the light shield and screws (onsome
models).When replacing the light shield,
make sure that the tabs at the back of the
shieldfit into the slots at the back of the
light shield housing.
Plugthe refrigerator back in.
bulb of the same or lower wattage, replace
Replace the bulb with an appliance bulb
O
of the same or lower wattage, and
reinstall the light shield. When
reinstalling the light shield, make sure
the top tabs snap securely into place.
Replace the screw (on some models).
Reinstall the shelf and plug the
refrigerator back in.
I r I I Display
20
iii iiii_il i __
Dispenser (onsome models)
Unplugthe refrigerator.
Thebulb islocated on the dispenser under
the control panel.Removethe light bulb by
turning it counterclockwise.
Refrigerator Compartment (on models with LEDlighting)
Somemodels may have LEDlighting display Ifthis assembly needsto be replaced,call GE
on the top and/or sides of the fresh food Serviceat 1.800.432.2737in the United States
compartment and inthe rear and sideof the or 1.800.56!.3344 in Canada.
freezer compartment
Replace the bulb with a bulb of the same
size and wattage.
Plug the refrigerator back in.
Trim kits and decorator panels.
GEAppliances.com
For CustomStyle ''_models
Read these instructions completely and carefully.
Before You Begin
Some models ore equipped with trim kits that allow you to install door ponds. You con order pre-cut block, white,
bisque or stainless steel decorator ponds from GE Ports and Accessories, 800.626.2002, or you con add wood
ponds to match your kitchen cabinets.
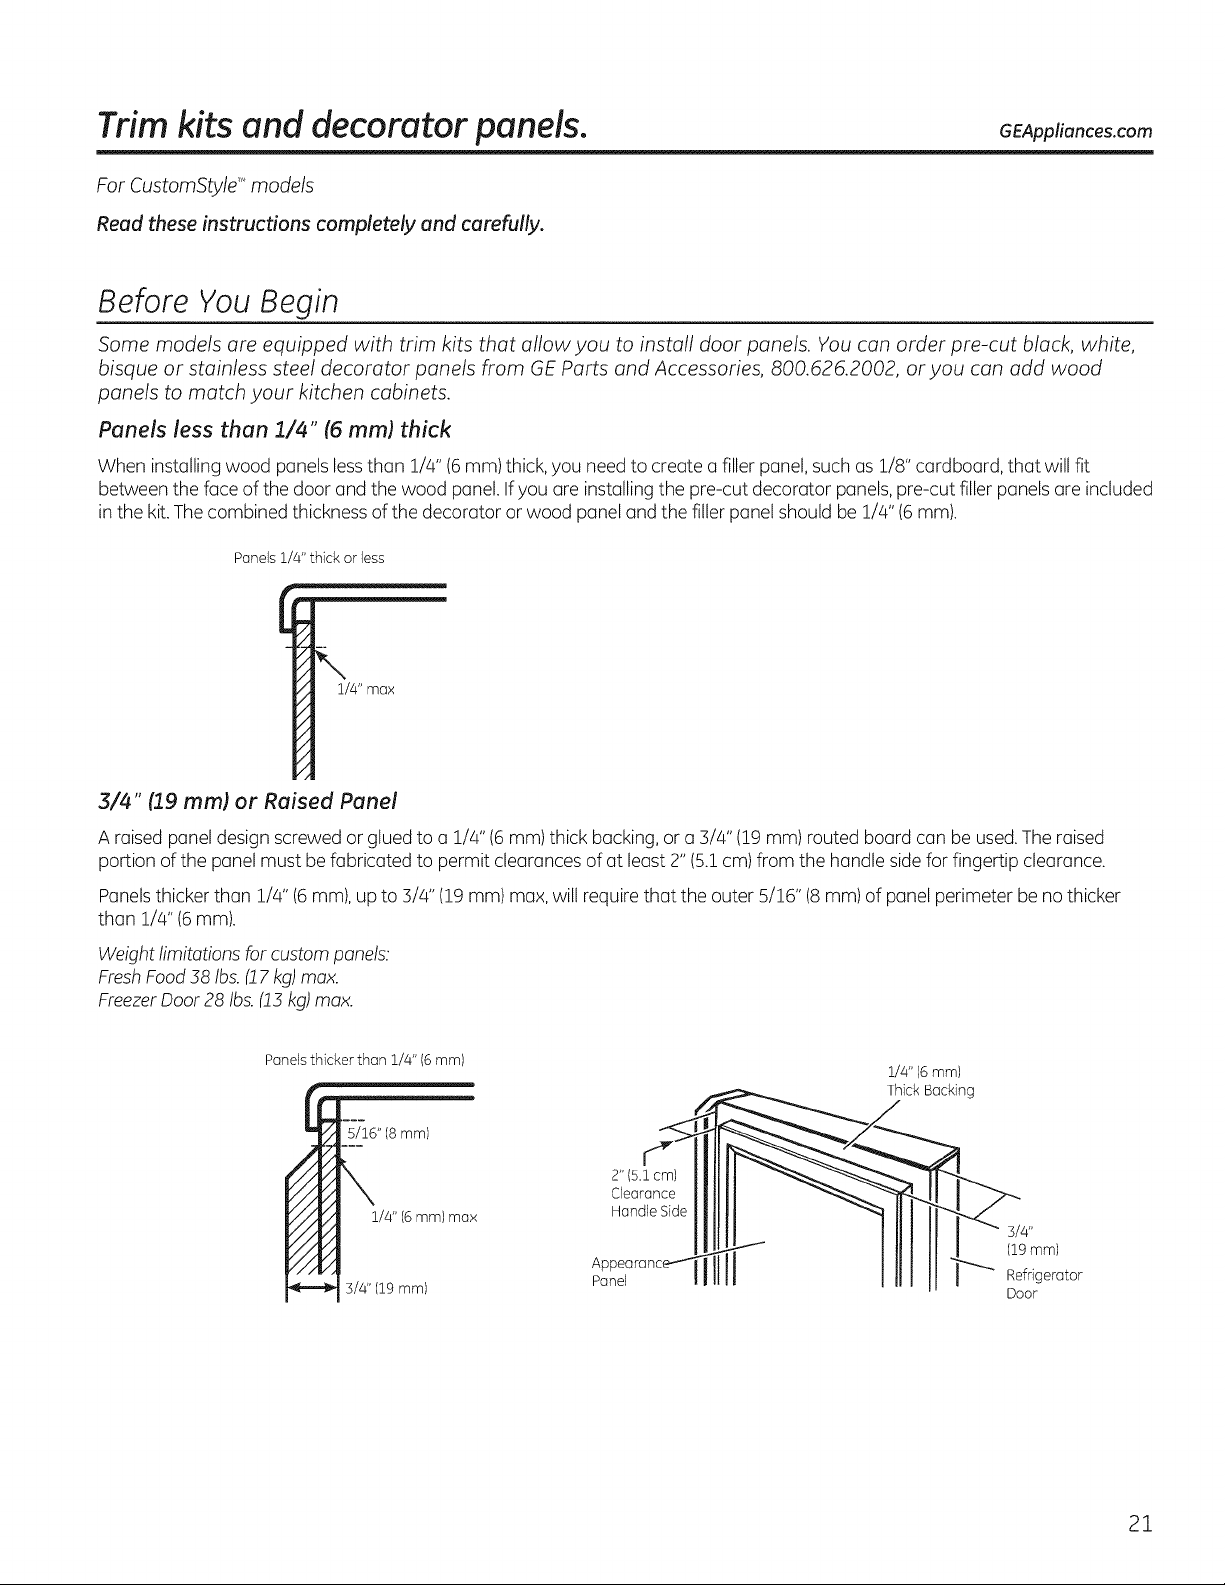
Panels less than 1/4" (6 mm) thick
When installing wood panelslessthan 1/4" (6mm) thick, you need to create a filler panel, such as 1/8" cardboard, that will fit
between the face of the door and the wood panel.Ifyou are installing the pre-cut decorator panels,pre-cut filler panels are included
in the kit.The combined thickness ofthe decorator or wood panel and the filler panel should be !/4" (6mm).
Panels 1/4" thick or less
3/4" (19 mm) or Raised Panel
A raised panel design screwed or glued to a 1/4" (6mm) thick backing,or a 3/4" (19 mm) routed board can be used.The raised
portion of the panel must be fabricated to permit clearances of at least 2" (5.1cm) from the handle sidefor fingertip clearance.
Panelsthicker than !/4" (6 mm),upto 3/4" (19 mm) max, will require that the outer 5/16" (8 mm) of panel perimeter be no thicker
than !/4" (6mm).
Weight limitations for custom panels.
FreshFoodif8 Ibs.(! 7kg) max.
FreezerDoor 28 Ibs.(!5 kg)max.
Panels thicker than 1/4" 16mm)
5/16" (8mm)
1/4" (6ram)max
3/4" (19 mm)
2" (5.1cm)
Clearance
Handle Side
Panel
I
1/4" (6mm)
Thick Backing
3/4"
(19mm)
Refrigerator
Door
21

Trim kits and decorator panels.
23' Dimensions for Custom Wood Panels
Theareas at the top of the panels need to be cut out ofthe panels.
FreezerPanel
Without Dispenser
FreezerPanel
With Dispenser
FreshFoodPanel
Cutout--_
t
5/16"
(8 mm)
I"-" 1/8" (5 mm)
i
L
_1
Cutout --_
t
5/16"
(8 mm:
p- 1/8" (3 mm)
i
i
.,I
17YJ'
(45.4 cm)
67%2"
(170.9 cm)
FRONT
4_ !41%_''
(36.8 cm)
FRONT
141%2"..
(36.8 cm)
3P/8"
(85.4 cm)
25' CustomStyle T"Dimensions for Custom Wood Panels
Theareas at the top of the panels need to be cut out ofthe panels.
1/8" (3 mm)-- N
67%2"
(170.9 cm)
FRONT
,_ 191%Z' ..__
(49.5cm)
!,
Cutout
m
m
----_ 5/16"
I..,
"-'} (8 mm)
FreezerPanel
Without Dispenser
Cutout--m _- 1/8" (3 mm)
",
:::: J
t
5/16"
(8 ram)
69"
(175.3cm)
FRONT
14z%2" _,
"(36.8 cm)
Cutout -_"
t
5/16"
18 mm)
Freezer Panel
With Dispenser
I"-- 1/8" (3 mm)
i
J
17"
(43.2 cm)
FRONT
14_%_'' .
(36.8 cm)
36V4"
(92.0 cm)
FreshFoodPanel
1/8" (3 mm) ,--_I
-i_
69"
(175.3cm)
FRONT
_. 19zsA2'' ___
(49.5 cm)
_- Cutout
i
----_ 5/16"
"'] (8 mm)
22
Inserting the door panels.
Read these instructions completely and carefully.
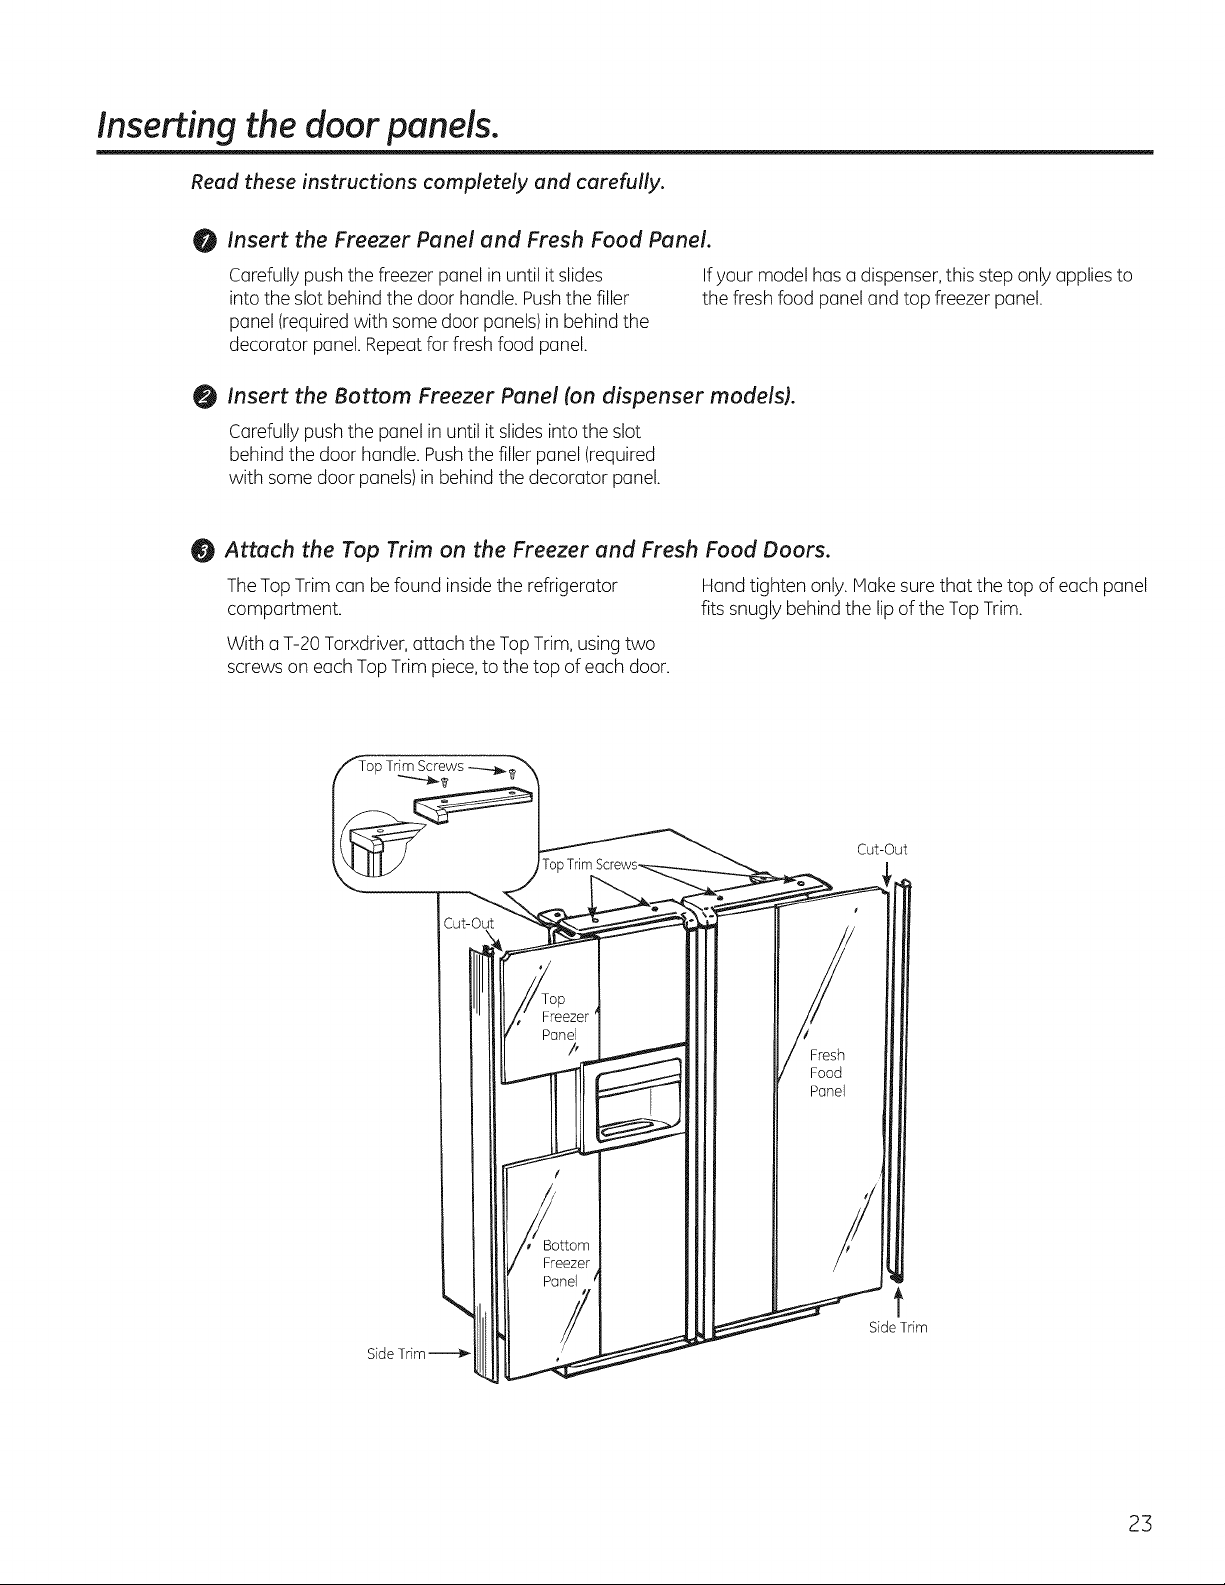
Insert the Freezer Panel and Fresh Food Panel.
0
Carefully push the freezer panel in until it slides
into the slot behind the door handle. Pushthe filler
panel (requiredwith some door panels/in behind the
decorator panel. Repeatfor fresh food panel.
0
Insert the Bottom Freezer Panel (on dispenser models).
Carefully push the panel in until it slides into the slot
behind the door handle. Pushthe filler panel (required
with some door panels)in behind the decorator panel.
0 Attach the Top Trim on the Freezer and Fresh Food Doors.
TheTop Trim can be found insidethe refrigerator Hand tighten only. ivl(]kesurethat the top of each panel
compartment, fits snugly behind the lip of the TopTrim.
With a T-20 Torxdriver,attach the Top Trim,using two
screws on each TopTrim piece,to the top of each door.
Ifyour model hasa dispenser,this step only applies to
the fresh food panel and top freezer panel.
SideTrim
Cut-Out
t
SideTrim
23
Inserting the door panels.
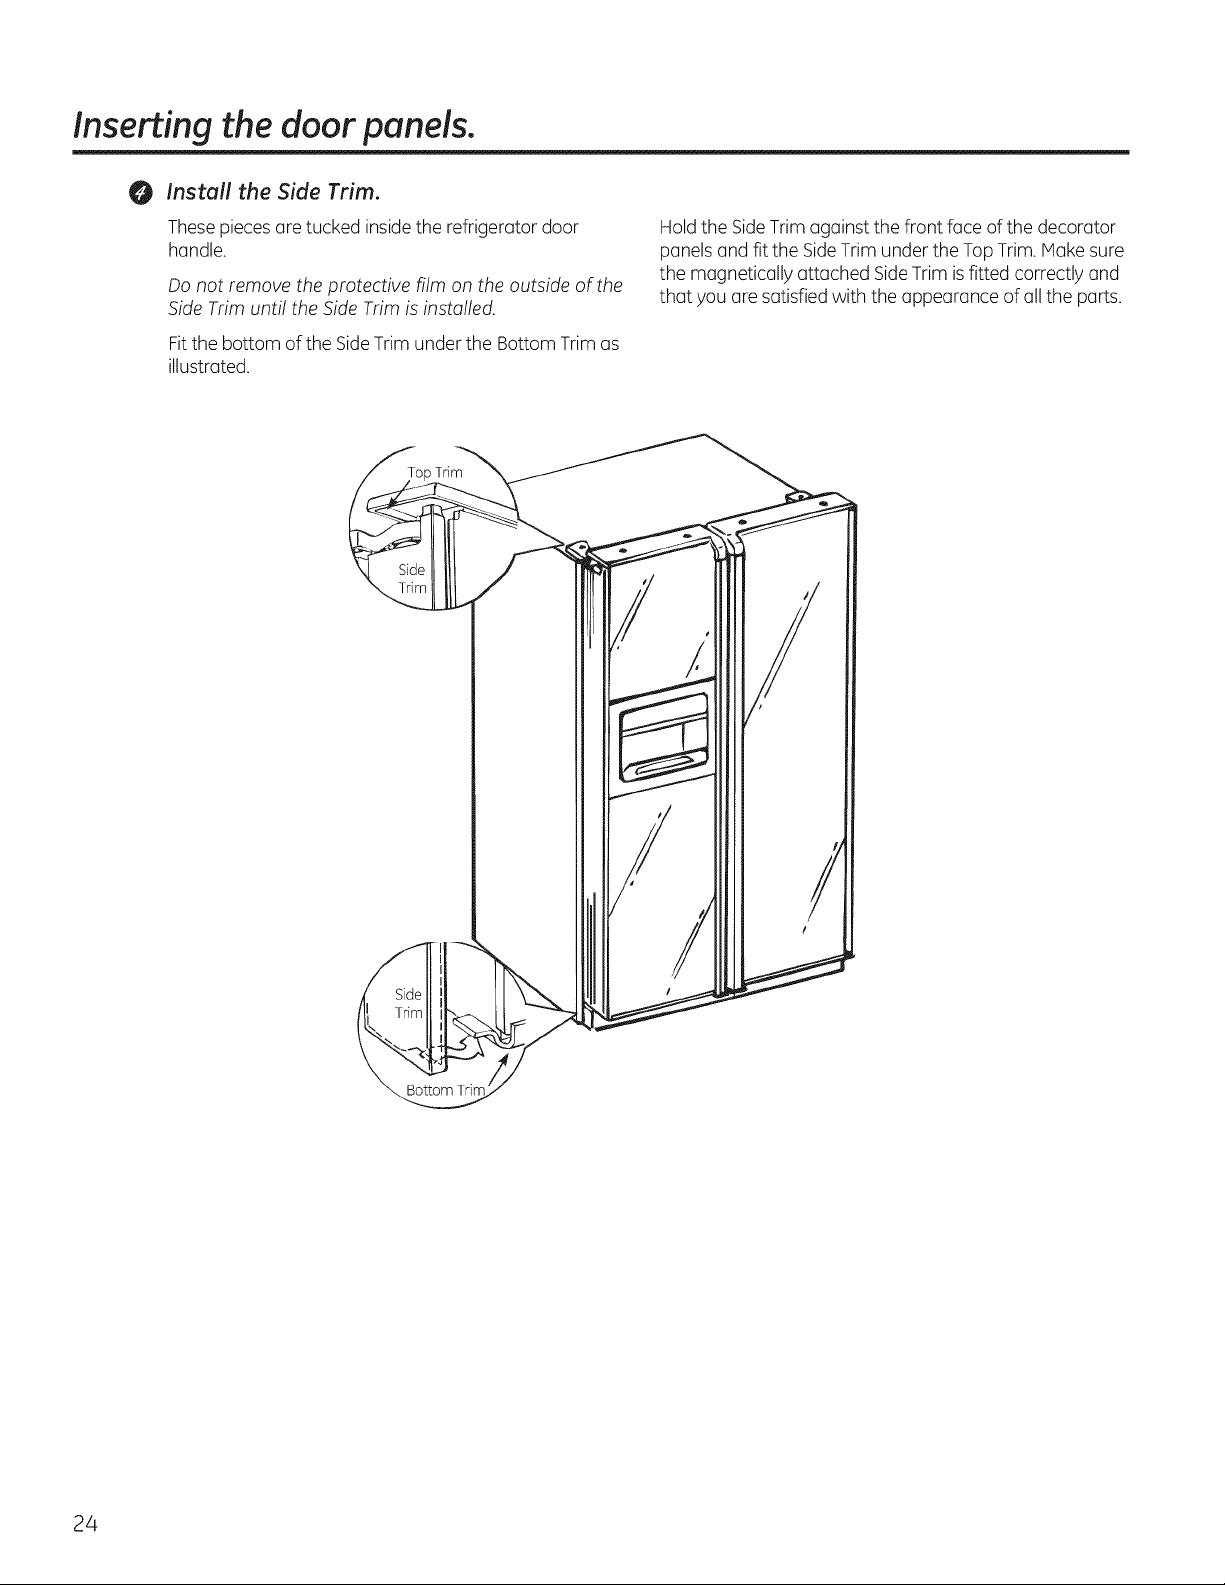
/nsta// the Side Trim.
O
Thesepiecesare tucked insidethe refrigerator door
handle.
Do not remove the protective film on the outside of the
Side Trim until the Side Trim is installed.
Fitthe bottom of the SideTrim under the Bottom Trim as
illustrated.
Trim
Holdthe SideTrim against the front face of the decorator
panelsand fit the SideTrim under the TopTrim.Hake sure
the magnetically attached SideTrim is fitted correctly and
that you are satisfied with the appearance of all the parts.
24
Bottom Trim
I stall ti
efrigerator
I structi
Questions? Call 800.GE.CARES 1800.432.2737) or Visit our Website at: ge.com
In Canada, call 1.800.561.3344 or Visit our Website at: geappliances.ca
BEFORE YOU BEGIN
Read these instructions completely
and carefully.
. IMPORTANT - Savetheseinstructions
for local inspector's use.
" IMPORTANT - Observe all governing
codes and ordinances.
, Note to Installer- Be sure to leave these
instructions with the Consumer.
, Note to Consumer - Keep these instructions
for future reference.
. Skill level - Installation of this appliance requires
basic mechanical skills.
ns
Models 22, 23, 25, 26, 27 and 29
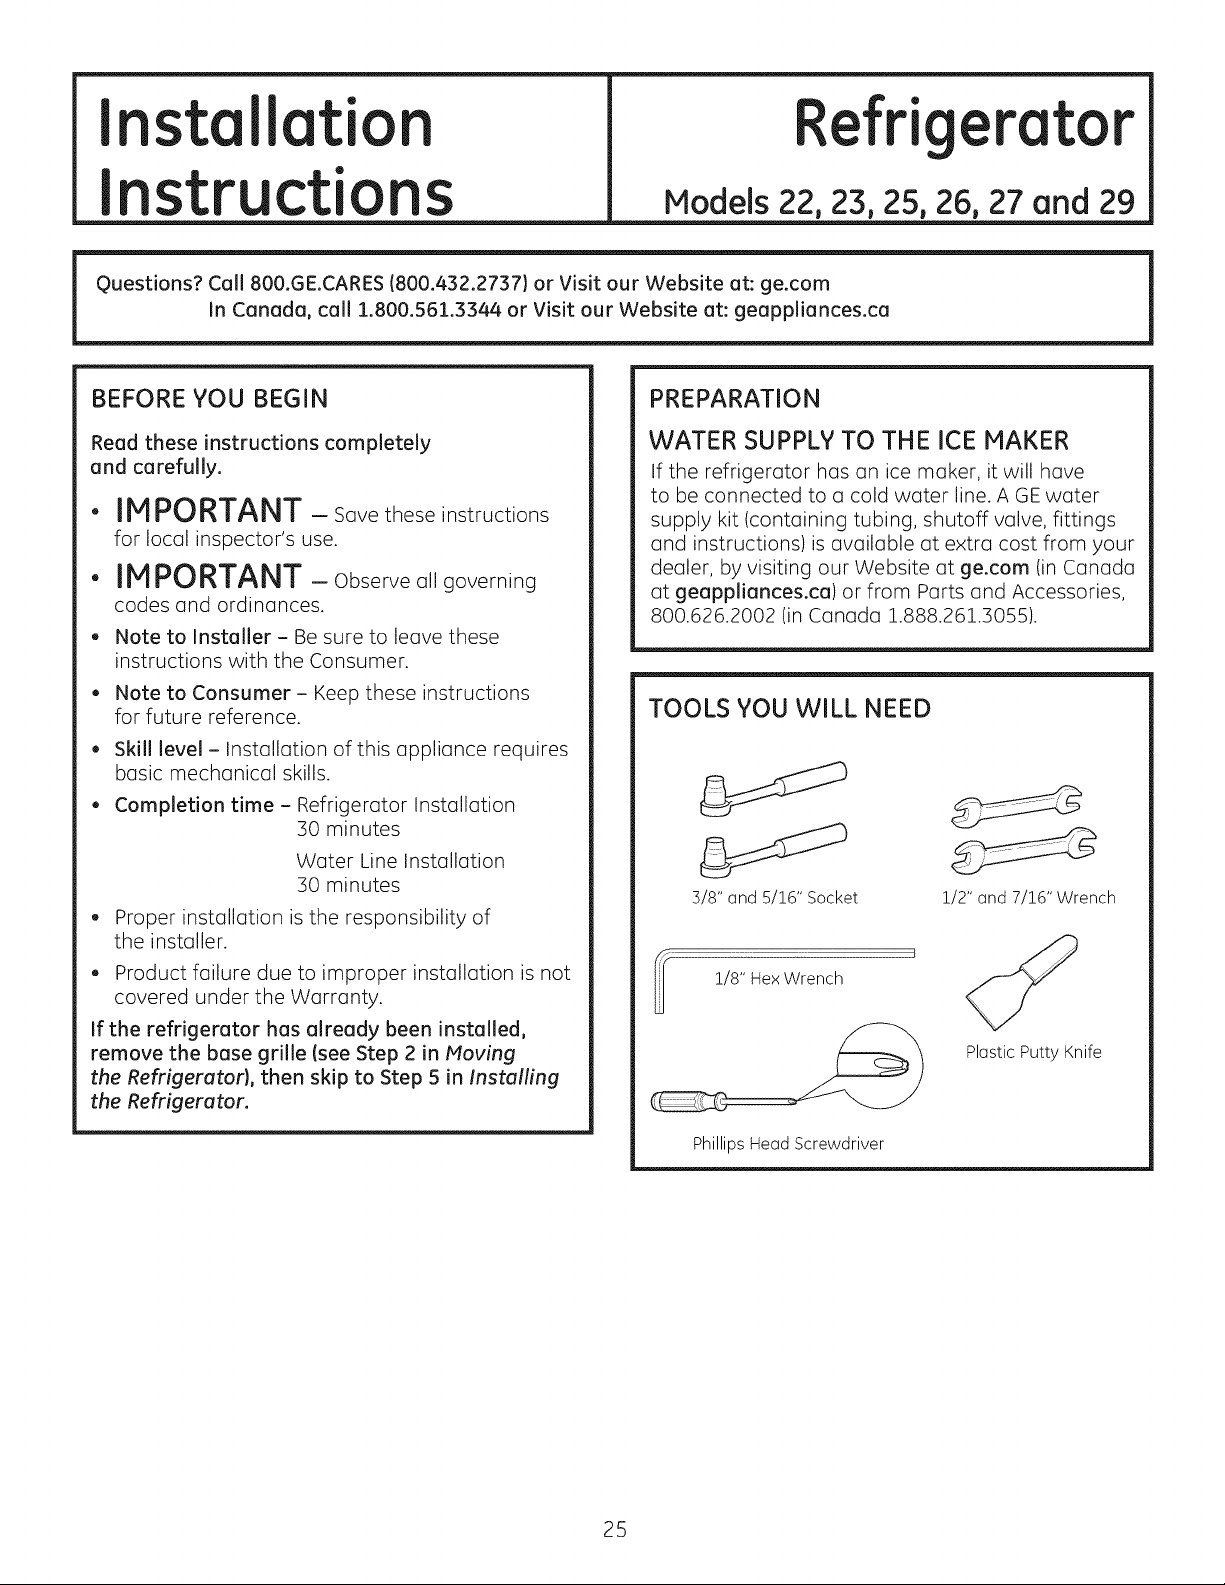
PREPARATION
WATER SUPPLY TO THE ICE MAKER
If the refrigerator has on ice maker, it will have
to be connected to a cold water line. A GE water
supply kit (containing tubing, shutoff valve, fittings
and instructions) is available at extra cost from your
dealer, by visiting our Website at ge.com (in Canada
at geappliances.ca) or from Parts and Accessories,
800.626.2002 (in Canada 1.888.261.3055).
TOOLS YOU WILL NEED
, Completion time - Refrigerator Installation
30 minutes
Water Line Installation
30 minutes
. Proper installation is the responsibility of
the installer.
, Product failure due to improper installation is not
covered under the Warranty.
If the refrigerator has already been installed,
remove the base grille {see Step 2 in Moving
the Refrigerator}, then skip to Step 5 in Installing
the Refrigerator.
3/8" and 5/16" Socket
1/8" Hex Wrench
Phillips Head Screwdriver
1/2"and 7/16" Wrench
U
Plastic Putty Knife
25
Installation Instructions
MOVING THE REFRIGERATOR
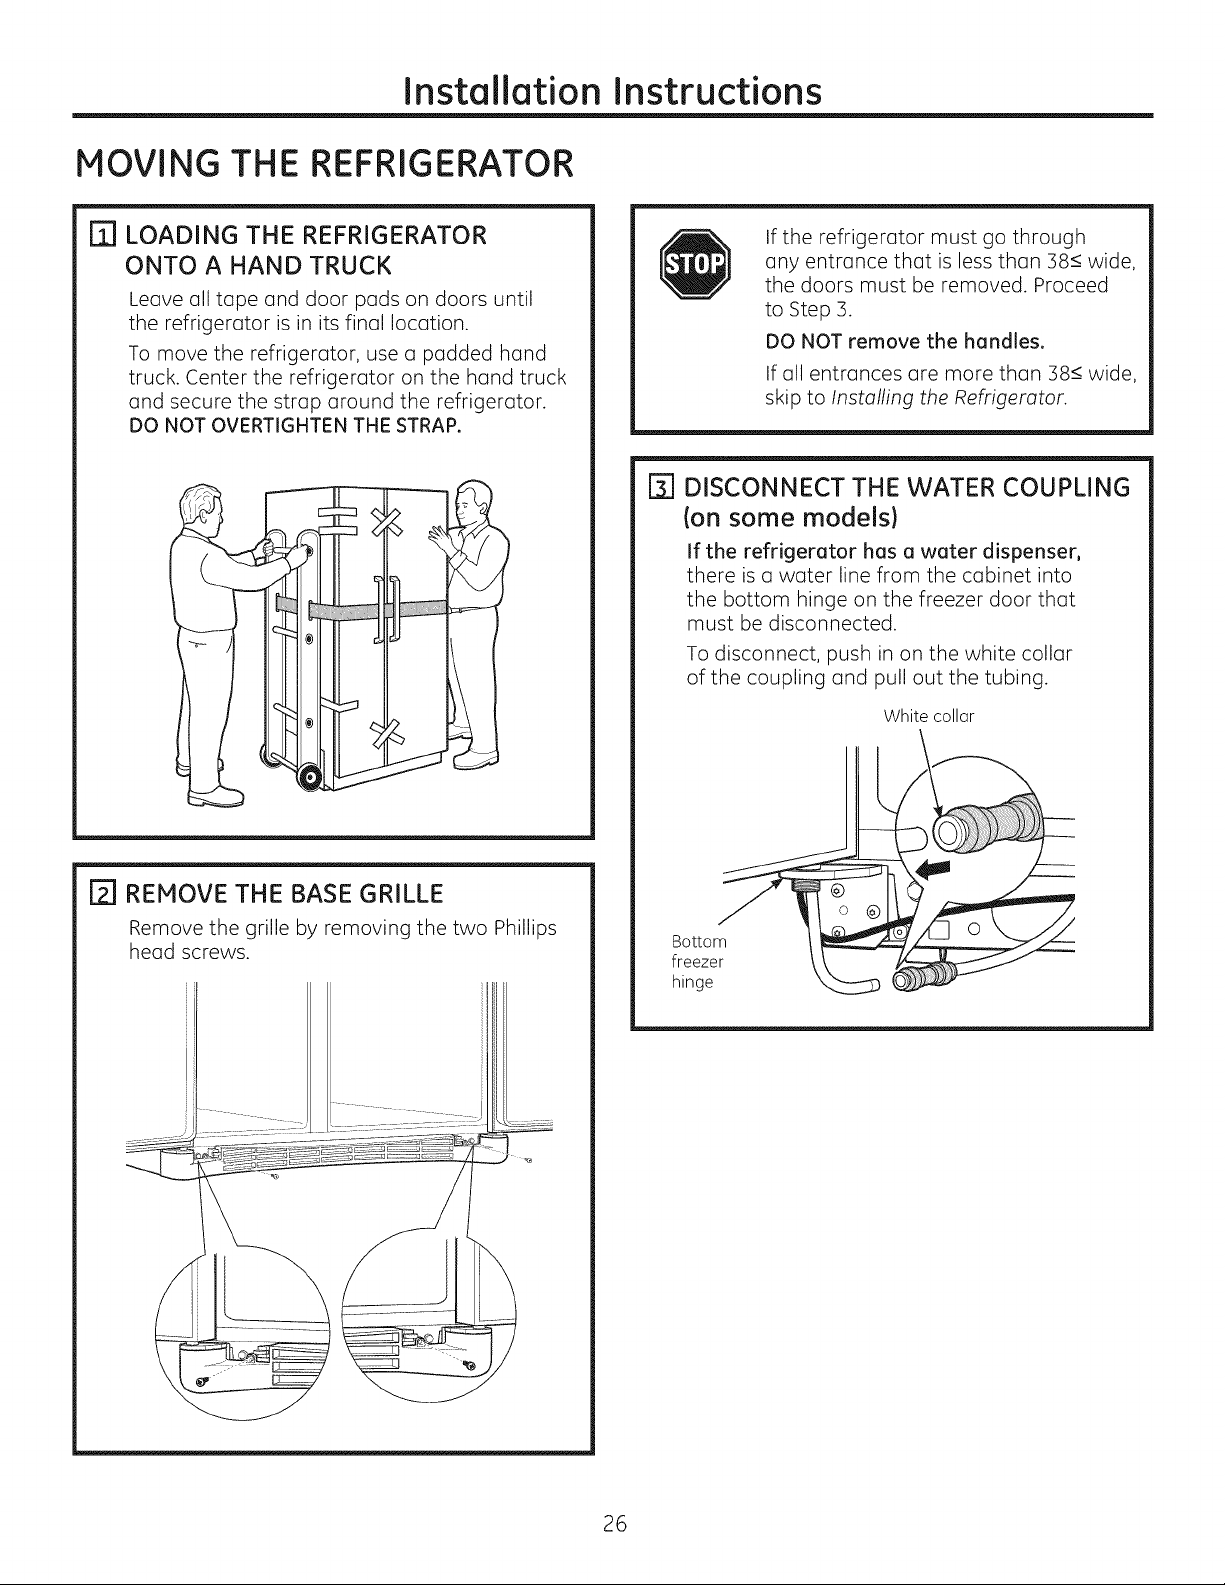
I'_ LOADING THE REFRIGERATOR
ONTO A HAND TRUCK
Leave all tape and door pads on doors until
the refrigerator is in its final location.
To move the refrigerator, use a padded hand
truck. Center the refrigerator on the hand truck
and secure the strap around the refrigerator.
DO NOT OVERTIGHTEN THE STRAP,
If the refrigerator must go through
any entrance that is less than 38< wide,
the doors must be removed. Proceed
to Step 3.
DO NOT remove the handles.
If all entrances are more than 38< wide,
skip to Installing the Refrigerator.
[] DISCONNECT THE WATER COUPLING
(on some modelsl
If the refrigerator has a water dispenser,
there is a water line from the cabinet into
the bottom hinge on the freezer door that
must be disconnected.
To disconnect, push in on the white collar
of the coupling and pull out the tubing.
White collar
I'_ REMOVE THE BASE GRILLE
Remove the grille by removing the two Phillips
head screws.
Bottom
freezer
hinge
26
Installation Instructions
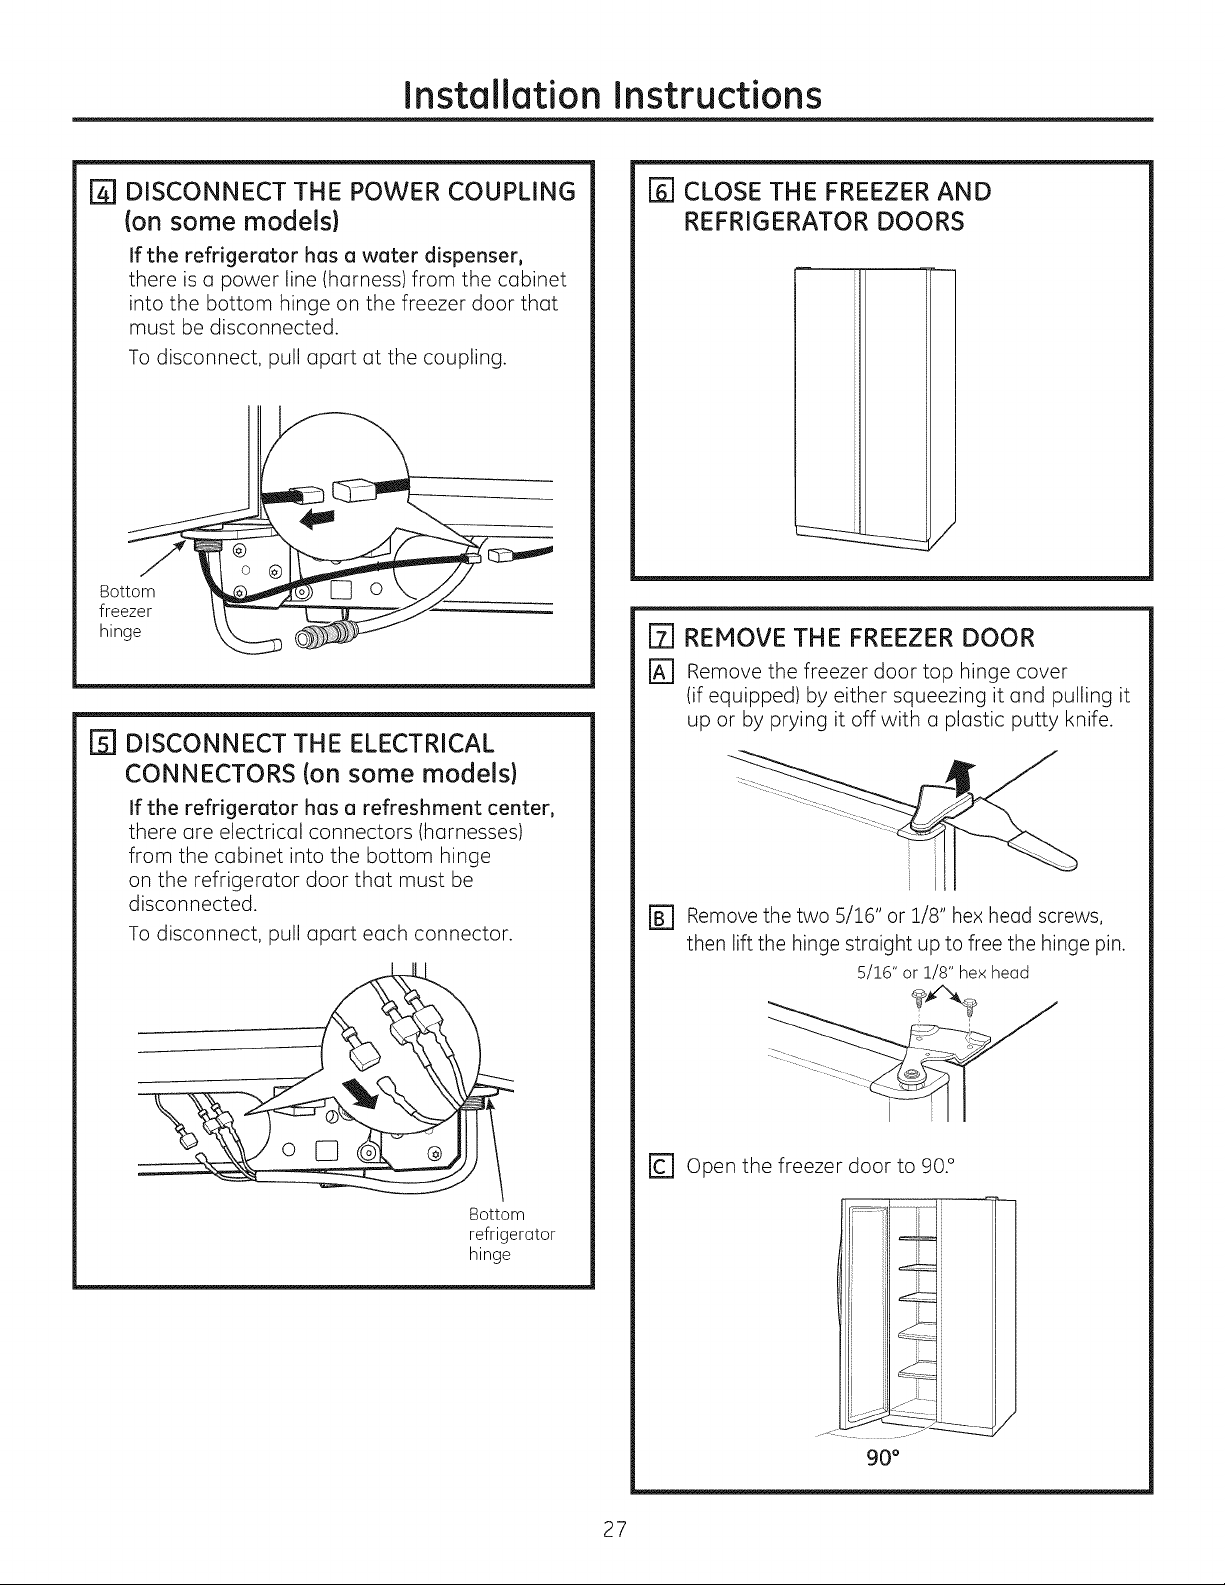
[_[] DISCONNECT THE POWER COUPLING
(on some models)
If the refrigerator has a water dispenser,
there is a power line (harness) from the cabinet
into the bottom hinge on the freezer door that
must be disconnected.
To disconnect, pull apart at the coupling.
Bottom
freezer
hing_
[] DISCONNECT THE ELECTRICAL
CONNECTORS (on some models)
If the refrigerator has a refreshment center,
there are electrical connectors (harnesses)
from the cabinet into the bottom hinge
on the refrigerator door that must be
disconnected.
To disconnect, pull apart each connector.
[_ CLOSE THE FREEZER AND
REFRIGERATOR DOORS
I
i
i
i
i
i
i
i
i
i
i
i
i
i
i
i
i
[] REMOVE THE FREEZER DOOR
r_ Remove the freezer door top hinge cover
(if equipped) by either squeezing it and pulling it
up or by prying it off with a plastic putty knife.
Remove the two 5/16" or 1/8" hex head screws,
%
then lift the hinge straight up to free the hinge pin.
S/16" or 1/8" hex head
Bottom
refrigerator
hinge
r_ open the freezer door to 90.°
27
Installation Instructions
MOVING THE REFRIGERATOR (CONT.}
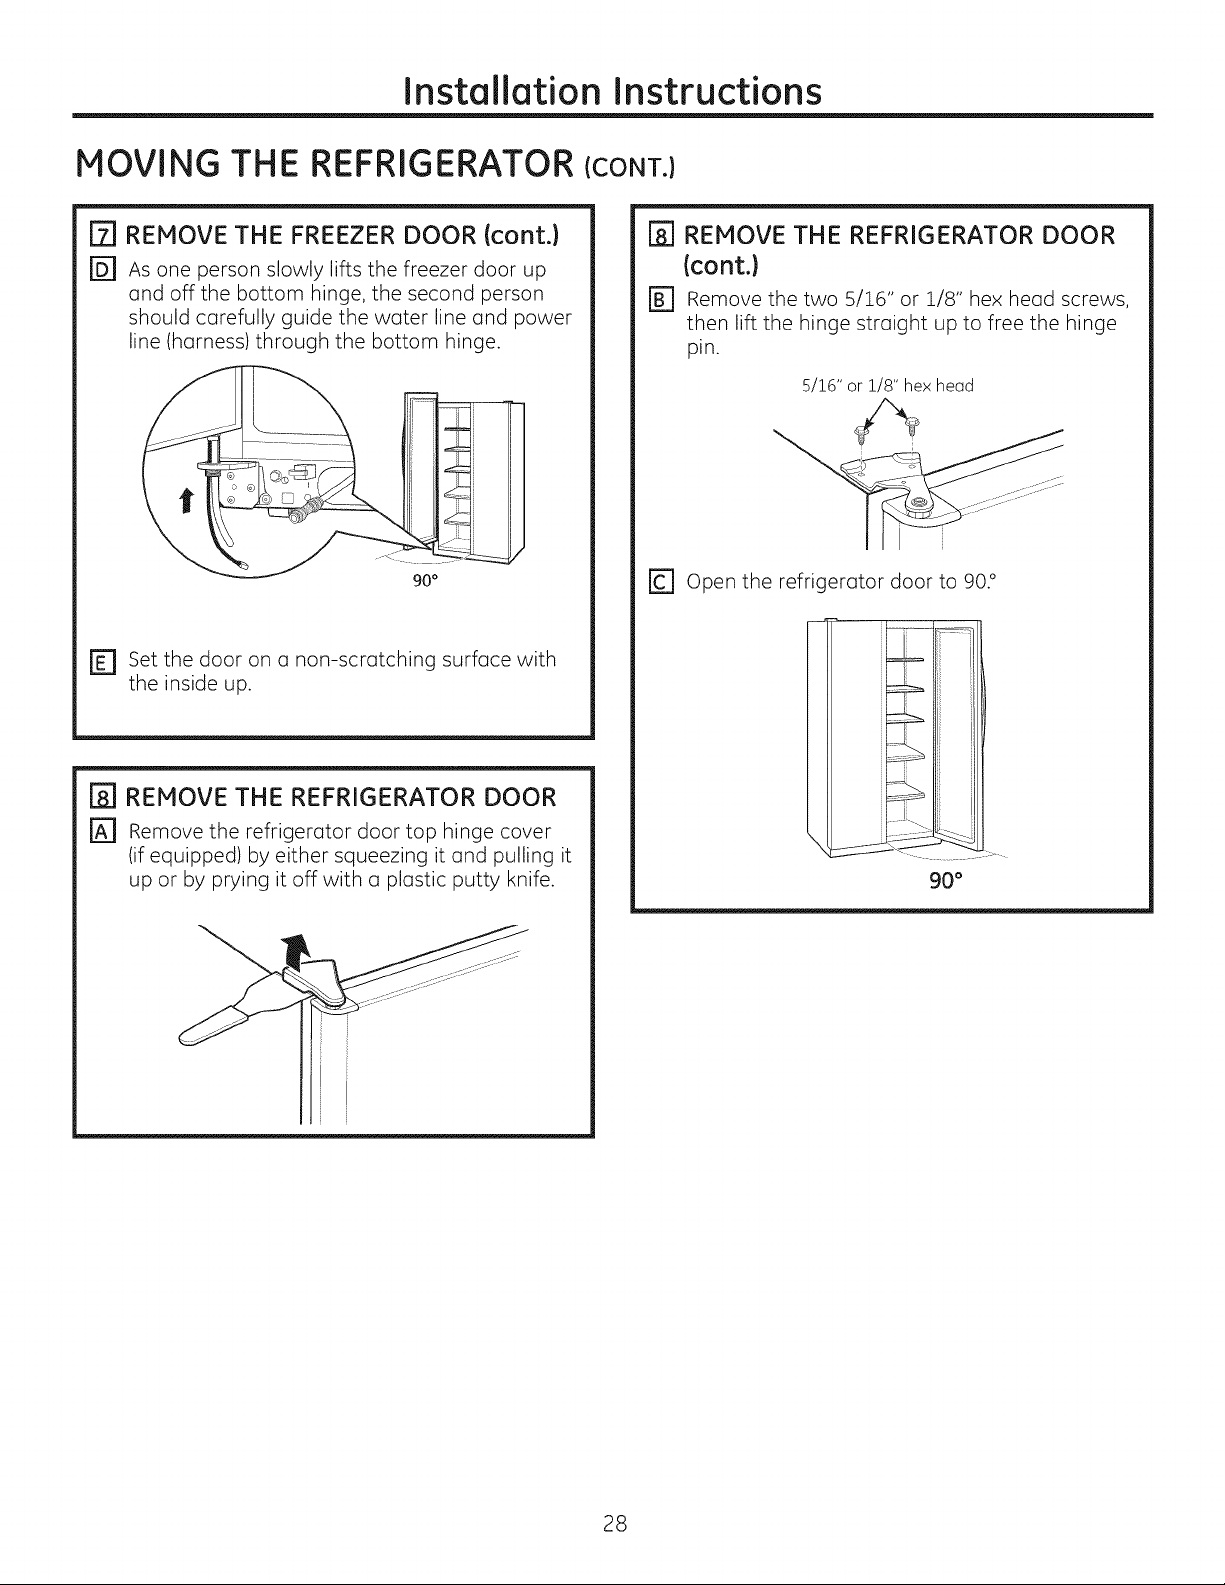
_] REMOVE THE FREEZER DOOR (cont.}
FD] As one person slowly lifts the freezer door up
and off the bottom hinge, the second person
should carefully guide the water line and power
line (harness) through the bottom hinge.
i|
90°
r_ set the door on a non-scratching surface with
the inside up.
[_ REMOVE THE REFRIGERATOR DOOR
r_ Remove the refrigerator door top hinge cover
lif equipped) by either squeezing it and pulling it
up or by prying it off with a plastic putty knife.
r_ REMOVE THE REFRIGERATOR DOOR
(cont.)
r_ Remove the two 5/16" or 1/8" hex head screws,
then lift the hinge straight up to free the hinge
pin.
5/16" or 1/8" hex head
r_ open the refrigerator door to 90.°
i i......i
i
i
i_li i
i
i
i ....
90 °
]
28
Installation Instructions
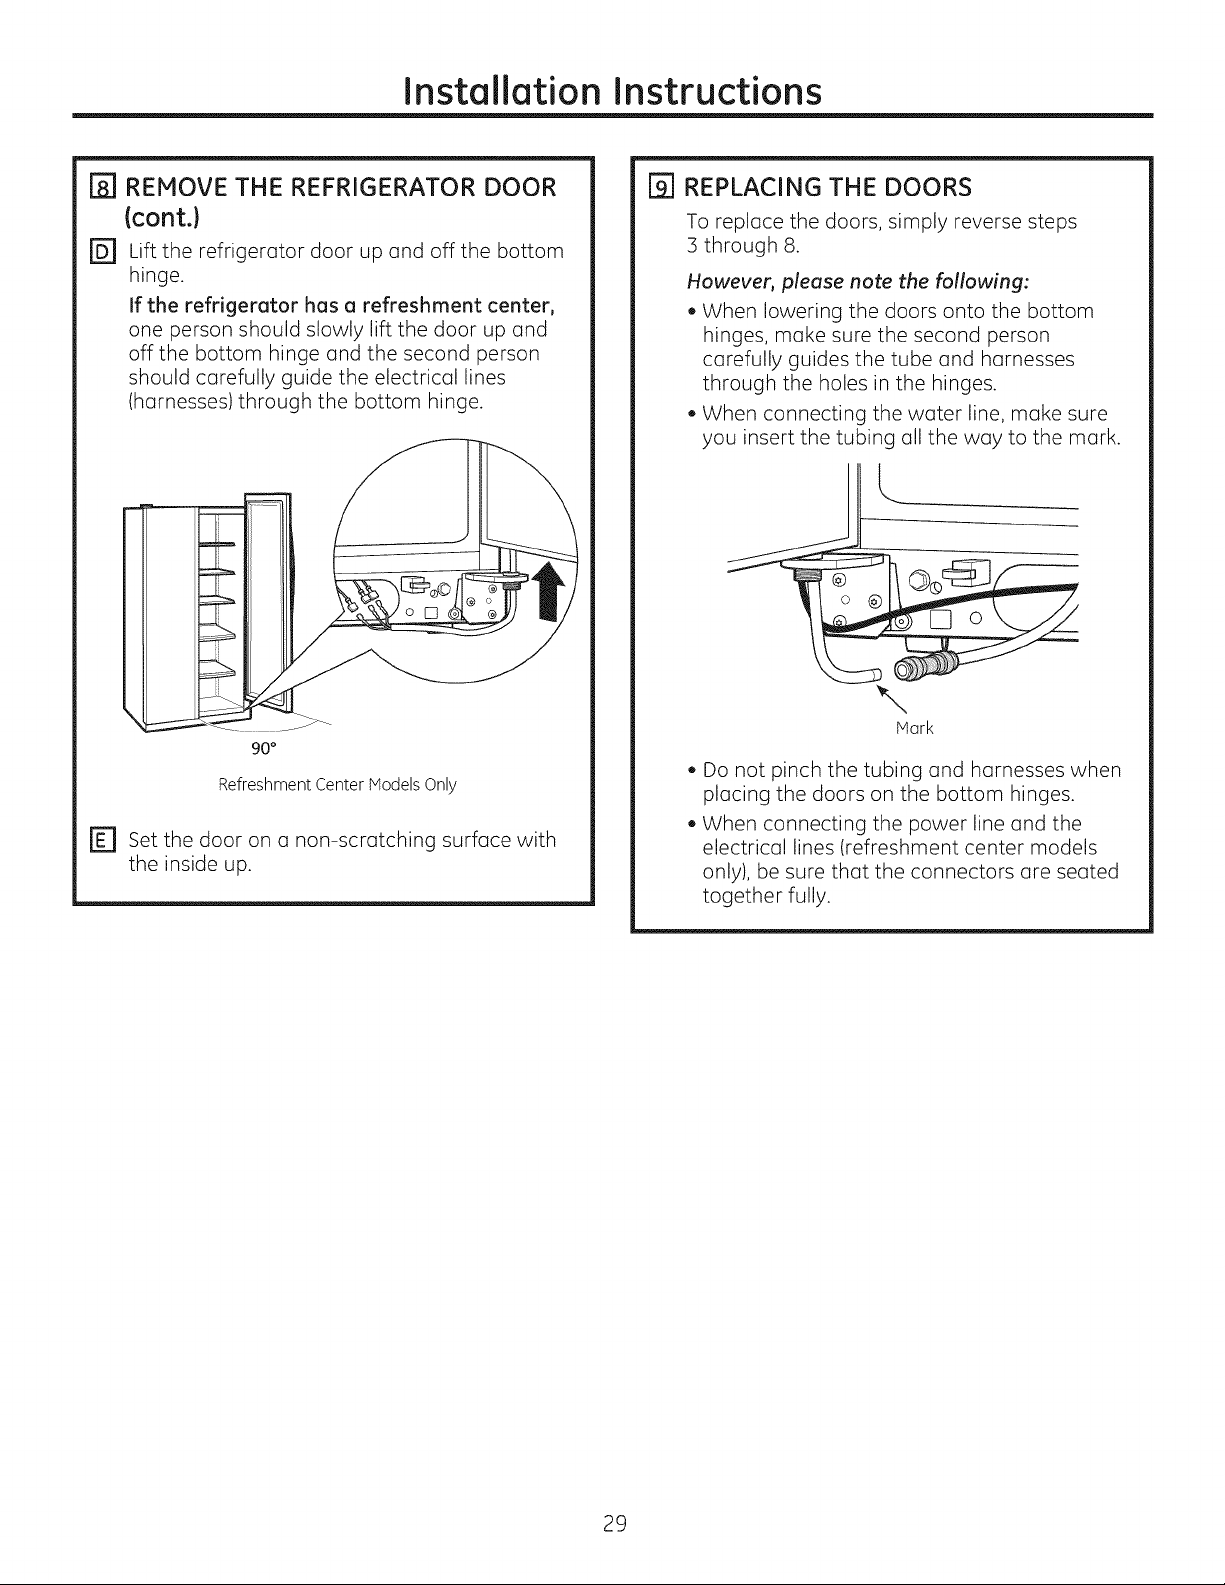
[_] REMOVE THE REFRIGERATOR DOOR
(cont.)
r_ Lift the refrigerator door up and off the bottom
hinge.
if the refrigerator has a refreshment center,
one person should slowly lift the door up and
off the bottom hinge and the second person
should carefully guide the electrical lines
(harnesses) through the bottom hinge.
rg] REPLACING THE DOORS
To replace the doors, simply reverse steps
3 through 8.
However, please note the following:
, When lowering the doors onto the bottom
hinges, make sure the second person
carefully guides the tube and harnesses
through the holes in the hinges.
, When connecting the water line, make sure
you insert the tubing all the way to the mark.
L •
\
Mark
Refreshment Center Models Only
r_ set the door on a non-scratching surface with
the inside up.
, Do not pinch the tubing and harnesses when
placing the doors on the bottom hinges.
, When connecting the power line and the
electrical lines (refreshment center models
only), be sure that the connectors are seated
together fully.
29
Installation Instructions
INSTALLING THE REFRIGERATOR
REFRIGERATOR LOCATION
, Do not install the refrigerator where
the temperature will go below 60°F (16°C)
because it will not run often enough to maintain
proper temperatures.
, Do not install the refrigerator where
the temperature will go above 200°F (37°C)
because it will not perform properly.
, Install it on a floor strong enough to support it
fully loaded.
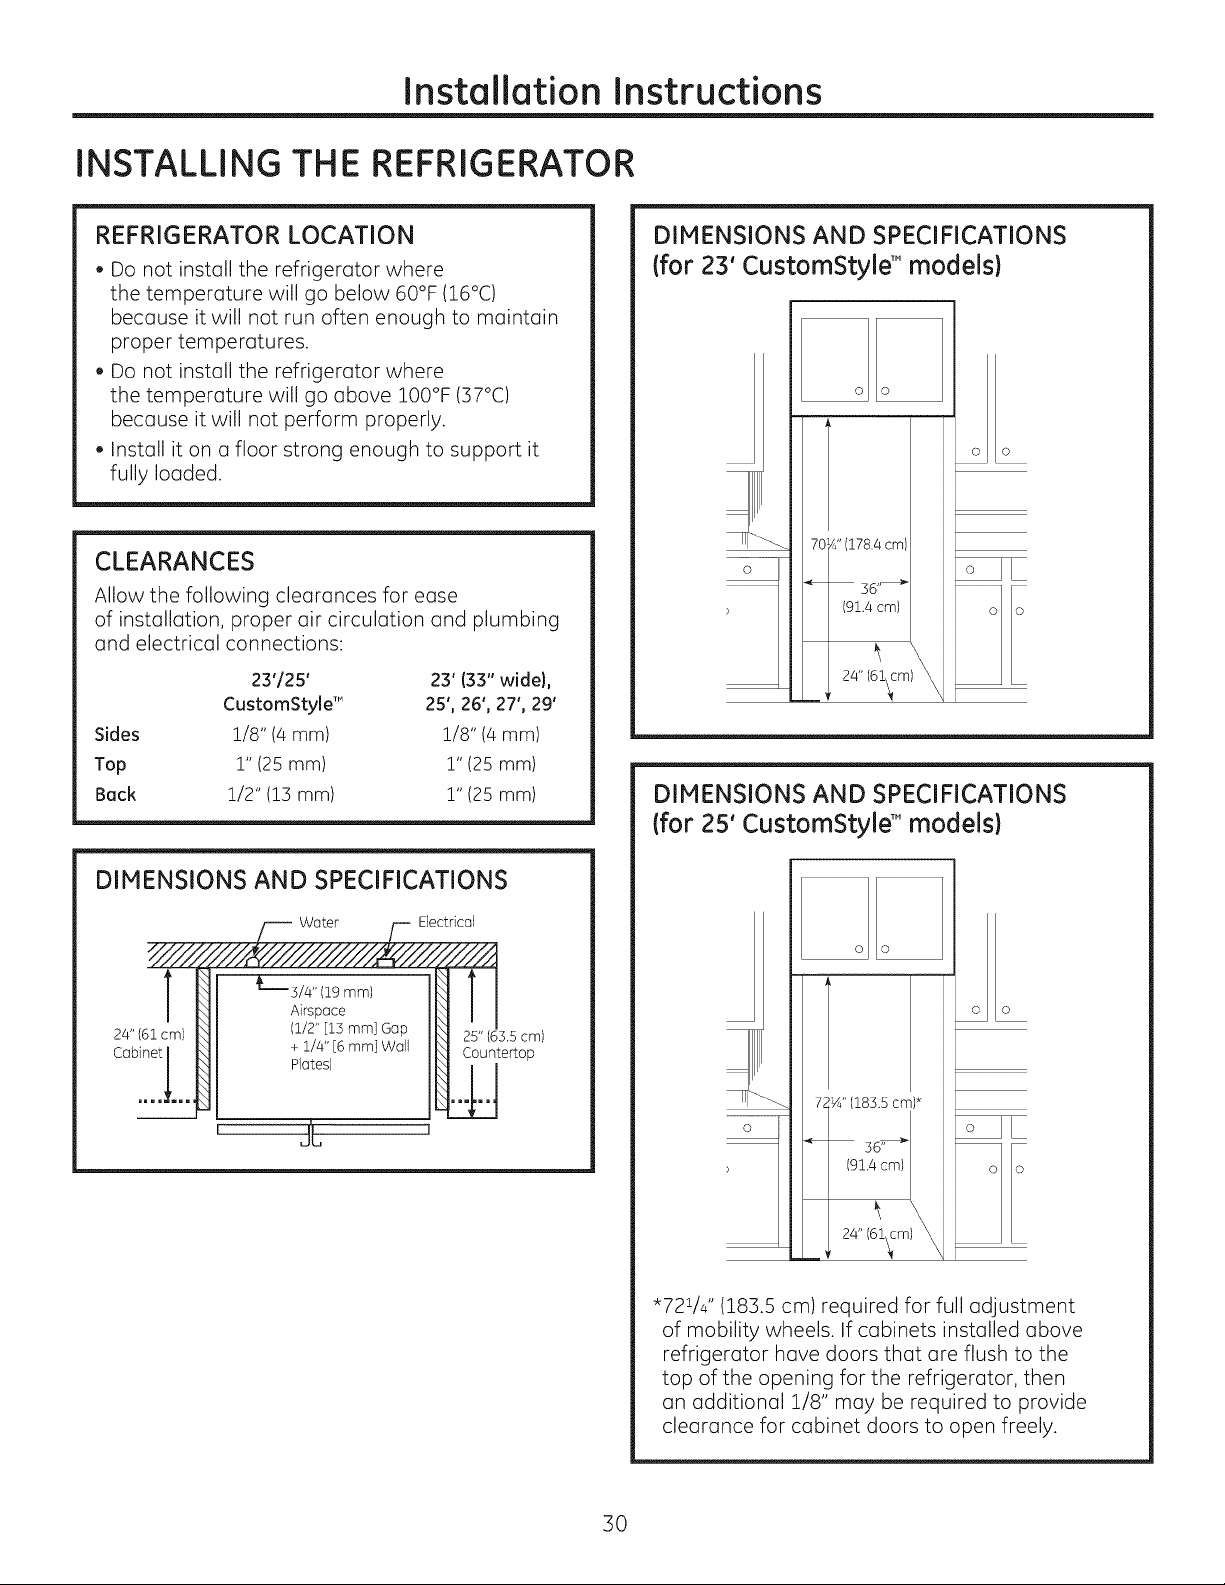
CLEARANCES
Allow the following clearances for ease
of installation, proper air circulation and plumbing
and electrical connections:
23'/25' 23' B3" wide},
CustomStyle T" 25', 26', 27', 29'
Sides
Top
Back
1/8" (4 mm) 1/8" (4 mm)
1" (25 mm) 1" (25 mm)
1/2" (13 mm) 1" (25 mm)
DIMENSIONS AND SPECIFICATIONS
(for 23' CustomStyle T"models)
o o
7( 4" (178.4 cm)
o
)
(91.4cm)
t
24" (61_cm)
DIMENSIONS AND SPECIFICATIONS
(for 25' CustomStyle'" models)
DIMENSIONS AND SPECIFICATIONS
Water Electrical
_(19 mm)
Airspace
(1/2" [13 mm] Gap
+ 1/4" [6 mm] Wall
Plates)
25" (65.5cm)
Countertop
24" (61_cm)
"721/j ' (183.5 cm) required for full adjustment
of mobility wheels. If cabinets installed above
refrigerator have doors that are flush to the
top of the opening for the refrigerator, then
an additional 1/8" may be required to provide
clearance for cabinet doors to open freely.
3O
 Loading...