

GE PVUS830, PVUS836 Owner's Manual And Installation Instructions

Range Hoods
Vented
350A4502P617 LI26UA ED. 02 / 08 05-07 ATS
Safety Instructions . . . . . . . . . 2, 3
Operating Instructions
Light Controls . . . . . . . . . . . . . . . .4
Vent Controls . . . . . . . . . . . . . . . .4
Care and Cleaning
Grease Filters . . . . . . . . . . . . . . . .5
Hood Lights . . . . . . . . . . . . . . . . .6
Hood Surfaces . . . . . . . . . . . . . . . .5
Stainless Steel Surfaces . . . . . . . . .5
Installation Instructions . . .7–13
Troubleshooting Tips . . . . . . . .16
Consumer Support
Consumer Support . . . Back Cover
Product Registration . . . . . . .17-18
Warranty . . . . . . . . . . . . . . . . . . . 19
Write the model and serial
numbers here:
Model # ________________
Serial # ________________
You can find them on a label
on the inside of the hood.
PVUS830
PVUS836
Owner’s Manual and
Installation Instructions
www.GEAppliances.ca
SAFETY PRECAUTIONS
IMPORTANT SAFETY INFORMATION.
READ ALL INSTRUCTIONS BEFORE USING.
WARNING –
TO REDUCE THE RISK OF FIRE,
ELECTRIC SHOCK OR INJURY TO PERSONS, OBSERVE
THE FOLLOWING:
A. Use this unit only in the manner intended
WARNING –
TO REDUCE THE RISK OF FIRE,
OR ELECTRIC SHOCK, DO NOT USE THIS HOOD WITH
ANY EXTERNAL SOLID STATE SPEED CONTROL DEVICE
by the manufacturer. If you have questions,
contact the manufacturer.
B. Before servicing or cleaning unit, switch power
off at service panel and lock the service
disconnecting means to prevent power from
being switched on accidentally. When the
service disconnecting means cannot be locked,
securely fasten a prominent warning device,
such as a tag, to the service panel.
C. This unit must be grounded.
CAUTION –
For general ventilating use only.
Do not use to exhaust hazardous or explosive
materials and vapors.
CAUTION –
To reduce risk of fire and to
properly exhaust air, be sure to duct air outside.
Do not vent exhaust air into spaces within walls or
ceilings or into attics, crawl spaces, or garages.
WARNING –
TO REDUCE THE RISK OF
INJURY TO PERSONS IN THE EVENT OF A RANGE
TOP GREASE FIRE, OBSERVE THE FOLLOWING*:
A. SMOTHER FLAMES with a close-fitting
lid, cookie sheet, or metal tray, then turn off
the burner. BE CAREFUL TO PREVENT
BURNS. If the flames do not go out
immediately, EVACUATE AND CALL
THE FIRE DEPARTMENT.
B. NEVER PICK UP A FLAMING PAN—
You may be burned.
C. DO NOT USE WATER, including wet
dishcloths or towels—a
violent steam
explosion
will result.
D. Use an extinguisher ONLY if:
1. You know you have a Class ABC
extinguisher, and you already know how
to operate it.
2. The fire is small and contained in the
area where it started.
3. The fire department is being called.
4. You can fight the fire with your back to
an exit.
* Based on “Kitchen Fire Safety Tips
” published
by NFPA.
Consumer Support
Troubleshooting Tips
Operating Instructions Safety Instructions
Care and Cleaning
2
Consumer Support
Troubleshooting Tips
Operating Instructions
Safety Instructions
Care and Cleaning
READ AND FOLLOW THIS SAFETY INFORMATION CAREFULLY.
READ AND SAVE THESE INSTRUCTIONS
SAFETY PRECAUTIONS
www.GEAppliances.ca
WARNING –
TO REDUCE THE RISK OF
A RANGE TOP GREASE FIRE:
A. Never leave surface units unattended at high
settings. Boilovers cause smoking and greasy
spillovers that may ignite. Heat oils slowly on
low or medium settings.
B.
C. Clean ventilating fans frequently. Grease
should not be allowed to accumulate on fan
or filter.
D. Use proper pan size. Always use cookware
appropriate for the size of the surface element.
WARNING –
TO REDUCE THE RISK OF FIRE,
ELECTRIC SHOCK OR INJURY TO PERSONS, OBSERVE
THE FOLLOWING:
A. Installation work and electrical wiring must be
done by qualified person(s) in accordance
with all applicable codes and standards,
including fire-rated construction.
B. Sufficient air is needed for proper
combustion and exhausting of gases through
the flue (chimney) of fuel burning equipment
to prevent back drafting. Follow the heating
equipment manufacturer’s guideline and
safety standards such as those published by
the National Fire Protection Association
(NFPA), and the American Society for
Heating, Refrigeration and Air Conditioning
Engineers (ASHRAE), and the local code
authorities.
C. When cutting or drilling into wall or ceiling,
do not damage electrical wiring and other
hidden utilities.
D. Ducted fans must always be vented to the
outdoors.
WARNING –
TO REDUCE THE RISK OF FIRE,
USE ONLY METAL DUCTWORK.
Do not attempt to repair or replace any
part of your hood unless it is specifically
recommended in this guide. All other servicing
should be referred to a qualified technician.
3
Always turn hood ON when cooking at high
heat or when flambeing food (i.e. Crepes
Suzette, Cherries Jubilee, Peppercorn Beef
Flambé).
Using the hood controls.
ALWAYS USE THE HIGH SETTING WHEN GRILLING.
FOR BEST RESULTS
• Continuous use of the fan system while cooking helps
keep the kitchen comfortable and less humid.
• It also reduces cooking odours and soiling moisture
that create a frequent need for cleaning.
• Turn the blower on before starting to cook.
• Use a rear burner when browning or pan frying meat.
• Open a window or inside door slightly.
• Clean the filters and the wall behind the filters
frequently.
• The blower should be turned on for a few minutes
before
cooking in order to establish air currents upward
through the hood. Thus when heat, smoke, moisture,
grease and cooking odours are produced, they will be
carried outside instead of drifting into other rooms.
• Use the low speeds for normal use and the higher
speeds for strong odours or fumes.
• Drafts across the range or cooktop will cause the escape
of heat, smoke, moisture, grease and cooking odours
from the hood. Such drafts should be prevented as
much as possible.
• Kitchen ventilation ventilation is best when the only air
currents are those created by the blower itself.
•
For Gas Cooktops
, a lower blower speed should be
used if:
• the gas flame is being distorted by the air movement.
• the burner continually sparks (clicks).
• the burner flame repeatedly blows out.
CAUTION!
Lamps are not supplied; use ONLY
120 Volt, 50 Watt (maximum) 50° halogen light made
for a GU10 base,
suitable for use in open luminaries
.
Consumer Support
Troubleshooting Tips
Operating Instructions
Safety Instructions
Care and Cleaning
4
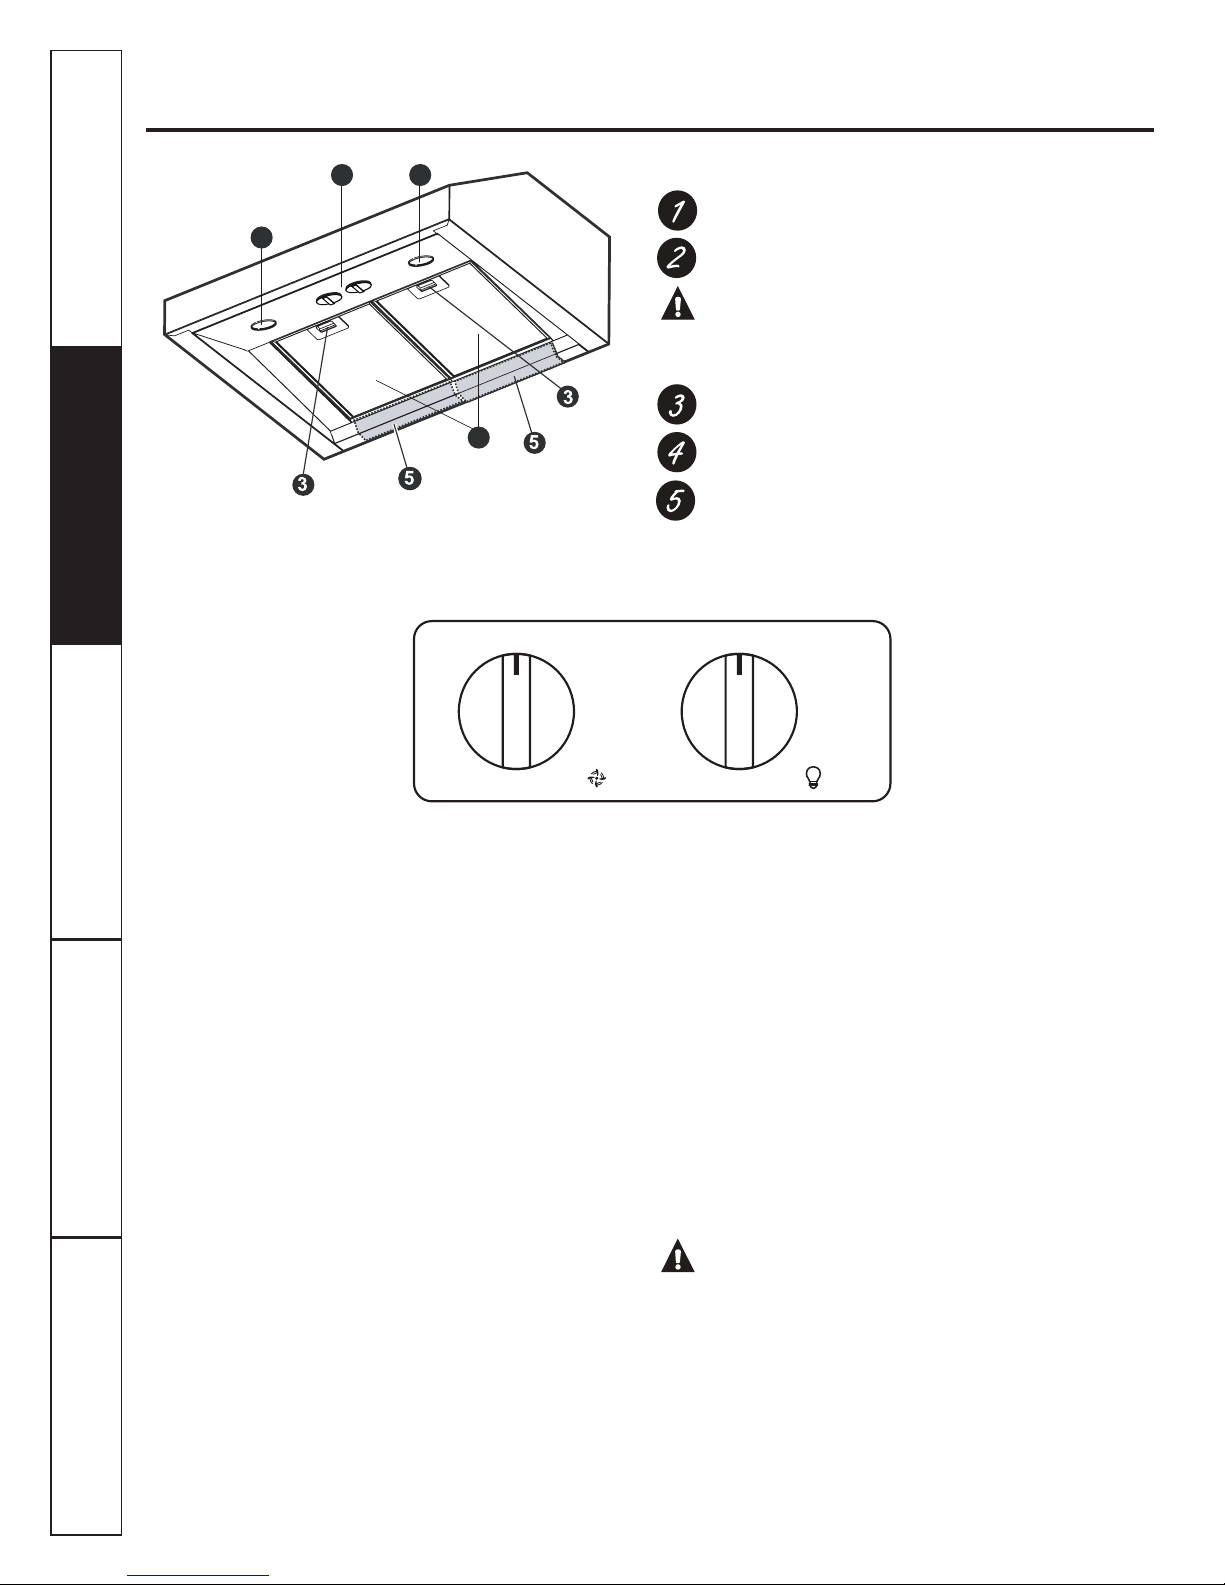
FEATURES
Blower and light controls
Halogen lamp housings
CAUTION!
Lamps are not supplied; use ONLY
120 Volt, 50 Watt (maximum) 50° halogen light made
for a GU10 base,
suitable for use in open luminaries
.
Grease filter handle
Grease filter
Drip trays
NOTE:
Grease filter and drip trays are not installed, see relative section in this manual for their installation.
1 2
2
4
Control Knobs
OFF
LO
MED
OFF
LO
NITE
FAN Control
Turn to LO, MED, HI or MAX as needed.
Continuous use of the fan system while cooking
helps keep the kitchen comfortable and less humid.
It also reduces cooking odors and soiling moisture
that create a frequent need for cleaning.
MAX
HI
FA N LIGHT
LIGHT Control
Turn to HI while cooking or to NITE for use as
a night light.
Care and cleaning of the vent hood.
www.GEAppliances.ca
The efficiency of the range hood system depends on the cleanliness of the intake and filters.
The frequency of cleaning required depends on the amount and type of cooking.
• Do not use the ventilating system without the filters in place or with grease-laden filters or surfaces.
These hoods have reusable metal
grease filters and drip trays. The
metal filters also help prevent
flaming foods on the cooktop from
damaging the inside of the hood.
For this reason, the metal filters
must
ALW AYS
be in place when the
hood is used.
To Clean Filters and Drip Trays
• The metal filters and drip trays
should be cleaned once a month,
or as needed.
• To clean the metal filters and
drip trays, drain and wipe all
excess grease with a dry paper
towel. Soak them and then swish
them around in hot water and
detergent. Don’t use ammonia or
ammonia products because they
will darken the metal.
• Do not use abrasives or oven
cleaners. Rinse, shake and let the
filters and drip trays dry before
replacing. They may also be
cleaned in an automatic
dishwasher.
To Remove the Metal Grease Filters
and Drip Trays
• Turn the fan and lights off.
• Push each handle towards the
back and pull downwards. Fig. 1
• Unscrew the knobs that secure the
drip tray holding brackets. Fig. 3
• Grasp the drip tray and carefully
lift it up and out of the hood
track. Fig. 2
To Replace The Metal Grease Filters
• Reverse above procedure.
To Replace the Drip Trays - Figures 2-3
Place and seat the drip tray
into the hood track.
Slide trays left or right until all
trays are side by side in place
in the track.
Firmly secure the drip trays
with the the drip tray holding
brackets.
Filters and Drip Trays
To clean the hood surface, use
a hot, damp cloth with a mild
detergent suitable for painted
surfaces. Use a clean, hot, damp
cloth to remove soap.
Dry with a dry, clean cloth. Do not
use steel-wool pads or other
abrasive cleaners. They will scratch
the surface.
Anodized Aluminum Surface/Painted Surfaces
(on some models)
Consumer Support
Troubleshooting TipsOperating InstructionsSafety Instructions Care and Cleaning
5
Do not use a steel wool pad; it will
scratch the surface.
Shake bottle well.
Place a small amount of
CERAMA BRYTE®Stainless
Steel Cleaning Polish and
Conditioner on a dry cloth
or dry paper towel.
Clean a small area
(approximately 8” x 8” or
20.3 x 20.3 cm), rubbing with
the grain of the stainless steel if
applicable.
Dry and buff with a clean, dry
paper towel or soft cloth.
Repeat as necessary.
Stainless Steel Surfaces
(on some models)
To order:
To order CERAMA BRYTE®Stainless Steel
Cleaning Polish and Conditioner, please call
our toll-free number:
National Parts
Centre . . . . . . . . . . . 1.800.661.1616
www.GEAppliances.ca
CERAMA BRYTE
®
Stainless Steel Cleaning
Polish and Conditioner . . . # PM10X313
WARNING
To avoid risk of fire and explosion do not use flammable liquids or solvents.
Always unplug or disconnect the appliance from the power supply before servicing.
WARNING
Be sure the entire hood (including the filters and light bulbs) has cooled and grease has
solidified before attempting to clean any part of the appliance.
Fig. 1
Fig. 2
Fig. 3
Consumer Support
Troubleshooting Tips
Operating Instructions Safety Instructions
Care and Cleaning
6
Care and cleaning of the vent hood.
Be sure electrical power is off and all surfaces are cool before cleaning or servicing any part of the vent hood.
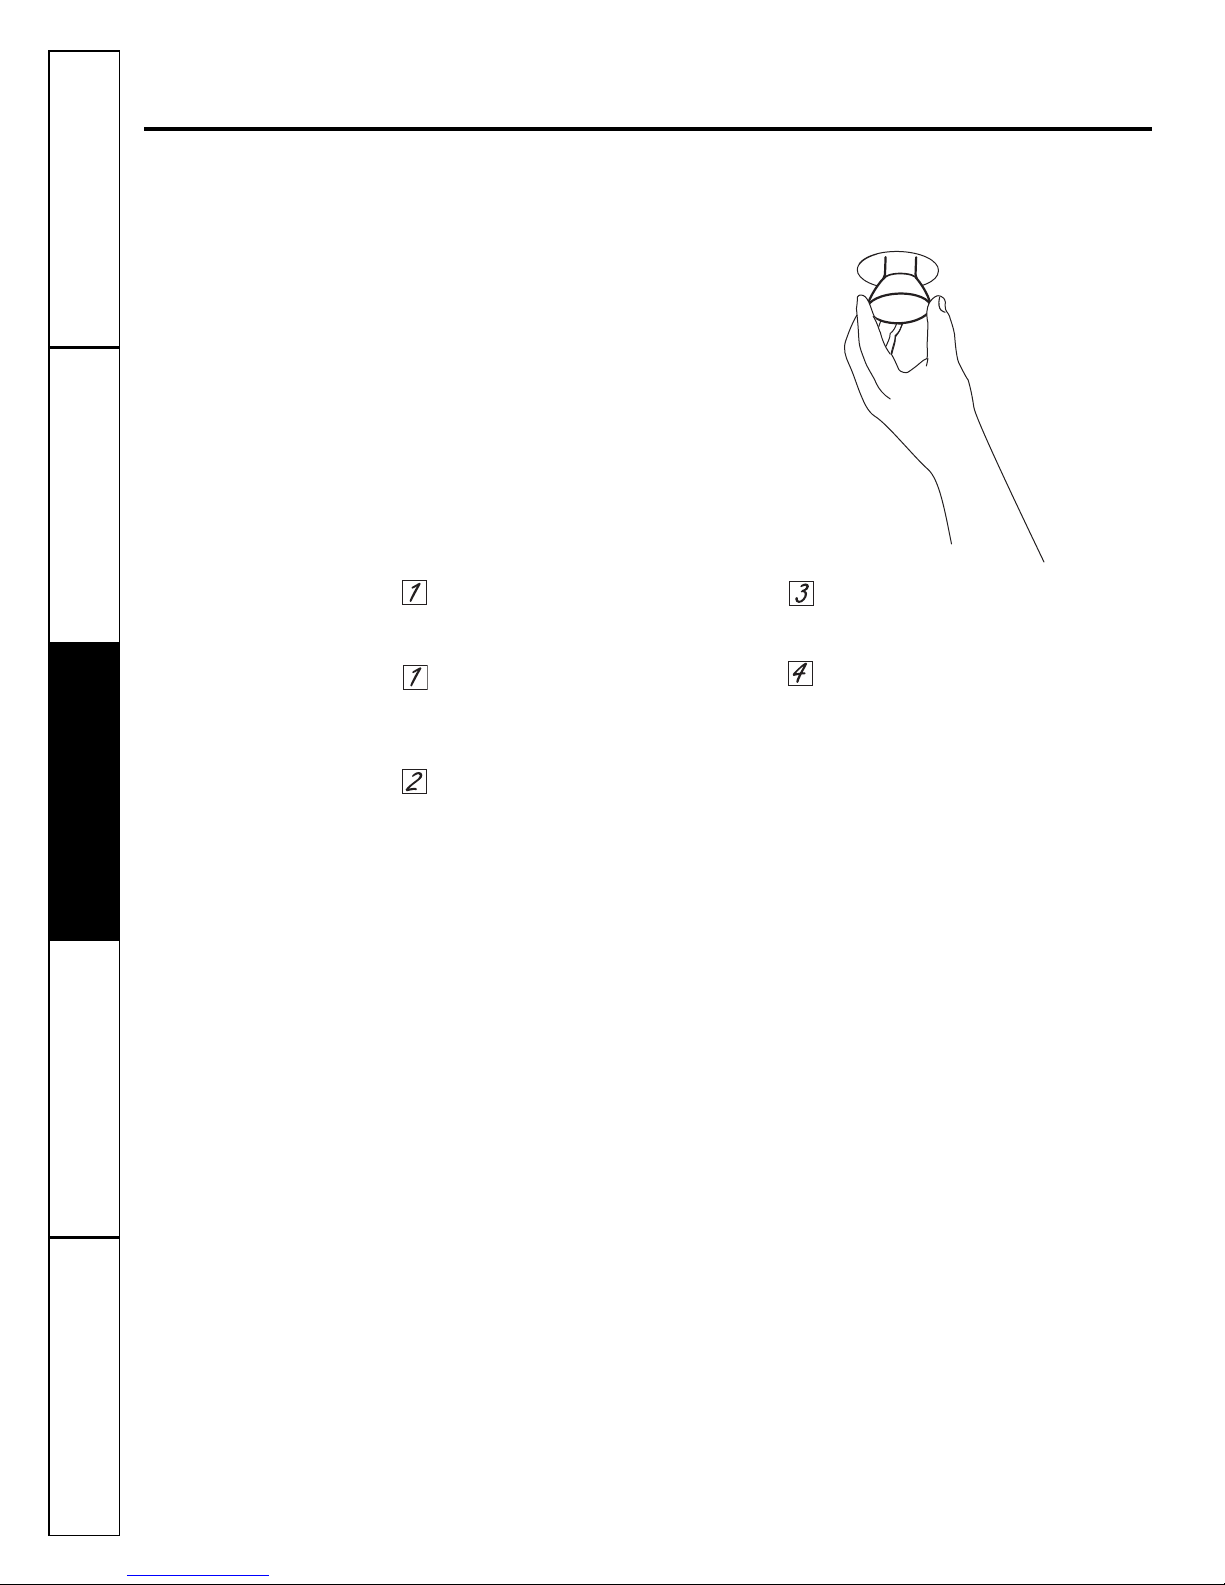
Hood Lights
NOTE: The glass cover should be
removed only when cold. Wearing latex
gloves may offer a better grip.
CAUTION
: Before replacing your
light bulb, disconnect the electrical power
to the hood at the main fuse or circuit
breaker panel.
Be sure to let the light cover and bulb cool
completely.
For your safety, do not touch a hot bulb
with bare hands or a damp cloth.
To remove:
Using gloves or a dry cloth, remove
the bulb by twisting counterclockwise.
To replace:
Use a new 120-volt, 50-watt
(maximum) 50° halogen light made
for a GU10 base, suitable for use in
open luminaries.
Using gloves or a dry cloth, remove
the new bulb from its packaging.
NOTE: Do not touch the new halogen
bulb with bare fingers. Touching the bulb
with bare fingers will significantly reduce
the life of the bulb.
Push the bulb straight into the
receptacle all the way and turn
clockwise.
Reconnect electrical power to
the hood.
 Loading...