

Page 1

Range Hoods
Vented
350A4502P595 03-07 ATS
Safety Instructions . . . . . . . . . 2, 3
Operating Instructions
Light Controls . . . . . . . . . . . . . . . .4
Vent Controls . . . . . . . . . . . . . . . .4
Care and Cleaning
Grease Filters . . . . . . . . . . . . . . . .5
Hood Lights . . . . . . . . . . . . . . . . .6
Hood Surfaces . . . . . . . . . . . . . . . .5
Stainless Steel Surfaces . . . . . . . . .5
Installation Instructions . . .7–16
Troubleshooting Tips . . . . . . . .18
Consumer Support
Consumer Support . . . Back Cover
Product Registration . . . . . .19, 20
Warranty . . . . . . . . . . . . . . . . . . . 21
Write the model and serial
numbers here:
Model # ________________
Serial # ________________
You can find them on a label
on the inside of the hood.
PVWS930
PVWS936
PVWT936
PVWG936
PVIG940
Owner’s Manual and
Installation Instructions
www.GEAppliances.ca
LI3FQA Ed. 01/08
Page 2
SAFETY PRECAUTIONS
IMPORTANT SAFETY INFORMATION.
READ ALL INSTRUCTIONS BEFORE USING.
WARNING –
TO REDUCE THE RISK OF
FIRE, ELECTRIC SHOCK OR INJURY TO PERSONS,
OBSERVE THE FOLLOWING:
A. Use this unit only in the manner intended
by the manufacturer. If you have
questions, contact the manufacturer.
B. Before servicing or cleaning unit, switch
power off at service panel and lock the
service disconnecting means to prevent
power from being switched on
accidentally. When the service
disconnecting means cannot be locked,
securely fasten a prominent warning
device, such as a tag, to the service panel.
C. Do not use this unit with any solid-state
speed control device.
D. This unit must be grounded.
CAUTION–
For general ventilating use
only. Do not use to exhaust hazardous or
explosive materials and vapors.
CAUTION–
To reduce risk of re and to
properly exhaust air, be sure to duct air outside.
Do not vent exhaust air into spaces within walls
or ceilings or into attics, crawl spaces, or
garages.
WARNING–
To reduce the risk of re or
electric shock, DO NOT use this fan with any
solid-state speed control device.
WARNING –
TO REDUCE THE RISK OF
INJURY TO PERSONS IN THE EVENT OF A
RANGE TOP GREASE FIRE, OBSERVE THE
FOLLOWING*:
A. SMOTHER FLAMES with a close-fitting
lid, cookie sheet, or metal tray, then turn
off the burner. BE CAREFUL TO
PREVENT BURNS. If the flames do not go
out immediately, EVACUATE AND CALL
THE FIRE DEPARTMENT.
B. NEVER PICK UP A FLAMING PAN —
You may be burned.
C. DO NOT USE WATER, including wet
dishcloths or towels—a violent steam
explosion will result.
D. Use an extinguisher ONLY if:
1. You know you have a Class ABC
extinguisher, and you already know how
to operate it.
2. The fire is small and contained in the
area where it started.
3. The fire department is being called.
4. You can fight the fire with your back to
an exit.
* Based on “Kitchen Fire Safety Tips
”
published by NFPA.
Consumer Support Troubleshooting Tips
Operating Instructions
Safety InstructionsCare and Cleaning
2
Page 3

Consumer Support
Troubleshooting Tips
Operating Instructions
Safety Instructions
Care and Cleaning
READ AND FOLLOW THIS SAFETY INFORMATION CAREFULLY.
READ AND SAVE THESE INSTRUCTIONS
SAFETY PRECAUTIONS
www.GEAppliances.ca
WARNING –
TO REDUCE THE RISK OF
A RANGE TOP GREASE FIRE:
A. Never leave surface units unattended at
high settings. Boilovers cause smoking and
greasy spillovers that may ignite. Heat oils
slowly on low or medium settings.
B. Always turn hood ON when cooking at
high heat or when cooking flaming foods.
( i.e. Crepes Suzette, Cherries Jubilee, Pepper
corn Beef Flambé).
C. Clean ventilating fans frequently. Grease
should not be allowed to accumulate on
fan or filter.
D. Use proper pan size. Always use cookware
appropriate for the size of the surface
element.
WARNING –
TO REDUCE THE RISK OF
FIRE, ELECTRIC SHOCK OR INJURY TO PERSONS,
OBSERVE THE FOLLOWING:
A. Installation work and electrical wiring
must be done by qualified person(s) in
accordance with all applicable codes and
standards, including fire-rated
construction.
B. Sufficient air is needed for proper
combustion and exhausting of gases
through the flue (chimney) of fuel
burning equipment to prevent back
drafting. Follow the heating equipment
manufacturer’s guideline and safety
standards such as those published by the
National Fire Protection Association
(NFPA), and the American Society for
Heating, Refrigeration and Air
Conditioning Engineers (ASHRAE), and
the local code authorities.
C. When cutting or drilling into wall or
ceiling, do not damage electrical wiring
and other hidden utilities.
D. Ducted fans must always be vented to the
outdoors.
WARNING –
TO REDUCE THE RISK OF
FIRE, USE ONLY METAL DUCTWORK.
Do not attempt to repair or replace any
part of your hood unless it is specifically
recommended in this guide. All other
servicing should be referred to a qualified
technician.
3
Page 4
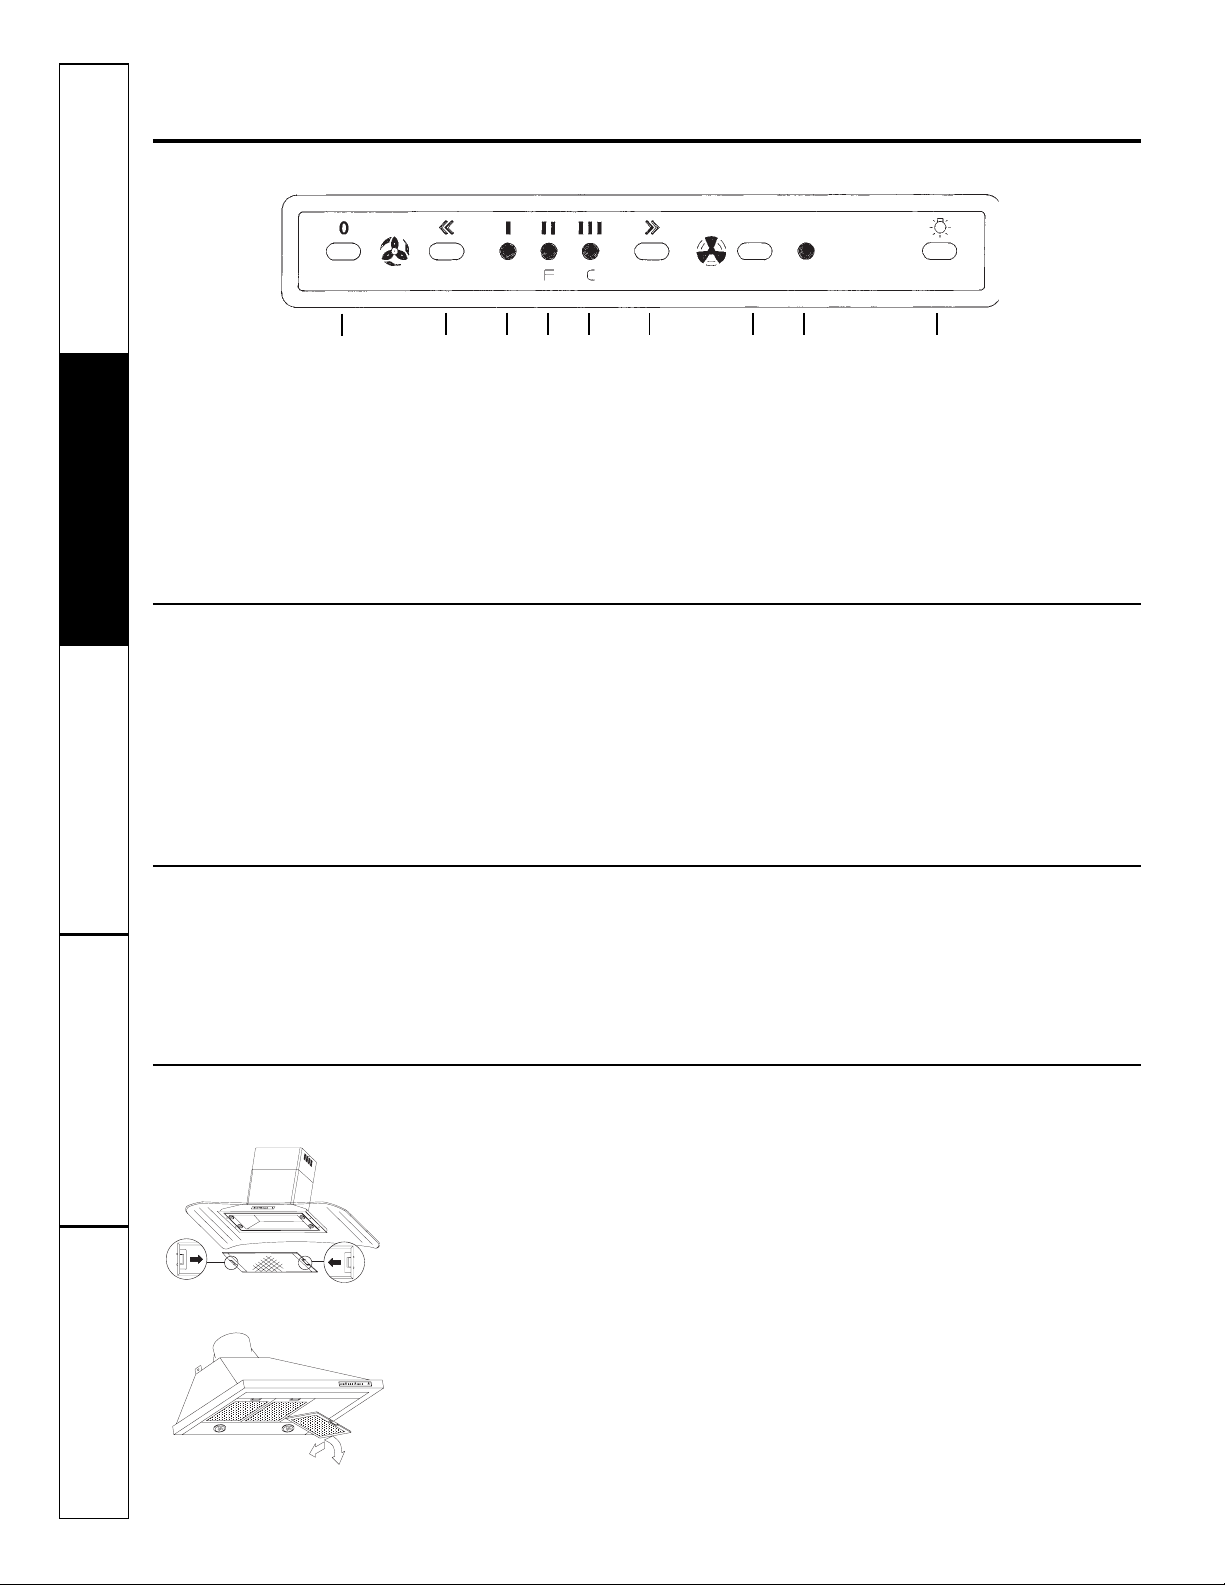
Using the hood controls.
Throughout this manual, features and appearance may vary from your model.
A - MOTORSTOP
B - SPEED DECREASE
D - LED:SPEED 1
F - LED: SPEED 2 AND METAL FILTER SATURATION
(WHEN FLASHING)
C - LED: SPEED 3 AND COAL FILTER SATURATION
(WHEN FLASHING)
E - MOTOR START AND SPEED INCREASE
G - TIMED INTENSIVE SPEED
H - LED TIMED INTENSIVE SPEED
I - “ON-OFF’ LIGHT
- MOTOR OPERATING PERFORMANCE CHECKUP. WHEN ANY OF THE BUTTONS ARE
PRESSED, ALL FOUR LEDS TURN ON TO
INDICATE THAT THE FOUR FAN SPEEDS
OPERATE PROPERLY. IF ONE OF THE LIGHTS
DOES NOT COME ON, IT MEANS THAT THE
SPEED CORRESPONDING TO THAT LIGHT
DOES NOT WORK.
Consumer Support
Troubleshooting Tips Operating Instructions
Safety Instructions
Care and Cleaning
4
Control Device Reset
Grease Filters:
After cleaning the grease filters, press buttons (A)-(E) for
2 seconds until you hear the beep and the LED stops
flashing.
Coal Filter:
After replacing the cartridge, press both buttons (A)-(B)
for 2 seconds until you hear the beep. The LED will stop
flashing.
The coal filter saturation is also indicated when the hood
is used in vented version.
The hood is provided with a storage device which counts
the number of hours of operation and which regulates
the lighting up of the coal filter saturation LEDS.
For the correct operation of this device, it is important
that the hood be switched off by pressing button (A)
before unplugging it for any maintenance work.
ABDFCEGH
I
Filters
To remove the metal grease filter/s:
■ Unplug the hood from the mains
socket.
FOR MODELS PVIG940, PVWG936
■ Press the clips towards the centre and
remove the filters. Fig. 1.
FOR MODELS PVWS930, PVWS936,
PVWT936
■ Press the handles and remove the
filters. Fig. 2.
To replace the metal grease filter/s:
■ Follow the same procedure, but
backwards.
The metal grease filters are manufactured using anodised aluminium and have an unlimited duration.
Fig. 1
Fig. 2
Hood Operation
Turn the fan on for approximately 5 minutes before you
start cooking in order to create some upwards drafts
through the hood.
This causes the heat, smoke, steam, grease and odours
produced during cooking to be pushed outwards, thereby
preventing them from drifting into other rooms.
Use the low speed settings for normal use and the high
speed settings for strong odours or thick smoke.
The presence of drafts in the kitchen or in the hood
reduces the efficiency of the hood. These drafts
should be avoided wherever possible.
Page 5
Care and cleaning of the vent hood.
www.GEAppliances.ca
Consumer SupportTroubleshooting TipsOperating InstructionsSafety Instructions Care and Cleaning
5
Be sure electrical power is off and all surfaces are cool before cleaning or servicing any part of the vent hood.
Make sure lamps are cold before cleaning the hood.
To clean the filter/s
We recommend you wash the filters at least once a
month, by hand or in the dishwasher. Let the water drip
out of the holes on the edges and leave the filters to dry
completely before reinstalling them.
To clean the hood surface
For general cleaning operations, rub the external part of
the hood made of glass, using soapy water or household
cleaning products, rinsing it thoroughly and drying it
with a soft dry cloth to avoid marks being left by the
water.
Stainless Steel Surfaces
Do not use a steel-wool pad; it will scratch the surface.
Shake bottle well.
Place a small amount of CERAMA BRYTE
®
Stainless
Steel Cleaning Polish and Conditioner on a dry cloth
or dry paper towel.
Clean a small area (approximately 8” x 8” or
20.3 x 20.3 cm), rubbing with the grain of the
stainless steel if applicable.
Dry and buff with a clean, dry paper towel or soft
cloth.
Repeat as necessary.
Page 6
Consumer Support Troubleshooting Tips Operating Instructions Safety Instructions
Care and Cleaning
6
Care and cleaning of the vent hood.
Be sure electrical power is off and all surfaces are cool before cleaning or servicing any part of the vent hood.
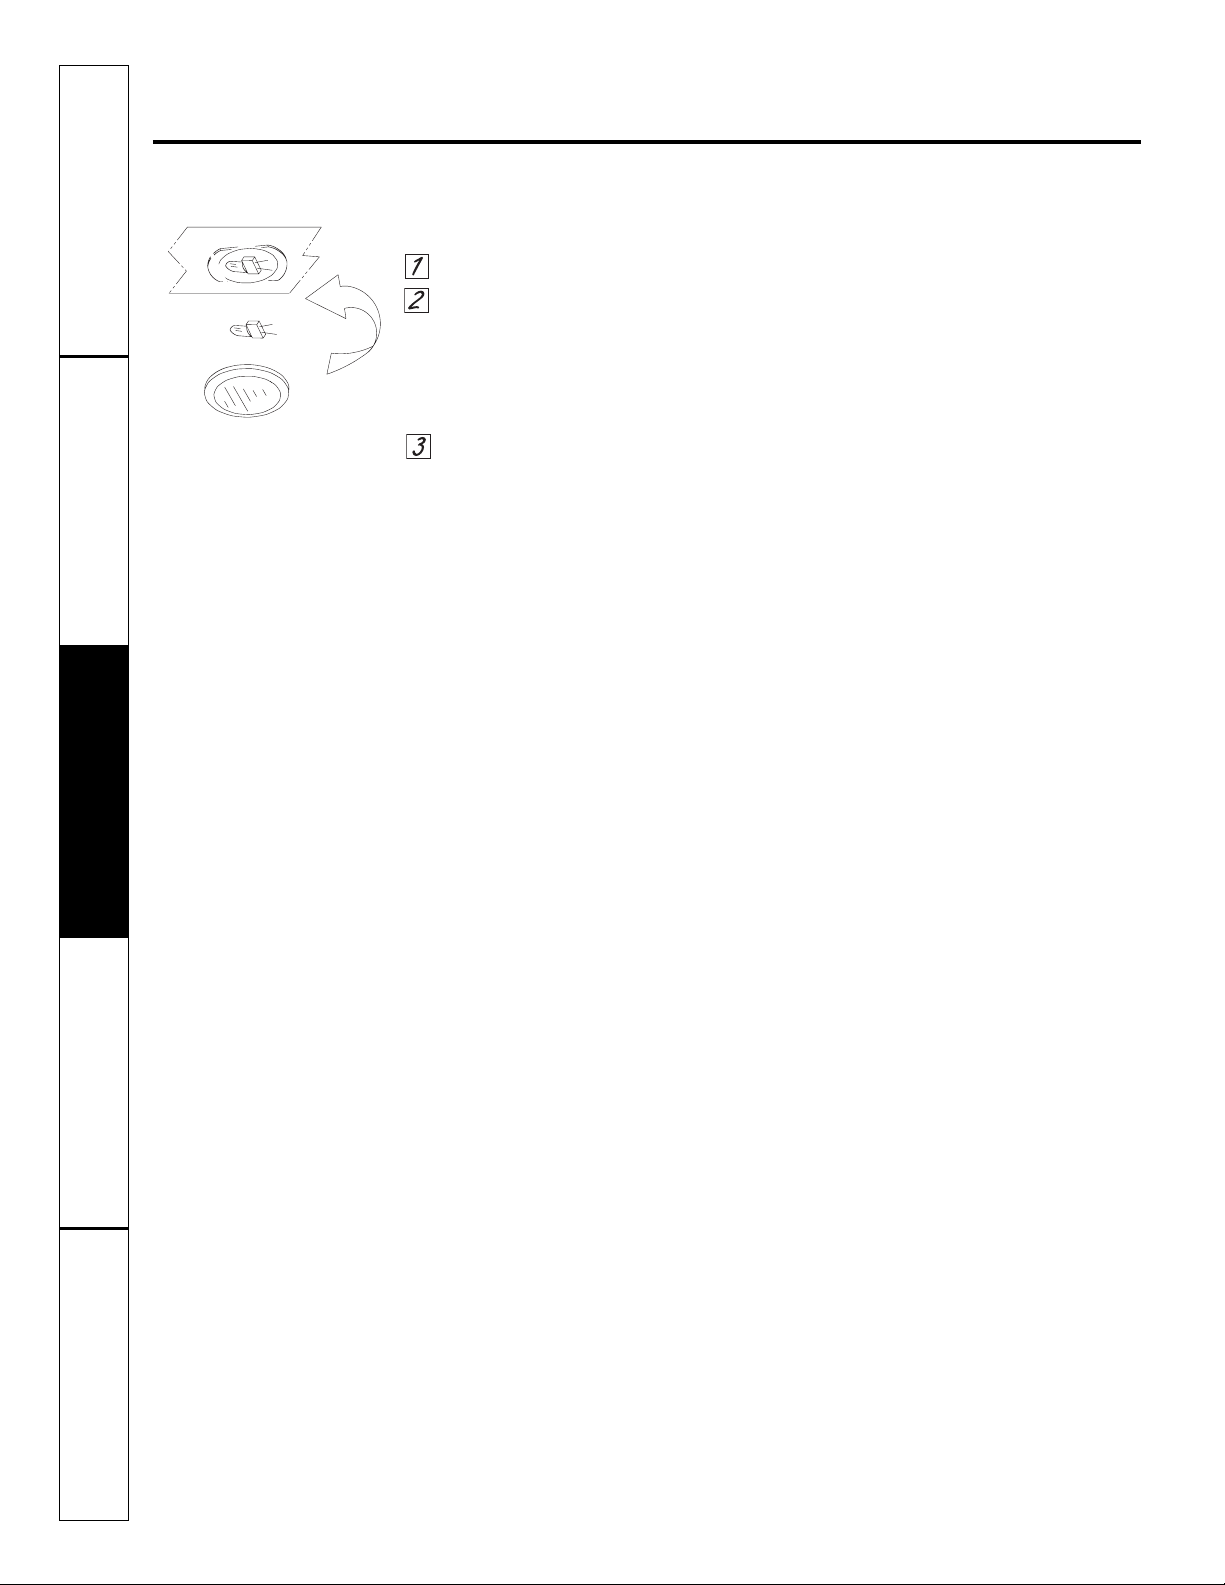
Unscrew the lamp diffusers.
Remove the blown lamp and replace
it with a new 20 Watt (max) 12 Volt
halogen lamp with a G-4 cap. Follow
the instructions given on the lamp
box. Do not touch the lamp with your
bare hands.
Place the lamp diffuser back in place.
Fig. 3
Replacement of lamps
(Models PVWS930, PVWS936, PVWT936, PVWG936, PVIG940)
Page 7

BEFORE YOU BEGIN
7
Installation
Range Hood
Instructions
Re ad the se instructions c omp let ely an d c arefully.
• IMPORTANT – Save these
instructions for local inspector’s use.
• IMPORTANT – Observe all
governing codes and ordinances.
• Note to Installer – Be sure to leave these
in str uct ions with the Con sum er.
• Note to Consumer – Ke ep the se instructions
fo r f utu re reference.
• Skill level – Ins tallation of t his ve nt hoo d r equ ires
ba sic me cha nical and electri cal sk ill s.
• Completion time – 1 to 3 hours
• Prope r i nst all ati on is the respons ibi lit y o f t he
in sta lle r.
• Produ ct fai lur e d ue to improper insta lla tio n i s n ot
co ver ed und er the Warranty.
WARNING – Before beginning the
installation, switch power off at service panel and lock
the service disconnecting means to prevent power
from being switched on accidentally. When the service
disconnecting means cannot be locked, securely
fasten a prominent warning device, such as a tag, to
the service panel.
FOR YOUR SAFETY:
Questions? Call 1-800-561-3344
or Vi sit ou r Website at: www .
GEAppliances.ca
Due to the weight and size of these vent hoods and to
reduce the risk of personal injury or damage to the
pr odu ct, TWO PEOPLE ARE REQUIRED FOR
PROPER INSTALLATION
CAUTION:
WAR NING: - TO RE DUC E TH E RIS K OF FIRE, ELEC TRIC SHOCK
OR INJU RY TO PERS ONS , OBS ER VE T HE FO LLO WI NG:
A. Installation work and ele ctrical wiring must be
done by
qualified person(s) in accor dance with all applicable codes and standards, i ncluding fire-rated
construction.
B. Sufficient air is needed for proper combustion
and exhausting of gases thro ugh the flue (chimney)
of fuel burning equipment to prevent back drafting.
Follow the heating equipment manufacturers guidline and safety standards s uch as those published by
the National Fire Protection Association
(NFPA), and the American Soc iety for Heating,
refrigeration and Air Condit ioning Engineers
(ASHRAE), and the local cod e
authorities.
C. When cutting or drilling into wall or ceiling do
not damage electrical wiring and other hidden
utilities.
D. Ducted fans must always b e vented to the
outdoors.
WAR NING: - TO RE DUC E TH E RIS K OF FIRE, OF F IER, USE
ON LY ME TAL D UCTWO RK.
D o n ot attempt to rep air or re pla ce any part of your
ho od unl ess it is specif ica lly re com men ded in this
gu ide . A ll other servicing s hou ld be re fer red to a
qu ali fie d t echnician.
CAU TION: - TO RE DUC E TH E RIS K OF FIRE AND T O PRO PERLY
EX HAUST AIR.
B e s ure to duct air outs ide - D o n ot vent exhaust air
in to spa ces within walls or cei lin gs or into attics, cra wl
sp ace s, or garages.
Page 8

Installation Instructions
8
PRODUCT DIMENSIONS
1 Ft = 0.3 m
1” = 2.5 cm
MODEL W D H T
PVWS930/936 30” - 36” 19.3 33” - 45.3” 15.75”
PVWT936 36” 19.3 38.6” - 53.7” 15.75”
PVWG936 36” - 42” - 48” 19.7” 33.4” 17.7”
PVIG940 39.4” 27.5” 33.4” - 48” 17.7”
2.5”
PVWS930
PVWS936
24.8”
12”
5.9”
13.4”
10.8”
PVWG936
15.7”
2.5”
24.8”
PVWT936
12”
5.9”
13.4”
PVIG940
15.7”
10.8”
38.6” min.
53.7” max.
15.75”
36”
19.3”
Page 9

Installation Instructions
9
Use this chart to compute maximum
permissable lengths for duct runs to
outdoors.
Note:
Do not exceed maximum permissable
equivalent lengths!
Maximum duct length:
100 foot for vent hoods.
Flexible ducting:
If flexible metal ducting is used, all
the equivalent feet values in the table
should be doubled. The flexible
metal duct should be straight and
smooth and extended as much as
possible.
Do NOT use flexible ducting.
Note:
Any home ventilation system, such as a
ventilation hood, may interrupt the proper flow of
combustion air and exhaust required by fireplaces,
gas furnaces, gas water heaters and other
naturally vented systems. To minimize the chance
of interruption of such naturally vented systems,
follow the heating equipment manufacturer’s
guidelines and safety standards such as those
published by NFPA and ASHRAE.
DUCT FITTINGS
Using a smaller diameter duct
size will reduce performance
*Actual length of straight duct plus duct fitting
equivalent. Equivalent length of duct pieces are
based on actual tests conducted by GE Evaluation
Engineering and reflect requirements for good
venting performance with any ventilation hood.
Duct Piece
Quantity
Used
Total
Equivalent
Length
1 Ft = 0.3 m
1” = 2.5 cm
Equivalent
Length*
1 ft.
(per foot
length
1 ft.
(per foot
length
8 ft.
6 ft.
15 ft.
9 ft.
20 ft.
1 ft.
5 ft.
5 ft.
15 ft.
30 ft.
30 ft.
30 ft.
24 ft.
Dimensions
Round,
straight
3¼” x 12”
straight
90° elbow
45° elbow
3¼” x 12” or
90° elbow
3¼” x 12” or
45° elbow
3¼” x 12” or
90° flat elbow
7” round to
3¼” x 12”
transition
3¼” x 12” to 7” round
transition
7” round to
3¼” x 12”
transition 90° elbow
3¼” x 12” to7” round
transition 90° elbow
Round
wall cap
with damper
3¼” x 12”
wall cap with
damper
7” round
roof cap
Round
roof vent
Total Duct Run
Page 10

Installation Instructions
10
TOOLS AND MATERIALS REQUIRED
(NOT SUPPLIED)
Pencil and
tape measure
Electric drill with
1
/8” and 3/8” bits
Spirit level
Flashlight
Pliers
Wire Cutter/Stripper
Phillips and
Flat blade screwdrivers
cUL Listed Wire nuts
Hammer
Saber saw or Key Hole Saw
Ladder
¼” pivoting hex socket
Allen Wrench
Duct tape
Safety glasses
Metal snips
OPTIONAL ACCESSORIES
■
Kit 01235 Model PVIG940
Chimney + Structure 84 - 121.5 cm
(Venting)
■
Kit 01237 Model PVWG936
Chimney 51.5 cm
■
Kit 01238 Model PVWT936
Chimney 70 - 140 cm (Venting)
■
Kit 01239 Models PVWS930/936
Chimney 92.5 - 132 cm (Venting)
Ductless Recirculating Kit
■
Kit 01378 Models PVWS930/936, PVWT936
Carbon Filter + Filtrating Deflector:
Changes Hood from Venting to
Filtrating
■
Kit 01379 Model PVWIG940
Carbon Filter + Filtrating Deflector +
RUA: Changes Hood from Venting to
Filtrating
PARTS PROVIDED
MODELS PVWS930, PVWS936 AND PVWT936
• Hood canopy with internal blower, grease filters and
lights already installed
• Duct covers
• Duct Cover support bracket
• Transition (may be already installed)
• Hardware Packet:
Note: the hardware packet contains several fittings material.
For models PVWS930, PVWS936 and PVWT936, consider
what is listed below ONLY:
•
• Hook with leveling screws x 2
• Template
• Use, Care and Installation Guide
• 10 x 60 drywall anchors x 2 (To attach duct cover
support bracket)
• 6 x 80 screws x 8 + washers x 8 (2 To attach duct cover
support bracket + 6 to attach the hood canopy)
• 3,5 x 9,5 screws x 6 (2 to attach the transition + 4 to
attach the duct cover)
Additional Materials:
• 120V 60Hz. 15 or 20 Amp, 2 wire with ground.
Properly grounded branch circuit.
• Strain relief for junction box.
• 7” round metal duct or 3¼” x 12” rectangular duct, length
to suit installation.
1 Ft = 0.3 m
1” = 2.5 cm
Page 11

Installation Instructions
11
PARTS PROVIDED -
Continued
1 Ft = 0.3 m
1” = 2.5 cm
• Hood canopy with internal blower, grease filters and
lights already installed
• Glass vapour catcher
• Duct covers
• Duct Cover support bracket
• Transition (may be already installed)
• Hardware Packet:
Note: the hardware packet contains several fittings material.
For model PVWG936, consider what is listed below ONLY:
• Allen Wrench
• Lower support bracket x 2 (to attach the hood
canopy)
• Rubber tape (for glass vapour catcher)
• Bushes x 4 (for glass vapour catcher)
• 6 x 20 screws x 4 (for glass vapour catcher)
• Template
• Use, Care and Installation Guide
• 10 x 60 drywall anchors x 2 (To attach duct cover
support bracket)
• 6 x 80 screws x 6 + washers x 6 (2 To attach duct cover
support bracket + 4 to attach the hood canopy)
• 3,5 x 9,5 screws x 14 (2 to attach the transition + 4 to
attach the duct cover + 8 to attach the lower support
brackets)
MODEL PVWG936
DUCTING OPTIONS AND EXAMPLES
Closely follow the instructions set out in this manual.
All responsibility, for any eventual inconveniences,
damages or fires caused by not complying with the
instructions in this manual, is declined.
Venting Methods
The hood is equipped with a transition B for discharge
of fumes to the outside (Ducting version).
Models PVWS930/936 and PVWT936: Minimum Duct
Size (Ducting/Ductless version): 5" Round Pipe.
Models PVWG936 and PVIG940: Minimum Duct Size
(Ducting/Ductless version): 6" Round Pipe.
• Hood canopy with internal blower, grease filter and
lights already installed
• Glass vapour catcher
• Duct covers
• Chimney structure
• Transition (may be already installed)
• Use, Care and Installation Guide
• Hardware Packet:
Note: the hardware packet contains several fittings material.
For model PVIG940, consider what is listed below ONLY:
• Allen Wrench
• Rubber tape (for glass vapour catcher)
• Bushes x 4 (for glass vapour catcher)
• 6 x 20 screws x 4 (for glass vapour catcher)
• Template
• 6 x 80 screws x 4 + washers x 4(To attach the chimney
structure to the ceiling)
• 3,5 x 9,5 screws x 16 (8 to assemble the structure + 4 to
attach the duct covers + 2 to attach the transition + 2 to
attach the junction cover (may be already intsalled))
• 8 x 16 screws x 4 (to attach the canopy to the structure).
MODEL PVIG940
Ducted Version
Pipe
Pipe
Sidewall Cap
with Gravity
Damper
Pipe
Roof Pitch w/Flashing and Cap
Ducted Version
Roof Pitch w/Flashing and Cap
Preparation
Do not cut a joist or stud unless absolutely necessary. If
a joist or stud must be cut, then a supporting frame
must be constructed.
Fittings material is provided to secure the hood to most
types of walls/ceilings.
However, a qualified technician must verify suitability of
the materials in accordance with the type of
wall/ceiling.
Before making cutouts, make sure there is proper
clearance within the ceiling or wall for exhaust vent.
Hood installation height above cooktop is the users
preference. The lower the hood is above the cooktop,
the more efficient the capturing of cooking odors,
grease and smoke.
The hood shall be installed at 30" (76,2 cm) minimum
to 36" (91,4 cm) above the countertop.
Check your ceiling height and the hood height
maximum before you select your hood.
Models PVWS930/936, PVWT936
and PVWG936
Model PVIG940
Page 12

Installation Instructions
12
1 Ft = 0.3 m
1” = 2.5 cm
Models PVWS930/936 and
PVWT936
WALL INSTALLATION
FOR MODELS PVWS930, PVWS936, PVWT936 AND
PVWG936 ONLY
(For model PVIG940 installation, please refer to the
paragraph
"CEILING INSTALLATION"
on the next pages).
1. Choose the assembly height which is most convenient
for the user and mark the wall behind the hob.
2. Mark the centre line of the hood and trace the vertical
line from the bottom of the hood to the ceiling.
3. Fasten the template using adhesive tape, making sure
the centre line corresponds with the bottom of the
hood.
4. Mark the centre of the fixing points (6 fixing points for
models PVWS930/936 and PVWT936; 4 fixing points
for model PVWG936) through the template on the wall
and then remove the template.
5. Trace a horizontal line on the wall 1” above the highest
fixing point and 1” below the lowest fixing point.
6. Find studs behind drywall by tapping wall or using a
stud finder. Mark the center of the studs with a vertical
line to the right and left of the marked fastener
location.
7.
Note:
All fastener location must span the studs
otherwise proceed as follows:
• Cutout drywall along marked lines.
• Install wood blocking between studs and make sure it
is flush with existing stud front. Make sure all
mounting screws will anchor to added studs.
• Replace drywall and refinish.
8. Mark the centre line again and the bottom of the hood
in same position as before and fasten the template to
the wall using adhesive tape as indicate above at point 3.
Ø 6 x 80
Models PVWS930/936 and PVWT936
A. Centerline
B. Mounting Hook
Location
C. Fastener Locations
D. Mounting Height
Reference
E. Template
Model PVWG936
A. Centerline
B. Mounting Hook Location
C. Fastener Locations
D. Mounting Height Reference
E. Template
9.
Models PVWS930/936 and PVWT936:
Attach the 2 hooks with leveling screws (provided in the
assembly kit) to the points marked on the template with
2 screws and then remove the template.
Model PVWG936:
Screw 2 screws on lower fixing point but do not tighten
them completely (leave a space of ½") they will serve to
hang the hood canopy.
Models PVWS930/936 and
PVWT936
Model PVWG936
Ø 6 x 80
A. Centerline
B. Mounting Hooks (screws)
C. Fastener Locations
10. Install the bracket flush with the ceiling using the
drywall anchors provided with the appliance.
Model PVWG936
Ø 10 x 60
Ø 6 x 80
Ø 10 x 60
Ø 6 x 80
11. Determine and make all necessary cuts in the wall for
the vent system. Install the vent system before the
canopy hood. See „Venting methods“ paragraph.
12. Determine the required height for the conduit and
cut a 1¼" hole at this location. Run wires through
hole according to the National Electrical Code or
CSA Standards and local codes and ordinances.
Note:
If a In-line blower installation is required/
needed, then provide an additional hole/conduit.
There must be enough power supply cable from the
fused disconnect (Or circuit breaker) box to make the
connection in the hood’s Junction box/es.
Use caulking to seal all openings.
Do Not turn on power until installation is completed.
Page 13

Installation Instructions
13
1 Ft = 0.3 m
1” = 2.5 cm
WALL INSTALLATION -
Continued
13.
Model PVWG936:
Fix the 2 supplied brackets on the rear side of the
motor housing with 4 screws each.
Ø 3.5 x 9.5
Lower Support Bracket
14. Hang hood with the 2 mounting hooks (screws).
WARNING
Excessive Weight Hazard - Use two or more people to move
and install range hood. Failure to do so can result in back or
other injury.
15. Hang hood with the 2 mounting hooks (screws).Level
the appliance, using a carpenters level across bottom
of hood and (models PVWS930/936 and PVWT936
only) with leveling screws in mounting hooks.
16. Secure hood with 2 screws on top and (models
PVWS930/936 and PVWT936 only) 2 screws on
bottom.
Models PVWS930/936 and PVWT936
A. Centerline on Wall
B. Mounting Hooks
C. Mounting Screws
D. Leveling Screws
Model PVWG936
Ø 6 x 80
17. Install the transition at the top of the hood in case it
has been removed.
Models PVWS930/936 and
PVWT936
Ø 6 x 80
Ø 3.5 x 9.5
Model PVWG936
Ø 3.5 x 9.5
18. Connect ducting to transition. Seal with duct tape.
Do not use duct smaller than the transition.
19. Electrical connection
WARNING
• Electrical Shock Hazard
• Turn off power circuit at the service panel before wiring this
unit.
• 120 VAC, 15 or 20 Amp circuit required.
ELECTRICAL GROUNDING INSTRUCTIONS
THIS APPLIANCE IS FITTED WITH AN ELECTRICAL
JUNCTION BOX WITH 3 WIRES, ONE OF WHICH
(GREEN/YELLOW) SERVES TO GROUND THE
APPLIANCE. TO PROTECT YOU AGAINST ELECTRIC
SHOCK, THE GREEN AND YELLOW WIRE MUST BE
CONNECTED TO THE GROUNDING WIRE IN YOUR
HOME ELECTRICAL SYSTEM, AND IT MUST UNDER
NO CIRCUMSTANCES BE CUT OR REMOVED.
Failure to do so can result in death or electrical shock.
Remove the knockout and the Junction box cover and
install the conduit connector (cUL listed) in junction box.
Page 14

Installation Instructions
14
1 Ft = 0.3 m
1” = 2.5 cm
Run 3 wires; black, white and green ,according to the
National Electrical Code and local codes and
ordinances, in ½" conduit from service panel to
junction box.
WALL INSTALLATION -
Continued
Connect black wire from service panel to black or red
in junction box, white to white and green to greenyellow.
Close and secure junction box cover.
20. Check all light bulbs to make sure they are secure in
their sockets.
Turn power (On) in service panel.
Check lights and blower operation.
21. Install filters.
22. Install duct covers with 4 screws.
23.
Model PVWG936:
Install the glass vapoure catcher with 4 screws and
bushes, place the rubber tape between the canopy
metal edge and the glass (see drawing at last pages
of this manual).
Model PVWG936
Ø 3.5 x 9.5
Duct Cover
Models PVWS930/936 and PVWT936
Ø 3.5 x 9.5
Duct Cover
Page 15

Installation Instructions
15
CEILING INSTALLATION
FOR MODEL PVIG940 ONLY
(For models PVWS930/936, PVWT936 and PVWG936
installation, please refer to paragraph
"WALL
INSTALLATION"
on previous pages).
1. Choose the assembly height which is most convenient
for the user.
2. Measure the height “H” between the ceiling and the
floor
• establish the desired distance “D” between the floor
and the hood
• measure the height “X” of the hood
• you will obtain “L” by applying the following formula
L = H - (D + X).
min. 30” - 36”
Once you have regulated the length of the telescopic
structure, fasten the two items using the 8 screws.
Ø 3.5 x 9.5
3. Mark the centre lines of the hob or the distance on the
overlying ceiling. Use the centre lines marked on the
ceiling to position the assembly template.
Note the position of the front part of the hood and
proceed with the installation.
Note:
All fastener location must span the studs
otherwise proceed as described in Step 4.
4. Remove the template and keep it. Cut the dry wall of
the ceiling and remove it. Install some wooden strips of
suitable length 2” x 4” between the joists to create the
assembly points of the chimney flue. Use the template
for the dimensions and to define the space required.
Make sure you fasten the wooden strips safely and level.
Consult a professional if you are having difficulty or if
this is your first installation.
5. Install the outlet duct. The female end should be 4½”
under the finished ceiling and fastened safely to the
joists. Do not use smaller ducts than those specified.
6. Install the conduit in the position marked in the hood
and measure out the length “L” from the ceiling (see
installation Step 2).
7. Install the dry wall around the duct and conduit then
proceed with the ceiling finish.
8. Fasten the outlet duct to the female end situated 4”
underneath the ceiling.
9. Position the telescopic structure adjusted previously.
Fasten it to the ceiling using the 4 screws. The outlet
duct and the conduit pass along inside it.
10. Insert the chimney with the grid facing the ceiling and
fasten it on the sides to the telescopic structure using
2 screws.
Template
1 Ft = 0.3 m
1” = 2.5 cm
D
Page 16

Installation Instructions
16
CEILING INSTALLATION -
Continued
11. Insert the other chimney and keep it raised. Fix the
low connector to the connection box. Then fasten the
outlet duct onto the transition.
12. Bring the canopy together with the telescopic
structure, and fasten them together using 4 screws
(M8 x 16).
Then you can carry out the electrical connection
(consult Step 19 of
“WALL INSTALLATION”
instructions
on previous page).
13. Lower the chimney and fasten it on the sides to the
hood.
Ø 6 x 80
Ø 3.5 x 9.5
M8 x 16
14. Install the glass vapour catcher with 4 screws and
bushes, place the rubber tape between the canopy
metal edge and the glass (see drawing at last pages of
this manual)
Page 17

17
Notes.
www.GEAppliances.ca
Consumer SupportTroubleshooting TipsOperating InstructionsSafety Instructions Care and Cleaning
Page 18

18
Before you call for service…
Consumer Support
Troubleshooting Tips
Operating Instructions Safety InstructionsCare and Cleaning
Troubleshooting Tips
Save time and money! Review the charts on the following
pages rst and you may not need to call for service.
P r o b l e m P o s s i b l e Causes
What To Do
Fan does not operate
A fuse may be blown or a • Replace fuse or reset circuit breaker.
when the switch is on
circuit breaker tripped.
Fan fails to circulate air
Excessively soiled lters. • Remove the lters, clean if necessary and replace
or moves air slower than
them. If cleaning and replacing the lters does not
normal
correct the problem, call for service.
Page 19

19
OWNERSHIP REGISTRATION
P.O. BOX 1780
MISSISSAUGA, ONTARIO
L4Y 4G1
(FOR CANADIAN CONSUMERS ONLY POUR RÉSIDENTS CANADIENS SEULEMENT)
Please place in envelope and mail to:
Veuillez mettre dans une enveloppe et envoyez à :
Page 20

20
CUT ALONG THIS LINE AND RETURN CARD – THANKS
DÉCOUPEZ ICI ET ENVOYEZ LA FICHE – MERCI
For Canadian
Customers
Pour les
consommateurs
canadiens
OWNERSHIP REGISTRATION CERTIFICATE – FICHE D’INSCRIPTION DU PROPRIÉTAIRE
Please register your product to enable us to contact you in
the remote event a safety notice is issued for this product
and to allow for efficient communication under the terms of
our warranty, should the need arise.
REGISTER ON-LINE:
ENREGISTREMENT SUR INTERNET À :
MR. / M. MRS. / MME
MISS/MLLE
STREET NO / NO RUE STREET NAME / RUE
CITY / VILLE
MS.
www.geappliances.ca
www.electromenagersge.ca
FIRST NAME / PRÉNOM
Veuillez enregistrer votre produit afin de nous permettre de
communiquer avec vous si jamais un avis de sécurité concernant
ce produit était émis et de communiquer facilement avec vous en
vertu de votre garantie, si le besoin s’en fait sentir.
LAST NAME / NOM
MAIL TO:
POSTEZ À :
P.O. BOX 1780, MISSISSAUGA
ONTARIO, L4Y 4G1
APT.NO/APP./RR#
PROVINCE
POSTAL CODE/CODE POSTAL
AREA CODE/
DID YOU PURCHASE A SERVICE CONTRACT FOR THIS APPLIANCE?
NAME OF SELLING DEALER / NOM DU MARCHAND
INSTALLA TION DATE / D ATE D’INSTA LLATION
IND. RÉG.
AVEZ-VOUS ACHETÉ UN CONTRAT DE SERVICE POUR CET APPAREIL ?
Y/A M D/J
I do not wish to receive any promotional offers regarding this product.
TELEPHONE/TÉLÉPHONE E-MAIL/COURRIEL
CORRESPONDENCE
CORRESPONDANCE
ENGLISH
FRANÇAIS
Je ne désire pas recevoir d’offres promotionnelles concernant ce produit
YES/OUI
NO/NON
MODEL / MODÈLE
SERIAL / SÉRIE
.
IF YES/SI OUI : EXPIRATION
Y/A M
D/J
Page 21

Range Hood Warranty.
For The Period Of: Mabe Will Replace:
One Year Any part
of the range hood which fails due to a defect in materials or workmanship.
From the date of the
During this
full one-year warranty,
Mabe will also provide,
free of charge,
all labor and
original purchase
in-home service to replace the defective part.
■ Service trips to your home to teach you how to use
the product.
■ Improper installation, delivery or maintenance.
■ Failure of the product if it is abused, misused, or
used for other than the intended purpose or used
commercially.
■ Replacement of house fuses or resetting of circuit
breakers.
■ Damage to the product caused by accident, fire, floods
or acts of God.
■ Incidental or consequential damage caused by possible
defects with this appliance.
■ Damage caused after delivery.
What Mabe Will Not Cover:
All warranty service provided by our Factory Service Centers, or
an authorized Customer Care
®
technician. To schedule service,
on-line, 24 hours a day, visit us at www.GEAppliances.ca, or call
1.800.561.3344.
Staple your receipt here.
Proof of the original purchase
date is needed to obtain service
under the warranty.
Consumer SupportTroubleshooting TipsOperating InstructionsSafety Instructions Care and Cleaning
21
This warranty is extended to the original purchaser and any succeeding owner for products purchased for home
use within Canada. If the product is located in an area where service by a Mabe Authorized Servicer is not available,
you may be responsible for a trip charge or you may be required to bring the product to an Authorized Mabe Service
Location for service.
Some provinces do not allow the exclusion or limitation of incidental or consequential damages. This warranty
gives you specific legal rights, and you may also have other rights which vary from province to province. To know
what your legal rights are, consult your local or provincial consumer affairs office.
Warrantor: Mabe Canada Inc. Burlington, Ontario
EXCLUSION OF IMPLIED WARRANTIES—Your sole and exclusive remedy is product repair as provided in this
Limited Warranty. Any implied warranties, including the implied warranties of merchantability or fitness for a
particular purpose, are limited to one year or the shortest period allowed by law.
Page 22

Consumer Support.
GE Appliances Website
GEAppliances.ca
Have a question or need assistance with your appliance? Try the GE Appliances Website 24 hours a day,
any day of the year! For greater convenience and faster service, you can now download Owner’s Manuals,
order parts or even schedule service on-line.
Schedule Service
GEAppliances.ca
Expert Mabe repair service is only one step away from your door. Get on-line and schedule your service at
your convenience 24 hours any day of the year! Or call 1-800-461-3636 during normal business hours.
Extended Warranties
GEAppliances.ca
Purchase a GE extended warranty and learn about special discounts that are available while your warranty
is still in effect. You can purchase it on-line anytime, or call 1-888-261-2133 during normal business hours.
Mabe Consumer Home Services will still be there after your warranty expires.
Parts and Accessories
GEAppliances.ca
Individuals qualified to service their own appliances can have parts or accessories sent directly to their
homes (VISA, MasterCard and Discover cards are accepted). Order on-line today, 24 hours every day or
by phone at 1-800-661-1616 during normal business hours.
Instructions contained in this manual cover procedures to be performed by any user. Other servicing generally
should be referred to qualified service personnel. Caution must be exercised, since improper servicing may cause
unsafe operation.
Contact Us
GEAppliances.ca
If you are not satisfied with the service you receive from Mabe, contact us on our Website with all the details
including your phone number, or write to: General Manager, Customer Relations, Mabe Canada Inc.
Suite 310, 1 Factory Lane
Moncton, N.B. E1C 9M3
Register Your Appliance
GEAppliances.ca
Register your new appliance on-line—at your convenience! Timely product registration will allow for
enhanced communication and prompt service under the terms of your warranty, should the need arise.
You may also mail in the pre-printed registration card included in the packing material.
 Loading...