

GE PT900, PT958, PK956, CT918, CT959 Owner's Manual
...
GEAppliances.com
Safety Instructions ...................2–4
Operating Instructions
Clock and Timer ....................................... 9
Control Lockout ........................................ 9
Controls ........................................................5
Convection .......................................13–15
Oven..........................................................6-8
Probe ..........................................................11
Proofing .....................................................12
Sabbath Feature ...................................22
Self-Cleaning Oven .......................18, 19
Special Features ............................20, 21
Thermostat ..............................................17
Timed Baking
and Roasting ...................................10, 16
Warming ...................................................12
Care and Cleaning
Aluminum Foil .........................2, 4, 6, 18
Cleaning Oven Door ............................24
Control Panel ..........................................26
Electric Self-Cleaning
Lift-Off Oven Door ................................24
Light Bulb .................................................23
Probe ..........................................................24
Racks ..........................................................25
Removing Packaging Tape ..............23
Stainless Steel Surfaces ....................26
Owner’s Manual
PK916–27s Single Wall Oven
PK956–27s Double Wall Oven
PT900-30s Single Wall Oven
PT916–30s Single Wall Oven
PT956–30s Double Wall Oven
PT958-30sDouble Wall Oven
CT918-30s Single Wall Oven
CT959-30s Double Wall Oven
Troubleshooting Tips .........27-29
Accessories ........................................30
Consumer Support
Consumer Support ...............................34
Warranty .................................................33
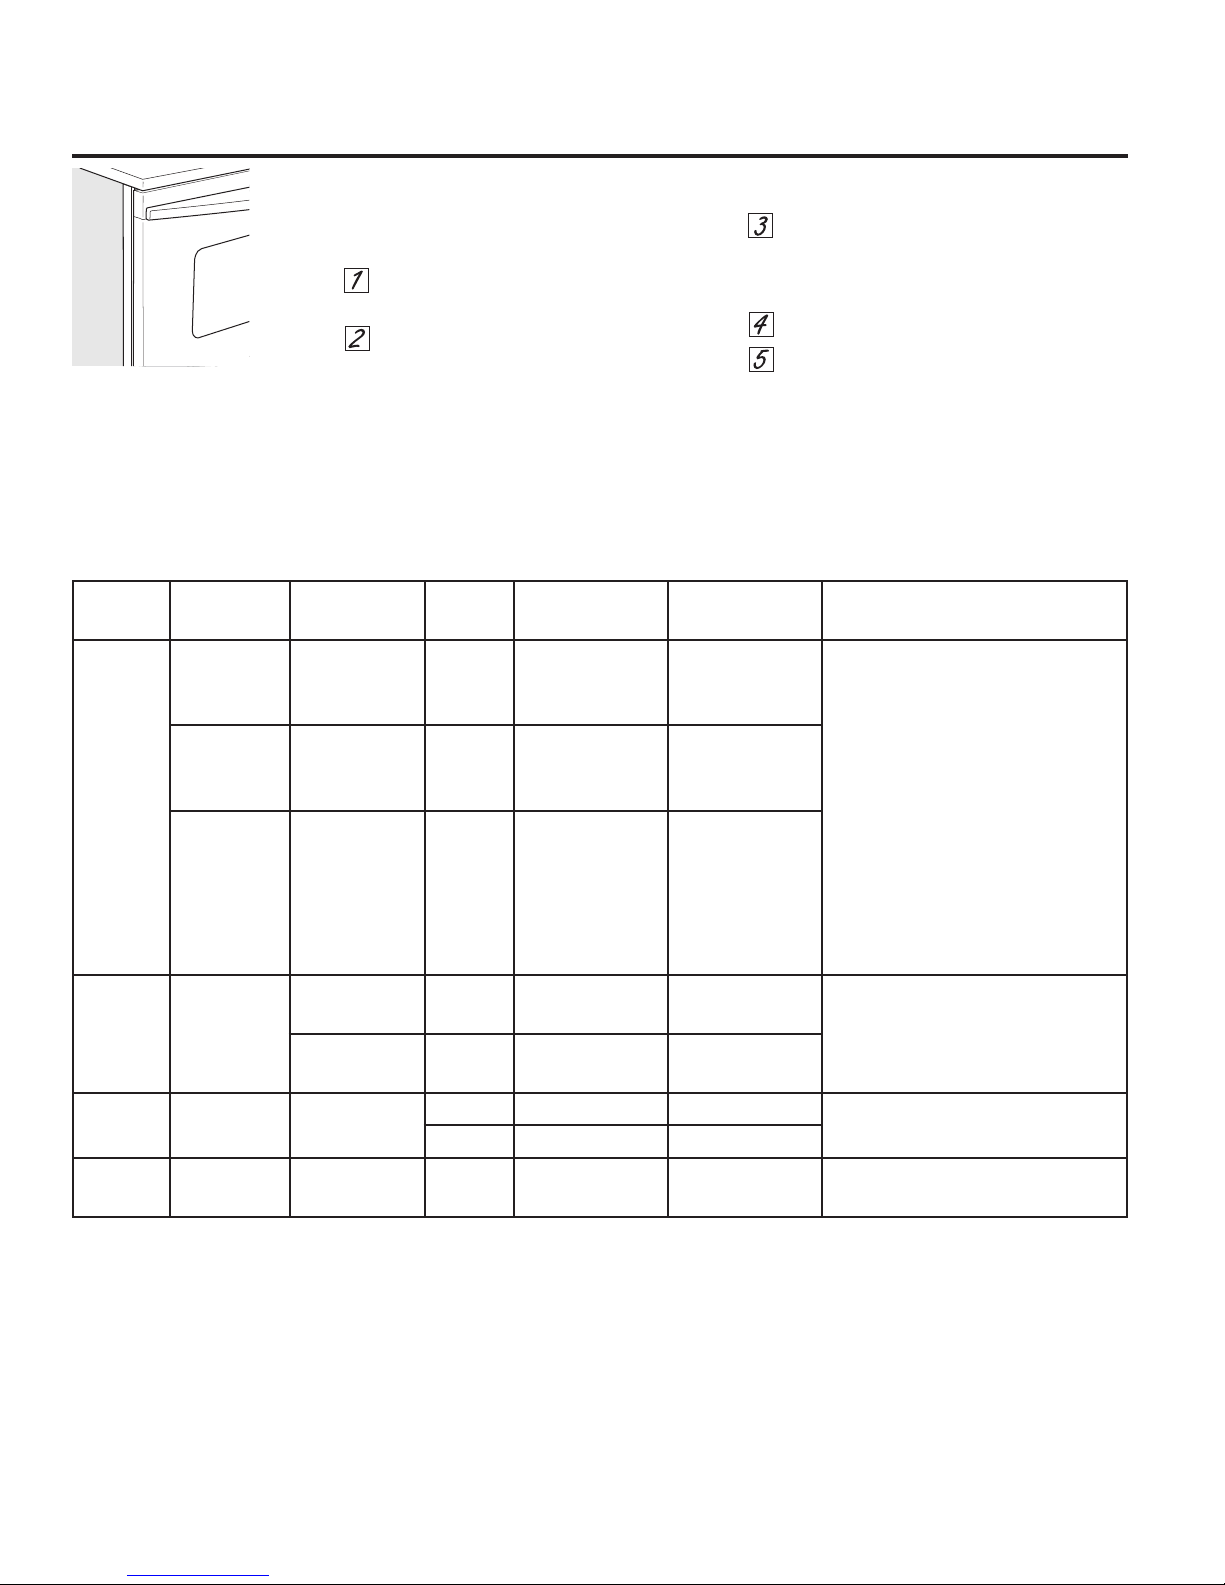
Write the model and serial
numbers here:
Model # __________________
Serial # ___________________
You can find them on a label
on the front of the oven behind
the oven door on single oven models, or
Built-In Oven
the front of the lower oven behind
the oven door on double oven models.
Printed on
Recycled Paper
49-80717 04-14 GE
IMPORTANT SAFETY INFORMATION.
READ ALL INSTRUCTIONS BEFORE USING.
WARNING
Read all safety instructions before using the product. Failure to follow these instructions may result in fire, electrical
shock, serious injury or death.
WARNING
The California Safe Drinking Water and Toxic Enforcement Act requires the Governor of California to publish a list of
substances known to the state to cause cancer, birth defects or other reproductive harm, and requires businesses
to warn customers of potential exposure to such substances.
The fiberglass insulation in self-clean ovens gives off a very small amount of carbon monoxide during the cleaning
cycle. Exposure can be minimized by venting with an open window or using a ventilation fan or hood.
WARNING
■ Use this appliance only for its intended purpose as
described in this Owner’s Manual.
■ Be sure your appliance is properly installed and
grounded by a qualified installer in accordance with
the provided installation instructions.
■ Do not attempt to repair or replace any part of your
oven unless it is specifically recommended in this
manual. All other servicing should be transferred to
a qualified technician.
IMPORTANT SAFETY NOTICE
GENERAL SAFETY INSTRUCTIONS
■ Do not touch the heating elements or the interior
surface of the oven. These surfaces may be hot
enough to burn even though they are dark in color.
During and after use, do not touch, or let clothing
or other flammable materials contact any interior
area of the oven; allow sufficient time for cooling
first. Other surfaces of the appliance may become
hot enough to cause burns. Potentially hot surfaces
include the oven vent opening, surfaces near the
opening and crevices around the oven door.
■ Before performing any service, disconnect the
power supply at the household distribution panel
by removing the fuse or switching off the circuit
breaker.
■ 'RQRWOHDYHFKLOGUHQDORQH³FKLOGUHQVKRXOGQRW
be left alone or unattended in an area where an
appliance is in use. They should never be allowed
to climb, sit or stand on any part of the appliance.
■ CAUTION: Do not store items of interest
to children in cabinets above an oven - children
climbing on the oven to reach items could be
seriously injured.
■ 8VHRQO\GU\SRWKROGHUV³PRLVWRUGDPSSRWKROGHUV
on hot surfaces may result in burns from steam. Do
not let pot holders touch hot heating elements. Do not
use a towel or other bulky cloth in place of pot holders.
■ Never use your appliance for warming or heating
the room.
2
SAVE THESE INSTRUCTIONS
■ Do not heat unopened food containers. Pressure
could build up and the container could burst,
causing an injury.
Do not use any type of foil or liner to cover the
oven bottom or anywhere in the oven, except as
described in this manual. Oven liners can trap heat
or melt, resulting in damage to the product and risk
of shock, smoke or fire.
■ Avoid scratching or impacting glass doors or control
panels. Doing so may lead to glass breakage. Do not
cook on a product with broken glass. Shock, fire or
cuts may occur.
■ &RRNPHDWDQGSRXOWU\WKRURXJKO\³PHDWWRDWOHDVW
an internal temperature of 160°F and poultry to
at least an internal temperature of 180°F. Cooking
to these temperatures usually protects against
foodborne illness.
www.GEAppliances.ca
WARNING
Do not store or use flammable materials in or near
an oven, including paper, plastic, pot holders, linens,
wall coverings, curtains, drapes and gasoline or
other flammable vapors and liquids.
Never wear loose-fitting or hanging garments while
using the appliance. These garments may ignite if
they contact hot surfaces, causing severe burns.
WARNING
KEEP FLAMMABLE MATERIALS AWAY FROM THE OVEN
Failure to do so may result in fire or personal injury.
IN THE EVENT OF A FIRE, TAKE THE FOLLOWING STEPS
TO PREVENT INJURY AND FIRE SPREADING:
Do not use water on grease fires. Never pick up a
flaming pan.
If there is a fire in the oven during baking, smother
the fire by closing the oven door and turning the
oven off or by using a multi-purpose dry chemical or
foam-type fire extinguisher.
Do not let cooking grease or other flammable
materials accumulate in or near the oven. Grease in
the oven or near the oven may ignite.
If there is a fire in the oven during self-clean, turn
the oven off and wait for the fire to go out. Do not
force the door open. Introduction of fresh air at selfclean temperatures may lead to a burst of flame
from the oven. Failure to follow this instruction may
result in severe burns.
WARNING
Stand away from the oven when opening the oven
door. Hot air or steam which escapes can cause
burns to hands, face and/or eyes.
Keep the oven vent unobstructed.
Keep the oven free from grease buildup. Grease in
the oven may ignite.
Place oven racks in desired location while oven is
cool. If rack must be moved while oven is hot, do not
let pot holder contact hot heating element in oven.
When using cooking or roasting bags in the oven,
follow the manufacturer’s directions.
OVEN SAFETY INSTRUCTIONS
Pulling out the standard racks to their stop-locks
or the extension rack to its fully open position
is a convenience in lifting heavy foods. It is also
a precaution against burns from touching hot
surfaces of the door or oven walls.
Do not leave items such as paper, cooking utensils
or food in the oven when not in use. Items stored in
an oven can ignite.
Never place cooking utensils, pizza or baking stones,
or any type of foil or liner on the oven floor. These
items can trap heat or melt, resulting in damage to
the product and risk of shock, smoke or fire.
SAVE THESE INSTRUCTIONS
3

IMPORTANT SAFETY INFORMATION.
READ ALL INSTRUCTIONS BEFORE USING.
WARNING
The self-cleaning feature operates the oven at temperatures high enough to burn away food soils in the oven.
Follow these instructions for safe operation.
Before self-cleaning the oven, remove shiny silver
colored oven racks (on some models), the probe, any
aluminum foil, and any broiler pan, grid, and other
cookware. Only porcelain coated oven racks may
be left in the oven.
Before operating the self-clean cycle, wipe grease
and food soils from the oven. Excessive amount of
grease may ignite, leading to smoke damage to your
home.
SELF-CLEANING OVEN SAFETY INSTRUCTIONS (Some models)
If the self-cleaning mode malfunctions, turn the
oven off and disconnect the power supply. Have it
serviced by a qualified technician.
Do not clean the door gasket. The door gasket is
essential for a good seal. Care should be taken not
to rub, damage or move the gasket.
Do not use oven cleaners. No commercial oven
cleaner or oven liner protective coating of any kind
should be used in or around any part of the oven.
SAVE THESE INSTRUCTIONS
4
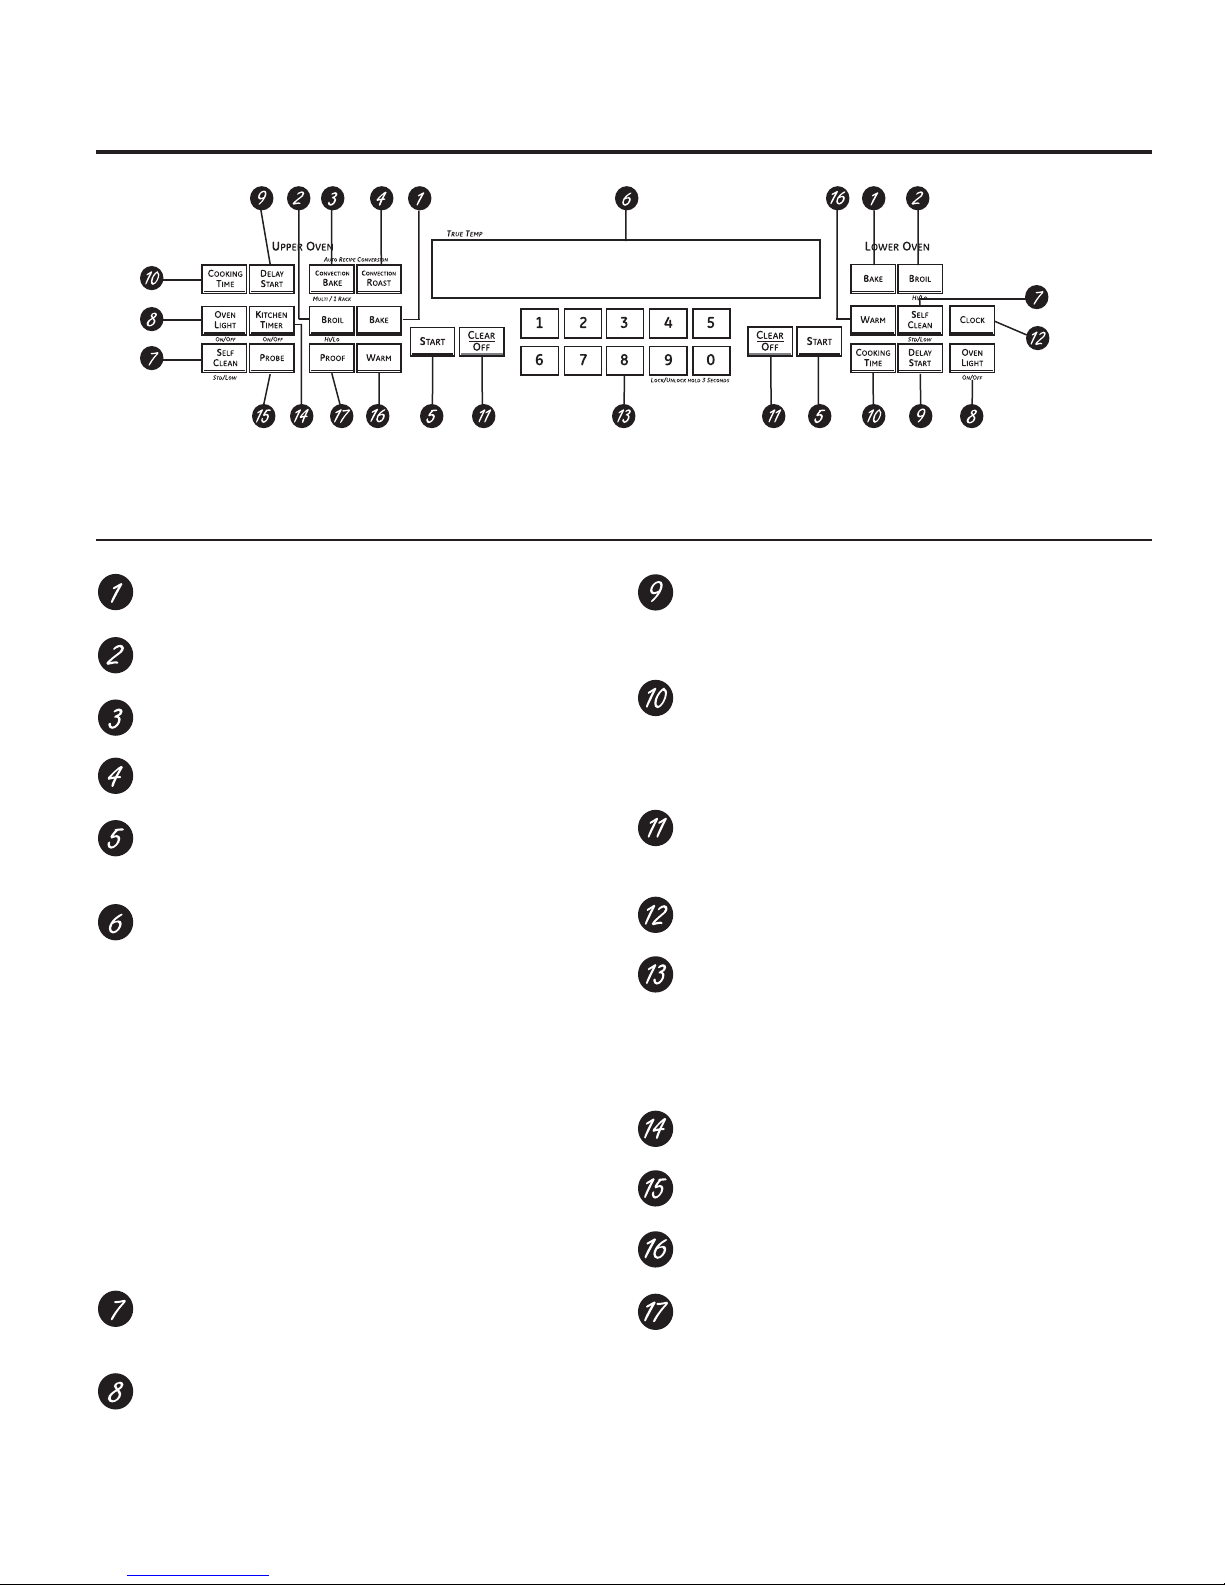
Using the oven controls.
(Throughout this manual, features and appearance may vary from your model.) GEAppliances.com
Double oven control shown.
Bake Pad
Press to select the bake function.
Broil Hi/Lo Pad
Press to select the broil function.
Convection Bake Pad
Press to select baking with the convection function.
Convection Roast Pad
Press to select roasting with the convection function.
Start Pad
Must be pressed to start any cooking or cleaning
function.
Display
Shows the time of day, oven temperature, whether the
oven is in the bake, broil or self-cleaning mode and the
times set for
the timer or automatic oven operations.
If “F– and a number or letter” flash in the display and the oven
control signals, this indicates a function error code. Press the
Clear/Off pad. Allow the oven to cool for one hour. Put the oven
back into operation. If the function error code repeats, disconnect
the power to the oven and call for service.
If your oven was set for a timed oven operation and a power
outage occurred, the clock and all programmed functions must
be reset.
The time of day will flash in the display when there has been a
power outage.
Self Clean Std/Low Pad
Press to select self-cleaning function. See the Using the
self-cleaning oven section.
Delay Start Pad
Use along with Cooking Time or Self Clean Std/Low
pads to set the oven to start and stop automatically at a
time you set.
Cooking Time Pad
Press and then press the number pads to set the amount
of time you want your food to cook. The oven will shut off
automatically when the cooking time has run out, unless
the Cook and Hold feature was set.
Clear/Off Pad
Press to cancel ALL oven operations except the clock
and timer.
Clock Pad
Press before setting the clock.
Number Pads
Use to set any function requiring numbers such as the
time of day on the clock, the timer, the oven temperature,
the internal food temperature, the start time and
length of operation for timed baking
and self-cleaning.
Kitchen Timer On/Off Pad
Press to select the timer feature.
Probe Pad
Press when using the probe to cook food.
Warm Pad
Press to keep hot, cooked foods warm.
Proof Pad
Press to select a warm environment useful for rising
yeast-leavened products.
Oven Light On/Off Pad
Press to turn the oven light on or off.
5
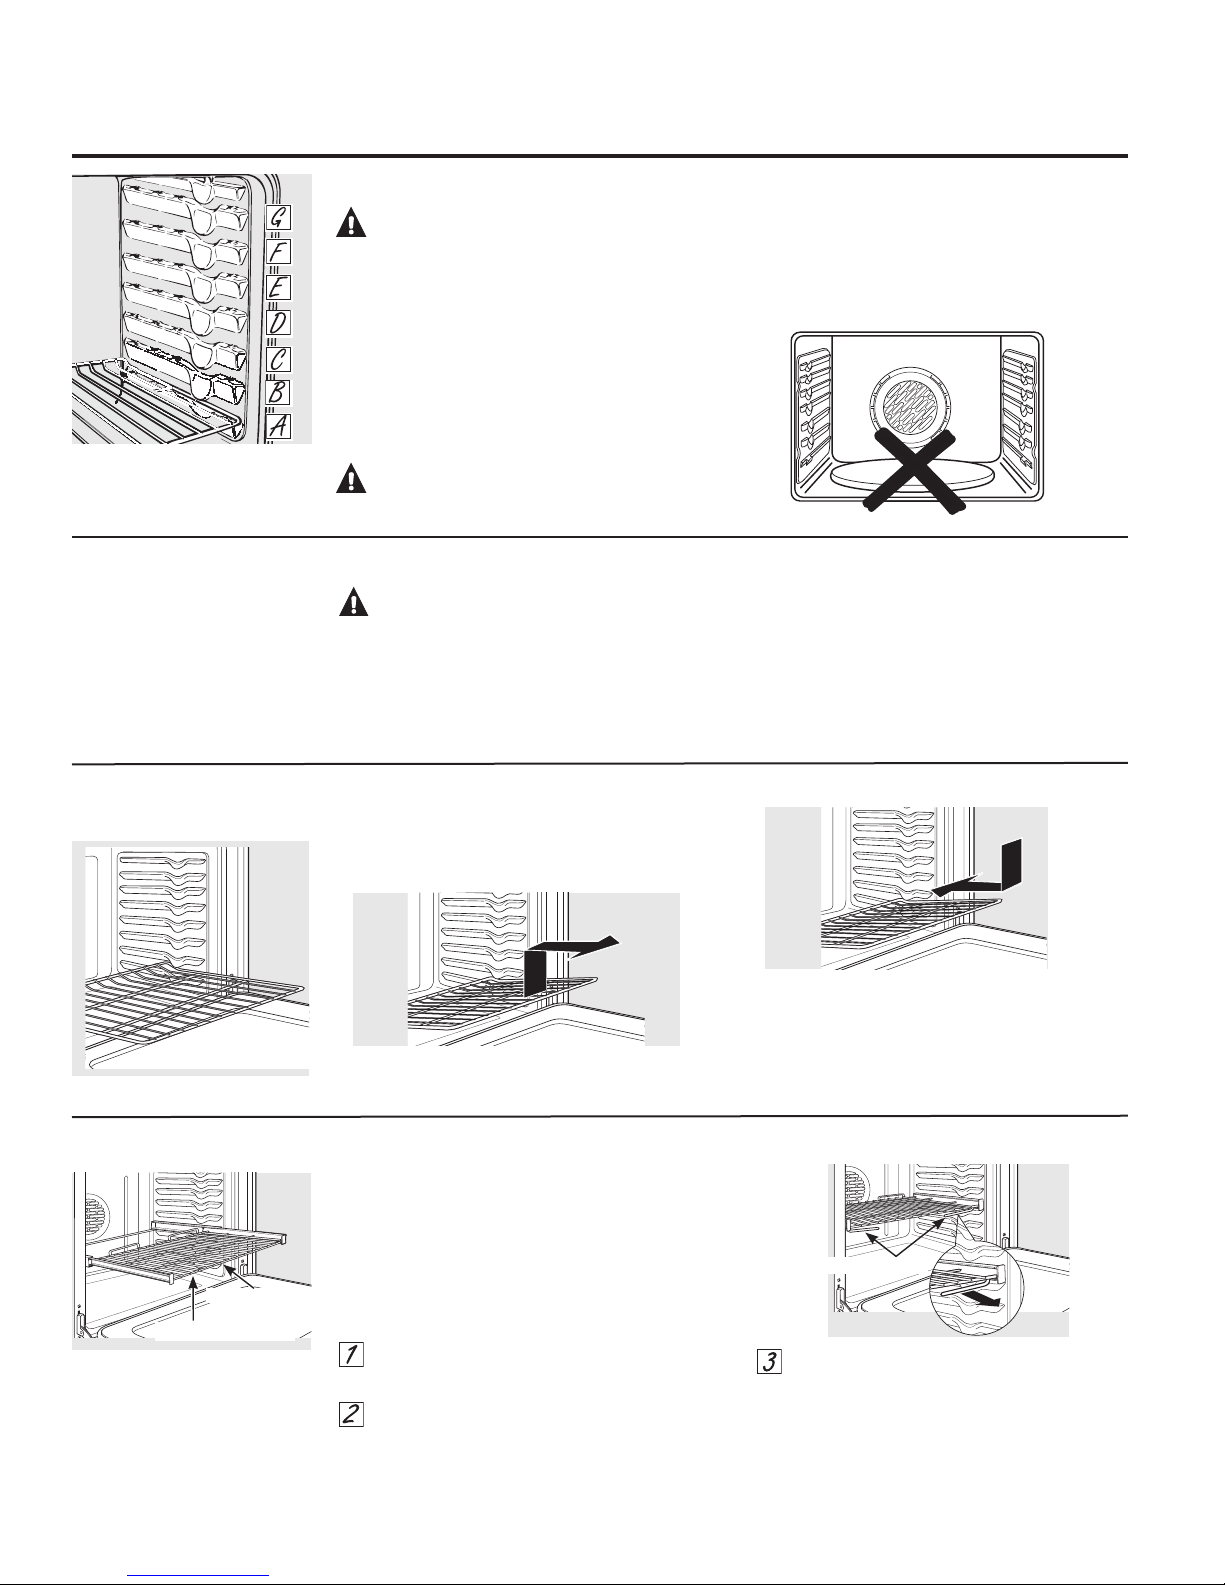
Using the oven.
Before you begin…
CAUTION:To avoid possible
burns, place the racks in the desired position
before you turn the oven on.
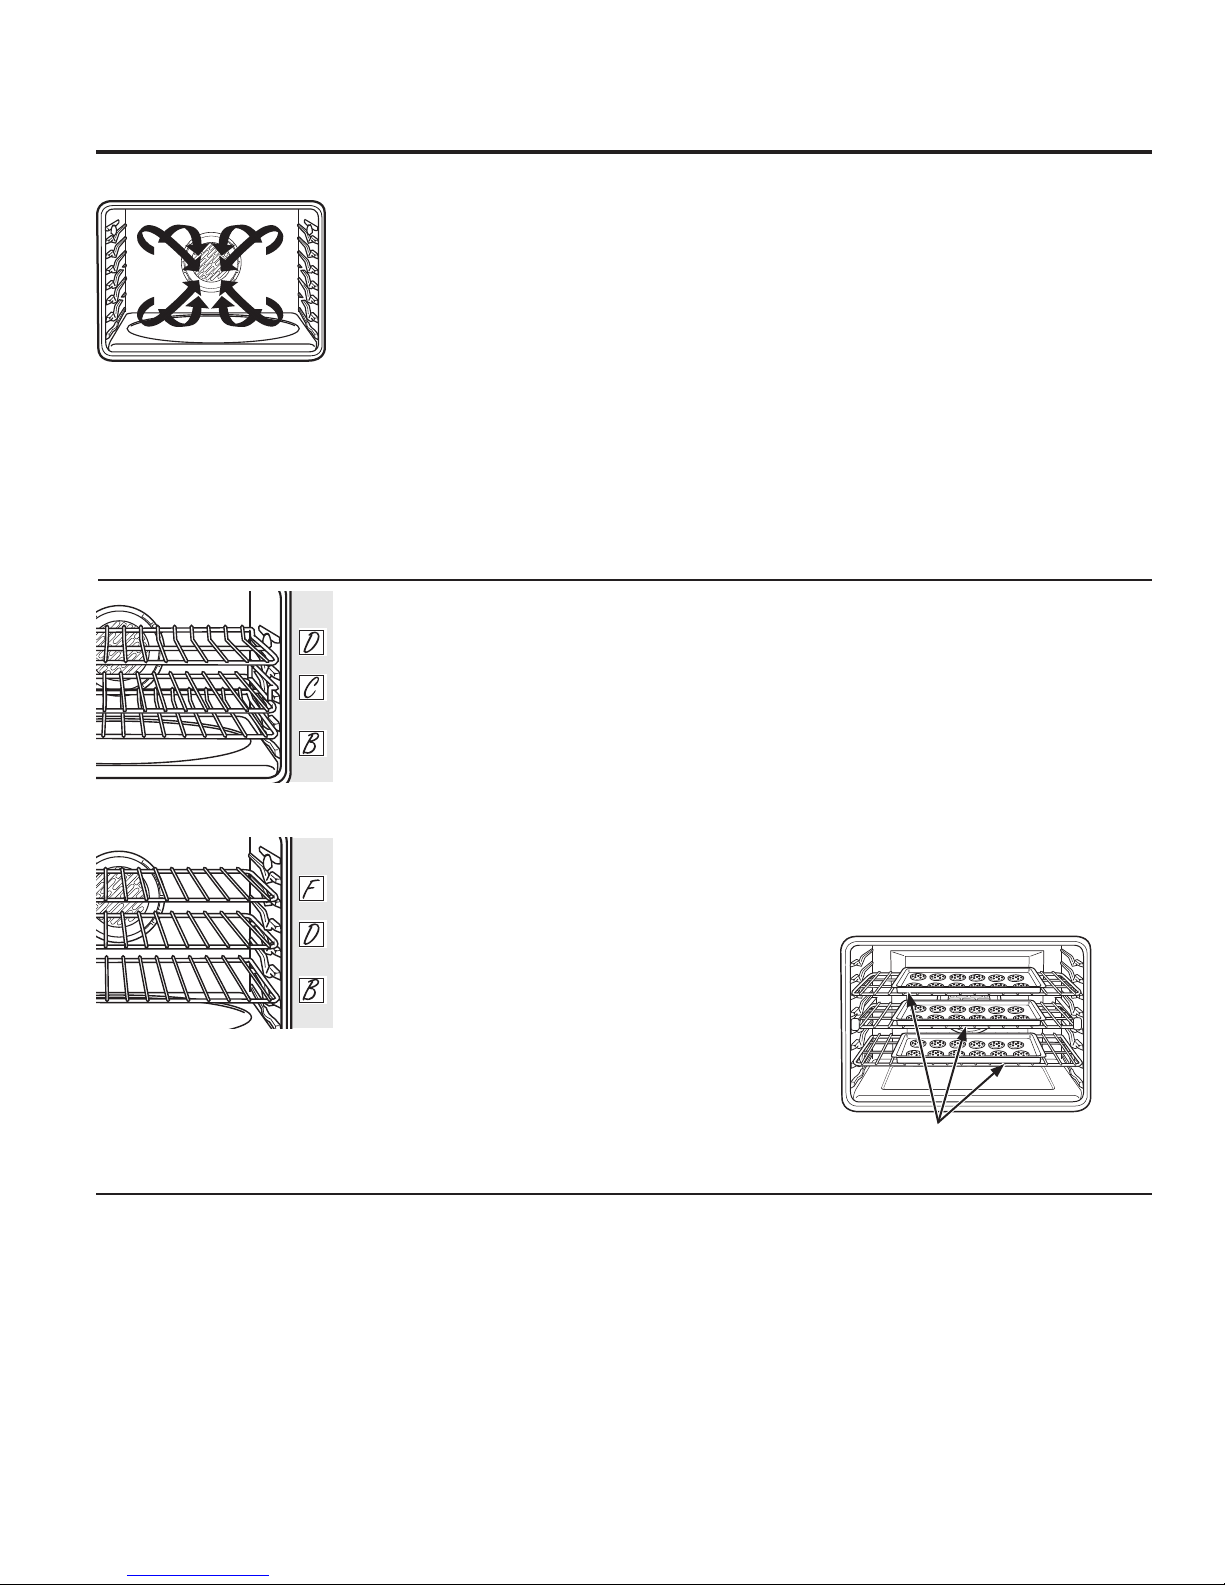
The racks are designed so that when
placed correctly in the oven on the
supports, they will stop before coming
completely out and will not tilt.
NOTE: The 27” oven has 4 rack positions.
The 30” oven has 7 rack positions.
CAUTION:Never place cooking
utensils, pizza stone, or any other items on
Aluminum Foil and Oven Liners
CAUTION: Do not use any type
of foil or oven liner to cover the oven bottom.
These items can trap heat or melt, resulting
in damage to the product and risk of shock,
smoke or fire. Damage from improper use
of these items is not covered by the product
warranty.
the oven floor.
beneath the oven floor. Placing items on the
oven floor may cause the oven to overheat,
resulting in damage to the oven and risk of
damage or fire to cabinets.
Foil may be used to catch spills by placing
a sheet on a lower rack, several inches
below the food. Do not use more foil than
necessary and never entirely cover an oven
rack with aluminum foil. Keep foil at least
1-1/2” from oven walls to prevent poor heat
circulation.
There is a heating element
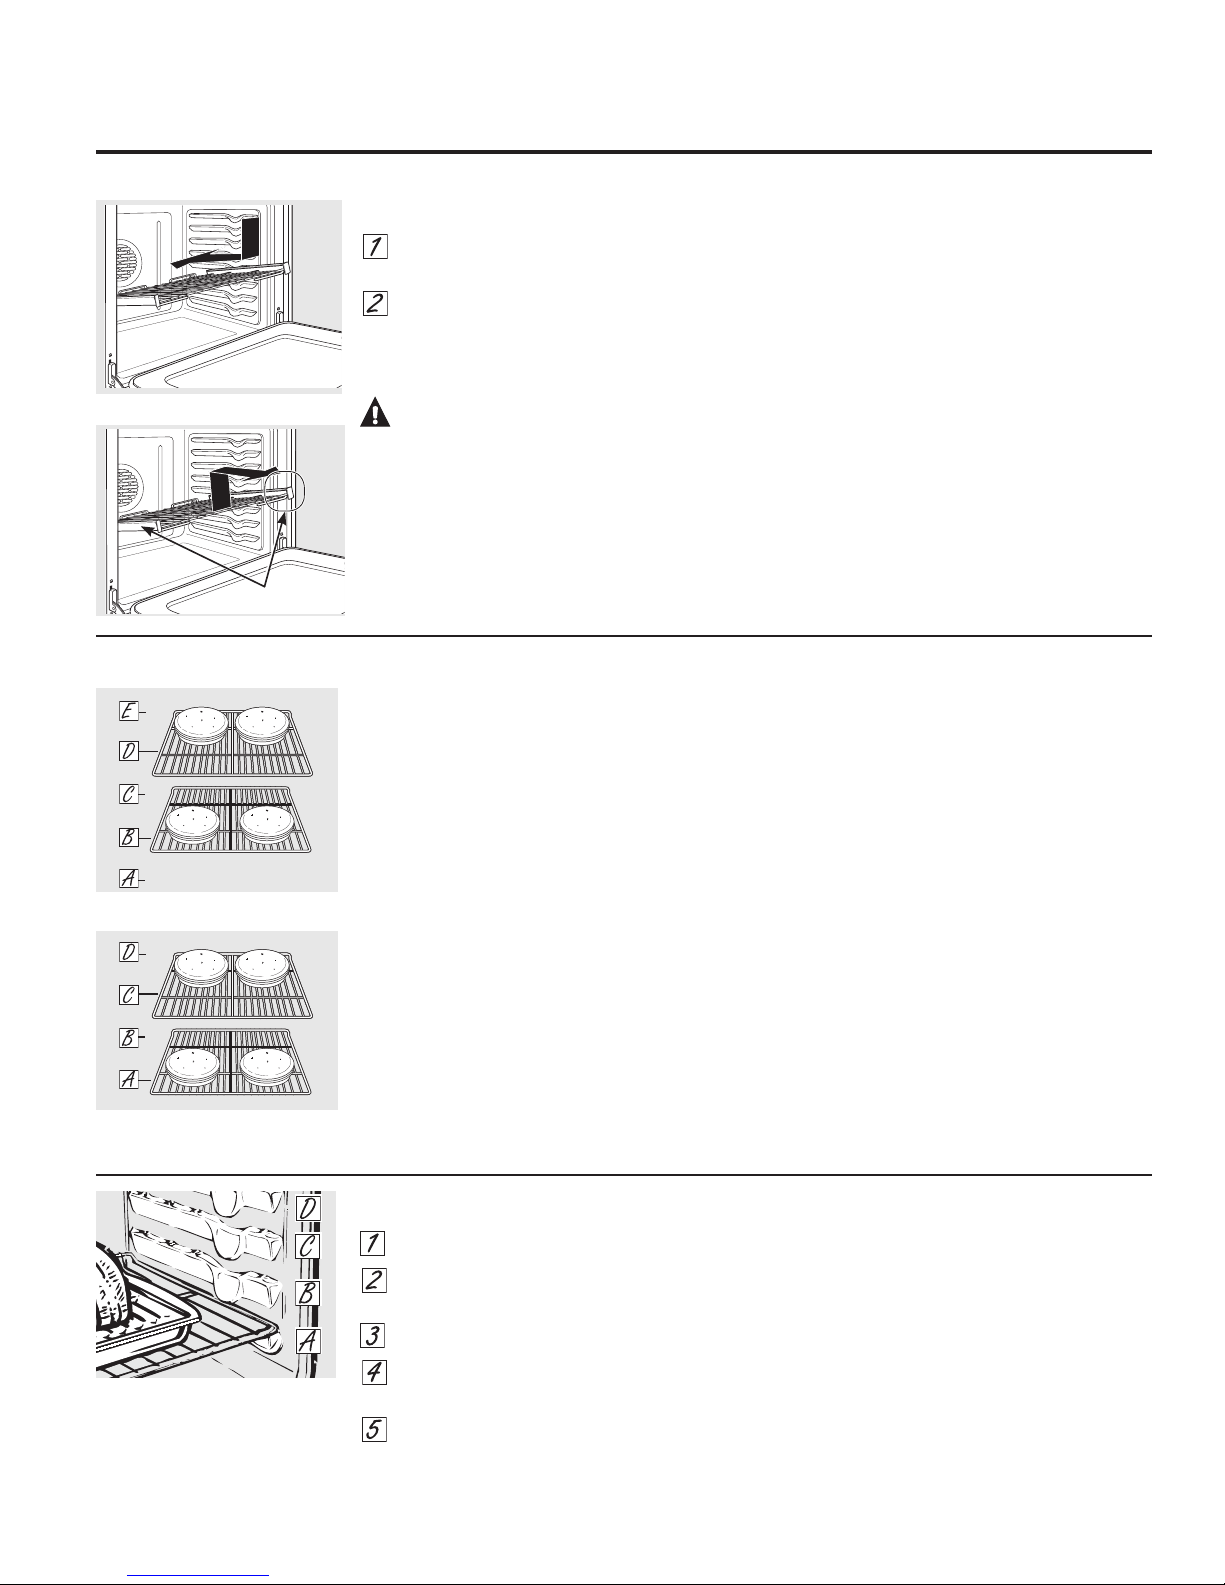
Standard Racks
When placing and removing cookware,
pull the rack out to the bump (stop
position) on the rack support.
To replace, place the curved end of
the rack (stop-locks) onto the oven
supports, tilt up the front of the rack
To remove a rack, pull it toward you, tilt
the front end up and pull it out.
and push the rack in.
Extension Racks
When placing and removing cookware,
always pull the rack out by its upper front
rail to its fully open position.
NOTE: Do not extend the rack quickly.
Upper Front Rail
Fully Open Position
6
Food may slide off the front of the rack.
To remove the rack:
Make sure the rack is pushed all the
way into the oven.
Pull both release levers toward the
front of the rack, hold them and slide
the rack toward you to the bump (stop
position) on the rack support.
NOTE: When handling the extension
rack, do not allow the sliding portion to
fall open. This can damage the slides.
Release Levers
Firmly grasp both sides of the rack
frame and the sliding rack, tilt the
front end up and pull it out.
30” Ovens
27” Ovens
Grasp here
Extension Racks (Continued)
To replace the rack:
Firmly grasp both sides of the rack
frame and the sliding rack.
Place the curved end of the rack
(stop-locks) onto the oven supports,
tilt up the front of the rack and push it
in as far as it will go.
CAUTION:Never use the rack
when its frame is not fully inserted in the
oven and locked into position.
Preheating and Pan Placement
Preheat the oven if the recipe calls for it.
Preheating is necessary for good results
when baking cakes, cookies, pastry and
breads.
To preheat, set the oven at the correct
temperature. The control will beep when
the oven is preheated and the display
will show your set temperature. This may
take approximately 10-15 minutes.
Baking and roasting results will be better
if the rack is positioned so that food is
centered in the oven cavity as much as
possible. Angel food cake is the exception
and should be placed on the bottom oven
rack (Rack A). Follow package directions
on prepackaged and frozen foods for pan
placement.
www.GEAppliances.ca
When the rack is properly installed and
locked into position, the locking side
paddles on the rack frame will clicklock into place on the oven supports. If
the side paddles did not click-lock into
position, repeat the steps above and
make sure the side paddles have been
correctly cleaned and lubricated. See
Extension Rack in the Care and cleaning
section.
Do not place the extension rack in the
highest position in the oven.
Pans should not touch each other or the
walls of the oven. Leave approximately
1-1/2” from the oven walls. If you need
to use two racks, stagger the pans so
one is not directly above the other.
Please note that extension racks position
food higher in the oven. An extension rack
should be placed one position lower than
a flat rack would be so the food is in the
same location.
For 27” Ovens: If baking four cake layers at
the same time, place two layers on rack A
and two layers on rack C.
For 30” Ovens: If baking four cake layers at
the same time, place two layers on rack B
and two layers on rack D.
Stagger pans on the rack so one is not
directly above the other.
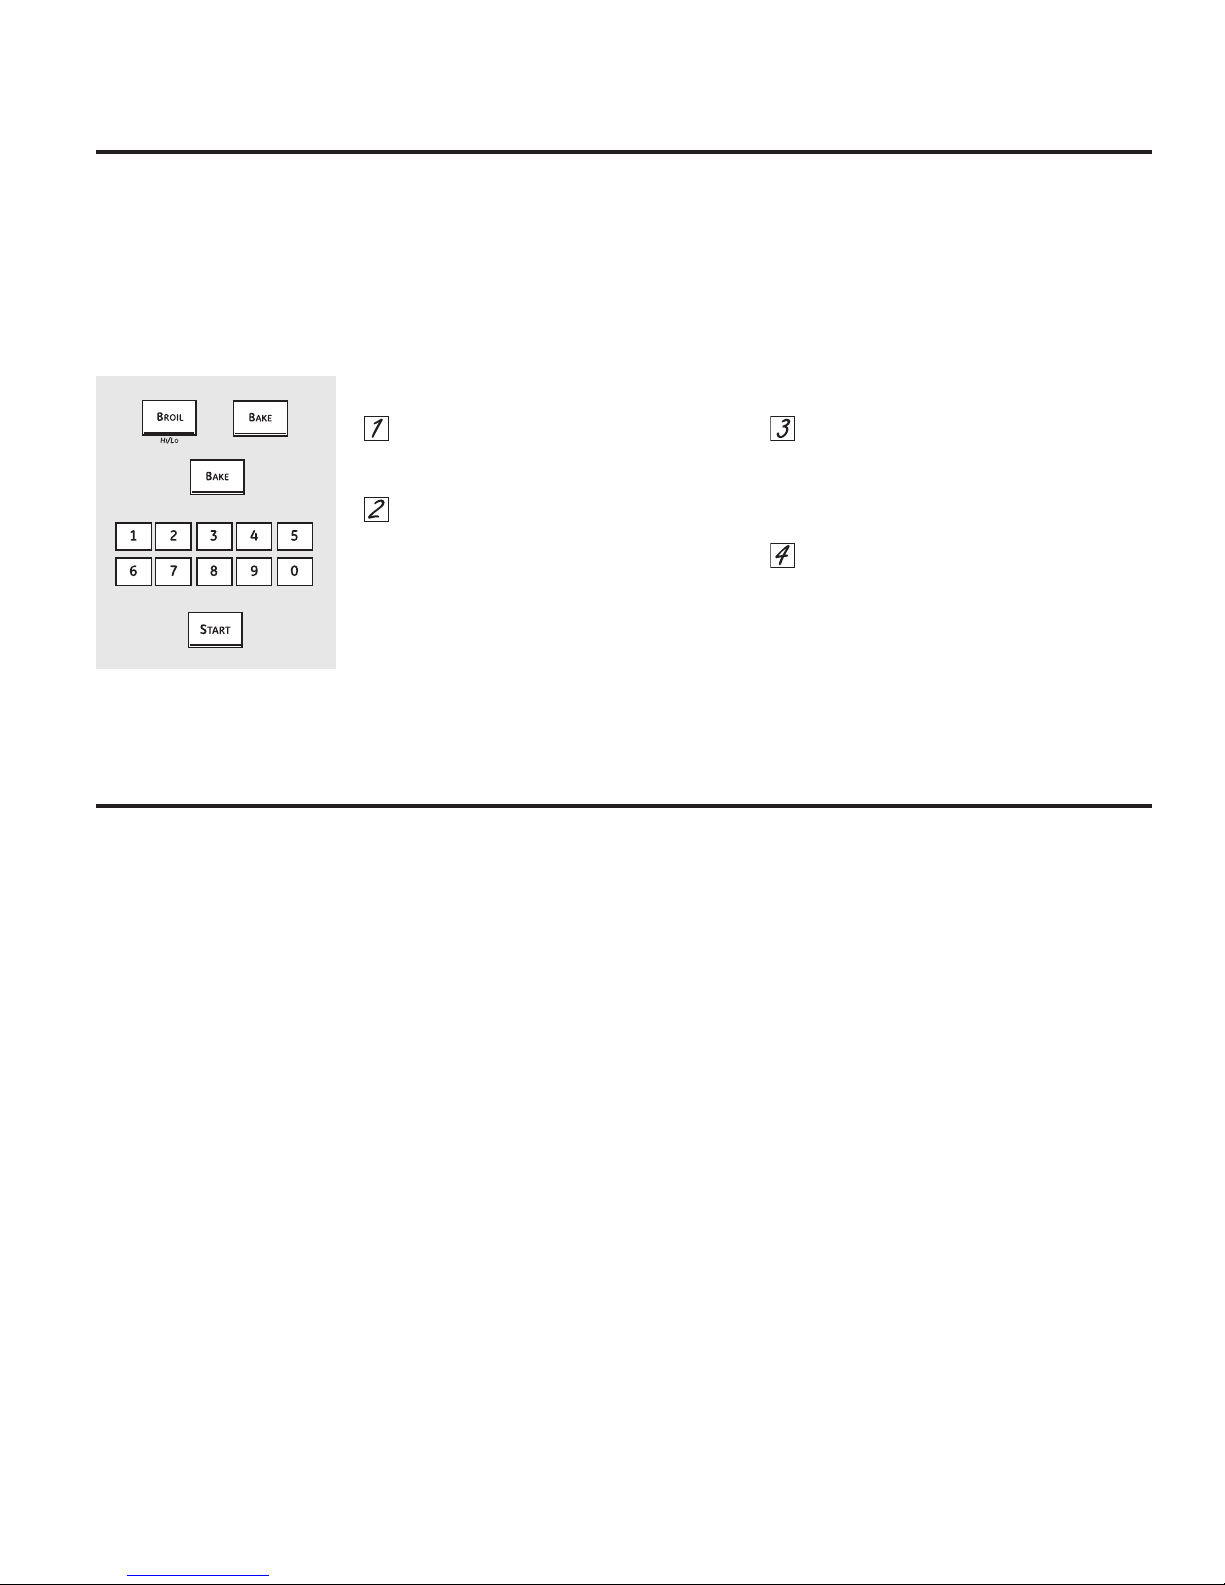
How to Set the Oven for Baking or Roasting
Press the Bake pad.
Press the number pads to set the desired
temperature.
Press the Start pad.
Check food for doneness at minimum time
NOTE: A cooling fan may
automatically turn on and off to
cool internal parts. This is normal,
and the fan may continue to run
even after the oven is turned off.
on recipe. Cook longer if necessary.
Press the Off pad when cooking is
complete.
7
Using the oven.
How to Set the Oven for Broiling
Close the door. Always broil with the door
closed.
Close the door. Always broil with
the door closed.
If your oven is connected to 208
volts, rare steaks may be broiled
by preheating the broiler and
positioning the oven rack one
position higher.
The size, weight, thickness, starting temperature
and your preference for doneness will affect
broiling times. This guide is based on meats
at refrigerator temperature.
Broiling Guide
Food Doneness Type or
Thickness
Beef Rare
(140°F)
Medium
(160°F)
Well Done
(170°F)
Chicken Breast,
Fish
fillets
Pork
chops
Well Done
(170°F)
Steaks -
1” thick
Steaks 3/4” - 1”
thick
Steaks 3/4” - 1”
thick
Ground Beef
Patties (1/2”
to 3/4” thick
boneless
Breast,
bone-in
1/2” to 1”
thick
3/4” thick Hi 3 (C) 4 (D) To avoid curling, slash fat at 1”
Place the meat or fish on a broiler grid in a
broiler pan.
Follow suggested rack positions
in the Broiling Guide.
Broil
Setting
Rack Position
27”
Rack Position
Hi 4 (D) 4 (D) or 5 (E) Steaks less than 1” thick are
Hi 4 (D) 4 (D) or 5 (E) To avoid curling, slash fat at 1”
Hi 4 (D) 6 (F)
Lo 1 (A) 4 (D) or 5 (E) Broil skin-side down first.
Lo 1 (A) 4 (D) or 5 (E)
Hi 3 (C) 6 (F) Handle and turn very carefully.
Lo 3 (C) 6 (F)
Press the Broil Hi/Lo pad once for
HI Broil.
To change to LO Broil, press
the Broil Hi/Lo pad again.
Press the Start pad.
When broiling is finished, press
the Clear/Off pad.
Comments
30”
difficult to cook rare. They cook
through before browning.
intervals.
intervals.
† The U.S. Department of Agriculture says “Rare beef is popular, but you should know that cooking it to only 140°F means some food poisoning organisms
may survive.” (Source: Safe Food Book. Your Kitchen Guide. USDA Rev. June 1985.)
8
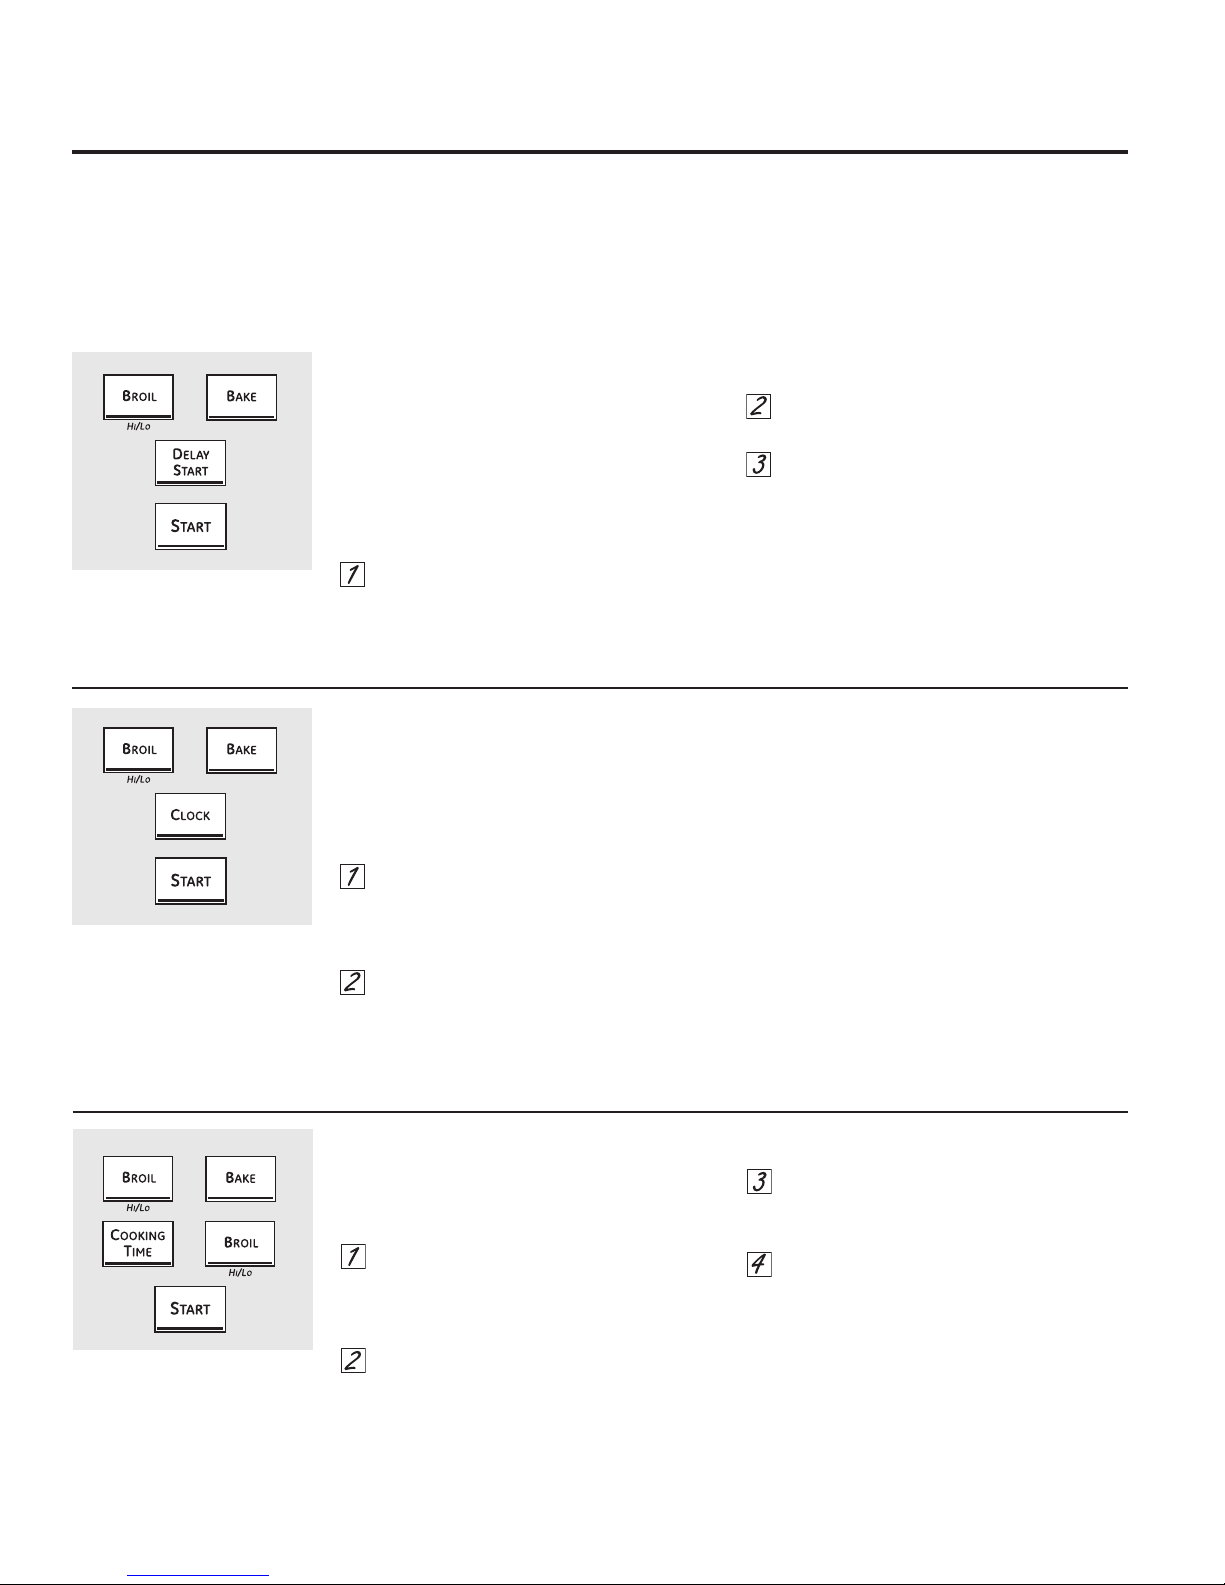
Using the clock, timer and control lockout.
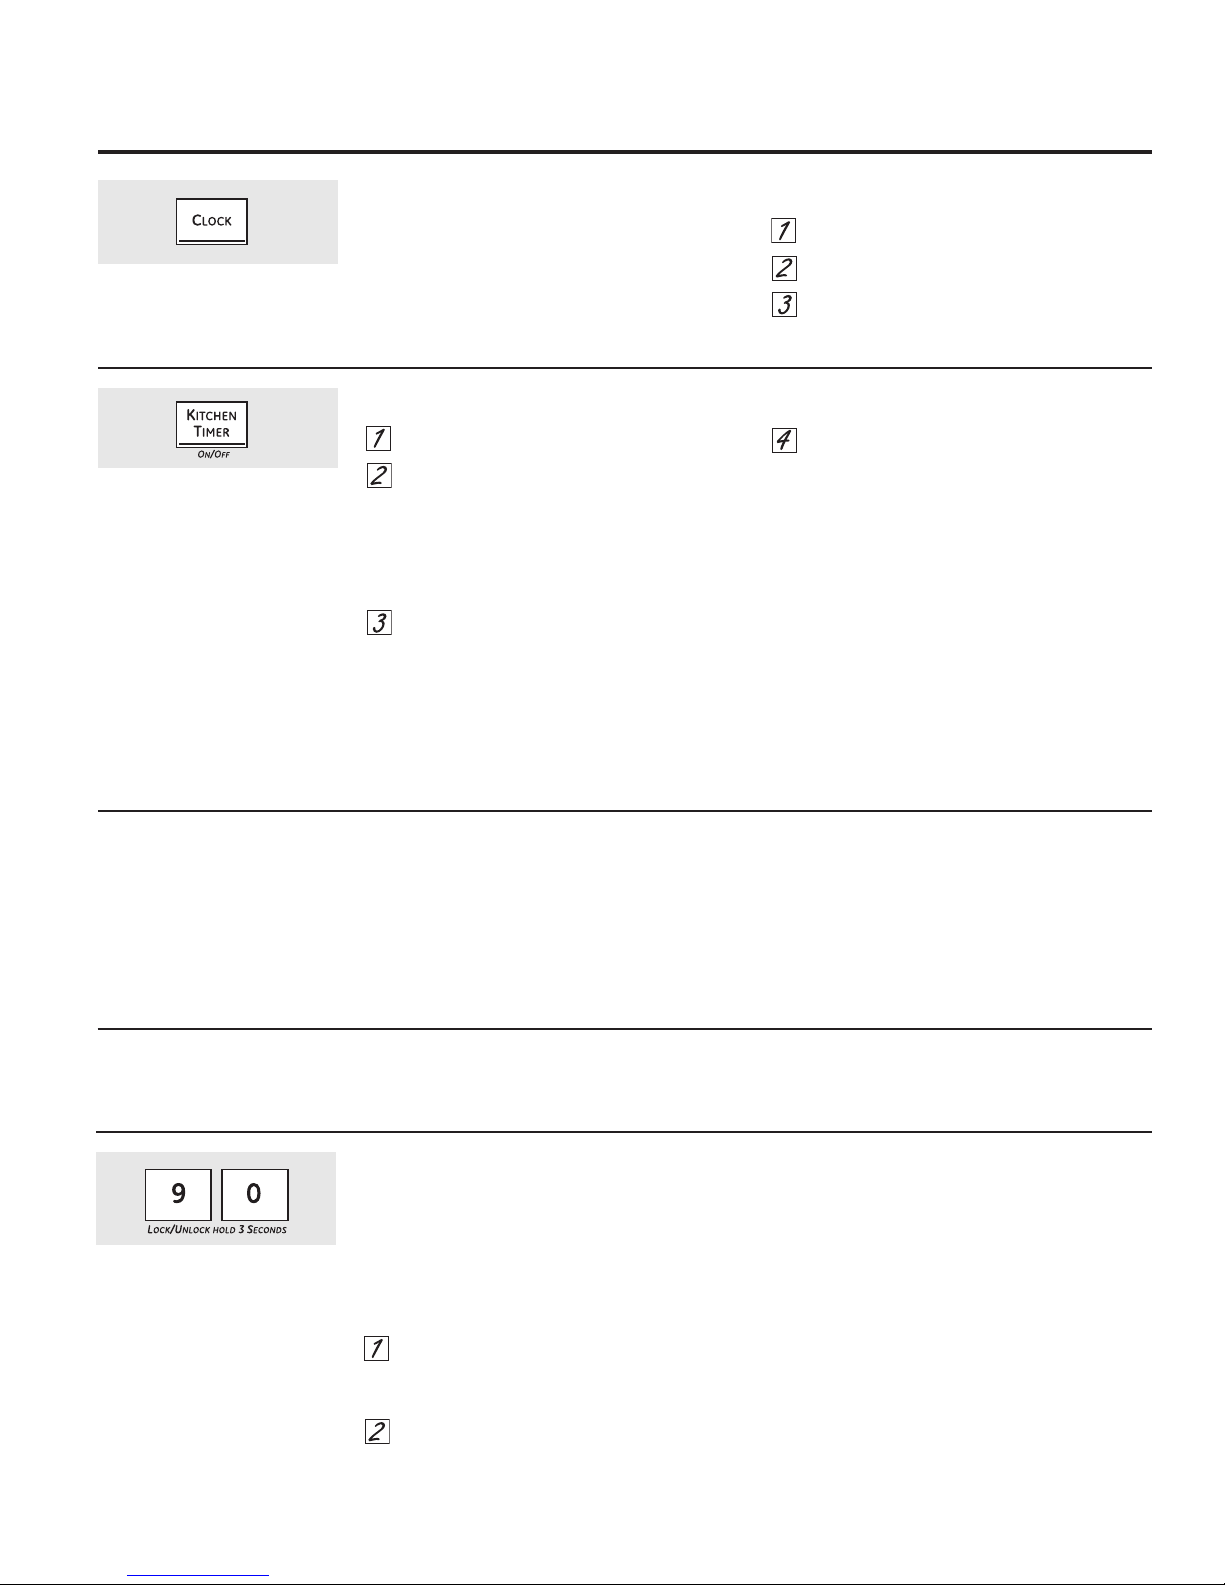
To Set the Clock
Make sure the clock is set
to the correct time of day.
The timer is a minute timer only.
The timer does not control oven
operations. The maximum setting
on the timer is 9 hours and 59
minutes.
The clock must be set to the correct time of day
for the automatic oven timing functions to work
properly. The time of day cannot be changed
during a timed baking or self-cleaning cycle.
To Set the Timer
Press the Kitchen Timer On/Off pad.
Press the number pads until the amount
of time you want shows in the display. For
example, to set 2 hours and 45 minutes,
press 2, 4 and 5 in that order. If you make
a mistake, press the Kitchen Timer On/Off
pad and begin again.
Press the Start pad.
After pressing the Start pad, SET disappears;
this tells you the time is counting down,
although the display does not change until one
minute has passed. Seconds will not be shown
in the display until the last minute is counting
down.
Press the Clock pad.
Press the number pads.
Press the Start pad.
When the timer reaches :00, the control
will beep 3 times followed by one beep
every 6 seconds until the Kitchen Timer
On/Off pad is pressed.
The 6-second tone can be canceled by
following the steps in the Special features of
your oven control section under Tones at the
End of a Timed Cycle.
To Reset the Timer
If the display is still showing the time remaining,
you may change it by pressing the Kitchen
Timer On/Off pad, then press the number pads
until the time you
want appears in the display.
To Cancel the Timer
Press Kitchen Timer On/Off pad twice.
Control Lockout
Your control will allow you to lock out the touch
pads so they cannot be activated when pressed.
NOTE: On double oven models, this activates
this feature for both ovens.
To lock/unlock the controls:
Press the 9 and 0 pads at the same time
for 3 seconds, until the display shows LOC
ON.
To unlock the control, press the 9 and 0
pads at the same time for 3 seconds, until
the display shows LOC OFF.
If the remaining time is not in the display (clock,
delay start or cooking time are in the display),
recall the remaining time by pressing the
Kitchen Timer On/Off pad and then pressing
the number pads to enter the new time you
want.
When this feature is on and the touch pads are
pressed, the control will beep and the display
will show LOC ON.
NOTES:
■ The control lockout mode affects all touch
pads. No touch pads will work when this
feature is activated.
■ The adjustment will be retained in memory
after a power failure.
9
Using the timed baking and roasting features. (on some models)
On double oven models, you can use timed baking in one oven while using self-clean in the other; you can also use timed
baking in both ovens at the same time.
NOTE: )RRGVWKDWVSRLOHDVLO\³VXFKDVPLONHJJVILVKVWXIILQJVSRXOWU\DQGSRUN³VKRXOGQRWEHDOORZHGWRVLWIRUPRUH
than 1 hour before or after cooking. Room temperature promotes the growth of harmful bacteria. Be sure that the oven
light is off because heat from the bulb will speed harmful bacteria growth.
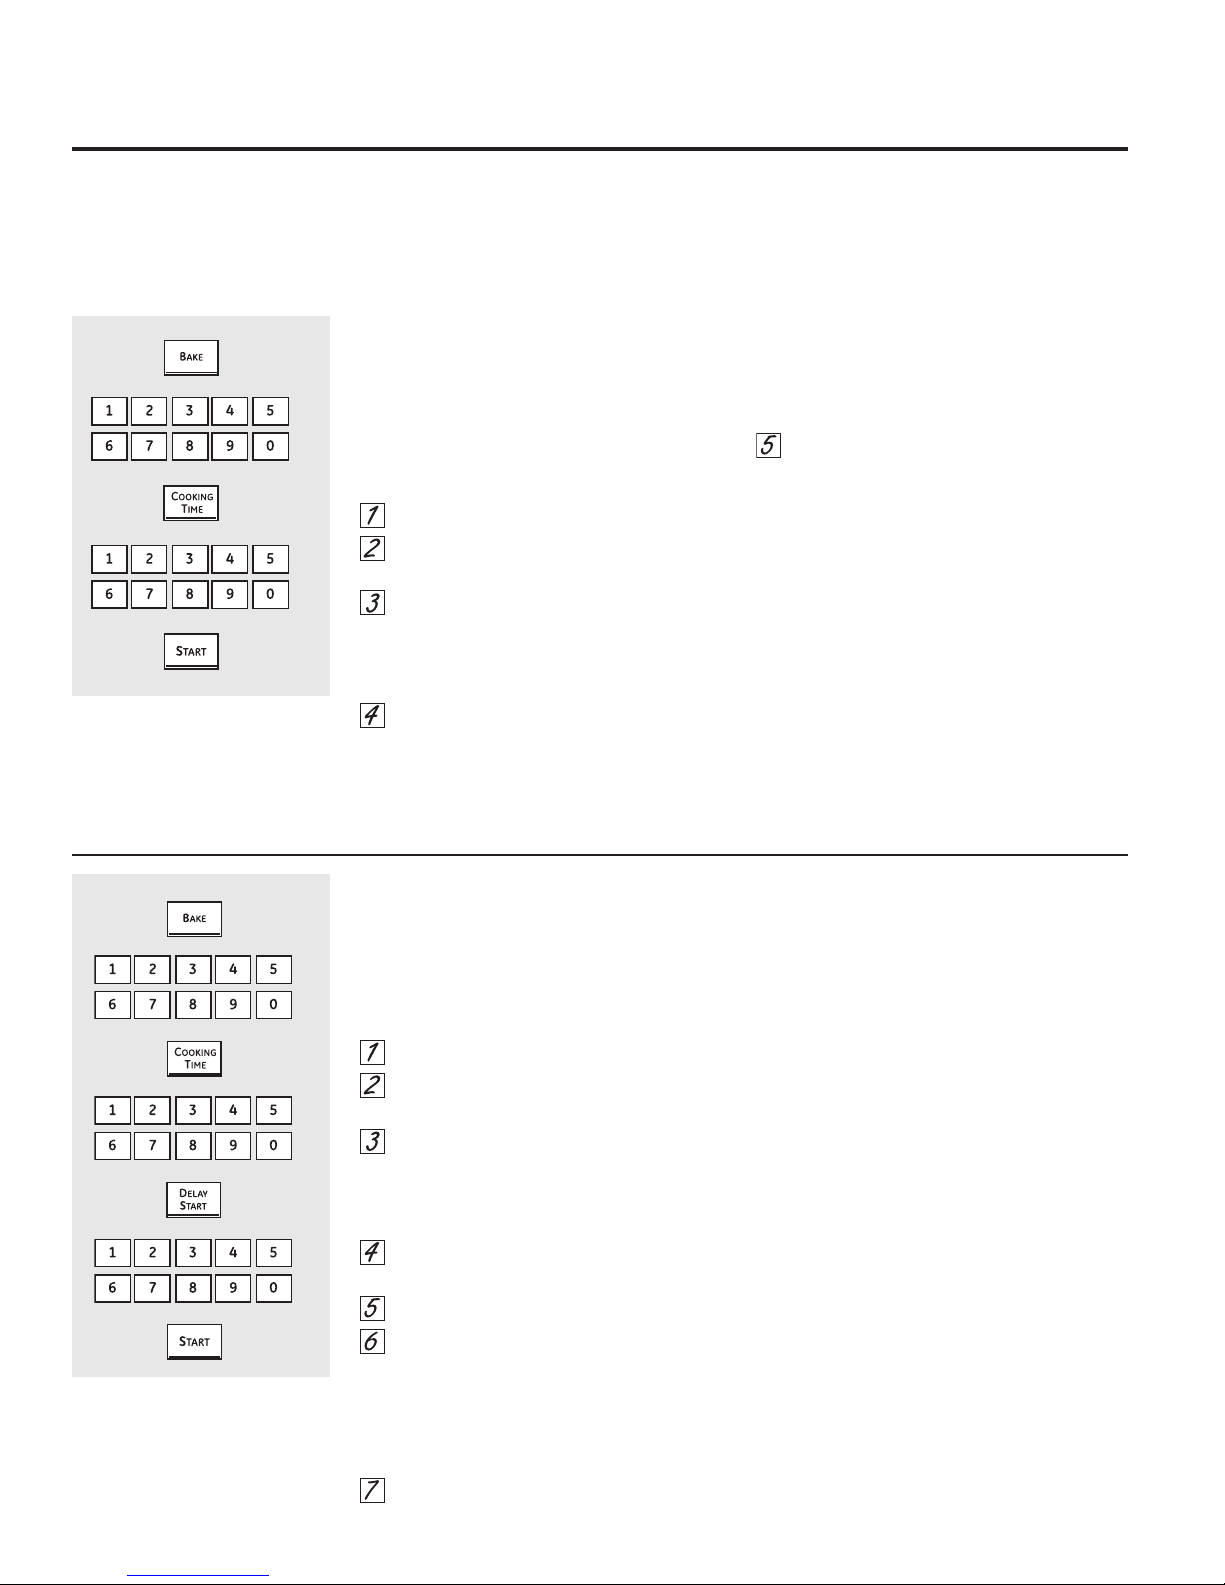
How to Set an Immediate Start and Automatic Stop
10
The oven will turn on immediately and cook
for a selected length of time. At the end
of the cooking time, the oven will turn off
automatically.
Make sure the clock shows the correct time
of day.
Press the Bake pad.
Using the number pads, enter the desired
temperature.
Press the Cooking Time pad.
NOTE: If your recipe requires preheating, you
may need to add additional time to the length
of the cooking time.
Using the number pads, enter
the desired baking time. The oven
temperature and the cooking time
that you entered will be displayed.
NOTE: If you want your food to be kept warm
for up to 3 hours after the cooking function is
finished, press the Warm pad once.
Press the Start pad.
The display will show the changing
temperature (starting at 100°F) and the
cooking time. The display starts changing
once the temperature reaches 100°F.
NOTE: On double oven models, when using
both ovens at the same time, the times
showing in the display will be for the last oven
set. To display the time set for the first oven set,
press the Cooking Time pad for that oven.
The oven will continue to cook for the
programmed amount of time, then shut off
automatically unless the warmer feature was
set.
Press the Clear/Off pad to clear the display.
How to Set a Delayed Start and Automatic Stop
You can set the oven control to delay-start the
oven, cook for a specific length of time and
then turn off automatically.
Make sure the clock shows the correct time
of day.
Press the Bake pad.
Using the number pads, enter the desired
temperature.
Press the Cooking Time pad.
NOTE: If your recipe requires preheating, you
may need to add additional time to the length
of the cooking time.
Using the number pads, enter the desired
baking time.
Press the Delay Start pad.
Using the number pads, enter the time
of day you want the oven to turn on and
start cooking.
NOTE: If you want your food to be kept warm
for up to 3 hours after the cooking function is
finished, press the Warm pad once.
Press the Start pad.
NOTE: An attention tone will sound if you are
using timed baking and do not press the Start
pad after entering the baking temperature.
If you would like to check the times you have
set, press the Delay Start pad to check the
start time you have set or press the Cooking
Time pad to check the length of cooking time
you have set.
When the oven turns on at the time of
day you have set, the display will show the
changing temperature (starting at 100°F) and
the cooking time. The display starts changing
once the temperature reaches 100°F.
NOTE: On double oven models, when using
both ovens at the same time, the times
showing in the display will be for the last oven
set. To display the time set for the first oven set,
press the Delay Start or the Cooking Time pad
for that oven.
The oven will continue to cook for the
programmed amount of time, then shut off
automatically unless the warmer feature was
set.
Press the Clear/Off pad to clear the display.

Using the probe. GEAppliances.com
For many foods, especially roasts and poultry, internal food temperature is the best test for doneness.
The temperature probe takes the guesswork out of roasting by cooking foods to the exact doneness you want.
NOTE: Some double oven models have a probe
in the upper oven only.
Cable
Probe
Handles
The temperature probe has a
skewer-like probe at one end and
a plug at the other end that goes
into the outlet in the oven.
Use of probes other than the one provided
with this product may result in damage to the
probe.
Use the handles of the probe and plug when
inserting and removing them from the meat
and outlet.
■ To avoid damaging your probe, do not use
tongs to pull on the cable when removing it.
■ To avoid breaking the probe, make sure food
is completely defrosted before inserting.
Plug
■ To prevent possible burns, do not unplug
the probe from the outlet until the oven has
cooled.
■ Never leave your probe inside the oven during
a self-cleaning cycle.
■ Do not store the probe in the oven.
After preparing the meat and placing it on
a trivet or on a broiler pan grid, follow these
directions for proper probe placement.
Lay the probe on the outside of the meat
along the top or side and mark with your
finger where the edge of the meat
comes to on the probe. The point should
rest in the center of the thickest meaty
part of the roast.
Insert the probe completely into
the meat, up to the handle. It should not
For roasts with no bone, insert the probe into
the meatiest part of the roast. For bone-in
ham or lamb, insert the probe into the center
of the lowest large muscle or joint.
Insert the probe into the center of dishes such
as meat loaf or casseroles. When cooking fish,
insert the probe from just above the gill into
the meatiest area, parallel to the backbone.
Insert the probe into the meatiest part
of the inner thigh from below and parallel to
the leg of a whole turkey.
touch bone, fat or gristle.
How to Set the Oven For Roasting When Using the Probe
Insert the probe into the meat.
Plug the probe into the outlet in the oven.
Make sure it’s pushed all the way in. Close
the oven door.
Press the Probe pad.
Press the number pads to set the desired
internal food or meat temperature. The
maximum internal temperature for the
food that you can set is 200°F.
Press the Bake pad.
Press the number pads to set the desired
oven temperature.
Press the Start pad.
The display will flash if the probe is inserted
into the outlet and you have not set a probe
temperature and pressed the Start pad.
When the oven starts to heat, the word LO will
be in the display.
After the internal temperature of the meat
reaches 100°F, the changing internal
temperature will be shown in the display.
When the internal temperature of the
meat reaches the number you have set,
the probe and the oven turn off and the
oven control signals. To stop the signal,
press the Clear/Off pad. Use hot pads to
remove the probe from the food. Do not
XVHWRQJVWRSXOORQLW³WKH\PLJKW
damage it.
To change the oven temperature during the
Roast cycle, press the Bake pad and then the
number pads to set the new temperature.
If the probe is removed from the food before
the final temperature is reached, a tone will
sound and the display will flash until the probe
is removed from the oven.
You can use the timer even though you cannot
use timed oven operations.
11

Using the proofing and warming features (on some models).
The proofing feature maintains a warm environment useful for rising yeast-leavened products.
How to Set the Oven for Proofing
12
or
Place the covered dough in the oven on
rack B or C.
NOTE: For best results, cover the dough with a
cloth or with greased plastic wrap (the plastic
may need to be anchored underneath the
container so the oven fan will not blow it off).
Press the Proof pad once or the Warm/
Proof pad twice and then the Start pad.
The display will read PrF (proof).
The oven interior light turns on and remains on
during proofing.
The proofing feature automatically provides the
optimum temperature for the proofing process,
and therefore does not have a temperature
adjustment.
Set the Kitchen Timer for the minimum
proof time.
When proofing is finished, press the Clear/
Off pad.
■ To avoid lowering the oven temperature and
lengthening proofing time, do not open the
oven door unnecessarily.
■ Check bread products early to avoid over-
proofing.
NOTE:
■ Do not use the proofing mode for warming
food or keeping food hot. The proofing oven
temperature is not hot enough to hold foods
at safe temperatures. Use the Warm feature
to keep hot food warm.
■ Proofing will not operate when oven is above
125°F. “HOT” will show in the display.
How to Set the Oven for Warming (on some models)
or
The warm feature keeps cooked foods warm
for up to 3 hours after a timed function is
finished, or warm can be activated to keep
hot, cooked foods warm. This feature is not
designed to reheat cold food.
To use this feature, press the Warm or Warm/
Proof pad once and then the Start pad.
To activate this feature for use after Timed
Baking or Roasting, press the Warm or Warm/
Proof pad while programming the oven and
before pressing Start.
To Crisp Stale Items
■ Place food in low-sided dishes or pans.
■ For best results, place the food items in a
single layer. Do not stack.
■ Leave them uncovered.
■ Check crispness after 20–30 minutes. Add
time as needed.
IMPORTANT NOTES:
■ Food should be kept hot in its cooking
container or transferred to a heat-safe serving
dish.
■ For moist foods, cover them with an oven-
safe lid or foil.
■ Fried or crisp foods do not need to be covered,
but can become too dry if warmed for too
long.
■ Repeated opening of the door allows the hot
air to escape and the food to cool.
■ Allow extra time for the temperature inside
the oven to stabilize after adding items.
■ With large loads it may be necessary to cover
some of the cooked food items.
■ Remove serving spoons, etc., before placing
containers in the oven.
■ Do not use plastic containers, lids or plastic
wrap.
CAUTION: Plastic containers, lids
or plastic wrap will melt if placed in the oven.
Melted plastic may not be removable and is not
covered under your warranty.
Food
Casserole Medium or 2 Covered
Chili High or 3 Covered
Pizza Medium or 2 Uncovered
Potatoes,
baked
Waffles Low or 1 Covered
Control
Setting
High or 3 Uncovered
Covered/
Uncovered
Using the convection oven. (on some models) GEAppliances.com
Convection Bake
Multi-rack position - 27”
Multi-rack position - 30”
NOTE: The convection fan will cycle on and off
while cooking to best distribute hot air in the
oven.
The convection oven fan shuts off when the
oven door is opened. DO NOT leave the door
open for long periods of time while using
convection cooking or you may shorten the life
of the convection heating element.
In a convection oven, a fan circulates hot air
over, under and around the food.
This circulating hot air is evenly distributed
throughout the oven cavity. As a result, foods
DUHHYHQO\FRRNHGDQGEURZQHG³RIWHQLQOHVV
time with convection heat.
Multi-Rack Convection Baking
When convection baking with only 1 rack, follow
the rack positions recommended in the Using
the oven section.
Because heated air is circulated evenly
throughout the oven, foods can be baked with
excellent results using multiple racks.
Multi-rack baking may increase cook times
slightly for some foods but the overall result is
time saved. Cookies, muffins, biscuits and other
quickbreads give very good results with multirack baking.
For 27 s Ovens: When baking on 3 racks, place
one rack in the second (B) position, one in
the third (C) position and one in the fourth (D)
position.
For two-rack baking, place one rack in the
secind (B) rack position. Place the other rack in
the third (C) rack position.
For 30 s Ovens: When baking on 3 racks, place
one rack in the second (B) position, one in
the fourth (D) position and one in the sixth (F)
position.
■ Ideal for evenly browned baked foods cooked
on multiple racks.
■ Good for large quantities of baked foods.
■ Good results with cookies, biscuits, muffins,
brownies, cupcakes, cream puffs, sweet rolls,
angel food cake and bread.
The convection fan circulates the heated air
evenly over and around the food.
For two-rack baking, place one rack in the
second (B) rack position. Place the other rack in
the fourth (D) rack position.
NOTE: Please note that extension racks position
food higher in the oven. An extension rack
should be placed one position lower than a
flat rack would be so the food is in the same
location.
For best results when baking multiple racks of
cookies, line up the front of the cookie sheets
with the front edge of the racks.
Cookie sheets lined up at the front
edge of the oven racks
Adapting Recipes…
You can use your favorite recipes in the
convection oven.
When convection baking, reduce baking
temperature by 25°F or activate the Auto
Recipe
Conversion in the Special features of your oven
control section.
™
Conversion feature. See Auto Recipe
■ Use pan size recommended.
■ Some package instructions for frozen
casseroles or main dishes have been
developed using commercial convection
™
ovens. For best results in this oven, preheat
the oven and use the temperature on the
package.
13
Using the convection oven. (on some models)
Convection Roast
■ Good for large tender cuts of meat,
uncovered.
The convection fan circulates the heated air
evenly over and around the food. Meat and
poultry are browned on all sides as if they
were cooked on a rotisserie. Heated air will be
circulated over, under and around the food
being roasted. The heated air seals in juices
quickly for a moist and tender product while,
at the same time, creating a rich golden brown
exterior.
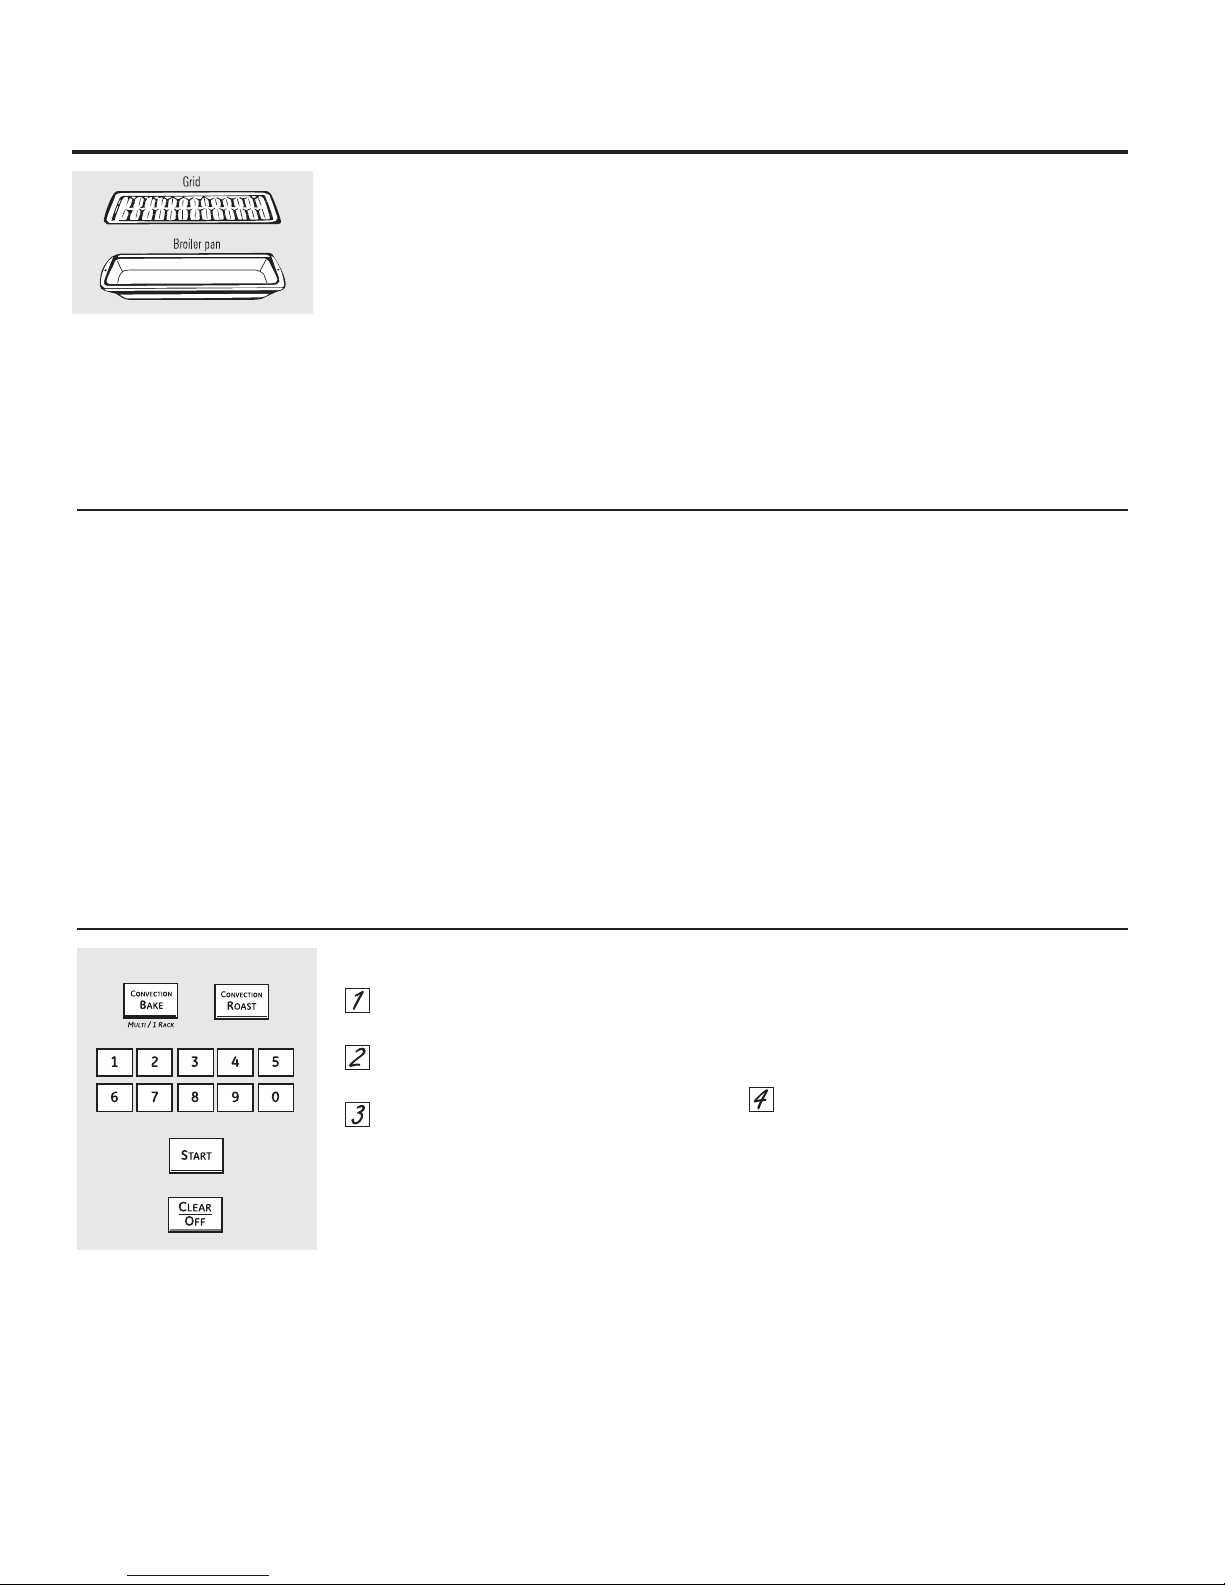
When you are convection roasting it is
important that you use a broiler pan and grid
for best convection roasting results. The pan is
used to catch grease spills
and the grid is used to prevent grease spatters.
When baking cookies, you will
get the best results if you use
a flat cookie sheet instead
of a pan with low sides.
OR
Cookware for Convection Cooking
Before using your convection oven, check
to see if your cookware leaves room for air
circulation in the oven. If you are baking with
several pans, leave space between them. Also,
be sure the pans do not touch each other or
the walls of the oven.
Paper and Plastic
Heat-resistant paper and plastic containers
that are recommended for use in regular
ovens can be used in convection ovens.
Plastic cookware that is heat-resistant to
temperatures of 400°F can also be used.
Metal and Glass
Any type of cookware will work in your
convection oven. However, metal pans
heat the fastest and are recommended for
convection baking.
■ Darkened or matte-finished pans will bake
faster than shiny pans.
■ Glass or ceramic pans cook more slowly.
For recipes like oven-baked chicken, use a pan
with low sides. Hot air cannot circulate well
around food in a pan with high sides.
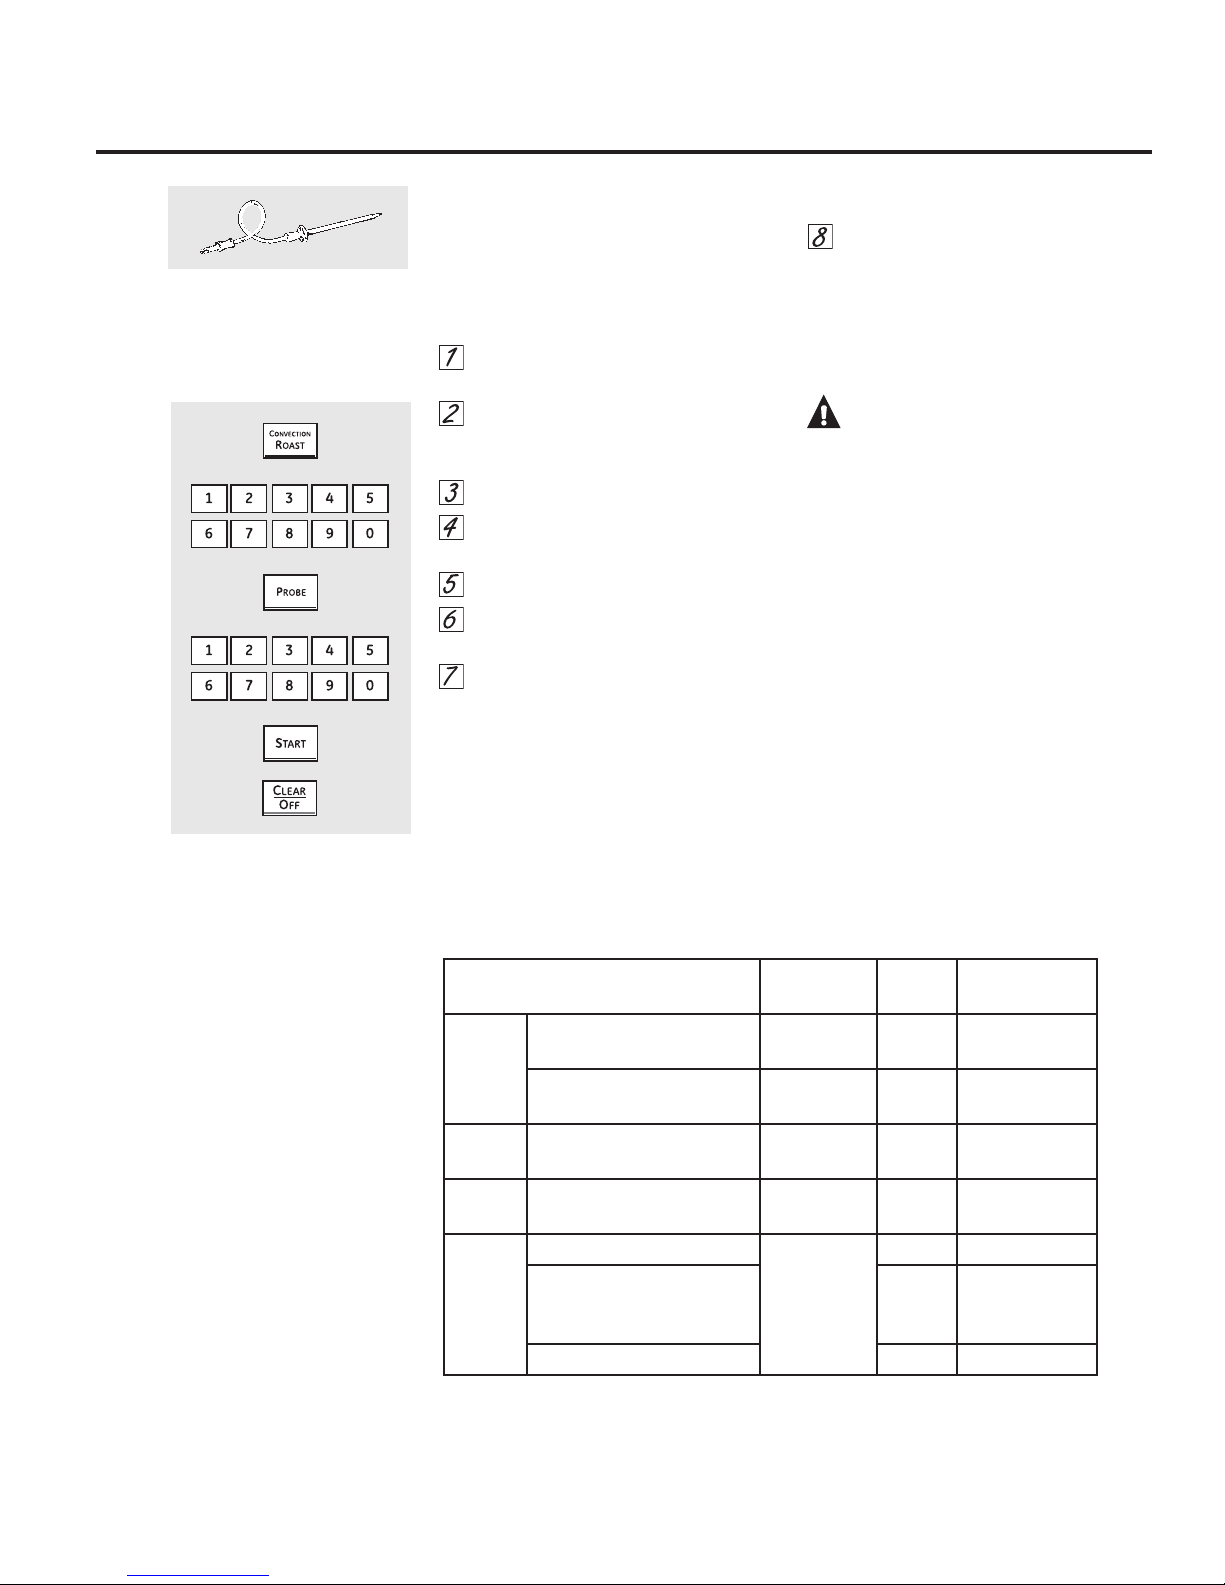
How to Set the Oven for Convection Baking or Roasting
Press the Convection Bake pad or the
Convection Roast pad.
Press the number pads to set the desired
oven temperature.
Press the Start pad.
To change the oven temperature, press the
Convection Bake or Convection Roast pad
and then the number pads to set the new
temperature.
When the oven starts to heat, the changing
temperature, starting at 100°F, will be
displayed. When the oven reaches the
temperature you set, 3 beeps will sound.
Press the Clear/Off pad when finished.
■ You will hear a fan while cooking with
convection. The fan will stop when the door is
opened, but the heat will not turn off.
■ You may hear the oven clicking during
baking. This is normal.
14
GEAppliances.com
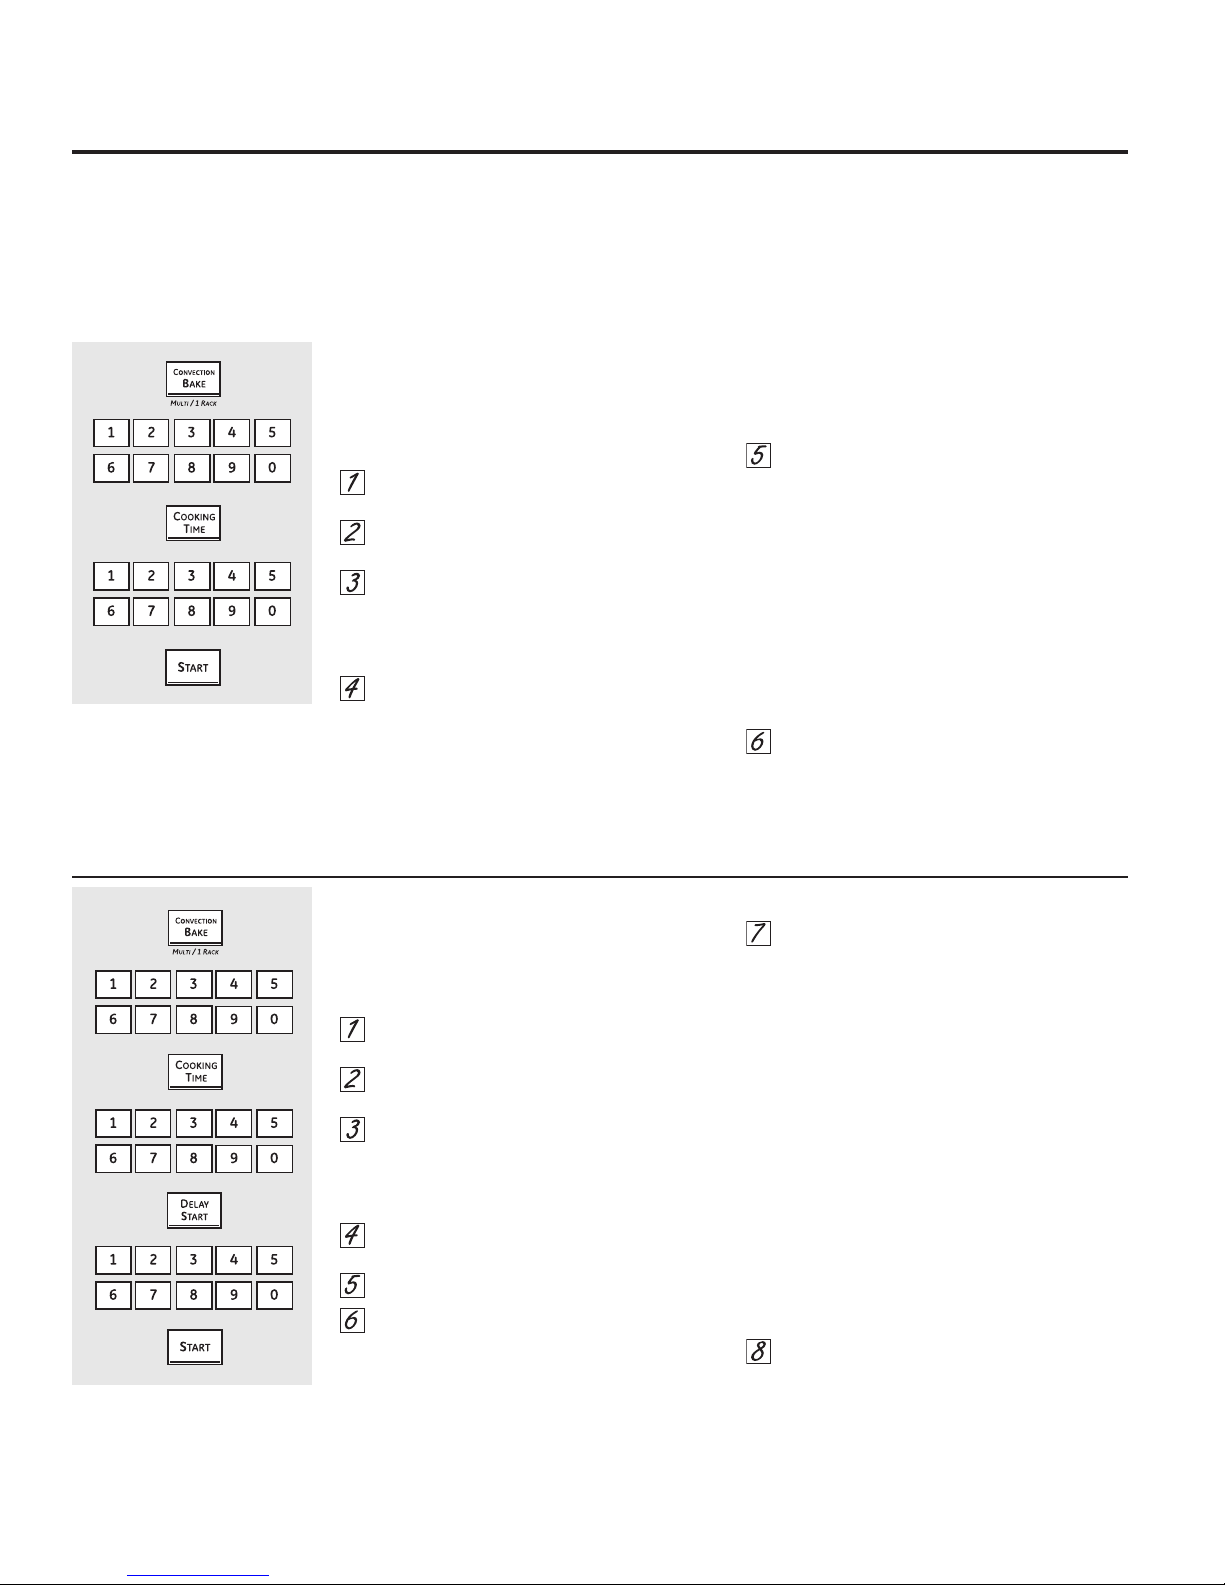
How to Set the Oven for Convection Roasting when Using the Probe
For best results when roasting
large turkeys and roasts, we
recommend using the probe
included in the convection oven.
The display will flash PROBE and the
oven control will signal if the probe
is inserted into the outlet, and you
have not set a probe temperature and
pressed the Start pad.
Place the rack in the lowest position
(A). Insert the probe into the meat.
Plug the probe into the outlet in the
oven. Make sure it is pushed all the
way in. Close the oven door.
Press the Convection Roast pad.
Press the number pads to set the
desired oven temperature.
Press the Probe pad.
Press the number pads to set the
desired internal meat temperature.
Press the Start pad.
When the oven starts to heat, the word LO
will be in the display.
After the internal temperature of the meat
reaches 100°F, the changing internal
temperature will be shown in the display.
When the internal temperature of the
meat reaches the number you have
set, the probe and the oven turn off
and the oven control signals. To stop
the signal, press the Clear/Off pad.
Use hot pads to remove the probe
from the food. Do not use tongs to pull
RQLW³WKH\PLJKWGDPDJHLW
CAUTION:
To prevent
possible burns, do not unplug the probe
from the oven outlet until the oven has
cooled. Do not store the probe in the oven.
NOTE:
■ If the probe is removed from the food
before the final temperature is reached, a
tone will sound and the display will flash
until the probe is removed from the oven.
■ You will hear a fan while cooking with
this feature. The fan will stop when the
door is opened, but the heat will not
turn off.
■ You can use the timer even though you
cannot use timed oven operations.
■ You will not be able to use the probe
in the upper oven during timed oven
operations. This is because, with the
probe, you are cooking by temperature
rather than time.
To change the oven temperature
during the Convection Roast cycle,
press the Convection Roast pad
and then press the number pads
to set the new desired
temperature.
Convection Roasting Guide
Meats Doneness
Beef Rib Roast (4 to 8 lbs.),
Bone-In and Boneless
Tenderloin Roast
Med. Rare
Medium
Med. Rare 425°F 145°F
Oven
Temp.
325°F
325°F
(2 to 6) lbs.
Lamb Leg (4 to 9 lbs)
Medium 325°F 160°F
Bone-In and Boneless
Pork Loin Roast (3 to 5 lbs)
Medium 325°F 160°F
Bone-in and Boneless
Poultry Whole chicken (5-8 lbs.) 350°F 170°F
Turkey, whole*
325°F 170°F - 180°F
Unstuffed (10 to 16 lbs.)
Unstuffed (18 to 24 lbs.)
Turkey breast (4 to 8 lbs.) 325°F 170°F
*Stuffed birds generally require 30-45 minutes additional roasting time. Shield legs and breast with
foil to prevent the skin from over browning and getting too dry.
Internal
Temp.
145°F
160°F
15
Using the timed features for convection cooking. (on some models)
On double oven models, you can use timed baking or roasting in one oven while using self-clean in the other;
you can also use timed baking or roasting in both ovens at the same time.
You will hear a fan while cooking with these features. The fan will stop when the door is opened, but the heat will not
turn off.
NOTE: )RRGVWKDWVSRLOHDVLO\³VXFKDVPLONHJJVILVKVWXIILQJVSRXOWU\DQGSRUN³VKRXOGQRWEHDOORZHGWRVLW
for more than 1 hour before or after cooking. Room temperature promotes the growth of harmful bacteria. Be sure
that the oven light is off because heat from the bulb will speed harmful bacteria growth.
How to Set an Immediate Start and Automatic Stop
The oven will turn on immediately and cook for a
selected length of time. At the end of the cooking time,
the oven will turn off automatically.
Make sure the clock shows the correct time of day.
Press the
Roast
Press the number pads to set the desired oven
temperature.
Press the Cooking Time pad.
NOTE
need to add additional time to the length of the
cooking time.
Press the number pads to set the desired length
of cooking time. The minimum cooking time you
can set is 1 minute. The oven temperature that
you set and the cooking time that you entered
will be in the display.
Convection
pad.
: If your recipe requires preheating, you may
Bake or
Convection
NOTE: If you want your food to be kept warm
for up to 3 hours after the cooking function is
finished, press the Warm pad once.
Press the Start pad.
The display will show the changing temperature
(starting at 100°F) and the cooking time. The display
starts changing once the temperature reaches
100°F.
NOTE:On double oven models, when using both ovens
at the same time, the times showing in the display will
be for the last oven set. To display the time set for the
first oven set, press the Cooking Time pad for that oven.
The oven will continue to cook for
the programmed amount of time, then shut
off automatically, unless the warmer feature was set.
Press the Clear/Off pad to clear the display if
necessary. Remove the food from the oven.
Remember, even though the oven shuts off
automatically, food left in the oven will continue
cooking after the oven turns off.
16
How to Set a Delayed Start and Automatic Stop
You can set the oven control to delay-start the oven,
cook for a specific length of time and then turn off
automatically.
Make sure the clock shows the correct time of day.
Press the
Roast
Press the number pads to set the desired oven
temperature.
Press the Cooking Time pad.
NOTE:If your recipe requires preheating, you may
need to add additional time to the length of the cooking
time.
Press the number pads to set the desired
cooking time.
Press the Delay Start pad.
Press the number pads to set the time of day
you want the oven to turn on and start cooking.
NOTE: If you want your food to be kept warm
for up to 3 hours after the cooking function is
finished, press the Warm pad once.
If you would like to check the times you have set,
press the Delay Start pad to check the start time you
have set, or press the Cooking Time pad to check the
length of cooking time you have set.
Convection
pad.
Bake or
Convection
Press the Start pad.
NOTE
: An attention tone will sound if you are using
timed baking or roasting and do not press the Start
pad after entering the baking or roasting temperature.
When the oven turns on at the time of day you have
set, the display will show the changing temperature
(starting at 100°F) and the cooking time. The display
starts changing once the temperature reaches
100°F.
NOTE
: On double oven models, when using both
ovens at the same time, the times showing in the
display will be for the last oven set. To display the
time set for the first oven set, press the Delay Start or
Cooking Time pad for that oven.
The oven will continue to cook for the programmed
amount of time, then shut off automatically, unless
the warmer feature
was set.
Press the Clear/Off pad to clear the display if
necessary. Remove the food from the oven.
Remember, even though the oven shuts off
automatically, food left in the oven will continue
cooking after the oven turns off
.
$GMXVWWKHRYHQWKHUPRVWDW³'RLW\RXUVHOI GEAppliances.com
You may find that your new oven cooks differently than the one it replaced. Use your new oven for a few weeks
to become more familiar with it. If you still think your new oven is too hot or too cold, you can adjust the
thermostat yourself.
Do not use thermometers, such as those found in grocery stores, to check the temperature setting of your oven. These
thermometers may vary 20–40 degrees.
NOTE: This adjustment will only affect baking and roasting temperatures; it does not affect broiling or self-cleaning
temperatures. The adjustment will be retained in memory after a power failure.
To Adjust the Thermostat
+
Press the Bake and Broil Hi/Lo pads at the
same time for 3 seconds until the display
shows SF.
Press the Bake pad for the oven which you
want to use. A two-digit number shows in
the display.
Press Bake again to alternate between
increasing and decreasing the oven
temperature.
The oven temperature can be adjusted up
to (+) 35°F hotter or (-) 35°F cooler. Press
the number pads the same way you read
them. For example, to change the oven
temperature 15°F, press 1 and 5.
When you have made the adjustment,
press the Start pad to go back to the time
of day display. Use your oven as you would
normally.
7KHW\SHRIPDUJDULQHZLOODIIHFWEDNLQJSHUIRUPDQFH
Most recipes for baking have been developed using high-fat products such as butter or margarine (80% fat). If you
decrease the fat, the recipe may not give the same results as with a higher-fat product.
Recipe failure can result if cakes, pies, pastries, cookies or candies are made with low-fat spreads. The lower the fat
content of a spread product, the more noticeable these differences become.
Federal standards require products labeled “margarine” to contain at least 80% fat by weight. Low-fat spreads, on the other hand,
contain less fat and more water. The high- moisture content of these spreads affect the texture and flavor of baked goods. For best
results with your old favorite recipes, use margarine, butter or stick spreads containing at least 70% vegetable oil.
17
Using the self-cleaning oven.
The oven door must be closed and all controls must be set correctly for the cycle to work properly.
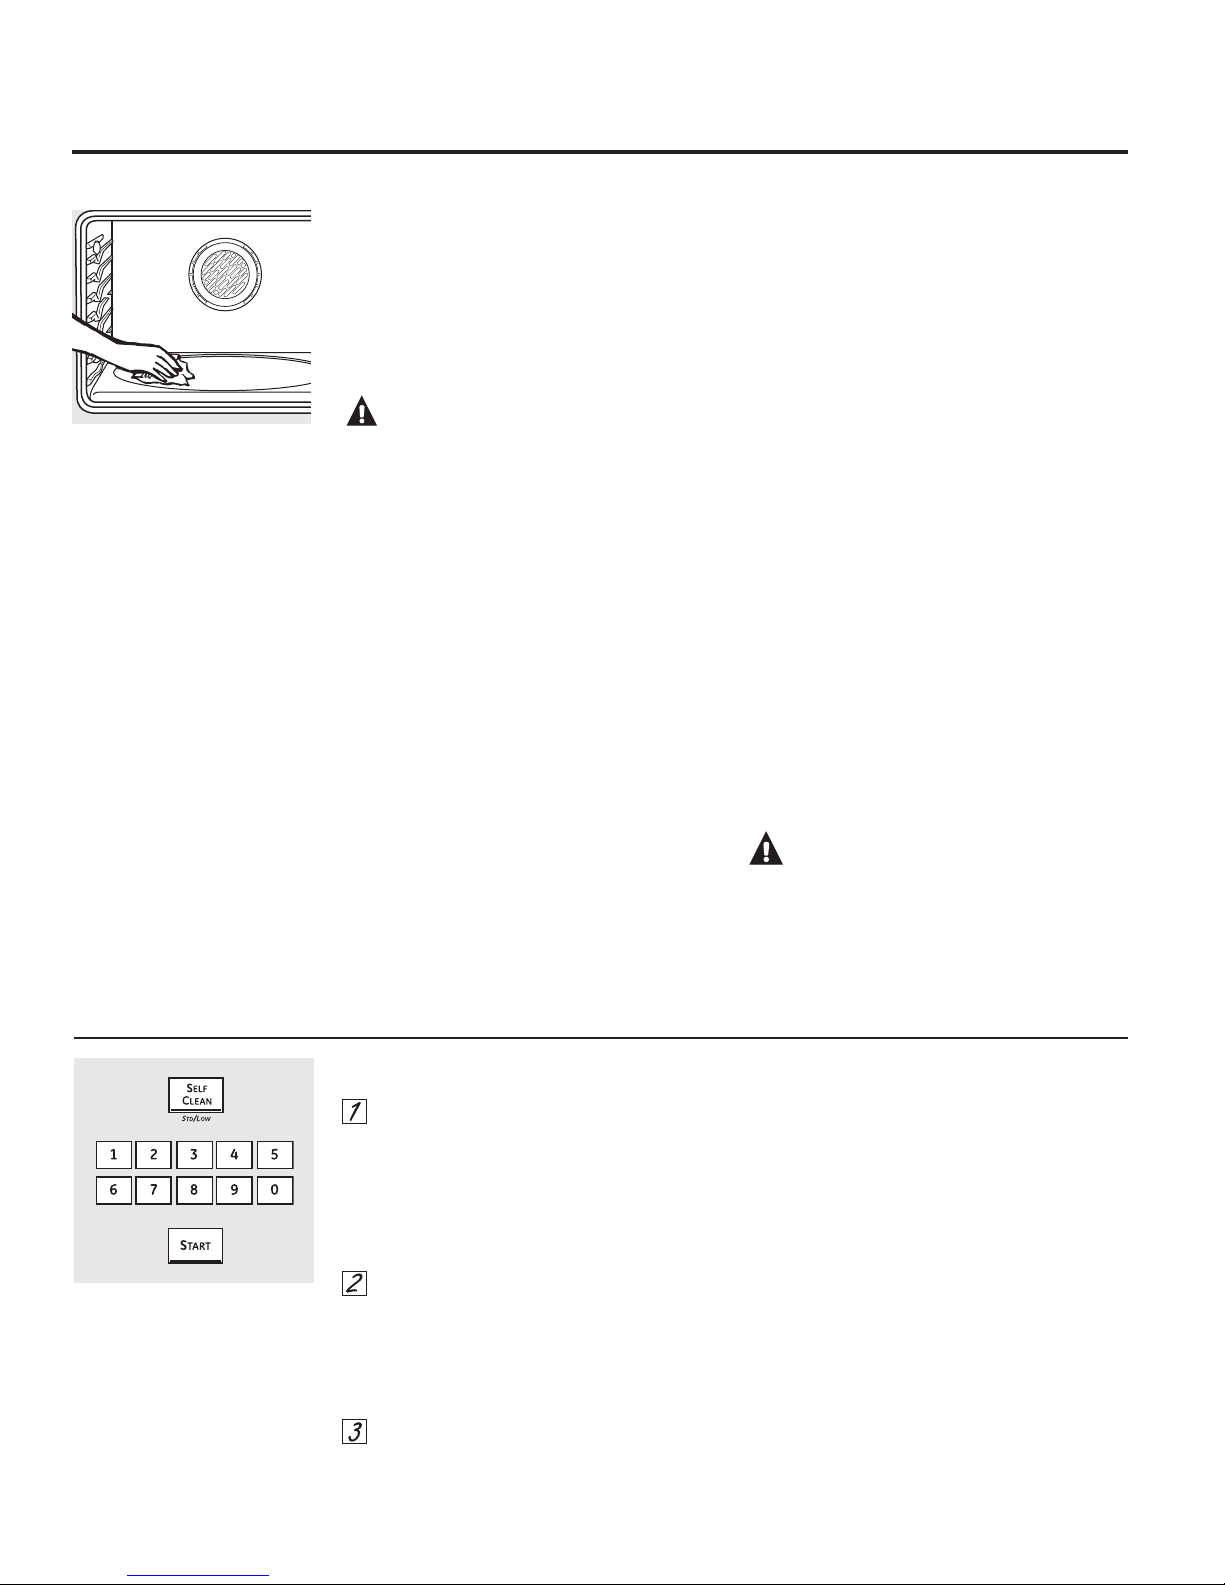
Before a Clean Cycle
Wipe up heavy soil on the oven
bottom. (appearance may vary)
We recommend venting your kitchen with an
open window or using a ventilation fan or hood
during the first self-clean cycle.
Remove any broiler pan, broiler grid, probe, all
cookware and any foil from the oven.
WARNING FIRE HAZARD:
Wipe grease and heavy soil from the oven
bottom before self-cleaning. Failure to do so
may result in an oven fire.
Note: Porcelain-coated oven racks may remain
in the oven during the self-cleaning cycle
without being damaged. The shiny, silver-colored
oven racks may be cleaned in the self-cleaning
oven. However, they will darken in color, loose
their luster and become hard to slide.
Soil on the front frame of the range and
outside the gasket on the door will need to be
cleaned by hand. Clean these areas with hot
water, soap-filled steel-wool pads, or cleansers
such as Soft Scrub (R). Rinse well with clean
water and dry.
Do not use abrasives or oven cleaners. Clean
the top, sides and outside of the oven door
with soap and water.
Do not clean the gasket. The fiberglass
material of the oven door gasket cannot
withstand abrasion. It is essential for the gasket
to remain intact. If you notice it becoming worn
or frayed, replace it.
Make sure the oven light bulb cover is in place
and the oven light is off.
Wipe up sugary spillovers and acidic spillovers
such as lemon juice, tomato sauce, or milk
based sauces. Porcelain enamel is acid
resistant, not acid proof. The procelain finish
may discolor if acidic or sugary spills are not
wiped up prior to a self-cleancycle.
IMPORTANT: The health of some birds is
extremely sensitive to the fumes given off
during the self-cleaning cycle of any oven.
Move birds to another well-ventilated room.
■ On double oven models, you can set a clean
cycle in both ovens at the same time. The
last oven set will automatically delay its start
until the end of the first oven’s clean cycle.
■ On 27” double oven models, both ovens lock
when one is set to Clean. Both will unlock
when all clean cycles have completed
■ On 30” double oven models, you can use
timed baking in one oven and self-clean the
other at the same time.
CAUTION: Never place cooking
utensils or any other items on the oven floor.
There is a heating element beneath the oven
floor. Placing items on the oven floor may cause
the oven to overheat, resulting in damage to the
oven and risk of damage or fire to cabinets.
How to Set the Oven for Cleaning
Press the Self Clean Std/Low pad once for
a 4-hour clean time or twice for a 3-hour
clean time.
A 3-hour self-clean time is recommended
for use when cleaning small, contained
spills. A self-clean time of 4 hours or longer
is recommended for a dirtier oven.
If a time other than 4 hours or
3 hours is needed, use the number pads
and enter the desired clean time.
You can change the clean time to any time
between 3 hours and 5 hours, depending on
how dirty your oven is.
Press the Start pad.
18
The door locks automatically. The display
will show the clean time remaining. It will not
be possible to open the oven door until the
temperature drops below the lock temperature
and the LOCKED light goes off.
When the LOCKED light goes off, you will be
able to open the door.
■ The words LOCKED will flash and the oven
control will signal if you set the clean cycle
and forget to close the oven door.
■ To stop a clean cycle, press the Clear/
Off pad. When the LOCKED light goes off
indicating the oven has cooled below the
locking temperature, you will be able to open
the door.
The oven door must be closed and all controls must be set correctly for the cycle to work properly.
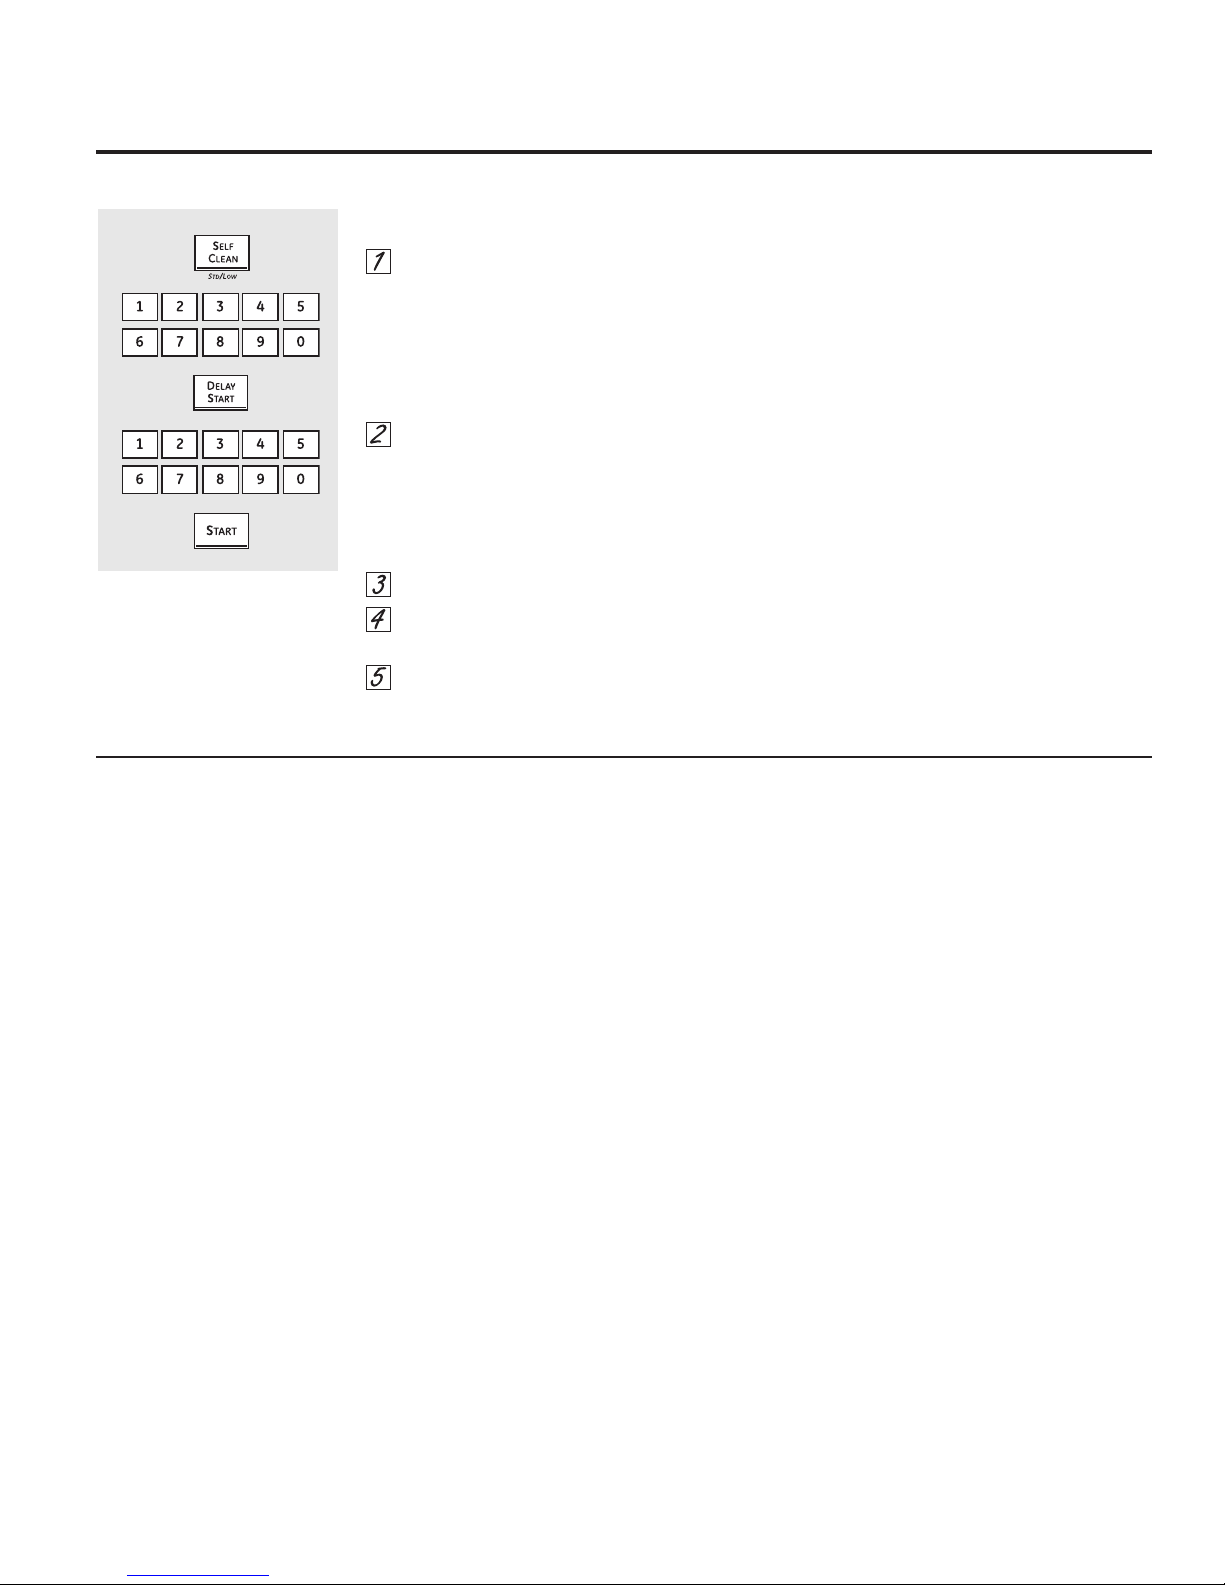
How to Delay the Start of Cleaning
GEAppliances.com
Press the Self Clean Std/Low pad once for
a 4-hour clean time or twice for a 3-hour
clean time.
A 3-hour self-clean time is recommended
for use when cleaning small, contained
spills. A self-clean time of 4 hours or longer
is recommended for a dirtier oven.
If a time other than 4 hours or 3 hours is
needed, use the number pads and enter
the desired clean time.
You can change the clean time to any time
between 3 hours and 5 hours, depending on
how dirty your oven is.
Press the Delay Start pad.
Using the number pads, enter the time of
day you want the clean cycle to start.
Press the Start pad.
After a Clean Cycle
You may notice some white ash in the oven.
Wipe it up with a damp cloth after the oven
cools.
If white spots remain, remove them with a soapfilled steel-wool pad and rinse thoroughly with a
vinegar and water mixture. These deposits are
usually a salt residue that cannot be removed by
the clean cycle.
A white discoloration may appear after
cleaning if acidic or sugary foods were not
wiped up before the clean cycle. This is normal
and will NOT affect performance.
If the oven is not clean after one clean cycle,
repeat the cycle.
■ You cannot set the oven for cooking until the
oven is cool enough for the door to unlock.
The door locks automatically. The display will
show the start time. It will not be possible to
open the oven door until the temperature
drops below the lock temperature and the
LOCKED light goes off.
When the LOCKED light goes off, you will be
able to open the door.
NOTE: On double oven models, you can set a
delay clean in both ovens at the same time. The
second oven set will automatically delay the
start of cleaning until the end of the first oven’s
clean cycle.
To recall the start time of the second oven set,
press the Delay Start pad on the controls for
the second oven.
Extension Rack
If it becomes difficult to slide or if the release
levers become difficult to use, see Extension
Rack in the Care and Cleaning section. Do not
spray extension rack with cooking spray or other
lubricant sprays.
If it becomes hard to remove or replace, wipe
the oven rack supports with cooking oil. Do not
wipe cooking oil on the slides.
NOTE: After the first self-clean cycle, the gray
stainless steel surfaces will change color on
enameled extension racks. This is normal.It is not
recommended to self-clean nickel extension racks
as the whole rack will discolor because of the selfclean temperatures.
■ While the oven is self-cleaning, you can press
the Clock pad to display the time of day. To
return to the clean countdown, press the Self
Clean Std/Low pad.
Standard Racks
If they become hard to slide, wipe their
side edges and the oven rack supports with
cooking oil.
19
Special features of your oven control.
Your new touch pad control has additional features that you may choose to use. The following are the features and how
you may activate them.
The special feature modes can only be activated while the display is showing the time of day. They remain in the control’s
memory until the steps are repeated.
When the display shows your choice, press the
Start pad. The special features will remain in memory after a power failure,
except for the Sabbath feature, which will have to be reset.
12-Hour Shutoff
+
With this feature, should you forget and leave
the oven on, the control will automatically
turn off the oven after 12 hours during baking
functions
or after 3 hours during a broil function.
If you wish to turn OFF this feature, follow the
steps below.
Press the Bake and Broil Hi/Lo pads (on
double oven models, use the upper oven
controls) at the same time for 3 seconds,
until the display shows SF.
12-Hour, 24-Hour or Clock Blackout
+
Your control is set to use a 12-hour clock.
If you would prefer to have a 24-hour military
time clock or black out the clock display, follow
the steps below.
Press the Bake and Broil Hi/Lo pads (on
double oven models, use the upper oven
controls) at the same time for 3 seconds,
until the display shows SF.
Press the Clock pad once. The display will
show 12 hr. If this is the choice you want,
press the Start pad.
Press the Delay Start pad until no shdn
(no shutoff) appears in the display.
Press the Start pad to activate the no
shutoff and leave the control set in this
special features mode.
NOTE: On double oven models, this activates
this special feature for both ovens.
Press the Clock pad again to change to
the 24-hour military time clock. The display
will show 24 hr. If this is the choice you
want, press the Start pad.
Press the Clock pad again to black out the
clock display. The display will show OFF. If
this is the choice you want, press the Start
pad.
NOTE: If the clock is in the black-out mode, you
will not be able to use the Delay Start function.
Fahrenheit or Celsius Temperature Selection
+
+
Your oven control is set to use the Fahrenheit
temperature selections, but you may change this
to use the Celsius selections.
Press the Bake and Broil Hi/Lo pads (on
double oven models, use the upper oven
controls) at the same time for 3 seconds,
until the display shows SF.
Press the Broil Hi/Lo and Cooking Time
pads at the same time. The display will
show F (Fahrenheit).
20
Press the Broil Hi/Lo and Cooking Time
pads again at the same time. The display
will show C (Celsius).
Press the Start pad.
NOTE: On double oven models, the new setting
will be displayed for both ovens.

GEAppliances.com
Tones at the End of a Timed Cycle
+
At the end of a timed cycle, 3 short beeps
will sound followed by one beep every 6
seconds until the Clear/Off pad is pressed. This
continuous
6-second beep may be canceled.
To cancel the 6-second beep:
Press the Kitchen Timer On/Off
pad. The display shows CON BEEP
(continuous beep). Press the Kitchen Timer
On/Off pad again. The display shows
BEEP. (This cancels the one beep every 6
seconds.)
Press the Bake and Broil Hi/Lo
pads (on double oven models use the
upper oven controls) at the same time for
3 seconds, until the display shows SF.
Press the Start pad.
NOTE: On double oven models, this cancels
the end-of-cycle tone for both ovens.
Auto Recipe™ Conversion (on some models)
+
When using convection bake, the Auto Recipe
Conversion feature will automatically convert
entered regular baking temperatures to
convection baking temperatures.
Once the feature is activated, the display
will show the actual converted (reduced)
temperature. For example, if you enter a regular
recipe temperature of 350°F and press the
Start pad, the display will show CON and
the converted temperature of 325°F.
NOTE: This feature does not convert convection
bake cooking times, only regular baking
temperatures.
™
To activate the feature:
Press the Bake and Broil Hi/Lo pads (on
double oven models, use the upper oven
controls) at the same time for 3 seconds,
until the display shows SF.
Press the Convection Bake pad.
The display will show CON OFF.
Press the Convection Bake pad again. The
display will show CON ON.
Press the Start pad.
To deactivate the feature, repeat steps 1–3
above but press the Start pad when CON OFF
is in the display.
21
 Loading...