

GE Profile PHP900, Monogram ZHU36, Profile PHP960, Monogram ZHU30 Technical Service Manual

GE Consumer & Industrial
XXR
Q
H
O
T
VE
R
Y
H
O
T
LEFT
SIDE
RIGHT
SIDE
NO
T
SO
H
O
T
XBEW
Y
W
ARM
XQM
A
H
O
T
XX
R
Q
H
O
T
VE
R
Y
H
OT
NO
T
SO
H
O
T
XBEW
Y
W
ARM
XQM
A
H
O
T
LEFT
SIDE
RIGHT
SIDE
REALL
Y
H
O
T
Technical Service Guide
April 2008
Profi le and Monogram
30- and 36-in.
Induction Cooktop
31-9164
PHP900
PHP960
ZHU30
ZHU36
GE Appliances
General Electric Company
Louisville, Kentucky 40225

IMPORTANT SAFETY NOTICE
!
The information in this service guide is intended for use by
individuals possessing adequate backgrounds of electrical,
electronic, and mechanical experience. Any attempt to repair a
major ap pli ance may result in personal injury and property
damage. The man u fac tur er or seller cannot be responsible for the
in ter pre ta tion of this in for ma tion, nor can it assume any liability in
connection with its use.
WARNING
To avoid personal injury, disconnect power before servicing
this prod uct. If electrical power is required for diagnosis or test
purposes, disconnect the power immediately after performing the
necessary checks.
RECONNECT ALL GROUNDING DEVICES
If grounding wires, screws, straps, clips, nuts, or washers used to
complete a path to ground are removed for service, they must be
returned to their original position and properly fastened.
GE Consumer & Industrial
Technical Service Guide
Copyright © 2008
All rights reserved. This service guide may not be reproduced in whole or in part
in any form without written permission from the General Electric Company.
– 2 –

Table of Contents
Appearance Defects ........................................................................................................................................................21
Component Locator Views ...........................................................................................................................................17
Control Features ................................................................................................................................................................ 8
Cooktop Components ..................................................................................................................................................... 21
Cooktop Removal From Countertop ........................................................................................................................21
Diagnostics and Service Information ......................................................................................................................31
Elements ...............................................................................................................................................................................22
Fans .........................................................................................................................................................................................30
Filter Board ..........................................................................................................................................................................29
Generator Boards .............................................................................................................................................................28
Glass Maintop ..................................................................................................................................................................... 22
Heat Shield ........................................................................................................................................................................... 26
Installation ........................................................................................................................................................................... 7
Introduction ......................................................................................................................................................................... 4
Introduction to Induction Cooking ............................................................................................................................ 6
LINbus Connectors ........................................................................................................................................................... 27
Nomenclature .................................................................................................................................................................... 5
Operation Overview .........................................................................................................................................................16
Schematics and Wiring Diagrams ............................................................................................................................33
Thermal Cut-out ................................................................................................................................................................28
Touch Board ........................................................................................................................................................................23
Warranty .............................................................................................................................................................................. 35
– 3 –
Introduction
Introducing GE Profi le and GE induction cooktops―
offering fast, effi cient cooking.
Induction cooktops provide unmatched cooking performance and
fl exibility. Induction technology heats only the pan and its contents and
offers energy effi ciency by reducing wasted heat when compared to
radiant and gas cooktops.
The new Monogram and Profi le, 30- and 36-in. Induction Cooktops have
the following new features:
Innovative technology• ―delivers the responsiveness of a gas cooktop.
Superior performance• ―Induction technology heats only the pan and
its contents, providing an incredibly fast boil time.
Remarkable versatility• ―This induction cooktop offers the choice of 19 different power levels, including
a 3700-watt, 11" element for large cookware ( the highest wattage induction element in the industry*),
warming capability, and a low-heat simmer setting for delicate sauces.
Cooler cooktop surface• ―Since there is not a traditional thermal heating element, the induction cooktop
stays cooler than conventional radiant cooktops.
Below cooktop venting• ―that dissipates heat, permitting less depth to the burner box.
Easy cleanability• ―Cooktop cleaning is easier since spills and splatters do not burn on the cooktop.
Distinguished appearance• ―Sleek cooktop fi ts fl ush with the countertop, and is surrounded completely
in full-frame stainless steel trim. This cooktop can be installed above a GE® or GE Profi le™ wall oven.**
The four-burner models feature 1 ten-inch, 3700 W element, 2 seven-inch, 2500 W elements, and 1 six-inch
1800 W element. And with the 36-in. models, you get the addition of 1 eight-inch, 3200 W element.
*Among leading manufacturer brands
**Not to be installed over wall ovens with Trivection® technology
– 4 –
Profi le Model Number
Nomenclature
P H P 9 0 0 D 1 M B B
Brand
P = Profi le
H = Induction
P = Cooktop
Feature Pack
900 = 30-in. Width
960 = 36-in. Width
Monogram Model Number
Brand
Z = Monogram
H = Induction
U = Cooktop
Feature Pack
30 = 30-in. Width
36 = 36-in. Width
D = Color
S = Stainless
Z H U 30 R B M 1 B B
Control Type
R = Digital
Color Code
BB = Black on Black
SS = Stainless Steel
Model Year
M = 2007
Engineering Digit
1 = 1st Version
Color Code
BB = Black on Black
SS = Stainless Steel
Engineering Digit
1 = 1st Version
Model Year
M = 2007
B = Black
S = Stainless
PHP960 Model shown
Mini-Manual
Nomenclature
The nomenclature plate is located under the
cooktop.
The mini-manual is located inside the
burner box and is accessed by removing the
electrical cover on the bottom of the cooktop.
– 5 –
Serial Number
The fi rst two numbers of the serial number
identify the month and year of manufacture.
Example: AR123456S = January, 2008
A - JAN 2008 - R
D - FEB 2007 - M
F - MAR 2006 - L
G - APR 2005 - H
H - MAY 2004 - G
L - JUN 2003 - F
M - JUL 2002 - D
R - AUG 2001 - A
S - SEP 2000 - Z
T - OCT 1999 - V
V - NOV 1998 - T
Z - DEC 1997 - S
The letter des ig nat ing
the year re peats every
12 years.
Example:
T - 1974
T - 1986
T - 1998

Introduction to Induction Cooking
How Induction Cooking Works
Induction cooking uses high frequency (20-50 K hz)
magnetic energy to heat a ferrous metal pan when
it is placed over the induction coil. The induction
fi elds have no affect on non magnetic surfaces
such as paper, plastic, or non ferrous metals like
aluminum, or copper. Thermal sensors under the
glass surface communicate with microprocessor
controls for pan sensing and turn-down.
Part one: Coil produces electromagnetic energy
The fi rst component needed is an induction coil or
element. The induction coil generates the magnetic
fi eld needed for induction cooking.
Glass Cooktop Surface
Induction Coil
Part two: Pan uses the energy to produce heat
The second component is the ferromagnetic cooking
pan with a bottom constructed of material that will
attract a magnet. If a magnet will not stick to the
bottom of the pan, it can not be used for induction
cooking.
created by the induction coil is applied to only the
bottom of the pan.
Induction Fields
The contents of the pan are therefore heated more
quickly than they would be if heated by a gas
fl ame or a traditional radient heating element.
By heating only the bottom of the pan, the
surrounding surface remains cooler than with
traditional cooktops.
Features:
Testing Bottom of Pan with Magnet
Easy cleanability• ―Cooktop cleaning is easier
since spills and splatters do not burn on the
cooktop, which is about 500°F vs 1200°F for
radiant.
Control and responsiveness equal to gas• ―
This induction cooktop give you instant control
When the proper type of pan is placed over an
of the amount of heat added to the cookware.
energized induction coil, a fi eld of magnetic waves
will cause the bottom of the pan to heat.
Fast and Powerful• ―providing an incredibly
fast boil time. 3700 w, 8.5 min. to boil vs 12 to
14 min. for radiant and 14 to 16 min. for gas
Water
Glass Cooktop Surface
Pan with Bottom of
Magnetic Material
Induction Coil
(18k BTU).
Effi cient performance• ―Induction technology
heats only the pan and its contents, not the
kitchen. Effi ciency ratings are: Induction 83%,
Radiant 72%, and gas 38%.
Induction cooking is very effi cient. The energy
Note: There are no health risks associated with the use of this cooktop. The RF fi eld from an induction
element dies away to almost nothing at a distance of about one foot (30 centimeters). You will not receive
even trivial radiation from an induction cooktop unless you spend a long time well within one foot of an
operating element.
– 6 –
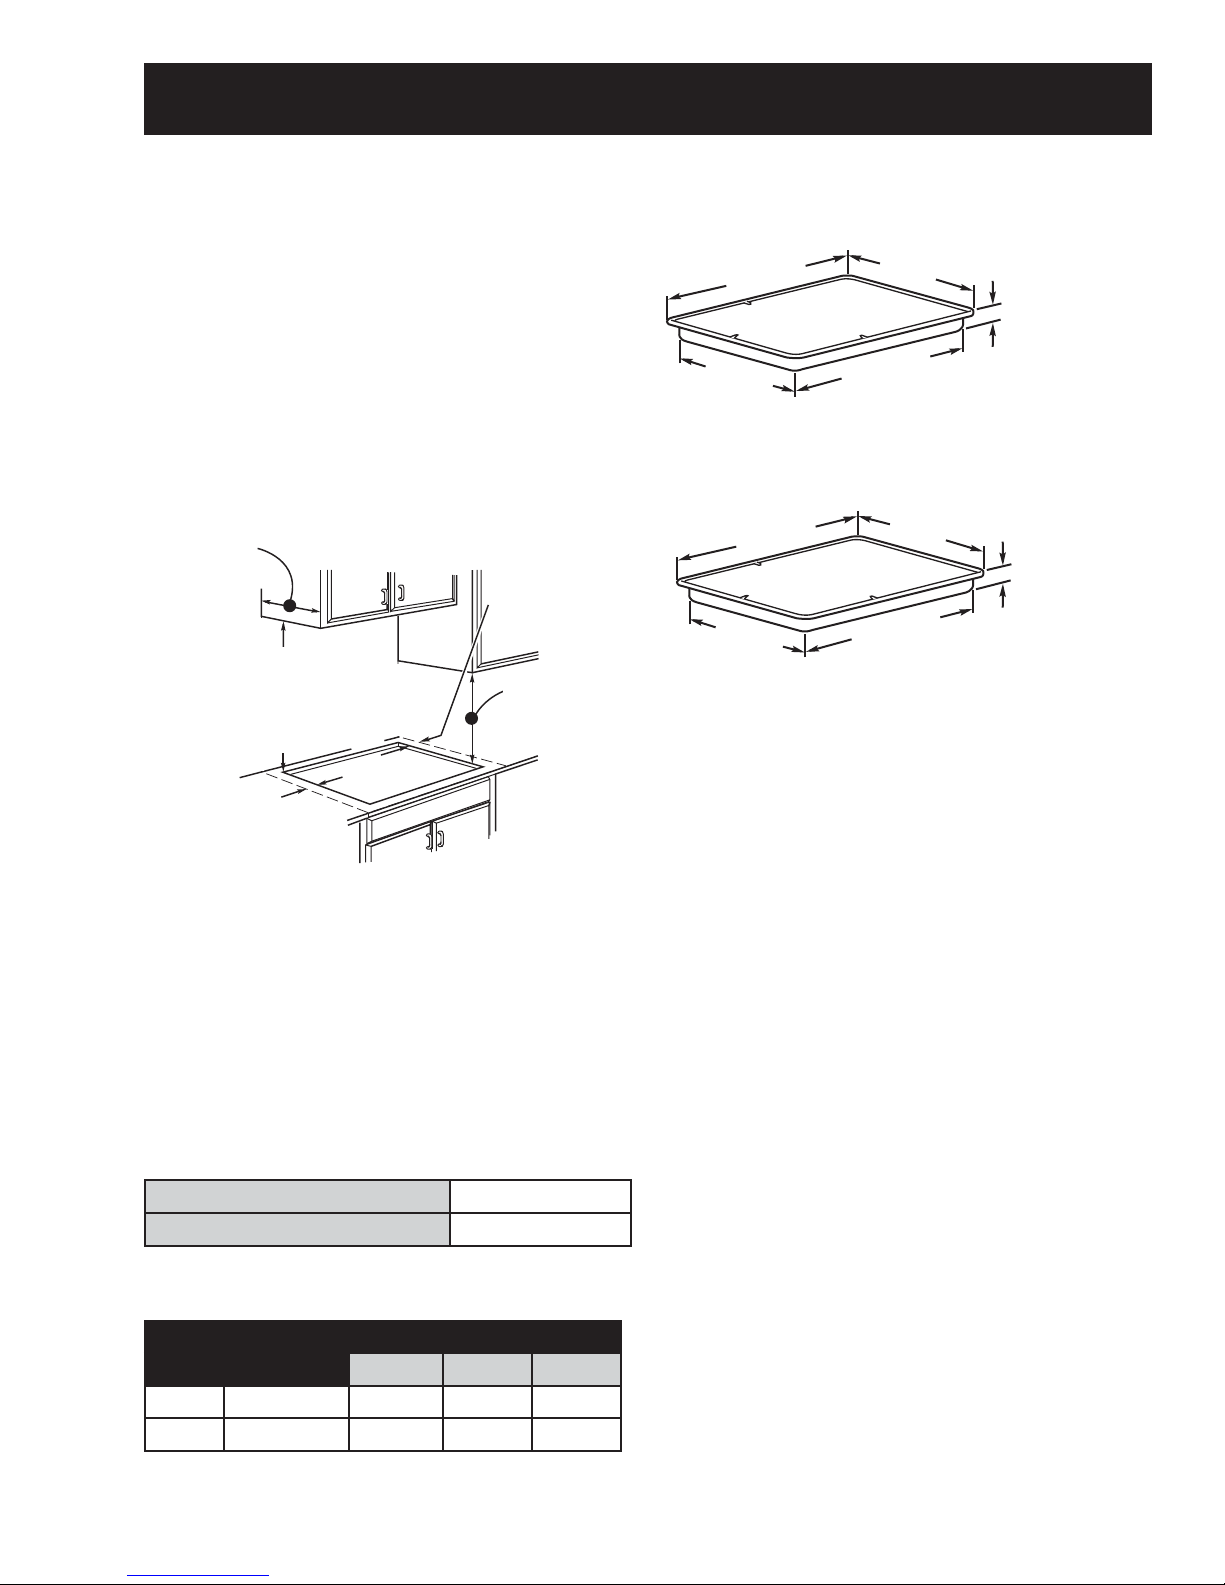
Installation
r
WARNING: Before beginning the installation,
switch power off at the service panel and lock the
service disconnecting means. When the service
disconnecting means cannot be locked, securely
fasten a warning tag to the service panel.
Note: The complete installation instructions are
inclosed with the Use and Care Manual. Carefully
read and follow these instructions.
The following minimum clearance dimensions must
be maintained.
13″ MAX. Depth of uprotected
overhead cabinets
30″ MIN.
Clearance from
countertop to
unprotected
overhead surface
2″ MIN. Clearance
from cutout to side
wall on the left of
the unit
2″ MIN. Clearance
from cutout to
side wall on the
right of the unit
15″ MIN. Height
from countertop to
nearest cabinet on
either side of unit
If a 30-in. clearance between the cooking surface
and overhead combustible materials or metal
cabinets cannot be maintained, a minimum
clearance of 24-in. is required and the underside of
the cabinets above the cooktop must be protected
with not less than 1/4-in. insulating millboard
covered with sheet metal not less than 0.0122-in.
thick.
Grounding Specifi cations
Models PHP900 and ZHU30
29-3/4″
(29-7/8″ SS)
Cooktop
19-3/8″
21-3/8″
(21-1/2″ SS) at center
28-1/4″
4-5/8“ at front
baffle
3-1/4” at rear ai
intake
Models PHP960 and ZHU36
(36-1/8″ SS) at center
36″
Cooktop
18-7/8″
20-7/8″
(21″ SS) at center
33-5/8″
4-5/8“ at front
baffle
3-1/4” at rear air
intake
Power Supply
The cooktop must be connected to a supply circuit
of the proper voltage and frequency as specifi ed
on the rating plate. Wire size must conform to the
National Electrical Code or the prevailing local code.
The rating plate is located on the bottom of the
burner box.
Wiring
Built-in power leads are UL-approved for connection
to larger gauge household wiring. The insulation of
these leads is rated at temperatures much higher
than the temperature rating of household wiring.
The current-carrying capacity of a conductor is
governed by the temperature rating of the insulation
around the wire rather than the wire gauge alone.
Ground Path Resistance
Insulation Resistance
.
Overcurrent Protection
Maximum Kilowatt Rating
Size NEC Rating
30-in. 40 Amp 8.3 9.4 9.6
36-in. 50 Amp 10.4 11.8 12.0
The branch circuit load for one counter-mounted
cooktop is the rating on the nomenclature plate.
208V 236V 240V
0.10Ω Max.
205KΩ Min.
WARNING: Improper connection of aluminum house
wiring to these copper leads can result in a serious
problem. Use only connectors designed for joining
copper to aluminum and follow the manufacturer's
recommended procedure closely.
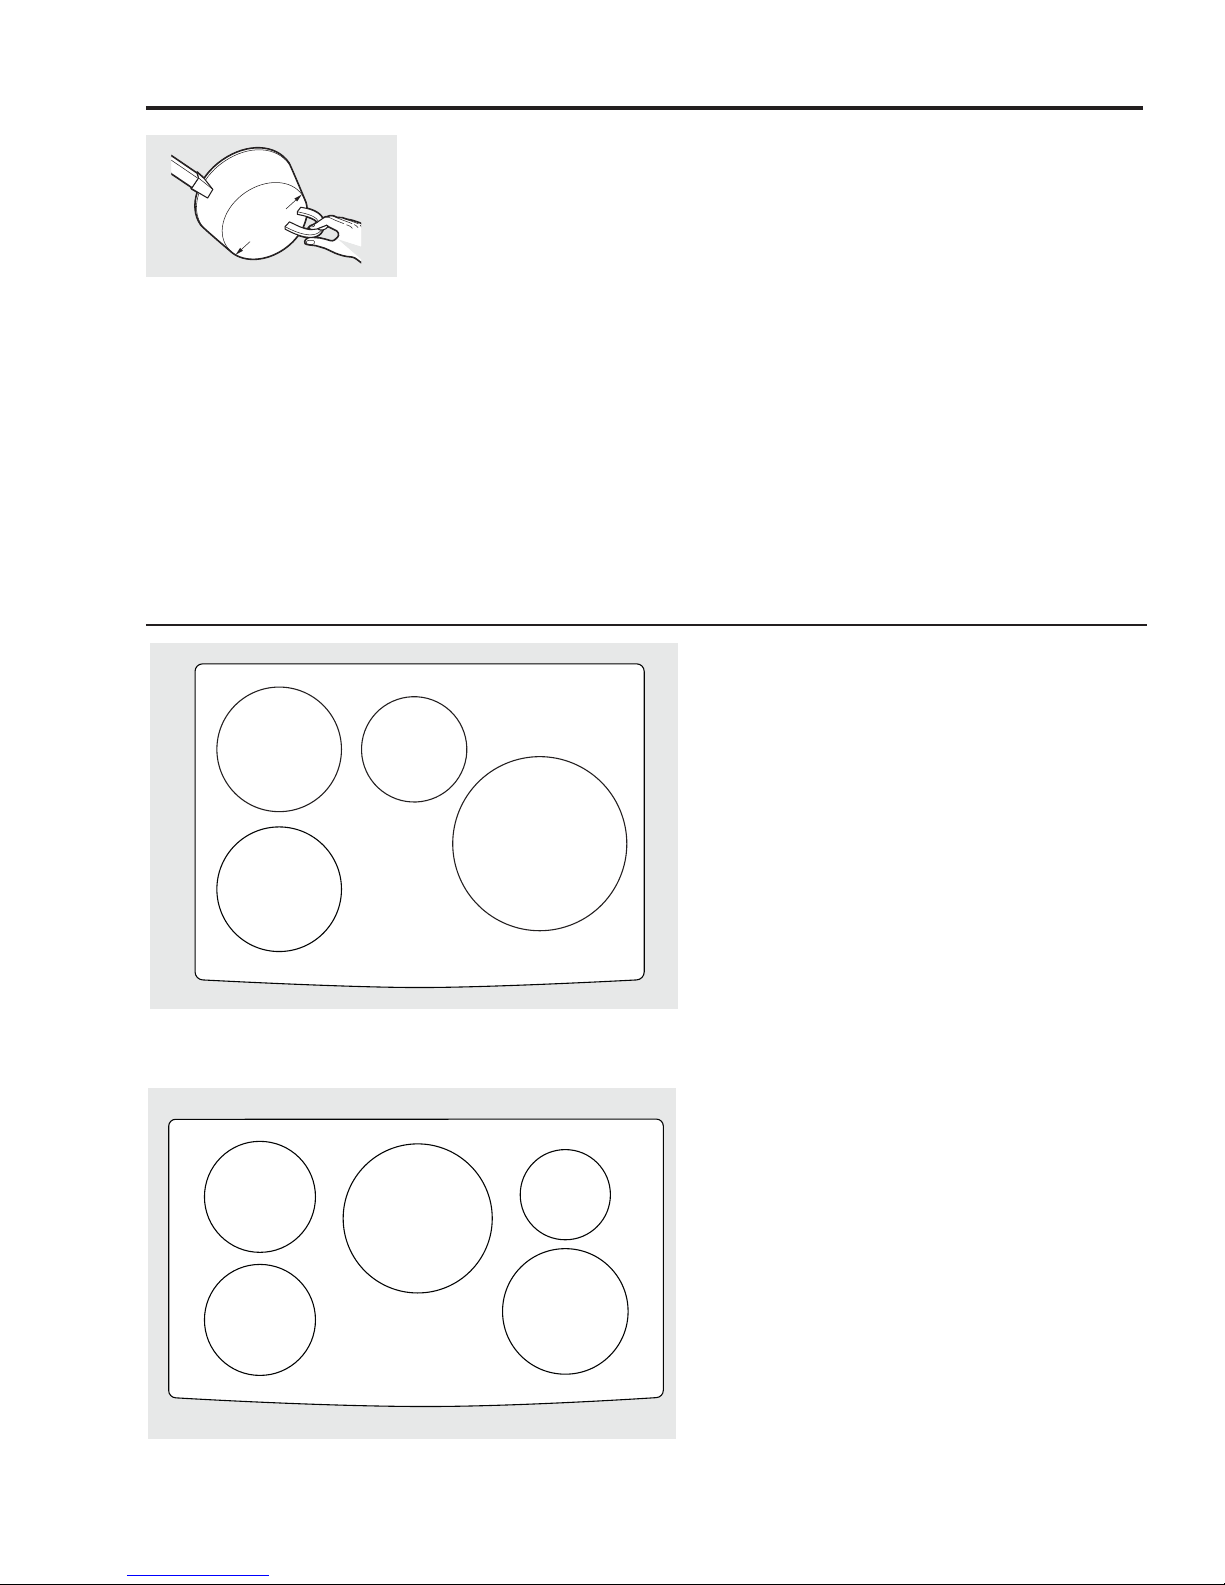
Ceramic Glass Cooktop
If the glass is damaged, it may be replaced as a
separate part. The touch board and electronics are
separate parts.
– 7 –
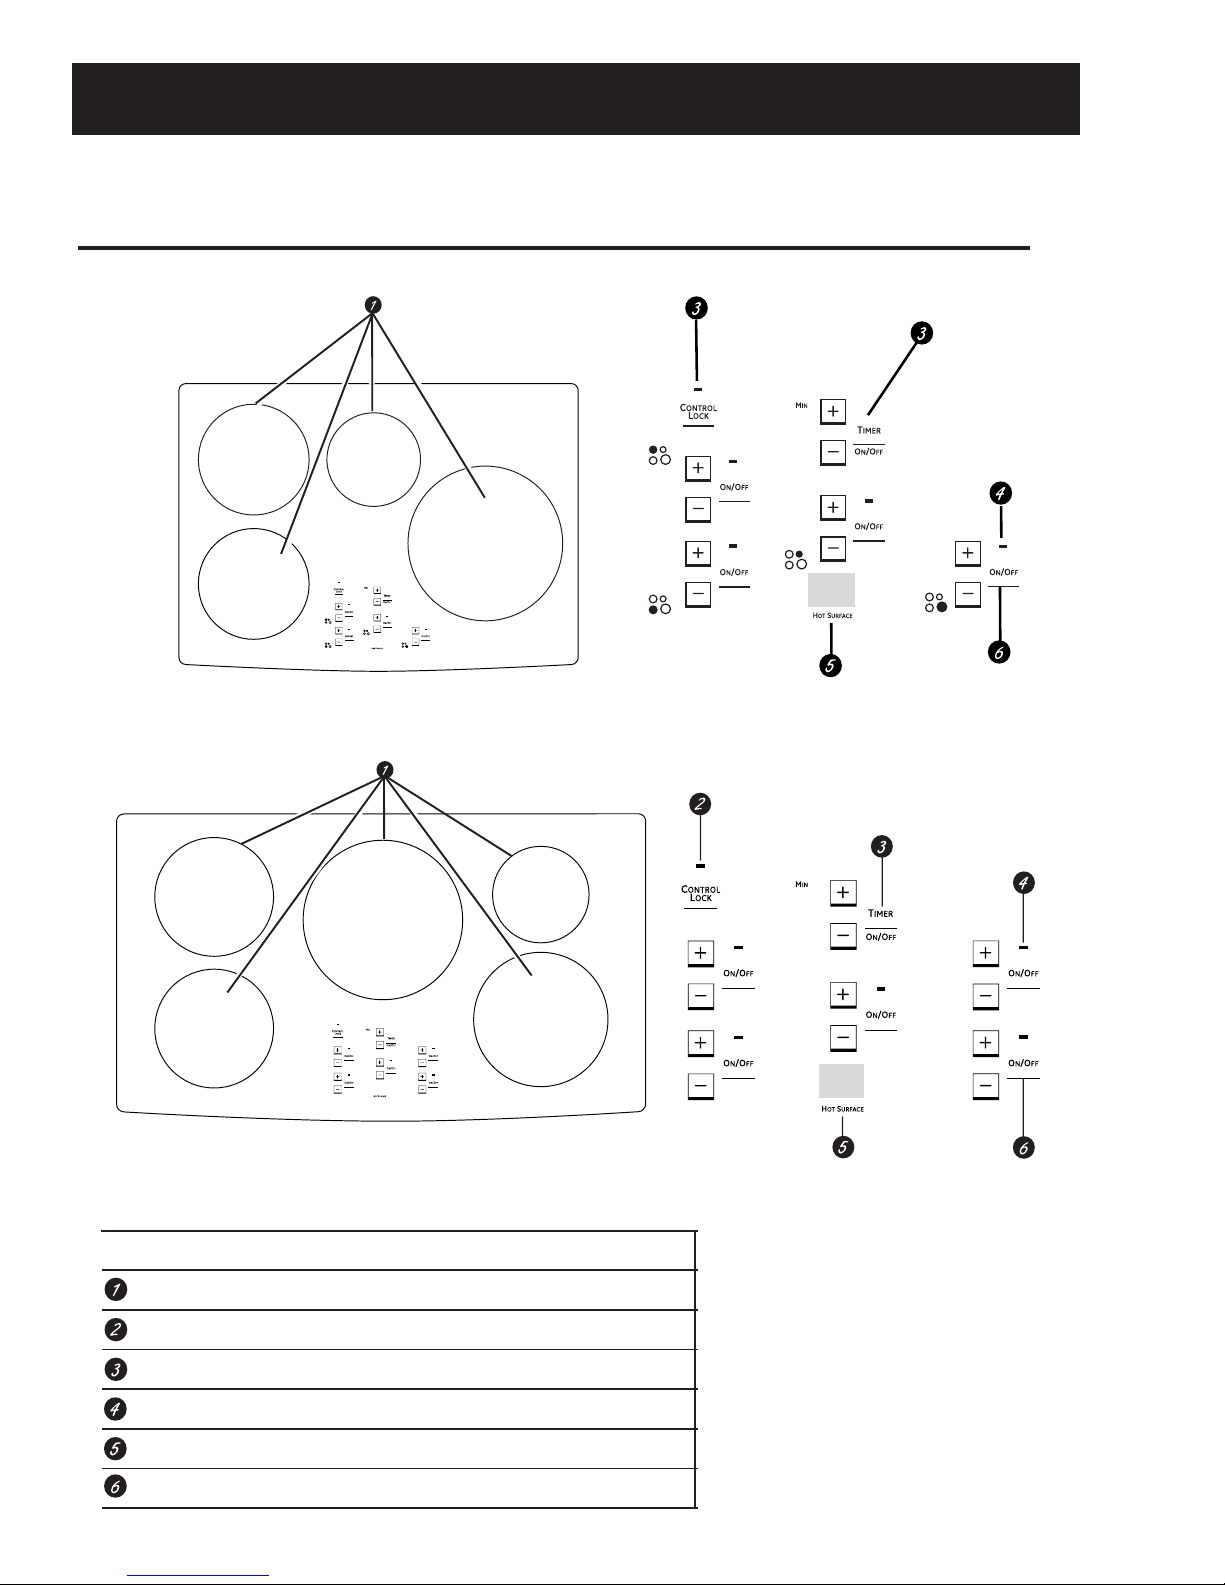
Control Features
Features of your cooktop.
Throughout this manual, features and appearance may vary from your model.
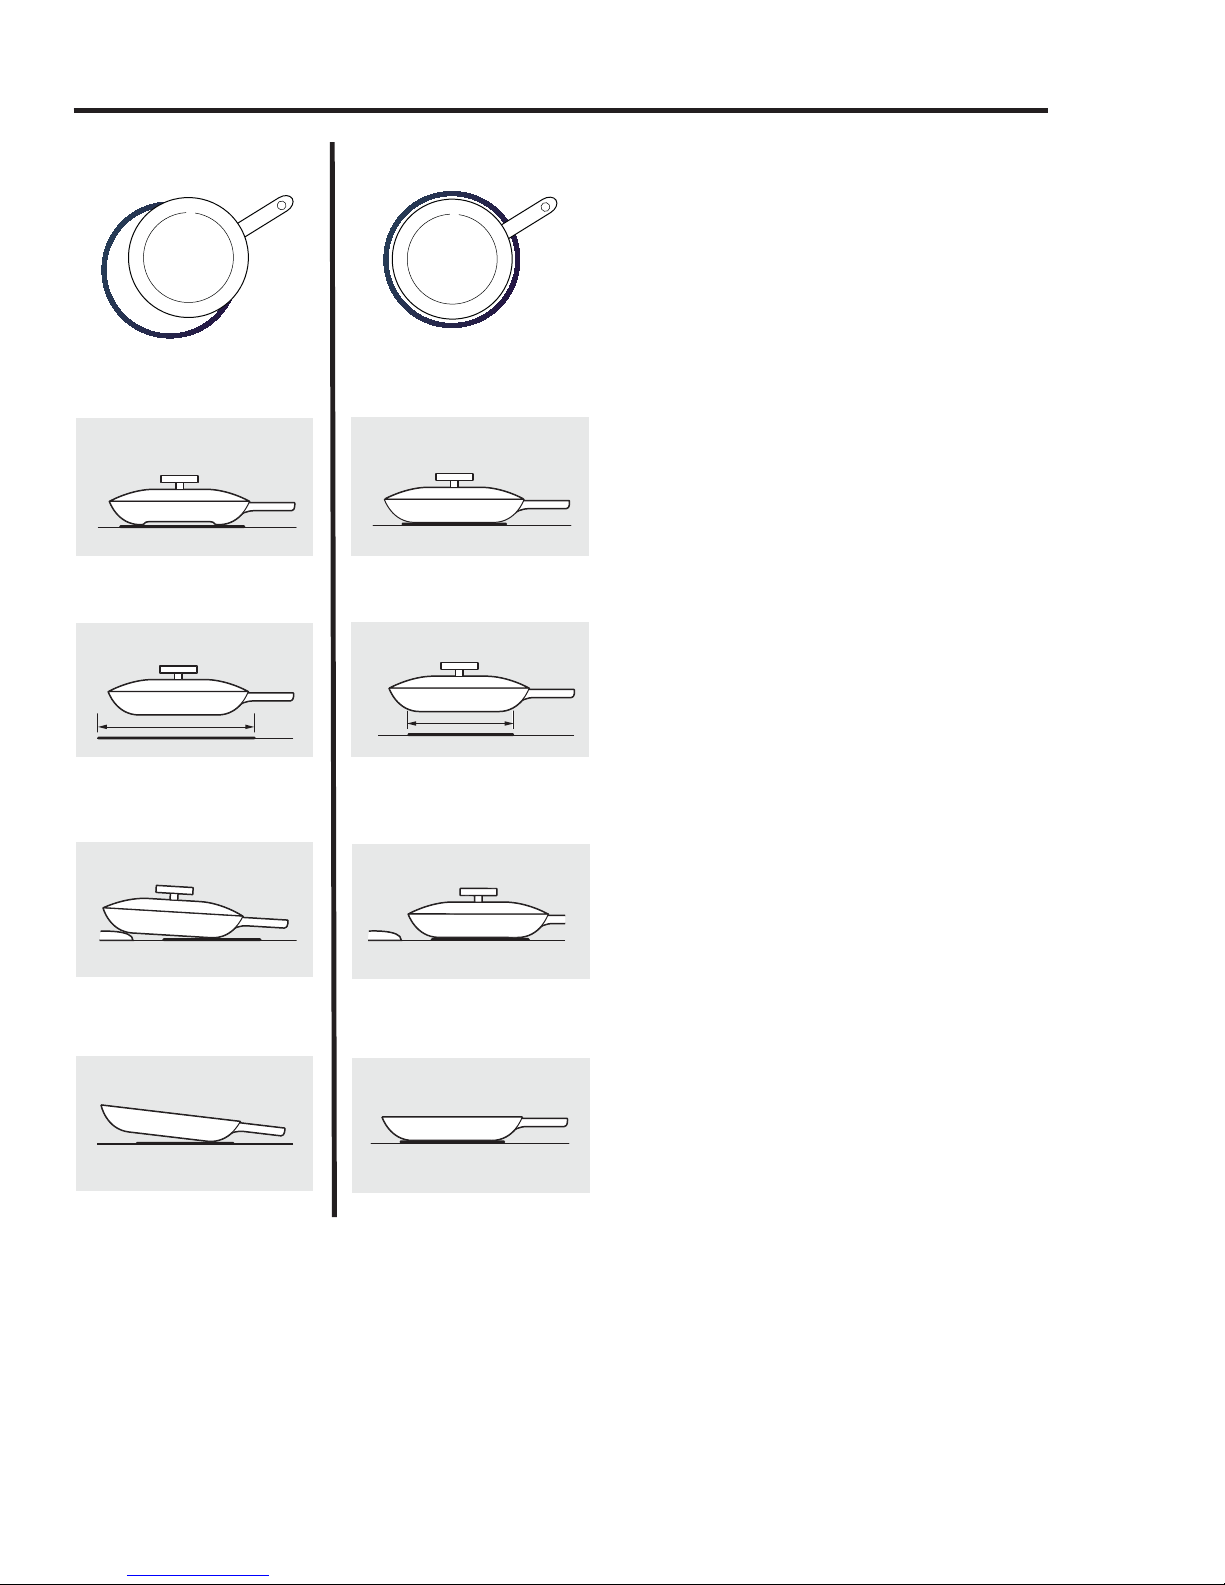
PHP900 30″ Cooktops
PHP960 36″ Cooktops
NOTE: 30” models have cooking element location
indicators next to each control.
Feature Index (Features and appearances may vary.) Explained on page
Cooking Elements 10
Control Lock 13
Kitchen Timer 12
ON Indicator Light (one for each element) 10
Hot Surface Indicator Light Area 12
Cooking Element ON/OFF Control 10
– 8 –
How induction cooking works. ge.com
Min. Size
Use the minimum size pan for
the element. The pan material is
correct if a magnet sticks to the
bottom.
5-3/4” Min. Dia.
Pan Size
5-3/4” Min. Dia.
Pan Size
The elements beneath the cooking
surface produce a magnetic field that
causes the electrons in the ferrous
metal pan to vibrate and produce
heat.
The cooking surface itself does not
heat. Heat is produced in the cooking
pan, and cannot be generated until a
pan is placed on the cooking surface.
When the element is activated, the pan
begins to heat immediately and in turn
heats the contents of the pan.
4-3/4” Min. Dia.
Pan Size
7” Min. Dia.
Pan Size
Magnetic induction cooking requires
the use of cookware made of ferrous
metals—metals to which magnets will
stick, such as iron or steel.
Use pans that fit the element size.
The pan must be large enough for the
safety sensor to activate an element.
The cooktop will not start if a very
small steel or iron utensil (less than
the minimum size across the bottom) is
placed on the cooking surface when
the unit is turned on—items such as
steel spatulas, cooking spoons, knives
and other small utensils.
Using the correct size cookware
Each cooking element requires a MINIMUM pan
size. If the pan is properly centered, and of the
correct material, but is too small for the cooking
element, the element cannot be activated. The
display will flash “F” along with the power level
selected.
Cookware larger than the element ring may be
used; however, heat will only occur above the
element.
30” Wide Cooktop. Use the minimum size pan shown for each cooking
element.
5-3/4” Min. Dia.
Pan Size
5-3/4” Min. Dia.
Pan Size
36” Wide Cooktop. Use the minimum size pan shown for each cooking
element.
7” Min. Dia.
Pan Size
4-3/4” Min.
Dia. Pan Size
7” Min. Dia.
Pan Size
For best results, the cookware must make FULL
contact with the glass surface.
Do not allow the bottom of the pan or cookware to
touch the surrounding metal cooktop trim or to
overlap the cooktop controls.
For best performance, match the pan size to the
element size. Using a smaller pot on a larger burner
will generate less power at any given setting.
– 9 –
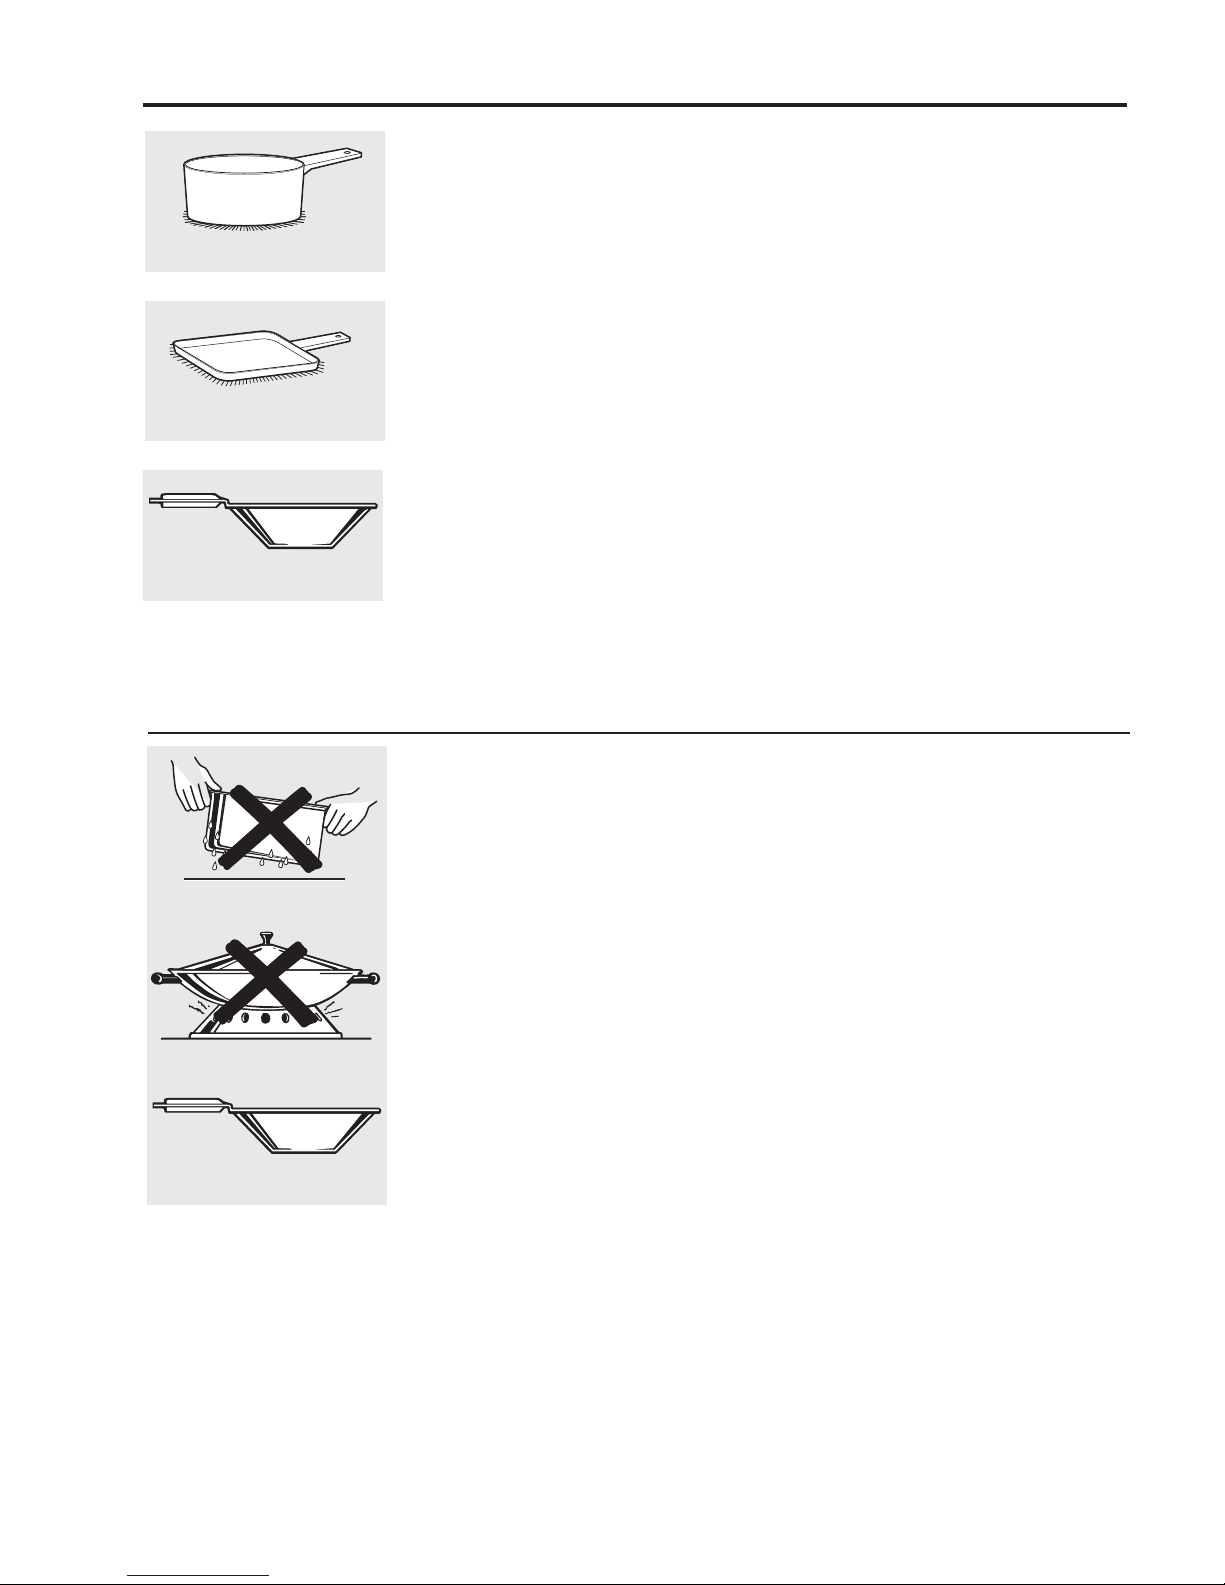
Choosing the correct cookware to use.
INCORRECT
Cookware not centered on cooking
element surface.
Curved or warped pan bottoms
or sides.
CORRECT
Cookware centered correctly
on cooking element surface.
Flat pan bottom.
Cookware recommendations
Cookware must fully contact the surface of the
cooking element.
Use flat-bottomed pans sized to fit the cooking
element and also to the amount of food being
prepared.
CAUTION:
■ The cooking elements may appear to be cool while
turned ON and after they have been turned OFF.
The glass surface may be HOT from residual heat
transferred from the cookware and burns may occur.
■ DO NOT TOUCH HOT COOKWARE or PANS directly
with hands. Always use mitts or pot holders to
protect hands from burns.
■ DO NOT SLIDE cookware across the cooktop
surface. Doing so may permanently damage the
appearance of the ceramic cooktop.
Pan does not meet the minimum
size required for the cooking
element used.
Pan bottom rests on cooktop trim
or does not rest completely on the
cooktop surface.
Heavy handle tilts pan.
Pan size meets or exceeds the
recommended minimum size
for the cooking element used.
Pan bottom rests completely on the
cooktop surface.
Pan is properly balanced.
– 10 –
(Continued next page)
Use flat-bottomed pans.
Use a griddle.
Use a flat-bottomed wok.
Suitable Cookware
Use quality cookware with heavier
bottoms for better heat distribution
and even cooking results. Choose
cookware made of magnetic stainless
steel, enamel coated cast iron,
enameled steel and combinations
of these materials.
Some cookware is specifically
identified by the manufacturer for use
with induction cooktops. Use a magnet
to test if the cookware will work.
Flat-bottomed pans give best results.
Pans with rims or slight ridges can be
used.
Round pans give best results. Pans
with warped or curved bottoms will
not heat evenly.
For wok cooking, use a flat-bottomed
wok. Do not use a wok with a support
ring.
Cookware “noise”
Slight sounds may be produced by
different types of cookware. Heavier
pans such as enameled cast iron
produce less noise than a lighter
weight multi-ply stainless steel pan.
The size of the pan, and the amount
of contents, can also contribute to
the sound level.
When using adjacent elements that are
set at certain power level settings,
magnetic fields may interact and
produce a low whistle or intermitted
"hum". These noises can be reduced or
eliminated by lowering or raising the
power level settings of one or both of
the elements. Pans that completely
cover the element ring will produce less
noise.
A low “humming” noise is normal
particularly on high settings.
Do not place wet pans
on the glass cooktop.
Do not use woks with support
rings on the glass cooktop.
Use flat-bottomed woks
on the glass cooktop.
For Best Results
■ Do not place wet pans or lids on the
cooking surface or induction rings.
■ Do not place wet fingers on the glass
cooktop. Wipe up spills on the controls
with dry hands.
■ Do not use woks with support rings. This
type of wok will not heat on an induction
element.
■ Use only a flat-bottomed wok, available
from many cookware manufacturers.
The bottom of the wok should match the
diameter of the induction ring to insure
proper contact.
■ Some special cooking procedures
require specific cookware such as
pressure cookers, deep-fat fryers, etc.
Cookware with flat bottoms that match
the size of the surface element being
used will produce the best results.
– 11 –
 Loading...