

GE JT980, Profile JT930SHSS, Profile JT930SKSS, Profile JT980SKSS, Profile JT980SHSS Owner's Manual

www.GEAppliances.com
164D4290P388-1 49-80236-1 10-03 JR
JT930—30 ″ Single Wall Oven
JT980—30 ″ Double Wall Oven
Owner’s Manual
Safety Instructions . . . . . . . . . . . .2–7
Operating Instructions
Adjusting Temperature . . . . . . . . . .34
Clock, Timer and
Control Lockout . . . . . . . . . . . . . . .12
Controls . . . . . . . . . . . . . . . . . . . .9–11
Convection . . . . . . . . . . . . . . . .24–27
Defrost Feature, Guide . . . . . . .19, 20
Introduction . . . . . . . . . . . . . . . . . . .8
Oven . . . . . . . . . . . . . . . . . . . . .13–15
Proof, Warmer and Warm . . . . . . .29
Recipes . . . . . . . . . . . . . . . . . . . . . . .28
Sabbath Feature . . . . . . . . . . . .35–37
Self-Cleaning Oven . . . . . . . . . .30, 31
Settings . . . . . . . . . . . . . . . . . . .32, 33
Speed Baking/
Speed Roasting . . . . . . . . . . . . .16, 17
Speed Broiling, Guide . . . . . . .17, 18
Timed Baking
and Roasting . . . . . . . . . . . .22, 26, 27
Traditional Baking/Roasting . .21, 22
Traditional Broiling, Guide . . . . . .23
Care and Cleaning
Broiler Pan and Grid . . . . . . . . . . .39
Cleaning Oven Door . . . . . . . . . . .38
Control Panel . . . . . . . . . . . . . . . . .39
Light Bulb . . . . . . . . . . . . . . . . . . . .37
Packaging Tape . . . . . . . . . . . . . . . .37
Racks . . . . . . . . . . . . . . . . . . . . . . . .39
Stainless Steel Surfaces . . . . . . . . . .38
Troubleshooting Tips . . . . . . .40–43
Accessories . . . . . . . . . . . . . . . . . . .44
Consumer Support
Consumer Support . . . . .Back Cover
Product Registration . . . . . . . . 45, 46
Warranty . . . . . . . . . . . . . . . . . . . . .47
Built-In Oven
Write the model and serial
numbers here:
Model #______________________
Serial # ______________________
You can find them on a label on
the side trim or on the front of the
(lower) oven behind the oven door.
Self-Cleaning Oven with Trivection
™
IMPORTANT SAFETY INFORMATION.
READ ALL INSTRUCTIONS BEFORE USING.
■ Do not attempt to operate this oven with
the door open since open-door operation
can result in harmful exposure to
microwave energy. It is important not to
defeat or tamper with the safety interlocks.
■ Do not place any object between the oven
front face and the door or allow soil or
cleaner residue to accumulate on sealing
surfaces.
■ The oven should not be adjusted or
repaired by anyone except properly
qualified service personnel.
■ Do not operate the oven if it is damaged.
It is particularly important that the oven
door close properly and that there is no
damage to the:
door (bent),
hinges and latches (broken or
loosened),
door seals and sealing surfaces.
PRECAUTIONS TO AVOID POSSIBLE EXPOSURE TO EXCESSIVE
MICROWAVE ENERGY
Safety Instructions
Operating Instructions
Care and CleaningTroubleshooting TipsConsumer Support
2
WARNING!
For your safety, the information in this manual must be followed to minimize the risk of fire or
explosion, electric shock, or to prevent property damage, personal injury, or loss of life.
IMPORTANT SAFETY NOTICE
The California Safe Drinking Water and Toxic Enforcement Act requires the Governor of California
to publish a list of substances known to the state to cause cancer, birth defects or other reproductive
harm, and requires businesses to warn customers of potential exposure to such substances.
The fiberglass insulation in self-clean ovens gives off a very small amount of carbon monoxide during
the cleaning cycle. Exposure can be minimized by venting with an open window or using a ventilation
fan or hood.

When using electrical appliances, basic safety precautions should be followed, including the following:
WARNING—Grounding Instructions:
This appliance must be connected to a
grounded, metallic, permanent wiring
system, or an equipment grounding
conductor should be run with the circuit
conductors and connected to the equipment
grounding terminal or lead on the
appliance.
WARNING—To reduce the risk of burns,
electric shock, fire, injury to persons or
exposure to excessive microwave energy:
■ Use this appliance only for its intended
purpose as described in this manual. Do
not use corrosive chemicals or vapors in
this appliance. This oven is specifically
designed to heat or cook food, and is not
intended for laboratory or industrial use.
■ Be sure your appliance is properly
installed and grounded by a qualified
technician in accordance with the
provided installation instructions.
■ Do not attempt to repair or replace any
part of your oven unless it is specifically
recommended in this manual. All other
servicing should be referred to a qualified
technician.
■ Have the installer show you the location of
the circuit breaker or fuse. Mark it for easy
reference.
■ Before performing any service, disconnect
the oven power supply at the household
distribution panel by removing the fuse or
switching off the circuit breaker.
■ Do not leave children alone—children
should not be left alone or unattended in
an area where an appliance is in use. They
should never be allowed to sit or stand on
any part of the appliance.
■ Do not store this appliance outdoors.
Do not use this product near water—
for example, in a wet basement, or near
a swimming pool.
■ Do not operate this appliance if it has a
damaged cord or plug, if it is not working
properly or if it has been damaged or
dropped.
■ This appliance should be serviced only
by qualified service personnel. Contact
nearest authorized service facility for
examination, repair or adjustment.
■ Do not allow anyone to climb, stand or
hang on the door. They could damage the
oven, or cause severe personal injury.
■ Be sure the oven is securely installed in a
cabinet that is firmly attached to the house
structure. Never allow anyone to climb, sit,
stand or hang on the oven door.
■ Never leave the oven door open when you
are not watching the oven.
■ Always keep combustible wall coverings,
curtains or drapes a safe distance from
your oven.
■ Always keep dish towels, dish cloths, pot
holders and other linens a safe distance
from your oven.
■ Always keep wooden and plastic utensils
and canned food a safe distance away
from your oven.
■ Teach children not to play with the
controls or any other part of the oven.
■ Large scratches or impacts to glass doors
can lead to broken or shattered glass.
■ Do not cover or block any openings on
the appliance.
SAFETY PRECAUTIONS
www.GEAppliances.com
3
Safety Instructions
Operating Instructions Care and Cleaning
Troubleshooting Tips Consumer Support

■ Do not store flammable materials in
an oven.
■ CAUTION: Items of interest to
children should not be stored in cabinets
above an oven; children climbing on the
oven to reach items could be seriously
injured.
■ Never wear loose-fitting or hanging
garments while using the appliance. Be
careful when reaching for items stored in
cabinets over the oven. Flammable material
could be ignited if brought in contact with
hot surfaces or heating elements and may
cause severe burns.
■ Use only dry pot holders—moist or damp
pot holders on hot surfaces may result in
burns from steam. Do not let pot holders
touch hot heating elements. Do not use a
towel or other bulky cloth.
■ For your safety, never use your appliance
for warming or heating the room.
■ Do not let cooking grease or other
flammable materials accumulate in or
near the oven.
■ Do not use water on grease fires. Never pick
up a flaming pan. Turn the controls off.
■ Flame in the oven can be smothered
completely by closing the oven door and
turning the oven off or by using a multipurpose dry chemical or foam-type fire
extinguisher.
■ Do not touch the heating elements or the
interior surface of the oven. These surfaces
may be hot enough to burn even though
they are dark in color. During and after
use, do not touch, or let clothing or other
flammable materials contact any interior
area of the oven; allow sufficient time for
cooling first.
■ Potentially hot surfaces include oven vent
openings, surfaces near the openings,
crevices around the oven door, the edges
of the window and metal trim parts above
the door.
■ REMEMBER : The inside surface of the oven
may be hot when the door is opened.
■ Never leave jars or cans of fat drippings in
or near your oven.
■ Do not store or use combustible materials,
gasoline or other flammable vapors and
liquids in the vicinity of this or any other
appliance.
■ Stand away from the oven when opening
the oven door. Hot air or steam which
escapes can cause burns to hands, face
and/or eyes.
■ Do not heat unopened food containers.
Pressure could build up and the container
could burst, causing an injury.
■ Keep the oven vent unobstructed.
■ Keep the oven free from grease buildup.
■ Place the oven rack in the desired position
while the oven is cool. If racks must be
handled when hot, do not let pot holder
contact the heating elements.
■ When using cooking or roasting bags in the
oven, follow the manufacturer’s directions.
■ Pulling out the rack to the stop-lock is a
convenience in lifting heavy foods. It is also
a precaution against burns from touching
hot surfaces of the door or oven walls.
■ Do not use the oven to dry newspapers.
If overheated, they can catch on fire.
■ Do not use the oven for a storage area.
Items stored in an oven can ignite.
■ Do not leave paper products, cooking
utensils or food in the oven when not
in use.
■ After broiling, always take the broiler pan
out of the oven and clean it. Leftover
grease in the broiler pan can catch fire
next time you use the pan.
■ Clean only parts listed in this Owner’s
Manual.
■ Do not use aluminum foil to line oven
bottoms. Improper installation of
aluminum foil may result in a risk
of electric shock or fire.
WARNING!
SAFETY PRECAUTIONS
4
Safety Instructions
Operating Instructions
Care and CleaningTroubleshooting TipsConsumer Support
IMPORTANT SAFETY INFORMATION.
READ ALL INSTRUCTIONS BEFORE USING.

Read and follow the specific “Precautions to Avoid Possible Exposure to Excessive Microwave Energy”
section in this manual.
To reduce the risk of fire in the oven cavity:
■ Do not overcook food. Carefully attend
appliance if paper, plastic or other
combustible materials are placed inside
the oven to facilitate cooking.
■ In defrost mode, remove wire twist-ties
from paper or plastic containers before
placing bags in the oven.
■ Oven Cooking Bags—Do not use the wire
twist-tie to close the bag.
■ Do not use paper towels.
■ Do not use your oven to dry newspapers.
■ Do not overcook potatoes. They could
dehydrate and catch fire, causing damage
to your oven.
■ Do not operate the oven while empty to
avoid damage to the oven and the danger
of fire.
■ Do not use the oven for storage purposes.
Do not leave paper products, cooking
utensils or food in the oven when not
in use.
■ If materials inside the oven should ignite,
keep the oven door closed, turn the oven
off and shut off power at the fuse or circuit
breaker panel. If the door is opened, the
fire may spread.
■ This oven is not approved or tested for
marine use.
■ Some products such as whole eggs and
sealed containers—for example, closed
jars—will explode and should not be
heated in this oven. Such use of the oven
could result in injury.
■ Do not boil eggs in this oven. Pressure will
build up inside the egg yolk and will cause
it to burst, possibly resulting in injury.
■ Do not pop popcorn in your oven.
■ Foods with unbroken outer “skin” such as
potatoes, sausages, tomatoes, apples, egg
yolks, chicken livers and other giblets
should be pierced to allow steam to escape
during cooking.
■ Don’t defrost frozen beverages in narrow-
necked bottles (especially carbonated
beverages). Even if the container is
opened, pressure can build up. This can
cause the container to burst, possibly
resulting in injury.
■ Hot foods and steam can cause burns.
Be careful when opening any containers
of hot food, cooking pouches and boxes.
To prevent possible injury, direct steam
away from hands and face.
■ As with any appliance, close supervision is
necessary when used by children.
TRIVECTION™OVEN
www.GEAppliances.com
5
Safety Instructions
Operating Instructions Care and Cleaning
Troubleshooting Tips Consumer Support
Safety Instructions
Operating Instructions
Care and CleaningTroubleshooting TipsConsumer Support
IMPORTANT SAFETY INFORMATION.
READ ALL INSTRUCTIONS BEFORE USING.
■ Steam or vapor escaping from around
the door.
■ Dimming of the oven light and change
in the blower sound may occur.
■ The microwave fan may operate with both
ovens off. It is cooling the control and will
turn itself off.
■ Some TV-radio interference might be
noticed while using your oven. It is
similar to the interference caused by other
small appliances and does not indicate a
problem with your oven.
ALL THESE THINGS ARE NORMAL WITH YOUR TRIVECTION™OVEN
If you see arcing, open the door and correct the problem.
ARCING
Arcing is the microwave term for sparks in the
oven. Arcing is caused by:
■ Metal or foil touching the side of the oven.
■ Foil not molded to food (upturned edges
act like antennas).
■ Metal, such as twist-ties, poultry pins or
gold-rimmed dishes in the oven.
■ Recycled paper towels containing small
metal pieces being used in the oven.
Liquids such as water, coffee or tea are able
to be overheated beyond the boiling point
without appearing to be boiling. Visible
bubbling or boiling when the container is
removed from the microwave oven is not
always present. THIS COULD RESULT IN VERY
HOT LIQUIDS SUDDENLY BOILING OVER WHEN
THE CONTAINER IS DISTURBED OR A UTENSIL
IS INSERTED INTO THE LIQUID.
SUPER HEATED WATER AND SPONTANEOUS BOILING
6
Cook meat and poultry thoroughly—meat to at least an INTERNAL temperature of 160°F and poultry
to at least an INTERNAL temperature of 180°F. Cooking to these temperatures usually protects against
foodborne illness.
COOK MEAT AND POULTRY THOROUGHLY…
■ Do not clean the door gasket. The door
gasket is essential for a good seal. Care
should be taken not to rub, damage or
move the gasket.
■ Do not use oven cleaners. No commercial
oven cleaner or oven liner protective
coating of any kind should be used in or
around any part of the oven. Residue from
oven cleaners will damage the inside of the
oven when the self-clean cycle is used.
■ Keep the oven vent unobstructed.
■ Before self-cleaning the oven, remove the
broiler pan, grid, racks and other cookware.
■ Be sure to wipe up excess spillage before
starting the self-cleaning operation.
■ If the self-cleaning mode malfunctions,
turn the oven off and disconnect the power
supply. Have it serviced by a qualified
technician.
■ Listen for fan—A fan noise should be
heard sometime during the cleaning cycle.
If not, call a serviceman before selfcleaning again.
SELF-CLEANING OVEN
READ AND FOLLOW THIS SAFETY INFORMATION CAREFULLY.
SAVE THESE INSTRUCTIONS
7
www.GEAppliances.com
Safety Instructions
Operating Instructions Care and Cleaning
Troubleshooting Tips Consumer Support
Introduction.
The GE Profile oven with Trivection™technology is a microwave-assist wall oven designed to cook food up to five
times faster than a traditional oven. This oven gives the user the flexibility to cook food in traditional cooking modes
(bake or broil), convection modes (convection bake and convection roast) or in speedcook modes (speed bake and
speed broil). This oven features easy-to-use controls that will guide you through oven operations.
Bake
Baking is cooking with heated air. The
upper and lower elements cycle back and
forth to heat the air and maintain
temperature. Used for traditional baking
and roasting. Best for delicate items.
Broil
Heat is provided by the upper element
to broil your food. May be used with the
oven door open or closed.
Convection Bake—Multi and Single Rack
Heat is provided by the element in the
back of the oven, along with the upper
and lower elements. The air is circulated
with a reversing fan system. The fan will
change directions to provide optimal
evenness and browning. The Multi Rack
option is ideal for evenly baking foods
when using more than one rack. The
1 Rack option, used for one rack of food,
cooks food faster than BAKE mode.
Convection Roast
Heat is provided by the upper element
and circulated with the reversing fan
system. The fan will change directions to
provide optimal evenness and browning.
Good for roasting large tender cuts of
meat or poultry, uncovered. Roasts foods
up to 25% faster.
Speed Bake
Heat is provided by the three elements
and microwave. The exact combination
of elements is automatically determined
by the food category selected. Air is
circulated with the reversing fan system
described above. Ideal for baking and
roasting foods up to five times faster.
Speed Broil
Heat is provided by the upper element
and microwave. Air is circulated with the
reversing fan system described above.
Oven door must be closed. Ideal for
broiling foods to medium to well done
doneness levels two times faster than
traditional broil.
8
Safety Instructions
Operating Instructions
Care and CleaningTroubleshooting TipsConsumer Support
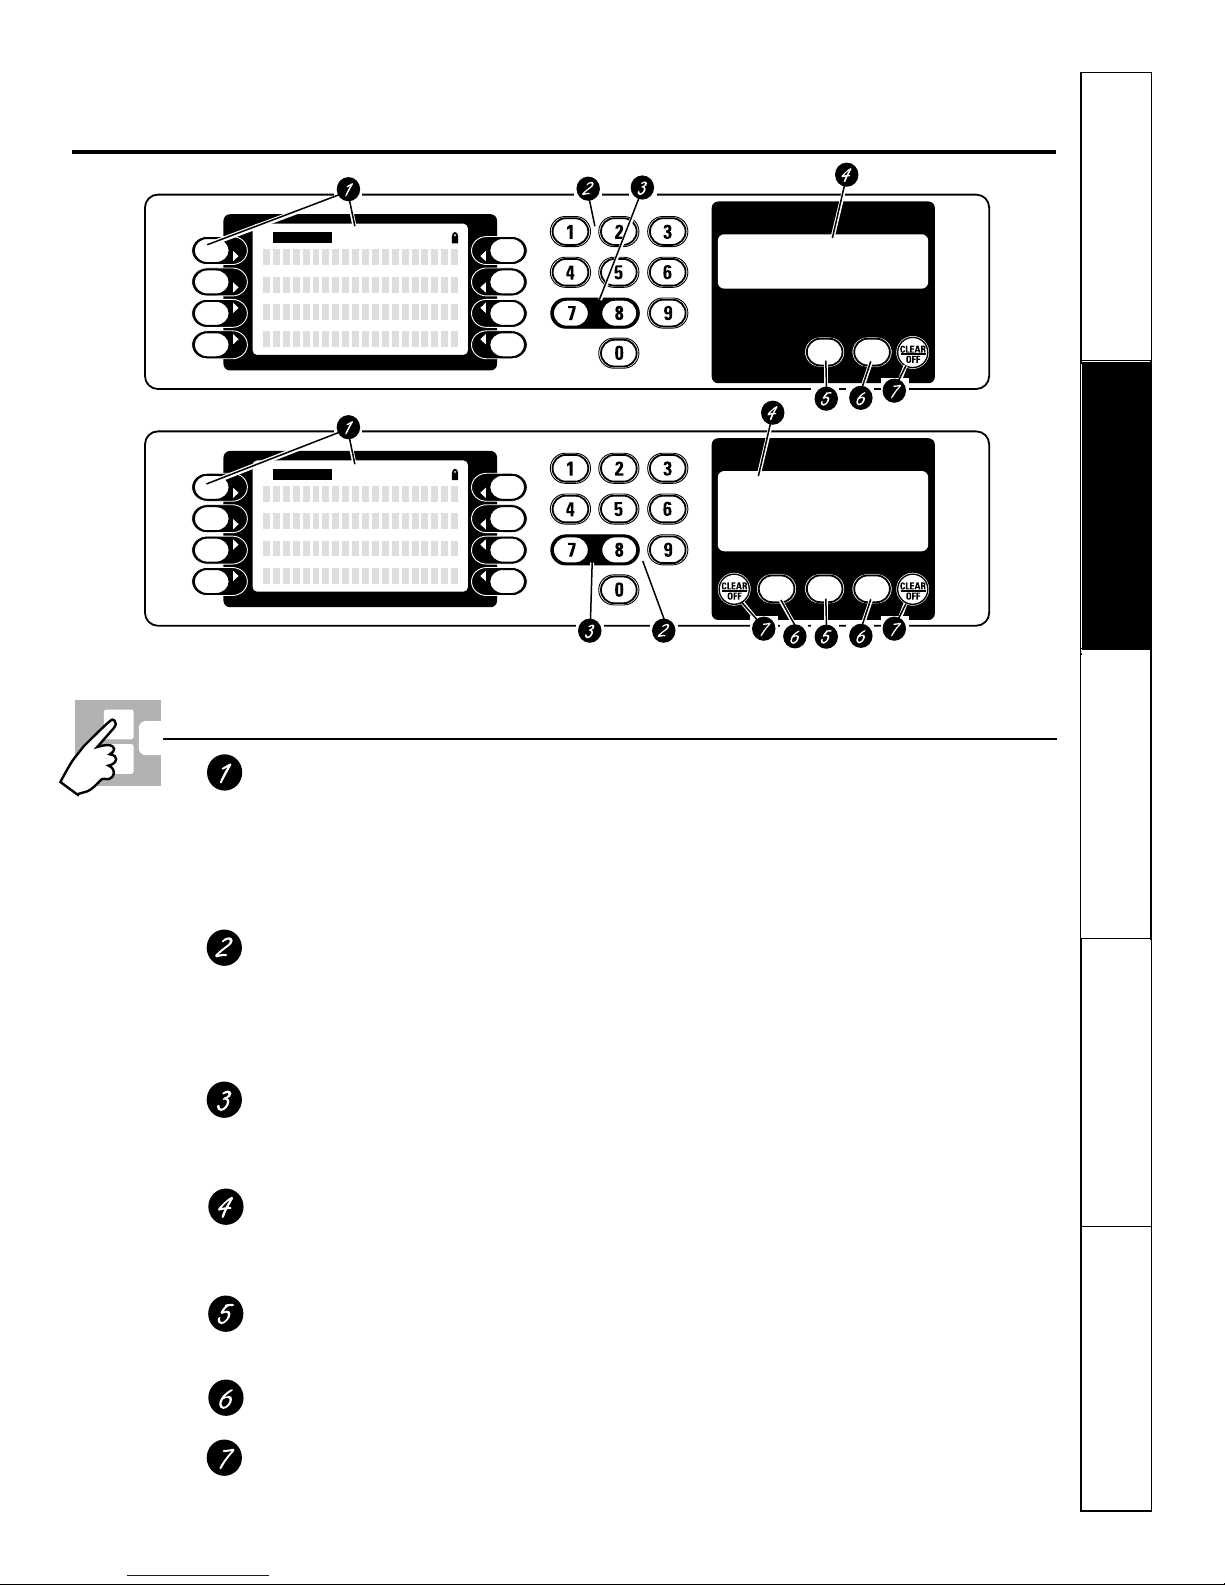
Using the oven controls.
(Throughout this manual, features and appearance may vary from your model.) www.GEAppliances.com
Control Screen & Keypad
All cooking modes, special features and
oven settings are directed and operated
from the control screen. Directions for
operating the oven and prompting for
required information are displayed within
the control screen.
Numeric Keypad
Used to enter information requiring
numbers such as time of day on the clock,
timer, oven temperature, start time and
length of operation for timed baking and
self-cleaning.
Control Lockout
Allows the user to lock the control so that
the touch pads cannot be activated when
pressed.
Time and Temperature Display
All time and temperature information
is displayed in this area as feedback to
the user.
Kitchen Timer
Turns the kitchen timer on and off.
Does not control the oven.
Oven Light
Turns oven light on or off.
Clear/Off
Cancels ALL oven operations EXCEPT the
clock and timer.
If “F– and a number or letter” flash in the display and
the oven control signals, this indicates a function
error code. Press the CLEAR/OFF pad. Allow the oven to
cool for one hour. Put the oven back into operation. If the
function error code repeats, disconnect the power to the
oven and call for service.
If your oven was set for a timed oven operation
and a power outage occurred, the clock and all
programmed functions must be reset.
The time of day will flash in the display when there
has been a power outage.
Oven Control Layout and Description
Double oven control.
Single oven control.
CONTROL LOCK
OVEN
LIGHT
UPPER OVEN LOWER OVEN
OVEN
LIGHT
KITCHEN
TIMER
ON/OFF
SELECT
CONTROL LOCK
OVEN
LIGHT
KITCHEN
TIMER
ON/OFF
SELECT
Safety Instructions
Operating Instructions Care and Cleaning
Troubleshooting Tips Consumer Support
9
Safety Instructions
Operating Instructions
Care and CleaningTroubleshooting TipsConsumer Support
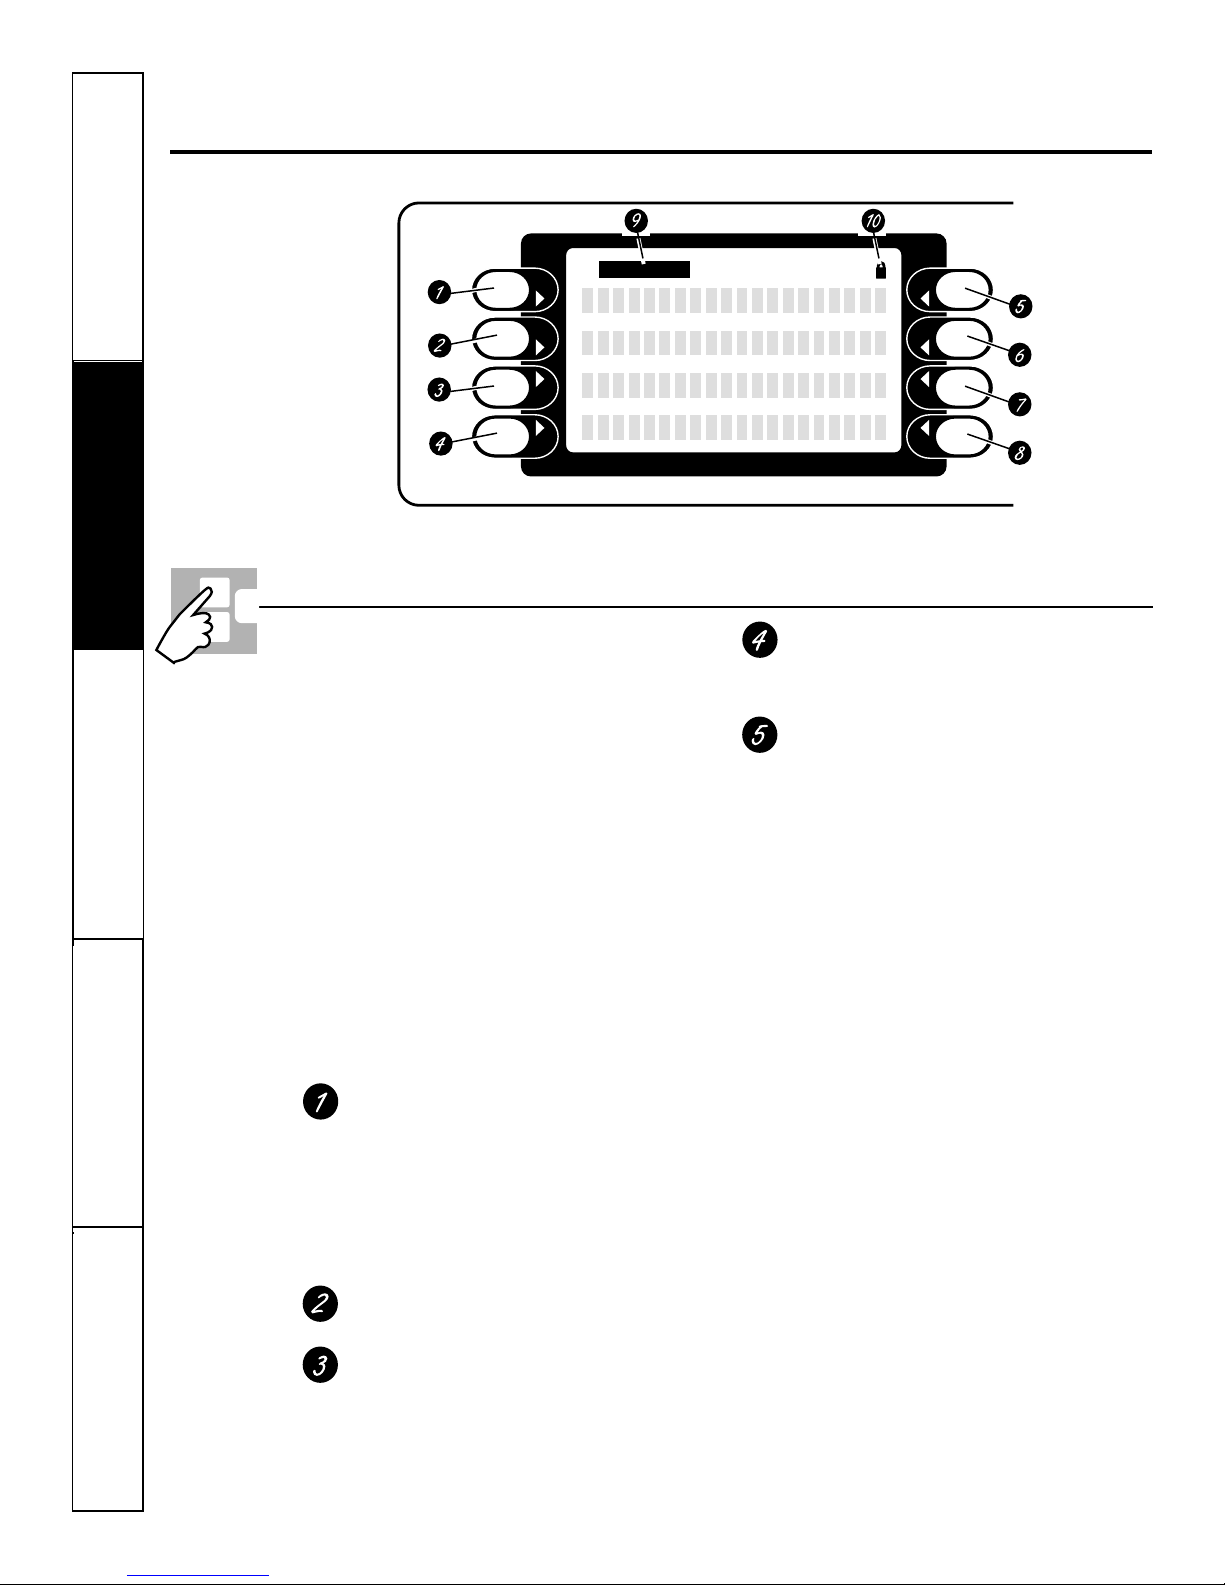
Press pad beside display to select item
in display.
Oven Control Sleep Feature—Any time the oven is
not in use (no cooking, no cleaning, no help and
no timers) for more than 10 minutes, the oven
control will go to sleep. While sleeping, the
control display will not show any text; it will go
blank. The clock will remain displayed in the time
and temperature display unless the “no clock”
option has been selected.
There will be no audible signal given to indicate
that the control is entering the sleep feature.
The control will enter the sleep feature even
when the control is locked.
The user cannot turn this feature OFF.
How to Exit the Sleep Feature—Touch any key. The
function associated with that key will not be started,
but the control display main menu will reappear.
Speedcook
In Speedcook mode, the user will be
prompted to enter food category,
temperature and cooking time.
Speed bake—Bakes food faster than
traditional cooking modes.
Speed broil—Broils food faster than
traditional Hi/Lo Broil.
Bake
Traditional bake mode.
Convection
Conv 1-Rack—Convection bake function
used for baking on one rack.
Conv Multi—Convection bake function
used for baking on more than one rack.
ConvRoast—Convection roast function.
Broil
LO & HI—Traditional broil function.
Speed broil
Features
Additional cooking-related features.
Defrost—This feature is used to thaw
frozen foods. Enter the defrost time using
the chart in the Using the Defrost Feature
section.
Self-Clean—This feature cleans the oven.
See the Using the self-cleaning oven section.
Warmer—This feature keeps hot, cooked
food warm for up to 3 hours. It is not
intended for reheating cold food. See the
How to Set the Oven for Warmer section.
Proof—This feature maintains a warm
environment useful for rising yeastleavened products. It is not intended to
keep food warm or reheat cold food. See
the How to Set the Oven for Proof section.
Warm (Cook & Hold)—When this feature is
turned on, it will keep hot, cooked foods
warm for up to 3 hours following a Timed
Bake function. See the How to Set the Oven
for Warm section.
Sabbath—Designed for use on the Jewish
Sabbath and Holidays. See the Using the
Sabbath Feature section.
Using the oven controls.
(Throughout this manual, features and appearance may vary from your model.)
SELECT
Control Screen and Keypad
10
Settings
This oven has additional settings that you
may choose to use. See the Settings section.
Recipes
NOTE: On double wall ovens, Recipes is
available only on the upper oven.
This oven feature allows the user
to store up to six temperature/cooking
time combinations. The user can then
speed bake, bake or convection bake/roast
one of the six stored favorite recipes
without having to choose the settings
each time.
Help
Provides basic information on each
function and how to find the function.
If selected from the home screen, it gives
general help. If selected while performing
a function, it gives help on that function.
Select Exit to leave Help.
Select Prompt
Visual prompt to the user indicating
that a selection needs to be made from
the control screen.
Door Lock Indicator
Indicates that the oven door is locked
for self-clean.
www.GEAppliances.com
Safety Instructions Operating Instructions Care and Cleaning Troubleshooting Tips Consumer Support
Control Screen and Keypad
11
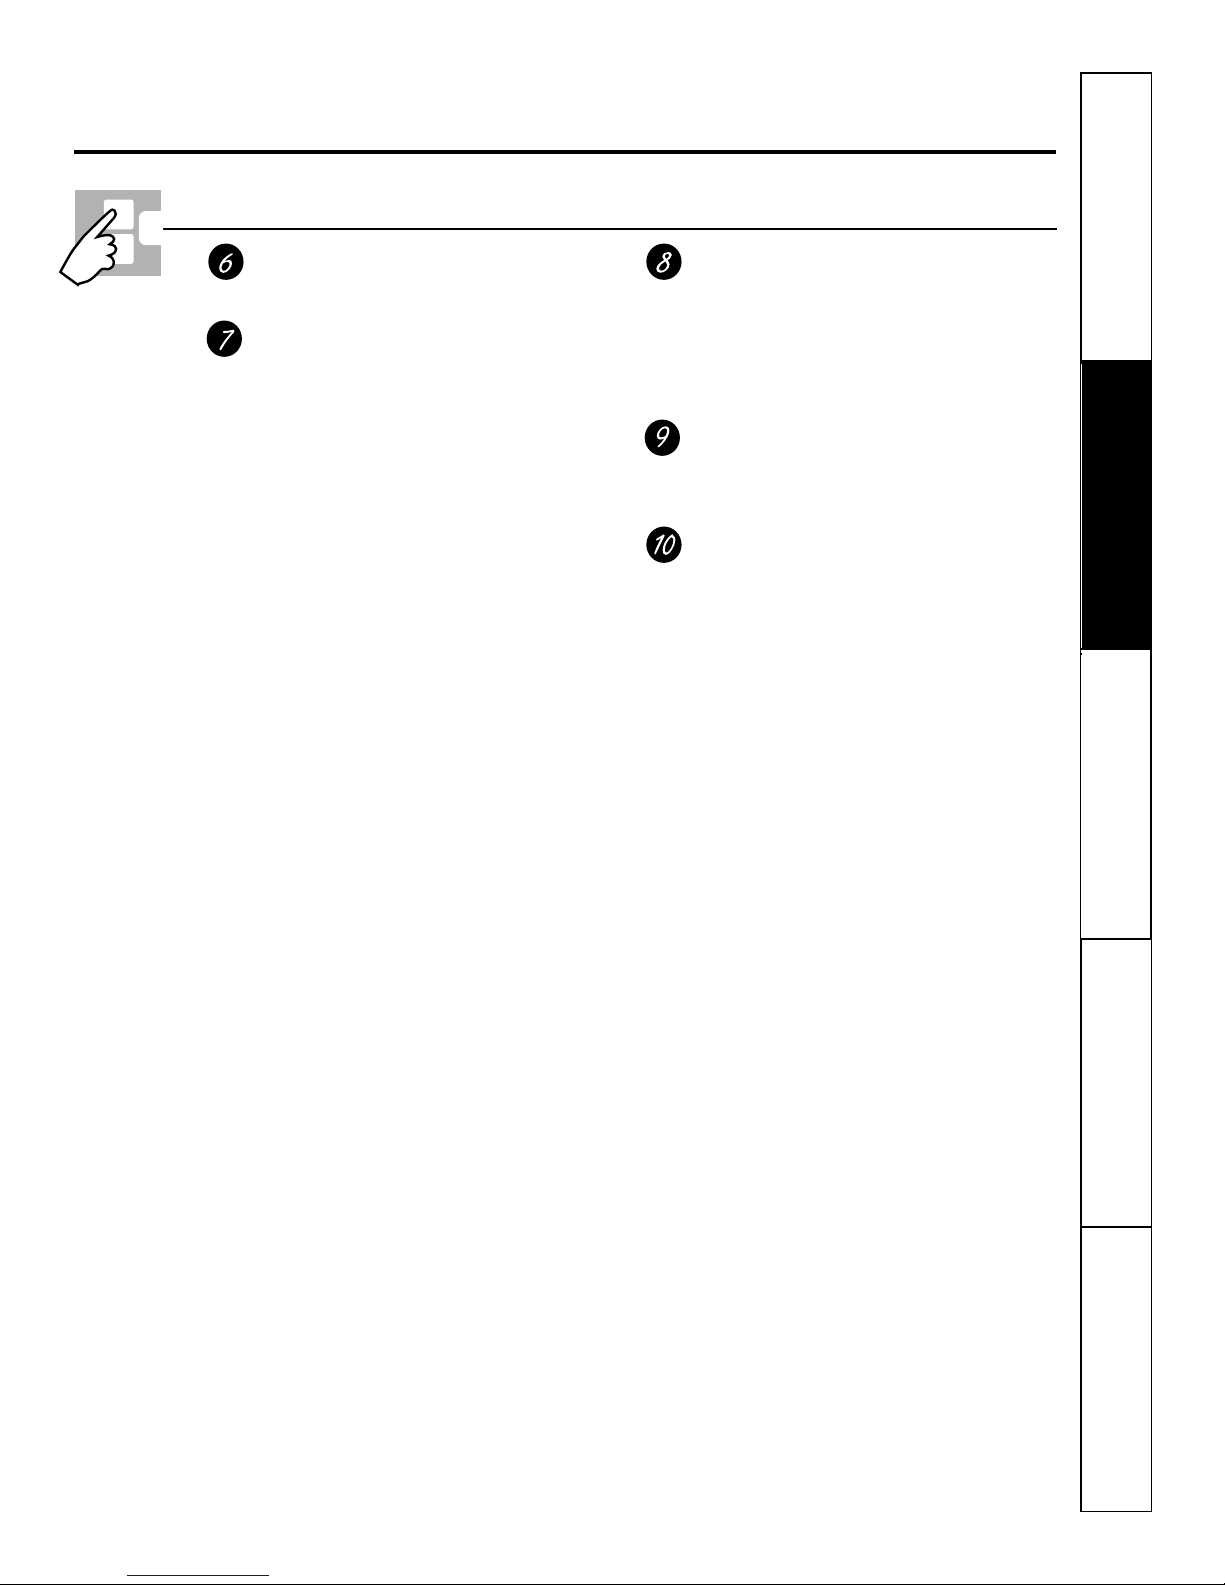
Your control will allow you to lock out the touch
pads so they cannot be activated when pressed.
NOTE: On double oven models, this activates this
feature for both ovens.
To lock/unlock the controls:
Press the 7 and 8 pads at the same
time for 3 seconds, until the control
screen shows CONTROL IS LOCKED.
To unlock the control, press the
7 and 8 pads at the same time for
3 seconds, until CONTROL IS LOCKED
disappears from the control screen
and the main menu is displayed.
When this feature is on and the touch
pads are pressed, the control will show
CONTROL IS LOCKED.
■ The control lockout mode affects
all touch pads.
■ The control will remain locked
after a power failure.
12
Using the clock, timer and control lockout.
To Set the Clock
The clock must be set to the correct time
of day for the automatic oven timing
functions to work properly. The time of
day cannot be changed during timed
baking, a self-cleaning cycle or delayed
start time.
Select SETTINGS.
Select CLOCK.
Press the number pads.
Select ENTER.
Make sure the clock is set to the
correct time of day.
To Set the Timer
Press the KITCHEN TIMER pad.
Press the number pads until the
amount of time you want shows
in the display. For example, to set
2 hours and 45 minutes, press 2, 4
and 5 in that order. If you make a
mistake, press the KITCHEN TIMER
pad and begin again.
Select START.
After selecting START, SET disappears;
this tells you the time is counting down,
although the display does not change until
one minute has passed. Seconds will not be
shown in the display until the last minute is
counting down.
When the timer reaches :00,
the control will beep 3 times
followed by one beep every
6 seconds until the KITCHEN
TIMER pad is pressed once.
The continuous beep can be canceled by
following the steps in the Settings section
under Tones at the End of a Timed Cycle.
The timer is an hour and minute
timer only.
The timer does not control oven
operations. The maximum setting on
the timer is 9 hours and 59 minutes.
To set 10 minutes, enter 10. DO NOT
enter 10:00!
To Reset the Timer
If the remaining time is not in the display
(clock, delay start or cooking time are in
the display), recall the remaining time by
pressing the KITCHEN TIMER pad or using
REVIEW TIMES.
You may change it by pressing the
KITCHEN TIMER pad, then press the
number pads until the time you want
appears in the display.
To Cancel the Timer
Press KITCHEN TIMER pad twice.
Control Lockout
Safety Instructions
Operating Instructions
Care and CleaningTroubleshooting TipsConsumer Support
KITCHEN
TIMER
ON/OFF
CONTROL LOCK

Using the oven. www.GEAppliances.com
To avoid possible burns, place the racks in the desired position before you turn the oven on.
Before you begin…
The racks have stop-locks, so that when
placed correctly on the supports, they will
stop before coming completely out, and
will not tilt.
When placing and removing cookware,
pull the rack out to the bump on the
rack support.
To remove a rack, pull it toward you,
tilt the front end up and pull it out.
To replace, place the end of the rack
(stop-locks) on the support, tilt up the
front and push the rack in.
NOTE: On double wall ovens, the rack design is
unique for the upper Trivection™ oven. Due to
this, the upper oven racks and the lower oven
racks are not interchangeable.
NOTE: A cooling fan will automatically turn on
during all cooking modes. This fan turns on to
cool internal parts. It may run for up to 1-1/2
hours after the oven is turned off.
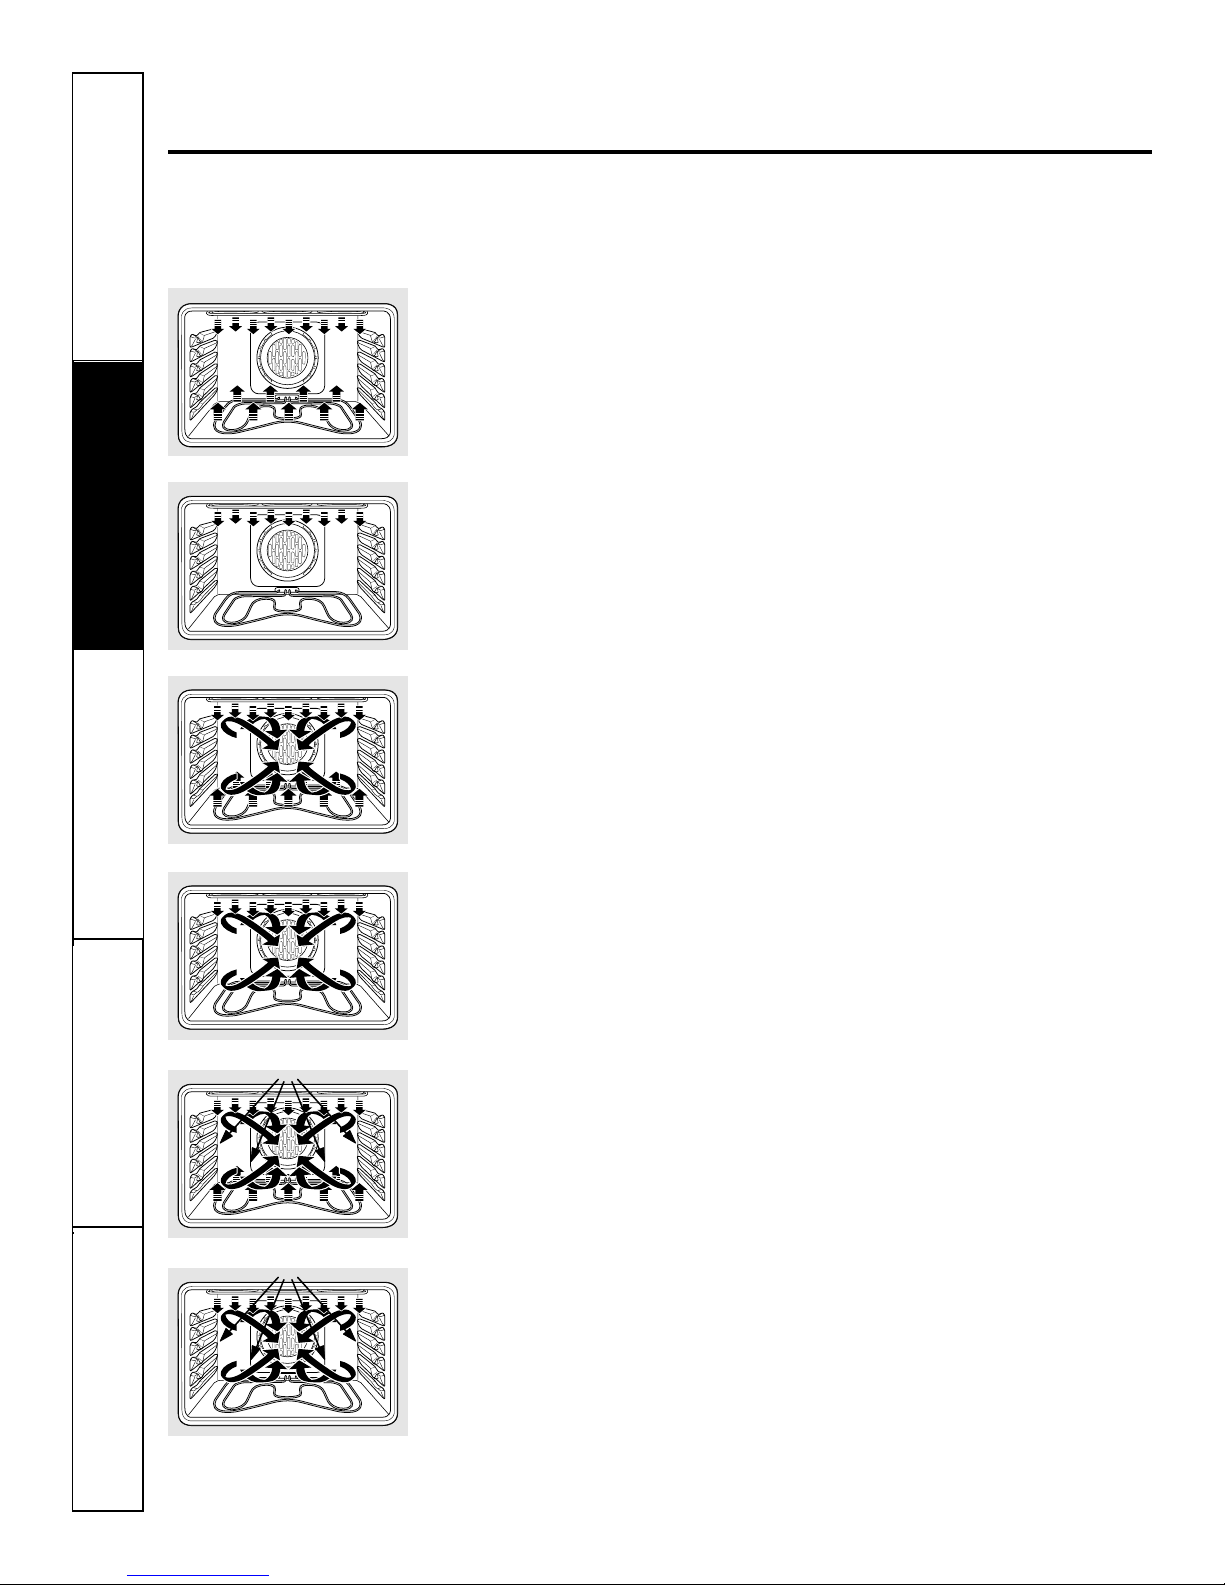
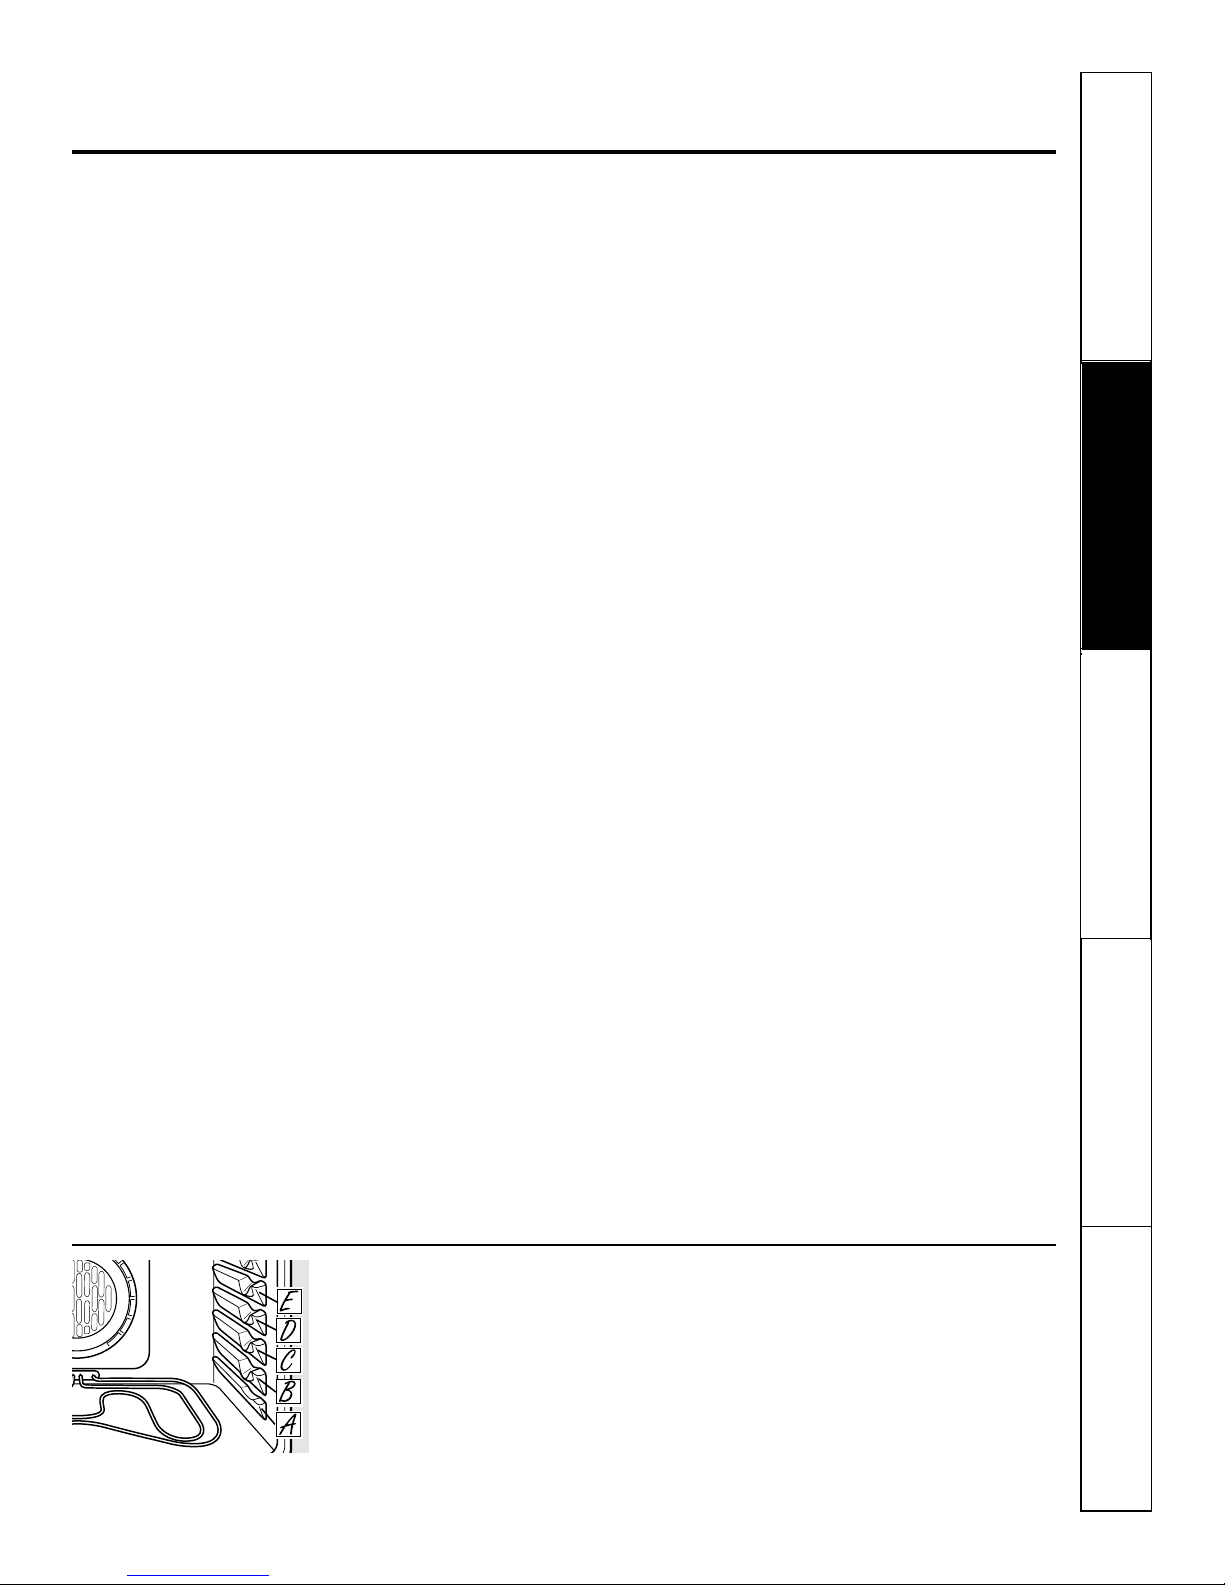
30″ Trivection™oven has
5 rack positions A–E (as shown).
30″ lower oven of double oven has
7 rack positions A–G (as shown).
13
Safety Instructions
Operating Instructions Care and Cleaning
Troubleshooting Tips Consumer Support

Using the Trivection™oven.
Microwave Assisted
In the Trivection oven, a microwave is
used to assist cooking.
The combination of microwave,
convection fan and heating elements is
unique for each food category.
NOTE: The microwave will cycle on and off while
cooking to best distribute energy to the food.
The microwave turns off and the cook time
stops counting down when the oven door
is opened.
NOTE: The convection fan may cycle on and off
and change direction while cooking to best
distribute hot air in the oven. The convection fan
shuts off when the oven door is opened.
Auto Recipe™Conversion
You can use your favorite recipes in the
Trivection oven.
When speedcooking, enter the
traditional cooking temperature and
the maximum recipe/package cook time.
When speedcooking, the Auto Recipe
™
conversion feature automatically converts
traditional cook time into the appropriate
speedcooking time. The converted time
will display after you start the oven. This
time will be up to 5 times faster than
traditional baking based on food type.
Cookware for Speedcooking. . .
You can use cookware that is oven-safe.
Heat-resistant paper and plastic
containers and bakeware that are
recommended for use in traditional
baking can also be used for speed baking.
However, they should not be used at
temperatures higher than the
temperature recommended by the
bakeware manufacturer.
If you are cooking with several pans,
leave space between them. Arcing is the
microwave term for sparks in the oven.
To avoid arcing, be sure there is at least
1 inch of space between metal surfaces—
pans, wall of cavity, aluminum foil.
Do not completely surround food with
metal and/or foil while speedcooking—
you will not have a time savings (for
example, wrapping potato with foil, using
metal roasting pan with lid).
When using a metal pan, do not cover it
with a metal lid or foil (a glass lid or
parchment paper may be used).
However, foil may be used to shield food
to prevent overbrowning or overcooking
(i.e., placing small strips of foil on tips of
wings and legs of poultry). Also, foil
covers may be tented over food (i.e.,
large frozen casseroles) toward the end
of their cook time to prevent
overbrowning or overcooking.
DO NOT USE FOOD WRAPPERS MADE
FROM A COMBINATION OF METAL FOIL
AND PAPER IN THE OVEN in speedcook
modes. For example, some frozen or
deli breads are baked and sold in these
wrappers. Remove the food from
the wrapper and speed bake on a flat
metal pan.
When speedcooking with metal pans,
heavy aluminum pans are recommended
for best results.
When speed baking with stoneware or
cooking stones, refer to the manufacturer’s
owner’s manual for proper use and
maintenance. For best results, preheat
your flat cooking stones. If the
manufacturer does not recommend
preheating the cooking stones, do not
use them in Speedcooking modes. Do not
use hearth inserts while speedcooking.
Use pans with low sides whenever
possible. A shallow pan allows air
to circulate around the food more
efficiently.
Dark or matte finish bakeware will
produce darker browning on food.
When you are speed broiling, it is
important that you use the broiler pan
with grid for best results. The pan is
used to catch grease spills and the grid
is used to prevent grease spatters.
14
Safety Instructions
Operating Instructions
Care and CleaningTroubleshooting TipsConsumer Support
Safety Instructions
Operating Instructions Care and Cleaning
Troubleshooting Tips Consumer Support
www.GEAppliances.com
Other Speedcooking Tips. . .
You must preheat your oven.
Put the food in the oven after the
preheat beep when the oven control
displays “Put Food In Oven” and then
press START. You must press the START
key after placing the food in the oven to
start the speedcook mode.
When choosing a speedcook food
category, refer to the chart on page 16.
All frozen foods should be speedcooked
using the FROZENFOODS category.
When baking potatoes, the
recommended cooking temperature
is 350°F and cooking time is 90 minutes
for medium sized potatoes. Add an
additional 15–30 minutes for large
potatoes or when baking more than
four potatoes.
In general, when cooking meats wrapped
in dough or refrigerated dough product,
use the Biscuit/Roll or BakedGoods
category.
For recipes using a large quantity
of cheese, milk and/or eggs, use the
BakedGoods category.
Larger amounts of food or multiple racks
of food may require additional time.
Check food doneness as prompted and
continue cooking as needed.
Items such as appetizers, cookies, biscuits
and rolls can be speed baked on multiple
racks. Cooking time may increase slightly
for some foods, but since two or three
racks of food are being cooked at the
same time, the overall result is substantial
time saved.
When cooking multiple items or pans,
leave space between them for maximum
air circulation.
Cakes and quick breads (banana,
zucchini or pumpkin bread) are not
recommended for multiple rack speed
baking. Place cakes side-by-side on one
rack if speed baking. When using more
than one rack to cook these foods, use
CONV MULTI mode. See Using the
convection modes section.
Meats/Poultry
Cooking times will vary depending on
the cut of meat. Check for doneness at
minimum time. Note: Meats will continue
to cook and internal temperatures will
rise after they are removed from the oven
(standing time).
Use the broiler pan and grid provided
with your oven for best results.
As in a conventional oven, aluminum foil
may be used to shield food—to prevent
overbrowning or overcooking (i.e., placing
small strips of foil on tips of wings and legs
of poultry). Also, foil covers may be tented
over food (i.e., large frozen casseroles)
toward the end of their cook time to
prevent overbrowning or overcooking.
Make sure that the foil is securely attached
to the food. However, large amounts of
foil or fully enclosing food in foil blocks
the microwave energy, which eliminates
time savings.
Do not use oven thermometers, meat
thermometers or wire twist-ties in the
oven while speedcooking.
Pop-up thermometers in your meat
may be inaccurate. Check the temperature
of the meat with a thermometer after
removing the meat from the oven.
For best results, speed bake turkeys
unstuffed.
Rack Positions for Speed Baking. . .
If cooking on one rack, place food so that it is approximately centered in the oven.
Rack Positions and Examples
C Cookies, pizza, pie, muffins, cakes, biscuits, casseroles
B Loaves of bread, bundt cakes, meat loaf, small and medium roasts, whole chicken
A Very tall items: turkey, large roasts, angel food cakes
If cooking on two racks, use rack positions A and D to provide lots of space between
items for optimal results.
If cooking on three racks, use rack positions A, C and E.
Rack positions, Trivection™Oven.
15
 Loading...