

GE Profile J2S968 SERIES, Profile JGS968 SERIES, JGSP48, Profile JGSP48 SERIES Technical Service Manual
GE Consumer Products
TECHNICAL SERVICE GUIDE
Profile Dual Fuel and
Profile All Gas
Slide-In Ranges
MODEL SERIES:
J2S968
JGS968
JGSP48
PUB # 31-9105 07/03

IMPORTANT SAFETY NOTICE
The information in this service guide is intended for use by
individuals possessing adequate backgrounds of electrical,
electronic, and mechanical experience. Any attempt to repair a
major appliance may result in personal injury and property
damage. The manufacturer or seller cannot be responsible for the
interpretation of this information, nor can it assume any liability in
connection with its use.
W ARNING
If the information in this manual is not followed exactly, a fire or
explosion may result causing property damage, personal injury or
death. If you smell gas:
- Do not try to light any appliance.
- Do not touch any electrical switch; do not use any phone in
the building.
- Immediately call the gas supplier from a neighbor’s phone.
Follow the gas supplier’s instructions.
- If you cannot reach the gas supplier, call the fire dep artment.
W ARNING
To avoid personal injury, disconnect power before servicing this
product. If electrical power is required for diagnosis or test
purposes, disconnect the power immediately after performing the
necessary checks.
RECONNECT ALL GROUNDING DEVICES
If grounding wires, screws, straps, clips, nuts, or washers used
to complete a path to ground are removed for service, they must
be returned to their original position and properly fastened.
GE Consumer Products
Technical Service Guide
Copyright © 2003
All rights reserved. This service guide may not be reproduced in whole or in part
in any form without written permission from the General Electric Company .
– 2 –

Table of Contents
Adjusting the Oven Thermostat .......................................................................................18
Bake and Broil Burner Flame Adjustment s......................................................................30
Bake Burner Glow-bar Igniter...........................................................................................28
Bake Element (Dual Fuel).................................................................................................32
Broil Burner Glow-bar Igniter............................................................................................28
Broil Element (Dual Fuel).................................................................................................32
Component Locator Views ..............................................................................................21
Control Features................................................................................................................8
Control Panel Assembly...................................................................................................38
Control V alve (All Gas) .....................................................................................................36
Convection Element (Dual Fuel).......................................................................................34
Convection Fan Assemblies ............................................................................................33
Convection Fan Guard.....................................................................................................34
Convection Fan Motor......................................................................................................34
Cooling Fan......................................................................................................................44
Diagnostic and Service Information .................................................................................51
Door Assemblies .............................................................................................................24
Door Latch Assembly .......................................................................................................46
Electronic Oven Control (ERC) Pin Locator ....................................................................39
Failure Codes ..................................................................................................................51
Fan Cycle Information.......................................................................................................33
Glass Cooktop .................................................................................................................45
Glow-bar Igniter (All Gas) .................................................................................................27
Igniter Switches and Harness ..........................................................................................42
Introduction ........................................................................................................................5
Keypanel and ERC ..........................................................................................................38
Low Flame Simmer Adjustments.....................................................................................40
LP Conversion Instructions..............................................................................................53
Maintop Burner Alignment ................................................................................................40
Maintop Burner Assembly ................................................................................................41
Meat Probe Outlet ............................................................................................................36
Model Number....................................................................................................................6
Motorized Door Lock Circuit Information..........................................................................47
Nomenclature ....................................................................................................................6
Notes ...............................................................................................................................61
Oven Burner Ignition System (All Gas) ............................................................................27
Oven Calibration ..............................................................................................................52
Oven Components ..........................................................................................................27
Oven Door .......................................................................................................................24
Oven Gas Shut-off V alve (All Gas)...................................................................................26
Oven Light Bulbs .............................................................................................................26
Oven Temperature Sensor ..............................................................................................36
Oven Vent (All Gas) .........................................................................................................37
Oven Vent (Dual Fuel)......................................................................................................37
– 3 –

Table of Contents (Cont.)
Range Components .........................................................................................................24
Range Removal ...............................................................................................................25
Range Top Components..................................................................................................40
Relay Contacts Operation Test and Control Voltage Check.............................................52
Serial Number ...................................................................................................................6
Schematics and Wiring Diagrams...................................................................................56
Special Oven Control Features..........................................................................................9
Spark Igniter .....................................................................................................................42
Spark Module ...................................................................................................................42
Storage Drawer................................................................................................................25
Surface Burner Adjustments............................................................................................40
Testing the Flame S tability ...............................................................................................41
Thermal Switches ............................................................................................................46
Upper and Lower Heat Shields ........................................................................................43
Using the Clock and Timer............................................................................................... 11
Using the Convection Oven .............................................................................................16
Using the Oven Controls....................................................................................................8
Using the Probe ...............................................................................................................13
Using the Proofing and Warming Features......................................................................16
Using the Sabbath Feature ..............................................................................................20
Using the Self-Cleaning Oven..........................................................................................18
Using the Timed Baking and Roasting Features..............................................................12
Using the Timed Features for Convection Cooking..........................................................14
Warranty............................................................................................................................7
– 4 –
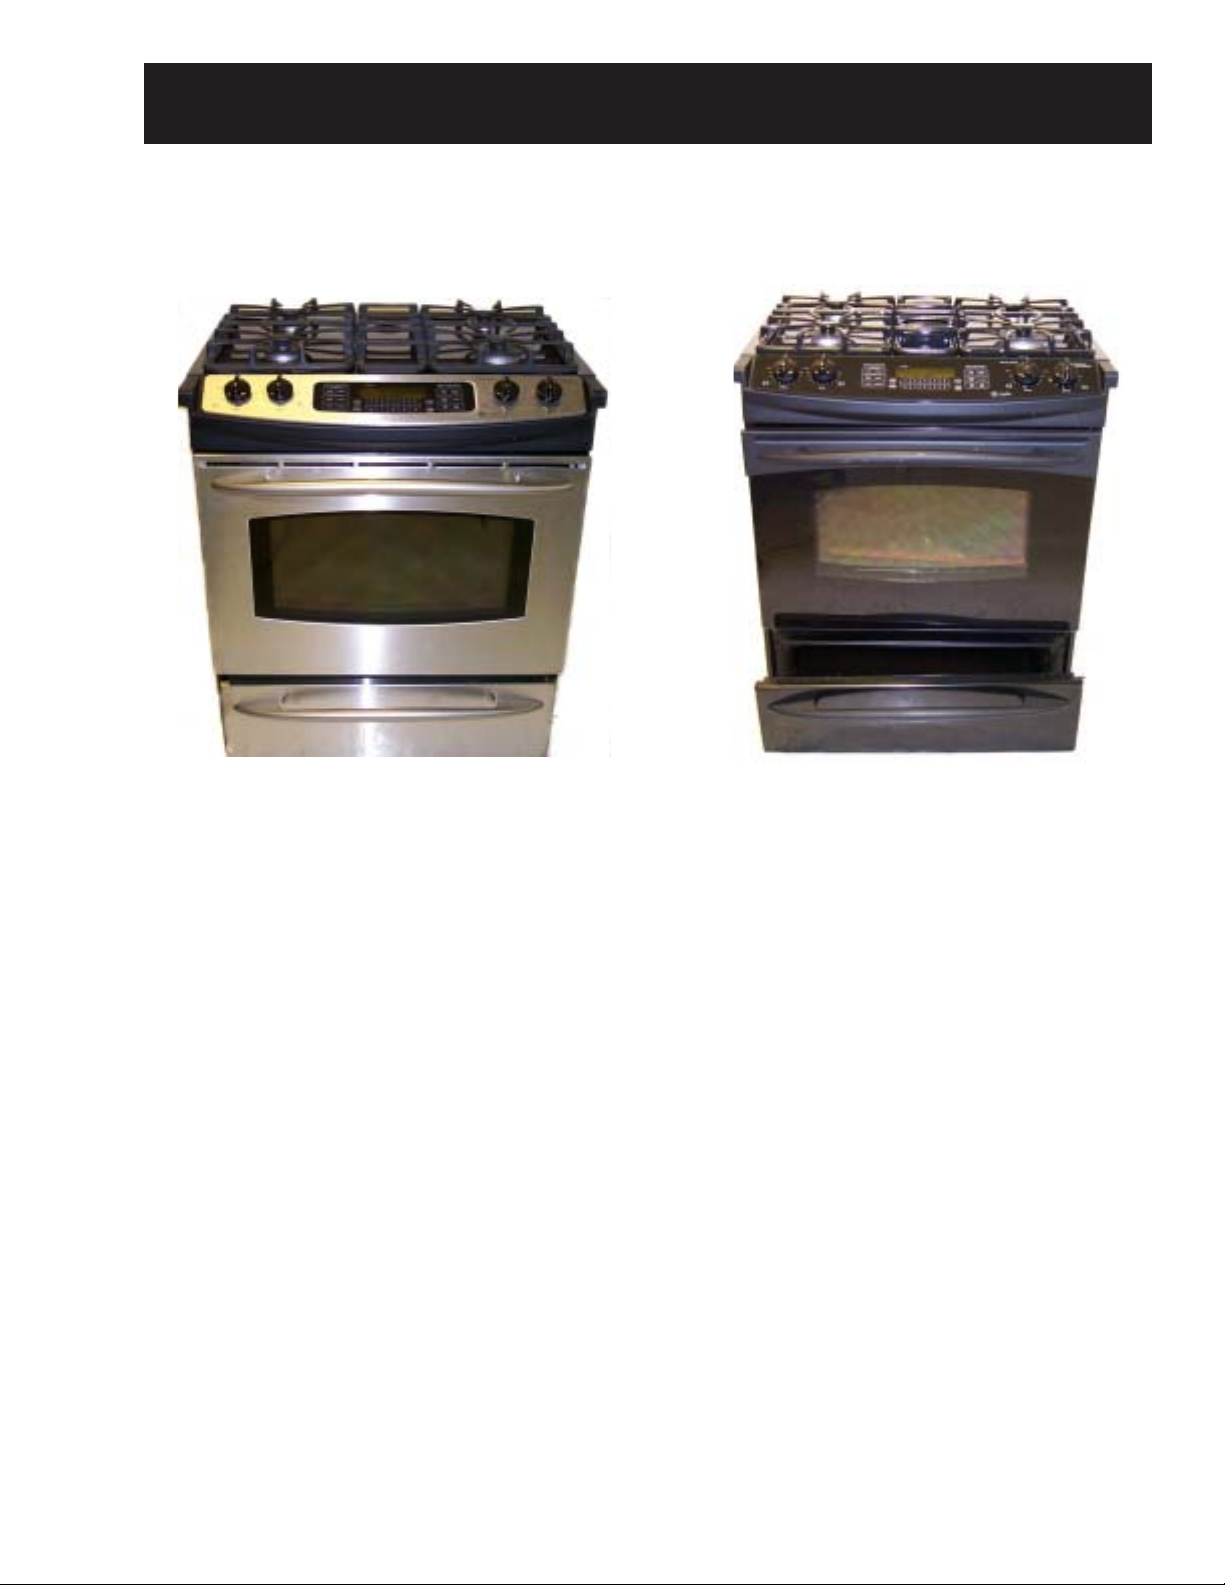
Introduction
Dual Fuel Range All Gas Range
The new 30-in. Slide-In Dual Fuel and All Gas
Ranges make an eloquent statement of style,
convenience, and kitchen planning flexibility . The
SmartSet Electronic Touch Controls are simple to
understand and easy to operate. Just read and
touch.
The Dual Fuel Range has an electric oven and gas
cooktop.
These ranges include many helpful features, such
as a specially designed touch-control panel that is
uniquely angled for optimal, user-friendly operation.
The convection baking and roasting feature
provides even cooking and superior baking every
time.
New servicing features include front accessibility
to all components except the convection oven fan
motor and easy replacement access to the oven
door locking assembly.
The information on the following pages will help
you service these new 30-in. Slide-In Dual Fuel
and All Gas Ranges ef fectively and efficiently.
– 5 –
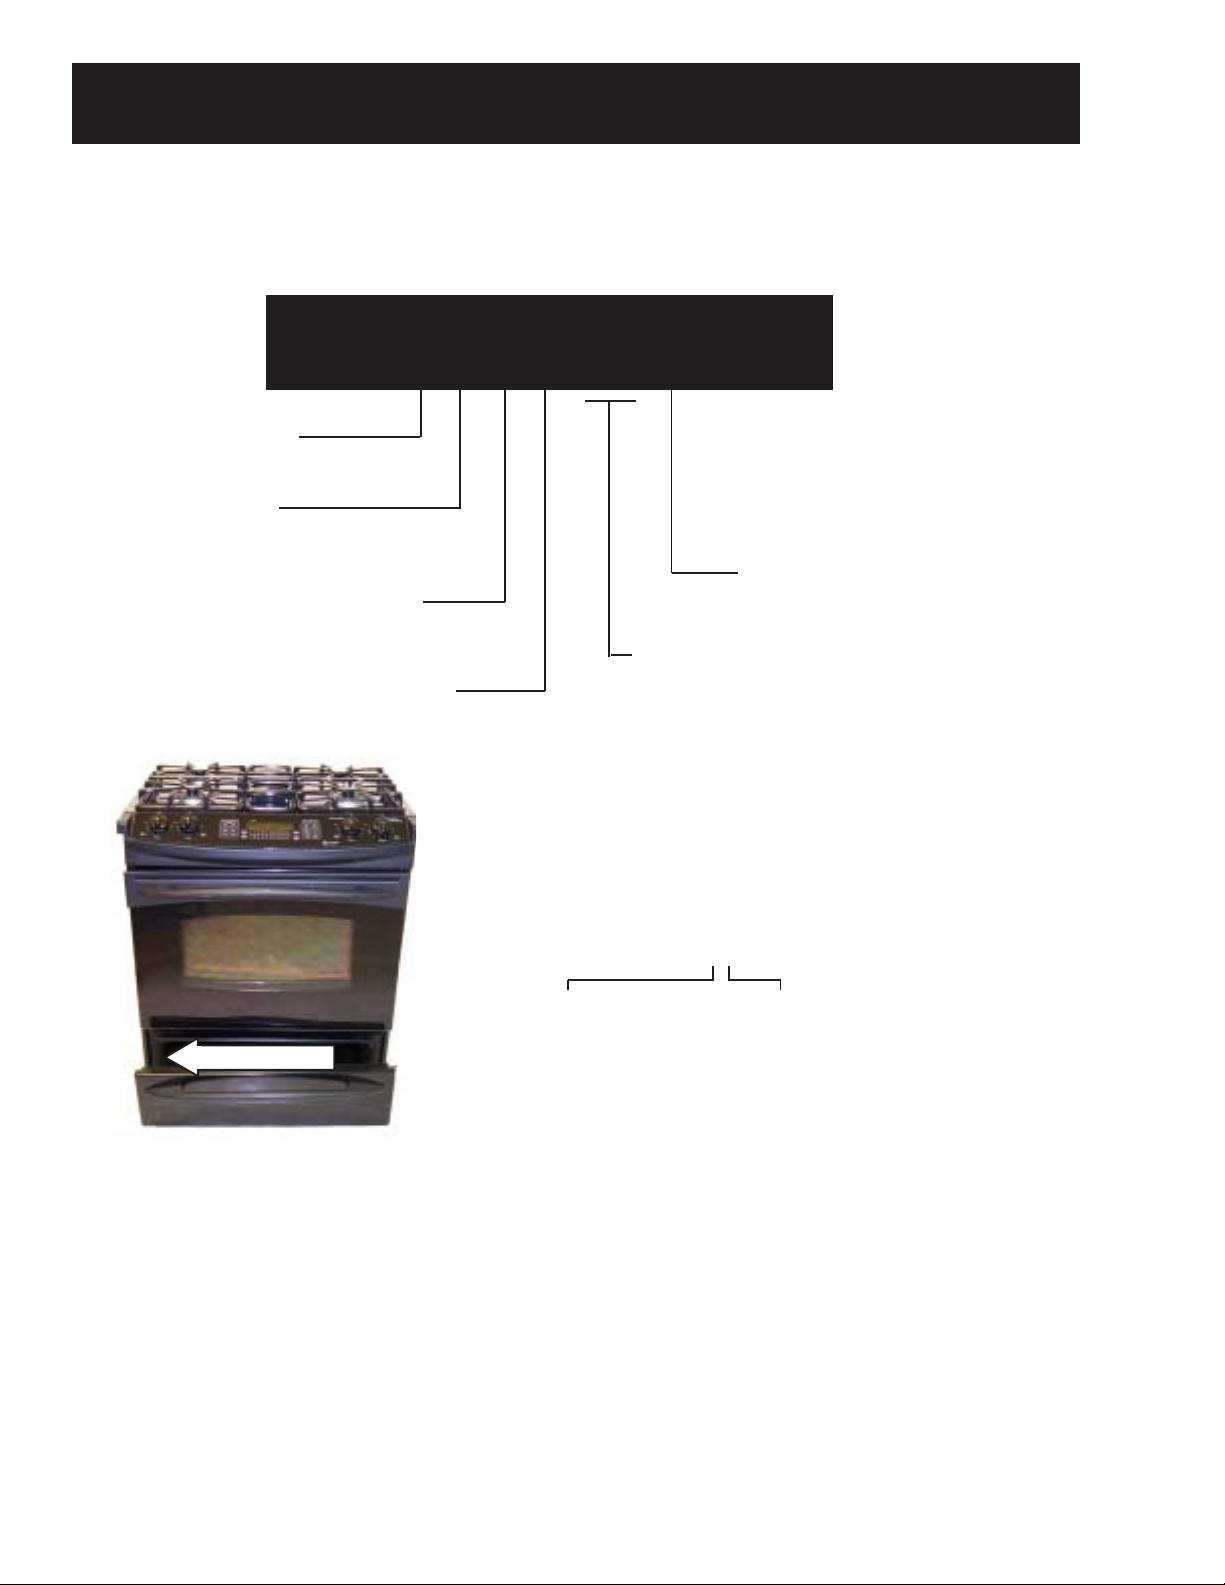
Model Number
Product
J = GE Cooking Product
Fuel
2 = Dual Fuel
G = Gas
Configuration
S = Slide-In
Oven Type
9 or P = Self-Clean
Nomenclature
J 2 S 9 6 8 B
Color
B = Black
Feature Pack
Designates features–the higher
the number, the more features.
Nomenclature
The serial plate of your range is
located on the oven frame above
the storage drawer.
In addition to the model and serial
numbers, this plate tells the power
ratings of the electrical supply
circuit for dual fuel models and, for
all models, the ratings of the
burners, the type of fuel, and
pressure the cooktop was adjusted
for when it left the factory.
Serial Number
The first two numbers of the serial number
identify the month and year of manufacture.
Example: AF123456S = January, 2003
A - JAN 2005 - H
D - FEB 2004 - G
F - MAR 2003 - F
G - APR 2002 - D
H - MAY 2001 - A
L - JUN 2000 - Z
M - JUL 1999 - V
R - AUG 1998 - T
S - SEP 1997 - S
T - OCT 1996 - R
V - NOV 1995 - M
Z - DEC 1994 - L
Note: The technical sheet is located under the
control panel.
The letter designating
the year repeats every
12 years.
Example:
T - 1974
T - 1986
T - 1998
– 6 –
W arranty
■ Ser vice trips to your home to teach you how to use
the product.
■ Improper installation, delivery or maintenance.
■ Failure of the product if it is abused, misused,
or used for other than the intended purpose or
used commercially.
■ Replacement of house fuses or resetting of circuit
breakers.
■ Damage to the product caused by accident, fire, floods
or acts of God.
■ Incidental or consequential damage caused by possible
defects with this appliance.
■ Damage caused after deliver y.
What GE Will Not Cover:
This warranty is extended to the original purchaser and any succeeding owner for products purchased for
home use within the USA. In Alaska, the warranty excludes the cost of shipping or service calls to your home.
Some states do not allow the exclusion or limitation of incidental or consequential damages. This warranty
gives you specific legal rights, and you may also have other rights which vary from state to state. To know
what your legal rights are, consult your local or state consumer affairs office or your state’s Attorney General.
For The Period Of: GE Will Replace:
One Year Any part of the range which fails due to a defect in materials or workmanship. During this
From the date of the full one-year warranty, GE will also provide, free of charge, all labor and in-home service to
original purchase replace the defective part.
GE Dual Fuel Range Warranty.
(For customers in the United States)
All warranty service provided by our Factory Service Centers,
or an authorized Customer Care
®
technician. To schedule service,
on-line, 24 hours a day, visit us at www.GEAppliances.com, or
call 800.GE.CARES (800.432.2737).
Warrantor: General Electric Company. Louisville, KY 40225
For Customers in the Canada:
Warrantor: Camco Inc.
All warranty service provided by our Factory Service Centers or an authorized Customer Care®
technician. For service, call 1.800.361.3400.
– 7 –
Control Features
g
Using the Oven Controls
(Throughout this manual, features and appearance may vary from your model.)
Features and appearance may vary.
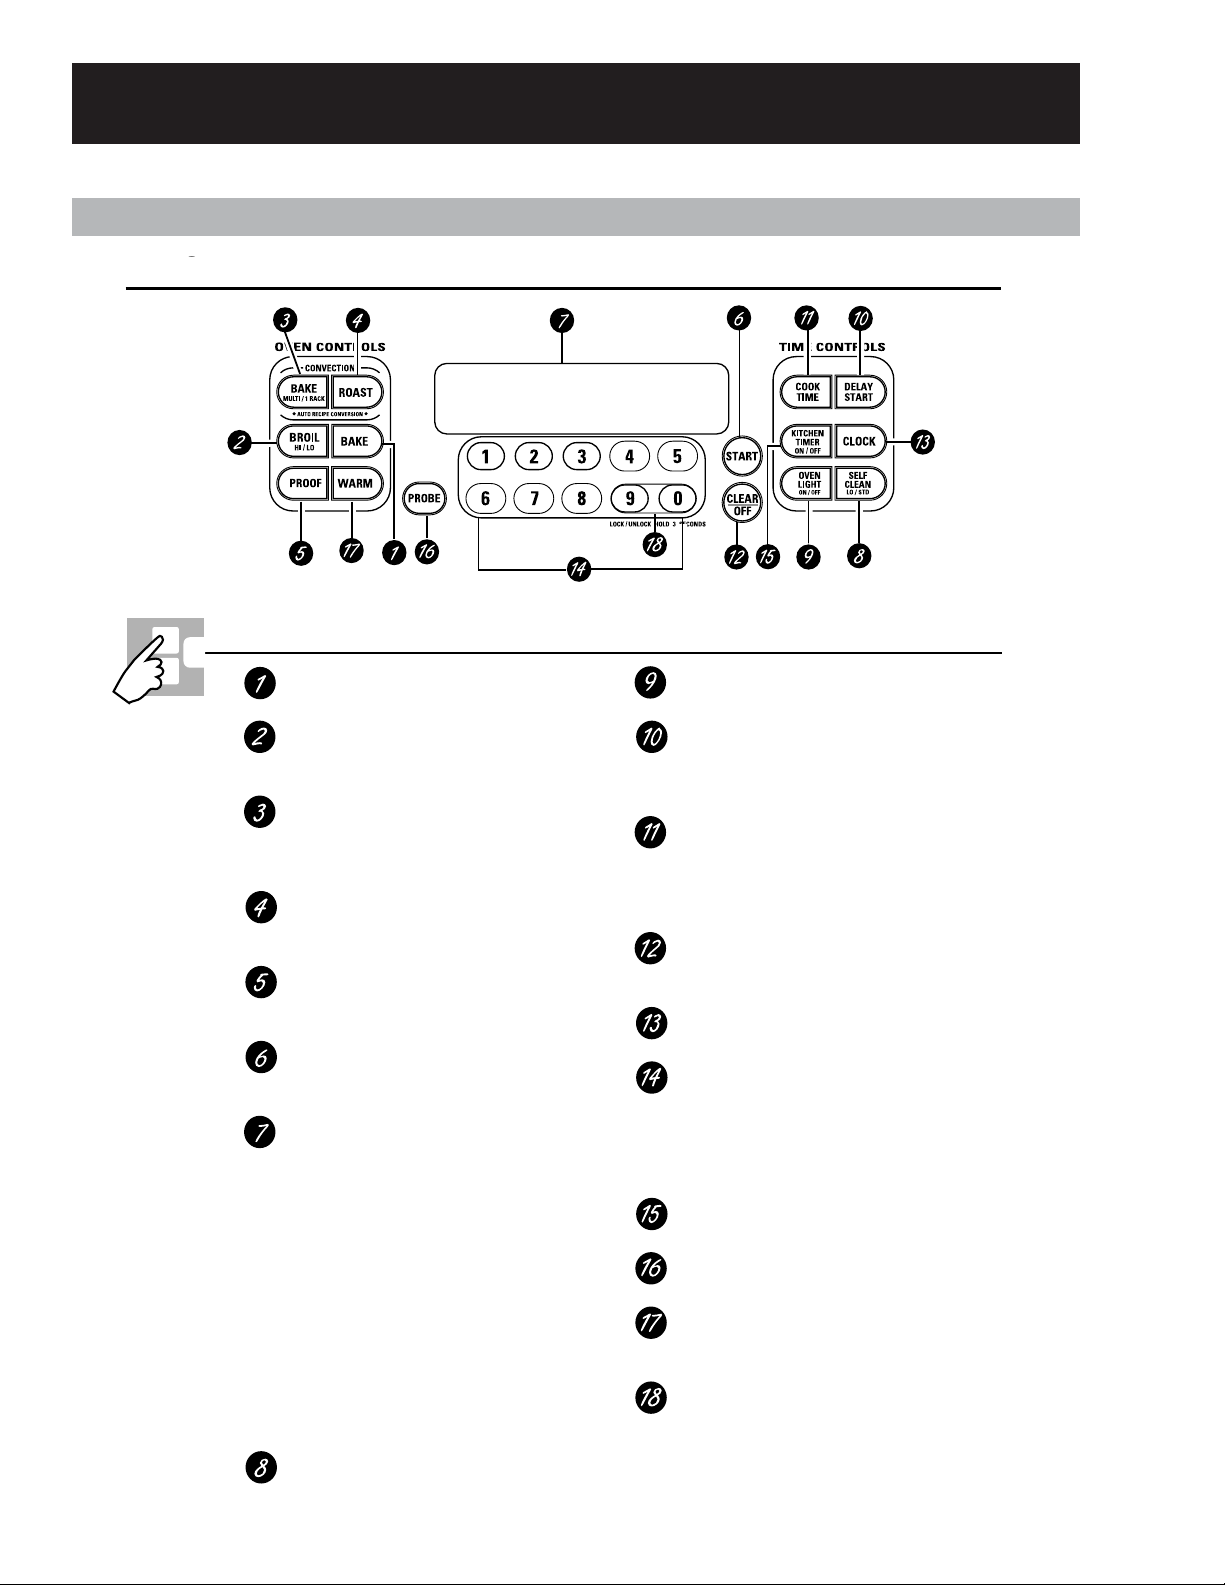
Oven Control, Clock and Timer Features and Settings
BAKE Pad
Touch to select the bake function.
BROIL HI/LO Pad
Touch to select the broil function. Touch once for
high broil and twice for low broil.
CONVECTION BAKE Pad
Touch to select baking with the convection
function. Touch once for multi-rack convection
baking and twice for 1-rack convection baking.
CONVECTION ROAST Pad
Touch to select roasting with the convection
function.
PROOF Pad
Touch to select a warm environment useful for
rising yeast-leavened products.
START Pad
Must be touched to start any cooking or
cleaning function.
Display
Shows the time of day, oven temperature,
whether the oven is in the bake, broil or
self-cleaning mode and the times set for the
timer or automatic oven operations.
If “F– and a number or letter” flash in the display and the
oven control signals, this indicates a function error code.
Touch the CLEAR/OFF pad. Allow the oven to cool for one hour.
Put the oven back into operation. If the function error code repeats,
disconnect the power to the oven and call for service.
If your oven was set for a timed oven operation and a
power outage occurred, the clock and all programmed
functions must be reset.
The time of day will flash in the display when there has
been a power outage.
SELF CLEAN LO/STD Pad
Touch to select self-cleaning function. See the
Using the self-cleaning oven section.
OVEN LIGHT ON/OFF Pad
Touch to turn the oven light on or off.
DELAY START Pad
Use along with COOK TIME or SELF CLEAN
LO/STD pads to set the oven to start and stop
automatically at a time you set.
COOK TIME Pad
Touch and then touch the number pads to set
the amount of time you want your food to cook.
The oven will shut off when the cooking time
has run out.
CLEAR/OFF Pad
Touch to cancel ALL oven operations except the
clock, timer and control lockout.
CLOCK Pad
Touch before setting the clock.
Number Pads
Use to set any function requiring numbers
such as the time of day on the clock, the timer,
the oven temperature, the internal food
temperature, the start time and length of
operation for timed baking and self-cleaning.
KITCHEN TIMER ON/OFF Pad
Touch to select the timer feature.
PROBE Pad
Touch when using the probe to cook food.
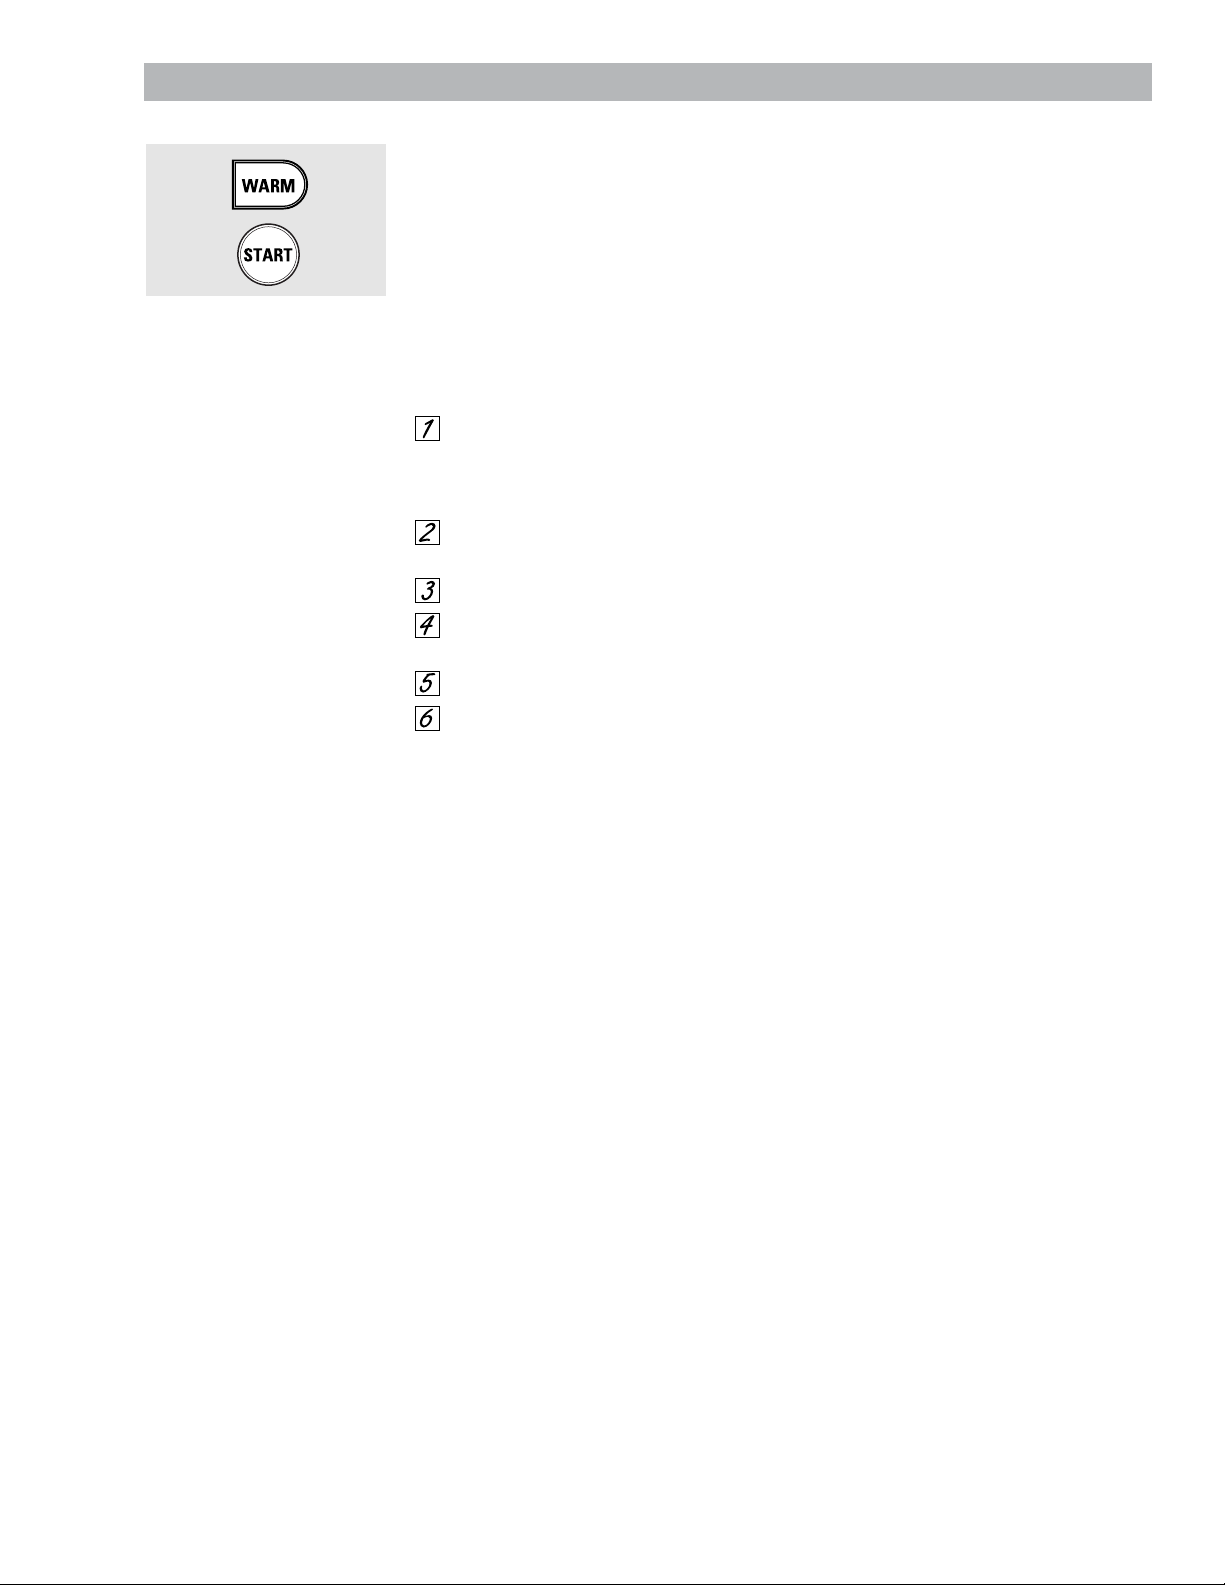
WARM Pad
Touch to keep cooked foods warm. See the
How to Set the Oven for Warming section.
CONTROL LOCKOUT
The control lockout is 9 and 0. Touch and hold
the 9 and 0 pads at the same time for 3 seconds.
– 8 –
Your new touch pad control has additional features that you may choose to use. The following are the features
and how you may activate them.
The special feature modes can only be activated while the display is showing the time of day. They remain
in the control’s memory until the steps are repeated.
When the display shows your choice, touch the START pad. The special features will remain in memory after
a power failure, except for the Sabbath feature, which will have to be reset.
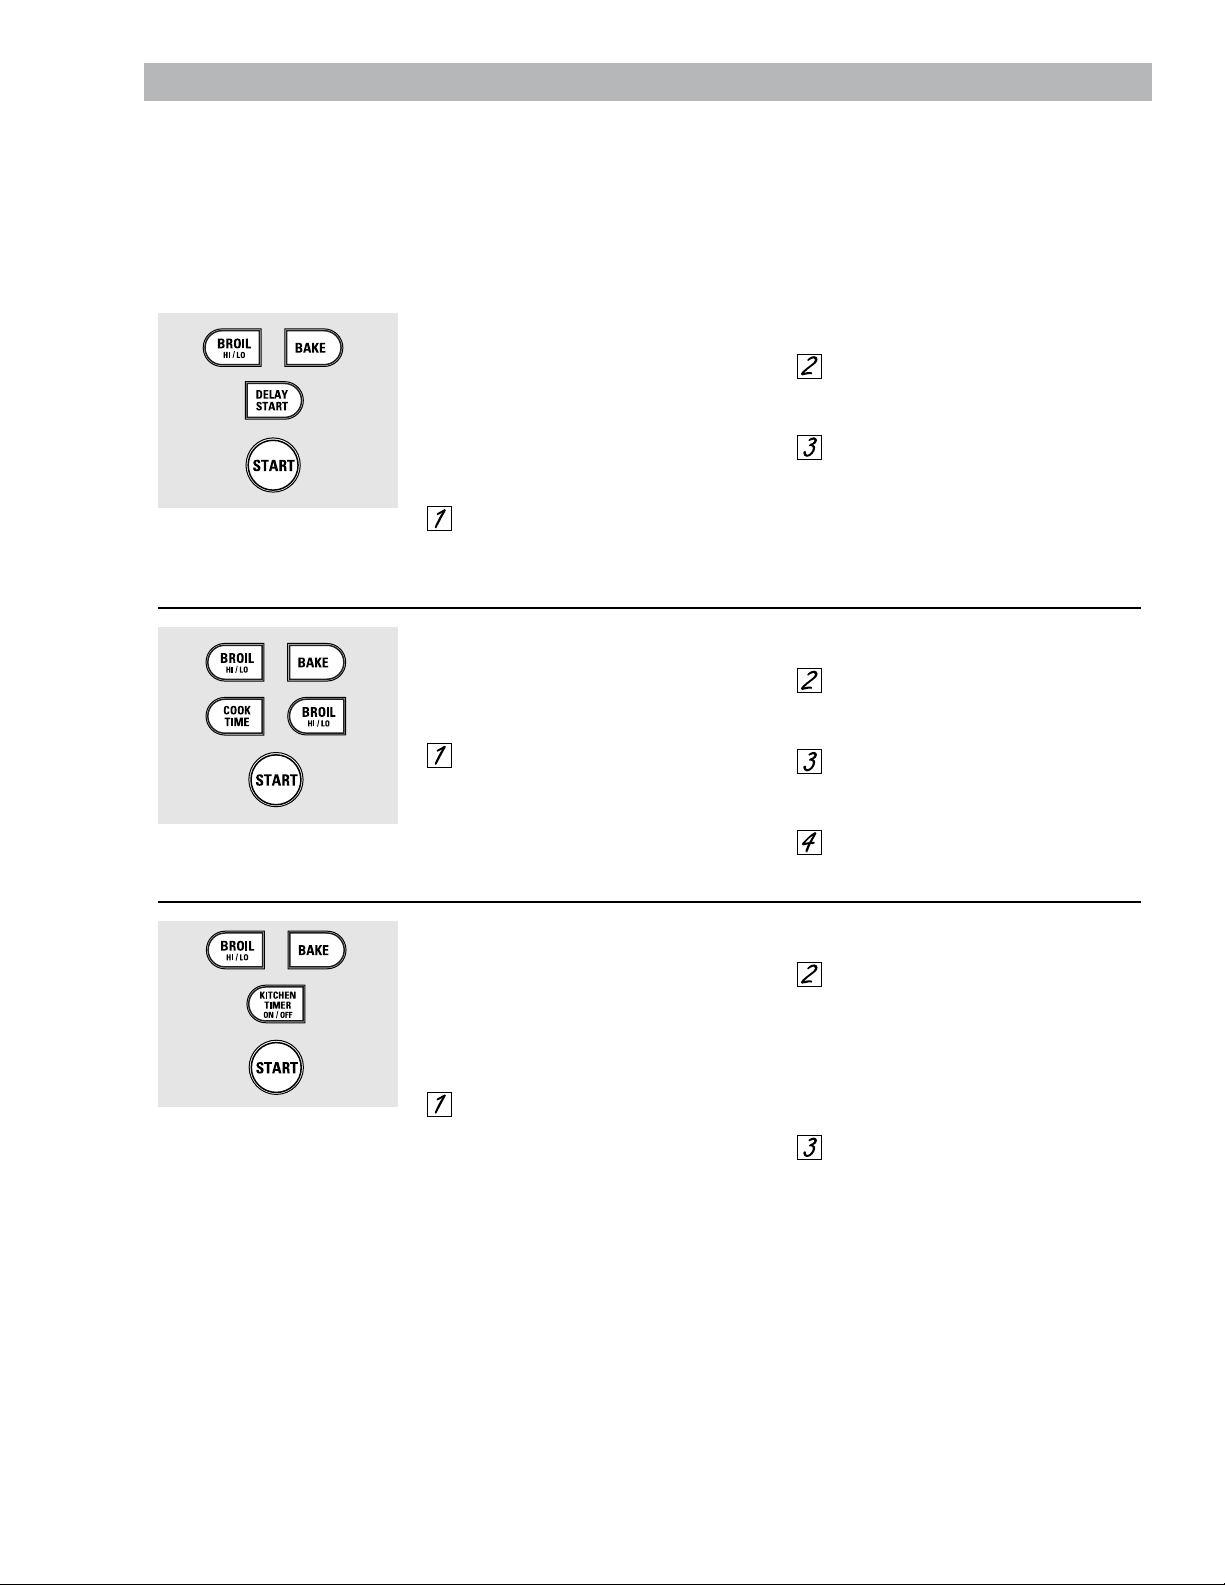
12-Hour Shutdown
With this feature, should you forget and leave the
oven on, the control will automatically turn off the
oven after 12 hours during baking functions or
after 3 hours during a broil function.
If you wish to turn OFF this feature, follow
the steps below.
Touch the BROIL HI/LO and BAKE
pads at the same time for 3 seconds
until the display shows SF.
Touch the DELAY START pad until
no shdn (no shut-off) appears in the
display.
Touch the START pad to activate the
no shut-off and leave the control
set in this special features mode.
Fahrenheit or Celsius Temperature Selection
Your oven control is set to use the Fahrenheit
temperature selections but you may change this
to use the Celsius selections.
Touch the BROIL HI/LO and BAKE
pads at the same time for 3 seconds
until the display shows SF.
Touch the COOK TIME and BROIL
HI/LO pads at the same time. The
display will show F (Fahrenheit).
Touch the COOK TIME and BROIL
HI/LO pads again at the same time.
The display will show C (Celsius).
Touch the START pad.
Tones at the End of a Timed Cycle
At the end of a timed cycle, 3 short beeps will
sound followed by one beep every 6 seconds
until the CLEAR/OFF pad is touched. This
continual 6-second beep may be canceled.
To cancel the 6-second beep:
Touch the BROIL HI/LO and BAKE
pads at the same time for 3 seconds
until the display shows SF.
Touch the KITCHEN TIMER ON/OFF
pad. The display shows CON BEEP
(continuous beep). Touch the
KITCHEN TIMER ON/OFF pad
again. The display shows BEEP.
(This cancels the one beep
every 6 seconds.)
Touch the START pad.
Special Oven Control Features
+
+
+
+
– 9 –
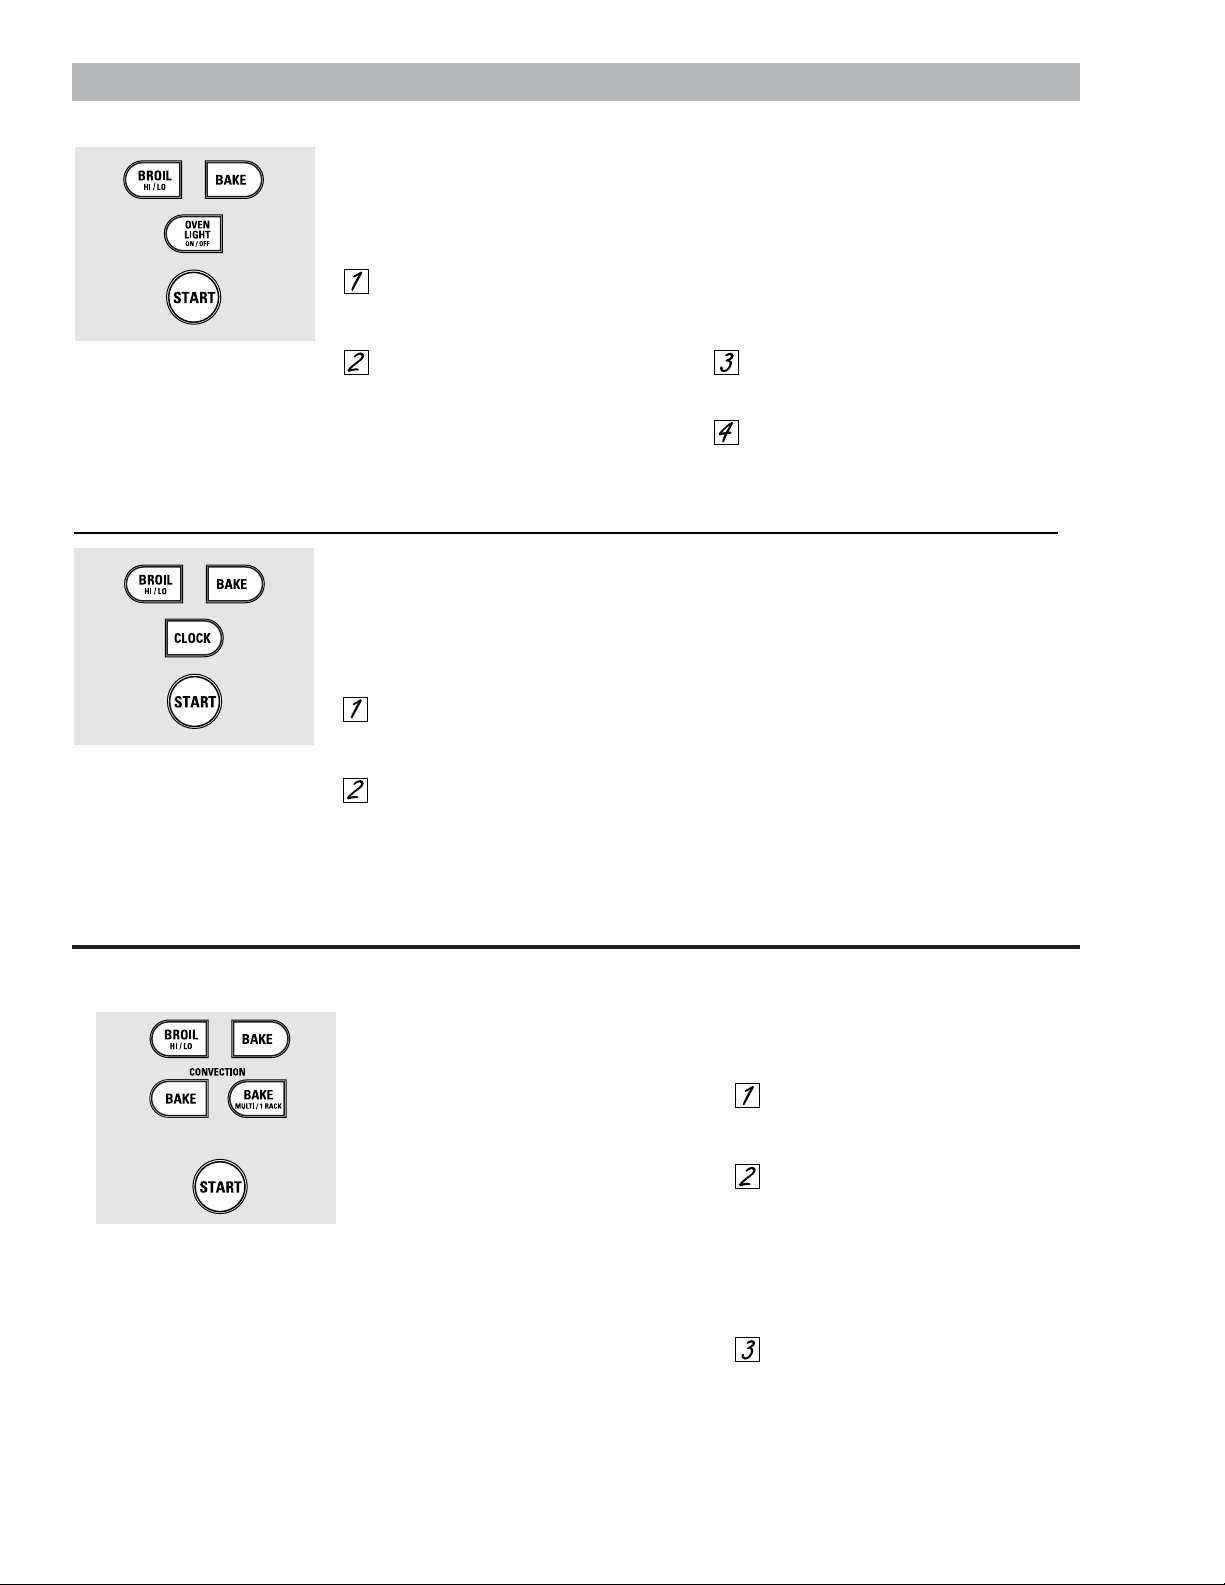
12-Hour, 24-Hour or Clock Blackout
Your control is set to use a 12-hour clock.
If you would prefer to have a 24-hour
military time clock or black out the clock
display, follow the steps below.
Touch the BROIL HI/LO and BAKE
pads at the same time for 3 seconds
until the display shows SF.
Touch the CLOCK pad once. The
display will show 12 hr. If this is
the choice you want, touch the
START pad.
Touch the CLOCK pad again to change
to the 24 hour military time clock. The
display will show 24 hr. If this is the choice
you want, touch the START pad.
Touch the CLOCK pad again to black out
the clock display. The display will show
OFF. If this is the choice you want, touch
the START pad.
NOTE: If the clock is in the black-out mode you
will not be able to use the Delay Start function.
Tone Volume
This feature allows you to adjust the tone
volumes to a more acceptable volume. There are
three possible volume levels.
Touch the BROIL HI/LO and BAKE
pads at the same time for 3 seconds,
until the display shows SF.
Touch the OVEN LIGHT ON/OFF pad.
The display will show 2 BEEP. This is
the high volume level.
Touch the OVEN LIGHT ON/OFF pad
again. The display will show 3 BEEP.
This is the loudest volume level.
Touch the OVEN LIGHT ON/OFF pad
again. The display will show 1 BEEP.
This is the quietest volume level.
For each time the level is changed,
a tone will sound to provide an
indication of the volume level.
Choose the desired sound level
(1 BEEP, 2 BEEP, 3 BEEP).
Touch the START pad to activate the
level shown.
Using Auto Recipe™Conversion
When using convection bake, the Auto Recipe
™
Conversion feature will automatically convert
entered regular baking temperatures to
convection baking temperatures.
The display will show the actual converted
(reduced) temperature. For example, if you enter a
regular recipe temperature of 350°F and touch the
START pad, the display will show CON
and the converted temperature of 325°F.
NOTE: This feature only converts cooking
temperatures, not cooking times.
To turn off this feature:
Touch the BROIL HI/LO and BAKE
pads at the same time for 3 seconds
until the display shows SF.
Touch the CONVECTION BAKE or
CONVECTION BAKE MULTI/1 RACK
pad (depending on model). The
display will show CON ON. Touch the
CONVECTION BAKE or CONVECTION
BAKE MULTI/1 RACK pad again. The
display will show CON OFF.
Touch the START pad.
To turn on this feature, repeat steps 1–3
above but touch the START pad when
CON ON is in the display.
(depending on model)
Special Oven Control Features
+
+
+
OR
– 10 –
Using the Clock and Timer
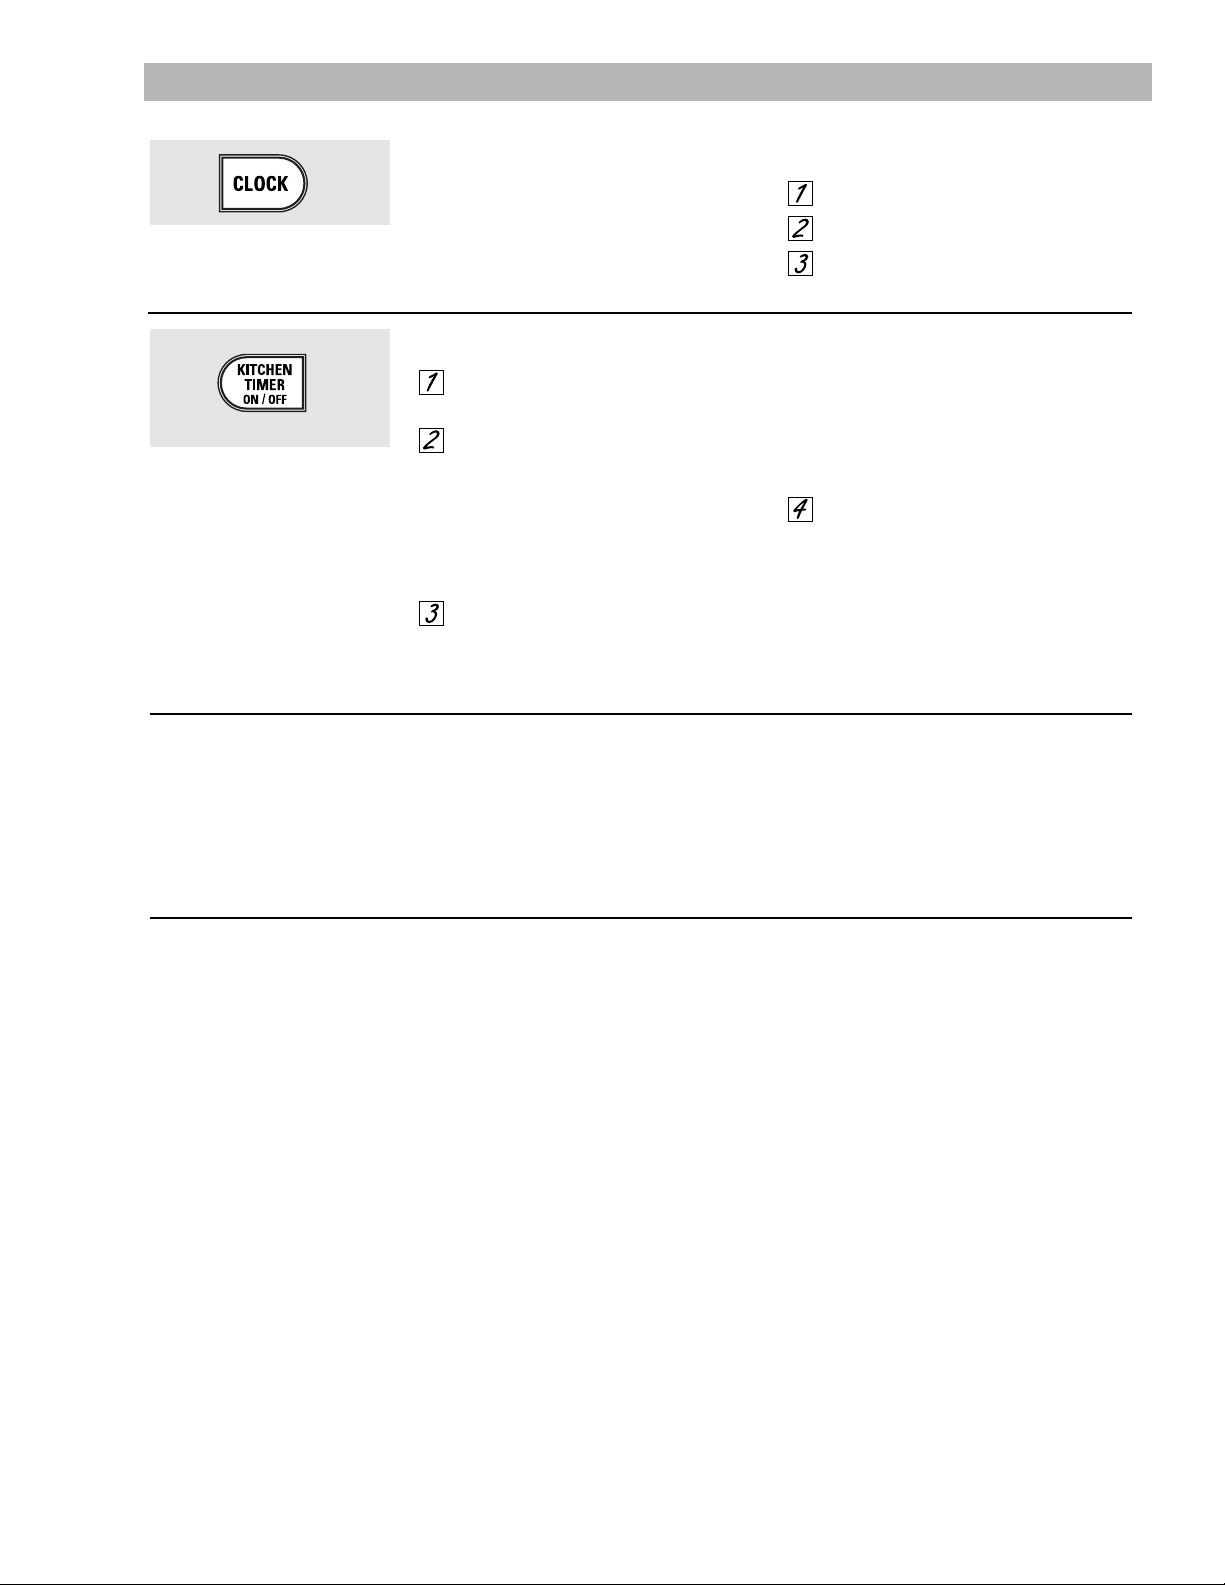
To Set the Clock
The clock must be set to the correct time
of day for the automatic oven timing
functions to work properly. The time of
day cannot be changed during a timed
baking or self-cleaning cycle.
Touch the CLOCK pad.
Touch the number pads.
Touch the START pad.
Make sure the clock is set to the
correct time of day.
To Set the Timer
Touch the KITCHEN TIMER
ON/OFF pad.
Touch the number pads until the
amount of time you want shows
in the display. For example, to set
2 hours and 45 minutes, touch 2, 4
and 5 in that order. If you make a
mistake touch the KITCHEN TIMER
ON/OFF pad and begin again.
Touch the START pad.
After touching the START pad, SET disappears;
this tells you the time is counting down, although
the display does not change until one minute has
passed. Seconds will not be shown in the display
until the last minute is counting down.
When the timer reaches :00, the
control will beep 3 times followed
by one beep every 6 seconds until
the KITCHEN TIMER ON/OFF pad
is touched.
The 6-second tone can be canceled by following
the steps in the Special features of your oven
control section under Tones at the End of a
Timed Cycle.
The timer is a minute timer only.
The timer does not control oven
operations. The maximum setting on
the timer is 9 hours and 59 minutes.
To Reset the Timer
If the display is still showing the time
remaining, you may change it by
touching the KITCHEN TIMER ON/OFF pad,
then touch the number pads until the
time you want appears in the display.
If the remaining time is not in the display
(clock, delay start or cooking time are in
the display), recall the remaining time by
touching the KITCHEN TIMER ON/OFF pad
and then touching the number pads to
enter the new time you want.
To Cancel the Timer
Touch the KITCHEN TIMER ON/OFF
pad twice.
– 11 –
NOTE: Foods that spoil easily—such as milk, eggs, fish, stuffings, poultry and pork—should not be allowed to sit for
more than 1 hour before or after cooking. Room temperature promotes the growth of harmful bacteria. Be sure that
the oven light is off because heat from the bulb will speed harmful bacteria growth.
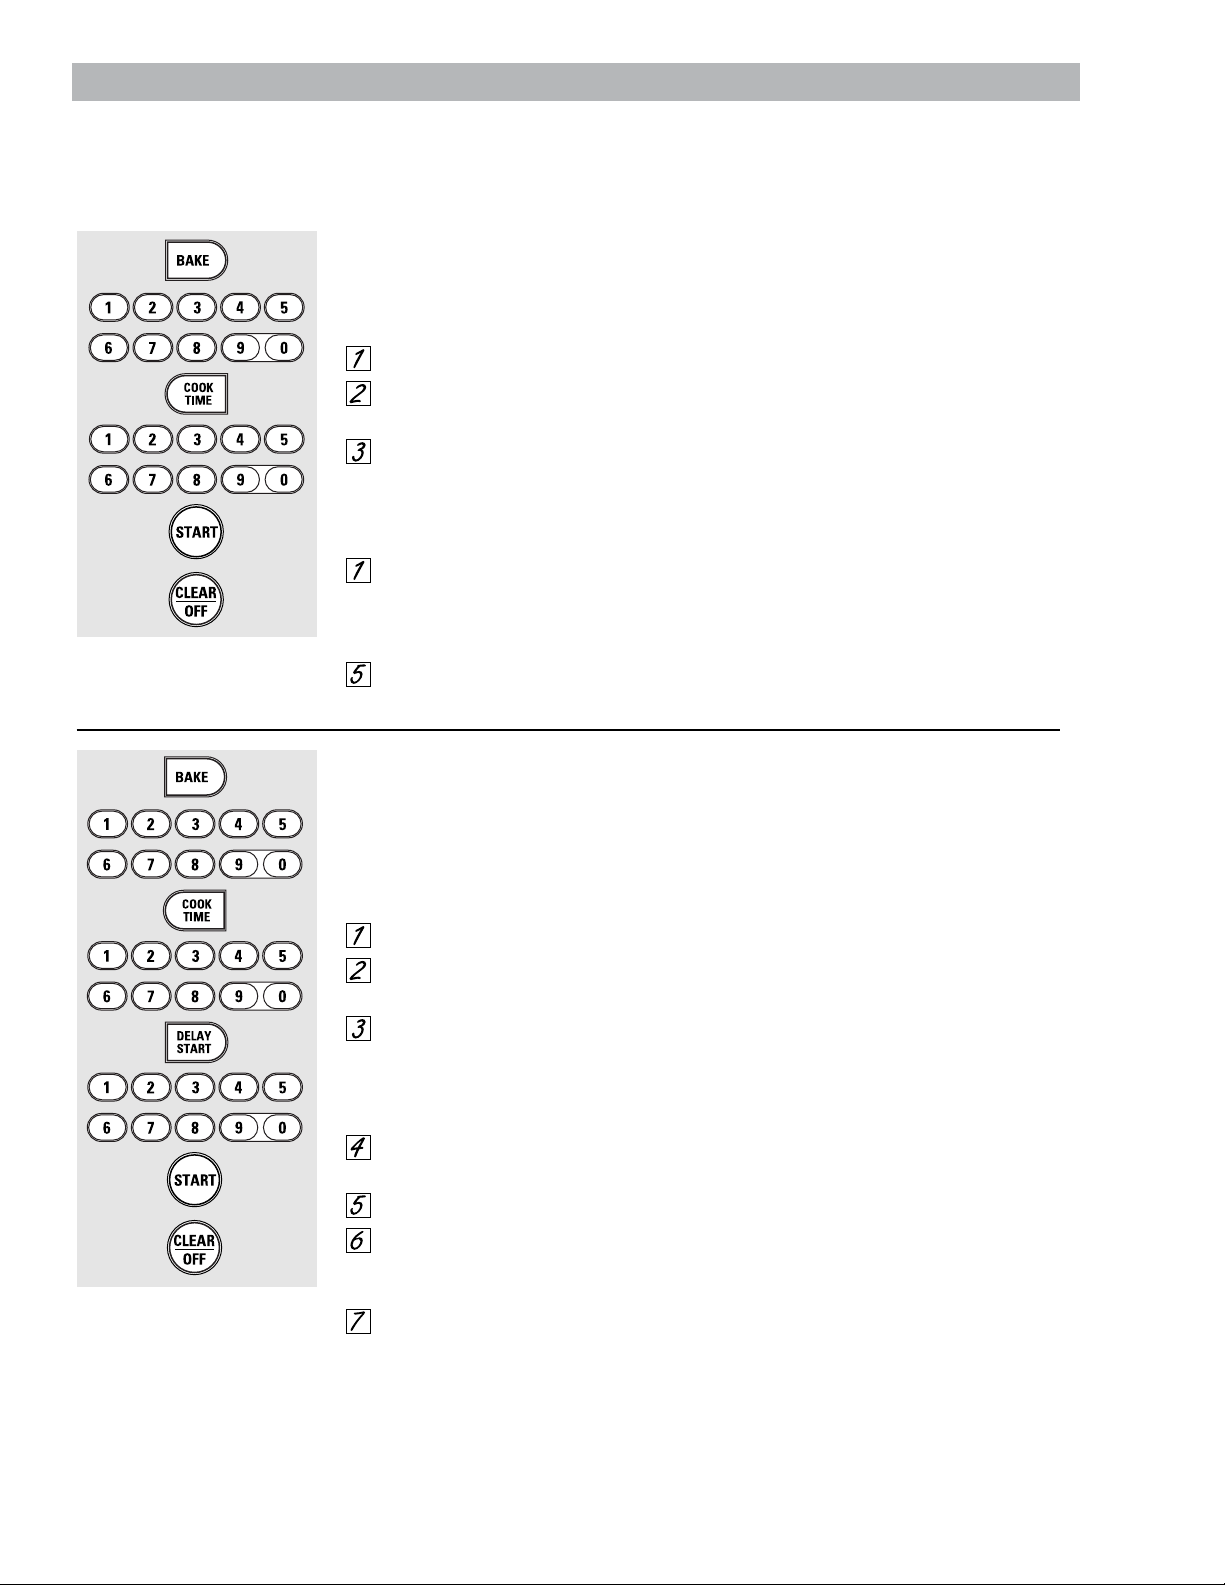
How to Set an Immediate Start and Automatic Stop
The oven will turn on immediately and cook for
a selected length of time. At the end of the
cooking time the oven will turn off automatically.
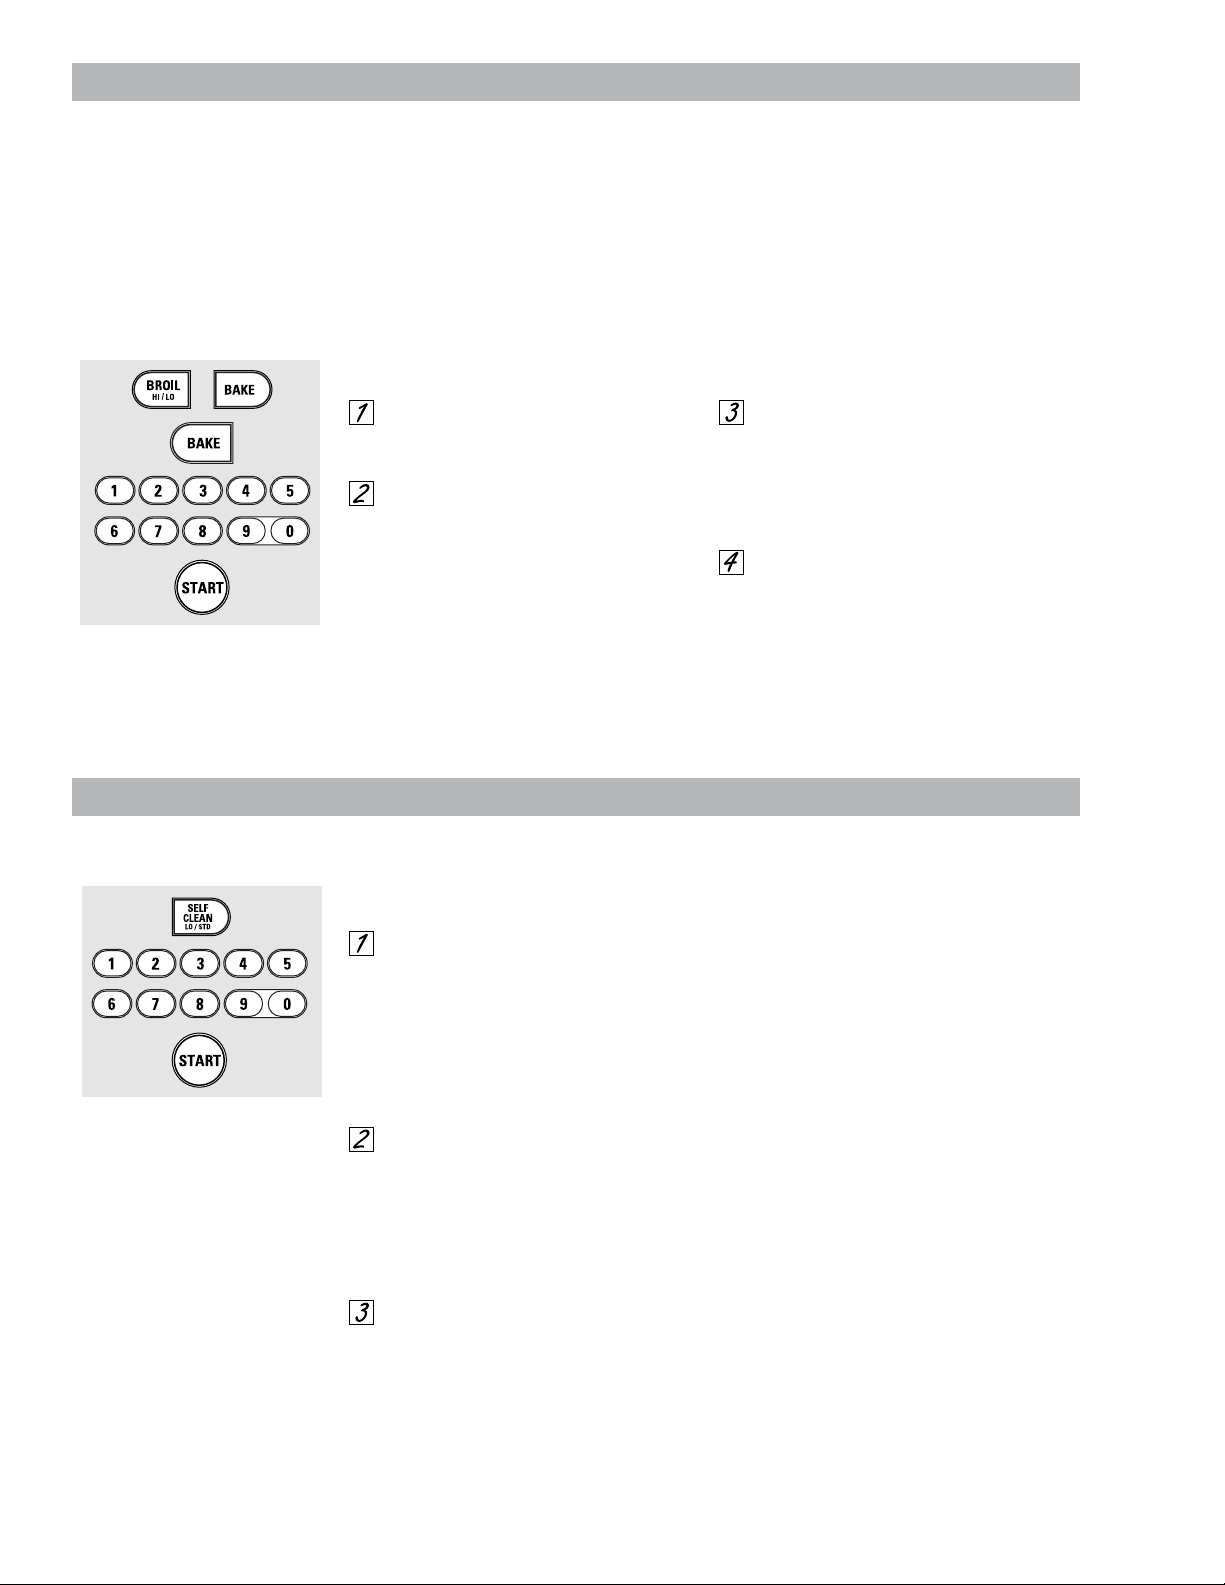
Touch the BAKE pad.
Using the number pads, enter the
desired temperature.
Touch the COOK TIME pad.
NOTE: If your recipe requires preheating, you
may need to add additional time to the length of
the cooking time.
Using the number pads, enter the
desired baking time. The oven
temperature and the cooking time
that you entered will be displayed.
Touch the START pad.
The display will show the changing
temperature (starting at 100ºF) and the
cooking time. The display starts changing
once the temperature reaches 100ºF.
The oven will continue to cook for the
programmed amount of time, then shut
off automatically, unless the WARM or
the Cook and Hold feature was set.
Depending on your model, see the How
to Set the Oven for Warming section or the
Special features of your oven control section.
Touch the CLEAR/OFF pad to clear the
display.
How to Set a Delayed Start and Automatic Stop
You can set the oven control to delay-start the
oven, cook for a specific length of time and then
turn off automatically.
Make sure the clock shows the correct
time of day.
Touch the BAKE pad.
Using the number pads, enter the
desired temperature.
Touch the COOK TIME pad.
NOTE: If your recipe requires preheating, you
may need to add additional time to the length of
the cooking time.
Using the number pads, enter the
desired baking time.
Touch the DELAY START pad.
Using the number pads, enter the
time of day you want the oven to
turn on and start cooking.
Touch the START pad.
NOTE: An attention tone will sound if you are
using timed baking and do not touch the START
pad after entering the baking temperature.
If you would like to check the times you
have set, touch the DELAY START pad to
check the start time you have set or touch
the COOK TIME pad to check the length
of cooking time you have set.
When the oven turns on at the time of
day you have set, the display will show the
changing temperature (starting at 100ºF)
and the cooking itme. The display starts
changing once the temperature reaches
100ºF.
The oven will continue to cook for the
programmed amount of time, then shut
off automatically, unless the WARM or
the Cook and Hold feature was set.
Depending on your model, see the How to
Set the Oven for Warming section or the
Special features of your oven control section.
Touch the CLEAR/OFF pad to clear the
display.
Using the Timed Baking and Roasting Features
– 12 –
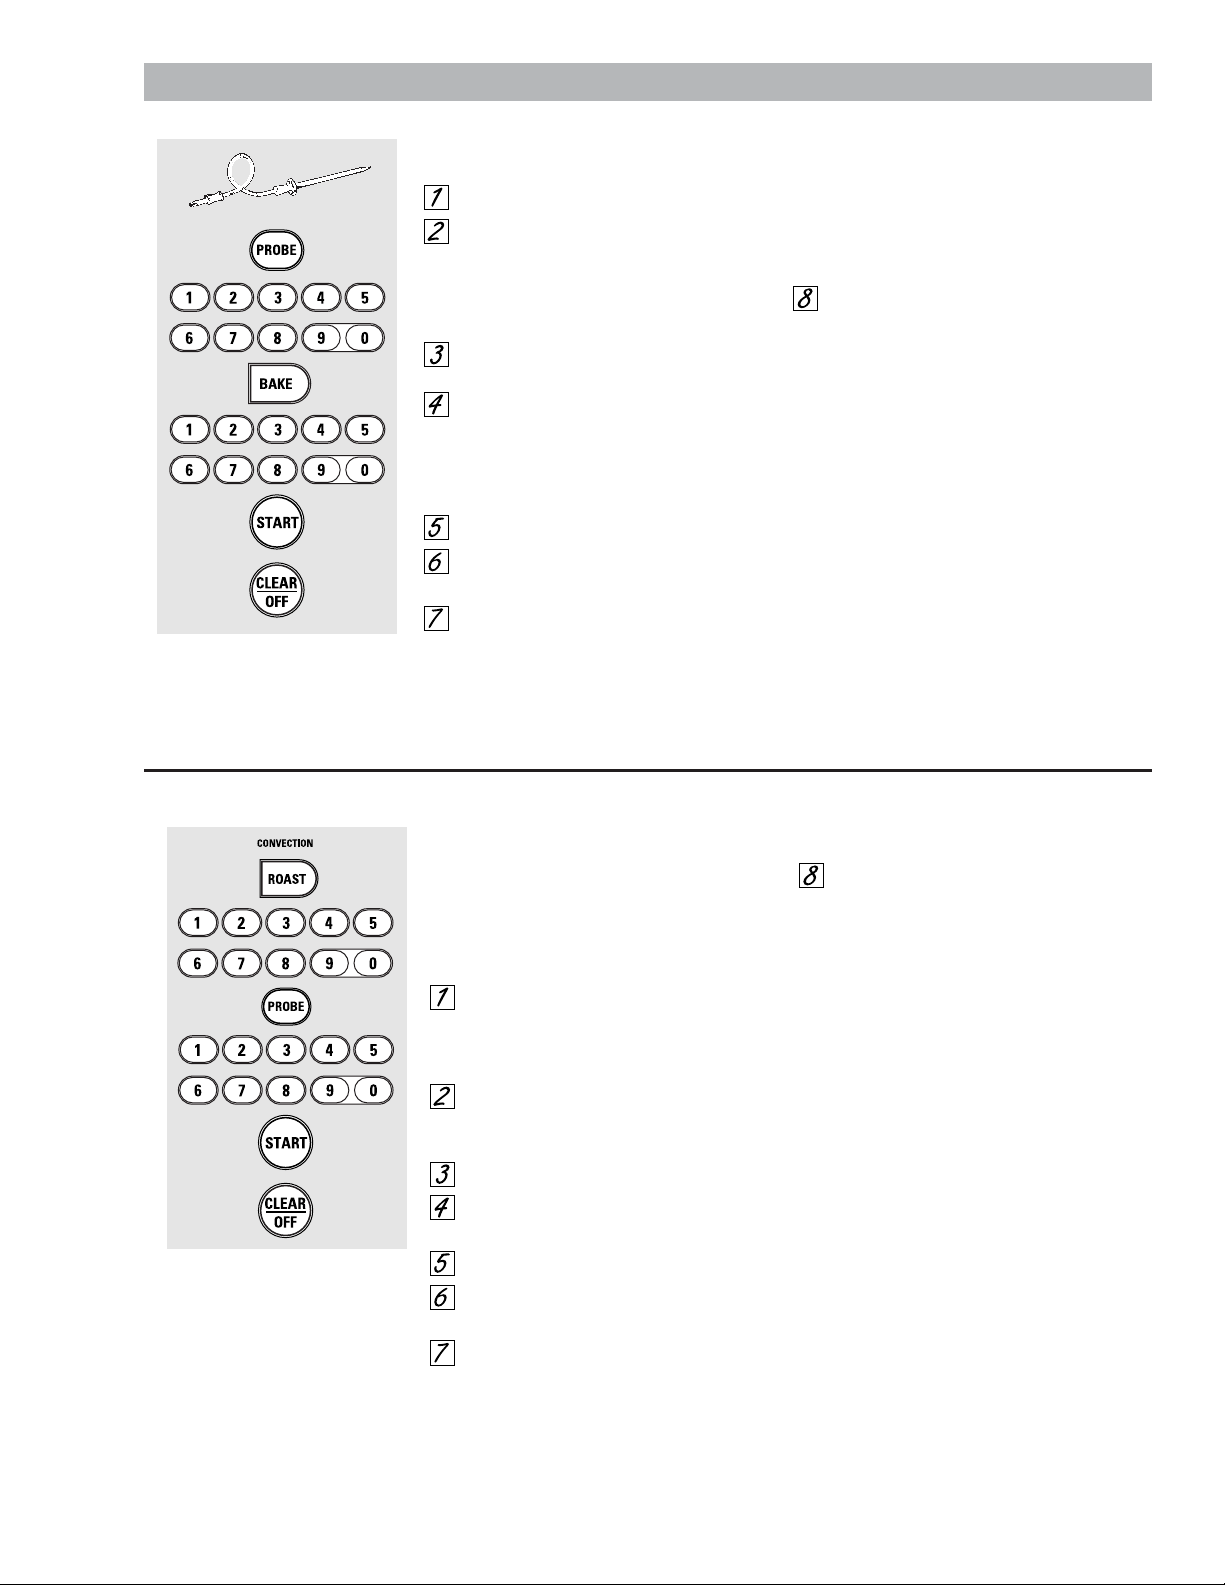
Insert the probe into the food.
Plug the probe into the outlet in the
oven. Make sure it’s pushed all the
way in. Close the oven door. Make
sure the probe cable is not touching
the broil element.
Touch the PROBE pad.
Touch the number pads to set the
desired internal food or meat
temperature. The maximum
internal temperature for the food
that you can set is 200ºF.
Touch the BAKE pad.
Touch the number pads to set the
desired oven temperature.
Touch the START pad.
The display will flash if the probe is inserted
into the outlet and you have not set a probe
temperature and touched the START pad.
After the internal temperature of the
food reaches 100°F, the changing
internal temperature will be shown in
the display.
When the internal temperature of
the food reaches the number you
have set, the probe and the oven
turn off and the oven control
signals. To stop the signal, touch the
CLEAR/OFF pad. Use hot pads to
remove the probe from the food.
Do not use tongs to pull on it—they
might damage it.
To change the oven temperature during
the Roast cycle, touch the BAKE pad and
then the number pads to set the new
temperature.
■ If the probe is removed from the food before
the final temperature is reached, a tone will
sound and the display will flash until the probe
is removed from the oven.
■ You can use the timer even though you
cannot use timed oven operations while
using the probe.
How to Set the Oven For Roasting When Using the Probe
(on some models)
Using the Probe
How to Set the Oven for Convection Roasting when Using the Probe
The display will flash PROBE and the
oven control will signal if the probe is
inserted into the outlet, and you have not
set a probe temperature and pressed the
START pad.
Place the oven rack in the position
that centers the food between the
top and bottom of the oven. Insert
the probe into the meat.
Plug the probe into the outlet in the
oven. Make sure it is pushed all the
way in. Close the oven door.
Touch the CONVECTION ROAST pad.
Touch the number pads to set the
desired oven temperature.
Touch the PROBE pad.
Touch the number pads to set the
desired internal meat temperature.
Touch the START pad.
When the oven starts to heat, the word
LO will be in the display.
After the internal temperature of the meat
reaches 100°F, the changing internal
temperature will be shown in the display.
When the internal temperature of
the meat reaches the number you
have set, the probe and the oven
turn off and the oven control
signals. To stop the signal, touch the
CLEAR/OFF pad. Use hot pads to
remove the probe from the food.
Do not use tongs to pull on it—they
might damage it.
CAUTION:
To prevent possible burns,
do not unplug the probe from the oven outlet until
the oven has cooled. Do not store the probe in
the oven.
NOTE:
■ If the probe is removed from the food before
the final temperature is reached, a tone will
sound and the display will flash until the probe
is removed from the oven.
■ You will hear a fan while cooking with this
feature. The fan will stop when the door is
opened, but the heat will not turn off.
■ You can use the kitchen timer even though you
cannot use timed oven operations.
To change the oven temperature
during the Convection Roast cycle,
touch the CONVECTION ROAST pad
and then touch the number pads to
set the new desired temperature.
– 13 –
You will hear a fan while cooking with these features. The fan will stop when the door is opened, but the heat
will not turn off.
NOTE: Foods that spoil easily—such as milk, eggs, fish, stuffings, poultry and pork—should not be allowed to
sit for more than 1 hour before or after cooking. Room temperature promotes the growth of harmful bacteria.
Be sure that the oven light is off because heat from the bulb will speed harmful bacteria growth.
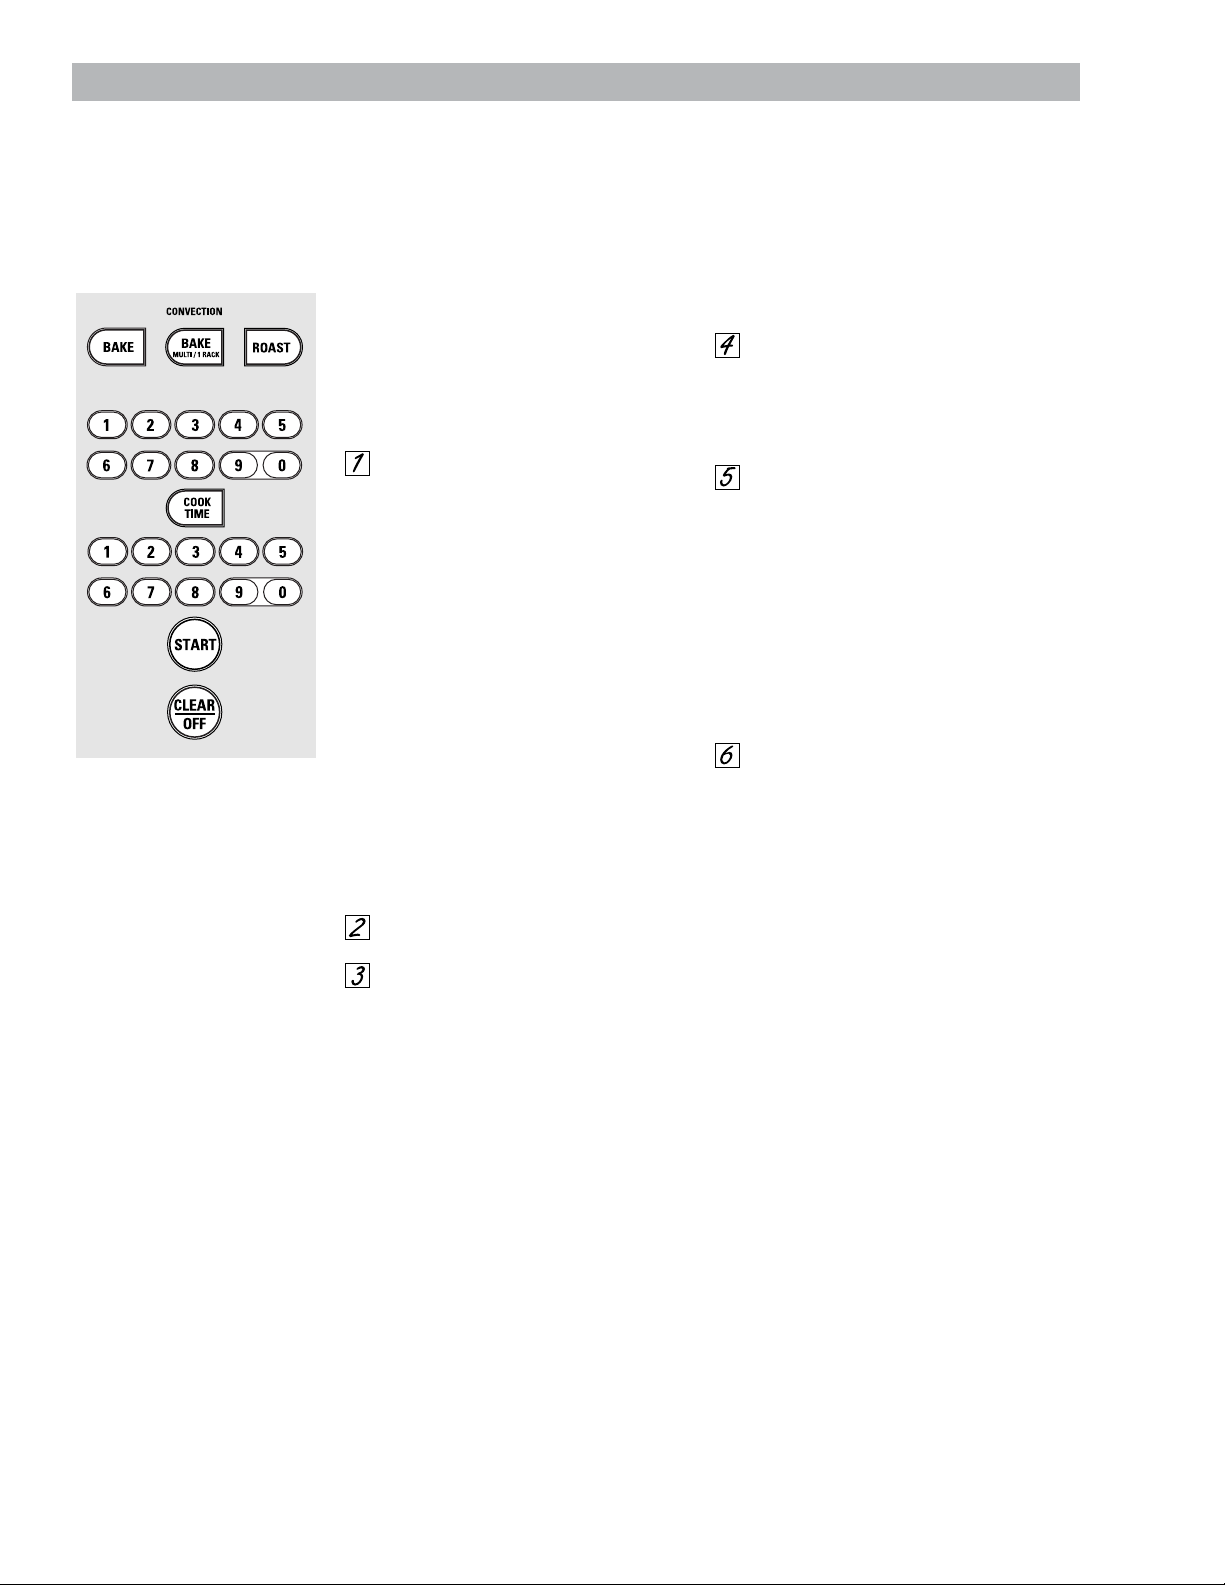
How to Set an Immediate Start and Automatic Stop
The oven will turn on immediately and cook for a
selected length of time. At the end of the cooking
time, the oven will turn off automatically.
Make sure the clock shows the correct time
of day.
Touch the CONVECTION BAKE
MULTI/1 RACK pad once
(CONVECTION BAKE MULTI mode)
for multi-rack convection baking.
This mode is used for cooking food
items on more than one rack (i.e., 2,
3 or more racks) at the same time in
convection bake. See Multi-Rack
Baking section for more information.
Touch the CONVECTION BAKE MULTI/
1 RACK pad twice (CONVECTION BAKE
1 RACK mode) for one rack
convection baking. This mode is used
for cooking food items on only one
rack in convection bake.
NOTE: On some models, there is only
a
CONVECTION BAKE pad which
works for both one-rack and multirack convection baking.
Touch the CONVECTION ROAST pad
for convection roasting.
T
ouch
the number pads to set the
desired oven temperature.
T
ouch
the COOK TIME pad.
NOTE: If your recipe requires preheating, you may
need to add addtional time to the length of the
cooking time.
Touch the number pads to set the
desired length of cooking time. The
minimum cooking time you can set
is 1 minute. The oven temperature
that you set and the cooking time that
you entered will be in the display.
Touch the START pad.
The display will show the changing
temperature (starting at 100°F) and the
cooking time. The display starts changing
once the temperature reaches 100°F.
The oven will continue to cook for the
programmed amount of time, then shut
off automatically, unless the WARM
or
the Cook and Hold feature was set.
Depending on your model, see the How to
Set the Oven for Warming section or the
Special features of your oven control section.
Touch the CLEAR/OFF pad to clear
the display if necessary. Remove
the food from the oven. Remember,
even though the oven turns off
automatically, food left in the oven
will continue cooking after the oven
turns off.
(depending on model)
Using the Timed Features for Convection Cooking
OR
OR
– 14 –
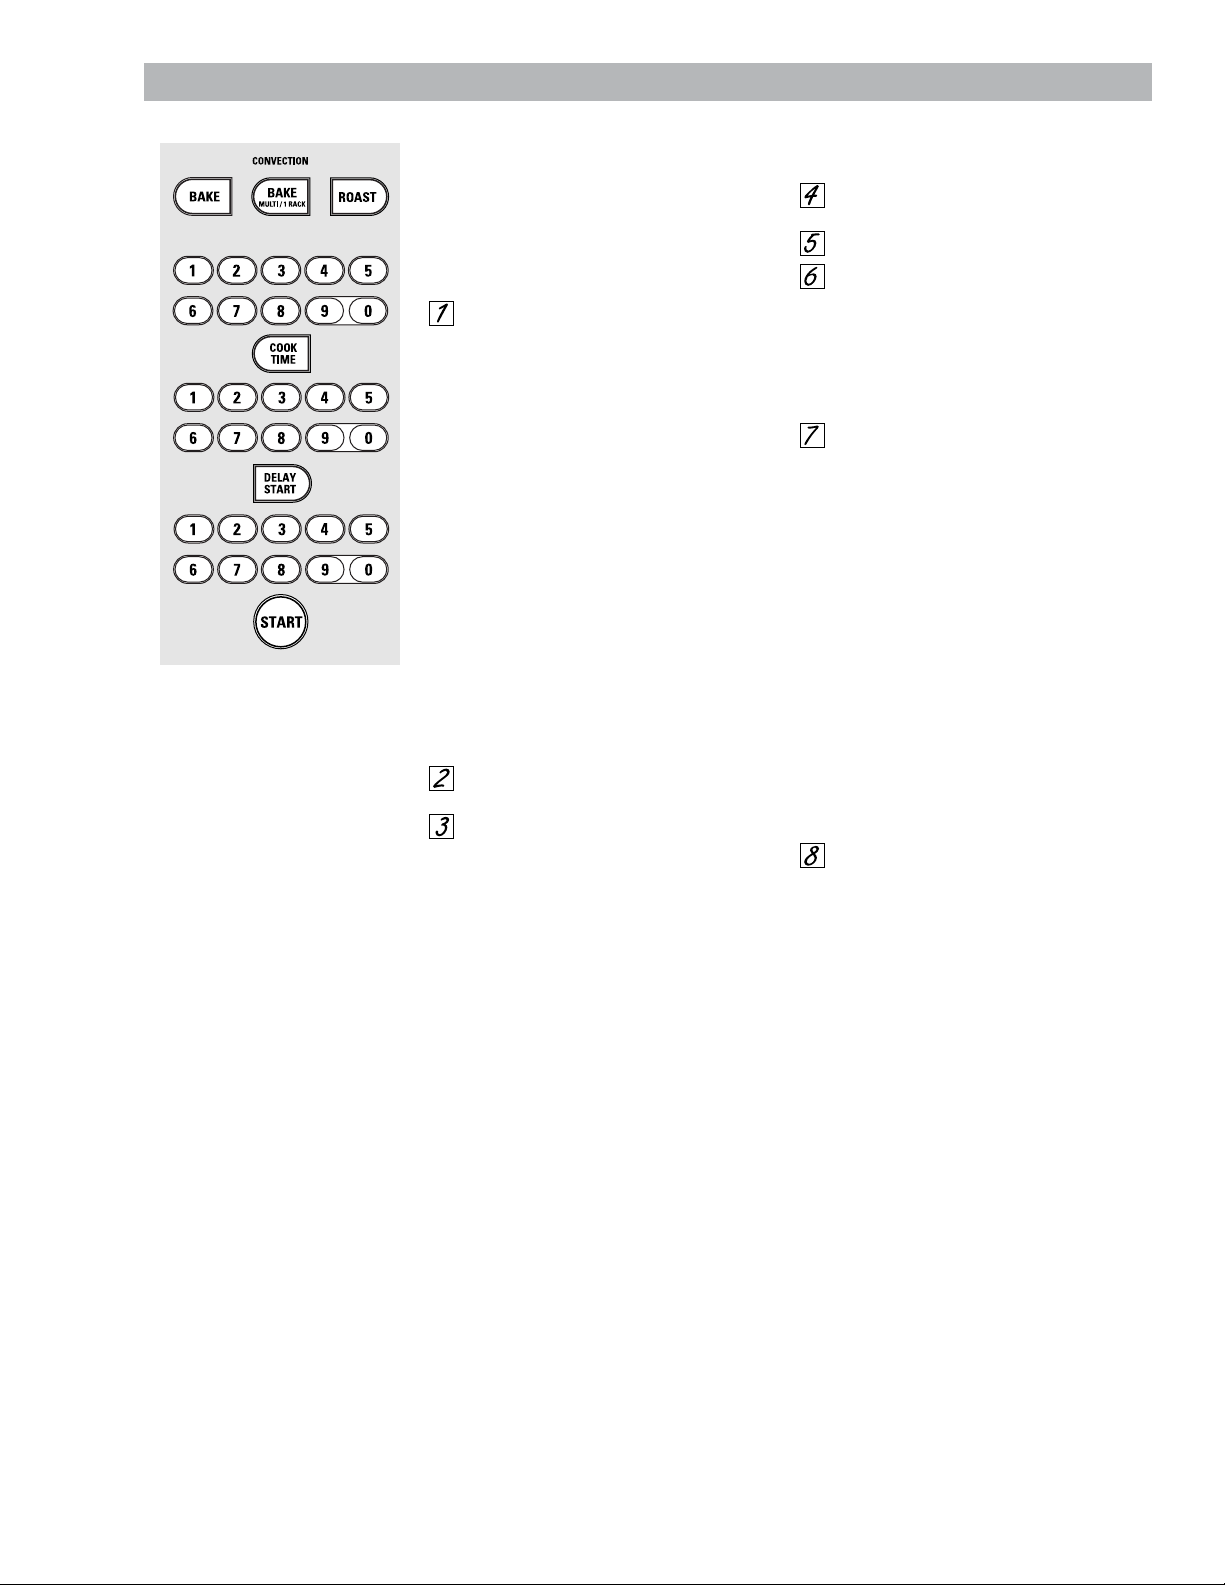
How to Set a Delayed Start and Automatic Stop
You can set the oven control to delay-start the oven,
cook for a specific length of time and then turn off
automatically.
Make sure the clock shows the correct time
of day.
Touch the CONVECTION BAKE
MULTI/1 RACK pad once
(CONVECTION BAKE MULTI mode)
for multi-rack convection baking.
This mode is used for cooking food
items on more than one rack (i.e., 2,
3 or more racks) at the same time in
convection bake. See Multi-Rack
Baking section for more information.
Touch the CONVECTION BAKE MULTI/
1 RACK pad twice (CONVECTION BAKE
1 RACK mode) for one rack
convection baking. This mode is used
for cooking food items on only one
rack in convection bake.
NOTE: On some models, there is only
a
CONVECTION BAKE pad which
works for both one-rack and multirack convection baking.
Touch the CONVECTION ROAST pad
for convection roasting.
Touch the number pads to set the
desired oven temperature.
Touch the COOK TIME pad.
NOTE: If your recipe requires preheating, you may
need to add additional time to the length of the
cooking time.
Touch the number pads to set the
desired cooking time.
Touch the DELAY START pad.
Touch the number pads to set the
time of day you want the oven to turn
on and start cooking.
If you would like to check the times you have set,
touch the DELAY START pad to check the start time
you have set, or touch the COOK TIME pad to
check the length of cooking time you have set.
Touch the START pad.
NOTE: An attention tone will sound if you are
using timed baking or roasting and do not touch
the START pad after entering the baking or
roasting temperature.
When the oven turns on at the time
of day you have set, the display will
show the changing temperature
(starting at 100°F) and the cooking time.
The display starts changing once the
temperature reaches 100°F.
The oven will continue to cook for the
programmed amount of time, then shut
off automatically, unless the WARM
or the
Cook and Hold feature was set.
Depending on your model, see the How to
Set the Oven for Warming section or the
Special features of your oven control section.
Touch the CLEAR/OFF pad to clear
the display if necessary. Remove
the food from the oven. Remember,
even though the oven shuts off
automatically, food left in the oven
will continue cooking after the oven
turns off.
OR
OR
(depending on model)
Using the Timed Features for Convection Cooking
– 15 –

Using the Convection Oven
How to Set the Oven for Convection Baking or Roasting
OR
(depending on model)
OR
Touch the CONVECTION BAKE
MULTI/1 RACK pad once
(CONVECTION BAKE MULTI mode)
for multi-rack convection baking.
This mode is used for cooking food
items on more than one rack (i.e., 2,
3 or more racks) at the same time in
convection bake
Touch the CONVECTION BAKE MULTI/
1 RACK pad twice (CONVECTION BAKE
1 RACK mode) for one rack
convection baking. This mode is used
for cooking food items on only one
rack in convection bake.
NOTE: On some models, there is only
a
CONVECTION BAKE
works for both one-rack and multirack convection baking.
Touch the CONVECTION ROAST pad
for convection roasting.
pad which
Touch the number pads to set the
desired oven temperature.
Touch the START pad.
To change the oven temperature, touch
the CONVECTION BAKE MULTI/1 RACK,
CONVECTION BAKE (depending on
model) or CONVECTION ROAST pad and
then the number pads to set the new
temperature.
When the oven starts to heat, the
changing temperature, starting at 100°F,
will be displayed. When oven reaches the
temperature you set, 3 beeps will sound.
Touch CLEAR/OFF pad when
finished.
■ You will hear a fan while cooking with
convection. The fan will stop when the door is
opened, but the heat will not turn off.
■ You may hear the oven clicking during
baking. This is normal.
Using the Proofing and Warming Features
The proofing feature maintains a warm environment useful for rising yeast-leavened products.
How to Set the Oven For Proofing (on some models)
Place the covered dough in a dish in
the oven on shelf B or C.
NOTE: For best results, cover the dough with a
cloth or with greased plastic wrap (the plastic
may need to be anchored underneath the
container so the oven fan will not blow it off).
Touch the PROOF pad and then the
START pad.
The display will read PrF (proof).
The oven interior light turns on and
remains on during proofing.
The proofing feature automatically
provides the optimum temperature for
the proofing process, and therefore does
not have a temperature adjustment.
Set the KITCHEN TIMER ON/OFF for
the minimum proof time.
When proofing is finished, touch
the CLEAR/OFF pad.
■ To avoid lowering the oven temperature
and lengthening proofing time, do not
open the oven door unnecessarily.
■ Check bread products early to avoid
over-proofing.
NOTE:
■ Do not use the proofing mode for warming
food or keeping food hot. The proofing oven
temperature is not hot enough to hold foods
at safe temperatures. Use the WARM or the
Cook and Hold feature (depending on model) to
keep food warm.
■ Proofing will not operate when oven is above
125°F. “HOT” will show in the display.
– 16 –
How to Set the Oven For Warming
(on some models)
The WARM feature keeps cooked
foods hot.
This feature is not designed to reheat
cold food.
To use the WARM feature, touch the
WARM pad and then the START pad.
To use the WARM feature after Timed
Baking or Roasting, follow these steps:
Touch the mode of cooking that
you want to use (BAKE, CONVECTION
BAKE MULTI, CONVECTION BAKE
1 RACK or CONVECTION ROAST).
Touch the number pads to set the
oven temperature.
Touch the COOK TIME pad.
Touch the number pads to set the
desired length of cooking time.
Touch the WARM pad.
Touch the START pad.
To Crisp Stale Items
■ Place food in low-sided dishes or pans.
■ For best results, place the food items in
a single layer. Do not stack.
■ Leave them uncovered.
■ Check crispness after 20–30 minutes.
Add time as needed.
IMPORTANT NOTES:
■ Food should be kept hot in its cooking
container or transferred to a heat-safe
serving dish.
■ For moist foods, cover them with an oven-safe
lid or aluminum foil.
■ Fried or crisp foods do not need to be covered,
but can become too dry if warmed for too long.
■ Repeated opening of the door allows the hot
air to escape and the food to cool.
■ Allow extra time for the temperature inside the
oven to stabilize after adding items.
■ With large loads it may be necessary to cover
some of the cooked food items.
■ Remove serving spoons, etc., before placing
containers in the oven.
■ Do not use plastic containers, lids or plastic
wrap.
CAUTION:
Plastic containers, lids
or plastic wrap will melt if placed in the oven.
Melted plastic may not be removable and is
not covered under your warranty.
Using the Proofing and Warming Features
– 17 –
Adjusting the Oven Thermostat
You may find that your new oven cooks differently than the one it replaced. Use your new oven for a few weeks to
become more familiar with it. If you still think your new oven is too hot or too cold, you can adjust the thermostat
yourself.
Do not use thermometers, such as those found in grocery stores, to check the temperature setting of your oven.
These thermometers may vary 20–40 degrees.
NOTE: This adjustment will only affect baking and roasting temperatures; it will not affect broiling, convection or
self-cleaning temperatures. The adjustment will be retained in memory after a power failure.
+
Touch the BROIL HI/LO and BAKE
pads at the same time for 3 seconds
until the display shows SF.
Touch the BAKE pad. A two digit
number shows in the display.
Touch BAKE again to alternate
between increasing and decreasing
the oven temperature.
The oven temperature can be
adjusted up to (+) 35ºF hotter or (-)
35ºF cooler. Touch the number pads
the same way you read them. For
example, to change the oven
temperature 15ºF, touch 1 and 5.
When you have made the
adjustment, touch the START pad to
go back to the time of day display.
Use your oven as you would
normally.
Using the Self-Cleaning Oven
To Adjust the Thermostat
The oven door must be closed and all controls set correctly for the cycle to work properly.
How to Set the Oven for Cleaning
Touch the SELF CLEAN LO/STD pad
once for a 4-hour clean time or
twice for a 3-hour clean time.
A 3-hour self-clean time is
recommended for use when
cleaning small, contained spills. A
self-clean time of 4 hours or longer
is recommended for a dirtier oven.
If a time other than 3 hours or
4 hours is needed, use the number
pads and enter the desired clean
time.
You can change the clean time to any
time between 3 hours and 5 hours,
depending on how dirty your oven is.
Touch the START pad.
When the LOCKED light goes off, you will
be able to open the door.
■ The word LOCKED will flash and the
oven control will signal if you set the
clean cycle and forget to close the oven
door.
■ To stop a clean cycle, touch the
CLEAR/OFF pad. When the LOCKED light
goes off indicating the oven has cooled
below the locking temperature, you
will be able to open the door.
The door locks automatically. The display
will show the clean time remaining. It will
not be possible to open the oven door
until the temperature drops below the
lock temperature and the LOCKED light
goes off.
– 18 –
How to Delay the Start of Cleaning
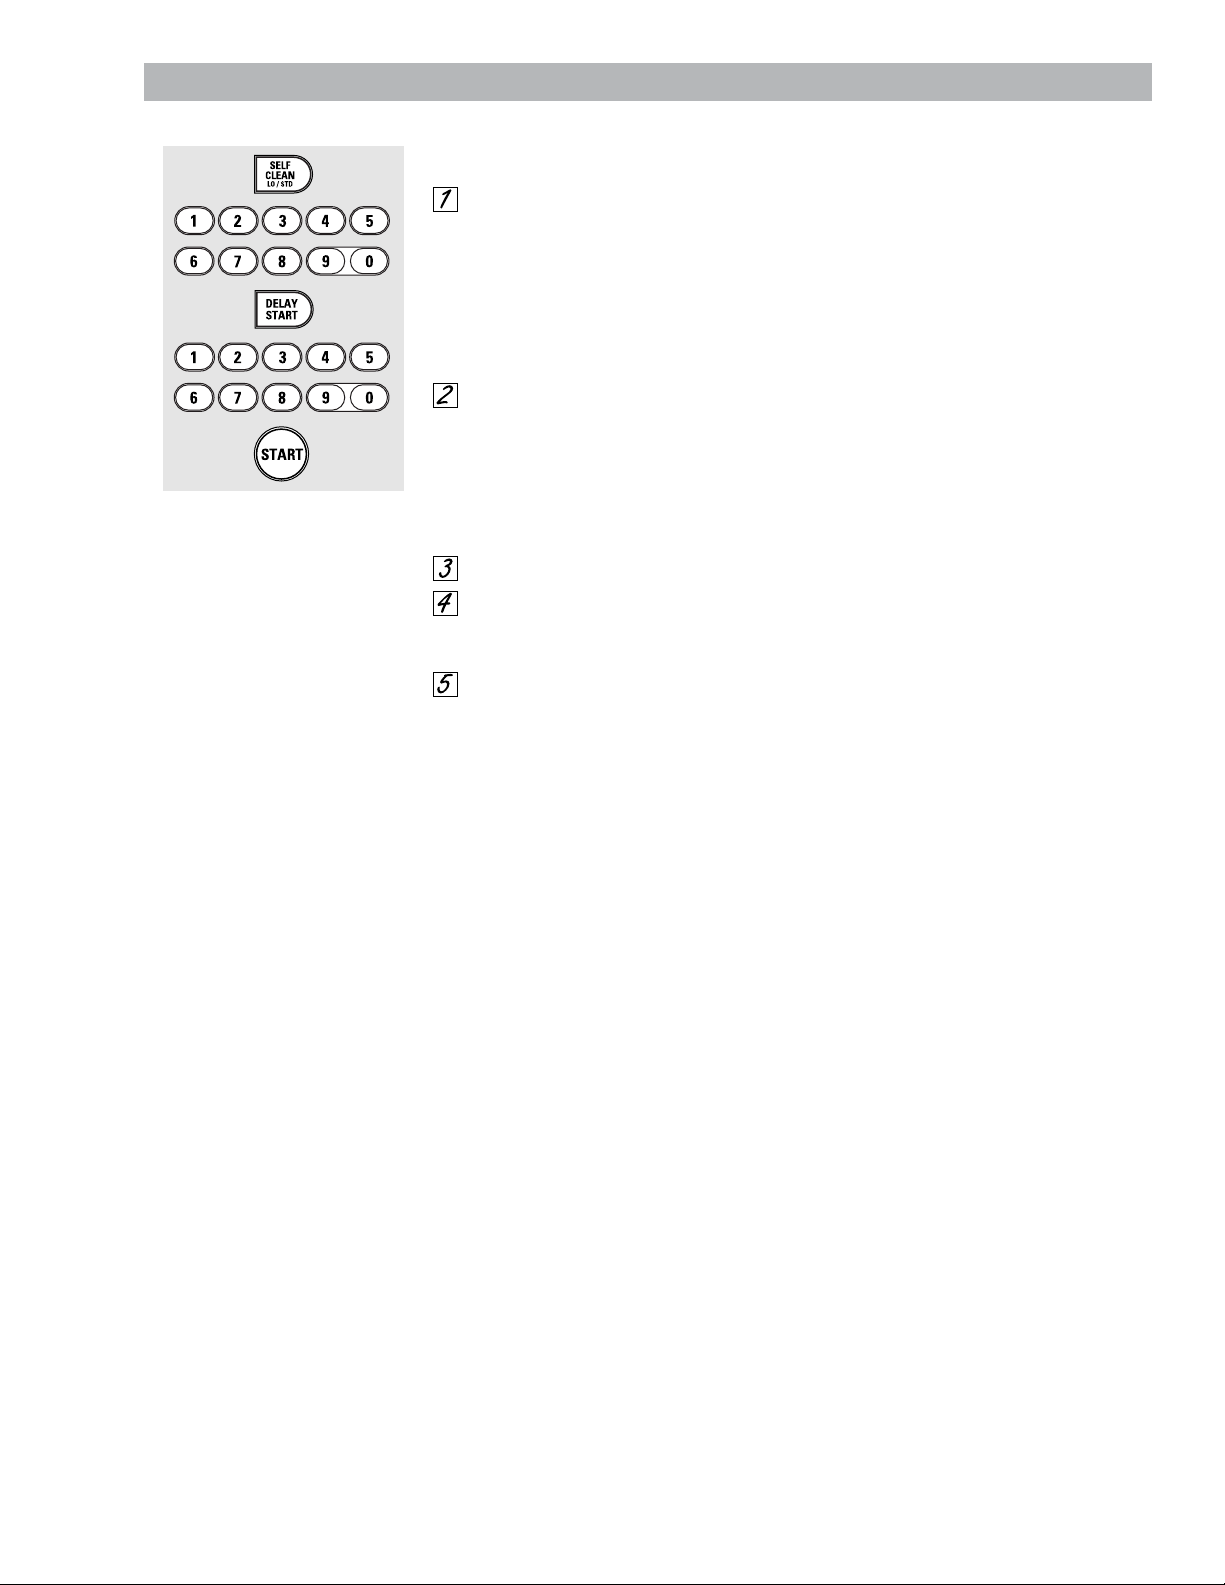
Touch the SELF CLEAN LO/STD pad
once for a 4-hour clean time or
twice for a 3-hour clean time.
A 3-hour self-clean time is
recommended for use when
cleaning small, contained spills. A
self-clean time of 4 hours or longer
is recommended for a dirtier oven.
If a time other than 3 hours or
4 hours is needed, use the number
pads and enter the desired clean
time.
You can change the clean time to any
time between 3 hours and 5 hours,
depending on how dirty your oven is.
Touch the DELAY START pad.
Using the number pads, enter the
time of day you want the clean cycle
to start.
Touch the START pad.
The door locks automatically. The
display will show the start time. It will
not be possible to open the oven door
until the temperature drops below the
lock temperature and the LOCKED light
goes off.
When the LOCKED light goes off, you will
be able to open the door.
Using the Self-Cleaning Oven
– 19 –
 Loading...