

GE Profile Arctica, Profile CustomStyle Installation Information
GE Profile Arctica® and GE CustomStyle™ side-by-side installation information & specifications
W3624
1/2" to 3/4" Side Panel
Side
Trim
Route
hand slot
before
installing
panel.
Select appr opriate
si
ze door pane l from
cabinet lin e.
W
A
T
E
R
C
R
U
S
H
E
D
C
U
B
E
D
R
E
S
E
T
W
A
T
E
R
F
I
L
T
E
R
HOLD 3 SECS
Q
U
I
C
K
I
C
E
L
I
G
H
T
D
O
O
R
A
L
A
R
M
L
O
C
K
C
O
N
T
R
O
L
HOLD 3 SECS
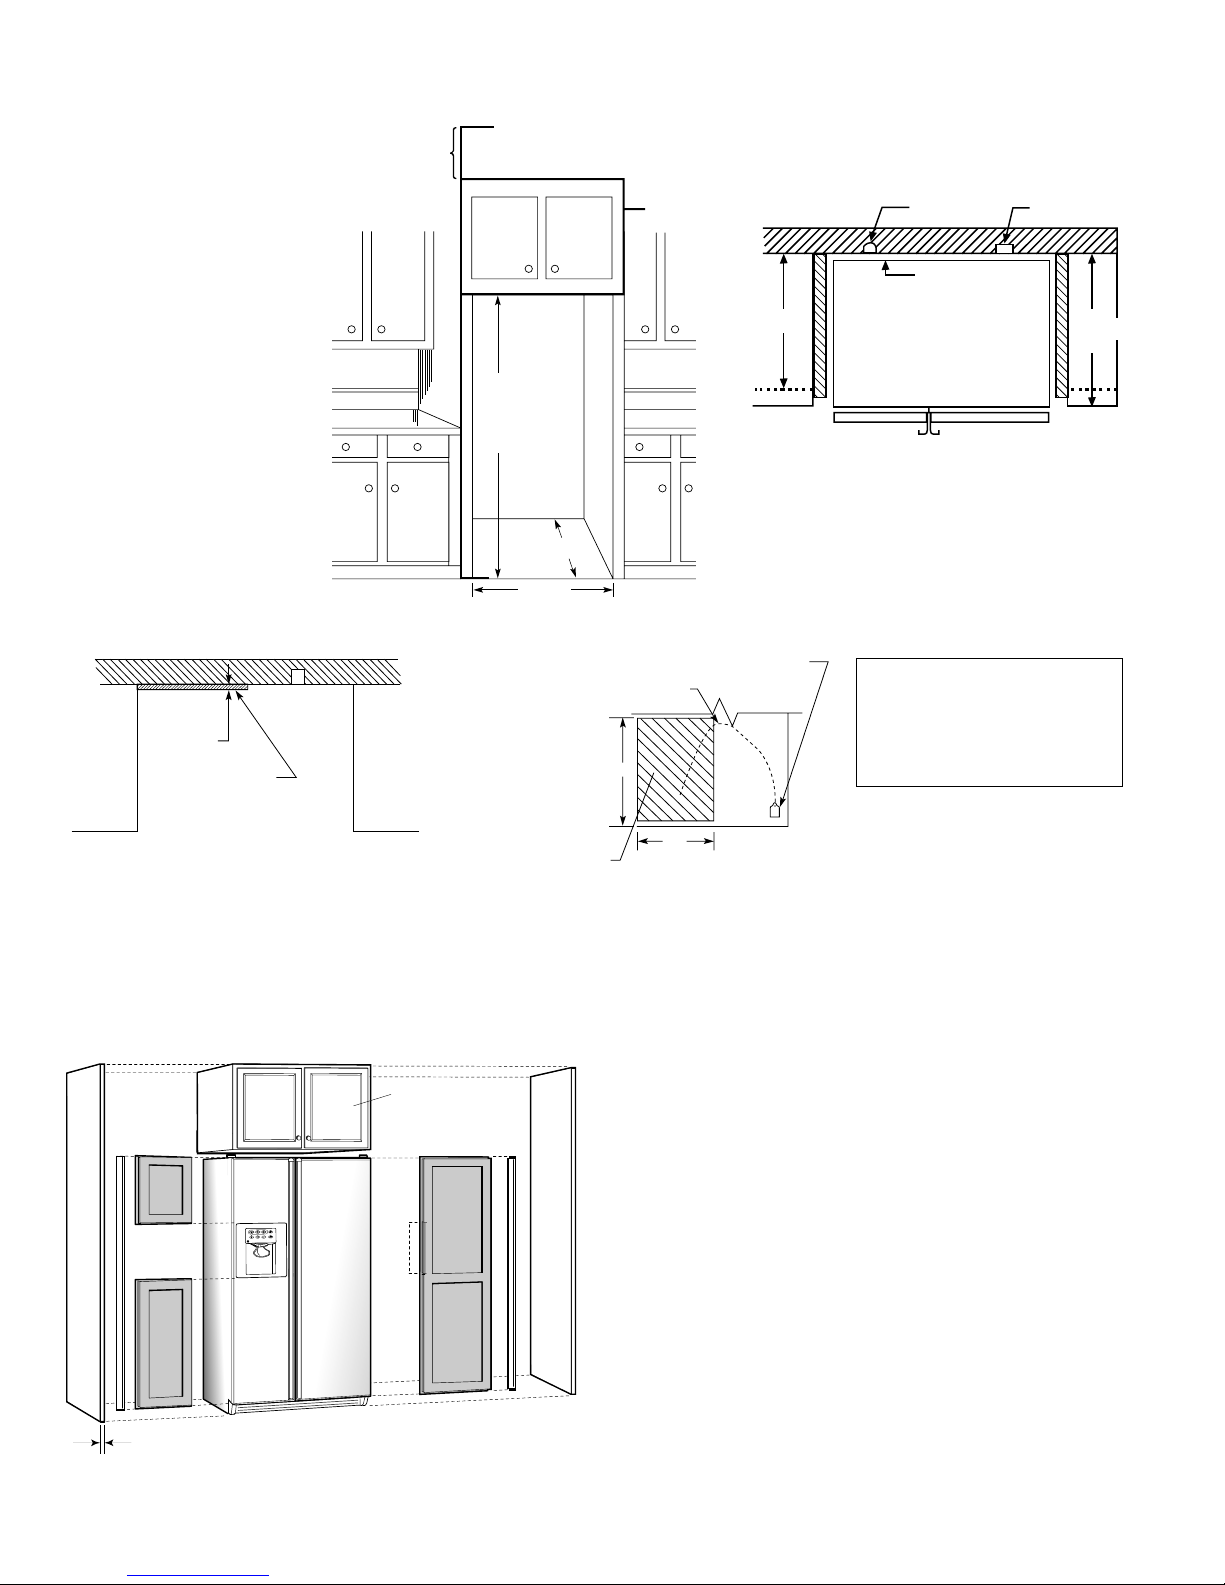
8' Ceiling
13" to 14"
Cabinet
12"
Soffit
36-1/8"
24-1/2"
70-1/4"*
23 cu. ft. models
72-1/4"*
25 cu. ft. models
8' Ceiling
13" to 14"
Cabinet
12"
Soffit
36-1/8"
24-1/2"
*The rough-in dimensions of 70-1/4"/72-1/4" are minimum and measured from
the finished floor to top of opening (or the underside of the overhead cabinets).
For Models with Trim Kit: If frameless style cabinets are planned for above the
refrigerator, you may need to consider adding a maximum of 1/4" (70-1/2") to
height of opening for 23 cu. ft. models and 1/8" (72-3/8") for 25 cu. ft. models
to allow additional clearance between cabinet doors and top of refrigerator trim
when cabinet doors are in open position.
70-1/4"*
23 cu. ft. models
72-1/4"*
25 cu. ft. models
25"
Counter
Top
ElectricalWater
3/4" Airspace
(1/2" Gap + 1/4"
Wall Plates)
24"
Cabinet
25"
Counter
Top
Electrical Water
3/4" Airspace
(1/2" Gap + 1/4"
Wall Plates)
24"
Cabinet
25"
Counter
Top
Electrica
lWater
3/4" Airspac
e
(1/2" Gap + 1/4"
Wall Plates
)
24"
Cabinet
25"
Counter
Top
Electrical Water
Trim
3/4" Airspace
(1/2" Gap + 1/4"
Wall Plates
)
24"
Cabinet
FOR 21 CUBIC FOOT MODELS
FOR 24 CUBIC FOOT MODEL
S
Alternate
water
line location
through floor
1/2"
Recommended water line
location using recess
in rear wall
Recommended single loop
of 1/4" copper water line
Water hook-up
on the refrigerator
Rear Wall View
Top View
18"
24"
Allow 48" minimum water
line to enable refrigerator
to be pulled forward
Alternate
water
line location
through floor
1/2"
Top View
Rough-in dimensions
Standard, new construction
and replacement installation
Installation tips to
maximize the built-in look
• All wall/floor molding should be
removed prior to installation.
• Water recess on rear wall
recommended to prevent water line
damage. 48" minimum length,
1/4"-diameter water line tubing
recommended.
• When possible, recess both copper
water line and electrical outlet
(see local codes).
• Front and rear leveling legs are
adjustable for the built-in look
(see owner’s manual).
• If optional collar trim kit is to be used
or anticipated, see collar trim
installation on next page for
different rough-in dimensions.
Installation of water outlets
Create a custom look for your GE Profile CustomStyle side-by-side refrigerator
Still another advantage offered by GE Profile CustomStyle Refrigerators is ease of
installation. For a refrigerator that does so much to enhance the beauty of your kitchen,
the “behind-the-scenes” preparation and installation are surprisingly simple.
Fabricating the enclosure
• The drawing shows an 84" cabinet elevation. Adjust dimensions accordingly for other
cabinet elevations.
• Cabinet pieces to order: (2) side panels and (1) wall cabinet.
• Side panels will typically be attached to adjacent cabinets and/or cleated to rear wall
and floor.
• Refer to GE refrigerator installation instructions for proper plumbing, and electrical and
air clearances.
• (1) Some framed cabinet lines will make a refrigerator enclosure with a cabinet 12" high
x 39" wide with sides and 1-1/2" face frame extended down to floor to create the
refrigerator space. This will replace the above construction. (2) A tall cabinet on either
side of the refrigerator can replace a side panel.
• Counter overhangs on either side of the refrigerator should have clipped corners to allow
for full door swing.
• If the refrigerator has a wall returning beyond the front of the refrigerator on either side,
a 2" tall filler will help allow for movement of the door.
Door Panels
• See drawings for exact dimensions of the fresh-food and freezer door panels.
• Refrigerator door fronts from stock and most semi-custom cabinet manufacturers will
be supplied as 1/4"-thick panels cut to dimensions, with closest available
standard door sizes applied to front.
– This will leave a “reveal” at top/bottom and sides. Width of “reveal” will depend
on manufacturer’s standard door sizes.
– Door will be affixed on the 1/4" panels at factory or in the field by the local
supplier, depending on manufacturer.
• Local shop-built or custom cabinet supplier may fabricate custom 3/4" panels.
In this case, edges must be routed.
• Follow notes on drawing to assure room for fingers/hands to open handles.
IMPORTANT: Before finalizing specifications
for your GE Profile CustomStyle Refrigerator,
please NOTE:
• A minimum width of 36" is required for
refrigerator installation
• Be sure to allow for 1/2" or 3/4" side panels
in addition to the 36" minimum
Overhead
Cabinet
Cabinet
Door
Top Trim
Case
1"
Magnetic
Tape
3/4" Cabinet
Side Panel
1/2" Cabinet
Side Panel
Side trim must be installed
flush with the gasket contact
surface on the case.
Refrigerator
Case
Side TrimDoor Gasket
70-1/4"*
23 cu. ft. models
72-1/4"*
25 cu. ft. models
36-1/8"
24-1/2"
1/2" minimum
*The rough-in dimensions of 70-1/4"/72-1/4" are minimum and measured from
the finished floor to top of opening (or the underside of the overhead cabinets).
For Models with Trim Kit: If frameless style cabinets are planned for above
the refrigerator, you may need to consider adding a maximum of 1/4" (70-1/2")
to height of opening for 23 cu. ft. models and 1/8" (72-3/8") for 25 cu. ft. models
to allow additional clearance between cabinet doors and top of refrigerator trim
when cabinet doors are in open position.
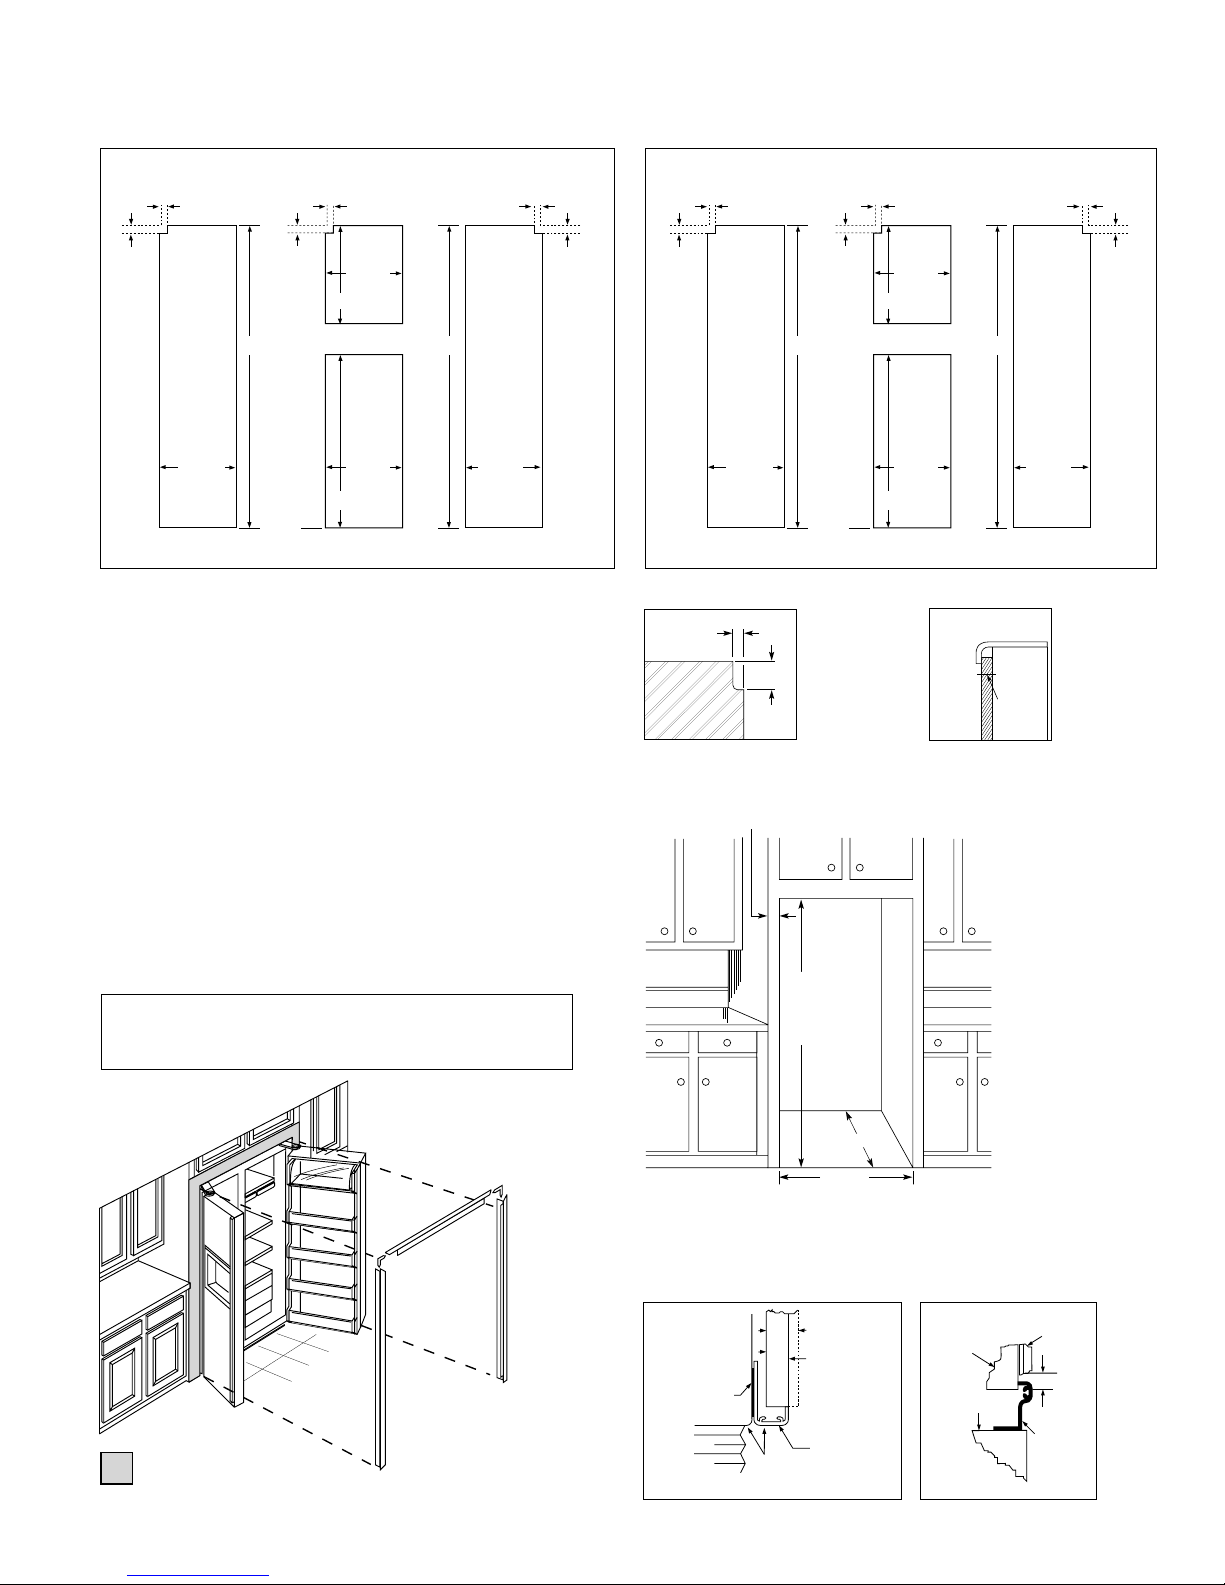
Door panel dimensions (in inches)
Freezer Panel
Without Dispenser
Freezer Panel
With Dispenser
Fresh Food
Pane
l
Cut
out
1/8 1/8
14-15/32
14-15/32
14-15/32
33-5/8
17-7/8
19-15/32
5/16
Cut
out
Cut
out
1/8
5/16 5/16
FRONT
67-9/32
67-9/32
FRONT FRONT
5/16"
1/8"
1/4" Max.
Panels 1/4" thick
or less
Freezer Panel
Without Dispenser
Freezer Panel
With Dispenser
Fresh Food
Pane
l
Cut
out
1/8 1/8
14-15/32
14-15/32
14-15/32
36-1/4
17
19-15/32
5/16
Cut
out
Cut
out
1/8
5/16 5/16
FRONT
6969
FRONT FRONT
23 cu. ft. models 25 cu. ft. models
ge.com
Freezer panel
without dispenser
Freezer panel
with dispenser
Fresh food
panel
Order your own custom wood panels to match cabinetry or other decor.
Panels up to 1/4" thick will fit door frame with no special preparation. Add filler behind
material thinner than 1/4" for proper fit.
Weight Limits: Total weight of panels (i.e., both freezer panels)—Fresh Food = 38 lbs.,
Freezer = 28 lbs.
Note: Panels up to 3/4" will require special routing area around handles.
Dimensions may vary depending on depth of panel.
Collar trim installation
An enclosure is required to match up to the trim (see Typical Installation). To obtain
the most integrated look, the cabinet or soffit above the refrigerator should extend out
to the same depth as the side panels. The refrigerator opening must have minimum
dimensions of 70-1/4" high x 36-1/8" wide x 24-1/2" deep for 23 cu. ft. models and
72-1/4" high x 36-1/8" wide x 24-1/2" for 25 cu. ft. models, as shown at right. If there is
an overhead cabinet, allow 1" for cabinet door clearance with the top trim piece so the
cabinet doors can be opened without hitting the top trim. If 1/2" side panels are used,
then side trim and panel will be even. If 3/4" side panels are used, then some of the side
panel will extend beyond the trim and must be finished.
IMPORTANT: Before finalizing specifications for your GE Profile CustomStyle
Refrigerator, please NOTE:
• A minimum width of 36-1/8" is required for refrigerator installation with collar
Freezer panel
without dispenser
Detail C
Fresh Food panel shown
Freezer panel
with dispenser
Notch required
at top corner
as noted.
Fresh food
panel
Typical Installation
Shaded areas represent front surfaces of side panels and
overhead cabinet or soffit that contacts trim.
 Loading...