

GE Profile Advantium PSB9240DFBB, Profile Advantium PSB9240DF, Profile Advantium PSB9240DFWW Dimension Manual
Specification Revised 7/13
240406
Listed by
Underwriters
Laboratories
PSB9240DF
GE Profile™ Series Advantium® 240V - 30 in. Wall Oven
For answers to your Monogram® or GE®
appliance questions, visit our website at
geappliances.com or call GE Answer Center®
service, 800.626.2000.
2x4’s or
equivalent
solid floor
25-1/8"
Cutout width
cabinet
width
Required
cutout location
36-3/4"
minimum
from floor
Junction box
location
(240-volt
models only)
4-3/16"
21-1/2"
To Back of Control
17-1/2"
Cutout height
A
B
23-1/2"
Cutout depth
Note: Cabinets installed adjacent
to wall ovens must have an adhesion
spec of at least 194° F temperature rating.
Construct Solid
Bottom Min.
3/8" Plywood
Supported by
2 x 4 or 1 x 2
Runners, all
Four Sides.
(Must Support
150 lbs.)
Conduit
(48-1/2"
long)
19-1/8"
29-3/4"
A=Allow 1" overlap of oven over bottom edge of cutout.
B=Allow 11/16"-3/4" for overlap of oven over side edges of cutout.
Note: Cabinets
installed adjacent
to wall ovens must
have an adhesion
spec of at least a
194°F temperature
rating.
Note: 2" minimum
between cutouts
when installed
above warming
drawer or single
wall oven.
Installation
Information:
Before installing,
consult installation
instructions packed
with product for current
dimensional data.
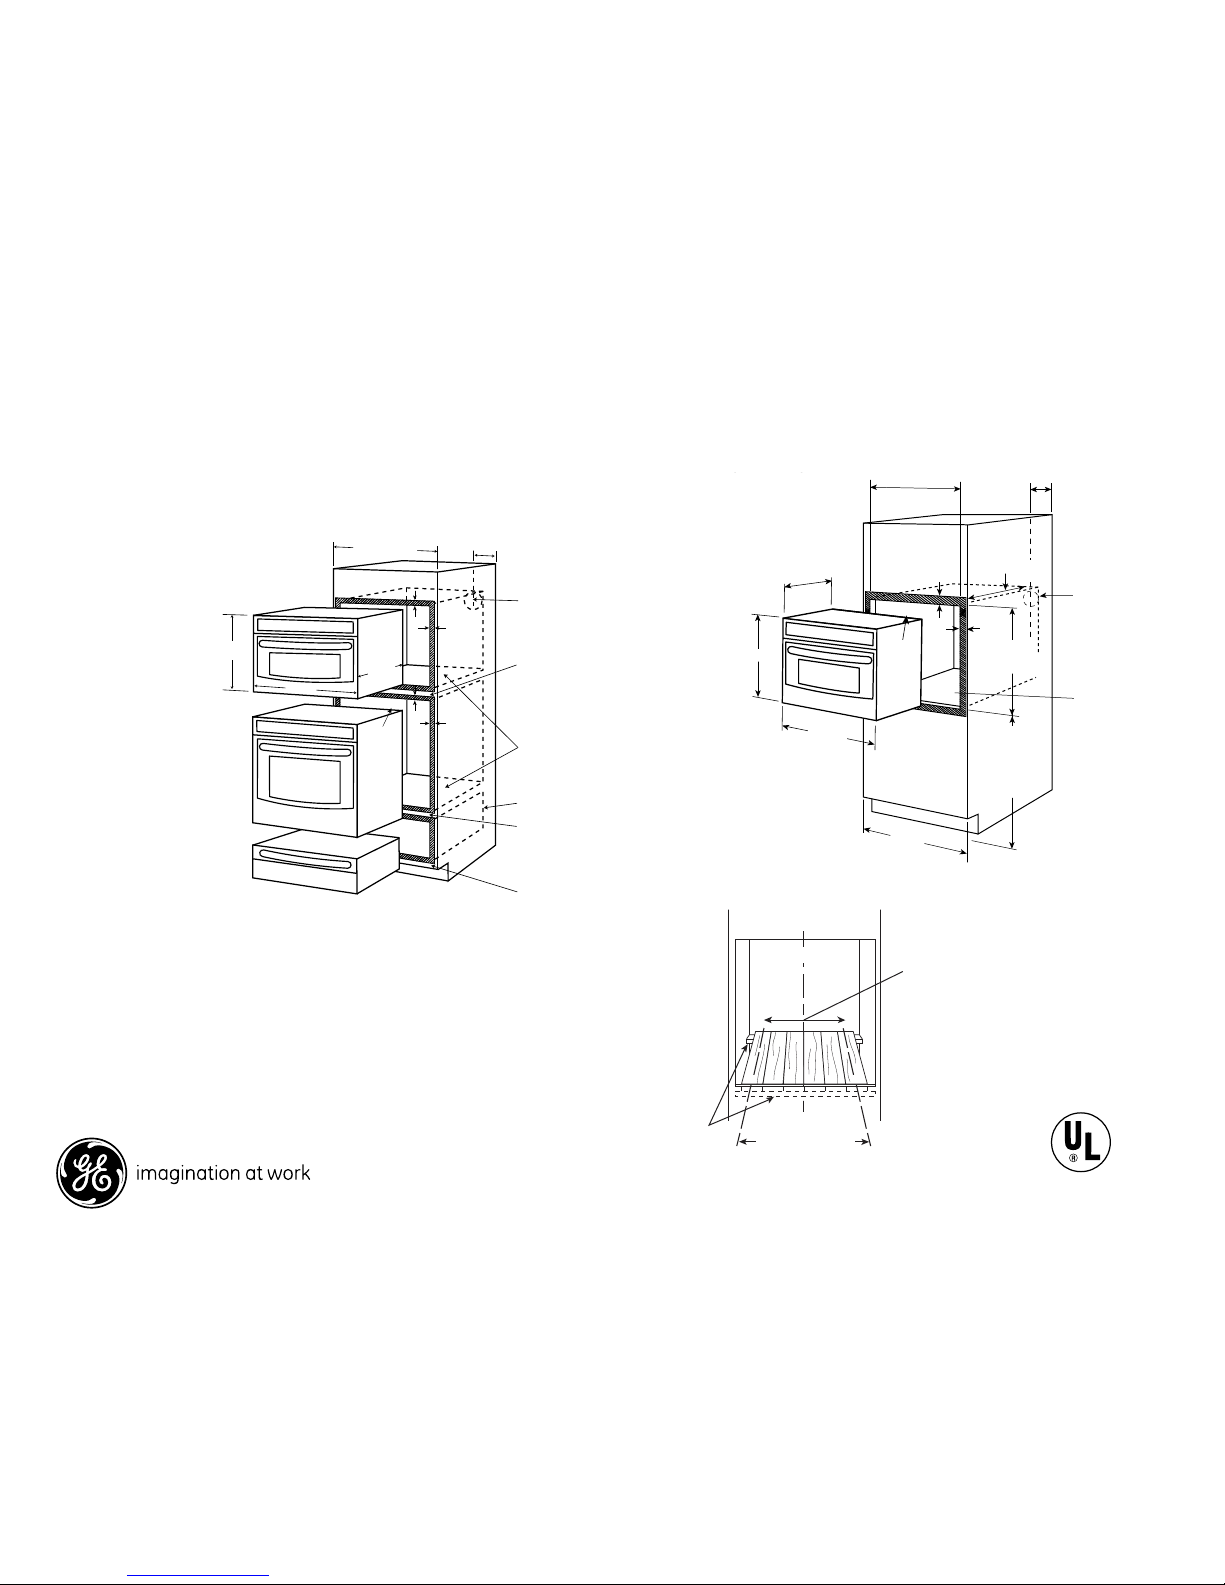
Advantium wall oven/GE Profile™ Series cooking tower
dimensions and cabinet installation information (in inches)
C
L
(Must support 130 lbs.)
2x4’s or
equivalent
solid floor
Suitable
bracing
to support
runners
21-5/8"
over centerline
of cabinet
25-1/8"
Cutout width
cabinet
width
Required
cutout location
36-3/4"
minimum
from floor
Junction box
location
(240-volt
models only)
4-3/16"
21-1/2"
To Back of Control
17-1/2"
Cutout height
A
B
23-1/2"
Cutout depth
Advantium Wall Oven Dimensions (in inches)and
Cabinet Installation (in inches)
Note: Cabinets installed adjacent
to wall ovens must have an adhesion
spec of at least 194° F temperature rating.
Construct Solid
Bottom Min.
3/8" Plywood
Supported by
2 x 4 or 1 x 2
Runners, all
Four Sides.
(Must Support
150 lbs.)
Conduit
(48-1/2"
long)
19-1/8"
29-3/4"
A=Allow 1" overlap of oven over bottom edge of cutout.
B=Allow 11/16"-3/4" for overlap of oven over side edges of cutout.
1" Min. above toekick or adjust
to oven installation height
2" MIN between cutouts
2-1/2" MIN between cutouts
recommended—2" MIN required
9-1/4" cutout height
28-1/2" cutout width
Junction box location
A
B
A
B
Construct Solid Bottom
MIN 3/8" Plywood Supported by
2 x 4 or 1 x 2 Runners, all Four Sides.
(Must Support 150 lbs. for Advantium)
(Must Support 200 lbs. for Wall Oven)
4-3/16
Conduit
(46" long)
Cabinet width
(240-volt models only)
21-1/2"
To back
of Control
19-1/8"
29-3/4"
C
L
2x4’s or
equivalent
solid floor
21-5/8"
over centerline
of cabinet
25-1/8"
Cutout width
cabinet
width
Required
cutout location
36-3/4"
minimum
from floor
Junction box
location
(240-volt
models only)
4-3/16"
21-1/2"
To Back of Control
17-1/2"
Cutout height
A
B
23-1/2"
Cutout depth
Advantium Wall Oven Dimensions (in inches)and
Cabinet Installation (in inches)
Note: Cabinets installed adjacent
to wall ovens must have an adhesion
spec of at least 194° F temperature rating.
Construct Solid
Bottom Min.
3/8" Plywood
Supported by
2 x 4 or 1 x 2
Runners, all
Four Sides.
(Must Support
150 lbs.)
Conduit
(48-1/2"
long)
19-1/8"
29-3/4"
A=Allow 1" overlap of oven over bottom edge of cutout.
B=Allow 11/16"-3/4" for overlap of oven over side edges of cutout.
Note: Advantium wallovens can be installed below GE/GE Profile Series nondowndraft gas and electric cooktops. It CANNOT be installed below induction or
Monogram (2GU3841385) gas cooktops.
Note: Advantium wall oven comes with two lower trim pieces. One is for use above
36-inch height installations and one is for use below 36-inch installations. Use of
the accessory drawer will replace the bottom trim piece for applicable installations.
Please see installation instructions for full details.
240406
Specification Revised 7/13
PSB9240DF
GE Profile™ Series Advantium® 240V - 30 in. Wall Oven
Installation over a GE/Monogram
Warming Drawer:
30”
23-1/2”
25-1/4”
Min.
21”
2” Min.
(3”
recommended)
Per warming
drawer
requirement
Construct
Solid Bottom
Min. 3/8”
Plywood
Supported
by 2x4 or 2x2
Runners all
Four Sides
5” min.
from floor
1” min.
above
toekick
Warming Drawer:
Construct Solid
Bottom Min.
3/8” Plywood
Supported by
2x4 or 2x2
Runners all
Four Sides
30”
23-1/2”
21”
2” Min.
Per Oven
Requirement
Per warming drawer requirement
2” Min.
(3”
recommended)
25-1/4”
Min.
5” min.
from floor
1” min.
above
toekick
Prepare the opening
The Advantium 240V can be installed in combination with
other GE/Monogram appliances. Always follow each product's
Installation Instructions to compete the installation.
Single Oven Installation:
Order a 30" wide single oven cabinet or cut the opening in a wall
to the dimensions shown.
* For existing cutouts, a
maximum width of 28-1/2"
is acceptable. If the opening
is slightly wider, secure a
furring strip on each side of
the cutout for securing the
oven.
• Always maintain 36-3/4"
minimum height from
the floor to the cutout in
any single or combined
installation.
• Allow 3/4" to 2-1/8" case
trim overlap on the sides
and 7/8" overlap on the
bottom of the opening for
all models. The amount of overlap on the sides depends on the
actual cutout width. Allow 1-1/4" case trim overlap on the top for
models PSB9240 and for models ZSC2200, ZSC2201 and ZSC2202.
• Oven overlaps will conceal cut edges on all sides of the opening.
Prepare the opening (cont.)
When installed over a single oven or a
warming drawer, allow at least 2" between
the two openings. This separation will
provide clearance for bottom overlap of the
Advantium 240V and the other appliance
overlaps.
Construct a solid oven floor of 3/8" min. thick
plywood supported by 2 x 4 or 2 x 2 runners
on all sides.
• the support must be level and rigidly
mounted, flush with the bottom edge of
the cutout.
* For existing cutouts, a maximum width of
28-1/2" is acceptable. If the opening is slightly
wider, secure a furring strip on each side of
the cutout for securing the oven.
Note: Additional clearances between the
cutouts may be required. Check to be sure the
oven supports above the Warming Drawer
location do not obstruct the required interior
depth and height. See Warming Drawer
installation instructions for details.
Installation over a GE/Monogram Oven
and Warming Drawer:
* For existing cutouts, a maximum width of
28-1/2" is acceptable. If the opening is slightly
wider, secure a furring strip on each side of
the cutout for securing the oven.
Note: Additional clearances between the
cutouts may be required. Check to be sure the
oven supports above the Warming Drawer
location do not obstruct the required interior
depth and height. See Warming Drawer
installation instructions for details.
CAUTION: For personal safety, the mounting
surface must be capable of supporting the
cabinet load, in addition to the added weight
of this approximate 80-pound oven and 30pound drawer, plus additional oven loads of up
to 50 pounds or a total weight of 160 pounds.
30”
23-1/2”
25-1/4”
Min.
21”
Construct
Base
Min. 3/8”
Plywood
Supported
by 2x4 or
2x2
Runners
all
Four Sides
5” min.
from floor
1” min.
above
toekick
Preparation WITH an Accessory Drawer
 Loading...