

GE PP9830TJ1WW, PP9830SJ1SS, PP9830DJ1BB Owner’s Manual
GEAppliances.com
Safety Information ............ 2
¢3
-O
(-
O
C
¢3
• m
-O
¢3
C_
Wa rra nty ........................ 4
PP9830
Assistance /
Parts and Accessories ......... 5
Using The Cooktop
Cooktop Features .................. 6
Surface Burners .................... 7
Cookware for Radiant
Glass Cooktop .................... 9
For Best Results .................... 9
Care and Cleaning
Cleaning The Cooktop ............. 10
Cleaning the Glass Cooktop ........ 11
Installation Instructions ...... 1]
Troubleshooting Tips ......... 25
For a Spanish version of this
manual, visit our Website at
GEAppliances.com.
Para consultar una version
en espaflol de este manual
de instrucciones, visite
nuestro sitio de internet
GEAppliances.com.
Write the model and serial
numbers here:
Model #
Serial #
Find these numbers on a label
under the cooktop, on the side
of the vent chamber.
49-80635-1 03-15 GE
2:
O
g
IMPORTANT SAFETY INFORMATION.
READ ALL INSTRUCTIONS BEFORE USING.
_E
O
Li..
Z
!
I--"
I.LI
I1
<I:
¢D
I ! Read all safety instructions before using the product. Failure to follow these
A WARN ING instructions may result in fire, electric shock, serious injury or death.
( WARNING IGENERAL SAFETY INSTRUCTIONS
[] Use this appliance for its intended purpose as
described in this Owner's Manual.
[] Be sure your appliance is properly installed and
grounded by a qualified installer in accordance
with the provided installation instructions.
[] Do not attempt to repair or replace any part of
your range unless it is specifically recommended
in this manual. All other servicing should be
referred to a qualified technician.
[] Before performing any service, unplug the
cooktop or disconnect the power supply at the
household distribution panel by removing the
fuse or switching off the circuit breaker.
[] Do not leave children alone--children should
not be left alone or unattended in an area where
an appliance is in use. They should never be
allowed to climb, sit or stand on any part of the
appliance.
[]CAUTION: Donotstoreitemsofinterest
to children above a cooktop--children climbing
on the cooktop to reach items could be seriously
injured.
[] Use only dry pot holders--moist or damp pot
holders on hot surfaces may result in burns from
steam. Do not let pot holders touch hot surface
units or heating elements. Do not use a towel or
other bulky cloth in place of pot holders.
[] Never use your appliance for warming or heating
the room.
[] Do not touch the surface elements. These
surfaces may be hot enough to burn even though
they are dark in color. During and after use,
do not touch, or let clothing or other flammable
materials contact the surface units or areas
nearby the surface units; allow sufficient time for
cooling first. Other surfaces of the appliance may
become hot enough to cause burns. Potentially
hot surfaces include the cooktop and areas
facing the cooktop.
[] Do not heat unopened food containers. Pressure
could build up and the container could burst,
causing an injury.
[] Cook meat and poultry thoroughly--meat to
at least an internal temperature of 160°F and
poultry to at least an internal temperature of
180°F. Cooking to these temperatures usually
protects against foodborne illness.
[] Sufficient air is needed for proper combustion and
exhausting of gases through the flue (chimney) of
fuel burning equipment to prevent back drafting.
Follow the heating equipment manufacturer's
guide lines and safety standards, such as
those published by the National Fire Protection
Association (NFPA), the AmericanSociety for
Heating, Refrigeration and Air Conditioning
(ASHRAE) and the local code authorities, when
applicable, install any make up (replacement)
air system in accordance with local building
code requirements. Visit GEAppliances.com for
available makeup air solutions
IA WARNING IKEEPFLAMMABLE MATERIALS AWAY FROM
THE COOKTOP.
[] Do not store or use flammable material near the
cooktop, including paper, plastic, pot holders,
linens, wall coverings, curtains, drapes and
gasoline or other flammable vapors and liquids.
[] Never wear loose-fitting or hanging garments while
using the appliance. These garments may ignite if
they contact hot surfaces causing severe burns.
[] Do not let cooking grease or other flammable
materials accumulate on or near the cooktop.
Grease on the cooktop may ignite.
[] Clean ventilating hoods frequently. Grease should
not be allowed to accumulate on the hood or filter.
SAVETHESEINSTRUCTIONS
49 80635 2
IA WARNING j IN THE EVENT OF A FIRE, TAKE THE FOLLOWING
STEPSTO PREVENT THE FIRE FROM SPREADING:
[] Do not use water on grease fires. Never pick up
a flaming pan. Turn the controls off. Smother a
flaming pan on a surface unit by covering the
pan completely with a well-fitting lid, cookie sheet
or flat tray. Use a multi-purpose dry chemical or
foam-type fire extinguisher.
I,D
:1>
"1"1
r'n
--t
.,<
Z
-rl
O
Z
IA WARNING 1RADIANT COOKTOP SAFETY INSTRUCTIONS
[] Never leave the surface units unattended at medium
or high heat settings. Boilovers cause smoking and
greasy spillovers that may catch on fire.
[] Never leave oil unattended while frying. If allowed
to heat beyond its smoking point, oil may ignite
resulting in fire that may spread to surrounding
cabinets. Use a deep fat thermometer whenever
possible to monitor oil temperature.
[] To avoid oil spillover and fire, use a minimum
amount of oil when shallow pan-frying and avoid
cooking frozen foods with excessive amounts of ice.
[] Use proper pan size--select cookware having
flat bottoms large enough to cover the surface
heating element. The use of undersized
cookware will expose a portion of the surface
unit to direct contact and may result in ignition
of clothing. Proper relationship of cookware to
surface unit will also improve efficiency.
[] Only certain types of glass, glass/ceramic,
earthenware or other glazed containers are
suitable for cooktop service; others may break
because of the sudden change in temperature.
[] To minimize the possibility of burns, ignition of
flammable materials and spillage, the handle of a
container should be turned toward the center of the
range without extending over nearby surface units.
[] When preparing flaming foods under a hood, turn
the fan on.
[] Use care when touching the cooktop. The glass
surface of the cooktop will retain heat after the
controls have been turned off.
[] Avoid scratching or impacting the glass cooktop.
Doing so may lead to broken glass. The cooktop
can be scratched with items such as knives,
sharp instruments, rings or other jewelry, and
rivets on clothing.
[] Do not cook on a broken cooktop. If glass
cooktop should break, cleaning solutions and
spillovers may penetrate the broken cooktop and
create a risk of electric shock. Contact a qualified
technician immediately.
[] Do not place or store items that can melt or catch
fire on the glass cooktop, even when it is not
being used. If the cooktop is inadvertently turned
on, they may ignite. Heat from the cooktop after it
is turned off may cause them to ignite also.
[] Use CERAMA BRYTE ®ceramic Cooktop Cleaner
and CERAMA BRYTE ® Cleaning Pad to clean
the cooktop. Wait until the cooktop cools and
the indicator light goes out before cleaning. A
wet sponge or cloth on a hot surface can cause
steam burns. Some cleaners can produce
noxious fumes if applied to a hot surface.
NOTE: Sugar spills are an exception. They
should be scraped off while still hot using an
oven mitt and a scraper. See the Cleaning the
glass cooktop section for detailed instructions.
[] Read and follow all instructions and warnings on
the cleaning cream label.
!
O
49 80635 1
SAVETHESEINSTRUCTIONS
t--
<1:
O9
Thank You! ooofor your purchase of c]GEBrand appliance.
Register Your Appliance: Register your new appliance on-line at your convenience!
www.geappliances.com/service_and_support/register/
Timely product registration will allow for enhanced communication and prompt service under the terms of your warranty,
should the need arise. You may also mail in the pre-printed registration card included in the packing material.
GE Radiant Cooktop Warranty
GEAppliances.com
All warranty service is provided by our Factory Service Centers, or an authorized Customer Care®technician•
To schedule service, on-line, visit us at www.geappliances.com/service_and_support/, or call 800.GE.CARES
(800•432•2737)• Please have serial number and model number available when calling for service•
Servicing your appliance may require the use of the onboard data port for diagnostics• This gives a GE factory
service technician the ability to quickly diagnose any issues with your appliance and helps GE improve its products
by providing GE with information on your appliance• If you do not want your appliance data to be sent to GE, please
advise your technician not to submit the data to GE at the time of service•
For the period of one year from the date of the original purchase• GE will provide any part of the cooktop which
fails due to a defect in materials or workmanship• During this limited one-year warranty, GE will also provide, free of
charge, all labor and in-home service to replace the defective part.
What GE will not cover:
[] Service trips to your home to teach you how to use
the product•
[] Improper installation, delivery or maintenance•
[] Failure of the product if it is abused, misused,
modified or used for other than the intended purpose
or used commercially•
[] Replacement of house fuses or resetting of circuit
breakers•
[] Damage to the product caused by accident, fire,
floods or acts of God.
[] Incidental or consequential damage caused by
possible defects with this appliance•
[] Damage caused after delivery.
[] Product not accessible to provide required service.
[] Service to repair or replace light bulbs, except for
LED lamps•
[] Installation or service for a makeup (replacement)
air system.
"_.o
-! fl)
EXCLUSION OF IMPLIED WARRANTIES
Your sole and exclusive remedy is product repair as provided in this Limited Warranty, Any implied warranties,
including the implied warranties of merchantability or fitness for a particular purpose, are limited to one year or the
shortest period allowed by law.
r-
This warranty is extended to the original purchaser and any succeeding owner for products purchased for home use
within the USA. Ifthe product is located in an area where service by a GE Authorized Servicer is not available, you
may be responsible for a trip charge or you may be required to bring the product to an Authorized GE Service location
for service• In Alaska, the warranty excludes the cost of shipping or service calls to your home.
Some states do not allow the exclusion or limitation of incidental or consequential damages• This warranty gives you
O
specific legal rights, and you may also have other rights which vary from state to state• To know what your legal rights
are, consult your local or state consumer affairs office or your state's Attorney General.
Warrantor: General Electric Company. Louisville, KY40225
Extended Warranties: Purchase a GE extended warranty and learn about special discounts that are available while
your warranty is still in effect. You can purchase it on-line anytime
www.geappliances.com/service_and_support/shop-for-extended-service-plans.htm
or call 800•626•2224 during normal business hours. GE Consumer Home Services will still be there after your
warranty expires.
49 80635 2

Have a question or need assistance with your appliance?
Try the GE Appliances Website (www.geappliances.com/service_and_support/) 24 hours a day, any day of the
year! For greater convenience and faster service, you can now download Owner's Manuals, order parts or even
schedule service on-line.
Schedule Service: Expert GE repair service is only one
step away from your door. Get on-line and schedule your
service at www.geappliances.com/service_and_support/
Or call 800.GE.CARES (800.432.2737) during normal
business hours.
Parts and Accessories: Individuals qualified to service
their own appliances can have parts or accessories sent
directly to their homes (VISA, MasterCard and Discover
cards are accepted).Order on-line today, 24 hours
every day or by phone at 800.626.2002 during normal
business hours.
Instructions contained in this manual cover procedures
to be performed by any user. Other servicing generally
should be referred to qualified service personnel. Caution
must be exercised, since improper servicing may cause
unsafe operation.
Real Life Design Studio: GE supports the Universal
Design concept of products, services and environments
that can be used by people of all ages, sizes and
capabilities. We recognize the need to design for a wide
range of physical and mental abilities and impairments.
For details of GE's Universal Design applications,
including kitchen design ideas for people with disabilities,
check out our Website today. For the hearing impaired,
please call 800.TDD.GEAC (800.833.4322).
Contact Us: If you are not satisfied with the service you
receive from GE, contact us on our Website with all the
details including your phone number, or write to:
General Manager, Customer Relations
GE Appliances, Appliance Park Louisville, KY 40225
Parts and Accessories
To place an order visit us online at:
www.GEApplianceParts.com (U.S.) or www.GEAppliances.ca (Canada)
or call 800.626.2002 (U.S.) 800.661.1616 (Canada)
The following parts are available:
Parts
Vent Filter WB02X10651
Vent Grille (White) WB07X11211
Vent Grille (Black) WB07X11210
Lock and Vent Control Knob (White) WB03X10323
Lock and Vent Control Knob (Black) WB03X10322
Lock and Vent Control Knob (SS) WB03X10324
Burner Control Knob (White) WB03X10138
Burner Control Knob (Black) WB03X10136
Burner Control Knob (SS) WB03T10272
Cleaning Supplies
CitruShine Stainless Steel Wipes WX10X10007
CERAMA BRYTE _ Stainless Steel Appliance Cleaner PM10X311
CERAMA BRYTE _ Cleaning Pads for Ceramic Cooktops WX10X350
CERAMA BRYTE _ Ceramic Cooktop Cleaner WX10X300
CERAMA BRYTE _ Ceramic Cooktop Scraper WXl0X0302
Kit (Kit includes cream and cooktop scraper) WB64X5027
:1>
¢D
m
I,D
Z
db
rn
-4
I,D
:I>
Z
I'TI
O
rrl
U'}
How to Remove Protective Shipping Film and Packaging Tape
Carefully grasp a corner of the protective shipping film
with your fingers and slowly peel it from the appliance
surface. Do not use any sharp items to remove the film.
Remove all of the film before using the appliance for the
first time.
49 80635 1 5
To assure no damage is done to the finish of the
product, the safest way to remove the adhesive from
packaging tape on new appliances is an application of
a household liquid dishwashing detergent. Apply with a
soft cloth and allow to soak.
NOTE: The adhesive must be removed from all parts. It
cannot be removed if it is baked on.
LD
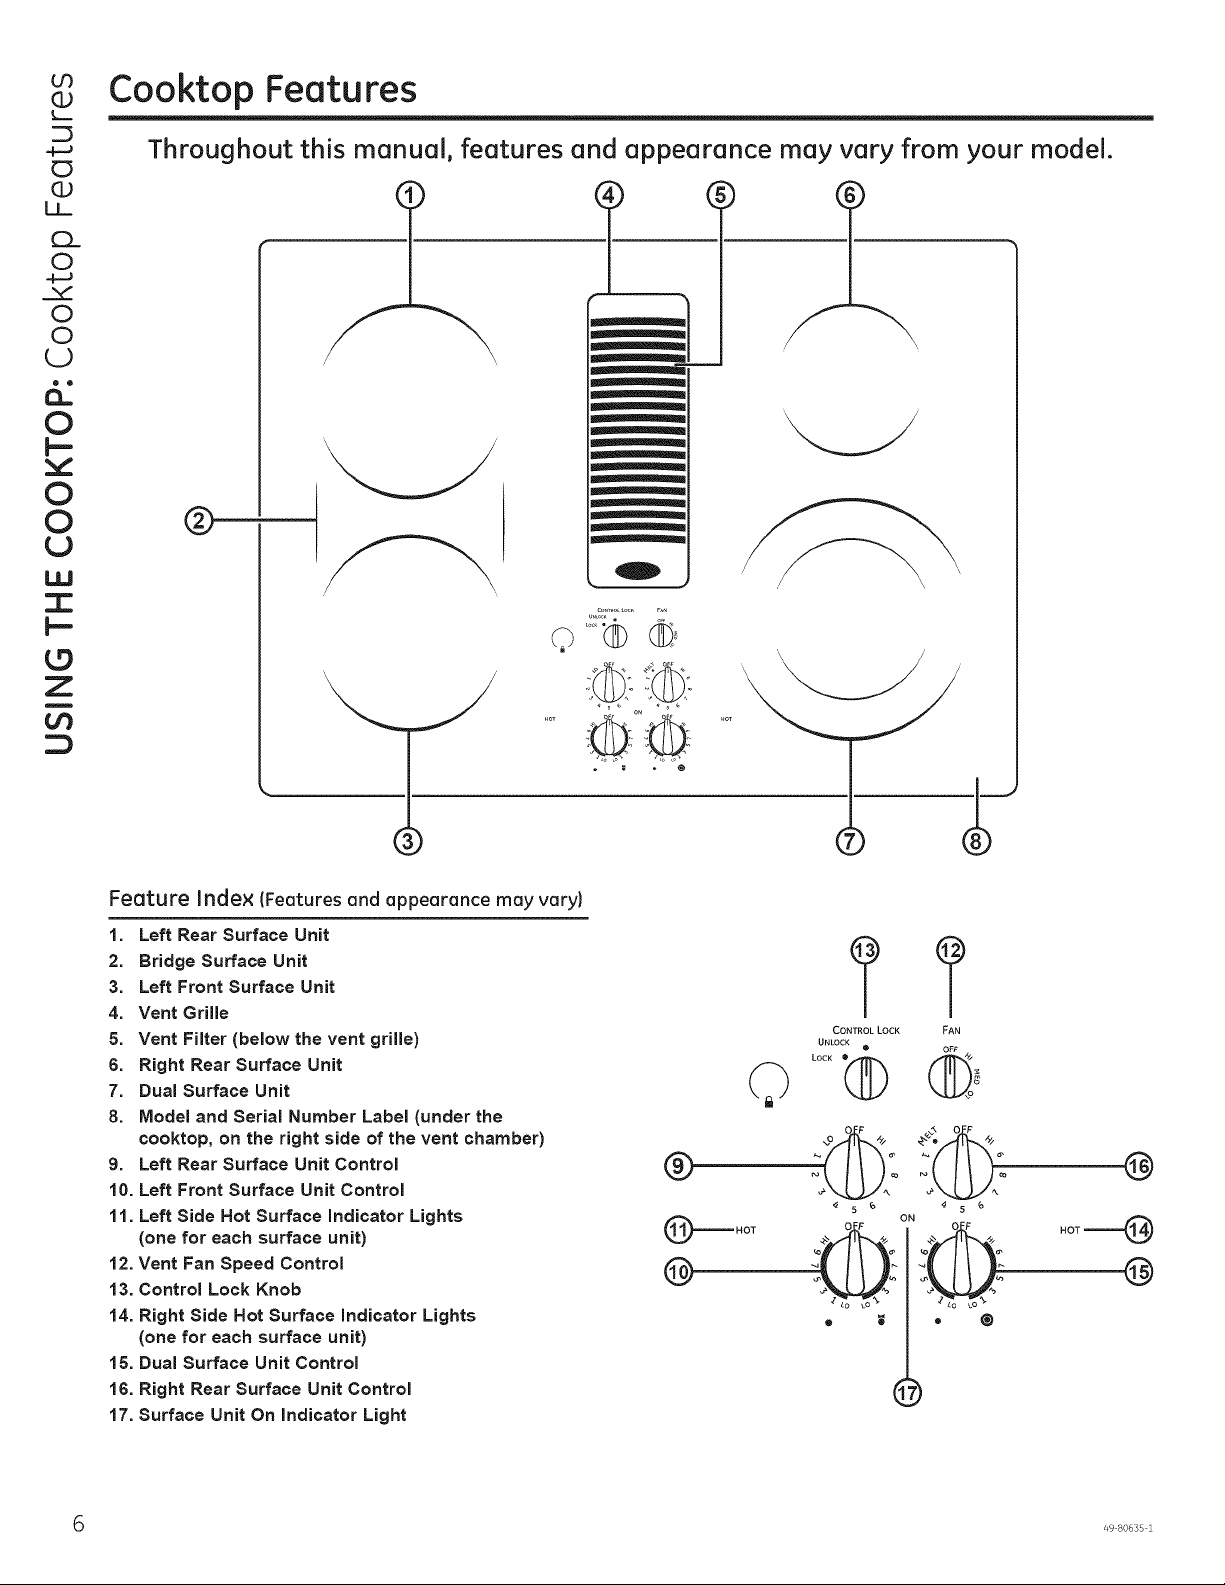
Cooktop Features
C3
CL
O
.+-J
O
O
U
6:
O
F=.
O
O
_J
LU
F.=
L9
Z
i
U3
::)
Throughout this manual, features and appearance may vary from your model.
;)
®
0
Feature Index (Features and appearance may vary)
1. Left Rear Surface Unit
2. Bridge Surface Unit
3. Left Front Surface Unit
4. Vent Grille
5. Vent Filter (below the vent grille)
6. Right Rear Surface Unit
7. Dual Surface Unit
8. Model and Serial Number Label (under the
cooktop, on the right side of the vent chamber)
9. Left Rear Surface Unit Control
10. Left Front Surface Unit Control
11. Left Side Not Surface Indicator Lights
(one for each surface unit)
12. Vent Fan Speed Control
13. Control Lock Knob
14. Right Side Not Surface Indicator Lights
(one for each surface unit)
15. Dual Surface Unit Control
16. Right Rear Surface Unit Control
17. Surface Unit On Indicator Light
®
_)'_ HOT
®
CONTROL LOCK
UNLOCK
LOCK @_
,Z _o _o%
@
?
e
5 _
FAN
OFf"t_
@
5 _
- _o Lo -
• ®
49 80635 2
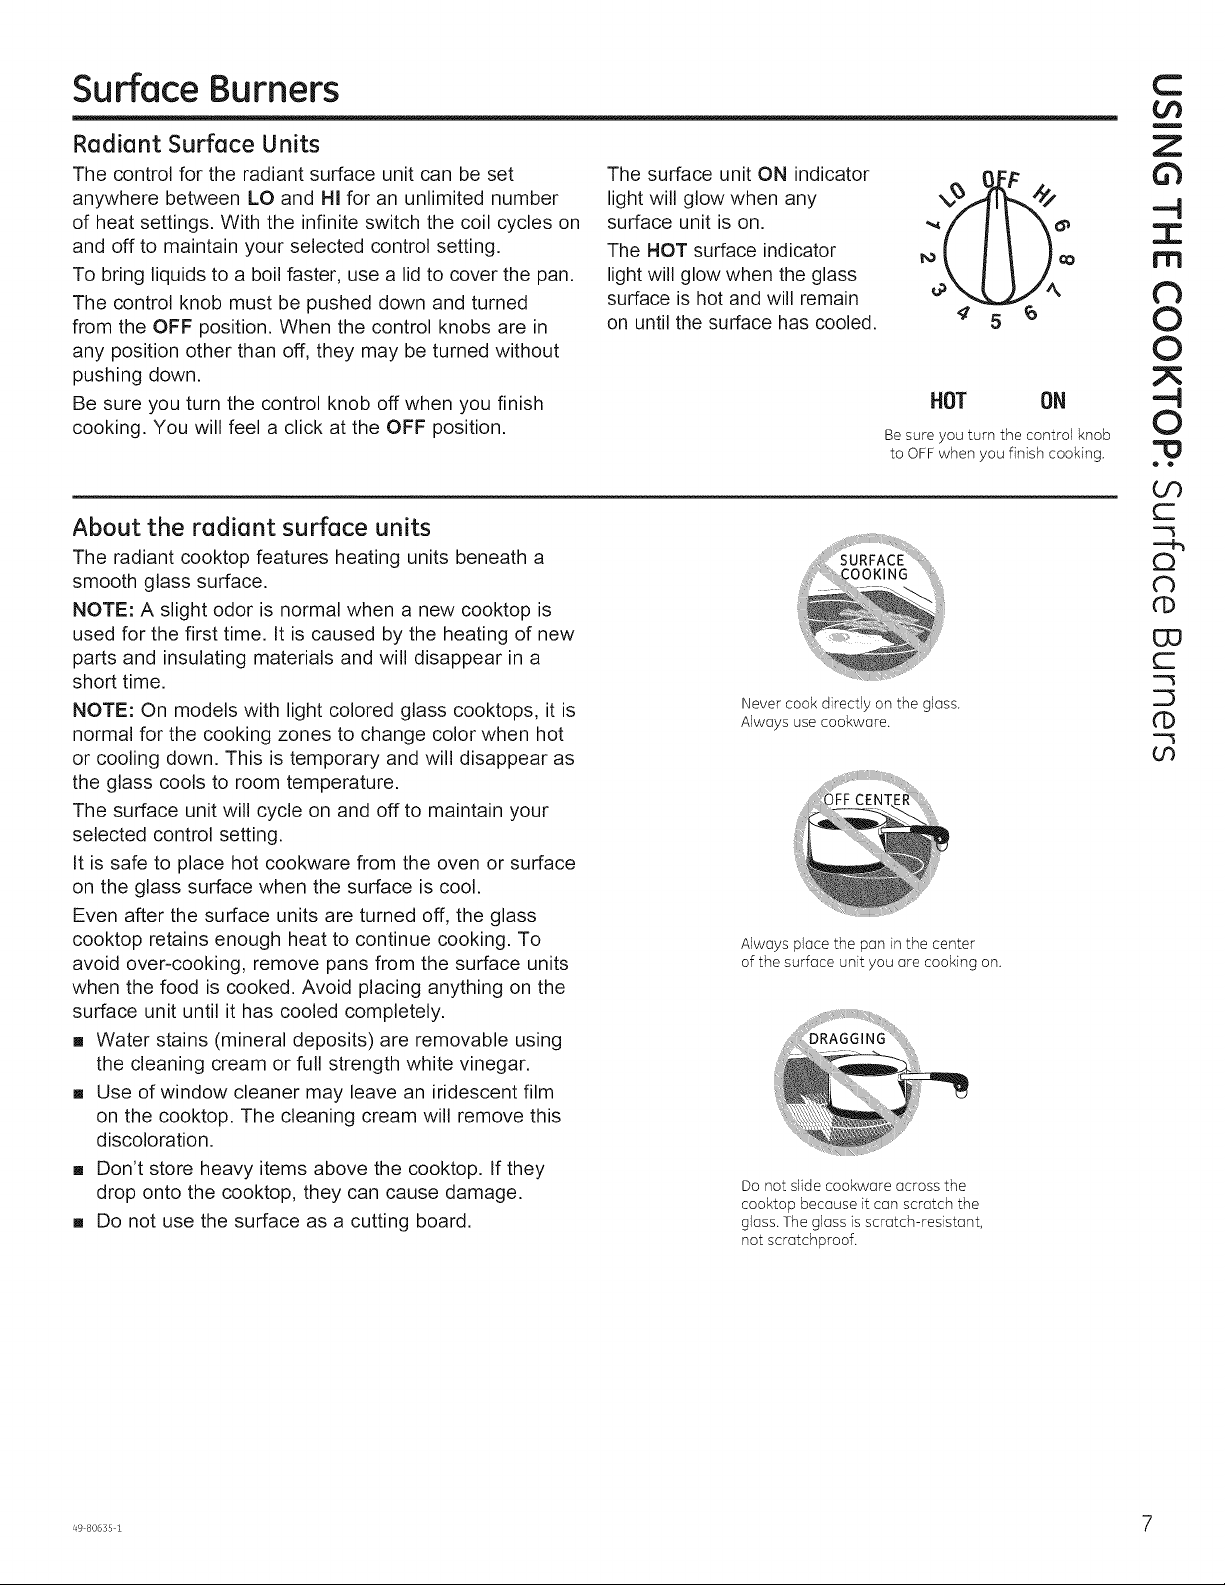
Surface Burners
Radiant Surface Units
The control for the radiant surface unit can be set
anywhere between LO and HI for an unlimited number
of heat settings. With the infinite switch the coil cycles on
and off to maintain your selected control setting.
To bring liquids to a boil faster, use a lid to cover the pan.
The control knob must be pushed down and turned
from the OFF position. When the control knobs are in
any position other than off, they may be turned without
pushing down.
Be sure you turn the control knob off when you finish
cooking. You will feel a click at the OFF position.
About the radiant surface units
The radiant cooktop features heating units beneath a
smooth glass surface.
NOTE: A slight odor is normal when a new cooktop is
used for the first time. It is caused by the heating of new
parts and insulating materials and will disappear in a
short time.
NOTE: On models with light colored glass cooktops, it is
normal for the cooking zones to change color when hot
or cooling down. This is temporary and will disappear as
the glass cools to room temperature.
The surface unit will cycle on and off to maintain your
selected control setting.
It is safe to place hot cookware from the oven or surface
on the glass surface when the surface is cool.
Even after the surface units are turned off, the glass
cooktop retains enough heat to continue cooking. To
avoid over-cooking, remove pans from the surface units
when the food is cooked. Avoid placing anything on the
surface unit until it has cooled completely.
[] Water stains (mineral deposits) are removable using
the cleaning cream or full strength white vinegar.
[] Use of window cleaner may leave an iridescent film
on the cooktop. The cleaning cream will remove this
discoloration.
[] Don't store heavy items above the cooktop. If they
drop onto the cooktop, they can cause damage.
[] Do not use the surface as a cutting board.
The surface unit ON indicator
light will glow when any
surface unit is on.
The HOT surface indicator
light will glow when the glass
surface is hot and will remain
on until the surface has cooled.
_:jiiii_i_U_R_A_i_i:i'ii:i:i,iiii:_,,¸
',COOKING :
Never cook directly on the glass.
Always use cookware.
CENT ER
}
Always place the pan in the center
of the surface unit you are cooking on.
....._'iiiii iiii/iiiii_....
Do not slide cookware across the
cooktop because it can scratch the
glass. The glass is scratch-resistant,
not scratchproof.
I'_ co
HOT ON
Besure you turn the control knob
to OFFwhen you finish cooking.
C
£r}
Z
GI
---4
I
rrl
db
O
O
--4
O
• •
Go
C
C3
db
d)
O3
C
d)
Or)
49 80635 1 7

or)
L_
(D
C
!.
03
(b
U
ED
!.
oO
Surface Burners (Cont.)
Dual Surface Unit
The right front surface unit has 2 cooking sizes to select
from so you can match the size of the unit to the size of
the cookware you are using.
To use the large (9dnch) surface unit, turn the knob
clockwise to El and select the desired setting. The unit
will heat the entire area contained by the larger circle.
To use the small (6-inch)
surface unit, turn the knob
counterclockwise to I:1and
select the desired setting. The
unit will only heat the area
inside the smaller circle.
Small 6" -€_O @
surface unit Large 9"
setting surface unit setting
O
I--
O
O
U
I.U
I
Z
Bridge Surface Unit
Make sure the pan rests flat on the glass cooktop and
it is not resting on the trim. If you notice poor cooking
performance, move the pan to make sure it is flat on
the cooktop.
To use the bridge burner, turn the burner knob to El and
select the desired setting. The unit will heat the front
surface burner and the bridge.
Choose pans that match the circle/bridge area as closely
as possible.
Surface Elements Cycle On and Off
Surface elements will cycle on and off to maintain the
temperature you have selected.
All radiant surface elements have a temperature limiter
that protects the glass cooktop from getting too hot.
Temperature Limiter
Every radiant surface unit has a temperature limiter.
The temperature limiter protects the glass cooktop from
getting too hot.
To use only the front surface
unit, turn the burner knob to [I_
and select the desired setting.
The unit will only heat the front
surface burner.
You can create an oblong
heated area by using the left
rear unit in addition to the front
unit bridge combination.
The temperature limiter may cycle the elements off
while cooking if:
[] The pan boils dry.
[] The pan bottom is not flat.
[] The pan is off-center.
[] There is no pan on the element.
The temperature limiter may cycle the units off for a
time if:
[] The cooktop is on while cooking.
[] The pan boils dry.
[] The pan bottom is not flat.
[] The pan is off-center.
[] There is no pan on the unit.
Front
Burner-}_ Front ----I_
only Burner and v
Bridge
Control Lock-Out for Surface Units
To activate control lock-out, turn the Control Lock knob
to LOCK. This will prevent surface units from heating.
An indicator light will glow to show that they are locked.
The downdraft fan will remain operable with control
lockout engaged.
How to Operate the Vent System
The built-in vent system helps remove cooking vapors,
odors and smoke from foods prepared on the cooktop.
To operate the downdraft vent system, turn the vent fan
speed control knob to HI, MED or LO, as needed.
In the locked position, the cooktop CONTROLLOCK
will produce an audible sound if any Lock "
surface unit control knob is engaged or /" Ill "_
moved to a position other than OFF.
Continuous use of the vent system while FA,
cooking helps keep the kitchen comfortable OFF
and less humid, reducing cooking odors if ill "_
and soiling moisture that normally creates a klll,,,,u/,.o
frequent need for cleaning.
UNLOCK
\JlJ
49 80635 2
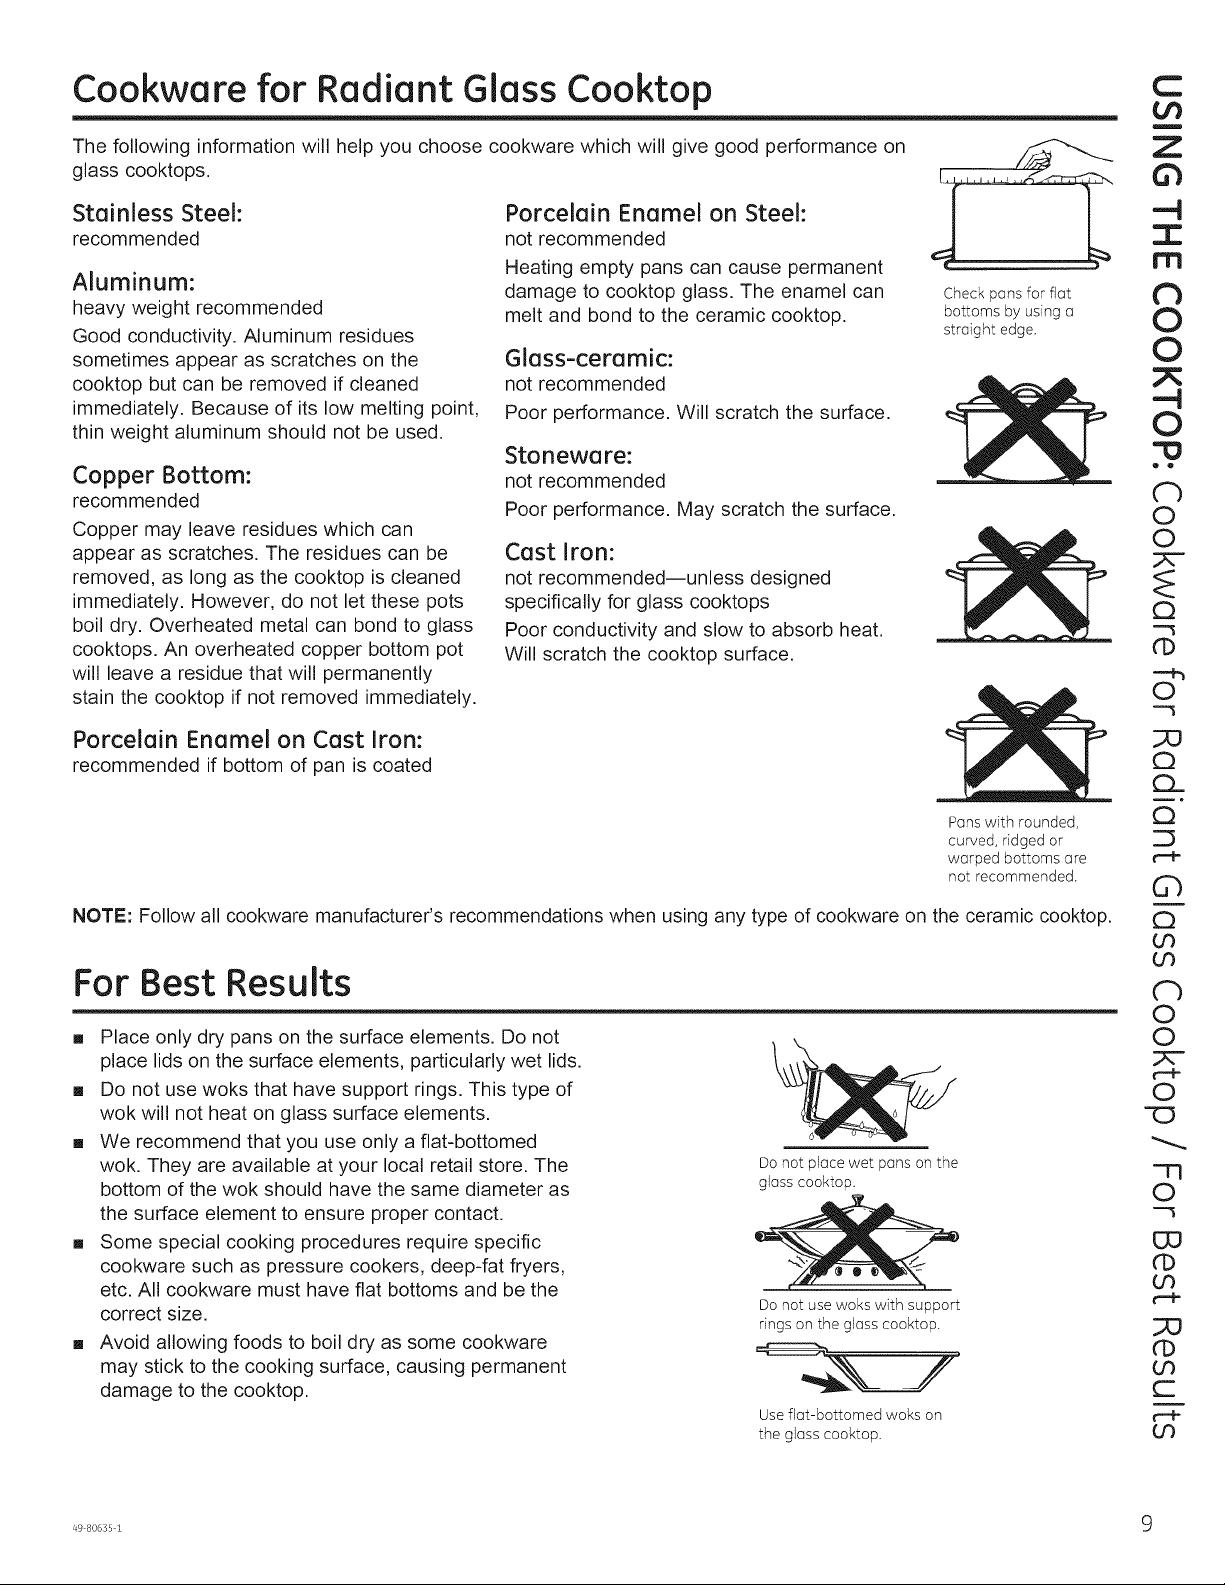
Cookware for Radiant Glass Cooktop
C
i.n
The following information will help you choose cookware which will give good performance on
glass cooktops.
Stainless Steel:
recommended
Aluminum:
heavy weight recommended
Good conductivity. Aluminum residues
sometimes appear as scratches on the
cooktop but can be removed if cleaned
immediately. Because of its low melting point,
thin weight aluminum should not be used.
Porcelain Enamel on Steel:
not recommended
Heating empty pans can cause permanent
damage to cooktop glass. The enamel can
melt and bond to the ceramic cooktop.
Glass-ceramic:
not recommended
Poor performance. Will scratch the surface.
Stonewa re:
Copper Bottom:
recommended
Copper may leave residues which can
appear as scratches. The residues can be
removed, as long as the cooktop is cleaned
immediately. However, do not let these pots
boil dry. Overheated metal can bond to glass
cooktops. An overheated copper bottom pot
will leave a residue that will permanently
stain the cooktop if not removed immediately.
not recommended
Poor performance. May scratch the surface.
Cast Iron:
not recommended--unless designed
specifically for glass cooktops
Poor conductivity and slow to absorb heat.
Will scratch the cooktop surface.
Check pans for flat
bottoms by using a
straight edge.
Z
-4
I
rrl
0
0
-4
0
ii ii
("b
O
O
Q
..-%
©
PorcelainEnamel on Cast Iron:
recommended if bottom of pan is coated
Pans with rounded,
curved, ridged or
warped bottoms are
not recommended.
NOTE: Follow all cookware manufacturer's recommendations when using any type of cookware on the ceramic cooktop.
For Best Results
[] Place only dry pans on the surface elements. Do not
place lids on the surface elements, particularly wet lids.
[] Do not use woks that have support rings. This type of
wok will not heat on glass surface elements.
[] We recommend that you use only a fiat-bottomed
wok. They are available at your local retail store. The
bottom of the wok should have the same diameter as
the surface element to ensure proper contact.
[] Some special cooking procedures require specific
cookware such as pressure cookers, deep-fat fryers,
etc. All cookware must have fiat bottoms and be the
correct size.
[] Avoid allowing foods to boil dry as some cookware
may stick to the cooking surface, causing permanent
damage to the cooktop.
Do not place wet pans on the
glass cooktop.
_ w
Do not use woks with support
rings on the glass cooktop.
Use fiat-bottomed woks on
the glass cooktop.
;;o
Q
Q
Q
U_
n
©
©
©
-0
-r]
©
Co
U_
O9
C
49 80635 1 9
U
F-
i
U
Z
!
Z
LU
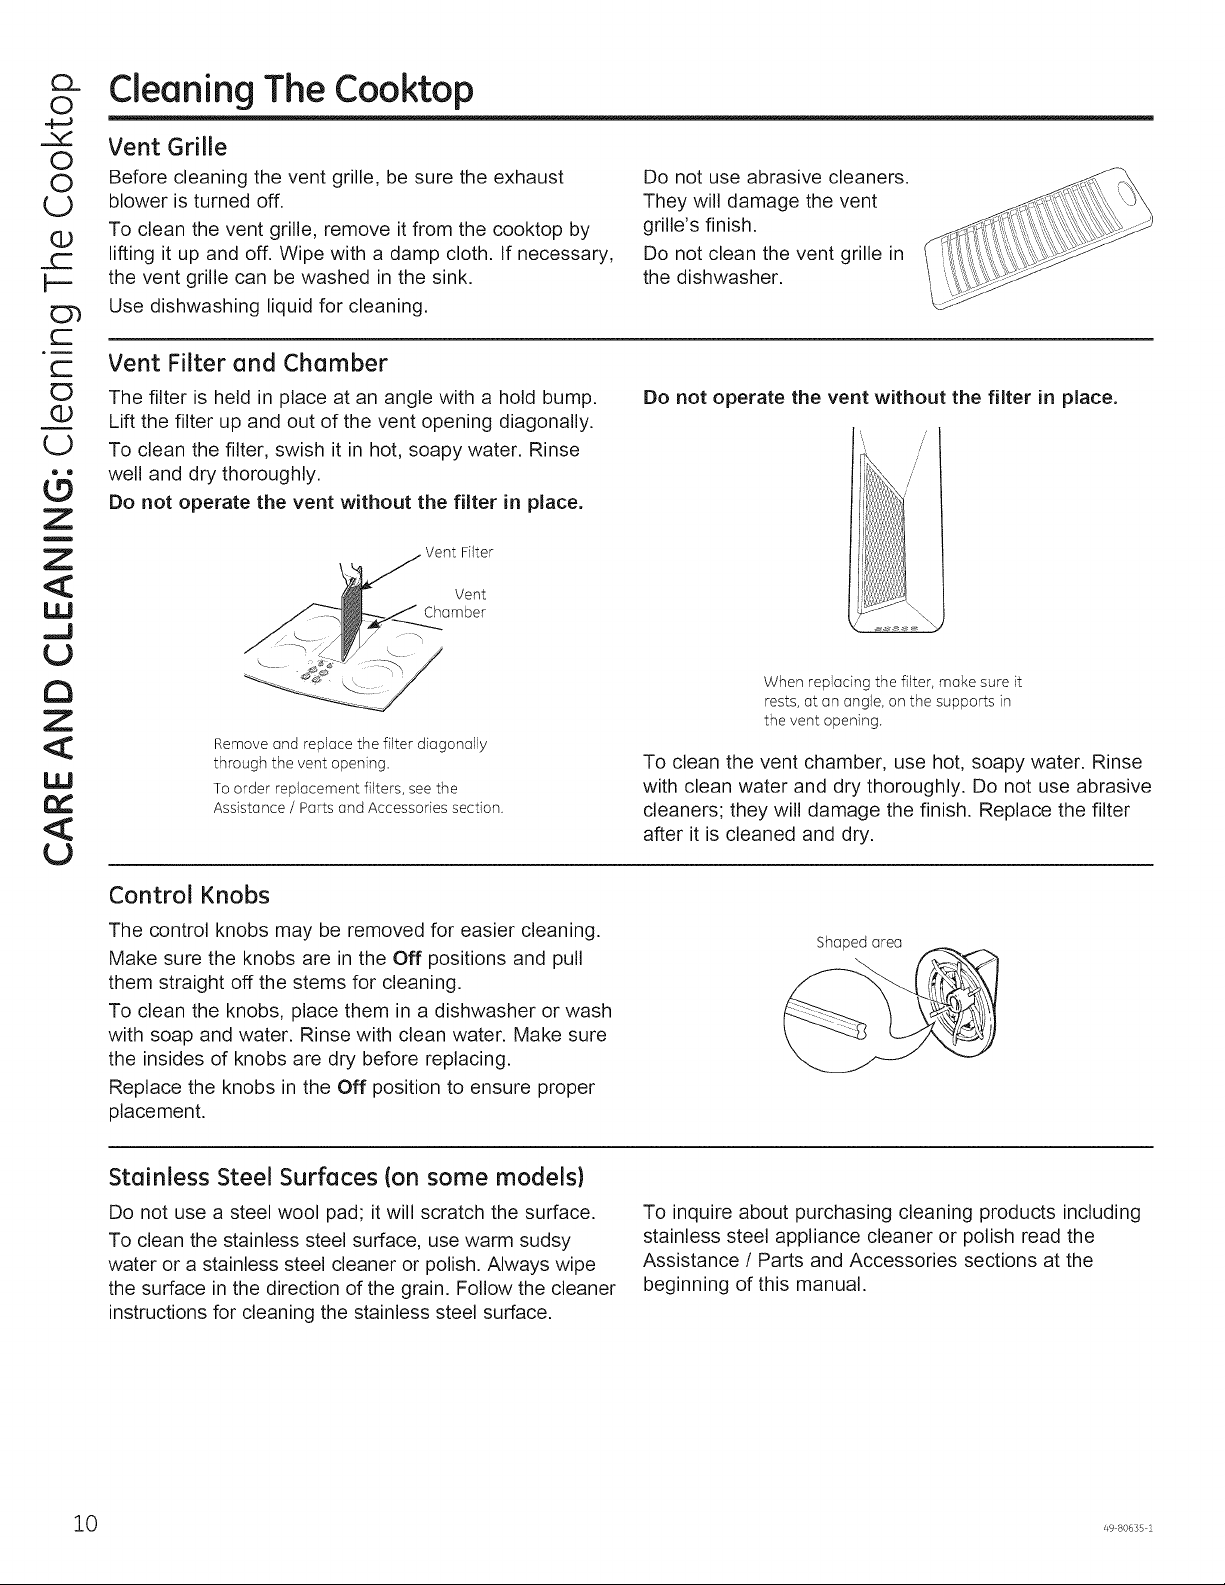
Cleaning The Cooktop
O
,,!
Vent Grille
O
Before cleaning the vent grille, be sure the exhaust
O
blower is turned off.
To clean the vent grille, remove it from the cooktop by
(b
lifting it up and off. Wipe with a damp cloth. If necessary,
c-
the vent grille can be washed in the sink.
Use dishwashing liquid for cleaning.
r
Vent Filter ond Chomber
C
The filter is held in place at an angle with a hold bump.
Lift the filter up and out of the vent opening diagonally.
To clean the filter, swish it in hot, soapy water. Rinse
well and dry thoroughly.
Do not operate the vent without the filter in place.
Filter
Vent
Chamber
Do not use abrasive cleaners.
They will damage the vent
grille's finish.
Do not clean the vent grille in
the dishwasher.
Do not operate the vent without the filter in place.
a
Z
<1:
LU
r_
U
Remove and replace the filter diagonally
through the vent opening.
To order replacement filters, see the
Assistance / Parts and Accessories section.
Control Knobs
The control knobs may be removed for easier cleaning.
Make sure the knobs are in the Off positions and pull
them straight off the stems for cleaning.
To clean the knobs, place them in a dishwasher or wash
with soap and water. Rinse with clean water. Make sure
the insides of knobs are dry before replacing.
Replace the knobs in the Off position to ensure proper
placement.
Stoinless Steel Surfoces (on some models}
Do not use a steel wool pad; it will scratch the surface.
To clean the stainless steel surface, use warm sudsy
water or a stainless steel cleaner or polish. Always wipe
the surface in the direction of the grain. Follow the cleaner
instructions for cleaning the stainless steel surface.
When replacing the filter, make sure it
rests, at an angle, on the supports in
the vent opening.
To clean the vent chamber, use hot, soapy water. Rinse
with clean water and dry thoroughly. Do not use abrasive
cleaners; they will damage the finish. Replace the filter
after it is cleaned and dry.
Shaped area
To inquire about purchasing cleaning products including
stainless steel appliance cleaner or polish read the
Assistance / Parts and Accessories sections at the
beginning of this manual.
10 49 80635 2
Cleaning the Glass Cooktop
th
Normal Daily Use Cleaning
ONLY use CERAMA BRYTE ®Ceramic Cooktop
Cleaner on the glass cooktop. Other creams may not
be as effective.
To maintain and protect the surface of your glass
cooktop, follow these steps:
1. Before using the cooktop for the first time, clean it
with CERAMA BRYTE ®Ceramic Cooktop Cleaner.
This helps protect the top and makes cleanup easier.
2. Daily use of CERAMA BRYTE ®Ceramic Cooktop
Cleaner will help keep the cooktop looking new.
3. Remove the burner grates, vent grille and vent grille
gasket.
4. Shake the cleaning cream well. Apply a few drops of
CERAMA BRYTE ®Ceramic Cooktop Cleaner directly
to the cooktop.
Burned-On Residue
NOTE: DAMAGE to your glass surface may occur if you
use scrub pads other than those recommended.
1. Allow the cooktop to cool.
2. Remove the burner grates, vent grille and vent grille
gasket. Spread a few drops of CERAMA BRYTE ®
Ceramic Cooktop Cleaner to the entire burned
residue area.
3. Using the included CERAMA BRYTE ® Cleaning Pad
for Ceramic Cooktops, rub the residue area, applying
pressure as needed.
4. If any residue remains, repeat the steps listed above
as needed.
Heavy, Burned-On Residue
1. Allow the cooktop to cool.
2. Remove the burner grates, vent grille and vent grille
gasket.
3. Use a single-edge razor blade scraper at approximately
a 45 ° angle against the glass surface and scrape the
soil. It will be necessary to apply pressure to the razor
scraper in order to remove the residue.
4. After scraping with the razor scraper, spread a few drops
of CERAMA BRYTE®Ceramic Cooktop Cleaner on the
entire burned residue area. Use the CERAMA BRYTE®
Cleaning Pad to remove any remaining residue.
5. For additional protection, after all residue has been
removed, polish the entire surface with CERAMA
BRYTE ®Ceramic Cooktop Cleaner and a paper towel.
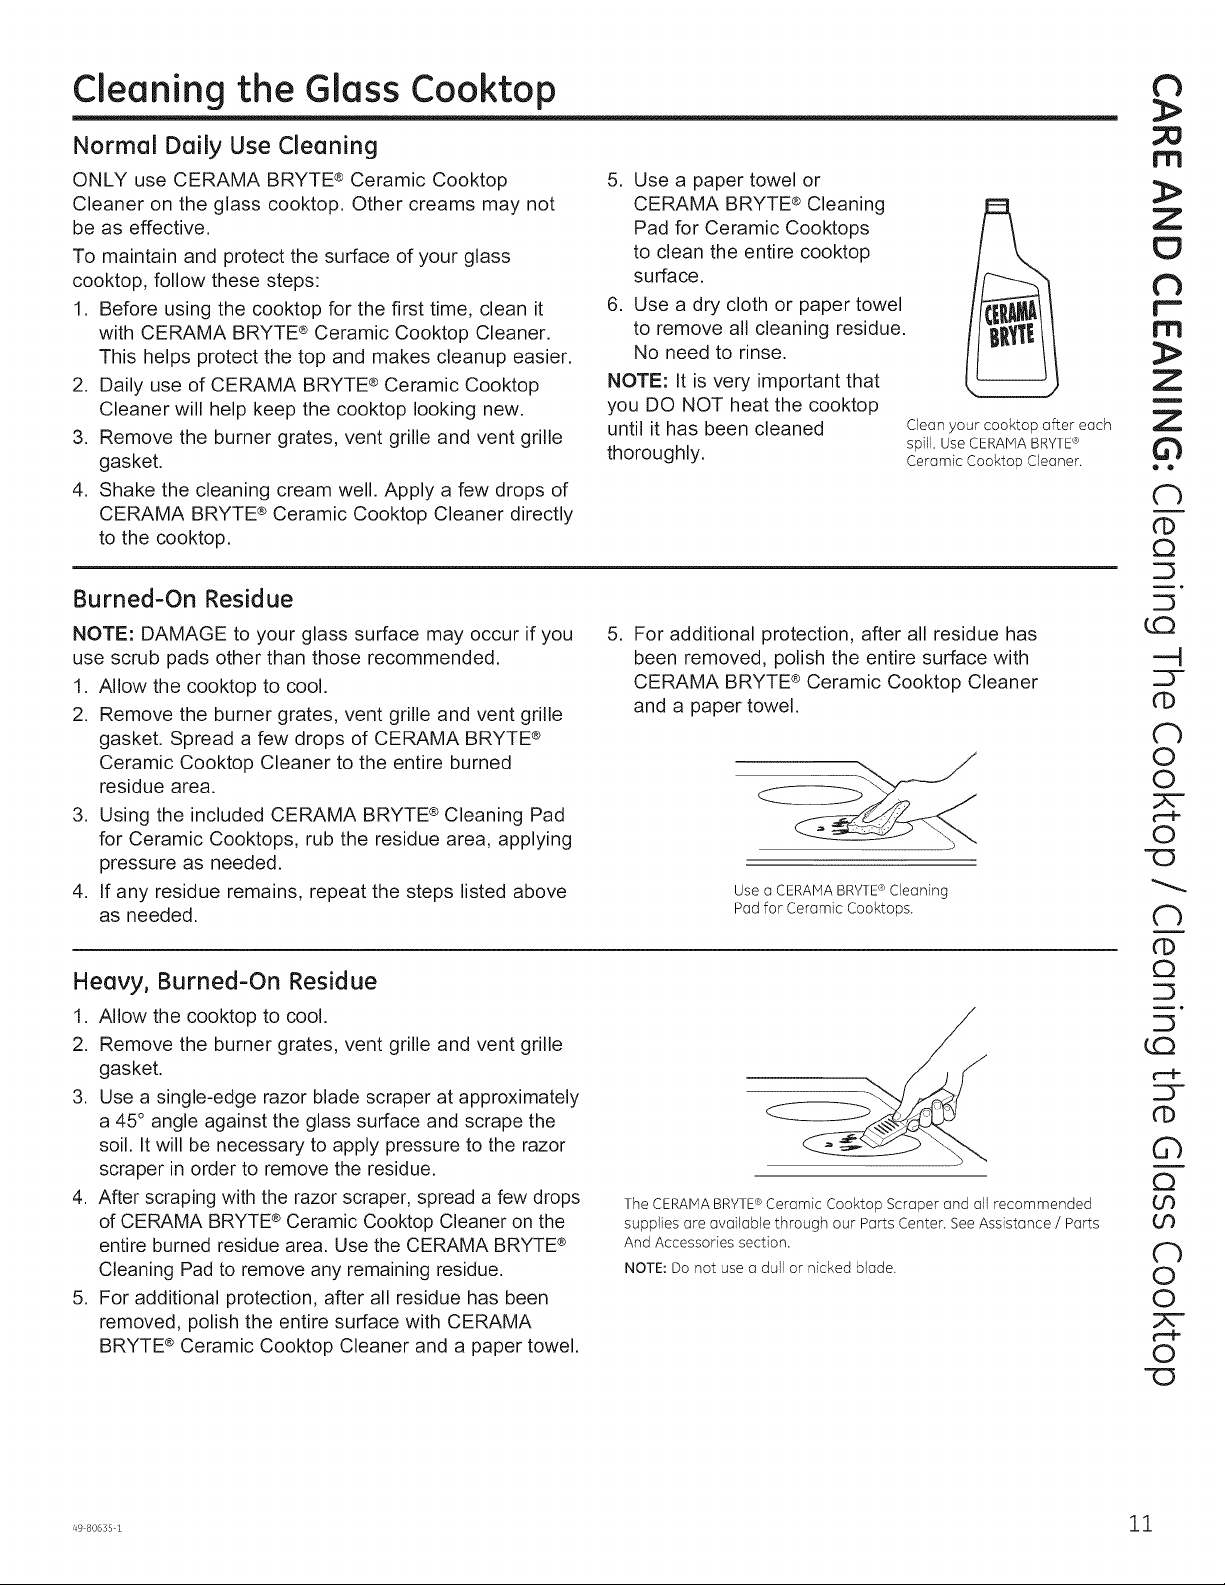
5. Use a paper towel or
CERAMA BRYTE ®Cleaning
Pad for Ceramic Cooktops
to clean the entire cooktop
surface.
6. Use a dry cloth or paper towel
to remove all cleaning residue.
No need to rinse.
NOTE: It is very important that
you DO NOT heat the cooktop
until it has been cleaned
thoroughly.
,
For additional protection, after all residue has
been removed, polish the entire surface with
CERAMA BRYTE ®Ceramic Cooktop Cleaner
and a paper towel.
Use a CERAMABRYTE Cleaning
Pad for Ceramic Cooktops.
The CERAMABRYTE®Ceramic Cooktop Scraper and all recommended
supplies are available through our Parts Center. See Assistance / Parts
And Accessories section.
NOTE: Do not use a dull or nicked blade.
Clean your cooktop after each
spill, Use CERAMA BRYTE®
Ceramic Cooktop Cleaner.
®
m
th
Z
!
• •
Cb
CD
Q
CD
O
©
©
-O
N
CD
Q
r_
CD
Q
U)
N
©
O
©
-O
CL
O
,,,f
O
O
U
O0
O0
C3
LD
_CZ
¢-
C
C3
U
G
Z
!
Z
,,,,J
U
a
Z
Cleaning the Glass Cooktop
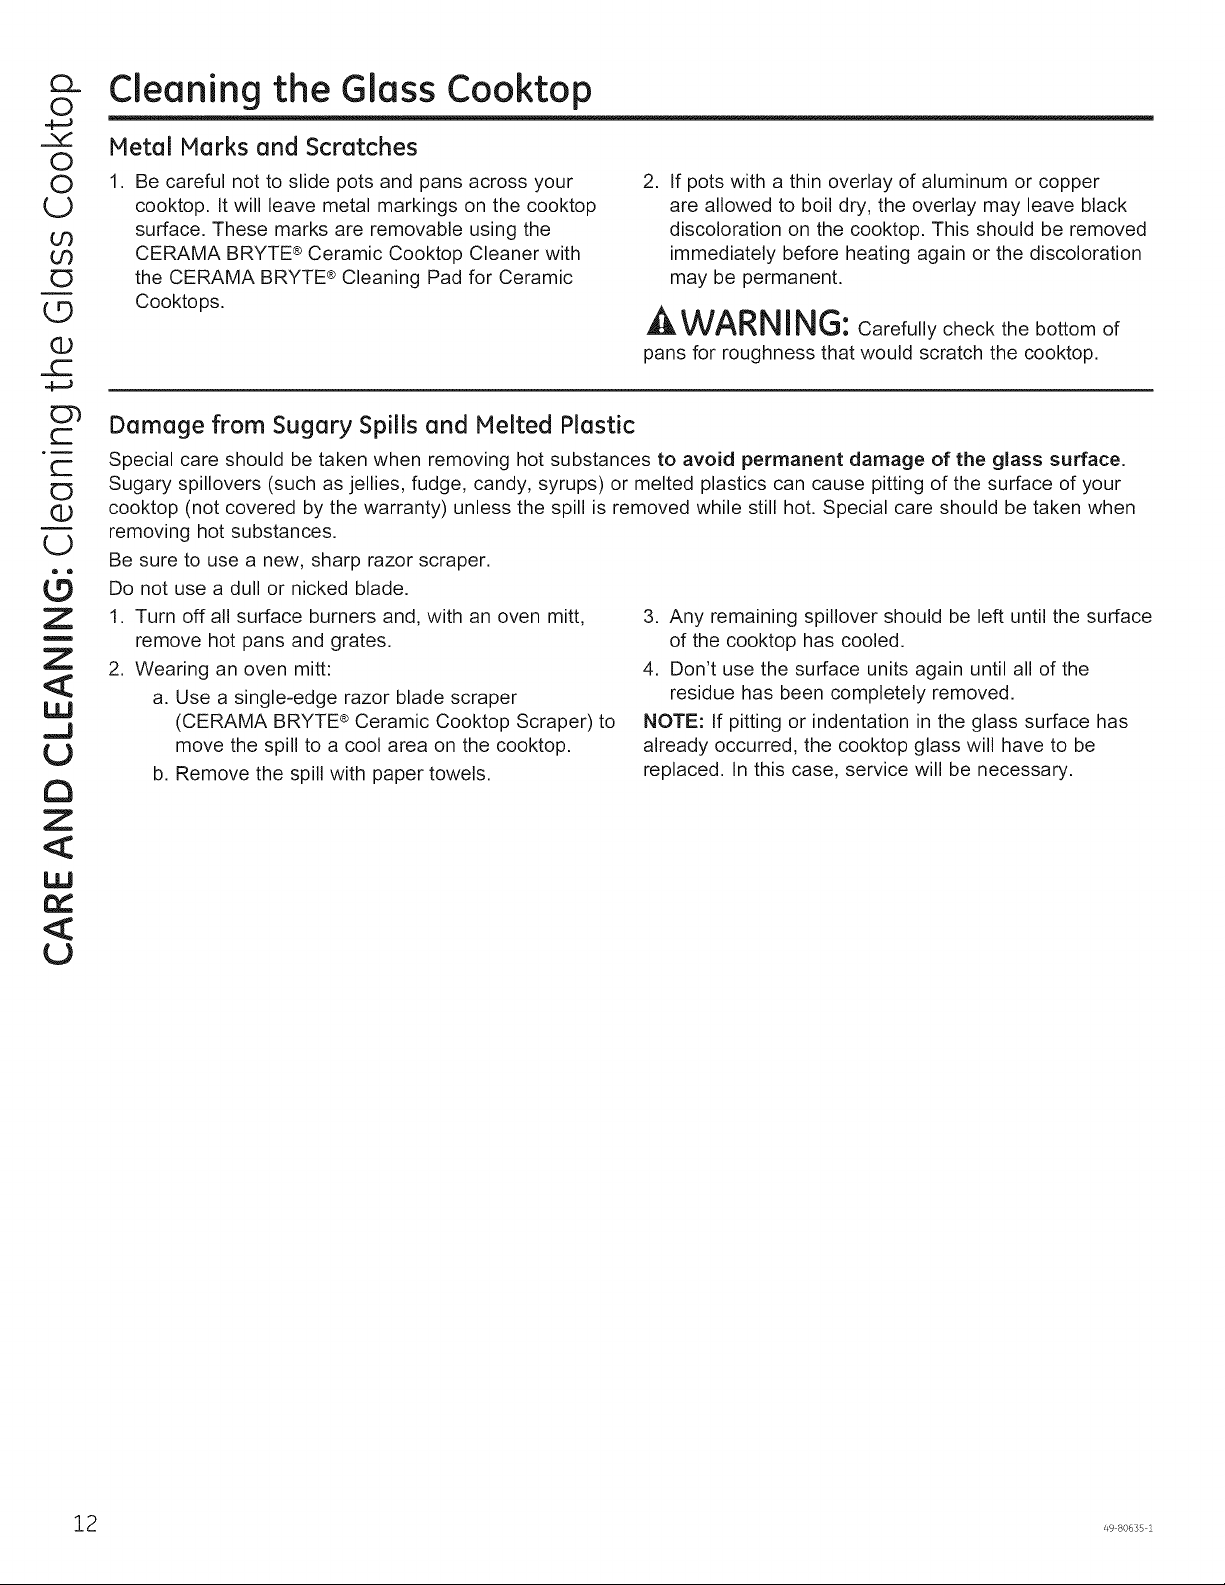
Metal Marks and Scratches
,
Be careful not to slide pots and pans across your
cooktop. It will leave metal markings on the cooktop
surface. These marks are removable using the
CERAMA BRYTE ®Ceramic Cooktop Cleaner with
the CERAMA BRYTE ®Cleaning Pad for Ceramic
Cooktops.
Damage from Sugary Spills and Melted Plastic
Special care should be taken when removing hot substances to avoid permanent damage of the glass surface.
Sugary spillovers (such as jellies, fudge, candy, syrups) or melted plastics can cause pitting of the surface of your
cooktop (not covered by the warranty) unless the spill is removed while still hot. Special care should be taken when
removing hot substances.
Be sure to use a new, sharp razor scraper.
Do not use a dull or nicked blade.
1. Turn off all surface burners and, with an oven mitt,
remove hot pans and grates.
2. Wearing an oven mitt:
a. Use a single-edge razor blade scraper
(CERAMA BRYTE® Ceramic Cooktop Scraper) to
move the spill to a cool area on the cooktop.
b. Remove the spill with paper towels.
2. If pots with a thin overlay of aluminum or copper
are allowed to boil dry, the overlay may leave black
discoloration on the cooktop. This should be removed
immediately before heating again or the discoloration
may be permanent.
,& WARNING: Carefully check the bottom of
pans for roughness that would scratch the cooktop.
3. Any remaining spillover should be left until the surface
of the cooktop has cooled.
4. Don't use the surface units again until all of the
residue has been completely removed.
NOTE: If pitting or indentation in the glass surface has
already occurred, the cooktop glass will have to be
replaced. In this case, service will be necessary.
r_
£3
2 49 80635 2
I stallatio
Radiant Downdraft Cooktop
i
Z
{,t3
I structios
r_ ,,if you have questions, call 800.GE.CARES or visit our website at GEAppliances.com
BEFORE YOU BEGIN
Read these instructions completely and carefully.
•IMPORTANT- savetheseinstructionsforlocal
inspector's use.
•IMPORTANT - Observeallgoverning codes
and ordinances.
• Note to Installer - Be sure to leave these instructions
with the Consumer.
• Note to Consumer - Keep these instructions for future
reference.
• Unlessvery knowledgeable inthe installation of this
product, engage a professional installer.
• Proper installation is the responsibility of the installer.
• Product failure due to improper installation is not
covered under the Warranty.
AWARNING - Beforebeginningthe installation,
switch power off at the servicepanel and lock the service
disconnecting meansto prevent power from being switched
on accidentally.When the servicedisconnecting means
cannot be locked,securelyfasten a prominent warning
device,such as atag,to the service panel.
PP9830
IPIPORTANT SAFETY INSTRUCTIONS
IkWARNING -TOREDUCETHERISK
OF FIRE,ELECTRICSHOCK OR INJURYTO PERSONS,
OBSERVETHE FOLLOWING:
[] Installationwork and electrical wiring must be done
by qualified person(s)inaccordance with all applicable
codes and standards,includingfire-rated
construction.
r_ sufficient air isneededfor proper combustion and
exhausting of gasesthrough the flue (chimney)of fuel
burning equipment to prevent back drafting. Follow
the heating equipment manufacturer's guidelines and
safety standards such asthose published by
the National FireProtectionAssociation (NFPA),and
the American Societyfor Heating,Refrigerationand
Air ConditioningEngineers(ASHRAE),and the local
code authorities.
[] When cutting ordrilling into wall or ceiling,do not
damage electrical wiring and other hidden utilities.
[] Ductedfans must always be vented to the outdoors.
• Thisunit must beproperly grounded.
^_WARNING -ToREDUCETHERISKOFFIRE,
USE ONLY METAL DUCTWORK.
r-
r"
i
0
Z
i
Z
{a3
-4
C
-4
i
0
Z
{a3
EXHAUST BLOWER RATINGS
EXHAUST BLOWER SAFETYWARNING
Sufficient air isneededfor proper combustion and exhausting of gasesthrough the flue (chimney)offuel burning equipment to
prevent backdrafting. Followthe heating equipment manufacturer's guide linesand safety standards, suchas those published by
the National FireProtectionAssociation (NFPA),the American Societyfor Heating, Refrigeration andAirConditioning(ASHRAE)and
the local code authorities, when applicable, install any make up (replacement)air system in accordance with local building code
requirements.Visit GEAppliances.comfor available makeup air solutions.
Z
0
i
I.--
U
!--.
Z
u
Z
0
g
_J
_J
Installation Instructions
UNPACKING YOUR COOKTOP
Checkto besurethatall packingmaterialsand
tapehavebeenremoved.Thiswillincludetapeon
controlknobs(ifapplicable),adhesivetape,wireties,
cardboardandprotectiveplastic.Failureto remove
thesematerialscouldresultindamagetothe
applianceoncetheappliancehasbeenturnedonand
surfaceshaveheated.
Vent Grille
Z
i
Sheet Metal
Screws (9)
(8-18 x 3/8"1
Cleaning Cream
Scrub Sponge
Foam Gasket Tape
_,CAUTION:
DO NOT LIFT
FROM VENT
OPENING OR
BUMP GLASS
CAUTION: GLASS ISFRAGILE DO NOT BUMP
EDGE OF GLASS DURING INSTALLATION
Blower
Blower Assembly and (4) Mounting
Nuts (10-32 keps - nuts with lock
washers attached)
4 49 80635 2
Plenum
Vent
Filter
Installation Instructions
PREPARATION
TOOLS AND MATERIALS YOU WILL NEED
• Cutresistantgloves
• Saw
• Flat-bladescrewdriver
° Electrician'spliers
• Duct tape
• Measuringtape or scale
• Carpenter'ssquare
• 7/16" wrench or socketset
• Drilland drill bit
• Sheetmetal screws
• Junction box*
• 3/4" flexible conduit*
• Electricalwire perlocal code*
• Wire nuts*
• Ductwork
•NOTE:Electricalinstalbtion kit JXCK89muy be ordered
separatelyand includes all the parts necessaryto connect
the cooktop to typical rough-inwiring.
ELECTRICALREOUIREIENTS
Thisappliance must besuppliedwith the propervoltageand
frequency, us listedin these Installation Instructions,and
connectedto an individual,properlygrounded branch circuit,
protected by a40-amp circuit breaker or time delay fuses.
All wire connections must be made in accordance with local
codes and properly insulated.Checkwith your localutility for
governing electricalcodesand ordinances. Inthe absence
of localelectrical codes,the National ElectricalCode,ANSI/
NFPANo. 70 - Latest Edition,governing electric range
installations,must be followed.
A copy of the National ElectricalCodecan be obtained by
writing to:
National FireProtection Association
Batterymarch Park
Quincy,MA02260
EffectiveJonuary 1,1996, the National ElectricalCode
requiresthat new, but not existing,construction utilizea
four-conductor connection to anelectric range.When
installing anelectric range in new construction, follow
the instructions inNEWCONSTRUCTIONANDFOUR-
CONDUCTORBRANCHCIRCUITCONNECTION.
!
Z
¢D
r'-
!
O
Z
!
Z
-4
C
-4
!
O
Z
CAUTION:FORPERSONALSAFETY,REMOVE
HOUSEFUSEOROPENCIRCUITBREAKERBEFORE
PREPARINGJUNCTIONBOX.
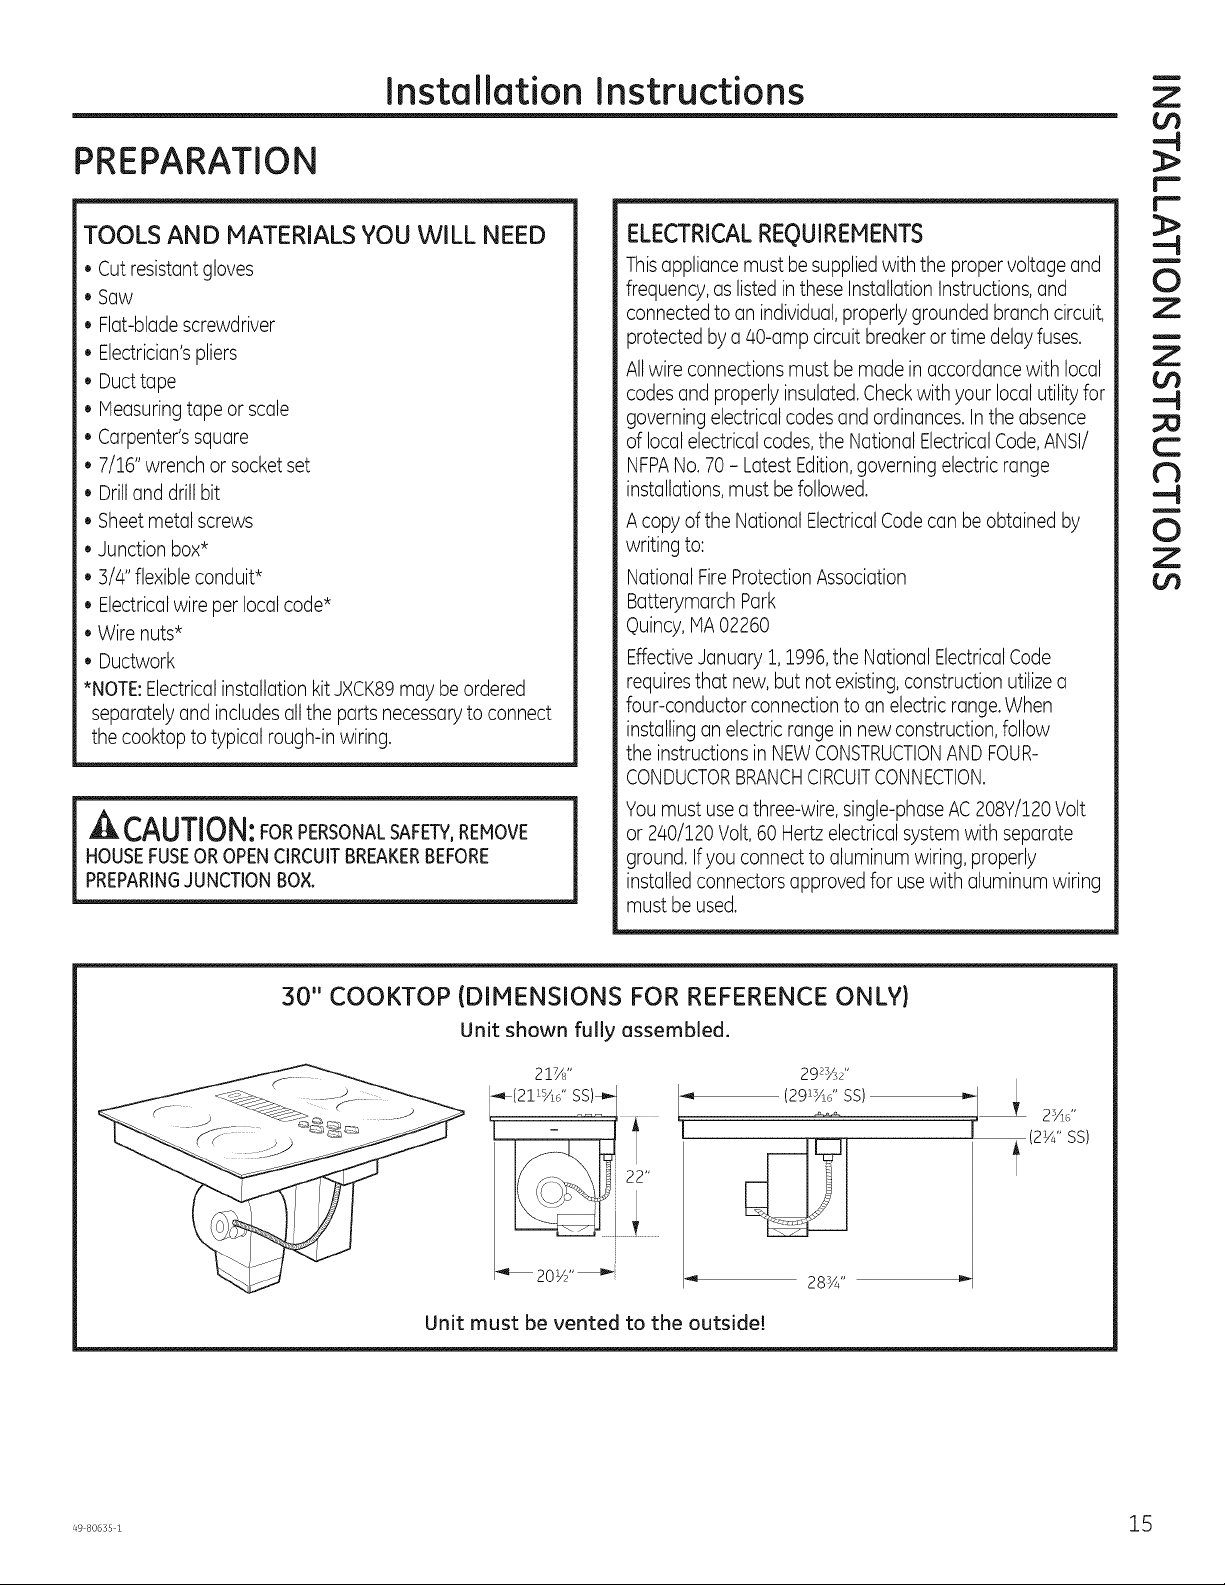
30" COOKTOP (DIMENSIONS FOR REFERENCE ONLY)
Unit shown fully assembled.
-',_(2 ! is/16'' SS)_
Unit must be vented to the outside!
2!7/8''
_ 20Y_"_
You must useathree-wire, single-phase AC208Y/120Volt
or 240/120 Volt,60 Hertz electrical systemwith separate
ground. Ifyou connect to aluminum wiring, properly
installed connectorsapproved for use with aluminum wiring
must be used.
292y_2''
(29zYS ' SS)
.......
"_ 28Y4"
Z
0
i
I--.
U
=)
Installation Instructions
CABINET PREPARATION
rT] PREPARING FOR INSTALLATION
E] PREPARING THE BASE CABINET
Z
u
Z
0
g
_u
_u
Z
i
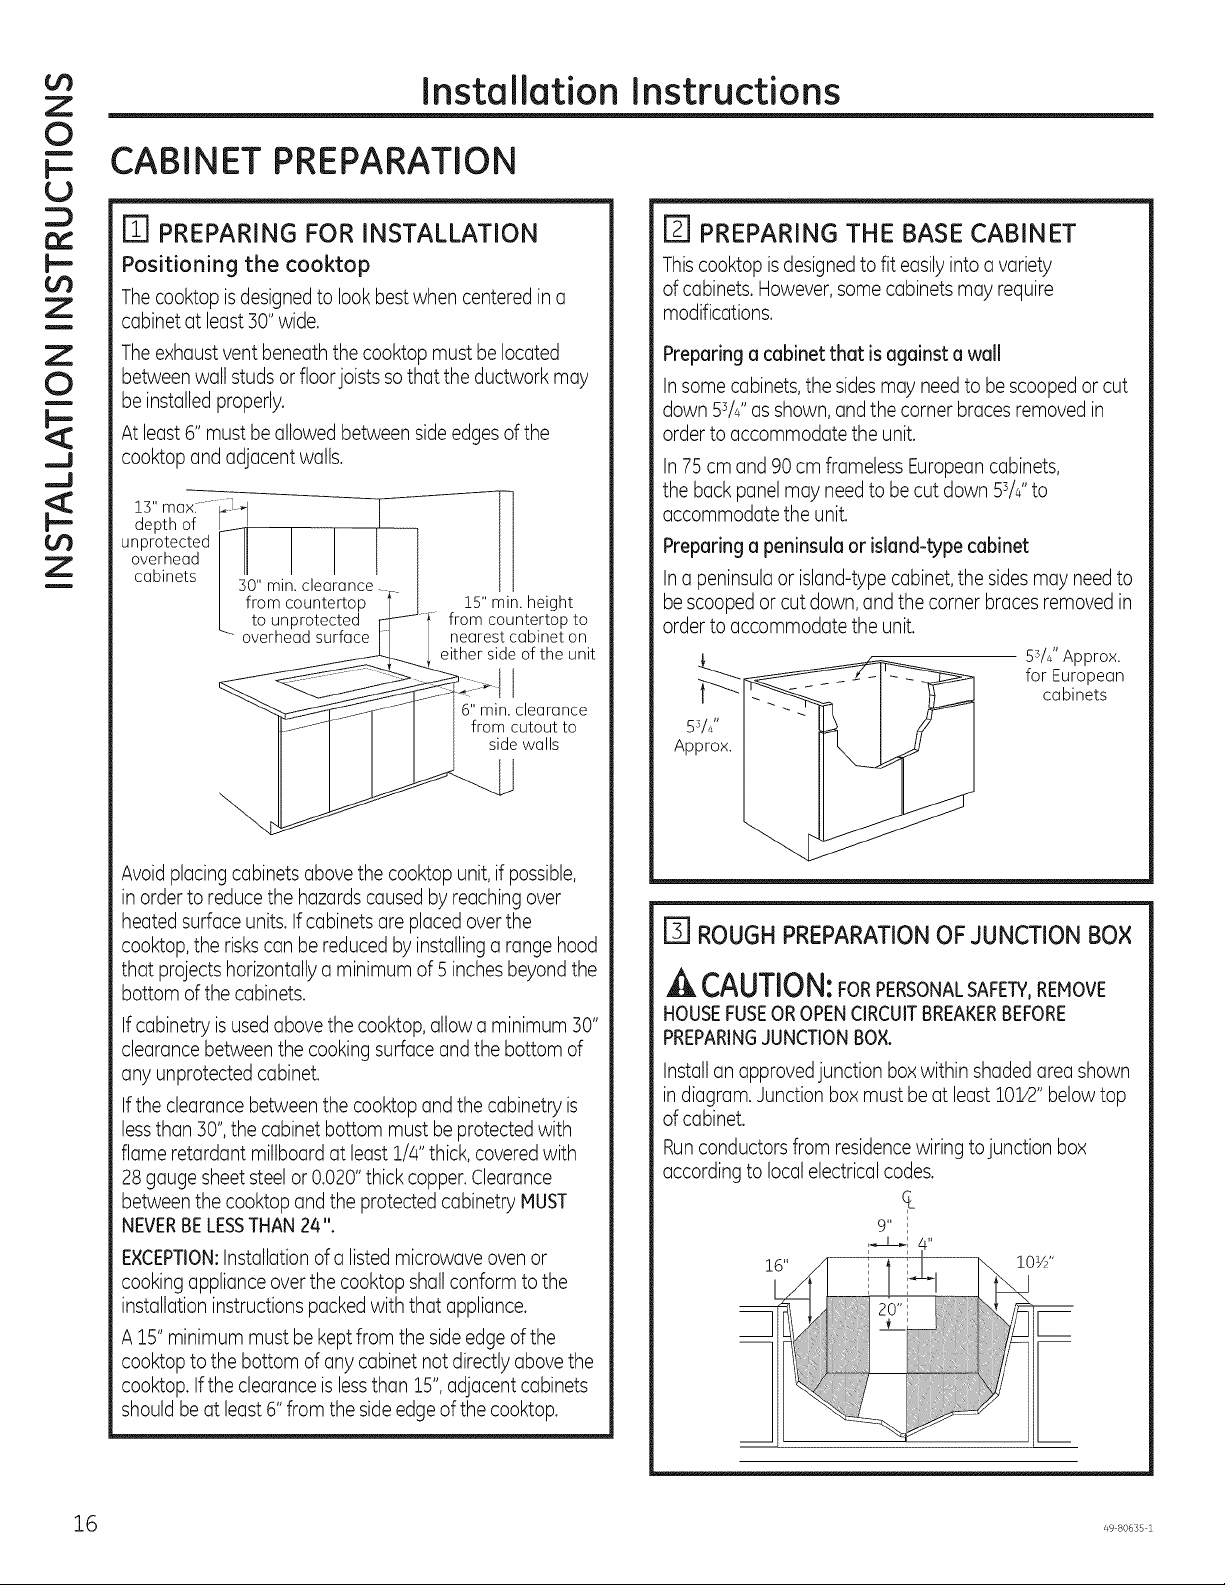
Positioning the cooktop
Thecooktop isdesigned to lookbestwhen centered in a
cabinet at least 30" wide.
Theexhaust vent beneath the cooktop must be located
between wall studs or floor joists sothat the ductwork may
be installedproperly.
At least 6" must be allowed between side edges ofthe
cooktop and adjacent walls.
depth of _
unprotectedI II I
°vet.headI IJ I
cabinets I 3'0"min. clea'rance
I from countertop
/to unprotected
_" overhead surface
15" min. height
from countertop to
nearest cabinet on
either side of the unit
6" min. clearance
from cutout to
side walls
Thiscooktop is designedto fit easilyinto a variety
of cabinets. However,some cabinets may require
modifications.
Preparing a cabinet that is against a wall
Insome cabinets,the sides may needto be scooped or cut
down Ss/J' as shown,and the corner braces removed in
order to accommodate the unit.
In 75 cm and 90 cm frameless Europeancabinets,
the back panel may need to be cut down 5s/4"to
accommodate the unit.
Preparing a peninsula or island-type cabinet
Ina peninsula or island-type cabinet,the sides may needto
be scoopedor cut down, and the corner braces removed in
order to accommodate the unit.
5sA" Approx.
for European
cabinets
5s/4"
Approx.
Avoid placing cabinets abovethe cooktop unit, if possible,
in orderto reducethe hazards causedby reaching over
heated surface units.If cabinets are placed overthe
cooktop, the riskscan be reduced by installingarange hood
that projects horizontallya minimum of 5 inchesbeyond the
bottom of the cabinets.
If cabinetry isused abovethe cooktop, allow a minimum 30"
clearance betweenthe cooking surface and the bottom of
any unprotected cabinet.
Ifthe clearance between the cooktop and the cabinetry is
lessthan 30",the cabinet bottom must beprotected with
flame retardant millboard at least1/4"thick,coveredwith
28 gauge sheetsteelor 0.020"thick copper.Clearance
between the cooktop andthe protected cabinetry MUST
NEVERBELESSTHAN24".
EXCEPTION:Installation of a listed microwave oven or
cooking appliance overthe cooktop shall conform to the
installation instructions packedwith that appliance.
A 15"minimum must be kept from the side edge ofthe
cooktop to the bottom of any cabinet not directly abovethe
cooktop. Ifthe clearance is lessthan 15",adjacent cabinets
should be at least6"from the side edge ofthe cooktop.
F_ ROUGHPREPARATIONOF JUNCTION BOX
,A CAUTION:FORPERSONALSAFEW,REMOVE
HOUSEFUSEOROPENCIRCUITBREAKERBEFORE
PREPARINGJUNCTIONBOX.
Installanapprovedjunctionboxwithinshadedareashown
indiagram.Junctionboxmustbeat leastlO:V2"belowtop
ofcabinet.
Runconductors from residencewiring tojunction box
according to local electricalcodes.
9'*
!6" !OYi
6 49 80635 2
Installation Instructions
CABINET PREPARATION CUTOUTS
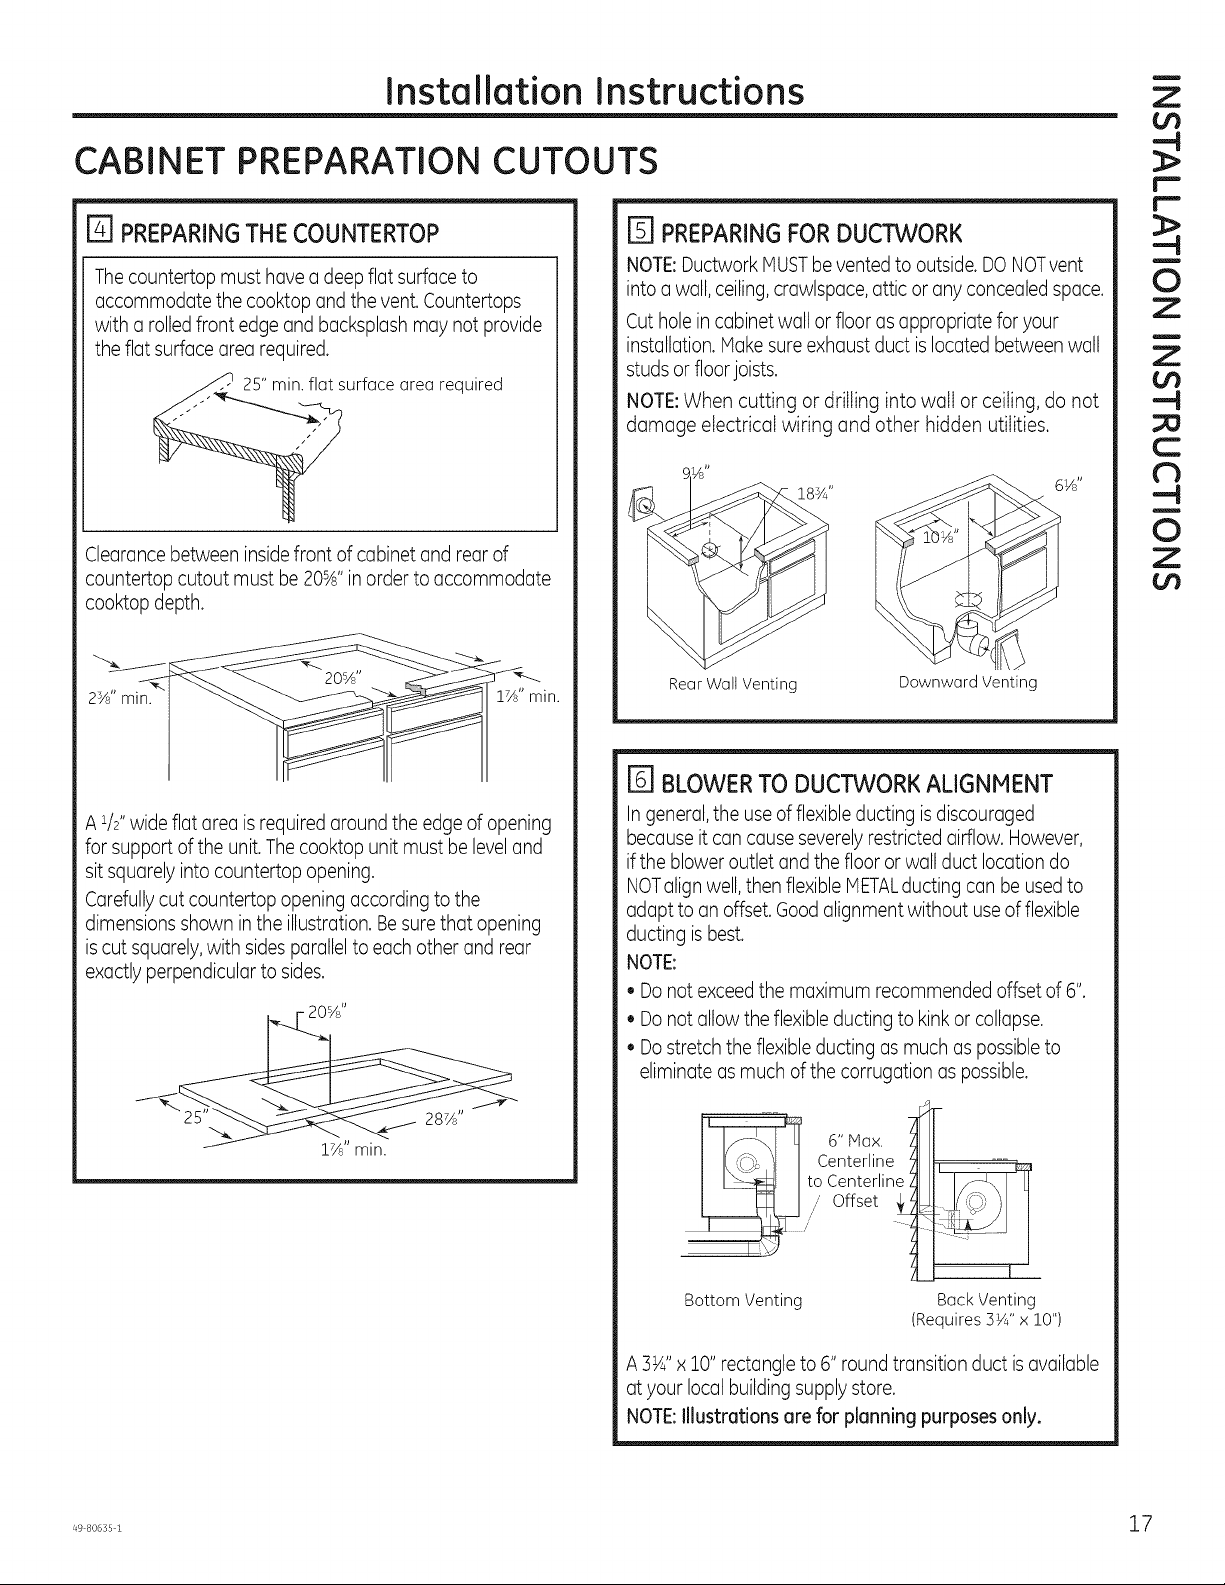
[_ PREPARING THE COUNTERTOP
Thecountertop must have a deepflatsurface to
accommodate the cooktop and the vent. Countertops
with a rolledfront edge and backsplash may not provide
the flat surface area required.
25" min. flat surface area required
Clearance between insidefront of cabinet and rear of
countertop cutout must be 20sA"inorder to accommodate
cooktop depth.
[_ PREPARING FOR DUCTWORK
NOTE:Ductwork MUSTbevented to outside. DONOTvent
into a wall, ceiling,crawlspace, attic or any concealed space.
Cut holeincabinetwall or floor as appropriate foryour
installation. Makesureexhaust duct is located between wall
studsor floor joists.
NOTE:When cutting or drilling into wall or ceiling, do not
damage electrical wiring and other hidden utilities.
183A ''
!
Z
r-
r-
!
0
Z
!
Z
-4
C
d_
--I
!
0
Z
2sA'' min.
A lh" wide flat area is required around the edge of opening
for support ofthe unit.Thecooktop unit must beleveland
sit squarely into countertop opening.
Carefullycut countertop opening accordingto the
dimensions shown in the illustration. Besure that opening
iscut squarely,with sides parallelto each other and rear
exactly perpendicular to sides.
20%"
1_" min.
Rear Wall Venting
Downward Venting
F_ BLOWERTO DUCTWORKALIGNMENT
Ingeneral, the useofflexible ducting isdiscouraged
because it can cause severelyrestricted airflow. However,
ifthe blower outlet and the floor or wall duct location do
NOTalign well,then flexible METALducting can be usedto
adapt to anoffset. Goodalignment without use of flexible
ducting isbest.
NOTE:
• Donot exceedthe maximum recommended offset of 6".
• Donot allow the flexible ducting to kinkor collapse.
• Dostretch the flexibleducting as much as possibleto
eliminate as much ofthe corrugation as possible.
6" Hax.
t°Ccntni_irl_:e _ i_
/,, Offset _
BottomVenting BackVenting
A 3_4"x !0" rectangle to 6" round transition duct is available
at your local building supply store.
NOTE:Illustrations are for planning purposes only.
(Requires3Y4"x 10")
 Loading...