

ge.com
Safety Instructions
......................
2-4
Operating Instructions
Cookware Tips
Dual Surface Element. ...........................7
Fea tures of Your Cooktop
Kitchen Timer
Locking the Cooktop
Pan Detection Feature
Pan Sizing Feature
Surface Elements
Warmer Surface Element
...............................
.........................................
.............................
............................
..................................
................................
10, 11
....................
.....................
6-9
Care and Cleaning
Control I,ock Pad
Glass Cooktop................................13, 14
Packaging Tape
..............................
.................................
13
12
Troubleshooting Tips . . 15, 16
Consumer Support
Consumer Support . . . Back Cover
Product Registration.....................17, 18
Warranty............................................19
Owner's Manual
PP950
PP980
5
9
9
9
9
7
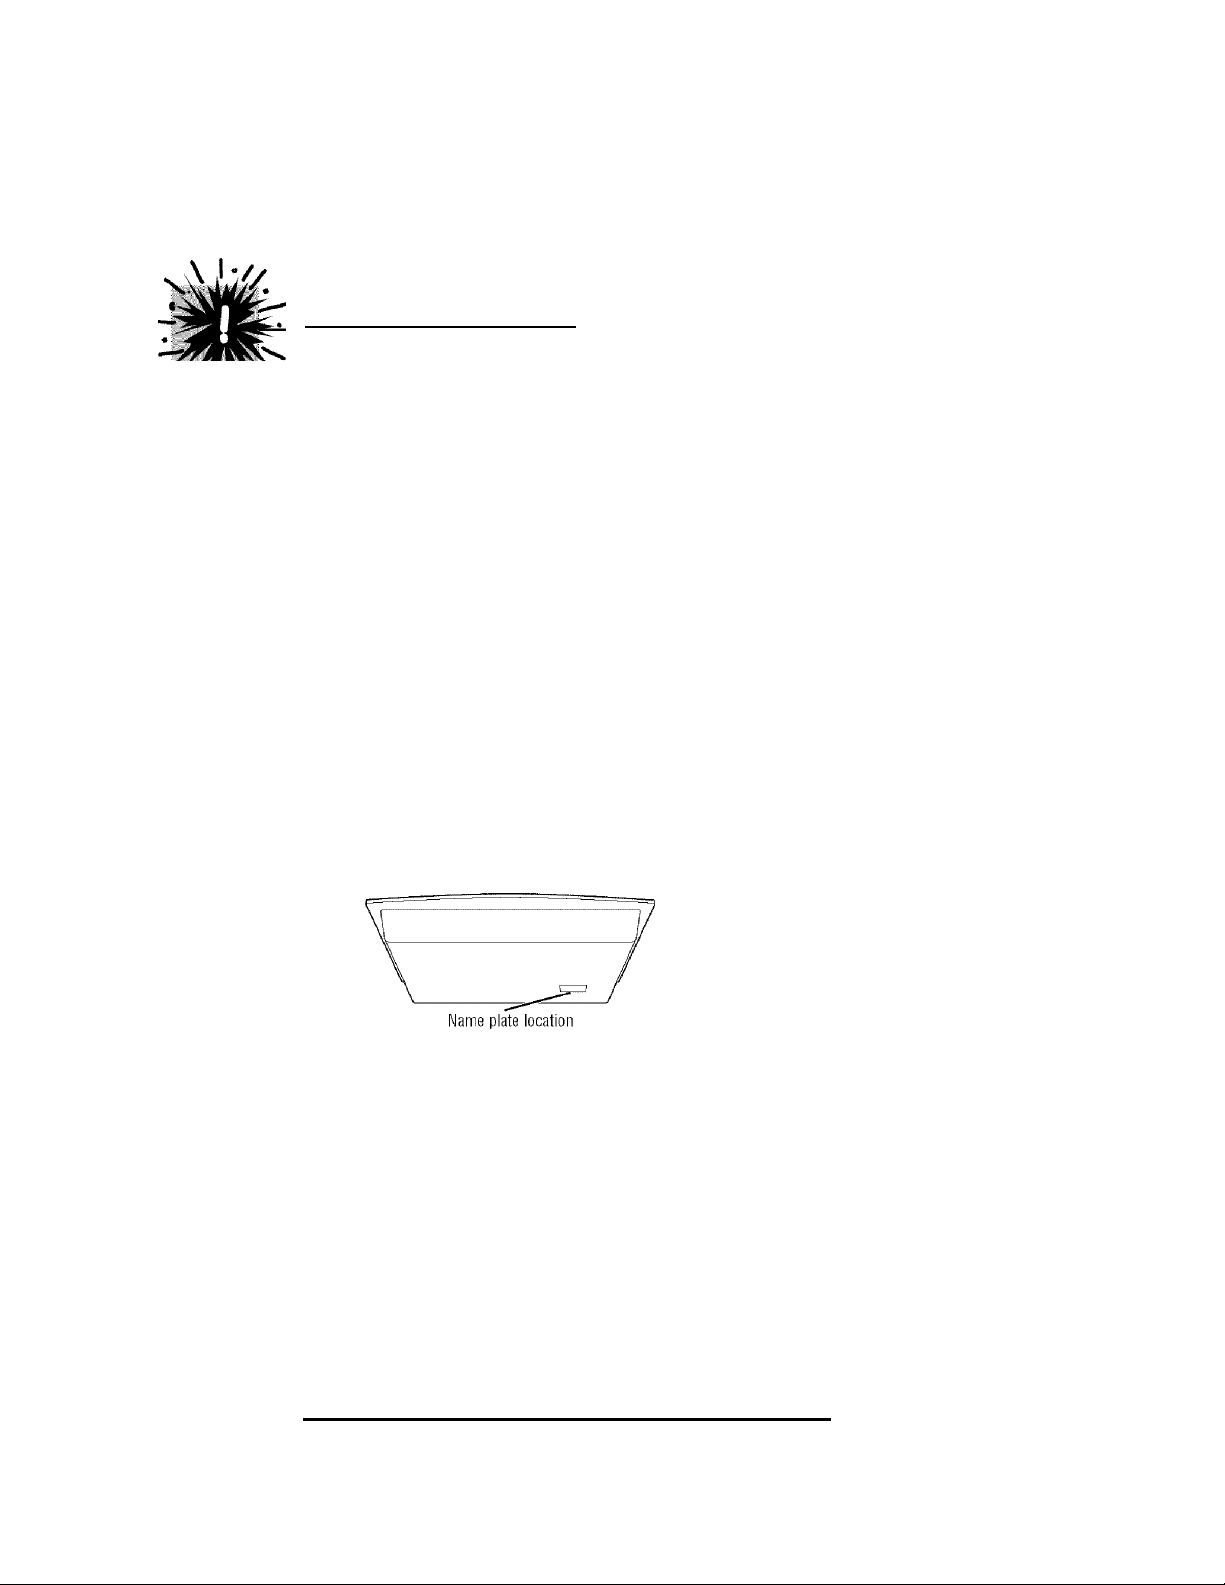
Write the model and serial
numbers here:
Modem
Serial #
You can find them on a label
under the cooktop.
49-80423 09-06 JR
IMPORTANT SAFETY INFORMATION.
READ ALL INSTRUCTIONS BEFORE USING.
A WARNING!
For your safety, the information in this manual must be followed to minimize the risk of fire or
explosion, electric shock, or to prevent property damage, personal injury, or loss of life.
SAF ETY PREC AUTI ONS
When using electrical appliances, basic safety precautions should be followed, including
the following:
Use this appliance only for its intended use as
described in this manual.
i Do not attempt to repair or replace any
part of your cooktop unless it is specifically
recommended in this manual. All other
seracing should be referred to a qualified
technician.
i Before perfbmiing any serace, disconnect
the cooktop power supply at the household
distribution panel by remo\dng the fuse or
switching off the circuit breaker.
i Be sure your appliance is propeify installed
and grounded by a qualified technician in
accordance with the prorided installation
instructions. This appliance must be supplied
with the proper voltage and frequency, and
connected to an indicidual, properly grounded
branch circuit, protected by a circuit breaker
or fuse acceptable for the indicated wnttage
on the name plate.
____________________________
CAUTION: Items of interest to children
should not be stored in cabinets above a
cooktoj>—children climbing on the cooktop
to reach items could be seriously injured.
Alw'ays keep combustible w'all coverings,
curtains or drapes a safe distance from
your cooktop.
Vhvays keep dish tow'els, dishcloths, pot holders
and other linens a safe distance aw'ay from your
cooktop.
! Always keep wooden and plastic utensils and
canned food a safe distance away from your
cooktop. They may become hot and could
cause burns.
Never w'ear loose-fitting or hanging garments
wiiile using the appliance. Flammable material
could be ignited if brought in contact with hot
srrrface elements and may cause severe burns.
! Use orrly dry pot holders—moist or damp pot
holders on hot surfaces may result in burns
frorrr stearrr. Do not let pot holders torrch hot
sirrface elerrrents. Do not use a townl or other
birlky cloth. Such cloths can catch fire on a
hot stttface element.
Do not itse water on grease fires. Never pick ttp
Î Have the installer show you the location
of the circuit breaker or fuse. Mark it for ea.sy
reference.
Do not leave children alone—children
should not be left alone or unattended in an
area where an appliance is in use. They should
never be allow'ed to sit or stand on any part of
the appliance.
Teach children not to play with the controls or
any other part of the cooktop.
i Do not allow anyone to climb, stand or hang on
the cooktop.
COO K ME AT A ND P OULT RY T HORO UGHL Y...
Cook meat and poultry thoroughly—meat to at least an INTERNAL temperature of 1B0°Fand poultry
to at least an INTERNAL temperature of 180°E Cooking to these temperatures usually protects against
2
foodbome Illness.
a flaming pan. Turn the controls off. Smother
a flaming pan on a stttface element by covering
the pan completely with a well-fitting lid, cookie
sheet or .flat tray. Use a mirlti-purpose dry
chemical or foam-type extingtrisher.
Flarrring grease orrtside a pan can be put orrt
by coveting with baking soda or, if available,
using a mtilti-prrrpose drv chemical or
foam-type fire extinguisher.
'When preparing flaming foods under the hood,
tunr the fan on.
______________

A WARNING!
SAF ETY PREC AUTI ONS
ge.com
Do not. touch glass ceramic surface
elements while cooking. Tliis surface may
be hot enough to bum even though it may
appear dark in color. During and after use,
do not touch, or let clothing or other
flammable materials contact the cooking
surface. Note the hot indicator lights and
allow sufficient time for cooling first.
Hot .surfaces may include both the cooktop
and areas facing the cooktop.
( lb minimize tlie possibility of burns,
ignition of flammable materials and
spillage, the handle of a container should
be turned toward the center of the
cooktop without extending over any
nearbv surface elements.
i Always turn off the surface element contiol
before remoting the cookware.
! Use proper pan size—select cookware
haring flat bottoms large enough to cover
the surface element heating element. Tlie
use of undersized cookware \rill expose a
portion of the surface element to direct
contact and may result in ignition of
clothing. Proper relationship of cookware
to surface element will also improve
efficiency.
! Never leave surface elements unattended
at hiah heat settitia's. Boilovers mav cause
smoking and greasy spillovers may ignite.
Glass and ceramic cookware is not
recommended for use \rith your radiant
ceramic glass cooktop,
‘ Keep an eye on foods being fried at high
or medium-high heat settings,
I Foods for frying should be as dry as
possible. FYost on frozen foods or moisture
on fresh foods can cause hot fat to bubble
up and over the sides of the pan.
I f a combination of oils or fats will be used
in fixing, stir together before heating, or as
fats melt slowly.
Ahvays heat fat slowly, and wratch as it heats.
Use a deepfat thennometer wltenever
possible to prevent overheating fat beyond
the smoking point.
Never tiy to move a pan of hot fat,
especially a deepfat fiyer. Wait until the fat
is cool.
Do not store flammable materials near
the cooktop.
Keep the hood and grease filters clean to
main
maintain good ventinu and to avoid prease
fires.
I )o not store or use combustible materials,
gasoline or other flammable vapors and
licjuids in the riciniry of this or any
appliance.
Clean only parts listed in this Owner’s
Manual.
I )o not leave papei’ products, cooking
utensils or food on the cooktop wlien not
in use.
Keep cooktop clean and free of
accumulation of grease or spillovers
wliich may ignite.
Í Never heat unopened food containers.
Pressure buildup may make container
burst and cause injuix.
Never leave jars or cans of fit t drippings
on or near your cooktop.
Never use your appliance for wnmiing or
heating the room.
& *r> o
Woid placing a.ny objects on or near the
keypads in order to prevent accidental
activation of the cooktop controls.
Use little fat for effective shallow or
deepfat fiving. Filling the pan too full of
fat can cause spillovers when food is added.
5

S’
•S
ft
ft
ft
CO
■ft
ft
ft
I
c2
ft
5^
ft
ft
■ft
■I
ft
t:
ft
IMPORTANT SAFETY INFORMATION.
READ ALL INSTRUCTIONS BEFORE USING.
A WARNING!
RAD IANT SUR FACE ELE MENT S
Use care when touching the cooktop. The glass surface of the cooktop will retain heat after the
controls have been turned off.
Avoid scratching tlie glass cooktop.
Tlte cooktop can be scratched with items
such as sharp instruments, rings or other
jewelry.
Ï Never use tlte glass cooktop surfece as a
cutting board.
i Do not place or store items on tojr of tlte
glass cooktop surfece when it is not in use.
Be careful when placing spoons or other
Stirling utensils on glass cooktop surfece
when it is in use. Tliey may become hot
and could cause bums.
.Vvoid heating an empty pan. Doing so may
damage the cooktop and the pan.
Do not allow water, other liquids or grease
to remain on the cooktop.
Do not operate the glass surface elements
if the glass is broken. Spillovers or cleaning
solution may penetrate a broken cooktop
and create a risk of electrical shock.
Contact a qualified technician immediately
should your glass cooktop become broken.
Ï Spilled or bumtron foods may cause
accidental activation or deactivation of the
keypad. Clean the keypad thoroughly, and
controls will resume nomial operation.
To prevent accidental activation of the
cooktojt, do not ¡dace any objects on or
near the keypad.
Clean the cooktop with caution. Always
lock the control panel using tlie control
lock feature and wait until the entire glass
surface is cool before attempting to clean
the cooktop. See the Locking the Cooktop
section for details. If a wet sponge or cloth
is used to tripe spills on a hot surface
element, be careful to avoid steam burns.
Some cleansers can produce noxious
fumes if applied to a hot surface.
NOTE: We recommend that you avoid
\riping any surface element areas until they
have cooled and the indicator light has
gone off. Sugar spills are the exception to
this. Please see the Cleaning the glass
cooktop section.
I To avoid possible damage to the cooking
surface, do not apply the cleaning cream
to the glass surfitce when it is hot.
I Aftei' cleaning, use a dry cloth or paper
towel to remove all the cleaning cream
residue.
Read and follow all instructions and
warnings on the cleaning cream labels.
: l.arge scratches or impacts to cooktops can
lead to broken or shattered glass.
I Use care wlien touching tlie cooktop. Tlie
glass surface of the cooktop \rill retain heat
after the controls have been turned OFF.
I >o not stand on the glass cooktop.
I
I
I
§
a
Vi-'
REA D AN D FO LLOW THI S SA FETY INF ORMA TION CAR EFUL LY.
Cf\" SAVE THESE INSTRUCTIONS
4
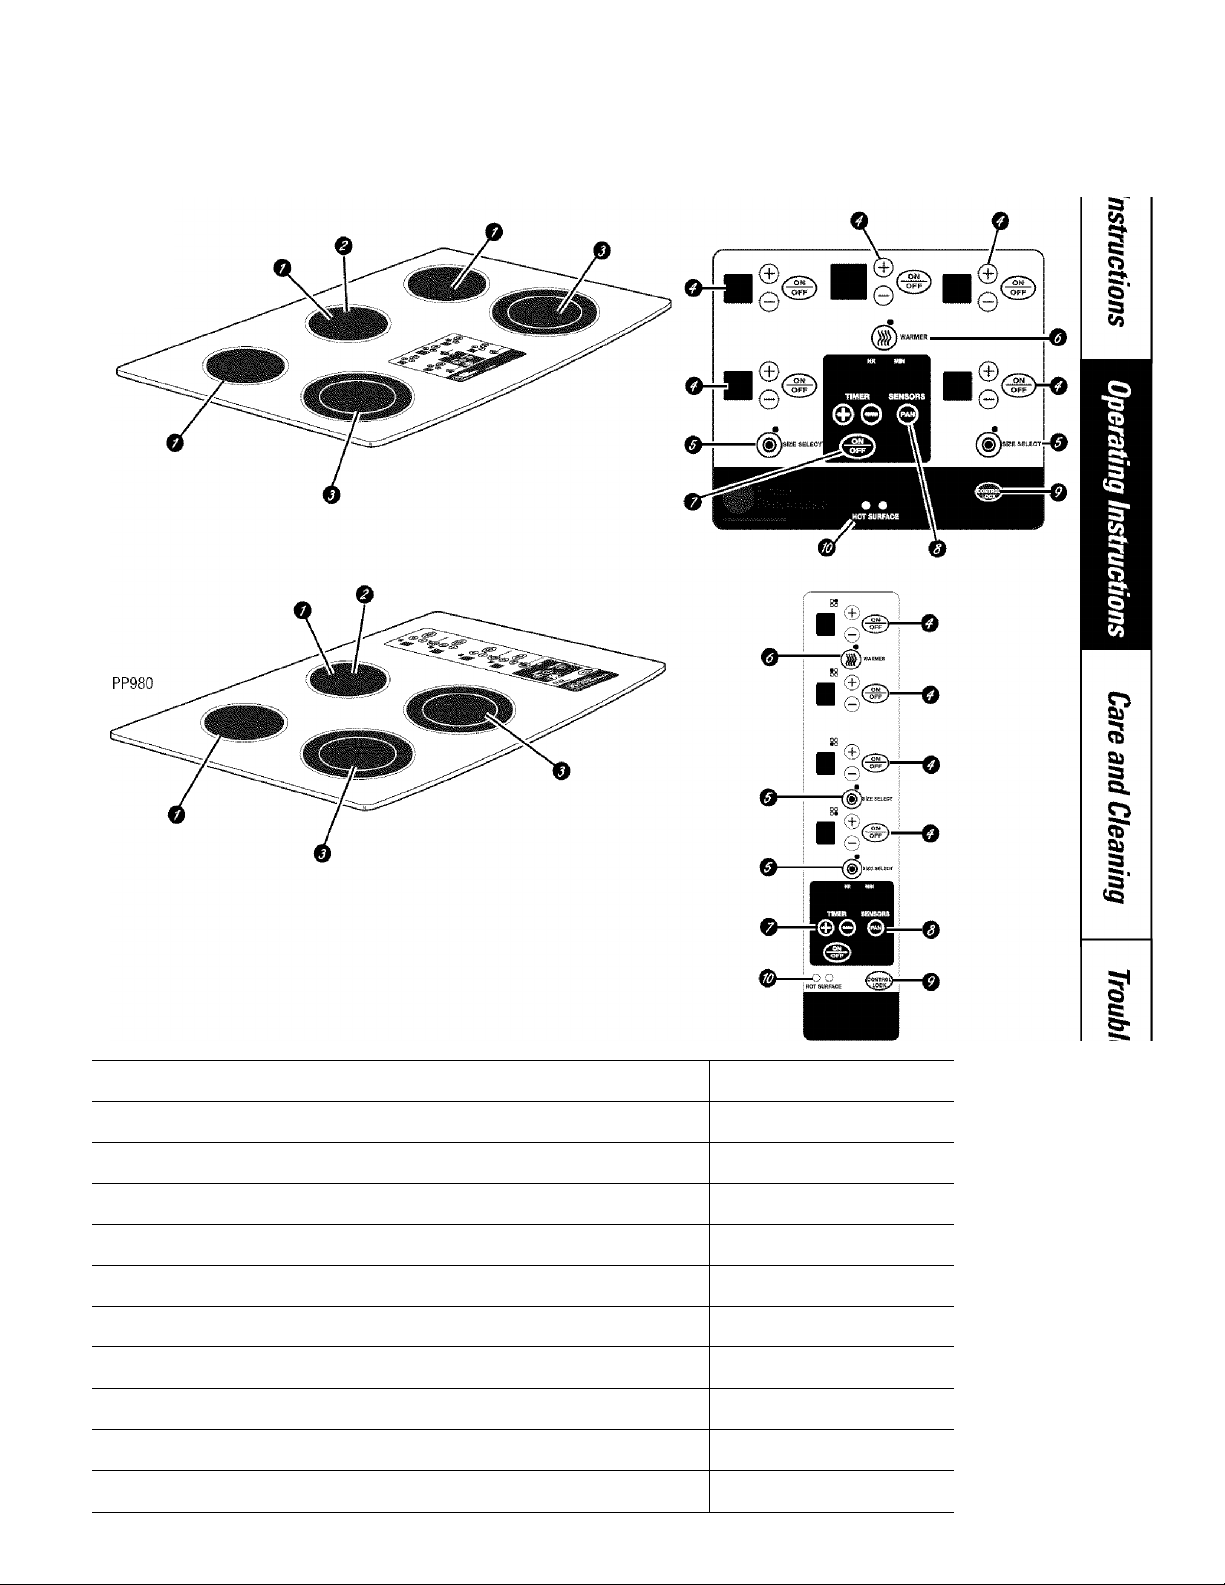
Features of your cooktop.
Throughout this manual, features and appearance may vary from your model.
PP950
ge.com
Feature Index (Features and appearances may vary.)
Q Single Smfare Element 6
^ Wanner Surface Element 8
Q Dual Surface Element 7
Q Sint^le Surface Element (’ontrol Pad 6
^ Dual Surface Element ("ontrol Pad 7
Q Wanner Surface Element C'ontrol Pad 8
Q Kitchen Timer (Control Pad
@ Pan Sensor (Control Pad 9
0 Conti ol Lock Pad 9
0 Hot Surface Indicator Lights (one for each surface element) 9
Explained on page
I
I
9
I
5

§
ft
I
Using the surface elements.
Your new Profile Cooktop makes an eloquent statement of style, convenience, and kitchen planning flexibility. Whether you
chose it for its purity of design, assiduous attention to detail, or for both of these reasons—you'll find that your Profile
cooktops superior blend of form and function will delight you for years to come.
è'
«/a
S’
•S
ft
ft
ft
CO
■ft
ft
ft
I
c2
This cooktop contains several new features such as pan detection and pan sizing. The touch controls give you precise
control of the surface elements. You can quickly switch between a steady low heat and full power or any setting in
between. The information on the following pages will help you operate and maintain your cooktop properly.
NOTE:
Throughout this manual, features and appearance may vary from your model.
AtoMt the radiant surface elements.
Never cook directly on the glass.
Always use cookware.
Always center the pan on the surface
element you are using.
IjRAhUNK
Do not slide cookware across the
control or cooktop surface because
it can scratch the glass. The glass is
scratch-resistant, not scratchproof.
The radiant cooktop features heating
elements beneath a smooth glass smiace.
Cooktop tem|>eratures increase with
the munber of surface elements that
are on. With 3 or 4 elements turned on,
cooktop temperatures are high. .AJwavs
use caution when touching it.
The indicator lights will come on next
to the Warmer and Dual burners when
activated, lights also activate for the Pan
Detect and Control Lock features when
they are turned on. The indicator lights
will go off when the surface element or
feature is turned off.
The appropriate HOT SURFACE indicator
light will glow when its corres{>onding
radiant element is turned on and will
remain on until the surface has cooled
to approximately l.b()°F.
NOTE:
Hot surface indicator light will:
Come on when the surface element is
lurned on.
Stay on even after the element is turned off.
i Glow brightly until the element has cooled
below 150°F.
NOTE: A slight odor is normal when a new
cooktop is used for the first time. It is caused by
the heating of new parts and insulating materials
and will disappear in a short time.
It is safe to place hot cookware (fiom
the oven or surface) on the glass cooktop
w hen the surface is cool. Never place
cookware on the control area.
Even aftei’ the surface elements are
turned off, the glass cooktop retains
enough heat to continue cooking. To
avoid overcooking, remove pans from
the surface elements wfien the food is
cooked. Avoid jjlaring utensils that could
become hot or plastics that could melt
on the surface element until it has cooled
completely.
M Water stains (mineral deposits) are removable
using the cleaning cream or full strength white
vinegar.
■■■ Use of window cleaner may leave an
iridescent film on the cooktop. The cleaning
cream will remove this discoloration.
Don't store heavy items above the cooktop.
If they drop onto the cooktop, they can cause
damage.
"Do not use the surface as a cutting board.
Radiant Surface Elements
The controls for the radiant surface
elements allow' for T1 different heat
settings; l.ow', 1-9 and High. The heating
element may not rfsibly glow' at low' heat
settings.
The suiface heating element will cvde on
and off to maintain )’oui selected control
setting.
Each radiant surface element has a
temperature limiter w'hich protects the
glass cooktop from getting too hot.
NOTE: This cooktop has a rapid heat-up feature.
"If the cooktop is cool when turned on, it will
glow red for a short period of time until the
desired power setting Is reached.
If the cooktop is already warm, the rapid
heat-up feature may not activate.
6

OFF
0
OR
©
OFF
©
OR
0
©
OR
0
SIZE SELECT
Single Surface Element
To turn on a sintjle surface element:
Touch the ON/OFF j>ad, then touch
^— the f+J/^Jpad.
Use the (+)/(-) jjdd to choose the
desired power setting. The control
will beep each time a pad is touched.
Dual Surface Element
The dual surface element has a pan
sizing sensor which will automatical!)' set
the small or large suiface element to
match the size of your pan (see the
Pan Sizing
automatic jran sizing sensor and select
the small or large suiface element:
VJi Touch the dual surface element
^ O/V/Off pad.
^ Use the {+)/f-^pad to set the desired
section). To override the
power setting.
Using
Warmer Surface Element
To turn on the warmer surface element:
Touch the ON/OFF pad, then touch
the WARMEEpad. The suiface
element will turn on to w'amier
power setting W1 (low).
2 Use the (+)/H pvl to choose
additional settings of W2(medium)
and W3 (high).
To turn off the w'amier power settings,
touch the ON/OFF pad. To change from
the wanner settings to regular cooldng
settings, press the WARMER pad. The
surface element will be on pow'er setting
I. (low). The suiface element inav then
be set to the desired setting using the
M/f-jpads. To turn off the surface
element, touch the ON/OFF pad again.
Food Type Control Setting
Breads/Pastries W1 (LOW)
Sauces W2 (Medium)
Soups (cream) W2 (Medium)
Stews W2 (Medium)
Vegetables W2 (Medium)
Hot Beverages W3 (HIGH)
Soups (liquid) W3 (HIGH)
The chart above shows initial suggested settings
only. The temperature, type and amount of food,
and the time held will affect the quality of the
food.
ge.com
To turn off'a single surface element,
touch the ON/OFF pad again.
^ Touch the SIZE SELECT once to
turn on the large surface element.
Touch the pad again to turn on the
small surface element.
Wien the indicator light next to the
SIZE SELECT pad is on, the large surface
element is on. When it is off, the small
suiface element is on.
To turn the dual surface element off,
touch the ON/OFF pad.
CAUTION: Do not warm food on the WARMER
for more than two hours.
Do not use plastic wrap to cover food. Plastic
may melt onto the surface and be very difficult
to remove.
Use only cookware recommended for top-of-range
cooking.
The WARMER will keep hot, cooked food
at sening temperature. .Alwatt; start with
hot food. Do not use to heat cold food.
Placing uncooked or cold food on surface
warmer could result in foodbarne illness.
For best results, all food on the
WARMER should be covered with a lid or
aluminum foil. Wien w'amiing pastries
or breads, the cover should be r ented to
all ow moisture to escape.
j'Uways use potholdeix or oven mitts when
removing food from the WARMER as
cookware and ¡jlates will be hot.
A hot surface indicator light will glow'
when the glass suiface is hot and tvil!
remain on until the surface has cooled
below' l.aO°F.
I
I
S'.
I
CB
su
a
sa.
D
cB*
a
3‘
«3

§
*
I
Using the smface elements.
Fault Code ("F" and a number in the display!
If an error occurs in the control
operation, a. fault code will flash “F”
with a number in the nd the
control will produce an audible sound.
,After cooling, touch the CONTROL
LOCK pad again to reset the conti ol.
Again attempt to set the control to
the desired cooking setting.
«/a
S’
•S
ft
ft
ft
CO
■ft
ft
ft
I
c2
To correct:
|~^ Touch the CONTROL LOCK pad to
reset the contiol.
Attempt to set the control to the
desiied rooking setting.
If the fault rode is not cleared, allow
the cooktop to cool rompleteh’.
If the fault code is still not cleared,
turn off the cooktop jjower at the
circuit breaker or fuse box for one
minute.
If the fault code reappears, call for
6
senice.
5

OFF
©-©
TIMER .
How to Lock the Cooktop
IMPORTANT: a. convenience, you
ran lock the entire cooktop at am’ time
when it is not in use or before cleaning,
I.A>cking the cooktop will jrrevent suiiace
elements from being turned on
accidentiilly.
To lock the cooktop:
Touch and hold the CONTROL LOCK jtad
ftrr 3 seconds.
A two-beejj signal will sound, the word
“l .OCK” will apjtear in the TIMER display,
Howto Operate the Kitchen Timer
NOTE: The kitchen timer will NOT turn off the
surface elements when the time reaches 00:00.
To ojrerate the kitchen timer, use the
j>ads below' the TIMER display.
Touch the ON/On= pad and then
touch the (+}/(-) pad to choose the
desired time setting. If the (+)/(-)pdd is
held for several seconds, the timei’ will
increase or decrease at a faster rate.
Using the Pan Detection Feature
This feature automatically turns off a
smface element after 60 seconds it'a pan
is absent from the surface element. The
power level display will flash until the
smface element automatically turns off
when the control detects the absence
of a pan.
To activate and deactivate pan detection for
all surface elements:
Touch the PAN pad. (At least one surface
element must be on.) The displav will
flash “P.AN ON” when the pan detectiim
feature is on.
.A, signal will sound and a light next to
the PAN pad will indicate whether the
feature is active. If the light is on, pan
ge.com
and the Control Lock light will turn on,
indicating that the cooktop is locked.
If the cooktop is locked while the suiface
elements or timer are in use, they will
automatically turn off
To unlock:
Touch and hold the CONTROL LOCK pad
again for 3 seconds.
A tw'o-beep signal will sound, and the
Control f.ock light will go out, indicating
that the cooktojj is unlocked.
.Alter you have chosen youi’ desired time,
the timer will automatically start to count
down from the houi’s/minutes that you
have selected. .After the timer counts
down to the last minute, it will count
down in seconds until 00:00, .After the
time has mn out, the control will beep
twice eveiy five seconds until the timer is
turned off. Touch the ON/OFF jjad to turn
the timer off.
detection is on, and if the light is off,
pan detection is off. When the pan
detection feature is disabled, the pan
sizing feature is also disabled.
NOTES:
For this feature to work properly, the
jran diameter must be greater than 4.0
inches and centered on the suiface
element.
This feature may not operate pro
with rounded, nmed or waiped pan
bottoms (see the Types of Cookware
section).
This feature will not work with
glass-ceramic/stoneware co( ikware
(see the TypesofCookwaresection).
I
I
S'.
I
CB
su
a
sa.
D
cB*
a
3‘
«a
Using Pan Sizing
This feature is only used on the dual
smface element when the pan detection
feature is enabled, Wften a small ¡ran is
¡rlaced on the smface element, the small
smface element will activate. Wlien a pan
larger than 6.0 inches is ¡rlaced on the
suiface element, the large surface
element ivill automaticalk'activate. This
feature may be overridden for a single
cooldng session while leaving the ¡ran
detection feature active (see Dual Surface
Element sectum).
To turn off this feature and the pan detection
feature:
Touch the PAN pad.
The light next to the pad will go out,
indicating that pan features are turned off'.
NOTE: The pan must be centered over the
surface element for this feature to work properly.
9

§
*
I
Selecting types of cookware.
The following information wili help you choose cookware which wiil give good performance on glass cooktops.
Pan Detection/Sizing will work properly with these py^es of cookw'are.
Pan Detection/Sizing will not work with these tvpes of pans.
«/a
S’
•S
ft
ft
ft
CO
■ft
ft
ft
I
c2
Check pens for flat bottoms by
using a straight edge.
Pans with rounded, curved,
ridged or warped bottoms are not
recommended. Pan Detection/Sizing
may not work properly with these
types of pans.
Stainless Steel:
recommended
Aluminum: 0*
heavyweight recommended
Good conductivitv', .AJuminum lesidue
sometimes appears as scratches on the
cooktop but can be removed if cleaned
immediately. Because of its low melting
point, thin wnight aluminum should not
be used.
Copper:
recommended
Copper Bottoms: ©*
usable, but not recommended
Pans with cojrper bottoms may leave
residue apjreaiing as scratches. Remove
any residue immediateh’ after use. Do not
let a pot boil diy. Ov’erheated metal can
bond to the glass cooktop and leave a
pennanent stain if it is not removed
immediatelv.
Porcelain Enamel-Covered Cast Iron: ^
recommended
As long as the cookw'are is covered
comjrletely with porcelain enamel, this
cookware is recommended. Caution is
recommended for cast-iron cookware
that is not completely covered with
smooth porcelain enamel, since it may
scratch the glass ceramic cooktop.
Glass-Ceramic/Stoneware: ^
not recommended
Poor perfimnance. May scratch the
surface.
NOTE: Use pans that match the diameter
of the surface element Cooking performance
will not be as good if the cookware is either
smaller or larger than the surface element.
Do not place wet pans
on the glass cooktop.
Do not use woks with support
rings on the glass cooktop.
Use flat-hottomed woks
on the glass cooktop.
70
For Best Results
: Place only diy pans on the surface
elements. Do not place lids on the
surface elements, paiticulaily w'et lids.
: Do not use woks that have support
rings. This ripe of wok will not heat on
glass surface elements.
Use onh’ a flat-bottomed wok,
available from man)' popular cookware
manufacturei's. The bottom of the wok
should have the same diameter as the
surface element to insure projaer
contact.
■s« >me sjrecial cooking procedures
I ecjuire specific cookware such as
pressure cookers, deej>fat byers, etc.
Ml cookw'are must have flat bottoms
that match the size of the surface
elements.

Right!
Wrong!
Nate: Flat-bottomed cannerò are
required for glass cooktops.
Observe the Following Points in Canning
When canning with water-bath or
piessure canner, larger-diameter pots
may be used. This is because boiling
water temperatures (even under
pressure) are not hamtful to the
cooktop siafaces smToimding the
surface elements.
HOWEVER, DO NOT USE lARGEDLUMETER CANNERS OR OTHE1Í
LARGE-DIAMETER POTS FOR
FRYING OR BOILING FOODS
OTHER THAN WATER. Most syrup
or sauce mixtures—and all types of
fiyiiig—cook at temperatures much
higher than boiling water. Such
tem¡>eratures could eventuallv harm
the glass cooktop surfaces.
Be sure the canner fits over the
m
center of the surface element.
If your cooktop or its location
does not allow the canner to be
centered on the surface element,
use smaller-diameter pots for
good canning results.
Flat-bottomed canners must be
7
used. Do not use canners with
flanged or lijtpled bottoms (often
found in enamelware) because
they don’t make enough contact
with the surface elements and
take a long time to boil water.
When canning, use recipes
and procedures from leputable
sources. Reliable recipes and
procedures are available from
the manufacturer of your canner;
manufacturers of glass jars for
canning, such as Ball and Kerr
brand; and the United States
Department of Agriculture
Extension SeiMce.
ge.com
Remember that canning is a
process that generates large
amounts of steam. To avoid btmis
from steam or heat, be careful
when canning.
NOTE: If your house has low voltage,
canning may take longer than expected,
even though directions have been
carefully followed. The process
time will be shortened by:
(I) using a pressure canner, and
{2} starting with HOT tap water for fastest
heating of large quantities of water
CAUTION:
Safe canning requires that harmful
microorganisms are destroyed and
that the jars are sealed completely.
When canning foods in a water-bath
canner, a gentle but steady boil must be
maintained for the required time. When
canning foods in a pressure canner, the
pressure must be maintained for the
required time.
'■ After you have adjusted the controls,
it is very important to make sure the
prescribed boil or pressure levels are
maintained for the required time.
Since you must make sure to
process the canning jars for the
prescribed time, with no interruption
in processing time, do not can on any
cooktop surface element if your canner
is not flat
I
».
I
I
a
».
cB*
»
»
I'
77

Care and cleaning of the cooktop.
Be sure electrical power is off and all surfaces are cool before cleaning any part of the cooktop.
How to Remove Protective Shipping Film and Packaging Tape
fiiretully grasp a comer of the protective
shipping film with your fmgei’s and slowly
peel it from the apjrliance sui face. Do
not use an)’ shaiy> items to remove the
film. Remove all of the film before using
the appliance foi- the firet time.
To assure no damage is done to the
finish of the product, the safest way to
remove the adhesive from packaging tajre
on new appliances is an apjrlication of a
household liquid dishwashing detergent.
Apply with a soft cloth and allow to soak.
NOTE: The adhesive must be removed from all
parts before using the cooktop. It cannot be
removed if it is baked on.
5^
72

Cleaning the glass cooktop.
Control Lock Pad
ge.com
Clean your cooktop after
each spill. Use ceramic
cooktop cleaner.
As a convenience, you can lock the
entire cooktop at any time when it is
not in use or before cleaning.
l.ocking the cooktop will jrrevent
surface elements from being turned
on accidently.
Normal Daily Use Cleaning
ONLY use ceramic cooktop cleaner on
the glass cooktop. Other creams may not
be as effective.
To maintain and protect the surface of
your glass cooktop, follow these stejrs:
Before using the cooktop for
the first time, clean it with ceramic
cooktop cleaner. This helps protect
the top and makes cleanup easier.
Daily use of ceramic cooktop
cleaner will help keep the cooktop
looking new.
Begin by locking the cooktop; see
the Locking the Cooktop section. Use
the same cleaning methods as those
described for the glass-ceramic toj>.
^ Shake the cleaning cream well.
Apply a few drops of ceramic
cooktop cleaner directly to the
cooktop.
Use a paper towel or cleaning pad
¥
for ceramic cooktops to clean the
entire cooktop suiface.
Use a dry cloth or paper towel
to remove all cleaning residue.
No need to rinse.
NOTE: It Is very important that you DO NOT
heat the cooktop until it has been cleaned
thoroughly.
Use a cleaning pad for ceramic
cooktops.
The ceramic cooktop scraper
and all recommended supplies are
available through our Parts Center.
See Instructions under “To Order
Parts" section on next page.
NOTE: Do not use a dull or
nicked blade.
Burned-On Residue
WARNING: DAMAGE to your glass surface
may occur If you use scrub pads other than the
pad included with your cooktop.
Allow the cooktop to cool.
Spread a few drops of ceramic
cooktop cleaner on the entire
burned residue area.
Using the included cleaning
pad for ceramic cooktops, rub the
residue area, applying pressure
as needed.
Heavy, Burned-On Residue
Allow the cooktop to cool.
LJse a single-edge razor blade
7
scraper at approximately a 45°
angle against the glass surface
atid scrape the soil. It will be
necessaiy to apply pressure to
the razor scraper in order to
remove the residue.
After scraping with the razor
scraper, spread a few drops of
ceramic cooktop cleaner on the
entire burned residue area. Use the
^ If ant' residue remains, repeat the
steps listed above as needed.
For additional protection, after all
residue has been removed, jtolish
the entire surface with ceramic
cooktop cleaner and a paper towel.
cleaning pad to remove any
remaining residue.
For additional protection,
after all residue has been
removed, ¡rolish the entire
surface with ceramic cooktop
cleaner and a paper towel.
75

Cleaning the glass cooktop.
Metal Marks and Scratches
|~^ Be careful not to slide pots and
pans across your cooktop. It will
leave metal markings on the
cooktop surface.
These marks are removable using
the ceramic cooktop cleaner with
the cleaning pad for ceramic
cooktops.
Glass surface—potential for permanent damage.
If pots with a thin overlay of
aluminum or copper are allow’ed
to boil diy; the overlay may leave
black discoloration on the cooktop.
This should be removed
immediateh’ before heating
again or the discoloration may
be pemianent.
WARNING: Carefully check the bottom of pans
for roughness that would scratch the cooktop.
Vi
5^
Q
Q
Q
Our testing shows that if
YOU are cooking high sugar
mixtures such as jeliy or
fudge and have a spiliover,
it can cause permanent
damage to the giass surface
unless the spillover is
immediately removed.
Damage from Sugary Spills and Melted Plastic
Turn off all surface elements.
Remove hot pans.
Wearing an oven mitt:
a. Use a single-edge razor blade
scraper (ceramic cooktop
scraper) to move the spill to
a cool ar ea on the cooktop.
b. Remove the spill with
paper towels.
Any remaining sjrillover should be
left until the surface of the cooktop
has cooled.
Don’t ttse the surface elements
again irntil all of the residtte has
been completely r emoved.
NOTE: If pitting or Indentation in the glass
surface has already occurred, the cooktop glass
will have to be replaced In this case, service will
be necessary.
To Order Parts
To order ceramic cooktop cleaner
and the cooktop scr aper; please call
our' toll-free number':
National Parts Center
Ceramic Cooktop Cleaner
Ceramic Cooktop Scraper
Kit
........................................
(Kit Includes cream and cooktop scraperj
Cleaning Pads for
Ceramic Cooktops ..................XWXI0X350
m.m.2D0Z.
. ./WXWX300
. .XWXWX0302
. .XWB64X5027
I
I
I
§
a
14

Before you call for service.
Troubleshooting Tips
( ; j Save time and money! Review the charts on the following
'**'*”'*^^ psgfes first and you may not need to call for service.
Problem Possible Causes What To Do
Surface elements will not
maintain a rolling boil
or cooking is slow
Surface elernents do
trot work properly
Scratches on cooktop
glass surface
Improper cookware
being used.
Cooktop controls
improperly set.
Incorrect cleaning methods
being used.
Cookware with rough bottoms
being used or coarse particles
(salt or sand) were between
the cookware and the surface
of the cooktop.
Cookware has been slid
across the cooktop surface.
• Use pans which ai'e absolutely flat and match
the diameter of the surface element selected.
• Check to see the c.oi rect conti'ol is set for the surface
element you are using.
• Use recommended cleaning procedures. See the
Cleaning the glass cooktop section.
• To avoid scratches, use the recommended cleaning
procedures. Make sure bottoms of cookware are clean
before use, and use cookware with smooth bottoms.
ge.com
I
I
».
I
(fl
ïb
a>
»
(§
I"
S
g5
Areas of discoloration
on the cooktop
Plastic melted to
the surface
Pitting (or indentation)
of the cooktop
Frequent cycling
off and on of
surface elements
Unresponsive keypad Keypad is dirty. • Clean the keypad.
Pan detection/sizing
not working properly
..................
Food spiDovers not cleaned
before next use.
Hot surface on a model
with a light-colored glass
cooktop.
Hot cooktop came into
contact with plastic placed
on the hot cooktop.
Hot sugar mixture spilled
on the cooktop.
Improper cookware
being used.
A fuse in your home may be
blown or the circuit breaker
tripped.
Improper cookware
being used.
Pan is improperly placed. • Make sure the pan is centered on the corresponding
Cooktop control
improperly set.
• See the Cleaning the glass cooktop section.
• This is normal. The surface may appear discolored
when it is hot. This is temporaiy and will disappear
as the glass cools.
• See the Glass surface - potential for permanent damage
section in the Cleaning the glass cooktop section.
• Call a qualified technician for replacement.
• Use only flat cookw'are to minimize cycling.
See the Radiant surface elements section.
• Replace the fuse or reset the circuit breaker.
• Use a flat, metallic pan that is 4.0'' or larger.
surface element.
• Check to see that the control is set projrerh’.
CB
a>
a
».
cB*
»
»
3‘
«3
??
I
I
s?
15
ë“
I

Before you call for service.
Troubleshooting Tips
Save time and money! Review the charts on the following
pages first and you may not need to call for service.
Problem Possible Causes What To Do
S’
•S
ft
ft
ft
CO
■ft
ft
ft
I
c2
TEMP appears
in the display
Surface element is
glowing red when it
should be on a low
power setting
"F" and a number You have a fault code. • Write down the “F” and the number and touch
appear in the display
and the cooktop
produces an audible
sound ........................
Cooktop too hot and the
time-out feature activated.
The rapid heat-up feature
activated.
• Allow the St
1 hour befo
• The cooktop has a rapid heat-up feature and is
designed to do this. See the Radiant surface elements
section.
the CONTROL LOCK pad. See the Fault code section.
irface element(s) to cool for 1/2 to
re usioi^ again.
16

GE Service Protection Plus'
GE, a name recognized worldwide for quality and dependability’, offers you
Service Protection Plus '"—comprehensive protection on all your appliances-
No Matter What Brand!
Benefits Include:
• Backed by GE
• AD brands covered
• Unlimited service caDs
• AD parts and labor costs included
• No out-of-pocket expenses
• No hidden deductibles
• One 800 number to call
You will be completely satisfied with our service protection or you may request your money back
on the remaining value of your contract. No questions asked. It’s that simple.
Protect your refrigerator, dishwasher, washer and diyer, ivmge, TV, VUR atid much more—any brand!
Plus there’s no extra cliarge for emergency service and low monthly financing is available. Even icemaker
ccn'eiage and food spoilage protection is offered. You can rest easy, knowing that all yotir valuable
household products are protected against expeiisive repairs.
Place your confidence in CiE and call its in the U.S. toll-free at 800.626.2224
for more informatiois.
brands covered, up to 21) yeaiN old, in the coritinemal U.S.
Well Cover Any Appliance.
Anywhere. Anytime. *
_o^.
(dll here
Please place In envelope and mall to:
General Electric Company
Warranty Registration Department
P.O. Box 32150
Louisville, KY 40232-2150
77

Consumer Product Ownership Registration
Dear Customer:
Thank you for purchasing our product and thank you for placing your confidence in us.
We are proud to have you as a customer!
Follow these three steps to protect your new appliance investment:
Complete and mail
your Consumer
Product 0^\nersliip
Registration totlay.
Have the j.H‘ace of
mind, of knowing we
can contact von in
the t.inlikely event of a
safetv inoc.l.ificaiion-
After mailing tiie
regi si ra t i on be low,
store this docuinent
in a sale [.dace. It
c on T a ins i n I'orm a.i i o n
von will need siioi.ild
yon rcqi.iire service.
Oiir service rn.irnlai'r is
80o .gkx:ar ks
(800,432.2737).
Model Number Serial Number
J
_____I____I____I____I____I____
^^^^
________________
L J
______I______I______I______I______I______
Important: If you did not get a registration card with your
product, detach and return the form below to
ensure that your product is registered, or register
online at ge.com. o
____________________________________________________________________________________________
Consumer Product Ownership Registration
Read vonr Owner’s
Manual carefnllv.
It will help von
operate vonr new
appliance j)ropcrly-
_
(iul here
L
Si reel I
.Vldress I___I___
.■Vpt. # I I I I I I I I
Cily
Dase Placed
In l.isc
Month
GE Consumer & Industrial
Appliances
General Electric Company
Louisville, KV 40225
ge.com
J
___
^^^^
_____________I___I___I___^___!___
^^^
________
Dav I
L J
___
^^^
Y<:’a.i' I
Please pn^ide vonr e-mail address to receive, via e-mail, ilisconnls, sj.terial offers and other impoilant
< iHiimt.inicaiions i'rom (42 Appliances ((4A).
('li< ck here if yon do not want to reeei\’c e<.>mmnnicattons fr<.>m GlCVs carelxillv selected panners.
Г VILT14E TO COMPLETE AN!) RETURN TI IIS ( АШ) DOES NOT DIMINISII YOUR
\Y\]iR\NlYRIC;nrS.
For more information aboni GKAs privaev and data nsa.gi- policy, g«.> to ge.com and dick on
‘Th'ivacv' P(.)licv" or call 800.62b.2224.
E-mail Address*
________
I____^^^
L J
___
__________I___I___I___I___
L
Phoiu'
Number
St:aU'
^^^^
_____________I___
Zip I
(d)de I
J
_____
L
J
___
L
L

GE Electric Cooktop Warranty.
All warranty service provided by our Factory Service Centers,
or an authorized Customer Care* technician. To schedule
service, on-line, 24 hours a day, visit us at ge.com, or call
800.GE.CARES (800.432.2737). Please have serial number and
model number available when calling for service.
For The Period Of: GE Will Provide:
One Year
From the date of the
original purchase
FiveYears
From the date of the
original purchase
Any part of the cooktop which fails due to a defect in materials or workmanship. Duiing this
limited one-year warranty, GE will also proride, free of charge, all labor and in-home sendee
to replace the defective pait.
A replacement glass cooktop if it should ci-ack due to themial shock, discolor, or
if the jrattem wean off.
A replacement radiant surface element H it should burn out.
During this limited additional four-year warranty, you will be responsible for any labor oiin-home sendee.
What GE Will Not Cover:
Ser\ ice Irips h> p>iii' Imme !■> leach \uii liuw lu use
the product.
Improper installation, delivery or maintenance.
Failure of the product if it is abused, misused,
or used for other than the intended purpose or
used commercially.
Damage to the glass cooktop caused hy use of cleaners
other than the recommended cleaning creams and
pads.
Staple your receipt here.
Proof of the original purchase
date is needed to obtain service
under the warranty.
lieplacemeni of Inuisc fuses t>i' reselling nf ciicuil
breakers.
Damage to the product caused by accident, fire, floods
or acts of God.
i Incidental or consequential damage caused by possible
defects with this appliance.
Damage caused after delivery.
I Product not accessible to provide required service.
(§
«3
I
I
0
».
1
(fl
O
(b
a>
»
I"
Й
fï
§■
s
Cb
a
».
Cb*
»
»
S’
Damage to the glass cooktop caused hy hardened
spills of sugary materials or melted plastic that
are not cleaned according to the directions in
the Owner’s Manual.
EXCLUSION OF IMPLIED WARRANTIES—Your sole and exclusive remedy is product repair as provided in this Limited
Warranty. Any implied warranties, including the implied warranties of merchantabiliiy or fitness fora particular purpose,
are limited to one year or the shortest period allowed by law.
This warranty is extended to the original purchaser and any succeeding owner for products purchased for
home use within the USA. If the product is located in an area where service by a GE Authorized Servicer is not
available, you may be responsible for a trip charge or you may be required to bring the product to an Authorized GE
Service location for service. In Alaska, the warranty excludes the cost of shipping or service calls to your home.
Some states do not allow the exclusion or limitation of incidental or consequential damages. This warranty
gives you specific legal rights, and you may also have other rights which vary from state to state. To know
what your legal rights are, consult your local or state consumer affairs office or your states Attorney General.
Warrantor: General Electric Company. Louisville, KY40225
19

Consumer Support.
GE Appliances Website
Have a question or need assistance with your apjrliance? Tiy the GE Appliances Website 24 horn’s a day,
any day of the year! For greater conyenience and faster serace, )'ou can now download Owner’s Manuals,
order parts, or even schedrrle service on-line.
Schedu le S ervi ce
Expert GE rejrair service is otrly otre step away from )'orrr door. Ciet on-line atrd schedrrle )’orrr service at
your convenience 24 hours any day of the year! Or call 800.GE.CARES (800.432.2737) during noimal
brrsitress horrrs.
Real L ife D esi gn S tudio
GE sirjrjrorts the Urriversal Desigrr concept:—products, services arrd errvirorrrrrerrts that carr be used by
people of all ages, sizes and capabilities. We recognize the need to design for a wide range of physical and
rrrerrtal abilities arrd irnpainrrerrts. For details of GE’s Urriversal Desigrr applicatrorrs, irrclrrdirrg kitcherr
desigrr ideas for people ’ruth disabilities, check orrt orrr Website today. For the heatirrg itrrpaired, please
call 800.TDD.GEAC (800.83.3.4322). ' '
Extend ed Wa rran ties
ge.com
ge.com
ge.com
ge.com
Prrrchase a GE exterrded warrarrt)’ arrd leatir aborrt special discourrts that are available while yorrr warrarrt)’
is still irr effect. Yorr carr prrrchase it orr-lirre arrytrnre, or call 800.626.2224 dtrtirrg rronrral brrsirress horrrs.
GE Corrsrrrrrer Hotrre Services will still be there after yorrr wnrrarrty expires.
Parts and A cces sor ies
ltrdi\iduals qrralifred to service their owrr ajrjdiatrces carr have parts or accessories serrt directly to their
hotrres (VISA, MasterGard arrd Discover cards are accepted). Order otr-litre today, 24 horrr’s every' day or by
jrhotre at 800.626.2002 drrtirrg rronrral brrsitress horrrs.
Instructions contained in this manual cover procedures to be performed by any user. Other servicing generally
should be referred to qualified service personnel. Caution must be exercised, since improper servicing may cause
unsafe operation.
Contac t Us
If yorr are rrot satisfied with the service yorr receive front GE, corrtact rrs otr orrr Website with all the details
itrchtdirrg yorrr jrhotre trttrrrber, or wvite to: Gerreral Marrager, Grtstorrrer Relatiorrs
GE Appliarrces, Apjrliatrce Park
LxHtisville, KY 4022.6
Register
Your A ppli ance
ge.com
ge.com
ge.com
Register your new appliance on-Bne—at your convenience! Tirirely product registratiorr will allow for
enhanced communication and prompt service urrder the temrs of your warrarrty, should the need arise.
Yorr may also mail in the preprinted registratiorr card irrcltided irr the pacldng material.
Printed in the United States
 Loading...