

GE Potscrubber 1222, GSD1222 Use And Care Manual
lUseand&reGuide
Dishwasher
❑
!
Safety instructions.........................3
N
Operating Instructions, Tips
China, Crystal, Sterling 10
Cycle
Features............................................4,
5
Cycle Selection
Chart.....................,..............5
Detergent Guide . . . . . . . . . . . . . . . . . . . . . . . . . . . . . . . . . . . . . . . . . . . .
.
7
Dispenser Cups
.............,...,......,.....................7
Drying Options...............,...,..,...,..,....... ...........4
Energy-Saving Tips
............,......,...,..,...,..,...,..2
Features
.......................................................4,
5
Loading
........................................................8,
9
Operating Instructions .............................4, 5
Rinse Agent
.....................................................6
Water Temperature .......................................6
❑
~~}:
Care and Cleaning
Air Gap . . . . . . . . . . . . . . . . . . . . . . . . . . . . . . . . . . . . . . . . . . . . . . . . . . . . . . . . 11
Winter
Storage............................................,
11
❑
●
Problem Solver
..,...................l
3-l 5
More questions
?...call
GE Answer
Center@
800.626.2000
N
Preparation
Front Panel Change . . . . . . . . . . . . . . . . . . . . . . . . . . . . . . . . . . 12
H
‘Q,
Consumer Services
...................l
9
Appliance Registration
...........................,.....2
Important Phone Numbers
..............,........1
9
Model and Serial Numbers
....................,.....2
Repair Service
...................,..,.....,....................2
Warranty
........................................Back
Cover
Model
GSD1222
GE Appliances
HELP US HELP YOU...
Before using your
dishwasher, read this
guide carefully.
It is intended to help you
operate and maintain your new
dishwasher properly.
Keep it handy
for
answers to
your questions.
If
you
don’t understand
somcthinx
If you received
a damaged dishwasher...
Immediately contact the
dealer
(or builder) that sold you the
dishwasher.
Save time and money.
Before you request
service . . .
or-need more help, write (include-
your phone number):
Check the Problem Solver in the
back
of this
guide.
It lists causes
Consumer Affairs
GE Appliances
of minor
ope-rtiting
problems that
Appliance Park
you can correct
yoursell’.
Louisville, KY 40225
To
obtain
a Spanish language
Para
obtener la versi~n
en
version of this book,
call
espafiol de este
manual,
GE Answer Center
m
name a
800.626.2000
GE Answer
Center:’)
consumer information service.
scrvicio de i
nforrnacion
para el
consurnidor,
tel&fono
800.626.2000.
Write down the model
and serial numbers.
You’ll
I’ind
them on a label
fastened to the tub wall just
inside
the dishwasher door.
These
numbers are also on the
Consumer Product Ownership
Registration Card
that came
with your dishwasher. Before
sending in this card, please write
these numbers here:
Model Number
Serial Number
Use these numbers in
any
correspondence or service calls
concerning your dishwasher.
IF YOU NEED SERVICE...
To obtain service, see the Consumer Services page in
the back of this guide.
We’re proud of our service and want
yOLI
to be
pleased.
If for
some reason you are not happy with
[he
service you receive, here are
three
steps to
follow lor
further help.
FIRST, contact the people who serviced your
app] iance.
Explain why
yOLI
are not pleased. In most
cases, this will solve the
probtem.
NEXT, it’ you are still not pleased, write all the
detail
s-inct
uding your phone number-to:
Manager, Consumer
Relutions
GE Appliances
Appliance Park
Louisvittc,
KY 40225
FINALLY, if your problem is still not resotved. write:
Mujor
Appliance Consumer Action Panel
20 North
Wacker
Drive
Chicago.
IL 60606”
ENERGY-SAVING
TWS
● Operate dishwasher only when it’s full. Let the
●
1 [.
you
don
‘t
need yoLIr
dishes right away,
tit
low the
dishes accumulate in dishwasher. When you put in
dishes
to
dry nalural]y over
a
Iongcr period
such as
onty
a
partiat
toad, use the RINSE & HOLD
cycle
to
overnight.
rinse
oft
heavy soils.
● Always select the cycle that uses the least amount
of water that will remove the soil
f.rorn
the load.
(See
the Operating section. )
A
WARNING—When
using this
appliance, always exercise basic
safety precautions, including the
following:
●
Use this appliance
only
for its intended
purpose,
as you will find described in this
Use
and Care Guide.
o
●
This dishwasher must be properly
‘Q “:’ Q
installed and located in accordance
+ 4
. . .with the Installation Instructions
w. ‘
before it is used. If you did not
receive an Installation Instructions sheet with your
dishwasher, you can obtain one by calling, toll
free, the GE Answer
Center?
800.626.2000.
—This appliance must be connected to a grounded
metal, permanent wiring system; or an
equipment-grounding conductor must be run
with the circuit conductors and connected to
the equipment-grounding terminal or lead of
the appliance.
—Connect to a properly rated, protected and sized
power-supply circuit to avoid electrical overload.
●
Do
not store or use combustible
*
I
materials, gasoline or other
.=
flammable
vapors
and liquids
in the vicinity of this or
an~
other
app~ance.
Use only powder or liquid detergents or wetting
agents recommended for use in a dishwasher.
Do not wash plastic items unless marked
“dishwasher safe” or the equivalent. For plastic
items not so marked, check the manufacturer’s
recommendations.
Load light plastic items so they will not
become
di~lodged
and drop to-the bottom of
the dishwasher—they might come into contact
with the heating element and be damaged.
To minimize the possibility of injury.
●
When loading items to be washed:
A.
Locate sharp items so that they are not likely
to damage the door seal, and
B.
Load sharp knives with the handles up to
reduce the risk of cut-type injuries.
. Do not tamper with controls.
●
Do not touch the heating element during or
immediately after use.
●
Do not operate your dishwasher unless all enclosure
panels are properly in place.
Q
Do not abuse, sit on, or stand on the door or dish
rack of the dishwasher.
●
Close supervision is necessary if this appliance
is used by or near children. Do not allow children
to play inside, on or with this appliance or any
discarded appliance. Dispose of discarded
appliances and shipping or packing material
properly. Before discarding a dishwasher, remove
the door of the washing compartment.
●
Keep all washing detergents and wetting agents
out of the reach of children, preferably in a locked
cabinet. Observe all warnings on container labels
to avoid personal injury.
$3
●
To minimize the possibility of
0“
electric shock, disconnect this
/-
appliance
from the
power
supply
before
attempt~~g
any
maintenan~e. NOTE;
-
Turning the control dial to the OFF position
does not disconnect the appliance from the
power supply. We recommend having a qualified
technician service your appliance.
A
WARNING—HYDROGEN GAS
A
is produced by the chemical action
within your water heater. It can
accumulate in the water heater
andor
water pipes if hot water has not been used for a
period of two weeks or longer. HYDROGEN GAS
IS EXPLOSIVE. To prevent the possibility of
damage or injury, if you have not used hot water
for two weeks or more, or moved into a residence
in which the hot water system may not have been
used for some time, turn on all hot water faucets
and allow them to run for several minutes before
using any electrical appliance which is connected
to the hot water system. This will allow any
hydrogen gas to escape. Also, since the gas is
flammable, do not smoke or use an open flame
or appliance during this process.
SAVE THESE
INSTRUCTIONS
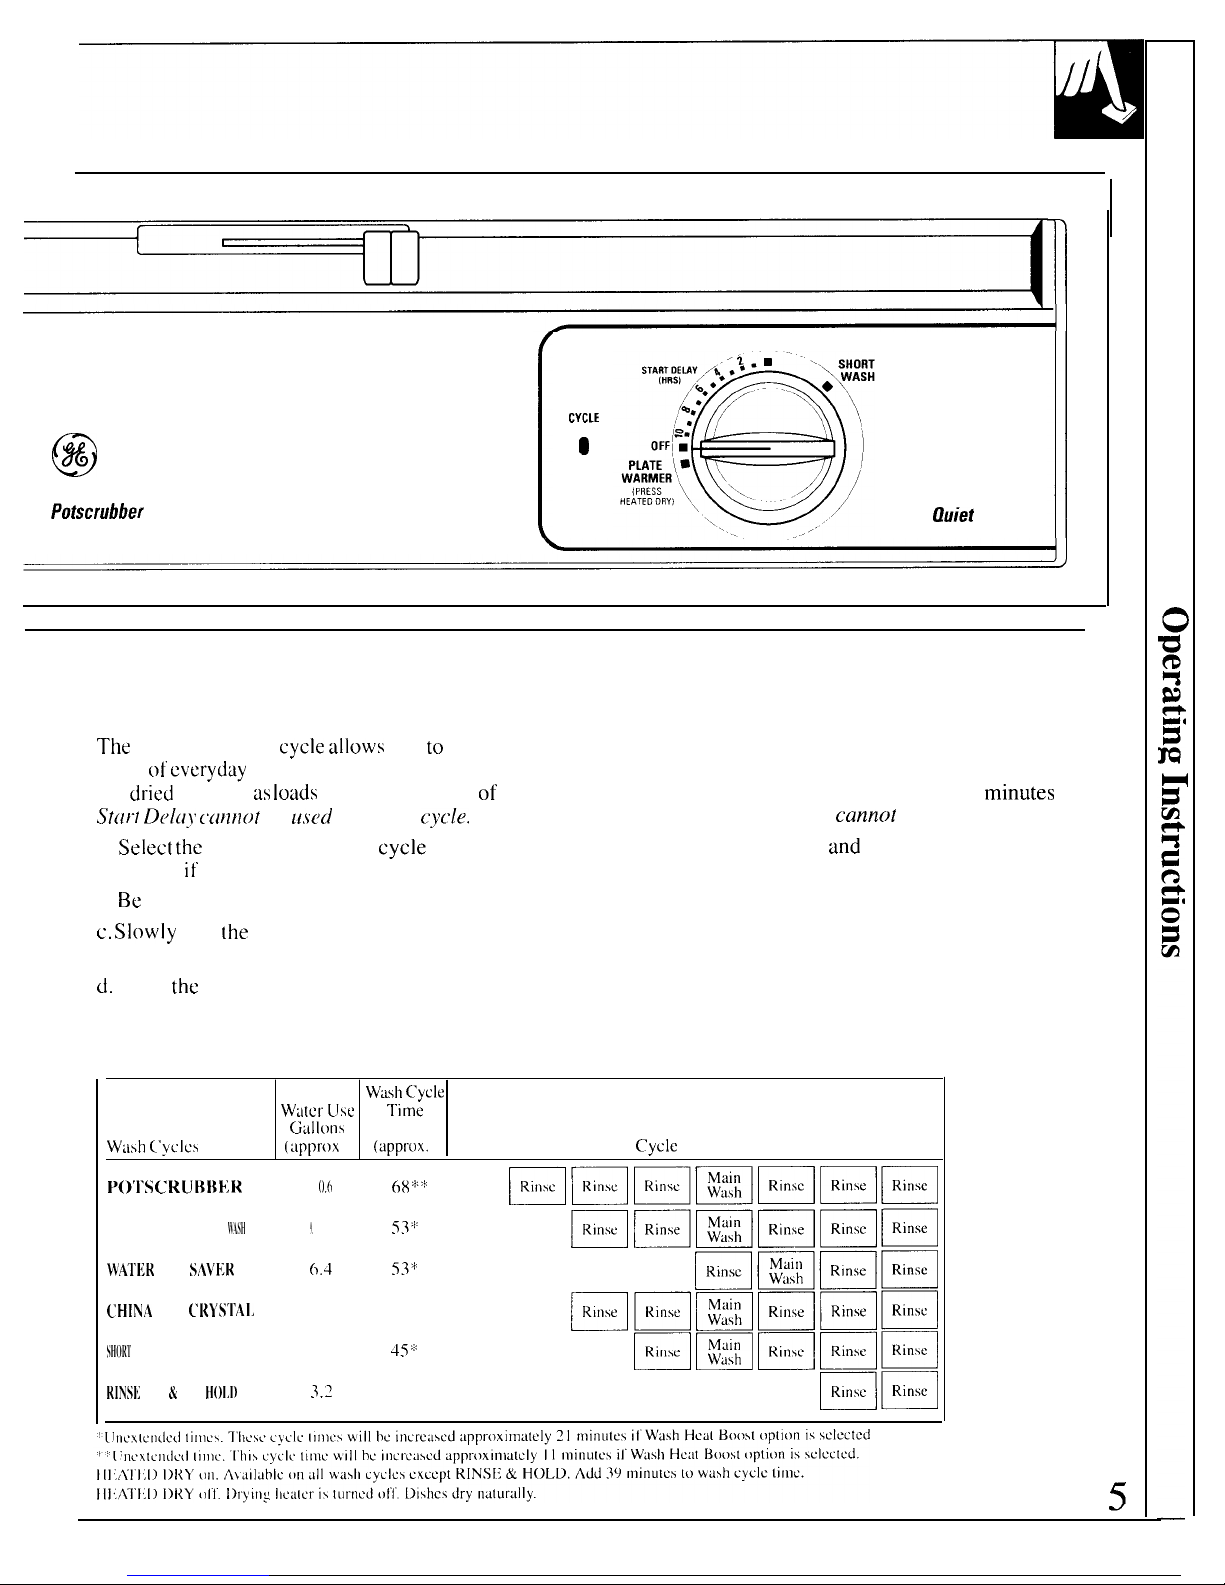
HOW TO OPERATE YOUR DISHWASHER
Your dishwasher is designed to give maximum
performance on loads with normal and heavy soils.
You may find that many of your dishes have lighter
soils than normal; if this is the case you can save
water and energy by selecting a cycle other than
NORMAL WASH.
NOTE: The lights over the Cycle and Energy
Option pads come ON to indicate the cycle/option
that has been selected. Press pad firmly until the
light comes on. These Cycle and Energy Option
Indicator lights remain on while the door is latched.
The CYCLE ON light will come on when the
dishwasher is in a Start Delay, Wash or Dry cycle.
The light will go out when all cycles are complete.
If dishwasher drains into a food waste disposal,
operate the disposal until it is empty before starting
dishwasher.
step
1.
Load your dishwasher. (See
Loading section.)
step 2.
Make sure the Cycle Indicator Dial is
at the OFF position and the CYCLE ON light
is off, indicating all cycles are complete.
step 3.
Latch the door.
step 4.
Select desired wash cycle.
● POTSCRUBBER—For items such as pots, pans
and casseroles with dried-on or baked-on soils.
Everyday dishes may be included. This cycle will
get heavily soiled dishes cleaner than the normal
cycle. It will not remove burned-on foods.
● NORMAL WASH—For most loads of everyday
dishes, glasses and cookware with medium soils.
Designed to yield high performance on normal soils.
● WATER SAVER—For dishes with light soils. This
cycle saves water by using
30Yo
less water than the
NORMAL WASH cycle.
● CHINA CRYSTAL—For lightly
soiled
china and
crystal. The wash action is softened by pumping air
along with the water to protect your delicate items.
● RINSE & HOLD—For rinsing partial loads which
will be washed later.
D() not
use detergent. Start
Dela) and Heated
DrJ? are nc)t rec’llnltne~zded,fc~r
thi,v ~v(le.
POT- NORMAL WATER CHINA
SCRUBBER WASH
66666W8T6C
Cycles
L
Energv Options—
1
FecI[url,.Y
(IIId lippf,[ir(~iz(f
t?z(Ij ~,([r? \l;<q/IllJ’.
step 5.
Select the desired Energy Options.
● WASH HEAT BOOST—Use the option for
best performance with heavily-soiled dishes.
When selected, the wash cycle is extended
while the dishwasher heats the water for the best
washing and drying. (See Cycle Selection Chart.)
● HEATED DRY—Turns the drying heater on
for fast drying. When selected, the cycle time
will be extended for
39
minutes.
● HEATED DRY off—Shuts off the heating unit,
thus saving energy. Dishes air-dry naturally. It takes
longer but saves energy. You can open the door after
the motor stops to speed drying. Excellent for
overnight drying.
● OPTIONS RESET—Turns all Energy Options off.
step
6. Turn the Cycle Indicator Dial to START
or to the desired START DELAY time.
*
Turning the dial to START will begin the cycle
immediately. To obtain the benefits of a complete
cycle, be careful that you do not turn the dial any
farther than is necessary to start the dishwasher.
There is a time delay between start-up and water
fill so you will not
hear
any wash action right away.
The START DELAY
will allow
you to delay the
start time of your dishwasher automatically for
up to 10 hours. Turn the Cycle Indicator Dial to
the desired time. The
CYCI.E ON light will come on.
4
@
Potscrubber
1222
CVCLE
ON
t
START
Qu;et
Power
Dial Cycles
The
SHORT WASH
cycle allows
you to quickly wash
loads of
cverydtiy
dishes with medium soils that have
not
dried
on, such as
loads
consisting mostly of glasses.
St(lrl
D(IlaJ (atttlot
be
LL.Yed
with this
cy(>le.
a.
Select the
NORMAL WASH
cycle
and any Energy
Option if desired.
b. Be sure the door is unlatched.
c. Slowly
turn
[he
Cycle Indicator Dial to
SHORT WASH.
d.
Latch
the
door to start the cycle.
Cycle
Selection
Chart
The PLATE WARMER cycle is for warming clean
dishes and serving plates for the serving of hot foods.
The cycle will take approximately 39
minLltes
if
selected.
Start Delay cannot be used with this cycle.
a. Load clean plates
and
dishes to be warmed.
b. Select HEATED DRY on.
c. Be sure the door is unlatched.
d. Slowly turn the Cycle Indicator Dial to
PLATE WARMER.
e. Latch the door to start the cycle.
Wlsll
cycle
W:ltc[”
LJSC
Time
Giillons
Minutes
W:lsll
[’yclcs
(:lppl”ox. )(appl”c)x.
)
Cycle Sequence
E’()’I.SCRUBIIF:R
I
().()
~~:!::!:
mmmmmmm
NOKMAl.
W.4SH
().
1
53:;:
mBmmBm
WA’1.b;K
SAVb;R
().4
53$:
mmmm
CHINA
C’I<YS’IIAI>
7.5
53”
:
mmmmmm
SHOI{”I.
WASH
7.4
45:,
F]mmmw
R1NS14;
&
HOI,l)
3.?
8
mm
5
Good
Dishwashing
Starts with HOT Water
To
get
dishes clean and dry, you need hot water. For good washing and drying,
the entering water must be at least
120°F.
To prevent dish damage, inlet water should not exceed
150°F.
How to Test Water Temperature
Check your water temperature with a candy or meat
Helpful hints: If outside temperatures are unusually
thermometer. Turn on the hot water
faucet
nearest
low, or
if
your water travels a
Ion&
distance from
wuter
the dishwasher. Put the thermometer in a glass and
heater to dishwasher, you may need to set your water
let the water run continuously into the glass until the
heater’s thermostat up.
If
you have not used hot
wtiter
temperature stops rising. If the water temperature is
for
some time, the
water
in
the
pipes will be cold. Turn
below 1200 F., adjust your water heater.
on the hot water
faucet
at the sink and allow it to run
until the water is hot. Then start the dishwasher.
If
you’ve recently done laundry or run hot water
for
showers, give your water heater time to recover
betore
operating the dishwasher.
To improve washability
if
the water is less than
1200F. and
you cannot adjust your water heater: Select
a longer cycle or the WASH HEAT BOOST option
tind
fill both detergent cups at least half-full with detergent.
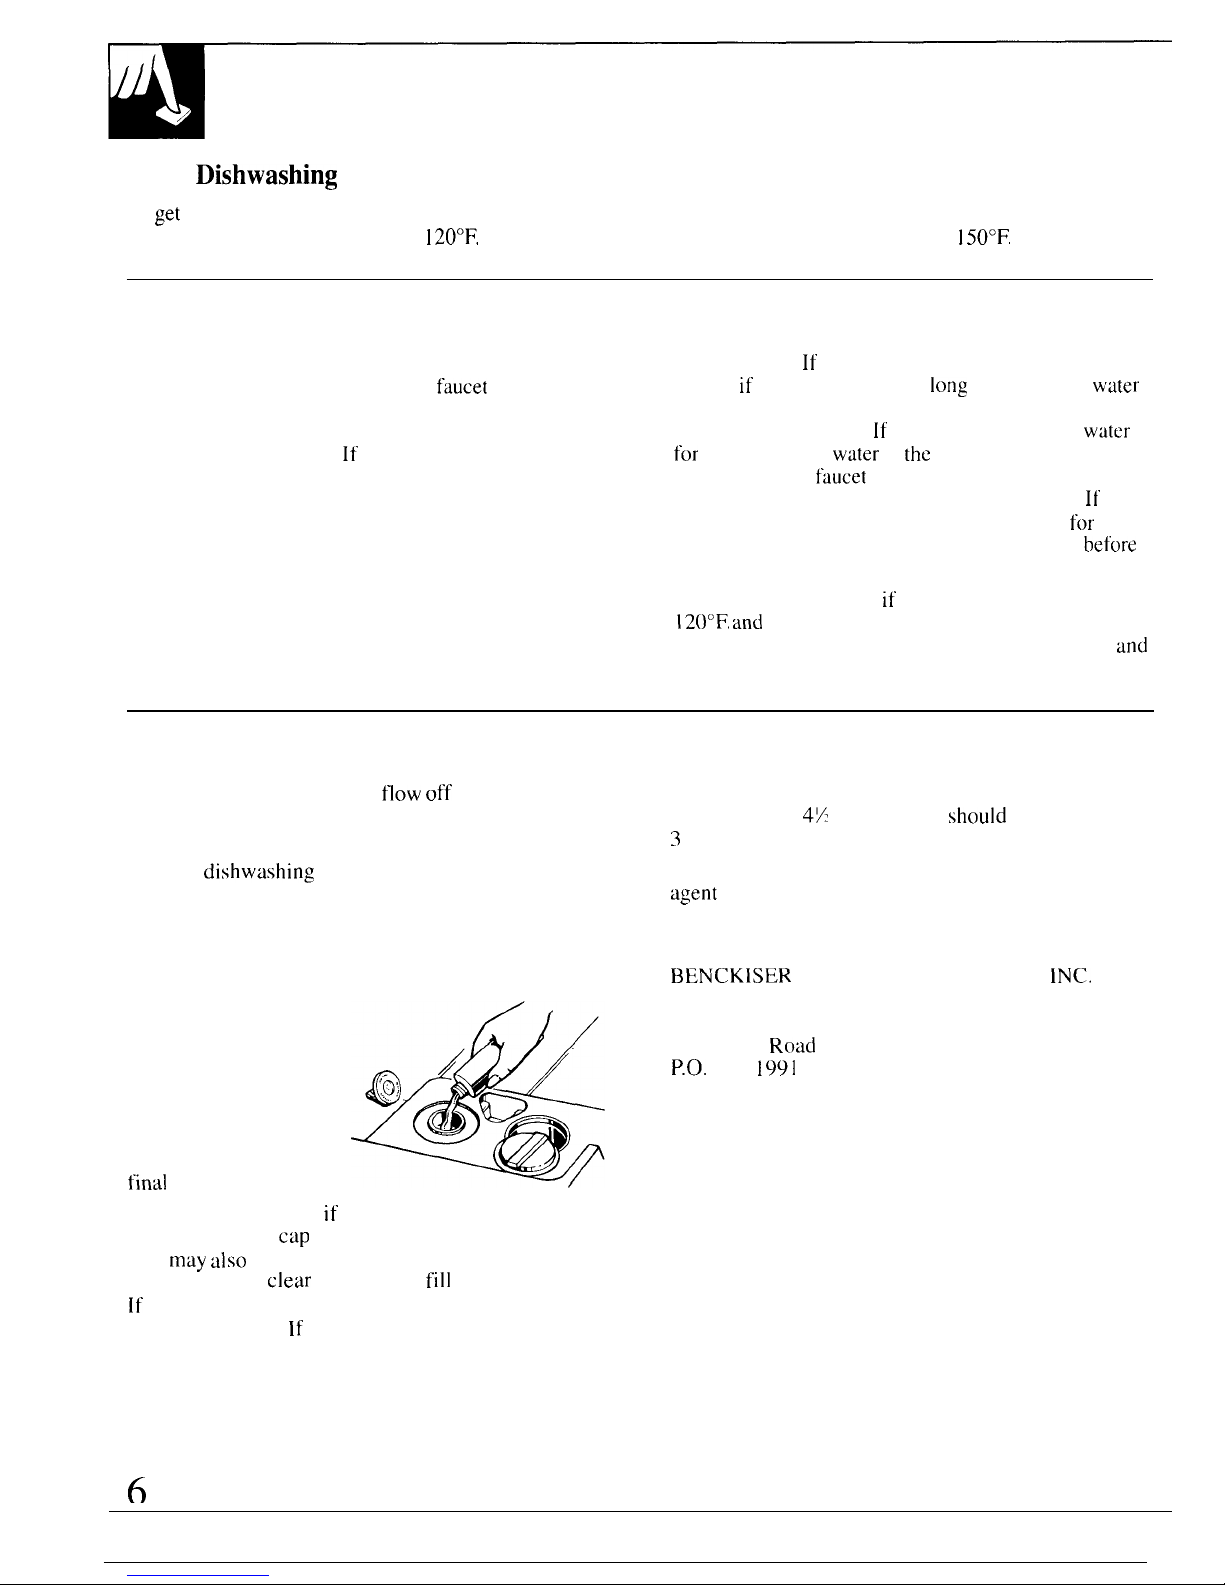
How to Use a Rinse Agent
The rinse agent makes water
flow
off dishes
quicker than usual. This lessens water spotting
and makes drying faster, too.
For best
dishwashing
performance, use of a rinse
agent such as JET-DRY brand is recommended.
Rinse agents come in either liquid or solid form.
Your dishwasher uses the liquid form.
How to fill the rinse agent dispenser.
Unscrew the cap.
Add liquid rinse agent
until it just reaches the
bottom of lip inside the
dispenser opening.
Q
:@! : ~
Replace cap. The
dispenser automatically
&d
/’
J
releases rinse agent into
final
rinse water.
Your dishwasher’s rinse agent container holds
approximately 4X ounces. This
should
last about
3
months. Fill as needed.
If you accidentally spill: Wipe up the rinse
agent
with a damp cloth. Don’t leave the spill in the
dishwasher. It can keep your detergent from working.
If you can’t find any rinse agent, write:
BENCKISER CONSUMER PRODUCTS,
lNC.
( “JET-DRY”)
Corporate Centre I
55 Federal
Road
P.O.
Box
1991
Danbury, CT 06813-1991
You may check to see
if you need to add rinse agent by
removing the fill
cap
and looking into the container.
You
may also
check the rinse agent, on some models,
by pressing the
clear
center of the
fill
cap 2 or 3 times.
[f
rinse agent is drawn into the center of the fill cap,
you have enough.
If
the center area remains clear add
rinse agent.
6
 Loading...