

GE PDWT580P00SS, PDWT500P00WW, PDWT500P00BB, PDWT480R10SS, PDWT480P00SS Owner’s Manual
...
Safety Instructions ........... 2,s
ge.com
(11
J=
(11
Operating Instructions
Care and Cleaning ................. 15
Control Panel and Settings ........ _J6
Loading Place Settings ............. 14
Loading the Racks ............. 12j 1_
Recommended Dishwasher
Products ............................. 7
Using the Dishwasher ............ 8-11
Troubleshooting Tips ...... 16-18
Consumer Support
Consumer Support ................. 22
Product Registration ............ 19, 20
Warranty .......................... 21
Stainless Steel
Tub Dishwashers
Write the model and serial
numbers here:
Model #
Serial #
Youcan find them on the tub wall
just insidethe door.
165D4700P372 49-55047 06-08 JR

IMPORTANTSAFETYINFORMATION.
READALL INSTRUCTIONSBEFOREUSING-
SAVETHESEINSTRUCTIONS
WARNING!
For your safety, the information in this manual must be followed to minimize the risk of fire
or explosion, electric shock, and to prevent property damage, personal injury, or death.
-&WARNING! WATER HEATER SAFETY
Under certain conditions, hydrogen gas may beproduced in a water heater that has not been used
for two weeks or more. HYDROGEN GAS IS EXPLOSIVE.
Ifthe hot water has not been used for two weeks or more, prevent the possibility of damage or injury
by turning on all hot water faucets and allow them to run for several minutes. Do this before using any
electrical appliance which is connected to the hot water system. This simple procedure willallow any built-
up hydrogen gas to escape. Since the gas is flammable, do not smoke or use an open flame or appliance
during this process.
%
PROPER INSTALLATION AND MAINTENANCE
This dishwasher must be properly installed and located in accordance with the Installation
Instructions before it is used. If you did not receive an Installation Instructions sheet with
your dishwasher, you can receive one by visiting our website at ge.com.
• Connect toa grounded metal, permanent wiring
system; or run an equipment-grounding
conductor with the circuit conductors and
connect to the equipment-grounding terminal
or lead of the appliance.
• Improper connection ofthe equipment-grounding
conductor can result in a riskof electricshock.
Checkwith a qualified electrician or service
representative if you are indoubt whether the
appliance is properly grounded.
• Disposeof discardedappliances and shipping
or packing material properly.
• Donot attempt to repair or replace any part
of your dishwasher unlessit isspecifically
recommended inthis manual. Allother servicing
should be referredto aqualified technician.
• Tominimize the possibility of electric shock,
disconnect this appliance from the power supply
beforeattempting any maintenance.
NOTE:Turningthe dishwasher off does not
disconnect the appliance from the power supply.
We recommend having a qualified technician
service gout appliance.
CAUTION: Topreventminorinjuryorpropertydamage
• Contentswashed in Anti-bacterial mode, if
available,may be hot to the touch. Use care
before handling.
• Usinga detergent that is
not specifically designed
for dishwashers will cause
the dishwasher to fillwith
suds.
• If your dishwasher is connected to a
wall switch, ensure that the switch is
on prior to use.
• Ondishwasherswith electronic
controls, if you choose to turn the wall
switch off between wash cycles, allow
5-10 secondsafter turning the switch on before
touching START/RESETto allow the control to
reboot.
• Non-Dishware Items: Do not wash itemssuch
aselectronic air cleanerfilters, furnace filters and
paint brushes in your dishwasher.Damage to
dishwasher and discoloration or staining of
dishwasher may result.
• Closesupervisionis necessary ifthis appliance
isused by or near children.
• Load light, plastic items so they will not
become dislodged and drop to the bottom
of the dishwasher-they might come into
contact with the heating element and be
damaged.

WARNING! RISK OF CHILD ENTRAPMENT
PROPER DISPOSAL OF THE DISHWASHER
ge.com
Junked or abandoned dishwashers ore dangerous...
even if they will sit for "justo few dogs." If you ore
getting rid of your old dishwasher,pleasefollow
the instructions to help prevent accidents.
O Screw
(Of} some
models)
A WARNING!
• Usethis appliance only for itsintended purpose
as described in this Owner's Manual.
• Useonly powder,tabs, liquid detergents or rinse
agents recommended for use in odishwasher and
keepthem out of the reach of children.Cuscude®,
Cascade ®Complete and Electrusol ®Automatic
Dishwoshing Detergents,and Jet-Dry®and
Cuscude Crystal Cloute rinseagents hove been
approved for usein oil GEdishwashers.
• On models with the SmartDispenseTM system,
do not mix any chlorine bleach-bused eutometic
dishwashing detergent with any dishwashing
detergent containing enzymes us this could
cause the detergents to congeal end leadto
blockage of the SmartDispenseTM system.
• Locatesharp itemsso that they ore not likely
to damage the door seal.
• Loadsharp kniveswith the handles up to reduce
the risk of cut-type injuries.
• Donot wash plastic items unlessmarked
dishwasher safe or the equivalent. Forplastic
items not so marked, checkthe manufacturer's
recommendations.
When using gour dishwasher, follow basic precautions,
including the following:
Before You Throw Awag Your Old Dishwasher
Take offthe door of the washing comportment or
remove the door latch (asshown).
NOTE: CDW9000 Series and PDW9200-PDW9900
Series models also have a latch screw which must be
removed (Step 1) as shown.
0
• Do not touch the heating element during or
immediately offer use.
• Do not operate your dishwasher unlessoil
enclosure panels ore properly in place.
• Do not tamper with controls.
• Do not abuse,sit on or stand on the door or dish
rock of the dishwasher.
• Do notollowchildrentoployorounddishwosher
when openingorclosingdoorduetothepossibility
ofsmollfingersbeingpinchedindoor.
• Do notdiscordo dishwosherwithoutfirstremoving
thedoorofthewoshingcomportmentorthedoor
latch.
• Do not store or usecombustible materials,gasoline
or other flammable vaporsand liquidsin the
vicinity of this or any other appliance.
• Do not allow children to play with, on or insidethis
appliance or any discordedappliance.
READ AND FOLLOW THIS SAFETY INFORMATION
CAREFULLY.
SAVE THESEINSTRUCTIONS
3
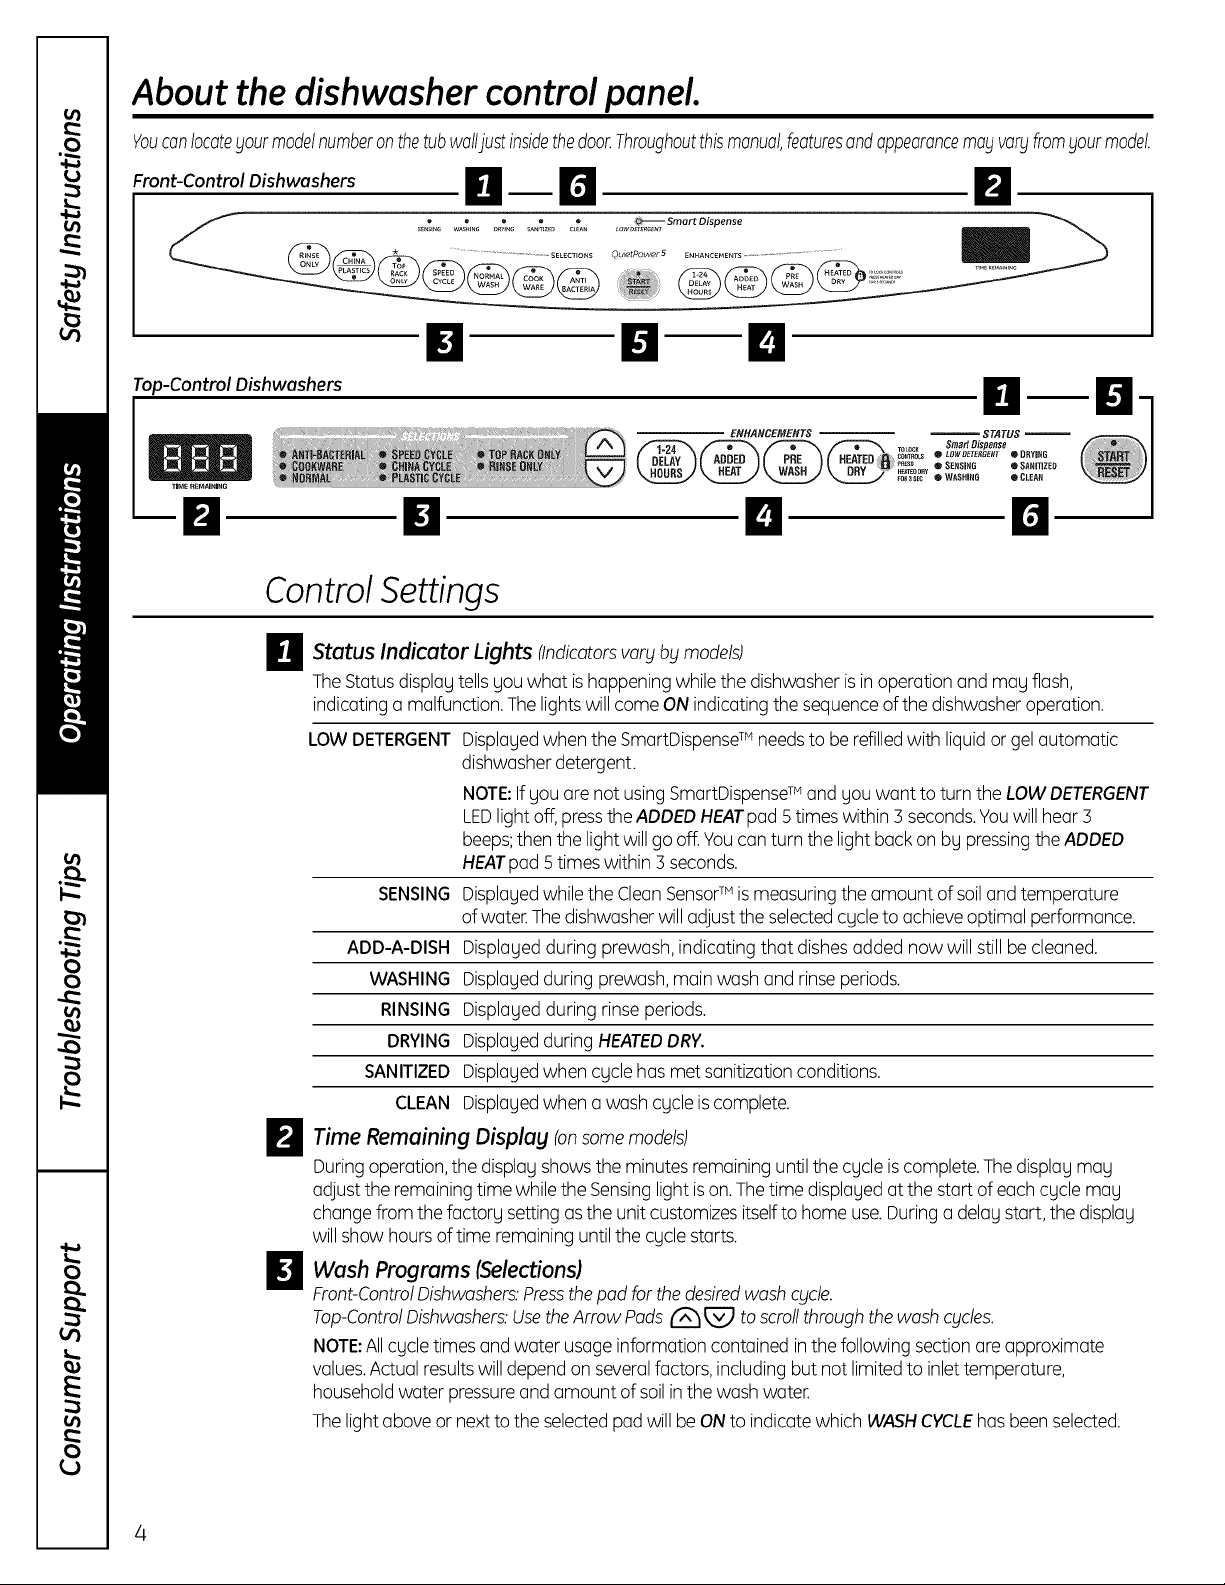
About the dishwasher control panel.
Youcanlocategourmodelnumberonthetubwalljustinsidethedoor.Throughoutthismanual,featuresandappearancemablvarblfromgourmodel.
Front-Control Dishwashers B -- D
s_._..... _...... _...... _....... _...... _SmartDisp ....
* ............................................SELECTIONS OuietPower5 ENHANCEMENTS..................................................
El El El
Top-Control Dishwashers
L.
ControlSettings
O Status Indicator Lights (Indicatorsvary by models)
TheStatus displagtells you what ishappeningwhile the dishwasherisinoperation and may flash,
indicating a malfunction.Thelightswill come ON indicating the sequenceofthe dishwasheroperation.
LOW DETERGENT
El
SENSING
ADD-A-DISH
WASHING
RINSING
DRYING
SANITIZED
CLEAN
O--
ENHANCEMENTS _ STATUS
_ONT_OLS 0 LOWgETERGENT tORYiNG
_,_ss ® SENSING 0 SANITIZED
._1_oD_y
_R3SEC 0 WASHIH6 • CLEAN
El El
Displagedwhen the SmartDispenseTM needs to be refilledwith liquid or gelautomatic
dishwasherdetergent.
NOTE:Ifgou are not usingSmartDispenseTM andgou want to turn the LOWDETERGENT
LEDlightoff,pressthe ADDEDHEATpad5 timeswithin 3 seconds.Youwill hear3
beeps;then the lightwillgo off.Youcan turn the light backon bg pressingtheADDED
HEATpad5timeswithin 3 seconds.
Displagedwhilethe CleanSensorTM ismeasuring the amount of soiland temperature
of water.Thedishwasherwilladjustthe selectedcgcleto achieveoptimal performance.
Displagedduring prewash, indicating that dishes added now will still be cleaned.
Displagedduring prewash,main wash and rinse periods.
Displagedduring rinse periods.
Displagedduring HEATEDDRY.
Displagedwhen cgcle has met sanitizationconditions.
Displayedwhen a wash cycle is complete.
_J_ Time Remaining Displag Ionsomemodels)
Duringoperation,the display showsthe minutes remaining until thecycle iscomplete.The display may
adjust the remaining time while the Sensinglight is on.Thetime displayed at the start of each cycle may
changefrom the factory setting asthe unit customizes itselfto home use.Duringa delay start, the display
willshow hoursof time remaining untilthe cycle starts.
Wash Programs (Selections)
irt
Front-ControlDishwashers:Pressthepad for thedesiredwash cblcle.
Top-ControlDishwashers:UsetheArrow Padsf'_ _ toscrollthrough thewash cucles.
NOTE:Allcycle times and water usageinformation contained in the following section are approximate
values.Actualresultswilldependon severalfactors,includingbut not limited to inlet temperature,
householdwater pressureand amount ofsoilin the wash water.
Thelightaboveor nextto the selected pad will beON to indicatewhich WASHCYCLEhasbeen selected.

ge.com
_l Wash (Selections)Icontinued)
Programs
ANTI-BACTERIAHeovg8.8gal.,105 min.
Medium 7.5gal.,95 min.
Light 6.3gal.,85 min.
Thiscycle raisesthe water temperature inthe final rinseto sanitizeyour dishware.
Thecycle lengthwill vary dependingon the temperature ofyour inletwater.
NOTE:TheAnti-Bacteriacycle is monitored for sanitization requirements.Ifthe cycle is
interrupted during or after the main wash portion or ifthe incoming water temperature
issolow that adequatewater heatingcannot be achieved,the sanitizingconditionsmay
not be met. Inthese cases,the sanitizedlight will not illuminate at the end of the cycle.
NOTE:NSF-certifiedresidentialdishwashersare not intended for licensedfood
establishments.
DEEPCLEAN
(onsome models)
9.6gal.,111 min.
Thiscycle is meant for heavily soiled dishesorcookware with dried-on or baked-on soils.
Thiscycle may not remove burned-on foods. Everydaydishesare safe to be used inthis
cycle.
NOTE:Onsome models,theSTEAMPRE-WASHenhancementwill be automatically
selectedwhen the DEEPCLEANcycle ischosen,and cannot be de-selected.
COOKWARE/
POTS & PANS
(on some models)
Heovg 10.0gal.,80 min.
Medium 8.8gal.,70 min.
Light 7.5 gal.,60 min.
Thiscycle is meant for heavily soiled dishesorcookware with dried-on or baked-on soils.
Thiscycle may not remove burned-on foods. Everyday dishesare safeto be used in
this cycle.
NORMALWASH Heavg 8.8 gal.,70 min.
Medium 7.5gal.,60 min.
Light 5.0 gal.,50 min.
Thiscycle is for medium/heavily soiled dishesand glassware.
SPEEDCYCLE
(onsome models)
7.5gal.,35 min.
Thiscycle is for everyday dishesand glassware.
HAND/GENTLE 7.5gal.,55 min.
{CHINACRYSTAL}Thiscycle isfor lightly soiled china and crystal.
GLASSES
(onsome models)
PLASTICSCYCLE
(onsome models)
7.5gal.,30 min.
Thiscycle is specifically designedfor glasses.
Heovg 8.8gal.,120 rain.
Medium 7.5gal.,105 min.
Light 5.0 gal.,90 min.
Thelonger time for this cycle includes a built-in drying portion that is specifically
designedto reduce the risk of melting plastic items and improve plasticdrying.
Forremoving red tomato-based stains,GErecommends the use of Cascade®
PlasticBoosterTM.
TOPRACKONLY
(onsome models)
Heovg 8.2gal.,70 min.
Medium 7.0gal.,60 rain.
Light 4.6 gal.,50 min.
Thiscycle washes lightly soileddishes on the upper reck only.
RINSEAND HOLD
{RINSEONLY}
2.5gal.,10 min.
Forrinsing partial loadsthat will be washed later.Donot usedetergent with this cycle.
NOTE: On some models, the HAND/GENTLE ond PLASTICS selector is o toggle pod; push pod to switch
between HAND/GENTLE ond PLASTICS.
NOTE:Thisdishwosher is equipped with CleonSensor rMwith outomotic temperoture control; therefore,
cgde length ond time mog vorg depending on soil ond woter temperoture conditions.
NOTE:Onlg the AnthBacterio cgcle has been designed to meet the requirements of Section 6, NSF 184 for
soil removol ond sonitizotion efficocg.

About the dishwasher control panel.
D Enhancements
Thelight above the selected pad will be ON to indicate which ENHANCEMENThasbeen selected.
DELAYHOURS
TEMP BOOST/
ADDED HEAT/
EXTRA HOT WASH
STEAM PRE-WASH/
PRE-WASH
(on some models)
HEATEDDRY
LightOff
HEATEDDRY
LightOn
RESET
Start
El
Front-Control Dishwashers
Closeand latch the dishwasher door and select the cycle and desiredenhancements.Touch the
START/RESETpad to begin the cycle. Water fill begins immediately, and approximately 60 secondslater
the wash action begins.
When the dishwasher door is fully closed and latched,the control panel lights will display the lost settings
you selected.If you don't wont to change any of the settings,simply touch the START/RESETpad to
begin the cycle.
If the door isclosed,the indicator lightswill turn off ifthe START/RESETpad is not selectedwithin 5 minutes.
Toactivate the display, open and closethe door or pressany pad.
Youcan delay the start of a wash cycle for up to 2/4hours (dependingon model).
Pressthe DELAYSTARTpad to choose the number of hours you want to delay the start
of the cycle; then pressSTART/RESET.
Front-Control Dishwashers: The machine will count down andstart automatically
at the correct time.
Top-Control Dishwashers:After closing the door,the machine will count down
and automatically start at the correct time.
NOTE:Tocancel the DELAYSTARTselection beforethe cycle begins,repeatedly press
the DELAYSTARTpad until the display isblank.
When selected,the cycle will runlonger with heating element on to improve both wash
and dry performance.
NOTE:Cannot be selected with RINSEANDHOLD cycle.
Forusewith heavily soiled and/or dried-on, baked-on soils.Thisoption MUSTbe
selectedPRIORto starting the cycle. The PRE-WASHoption adds 15 minutes
and theSTEAMPRE-WASHoption adds 2/4minutes to the cycle time.
NOTE:Cannot be selected with RINSEANDHOLDcycle.
Shutsoffthe drying heat option. Disheswill air dry naturally (Front-Control
Dishwashers)or fan dry (Top-ControlDishwashers)tosave energy.
Turnsthe heater on for fast drying. Thiswill extend the total cycle time by/45 minutes
for the NORMALcycle,58 minutes for the TOPRACKONLYand COOKWAREcycles,
]2 minutes for the DEEPCLEANcycle, 15 minutes for the ANTI-BACTERIAand
PLASTICScycles,and 30 minutes for all other cycles.
LOCK
Youcan lockthe controls to prevent any selections from being made. Or you can lock
the controls after you hove started a cycle.
Children cannot accidentally start dishwasher by touching pads with this option
selected.
Tounlock the dishwasher controls, pressand hold the HEATEDDRYpad for 3 seconds.
Thelight above the lock pad will turn off.Tolock the dishwasher,pressand hold the
HEATEDDRYpad for 3 seconds.The light above the LOCKpad will turn on.
Tochange a cycle after washing starts...
Front-Control Dishwashers: Touchthe START/RESETpad to cancelthe cycle.
TheSTART/RESETlightwillflash while the water ispumped out if needed.Thistakes
approximately 2 minutes.
Top-Control Dishwashers: Open the door slowlyto prevent splash-out.
Touchthe START/RESETpad to cancel the cycle. Ifthe START/RESETlight isflashing,
close the door until the water pumps out (thistakes approximately 2 minutes)
and the light stops flashing.
When the lightstops flashing,the dishwasher can bereprogrammed and restarted.
Ll start (continued)
Top-Control Dishwashers
After selecting the cycle and desiredenhancements, touch the START/RESETpod to ready the
dishwasher to beginthe cycle. Closethe door to start the cycle or begin the DELAVSTARTcountdown.
When the cycle starts,the water fill begins and approximately 60 seconds later the wash action begins.
Thedishwasher will always display your lost selection and enhancements. If you don't wont to change
the settings,simply touch the START/RESETpod to ready the dishwasher and closethe door to begin
the cycle.
Also,ifo power failure occurs NORMALand HEATEDDRYwill automatically be programmed. Hake any
new selections and touch the START/RESETpod to begin the new cycle.
When the door isopened,the indicator lights will turn off if the START/RESETpadis not selectedwithin
5 minutes. Toactivate the display, open and close the door or touch any pad.
Clean
D
Front-Control Dishwasher
TheCLEANlight is illuminated when the selected cycle and enhancements ore complete. The light will
stay ON until o pod ispressedor the door is opened and then closed.
Top-Control Dishwasher
TheCLEANlight is illuminated and o double beep will soundwhen the selected cycle and enhancements
ore complete. You may remove the dishes at any time.Thehigh-efficiency fan will run quietly for
30 minutes to 4 hours(depending on selected cycle) offer the CLEANlight is illuminated to continue
drying the dishes.The fan con be turned off by opening the door and pressingany keypad.
ALL MODELS:To turn off the audible end-of-cycle signal (orre-activate it ifit was previously turned off),
pressthe HEATEDDRYpod 5 times within 3 seconds.A triple beep will sound to indicatethe end-of-cycle
beep option has been toggled.
ge.com
Flashing display lights.
Status Indicator Lights What It Means
START/RESET
Cycle has been interrupted by pressingthe START/RESETpod,or there
has been o power failure. Light will stop flashing offer the dishwasher
automatically drains out the water.Thedishwasher will restart ifthe
interruption was the result of o power failure.
Recommended dishwasher products.
GErecommends the following products for use in its
dishwashers:
Foryour manual detergent dispenser,Cascade®
and ElectrasoF powder,liquid or gel automatic
dishwasher detergents ore approved.
Foryour SmortDispenseTM Detergent Dispenser,use
only the recommended detergents listed on page
10of this manual.
Jet Dry ®or CascadeCrystal Cleare rinseagents
to remove spots and prevent new film buildup on
your dishes,glosses,flatware, cookwore and
plastic. Using rinseagent also improves dry
performance.
• Cascade®Plastic BoosteffMto remove red staining
inside your dishwasher that con come from some
tomato-based foods.
• Cerama Bryte ®StainlessSteelApplianceCleaner
to cleon the exterior stainlesssteel panel of GEand
ProfileTM dishwashers (forstainlesssteel exterior
models only).

Using the dishwasher.
Check the Water Temperature
The entering water should be at least 120°F and not more than 150°F for effective cleaning and to
prevent dish damage. Check the water temperature with a candy or meat thermometer. Turn on the
hot water faucet nearest the dishwasher, place the thermometer in a glass and let the water run
continuously into the glass until the temperature stops rising.
Use Jet-Dry ®or Cascade Crystal Clear®Rinse Agent
det-Drg ®or Cascade Crgstal Clear _ rinse agent improves drging, removes spots and prevents new
film buildup on your dishes, glosses, flatware, cookwore and plastic.
Filling the Dispenser Rinse Aid Setting
Therinseagent dispenser holds3.5oz.of rinse agent.
Under normal conditions,this will last approximatelg
one month.Try to keep it full,but do not overfill.
Make sure the dishwasher door isfullg open.
m
Turnthe dispenser
F2-1
cap to the leftand
lift itout.
I-_1 Add rinse agent until
the indicator window
looks full.
[] Cleanup any spilled
rinseagent with a Indicator
damp cloth, window Dispenser cap
FI Replacethe dispenser cap.
Theamount of rinseagent released into the final
wash can be adjusted.Thefactory setting is at the
midpoint. Ifthere are ringsof calcium (hardwater)
spots on dishes,try a higher setting. If there is
foaming, use a lower setting.
Toadjust the setting:
Removethe dispenser cap_
thenturntheadjuster
counterclockwise to
increase the amount k._ \_ _j-"-'_ Rinse agent
of rinseagent or _ adjuster
clockwiseto reduce
the amount of rinseagent dispensed.
Dish Preparation Prior to Loading
• Noprerinsing of normal food soil is required. • Removelarge quantities of any remaining food.
• Scrapeoff hard soils,bones,toothpicks, skinsand • Removeleafy vegetables, meat trimmings and
seeds, excessiveamounts of grease or oil.
Forget to Add a Dish?
A forgotten dish can be added ang time before
the main wash.
I-_1 Squeezethe door latch to release the door.
I-_1 Do not open the door until the water spray
action stops. Steam may rise out of the
dishwasher.
8
I-_1Add forgotten dishes.
[_-I Close the door.

Manual Detergent Dispenser
Somemodelscomeequippedwithan automaticliquid
dishwasherdetergentdispenser(SmartDispenseTM) and
a manualdispenser.Youcanuseeitherofthesedispensers
butdon'tusebothatthesametime.
SmartDispense TM
ge.com
Forheavilysoiledloads,usea bit moredetergent.Forwater
temperaturesabove140%,useabitlessdetergent.
Medium Medium Extremely
Soft Soft Hard Hard
li MAINWASH[WASH]
//i ............ill
Thecoverofthemanualdispenserwillopenduringthe
washcycle.IfyouareusingSmartDispenseTM, leavethe
coverofthe manualdispenseropenbeforestartingthe
cycle.
Forthemanualdispenser,Cascade®and Electrosol®
AutomaticDishwashingDetergentshavebeenapproved.
Youmay usepowder,liquid,gelortabletsinthisdispenser.It
isimportanttokeeppowdereddetergentsandtabletsfresh
anddrysothey don'tloseeffectiveness.Therefore,donot
putdetergentintothemanualdispenseruntilyouareready
towashdishes.
Manual Detergent
Dispenser
Filfing Manual Detergent Dispenser
Theamountofdetergentto usedependsonwhetheryour
waterishardor soft.Withhardwater,youneedextra
detergent.Withsoftwater,youneedlessdetergent.
Protectyourdishesanddishwasherby contactingyour
waterdepartmentand askinghowhardyourwateris.
Twelveor moregrainsisextremelyhardwater.Awater
softenerisrecommended.Withoutit, limecanbuildup in
thewatervalve,whichcouldstickwhileopenandcause
flooding.Toomuchdetergentwithsoftwatercancause
a permanentcloudinessofglassware,calledetching.
Usetheinformationinthetablebelowasa guideto
determinethe amountofautomaticdishwasherdetergent
toplaceinthedispenser.Youmay usepowder,liquid,gel
ortabletsinthisdispenser.
Whenusingautomaticdishwashingdetergenttablets,
simplyplaceonetabletinthe mainwashsectionandclose
thecover.
Forheovilblsoiledloads,usethePotsandPansor HeovblWash
cycle,
DO NOTUSEHAND DISHDETERGENT
m
m
NOTE:Usingodetergentthatisnot specificoll_jdesigned
fordishwasherswillcausethedishwasherto fillwithsuds.
Duringoperation,thesesudswillspilloutofthedishwasher
vents,coveringthekitchenfloorandmakingthefloorwet.
Becausesomanydetergentcontainerslookalike,store
thedishwasherdetergentina separatespacefromall
othercleaners.Showanyonewhomay usethedishwasher
thecorrectdetergentandwhereit isstored.
Whiletherewillbenolastingdamagetothedishwasher,
yourdisheswillnotgetcleanusinga dishwashing
detergentthat isnotformulatedto workwith dishwashers.
Number
of Grains Detergent Cupsto Fill
Lessthan 4 Fillcup to soft line(1/3 full)
4 to 8 Fillcup to medium soft line (2/3 full)
8 to 12 Fillcup to medium hard line
(completely full)
Greater Fillboth main wash cup
than 12 and pre wash cup
Using the dishwasher.
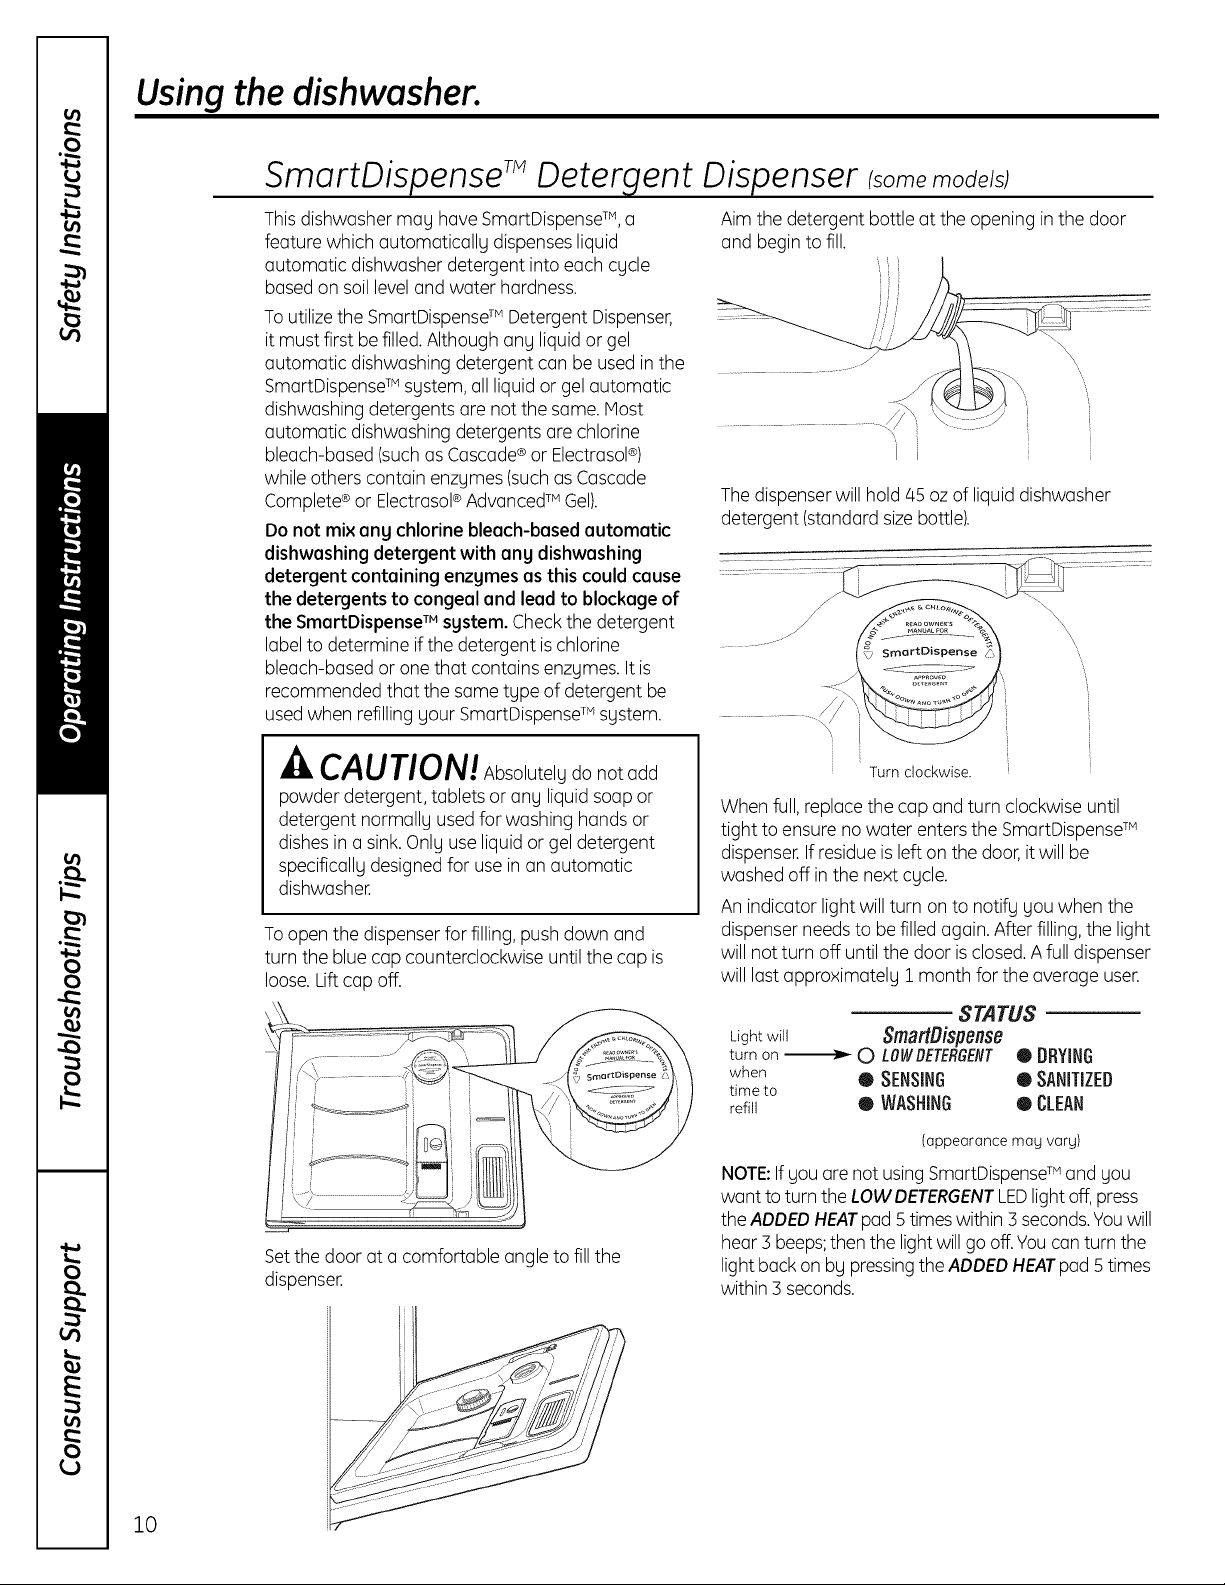
SmartOispense Detergent Dispenser (somemodels)
Thisdishwasher may have SmartDispenseTM,a
feature which automatically dispenses liquid
automatic dishwasher detergent into each cycle
based on soil leveland water hardness.
Toutilizethe SmartDispenseTMDetergent Dispenser,
it must first be filled.Although any liquid or gel
automatic dishwashing detergent can be used in the
SmartDispenseTMsystem,allliquid or gel automatic
dishwashing detergents are not the same, Most
automatic dishwashing detergents are chlorine
bleach-based (suchasCascade®or Electrasol®)
while others contain enzymes (suchas Cascade
Complete®or Electrasol®AdvancedTMGel).
Do not mix ony chlorine bleoch-bosed outomotic
dishwoshing detergent with ony dishwoshing
detergent contoining enzymes os this could couse
the detergents to congeol ond leod to blockoge of
the SmortDispense TMsgstem.Checkthe detergent
label to determine ifthe detergent ischlorine
bleach-based or one that contains enzymes. It is
recommended that the same type of detergent be
usedwhen refilling your SmartDispenseTMsystem.
CAUTION! Absolutely do not add
powder detergent, tablets or any liquidsoap or
detergent normally usedfor washing hands or
dishes in a sink. Only useliquid or gel detergent
specifically designedfor use in an automatic
dishwasher.
Toopen the dispenser for filling, push down and
turn the bluecap counterclockwise until the cap is
loose.Lift cap off.
Aim the detergent bottle at the opening in the door
and begin to fill.
,i
i
[
i
Thedispenserwill hold 45 oz of liquid dishwasher
detergent (standard sizebottle).
'x
Turn clockwise.
[
When full, replace the cap and turn clockwise until
tight to ensure no water enters the SmartDispenseTM
dispenser.If residueisleft on the door,it will be
washed off in the next cycle.
An indicator light will turn onto notify you when the
dispenser needs to befilled again. After filling,the light
will not turn off until the door isclosed.Afull dispenser
will last approximately I month for the average user.
STATUS
Light will SmartDispense
turn on _ O LOWDETERGEflT 9) DRYING
when 0 SENSING • SANITIZED
time to
refill 0 WASHING • CLEAN
10
Setthe door at a comfortable angle to fill the
dispenser.
(appearance may vary)
NOTE:Ifyou are not usingSmartDispenseTMand you
want to turn the LOW DETERGENTLEDlight off, press
theADDEDHEATpad 5 times within 3 seconds.Youwill
hear 3 beeps;then the lightwill go off.Youcan turn the
light back on by pressingtheADDEDHEATpad 5 times
within 3 seconds.

SmartDispense Detergent Dispenser
Water Hardness Calibration
ge.com
Priorto the first use,the dishwasher needsto
be calibrated for water hardness.Pleasefollow
directions below to calibrate the dishwasher to
the hardness of gour tap water.
Determine the Hardness of Vour Tap Water
Inthe bag that contained these instructions, gou
shouldfind a water hardnesstest strip package. Read
the instructions on the package, remove the test strip
and follow the instructions to determine the hardness
levelof gour tap water.Youwill usethis information to
calibrate gour dishwasher to dispensethe optimal
amount of detergent.
Water hardness test strip indication
SOFT
OREDI I I I I I I I I 1
1 RED _ 2
2 RED _ 3
3 RED _ 4
4 RED _ 5
HARD
Calibration of 12-Button Front-Control
Models With 3-Digit Displag
Press at the some time. Dispiag
r_ Closeand latchthe door (lightson, dishwasher
not running).
I-21 Pressthe COOKWAREor DEEPCLEAN
and DELAYHOURSpadsat the same time
for 3 seconds.The displag will show a number
from 1to 5. This isthe water hardnessvalue
currentlg set.
r-31 Pressthe COOKWAREor DEEPCLEANpad
to raise the value or the NORMALpad to lower
the value.Setthe water hardnessvalue to the
number determined with the test strip and table
above.
1-4-IOncethe water hardness isset, the
START/RESETpad to savethe setting and return
the dishwasher to normal operation.
Calibration of 7-Button Top-Control Models
With 3-Digit Display
_':':':;::: ;;;;;_ ;;;;_li_t _ @__"_.:=:; ::;z_
Displog Press ot the some time.
r_ open the door and touch a pad (other than
START}to turn lights on.
_] Pressthe "Up" 1_ Arrow Padand DELAY
HOURSpadat the same time for 3seconds.
Thedisplag will show a number from 1 to 5.
This isthe water hardnessvalue currentlg set.
press
Value to Enter
into Dishwasher
r_ Pressthe "Up" f-xhArrow Padto raise the value
or the "Down" _Arrow Padto lower the value.
Setthe water hardnessvalueto the number
determined with the test strip and table at the left.
[4-] Oncethe water hardness is set, the
press
START/RESETpad to savethe setting and return
the dishwasher to normal operation.
Calibration of Models Without a 3-Digit Displag
Front controls
Closeand latch the door (lightson, dishwasher
not running).
_] Pressthe COOKWAREor DEEPCLEANand
DELAYHOURSpadstogether for 3seconds.
All lights will light upand gou will hear I to 5
beeps.The number of beeps indicates the current
hardnessvalue.
r3-1Tochange the setting, pressthe DELAYHOURS
pad the number of times that corresponds to the
water hardness value determined at the left.The
control will beep each time gou pressthe pad.
E] Oncefinished pressingthe pad, gou will hear a
confirmation with beepsfor the number of times
gou pressedthe pad.
1-51If the number of beeps is not what gou desire,
start pressingthe DELAYHOURSpad again to
reenter a new water hardness level.
r6-] once the water hardness isset, the
press
START/RESETpad to savethe setting and return
the dishwasher to normal operation.
controls
Top
Openthe door and touch a padto turn lights on.
m
Pressthe "Up" i_ Arrow Padand DELAY
ra
HOURSpadat the same time for 3seconds.All
lights will light up and gou will hear I to 5 beeps.
The number of beepsindicatesthe current
hardnessvalue.
r_To change the setting, pressthe DELAVHOURS
pad the number of times that corresponds to the
water hardness value determined at the left.The
control will beep each time gou pressthe pad.
Oncefinished pressingthe pad, gou will hear a
confirmation with beepsfor the number of times
gou pressedthe pad.
r_ if the number of beeps isnot what gou desire,
start pressingthe DELAYHOURSpad again to
reenter a new water hardness level.
r6-] once the water hardness isset,pressthe
START/RESETpad to savethe setting and return
the dishwasher to normal operation.
NOTE:Youshould recalibrate the dishwasher control
ifwater conditions change; for example, if a water
softener sgstem isadded or removed from gour 11
home.

Loading the dishwasher racks.
For best dishwashing results, follow these loading guidelines. Features and appearance of rocks and silverware
baskets mabl varbl from blour model
Upper Rack
Although the upperrock isprimarily for
glosses,cups and saucers, pots and pans con
be placed in this rack for effective cleaning.
Cupsand glossesfit best along the sides.This
isalso a secure place for dishwasher plastics.
Theutility shelf (somemodels)may be placed
in the up or down position to add flexibility. A
wine gloss holder (somemodels)secureswine
glossesfor best washability.
Somemodels hove contoured metal cup
shelvesthat con secure up to 12wine glosses
(asshown).
Becausewine glossescome in various sizes,
offer loading,slowly push in the rock to make
surethey will clearthe top of the dishwasher.
Somemodels have on Angled RackSystem,
which allows you to angleyour dishes,such
as coffee mugs,for bettercleaning and
quicker drying. To position the tines,pull the
leverforward then drop the tines into
position,then releasethe lever.
Theupper rock isgood for oil kinds of
odd-shaped utensils.Saucepans,mixing
bowls and other items should be placed face
down. Fold-down tines (onsome models)
provide flexibility for extra-large and hard-
to-fit items.
Securelarger dishwasher-safe plastics over
2 tines when possible.
Makesuresmall plastic items are secure so
they can't fall onto the heater.
Besurethat items do not protrude through
the bottom of the rack and block rotation of
the middle spray arm. This could result in
poor wash performance for items in the
upper rock.
Checkto make surethat no items will block
rotation of the wash arm.
NOTE:TheSingle RockWash selection,on
models with this feature,washes the upper
rock only. If you usethis feature, do not load
items in the lower rock.
\
]qt-b4 l U11f/ f
I II II II II II II II II II II
12
Adjustable Upper Rack
Thestandard position of your adjustable rack
is"up" which allows for maximum clearance
for your taller items in the lower rack. If you
have taller wine glasses,tumblers or other
items to place inthe upper rack, you may
want to adjust the rackto the lower position.
Tolower the rack support the weight of the
rack with your hands asshown and press
both finger pads about 1/4" toward the inside
of the rack as indicated and guide the rack
down to its lower position.
Toraise the rack to the "up" position,pull up
on the center of the rack side frame until the
rack locksinto place.
Lower Rack
Thelower rack isbest used for plates,saucers
and cookware. Large items such as broiler
pans and baking racks should go along the
left-hand side. Load platters, pots and bowls
along the sides,in corners or in the back.The
soiledsideof items should face the center of
the rack. If necessary,oversizedglassesand
mugs can be placed in the lower rack to
maximize loading flexibility.
Also,be careful notto let a portion of an item
such as a pot or dish handle extend through
the bottom rack.Thiscould blockthe wash
arm and cause poor washing results.
Fold-down tines (onsome models)provide
flexibility for extra-large and hard-to-fit items.
Thetines may be left inthe up position or
folded down to customize the lower rack.
ge.com
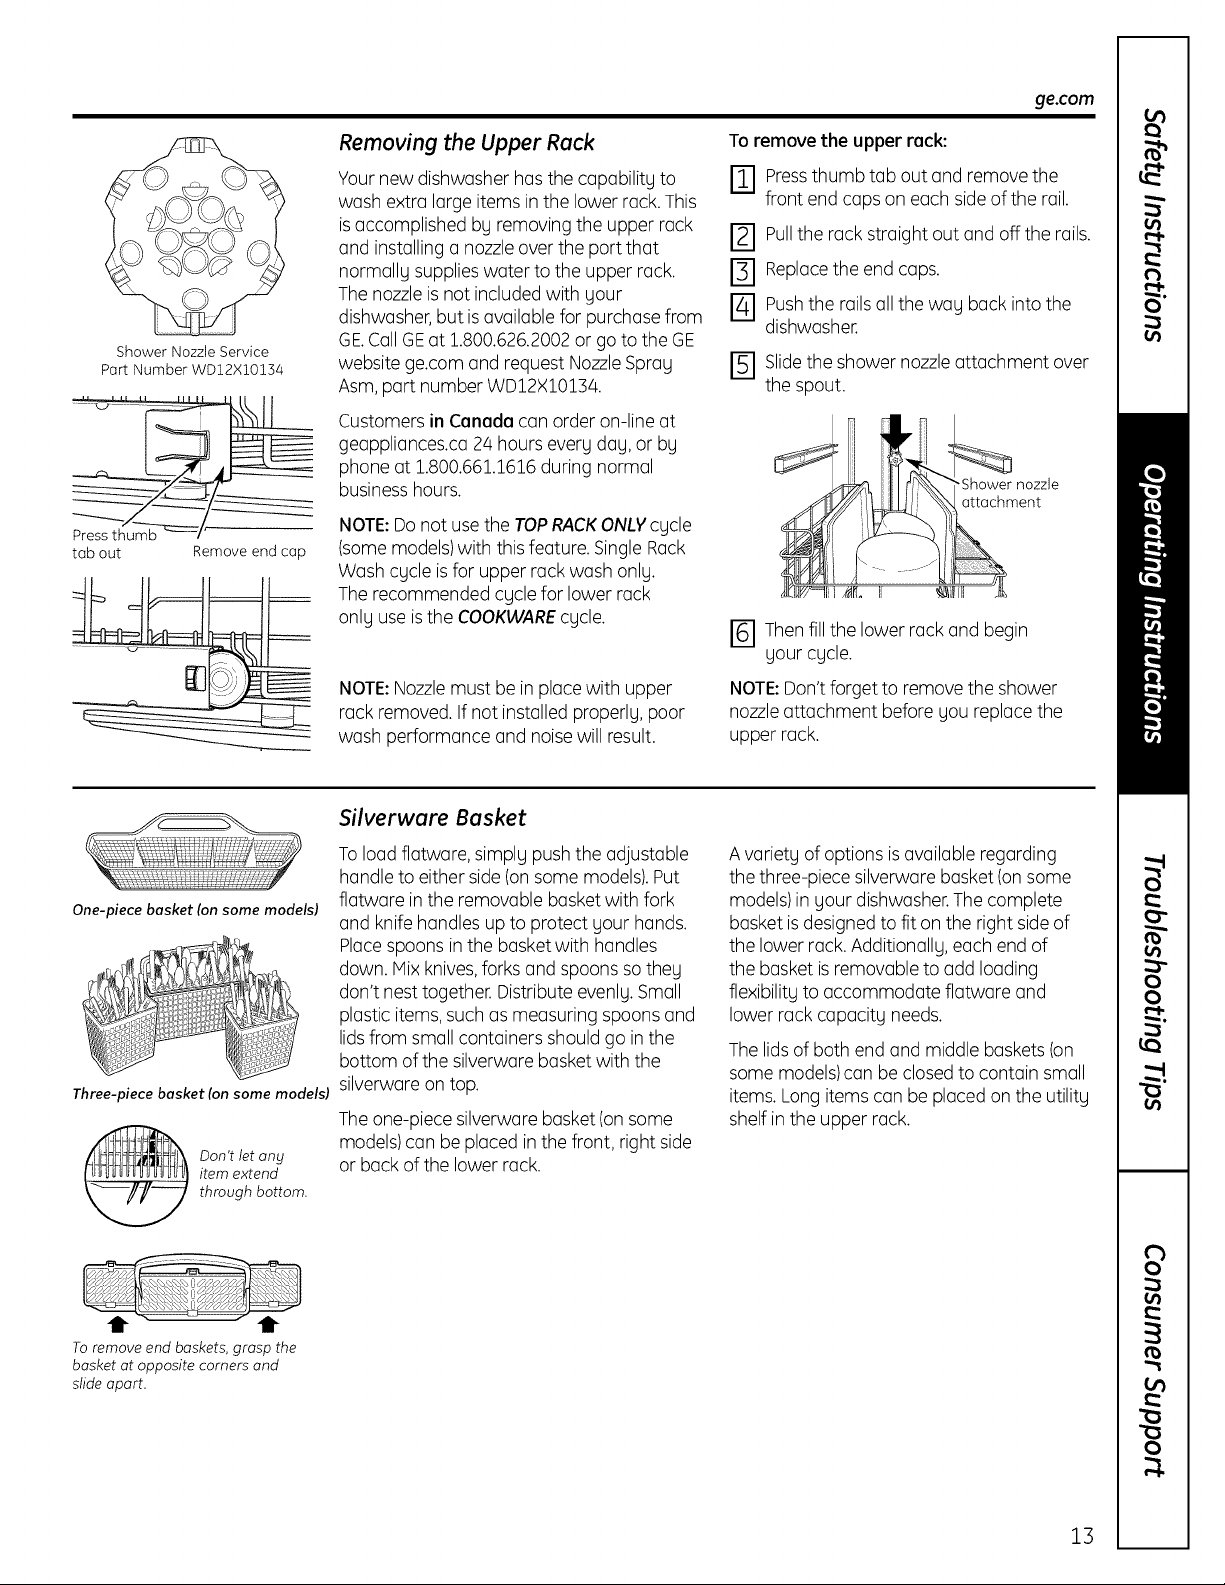
Shower Nozzle Service
Part Number WD12XlO134
tab out Remove end cap
Removing the Upper Rack
Yournew dishwasher hasthe capability to
wash extra large items in the lower rack,This
isaccomplished by removing the upper rack
and installing a nozzleoverthe port that
normally supplieswater to the upper rack,
The nozzleis not includedwith your
dishwasher,but isavailable for purchase from
GE.CallGEat 1.800.626.2002or go to the GE
website ge.com and request NozzleSpray
Asm,part number WD12X10134.
Customers inCanada can order on-line at
geappliances.ca 24 hours every day, or by
phone at 1.800.661.1616during normal
businesshours.
NOTE:Do not use the TOPRACKONLYcycle
(some models)with this feature. SingleRack
Wash cycle isfor upper rack wash only.
The recommended cycle for lower rack
only use is the COOl(WAREcycle.
NOTE:Nozzlemust be in placewith upper
rack removed.If not installed properly, poor
wash performance and noise will result.
Toremove the upper rack:
ITI Pressthumb tab out and remove the
front end caps on each sideofthe rail.
r_ Pullthe rackstraight out and offthe rails.
[] Replacethe end caps.
14-I Pushthe rails all the way back into the
dishwasher.
FI Slidethe shower nozzleattachment over
the spout.
"Shower nozzle
attachment
r_ Thenfillthe lower rack and begin
your cycle.
NOTE:Don'tforget to remove the shower
nozzleattachment before you replace the
upper rack.
One-piece basket (on some modelsl
Three-piece basket (on some modelsl
Don't let any
item extend
through bottom.
To remove end baskets, grasp the
basket at opposite corners and
slide apart.
Silverware Basket
Toload flatware, simply pushthe adjustable
handle to either side(on some models).Put
flatware in the removable basketwith fork
and knife handles up to protect your hands.
Placespoons in the basketwith handles
down. Mix knives,forks and spoons so they
don't nesttogether. Distribute evenly.Small
plastic items, suchas measuring spoons and
lidsfrom small containers should go in the
bottom of the silverware basketwith the
silverware on top.
Theone-piece silverware basket(on some
models)can beplaced in the front, right side
or back of the lower rack.
A variety of options isavailable regarding
the three-piece silverware basket(on some
models)in your dishwasher.Thecomplete
basket isdesignedto fit on the right sideof
the lower rack.Additionally, each end of
the basket is removable to add loading
flexibility to accommodate flatware and
lower rack capacity needs.
Thelidsof both end and middle baskets(on
some models)can be closedto contain small
items. Long items can be placed on the utility
shelf in the upper rack.
13
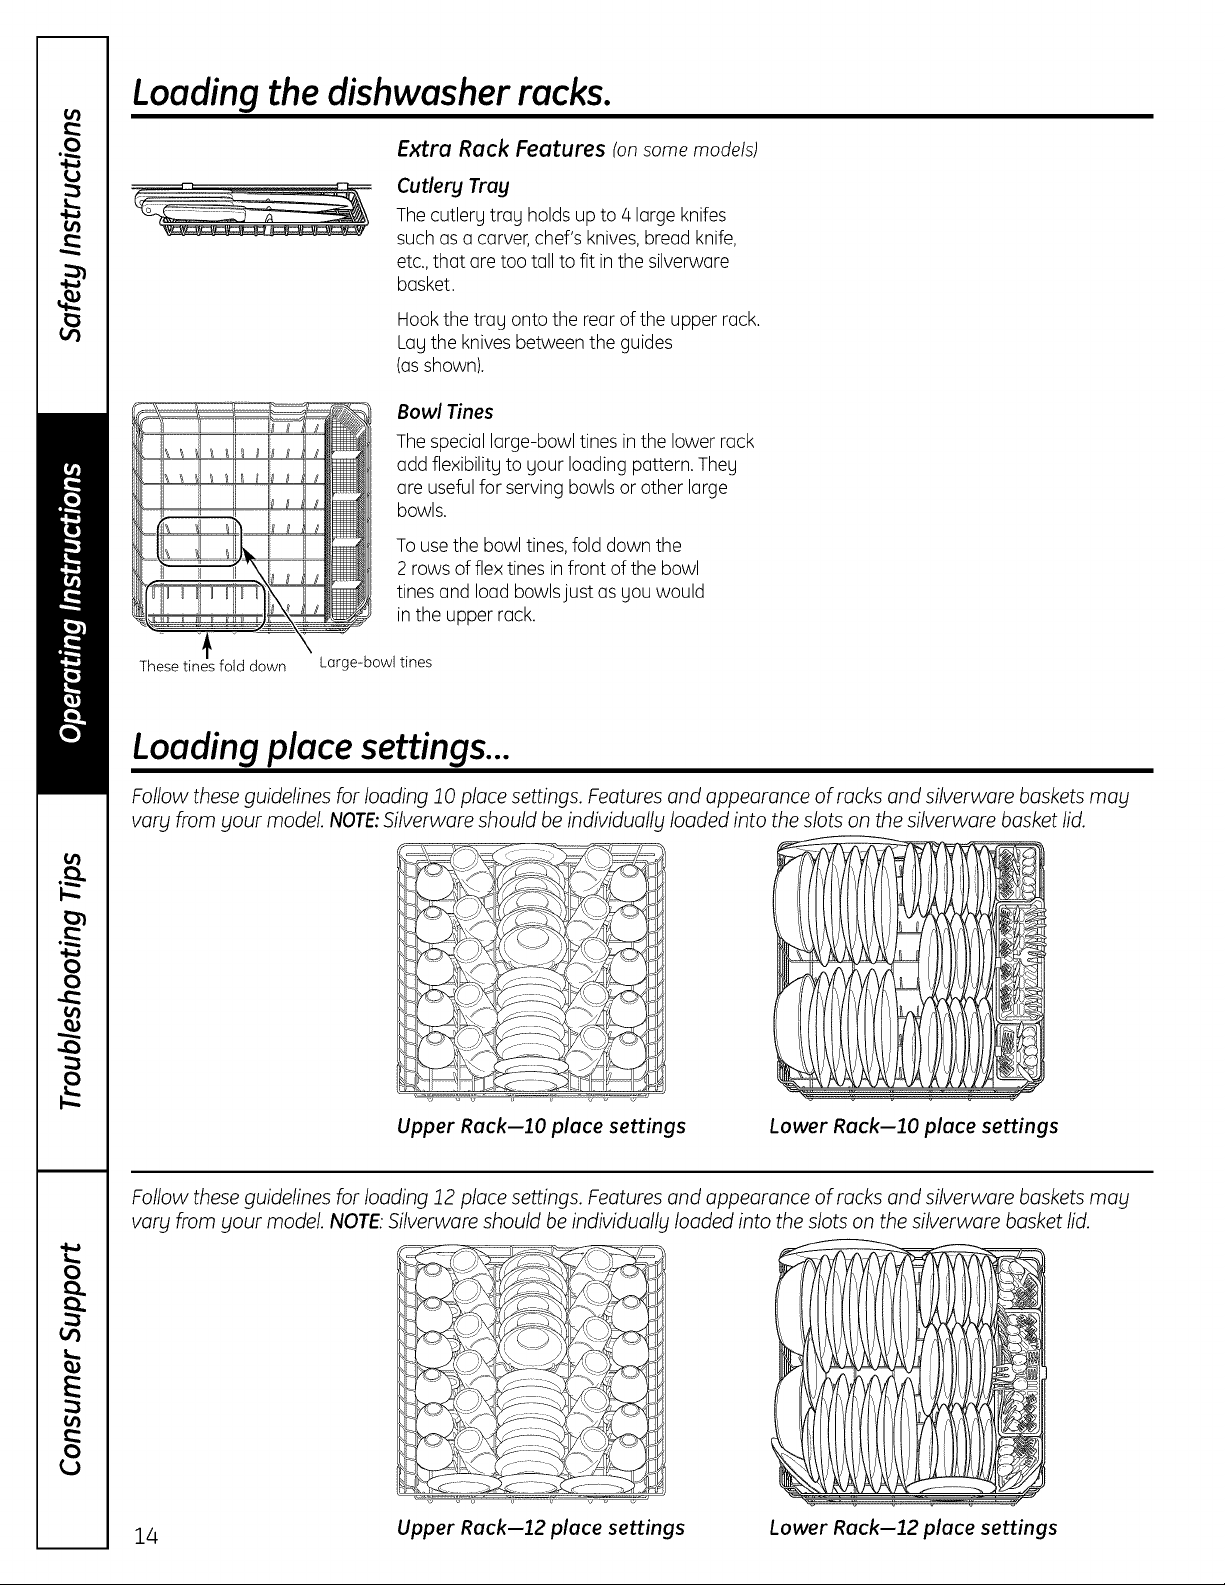
Loading the dishwasher racks.
Extra Rack Features (on some models)
Guffery Tray
Thecutlery tray holdsup to 4 largeknifes
such as a carver,chef's knives,bread knife,
etc.,that are too tall to fit inthe silverware
basket.
Hook the tray onto the rear of the upper rack.
Lay the knives between the guides
(asshown).
Bowl Tines
Thespecial large-bowl tines in the lower rack
add flexibility to your loading pattern. They
are usefulfor serving bowls or other large
p
L
_1_1I t Ill I I t
bowls.
Tousethe bowl tines,fold down the
2 rows of flex tines infront of the bowl
tines and load bowlsjust as you would
in the upper rack.
These tines fold down
Large-bowl tines
Loading place settings...
Follow these guidelines for loading 10 place settings. Features and appearance of racks and silverware baskets mag
vary from your model. NOTE:Silverware should be individually loaded into the slots on the silverware basket lid.
_11/
Upper Rack--lO place settings Lower Rack--lO place settings
Follow these guidelines for loading 12 place settings. Features and appearance of racks and silverware baskets mabl
varblfrom blour model. NOTE:Silverware should be individually loaded into the slots on the silverware basket lid.
14 Upper Rack--12 place settings Lower Rack--12 place settings

Caring for the dishwasher, ge.com
Cleaning the Exterior Door Panel
Beforecleaning the front panel,make
sure you knowwhat type of panelyou hove.
Referto the lasttwo lettersof your model
number. Youcan locate your model number
on the left-hand tub walljust insidethe door.
If your model number ends with BB,CC,WW,
SAor BG,then you have a PaintedDoor
panel. If your model number endswith SS,
then you havea StainlessSteelDoor panel. If
your model number ends with CS,then you
have a CleanSteelpanel.
Followthe instructions below for cleaning the
door panel for your specific model.
Painted Door Panel (model numbers ending
in BB-black,CC-bisque,WW-White, SA-silver
metallic or BG-grophite black)
Usea clean, soft, lightly dampened cloth,
then dry thoroughly. Youmay also usea
good appliance wax or polish.
Stainless SteelDoor Panel (modelnumbers
ending in SS)
Thestainlesssteel panels can be cleaned
with StainlessSteelMagic or a similar product
using a clean,soft cloth. Donot useappliance
wax, polish,bleach or products containing
chlorine on StainlessSteeldoors.
Youcan order StainlessSteelMagic
#WXlOX15 through GEPartsby calling
800.626.2002.
CleanSteel Door Panel (model numbers
ending in CS)
Use a clean, soft, lightly dampened cloth,
then dry thoroughly. Do not use appliance
wax, polish or any chemical agent on
CleanSteel doors.
Do not wipe the dishwasher with a soiled
dish cloth or wet towel. Thesemay leave
a residue. Do not use scouring pads or
powdered cleaners because these products
con scratch the finish.
Stainless Steel Interior--Tub and Inner Door
Thestainlesssteel usedto make the
dishwasher tub and inner door provides
the highest reliability available in a GE
dishwasher.If the dishwasher tub or inner
door should be scratched or dented during
normal use,they will not rust or corrode.
Thesesurface blemishes will not affect
their function or durability.
Cleaning the Control Panel
Tocleanthe control panel, usea lightly
dampened cloth. Then dry thoroughly.
Protect Against Freezing
If your dishwasher is left in on unheated
place during the winter,ask a service
technician to:
r_l cut off electrical power to the
dishwasher.Removefusesor trip
circuit breaker.
I-_1Turn off the water supplyand disconnect
the water inlet linefrom the water valve.
r_ Drainwater from the water inlet line
[_-] Reconnectthe water inlet lineto the
and water valve.(Usea pan to catch
the water.)
water valve.
Air gap _._ k('L I':_J_
Checktheairgapany time
goutdishwasherisn'tdraining
welt.
Does Vour Dishwasher Have an Air Gap?
An air gap protects your dishwasher
against water backing up into it if a drain
clogs.The air gap is not a part of the
dishwasher.It isnot covered by your
warranty. Not all plumbing codes require
air gaps,so you may not have one.
Theair gap is easg to clean.
[] Turnoff the dishwasher and lift off the
cover.
Removethe plasticcap and clean with
[-2]a toothpick.
15
 Loading...