

GE PDW9280L00SS, PDW8880L00SS, PDW8800L00BB, PDW8800L00WW Owner’s Manual
Safety Instructions ........... 2, 3
ge.com
Operating ImCn_tions
Care and Cleaning ............ 13
Control Panel and Setting_ .... 4.7
Flashing Display Lights .......... 7
I,oading Place Settings ......... 19
I,oading tile Racks ......... 10-19
Using tile Dishwasher . ........ 8-9
Troubleshooting Tips ...... 14-16
Consumer Support
Consumer Support ............ 24
Product Registration ........ 17, 18
_A'ananty .................... 23
PD W8 700 Series
PD W88 O0 Series
PD W9200 Series
PD W9800 Series
Write the model and serial
numbers here:
Model #
Serial #
You can find them on the mb wall
just inside the doo_:
165D#700P315 49-5991 06-05 JR

IMPORTANTSAFETYINFORMATION.
READALLINSTRUCTIONSBEFOREUSING.
For Four safety, the information in this manual must he followed to minimize the risk of fire
or explosion,electric shock, or to prevent property damage,personal injury,or death.
WATERHEATERSAFETY
Under certain conditions, hydrogen gas may be produced in a water heater that has not been used for
two weeks or more. HYDROGENGAS IS EXPLOSIVE,
If the hot water has not been used for two weeks or more, prevent the possibili D' of damage or iqjm T
by turning on all hot water fimcets and allow them to run for several minutes. Do this befi)re using any
electrical appliance which is connected to the hot water system, This simple procedure will allow any
built-up hydrogen gas to escape. Since the gas is flammable, do not Slnoke or use an open flalne or
appliance during this process.
Use this appliance only for its intended purpose as described in this Owner's Manual.
%
PROPERINSTALLATIONANDMAINTENANCE
This dishwasher must be properly installed and located in accordance with the Installation
Instructions before it is used. If you did not receive anInstallation Instructions sheet, you can receive
one by visiting ge.com, or by calling 800.GE.CARES(800.432.2737)in the United States. In Canada, visit
www.geappliances.ca or carl 1.800.361.3400.
• Connect to a grounded metal, permanent
wiring system; or run an equipment-grounding
conductor with the circuit conclucto_ and
connect to the equipment-grounding temfinal
or lead of the appliance.
• Improper connection of the equipment-
grounding conductor can result in a risk of
electric shock. Check with a qualified electrician
or service representative if w)u are in doubt
whether the appliance is properly grounded.
• Use supply con(lucto_ rated at least 75°C
(167°F).
• Dispose _ff discarded appliances and shil)ping or
packing material properly.
• Do not attempt to repair or replace any part
of your dishwasher unless it is specifically
recommended in this manual, M1 other servicing
should be referred to a qualified technician.
• To minimize the possibility ot electric shock,
disconnect this appliance from the power SUl)ply
befi)re attempting any maintenance.
NOTE: Turningthe dishwasheroff doesnot disconnectthe
appliance from thepower supp/y Werecommendhaving
a quafified technicianserviceyour appliance.
A WARNING!
DONOT...
• Do not tamper with controls.
• Do not abuse, sit on or stand on the door or
dish rack of the dislmz_she_:
• Do not discard a dislm;_sher without fi_st
removing the door or removing the door latch.
• Do not store or use combustible materials,
gasoline or other flammable wq)o_ and liquids
in the vicinity of this or any other appliance,
• Do not allow children to play around the
dishwasher when opening or closing the door
due to the possibili V of small finge_ being
pinched in the (h)o_:
• Do not allow children to l)lay with, on or inside
this appliance or any discarded appliance.
2
Z_WARNING!RISKOFCHI£DENTRAPMENT
PROPERDISPOSALOFTHEDISHWASHER
ge.com
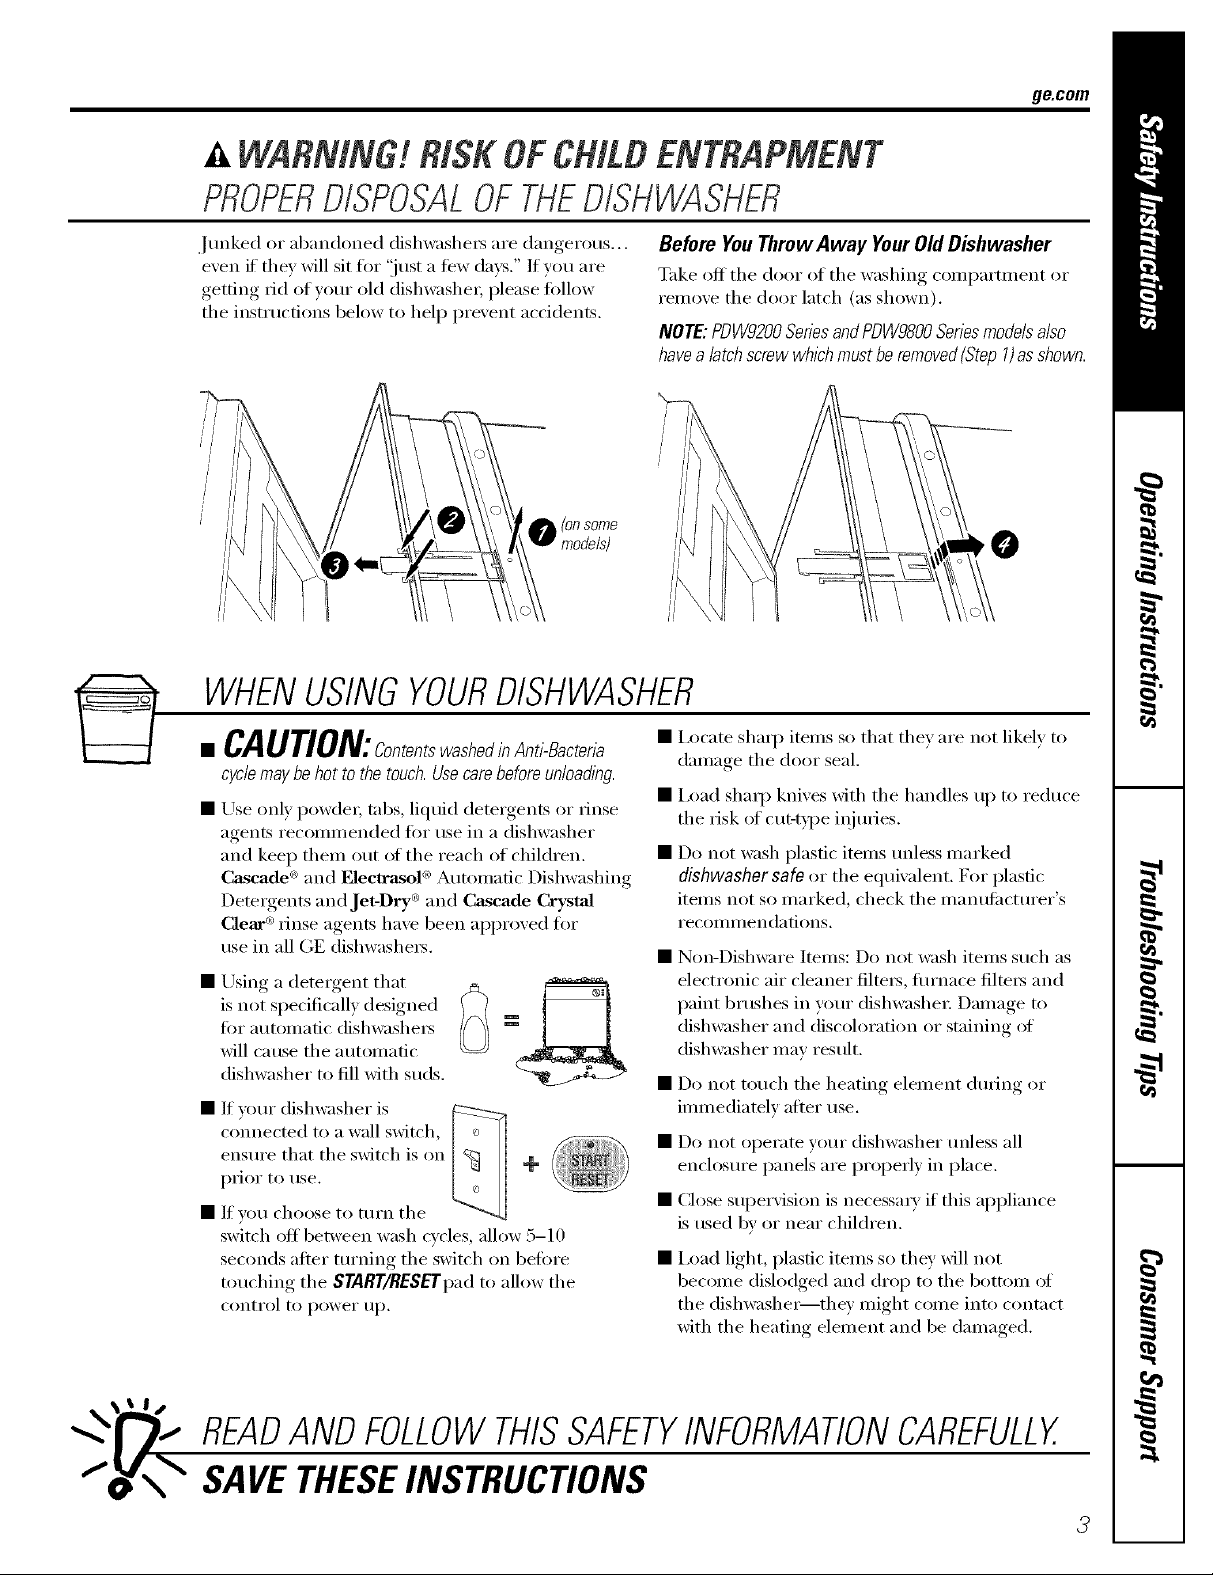
Junked or abandoned dishwashex_ are dangerous...
even if' they will sit fiw 'ijust a few days." If you are
getting rid of yore _old dishwasher; please fi_llow
the instructions below to help prevent accidents.
O Io0 some
models)
Before You ThrowAway Your Old Dishwasher
Take off the door of the washing compartment or
remove the door latch (as shown),
NOIE: PDW9200SeriesandPDW9800Seriesmode& also
havea latchscrew whichmustbe removed(Step 1)asshown.
WHENUSINGYOURDISHWASHER
• CAUTION:contentswashedinAn_,-sacter,a
cyclemay be hot to the touch. Usecarebefore unloadlbg.
• Use only powder; tabs, liquid detergents or rinse
agents recommended fl:,r tlse in a dishwasher
and keep them out of the reach of children.
Cascade ® and []ecWasoD _Automatic Dishwashing
Detergents and Jet-Dry ®and Cascade Crystal
Clear _)rinse agents have been approved for
use in all GE dishwashers.
• Using a detergent that
is not specifically designed
for automatic dishwashe_
will cause the automatic
dishwasher to fill with suds.
• If umr dishwasher is
com_ected to a wall switch,
ensm'e that the switch is on
prior to use.
• If w)u choose to turn the
switch off between wash cycles, allow 5-10
seconds after turning the switch on before
touching the START/RESETpad to allow the
control to power Ill).
+
• I,ocate shaq) items so that thev are not likely to
damage the door seal.
• i,oad shaq) knives with the handles up to reduce
the risk of cut-t)pe iqjtwies.
• Do not wash plastic items tmless marked
dishwasher safe or the equivalent. For plastic
items not so marked, check the i//anttfilcttlrer's
i'ecoillil/endations.
• Non-Dishware Items: Do not wash items such as
electronic air cleaner filte_, flu'nace filte_ and
paint brushes in yore" dishwasher: Damage to
dishwasher and discoloration or staining of
dishwasher may result.
• Do not touch the heating element dining or
immediately after use.
• Do not operate yore" dishwasher tmless all
enclosm'e panels are properly in place.
• Close supervision is necessa_ T if this appliance
is used by or near children.
• i,oad light, plastic items so they Mll not
become dislodged and drop to the bottom of
the dishwashe_they might come into contact
with the heating element and be damaged.
READANDFOLLOWTHISSAFETYINFORMATIONCAREFULLY.
SAVETHESEINSTRUCTIONS
3
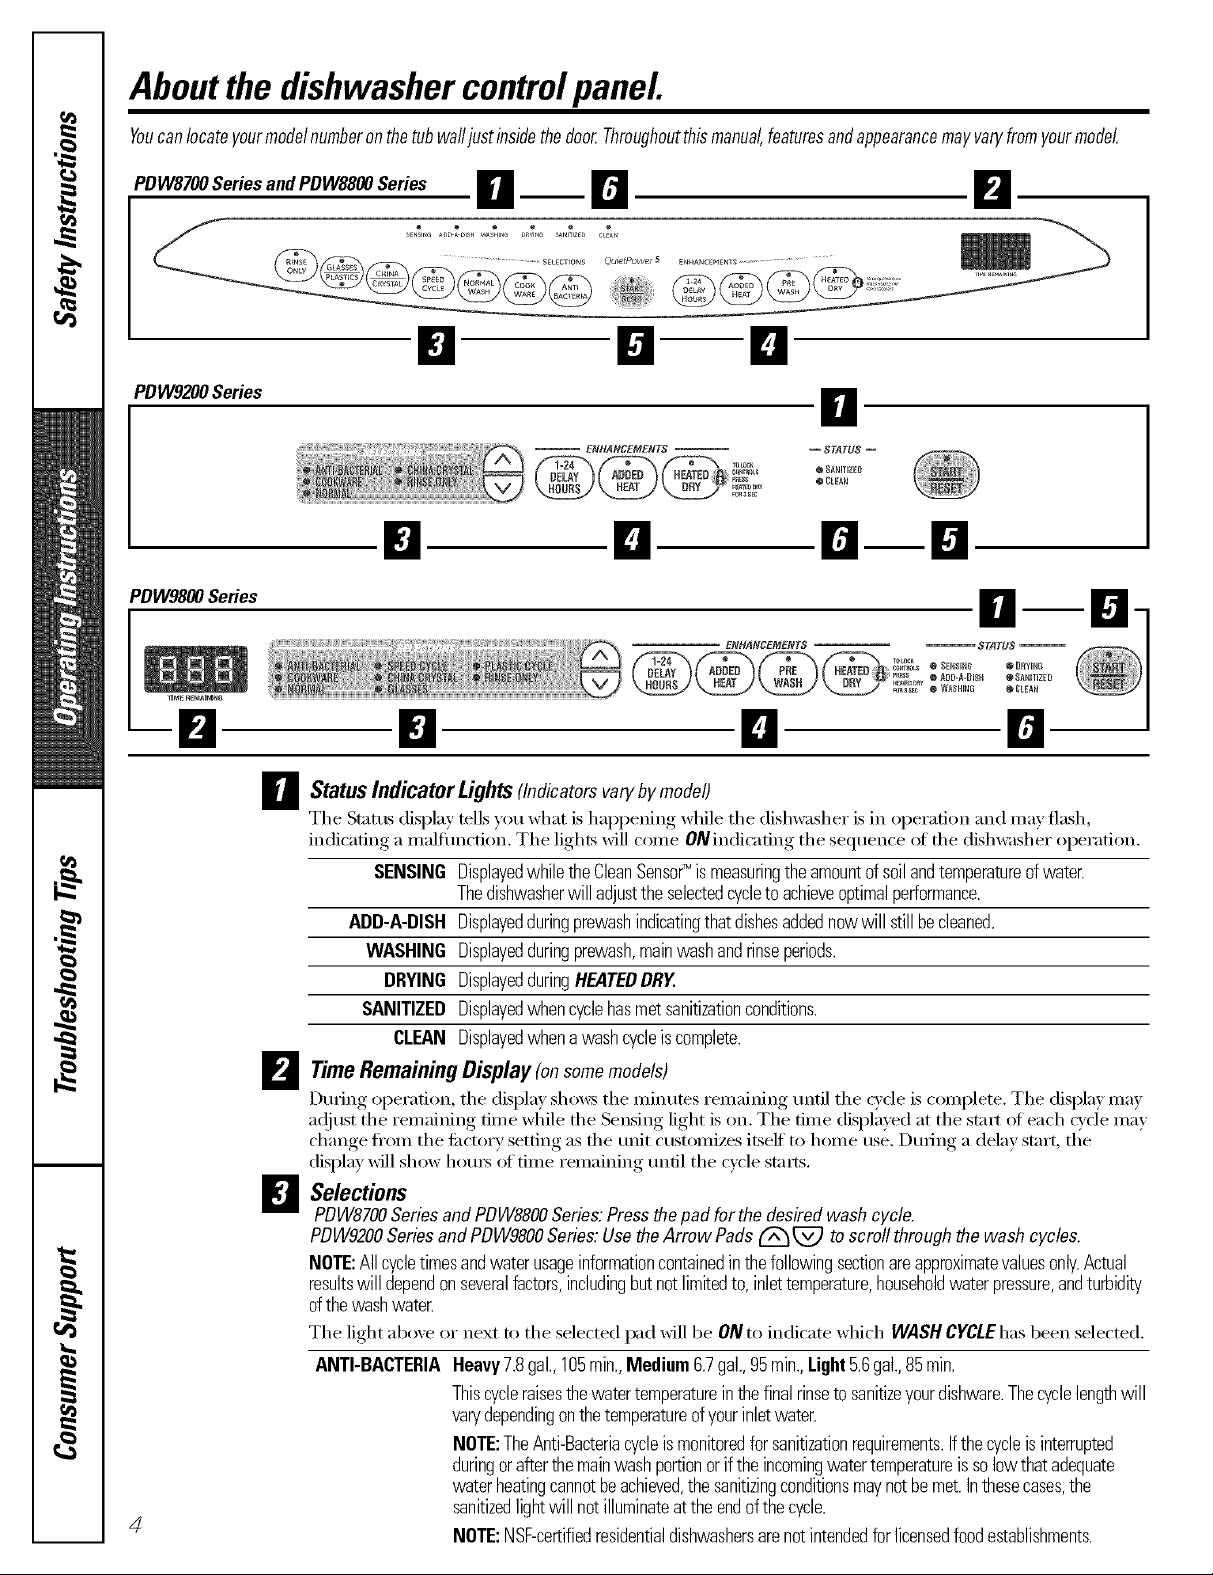
Aboutthe dishwashercontrolpanel
Youcanlocateyourmodelnumberonthetubwafljustinsidethedoor.Throughoutthismanual,featuresandappearancemayvaryfromyourmodel
PDW8700SeriesandPDW8800Series o __ r_ _,_
'_ - _E._........_....... _....... _...... _.........%
@ _/"_/"_/"_/"_,_,_ _ .......................... SELEC FIONS _U_lPO£1/e f 5 ENHANCEMENTS ..................
B 8 n
PDW9200Series 0
-- ENHANCEMFNTS --
-- STATUS
@ _ANITIZED
® CLEAN
El El
PDW9800 Series
4
O--D
El El El
O Status IndicatorLights (Indicatorsvarybymodel)
The Stares display tells you what is happening while the dishwasher is in operation and may flash,
indicating a malflmction. The lights will come ONindicafing the sequence ot fl_e dishwasher operation,
SENSINGDisplayedwhiletheCleanSensor_ismeasuringthe amountofsoilandtemperatureofwater.
Thedishwasherwill adjusttheselectedcycletoachieveoptimalperformance.
ADD-A-DISH Displayedduringprewashindicatingthatdishesaddednowwill stillbecleaned.
WASHING Displayedduringprewash,mainwashandrinseperiods.
DRYING DisplayedduringHEATEDDRY.
SANITIZEDDisplayedwhencyclehasmetsanitizationconditions.
CLEAN Displayedwhenawashcycleiscomplete.
TimeRemainingDisplay(onsomemodels)
B
During operation, the display shows the minutes remaining until the cycle is complete. The display may
a(!itlst the remaining time while the Sensing light is on. The time (lisl)l_ye(lat the start of each cvde may
change fl'om the _cto_ T setting as file ullit customizes itself to home rise. During a delay start, tl{e
display will show hotu_ of time remaining until the cycle starts.
Selections
0
PDW8700SeriesandPDW8800Series:Pressthepadforthe desiredwashcycle.
PDW9200SeriesandPDW9800Series:UsetheArrow Padst_ _ toscrollthroughthe wash cycles.
NOTE:Allcycletimesandwaterusageinformationcontainedinthefollowingsectionareapproximatevaluesonly.Actual
resultswill dependonseveralfactors,includingbutnotlimitedto,inlettemperature,householdwaterpressure,andturbidity
ofthewashwater.
The light above or next to the selected pad will be ONto indicate which WASHCYCLEhas been selected.
ANTI-BACTERIAHeavy7.8gal.,105min.,Medium6.7gal.,95min.,Light5.6gal.,85min.
Thiscycleraisesthewatertemperatureinthefinalrinsetosanitizeyourdishware.Thecyclelengthwill
varydependingonthetemperatureofyourinletwater.
NOTE:TheAnti-Bacteriacycleismonitoredforsanitizationrequirements.Ifthecycleis interrupted
duringorafterthemainwashportionoriftheincomingwatertemperatureissolowthatadequate
waterheatingcannotbeachieved,thesanitizingconditionsmaynotbemet.Inthesecases,the
sanitizedlightwillnotilluminateat theendofthecycle.
NOTE:NSF-certifiedresidentialdishwashersarenotintendedforlicensedfoodestablishments.

D Selections (continued)
COOKWAREHeavy8.9gal.,80rain.
(POTS& PANS) Medium7.8gal.,70rain.
Light6.7gal.,60rain.
Thiscycleismeantforheavilysoileddishesorcookwarewithdried-onorbaked-onsoils.
Thiscyclemaynot removeburned-onfoods.Everydaydishesaresafetobeusedinthiscycle.
NORMALWASH Heavy7.8gal.,75rain.
Medium6.7gal.,65rain.
Light4.5gal.,50rain.
Thiscycleisformedium/heavilysoileddishesandglassware.
SPEEDCYCLE6.7gal.,35rain.
Thiscycleisforeverydaydishesandglassware.
CHINACRYSTAL6.7gal.,35rain.
Thiscycleisforlightlysoiledchinaandcrystal.
PLASTICSCYCLEHeavy6.7gal.,160rain.
Medium5.6gal.,150rain.
Light4.5gal.,130rain.
Thelongertimeforthiscycleincludesabuilt-indryingportionthatis specificallydesignedto reduce
theriskof meltingplasticitemsandimproveplasticdrying.Forremovingredtomato-basedstains,GE
recommendstheuseofCascadePlasticBooster7
GLASSESHeavy6.7gal.,30rain.
Medium5.1gal.,35rain.
Light4.1gal.,30rain.
Thiscycleisspecificallydesignedforglasses.
RINSEONLY 2.3gal.,10rain.
Forrinsingpartialloadsthatwill bewashedlater.Donotusedetergentwiththiscycle.
ge.com
NOTE:OnthePDW8700SeriesandPDW8800Seriesmode&theGLASSES/PLASTICSselectorisa togglepad,toggle
thepaduntilthedesiredcyclebindicated
NOTE:Thisdishwasheris equippedwitha CleanSensor_ withautomatictemperaturecontrol,therefore,cyclelengthand
timemayvarydependingonsoilandtemperatureconditions.
NOTE:OnlytheAnti-BacteriacyclehasbeendesignedtomeettherequirementsofSection6,NSF184forsoftremoval
andsanitl2ationefficacy
D Enhancements
The light above the selected pad will be ON to indicate which ENHANCEMENThas been selected,
DELAYHOURS Youcandelaythestartofawashcycleforupto24hoursor2,4 or8 hours(dependingonmodel).
PresstheDELAYSTARTpadtochoosethenumberof hoursyouwantto delaythestartofthecycle;
thenpressSTART/RESET
Afterclosingthedoor,themachinewill countdownandautomaticallystartatthe correcttime.
NOTE:Tocancelthe DELAYSTARTselectionbeforethecyclebegins,pressthe DELAYSTART
paduntilthedisplayshowstheestimatedcycletimefortheselectedcycleinminutes.

Aboutthe dishwashercontrolpanel
D Enhancements
ADDEDHEAT
(EXTRAHOTWASH)
PREWASH
(onsomemodels)
HEATEDDRY
LightOff
HEATEDDRY
LOCK
RESET
(COl?tiylued)
Whenselected,the cyclewill runlongerwith heatingelementonto improvebothwashanddn/
performance.
NOTE:Cannotbeselectedwith RINSEONLYcycle.
Forusewith heavilysoiledand/ordried-on,baked-onsoils.ThisoptionMUSTbeselectedPRIORtc
startingthecycle.Thisoptionadds15minutesto thecycletime.
NOTE:Cannotbeselectedwith RINSEONLYcycle.
Shutsoffthedryingheatoption.Disheswillairdrynaturally(PDW8700SeriesandPDW8800Series)
orfandry(PDW9200SeriesandPDW9800Series)to saveenergy.
Turnstheheatingelementonforfastdrying.Thiswill extendthetotalcycletimeby 15minutesfor
theANTI-BACTERIALcycle,8 minutesfortheSPEEDcycle,15minutesforthePLASTICScycle,
30minutesforthe CHINACRYSTALandGLASSEScycles,and38minutesforall othercycles.
NOTE:Cannotbeselectedwith RINSEONLYcycle.
Youcanlockthecontrolstopreventanyselectionsfrombeingmade.Oryoucanlockthecontrols
afteryouhavestarteda cycle.
Childrencannotaccidentally startdishwasherbytouchingpadswiththisoptionselected.
Tounlockthedishwashercontrols,pressandholdtheHEATEDDRYpadfor3 seconds.Tolockthe
dishwasher,pressandholdtheHEATEDDRYpadfor3 seconds.ThelightabovetheLOCKpad
willturnoff.
Tochangeacycleafterwashingstarts...
PDW8700Seriesand PDW8800Series:Touchthe START/RESETpadtocancelthecycle.The
START/RESETlightwill flashwhilethewateris pumpedoutif needed.Thistakesapproximately
2minutes.
PDW9200SeriesandPDW9800Series:Openthedoorslowlyto preventsplash-out.Touchthe
START/RESETpadtocancelthecycle.IftheSTART/RESETlightisflashing,closethedoor
untilthewaterpumpsout(thistakesapproximately2 minutes)andthelightstopsflashing.
Whenthelightstopsflashing,thedishwashercanbereprogrammedandrestarted.
D Start
PDW8700SeriesandPDW8800Series
Closethedishwasherdoorandselectthecycleanddesiredenhancements.TouchtheSTART/RESETpadtobeginthe
cycle.Waterfill beginsimmediately,andapproximately60secondslaterthewashactionbegins.
Whenthedishwasherdooris fullyclosed,thecontrolpanellightswilldisplaythelastsettingsyouselected.Ifyoudon't
wanttochangeanyofthesettings,simplytouchtheSTART/RESETpadtobeginthecycle.
Ifthedooris closed,theindicatorlightswillturnoffifthe START/RESETpadisnotselectedwithin5minutes.Toactivate
thedisplay,openandclosethedoororpressanypad.
PDW9200SeriesandPDW9800Series
Afterselectingthe cycleanddesiredenhancements,touchtheSTART/RESETpadto readythedishwashertobeginthe
cycle.Closethedoortostartthecycleor begintheDELAYSTARTcountdown.Whenthecyclestarts,thewaterfill
beginsandapproximately60secondslaterthewashactionbegins.
Thedishwasherwill alwaysdisplayyourlastselectionandenhancements.Ifyoudon'twanttochangethe settings,
simplytouchtheSTART/RESETpadto readythedishwasherandclosethedoortobeginthecycle.
Also,if a powerfailureoccursNORMALandHEATEDDRYwillautomaticallybeprogrammed.Makeanynewselections
andtouchtheSTART/RESETpadtobeginthenewcycle.
Ifthedoorisopened,theindicatorlightswill turnoff ifthe START/RESETpadisnotselectedwithin5minutes.
Toactivatethedisplay,openandclosethedoorortouchanypad.

_ Clean
PDW8700SeriesandPDW8800Series
TheCLEANlightis illuminatedwhentheselectedcycleandenhancementsarecomplete.Thelightwill stayONuntil
a padispressedorthedooris openedandthenclosed.
PDW9200SeriesandPDW9800Series
TheCLEANlightis illuminatedandadoublebeepwill soundwhentheselectedcycleandenhancementsarecomplete.
Youmayremovethedishesatanytime.Notethehigh-efficiencyfanwill runquietlyfor30minutesto4 hours(depending
onselectedcycle)aftertheCLEANlightisilluminatedtocontinuedryingthedishes.Thefancanbeturnedoffbyopening
thedoorandpressinganykeypad.
NOTE:Toturnofftheaudibleend-of-cyclesignal(orre-activateit if it waspreviouslydisengaged),presstheHEATED
DRYpad5timeswithin3seconds.Atriplebeepwill soundto indicatetheend-of-cyclebeepoptionhasbeentoggled.
Flashingdisplaylights.
ge.com
StatusIndicator Lights
START/RESET
What It Means
Cycle has 1)een interrupted by pressing the START/RESETpad.Light will
quit flashing after the dishwasher automatically drains out the water:
Recommendeddishwasherproducts.
GE recommends the fi_llowing products fin" use in
its dishwasher's:
• Cascade®and Electrasol® powder, liquid or gel
automatic dishwasher detergents.
• Jet Dry® and Cascade Crystal Clear_ to relno',,e
spots and prevent new fihn buildup on your
dishes, glasses, flatware, cookware and plastic.
• Cascade®Plastic BoosterTM to remove red staining
inside your dishwasher that can come from some
tomato-based stains.
• CeramaBryte®Stainless Steel Appliance (:leaner
to clean the stainless steel panel of GE and
Profile ''_stainless exterior dishwashexs.
• Jet Dry ® Dishwasher Cleaner to hel I) remove
some hard water mineral stains that can occur
in hard water conditions.
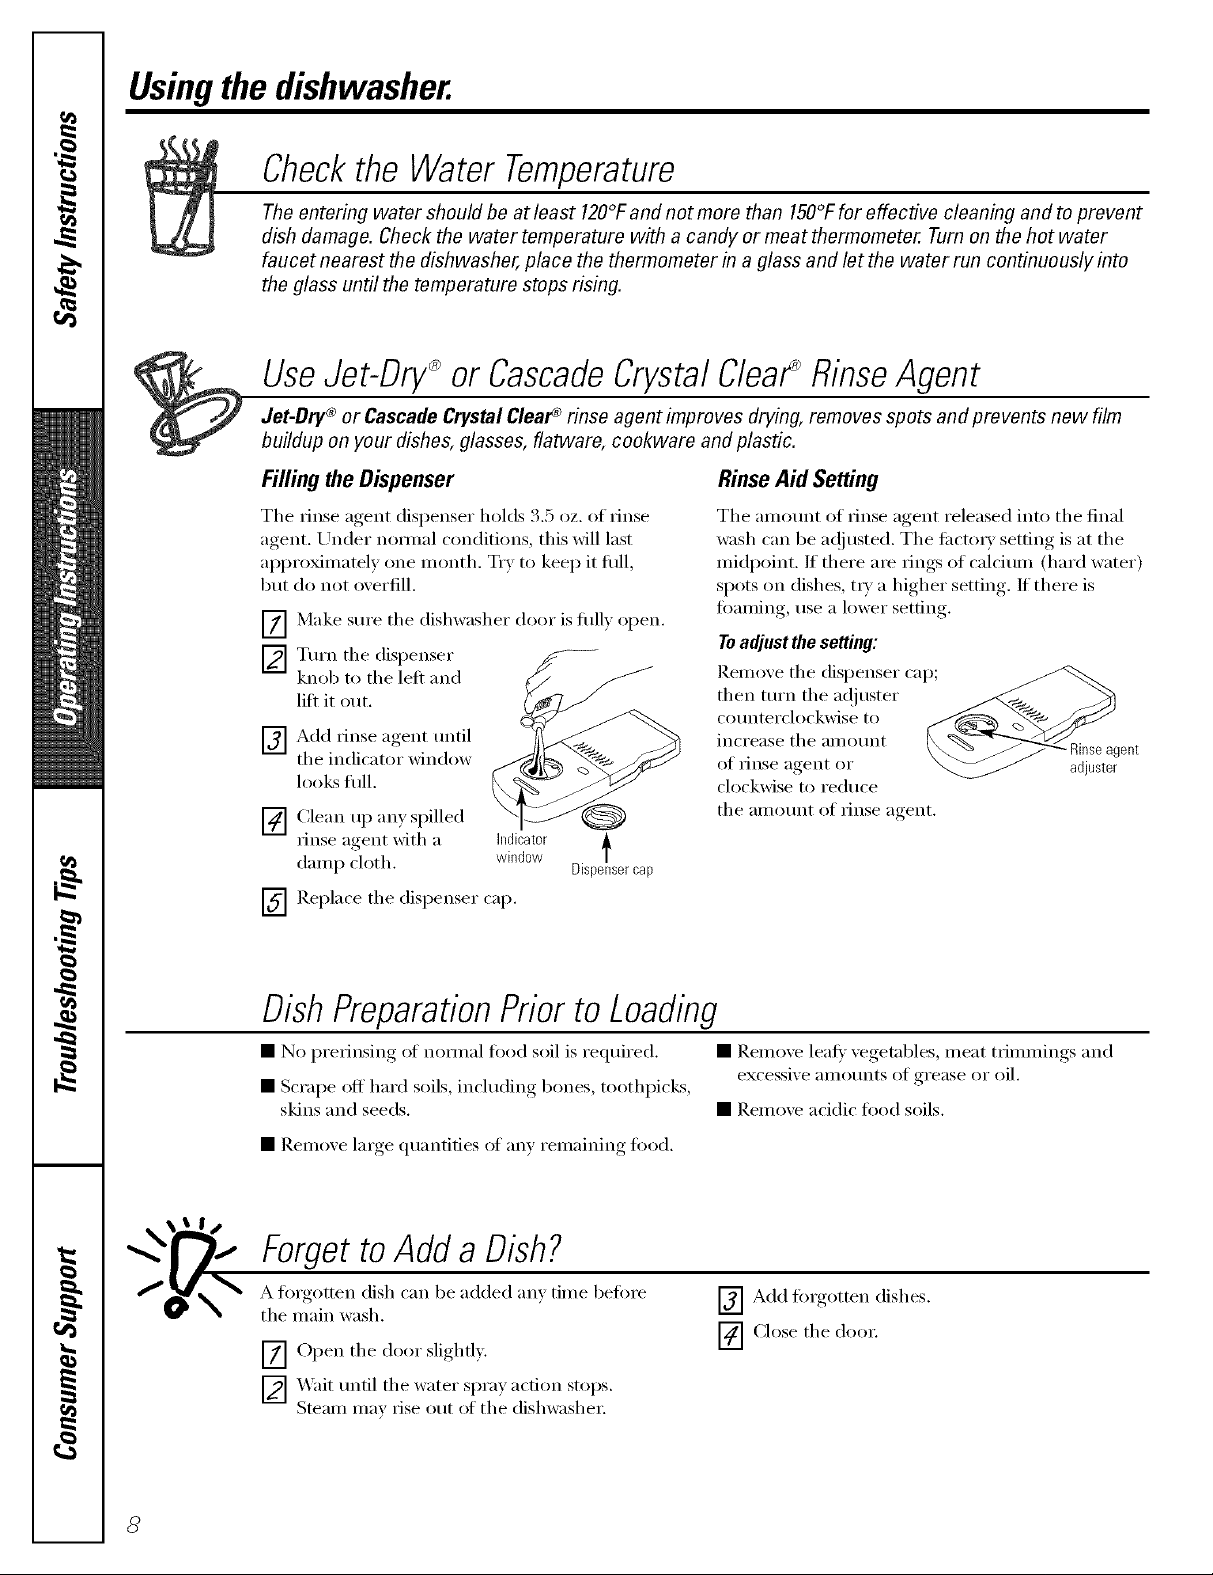
Usingthedishwasher.
Checkthe Water Temperature
The entering water should be at least 120°!:and not more than 150°!:for effective cleaning and to prevent
dish damage• Check the water temperature with a candy or meat thermometer. Turnon the hot water
faucet nearest the dishwasher, place the thermometer in a glass and let the water run continuously into
the glass until the temperature stops rising•
UseJet-Dry_or CascadeCrystalCleaPRinseAgent
Jet-Dry ® or Cascade CrystalClear_ rinse agent improves drying, removes spots and pre vents new film
buildup on your dishes, glasses, flatware, cookware and plastic•
Filling the Dispenser RinseAid Setting
The rinse agent dispenser holds 3.5 oz. of rinse
agent, Under nomml conditions, this will last
approximately one month. Try to kee I) it flfll,
gilt do )lot overfill.
Make sm'e the dishwasher door is flfll) open.
[]
Turn the dispenser
F_
knob to the left and
lift it ()tit.
Add rinse agent tmtil
F_
the indicator window
looks flfll.
Clean up any spilled
[]
m_se agent with a indicator
damp ch)th, window Dispenser/cap
N Replace the dispenser cap.
The amount of rinse agent released into the final
wash can be ac!justed. The fi_('to)y setting is at the
midpoint. If there are tings of calcium (hard water)
spots on dishes, tiT a higher setting. If there is
rimming, rise a lower setting.
To adjust the setting:
Remove the dispenser cap;
then mrn the a(!juster
counterclockwise to
increase the aii/Otlllt
of rillse agent or
ch)ckwise to reduce
the amount of rinse agent.
adjuster
DishPreparationPriorto Loadbg
• No prefinsing of nomml fi)od soil is required. • Reilloxe leaf} xegetables, i/leat trimmings and
• Scrape off hard soils, including bones, toothpicks, excessix e amotmts of grease or oil.
skins and seeds. • Remoxe acidic fl)od soils.
agent
• Remoxe large, (luantifies of am', remaining fi)od.
ForgettoAdda Dish?
A forgotten dish can be added am time before
the main wash.
[Z] Open the door slighfl).
_-] _,Vaittmtil the water spray action stops.
Steam may rise out of the dishwashe):
8
E]Add forgotten dishes.
r_--] Close the door
ProperUseof Detergent
g_com
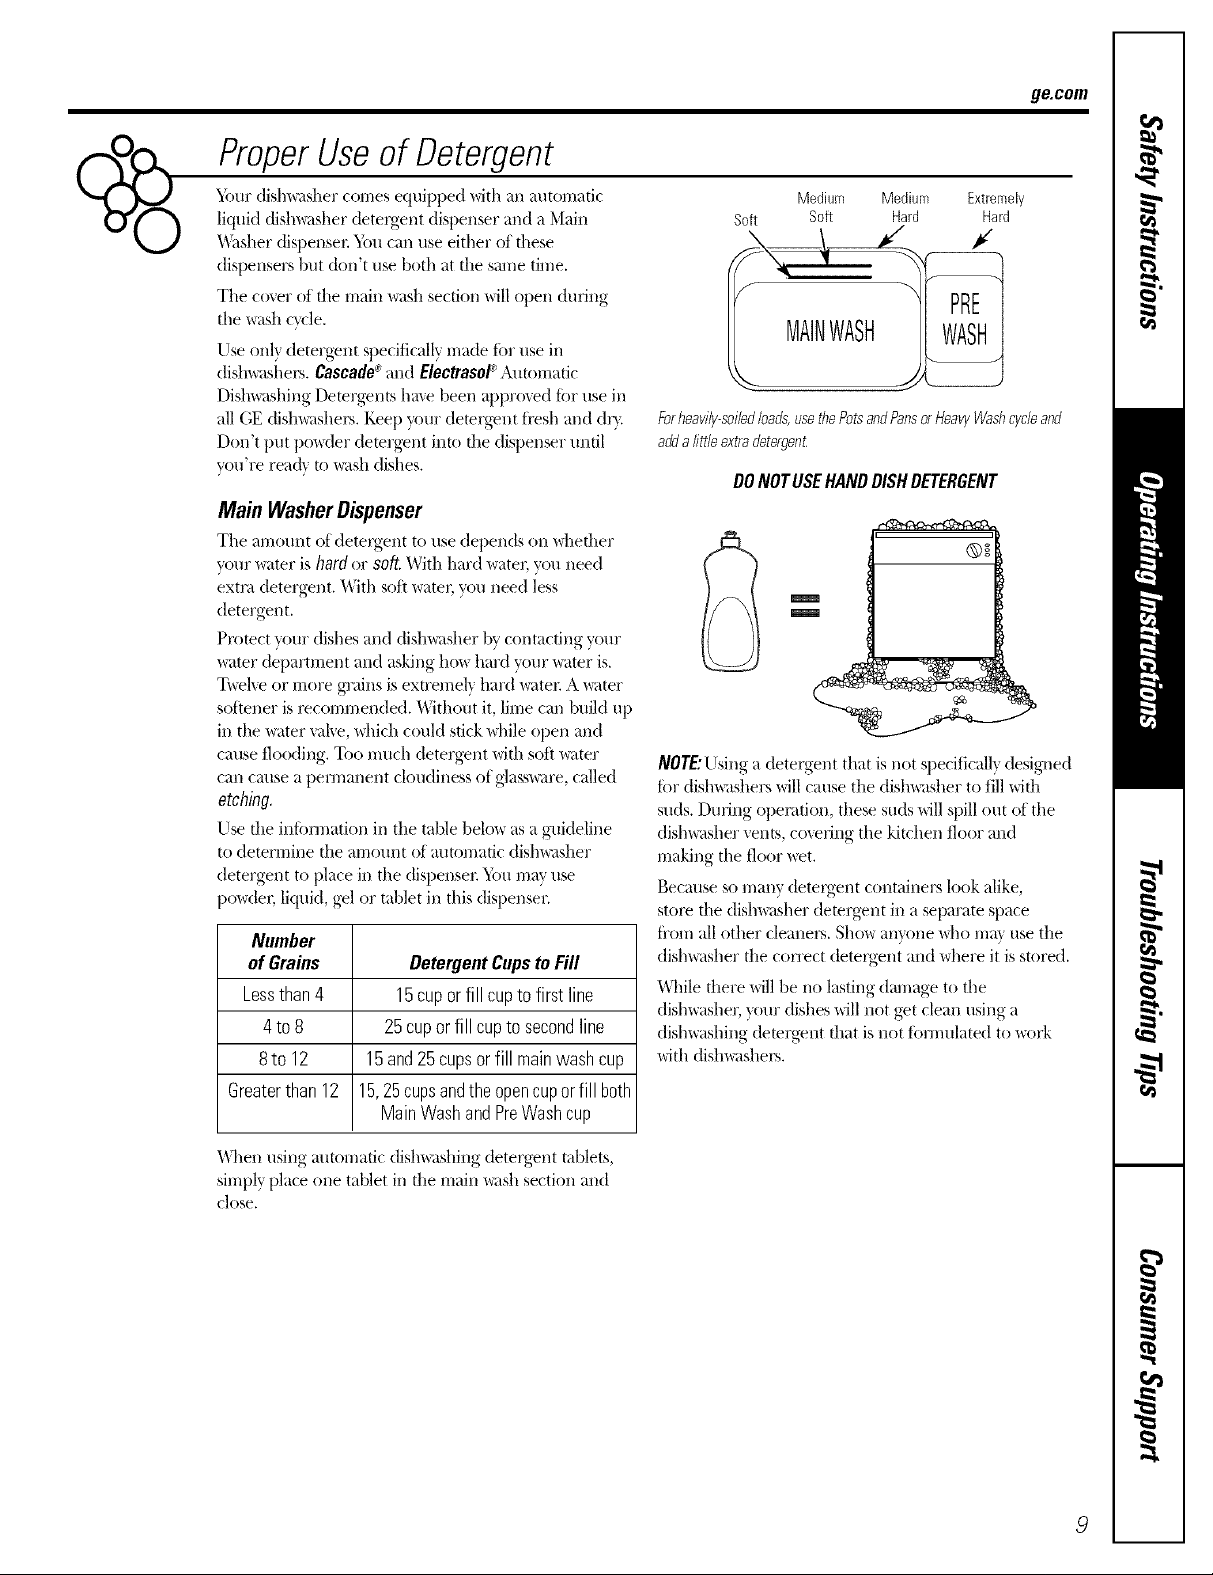
'_ur dishwasher comes equipped with an m_tomatic
liquid (fish_sher detexgent dispenser and a Main
_A_sher (fispensex: You can use either of fliese
dispensers but don't use both at die same time.
The cover of the main wash section will open during
the wash et_-le.
Use only detergent specifically made ti)r use in
dish_shex_. Cascade ®and ElectrasoF Automatic
Dish_shing Demrgents hme been approved ti)r tlse in
all (;E (fish_shex_. Keep ?_)ur demrgent ti'esh and drx.
Don't put powder demrgent into the dispenser until
you're rea& to _lsh dishes.
Main WasherDispenser
The amount ot detex\gentto use depends on \dlether
your _ater is hardor soft.With hard _aten you need
extra detergent. _,\]th soit wateg you need less
detergent.
Promct your dishes and dish_lsher by contacting your
water department and asking ho_ hard your water is.
T\_elve or more grains is exn'emelv hard _Jtex: A _ter
sottener is x_commended. _A]thout it, lime can build up
in the water rake, \ddch could stick \ddle open and
cause flooding. Too much detergent wifli soil _ter
can cause a per];qanent cloudiness of g]ass_are, called
etching.
Use die intimnation in the table belo_ as a g-uideline
to determine the arnount of automatic dishw,_sher
detergent to place in the dispense_: _ii)u may use
po_(tec liquid, gel or tablet in this dispenser
Number
ofGrains DetergentCupstoFill
Lessthan4 15cuporfill cuptofirst line
4to 8 25cuporfill cupto secondline
8to 12 15and25cupsorfill mainwashcup
Greaterthan 12 15,25cupsandtheopencuporfill both
MainWashandPreWashcup
Medium Medium Extremely
Soit Soft Hard Hard
Forheavily-soiledbads,usethePotsandPansorHeavyWast?cycleand
adda littleextradetergenL
DONOTUSEHANDDISHDETERGENT
NOTE:Using a detergent that is not specifidly desig_ed
tiw dislm_ishers will cause tile dislm_isher to fill with
suds. During operation, these suds will spill out of the
dislm_sher vents, co_erlng the kitchen floor and
making the floor wet.
Because so many detergent containers look alike,
sto_e file dislm_sher demrgent in a separate space
fl'om all other cleaners. Sho_ am_)l/e \_ho lna_, Ilse tile
dislm_sher file correct detergent and where it is stored.
_,\]dle there will be no lasting dmnage to the
dishwasher, }_ur dishes will not get clean using a
dishwashing demrgent that is not t_)mmlated to _)rk
with dish_;_she_.
"_\]_enusing automatic dislm_shing detergent tablets,
simply place one taNet in the main _sh section and
close.
Loadingthedishwasherracks.
For best dishwashing results, follow these loading guidelines. Features and appearance of racks and silverware baskets
may vary from your model
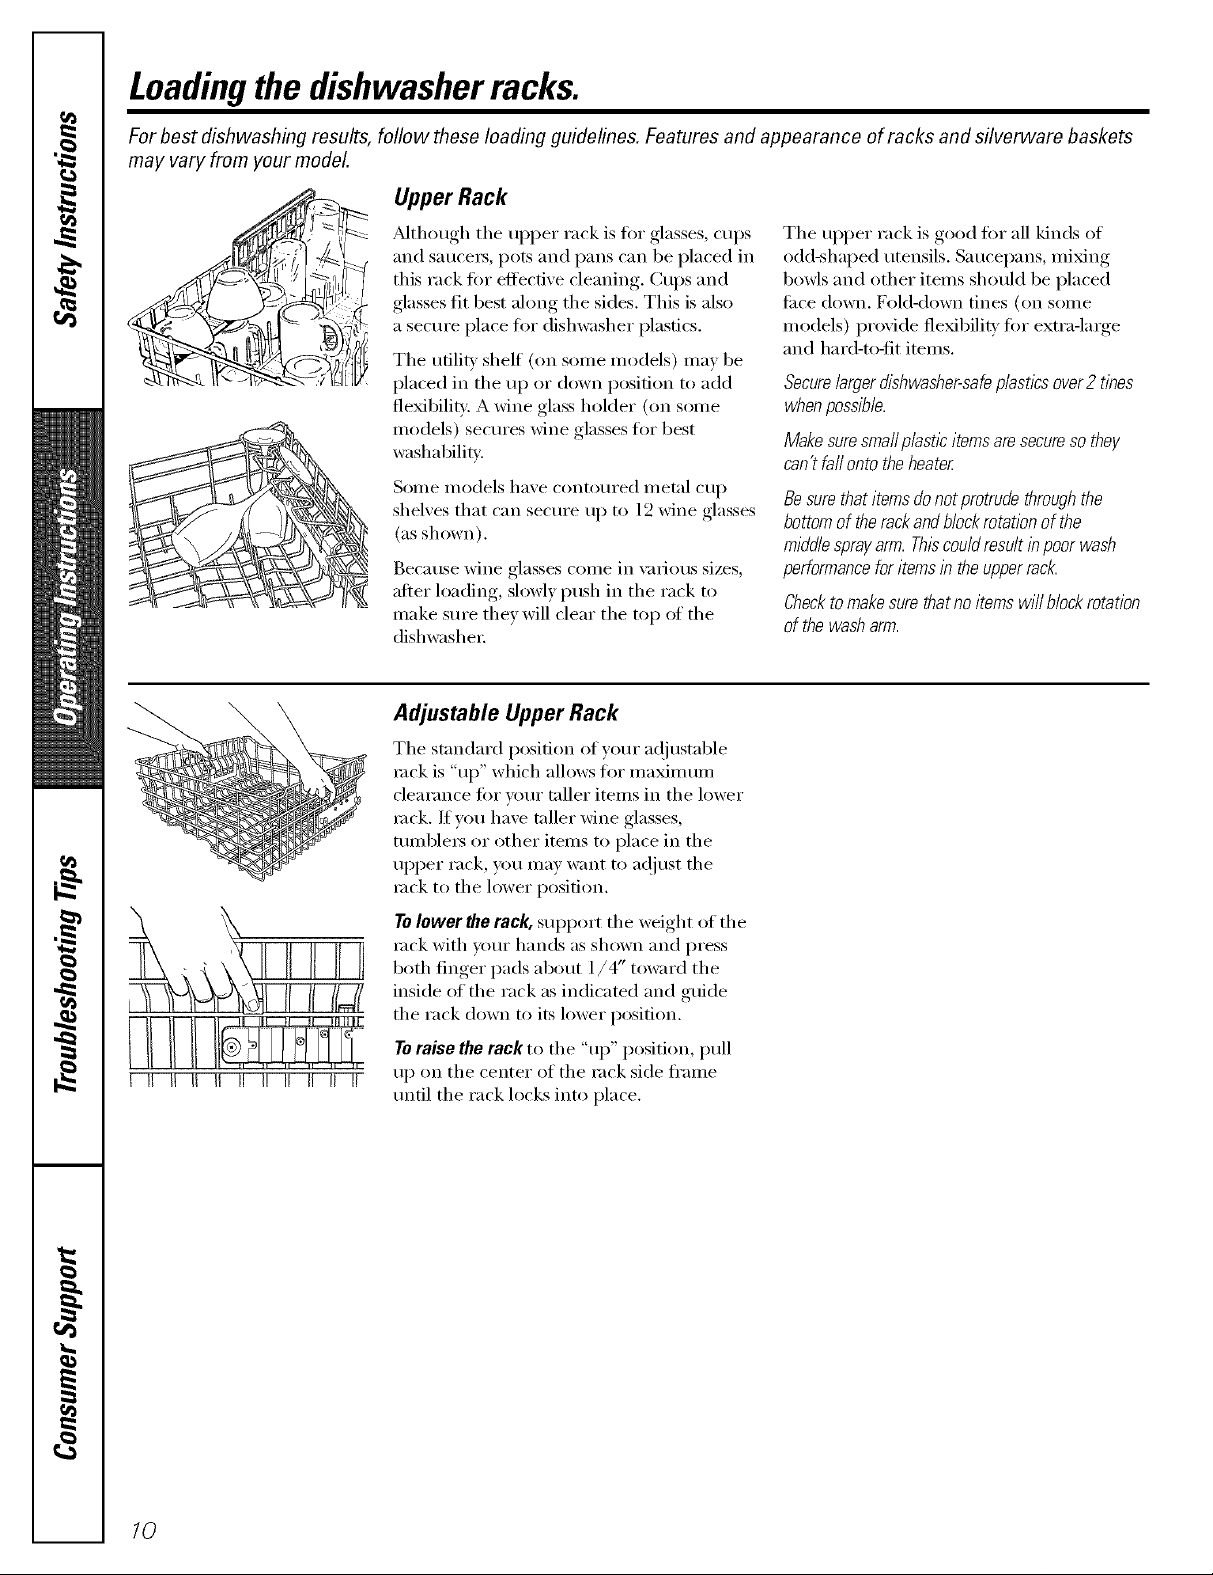
Upper Rack
i l/ li li il II _! II II II l!
Mthough the upper rack is fin" glasses, cups
and Satlcers, pots and l)[ins C[lll be placed in
this rack fi)r efli_ctive cleaning. Cups and
glasses fit best along the sides. This is also
a secure place fin" dishwasher plastics.
The utility shelf (on some models) may be
placed in the up or down position to add
flexibili£:. A wine glass holder (on some
models) secures wine glasses fin" best
washability.
Some models have contoured metal cup
shelves that can secure up to 12 wine glasses
(as shown).
Because wine glasses come in \m'ious sizes,
alter loading, slowly push in the rack to
make sure they will clear the top of the
dishwasher:
Adjustable Upper Rack
Tile standard p(>siti(m (>lyour a(!iustable
rock is "up" which allows fin" maximum
clearance fin" your t;fller items in tile lower
rock. If you have taller wine glasses,
tumble_ or other items to place in tile
ul)per rack, you may want to a(!just tile
rock to tile lower posit.ion.
Tolower _e rack, support the weight of the
rock with your hands as shown and press
both linger pads about l/4" toward tile
inside of the rack as indicated and guide
the rack down to its lower position.
Toraise the rack to the "up" position, pull
up on tile center of tile rock side fl'ame
until the rack locks into place.
Tile upper rack is good fin" all kinds of
odd-shaped utensils. Saucepans, mixing
bowls and other items should be placed
ti_ce down. Fold<lown tines (on some
models) provide flexil)ili_' fin" extra-large
and hard-to-fit items.
Securelarger dishwasher-safeplastics over2 tines
whenpossible.
Make sure smaflp/astlc items aresecureso they
can't fafl onto theheater.
Besurethatitemsdonotprotrudethroughthe
bottomoftherackandblockrotationof the
middlesprayarm.Thiscouldresultinpoorwash
performanceforitemsintheupperrack.
Checktomakesurethatnoitemswill blockrotation
of thewasharm.
10

Lower Rack
ge.com
tabout Removeendcap
The lower rack is best used for plates,
S_ltlceI'S alld cookwai'e. I,aI'_e itelIlS stl(h _ls
broiler pans and baking racks should go
along the left-hand side. Ixmd platters, pots
and bowls along the sides, in corners or in
the back. The soiled side of imms should
ti_ce the center of the rack. If necessar};
oversized glasses and mugs can be placed
in the lower rack to maximize loading
flexibility:
Removing the Upper Rack
_4_tlcan remove the ui_per rack to allow
space fin" lmge items in the lower rack.
To remove the upper rack:
[_] Press thumb tab ()tit and reulove the
fi'ont end caps on each side of the rail.
[2-_ Pull the rack straight out and
off the rails.
_] Replace the end caps.
[_ Push the rails all the wa) back into
the dishwasher
_dso, be carefid not to let a portion of an
item such as a pot or dish handle extend
through the bottom rack. This could block
the wash am_ and cause poor washing
results.
Fold-down tines (on some models) provide
flexibility fin" extra-large and hard-to-fit
items. The tines may be left in the up
position or tolded down to customize the
lower rack.
N Slide the shower nozAe attachment
(located in use and care bag) oxer the
SI)Otl[.
•Showernozzle
attachment
N Then fill the lower rack and beoin
VOIU" cx cle,
NOTE: Don't forgetto removethe shower nozzle
attachmentbefore youreplace theupper rack.
One-piece basket (on some models)
Three-piece basket (on some models)
Don't let any
item extend
through bottom
t t
Toremoveendbaskets,graspthebasket
atopposite comers andslideapar_
Silverware Basket
To load flatware, simply push the a(!justable
handle to either side. Put flatware in the
removable basket with fork and knife
handles up to protect your hands. Place
spoons in the basket with handles down.
Mix knives, fin'ks and spoons so they don't
nest together. Distribute evenly. Small
plastic items, such as measuring spoons and
lids fl'om small containe_ should go in the
bottom of the silverware basket with the
silverware on tOl),
The one-piece silverware basket (on some
models) can be placed in the fi'ont, right
side or back of the lower rack.
A wirier}, of options is a\:filable regarding
the three-piece silverware basket (on some
models) in your dishwasher: The complete
basket is designed to fit on the right side of
the lower rack. Additionally, each end of
the basket is remo\:d)le to add loading
flexibility to accommodate flatware and
lower rack capadty needs.
The lids of both end and middle baskets
(on some models) can be closed to contain
small items. I,ong items can be placed on
the utility shelf in the upI)er rack.
/7

Loadingthedishwasherracks.
Extra Rack Features (on some models)
CutleryTray
The cutle D" tray holds up to 4 large knffes
such as a carx'e_; chef's knives, bread knife,
etc., that are too tall to fit in tile silverware
basket.
Hook tile trax onto tile rear of tile upper
rock. Ira' tile knixes between tile guides
(asshown).
Bowl Tines
Tile special largeq)owl tines in tile lower
rock add flexibili_' to yore" loading pattern.
They are useflll fi)i" serving bowls or other
large bowls.
To use the bowl tines, told down the
2 r_)ws of flex fines in fl'ont of tile bowl
tines and load bowls just as you would
in tile tlppeI" rack.
Loadingplace settings...
Follow these guidelines for loading 10place settings. Features and appearance of racks and silverware baskets mw vary
from your model.
Upper Rack--lO place settings Lower Rack--lO place settings
Follow these guidelines for loading 12place settings. Features and appearance of racks and silverware baskets may vary
from your model
/2 Upper Rack--12 place settings Lower Rack--12 place settings

Caring for the dishwasher, ge.cem
Cleaning the Door Panel
gefi)re cleaning the fl'ont panel, make
sure you know what type of panel you have.
Reter to the last two lettet_ of your model
numbe_: _m can locate your model
nunlber on the left-hand till) wallj ust inside
the doo_: Ifwmr model number ends with
BB or _._.V then you have a Painted Door
panel. 1t veto" model mmlber ends with SS,
then you have a Stainless Smel Door panel.
Follow tile instructions below tot cleaning
the door panel for )ore" specific model.
Painted Door Panel (modelnumbersendingin
BB-black or WW-white)
Use a dean, soft, lighdy dampened cloth,
then dry thoroughly. You may also use a
good appliance wax or polish.
StainlessSteel Panels
StainlessSteel DoorPanel(modelnumbers
endinginSS)
The stainless steel panels can be cleaned
with Stainless Stool Magic or a similar
product using a clean, soft cloth. Do
not rise appliance wax, polish, bleach or
products containing chlorine on Stainless
Steel dome.
Ym can order StainlessSteelMagic
//WXlOX15tl/I'Otlgh GE Parts by calling
800.626.2002.
The stainless steel panels can be cleaned
with CERAMA BRIq'_ Stainless Steel
Appliance Cleaner or a similar product
using a clean, soft cloth.
You can order CERAMA BRYTE_ Stainless
Steel Appliance Cleaner through (;E Parts
b) calling 800.626.2002. (For U.S. onl).)
Cleaningthe ControlPanel
To clean the control panel, use a lightly
dampened cloth. Then dry thoroughly:
ProtectAgainstFreezing
It veto" dishwasher is left in an imheated
place dm'ing the winter; ask a serxice
technician to:
_]Cut off electrical power to tile
dishwasher; Remoxe fllses or trip
circuit breaker:
V_Turn off the water sui)ply and
disconnect the water inlet line fl'om
the water xalx e.
Stainless Steel Interior--Tub and Inner Door
The stainless steel used to make tile
dishwasher mb and imler door provides
tile highest reliabili V a\_lilable in a GE
dishwasher: If the dishwasher till) or imler
door should be scratched or dented dm-ing
nolIl/al use, they will not rust or corrode.
These stm'ilce blemishes will not affect
their flmction or dm'abilim
_] Drain water fl'om the water inlet line
and water valxe. (Use a pan to catch
the water:)
[_ Reconnect the water inlet line to the
water xalxe.
Checktheair gap any time your
dishwasher isn't draining well.
Does YourDishwasher Have an Air Gap?
An air gap protects yore" dishwasher
against water backing up into it if a drain
clogs. The air gap is not a part of the
dishwasher: It is not covered by y()m"
warranp,'. Not all i)lumbing codes require
air gaps, so yell Ill}IV not have one.
The air gap is easy to clean.
_] Tm'n off' the dishwasher and lift off the
COX eI:
_-_ Remoxe the plastic cap and clean
with a toothpick.
13
Beforeyoucall forservice...
Save time and money/. Review the charts on the following pages,
or visit ge.com. You may not need to call for service.
Troubleshooting -tips
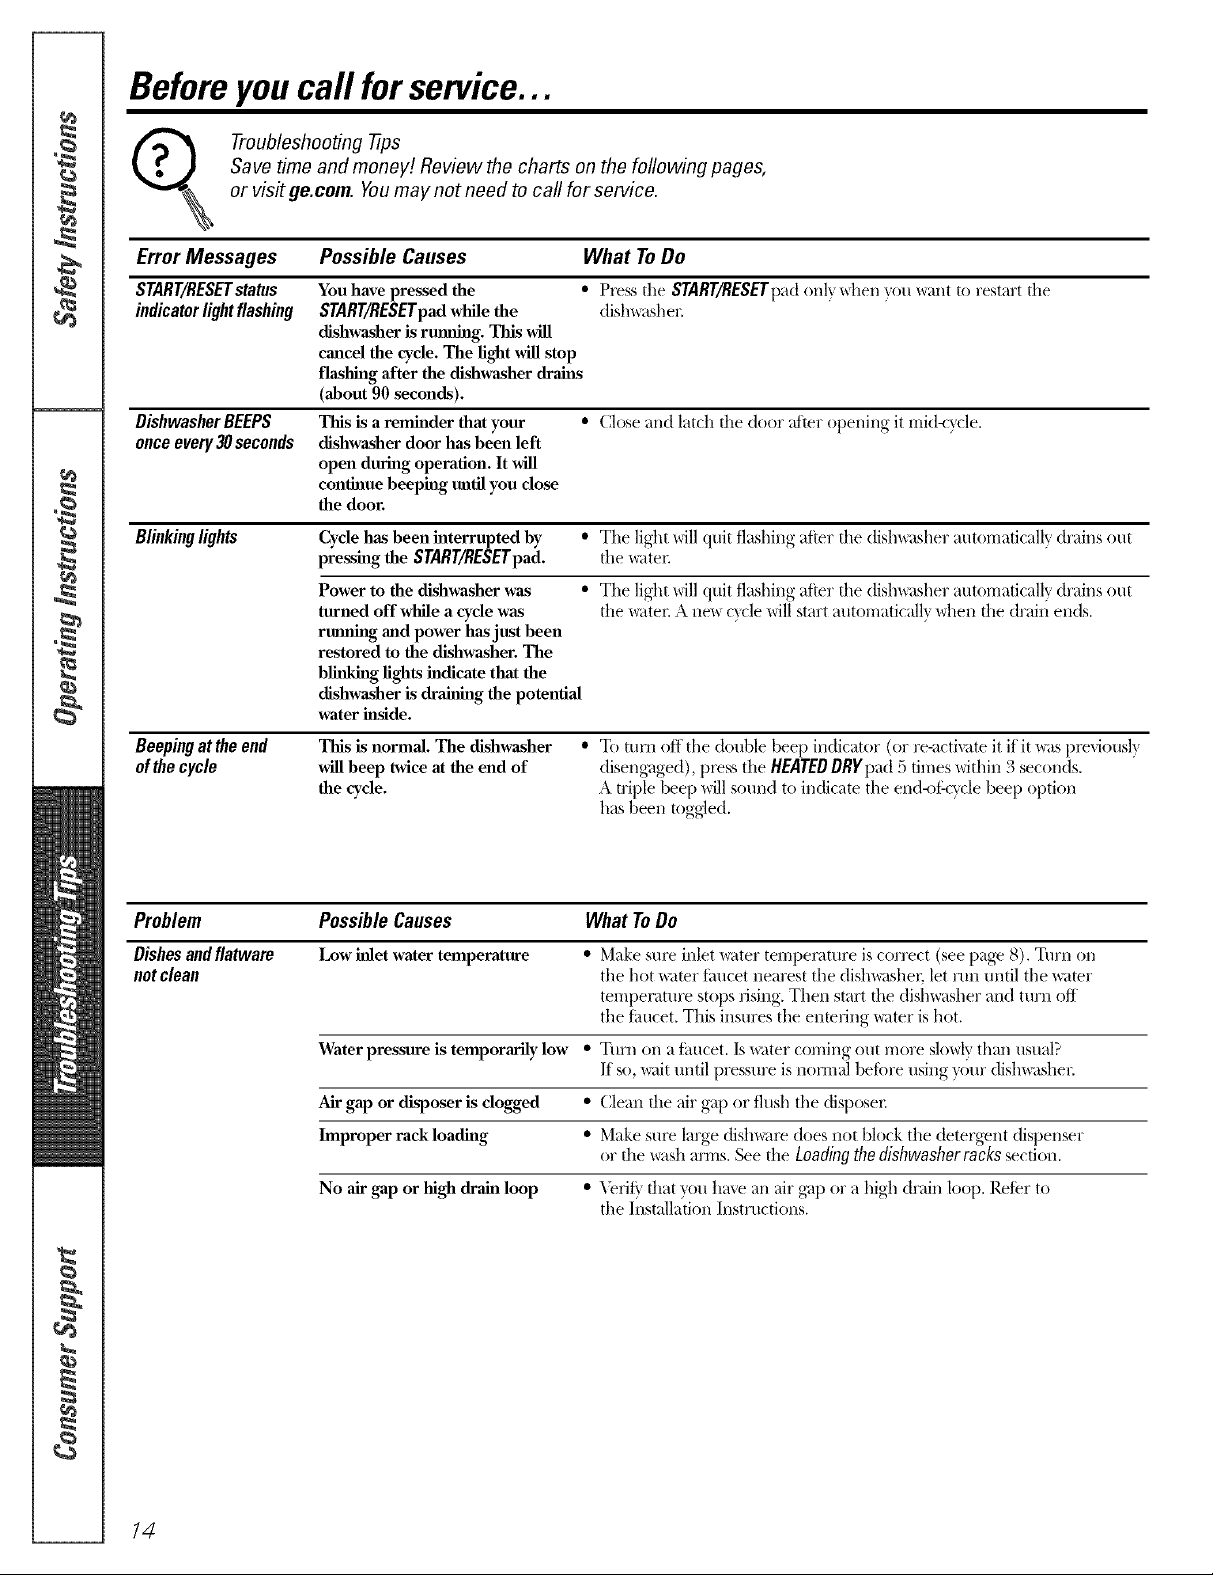
Error Messages Possible Causes What To Do
START/RESETstatus
indicatorlightflashing
DishwasherBEEPS This is a remhlder that your • Close and latch the door atter opening it mid-c_cle.
once every 30 seconds dishwasher door has been left
Blinkinglights Cycle has been interrupted by • The light will quit flashing after fl_e dishwasher automatically drains out
Beepingattheend
of thecycle
You have pressed the • Pless die START/RESETpadonly _d_en yon want to restart d_e
START/RESETpad wl_le the dish_sher.
dishwasher is rtunthlg. This will
cancel the cycle. The light will stop
flashing after the dishwasher drains
(about 90 seconds).
open during operation. It Mll
continue beeping until you dose
the door.
pressing the START/RESETpad. die _tel:
Power to the dishwasher was • The light will quit flashing after fl_e dishwasher automatically drains out
turned off while a cycle was fl_e _ltel: A ne_x cxcle will start automatically \allen die drai*) ends.
rmnthlg and power has just been
restored to the dishwasher. The
blh_lg lights indicate that the
dishwasher is drahlhlg the potential
water hlsJde.
This is normal. The dishwasher
beep twice at the end of
the cycle.
• To turn off tile double beep indicator (or re-activateit if it waspleviously
diseng_lged),pl_ss the HEATEDDRYpad 5 times within 3 seconds.
A triple beep willsound to indicate the end-ot:wcle beep option
has been ulggled.
Problem Possible Causes What ToDo
Dishesandflatware Low inlet water temperature • Make SUl_ inlet _ltel" temperature is correct (see page 8). Turn on
not clean tile hot _;_tel"taucet nearest tile dish_tshel; let rula until tile water
temperature stops rising. Then start file dishwasher and turn off
tile tm/cet. This insures tile enmring _ter is hot.
Water pressure is temporarily low • Turn on a thucet. Is _ter coming (,tat more slo\@ than usual?
If v), _it until pressure is nom-_al beiore using your dishwasher
Air gap or disposer is clogged • Clean the air gap or flush tile (fisposel:
Improper rack loading • Make sure large (fishware does not block the detergent dispenser
No air gap or high drain loop • X_rifi that _ou have an air g_q) or a high drain loop. Refer to
or the wash arms. See the Loadingthe dishwasher racks section.
tile lI_stall_ltionInstructions.
14
ge.com
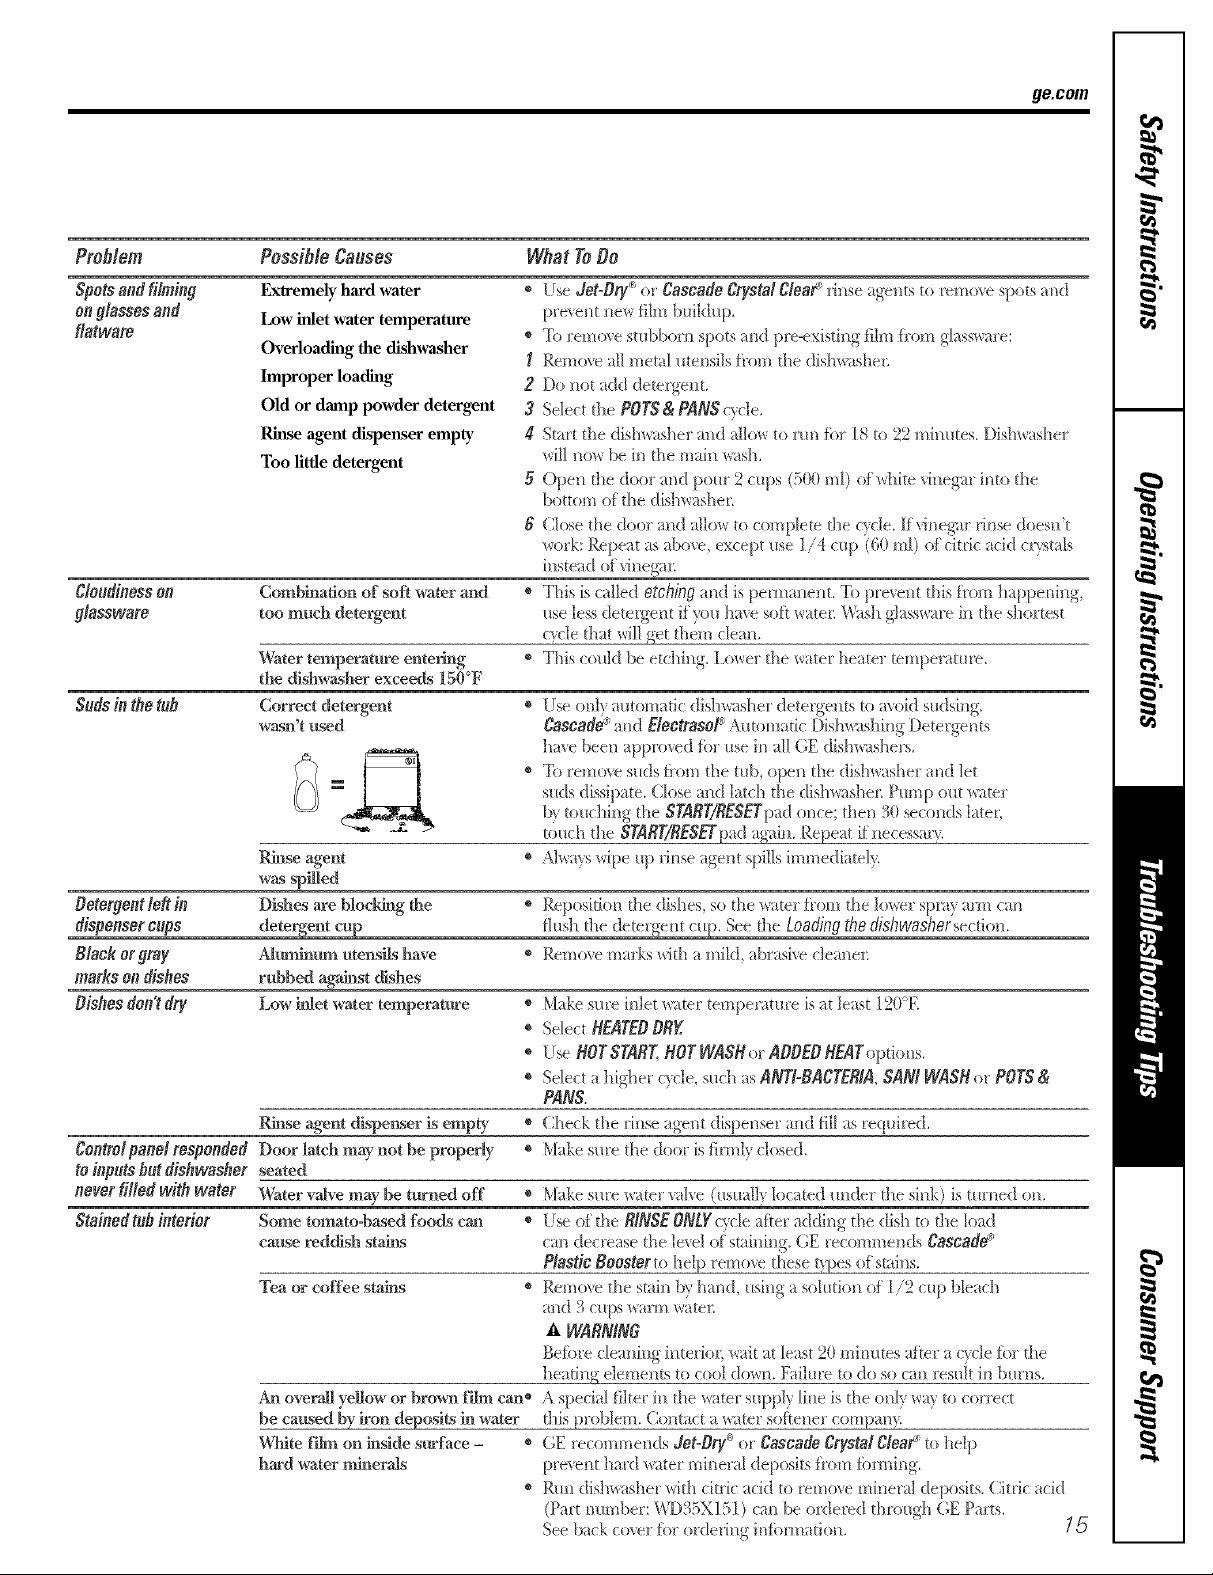
Problem Possible Causes What ToDo
Spotsandfilming Exlremely hard water + Use Jet-Dry+>or CascadeCrystalC/eaP dnse agents to remo_e spots and
Onglasses and Low inlet water temperature pre_ent tle_ fihn buiMup,
ftatware + To _emo\e stubborn spnts ;rod pre-existing tihn finm g[ass*_u'e:
Overloading the dishwasher ] Remo_e all metal uteusi]s from _he dishwasher
Improper loading 2 Do not add deter ,-ent
Old or damp powder detergent 3 Select d_e POTS &PANS c?cle,
Rhlse agent dispenser empty 4 Start the dishw:M_er and alhas to mn hw [ 8 _o 22 minutes. Dishwasher
Too little detergent w[11n(m be in the main wash.
5 Open the door and pnur2 cups (500 mI) of white vinegar into the
bottom of the dishwasher,
6 Close the door m_d allow to complem _he c}de. If vinegar rinse doesn't
work: Repeat as above, except use 1/4 cup (60 ml) of citdc acid crystals
instead of _ineg:ic
Combination of soft water and
too mush detergent
Water temperature enterb_g
the dishwasher exceeds 150°F
Sods in the ttth Correct detergent
Betergentleftin
dispensercups
Blackorgray
marksondishes
Bishesdon'tdry
wasn't used
Riuse agent +
was spiced
Dishes are blocki_g the +
deteNent cup
Al_mn uteusils have +
rnbbed agaiust dishes
Low _et water temperature +
+ This [s called etching and is pem_a_lent To prexent this h×ml happening,
use less detetgent ityou ha_e soft water: Wash glassware in the shortest
cwle that will get them clean.
+ This could be etching. Lo_er d_e wlter heater mmperamre.
Use onl? autnmadc dishw isher detergents _o avnkl sudsh_g.
Cascade+_and ElectrasoPAutomatic DM_washing Detergents
hae been approved hw use in all GE dishwashers.
To remn_e suds h'om the tub, open the dishwasher and let
suds dissipate. Close and latch the dishwasher Pmnp out w:_mr
b} _oucbing the SNRr/RESETp'ad once; then 30 seconds late_;
_ouch the START/BESETpadagHn. Repeat [f necessar_
Ah_ays wipe up rinse agent spills immediaM>
Reposk[on the dM-les, so the ware[" hTn!'fft the h)we!" spI'_l_} aYn/can
flush the deterge_t cuj>. See the Loading the dishwasher section.
Remove marks with a mild, abrask'e cleaner:
Make st*reinlet w:*tertemperature isat least 120°E
@
Select HEATEOORg
" Use HOTSTART,HOTVVASHnrABBEDHEATopdons,
+ Select a higher c?cle, sush asANTI-BACTERM,SAMWASHor POTS&
PANS.
_se agent dispel_ser is empty
Controlpanelrespondod Door latch may not be properly
to inputs but dishwasher seated
never RRed with water Water valve may be t_ned off
Stained tub interior Some tomato-based foods cao
cau.se reddish stak_
Tea or coffee stares
A_ overall yelgo_ or brown fib_ can*
be caused by iron deposks h_water
WJfite F_ on reside surface - +
hard water nfinerals
+ (_he_kthe r[l_seagent d[speuser and tilt asrequi_ed.
+ Make sm'e the door [s thm]} closed.
Make snre water _aive (usuall)located nnder d_e sink) is tusned on,
Use o_ the RINSE ONLYc?de after adding the dish _o O_eload
can decrease the leael of staining. GE recommends Cascade+_
Plastic Booster to help remo_e these t_pes of stains.
Relno_e the stain b} hand, ush_g a solmkm of 1/2 cup bleach
and 3 cups warm water:
A WARNING
Betiwe cleaning interior; wait at least 20 mimaes after a c_cle _iwthe
headng elements to cool down. Faihwe to do so can _esuit in bnrus.
A special tilter in d_e water st_ppl? lh_e is the only wa) m cusrect
fl_is problem. Cnntact a water softener compam
GE recommends Jet-Dry ®or Cascade Crystal Clear_:m help
pre_e_t bard water mineral deposits ti'om tbm_ing.
Rm_ dishwasher with ckric add to _*_mo_erob*era] deposks. Citric add
(Part number: WD35X151 ) cm*be otvte_>d through (',E Parts.
See back cn_>r for ordering infbrmadon, 15
 Loading...