

GE PDW9880L00SS, PDW9880J10SS, PDW9800L00WW, PDW9800L00BB, PDW9800J10WW Owner’s Manual
...
vvvvvv.GEAppliances.com
Safety Instructions ........... 2, 3
Operating Insinuations
Care and Cleaning ......... 13, 14
Control Panel and Setting_ .... 4-6
Flashing Display Lights .......... 7
I,oading Place SettinKs ......... 12
I,oading the Racks ......... 10-19
Optional Accessories ........... 13
Using the Dishwasher . ........ 8, 9
Troubleshooti_ Tips ...... 14-16
Consumer Support
Consumer Support ............ 20
Product Registration ........ 17, 18
_'anantv .................... 19
PD W8 l O0 Se'ries
PD W8 2 O0 Se'ries
PD W84 O0 Se'ries
PD W8 5 O0 Se'ries
PD W8600 Se'ries
PD W8 700 Series
PD W88 O0 Series
PD I/V9200 Series
PD I/V9 700 Series
PD !/V9800 Series
Write the model and serial
numbers here:
Model #
Serial #
You can find them on the mb wall
just inside the door.
165D4700P303 49-5979 11-04Jfl
IMPORTANTSAFETYINFORMATION.
READALLINSTRUCTIONSBEFOREUSING.
a, WARNING!
Foryoursafety,the informationin thismanualmust be followed tominimizethe risk offire
or explosion,electric shock,ortopreventpropertydamage,personal injury,ordeath.
WATERHEATERSAFETY
Under certain conditions, hydrogen gas may be produced in a water heater that has not been used for
two weeks or more. HYDROGEN GAS IS EXPLOSIVE.
If the hot water has not been used fin" two weeks or more, prevent the possibili_' of damage or iqjm y
by turning on all hot water fimcets and allow them to run fin" several minutes. Do this befi)re using any
electrical appliance which is connected to the hot water system, This simple procedure will allow any
built-up hydrogen gas to escape. Since the gas is flalnlnable, do not Slnoke or use an open flame or
appliance during this process.
Use this appliance only for its intended purpose as described in this Owner's Manual.
%
PROPERINSTALLATIONANDMAINTENANCE
This dishwasher must be properly installed and located in accordance with the Installation Instructions
before it is used. If you did not receive an Installation Instructions sheet, you can receive one by visiting
www.GEAppfiances.com, or by calling 800.GE.CARES(800.432.2737)inthe United States. In Canada, visit
www.geappliances.ca or call 1.800.361.3400.
• Connet--t to a grotlnded illetal, perlllanent
wiring system; or run an equipment-grounding
conductor with the circuit con(lucto_ and
connect to the equipment-grounding temfinal
or lead of the appliance.
• hnproper connection of the equipment-
grounding conductor can result in a risk of
electric shock. Check with a qualified electrician
or se_'ice representative if you are in doubt
whether the appliance is propedy grounded.
• Use supply conductors rated at least 75°C
(167°F).
• Dispose _ff discarded appliances and shipping or
packing material properly.
• Do not attempt to repair or replace any part
of your dishwasher unless it is specifically
recommended in this manual, M1 other servicing
should be referred to a qualified technician.
• To minimize the possibility ot electric shock,
disconnect this appliance ti'om the power supply
before attempting mV maintenance.
NOTE: Turningthe &shwasher off does not disconnectthe
appliance from thepower supply Werecommendhaving
a quafifiedtechnicianserviceyour appliance.
A WARNING!
DONOT...
• Do not tamper with controls.
• Do not abuse, sit on or stand on the door or
dish rack _ff the dishwasher:
• Do not discard a dishwasher without fi_st
removing the door or removing the door latch.
• Do not store or use combustible materials,
gasoline or other flammable wq)o_ and liquids
in the vicinity of this or any other appliance,
• Do not allow children to play around the
dishwasher when opening or closing the door
due to the possibili_,' of small finge_ being
pinched in the doo_:
• Do not allow children to play with, on or inside
this appliance or any discarded appliance.
2
A WARNING!RISKOFCHILDENTRAPMENT
PROPERDISPOSALOFTHEDISHWASHER
vvvvw.GEAppliances.com
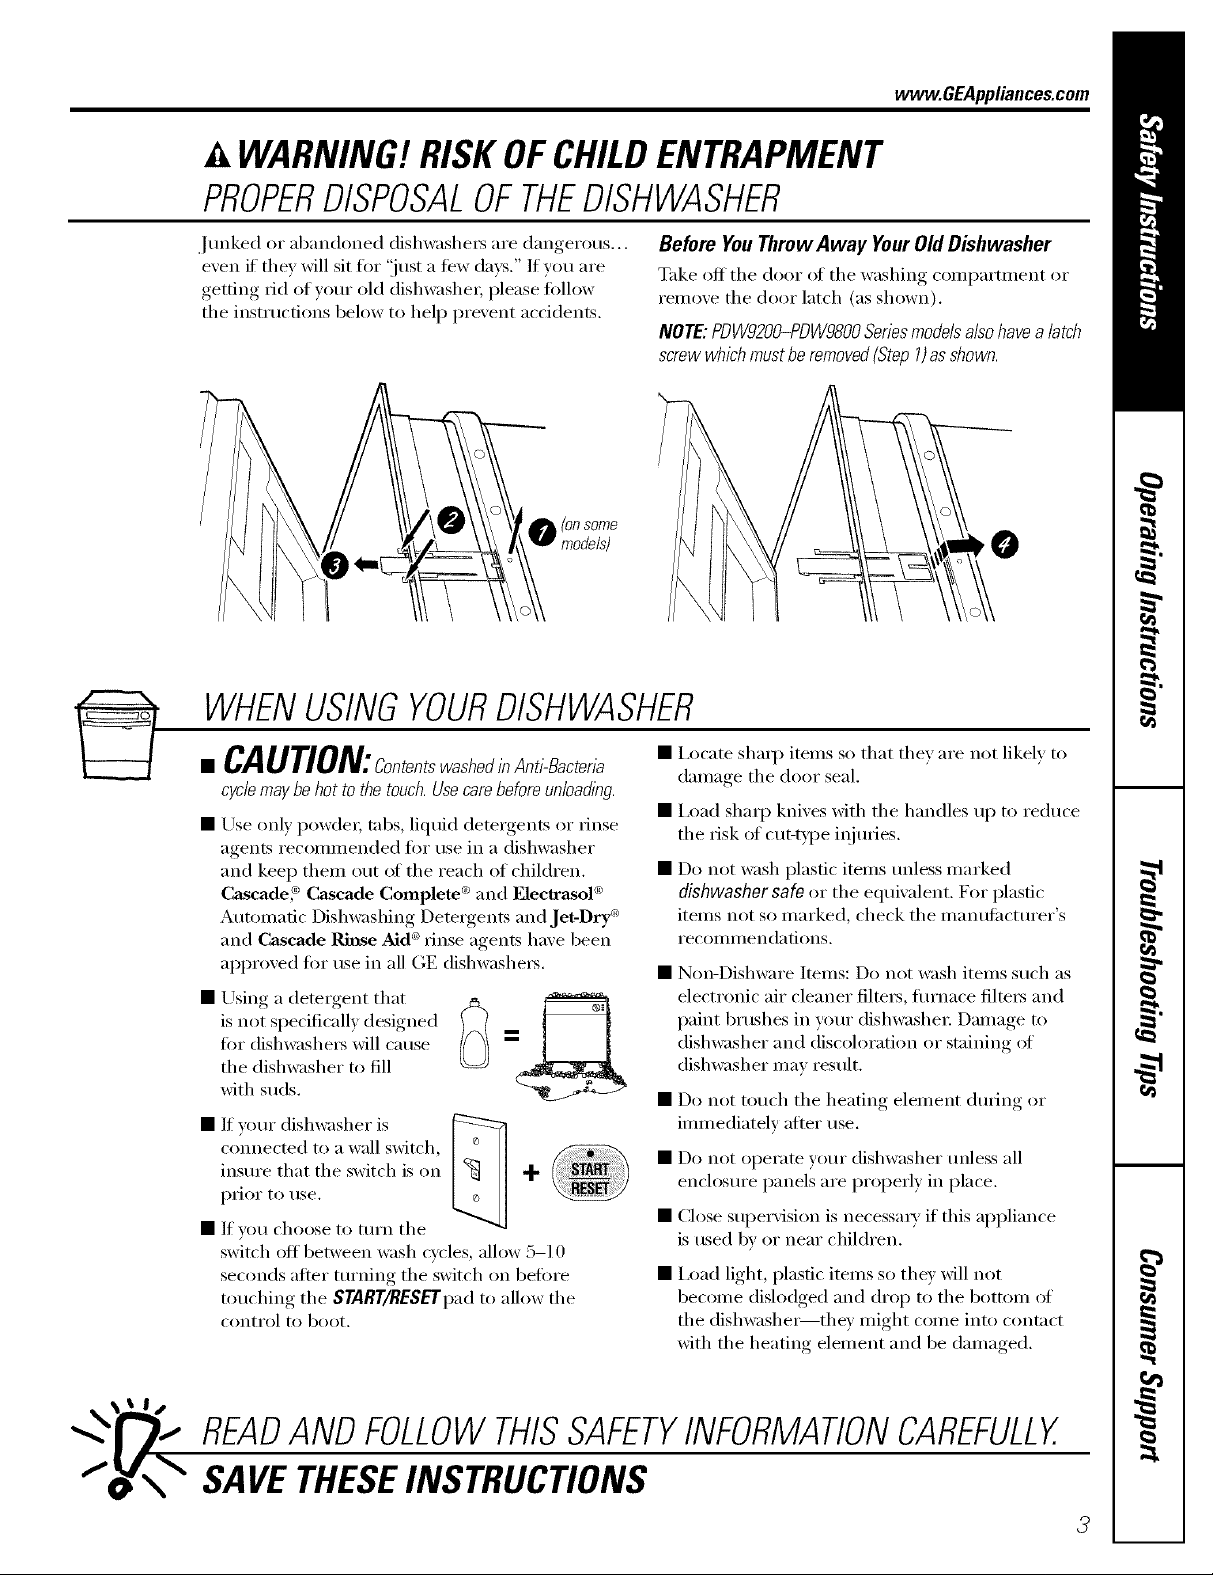
Junked or abandoned dishwashers are dangerous...
even if' the.v will sit for 'ijust a few days." If you are
getting rid of your old dishwasher; please fi_llow
the instructions below to help prevent accidents.
O IOR some
models)
Before YouThrowAway YourOldDishwasher
Take off the door ot the washing compartment or
remove the door latch (as shown),
NOTE:PDW920O-PDW9800Seriesmodelsalsohavea latch
screw which must be removed(Step 1)as shown.
WHENUSINGYOURDISHWASHER
• CAUTION:contentswashedinAnti-sacter,a
cyclemaybehottotiretouch.Usecarebeforeunloadlbg
• Use only powder; tabs, liquid detergents or rinse
agents recommended fin" use in a dishwasher
and keep them out of the reach of children.
Cascade, _'>Cascade Complete _ and Electrasol °
Automatic Dishwashing Detergents and Jet-Dry _
and Cascade Rinse Aid ¢¢rinse agents have been
approved for use in all GE dishwashe_.
• Using., a detero-ent_ that
is not specificall) designed
fin" dishwashe_ will cause
the dishwasher to fill
with suds.
• If _om" dishwasher is
connected to a wall switch,
insure that the switch is on @
pi'ioi" to rise.
• If you choose to ttlFn the
switch off between wash cycles, allow 5-10
seconds after turning the switch on before
touching the START/RESETpadto allow the
control to boot.
• I,ocate shaq) items so that thev are not likely to
damage the door seal.
• Ix)ad shaq) knives with the handles up to reduce
the risk ot cut-type iqjm_ies.
• Do not wash plastic items tmless marked
dishwashersafe or the equivalent. For plastic
items not so marked, check the manufi_ctm'er's
i'ecoiilll/endations.
• Non-Dishware Items: Do not wash items such as
electronic air cleaner filte_, flu'nace filte_ and
paint brushes in yore" dishwasher: Damage to
dishwasher and discoloration or staining of
dish_;_sher may result.
• Do not touch the heating element dtwing or
immediately alter use.
• Do not operate yore" dishwasher tmless all
enclosm'e panels are propedy in place.
• Close supervision is necessmy if this appliance
is used by or near children.
• I,oad light, plastic items so they Mll not
become dislodged and drop m the bottom (>I
the dishwashe_they might come into contact
with the heating element and be damaged.
READANDFOLLOWTHISSAFETYINFORMATIONCAREFULLY.
SAVETHESEINSTRUCTIONS
3

Aboutthe dishwashercontrolpanel
Youcan locate your model number on the tub wall just inside the door. Throughout this manual, features and appearance
may vary from your model
PDW8100-PDW8800Series 0
sE,_INGAD0-t-_IS,WAS',,,__N_ S_
O
PDW9200-PDW9800 Series
ControlSettings
O tatus IndicatorLights (Indicatorsvarybymodels)
Tile Status display tells you what is happening while tile dishwasher is in operation and mayflash,
indicating a malflmction. The lights will come ONindicating the sequence _ffthe dishwasher operation.
SENSING DisplayedwhiletheExtraOlean_ Sensorismeasuringtheamountofsoilandtemperatureofwater.
ADD-A-DISH Displayedduringprewashindicatingthatdishesaddednowwill stillbecleaned.
WASHING Displayedduringprewash,mainwashandrinseperiods.
RINSING Displayedduringrinseperiods.
DRYING DisplayedduringHEATEDDRY.
SANITIZEDDisplayedwhencyclehasmetsanitizationconditions.
CLEAN Displayedwhenawashcycleiscompleteandenhancementsarecomplete.
r,z
c&.
SELECTIONS
EN_NCEME_,_S
0@@0 .......
_0Ra_
Ii
ENHANCEMENTS i STATUS i |
f.l",24.._fAn_l=n"_f D:¢ _ . _, • SENSING • DRYING
0
Thedishwasherwill adjusttheselectedcycleto achieveoptimalperformance.
Ii !1
DRY ,_
TIME REMAINING
OmO
q
ADD-A-DISH SANITIZED
I
TimeRemainingDisplay (onsomemodels)
El
DtlxJng operation, tile display shows tile Illintltes relllaining tlnfil tile cycle is (-oIl/plete. Tile display
may a(!iust the remaining time while the Sensing light is on. The time displayed at the start of each
cycle may change ti'om tile ti_cto_ T setting as tile unit customizes itself to home use. During a delay
start, the display will show l/om_ ot time remaining until the cycle starts.
Selections
El
PDW8100-PDW8800Series:Pressthepad for thedesiredwash cycle.
PDW9200-PDW9800Series:UsetheArrow Pads t'R'__ to scrollthroughthe wash cycles.
Tile light above or next to tile selected pad will be ONto indicate which WASH CYCLEhas been selected.
ANTI-BACTERIAHeavy9.1gal.,92min.
(onsomemodels)Medium7.8gal.,89min.
Light6.5gal.,87min.
Thiscycleraisesthewatertemperatureinthefinalrinseto sanitizeyourdishware.Thecyclelength
willvarydependingonthetemperatureofyourinletwater.
NOTE:TheAnti-Bacteriacycleismonitoredforsanitizationrequirements.If thecycleisinterrupted
duringorafterthemainwashportionorif theincomingwatertemperatureissolowthatadequate
waterheatingcannotbeachieved,thesanitizingconditionsmaynotbemet.Inthesecases,the
sanitizedlightwill notilluminateat theendof thecycle.
4
NOTE:NSF-certifiedresidentialdishwashersarenotintendedfor licensedfoodestablishments.
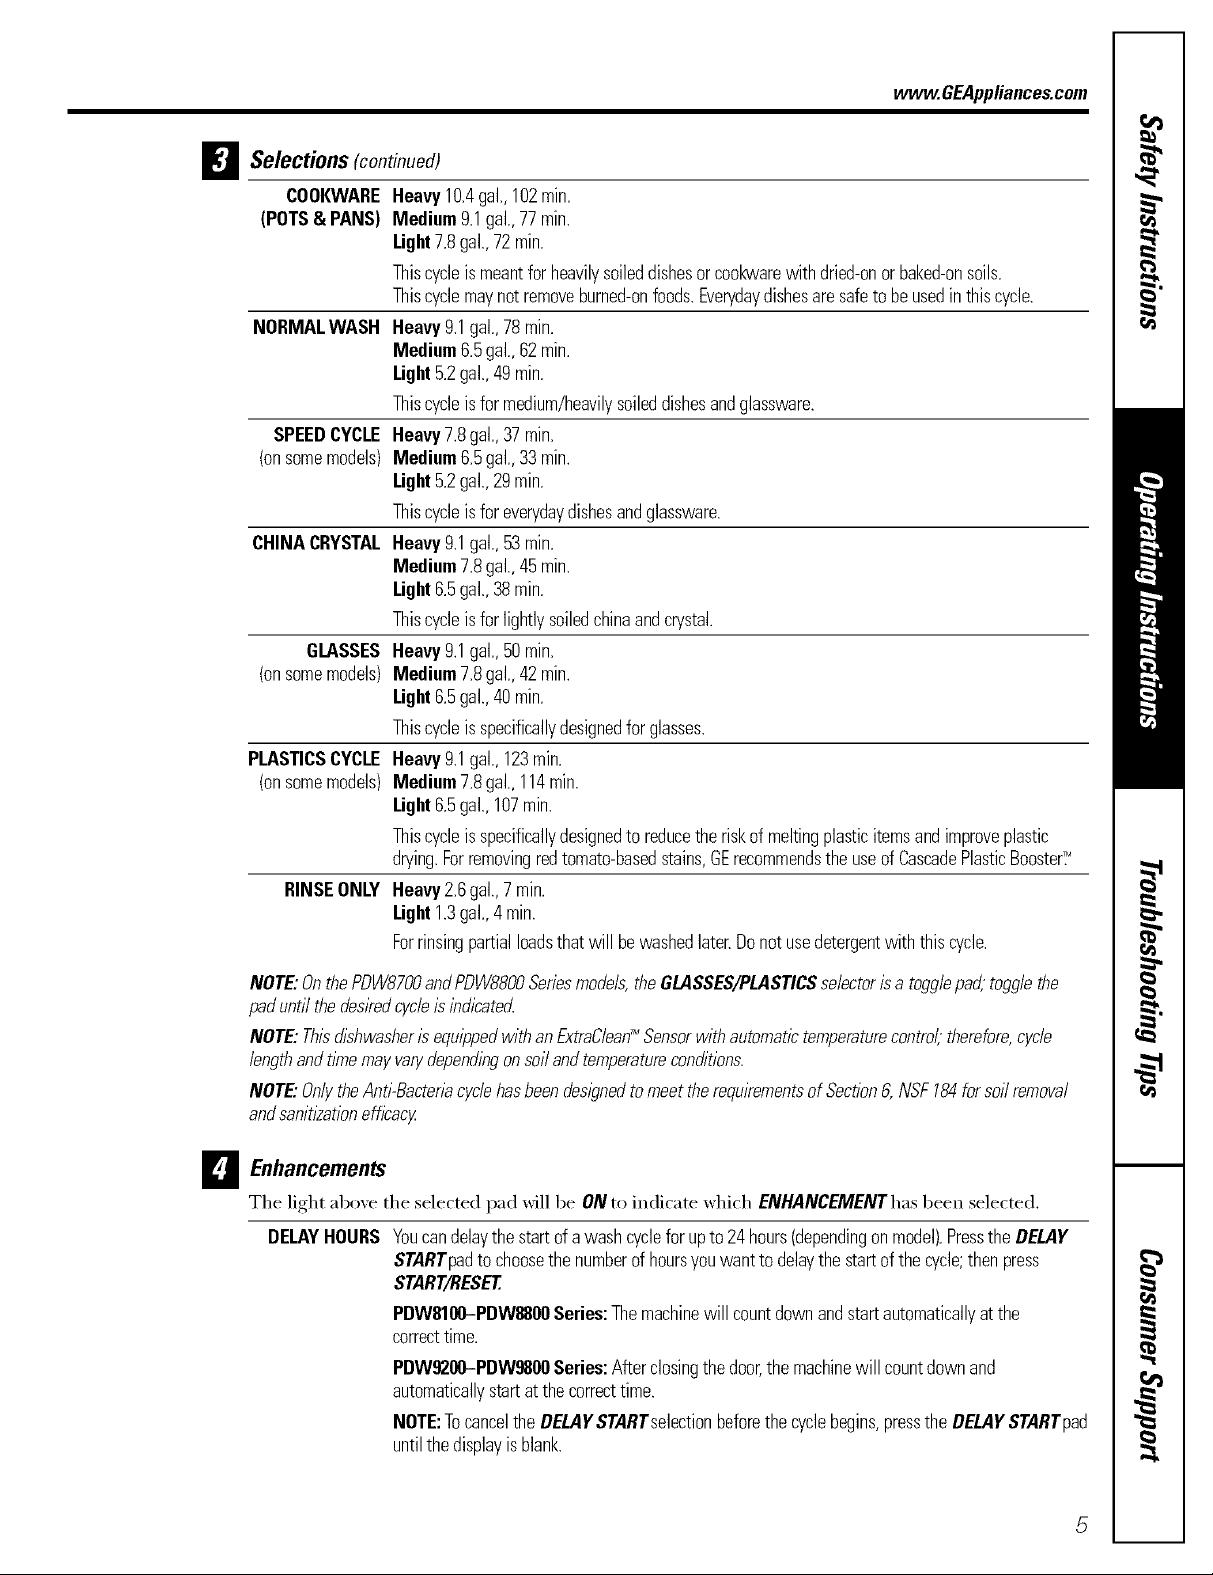
D Selections (continued)
COOKWAREHeavy10.4gal.,102rain.
(POTS& PANS) Medium9.1gal.,77rain.
Light7.8gal.,72rain.
Thiscycleismeantforheavilysoileddishesorcoolwvarewithdried-onorbaked-onsoils.
Thiscyclemaynot removeburned-onfoods.Everydaydishesaresafetobeusedinthiscycle.
NORMALWASH Heavy9.1gal.,78rain.
Medium6.5gal.,62rain.
Light5.2gal.,49min.
Thiscycleisfor medium/heavilysoileddishesandglassware.
SPEEDCYCLEHeavy7.8gal.,37rain.
(onsomemodels)Medium6.5gal.,33rain.
Light5.2gal.,29rain.
Thiscycleisfor everydaydishesandglassware.
CHINACRYSTALHeavy9.1gal.,53rain.
Medium7.8gal.,45rain.
Light6.5gal.,38rain.
Thiscycleisfor lightlysoiledchinaandcrystal.
GLASSESHeavy9.1gal.,50rain.
(onsomemodels)Medium7.8gal.,42rain.
Light6.5gal.,40min.
Thiscycleisspecificallydesignedforglasses.
PLASTICSCYCLEHeavy9.1gal.,123rain.
(onsomemodels)Medium7.8gal.,114rain.
Light6.5gal.,107rain.
Thiscycleisspecificallydesignedto reducetheriskof meltingplasticitemsandimproveplastic
drying.Forremovingredtomato-basedstains,GErecommendstheuseofCascadePlasticBooster7
RINSEONLY Heavy2.6gal.,7 rain.
Light1.3gal.,4 min.
Forrinsingpartialloadsthatwill bewashedlater.Donotusedetergentwiththiscycle.
www.GEAppliances.com
NOTE:OnthePDW8700andPDW88Ot?Seriesmodels,theGLASSES/PLASTICSselectoris a togglepad,togglethe
paduntilthedeskedcycleis indicated
NOTE:Thisdishwasheris equippedwithanExtraC/ean_Sensorwithautomatictemperaturecontrol,therefore,cycle
lengthandtl_nemayvan/dependingonsoilandtemperatureconditions.
NOTE."OnlytheAnti-BacteriacyclehasbeendesignedtomeettherequirementsofSection6,NSF184forsoilremoval
andsanit/2ationefficacy
D Enhancements
The light above the selected pad will be ON to indicate which ENHANCEMENThas been selected,
DELAYHOURS Youcandelaythestartofa washcyclefor upto24hours(dependingonmodel).PresstheDELAY
STARTpadtochoosethenumberof hoursyouwanttodelaythe startofthecycle;thenpress
START/RESET
PDW8100-PDW8800Series:Themachinewill countdownandstartautomaticallyatthe
correcttime.
PDW9200-PDW9800Series:Afterclosingthedoor,themachinewill countdownand
automaticallystartatthecorrecttime.
NOTE:TocanceltheDELAYSTARTselectionbeforethecyclebegins,pressthe DELAYSTARTpad
untilthedisplayisblank.

Aboutthe dishwashercontrolpanel
D Enhancements
ADDEDHEAT
(EXTRAHOTWASH)
PREWASH
(onsomemodels)
HEATEDDRY
LightOff
HEATEDDRY
LightOn
LOCK
6
RESET
(COl?tiylued)
Whenselected,the cyclewill runlongerwith heatingelementsonto improvebothwashanddry
performance.
NOTE:Cannotbeselectedwith RINSEONLYcycle.
Forusewith heavilysoiledand/ordried-on,baked-onsoils.ThisoptionMUSTbeselectedPRIORto
startingthecycle.Thisoptionadds16minutestothecycletime.
NOTE:Cannotbeselectedwith RINSEONLYcycle.
Shutsoff thedryingheatoption.Disheswillairdrynaturally(PDW8100-PDW8800Series)or
fandry(PDW9200-PDW9800Series)to saveenergy.
PDW8200-PDW8600Series:Turnsthe heateronforfastdrying.Thiswill extendthetotalcycle
timeby8 minutesforthe SPEEDCYCLEand30minutesforall othercycles.
PDW8100,PDW8700,PDW8800andPDW9200-PDW9800Series:Turnstheheateronforfast
drying.Thiswill extendthetotalcycletimeby30minutesfortheANTI-BACTERIALcycle,38
minutesfortheNORMALcycleandCOOKWAREcycle,8minutesfortheSPEEDcycle,15minutes
forthe PLASTICScycleand30minutesforallothercycles.
NOTE:Cannotbeselectedwith RINSEONLYcycle.
Youcanlockthecontrolsto preventanyselectionsfrombeingmade.Oryoucanlockthecontrols
afteryouhavestarteda cycle.
Childrencannotaccidentallystartdishwasherbytouchingpadswiththisoptionselected.
Tounlockthedishwashercontrols,pressandholdtheHEATEDDRYpadfor3 seconds.Tolockthe
dishwasher,pressandholdtheHEATEDDRYpadfor 3 seconds.Thelightabovethe LOCKpad
willturnoff.
Tochangeacycleafterwashingstarts...
PDW8100-PDW8800Series:Touchthe START/RESETpadtocancelthecycle.TheSTART/RESET
lightwill flashwhilethe waterispumpedoutif needed.Thistakesapproximately90seconds.
PDW9200-PDW9800Series:Openthedoorslowlytopreventsplash-out.Touchthe START/RESET
padto cancelthecycle.IftheSTART/RESETlightisflashing,closethedooruntilthewaterpumps
out(thistakesapproximately90seconds)andthelightstopsflashing.
Whenthelightstopsflashing,thedishwashercanbereprogrammedandrestarted.
D Start
PDW8100-PDW8800Series
Closethedishwasherdoorandselectthecycleanddesiredenhancements.TouchtheSTART/RESETpadtobeginthe
cycle.Waterfill beginsimmediately,andapproximately60secondslaterthewashactionbegins.
Whenthedishwasherdoorisfullyclosed,thecontrolpanellightswilldisplaythe lastsettingsyouselected.Ifyoudon't
wanttochangeanyofthe settings,simplytouchtheSTART/RESETpadto beginthecycle.
Ifthedooris closed,theindicatorlightswill turnoffiftheSTART/RESETpadisnotselectedwithin2 minutes.Toactivate
thedisplay,openandclosethedoororpressanypad.
PDW9200-PDW9800Series
Afterselectingthe cycleanddesiredenhancements,touchtheSTART/RESETpadtoreadythedishwashertobeginthe
cycle.Closethedoortostartthecycleor begintheDELAYSTARTcountdown.Whenthecyclestarts,thewaterfill
beginsandapproximately60secondslaterthewashactionbegins.
Thedishwasherwill alwaysdisplayyourlastselectionandenhancements.Ifyoudon'twantto changethesettings,
simplytouchthe START/RESETpadto readythe dishwasherandclosethedoortobeginthecycle.
Also,if a powerfailureoccursNORMALandHEATEDBRYwill automaticallybeprogrammed.Makeanynewselections
andtouchtheSTART/RESETpadtobeginthe newcycle.
r_ clean
PDW8100-PDW8800Series
TheCLEANlightis illuminatedwhentheselectedcycleandenhancementsarecomplete.Thelightwill stayONuntil
thedooris opened.
PDW9200-PDW9800Series
TheCLEANlightis illuminatedandadoublebeepwillsoundwhentheselectedcycleandenhancementsarecomplete.
Youmayremovethe dishesat anytime.Notethehigh-efficiencyfanwill runquietlyfor30minutesto 4 hours(depending
onselectedcycle)afterthe CLEANlight isilluminatedto continued_/ingthedishes.Thiscanbeinterruptedbyopening
thedoorandpressinganykeypad.
NOTE:Toturnoffthedoublebeepindicator(orre-activateit if it waspreviouslydisengaged),pressthe HEATEDDRY
pad5timeswithin3seconds.Atriplebeepwill soundtoindicatetheend-of-cyclebeepoptionhasbeentoggled.
Flashingdisplaylights.
www.GEAppliances.com
StatusIndicator Lights
START/RESET
What It Means
Cycle has been interrupted by pressing the START/RESETpad. Light will
quit flashing after the dishwasher autonmticallv drains out the water:
Recommendeddishwasherproducts.
GE recommends the fl_llowing products fin" use in
its dishwashers:
• Electrasol,®Cascade® and Cascade CompleteTM
Dishwasher Detexgents.
• Jet Dry® and Cascade Rinse Aid®to remoxe spots
and prevent new fihn buildup (m yore" dishes,
glasses, flatware, cookware and plastic.
• Cascade®Plastic BoosterTM to remove red staining
inside yore" dishwasher that can come fl'om some
tomato,-based stains.
• CeramaBryte®Stainless Steel Appliance Cleaner
to clean the stainless steel panel ot GE and
Profile "_stainless exterior dishwashex_.
• Jet Dry® Dishwasher Cleaner to hel I) remoxe
some hard water mineral stains that can occm"
in hard water conditions.
Usingthe dishwasher.
Checkthe Water Temperature
The entering water should be at least 120°!:and not more than 150°!:for effective cleaning and to prevent
dish damage. Check the water temperature with a candy or meat thermometer. Turnon the hot water
faucet nearest the dishwasher, place the thermometer in a glass and let the water run continuously into
the glass until the temperature stops rising.
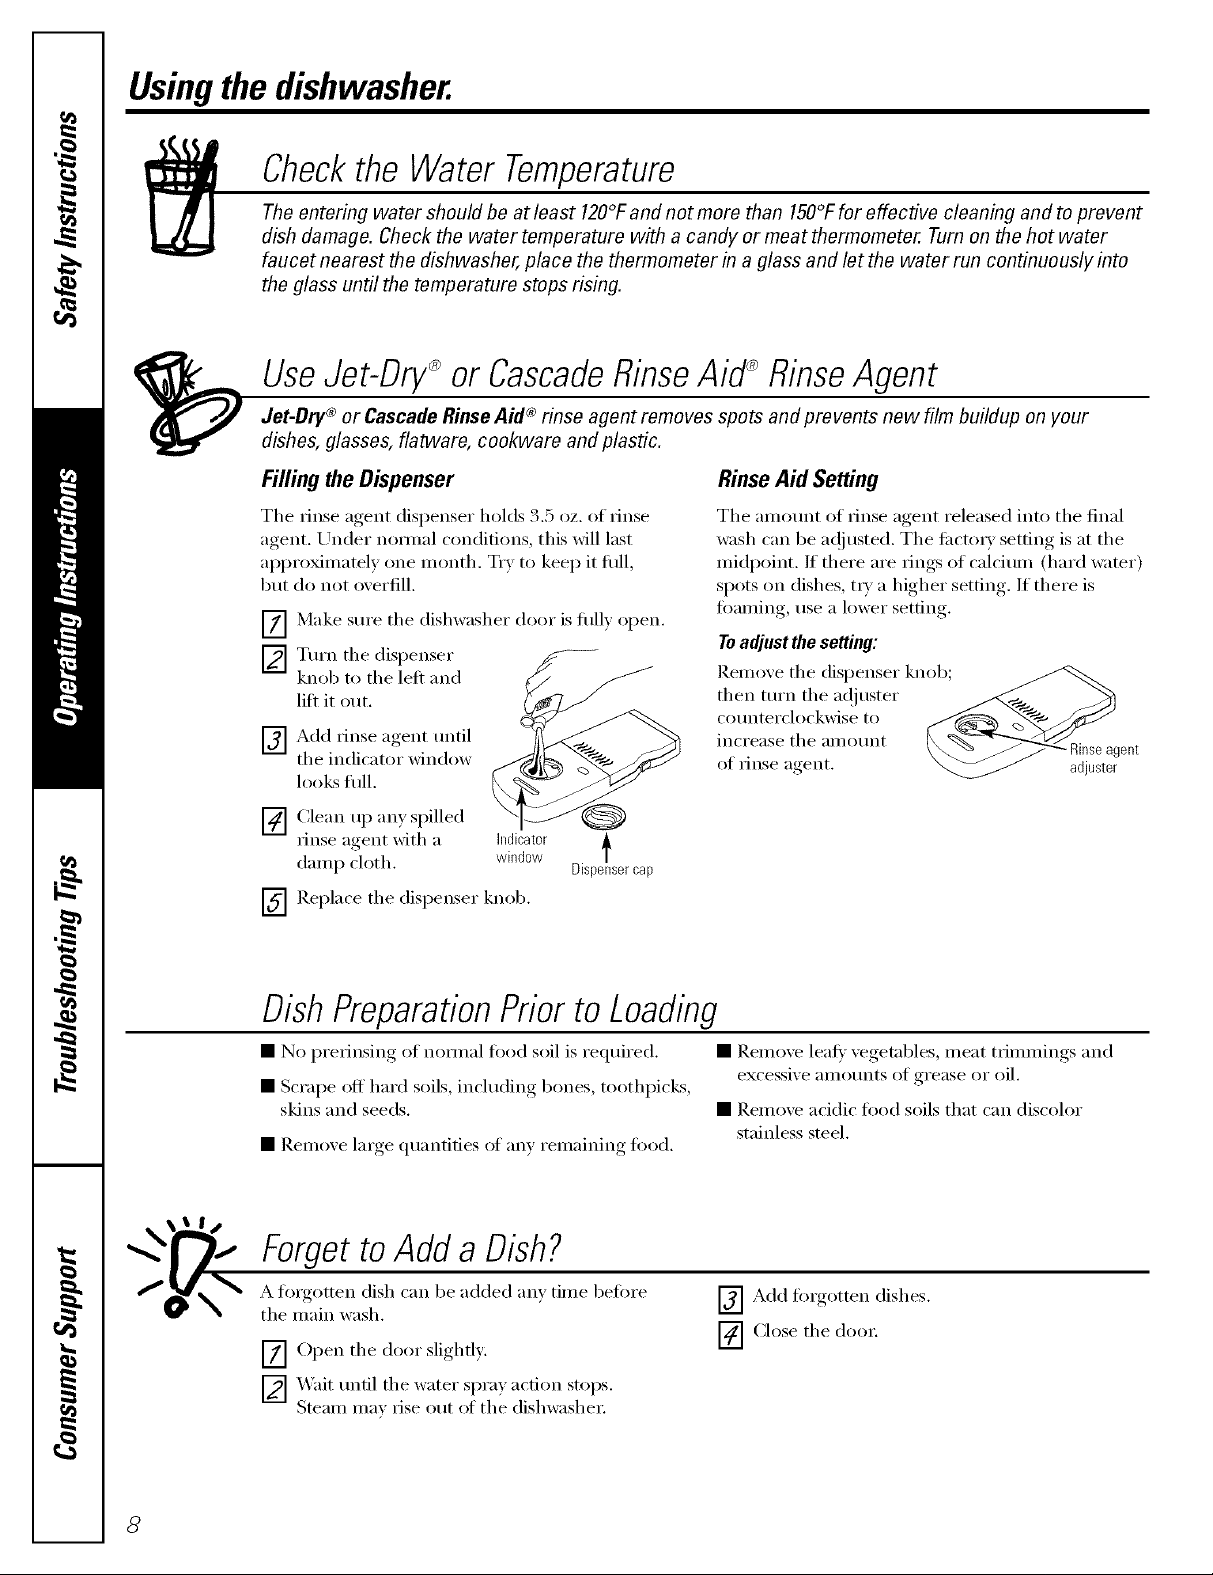
UseJet-Dry_or CascadeRinseAid_RinseAgent
Jet-Dry® or Cascade RinseAid rinse agent removes spots and prevents new film buildup on your
dishes, glasses, flatware, cookware and plastic.
®
Filling the Dispenser
The rinse agent dispenser holds 3.5 oz. of rinse
agent, Under nomml conditions, this will last
approximately one month. Try to kee I) it flfll,
gilt do not overfill.
Make sure the dishwasher door is flflly open.
[]
Turn the dispenser
F_
knob to the left and
lift it out.
Add rinse agent tmtil
F_
the indicator window
IDOLS fifll.
[]
(!lean up any spilled
m_se agent with a indicator
damp cloth, window Dispenserlcap
Replace the dispenser knob.
N
RinseAid Setting
The amount of _inse agent released into the final
wash can be a(!iusted. The ti_cto_y setting is at the
midpoint. If there are tings of calcium (hard water)
spots on dishes, tiT a higher setting. If there is
rimming, rise a lower setting.
Toadjust the setting:
Remo_e the dispenser knob;
then mrn the a@,ster _ .....
counterclockwise to ¢_ _J"
increase the amount Ix _ "_-/'_.
. , \_ _ _ _--_mnseagent
of Flnse agent. _ adjuster
DishPreparationPrior to Loadbg
• No prefii_sing of nomml fi)od soil is required. • Remove leaf)" vegetables, i/leat tfimlnings aim
• Scrape off hard soils, including bones, toothpicks, excessix e aillOtlnts of grease or oil.
skins and seeds. • Remove acidic food soils that can discolor
• Remove lmge quantities of any remaining food.
stainless steel.
ForgettoAddaDish?
A forgotten dish can be added any time heft)re
the main wash.
[Z] Open the door slightly.
['_ _'%fit tmtil the water spray action stops.
Steam ma_ rise out of the dishwasher:
8
_]Add fi_rgotten dishes.
r_ Close the door
ProperUseof Detergent
vvvvvv.GEAppliances.com
Use only detergent specifically made for use in
dishwashe_. Cascade7 Cascade Complete ® and
Electrasol ® Automatic DishwashingDetergentshave
been approved fin" use in all (;E dishwashe_. Keep
your detergent fl'esh and dry. Don't put detergent
into tile dispenser tmtil you;re ready to wash dishes.
Pdl wash cycles except RINSEONLYrequire
detergent. The amotmt of detergent to use depends
on whether your water is hard or soft.
Protect your dishes and dishwasher by contacting
your water department and asking how hard w_m"
water is. Twelve or more grains is extremely hard
water; A water softener is recommended. X4'ithout it,
lime can build up in the water \_flve, which could
stick while open and cause flooding. Too much
detergent with soft water can cause a pemmnent
cloudiness of glassware, called etching,
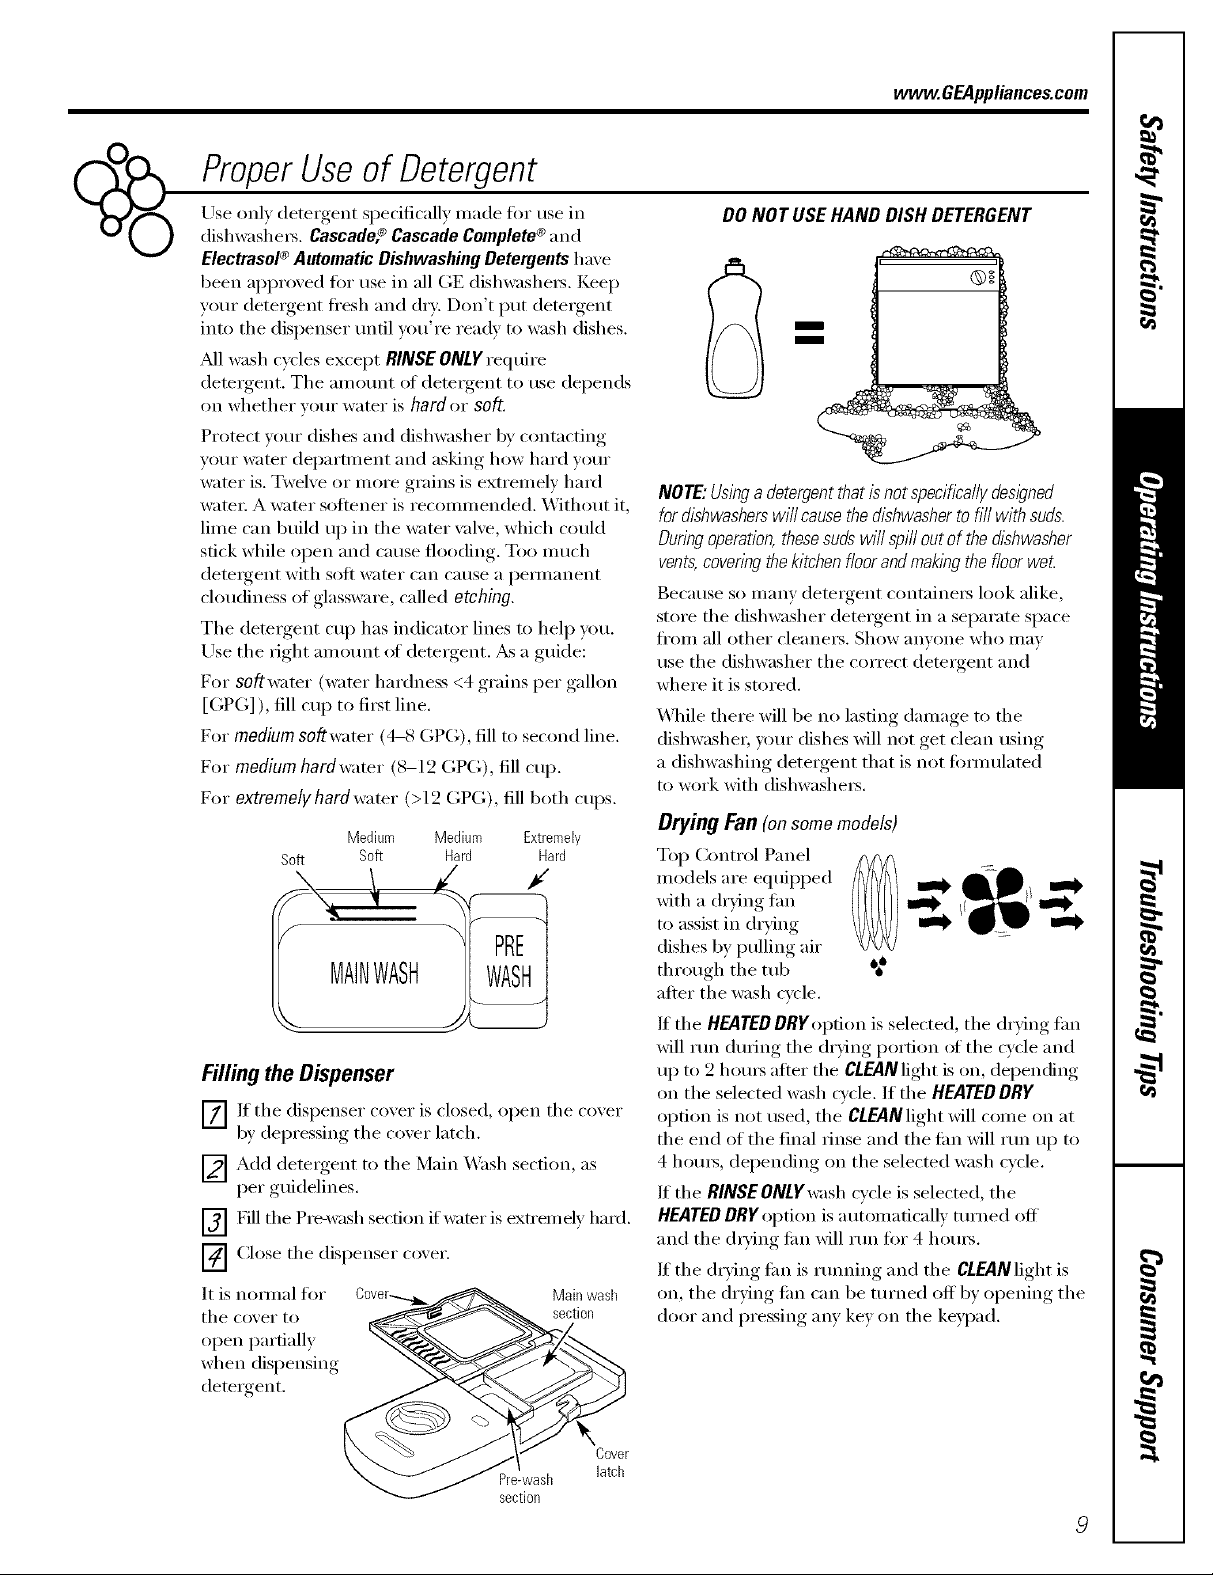
Tile detergent cup has indicator lines to hel I) you.
Use tile right amotmt of detergent. _s a guide:
For soft wamr (wamr hardness <4 grains per gallon
[GPG] ), fill cup to fi_t line.
For medium soft water (4-8 GPG), fill to second line.
For medium hard water (8-12 GPG), fill cup.
For oxtromolghard water (>12 GPG), fill both cups.
Medium Medium Extremely
Soft Soft Hard Hard
DONOT USEHANDDISH DETERGENT
m
m
NOTE:Uslhgadetergentthatisnotspecificallydesigned
fordishwasherswill causethedishwashertofi//withsuds.
Duringoperation,thesesudswi//spilloutofthedishwasher
vents,covenwthekitchenf/oorandmaklhgthefloorwet.
Because so many detergent containe_ look alike,
store tile dishwasher detergent in a separate space
fl'om all other cleaners. Show anwme who may
use the dishwasher the correct detergent and
where it is stored.
X,_]/ile there will be no lasting damage to the
dishwasher, yore" dishes will not get clean using
a dishwashing detergent that is not lommlated
to work with dishwashers.
Drying Fan(on some models)
Top Control Panel
models are equipped
with a dr)ing tim
to assist in drying
dishes by pulling air
through tile tub
after the wash cycle.
,g
Filling theDispenser
Z]lf tile dispenser co_er is closed, open tile co_er
b) depressing the coxer latch.
['_ Add detergent to the Main X,_ash section, as
per guidelines.
r_ Fill tile Pre-wash section if' water is extremely hard.
F_ Close tile dispenser cover.
It is nornlal for Main wash
tile cover to section
open partially
when dispensing
detergent.
Cover
Pre-wash latch
section
If tile HEATEDDRYoption is selected, tile drying tim
will rtm dm_ing tile (h')_ng portion of tile cycle and
up to 9 houI_ after tile CLEANlight is on, depending
on the selected wash cycle. If the HEATED DRY
option is not used, tile CLEANlight will come on at
the end of the final rinse and the tim will run up to
4 hom_, depending on the selected wash cycle.
If the RINSE ONLY w'ash cycle is selected, the
HEATEDDRY option is a utomaticallv turned off'
and tile (hying tim will run fin" 4 holms.
If the drying tim is framing and the CLEAN light is
on, the drying tim can be tin'ned off by opening tile
door and pressing am' key on tile keypad.

Loadingthedishwasherracks.
For best dishwashing results, follow these loading guidelines. Features and appearance of racks and silverware baskets
may vary from your model
Upper Rack
_Mthough the upper rack is fin" glasses, cups
and Satlcers, pots and l)[ins C[lll be placed in
this rack fin" efli_ctive cleaning. Cups and
glasses fit best along the sides. This is also
a secure place tin" dishwasher plastics.
The utility shelf (on some models) may be
placed in the up or down position to add
flexibili£:. A wine glass holder (on some
models) secures wine glasses fin" best
washability.
Some models have contoured metal cup
shelves that can secure up to 12 wine glasses
(as shown).
Because wine glasses come in \m_ious sizes,
after loading, slowly push in the rack to
make sure they will clear the top of the
dishwasher:
The upper rack is good fin" all kinds ()I
odd-shaped utensils. Saucepans, mixing
bowls and other items should be placed
e_ce down. Fold-down fines (on some
models) provide flexil)ilil'}, fin" extra-large
and hard-to-fit items.
Securelargerdishwasher-safeplasticsover2 tines
whenpossible.
Makesuresmaflp/astlcitemsaresecuresothey
can'tfailontotheheate_
Besurethatitemsdonotprotrudethroughthe
bottomoftherackandblockrotationof the
middlesprayarm.Thiscouldresultinpoorwash
performanceforitemsintheupperrack.
Checktomakesurethatnoitemswillblockrotation
of thewasharm.
I II II II II II II II II II II
Adjustable Upper Rack
The st;mdard position of your ac!justable
rock is "Ill)" which allows fin" maximum
clearance fin" your taller items in the lower
rock. Kyou have taller wine glasses,
tumble_ or other items to place in the
ul)per rack, you may want to a(!just the
rock to the lower position.
Tolower the rack, support the weight of the
rock with your hands as shown and press
both finger pads abotlt 1/4" toward the
inside of the rack as indicated and guide
the rack down to its lower position.
Toraise the rack to the "up" position, pull
up on the center of the rack side fl'ame
until the rack locks into place.
10

Lower Rack
vvww.GEAppliances.com
tabout Removeendcap
The lower rack is best used for plates,
S_ltlceI'S _llld ('ookw;li'e. I,aI'_e itelIlS stl(h _ls
broiler pans and baking racks should go
along the left-hand side. Ixmd platters, pots
and bowls along the sides, in corners or in
the back. The soiled side of imms should
ti_ce the center of the rack. If necessar};
oversized glasses and mugs can be placed
in the lower rack to maximize loading
flexibility:
Removing the Upper Rack
_tl can relnove the ui_per rack to allow
space fin" lmge items in the lower rack.
To remove the upper rack:
[_] Press thumb tab Otlt and reulove the
front end caps on each side of the rail.
[_ Pull the rack straight out and
off the rails.
_] Replace the end caps.
[_ Push the rails all the wa} back into
the dishwasher:
_&Jso,be carefid not to let a portion of an
item such as a pot or dish handle extend
through the bottom rock. This could block
the wash am_ and cause poor washing
results.
Fold-down tines (on some models) provide
flexibility fin" extra-large and hard-to-fit
items. The tines may be left in the up
position or folded down to customize the
lower rack.
N Slide the shower nozzle attachment
over the spout.
•Showernozzle
attachment
[6-] Then fill the lower rack and beoin
_ OtlI" c_cle.
NOTE: Don't forget to remove the showernozzle
attachmentbefore youreplace theupper rack.
One-piece basket (on some models)
Three-piece basket(onsome models)
Don't let any
itemextend
throughbottom
t t
Toremoveendbaskets,graspthebasket
atopposite comers andslideapart
Silverware Basket
To load flatware, simply push the a(!justable
handle to either side (on some models).
Put flatware in the remo\:d)le basket with
fork and kuife handles up to protect your
hands. Place spoons in the basket with
handles down. Mix knives, fin'ks and
spoons so they don't nest together:
Distfibum evenly. Small plastic imms, such
as meastuing spoons and lids fl'om small
containers should go in the bottom of the
silverware basket with the silverware on top.
The one-piece silverware basket (on some
models) can be placed in the fi'ont, right
side or back of the lower rack.
A wuieb, of options is a\:filable regarding
the three-piece silverware basket (on some
models) in your dishwasher: The complete
basket is designed to fit on the right side of
the lower rack. Additionally, each end of
the basket is remo\:d)le to add loading
flexibility' to accommodate flatware and
lower rack capad_' needs.
The lids of both end and middle baskets
(on some models) can be closed to contain
small items. I,ong items can be placed on
the utility shelf in the ui)per rack.
11

Loadingthedishwasherracks.
Extra Rack Features (on some models)
Cutlery Tray
The cutle D" tray holds up to 4 large knffes
such as a carx'e_; chef's knives, bread knife,
etc., that are too tall to fit in the silverware
basket.
Hook the trax onto the rear of the upper
_ck. Ira' the knixes between the guides
(asshown).
Bowl Tines
The special largeq)owl tines in the lower
_v_ckadd flexibiliD, to your loading pattern.
They are useflfl fin" serving bowls or other
large bowls.
To use the bowl tines, told down the
2 r_ws of flex fines in fl'ont of the bowl
tines and load bowls just as you would
in the upper rack.
Loadingplace settings...
Follow these guidelines for loading lOplace settings. Features and appearance of racks and silverware baskets may vary
from your model
I Ill[
..............k_
Upper Rack--lO place settings Lower Rack--lO place settings
Follow these guidelines for loading 12place settings. Features and appearance of racks and silverware baskets may vary
from your model
12
Upper Rack--12 place settings Lower Rack--12 place settings
 Loading...