

GE PDW8700N00WW, PDW8700N00BB, PDW8680N00SS, PDW8612K03SS, PDW8612K00SS Owner’s Manual
...
ge.com
F--
oL__
LJj
J=
UI
Safety Instructions .......... 2,3
Operating Instructions
Care and Cleaning ................ 15
Control Panel and Settings ....... 4-7
Flashing Displag Lights .............. 7
Loading Place Settings ............ 14
Loading the Racks ............. 12-14
Using the Dishwasher ........... 8-11
Troubleshooting Tips ..... 16-18
Consumer Support
Consumer Support ................ 24
Product Registration ........... 19, 20
Warranty ......................... 23
PDW8000 Series
PDW9000 Series
Write the model and serial
numbers here:
Model #
Serial #
Youcan find them on the tub wail
just inside the dooE
165D4700P335 49-55015 06-06 JR
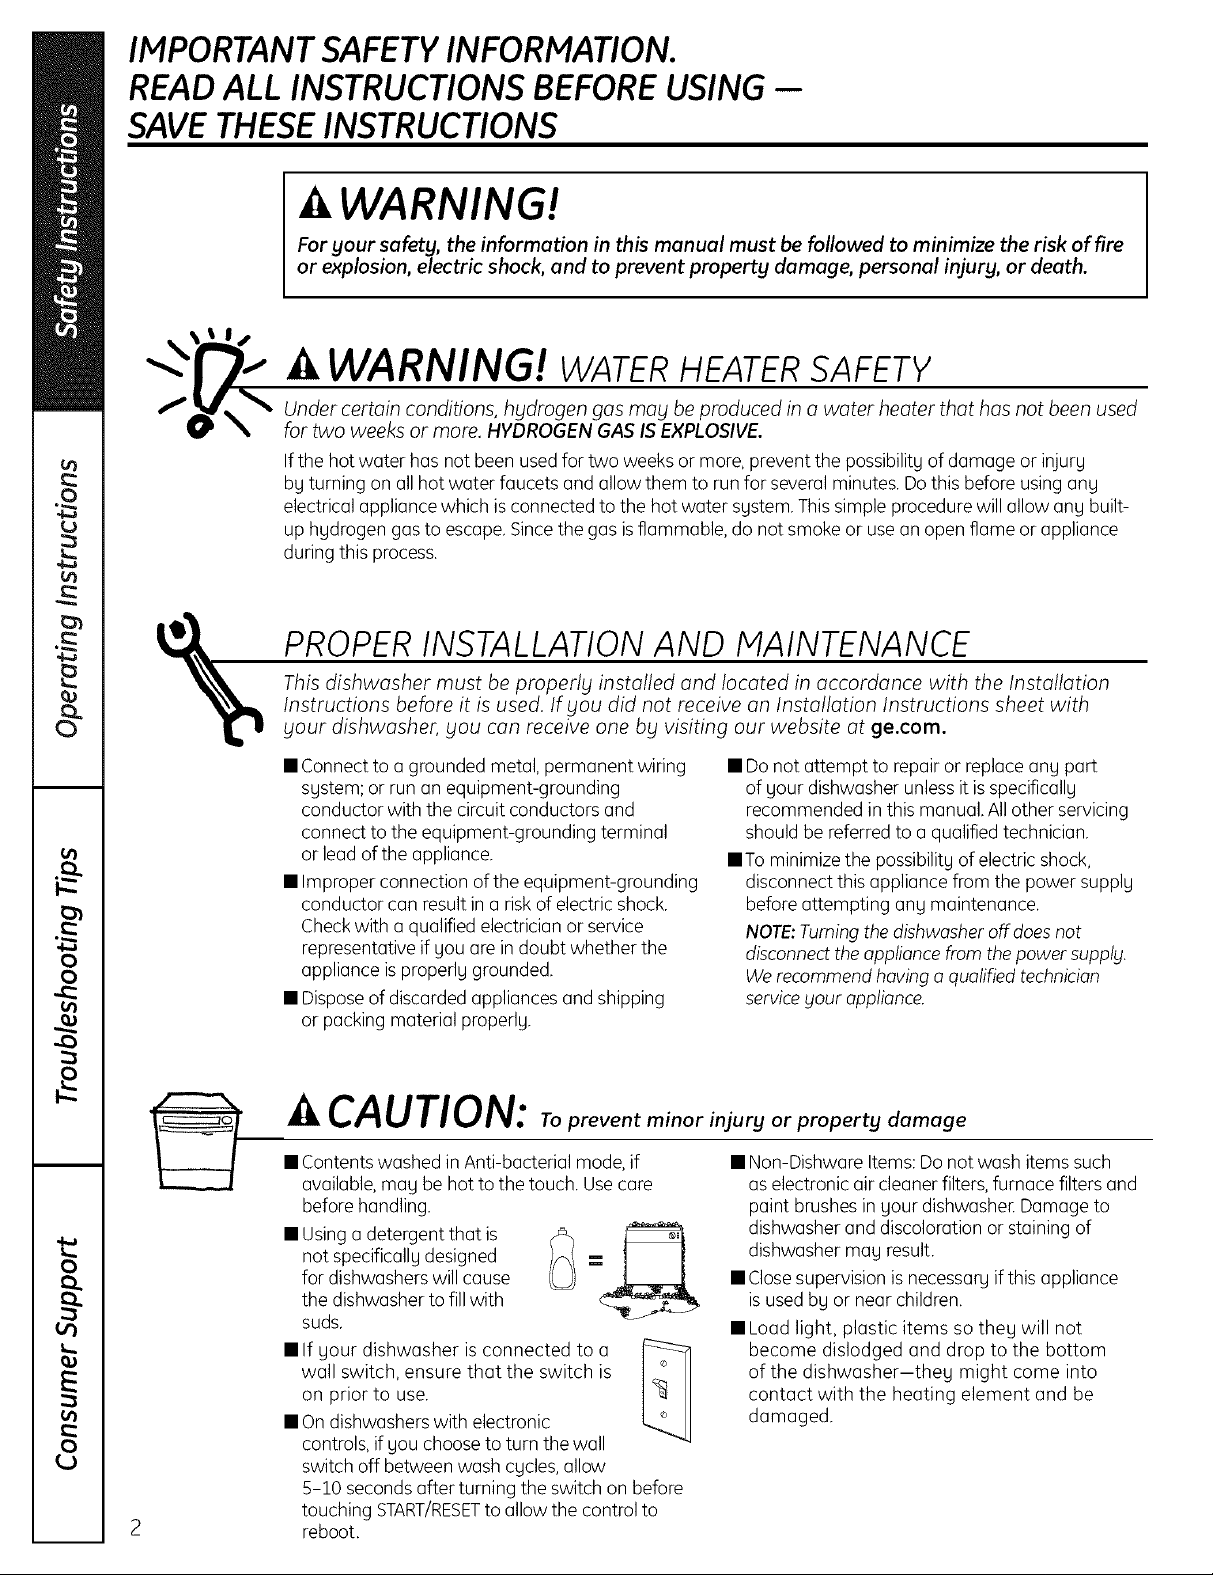
IMPORTANT SAFETY INFORMATION.
READ ALL INSTRUCTIONS BEFORE USING --
SAVE THESEINSTRUCTIONS
WARNING!
For gour safety, the information in this manual must be followed to minimize the risk of fire
or explosion, electric shock, end to prevent property damage, personal injury, or death.
_l I S
WARNING! WATERHEATERSAFETY
'__ _ for two weeks or more. HYDROGEN GAS IS EXPLOSIVE.
Under certain conditions, hydrogen gas may be produced in a water heater that has not been used
Ifthe hot water has not been usedfor two weeks or more,prevent the possibility of damage or injury
by turning on all hot water faucets and allow them to run for several minutes. Dothis before using ang
electrical appliance which is connected to the hot water system.This simpleprocedure will allow any built-
up hgdrogen gas to escape. Sincethe gas isflammable, do notsmoke or usean open flame or appliance
during this process.
PROPERINSTALLATIONAND MAINTENANCE
This dishwasher must be properly installed and located in accordance with the Installation
%
Instructions before it is used. If gou did not receive on Installation Instructions sheet with
gout dishwasher, gou con receive one bg visiting our website at ge.com.
• Connect to a grounded metal, permanent wiring
• Improper connection of the equipment-grounding
• Disposeof discarded appliances and shipping
• Contentswashed in Anti-bacterial mode, if
• Usinga detergent that is
• If your dishwasher is connected to a
• On dishwasherswith electronic
• Donot attempt to repair or replace any part
system; or run an equipment-grounding
conductor with the circuit conductors and
connect to the equipment-grounding terminal
or lead of the appliance.
conductor can result in a risk of electricshock.
Checkwith a qualified electrician or service
representative if you are in doubt whether the
appliance isproperly grounded.
or packing material properly.
of your dishwasher unlessit isspecifically
recommended in this manual. All other servicing
should be referred to a qualified technician.
• To minimizethe possibility of electric shock,
disconnect this appliance from the power supply
beforeattempting any maintenance.
NOTE:Tumingthe dishwasher off doesnot
disconnect theappliance from the power supplg.
Werecommend having o qualified technician
serviceyour appliance.
CAUTION: Topreventminorinjurgorpropertgdamage
• Non-Dishware Items: Donot wash items such
available,mag be hot to the touch. Usecare
before handling.
not specifically designed
for dishwashers will cause
the dishwasher to fill with
suds.
wall switch, ensure that the switch is
on prior to use.
controls, if you choose to turn the wall
switch off between wash cgcles,allow
5-10 seconds after turning the switch on before
touching START/RESETto allow the control to
reboot.
aselectronic air cleanerfilters, furnace filters and
paint brushes in your dishwasheEDamage to
dishwasher and discoloration or staining of
dishwasher mag result.
• Closesupervisionis necessary ifthis appliance
isused bg or near children.
• Load light, plastic items so theg will not
become dislodged and drop to the bottom
of the dishwasher-theg might come into
contact with the heating element and be
damaged.
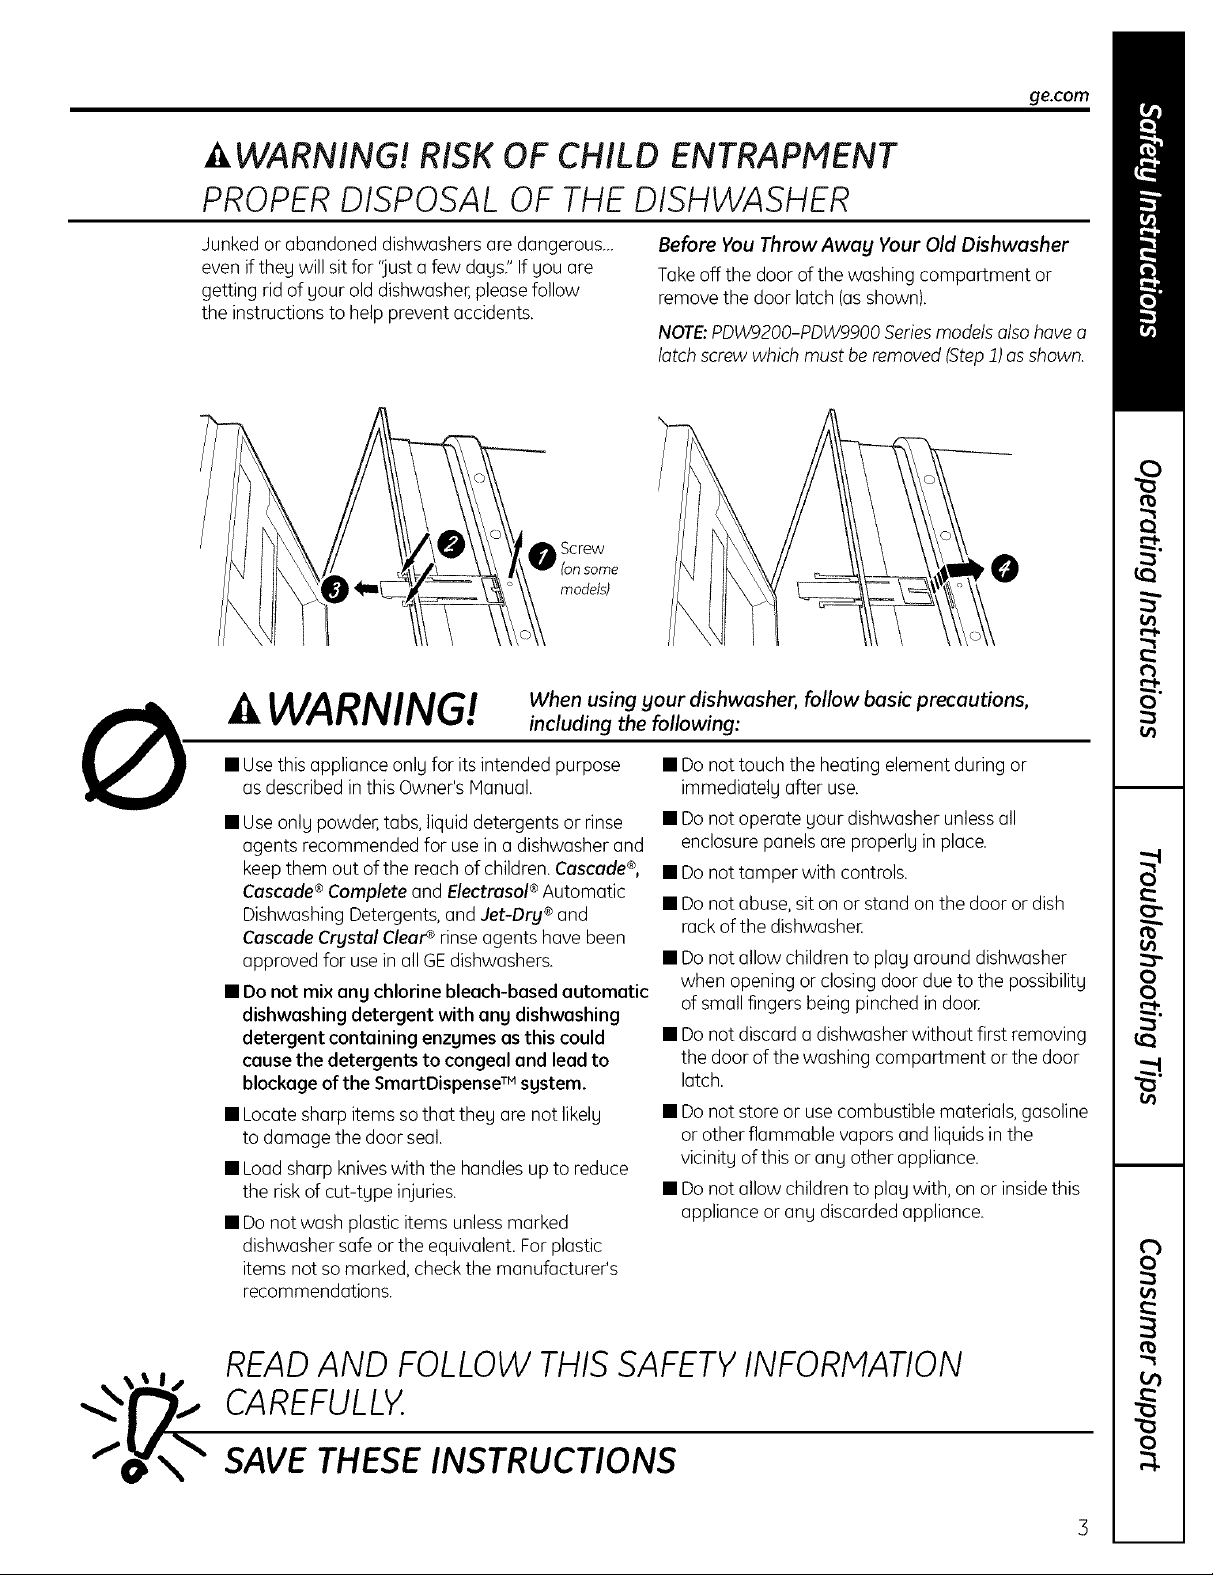
A WARNIN!! RISK OF CHILD ENTRAPMENT
PROPER DISPOSAL OF THE DISHWASHER
ge.com
Junked or abandoned dishwashers are dangerous...
evenif they will sit for 'just a few dags;' If you are
getting rid of your old dishwasher,please follow
the instructions to help prevent accidents.
Screw
(on some
models)
WARNING!
• Usethis appliance only for its intended purpose
as described in this Owner's Manual.
• Use only powder,tabs, liquid detergents or rinse
agents recommended for use in adishwasher and
keepthem out of the reach of children.Cascade®,
Cascade ®Complete and Electrasol ®Automatic
Dishwashing Detergents, and Jet-Dru ®and
Cascade Crustal Clear_ rinse agents have been
approved for use in all GE dishwashers,
• Do not mix any chlorine bleach-based automatic
dishwashing detergent with any dishwashing
detergent containing enzymes as this could
cause the detergents to congeal and lead to
blockage of the SmartDispense m system.
• Locate sharp items so that they are not likely
to damage the door seal.
• Load sharp knives with the handles up to reduce
the riskof cut-type injuries.
• Do not wash plastic items unless marked
dishwasher safe or the equivalent. For plastic
items not so marked, check the manufacturer's
recommendations.
When using your dishwasher, follow basic precautions,
including the following:
Before You Throw Away Your Old Dishwasher
Take off the door of the washing compartment or
remove the door latch (as shown).
NOTE:PDW9200-PDW9900 Series models also have a
latch screw which must be removed (Step 1) as shown.
• Do not touch the heating element during or
immediately after use.
• Do not operate your dishwasher unlessall
enclosure panels are properly in place.
• Do not tamper with controls.
• Do not abuse, sit on or stand on the door or dish
rack of the dishwashen
• Do not allow children to play around dishwasher
when opening or closing door dueto the possibility
of small fingers beingpinched in doon
• Do not discard a dishwasherwithout first removing
the door of the washing compartment or the door
latch.
• Do not store or usecombustible materials,gasoline
or other flammable vapors and liquids in the
vicinity of this or any other appliance.
• Do not allow children to play with, on or insidethis
appliance or any discarded appliance.
READAND FOLLOW THISSAFETYINFORMATION
CAREFULLY.
SAVETHESE INSTRUCTIONS
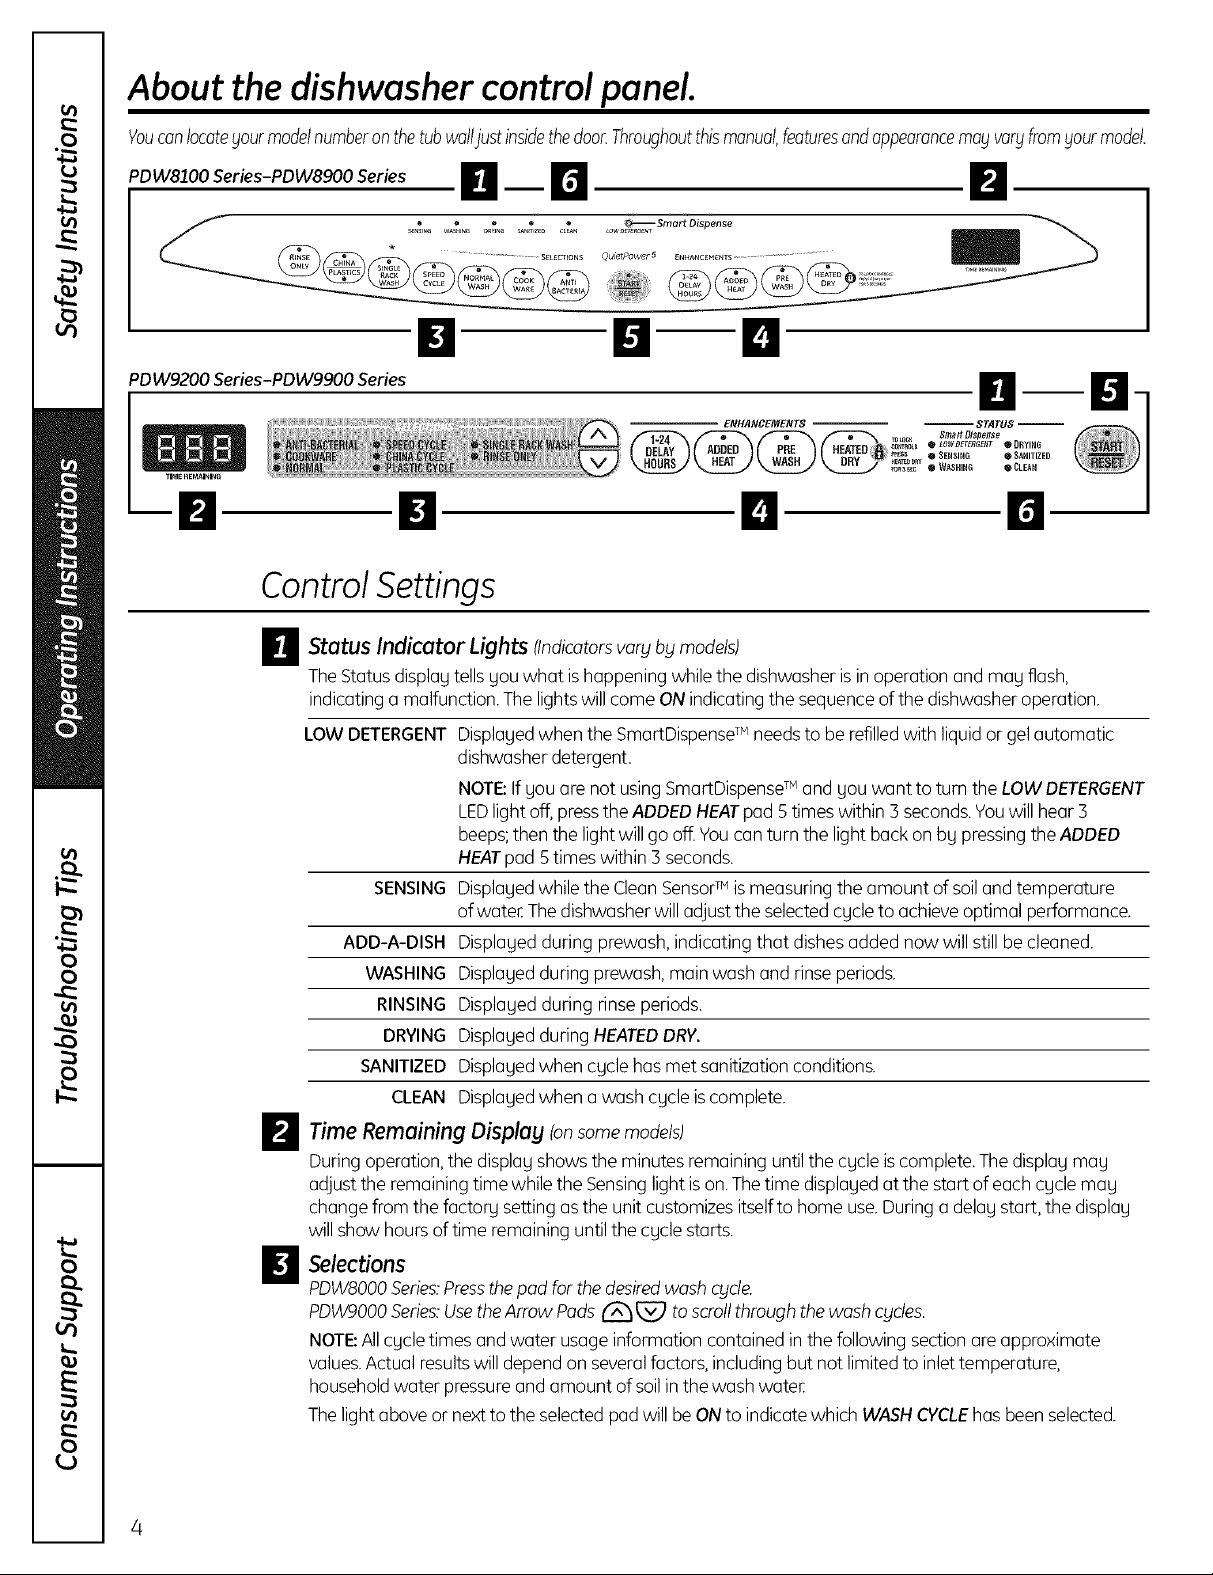
About the dishwasher control panel.
Youcanlocategourmodelnumberonthetubwalljustinsidethedoor.Throughoutthismanual,featuresandappearancemayvaryfromgoutmodel.
li 0 0
PDW9200 Series-PDW9900 Series
Control Settings
O Status Indicator Lights (Indicatorsvary by models)
TheStatus displaytells you what ishappening whilethe dishwasherisin operation and mag flash,
indicating a malfunction. Thelightswill come ON indicating the sequenceof the dishwasheroperation.
LOWDETERGENTDisplayedwhen the SmartDispenseTM needsto be refilledwith liquid or gelautomatic
SENSINGDisplagedwhile the CleanSensorTM ismeasuring the amount of soil and temperature
ADD-A-DISH Displaged during prewash, indicating that dishes added now will still be cleaned.
WASHING Displagedduring prewash,main wash and rinseperiods.
RINSING Displaged during rinseperiods.
DRYING Displayedduring HEATEDDRY.
SANITIZED Displagedwhen cgcle has met sanitizationconditions.
Omm
ENHANCEMENTS 'STATUS --
_L_ @ tOWDETER_EICT®DRYIN6
ra_aL_
mess @ SENSING ® SANITIZED
H_D_
_oRas_ @ W,_HING • CLEAN
El 0 El
dishwasherdetergent.
NOTE:Ifyou are not usingSmartDispenseTM and you want to tum the LOW DETERGENT
LEDlightoff, presstheADDED HEATpad 5times within3 seconds.Youwill hear 3
beeps;then the lightwill go off.Youcan turn the light back on bg pressingthe ADDED
HEATpad Stimes within 3 seconds.
of wateEThedishwasher willadjust the selectedcgcleto achieveoptimal performance.
CLEAN Displagedwhen a wash cgcle iscomplete.
O Time Remaining Displag fansomemodels)
Duringoperation,the displag showsthe minutes remaininguntil the cycle iscomplete.Thedisplog may
adjust the remainingtime while the Sensinglightison.The time displayedat the start of eachcycle may
change from the factory setting us the unit customizesitselfto home use.Duringa delay start, the display
will show hoursof time remaining untilthe cycle starts.
Selections
PDWbO00Series:Pressthepad for thedesiredwash cycle.
PDWgO00Series:UsetheArrow Pods _ _ toscrollthrough thewash cgcles.
NOTE:All cgcletimes and water usageinformation contained in the following sectionare approximate
values.Actual resultswill depend on severalfactors,including but not limited to inlet temperature,
householdwater pressureand amount ofsoil in thewash wateE
Thelight above or nextto the selected pad will beON to indicate which WASHCYCLEhas been selected.

Selections (continued)
ANTI-BACTERIAHeavg 8.8gal.,!05 rain.
Medium 7.5gal.,95 rain.
Light 6.3gal.,85 rain.
Thiscgcle raisesthe water temperature in the final rinseto sanitize gout dishware.The
cgcle lengthwillvarg depending on the temperature of gout inletwatec
NOTE:The Anti-Bacteriacgcleismonitored for sanitization requirements.Ifthe cgcleis
interrupted during or after the main wash portionor ifthe incoming water temperature is
solow that adequate water heating cannot beachieved,the sanitizingconditionsmag
not be met. Inthese cases,the sanitizedlightwill not illuminate at the end of the cgcle.
NOTE:NSF-certifiedresidentialdishwashersare not intendedfor licensedfood
establishments.
COOKWARE
{POTS& PANS)
NORMAL WASH
SPEED CYCLE
(on some models)
CHINA CRYSTAL
GLASSES
(onsome models)
PLASTICS CYCLE
(on some models)
SINGLE RACK WASH
(on some models)
RINSEONLY
Heavg !0.0 gal.,B0 rain.
Medium 8.8 gal.,70 rain.
Light 7.5gal.,60 rain.
Thiscgcle ismeant for heavilg soileddishesor cookwarewith dried-on or baked-on soils.
Thiscgcle mag not remove burned-on foods. Evergdagdishesare safeto be used in
this cgcle.
Heavg 8.8 gal.,70 rain.
Medium 7.5 gal.,60 rain.
Light 5.0gal.,50 rain.
Thiscgcle isfor mediumiheavilg soileddishes and glassware.
7.5gal.,35 rain.
Thiscgcle isfor evergdag dishesand glassware.
7.5gal.,35 rain.
Thiscgcle isfor lightlg soiledchina and crgstal.
7.5gal.,30 rain.
Thiscgcle isspecificallg designed for glasses.
Heavg 8.8 gal., !20 rain.
Medium 7.5 gal.,:!_05rain.
Light 5.0gal.,90 rain.
Thelonger time for this cgcle includes a built-in drging portion that isspecificallg
designedto reduce the risk of melting plastic items and improve plastic drging.
Forremoving red tomato-based stains,GErecommends the useof Cascade®
PlasticBoosterTM.
Heavg 8.2 gal.,70 min.
Medium 7.0 gal.,60 min.
Light 4.6gal.,50 min.
Thiscgcle washes lightlg soileddishes on the upper rack onlg.
2.5gal., 10 min.
Forrinsing partial loads that will bewashed late[ Donot usedetergent with this cgcle.
ge.com
NOTE: On the PDW8000 Series models, the CHINA CRYSTAL/PLASTICS selector is o toggle pad, push pad
to switch between CHINA CRYSTALand PLASTICS.
NOTE: This dishwasher is equipped with CleonSensoF '_ with automatic temperature control, therefore,
cgde length and time may vorg depending on soil and water temperature conditions.
NOTE: Only the Anti-Bacteria cycle has been designed to meet the requirements of Section 6, NSF 18/4 for
soil removal and sanitizotion efficacy.
About the dishwasher control panel.
_l_ Enhancements
The light above the selected pad willbe ON to indicate which ENHANCEMENT has been selected.
DELAYHOURS Youcan delag the start of a wash cgcle for up to 24 hours (depending on model). Press
the DELAY START pad to choose the number of hours you want to delag the start of
the cycle; then pressSTART/RESET.
PDWS000Series:Themachine will count down and start automatically at the
correct time.
PDW9000 Series:After closing the door,the machine will count down and
automatically start at the correct time.
NOTE:Tocancel the DELAYSTARTselection beforethe cycle begins, repeatedly press
the DELAYSTARTpad until the display isblank.
ADDED HEAT
{EXTRA HOT WASH}
PREWASH For usewith heavily soiledand/or dried-on, baked-on soils.Thisoption MUSTbe
(on some models) selected PRIORto starting the cycle. Thisoption adds !5 minutes to the cycle time.
HEATEDDRY Shuts offthe drying heat option. Disheswill air dry naturally (PDW8900Series)or
Light Off fan dry (PDW9200-PDW9900Series)to saveenergy.
HEATEDDRY Turnsthe heater on for fast drying. Thiswill extend the total cgcle time by !5 minutes
LightOn for the ANTI-BACTERIALcycle, 38 minutes for the NORMAL,SINGLERACKWASH
RESETTochange a cycle after washing starts...
When selected,the cycle will run longerwith heating element on to improve both wash
and dry performance.
NOTE:Cannot be selectedwith RINSEONLYcycle.
NOTE:Cannot be selectedwith RINSEONLYcycle.
and COOKWAREcycles,8 minutes for the SPEEDcycle, !5 minutes for the
PLASTICScycle and 30 minutes for all other cycles.
NOTE:Cannot be selectedwith RINSEONLYcycle.
LOCK Youcan lock the controls to prevent any selections from being made. Or you can lock
_1 the controls after you have started a cycle.
Children cannotaccidentally start dishwasher by touching pads with this option
selected.
Tounlock the dishwasher controls, pressand hold the HEATEDDRYpadfor 3 seconds.
Thelight above the lock pad will turn off.To lock the dishwasher,pressand hold the
HEATEDDRYpad for 3 seconds.The light above the LOCKpadwill turn on.
PDWS000Series:Touchthe START/RESETpad to cancelthe cgcle.The START/RESETlight
will flash while the water ispumped out if needed.This takes approximately 2 minutes.
PDW9000Series:Openthe door slowly to prevent splash-out. Touchthe START/RESET
pad to cancel the cycle. If the START/RESETlight isflashing, closethe door untilthe
water pumps out (thistakes approximately 2 minutes)and the light stopsflashing.
When the light stopsflashing, the dishwashercan be reprogrammed and restarted.
_ Start
PDW8000 Series
Close and latch the dishwasher door and select the cycle and desired enhancements. Touch the
START/RESETpad to begin the cycle. Water fill begins immediately, and approximately 60 seconds later
the wash action begins.
When the dishwasher door is fully closed and latched, the control panel lights will display the last settings
you selected. If you don't want to change any of the settings, simply touch the START/RESET pad to
begin the cycle.
If the door is closed, the indicator lights will turn off if the START/RESETpad is not selected within 5 minutes.
Toactivate the display, open and close the door or press any pad.
_ Start (continued)
PDW9000 Series
After selecting the cycle and desiredenhancements, touch the START/RESETpadto ready the
dishwasher to begin the cycle. Closethe door to start the cycle or beginthe DELAVSTARTcountdown.
When the cycle starts, the water fill begins and approximately 60 secondslater the wash action begins.
The dishwasherwill always display your last selection and enhancements. If you don't want to change
the settings,simply touch the START/RESETpad to ready the dishwasher and closethe doorto begin
the cycle.
Also,if a power failure occurs NORMALand HEATEDDRYwill automatically be programmed. Hakeany
new selectionsand touch the START/RESETpad to beginthe new cgcle.
When the door is opened,the indicator lights will turn off if the START/RESETpad is not selectedwithin
5 minutes.To activate the displag, open and closethe door or touch ang pad.
Clean
D
PDW8000 Series
TheCLEANlight is illuminated when the selected cgcle and enhancements are complete. Thelight will
stag ON until a padis pressedor the door isopened and then closed.
PDW9200 Series-PDW9900 Series
TheCLEANlight is illuminated and a doublebeep will sound when the selected cgcle and enhancements
are complete. You mag remove the dishes at ang time. The high-efficiencg fan will run quietly for 30
minutes to 4 hours (depending on selected cgcle)after the CLEANlight is illuminated to continue drying
the dishes.The fan can be turned off bg opening the door and pressingang kegpad.
ALL MODELS:Toturn off the audible end-of-cgcle signal (or re-activate it if it was previously tumed off),
pressthe HEATEDDRYpad 5 times within 3 seconds.A triple beep will sound to indicate the end-of-cgcle
beep option has been toggled.
ge.com
Flashingdisplay lights.
Status Indicator Lights What It Means
START/RESET
Cgcle hasbeen interrupted bg pressingthe START/RESETpad,or there
hasbeen o power failure. Light will stop flashing after the dishwasher
automatically drains out the water. Thedishwasher will restart if the
interruption was the result of o power failure.
Recommended dishwasher products.
GErecommends the following products for usein its
dishwashers:
• For your manual detergent dispenser,Cascade®
and ElectrasoF powder, liquidor gelautomatic
dishwasher detergents are approved.
• For your SmartDispenseTM Detergent Dispenser,use
only the recommended detergents listed on page
10of this manual,
• Jet Dry®or Cascade Crystal Clear®rinseagents
to remove spots and prevent new film buildup on
your dishes,glasses,flatware, cookware and
plastic. Using rinse agent also improves drg
performance.
• Cascade®Plastic BoosterTM to remove red staining
insidegour dishwasher that can come from some
tomato-based foods.
• Cerama Brgte®StainlessSteelAppliance Cleaner
to clean the exterior stainlesssteel panel of GEand
ProfileTM dishwashers(forstainlesssteel exterior
models only).

Using the dishwasher.
Check the Water Temperature
The entering water should be at least J20°F and not more than 150°F for effective cleaning and to
prevent dish damage. Check the water temperature with a candy or meat thermometer. Turn on the
hot water faucet nearest the dishwasher, place the thermometer in a gloss and let the water run
continuously into the glass until the temperature stops rising.
UseJet-Dry ®or Cascade Crystal Clear®RinseAgent
Jet-Dry ®or Cascade Crystal Clear ¢ rinse agent improves drying, removes spots and prevents new
film buildup on your dishes, glasses, flatware, cool<ware and plastic.
Filling the Dispenser Rinse Aid Setting
The rinse agent dispenser holds ].5 oz. of rinse agent.
Under normal conditions, this will last approximately
one month. Try to keep it full, but do not overfill.
[] Make sure the dishwasher door is fully open.
'2] Turn the dispenser
cap to the left and
lift it out.
F1Add rinse agent until
the indicator window
looks full.
[] Cleanup any spilled
nnseagent with a Indicator t
damp cloth, window Dispenser cap
E] Replacethe dispenser cap.
The amount of rinse agent releasedinto the final
wash can be adjusted.The factory setting isat the
midpoint. If there are ringsof calcium (hardwater)
spots on dishes,try a higher setting. If there is
foaming, use a lower setting.
TOadjust the setting:
Removethe dispenser cap;
then turn the adjuster
counterclockwise to
increasethe amount
of rinseagent or adjuster
clockwiseto reduce
the amount of rinse agent dispensed.
Dish Preparation Prior to Loading
• No prerinsing of normal food soilisrequired. • Removelarge quantities of any remaining food.
• Scrapeoff hard soils,bones,toothpicks, skinsand • Removeleafy vegetables,meat trimmings and
seeds, excessiveamounts of grease or oil.
agent
8
 Loading...