

GE PDW8000G01BB, PDW8000G01CC, PDW8000G01WW, PDW8000G03BB, PDW8000G03CC Installation Guide
...
Installation
Instructions
Built-In Dishwashers
PDW8000,PDW8060
DesignGuidewith
Installation Instructions
GEAppliances
Safety Information
BEFORE YOU BEGIN
Read these instructions completely mid carefully.
•IMPORTANT S_,,'etheseinstructionsfor
local inspector's use. Observe all governing
codes and ordinances,
• Note to Installer - Be sure to leave these instruc-
tions with the Consmner.
• Note to Consumer - Keep these instructions with
your Owner's Mai_ual tot fllture reterence.
• Skill Level - Installation of this dishwasher requires
basic mechanical and electrical skills, Proper installa-
tion is the responsibility of the installer, Product
failure due to improper installation is not covered
under the GE Applimace Warranty.
• Completion Time - 1 to 2 Hours. Nex_ installa-
tions require more time than replacement installa-
tions.
•IMPORTANT - ThedishwasherMUST
be installed to allow for future removal fl'om the
enclosure if serxice is required,
If you receixed a damaged dislmasher, you should
immediatelv contact wmr dealer or builder.
READ CAREFULLY.
KEEP THESE INSTRUCTIONS.
FOR YOUR SAFETY
Read and observe all CAUTION and WARNINGS
shown throughout these instructions.
CONTENTS
Design Information
Product Dimensions ....................................................... 3
Models Available ............................................................ 3
Advance Plam_ing .......................................................... 3
Installation Preparation
Materials Xibu Will Need ................................................. 4
Tools Ybu Will Need ....................................................... 4
Parts Supplied ................................................................. 5
Prepare Dishwasher Enclosure ..................................... 5
Drain Requirements ....................................................... 6
Prepare Electrical Wiring ............................................... 7
Prepare Hot Water Line ................................................. S
Custom Pm_el Dimensions
Custom Panels hw PDW8000 ........................................ 9
Installation Instructions
Step 1, Remo_,e Packaging ........................................... 10
Step 2, Install Leveling Legs ....................................... 10
Step 3, Remove Access Covers .................................... 10
Step 4, Install 90 ° Elbow ............................................... ] 0
Step 5, Install Power Cord ............................................ ] 1
Step 6, Level Dishwasher. ............................................. ] 1
Step 7, Slide Dishwasher into Opening ....................... ] ]
Step 8, Cmmect _vVater Line ........................................ 11
Step 9, Comaect Drain Line ........................................ 12
Step 10, Cmmect Electrical ......................................... 12
Step ] 1, Position and Level Dishwasher. ..................... 13
Step ] 2, Pre-Test Check List ........................................ 13
Step ] 3, Dishwasher Wet Test ..................................... 13
Step 14, Secure Dishwasher
to Cabinet or Countertop ....................................... 14
Step 15, Install Toekick ................................................ 14
Step 16, Install Side Filler Strips .................................. 15
2
Design Information
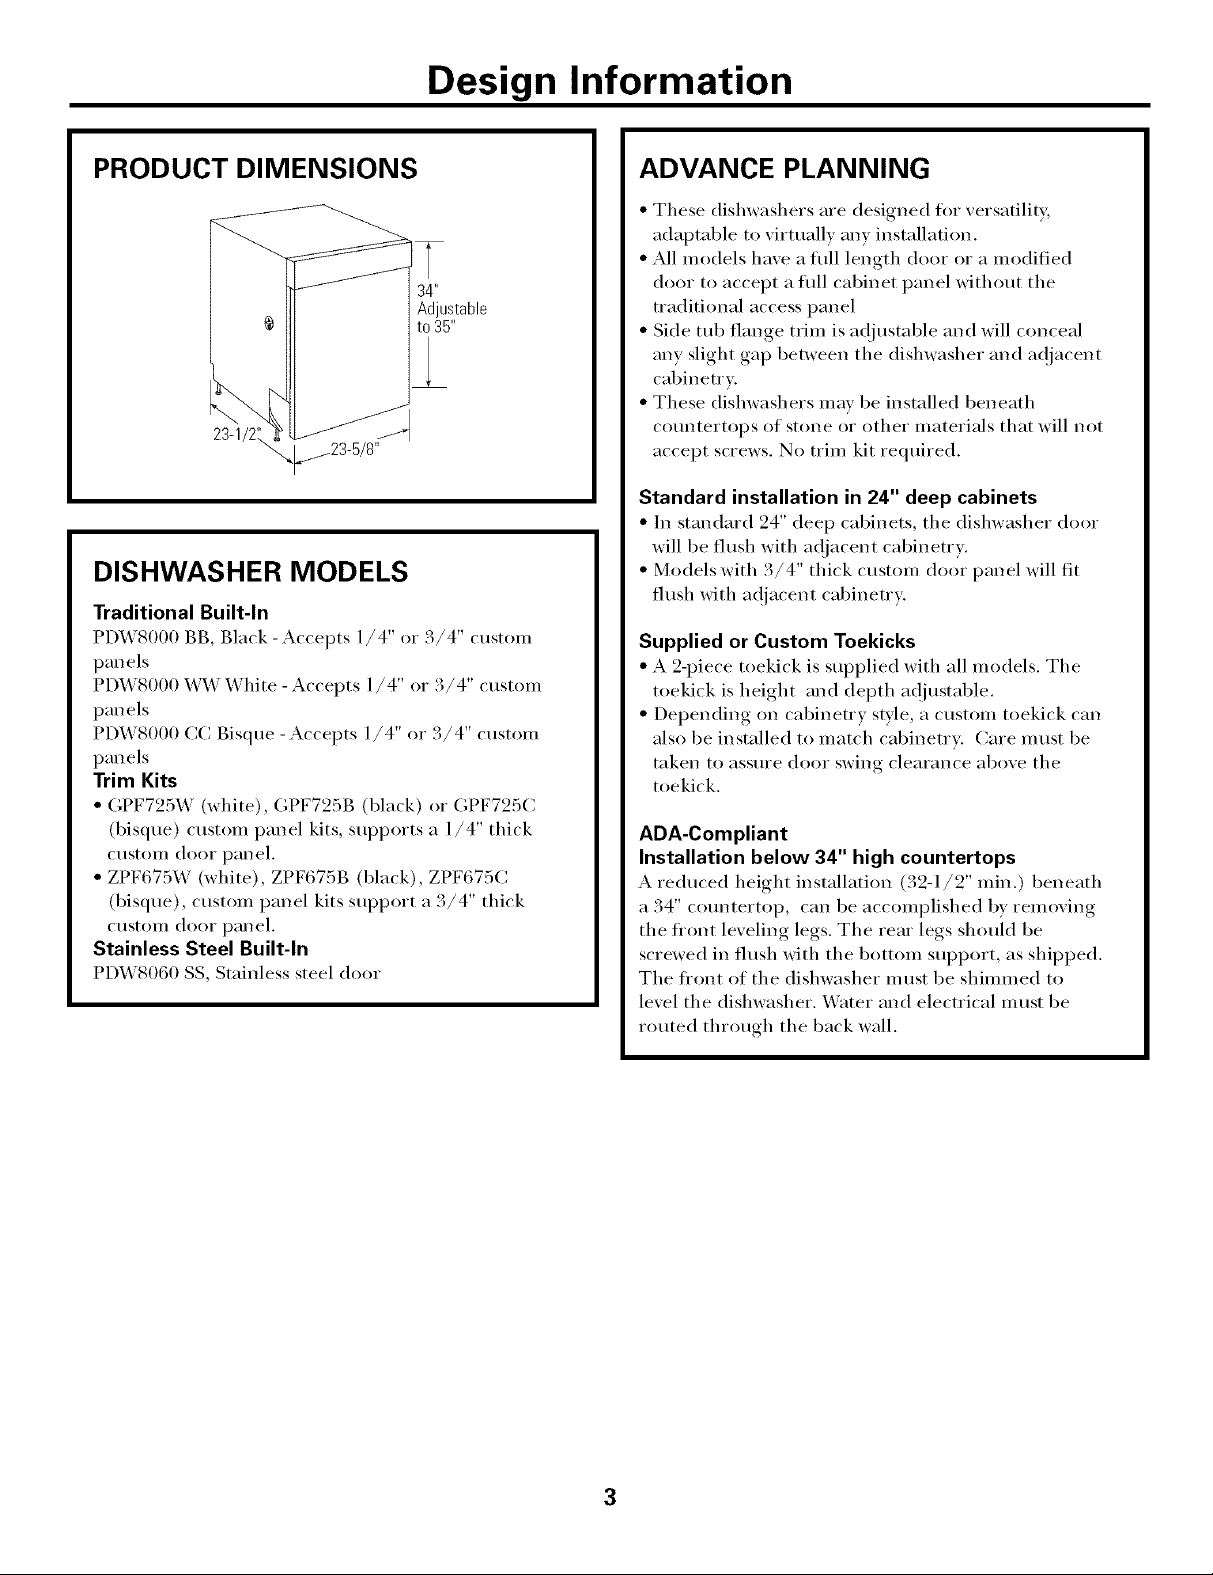
PRODUCT DIMENSIONS
34"
Adjustable
to 35"
DISHWASHER MODELS
Traditional Built-In
PD_V8000 BB, Black- Accepts 1/4" or 3/4" custom
panels
PD_V8000 W_V White -Accepts 1/4" or 3/4" custom
panels
PD_V8000 CC Bisque -Accepts 1/4" oi" 3/4" custom
panels
Trim Kits
• GPF725W (white), GPF725B (black) or GPF725C
(bisque) custon_ panel kits, supports a 1/4" thick
CtlStOlI/ door panel.
• ZPF675W (white), ZPF675B (black), ZPF675C
(bisque), custon_ panel kits support a 3/4" thick
custom door panel.
Stainless Steel Built-In
PD_vV8060 SS, Stainless steel door
ADVANCE PLANNING
• These dishwashers are designed for versatility,
adaptable to virtually any installation.
• All models have a flfll length door or a modified
door to accept a fifll cabinet panel without tile
traditional access panel
• Side tub flange trim is ac!justable and will conceal
any slight gap between tile dishwasher and a(!jacent
cabinetry.
• These dishwashers may be installed beneath
countertops of stone or other materials that will not
accept screws. No trim kit required.
Standard installation in 24" deep cabinets
• In standard 24" deep cabinets, tile dishwasher door
will be flush with ac!jacent cabinetry.
• Models with 3/4" thick custom door panel will tit
flush with ac!jacent cabinetry.
Supplied or Custom Toekicks
• A 2-piece toekick is supplied with all models. Tile
toekick is height and depth a(!justable.
• Depending on cabinetry style, a custoln toekick can
also be installed to match cabinetry. Care must be
taken to assure door swing clearance above tile
toekick.
ADA-Compliant
Installation below 34" high countertops
A reduced height installation (32-1/2" rain.) beneath
a 34" co/mtertop, can be accomplished by removing
the fl'ont leveling legs. The rear legs should be
screwed in flush with the bottom support, as shipped.
Tile fl'ont of tile dishwasher i//tlSt be shimmed to
level tile dishwasher. _v_ater and electrical must be
routed through tile back wall.

Installation Preparation
MATERIALS YOU WILL NEED:
Materials Required for All Installations
[] 90°Elbow (3/8"NPTexternalthread on one end,opposite
end sizedto fit water supply)
Note: Usenew ferrule. Donot use oldparts.
[] Strain relief for electrical connection
[] Thread seal tape
[] UL Listedwire connectors (3)
[] Screwtype hose clamps
Materials For New Installations Only:
[] Air gapfor drain hose, if required
[] Waste tee for house plumbing, if applicable
[] Electrical cable or power cord, if applicable
[] Hand shut-off valve (recommended)
[] Water line 3/8" min.copper or 1/2" min.plastic (plastic
must betested for temperature and pressure)
[] Couplerfor extending drain line, if applicable
@
90° Elbow
ThreadSeal
Tape
WasteTee Valve
Air c°uO_pler
Gap
WireNuts
Shut-Off
©G
Screw Type Clamps
©
StrainRelief
ElectricalCable
or PowerCord
HotWater Line
TOOLS YOU WILL NEED:
Tools Required for All Installations
[] Phillips head and flat blade screwdrivers
[] 3/8", 5/16" and 1/4" nutdrivers
[] Level
[] Carpenters square
[] Measuring tape
[] Safety glasses WireStrippers
[] Flashlight
[] Bucket to catch water when flushing the line
[] Tubing cutter
[] Glovesto protect against sharp edges
[] Wire strippers
For New Installations Only:
[] Drill and appropriate bits
[] Hole saw set
Level
Gloves
FlatBladeScrewdriver
_ PhillipsHead
_z_, Screwdriver
SafetyGlasses _ ,4._,_,,_ _E_ _Uubtit_
NutDriver
+
Square
Hole
SawSet

Installation Preparation
PARTS SUPPLIED:
Remove the hardware accessory bag and other parts
fl'om inside or taped to the outside of the dishwasher.
Check contents against illustrations to ii'Jsure that all
parts are included.
[] 2-piece toekick
[] 6 screws (see illustration)
[] 2 leveling legs
[] Junction boxcover
Junction
BoxCover
with screws
2 Leveling Legs
e_
Screws A Screws B
(2)Countertop (2)Cabinet
Mounting Mounting
Screws Screws
Screws C
(2)Color
Matched
Toekick
Screws
PREPARE DISHWASHER ENCLOSURE
ThisWallArea
mustbeFree/
34"to35" PipesorWires
Underside 1
ofCountertop
toFloor
24"Max
• The rough cabinet opening Inust be at lea.'t 24 deep,
_35 "
2. -,/8 rain. to 24" wide. The height should be 34" rain.
add _"
_)r) Ill}IX,
Note: ADA installation, beneath 34" high countertops may be accom-
plished byremoving front leveling legs. Drain hose, water and
electrical must be routed through the cutout onthe back of the
dishwasher.
• The dishwasher must be installed so that drain hose is
no more than 10 feet in length for proper drainage.
• The dishwasher inust be flfllv enclosed on the top, sides
and back, but should not support any part of the
eI/clostlI'e.
2-PieceToekickwith
SoundInsulation
• The floor inside the opening must be even and level
with the finished floor of the kitchen, If the kitchen
floor is tile, it may be
higher than the floor of
the installation cutout,
Pieces of wood may be
placed into the cutout
floor to make it level or
higher than the room
floor, This will alh)w easy
removal fi)r any flmn'e
service,
CornerInstallation
• When installing into a
corner, allow 2"rain.
J Countertop
clearance between
dishwasher and adjacent
cabinet or wall.
• Allow 24-1/2"min.clearance
Dishwasher
from the front ofthe
dishwasher for door
opening.
, _/2"
/_ Clearancefor Door
/Opening 2" Minimum
5
 Loading...