

GE GDWT106VBB, GDWT106VWW, GLD5604VCC, GLD5664VSS, GLD5604VBB Owner's Manual
...
GEAppliances.com
Safety Instructions ............. 2-s
LLJ
Operating Instructions
Care and Cleaning .................. lS
Control Panel and Settings .......... 6-9
Loading Place Settings .............. 14
Loading the Dishwasher Racks ...... 13
Unicouple ............................ 10
Using the Dishwasher ............ 11, 12
Troubleshooting Tips ......... 16-18
Consumer Support
Consumer Support .................... 24
Warranty ........................... 23
Tall Tub
Dishwashers
Write the model and serial
numbers here:
Model #
Serial #
Youcan find them on the tub wall
just inside thedoor.
TOP CONTROL MODELS
FRONT CONTROL MODELS
49-55077 05-11 GE
IMPORTANT SAFETY INFORMATION
READ ALL INSTRUCTIONS BEFORE USING-
SAVE THESE INSTRUCTIONS
_, WARNING!
For your safety, the information in this manual must be followed to minimize the risk of fire,
explosion, electric shock, and to prevent property damage, personal injury, or death.
_iADVERTENCIA!
Para su seguridad, siga las instrucciones de este manual a fin de minimizar riesgos de incendio,
explosiSn, descargas el_ctricas, y para evitar dafios en su propiedad, lesiones personales o la
muerte.
,_ WARNING! WATER HEATER SAFETY
Under certain conditions,hydrogen gas may be produced in a water heater that hasnot beenused for two or
more weeks.HYDROGENGASISEXPLOSIVE.
Ifthe hot water has not been usedfor two or more weeks, prevent the possibilityof damage or injury by turning
on all hot water faucets and allow them to run for several minutes. Dothis before usingany electrical appliance
connected to the hot water system.Thissimple procedure will allow any built-up hydrogen gas to escape.Since
the gas isflammable, do not smoke, usean open flame, or use the appliance during this process.
""_'_ _, iADVERTENCIA! SEGURIDADDELCALENTADORDEAGUA
Bajo ciertascondiciones,se podrd producir gas de hidr6geno en un calentador de agua que no rue usadopar dos
semanas o mds.ELGASDE HIDROGENOESE×PLOSlVO.
Siel agua caliente no seus6 par dos semanas o mSs,evite la posibilidad de que ocurran da5os o lesiones
abriendo todos losgrifos deagua caliente y dejando que corra agua par varios minutos. Haga esto antes de
usar cualquier artefacto el6ctrico conectado al sistema de agua caliente. Esteprocedimiento simple permitirc_la
sol!do de cuolquier acumulaci6n de gas de hidr6geno. Debido o que el gas es inflomoble, no fume, no use uno
llama abierta ni useel electrodom6stico durante este proceso.
PROPER INSTALLATION AND MAINTENANCE
This dishwasher must be properly installed and located in accordance with the Installation Instructions
before it is used. If you did not receive an Installation Instructions sheet with your dishwasher, you can
receive one by visiting our Website at GEAppliances.com. In Canada, visit www.GEAppliances.ca.
[] Connect the dishwasher/appliance to a grounded
metal,permanent wiring system;or run an
equipment-grounding conductor with the circuit
conductors and connect to the equipment-
grounding terminal or lead of the appliance.
[] Improper connection of the equipment-grounding
conductor can result in a riskof electric shock.Check
with a qualifiedelectrician or servicerepresentative
ifyou are in doubt whether the appliance is properly
grounded.
[] Disposeofdiscarded appliances and shipping
or packing material properly.
[] Donot attempt to repair or replace any part
of your dishwasher unless it isspecifically
recommended in this manual. Allother servicing
should be referred to a qualified technician.
[] To minimizethe possibilityof electric shock,
disconnect this appliance from the power supply
before attempting any maintenance.
NOTE'.Turningthe dishwasher off does not
disconnect the appliance from the power supply.We
recommend having a qualifiedtechnician service
your appliance.

IMPORTANT SAFETY INFORMATION
READ ALL INSTRUCTIONS BEFORE USING-
SAVE THESE INSTRUCTIONS GEApp'°,,ces.co,,
" CAUTION: To prevent minor injury and property damage
• Contentswashed in SANI WASH/SANITIZEmode, if
available, may be hot to the touch. Usecure before
handling.
• Usinga detergent that is
not specifically designed for
dishwashers will cause the
dishwasher to fill with suds.
• Ifyour dishwasher is
connected to a wall switch, ensure that
the switch ison prior to use.
• Ondishwashers with electronic controls,
ifyou choose to turn the wall switch
off between wash cycles,allow 5-10
secondsafter turning the switch on
before touching START/RESETto allow the control to
initialize.
• Non-Dishwure Items: Donot wash items such
as electronic air cleaner filters, furnace filters
and paint brushes in your dishwasher. Damage
to the dishwasher and discoloration or staining
of the dishwasher may result.
• Closesupervision is necessary ifthis appliance
isused by or near children.
• Load light,plastic items sothey do not become
dislodged and drop to the bottom of the
dishwasher-they might come into contact with
the heating element and be damaged.
PRECAUCION: A tin _e evitar lesiones menores y dafios sobre la propiedad
• Loscontenidos lavados en el modo SANIWASH/
SANITIZE(Lavado Desinfectante/ Desinfecci6n},
sieste producto est6 disponible,podrSn estar
calientes al tacto. Tenga
cuidado antes de tomar los
mismos con las manos.
• Eluso de un detergente
que no est6 diseBado
lavavajillas har6 que este Oltimose Ilene
de agua conjab6n.
espec[ficamente para !_
• Siellavavajillasest_ conectado a un
tomacorriente, asegOresede que el
interruptor est6 encendido antes del uso.
• Siellavavajillastiene controles electr6nicos,en
caso de decidir apagar elinterruptor entre ciclos
tM
de lavado, espere entre 5 y 10 segundos luego de
encender el interruptor antes de presionar START/
RESET(Iniciaff Reiniciar)para permitir que el control
se inicie..
• items que no sean Utensilios:Nolave art[culos tales
como filtros electr6nicos de limpieza con aire,filtros
de horno y brochas de pintura en su lavavajillas.Se
podrc_nproducir daBos,descoloraci6n o manchas
sobre el lavavajillas.
• Sedeber(_estarespecialmente atento siel
electrodom6stico es usado por niBoso sise
encuentra cerca de losmismos.
• Cargueartfculos deplSstico livianos,de modo
que no sean desplazadosni caigan al rondo del
lavavajillas- es posible que entren en contacto con
el elemento calentador y sean daBados.
ELECTRICALREQUIREMENTS
• Thisappliance must be supplied with 120V,60 Hz,
and connected to an
individual, properly
grounded branch circuit,
protected bya 15or 20
amp circuit breaker or
time-delay fuse.
• Ifthe electric sup-
ply provided does
not meet the above
Ensurepropergroundexist
beforeuse(portablemodels
only).
specifications, it is recommended that a licensed
electrician install an approved outlet.
• Yourdishwasher circuit should not be used for
any other appliance while the dishwasher is in
operation as the dishwasher requires the full
capacity of the circuit.
imlf the wall receptacle you plug the dishwasher's
power cord into iscontrolled by a switch, turn on
the switch.
IMPORTANT SAFETY INFORMATION
READ ALL INSTRUCTIONS BEFORE USING-
SAVE THESEINSTRUCTIONS
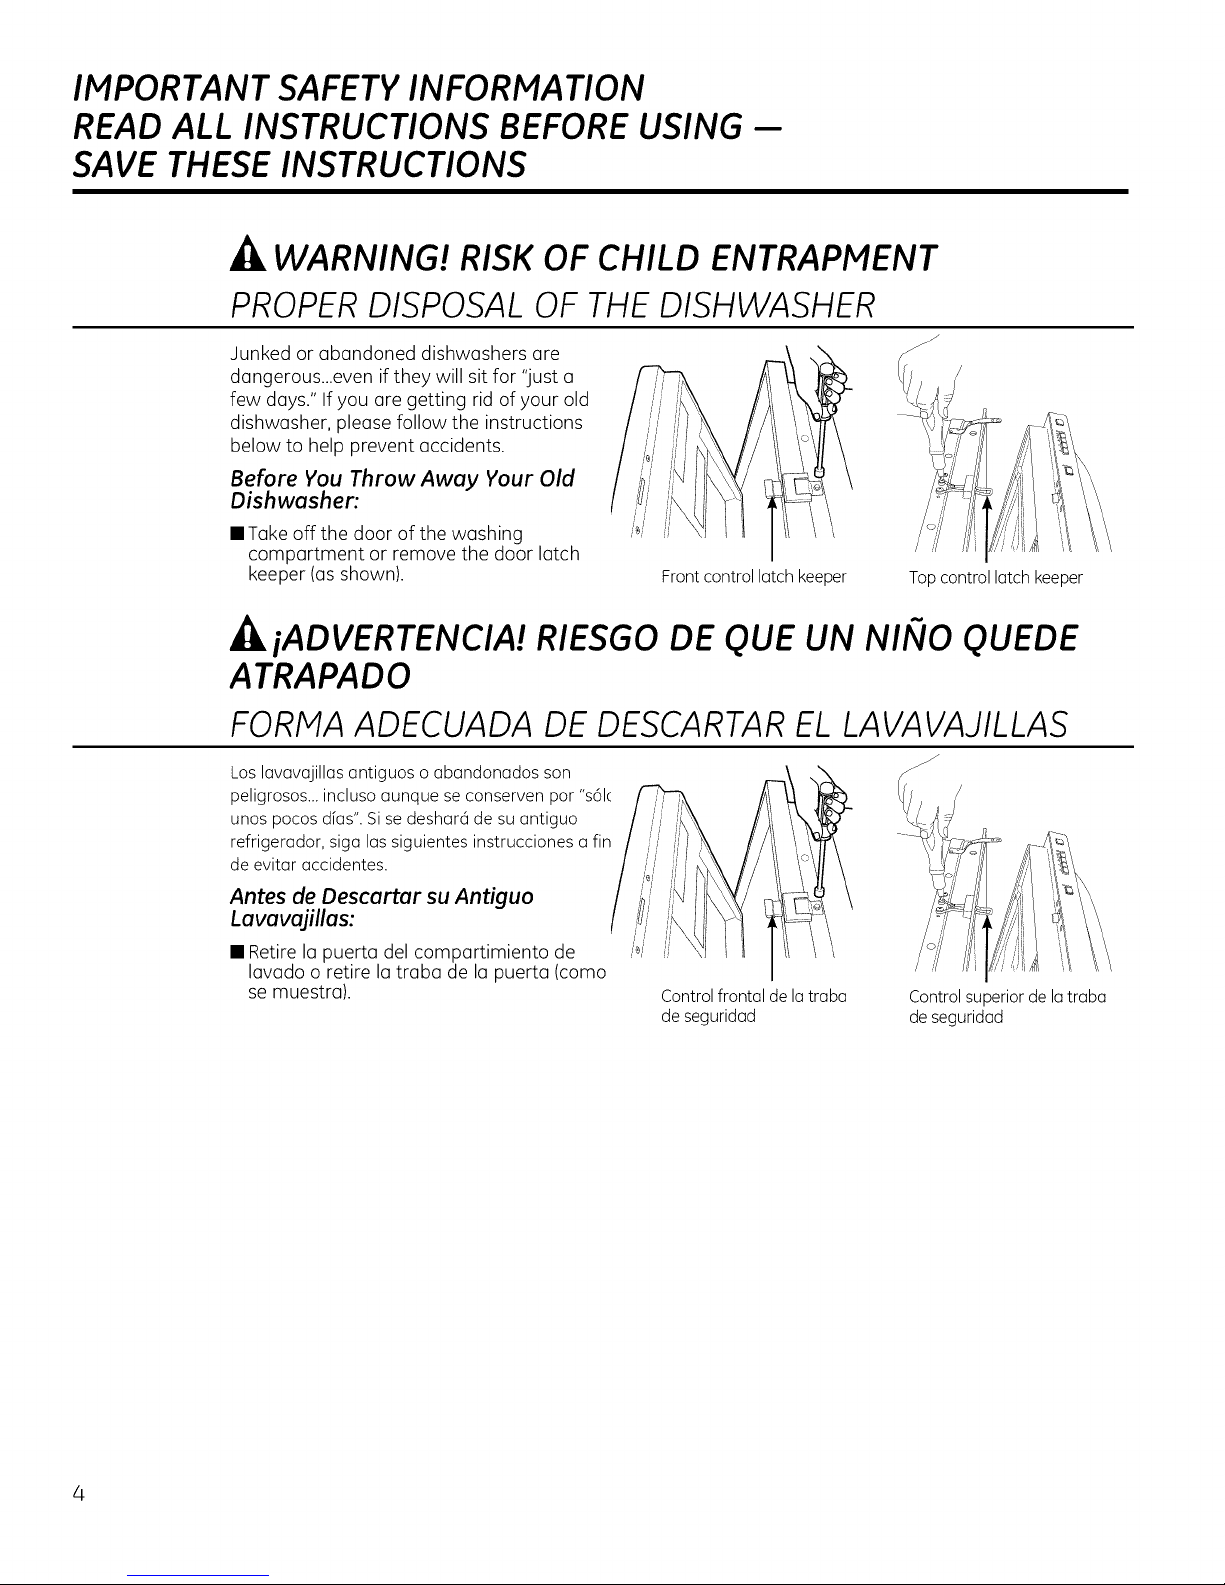
WARNING! RISK OF CHILD ENTRAPMENT
PROPER DISPOSAL OF THE DISHWASHER
Junked or abandoned dishwashers (]re
dangerous...even if they will sit for "just a
few doys." If you (]re getting rid of your old
dishwasher, please follow the instructions
below to help prevent accidents.
Before You Throw Away Your Old
Dishwasher:
• Takeoff the door of the washing
compartment or remove the door latch
keeper (as shown).
Front control latch keeper
iADVERTENCIA! RIESGO DE QUE UN NINO QUEDE
ATRAPADO
Topcontrol latch keeper
FORMA ADECUADA DE DESCARTAR EL LAVAVAJILLAS
Los lavavajillas antiguos o abandonados son
peligrosos.., incluso aunque seconserven por "s61(
unos pocos dfas". Si se deshara de su antiguo
refrigerador, siga las siguientes instrucciones a fin
de evitar accidentes.
Antes de Descartar su Antiguo
Lavavajillas:
• Retire la puerta del compartimiento de
lavado o retire la traba de la puerta (como
se muestra).
Control frontal de la traba
de seguridad
Control superior de la traba
de seguridad
IMPORTANT SAFETY INFORMATION
READ ALL INSTRUCTIONS BEFORE USING-
SAVE THESE INSTRUCTIONS GEApplionces.com
...A WARNING! When using your dishwasher, follow basic precautions.
• Usethisappliance only for its intended purpose •
usdescribed in this Owner'sManual.
• Use only powder, Cascade ®Complete Action Packs, •
liquid detergentsor rinseagents recommendedfor •
usein u dishwasherand keepthem out of the reach
of children.Cascade®and Cascade®Complete •
Automatic DishwashingDetergents,andCascade
Crystal Clearerinseagents have beenapproved for
usein all GEdishwashers. •
• Locatesharpitems sothat they are not likelyto
damage the door seal.
• Loadsharp kniveswith the handlesupto reduce the •
risk ofcut-type injuries.
• Donotwash plasticitems unlessmarked dishwasher
safe or the equivalent.For plasticitemsnot so marked, •
checkthe manufacturer's recommendations.
• Donottouch the heating element during or
immediately after use.
iADVERTENCIA!
• Useesteelectrodom6sticos61opar(]suprop6sito
original,como se describeen el Manual del Propietario.
• Use s61opolvo, Paquetes de Acci6n Completa
de Cascade@, detergentes Ifquidos o ogentes de
enjuogue recomendodos p(]ro uso en un Iovovojillos,
y monteng(] los mismos fuer(] del (]lconce de los
niflos. Los Detergentes poro L(]vodoen Lovovojillos
Autom6ticos Cascade@ y Cascade@ Complete, y
los ogentes de enjuogue de Cascade Crystal Clear@
fueron oprobodos por su uso en todos los Iovovojillos
deGE
• Ubique (]rticulos puntiogudos de modo que no h(]yo
posibilidudesde duflos sobreelsellodorde Io puertu.
• Ubiqueartfculos puntiagudos de modo que no hayu
posibilidudesde d(]flossobre el selludorde la puerto.
• Nolaveartfculosde pl(_stico,o menosquefigure que
sonseguros par(] uso en Iovovojilloso una indicoci6n
equivolente.Sise trot(] de artfculos de pl6stico
que no cuenton con dicha indicoci6n,consulte los
recomendocionesdel fobriconte.
• Notoque elelemento de colefacci6n duronte o
inmediotomente despu6sdel uso.
including the following:
Donot operateyour dishwasherunlessall enclosure
panelsare properlyin place.
Donot tamper with controls.
Donot abuse,sit on or stand on the door or dish rack
ofthe dishwasher.
Donot allow childrento play around the dishwasher
when openingor closingthe door dueto the possibility
ofsmall fingers being pinched inthe door.
Donot discard a dishwasher without first removing
the door of thewashing compartment or the latch
keeper.
Donot store or use combustible materials,gasolineor
otherflammable vapors and liquidsin the vicinity of
this or any other appliance.
Donot allow childrento play with, on or insidethis or
anydiscarded appliance.
AI usar su lavavajillas, siga las precauciones b6sicas,
incluyendo Io siguiente:
• Notoque el elemento de colefacci6n duronte o
inmediotamente despu6sdel uso.
• Notoque el elemento de colefacci6n duronte o
inmediatomente despu6sdel uso.
• Noabuse,no se siente ni separe sobrelu puerto o Io
bundejo del platodel Iovovajillas.
• Nopermit(] que losniflosjueguen olrededor del
Iovovojillosal abrir o cerrar Io puerto,debido o
Ioposibilidadde que sus dedospequeflos seon
presionodoscontro lu puerta.
• Nopermit(] que losniflosjueguen olrededor del
Iovavojillasal abrir o cerrar Io puerta,debido a
la posibilidadde que sus dedospequeflossean
presionadoscontra Iopuerta.
• Noguarde niusemateriales combustibles,gasolina u
otrosvapores inflamoblesy Ifquidoscerca de _ste ni
de otros electrodom_sticos.
• Noguarde niusemateriales combustibles,gasolina u
otrosvapores inflamoblesy Ifquidoscerca de _ste ni
de otros electrodom_sticos.
READAND FOLLOW THISSAFETYINFORMATIONCAREFULLY'.
SAVE THESE INSTRUCTIONS

About the dishwasher control panel.
Front Control Models Only. For top control models see Top Control Models Only section.
m
® SANmZED
R,NS_ " Cgcles
ONLY .... •
"__ U'_Y_ADC_,O.T'I " .... .
11
Front Control Settings
R tatus Indicator Lights
TheStatus display tellsyou what's happening while the dishwasher is in operation and may flash, indicating
a malfunction. The lights will come ON indicating the sequence of operation the dishwasher is in.
CLEAN
SANITIZED
B Cycles
The light above the selected pad willbe ON to indicate which cycle has been selected.
SANI WASH
(on some
models)
POTS & PANS
or HEAVY
WASH (onsome
models)
Displayed when a wash cycle is complete. The light stays ON as a reminder that
the dishes are clean. Openingthe door or pressingany keywhile the door isclosedand
latchedwill turn off the light.
Displayedat the end of the cyclewhen SAN!WASHhas been selected and the dishwasher
has met the requirements for sanitization. SeeSAN! WASH,below,for complete cycle
description. Opening the door or pressing any key while the door isclosed and latched will
turn off the light.
7.5-8.8 gal., 50-135 min.
This cycle raises the water temperature in the final rinse to sanitize your dishware.
The cycle length will vary depending on the temperature of your inlet water.
NOTE:The SANI WASHcycle is monitored for sanitization requirements. If the
cycle is interrupted during or after the main wash portion or if the incoming water
temperature is so low that adequate water heating cannot be achieved, the sanitizing
conditions may not be met. In these cases, the Sanitized light will not illuminate at the
end of the cycle.
NOTE:NSFcertified residentialdishwashersare not intended for licensedfood establishments.
8.8 gal., 88 min.
This cycle is meant for heavily soiled dishes or cookware with dried-on or baked-
on soils. Everyday dishes are safe to be used in this cycle.
2 4 8
L_ .tu.Lj
bTO
Options
e
R
m
CLEAN
o
NORMAL WASH
LIGHTWASH 7.6 gal., 46 min.
(onsome models) This cycle is for light to medium soiled dishes.
CHINA CRYSTAL6.3 gal., 41 min.
(onsome models) This cycle is for lightly soiled china and crystal.
RINSEONLY 1.2 gal., 7 min.
(on some For rinsing partial loads that will be washed later. Do not use detergent with this cycle.
models)
NOTE:Only the SANI WASHcycle has been designed to meet the requirements of Section 6, NSF184
for soil removal and sanitization efficacy.
3.3 gal., 54 min..
This cycle is meant for normal every day soil levels and is designed to conserve both
water and energy. NOTE:NORMAL WASHwas used to rate the energy efficiency of
this dishwasher.
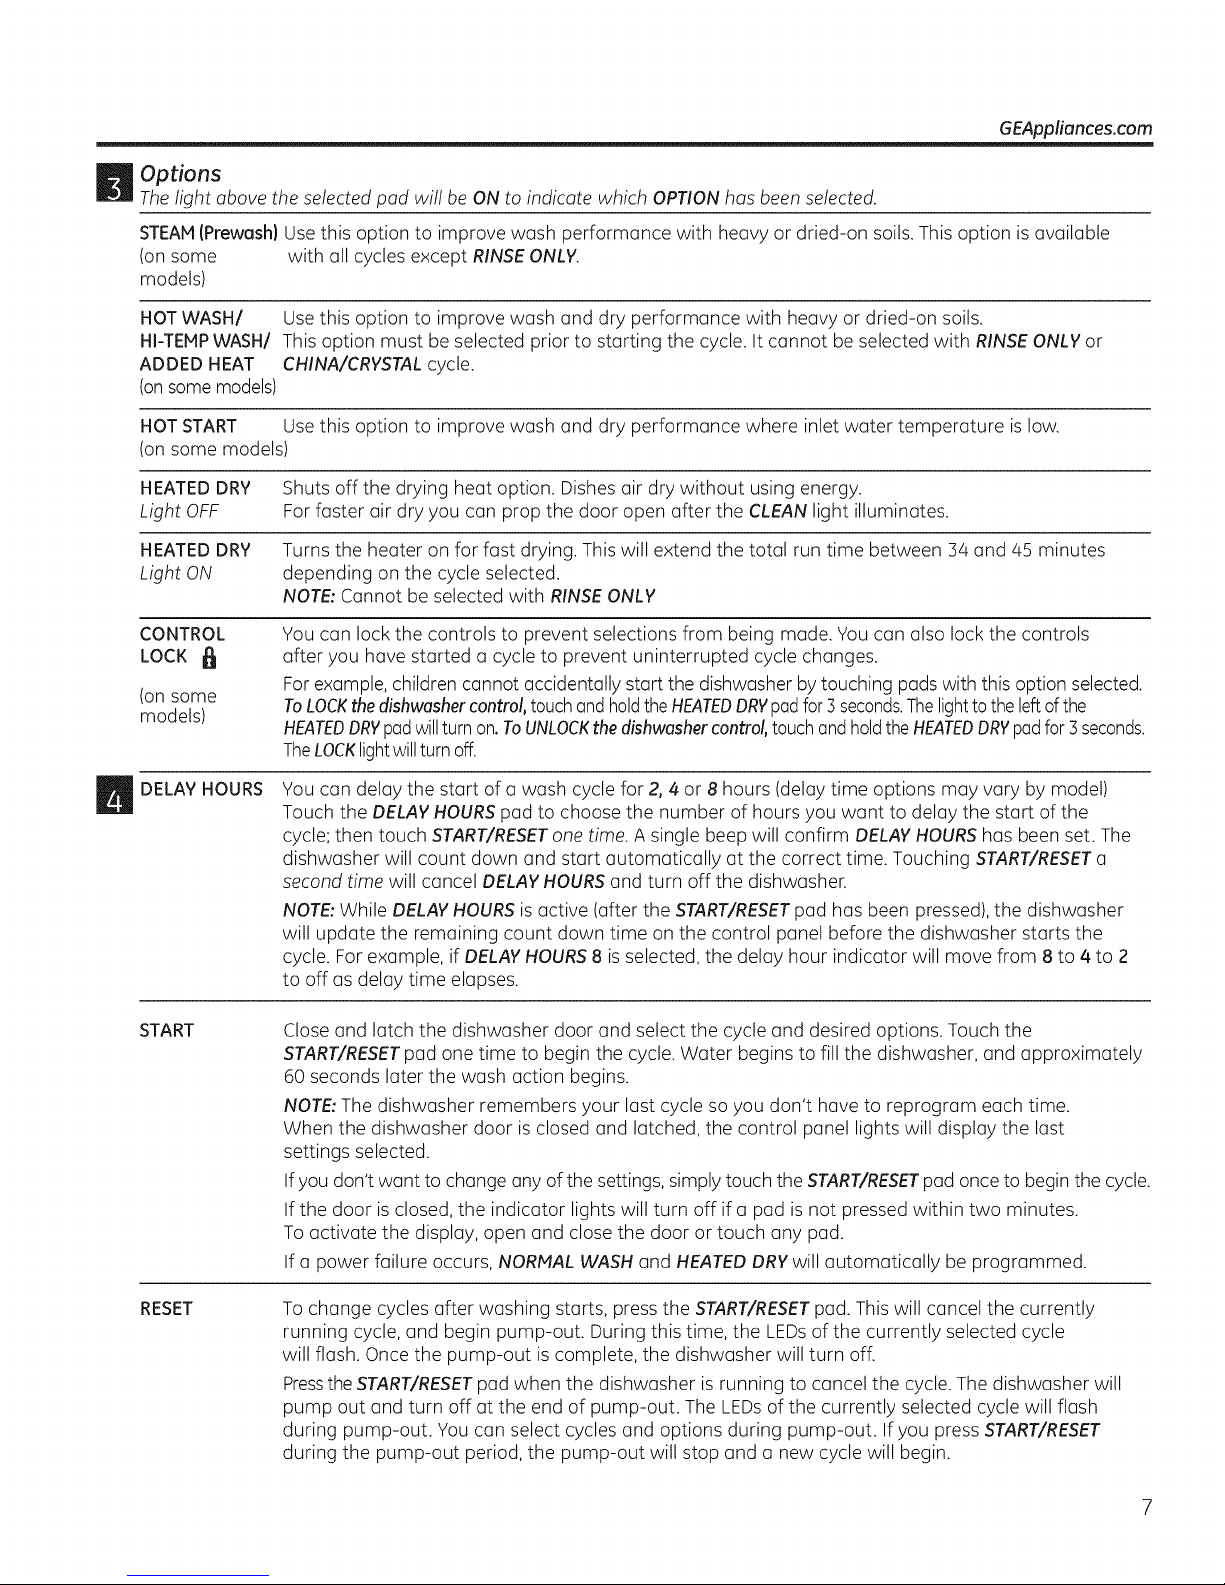
_t_ Options
The light above the selected pad will be ON to indicate which OPTION has been selected.
STEAM(Prewash) Use this option to improve wash performance with heavy or dried-on soils. This option is available
(on some with all cycles except RINSE ONLY.
models)
HOTWASH/ Use this option to improve wash and dry performance with heavy or dried-on soils.
HI-TEHPWASH/ This option must be selected prior to starting the cycle. It cannot be selected with RINSE ONLY or
ADDED HEAT CHINA/CRYSTAL cycle.
(on some models)
HOT START Use this option to improve wash and dry performance where inlet water temperature is low.
(on some models)
HEATED DRY Shuts off the drying heat option. Dishes air dry without using energy.
Light OFF Forfaster air dry you can prop the door open after the CLEAN light illuminates.
HEATEDDRY Turns the heater on for fast drying. This will extend the total run time between 54 and 45 minutes
Light ON depending on the cycle selected.
NOTE:Cannot be selected with RINSEONLY
GEAppliances.com
CONTROL
LOCK
(on some
models)
DELAY HOURS
START
You can lock the controls to prevent selections from being made. You can also lock the controls
after you have started u cycle to prevent uninterrupted cycle changes.
Forexample, children cannot accidentally start the dishwasher by touching pads with this option selected.
ToLOCKthedishwashercontrol,touchandholdthe HEATEDDRYpadfor3 seconds.Thelightto theleftof the
HEATEDDRYpadwillturnon.ToUNLOCKthedishwashercontrol,touchand holdthe HEATEDDRYpadfor3seconds.
TheLOCKlightwillturnoff.
You can delay the start of a wash cycle for 2, 4 or 8 hours (delay time options may vary by model)
Touch the DELAYHOURSpad to choose the number of hours you want to delay the start of the
cycle; then touch START/RESETone time. A single beep will confirm DELAYHOURShas been set. The
dishwasher will count down and start automatically at the correct time. Touching START/RESETa
second time will cancel DELAYHOURSand turn off the dishwasher.
NOTE:While DELAYHOURSis active (after the START/RESETpad has been pressed),the dishwasher
will update the remaining count down time on the control panel before the dishwasher starts the
cycle. For example, if DELAYHOURS8 is selected, the delay hour indicator will move from 8 to 4 to 2
to off as delay time elapses.
Close and latch the dishwasher door and select the cycle and desired options. Touch the
START/RESETpad one time to begin the cycle. Water begins to fill the dishwasher, and approximately
60 seconds later the wash action begins.
NOTE:The dishwasher remembers your last cycle so you don't have to reprogram each time.
When the dishwasher door is closed and latched, the control panel lights will display the last
settings selected.
If you don't want to change any of the settings, simply touch the START/RESETpad once to begin the cycle.
If the door is closed, the indicator lights will turn off if a pad is not pressed within two minutes.
To activate the display, open and close the door or touch any pad.
If a power failure occurs, NORMAL WASH and HEATEDDRY will automatically be programmed.
RESET
To change cycles after washing starts, press the START/RESETpad. This will cancel the currently
running cycle, and begin pump-out. During this time, the LEDsof the currently selected cycle
will flash. Once the pump-out is complete, the dishwasher will turn off.
Pressthe START/RESETpad when the dishwasher is running to cancel the cycle. The dishwasher will
pump out and turn off at the end of pump-out. The LEDsof the currently selected cycle will flash
during pump-out. You can select cycles and options during pump-out. If you press START/RESET
during the pump-out period, the pump-out will stop and a new cycle will begin.
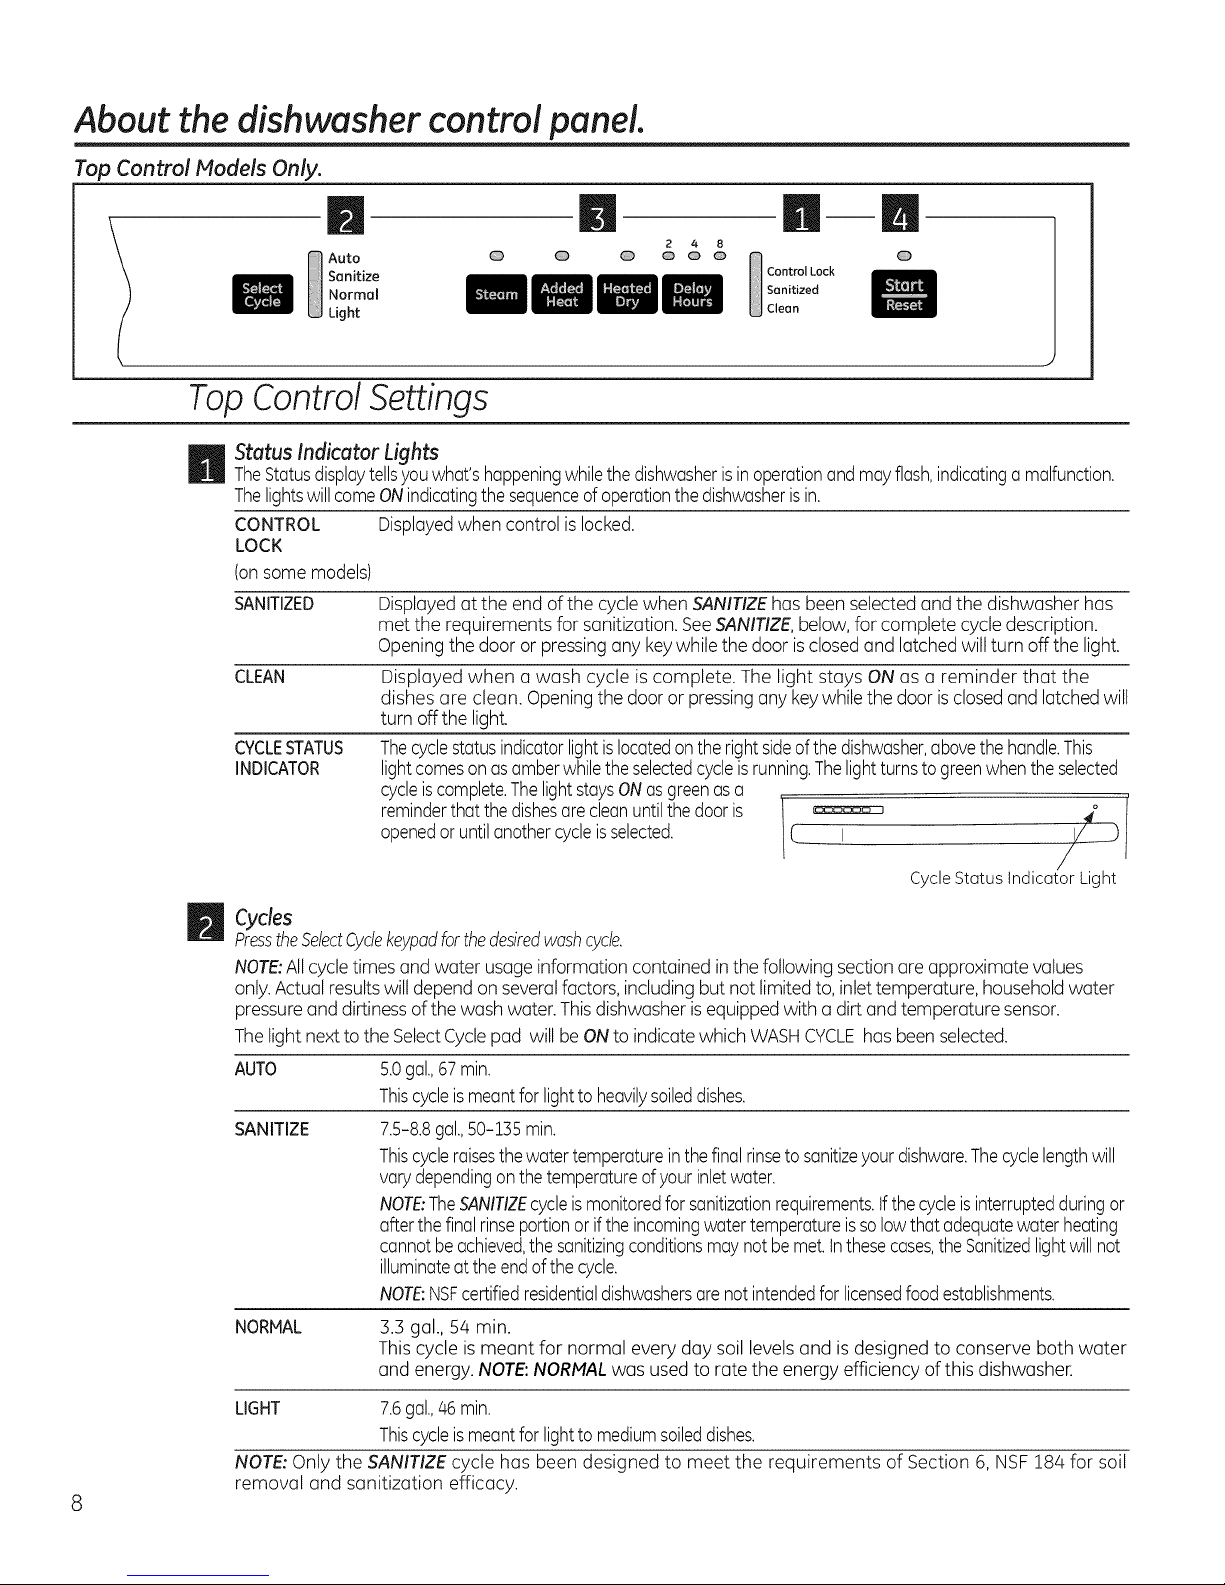
About the dishwasher control panel.
Top Control Models Only.
B
Auto
Sanitize
Normal
Light
\ J
@ @ @ @ @ @
2 4 8
ini--m
Control Lock
Sanitized
Clean
@
TopControlSettings
_ tatus Indicator Lights
TheStatusdisplaytellsyouwhat'shappeningwhilethe dishwasheris inoperationandmayflash,indicatingamalfunction.
ThelightswillcomeONindicatingthesequenceofoperationthedishwasherisin.
CONTROL Displayedwhen control islocked.
LOCK
(onsome models)
SANITIZED Displayedat the end of the cyclewhen SANITIZEhas been selected and the dishwasher has
met the requirements for sanitization. SeeSANITIZE,below,for complete cycledescription.
Openingthe door or pressingany keywhile the door isclosedand latched will turn off the light.
CLEAN Displayed when a wash cycle is complete. The light stays ON as a reminder that the
dishes are clean. Openingthe door or pressingany keywhile the door isclosedand latchedwill
turn off the light.
CYCLESTATUS Thecyclestatusindicatorlightislocatedonthe rightsideofthe dishwasher,abovethehandle.This
INDICATOR lightcomesonasamberwhiletheselectedcycleisrunning.Thelightturnstogreenwhentheselected
cycleiscomplete.ThelightstaysONasgreenasa
reminderthatthe dishesarecleanuntilthe dooris I _ 2
openedoruntilanothercycleisselected. 1[. I
r
CycleStatusIndicatorLight
7
Cycles
PresstheSelectCydekeypadforthedesiredwashcycle.
NOTE:Allcycletimes and water usageinformation contained in the following section are approximate values
only.Actual resultswill depend on severalfactors, including but not limited to, inlettemperature, householdwater
pressureand dirtinessof the wash water. Thisdishwasher isequippedwith a dirtand temperature sensor.
Thelight nextto the SelectCyclepad will be ONto indicate which WASHCYCLEhas beenselected.
AUTO S.0gal.,67min.
Thiscycleismeantforlightto heavilysoileddishes.
SANITIZE
NORMAL 3.3 gal., 54 min.
LIGHT 7.6gal.,46min.
NOTE:Only the SANITIZEcycle has been designed to meet the requirements of Section 6, NSF184 for soil
removal and sanitization efficacy.
8
7.5-8.8gal.,50-1% min.
Thiscycleraisesthewatertemperaturein thefinalrinsetosanitizeyourdishware.Thecyclelengthwill
varydependingonthetemperatureofyourinletwater.
NOTE:TheSANITIZEcycleismonitoredfor sanitizationrequirements,if thecycleisinterruptedduringor
afterthefinal rinseportionorifthe incomingwatertemperatureisso lowthatadequatewaterheating
cannotbeachieved,the sanitizingconditionsmaynotbemet.tnthesecases,the Sanitizedlightwillnot
illuminateattheendof thecycle.
NOTE:NSFcertifiedresidentialdishwashersarenotintendedfor licensedfoodestablishments.
This cycle is meant for normal every day soil levels and isdesigned to conserve both water
and energy. NOTE:NORMALwas used to rate the energy efficiency of this dishwasher.
Thiscycleismeantforlightto mediumsoileddishes.
 Loading...