

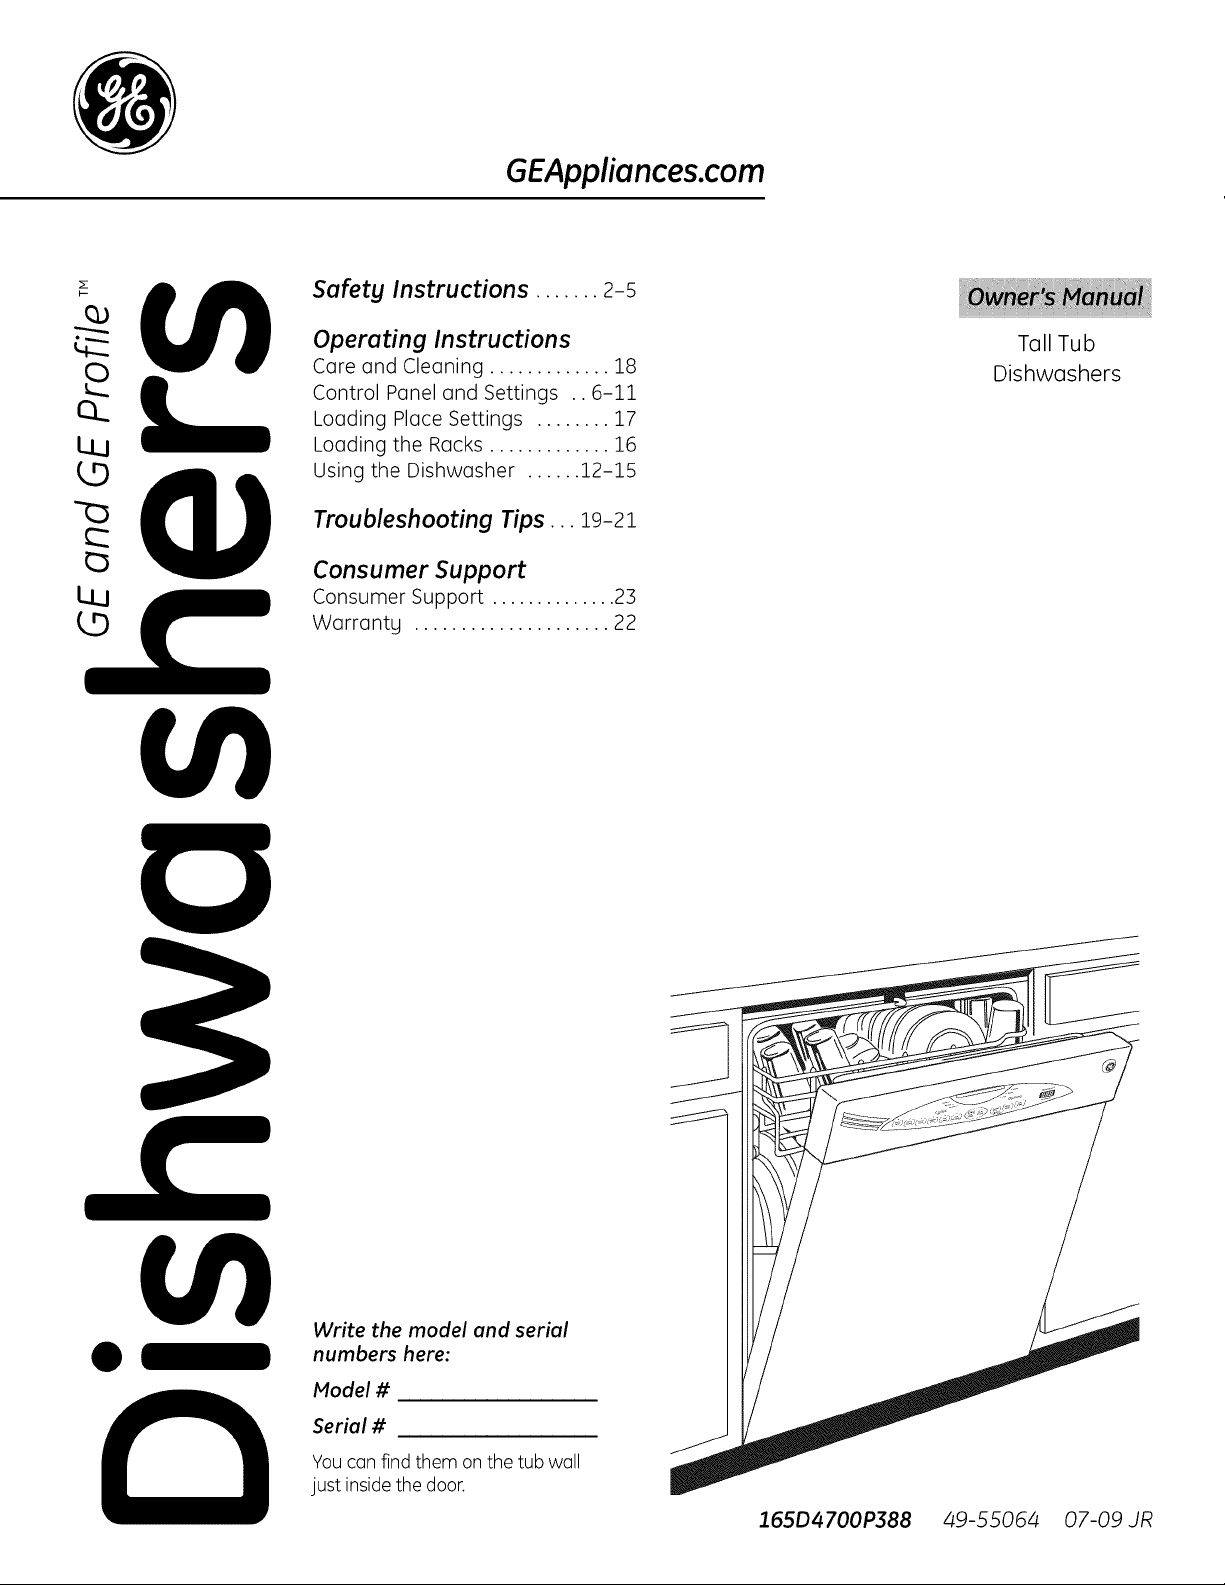
GE PDW7880R10SS, PDW7800R30WW, PDW7800R30CC, PDW7800R30BB, PDW7800R10WW Owner’s Manual
...
GEAppliances.com
Safetg Instructions ....... 2-s
0
LS.j
_3
Operating Instructions
Care and Cleaning ............. 18
Control Panel and Settings .. 6 j 1 1
Loading Place Settings ........ 17
Loading the Racks ............. 16
Using the Dishwasher ...... 12j 1_
Troubleshooting Tips... 19-21
Consumer Support
Consumer Support .............. 23
Warrantg ..................... 22
Tall Tub
Dishwashers
Write the model and serial
numbers here:
Model #
Serial #
Youcan find them onthe tub wall
just insidethe door.
165D4700P388 49-55064 07-09 JR
IMPORTANT SAFETY INFORMATION
READ ALL INSTRUCTIONS BEFORE USING --
SAVE THESE INSTRUCTIONS
WARNING!
For your safety, the information in this manual must be followed to minimize the risk of fire,
explosion, electric shock, and to prevent property damage, personal injury, or death.
WARNING! WATER HEATER SAFETY
Undercertain conditions, hydrogengas may be producedin a water heater that hasnot beenusedfor two
or more weeks. HYDROGENGAS ISEXPLOSIVE.
If the hot water has not been used for two or more weeks, prevent the possibility of damage or injury
by turning on all hot water faucets and allow them to runfor severalminutes. Do this before using any
electrical appliance connected to the hot water system.Thissimple procedure will allow any built-up
hydrogen gas to escape. Sincethe gas is flammable, do not smoke,usean open flame, or use the appliance
during this process.
PROPER INSTALLATION AND MAINTENANCE
This dishwasher must be properly installed and located in accordance with the Installation Instructions
%
before it is used. If you did not receive an Installation Instructions sheet with your dishwasher, you can
receive one by visiting our Website at GEAppliances.com. In Canada, visit www.GEAppliances.ca.
• Connect the dishwasher/appliance to a grounded
metal, permanent wiring system; or run an
equipment-grounding conductor with the circuit
conductors and connect to the equipment-
grounding terminal orlead of the appliance.
• Improperconnection ofthe equipment-grounding
conductor can result in a riskof electric shock.
Checkwith a qualifiedelectrician or service
representative ifyou are in doubt whether the
appliance is properly grounded.
• Disposeof discarded appliances and shipping
or packing material properly.
• Donot attempt to repair or replaceany part
of your dishwasher unlessit isspecifically
recommended in this manual. Allother servicing
should be referredto a qualified technician.
• To minimizethe possibility of electric shock,
disconnect this appliance from the power supply
beforeattempting any maintenance.
NOTE:Turningthe dishwasher off doesnot
disconnecttheappliancefrom thepower supply.
Werecommend having o qualifiedtechnician
serviceyour appliance.
CAUTION: To prevent minor injury and property damage
• Contents washed in Anti-bacterial mode, if
available,may be hot to the touch. Usecare
before handling.
• Usinga detergent that isnot
specifically designed for
dishwashers will cause the
dishwasherto fill with suds.
• If your dishwasher is connected to a wall
switch,ensure that the switch isonprior
to use.
• On dishwasherswith electronic controls,
if you choose to turn the wall switch
off between wash cycles,allow 5-10 seconds after
turning the switch on beforetouching START/RESET
to allow the control to initialize.
2
Lt
• Non-Dishware Items:Donot wash items such
aselectronic air cleanerfilters, furnace filters
and paint brushes inyour dishwasher.Damage
to the dishwasher and discoloration or staining
of the dishwasher may result.
• Closesupervisionisnecessary ifthis appliance
isused by or near children.
• Load light, plastic items sothey do not become
dislodgedand drop to the bottom of the
dishwasher-they might come into contact with
the heating element and be damaged.
INFORMACION IMPORTANTEDESEGURIDAD
LEA TODASLASINSTRUCCIONESANTESDE USAR--
GUARDEESTASINSTRUCCIONES
iADVERTENCIA!
Para su seguridad, debe cumplirse con la informaciSn de este manual a fin de minimizar
el riesgo de incendio o explosi6n, descarga el_ctrica o para prevenir dafios a la propiedad,
lesiones personales o la muerte.
iADVERTENCIA! SEGURIDAD DEL CALENTADOR DE AGUA
Bojo ciertascondiciones,puedeproducirse gas de hidr6geno en un calentador de agua que no se ha usado
durante dossemanas o rods. ELGASDE HIDROGENOESEXPLOSIVO,
Siel agua caliente no se ha utilizado pardos semanas o m6s, evite la posibilidad de daflos o lesiones
abriendo todos losgrifos de agua caliente g dej6ndolas correr durante varios minutos. Haga esto antes
de utilizar cualquier aparato el_ctrico que seencuentre conectado al sistema de agua caliente. Estesimple
procedimiento permitir6 que se liberecualquier clase de acumulaci6n de gasde hidr6geno.Yaque el gas
es inflamable, no fume o utilice una llama abierta o un aparato durante esteproceso.
INSTALACION VMANTENIMIENTO ADECUADOS
Este lavaplatos debe instalarse de manera adecuada g ubicarse de acuerdo con los Instrucciones de
%
Instalaci6n antes de comenzar el usa. Si usted no ha recibido una pdgina de Instrucciones de instalaci6n
con su lavaplatos, puede obtener una visitando nuestro sitio Web en GEApplionces.com.
• Conecte el lavaplatos/aparato a unsistema
de cableado permanente con conexi6n a tierra
o debe utilizarseun conductor de conexi6n atierra
del equipamiento con losconductores de circuito,
g debe conectarse a la terminal de conexi6n
a tierra o conductor delaparato.
• Unaconexi6n inadecuada del conductor de
conexi6n a tierra de equipo puede provocar
un riesgodedescargael_ctrica.Consulteaun
electricista calificado o representante de servicio
t_cnico si tiene dudas sabrela correcta conexi6n
a tierra del aparato.
• Eliminelosaparatos que no va a utilizar m6s g el
material de empaque o endo coma corresponde.
GEAppliances.com
• Nointente reparar o cambiar ningunapiezade
su lavaplatos a menos que est_ especificamente
recomendado en este manual. Cualquier otro
serviciodebe realizarloun tOcnicocalificado.
• Paraminimizar la posibilidad de una descarga
el@ctrica,desconecte este aparato de la fuente
de energfaantes de realizarcualquierclasede
mantenimiento.
NOTA:Apagarel lavaplatosno desconectael
aparoto delsuministro deenergia.Recomendamos
que un tdcnicocolificodorealiceel serviciotdcnico
de suaparoto.
PRECAUCION: Para evitar lesiones menores g dafios a la propiedad
• Loselementos lavados en el modo anti-bacterial,
si se encuentra disponible,pueden quedar
calientes al tacto. Tenga cuidado antes de
tocarlos.
• Utilizarun detergente no
dise5ado espedficamente
para lavaplatos provocar(i
que el aparato se Ilene
• Sisu lavaplatos seencuentra conectado
a un interruptor de pared,verifique que
de espuma. __
el interruptor seencuentre encendido
antes del usa.
• Enlavaplatos con controles electr6nicos,siusted
elUeapagar el interruptor de pared entre ciclos
de lavado,deje pasar 5-10 segundos despu@sde
encender el interruptor antes de presionar
START/RESETpara permitir que el control seinicie.
• Elementosno aptos para lavaplatos: No lave
elementos coma filtros de limpiadores de aire
electr6nicos,filtros de hornos g pincelesde pintura
en sulavaplatos. Puedenproducirse danos en el
lavaplatos g decoloraci6n o manchas en el
aparato.
• Se requiere una supervisi6nestricta cuando
cualquier aparato esutilizado par ninos o en
su cercanfa.
• Cargue elementos livianos y pl6sticos de modo
que no se desplacen g caigan al rondo del
lavaplatos, ga que pueden entrar en contacto con
el elemento calentador g da_arse.
IMPORTANT SAFETY INFORMATION
READ ALL INSTRUCTIONS BEFORE USING-
SAVE THESE INSTRUCTIONS
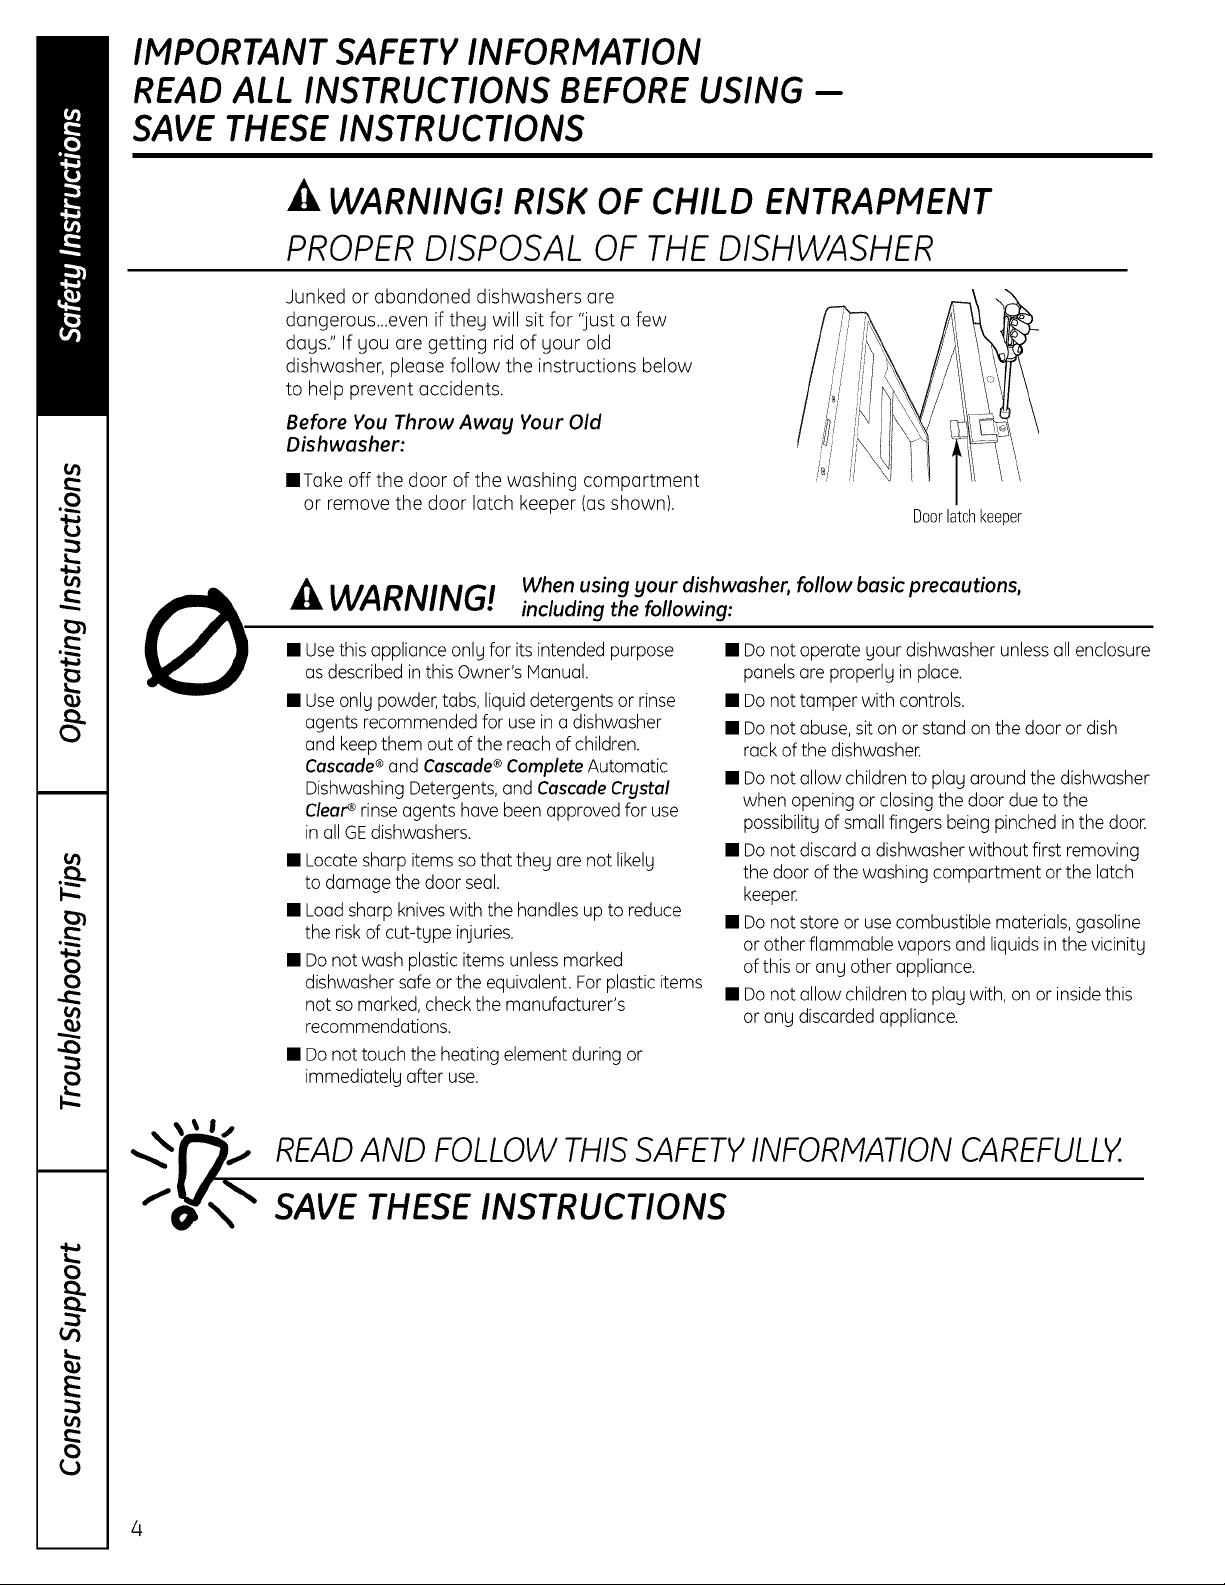
ik WARNING! RISK OF CHILD ENTRAPMENT
PROPER DISPOSAL OF THE DISHWASHER
Junked or abandoned dishwashers are
dangerous...even if they will sit for "just a few
days." If you are getting rid of your old
dishwasher, please follow the instructions below
to help prevent accidents.
Before You Throw Awag Your Old
Dishwasher:
• Take off the door of the washing compartment
or remove the door latch keeper (as shown).
Doorlatchkeeper
_kWARNING! When using your dishwasher, follow basic precautions,
• Use this appliance only for its intended purpose
as described in this Owner's Manual.
• Use only powder, tabs, liquid detergents or rinse
agents recommended for use in a dishwasher
and keep them out of the reach of children.
Cascade ®and Cascade ®Complete Automatic
Dishwashing Detergents, and Cascade Crystal
Clear ¢ rinse agents have been approved for use
in all GE dishwashers.
• Locate sharp items so that they are not likely
to damage the door seal.
• Load sharp knives with the handles up to reduce
the risk of cut-type injuries.
• Do not wash plastic items unless marked
dishwasher safe or the equivalent. For plastic items
not so marked, check the manufacturer's
recommendations.
• Do not touch the heating element during or
immediately after use.
including the following:
• Do not operate your dishwasher unless all enclosure
panels are properly in place.
• Do not tamper with controls.
• Do not abuse, sit on or stand on the door or dish
rack of the dishwasher.
• Donot allow children to play around the dishwasher
when opening or closingthe door dueto the
possibility ofsmallfingersbeing pinchedinthe door.
• Donot discard a dishwasherwithout first removing
the door of the washing compartment or the latch
keeper.
• Donot store or usecombustible materials,gasoline
or other flammable vapors and liquidsin the vicinity
of this or any otherappliance.
• Donot allow children to play with, on or insidethis
or any discardedappliance.
READAND FOLLOWTHISSAFETYINFORMATIONCAREFULLY
SAVE THESE INSTRUCTIONS
INFORMACION IMPORTANTEDESEGURIDAD
LEA TODASLASINSTRUCCIONESANTESDE USAR--
GUARDEESTASINSTRUCCIONES
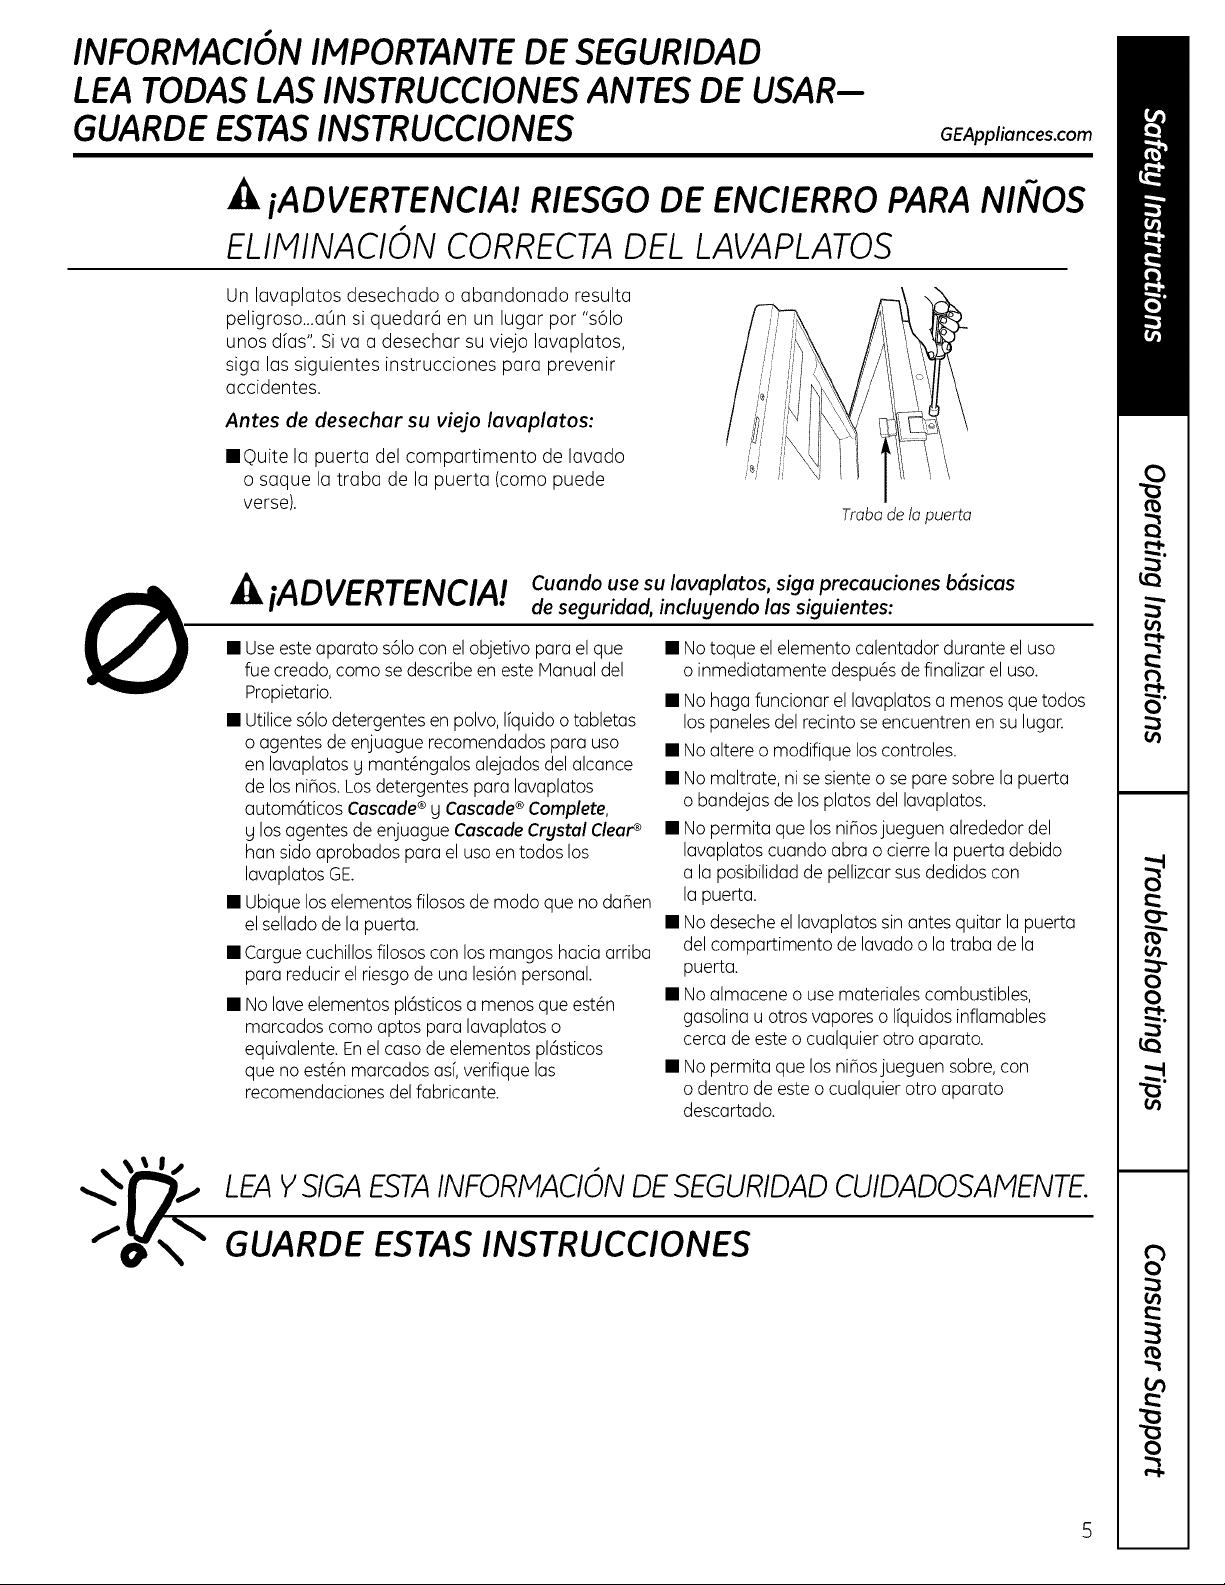
,_kiADVERTENCIA! RIESGO DE ENCIERRO PARA NI_IOS
ELIMINACION CORRECTA DEL LAVAPLATOS
Un lavaplatos desechado o abandonado resulta
peligroso...aOn si quedar6 en un lugar por "s61o
unos dfas".Siva a desechar su viejo lavaplatos,
siga las siguientes instrucciones para prevenir
accidentes.
Antes de desechar su viejo lavaplatos:
IIQuite la puerta del compartimento de lavado
o saque la traba de la puerta (como puede
verse).
__l_iADVERTENCIA! c.ando.ses.lavaplatos,sigapreca.cionesbOsicas
• Useesteaparato s61ocon elobjetivoparael que
fue creado,comosedescribeen este Manualdel
Propietario.
• Utilices61odetergentesen polvo,Ifquidoo tabletas
o agentes de enjuague recomendados para uso
en lavaplatosg mant@ngalosalejados del alcance
de losniBos.Losdetergentespara lavaplatos
autom6ticos Cascade ®g Cascade ®Complete,
g losagentes de enjuague Cascade Crustal Clear_
han sido aprobados para el uso en todos los
lavaplatosGE.
• Ubiqueloselementosfilososde modo que no daBen
el selladode la puerta.
• Cargue cuchillosfilososcon losmangos haciaarriba
para reducirel riesgode una lesi6npersonal.
• Nolaveelementospl6sticosa menos que est@n
marcados como aptos para lavaplatos o
equivalente.Enel casode elementospl6sticos
que no est@nmarcados asf,verifique las
recomendacionesdelfabricante.
de seguridad, inclugendo las siguientes:
GEAppliances.com
Traba de ta puerta
• Notoque el elemento calentador durante el uso
o inmediatamente despu@sdefinalizar el uso.
• Nohaga funcionar el lavaplatos a menos que todos
lospaneles del recintose encuentren en sulugar.
• Noaltere o modifique loscontroles.
• Nomaltrate, ni se sienteo separe sobrelapuerta
o bandejasdelosplatos del lavaplatos.
• Nopermita que los nihosjueguen alrededordel
lavaplatoscuando abra o cierrelapuerta debido
a la posibilidadde pellizcarsusdedidos con
la puerta.
• Nodeseche ellavaplatossinantes quitar lapuerta
del compartimento de lavadoo latraba de la
puerta.
• Noalmacene o use materialescombustibles,
gasolinau otrosvaporeso Ifquidosinflamables
cerca de esteo cualquier otro aparato.
• Nopermita que los nihosjueguen sobre,con
o dentro de este o cualquierotro aparato
descartado.
LEAYSIGAESTAINFORMACIONDESEGURIDADCUIDADOSAMENTE.
GUARDE ESTAS INSTRUCCIONES
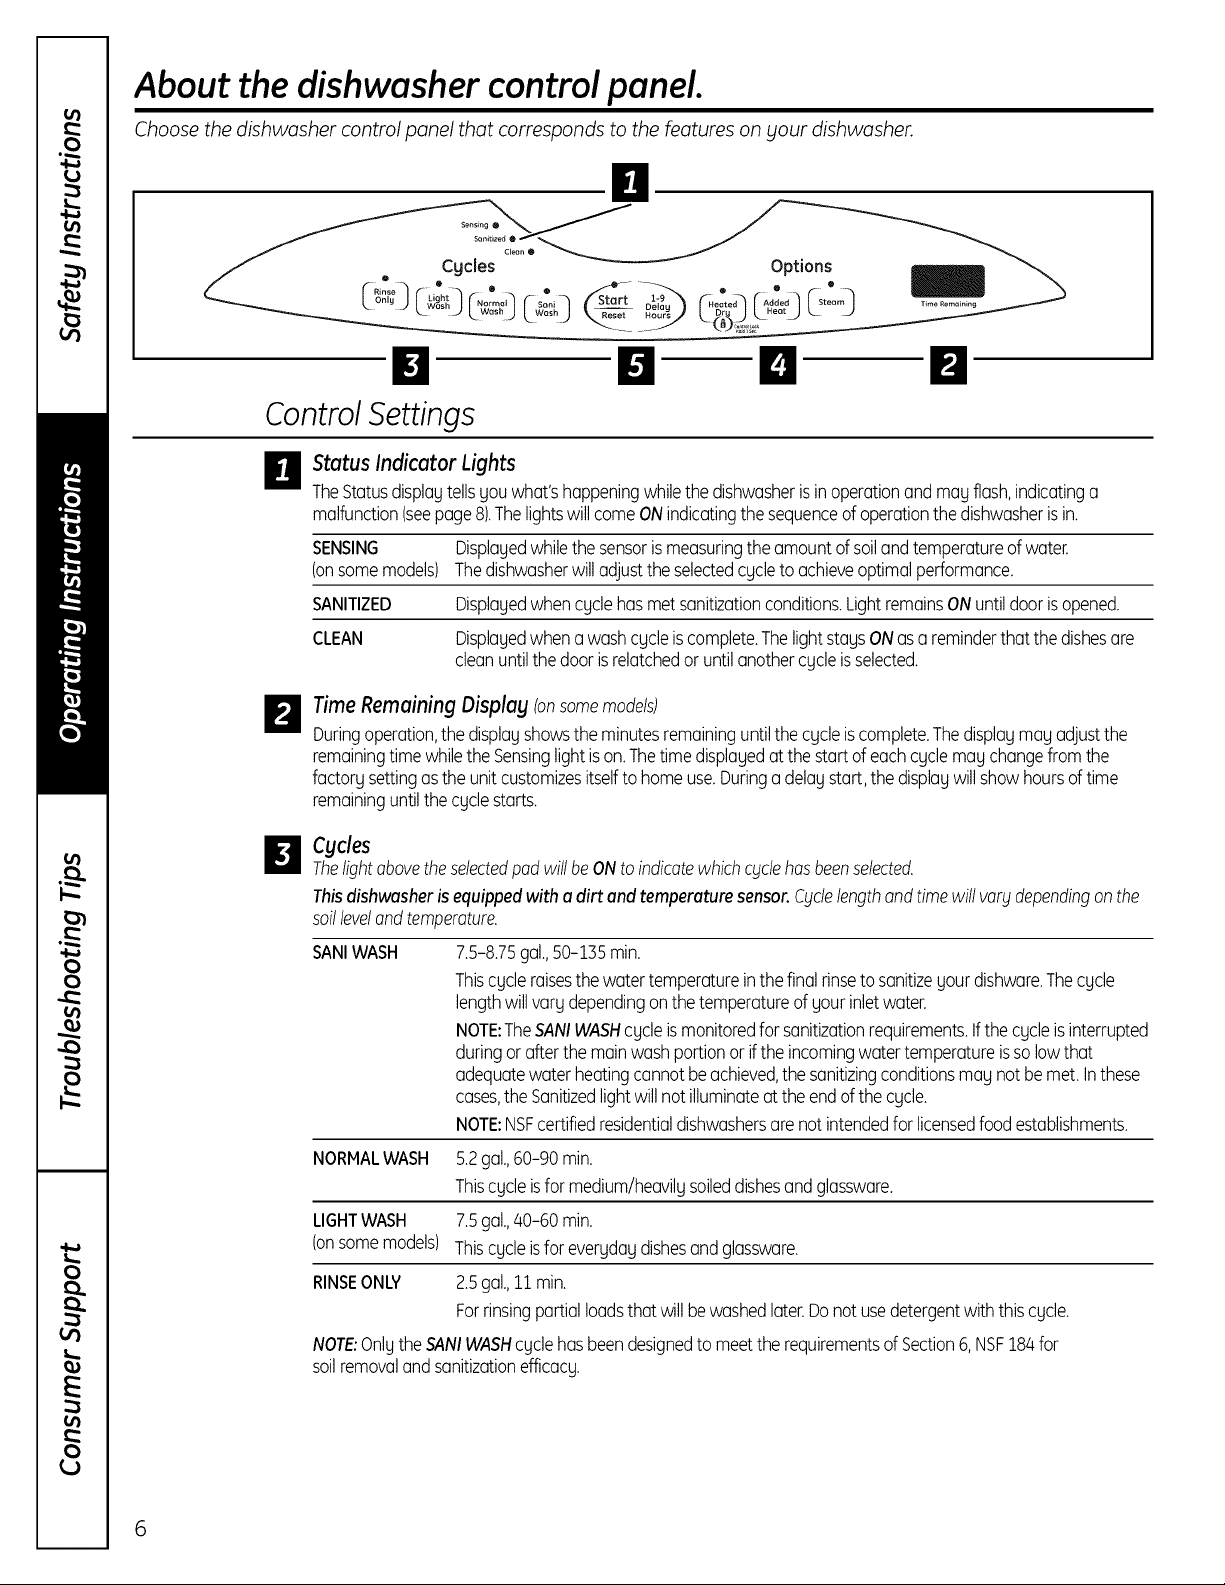
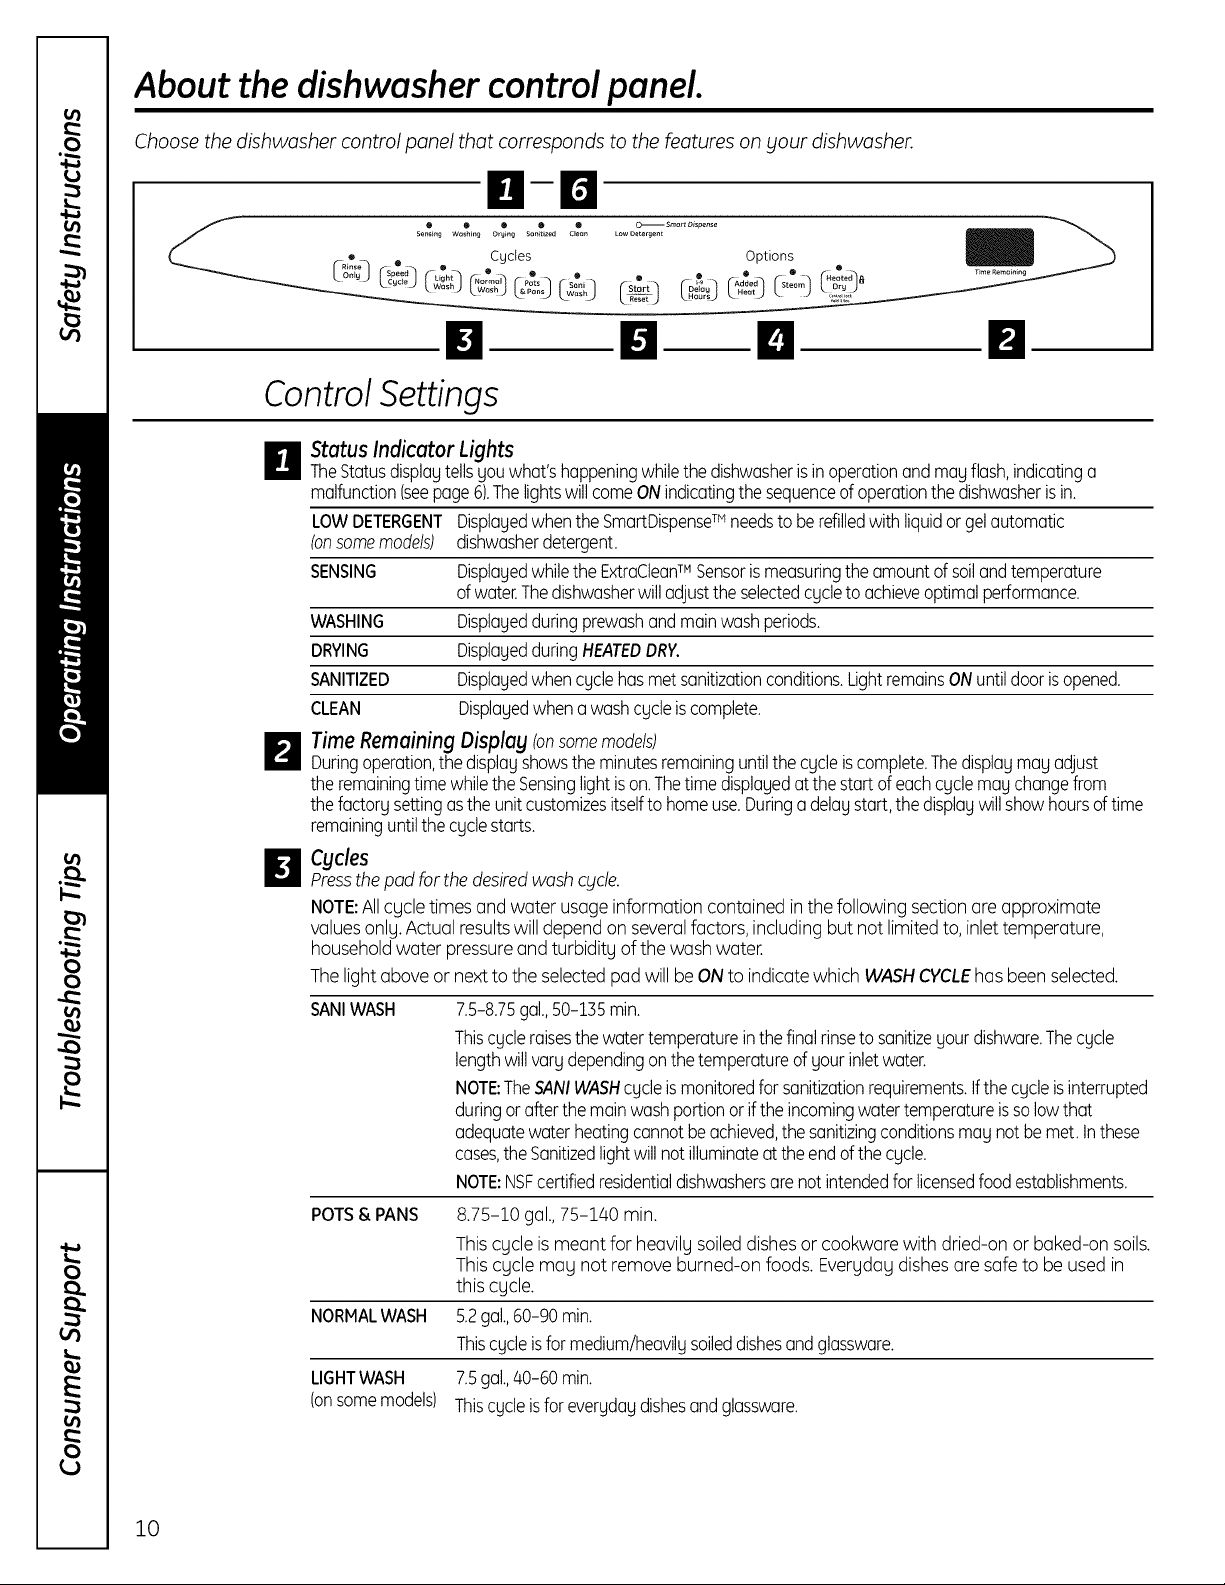
About the dishwasher control panel.
Choose the dishwasher control panel that corresponds to the features on your dishwasher.
!!
Rinse 0 ® ® Q Q 0
k_ J LWash_.... LWash J Reset H .... L Dr _ LHeet ) _ J
I't El El n
Control Settings
_l Stotus Indicator Lights
TheStatusdisplaytellsyouwhat'shappeningwhilethedishwasherisinoperationandmayflash,indicatinga
malfunction(seepage8).ThelightswillcomeONindicatingthesequenceofoperationthedishwasherisin.
SENSING Displayedwhilethesensorismeasuringtheamountofsoilandtemperatureofwater.
(onsomemodels) Thedishwasherwill adjusttheselectedcycletoachieveoptimalperformance.
SANITIZED Displayedwhencyclehasmetsanitizationconditions.LightremainsONuntildoorisopened.
CLEAN Displayedwhenawashcycleiscomplete.ThelightstaysONasa reminderthatthedishesare
cleanuntilthedoorisrelatchedor untilanothercycleisselected.
Time Remaining Displag (onsomemodels)
FI
Duringoperation,the displayshowstheminutesremaininguntilthecycleis complete.Thedisplaymayadjustthe
remainingtimewhiletheSensinglightison.Thetimedisplayedatthestartofeachcyclemay changefromthe
factorysettingastheunitcustomizesitselfto homeuse.Duringa delaystart,thedisplaywillshowhoursoftime
remaininguntilthe cyclestarts.
H Cycles
ThelightabovetheselectedpodwillbeONto indicatewhichcyclehasbeenselected.
Thisdishwasher is equipped with a dirt and temperature sensor. Cgclelength and time willvargdepending on the
soilleveland temperature.
SANIWASH
NORMALWASH 5.2gal.,60-90 min.
LIGHTWASH 7.5gal.,40-60 min.
(onsomemodels) Thiscycleisfor everydaydishesandglassware.
RINSEONLY 2.5gal.,11min.
NOTE"OnlytheSANIWASHcyclehasbeendesignedto meettherequirementsof Section6,NSF184for
soilremovalandsanitizationefficacy.
7.5-8.75gal.,50-135 min.
Thiscycle raisesthe water temperature inthe final rinse to sanitize your dishware. The cycle
length will vary depending on the temperature of your inlet water.
NOTE:TheSANIWASHcycle is monitored for sanitization requirements. Ifthe cycle is interrupted
during or after the main wash portion or ifthe incoming water temperature is so low that
adequate water heating cannot beachieved, the sanitizing conditions may not be met. Inthese
cases,the Sanitized light will not illuminate at the end of the cycle.
NOTE:NSFcertified residential dishwashers are not intended for licensed food establishments.
Thiscycle isfor medium/heavilysoileddishesand glassware.
Forrinsingpartialloadsthatwillbewashedlater.Donotusedetergentwiththiscycle.
GEAppliances.com
D Options
Thelightabovetheselectedpadwill beONtoindicatewhichoptionhasbeenselected.
STEAM Forusewithheavilysoiledand/ordried-on,baked-onsoils.ThisoptionMUSTbeselectedPRIOR
to startingthecycle.TheSTEAMoptionadds24 minutestothechicletime.
HEATEDDRY Shutsoff thedryingheatoption.Dishesairdry naturallyandenergyissaved.Forfasterairdry,
LightOFF youcan propthedooropenaftertheCLEANlight illuminates.
HEATEDDRY Turns the heater on for faster drying. This will extend the total cycle time between
Light ON 8 and 38 minutes depending on the cycle selected. NOTE:HEATEDDRY cannot be
selected with RINSEONLY cycle.
LOCK
ADDED
HEAT
DELAYHOURS
RESET
Youcanlockthecontrolstopreventanyselectionsfrombeingmade.Oryoucanlockthecontrols
afteryouhavestartedacycle.
Childrencannotaccidentallblstartdishwasherbbltouchingpadswiththisoptionselected.
ToLOCKthe dishwashercontrol,touchandholdtheHEATEDDRYpadfor Bseconds.Thelight
belowtheHEATEDDRYpadwillturnon.ToUNLOCKthedishwashercontrol,touchandholdthe
HEATEDDRYpadfor Bseconds.TheLOCKlightwillturnoff.
Whenselected,the cyclewillrun longerwiththe heatingelementonto improvebothwashand
dry performance.NOTE"Cannotbeselectedwith RINSEONLYcycle.
Youcandelaythestartofawashcyclefor upto 9 hours.Touchthe DELAYHOURSpadto choose
thenumberof hoursyouwanttodelaythestartof thecycle;thentouchSTART/RESETonetime.
Thedishwasherwillcountdownandstartautomaticallyatthecorrecttime.Touching
START/RESETasecondtime will cancelthe DELAYSTARTselection.
Tochangea cycleafterwashingstarts,touchtheSTART/RESETpadto cancelthecycle.The
START/RESETlightwillflashwhilethewaterispumpedoutifneeded.Thistakesapproximately
90seconds.Whenthelightstopsflashing,the dishwashercanbereprogrammedandrestarted.
Start
m
Closeandlatchthe dishwasherdoorandselectthecycleanddesiredenhancements.Touchthe START/RESETpad
onceto beginthecycle.Waterbeginstofill thedishwasher,andapproximately60secondslaterthewashaction
begins.TouchingtheSTART/RESETpada secondtimewillcancelthecycleandcausethewaterto drainout.Thiswill
takeapproximately2minutes.
NOTE:Thedishwasherremembersyourlastcyclesoyoudon'thaveto reprogrameachtime.Whenthedishwasher
doorisfullyclosed,thecontrolpanellightswilldisplaythelastsettingsyouselected.
Ifyoudon'twantto changeanyof thesettings,simplytouchtheSTART/RESETpadonceto beginthecycle.
Ifthedoorisclosed,theindicatorlightswillturnoff ifthe START/RESETpadisnotpressedwithintwo minutes.
Toactivatethedisplay,openandclosethedoorortouchanypad.
Also,ifa powerfailureoccurs,NORMALWASHandHEATEDDRYwillautomaticallybeprogrammed.
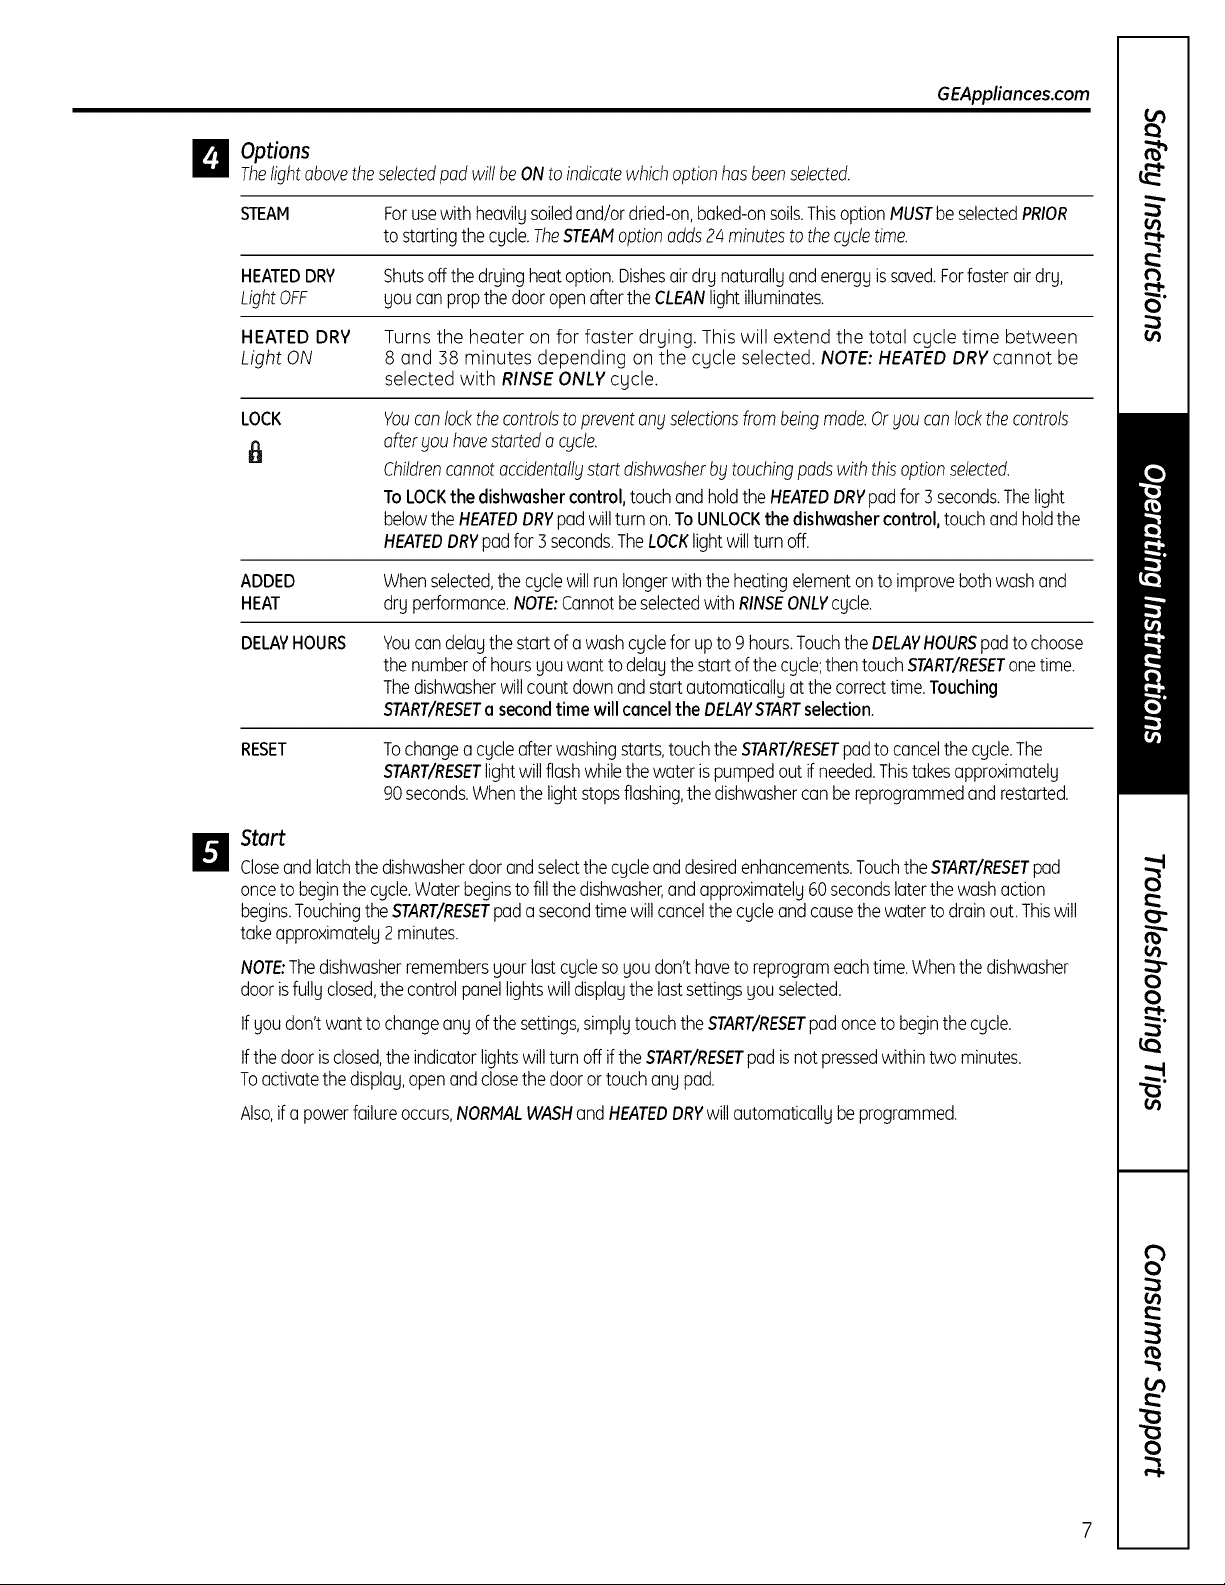
About the dishwasher control panel.
Choose the dishwasher control panel that corresponds to the features on your dishwasher.
!!
• SANiTiZED
RINSE •
ONLY Q¢O.,.Ah .....
_CRYSTAL_J _ UGNT _ " ..... .
Cgcles
2 4 8
_RT "DELAV'_
@ o,Y &o,
Options
• ®
HEATED
m ii !i
Control Settings
H Status Indicator Lights
The Status display tells you what's happening while the dishwasher is in operation and may flash,
indicating a malfunction (see page 8). The lights will come ON indicating the sequence
of operation the dishwasher is in.
CLEAN
SANITIZED
(on some
Displayed when cycle has met sanitization conditions. Light remains ON until
door is opened.
models)
CLEAN
(on some
Displayed when a wash cycle is complete. The light stays ON as a reminder that
the dishes are clean until the door is opened or until another cycle is selected.
models)
Cycles
Thelight above theselectedpad will beON to indicate whichqjcle hasbeenselected,
SANI WASH
(on some
models)
POTS & PANS
or HEAVY
WASH
NORMALWASH 5,6 gal,, 56 min.
7.5 gal., 97 min.
This cycle raises the water temperature in the final rinse to sanitize your dishware.
The cycle length will vary depending on the temperature of your inlet water.
NOTE:The SANI WASH cycle ismonitored for sanitization requirements. If the
cycle is interrupted during or after the main wash portion or if the incoming water
temperature is so low that adequate water heating cannot be achieved, the
sanitizing conditions may not be met. In these cases,the Sanitized light will not
illuminate at the end of the cycle.
NOTE:NSFcertified residential dishwashers are not intended for licensed food
establishments.
8.5 gal., 89 min.
This cycle is meant for heavily soiled dishes or cookware with dried-on or baked-
on soils. Everyday dishes are safe to be used in this cycle.
This cycle is for medium/heavily soiled dishes and glassware.
LIGHTWASH
(on some
6.1 gal., 56 min.
This cycle is for everyday dishes and glassware.
models)
CHINA CRYSTAL 6,1 gal,, 39 min,
(on some This cycle is for lightly soiled china and crystal.
models)
RINSEONLY 12 gal,, 6 min.
For rinsing partial loads that will be washed later. Do not use detergent with
this cycle.
NOTE:Only the SANI WASHcycle has been designed to meet the requirements of Section 6,
NSF 184 for soil removal and sanitization efficacy.
GEAppliances.com
D Options
Thelight above the selected pad will be ON to indicate which OPTIONhas been selected.
HOT START/ For use with heavily soiled and/or dried-on, baked-on soils. This option MUST be
STEAM selected PRIORto starting the cycle. Thisoption will improve both wash and dry
(on some performance. This option adds 20 minutes to the cycle time.
models) NOTE:Cannot be selected with RINSEONLYcycle.
HEATEDDRY Shuts off the drying heat option. Dishes air dry naturally and energy is saved.
Light OFF Forfaster air dry you can prop the door open after the CLEAN light illuminates.
HEATEDDRY Turns the heater on for fast drying. This will extend the total run time by 38 minutes.
Light ON NOTE:Cannot be selected with RINSEONLYcycle.
LOCK
You can lock the controls to prevent any selections from being made. Or you can lock
the controls after you have started a cycle.
(on some
models)
Children cannot accidentally start dishwasher bg touching pads with this option
selected.
ToLOCKthedishwashercontrol,touchandholdtheHEATEDDRYpadfor3seconds.Thelightbelow
theHEATEDDRYpadwillturn on.ToUNLOCKthe dishwashercontrol,touchandholdthe HEATED
DRYpadfor 3seconds.TheLOCKlightwillturnoff.
HOT WASH/
ADDED HEAT
When selected, the cycle will run longer with the heating element on to improve both
wash and dry performance. For use with heavily soiled and/or dried-on soils. This
option MUSTbe selected PRIORto starting the cycle. NOTE: Cannot be selected with
RINSEONLYcycle.
DELAY HOURS
You can delay the start of a wash cycle for 2, 4 or 8 hours (delay time options may
vary by model). Touch the DELAVHOURS pad to choose the number of hours you want
to delay the start of the cycle; then touch START/RESETone time. The dishwasher will
count down and start automatically at the correct time. Touching START/RESETa
secondtime will cancel the DELAYSTARTselection.
RESET
To change a cycle after washing starts, touch the START/RESETpad to cancel the
cycle. The START/RESETlight will flash while the water is pumped out if needed. This
takes approximately 90 seconds. When the light stops flashing, the dishwasher can be
reprogrammed and restarted.
_!_ Start
Close and latch the dishwasher door and select the cycle and desired enhancements. Touch the
START/RESETpad once to begin the cycle. Water begins to fill the dishwasher, and approximately
60 seconds later the wash action begins. Touching the START/RESETpad a second time will cancel
the cycle and cause the water to drain out. Thiswill take approximately 2 minutes.
NOTE:The dishwasher remembers your last cycle so you don't have to reprogram each time. When
the dishwasher door is fully closed, the control panel lights will display the last settings you selected.
If you don't want to change any of the settings, simply touch the START/RESETpad once to begin
the cycle.
If the door is closed, the indicator lights will turn off if the START/RESETpad is not pressed within two
minutes. To activate the display, open and close the door or touch any pad.
Also, if a power failure occurs, NORMAL WASH and HEATEDDRYwill automatically be programmed.
About the dishwasher control panel.
Choose the dishwasher control panel that corresponds to the features on _lour dishwasher.
o_ smart _ispense
• _ • Cycles
LOWDetergent %
Start Dei_y .........
Options
• o
N El Nirt
Control Settings
_ tatus Indicator Lights
TheStatusdisplaytellsyouwhat'shappeningwhilethedishwasherisinoperationand mayflash,indicatinga
malfunction(seepage6).ThelightswillcomeONindicatingthesequenceofoperationthedishwasherisin.
LOWDETERGENTDisplayedwhenthe SmartDispenseTM needsto berefilledwithliquidor gelautomatic
(onsomemodels) dishwasherdetergent.
SENSING DisplagedwhiletheExtraCleanTM Sensorismeasuringtheamountofsoilandtemperature
ofwater.Thedishwasherwilladjusttheselectedcgcleto achieveoptimalperformance.
WASHING Displagedduringprewashandmainwashperiods.
DRYING DisplagedduringHEATEDDRY.
SANITIZED Displagedwhencgclehasmetsanitizationconditions.LightremainsONuntildoorisopened.
CLEAN Displagedwhena washcgcleiscomplete.
TimeRemainingDisplay (onsomemodels)
FI
Duringoperation,the displagshowstheminutesremaininguntilthe cgcleiscomplete.Thedisplagmagadjust
theremainingtime whiletheSensinglightison.Thetimedisplagedat thestartofeachcgclemagchangefrom
thefactorgsettingastheunitcustomizesitselfto homeuse.Duringadelagstart,thedisplagwillshowhoursoftime
remaininguntilthe cgclestarts.
Cycles
Pressthe pad for the desiredwashcgcle.
NOTE:All cycletimes and water usageinformation contained in the following sectionareapproximate
valuesonly.Actual resultswill depend on severalfactors,includingbut not limited to, inlettemperature,
householdwater pressureand turbidity ofthe wash water.
Thelight aboveor nextto the selectedpadwill beON to indicatewhich WASHCYCLEhasbeenselected.
SANIWASH
POTS & PANS
NORMALWASH 5.2gal.,60-90 min.
LIGHTWASH 7.5gal.,40-60 min.
(onsomemodels) Thiscgcleisforevergdagdishesandglassware.
7.5-8.75gal.,50-135min.
Thiscgcleraisesthewatertemperatureinthefinalrinsetosanitizegourdishware.Thecgcle
lengthwillvarydependingonthetemperatureofyourinletwater.
NOTE:TheSANIWASHcycleismonitoredfor sanitizationrequirements.Ifthe cycleisinterrupted
duringor afterthemainwashportionorifthe incomingwatertemperatureissolowthat
adequatewaterheatingcannotbeachieved,the sanitizingconditionsmaynot bemet.Inthese
cases,theSanitizedlightwill notilluminateat theendofthecycle.
NOTE:NSFcertifiedresidentialdishwashersarenotintendedfor licensedfood establishments.
8.75-10 gal.,75-1/40min.
This cgcle ismeantfor heavilgsoiled dishesor cookware with dried-on or baked-on soils.
This cgcle mag not remove burned-on foods. Evergdagdishesare safe to be used in
this cgcle.
Thiscgcleisformedium/heavilgsoileddishesandglassware.
10
GEAppliances.com
SPEEDCYCLE 7.5 gal., 35-70 min.
(on some models) This cycle is for everyday dishes and glassware.
RINSE ONLY 2.5 gal., 10 min.
For rinsing partial loads that will be washed later. Do not use detergent with this cycle.
NOTE:Thisdishwasher isequippedwith o CleonSensoF"with automatic temperature control;therefore,cgde
length and time may vary depending on soil and temperature conditions.
NOTE:Onlythe SANIWASHcyclehasbeen designed to meet the requirementsofSection6, NSF184 for soil
removal and sonitizotion efficacy.
Options
D
Thelight above the selected pad will be ON to indicate which ENHANCEMENT/EXTRAhas been selected.
STEAH Forusewithheavilysoiledand/ordried-on,baked-onsoils.ThisoptionMUSTbeselectedPRIOR
(on some models)to startingthecycle.TheSTEAMoptionodds24 minutestothecycletime.
HEATEDDRY When HEATEDDRY is off, dishes will air dry.
Light OFF
HEATEDDRY Turns the heater on for faster drying. This will extend the total cycle time between
Light ON 8 and 38 minutes depending on the cycle selected. NOTE:HEATEDDRY cannot be
selected with RINSE ONLYcycle.
LOCK
ADDED HEAT When selected, the cycle will run with heating element on longer and may increase
DELAY HOURS
RESET
START
El
Closethedishwasherdoorandselectthecycleanddesiredenhancements.TouchtheSTART/RESETpadto beginthecycle.
Waterfillbegins,andapproximately60secondslaterthewashactionbegins.
NOTE:Thedishwasherremembersyourlastcyclesoyoudon't haveto reprogrameachtime.Whenthedishwasherdoor
isfullyclosed,the controlpanellightswilldisplaythelastsettingsyouselected.
Ifyoudon'twantto changeanyof thesettings,simplytouchtheSTART/RESETpadto beginthecycle.
Ifthedoorisclosed,theindicatorlightswillturnoff ifthe START/RESETpadisnotselectedwithintwo minutes.Toactivate
thedisplay,openandclosethedoororpressany pad.
Also,if a powerfailureoccurs,NORMALWASHand HEATEDDRYwillautomaticallybeprogrammed.Makeany new
selectionsandtouchthe START/RESETpadto beginthe cycle.
CLEAN
D
TheCLEANlightwillilluminateanda doublebeepwillsoundwhena washcycleiscomplete.Onsomemodels,theCLEAN
lightwillturnoffwhenthedoorisopened.Onothermodels,theCLEANlightwillremainonuntilthedoorisopened
andthenrelatchedoruntilany keypadispressedwhilethedoorislatchedshut.
You can lock the controls to prevent any selections from being mode. Oryou con lock
the controls after you hove started o cycle.
Children cannot occidentally start dishwasher bg touching pods with this option
selected.
To unlock the dishwasher controls, touch and hold the HEATEDDRY pad for 3
seconds. Thelight above the LOCK pad will turn off.To lock the dishwasher control,
touch and hold the HEATEDDRYpad for 3 seconds. The light above the LOCKpad
will turn on.
cycle times to improve both wash and dry performance.
NOTE: Cannot be selected with RINSE ONLY cycle.
You can delay the start of a wash cycle for up to 9 hours. Touch the DELAYHOURSpad
to choose the number of hours you want to delay the start of the cycle; then touch
START/RESET.The machine will count down and start automatically at the correct time.
Touching START/RESETa second time will cancel the DELAYSTARTselection.
NOTE:If you forget to fully close the door,a reminder signal will beep until you do so.
To change a cycle after washing starts, touch the START/RESETpad to cancel the
cycle. The START/RESETlight will flash while the water is pumped out if needed. This
takes approximately 90 seconds. When the light stops flashing, the dishwasher
can be reprogrammed and restarted.
11
Flashing displag lights.
Status Indicator Lights What It Means
Using
START/RESET
the dishwasher.
Check the Water Temperature
Theenteringwatershouldbeat least120°F(49°C)and
notmorethan 150°F(66°C)foreffectivecleaningandto
preventdishdamage.Checkthewatertemperaturewith
a candyor meatthermometer.Turnonthe hotwater
Use o Rinse Agent such as Cascade Crgstol Clear®
RinseagentssuchasCascade CrgstalClear®removespotsandpreventnewfilm builduponyourdishes,glasses,
flatware,cookwareandplastic.
Filling the Dispenser
Therinseagentdispenserholds3.5oz.(103.5ml)ofrinseagent.Undernormal
conditions,thiswilllastapproximatelyonemonth.Trytokeepitfull,butdonotoverfill.
r_ Makesurethedishwasherdoorisfullyopen.
_] Turnthedispensercapto theleftandliftitout.
[] Addrinseagentuntilthe indicatorwindowlooksfull.
E] Cleanupanyspilledrinseagentwitha dampcloth.
r_ Replacethedispensercap.
CyclehasbeeninterruptedbypressingtheSTART/RESETpad.Lightwillstop
flashingafterthedishwasherautomaticallydrainsoutthewater.
NOTE"FormodelswithouttheSTART/RESETpad,LEDsthat areilluminatedwillflash
duringreset.
faucetnearestthedishwasher,placethethermometerin
aglassandletthewaterruncontinuouslyintotheglass
untilthetemperaturestopsrising.
In
window Dispensercap
RinseAid Setting
Theamountof rinseagentreleasedintothe finalwashcanbeadjusted.Thefactory
settingisat the midpoint.Ifthereareringsofcalcium(hardwater)spotson dishes,try a
highersetting.Ifyouseefoaminthedishwasher,movetheindicatortoa lowersetting.
Toadjustthe setting
Removethe dispensercap;thenturnthe adjustercounterclockwiseto increasethe
amountof rinseagent,clockwiseto reducetheamountof rinseagent.
Dish Preparation Prior to Loading
• Noprerinsingofnormalfoodsoilisrequired.
• Scrapeoffhardsoils,includingbones,toothpicks,skins
and seeds.
• Removelargequantitiesof anyremainingfood.
• Removeleafyvegetables,meattrimmingsand
excessiveamountsofgreaseoroil.
• Removeacidicfoodsoilsthat candiscolorstainless
steel.
Rinseagent
adjuster
12
Manual Detergent Dispenser
Yourdishwashercomesequippedwithamanualdispenser
and,onsomemodelsan automaticliquiddishwasher
detergentdispenser(SmartDispenseTM).Youcan useeither
ofthesedispensers,butdon't usebothatthesametime.
SmartDispense TM
ManualDetergent
Dispenser
Thecoverof themainwashsectionwillopenduringthe
washcgcle.IfgouareusingSmartDispenseTM, leavethe
coverofthe mainwashsectiondispenseropenbefore
startingthecgcle.
Youmag usepowder,liquid,gelortabletsinthemanual
dispenser.Itisimportanttokeeppowdereddetergentsand
tabletsfreshanddrgsothegdon'tloseeffectiveness.
Therefore,donotputdetergentintothemanualdispenser
untilgouarereadgtowashdishes.
GEAppliances.com
Forheavilysoiledloads,usea bitmoredetergent.Forwater
temperaturesabove1/40°F(60°C),usea bitlessdetergent.
Medium Medium Extremely
Soft Soft Hard Hard
Forheavilysoiledloads,usethePotsandPansorHeawWashcycle.
DO NOTUSEHAND DISHDETERGENT
m
m
Filfing Manual Detergent Dispenser
Theamountof detergentto usedependsonwhetheryour
waterishardor soft.Withhardwater,gouneedextra
detergent.Withsoftwater,gouneedlessdetergent.
Protectgourdishesanddishwasherbgcontactinggour
waterdepartmentandaskinghowhardgourwateris.
Twelveor moregrainsisextremelghardwater.Awater
softenerisrecommended.Withoutit, limecanbuildup in
thewatervalve,whichcouldstickwhileopenandcause
flooding.Toomuchdetergentwithsoftwatercancausea
permanentcloudinessof glassware,calledetching.
Usethe informationinthetablebelowasa guideto
determinetheamountofautomaticdishwasherdetergent
to placeinthedispenser.Youmagusepowder,liquid,gel
ortabletsinthisdispenser.
Whenusingautomaticdishwashingdetergenttablets,
simplgplaceonetabletinthe mainwashsectionandclose
thecover.
Number
of Grains Detergent Cups to Fill
Less than 4 Fillcup to soft line (1/] full)
4 to 8 Fillcup to medium soft line (2/] full)
8 to 12 Fillcup to medium hard line
(completelg full)
Greater Fillboth main wash cup
than 12 and pre wash cup
NOTE:Usinga detergentthatisnotspecificallbtdesigned
fordishwasherswillcausethedishwasherto fillwith suds.
Duringoperation,thesesudswillspilloutofthedishwasher
vents,coveringthekitchenfloorandmakingthefloorwet.
Becausesomangdetergentcontainerslookalike,storethe
dishwasherdetergentina separatespacefromallother
cleaners.Showangonewhomag usethedishwasherthe
correctdetergentandwhereitisstored.
Whiletherewillbeno lastingdamagetothedishwasher,
gourdisheswill notgetcleanusingadishwashing
detergentthat is notformulatedto workwith dishwashers.
1B
Using the dishwasher.
SmartOispense Detergent Dispenser ionsome models)
This dishwasher may have a SmartDispenseTMfeature
which automatically dispensesliquid automatic
dishwasher detergent into each cycle based on soil
leveland water hardness.
To utilizethe SmartDispenseT"Detergent Dispenser,
it must first befilled.Although any liquidor gel
automatic dishwashing detergent can beusedin
the SmartDispenseT"system, all liquid or gel
automatic dishwashing detergents are not the same.
Mostautomatic dishwashing detergents are chlorine
bleach-based (such asCascade®)while others contain
enzymes (suchas CascadeComplete®).
Do not mix any chlorine bleach-based automatic
dishwashing detergent with any dishwashing
detergent containing enzymes asthis could cause
the detergents to congeal and lead to blockage of
the SmartDispense'" system. Checkthe detergent
label to determine if the detergent ischlorine
bleach-based or one that contains enzymes. It is
recommended that the same type of detergent be
usedwhen refilling your SmartDispense_"system.
CAUTION! Absolutely do not add
powder detergent, tablets or any liquid soap or
detergent normally usedfor washing hands or
dishes in a sink. Only useliquidor gel detergent
specifically designed for use in an automatic
dishwasher.
Setthe door at a comfortable angle to fillthe
dispenser.
Aimthe detergent bottle at the opening inthe door
and begin to fill.
i i i ,
The dispenserwill hold 40 ozof liquid dishwasher
detergent (standard sizebottle).
Whenfull, replacethe cap and turn clockwise
until tight to ensure that no water enters the
SmartDispenseTMdispenser.If residueisleft on
the door, itwill bewashed off in the next cycle.
14
ItLiPRECAUCION! Bajoninguna
circunstancia agregue detergente enpolvo,
tabletas, ojab6n o detergente Ifquido normalmente
utilizado para lavar manos o platos en un
fregadero. S61outilice detergente Ifquidoo en gel
espec[ficamente dise_ados para utilizar en
lavaplatos automdticos.
Filfing Dispenser
Toopen the dispenser for filling,push down and
turn the blue cap counterclockwise until the cap
isloose.Liftcap off.
An indicator light will turn on to notify you when the
dispenser needsto be filled again. After filling, the light
will not turn off untilthe door isclosed.A full dispenser
will last approximately 1 month for the average user.
Light will turn on when it is time to refill.
NOTE:Ifyou are not usingSmartDispense_"and you
want to turn the LOW DETERGENTLEOlight off,press
theADDED HEATpad 5 times within 3seconds.You
will hear 3 beeps,then the light will go off. Youcan
turn the light back on by pressingthe ADDEDHEAT
pad 5times within 3 seconds.
SmartDispense Detergent Dispenser
Water Hardness Calibration
GEAppliances.com
Priorto the first use,the dishwasher needsto
be calibrated for water hardness.Pleasefollow
directions below to calibrate the dishwasher to
the hardness of sour tap water.
Determine the Hardness of Your Tap Water
Inthe bag containing these instructions,Sou should
find a water hardnesstest strip package. Readthe
instructions on the package, remove the test strip and
follow the instructions to determine the hardness level
of sour tap water. Youwill usethis information to
calibrate sour dishwasher to dispensethe optimal
amount of detergent.
Water hardness test strip indication
SOFT
OREDI I I I I I I I I 1
1 RED _ 2
2 RED _ 3
3 RED _ 4
4 RED _ 5
HARD
Value to Enter
into Dishwasher
Set Control to Calibration Mode
From the standbg mode (dishwasher not running
a cgcle and the panel lights on), enter the water
hardness selection mode.
Control Calibration
Control Panel
Pressat thesametimefor3 seconds. Display
1.Closeand latch the door (lightson, dishwasher
not running).
2.Pressthe SANI WASHand DELAYHOURSpads at
the same time for 3 seconds.The displag will show
a number I to 5.This isthe water hardnessvalue
currentlg set.
Control Panel
WASHpadto lower WASHpadto
thevalue, raisethevalue.
3. Pressthe SANI WASHpad to raisethe value or
the NORMALWASHpad to lower the value.Set
the water hardness value 11to 51to the number
determined with the test strip and table at left.
4. Once the water hardness isset, pressthe
START/RESETpadto save the setting and return
the dishwasher to normal operation.
Youshould recalibrate the dispenser ifwater
conditions change, for example,if a water softener
sgstem isadded or removed.
Calibration of Models Without 3-Digit
Display Front Controls
1.Closeand latch the door (lightson, dishwasher not
running).
2. Press the SANIWASHand DELAYHOURSpads
together for 3 seconds.
3. To change the setting, press the DELAYHOURS pad
the number of times that corresponds to the water
hardness value. Youwillhear a confirmation with
beeps for the number of times Sou pressed the pad.
4. If the number of beeps isnot what Sou desire, start
pressingthe DELAYHOURSpad again to reenter
a new water hardness level.
5. Once the water hardness isset, pressthe
START/RESETpad to save the setting and return
the dishwasher to normal operation.
15
 Loading...