

GE PDW7800PCC - Profile 24 in. Dishwasher, PDW7800PCC 24 Owner's Manual
0
LU
ge.com
Safety Instructions ....... 2,s
Operating Instructions
Care and Cleaning ......... 11, 12
Control Panel and Settings .... _J_
Loading Place Settings ........ 11
Loading the Racks ............. 10
Using the Dishwasher ......... _J9
Troubleshooting Tips... 12-14
0
Consumer Support
Consumer Support ..... Back Cover
Warranty ..................... 15
Write the model and serial
numbers here:
Model #
Serial #
Youcan find them on thetub wall
just insidethe door.
165D4700P382 49-55058 OI-09JR
IMPORTANTSAFETYINFORMATION.
READALL INSTRUCTIONSBEFOREUSING-
SAVETHESEINSTRUCTIONS
WARNING!
For your safety, the information in this manual must be followed to minimize the risk of fire
or explosion, electric shock, and to prevent property damage, personal injury, or death.
WARNING! WATER HEATER SAFETY
Under certain conditions, hydrogen gas may be produced in a water heater that has not been used
for two weeks or more. HYDROGEN GAS IS EXPLOSIVE.
Ifthe hot water has not been used for two weeks or more, prevent the possibility of damage or injury
by turning on all hot water faucets and allow them to run for several minutes. Dothis before using any
electrical appliance which is connected to the hot water system. This simple procedure willallow any built-
up hydrogen gas to escape. Since the gas is flammable, do not smoke or use an open flame or appliance
during this process.
PROPER INSTALLATION AND MAINTENANCE
This dishwasher must be properly installed and located in accordance with the Installation
%
Instructions before it is used. If you did not receive an Installation Instructions sheet with
your dishwasher, you can receive one by visiting our website at www.ge.com. In Canada
visit www.geappliances.ca.
• Connect to agrounded metal, permanent wiring
system; or run an equipment-grounding
conductor with the circuit conductors and
connect to the equipment-grounding terminal
or lead of the appliance.
• Improper connection of the equipment-grounding
conductor can result in a risk of electric shock.
Checkwith a qualified electrician or service
representative if you areindoubt whether the
appliance is properly grounded.
• Disposeof discardedappliances and shipping
or packing material properly.
CAUTION: Topreventminorinjuryorpropertydamage
• Contents washed in Anti-bacterial mode, if
available, may be hot to the touch. Usecare
before handling.
• Usinga detergent that is
not specifically designed
for dishwasherswill cause
the dishwasher to fill with
suds.
• Ifyour dishwasher is connected to a
wall switch, ensure that the switch is
on prior to use.
• On dishwashers with electronic controls,
if you chooseto turn the wall switch
off between wash cycles, allow 5-10
seconds after turning the switch on before
2
touching START/RESETto allow the control
to boot.
• Do not attempt to repair or replace any part
of your dishwasher unless it isspecifically
recommended inthis manual. All other servicing
should be referredto a qualified technician.
• To minimizethe possibilityof electric shock,
disconnect this appliance from the power supply
before attempting any maintenance.
NOTE:Turningthe dishwasheroff doesnot
disconnectthe appliancefrom the power supply.
Werecommend having o qualified technician
servicegout appliance.
• Non-DishwareItems:Do not wash items such
as electronic air cleaner filters,furnace filters and
paint brushes in your dishwasher.Damage to
dishwasher and discoloration or stainingof
dishwasher may result.
• Closesupervision is necessary if this appliance
isusedby or near children.
• Load light, plastic items so they will not
become dislodged and drop to the bottom
of the dishwasher-they might come into
contact with the heating element and be
damaged.
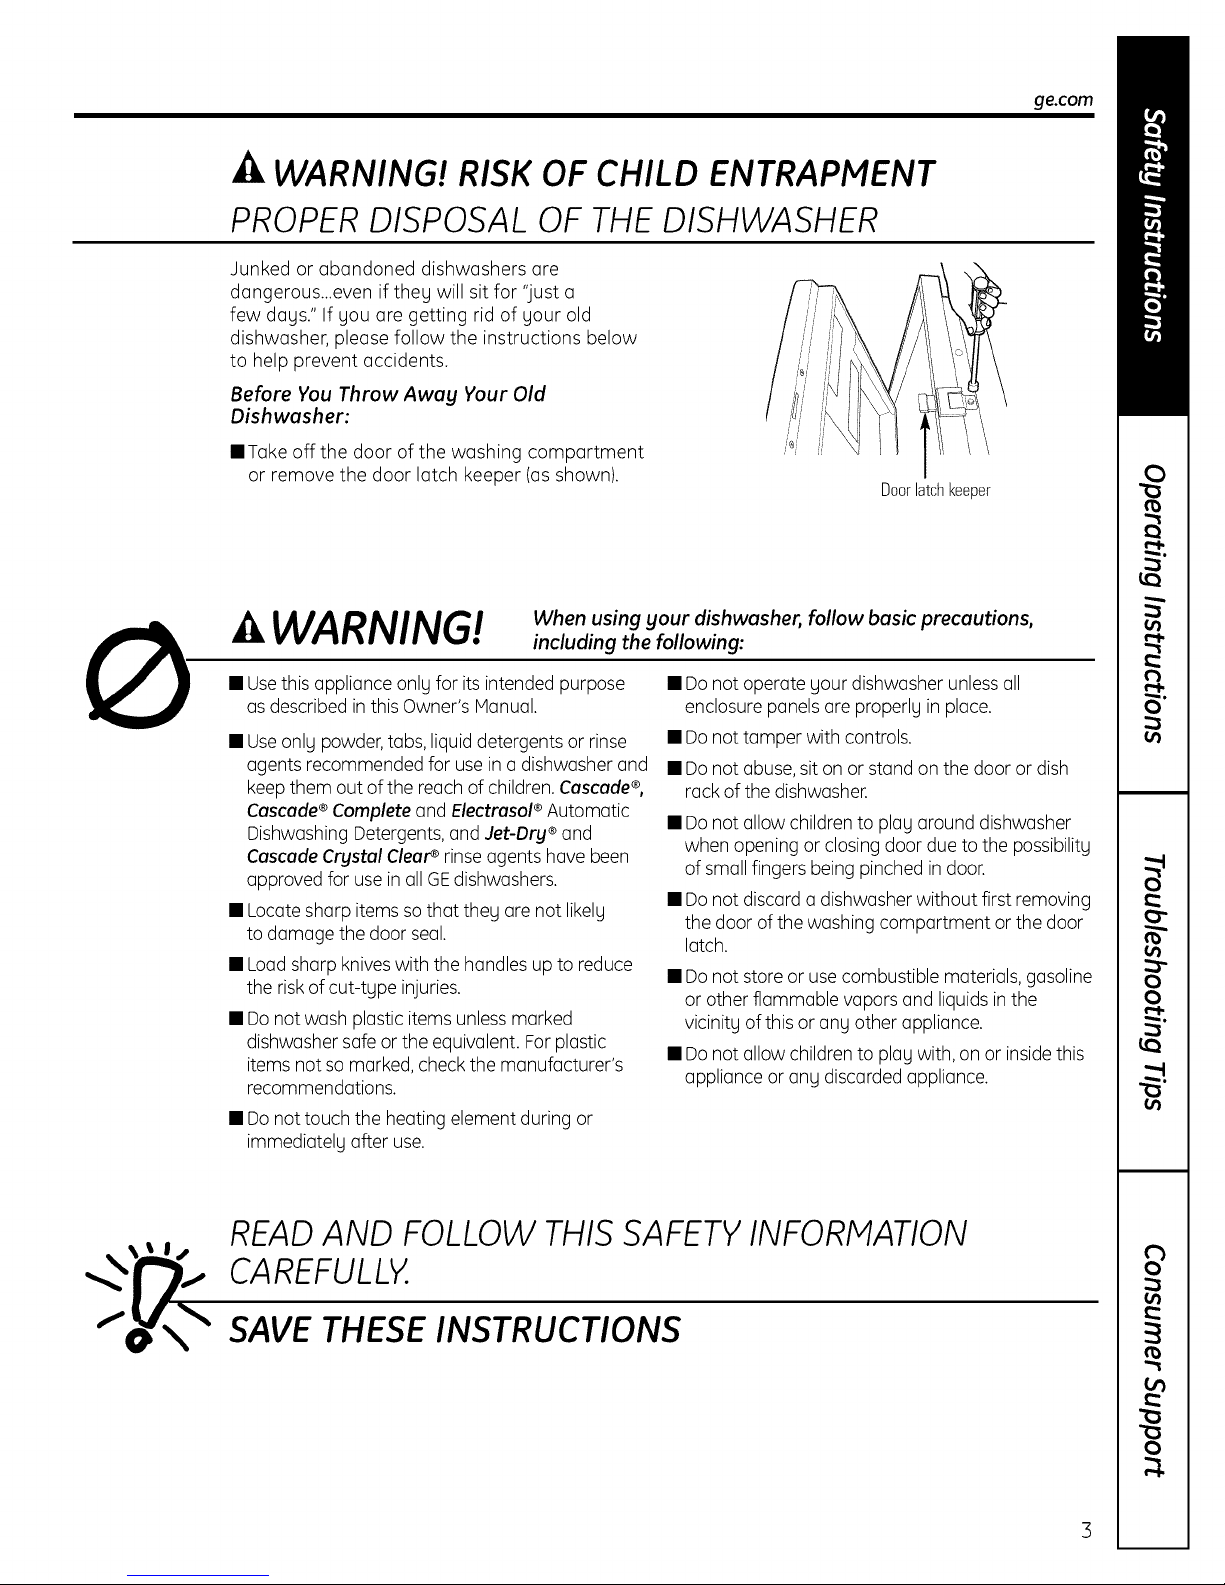
_k WARNING! RISK OF CHILD ENTRAPMENT
PROPER DISPOSAL OF THE DISHWASHER
Junked or obondoned dishwoshers ore
dongerous...even if they will sit for "just o
few doys." If you ore getting rid of your old
dishwosher, pleose follow the instructions below
to help prevent occidents.
Before You Throw Away Your Old
Dishwasher:
• Toke off the door of the woshing comportment
or remove the door Iotch keeper (osshown).
Doorlatchkeeper
ge.com
WARNING!
• Usethis opplionce only for itsintended purpose
os describedin this Owner's Monuol.
• Useonly powder,tobs, liquid detergents or rinse
ogents recommended for use in o dishwosher ond
keepthem out of the reoch of children.Cascade®,
Cascade®Complete and Electrasol®Automatic
Dishwashing Detergents,and Jet-Dry®and
Cascade Crystal Cleare rinseagents have been
approved for usein all GEdishwashers.
• Locatesharp itemsso that they are not likely
to damage the door seal.
• Loadsharp kniveswith the handles up to reduce
the risk of cut-type injuries.
• Donot wosh plostic items unlessmorked
dishwosher sofe or the equivolent. For plostic
items not so morked, checkthe monufocturer's
recommendotions.
• Donot touch the heoting element during or
immediotely ofter use.
When using gour dishwasher, follow basic precautions,
including the following:
• Do not operote your dishwosher unlessoil
enclosure ponels ore properly in ploce.
• Do not tomper with controls.
• Do not obuse,sit onor stond on the door or dish
rock of the dishwosher.
• Do not ollow children to ploy oround dishwosher
when opening or closing door due to the possibility
of smollfingers being pinched in door.
• Do not discord o dishwosherwithout first removing
the door of the woshing comportment or the door
Iotch.
• Do not store or usecombustible moteriols,gosoline
or other flommoble voporsond liquidsinthe
vicinity of this or ony other opplionce.
• Do not ollow children to ploy with, on or insidethis
opplionce or ony discorded opplionce.
READ AND FOLLOW THIS SAFETY INFORMATION
CAREFULLY.
SAVE THESE INSTRUCTIONS
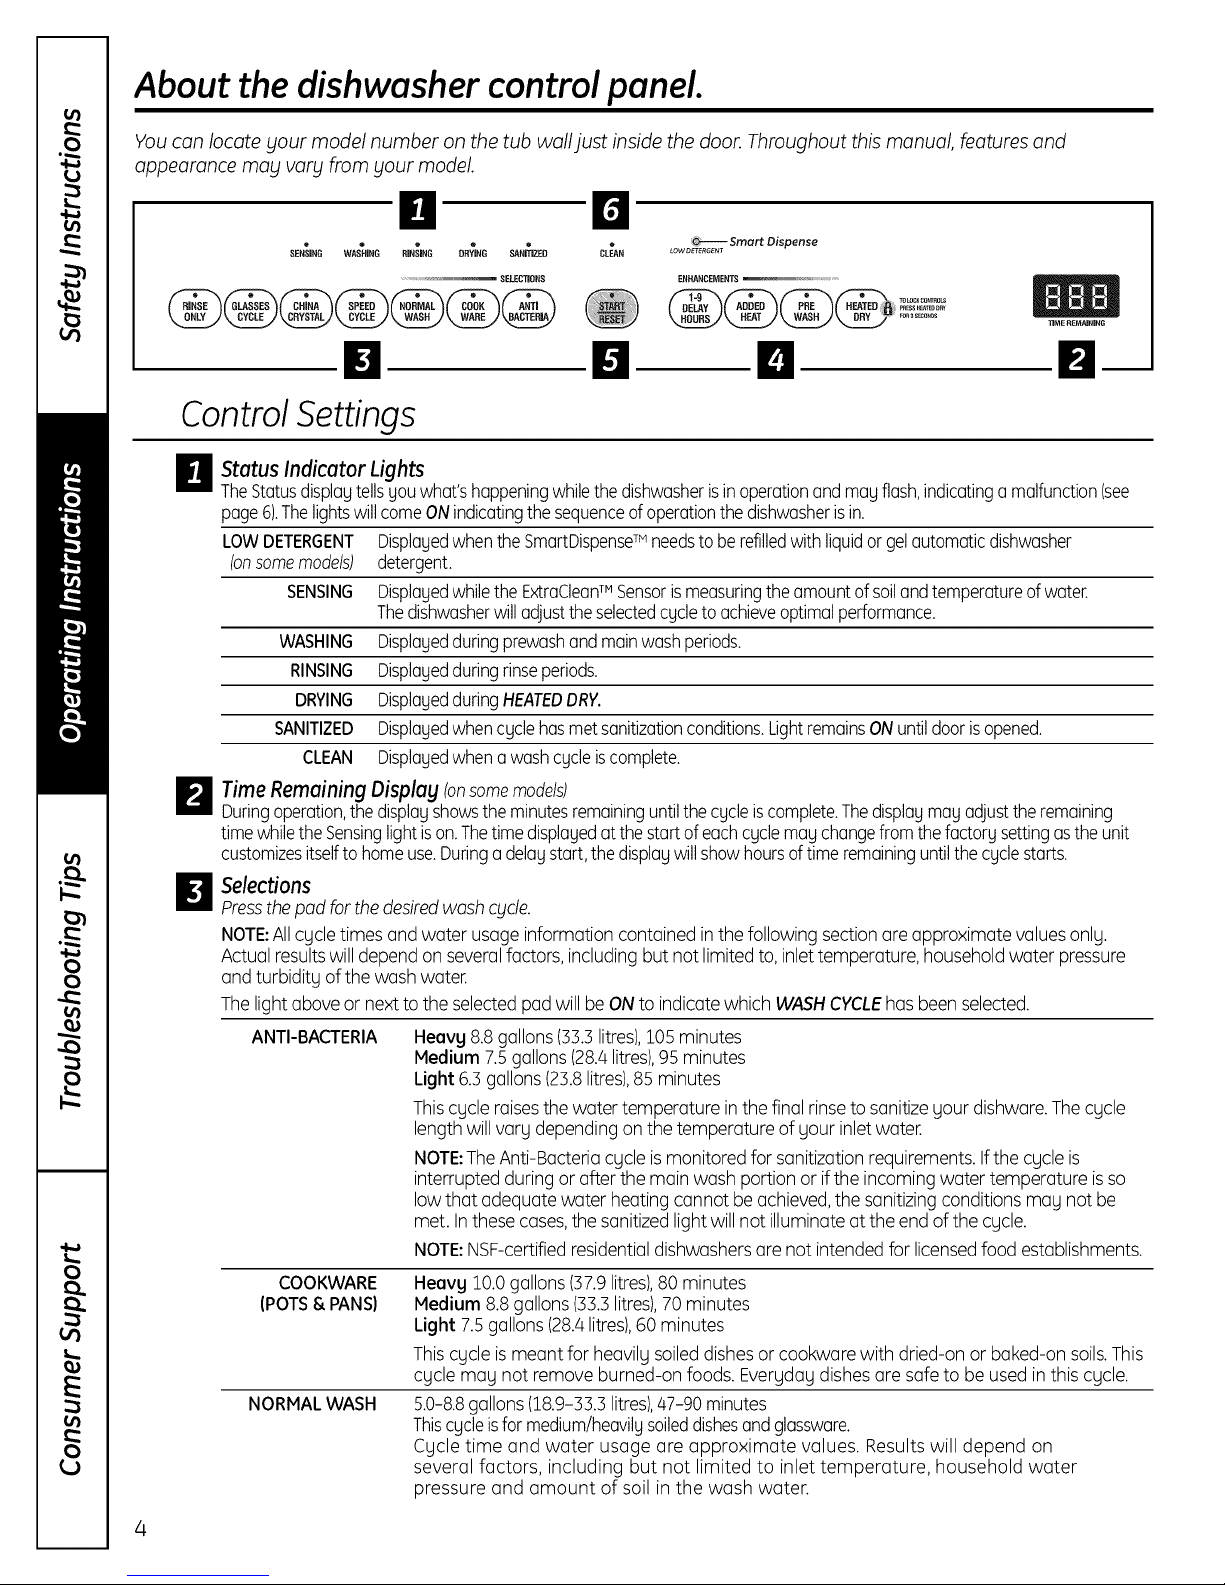
About the dishwasher control panel.
You can locate your model number on the tub wall just inside the door. Throughout this manual, features and
appearancemay vary fromyour model.
ll El
• * . . • . _ Smart Dispense
SENSING WASHING RiNSiNG DRYING SANiTiZED CLEAN LOW_ET_RGENT
.................................. SELECTIONS ENHANCEMENTS
D El El
Control Settings
_l Status Indicator Lights
TheStatusdisplaytellsyouwhat'shappeningwhilethedishwasherisinoperationandmayflash,indicatinga malfunction(see
page6).ThelightswillcomeONindicatingthesequenceofoperationthe dishwasherisin.
LOWDETERGENT Displayedwhenthe SmartDispenseTM needsto berefilledwithliquidorgelautomaticdishwasher
(onsomemodels) detergent.
SENSING Displayedwhilethe ExtraCleanTM Sensorismeasuringtheamountof soilandtemperatureof water.
Thedishwasherwilladjusttheselectedcycleto achieveoptimalperformance.
WASHING Displayedduringprewashandmainwashperiods.
RINSING Displayedduringrinseperiods.
DRYING DisplayedduringHEATEDDRY.
SANITIZED Displayedwhencyclehasmetsanitizationconditions.LightremainsONuntildoorisopened.
CLEAN Displayedwhena washcycleiscomplete.
TimeRemaining Displag (onsomemodels)
le
Duringoperation,the displayshowsthe minutesremaininguntilthe cycleiscomplete.Thedisplaymayadjusttheremaining
timewhiletheSensinglightison.Thetimedisplayedat thestartof eachcyclemay changefromthefactorysettingastheunit
customizesitselftohomeuse.Duringadelaystart,the displaywillshowhoursoftime remaininguntilthecyclestarts.
Selections
i[i
Pressthepad for the desiredwash c_Icle.
NOTE:Allcycletimes and water usage information contained inthe following sectionare approximate valuesonly.
Actual resultswill depend on severalfactors, including but not limitedto, inlettemperature, householdwater pressure
and turbidity of the wash water.
Thelightabove or next to the selectedpad will beONto indicatewhich WASHCYCLEhas beenselected.
ANTI-BACTERIA
COOKWARE
(POTS& PANS)
NORMAL WASH
Heavy 8.8gallons(33.3litres),105minutes
Medium 7.5gallons(28.4litres),95 minutes
Light 6.3 gallons(23.8litres),85 minutes
Thiscycle raisesthe watertemperature inthe final rinseto sanitizeyour dishware.Thecycle
lengthwill vary dependingon the temperature of your inletwater.
NOTE:TheAnti-Bacteriacycle ismonitored for sanitizationrequirements.Ifthe cycle is
interrupted during or after the main wash portion or ifthe incoming water temperature isso
lowthat adequate water heatingcannot beachieved,the sanitizingconditions may not be
met. Inthese cases,the sanitizedlight will not illuminate at the end ofthe cycle.
NOTE:NSF-certifiedresidentialdishwashersare not intendedfor licensedfood establishments.
Heavy 10.0gallons(37.9litres),80 minutes
Medium 8.8gallons(33.3litres),70minutes
Light 7.5gallons(28./4litres),60 minutes
Thiscycle ismeant for heavily soileddishesor cookwarewith dried-on or baked-on soils.This
cycle may not remove burned-on foods. Everyday dishes are safe to beused inthis cycle.
5.0-8.8gallons(18.9-33.3litres),/47-90minutes
Thiscycleisfor medium/heavilysoileddishesandglassware.
Cycle time and water usage are approximate values. Results will depend on
several factors, including but not limited to inlet temperature, household water
pressure and amount of soil inthe wash water.

SPEEDCYCLE 7.5gal.(28.4I),35 min.
(onsome models) Thiscycle isfor everyday dishesand glassware.
CHINACRYSTAL 7.5gal.(28.4I),35 min.
or HANDIGENTLE Thiscycle is for lightly soiledchina and crystal.
GLASSES 7.5gal.(28.4I),35 min.
(onsome models) Thiscycle isspecifically designedfor glasses.
RINSEONLY 2.5gal, (95 I),10min.
or RINSE& HOLD Forrinsing partial loadsthat will be washed later.Oonot use detergent with this cycle.
NOTE:TheCHINACRYSTAL/PLASTICS(somemodels)selectorisa toggle pad;toggle the pad until the
desiredcycle isindicated.
NOTE:Thisdishwasher isequippedwith o CleonSensoF"with automatic temperature control; therefore,cycle
length and time may vary dependingon soiland temperature conditions.
NOTE:Only theAnti-Bacteria cycle hasbeendesignedto meet therequirementsof Section6,NSF284 for soil
removal and sonitizotion efficacy.
Enhancements/Extras
II
The light above the selected pad will be ON to indicate which ENHANCEMENT/EXTRAhas been selected.
PREWASH For use with heavily soiled and/or dried-on, baked-on soils. This option MUSTbe
(on some models selected PRIORto starting the cycle. This option adds 26 minutes to the cycle time.
NOTE:Cannot be selected with RINSEONLYcycle.
HEATED DRY When HEATED DRY is off, dishes will air dry.
Light OFF
ge.com
HEATED DRY Turns the heater on for faster drying. This will extend the total cycle time between
Light ON 8 and 38 minutes depending on the cycle selected. NOTE: HEATED DRY cannot be
selected with RINSE ONLY cycle.
LOCK
ADDED HEAT or
EXTRAHOTWASH
or TEMPBOOST
(on some models
DELAY HOURS
RESET
Youcan lock the controls to prevent any selections from being made. Or you con lock
the controls after you hove started o cycle.
Children cannot occidentally start dishwasher bg touching pods with this option
selected.
To unlock the dishwasher controls, touch and hold the HEATEDDRYpad for 3 seconds.
The light above the LOCKpad will turn off.To lock the dishwasher, touch and hold the
HEATEDDRYpad for 3 seconds. The light above the LOCI( pad will turn on.
When selected, the cycle will run with heating element on longer and may
increase cycle times to improve both wash and dry performance.
NOTE:Cannot be selected with RINSEONLYcycle.
You can delay the start of awash cycle for up to 9 hours, Touch the DELAYHOURSpad
to choose the number of hours you want to delay the start of the cycle; then touch
START/RESET.Themachine will count down and start automatically at the correct time.
Touching START/RESETesecond time will cencel the DELAVSTARTselection. NOTE:If
you forget to fully close the door,a reminder signal will beep until you do so.
To change a cycle after washing starts, touch the START/RESETpad to cancel the
cycle. TheSTART/RESETlight will flash while the water is pumped out if needed. This
takes approximately 90 seconds. When the light stops flashing, the dishwasher
can be reprogrammed and restarted.
About the dishwasher control panel.
Start
m
Closethedishwasherdoorandselectthe cycleanddesiredenhancements.TouchtheSTART/RESETpadtobegin
thecycle.Waterfillbegins,andapproximately60secondslaterthewashactionbegins.
NOTE;Thedishwasherremembersyourlastcycleso youdon'thaveto reprogrameachtime.Whenthedishwasher
doorisfullyclosed,thecontrolpanellightswill displaythelastsettingsyou selected.
If youdon'twantto changeanyof thesettings,simplytouchtheSTART/RESETpadto beginthecycle.
Ifthedoorisclosed,theindicatorlightswillturnoffiftheSTART/RESETpadis notselectedwithintwo minutes.
Toactivatethedisplay,openandclosethedooror pressanypad.
Also,ifa powerfailureoccurs,NORMALandHEATEDDRYwillautomaticallybeprogrammed.Hakeanynew
selectionsandtouchtheSTART/RESETpadto beginthecycle.
Clean
m
TheCLEANlightwillilluminateanda doublebeepwillsoundwhena washcycleiscomplete.Onsomemodels,
theCLEANlightwillturnoffwhenthe doorisopened.Onothermodels,theCLEANlightwillremainonuntilthedoor
isopenedandthen relatchedoruntilanykeypadispressedwhilethedoorislatchedshut.
Flashing display lights.
Status Indicator Lights
START/RESET
Using the dishwasher.
Check the Woter Temperoture
Theenteringwatershouldbeat least120%(49°C)and
notmorethan 150%(66°C)foreffectivecleaningandto
preventdishdamage.Checkthewatertemperaturewith
acandyor meatthermometer.Turnonthehotwater
Use Jet-Dry ®or Cascade Crystal Clear®Rinse Agent
Jet-Dry®orCascadeCrystalCleare rinseagentsremovespotsandpreventnewfilm buildupon yourdishes,glasses,
flatware,cookwareandplastic.
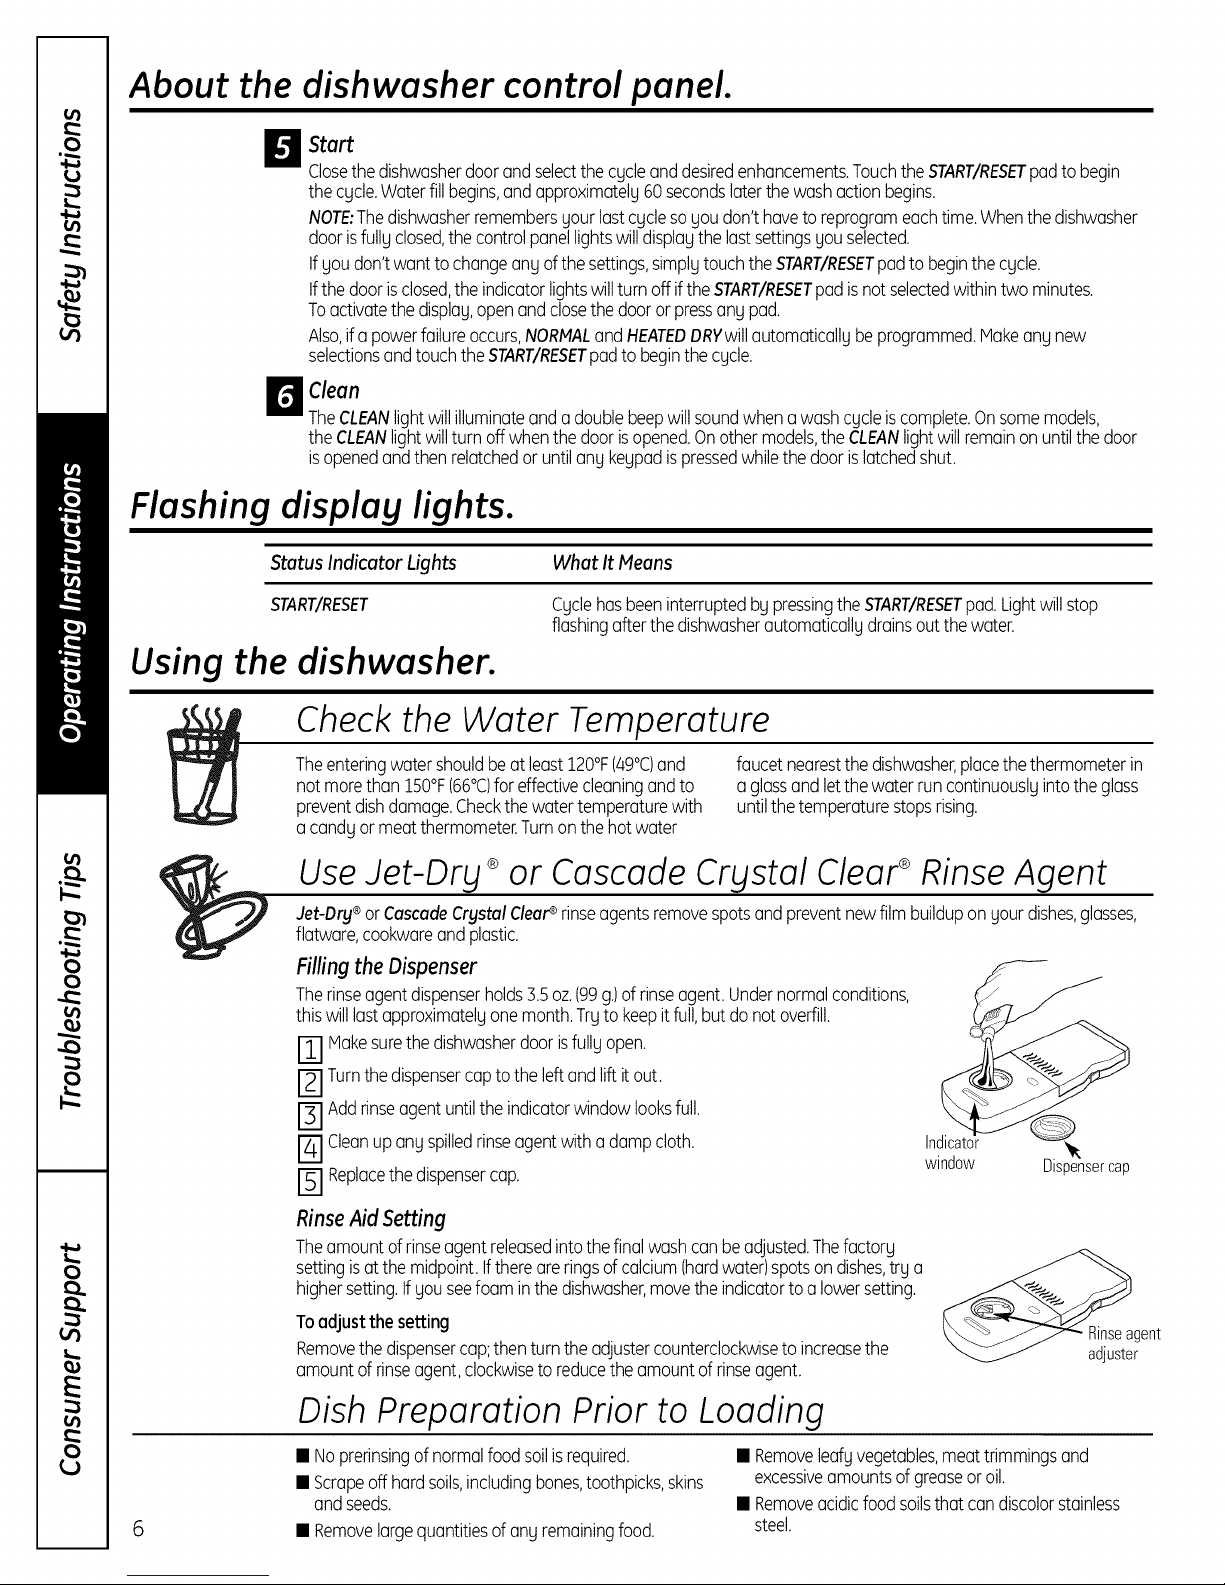
Filling the Dispenser
Therinseagentdispenserholds3.5oz.(99g.)ofrinseagent.Undernormalconditions,
thiswilllastapproximatelyonemonth.Tryto keepitfull,butdonotoverfill.
[] Hakesurethedishwasherdoorisfullyopen.
I_1 Turnthedispensercaptothe leftand liftitout.
[] Addrinseagentuntiltheindicatorwindowlooksfull.
[] Cleanupanyspilledrinseagentwitha dampcloth. In
F'I Replacethedispensercap. window Dispensercap
What It Means
CyclehasbeeninterruptedbypressingtheSTART/RESETpad.Lightwillstop
flashingafterthedishwasherautomaticallydrainsoutthewater.
faucetnearestthedishwasher,placethethermometerin
aglassandletthewaterruncontinuouslyintothe glass
untilthetemperaturestopsrising.
RinseAid Setting
Theamountof rinseagentreleasedintothefinal washcanbeadjusted.Thefactory
settingisat the midpoint.Ifthereareringsofcalcium(hardwater)spotsondishes,trya
highersetting.Ifyouseefoaminthedishwasher,movetheindicatorto a lowersetting.
Toadjustthe setting
Removethedispensercap;thenturn theadjustercounterclockwiseto increasethe
amountof rinseagent,clockwiseto reducetheamountof rinseagent.
Dish Preparation Prior to Loading
• Noprerinsingof normalfoodsoilisrequired.
• Scrapeoffhardsoils,includingbones,toothpicks,skins
and seeds.
6
• Removelargequantitiesof anyremainingfood.
Rinseagent
adjuster
• Removeleafyvegetables,meattrimmingsand
excessiveamountsofgreaseoroil.
• Removeacidicfoodsoilsthat candiscolorstainless
steel.
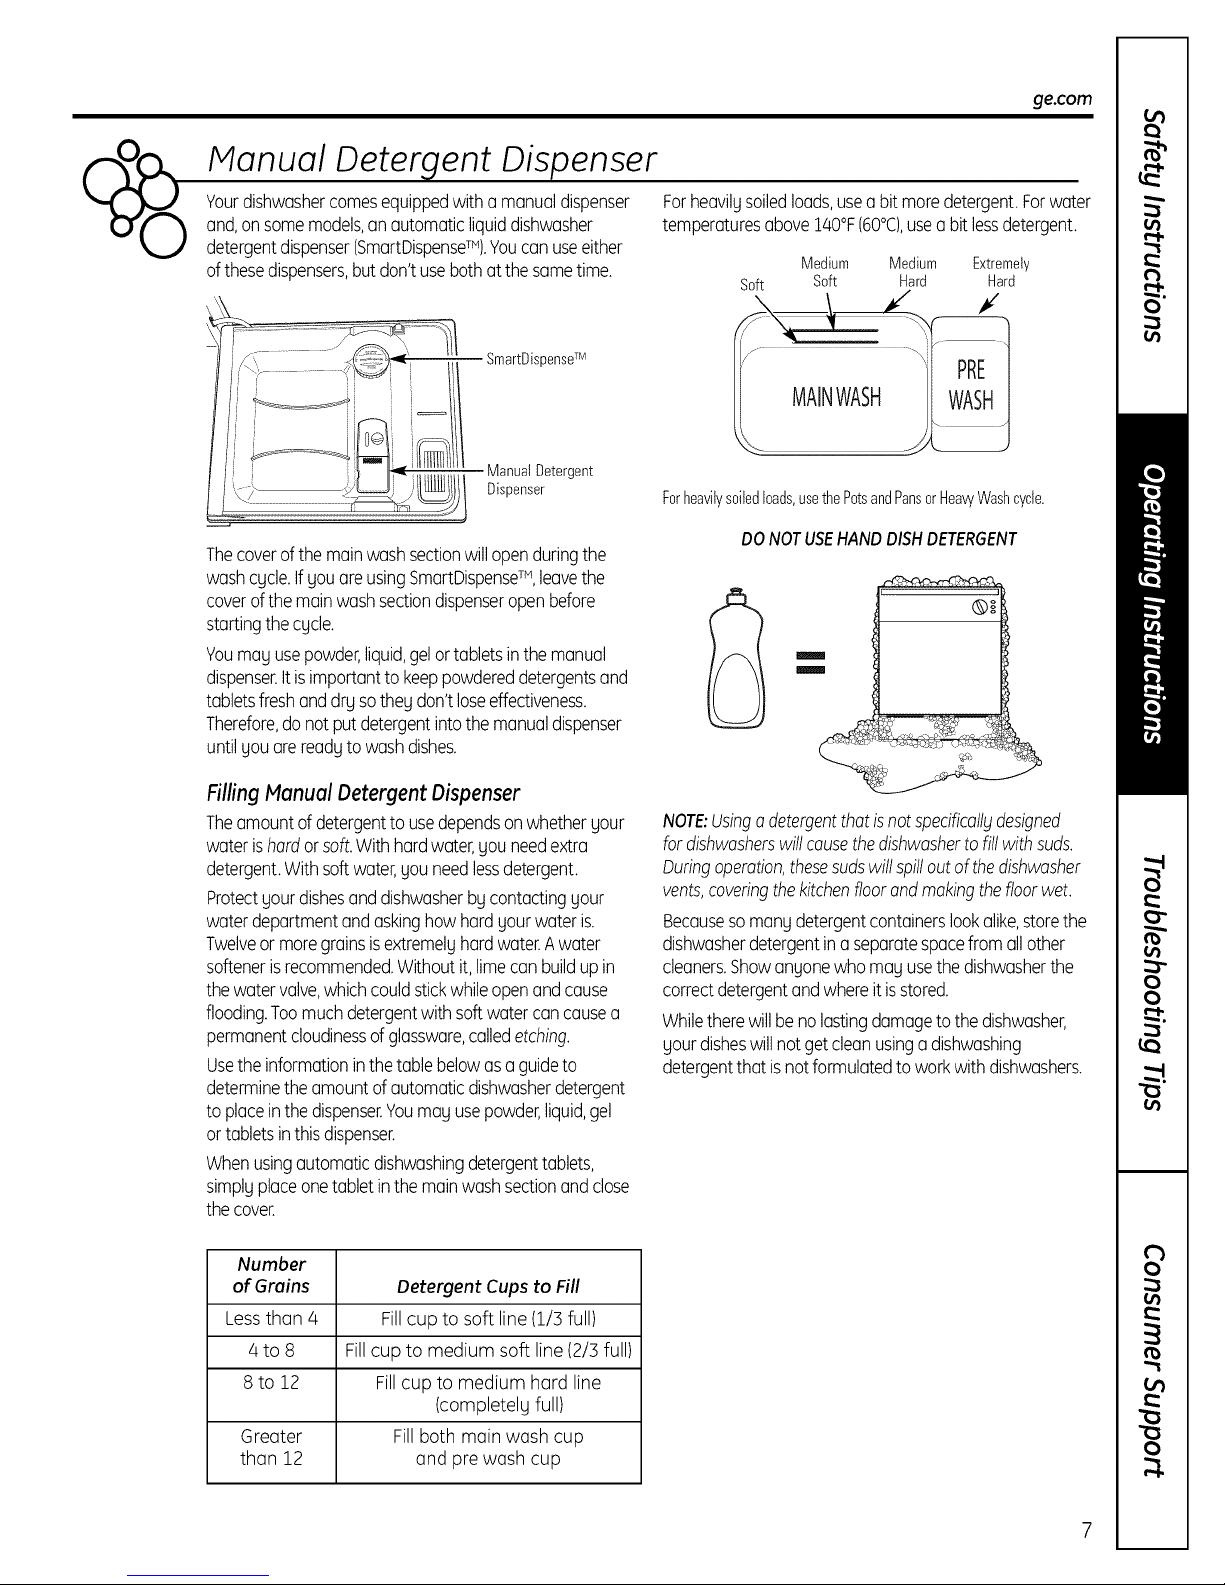
Manual Detergent Dispenser
Vourdishwashercomesequippedwitha manualdispenser
and,onsomemodels,an automaticliquiddishwasher
detergentdispenser(SmartDispenseTM).Voucanuseeither
ofthesedispensers,butdon't usebothatthesametime.
SmartDispense TM
ManualDetergent
Dispenser
Thecoverof themainwashsectionwillopenduringthe
washcycle.IfyouareusingSmartDispenseTM, leavethe
coverofthe mainwashsectiondispenseropenbefore
startingthecycle.
Voumay usepowder,liquid,gelortabletsinthe manual
dispenser.Itisimportanttokeeppowdereddetergentsand
tabletsfreshanddry sothey don'tloseeffectiveness.
Therefore,donotputdetergentintothemanualdispenser
untilyou arereadytowashdishes.
ge.com
Forheavilysoiledloads,useabitmoredetergent.Forwater
temperaturesabove180%(60°C),usea bit lessdetergent.
Medium Medium Extremely
Soft Soft Hard Hard
Forheavilysoiledloads,usethePotsandPansorHeawWashcycle.
DO NOTUSEHAND DISHDETERGENT
m
m
Filling Manual Detergent Dispenser
Theamountof detergentto usedependsonwhetheryour
waterishardorsoft.Withhardwater,youneedextra
detergent.Withsoftwater,youneedlessdetergent.
Protectyourdishesanddishwasherbycontactingyour
waterdepartmentandaskinghow hardyourwateris.
Twelveor moregrainsisextremelyhardwater.Awater
softenerisrecommended.Withoutit, limecanbuildup in
thewatervalve,whichcouldstickwhileopenandcause
flooding.Toomuchdetergentwithsoft watercancausea
permanentcloudinessofglassware,calledetching.
Usetheinformationinthetablebelowasaguideto
determinetheamountofautomaticdishwasherdetergent
to placeinthe dispenser.Voumayusepowder,liquid,gel
ortabletsinthisdispenser.
Whenusingautomaticdishwashingdetergenttablets,
simplyplaceonetabletinthemainwashsectionandclose
thecover.
Number
of Grains Detergent Cups to Fill
Lessthan 4 Fillcup to soft line(1/3 full)
4 to 8 Fillcup to medium soft line (2/3 full)
8 to 12 Fillcup to medium hard line
(completely full)
Greater Fillboth main wash cup
than 12 and pre wash cup
NOTE:Usingo detergentthatisnotspecificoll_tdesigned
fordishwasherswill causethedishwasherto fillwith suds.
Duringoperation,thesesudswillspilloutofthedishwasher
vents,coveringthekitchenfloorandmakingthefloorwet.
Becausesomanydetergentcontainerslookalike,storethe
dishwasherdetergentinaseparatespacefromallother
cleaners.Showanyonewho may usethedishwasherthe
correctdetergentandwhereitisstored.
Whiletherewillbeno lastingdamagetothedishwasher,
yourdisheswillnotgetcleanusingadishwashing
detergentthat is notformulatedtoworkwith dishwashers.
Using the dishwasher.
SmartOispense Detergent Dispenser ionsome models)
This dishwasher may have a SmartDispenseTMfeature
which automatically dispensesliquid automatic
dishwasher detergent into each cycle based on soil
levelandwater hardness.
To utilizethe SmartDispenseT"DetergentDispenser,
it must first befilled.Although any liquidor gel
automatic dishwashing detergent can be usedin
the SmartDispenseT"system, all liquidorgel
automatic dishwashing detergents are not the same.
Host automatic dishwashing detergents are chlorine
bleach-based (such asCascade®or Electrasol®)
while otherscontain enzymes (suchas Cascade
Complete®or Electrasol®AdvancedT"Gel).
Do not mix ong chlorine bleoch-bosed outomotic
dishwoshing detergent with ong dishwoshing
detergent contoining enzymes osthis could couse
the detergents to congeol ond leod to blockoge of
the SmortDispense'" system. Checkthe detergent
label to determine if the detergent ischlorine
bleach-based or one that contains enzymes. It is
recommended that the same type of detergent be
usedwhen refilling your SmartDispense_"system.
Zi,CAUTION! Absolutely do not add
powder detergent, tablets or any liquid soap or
detergent normally usedfor washing hands or
dishes in a sink.Onlyuse liquid or gel detergent
specifically designed for use in an automatic
dishwasher.
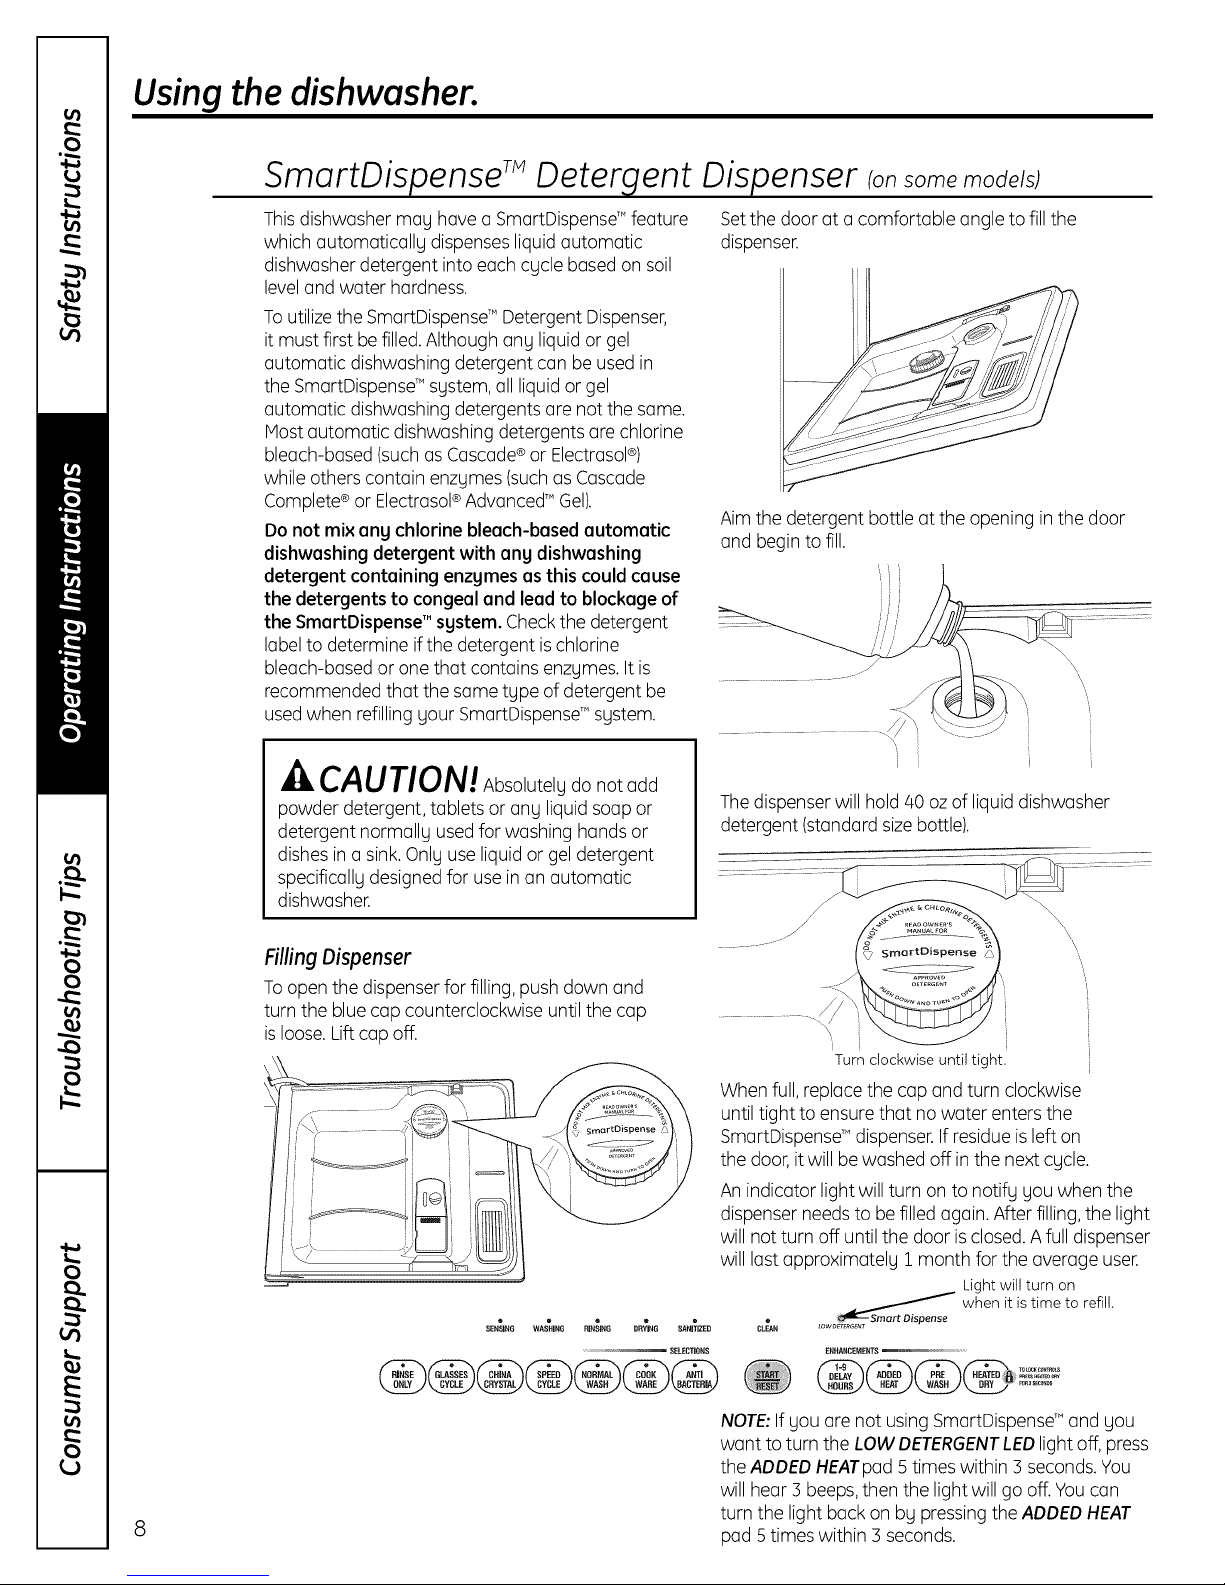
Setthe door at a comfortable angleto fillthe
dispenser.
Aimthe detergent bottle at the opening inthe door
and begin to fill.
i
Thedispenserwill hold 40 ozof liquiddishwasher
detergent (standard sizebottle).
Riling Dispenser
Toopen the dispenser for filling,push down and
turn the blue cap counterclockwise untilthe cap
isloose.Lift cap off.
@@@@@@@
Whenfull, replace the cap and turn clockwise
until tight to ensure that no water entersthe
SmartDispenseT"dispenser.Ifresidueisleft on
the door, itwill bewashed off in the nextcycle.
An indicator light will turn on to notify you when the
dispenser needsto be filled again.After filling, the light
will not turn off until the door isclosed.A full dispenser
will lastapproximately 1 month for the average user.
SEN;,NG_AS_ING.IN;i.GW,NG S_"I;,ZEO
SELEC'flONS
NOTE:Ifyou are not usingSmartDispense_"and you
want to turn the LOW DETERGENTLEDlight off,press
theADDED HEATpad 5 times within 3 seconds.You
will hear3 beeps,then the light will go off.Youcan
turn the light back on by pressingthe ADDEDHEAT
pad 5times within 3 seconds.
i
i i i
Turn clockwise until tight. 'i
Light will turn on
when it is time to refill.
CLEAN Low_ErE_G_NT
ENHANCEMENTS
SmartDispense Detergent Dispenser
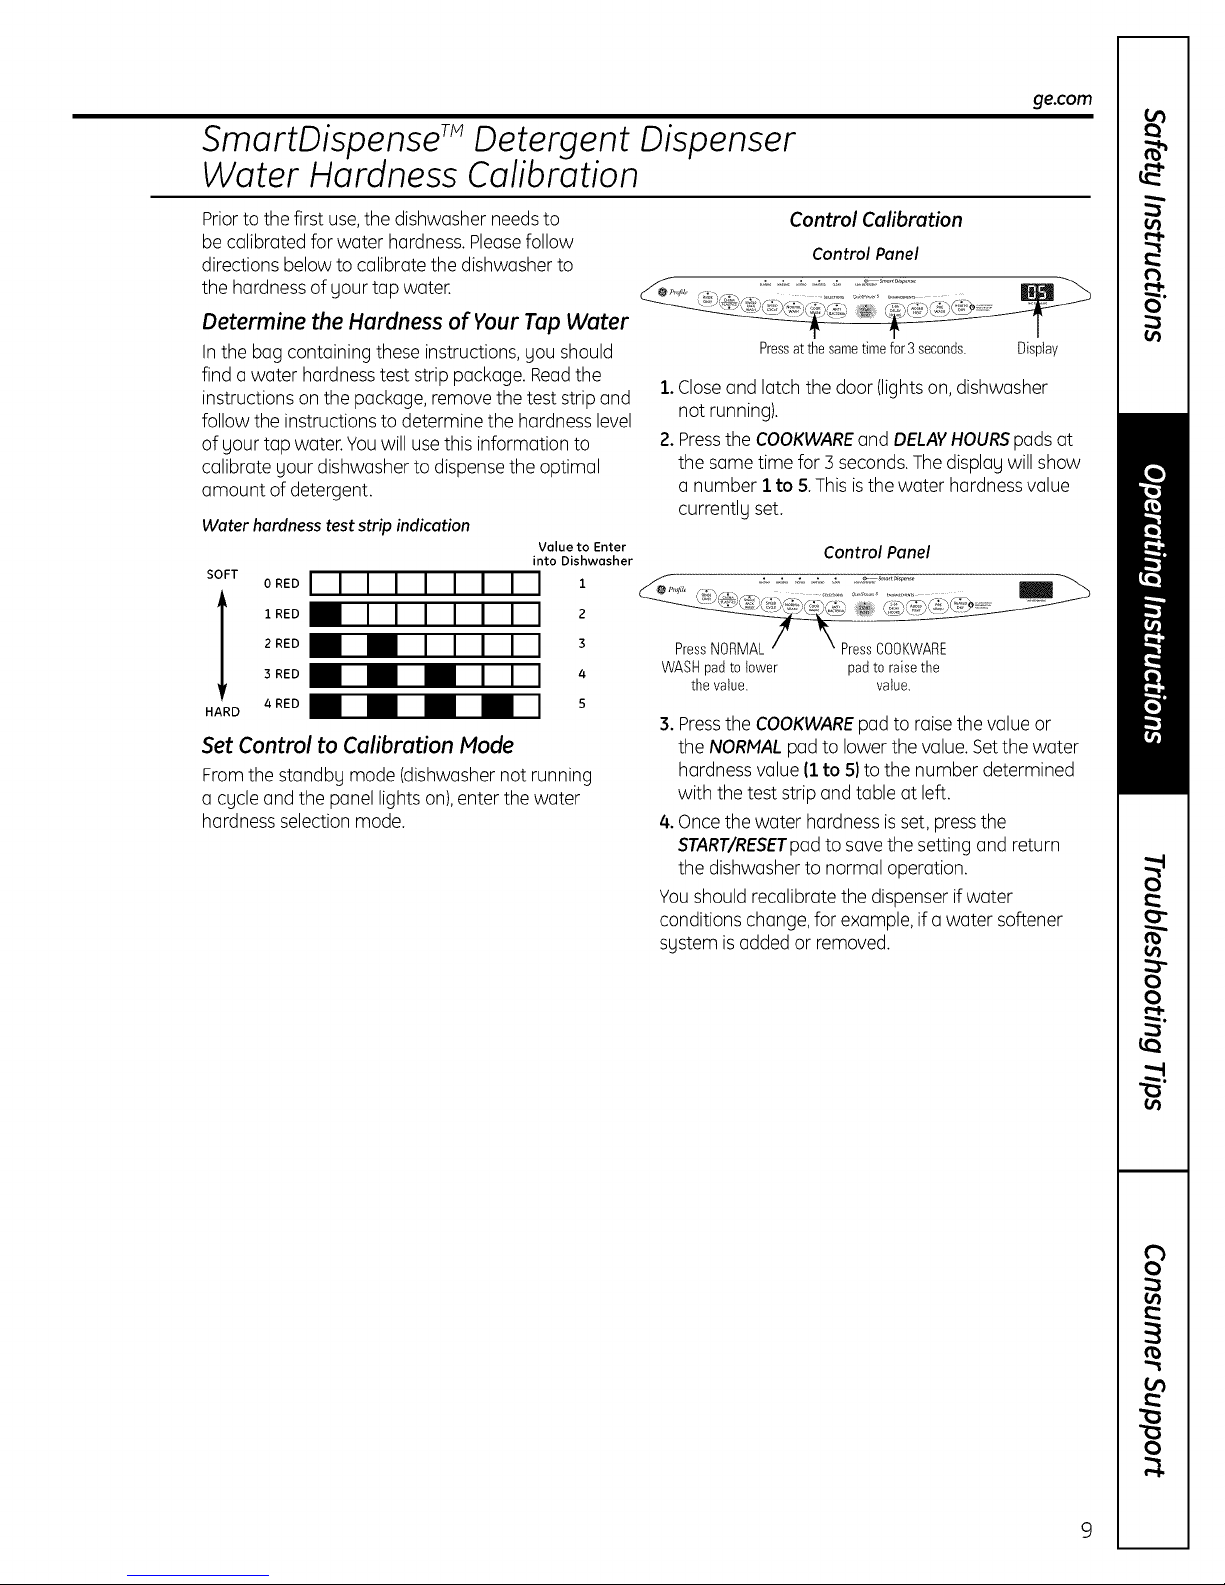
Water Hardness Calibration
ge.com
Priorto the first use,the dishwasher needsto
be calibrated for water hardness. Pleasefollow
directions below to calibrate the dishwasher to
the hardnessof gour tap water.
Determine the Hardness of Vour Tap Water
Inthe bag containing these instructions, gou should
find awater hardnesstest strippackage. Readthe
instructions on the package, removethe test strip and
follow the instructions to determine the hardness level
of gourtap water.Youwill use this information to
calibrate gour dishwasher to dispensethe optimal
amount of detergent.
Water hardness test strip indication
SOFT
OREDI I I I I I I I I 1
1 RED _ 2
2 RED _ 3
3 RED _ 4
4 RED _ 5
HARD
Volue to Enter
into Dishwosher
Set Control to Calibration Mode
From the standbg mode (dishwashernot running
a cgcle and the panel lights on),enter the water
hardness selectionmode.
Control Calibration
Control Panel
Pressatthe sametimefor3 seconds. Display
1.Closeand latch the door (lightson, dishwasher
not running).
2.Pressthe COOKWAREand DELAYHOURSpads at
the sametime for 3seconds.Thedisplauwill show
a number 1to 5.This isthe water hardness value
currentlu set.
Control Panel
WASHpadto lower padto raisethe
thevalue, value.
3.Pressthe COOKWAREpad to raisethe value or
the NORMALpad to lower the value. Setthe water
hardness value(1to 5)to the number determined
with the test strip and table at left.
4. Oncethe water hardness is set, pressthe
START/RESETpadto save the setting and return
the dishwasher to normal operation.
Youshould recalibrate the dispenser ifwater
conditions change, for example,if a water softener
sgstem isadded or removed.

Loading the dishwasher racks.
For best dishwashing results, follow these loading guidelines. Features and appearance of racks and silverware
baskets ma_l var_l from _lour model.
Upper Rack
J
I II II II II 11 II II II II I!
Although the upper rock isprimarily for
glosses,cups and saucers, pots and pans con
be placed in this rock for effective cleaning.
Cupsand glosses fit best alongthe sides.This
isalso o secure place for dishwasher-safe
plastics.
Theupperrackisadjustable (onsome models)
to addflexibilitg inloading gour dishwasher.
Tolower,push tabs inand lower rock.Toraise,
just pull up onrack untilit snaps.
Theutility shelf(on some models)mug be
placed in the upor down positionto odd
flexibilitg.A wine gloss holder (onsome
models)secureswine glosses for best
wushubilitg. Becausewine glossescome
in various sizes,after lauding,slowlg push
in the rockto make suretheg will clear
the top of the dishwasher.
Theupper rock isgood for oil kinds of
odd-shaped utensils.Saucepans,mixing
bowls and other items should be placed face
down. Fold-down tines (onsome models)
provide flexibilitg for extra-large and hard-to-
fit items.
Securelarger dishwasher-safe plastics over
2 tines when possible.
Makesure small plastic items aresecure so
theg can't fall onto the heater.
Besurethat items do not protrude through
the bottom of the rock and block rotation of
the middle sprog arm. This could result in
poor wash performance for items in the
upper rock.
Checkto make surethat no items will block
rotation of the wash arms.
Don'tletany
itemextend
throughbottom.
Toremoveendbaskets,graspthe
basketatoppositecornersand
slideapart.
Somemodels haveon AngledRackSgstem,
which ollows gouto angle gour dishes,such
as coffee mugs, for bettercleaning and
quicker drging.To position the tines, pull the
leverforward, drop the tines into position
and releasethe lever.
Lower Rack
Thelower rock isbest usedfor plates,saucers
and cookwore. Large items such as broiler
pans and baking rocks shouldgo along the
left-hand side. Load plotters, pots and bowls
along the sides,in corners orinthe back.The
soiledside of items shouldface the center of
the rock. If necessorg,oversizedglossesand
mugs con be placed in the lower rockto
maximize loading flexibilitg.
Silverware Basket
Avarietg of options isavailable regarding
the three-piece silverware basket in gour
dishwasher.The complete basket isdesigned
to fit on the right sideof the lower rock.
Additionollg, each end of the basketis
removable to odd loading flexibilitg to
accommodate flatware and lower rock
copocitg needs.
Toloadflatware, simplg push the adjustable
handle to either side.Put flatware in the
basket with knife handlesupto protect
gour hands. Placespoons in the basket
with handles down. Mix knives,forks and
spoons sotheg don't nesttogether.
Also,be careful notto let a portion of on item
such as o pot or dish handle extend through
the bottom rock. Thiscould blockthe wash
arm and cause poor washing results.
Fold-down tines (onsome models)provide
flexibilitgfor extra-large and hard-to-fit items.
Thetines mog be left inthe up position or
folded down to customize the lower rock.
Theprovided lidswith slots con be used
to ovoid nesting of silverware.Small plastic
items, such as measuring spoons and
lidsfor small containers,should go in
the bottom of the silverware basketwith
silverware ontop.
Thelidsof both endand middle baskets con
be closed to contain small items. Longitems
con be placedon the utilitg shelf in the
upper rock.
10
 Loading...