

GE GBS22**P, GBS20**P, PDS2O**P, PDS22**P Technical Service Manual
SEARS
3EPT.731A
TECHNICAL
FLASH
DISTRICT
MANAGER
CENTRAL
MANAGER
BRANCH
MANAGER
CALL
CENTRE
MANAGER
PARTS
MANAGER
T.
F.
46-106
JUNE
2OO4
CLAUDE
BABINEAU_
DEPARTMENT
73IA
DIVISION
46
SOURCE
C978
ERVICE
MANUA
DIVISION
46
G.E.
REFRIGERATORS
2OO3
ELBCTRONIC
BOTTOM-MOUNT
GE
Consumer
& lndustrial
TECHNICAL
SERVICE
GUIDE
2003
Electron
ic
Bottom-Mou nt
Refrigerators
MODEL
SERIES:
GBS22_
_P
GBS20__P
PDS22__P
PDS2O
P
-=:
PUB # 31-9112
1tM
IMPORTANT
SAFETY
NOTICE
The information
in this service
guide
is intended
for
use by
individuals
possessing
adequate backgrounds
of electrical,
electronic, and
mechanical
experience. Any attempt
to repair a
major appliance may
result
in
personal
injury
and
property
damage.
The manufacturer
or
seller cannot
be responsible
for the
interpretation
of this information,
nor can
it
assume
any
liability in
connection
with ib
use.
WARNING
To
avoid
personal
injury
disconnect
polver
before seMcing
this
product.
lf
elestrical
power
is required
for
diagnosis
or test
purposes,
disconnect the
power
immediately
after
performing
the
necessary
checks.
RECONNECT ALL GROUNDING DEVICES
lf
grounding
wires, screws,
Sfraps,
clips, nuts, or
washers used
to complete a
path
to
ground
are removed
for service, they must
be retumed
totheiroriginal
position
and
prcperlyfastened.
GE Consumer &
lndustial
TechnialServloe
Guide
Copynght@2004
All rights
reserved.
This
service
gufule
may not be reproduced
in whole
or
in
part
in
any
form without
written
permission
fiorn tte
Genenal Elecfic Comparry.
-2-
Table
of
Contents
-3-
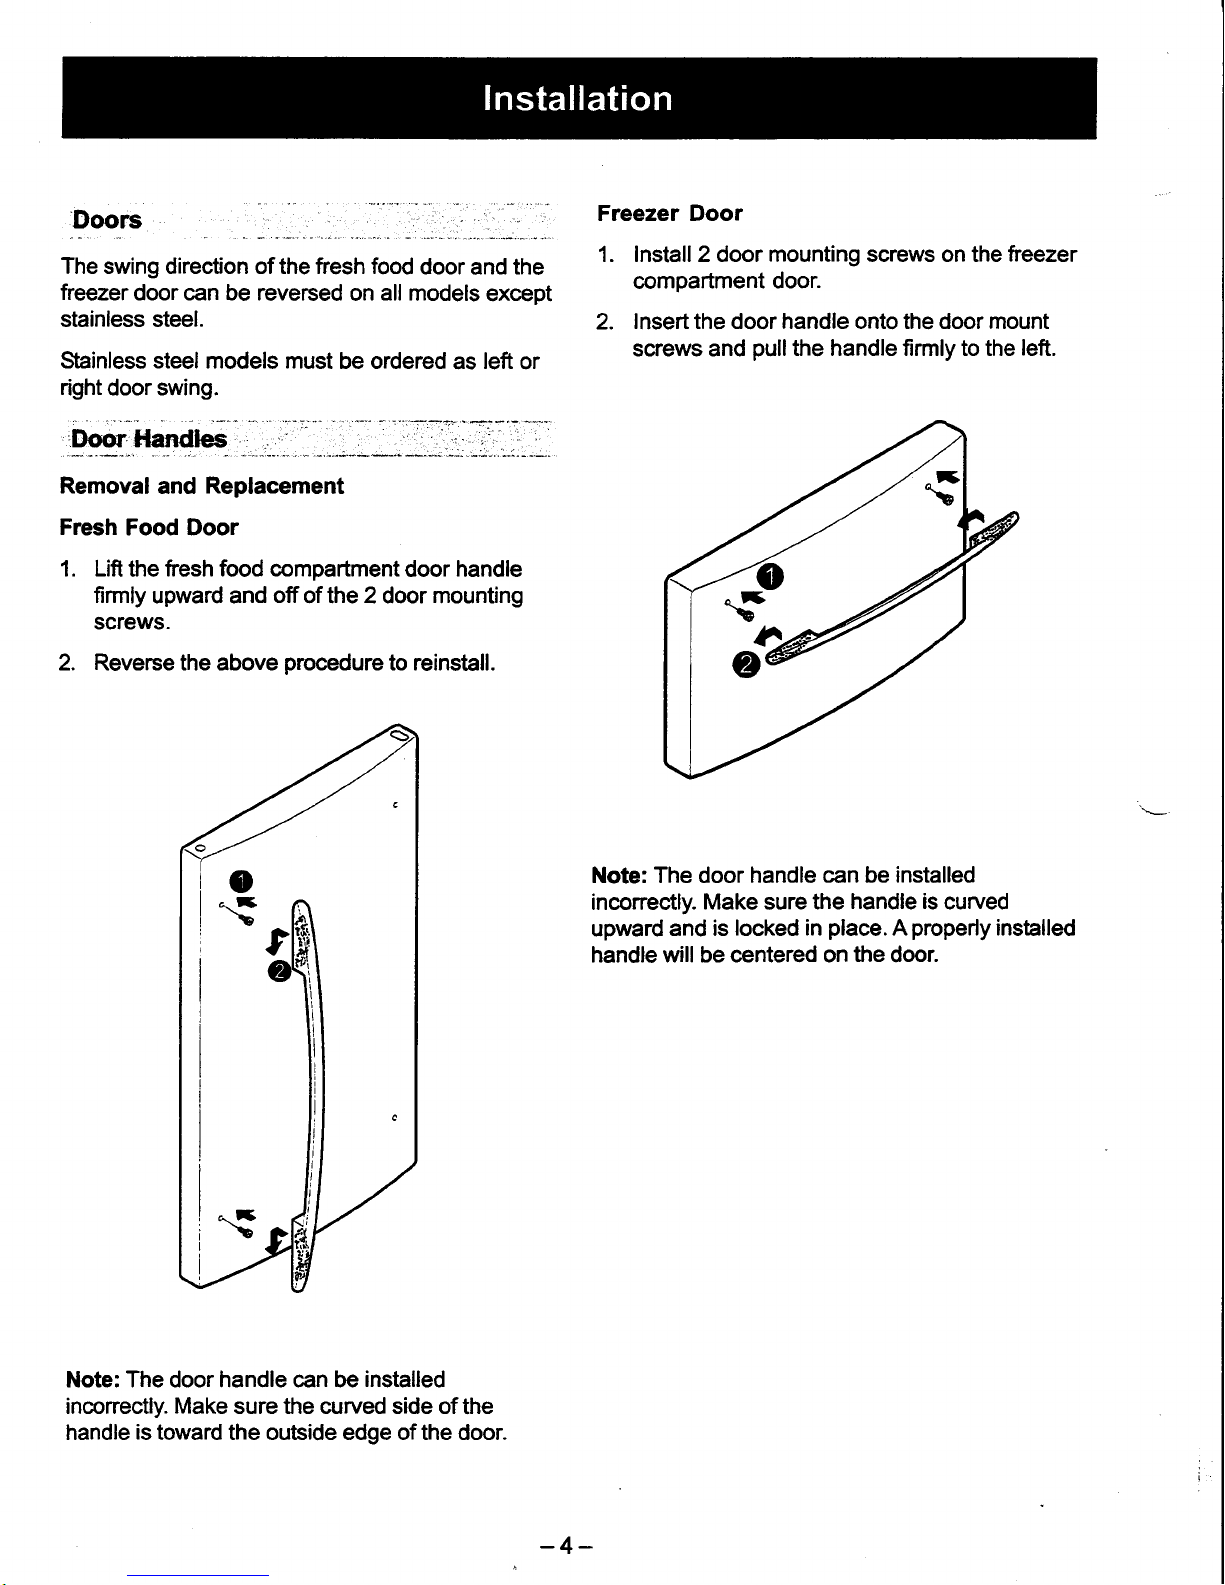
Doors
The swing direction of the fresh food
door
and
the
freezer
door can be reversed
on
all
models
except
stainless steel.
Stainless steel models must
be ordered
as
left
or
right
door swing.
Removal
and
Replacement
Fresh Food Door
1. Lifi
the
tresh food compartment
door handle
firmly
upward and
off
of the 2door mounting
screws.
2. Reverse the above
procedure
to reinstiall.
Note: The door handle can be
installed
inconectly.
Make
sure the curved side of
the
handle
is
toward the outside edge of the door.
Freezer Door
1. Install 2 door mounting screws on the
treezer
compartment
door.
2.
lnsert the door handle onto the door mount
screws and
pullthe
handle firmly to the
left.
Note: The door
handle can be installed
inconectly.
Make
sure
the
handle is
curved
upward
and is
locked in
place. A properly
installed
handle will be centered on
the
door.
-4-

Troubleshooting
Tips - Handle Installation
Handle too hard b
instrlUHandle tequircs
excesive torce to
itlr;fg, l
Mormting
bolts too tight- Remove
the handle.
Loosen the mounting
bola
sltghtly so that the handle will
snap
into place
when installed.
Defective normting bracket
or
bolts.
Remove
handle.
Check for defective
mounting
brackets or bols. If defective, replace.
Install
handle according to Installation
Instructions.
Larce handle/l{andle
rmkes
ratiling noise
at
fficlnretrt
Loose
normtingbolts
If the
handle installs properly
(slides
on and
locks/snaps into place)
but
is
loose, remove the
handle and tighten the mounting
bola. Use
a
lomm
socket
and ratchet
or wrench. Do not use a
screwdriver as
it will
not provide
enough torque
for
proper tightening.
Reinstall handle
according
to Insrallation Instructions included wi&
the
handle.
Freezer
handle is installed
baclmtards.
Remove handle.
Check for correct mounting
brackets
on
the
handle. There is
a right bracket
(R)
and a left bracket
(L).
The
handle has the
word
'RIGHT"
printed
in the bracket
cavity.
The
"R'bracket
should
be
installed in
the bracket
cavity marked
"RIGI{T".
The
"L"
bracket should
be
insr^lled on the
opposite side. Reinstall handle
according
to
Installation Instructions.
Fresh Foodhandle is mormtedupside
dorrn
or
incorrectly
relative to the
curve
ofthe Fresh Food door.
Make certain that the arrow label
on the
handle
is pointing at the center
of
the
unit. To
veri$,
the
handle should
look
straight from a
distance
(not
slanted to the side).
-5-

ELECTRICAL
SPECIFICATIONS
Temperature
Control
(Position
5)...............
........32 - 4"F
Detrost Conhol...
60 hrs @ 40
mins with
no dooropening
OvertemperatureThermostat.............
140-110"F
Defrost Thermistor..
..--..-....70'F
Electrical Rating: 115V.
AC,
60 H2.................1
-
5Amp.
Maximum
Cunent Leakage.....
........0.5
mA
Maximum
Ground Path Resistan@...............0.
14 Ohms
Energy Consumption.......507
k\rVh/yr for
20
culft
models
Energy Consumption.......520
kWh/yr for
22 cuftmodels
NO LOADPERFORITIANCE
Control
Position:5€
And Ambient
of;..........
.....
90'F
Fresh
Food,
"F.....
.---...32
-
42
Frozen Food,
"F.....
.......
-5 -
5
Percent
Running Time...........
.........
45
-
65
REFRIGERANONSYSTETTI
Minimum
Compressor Gapacity Vacuum......
........
22 in.
Minimum
Equalized Pressure
@
70"F
38
PS|G
@
90"F......
49 PStc
Reftigerant- R- 134a..
4.06o2-
Compressor................
690 BTU/hr
INSTALLANON
Clearance
must
be
provided
at top, sides
and rear
of the
refrigerator
for
air circulation.
ATTOP......
.1
inch
AT SIDES..
0.125
inch
AT REAR...
1
inch
The evaporatorfan forces air through
the
evaporator
into the fteezer
compartment.
Air from the
evaporator
is
also
forced through
the
electronic damper to
the top
of the
air
tunnel,
through the fresh food compartment, and retums
to the evaporator.
The fresh
food
compartment
receives
chilled
air
through an electronic damper at the bottom, rear
of the
ftesh
food compartment. The damper is
controlled by the
main
control board. When
open,
the damper allows
chilled
air
ftom
the
freezer
to
move
into
the
fresh
food compartment.
Air retums
from
the ftesh
food
compartment
to the
freezer compartment
via two vents located
to the
left
and
right
of
the
airtunnel.
r
coLD
AtR
*=
MIXED AIR
r r r
flfl REIURN TO
EVAPOMTOR
\
1
.-&
\
FRESH
FOOD'
\.
\
i-$
-
FREEZER
t
,
!>
AIR FLOW
-6-

Model Number
V-NOV
Z-DEC
L.
JUN
M.JUL
1999 - V
R.
AUG 1998 - T
s-sEP
1997-S
T-OCT
1996-R
2O0O
-Z
ExamPle:
Serial Number
The first
two characters of the serial number
identify the month
and
year
of
manufacture.
Example: AG123456S = January 2004
A. JAN
2005-H
Theletter
D
-
FEB
2004
-
G
designating the
F - MAR
2003
-
F
year
repeats
every
G - ApR
2OO2
_D
1?years.
H
-
MAY 2OO1
-A
T - 1974
T - 1986
T - 1998
The nomenclaftlre
plate
is located on the
upper left wall
of
the
fresh
food
connpartment.
1995
-
M
1994 - L
i{TERICIR'SHELIGS
H=UPGMDEGT
SS
K=SPI!+ROOFG|.ASS
M
=
SPILIL'rPf{OOF/SUDEOUT
GLASS
S
=
STAINIESS STEEL DOORS
EITERbRCOLOR
WW= WHTTE/VI/HITE
Ss = SrANLESS,SfAINLESS
CC = BISOUE/BISOUE
BB=BLACKtsl-ACK
-7-
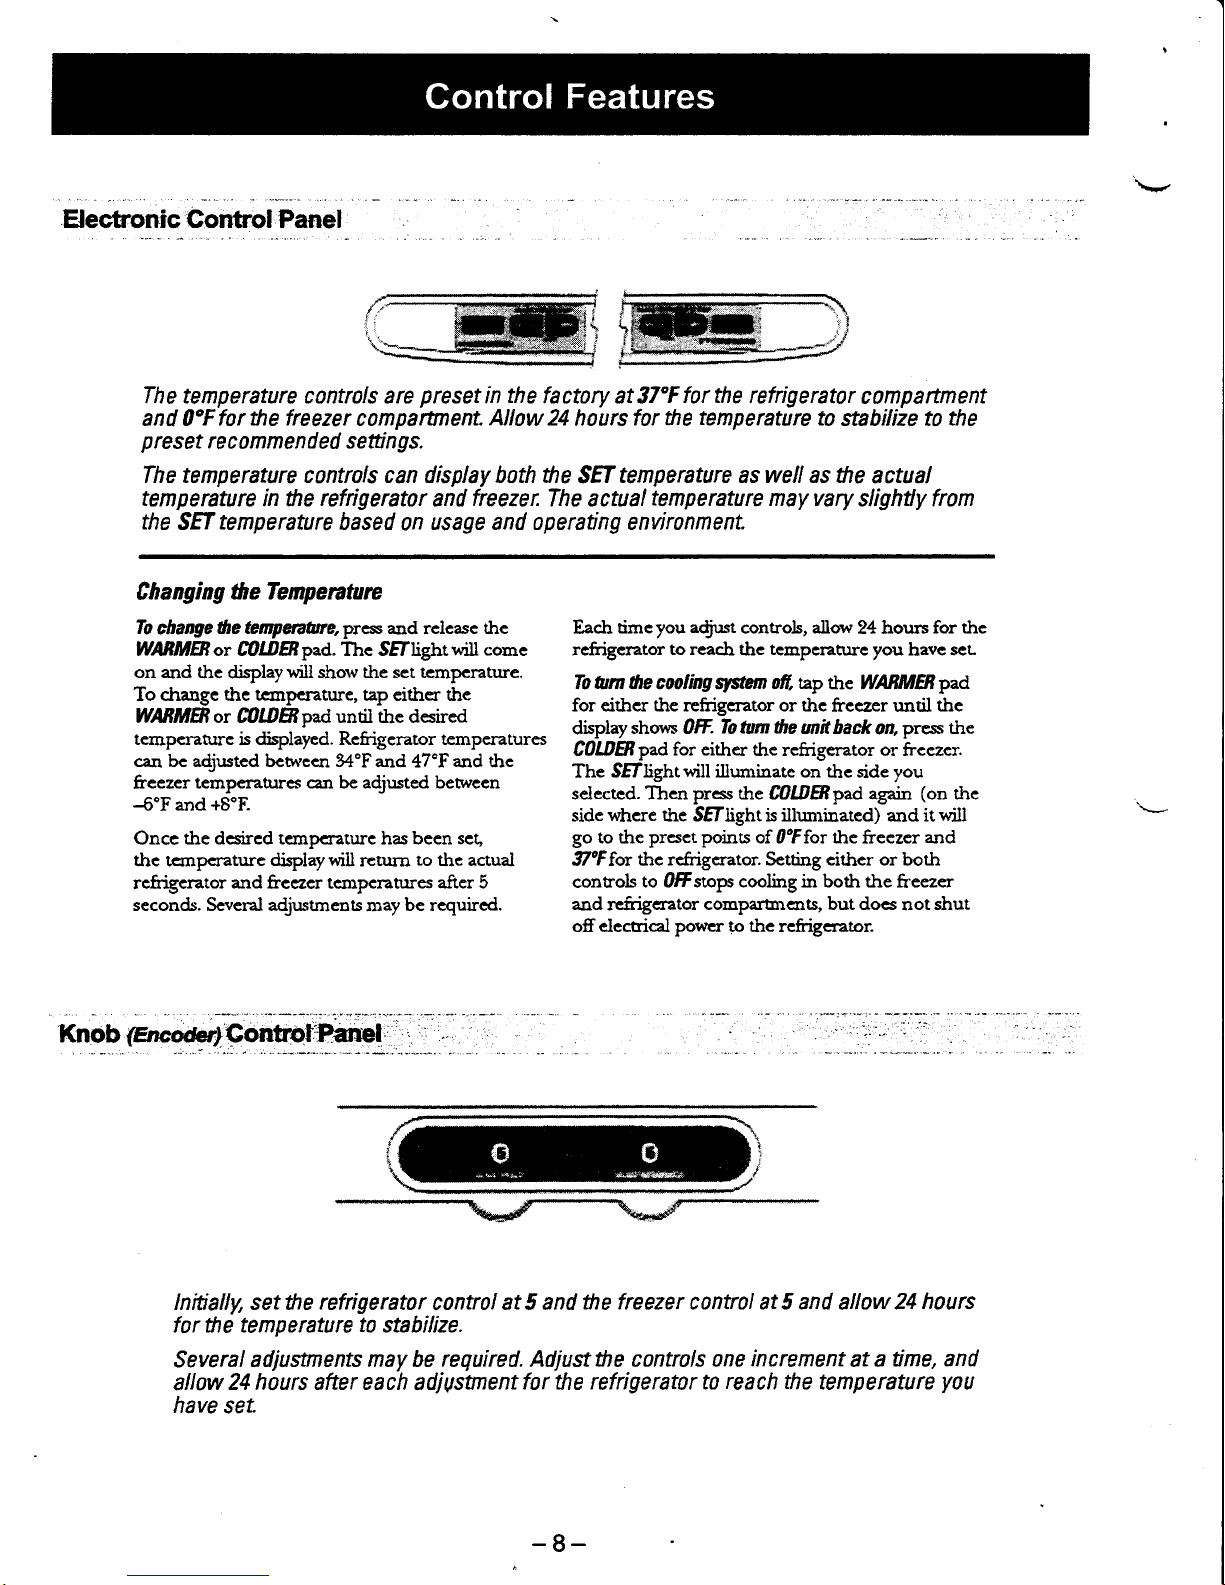
H ectronic Gontrol Panel
The tenperature controls are
preset
in
the
factory at 37"F
for the refrigerator
clmpartment
and OoF
for the freezer
compartnenL
Allow 24
hours
for the
temperature
ta
stahilize t0
the
p
res
et
re
c om
me n d
ed setti
n
gs.
The temperature
controls
can display both he
SEf
tenperature as well as the
actual
temperature
in the
refrigerator
and
freezer.
The actual
tenperature
nay vary
slighfly fron
the
SEf rcnperature based
0n
usage and operating envirlnment
C h a
ng i ng the Tempe
nta
re
To
change
the Eflrpqaane,press and
rclcase
thc
WBMBoT fiOl0Bpad. Thc SEf[ghtwill
come
on and the
displaywill
show the set tcmpcrature.
To drange the tcanperature, tap eithcr the
WAfrMBor C0lD8paduntjl the desired
temperahJre
is
displayed. Rcfrigerator temperatures
c:n be a{usted bcmeen 34'F
and 47'F
and
the
frcczcr
temperahrres can be adjusted betwccn
4"Fand
+8'F.
Once the dcsircd temperaturc has been set,
the tcrnpcrature
display wiil
r€turn
to
the actual
refrigerator
and
freezer tcmpcratures
after 5
seconds. Scveral adjr:stmens
nray
be required.
Each
timeyou
adjrrst
controls, allow
24 hours
for thc
rcfrigerator
to reach the tempcrahrrc you
have
seu
To
turn 6e cooling
qrsi/et,
fr,
ttp the
WABMB
pad
for either the refrigerator or the
freezer until
the
display
shom Otr.
To tum ,he
mit hack
on,
press the
C0UBpad
for either
the refrigerator or frcczcr.
Thc
Sff[ghtwill illuminate on the side
you
selectcd. Tlren press
the
C0o.ffipad again
(on
the
sidc
vihere the
SEllight is illnnrinated) and it
will
go to thc
prcsct poins
of OoFfor the
freezer
and
illoF
for
thc refrigerator. Setting cithcr or both
controls
to OfFstops cooling in both the
fi'eezer
and
rcfrigcrator
comparbrcns, but docs
not
shut
offdeccicai
power
to thc refrigerator.
Knob
(mcwlGontrol'Panel
lnitially, setthe
refrigerator
contrll
at 5 and
the freezer czntrol at 5 and
allow
24
hours
for the temperature
to
stabilize.
Several
adjustnents nay be
required. Adjustthe contrlls one
increment
at
a time,
and
allow
24 hours after each
adjUstnentfor
the refrigerat1r to
reach the
temperature
yTu
have
set.
-8-

Fresh Food
Section
Machine
Gompartment
#
#
s,
i:is
#,
-9-
 Loading...