

GE PB975TM1WW, PB975SM2SS, PB975SM1SS, PB975KM1CC, PB975BM1BB Owner’s Manual
...
_e.com
Safety Im_uc_ions . ............ 2-_'>
Op_wating Instructions
Broiling ........................ t4
Clock, _tchen Timei ;md
Con uol I_ock .................... _7
Comvcfion Oxvn ............. 19-23
Roasting Guide ................ 23
Timed Featmes ............. 2L 22
Cook_;v_re ....................... 7
O_en Cont_ols ............... 10, t 1
°_
Piobe .......................... t6
Sabbath Featme ................. a0
Sel}:Cleaning ................. 26, 27
Slow Cook, Pizza
and _A_nning Featmes ......... 24-25
Special Featmes .............. 28-29
Smfhce Units .................. C_-9
Thermostat Adj ustmen t--
Do It 3;bin>elf ................... 18
Timed Baking and
Roasting Featm>s ................ 15
Uppei O_wI_ .................... t2
o
PB970
PB975
Care and CIeani_ .......... 3t-37
Troubleshooting Tips ........ 38-41
Accessories . ................... 4t;
Co_mer Support
Consumei St_ppo_t ...... ga(k Cosec
Pioduct Regisuatkm .......... 43, 44
_A%wn:lmv . ..................... 47
Write the model and serial
numbers here:
Model #
Serial #
You can lind them on a label
behind the storage drawer
on the range fl'ame.
49-80444 03-07 dR
READALL/IVSTRUCTIOtV$BEFOREU$1N&
For your safety, Ne information in this manual must be followed to minimize the risk of fire, electric
shock, or to prevent property damage, personal injury, or loss of/if&
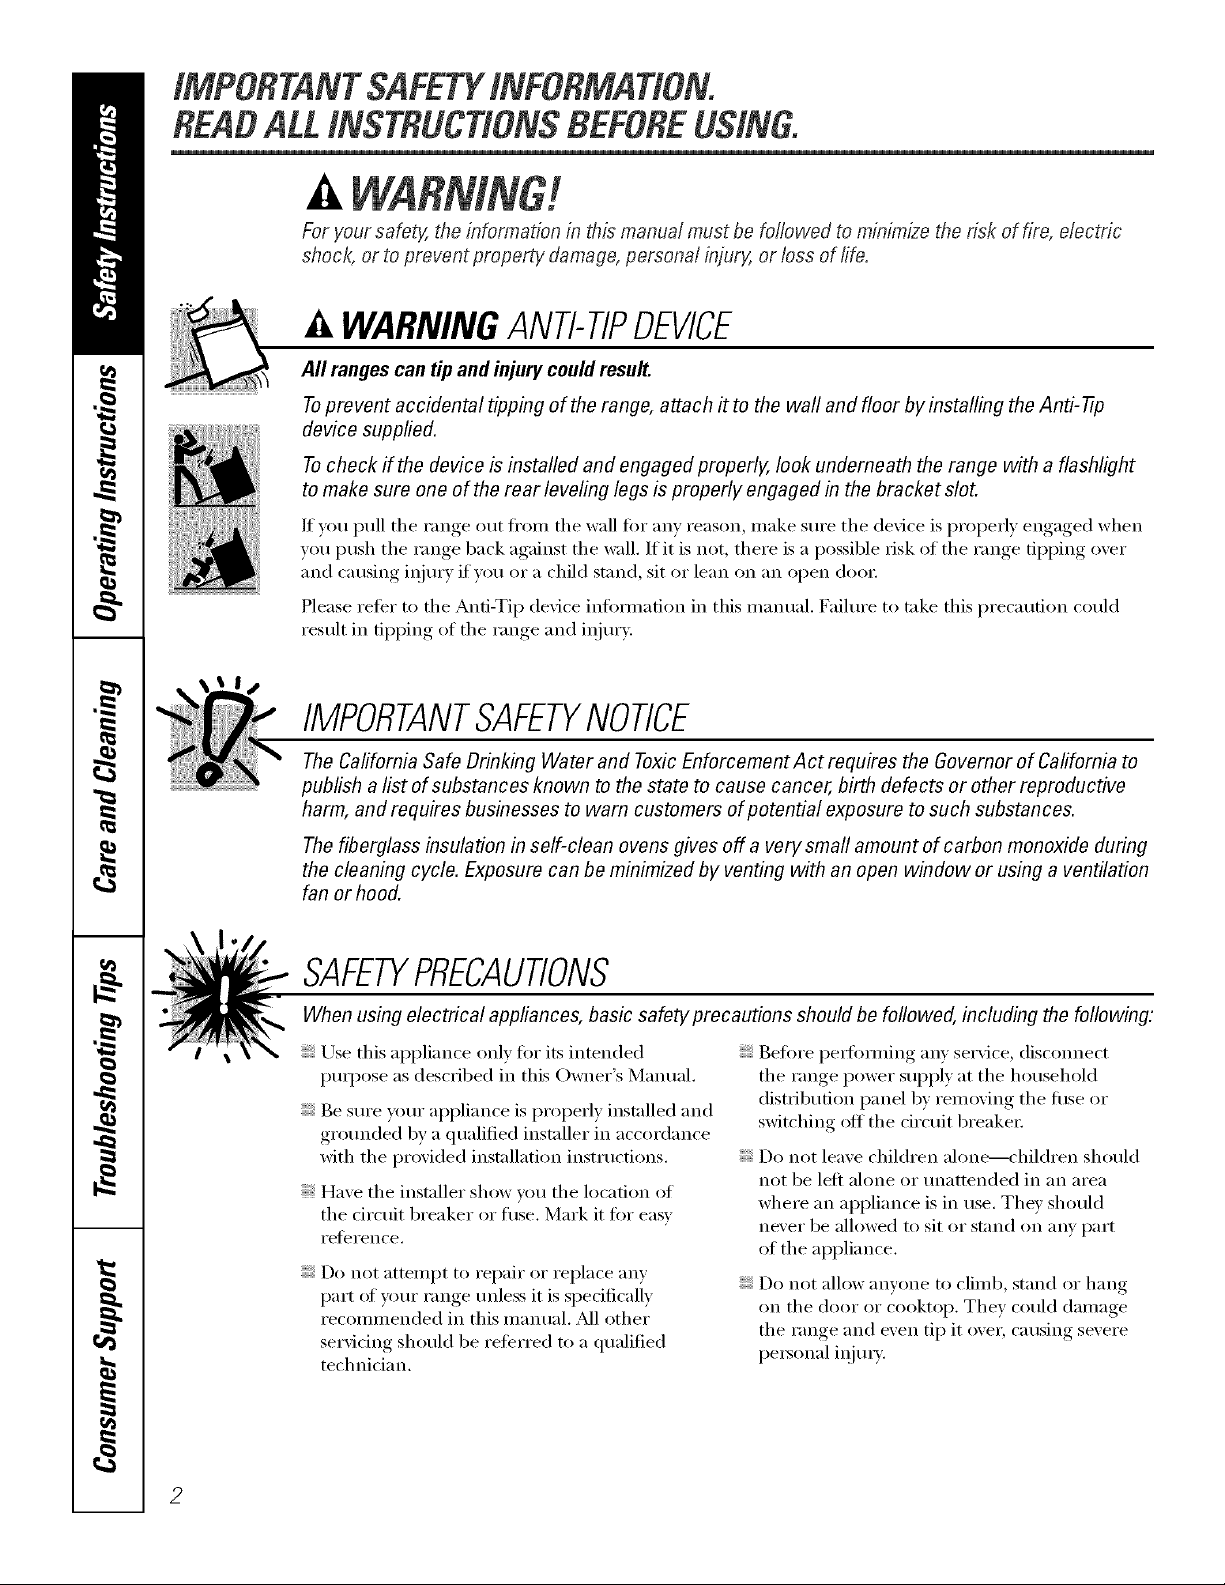
WARNINGANTI-TIPDEVICE
All rangescan tip and injury could result.
Topre vent accidental tipping of the range, attach it to the wall and floor by installing the Anti--tip
device supplied.
To check ff the device is installed and engaged properly, look underneath the range with a flashlight
to make sure one of the rear leveling legs is properly engaged in the bracket slot.
Ifyou pull the range out fl'om the wall fin" any reason, make sure the device is properly engaged when
you push the range back against the wall. If it is not, there is a possible risk of the range tipping over
and causing iqjm y if you or a child stand, sit or lean on an open door
Please relier to the Anti-Tip device infimnation in this manual. Failm'e to take this precaution could
result in tipping of the range and iqim>
IMPORTANTSAFETYNOtiCE
The California Safe Drinking Water and Toxic Enforcement Act requires the Governor of California to
publish alist of substances known to the state to cause cancer, birth defects or other reproductive
harm, and requires businesses to warn customers of potential exposure to such substances.
The fiberglass insulation in self-clean ovens gives off a very smafl amount of carbon monoxide during
the cleaning cycle. Exposure can be minimized by venting with anopen window or using a ventilation
fan or hood.
SAFETYPRECAUtiONS
When using electrical appflances, basic safety precautions should be followed, including the following:
Use this appliance onlv fin" its intended
pmI)ose as described in this Owner's Manual.
Be sm'e w)m" appliance is properly installed and
grotmded by a qualified installer in accordance
with the provided installation instructions.
Have the installer show you the location of
the drcuit breaker or fllse. Mark it fin" easy
relb'rence.
Do not attempt to repair or replace any
part of )_)m" range mfless it is specifically
recommended in this manual, M1 other
servicing should be rel_'rred U) a qualified
technidan.
Befi)re perfbmfing ai V se_Mce, disconnect
the range power supply at the household
distribution panel by removing the fllse or
switching off the circuit breaker:
Do not leave children alone---children should
not be left alone or tmattended in an area
where an appliance is in use. They should
never be allowed to sit or stand on mV pa_t
of the appliance.
Do not allow anyone to climb, stand or hang
on the door or cooktop. They could damage
the range and even tip it over, causing severe
personal iqjm>
2
_e.com
WARNING'!
SAFETYPRECAUTIONS
Donot operate the oven or cooktop controls if the glass is broken. Food splatter or cleaning solution
may penetrate a broken control panel or cooktop and create a risk of electrical shock. Contact a
qualified technician immediately should your glass control panel or cooktop become broken.
; D() IlOt stoI'e flalllI/lable IllatellalS ill _lIl ()veil
OF IleaI" tile cooktop.
CAUTION:lteIns o' intei'est to childI'en
should not be stored in cabinets above a range
or on tile back of a range----<hildren climbing
on tile range to reach items could be seriously
iqiured.
Never wear loose-fitting or hanging gam_ents
while using tile appliance. Be careflfl when
reaching fin" items stored over tile range.
Flammable material could be ignited if
brought in contact with hot sm_hce milts or
heating elements and may cause severe burns.
Use only city pot holde_--moist or damp
pot holde_ on hot surli_('es may result in
burns fl'om steam. Do not let pot holde_
touch hot SUll'il('e milts or heating elements.
Do not use a towel or other bulky cloth in
place of pot holde_.
Do not use water on grease fires. Never pick
up a flaming pan. Tm'n tile controls off'.
Smother a flaming pan on a surfi_ce trait
by covering tile pan completely with
a well-fitting lid, cookie sheet or fiat tray:
Use a multi-puq)ose dry chemical or
finm/-type fire exfinguishei:
Flaming grease outside a pan can be put
out by covering it with baking soda or; if
a*:filable, by using a multi-puq)ose dry
chemical or ti)am-type fire extinguishe_:
Name in tile oven can be smothered
complemly by closing the oven door and
turning tile oven off or by using a multi-
pml)ose (hy chemical or fi)am-type fire
extinguisher:
For your s'alb'_:, never use your appliance
fin" wamfing or heating tile room.
Do not let cooking grease or other flammable
materials accmmflate in or near the range.
Do not touch tile surfi_ce milts, tile heating
elements or tile interior sm_i_ce of tile oven.
These surli_ces may be hot enough to burn
even though tile*' are dark in colin: Dining and
alter rise, (lo Hot to/lch, or let clothing or other
flammable materials contact tile s/m'hce units,
areas nearby tile surfi_ce milts or anv interior
area of tile oven; allow sufficient time for
cooling fi_t.
Potentially hot smthces include the cooktop,
areas fi_dng the cooktop, oven vent opening,
smti_ces near the opening, crevices aro/md the
ovell door.
REMEMBER:Tile inside surfhce ot tile oven
may be hot when tile door is opened.
Do not store or use combustible materials,
gasoline or other flammable vapo_ and liquids
in tile vicinity of this or any other appliance.
Keep tile hood and grease filte_ clean
to maint;fin good venting and to avoid
grease fires.
Teach children not to play with tile controls
or any other part of tile range.
_Mways kee I) dish towels, dish cloths, pot
holde_ and other linens a safi _distance
fl'om yore" range.
_MwaD kee I) wooden and plastic utensils and
canned food a sale distance fl'oln your range.
Mways keep combustible wall coverings,
cm'tains or drapes a sate distance fl'om
VO/II" KIIlge.
COOKMEATANDPOULTRYTHOROUGHLY...
Cookmeat and poultry thoroughly--meat to at least an INTERNAL temperature of 160°Fand poultry to at least
an INTERNAL temperature of 180°E Cooking to these temperatures usually protects against foodbome illness.
3

READALL/NSTRUCFiON$BEFOBEU$1N&
RADIANTSURFACEUNITS
Useproper pan size--select cool<ware having f/at bottoms large enough tocover the surface unit heating
element.Theuse of undersized cookware will exposeaportion ofthe surface unit todirect contact andmay
result in ignition of clothing, Proper relationship of cookware tosurface unit will also improve efficbncg
Never leave the surfllce units unattended at
high heat settings. Boilove_ cause smoking
and greasy spillove_ that may catch on fire.
Only certain b'pes of glass, glassX eramic,
earthenware or other glazed containe_ are
suitable for cooktop service; othe_ may break
because _ff tile sudden change in temperatm'e.
To minimize tile possibilib' of bm'ns, ignition
of flammable materials and spillage, tile handle
of a container should be turned toward tile
center of tile range without extending over
nearby suitilce units.
_Mwavsturn tile stu_ilce units off before
rei/loving cookware.
X4]/ell preparing flaming foods tinder tile
hood, tm'n the tim on.
Use care when touching the cooktop.
The glass SUltilce of the cooktop will retain
heat after tile controls have been tin'ned ofli
Kee I) an eve on foods being flied at high or
medium high heat settings.
Foods for fi'ying should be as d_' as possible.
Frost on fl'ozen foods or moistm'e on fi'esh
fi)ods can Catlse hot tilt to bubble up and
over tile sides of tile pan.
Use little lilt for effective shallow or deep
lilt fl'ying. Filling tile pan too flfll of lilt can
cause spillove_ when food is added.
If a combination of oils or tilts will be used
in flTing, stir together befiwe heating, or
as lilts melt slowly.
_Mwm:s heat lilt slowly, and watch as it heats.
Use a deep tilt them_ometer whenever
possible to prevent overheating lilt beyond
tile smoking point.
Avoid scratching the glass cooktop. The
cooktop can be scratched with items such
as shaq) instruments, tings or otherjeweh T,
and rivets on clothing.
I_uge scratches or impacts to glass (loo_s or
cooktops can lead to broken or shattered glass,
Do not operate the radiant sm'iilce milts if the
glass is broken, Spillove_ or cleaning solution
may penetrate a broken cooktop and create a
risk of electrical shock. ())ntact a qualified
technician immediately should w)ur glass
cooktop become broken.
Never use the glass cooktop sm_ilce as a
cutting board.
Do not place or store items that can melt or
catch fire on tile glass cooktop, e\'en when it
is not being used.
Be careful when placing spoons or other sfining
utensils on glass cooktop sm_ilce when it is in ttse.
They may become hot and could cause blm_S.
Clean the cooktop with caution. If a wet
sponge or cloth is used to wipe spills on a hot
stn'filce trait, be carefifl to a\_fid steam burns.
Solile cleanei_ can pi'o(hlce noxio/is lilliles i[
applied to a hot surfilce.
NO]E: We recommend that wm avoid wiping
any surfilce unit areas until they have cooled
and the indicator light has gone off. Sugar
spills are the exception to this. Please see the
Cleaning the glass cooktop section.
_Al/en tile cooktop is cool, IlSe only tile
CEIL_dMA BRYTE ':Ceramic Cooktop Cleaner
and tile CEIL_dMA BRYTE Ceramic Cooktop
(3eaning Pad to clean tile cooktop.
To avoid possible damage to the cooking
Sllrfilce, do not apply cleaning creanl to
the glass SUltace when it is hot.
_Mter cleaning, use a di)' cloth or paper towel
to remove all cleaning cream residue.
Read and fi)llow all instructions and warnings
on the cleaning cream labels.
Do not use plastic wrap to cover tbod. Plastic
may melt onto tile smthce and be very dflticult
to i'eillove.
4
ge.com
WARNING!
OVEN
Stand away from the range when opening the oven door. Hot air or steam which escapes can cause
bums to hands, face and/or eyes.
Do not heat unopened food ('ontainet_.
Pressm'e could build up and the container
could bmst, causing an iqjury:
Kee I) the oven vent m_obstructed,
Kee I) the (wen fl'ee flxm_ grease buildui).
Place the oven rack in the desired position
while the oven is cool. If racks tlltlst be handled
when hot, (lit not let pot holder contact the
heating elements.
\._]/ell using cooking or roasting bags in the
oven, tollow the tnanufilctttrer's directions.
Pulling out the rack to the stop-lock is a
convenience in lifting heavy toods. It is also
a precaution against burns fl'om touching
hot sudhces of the door or oven walls.
Do not use the oven tit dt T ne_:spapet_.
If overheated, they can catch on fire.
Do not ilse the oven It)t" a stot'age at'ea, ]tetIlS
stored in an oven can ignite.
Do not leave paper products, cooking utensils
or fi)od in the oven when not in ttse.
Do not use ahmfinmn foil to line oven bottoms,
except as suggested in this manual. Improper
installation of ahmfinum foil may result in a
risk of electric shock or rite.
SELF-CLEANINGUPPEROVENANDLOWEROVEN
Do not use oven cleaners. No commercial oven cleaner or oven liner protective coating of any k&d
should be used in or around any part of the oven. Residue from oven cleaners will damage the inside
of the oven when the self-clean cycle is used.
Do not clean the (loot" gasket. The door gasket
is essential fi)r a good seal. Care should be
taken not to rub, damage or move the gasket.
Betore seltk'leaning the oven, remove shin>
silver-colored oven racks (oil some tnodels)
and all other cookware.
Gray porcelain-coated oven racks (on some
models) may be cleaned in the oven dm'ing
the selFclean cycle.
Be sm'e to Mpe up excess spillage befi)re
starting the selFcleaning operation.
If the selFcleaning mode malflmcfions, turn
the oven off and disconnect the power supl)ly.
Have it serviced by a qualified technician.
Clean only parts listed in this Owner's Manual.
READANDFOLLOWTHISSAFETYINFORMATIONCAREFULLY.
SAVETHESEINSTRUCTIONS
Abouttheradiantsurfaceunits.
NOTE:Throughoutthismanual,featuresand appearancemay varyfromyour model
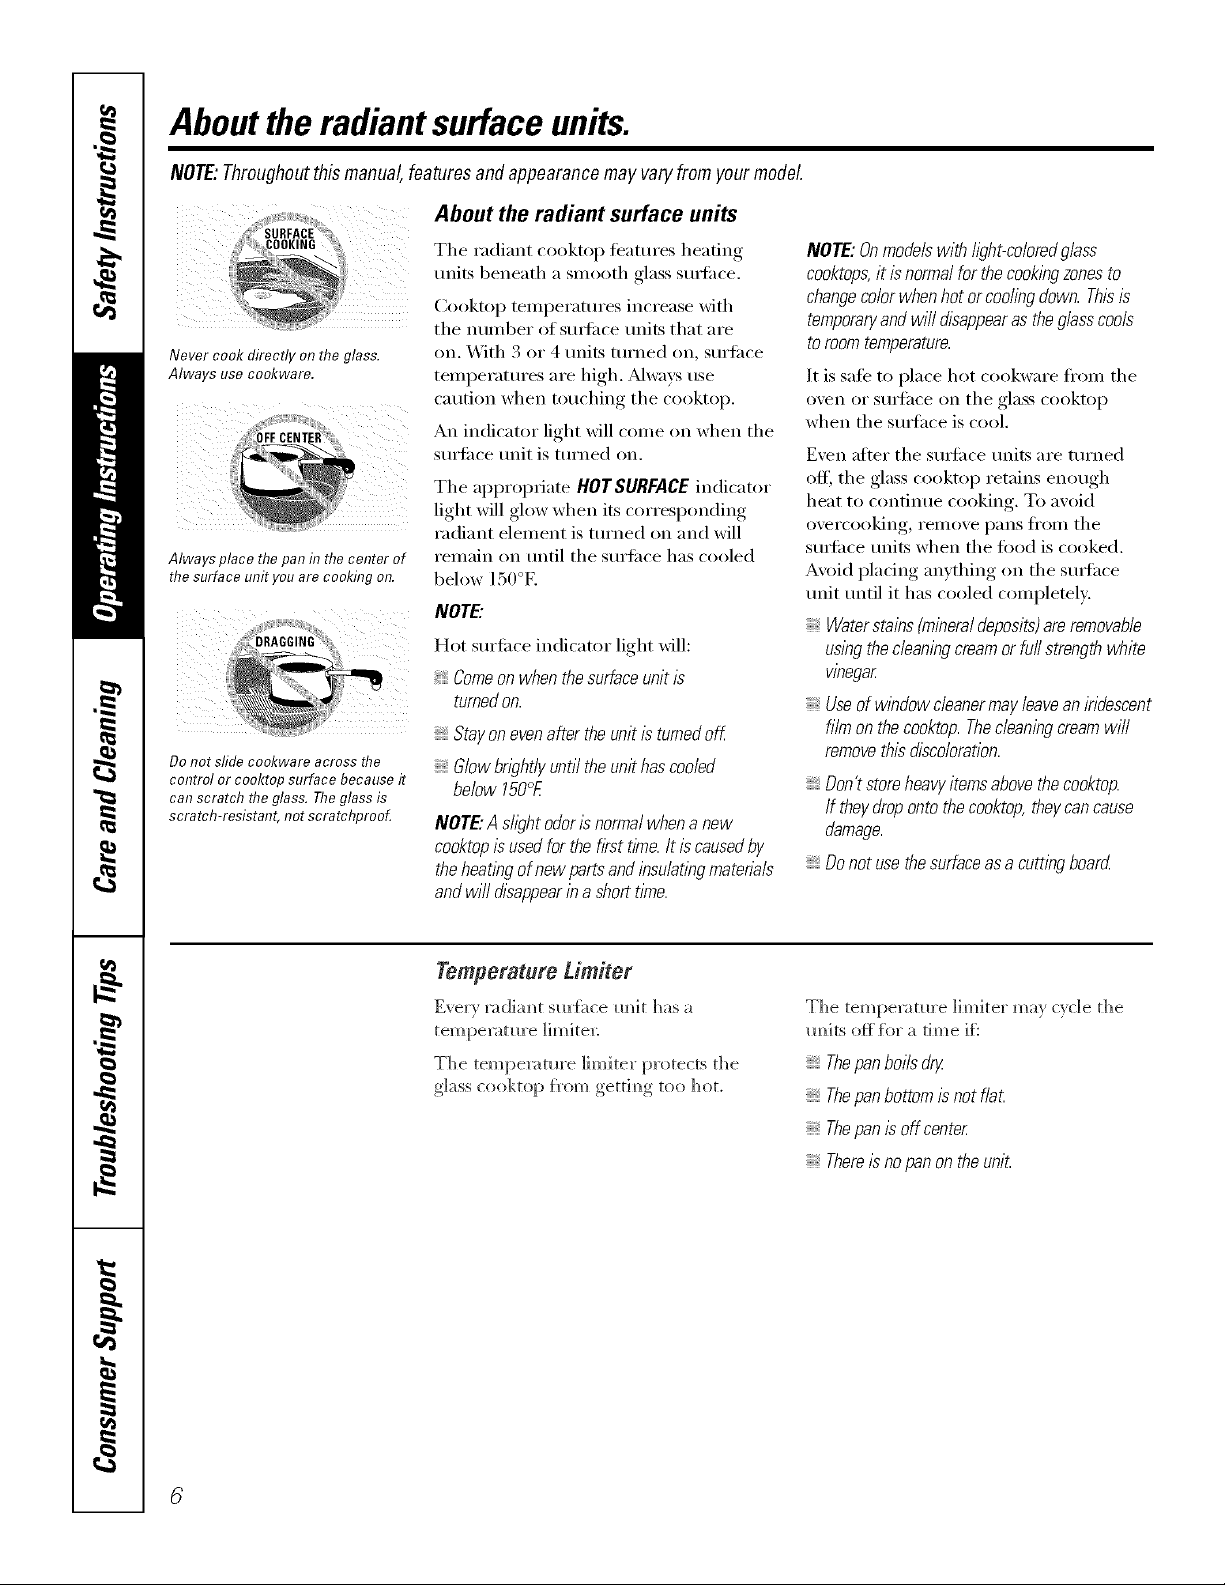
About the radiant surface units
]_OOKING
Never cook directly on the glass.
Always use co&ware.
iJiii[WJiiiiiiiiiliiiiii_
i_ i
Always place thepan h7thecenter of
the surface unit you are cooking on.
Do not sfide cookware across the
control or cooktop surface because it
can scratch theglass. Theglass is
scratch-resistant, not scratchprooL
The radiant cooktop features heating
milts beneath a smooth glass surti_ce.
Cooktop temperatures increase with
the nun/ber of SUll'ilce units that are
on. With 3 or 4 units turned on, surtilce
temperatures are high. Mwavs tlse
caution when touching the cooktop.
An indicator light will come on when the
surti_ce unit is turned on.
The appropriate HOTSURFACE indicator
light will glow when its corresponding
radiant element is turned on and will
remain on until the surti_ce has cooled
below 150°E
NOTE."
Hot surii_ce indicator light will:
Comeon when thesurface unit is
turnedon.
Stay oneven after theunit is turned oK
Glow brightly until theunit has cooled
below 150°£
NOTE."AslightodorIsnormalwhenanew
cooktopisusedforthe firsttime.Itis causedby
theheatlbgofnewpartsandinsu/atlbgmatena/s
andwi//disappearina shorttime.
NOTE:On models with/ighbcoloredg/ass
cooktops,it is normalfor thecook/bgzonesto
changecolor when hot orcoding down. Thisis
temporaryand wi// disappearas the glasscools
to roomtemperature.
It is safe to place hot cookware ti'om the
oven or surthce on the glass cooktop
when the surthce is cool.
Even after the surti_ce units are turned
off, the glass cooktop retains enough
heat to continue cooking. To avoid
ovei'cooking, i'ei/love [)[lns ][i'oi/l the
surli_ce units when the fi)od is cooked.
Avoid placing anything on the surthce
unit until it has cooled compleml>
Waterstains (mineraldeposits)are removable
us/bgthecleaningcream or fu//strength white
vinegar
Useof window cleanermay leavean iridescent
film on thecooktop. Thecleaning creamwi//
removethis discoloration.
Don'tstoreheavyitemsabovethecooktop.
If theydropontothecooktop,theycancause
damage.
Donotusethesurfaceasa cuttingboard
Temperature timber
Ever_ mdiam_t sm'fi_ce m_it has a
The tempe_;_ture ]imiter protects the
glass cooktop }_'omgettim_gtoo hot,
The tempe_:m*re ]hinter may c}c]e the
m_its offfl_r a time iP
Thepan boils dry.
Thepan bottom is not fiat
Thepan is off center
Thereisno panon the unit.
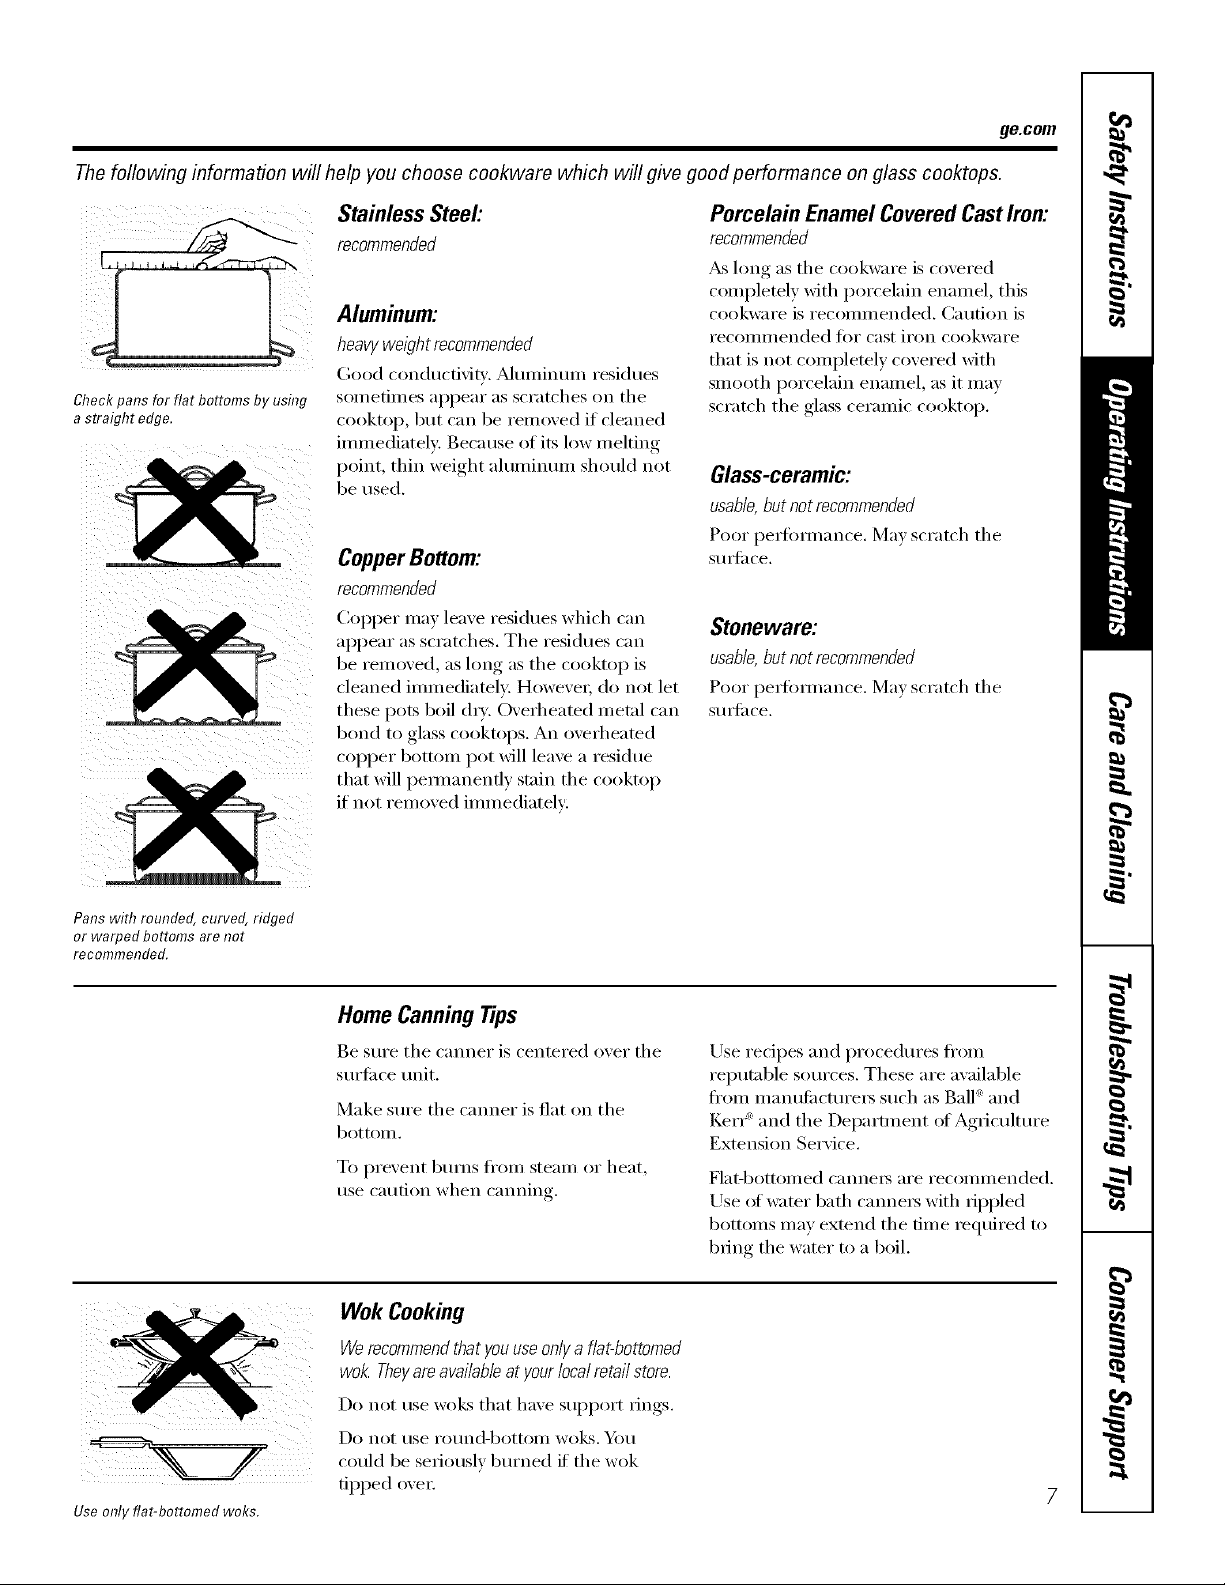
Thefollowing information will help you choose cookware which will give good performance on glass cooktops.
ge.com
Check pans for fiat bottoms by using
a straight edge.
Stainless Steek
recommended
Aluminum:
heavyweightrecommended
Good (ondu(fivil)'. _dtllllintlll/ residues
s()metin_es appear as scratches on the
cooktop, but can be removed if cleaned
immediately: Because of its low melting
point, thin weight aluminum should not
be used.
Copper Bottom:
recommended
Col)per may leave residues which ('_111
appear as scratches. The residues can
be removed, as long as the cooktop is
cleaned immediately: However; do not let
these pots boil (h T, Overheated metal can
bond to glass cooktops. An overheated
COl)per bottom pot will leave a residue
that will pemmnenfly stain the cooktop
if not removed immediately:
Porcelain EnamelCoveredCastIron:
recommended
_&_long as the cookware is covered
completely with porcelain enamel, this
cookware is recommended. Caution is
recolnmei_ded fi)r cast iron cookware
that is not completely covered with
smooth porcelain enamel, as it may
scratch the glass ceramic cooktop.
Glass-ceramic:
usable,butnotrecommended
Poor l)erlb_nan('e. May scrat('h the
StlI5_il ce.
Stoneware:
usabie,but not recommended
Poor pe_fimnance. May scratch the
StlI5_il ce.
Pans with rounded, curved, ridged
or warped bottoms are not
recommended.
Use only flat-bottomed woks.
Home CanningTips
Be sure the canner is centered over the
surti_ce trait.
Make sure the canner is fiat on the
bottom.
To prevent bui_ns fl'om steam or heat,
use caution when canning.
Wok Cooking
Werecommendthatyouuseonlya flat-bottomed
wok.Theyareavailableat yourlocalretailstore.
Do not rise wo]<s that have SUl)port rings.
Do not rise i'otlnd-bottOlll wo_s. _)tl
could be seriously burned if the wok
tipped ove_:
Use redpes and procedures from
reputable sources. These are available
ti'om n/anufilcturei3 such as Ball ®and
KeI'I_ and the Department ot Agriculture
Extension Service.
Flat-bottoliled CallllelS ai'e recoi/liilende(1,
Use (ff wamr bath canne_ with ril)pled
bottoms may extend the time required to
bring the water to a boil.
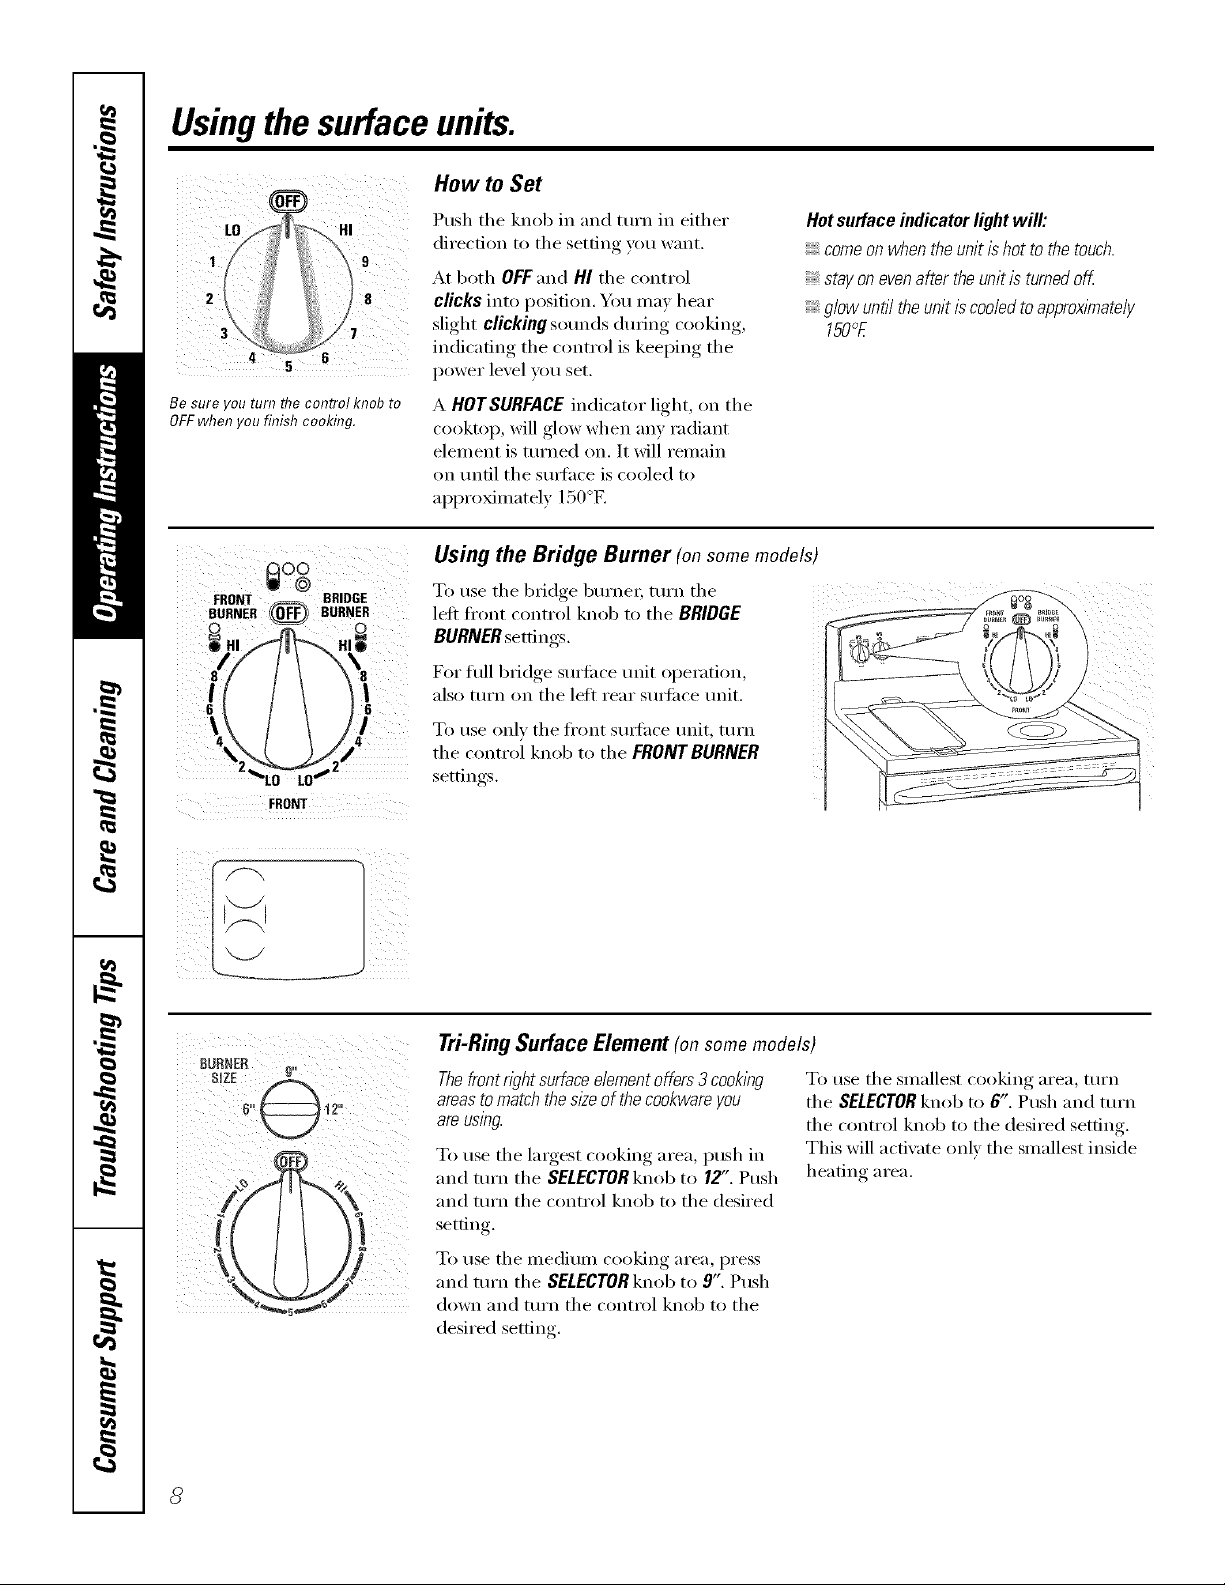
Usingthe surfaceunits.
How to Set
Be sure you turn flTecontrol knob to
OFF when youfinish cooking.
FRONT - - BRIDGE
BURNER_ BURNER
\ !
LO LO
FRONT
Push the knob in and turn in either
direction to tile setting you want.
At both OFFand HI the control
clicks into position. You may hear
slight clicking sounds during cooking,
indicating the control is keeping the
power level you set.
A HOTSURFACEindicator light, on the
cooktop, will glow when any radiant
element is turned on. It will remain
on tmfil the sm_hce is cooled to
approximately 150°K
Using the Bridge Burner (on some models)
To use tile bridge burnex; turn tile
leli fl'ont control knob to the BRIDGE
BURNER settings.
For flfll bridge surtilce unit operation,
also mrn on tile left rear SUltilce unit.
To use only tile fl'ont suI_hce unit, turI_
tile control knob to tile FRONTBURNER
settin ,s
Hot surface iudicator light will:
comeon when the unit ishot to the touch.
stay on evenafter the unit isturned off
glow until the unit is cooledto approximately
150°E
Tri-RingSurface Element(onsomemodels)
Thefront right surfaceelement offers 3 cooking
areasto match thesl2eof thecookwareyou
areusing.
To use tile largest cooking area, push in
and turn tile SELECTOR knob to 12". Push
and turn tile control knob to tile desired
setfin ,
To use tile medium cooking area, press
and turn tile SELECTOR knob to 9". Push
down and turn tile control knob to tile
desired setting.
To use tile smallest cooking area, mrn
tile SELECTORknob to 6". Push and turn
the control knob to the desired setting.
This will actiw_te only the smallest inside
heating area.
8
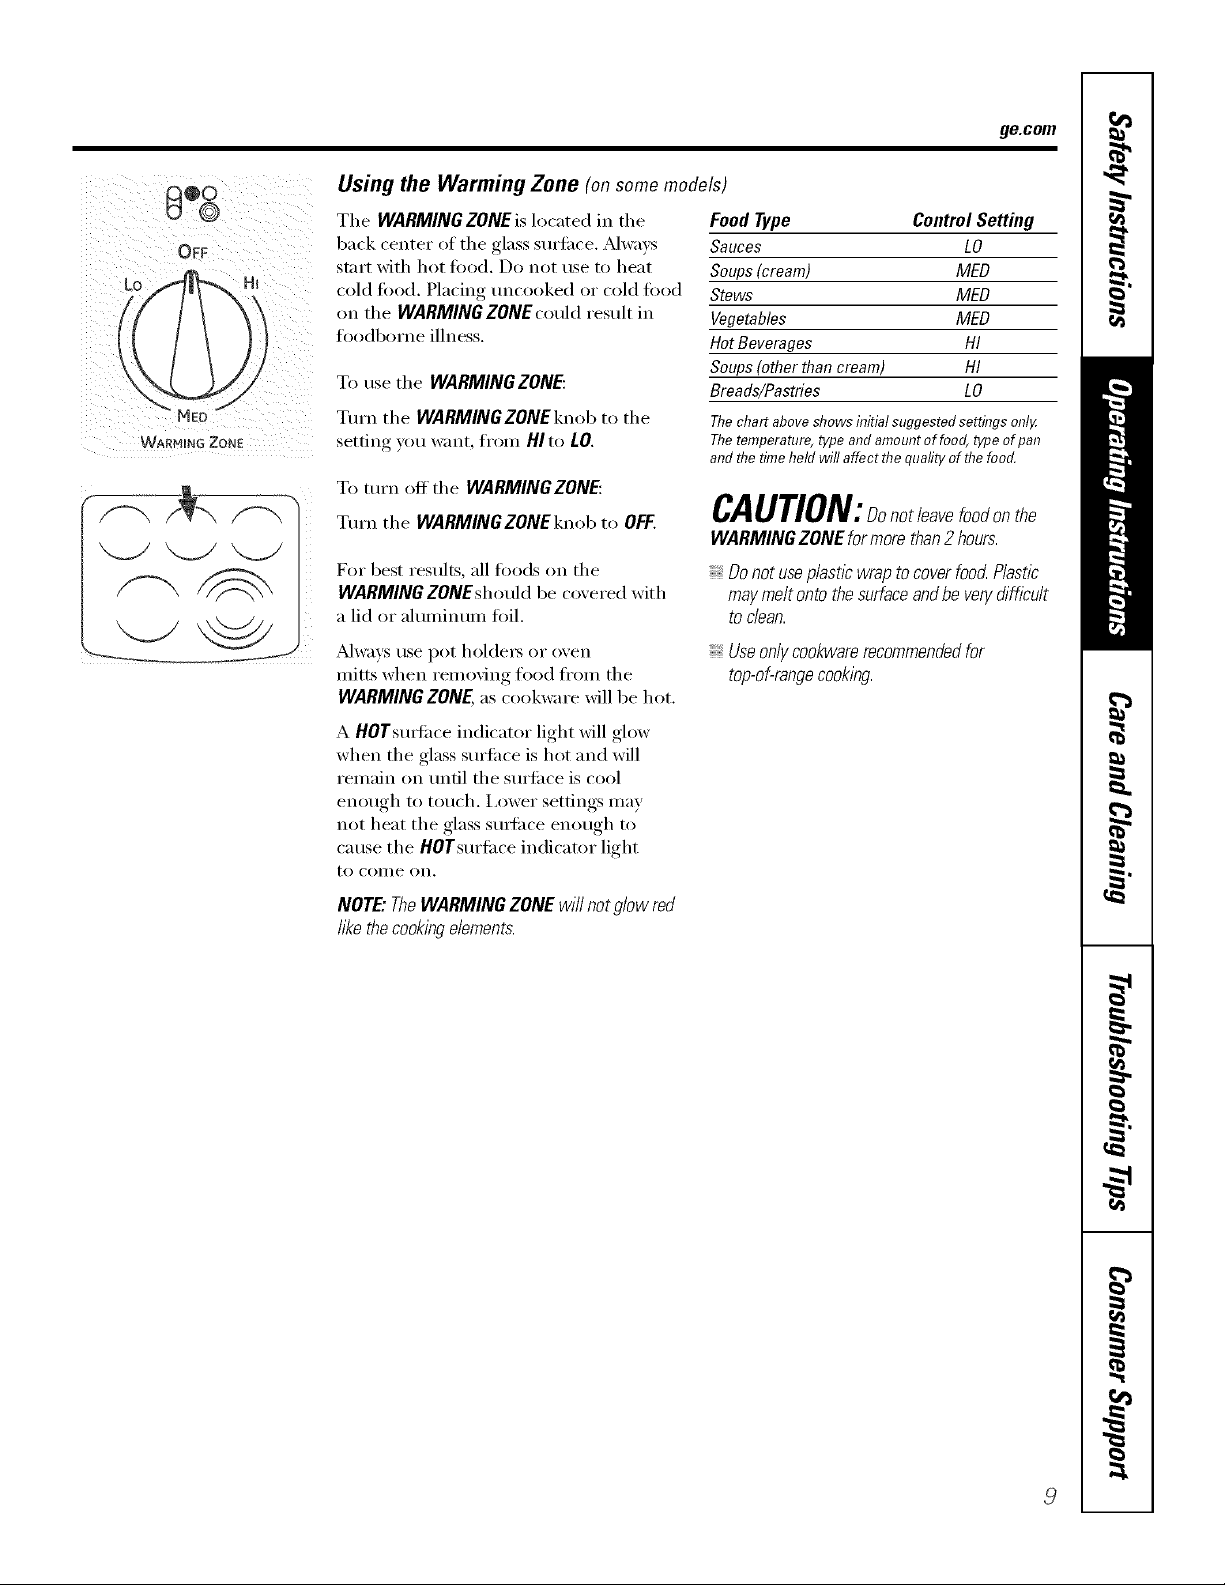
WARNING ZONE
Using the Warming Zone (onsomemodels)
The WARMING ZONE is located in the
back center of tile glass surtilce. _Mwa}_s
start with hot toad. Do not use to heat
cold food. Placing uncooked or cold food
oil tile WARMING ZONE could result in
toodborne illness.
To, use tile WARMING ZONE:
Turn tile WARMING ZONE knob to tile
setting you want fi'om HIto LO.
To mrn off tile WARMING ZONE:
Turn tile WARMINGZONEknob to OFF.
For best results, all fi)ods on tile
WARMING ZONEshould be coxered with
a lid or aluminum foil.
Food Type Control Setting
Sauces LO
Soups (cream) MED
Stews MED
Hot Beverages HI
Soups (other than cream) HI
Breads/Pastries LO
and flTetimeheld will affect flTequafity offlTefood.
ge.com
Vegetables MED
Thechart above showsinitial suggestedsettings only.
Thetemperature,type and amountoffoog type ofpan
CAUTION:Donotleavefoodonthe
WARMING ZONE formore than2 hours.
Donot useplastic wrap to cover foo_ Plastic
may melt ontothe surfaceand be verydifficult
todean.
_Mways use pot holders or (wen
mitts when removing fl)od fl'om tile
WARMINGZONE,as cookware will be hot.
A HOrsudi_ce indicator light will glow
when the glass surtilce is hot and will
remain on until tile surli_ce is cool
enough to touch. I,ower settings may
not heat the glass surtime enough to
cause tile HOTsurli_ce indicator light
to COille on.
NOTE"TheWARMINGZONEwillnotglowred
hkethecookingelements.
Useonlycookwarerecommendedfor
top-of-rangecooking.
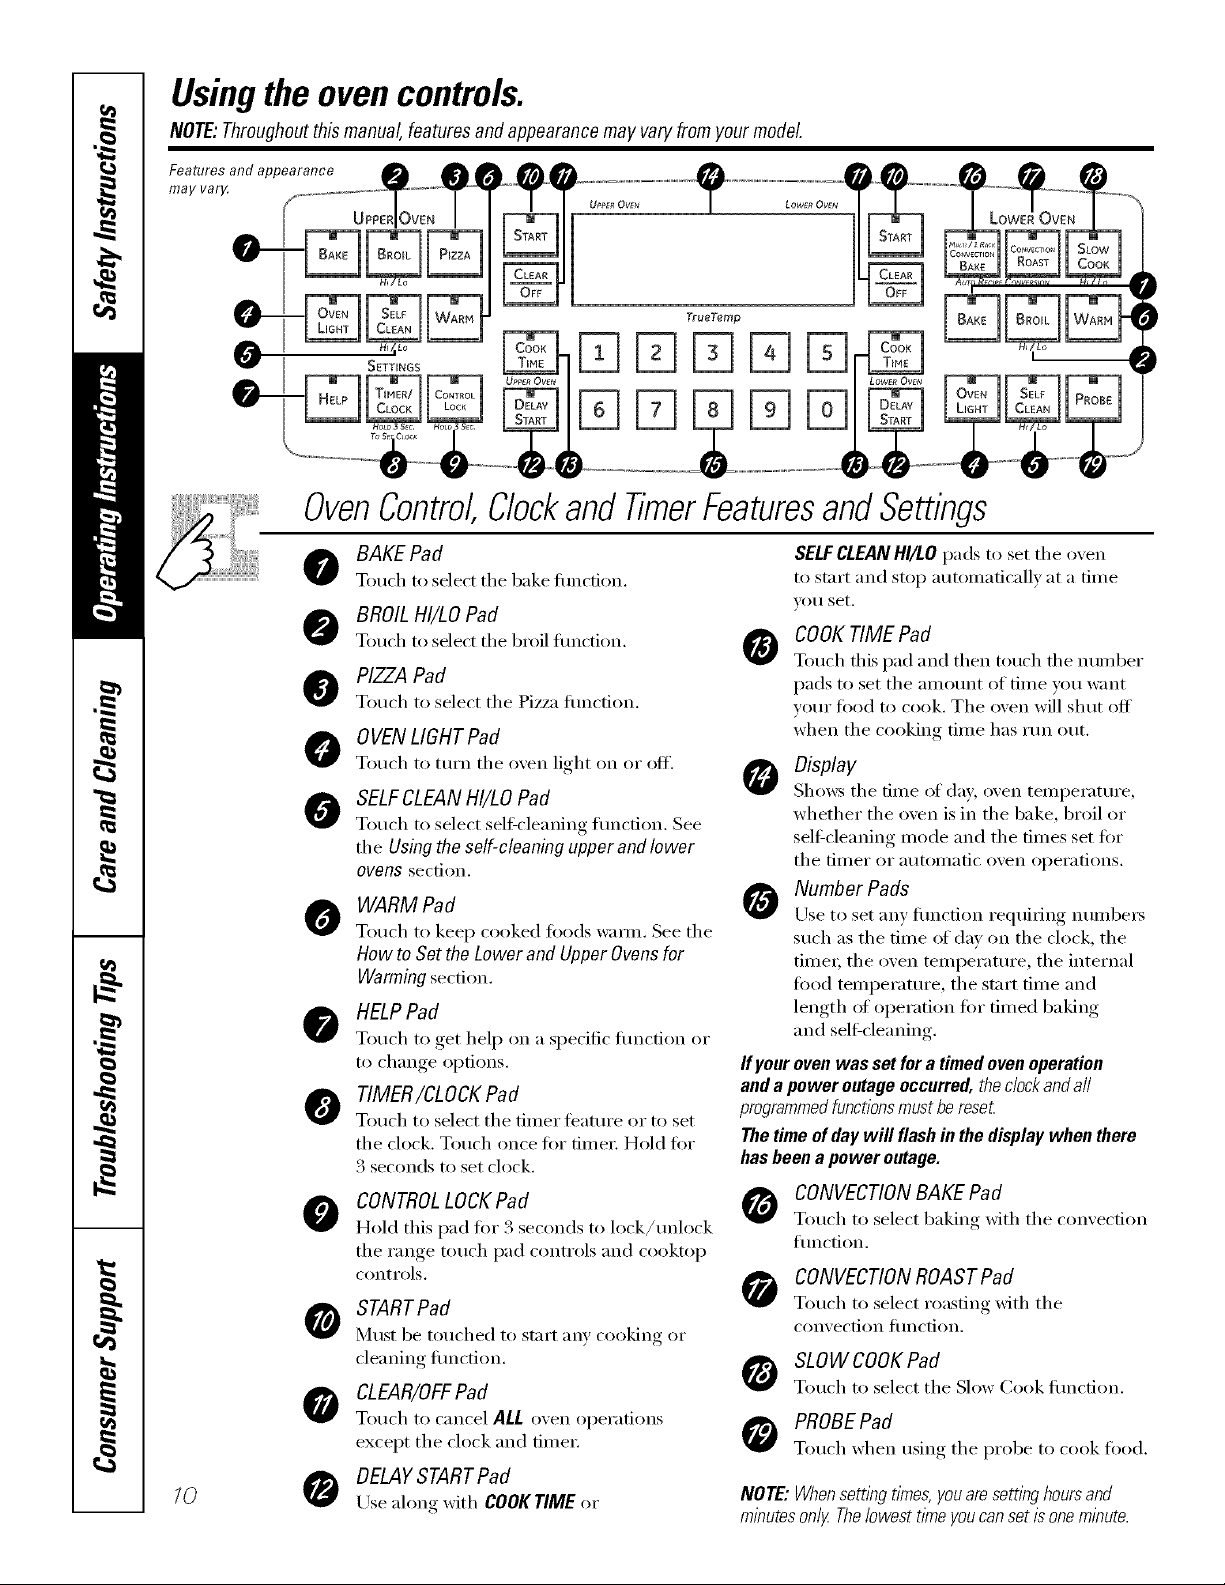
Usingthe ovencontrols.
NOTE:Throughoutthismanual,features andappearancemayvary fromyourmodel
Features and appearance
may var_
TrueTemp
SETTINGS
FqFq
OvenControlClockandTimerFeaturesandSettings
10
BAKE Pad
0
Touch to sdect tile bake flulction.
BROIL HI/LO Pad
0
Touch to select tile broil tilnction.
PIZZA Pad
@
Touch to select tile Pizza tiulction.
0 VEN LIGHT Pad
0
Touch to turn tile oven light oil or off.
SELFCLEANHI/LO Pad
0
Touch to select self:cleaning flulcfion. See
tile Using the self-cleaning upper and lower
ovens section.
WARM Pad
0
Touch to kee I) cooked too(ls waml. See tile
How to Set the Lower and Upper Ovens for
Warming section.
HELPPad
Touch to get hel I) on a spedfic tiulcfion or
to change options.
TIMER/CLOCK Pad
Touch to select tile diner teatuI'e or to set
tile clock. Touch once for tinIeI: Hold for
3 seconds to set clock.
CONTROLLOCKPad
0
Hold this I)ad for 24seconds to lock/unlock
tile range touch i)ad controls and cooktop
controls.
STARTPad
]¥hlst be totlched to stair _lIly cooking or
cleaning fiulction.
CLEAR/OFF Pad
Touch to cancel ALL oven oi)erafions
exceI)t tile clock and fiIneI:
DELAYSTARTPad
Use along with COOKTIME or
SELFCLEAN HI/LO I)ads to set tile men
to start and stop autoinaficallx at a fin/e
VO/I set.
COOKTIME Pad
Totlch this l)ad and then totlch the ntli//bei"
i)ads to set tile anlount of tiine yiiu want
your food to cook. Tile oven will shut off
when the cooking fiIne has run out.
Display
Shows tile dine of (la}; oven teilll)ei'attli'e ,
whether tile oven is in tile bake, broil or
self:cleaning nlode and tile dines set for
tile tii/ler or atltOillatic ()veil ol)ei'ations.
Number Pads
Use to set }IIIV fillIC[ion I'equiIJng n/llllbeI's
such as the fiIne of day oil the ch)ck, the
tiIneI; tile ()veil tenii)eramre, tile internal
food tenli)erature, tile start tiIne and
length (:,foi)eration fin" tinied baking
and self:cleaning.
Ifyour oven was set for a timed oven operation
and a power outage occurred, theclock and a//
programmedfunctionsmust be reset
The time of day will flash in the display when there
has been a power outage.
CONVECTIONBAKE Pad
Touch to select baking with tile con;ection
flulction.
CONVECTIONROASTPad
Touch to select roasting with tile
con'_ ection [ilnction.
SLOWCOOKPad
Touch to select tile Slow Cook fiulcfion.
PROBE Pad
Touch when using tile I)robe to cook load.
NOTE:Whensettl)_gt#nes,youaresettl)_ghoursand
minutesonly Thelowestt/meyoucansetis oneminute.
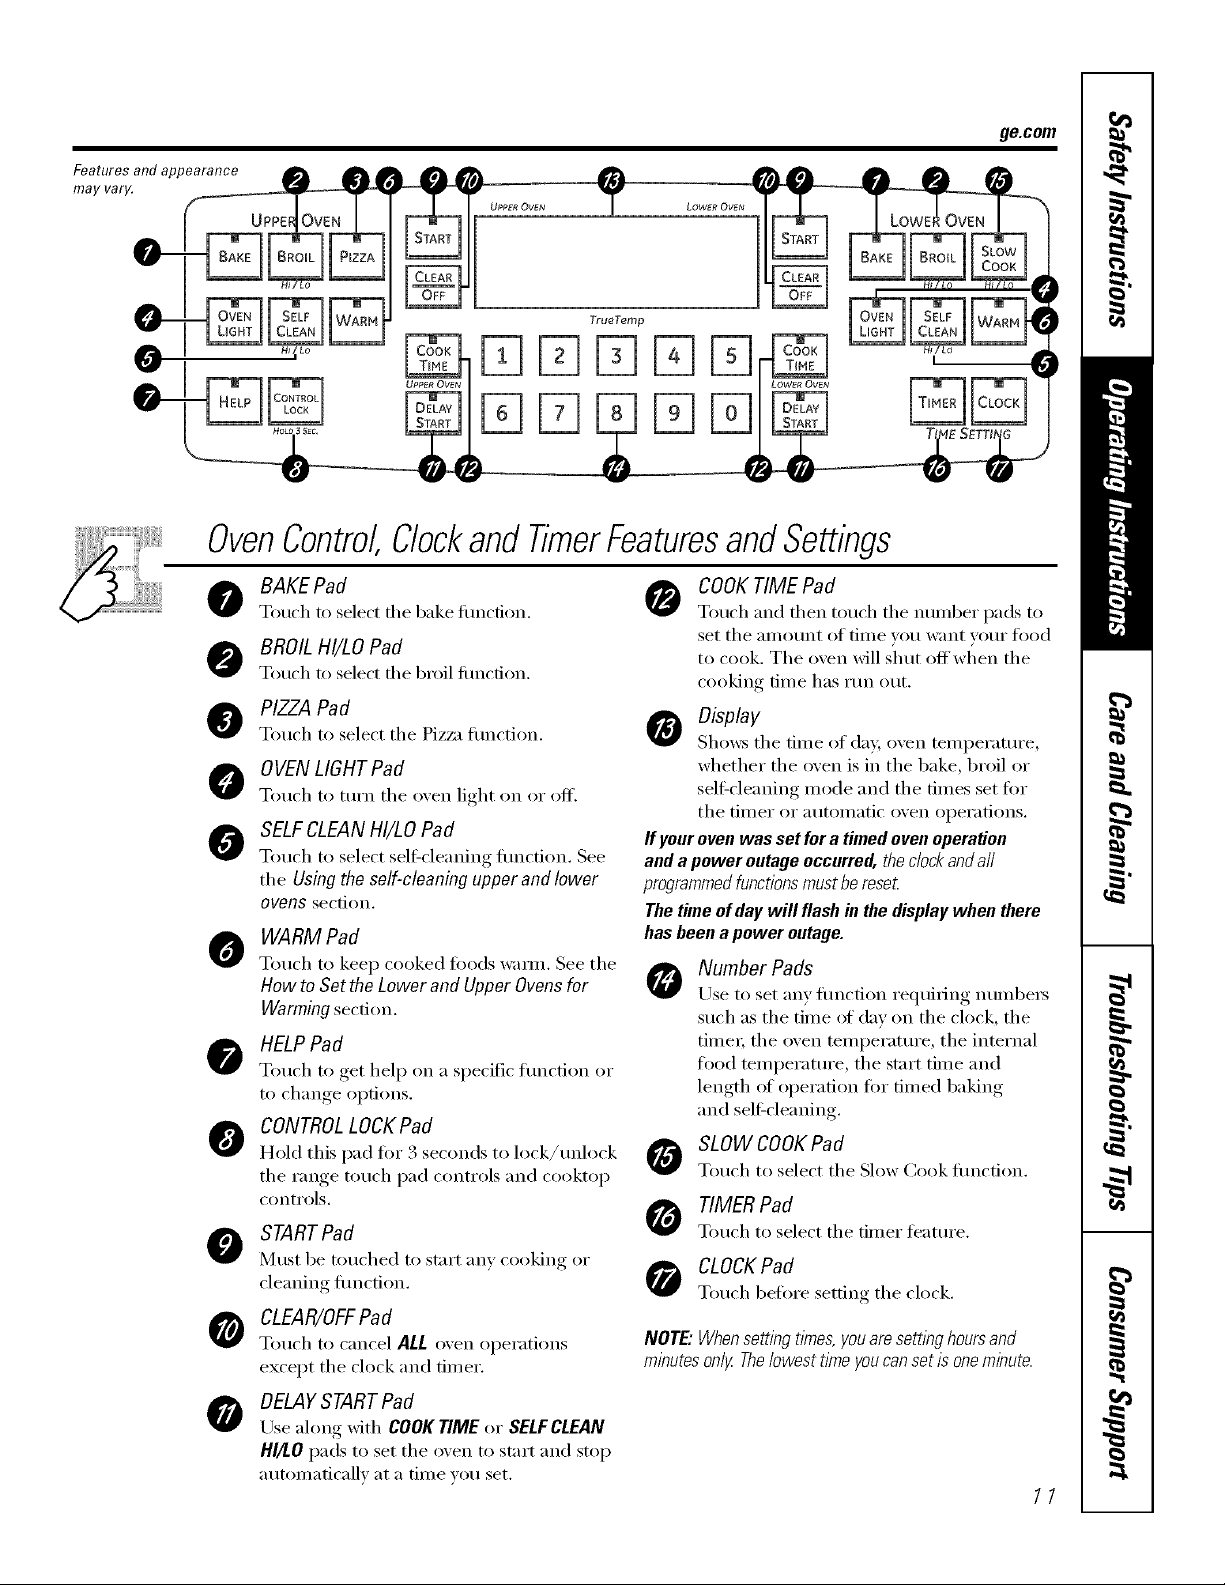
OvenControl,Clockand TimerFeaturesandSettings
ge.com
BAKE Pad
0
Touch to select the bake tiuwfion.
BROILHI/LO Pad
@
Touch to select file broil fimcfion.
PIZZA Pad
@
T(mch to select tile Piz/_l timction.
OVENLIGHTPad
0
Touch to turn tile oven light on or off.
SELFCLEANHI/LO Pad
0
Touch to select self:cleaning flmcfion. See
the Using the self-cleaning upper and lower
ovens section,
WARM Pad
0
Touch to kee I) cooked toads wam_. See the
How to Set the Lower and Upper Ovens for
Warming section,
HELPPad
T(mch to get hel I) on a specific flmction or
to change opfi(ms.
CONTROLLOCKPad
Hold this pad for 3 seconds to lock/unlock
tile range touch pad controls and cooktop
c(intr(ils.
STARTPad
0
Must be touched to start any cooking or
cleaning fimction.
CLEAR/OFF Pad
Touch to cancel ALL oven operations
except tile clock and timer.
DELAYSTARTPad
0
Use along with COOKTIME or SELFCLEAN
HI/LO pads to set the oven to start and stop
automatically at a time you set.
COOKTIME Pad
Touch and then to/lch tile ntlillber pads to
set tile amount (if time you want your tilocl
to cook. The oven will shut offwhen the
cooking time has run out.
Display
Sh(I_:s tile tillle (if day, oven tei/lpei'attli'e,
whether the oven is in the bake, broil or
self:cleaning mode and tile times set fin.
tile tii/ler or atltOlllatic (iven (ll)ei';iti(illS.
If your oven was set for a timed ovenoperation
and a power outage occurred, the clockand a//
programmedfunctionsmust be reset
The time of day will flash in the display when there
has been a power outage.
Number Pads
Use to set any function requiting numbers
such as the time _ff day on the clock, the
time_; tile oven temperature, tile internal
tiiod temperature, tile start time and
length (ff operation fin" timed 1)aking
and self:cleaning.
SLOW COOKPad
Touch t(I select tile Slow Cook flmcfi(m.
TIMER Pad
Totlch t() select tile timer teattlre.
CLOCKPad
Touch before setting tile clock.
NOTE."Whensetting tithes, youaresetting hoursand
minutes only Thelowest time youcan set is oneminute.
11
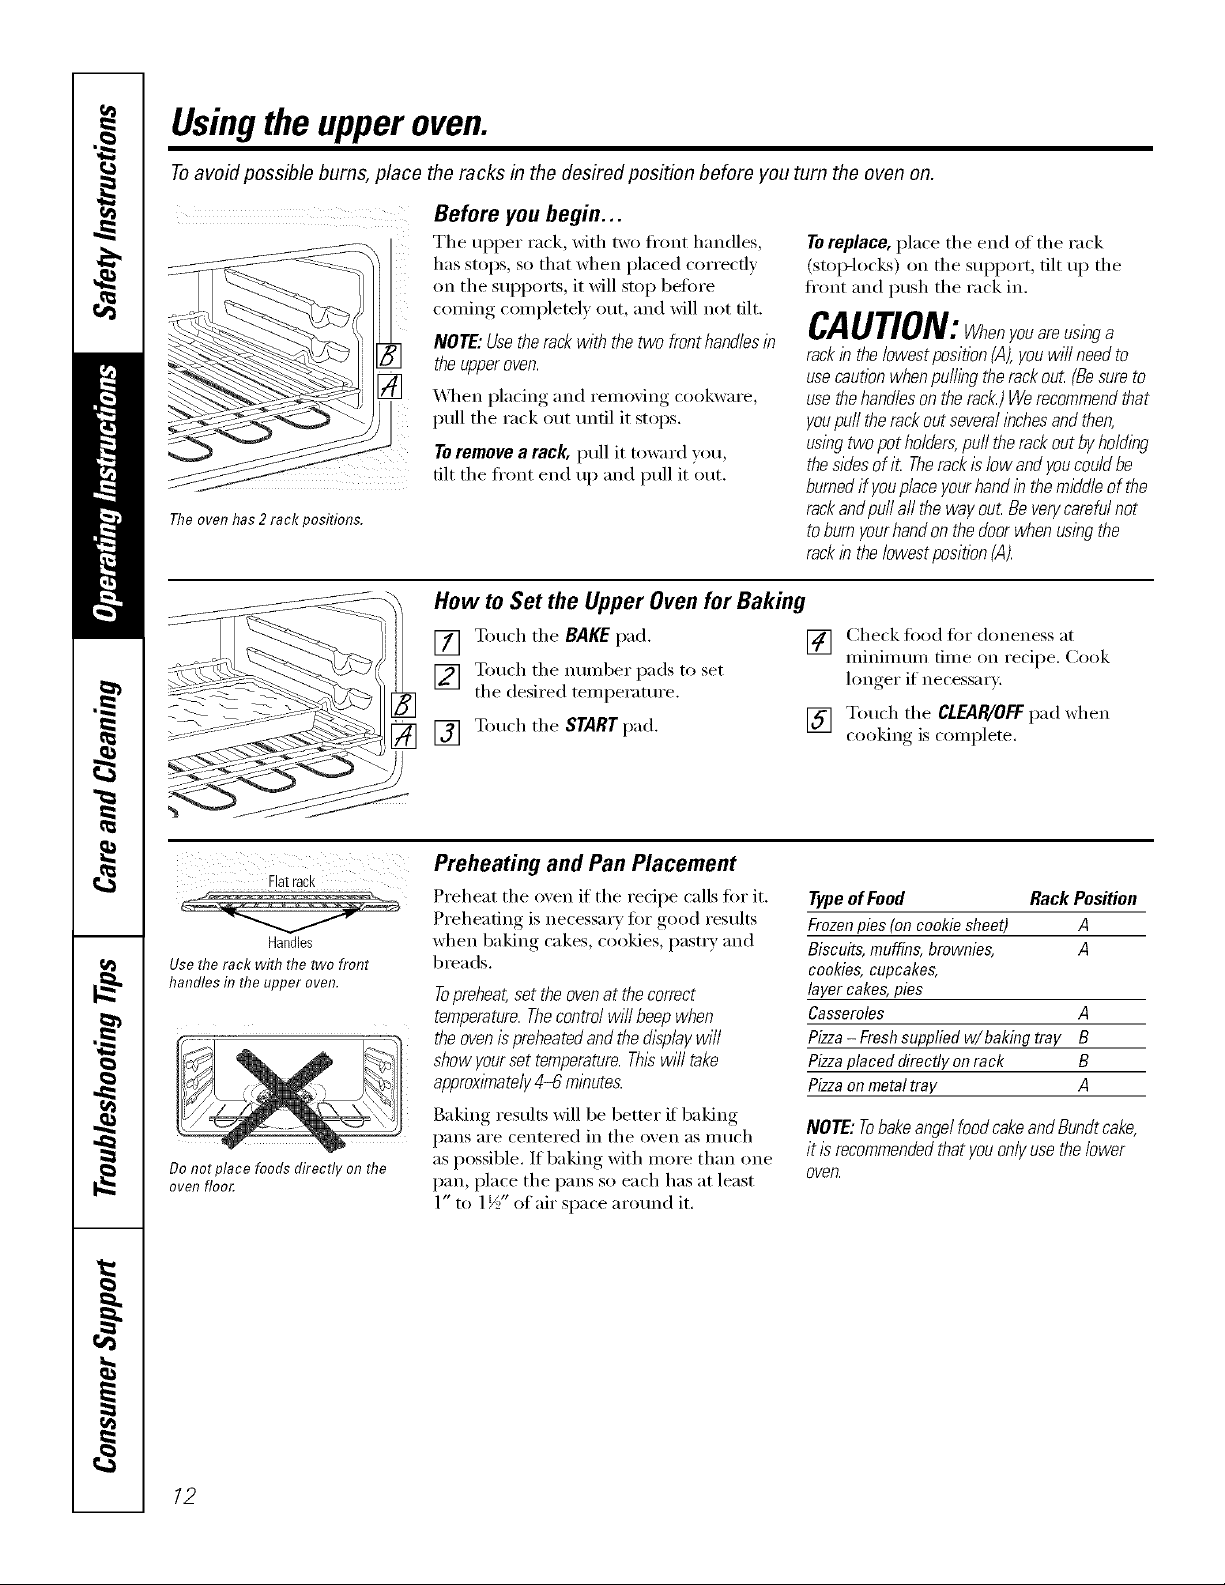
Usingthe upperoven.
Toavoid possible bums, place the racks in the desired position before you turn the oven on.
Before youbegin...
The upper rack, with two ti'ont handles,
has stops, so that when placed correctly
on the supports, it will stop before
coming completely out, and will not tilt.
NOTE: Usethe rock with the two fronthandles in
the upperoven.
_\]/ell placing and removing cookware,
pull the rack out tmtil it stops.
Toremove a rack, pull it toward you
tilt the ti'ont end up and pull it out.
The oven has 2 rack positions.
How to Set the Upper Oven for Baking
Toreplace, place the end of the rack
(stop-locks) on the support, tilt up the
ti'ont and push the rack in.
CAUTlON:whenyouarausinga
rack in thelowest position (A),you will need to
use caution when pu//ihg therack ou_(Besureto
use thehandles on therack.) Werecommendthat
youpuff the rack out severalinchesand then,
using two pot holders,puff therack out byholding
thesides ofiL Therackis low and youcould be
burnedif youplace yourhandin the middle of the
rack andpu// aft the way out Be verycarafu/not
toburn yourhand on the doorwhen using the
rack in the/owestposition (A).
Flatrack
Handles
Use the rack with the two front
handles in the upper oven.
Do not place foods directly on the
oven floo£
[] Touch the BAKE pad.
[] Touch the number pads to set
the desired temperatm'e.
[] Touch the START pad.
Preheating and Pan Placement
Preheat the oven if the recipe calls fin" it.
Preheating is necessary fin" good results
when baking cakes, cookies, pastry and
breads.
Topreheat,set theovenatthecorrect
temperature.Thecontrolwillbeepwhen
theovenispreheatedandthefllsplaywill
showyoursettemperature.Thiswilltake
approximately4-6 minutes.
Baking results Mll be better if baking
pans are centered in the oven as much
as possible. If baking with more than one
pan, place the pans so each has at least
1" to 1½" of air space arotmd it.
[] Check fi_od fin" doneness at
minimum time on recipe. Cook
longer if necessar).
[] Touch the CLEtlPJOFFpad when
cooking is complete.
Typeof Feed Rack Position
Frozenpies(oncookie sheet) A
Biscuits,muffins,brownies, A
cookies,cupcakes,
layer cakes,pies
Casseroles A
Pizza- Freshsuppliedw/baking tray B
Pizzaplaced directly on rack B
Pizzaonmetaltray A
NOTE: Tobake angel food cakeand Bundtcake,
it is recommendedthat youonlyuse the lower
oven.
12
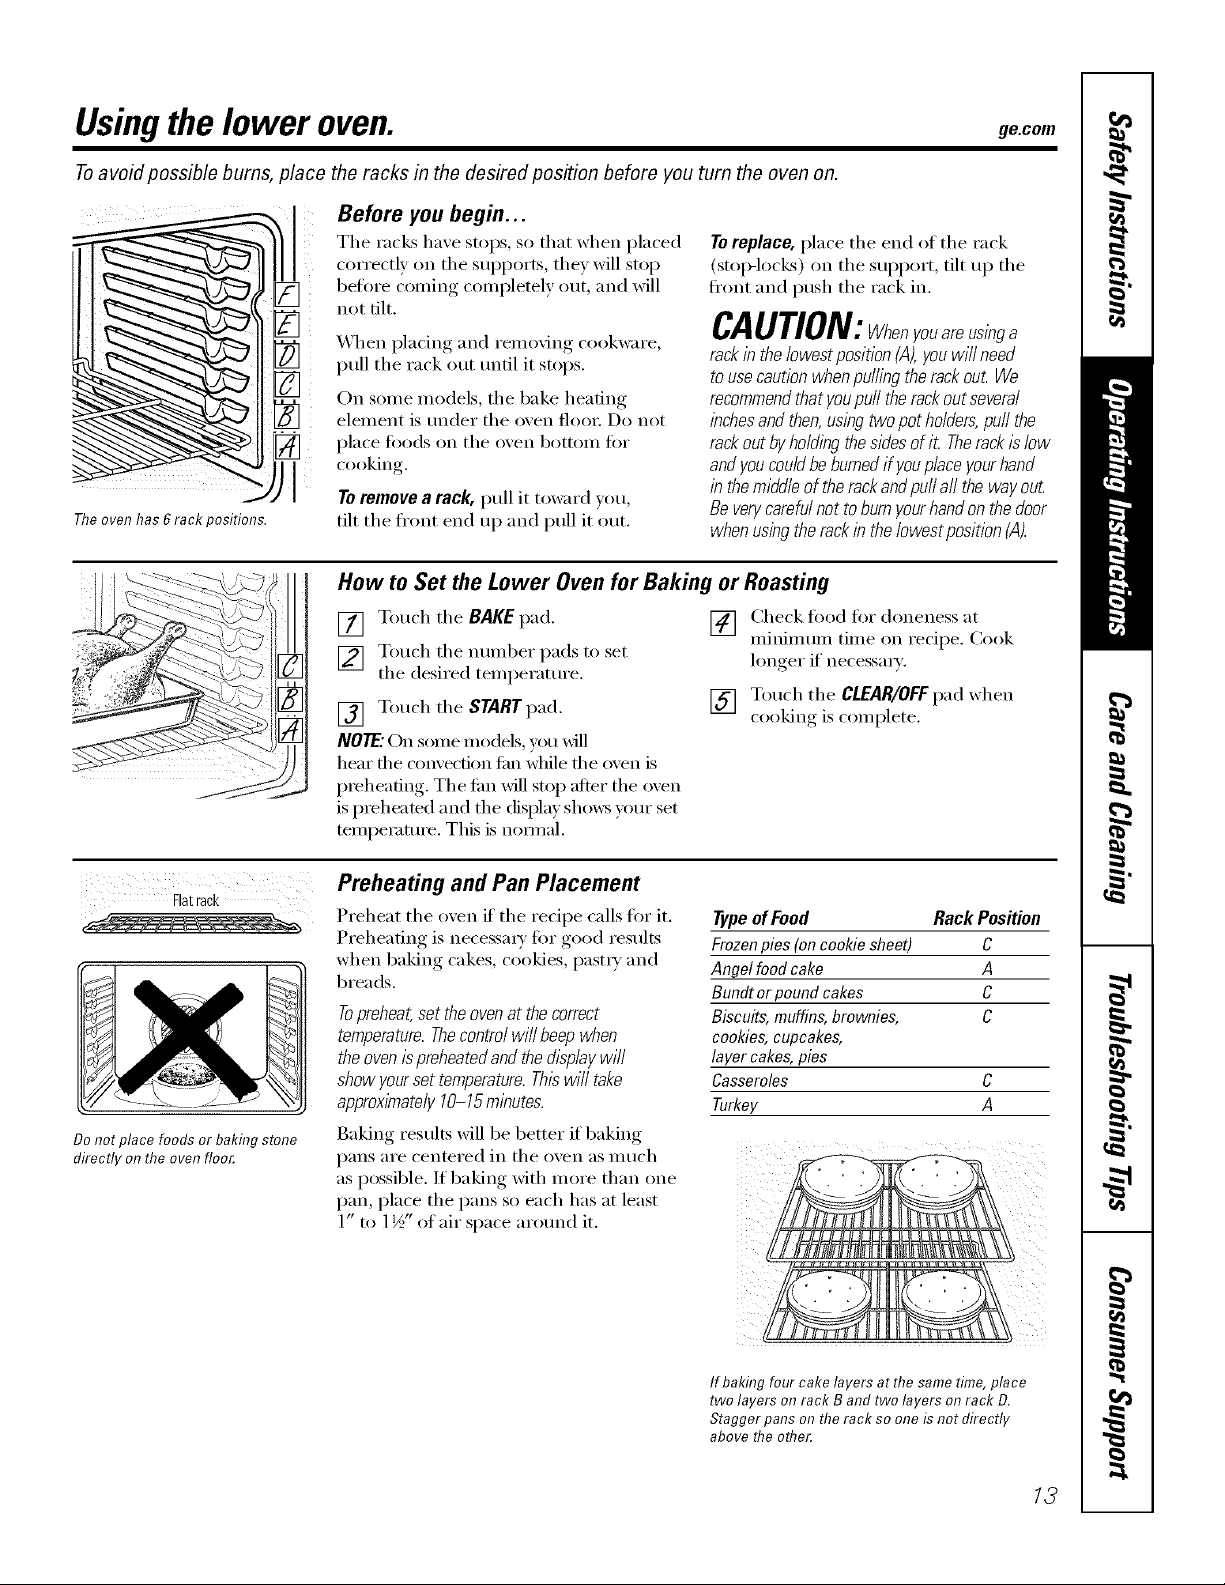
Usingthe lower oven. gecom
Toavoid possible bums, place the racks in the desired position before you turn the oven on.
Before youbegin...
il ¸ !
Theovenhas6rackpositions.
The racks have stops, so that when placed
correctly on the supports, they will stop
betore coming colnpletely otlt, and will
not tilt.
"_Ahen l)lacin°_ and removing, cookware,
pull the rack out until it stops.
On some models, the bake heating
element is under the oven flooi: DO not
place foods on the o`*en bot[oii1 [i)I"
cooking.
Toremove a rack, pull it toward _ou
tilt the fl'ont end up and pull it out.
How to Set the Lower Oven for Baking or Roasting
Toreplace, place the end of the rack
(Stol>locLs) on the support, tilt up the
ti'ont and push the rack ill.
CAUTION:Whenyouareusinga
rack in thelowest position (A),youwi// need
touse caution when puffing therack ou_ We
recommendthat youpuff the rackout several
inchesand then,using two pot holders,puff the
rack out byholding thesides ofi_ Therackis low
andyoucould be burnedif youplace yourhand
in the middleof the rackandpuffaft the way ouL
Be verycarefulnot to burn yourhandon the door
when usingthe rack in the/owestposition (A).
Flatrack
Do not place foods or baking stone
directly on tlTeoven floo_
[] Touch the BAKEpad.
[] Touch the munber pads to set
the desired temperature.
[] Touch the START pad.
NOTE."On some models, you _dll
hear the c'_mvection tim while the oven is
preheating. The tim will stop after the oven
is I)reheated and the (fisl)lay shows your set
temperature. This is noHnal.
Preheating and Pan Placement
Preheat the oven it the recipe calls for it.
Preheating is necessai y fin" good results
when baking cakes, cookies, l)astiT and
breads.
Topreheat,set the ovenat the correct
temperature.Thecontrol will beep when
the ovenispreheated andthe &splay will
show yourset temperature. Thiswill take
approximately 10-15minutes.
Baking results will be better if baking
pans are centered in the ()',ell as much
as possible. If baking with more than one
pan, place the pans so each has at least
1 tt - ,
1" to 1½ of mr space around it.
[] Check fi)od fin" doneness at
mininmnl time on recipe. Cook
longer if' necessaD'.
[] Touch the CLEAR/OFFpad when
cooking is complete.
Type of Food Rack Position
Frozen pies (on cookie sheet) C
Angel food cake A
Bundt or pound cakes C
Biscuits, muffins, brownies, C
cookies, cupcakes,
layer cakes, pies
Casseroles C
Turkey A
Ifbakingfour cakelayersat thesametime,place
twolayerson rackB andtwolayerson rackD.
Staggerpansontheracksooneisnotdirectly
abovetheother.
13
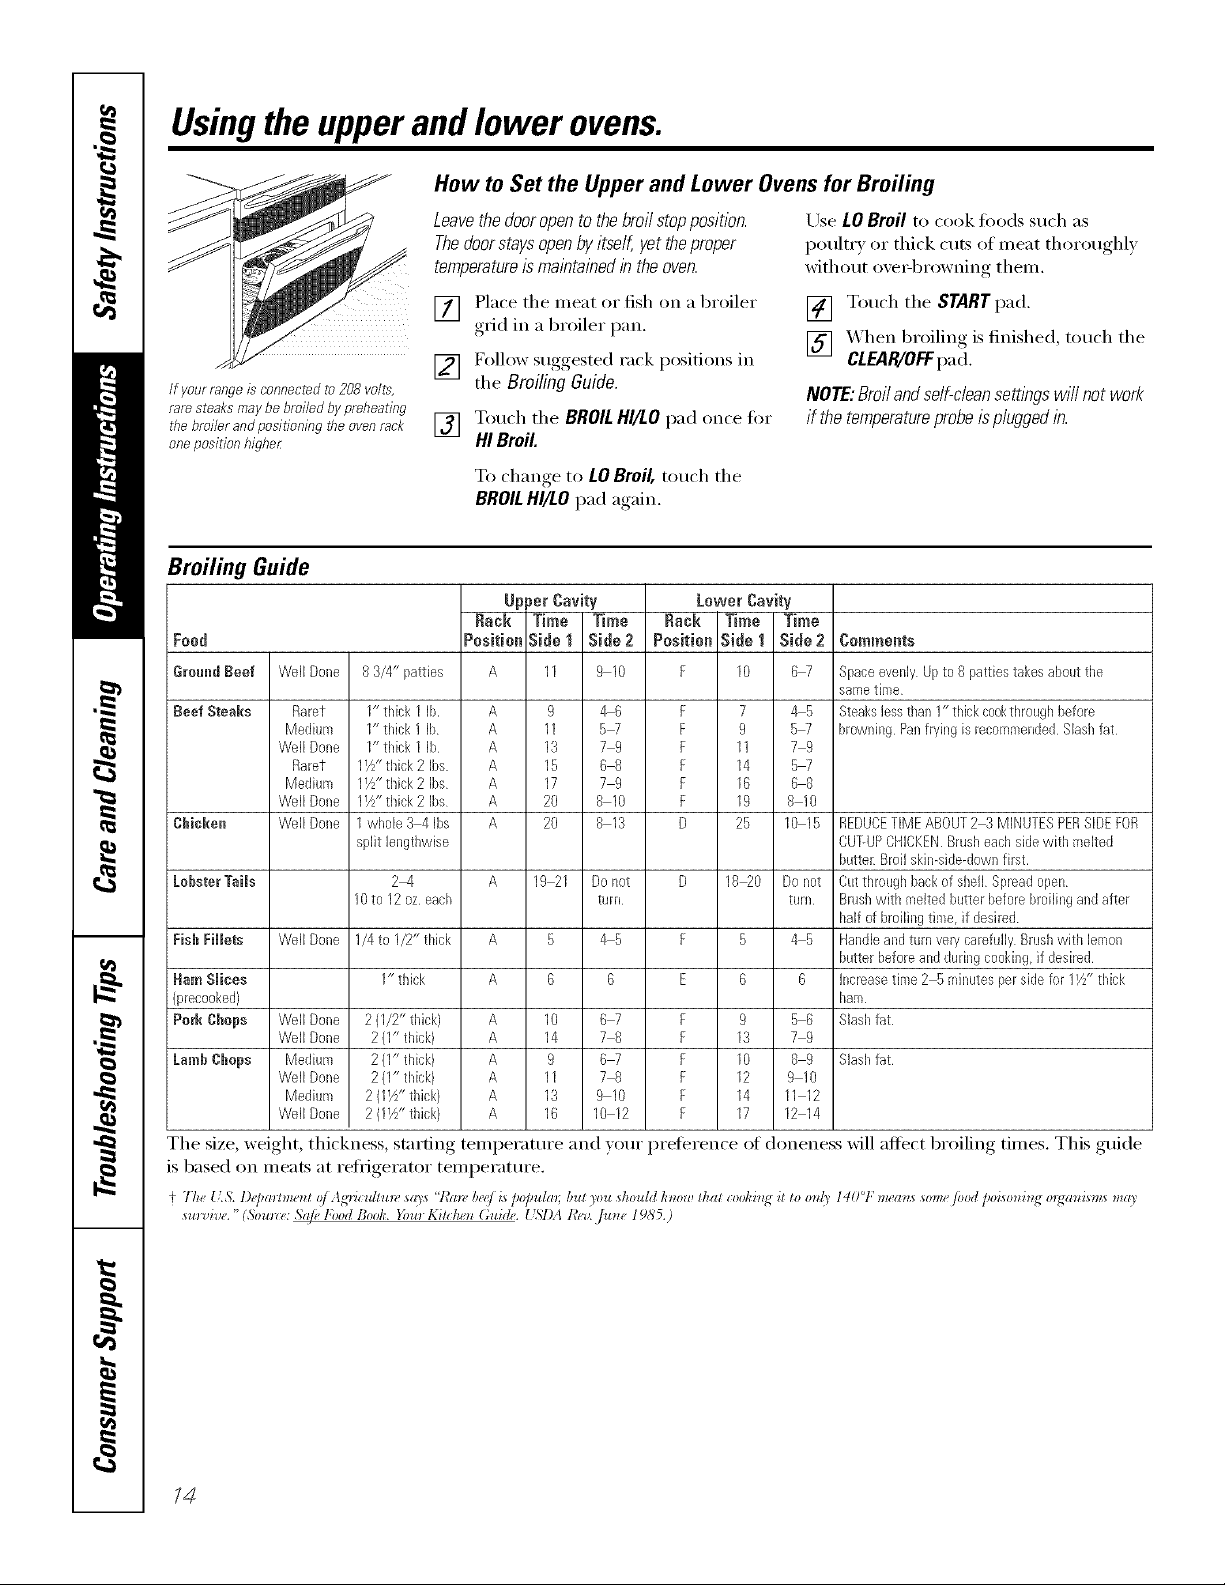
Usingthe upperand lower ovens.
How to Set the Upper and Lower Ovens for Broiling
Leavethe dooropen to thebroil stopposition.
Thedoorstays openbyitself, yet theproper
temperatureis maintained in the oven.
Use LOBroil to cook fi)ods such as
poultx T or thick cuts of meat thoroughly
without ovePbrowning them.
[] Place tile meat (rr fish on a broiler
[] Touch tile START pad.
g_i(1 in a broiler pan.
[] _Ahen broiling is finished, touch tile
CLEAR/OFFpa d.
NOTE:Broil andself-cleansettings will not work
if the temperatureprobeis plugged in.
If yourrangeis connectedto208volts,
raresteaksmaybebroiled bypreheating
thebroiler andpositioning theovenrack
oneposition higher
[] Follow suggested rack positions in
tile Broiling Guide.
[] Touch tile BROIL HI/LO I;ad once for
HI Broil
To change to LOBroil, touch tile
BROILHI/LO pad again.
Broiling Guide
Upper Cavity Lower Cavity
Rack Time Time Rack Time Time
Feed
WellDone
Rarer
Medium
WellDone
Rarer
Mediunl
WellDone
ebiokem_
LobsterTaiJs
Fish FNets
Ham Slices
(precooked)
Perk Chops
LambChops
Tile size, weight, thickness, starting teml)erattu'e
is based on meats at reliigerator teml)eratm'e.
+ 7h_, ILS'. l)_jmmm, nt oJAg'riculen_ scOs "t,%_,/)_e/k_/_o]mlm; bm )ou should know #ml cooking it e) onl_ 14t)°F m_an_ _omefired /_oi_onin£,m2ani_m_, mc9
sul ,,_ #. (5oulm .Sa/el'ood Boot¢. }f)ur Kildu n (;uide. [ '_I)AR_*,,J..]UlI¢,I g_5'5.)
WellDone
WellDone
WellDone 2(I/2" thick) A I0
WellDone 2(I" thick) A I4
Medium 2(I" thick) A 9
WellDone 2(I" tldck) A 11
Medium 2 (IV/' tlfick) A I3
WellDone 2 (11//'thick) A I6
83/4" patties A
1" tldck 1 lb. A 9
1" tlfick IIb A 11
1" tldck 1 Ib A I3
IV/'thick21bs. A I5
11/z'thick2Bs A I7
I1//' thick 2 Ibs A 20
1whole 3 4 Ibs A 20
split lengthwise
24 A
10to I2 oz each
I/4 to 1/2"thick A
1" thick A
Pesitiell Side 1 Side 2 Pesitiae Side 1 Side 2 Cemmeets
910 E 10 6 7
_6 F 7 4 5
5_ F 9 5_
79 F 1I 79
6 8 F 14 5W
79 F 16 68
810 F 19 8 I0
813 D 25 10 I5
I9 21
Do not
turn
5
45
6
67 E 9 56
78 E 13 79
67 E 10 89
7 8 E 12 9 I0
910 E 14 1I I2
I012 E 17 12 I4
and )our preference of doneness _fill affect broiling times. This guide
D I8_0 Donot Cutthrough backof shell Spreadopen
F 5 4 5 Hahdleandturnverycarefully Brushwith lemon
E 6 6 Increasetime 2 5minutesper sidefor 1I/2"tldck
Spaceevenly Upto 8 pattiestakesabout the
sametkoe
SteakslesstitanI" tlfick cookthroughbefore
browning Panfrying is recommendedSlashfat
REDUCETIMEABOUT2 3 MINUTESPERSIDEFOR
CU]-UPCHICKENBrusheachsidewith melted
butter:Broilskimside-dowhfirst•
turn Brushwitl_raeltedbutterbeforebroilingahd after
half of broilingtime, if desired
butterbefore andduringcooking,if desired
hare
Blasl_fat
Slasl_fat
/4
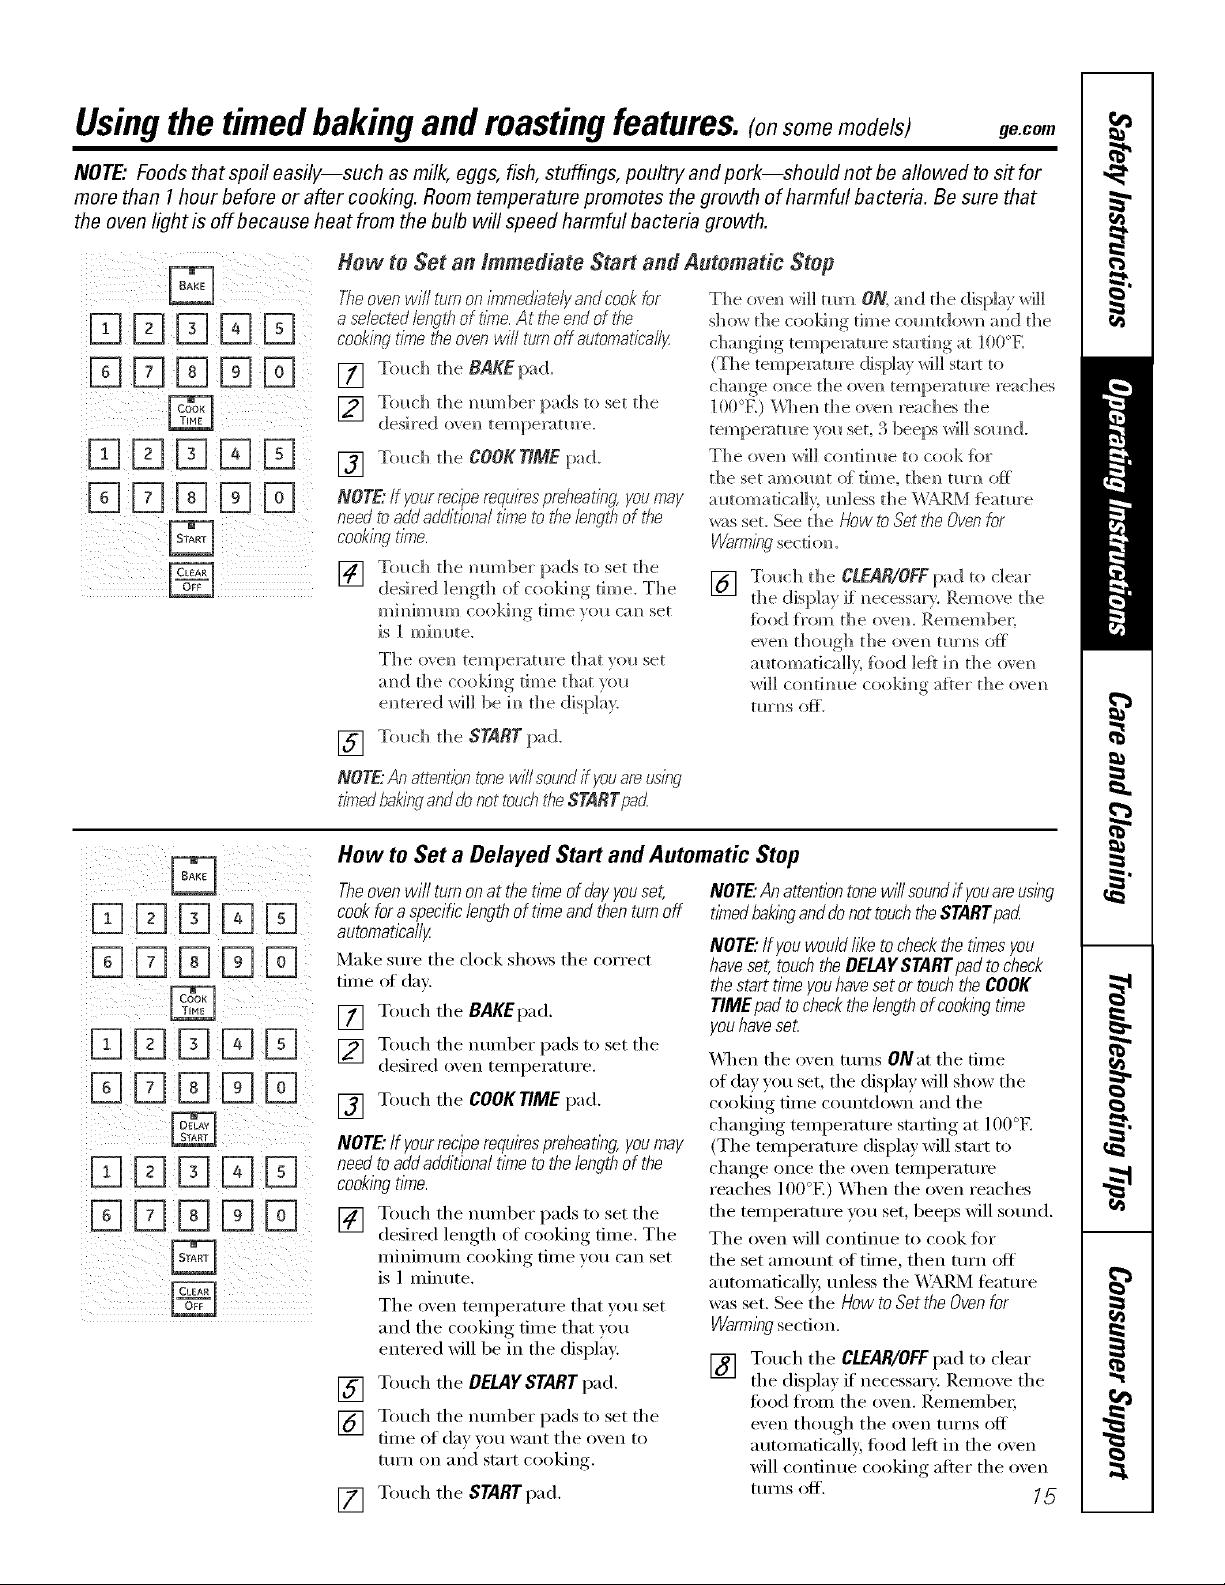
Usingthe timedbakingand mastingfeatures.(o,somemodels) go.corn
NOTE" Foods that spoil easily--such as milk, eggs, fish, stufings, poultry and pork--should not be allowed to sit for
more than 1hour before or after cooking. Room temperature promotes the growth of harmful bacteria. Be sure that
the oven light is off because heat from the bulb will speed harmful bacteria growth.
Hew to Set an Immediate Start and Automatic Step
() ( ;)i ¸¸¸:
iiD E] D E] E]
The over? wi//turn on ?_?med/atelyand cook for The o's'e]/wi]] tm'u ON, mid the display wi]]
a selected/engtflof fi_?e.At tileendofthe
cooking time the oven wi// turn off automatically
[] Touch the BAKEpad.
] Tol_ch the mm/1)er pads to set the
desired oven tempe]:)mre.
[] Touch die COOKTIME pad.
NOTE,"lf yourmc?_)emquirespreheafing,youmay
need to aW addifional time to the bng#? of the
cookingtime.
] Touch [lie ram/bet pads to se[ die
desi red 1en gth of cooki m/g tim e. The
m ]m/im Ilm cooki m/g [1m e vo I1 ca m/se[
is ] mimlte.
The eye]/[e]//peYtKHre [h;_[ }oH se[
amid the cookh/g time that }ou
em/tered wH] be ira/the dis[)]a}:
sho)_ the cookim/g time com/tdo_n and the
cham/gim/g temperature smrtim/g at ]00°E
(The tempemnlre display wi]] smut to
change once the o\ en tempemtm'e readies
] 00 °E) When the o',en reach es the
tempemtm'e yell set, 3 beeps wi]] som/d.
The o\en _rd]] contimle to cook fbr
the set amom]t of time, t]]e_] mrn of{
automatically, m]Iess the _\_kRM featm'e
was set. See the How to Set Ne Over?for
VVarrel}?gsecti on.
[] Touch the CLEAR/OFFpad to dear
the disl)]a ) if" m/ecessm). Remove the
%od {_'om the ()_em Rein embe];
e\ e(/ [hOHg]) []]e o',e(/ [HY_]S Of_
alltomatica]]y, fk)od left in the o',en
_rd]_comimle coddm/g a{ter the ovem/
iiDK]E]D D
iK][Z]DK] E] i
[] Touch the STARTpad.
NOTE,"An attentiontone will soundifyouam using
timedbakl_?ganddonot touch#?eSTARTpad
How to Set a Delayed Start and Automatic Stop
Theoven will turnon at the t?kneof dayyouset,
cook for aspecihclength of timeand then turn off
automatically
Make sure the clock sh(/ws the correct
tim e (If (lax.
[] Touch the BAKEpad.
[] Touch the number pads to set the
desired oxen temperature.
[] Touch the COOKTIME pad.
NOTE."If yourreciperequirespreheat?bgyoumay
needtoaddadditiona/t?metothelengthofthe
cookbgthroe.
[] Touch the number pads t)/set the
desired length )ff cooking time. The
IllillillllIIl] C))()king time y))tI CaI] set
is 1 minute.
The oven temperature that you set
and the cooking time that you
entered will be in the display:
[] Touch the DELAY START pad.
[] Touch the numl)er pads to set the
time )if day }ou want the oxen to
ttII'n on and start cooking.
[] Touch the START pad.
NOTE:Anattentiontonewff/soundif youareusbg
t?medbahw anddonottouchtheSTARTpad
NOTE."Ifyouwould177(otocheckthetimesyou
haveset,touchtheDELAYSTARTpadtocheck
thestarttimeyouhavesetor touchtheCOOK
TiMEpafltocheckthelengthofcookbgt?me
youhaveset
&,_]]en the oven rams ONat the time
of day you set, the display will show the
co()!dng time countdown and the
changing temperature starting at l O0°F,
(The temperature display will start to
change ()lice the ()veil tellll)eI';IttII'e
reaches 100°E) X,_]]en the oven reaches
the temperature you set, beeps will sound.
The oven will continue to cook t0r
the set anlount of time, then turn off
aut)m]aficall> unless the _,\;_RNI feature
was set. See the Howto Setthe Ovenfor
Warml))g sect.ion.
[] Touch the CLEAR/OFF pad to clear
the displa) ff necessary: Remove the
food fi'on] the ovelk l_en]en/bei;
even though the oven turI]s off
automaticall> food left in the oven
will continue cooking after the oven
tt)i'ns Off'. _ 5
 Loading...