

GE PS900SP1SS, PS900DP1CC, PS900DP1BB, PD900DP1WW, PD900DP1CC Owner’s Manual
...
P_,
6.
W(I,)
2
a
-0
I
GEAppliances.com
Safety Instructions ............................ 2-5
Operating Instructions
Kitchen Timer .......................................... 21
Oven ............................................... 14-35
Adjust Oven Thermostat .............................. 22
Baking or Roasting .................................... 17
Broiling, Broiling Guide ................................ 18
Controls ........................................... 14, 15
Convection Oven .................................. 23-26
Lower Oven Drawer ................................... 35
Preheating ............................................ 17
Probe ................................................. 20
Sabbath Feature ...................................... 33
Self-Cleaning ...................................... 29, 30
SlowCook,Warming and Proofing Features ........... 27, 28
Special Features .................................. :31-32
Timed Baking and Roasting ........................... 19
Warming Drawer ..................................... :34
Surface Units ........................................ 6-1:3
Cookware .............................................. 7
Griddle ............................................ 12, l:B
Knob-Controlled Models ........................... lO, 11
Touch Pad-Controlled Models ........................ 8, 9
Quick Set V,
Quick Set VI and
Next Step Control
om
m
Care and Cleaning
Control Knobs ......................................... 36
Control Panel .......................................... 36
Glass Cooktop ..................................... 42, 43
Lift-Off Oven Door ................................. 37, 38
Light ............................................... 40, 41
Oven Floor ............................................. :39
Oven Heating Elements ................................ 41
Racks .................................................. :38
RemovableWarming Drawer/Lower OvenDrawerPan ..... :39
Storage Drawer ........................................ :39
Surfaces ............................................... :36
Vent ................................................ :37,:39
Troubleshooting Tips ......................... 44-48
Accessories ......................................... 5o
Consumer Support
Consumer Support .................................... 52
Warrantg ..............................................51
Write the model and serial
numbers here:
Model #
Serial #
In Canada:
www.GEAppliances.ca
You can find them on a label
behind the drawer or behind the
lower oven door on the front of
the range frame.
Printed on
Recgcled Paper
49-80575-i 05-09JR
IMPORTANTSAFETYINFORMATION.
READALL INSTRUCTIONSBEFOREUSING.
I-AWARNING I
Read all safety instructions before using the product. Failure to follow these instructions may result in fire, electric
shock, serious injury or death.
ANTI-TIP DEVICE
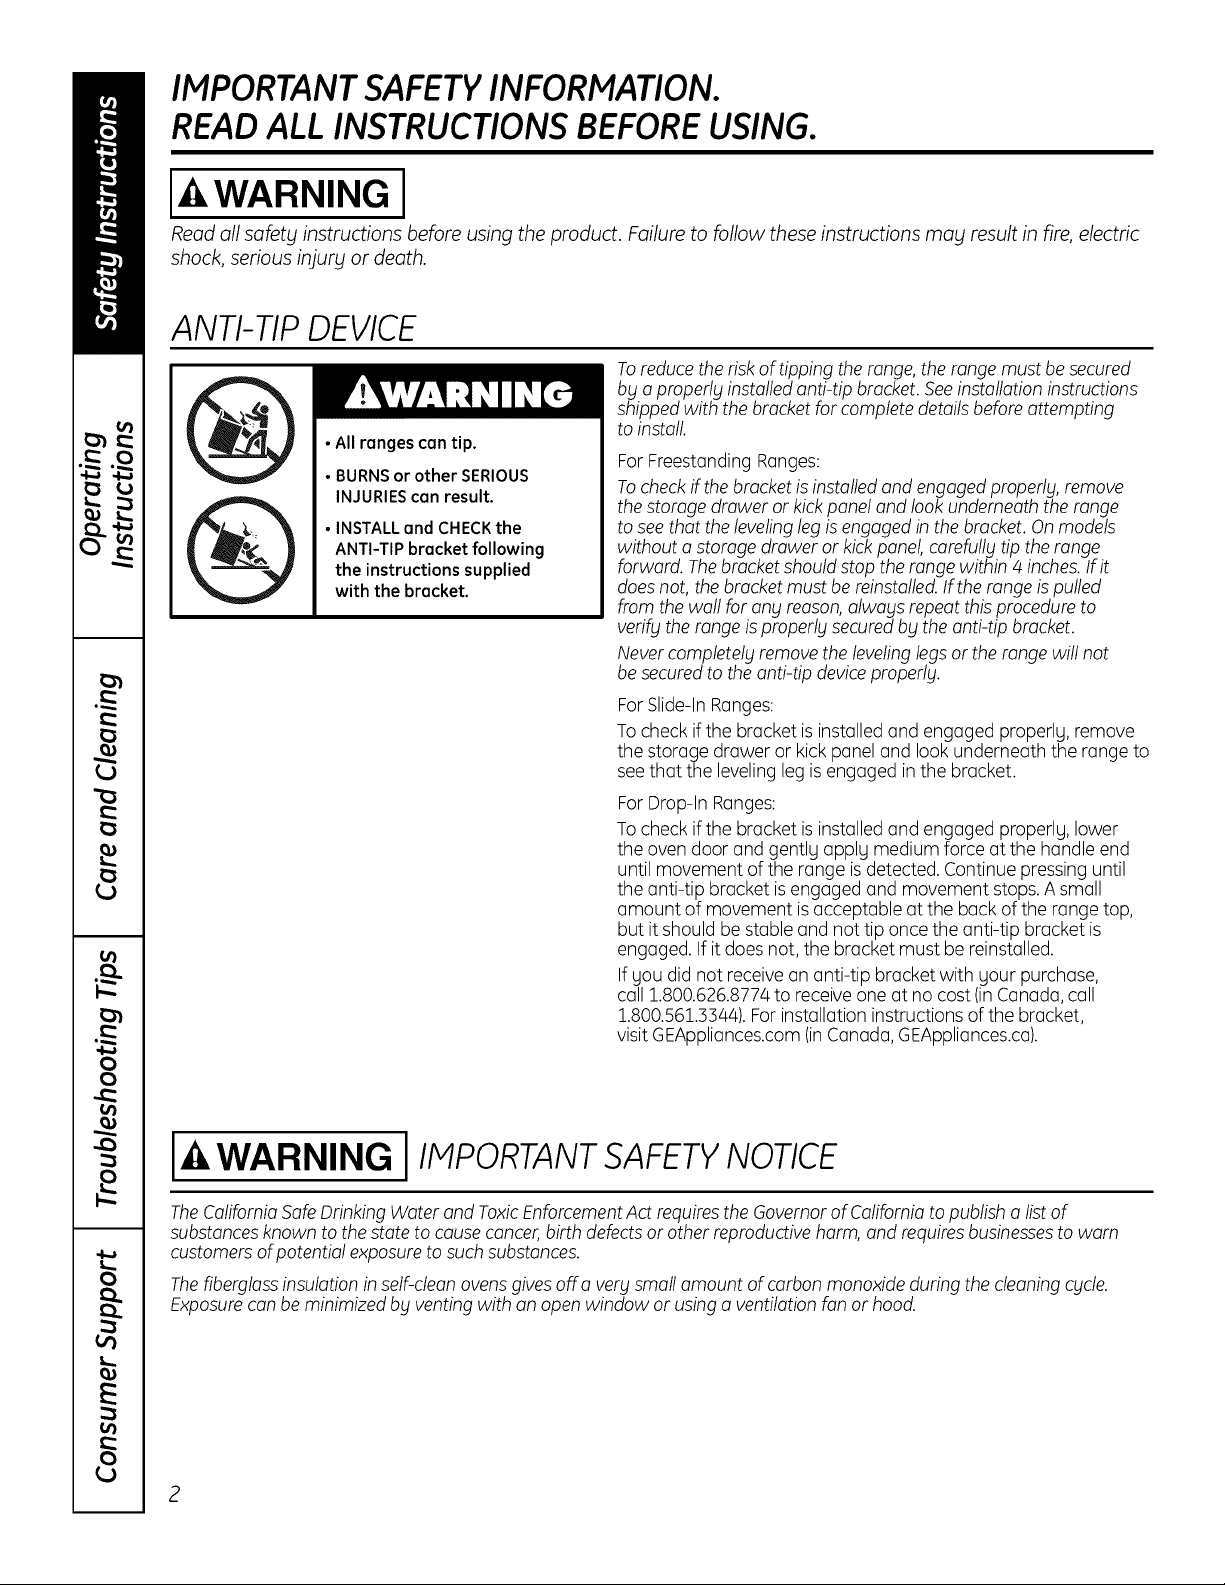
Toreducetherisk of tipping the range, the range must be secured
bblo properlblinstalledanti-tip bracket.Seeinstallation instructions
shippedwith the bracket for complete details beforeattempting
• All ranges can tip.
• BURNS or other SERIOUS
INJURIES can result.
• INSTALLand CHECKthe
ANTI-TIP bracket following
the instructions supplied
with the bracket.
to install
ForFreestandingRanges:
Tocheckifthe bracketis installedand engagedproperly, remove
the storage drawer or kickpanel and lookunderneath the range
to seethat the leveling leg isengaged in the bracket. Onmodels
without o storage drawer or kick panel, carefully tip the range
forward. Thebracket should stop the range within 4 inches.If it
doesnot, the bracket must be reinstalled.If therange is pulled
from the wall for any reason,always repeat this procedure to
verify the range is properly securedby theanti-tip bracket.
Nevercompletely removethe levelinglegsor the range will not
be securedto the anti-tip deviceproperly.
ForSlide-In Ranges:
Tocheck ifthe bracket isinstalled and engaged properlg, remove
the storage drawer or kickpanel and look underneath the range to
seethat the leveling leg is engaged in the bracket.
ForDrop-In Ranges:
Tocheck ifthe bracket isinstalled and engaged properlg, lower
the oven door and gentlg opplg medium force at the handle end
until movement of the range isdetected. Continue pressing until
the anti-tip bracket is engaged and movement stops.A small
amount of movement isacceptable at the back of the range top,
but it should be stable and not tip once the anti-tip bracket is
engaged. If it does not, the bracket must be reinstalled.
If gou did not receive on anti-tip bracket with gour purchase,
call 1.800.626.8774to receive one at no cost (inCanada,call
1.800.561.3344).Forinstallation instructions of the bracket,
visit GEApplionces.com(inCanada, GEApplionces.co).
WARNING IIMPORTANTSAFETYNOTICE
TheCaliforniaSafeDrinking Water and ToxicEnforcementAct requiresthe Governorof Californiato publisho listof
substancesknown to the state to causecancer,birth defectsor other reproductive harm, and requires businessesto worn
customersof potential exposure to suchsubstances.
Thefiberglass insulation in self-clean ovensgivesoff avery smallamount of carbon monoxideduring the cleaning cycle.
Exposurecon be minimized bblventing with on open window or usingo ventilation fan or hood.
2
WARNING I GENERALSAFETYINSTRUCTIONS
GEAppliances.com
, Usethis appliancefor its intendedpurposeas describedinthis
Owner'sManual.
, Besureyourapplianceisproperly installedandgrounded
by a qualified installerin accordancewith the provided
installationinstructions.
, Do notattempttorepairorreplaceany partofyourrange
unlessitisspecificallyrecommended inthismanual.All
otherservicingshouldbetransferredtoa qualified
technician.
, Beforeperforming anyservice,unplugthe rangeor
disconnectthepowersupply at thehouseholddistribution
panelby removingthe fuseor switchingoff the circuit
breaker.
, Donotleavechildrenalone-children shouldnot be left
alone or unattendedin anareawherean applianceisin use.
Theyshouldneverbe allowedto climb,sit or standon any
partof theappliance.
CAUTION:Do not store itemsofinterestto children
abovea range or onthe backguardof a range-children
climbingon the rangeto reachitems could beseriously
injured.
Useonlydry potholders-moist or damp pot holderson
hotsurfacesmay resultin burnsfrom steam.Donotlet pot
holderstouch hotsurfaceunitsor heatingelements.Donot
usea towel or otherbulky cloth in placeof pot holders.
Neveruseyourappliancefor warming or heating the room.
, Do not touch the surfaceunits,the heating elementsor
the interiorsurface of the oven.Thesesurfacesmay be
hot enoughto burneventhoughthey aredark incolor.
Duringand after use,do not touch,or let clothingor other
flammablematerialscontact thesurfaceunits,areas nearby
thesurfaceunitsor any interiorareaof the oven;allow
sufficienttime for coolingfirst. Othersurfacesof the
appliancemay becomehot enoughto causeburns.
Potentiallyhot surfacesincludethe cooktop,areasfacing
thecooktop,ovenventopening,surfacesnear the opening
and crevicesaroundtheovendoor.
Donot heatunopenedfood containers.Pressurecouldbuild
up andthe containercould burst,causingan injury.
Donot usealuminum foilto linethe drip pansor anywhere
intheoven,except asdescribedinthis manual.Misusecould
resultin damage to the rangeandshockor firehazard.
Avoidscratchingor impacting glassdoors,cooktopsor
control panels.Doingsomay leadto glassbreakage.Do not
cook on a productwith brokenglass.Shock,fireor cutsmay
occur.
, Cookmeat and poultry thoroughly-meat to at leastan
internaltemperature of 160°Fand poultryto at leastan
internaltemperature of 180°RCookingto these
temperaturesusuallyprotectsagainstfoodborneillness.
I-&WARNING I KEEPFLAMMABLE MATERIALSAWAY FROM
THE RANGE.
Donotstore or useflammablematerialsin anovenor near
the cooktop,includingpaper,plastic,potholders,linens,wall
coverings,curtains,drapesand gasolineor otherflammable
vaporsand liquids.
, Neverwear loose-fittingor hanginggarmentswhileusing
the appliance.Thesegarments may igniteifthey contact hot
surfaces,causingsevereburns.
Donot let cookinggreaseor otherflammablematerials
accumulate inor nearthe range.Greaseinthe ovenoron
the cooktopmay ignite.
, Cleanventilatinghoodsfrequently.Greaseshouldnot be
allowedto accumulateon the hoodor filter.
Itl, WARNING I IN THE EVENT OFA FIRE,TAKETHEFOLLOWING
STEPSTO PREVENTTHE FIREFROM SPREADING:
Donot usewater on greasefires.Neverpick upa flaming
pan.Turnthe controlsoff.Smothera flaming panon
a surface unit by coveringthe pancompletelywith a
well-fitting lid,cookiesheetor flat tray. Usea multi-purpose
dry chemicalor foam-type fire extinguisher.
If there is afire inthe ovenduring baking,smotherthe fire by
closingthe ovendoorand turningthe ovenoff orby usinga
multi-purposedry chemical or foam-type fire extinguisher.
, Ifthere isa firein the ovenduring self-clean,turnthe oven
off and wait for the fire to go out. Do not force thedoor
o_en.Introductionoffreshair at self-cleantemperatures
may leadto a burstof flamefrom the oven.Failuretofollow
thisinstructionmay resultin severeburns.
3
IMPORTANTSAFETYINFORMATION.
READALL INSTRUCTIONSBEFOREUSING.
I-&WARNING I COOKTOPSAFETY'INSTRUCTIONS
Never leave the surface units unattended at
medium or high heat settings. Boilovers cause
smoking and greasy spillovers that may catch
on fire.
Never leave oil unattended while frying. If allowed
to heat beyond its smoking point, oil may ignite,
resulting in fire that may spread to surrounding
cabinets. Use a deep fat thermometer whenever
possible to monitor oil temperature.
To avoid oil spillover and fire, use a minimum
amount of oil when shallow pan-frying and avoid
cooking frozen foods with excessive amounts of ice.
Use proper pan size-select cookware having flat
bottoms large enough to cover the surface heating
element. The use of undersized cookware will
WARNING I
(some models)
Use care when touching the cooktop. The glass
surface of the cooktop will retain heat after the
controls have been turned off.
Do not cook on a broken cooktop. If glass cooktop
should break, cleaning solutions and spillovers may
penetrate the broken cooktop and create a risk of
electric shock. Contact o qualified technician
immediately.
Avoid scratching the glass cooktop. The cooktop
con be scratched with items such as knives, sharp
instruments, rings or other jewelry and rivets on
clothing.
Do not place or store items that can melt or catch
fire on the glass cooktop, even when it is not being
used. If the cooktop is inadvertently turned on, they
RADIANT COOKTOPSAFETY INSTRUCTIONS
expose a portion of the surface unit to direct
contact and may result in ignition of clothing.
Proper relationship of cookware to surface unit
will also improve efficiency.
Only certain types of glass, glass/ceramic,
earthenware or other glazed containers are suitable
for cooktop service; others may break because of
the sudden change in temperature.
To minimize the possibility of burns, ignition of
flammable materials and spillage, the handle of a
container should be turned toward the center of the
range without extending over nearby surface units.
When preparing flaming foods under a hood, turn
the fan on.
may ignite. Heat from the cooktop or oven vent
after it isturned off may cause them to ignite also.
Use CERAIVIABRYTE® ceramic Cooktop Cleaner and
CERAIVIABRYTE®Cleaning Pad to clean the cooktop.
Wait until the cooktop cools and the indicator light
goes out before cleaning. A wet sponge or cloth
on a hot surface can cause steam burns. Some
cleaners can produce noxious fumes if applied to
a hot surface. NOTE: Sugar spills are an exception.
They should be scraped off while still hot using an
oven mitt and a scraper. See the Cleaning the gloss
cooktop section for detailed instructions.
Read and follow all instructions and warnings on
the cleaning cream label.
I WARNING I
(some models)
Do not immerse or soak the removable surface
units. Do not put them in a dishwasher. Do not self-
clean the surface units in an oven. Doing so may
cause them to fail, presenting a burn or fire hazard.
To avoid the possibility of a burn or electric shock,
always be certain that the controls for oil surface
COIL COOKTOP SAFETYINSTRUCTIONS
units are at the OFFposition and all coils are cool
before attempting to lift or remove a coil surface unit.
Be sure the drip pans are not covered and are in
place. Their absence during cooking could damage
range parts and wiring.
WARNINGIOVENSAFETYINSTRUCTIONS
GEAppliances.com
Stand away from the range when opening the oven
door. Hot air or steam which escapes can cause
burns to hands, face and/or eyes.
Keep the oven vent unobstructed.
Keep the oven free from grease buildup. Grease
in the oven may ignite.
Place oven racks in desired location while oven
is cool. If rack must be moved while oven is hot,
do not let pot holder contact hot heating element
in oven.
When using cooking or roasting bugs in the oven,
follow the manufacturer's directions.
WARNING I
(Some models)
The self-cleaning feature operates the oven at temperatures high enough to burn away food soils in the
oven. Follow these instructions for safe operation.
SELF-CLEANING OVEN SAFETY INSTRUCTIONS
i Beforeoperating the self-clean cycle,remove pans,
shiny metal oven racks and other utensilsfrom the
oven.Only gray porcelain-coated oven racksmay
beleft in the oven.Do not useself-cleanto clean
other parts,such asdrip pans or bowls.
Before operating the self-clean cycle, wipe grease
and food soils from the oven. Excessive amount of
grease may ignite, leading to smoke damage to
your home.
Pull the oven rack to the stop-lock position when
loading and unloading food from the oven. This
helps prevent burns from touching hot surfaces
of the door and oven walls.
Do not leave items such as paper, cooking utensils
or food in the oven when not in use. Items stored in
an oven can ignite.
Do not use aluminum foil to line the oven bottom.
Foil may trap or reflect heat, leading to a shock or
fire hazard.
If the self-cleaning mode malfunctions, turn the
oven off and disconnect the power supply. Have it
serviced by a qualified technician.
Do not clean the door gasket. The door gasket is
essential for a good seal. Care should be taken not
to rub, damage or move the gasket.
iiiiiiiiiiiii!
Do not use oven cleaners. No commercial oven
cleaner or oven liner protective coating of any kind
should be used in or around any part of the oven.
I-4,WARNING I WARMINGDRAWER/LOWEROVENDRAWER
SAFETYINSTRUCTIONS(somemodels)
The purpose of the warming drawer is to hold hot
cooked foods at serving temperature. Bacteria will
grow in food while it is below 140°F. Do not put cold
food in warming drawer. Do not heat food for more
than 2 hours. Failure to follow these instructions
may result in foodborne illness.
Do not leave paper products, plastics, canned food
or combustible materials in the drawer. They may
ignite.
Do not touch the heating element or the interior
surface of the drawer. These surfaces may be hot
enough to cause burns.
iiiiiiiiiiiii!
Use care when opening the drawer. Open the
drawer a crack and let hot air or steam escape
before removing or replacing food. Hot air or
steam that escapes can cause burns to hands,
face and/or eyes.
iiiiiiiiiiiii!
Do not use aluminum foil to line the warming
drawer. Foil is an excellent heat insulator and
will trap heat beneath it. This will upset the
performance of the drawer and potentially
cause a fire hazard.
5
For models with a glass cooktop.
I,_ I FIREHAZARD: Never leave the range unattended with the cooktop on medium
WARNING IorhighsettingsKeenflammableitemsawayfromthecooktonTurnoffal1
controls when done cooking. Failure to follow these instructions can result in
fire, serious injurg or death.
NOTE:Throughoutthis manual, features and appearancemag varg from gout model.
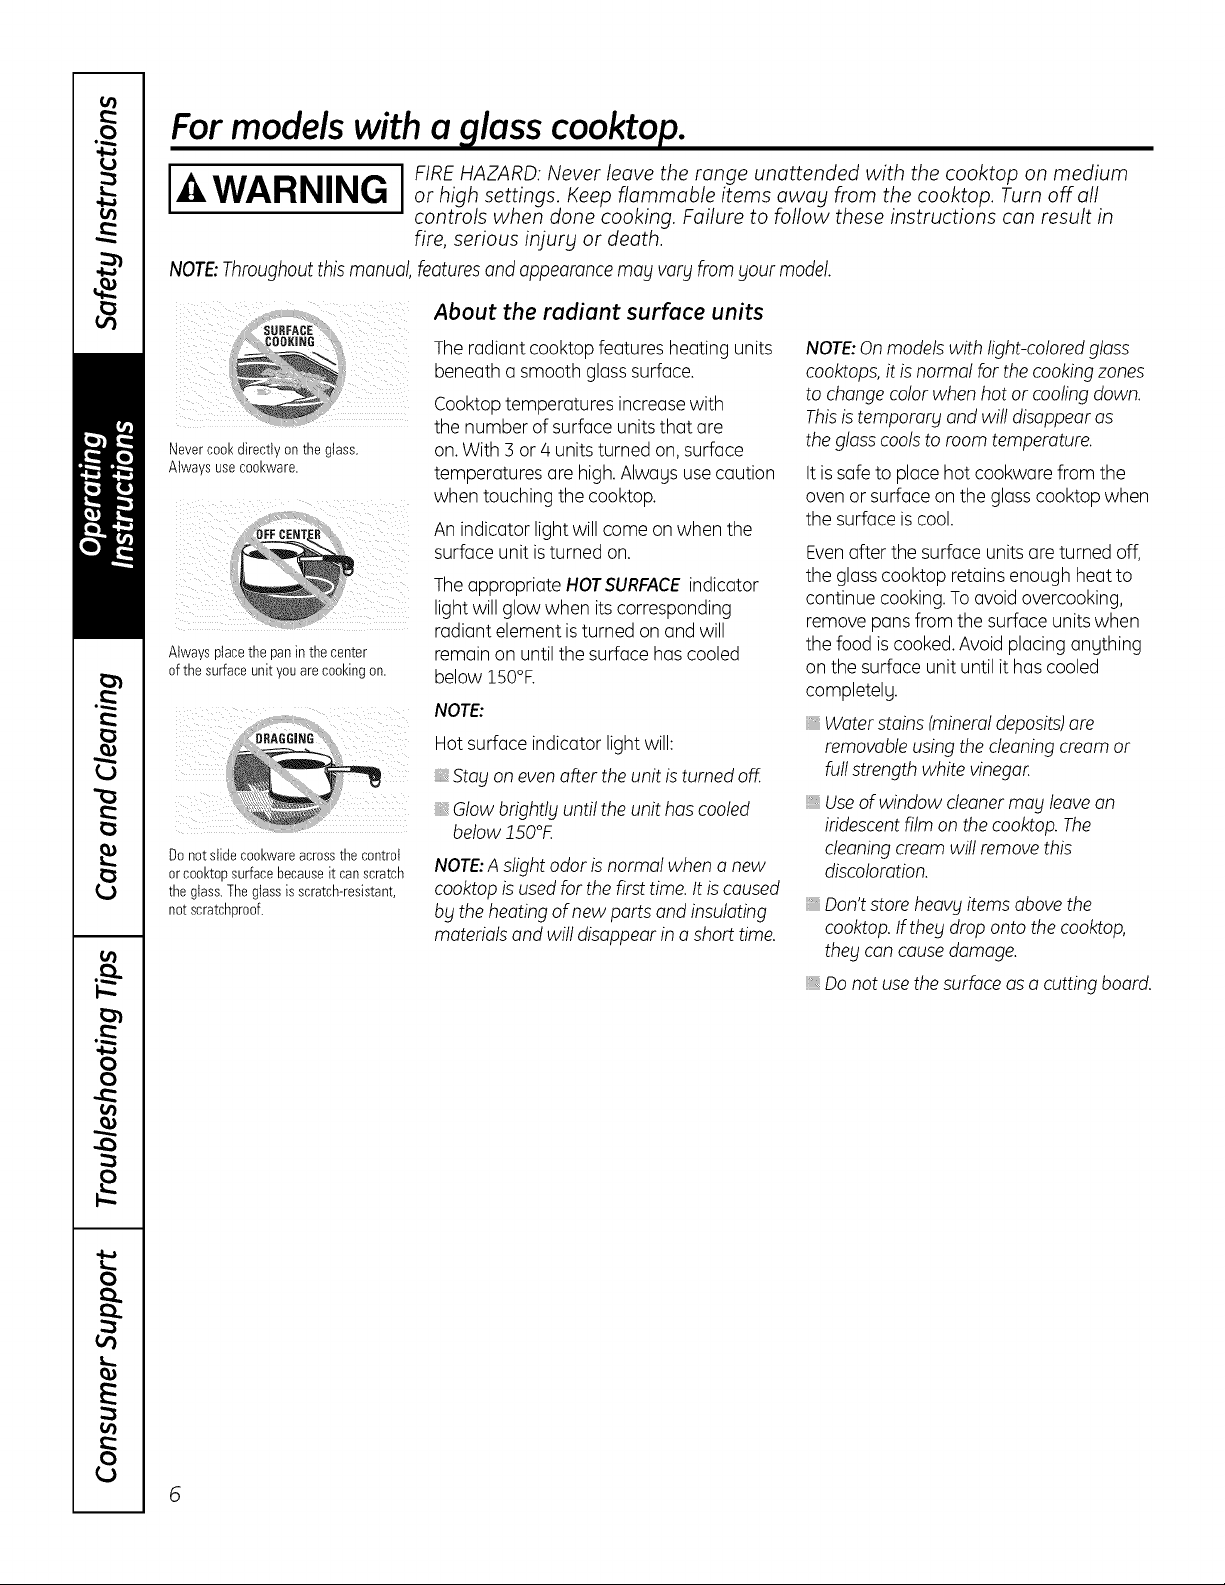
About the radiant surface units
CeOKING
Nevercookdirectly onthe glass.
Alwaysusecookware.
Alwaysplacethe panin the center
ofthe surfaceunit youarecookingon.
Donotslide cookwareacrossthe control
orcooktopsurfacebecauseit canscratch
theglass.Theglassis scratch-resistant,
notscratchproof.
The radiant cooktop features heating units
beneath a smooth glasssurface.
Cooktoptemperatures increasewith
the number of surface units that are
on.With 3 or 4 units turned on, surface
temperatures are high.Always usecaution
when touching the cooktop.
An indicator light will come on when the
surface unit isturned on.
The appropriate HOTSURFACEindicator
light will glow when its corresponding
radiant element is turned on and will
remain on until the surface has cooled
below 150°R
NOTE:
Hot surface indicator light will:
_,Stag on evenafter the unit is turned off.
_,Glow brightlg until the unit has cooled
below 250°F.
NOTE:A slight odor isnormal when o new
cooktop isusedfor thefirst time. It is caused
bg the heating of new parts and insulating
materialsand will disappear in o short time.
NOTE:Onmodels with light-colored glass
cooktops,it isnormal for the cookingzones
to changecolor when hot or cooling down.
Thisistempororg and will disappear as
the glasscools to room temperature.
It is safe to placehot cookware from the
oven or surface on the glasscooktop when
the surface iscool.
Evenafter the surface units are turned off,
the glasscooktop retains enough heat to
continue cooking. To avoid overcooking,
remove pans from the surface unitswhen
the food iscooked.Avoid placing angthing
on the surface unit until it has cooled
completelg.
Water stains (mineraldeposits)ore
removable using the cleaning cream or
fullstrength white vinegar.
, Useof window cleanermag leaveon
iridescentfilm on the cooktop. The
cleaningcream will removethis
discoloration.
_,Don'tstore heavg items abovethe
cooktop.If theg droponto thecooktop,
theg concause damage.
_,Do not use the surface as a cutting board.
Selectingtypesof cookware
for glass cooktopmodels, ionnon-/nduct/onmode sI
The following information will help you choose cookware which will give good performance on glass cooktops.
See insert for cookware to use with induction cooktops.
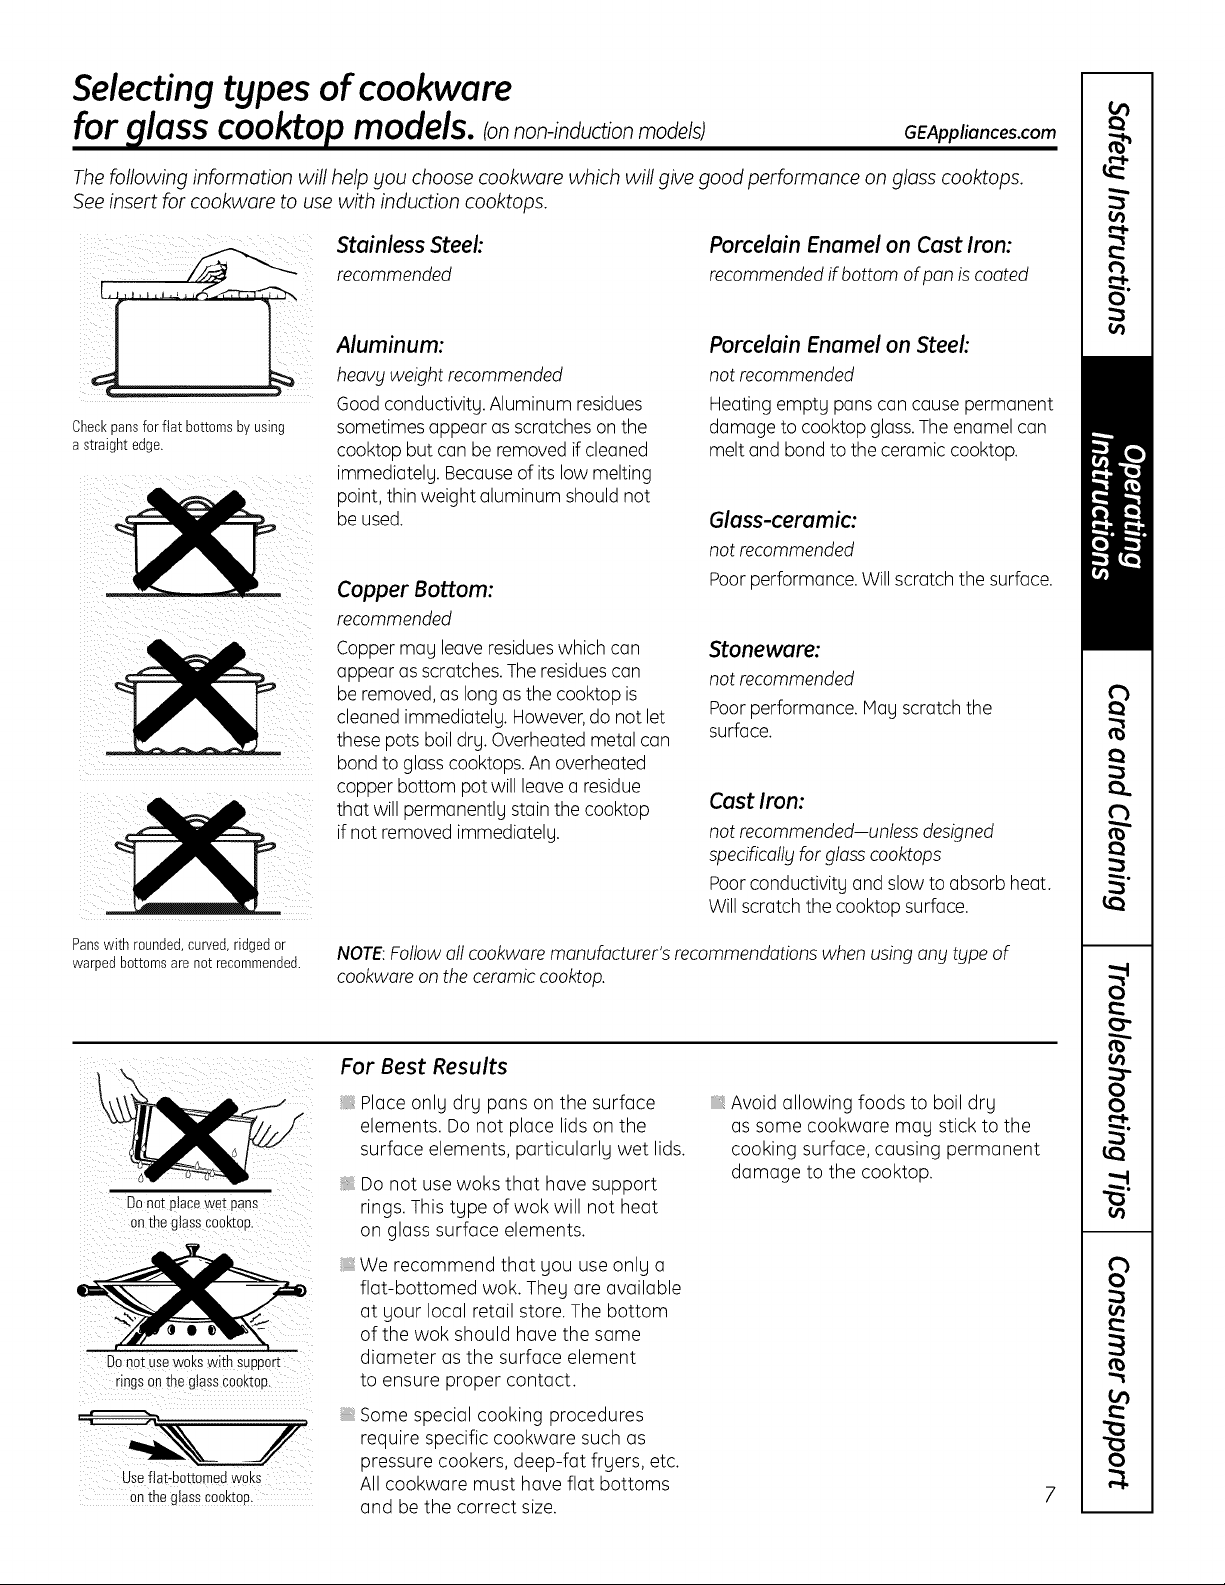
Checkpansfor flat bottomsby using
astraight edge.
Stainless Steel:
recommended
Aluminum:
heavy weight recommended
Good conductivity. Aluminum residues
sometimes appear as scratches on the
cooktop but can be removed if cleaned
immediately. Because of its low melting
point, thin weight aluminum should not
be used.
Copper Bottom:
recommended
Copper may leave residues which can
appear as scratches. The residues can
be removed, as long as the cooktop is
cleaned immediately. However, do not let
these pots boil dry. Overheated metal can
bond to glass cooktops. An overheated
copper bottom pot willleave a residue
that will permanently stain the cooktop
ifnot removed immediately.
Porcelain Enamel on Cast Iron:
recommended if bottom of pan is coated
Porcelain Enamel on Steel:
not recommended
Heating empty pans can cause permanent
damage to cooktop glass. The enamel can
melt and bond to the ceramic cooktop.
Glass-ceramic:
not recommended
Poor performance. Willscratch the surface.
Stoneware:
not recommended
Poor performance. Hay scratch the
surface.
Cast Iron:
not recommended-unless designed
specificoll_jfor gloss cooktops
Poor conductivity and slow to absorb heat.
Willscratch the cooktop surface.
GEAppliances.com
Panswith rounded,curved,ridgedor
warpedbottomsarenot recommended.
DOnot place wet Pans
onthe glasscooktop.
Donot USewoks with Support
ringsan the glass€ooktop,
Useflat-bottomedwoks
On the glass€ooktop 7
NOTE:Followoil cookwore manufacturer's recommendationswhen usingany type of
cookwore on the ceramic cooktop.
For Best Results
i Place only dry pans on the surface
elements. Do not place lids on the
surface elements, particularly wet lids.
Do not use woks that have support
rings. This type of wok will not heat
on glass surface elements.
We recommend that you use only a
flat-bottomed wok. They are available
at your local retail store. The bottom
of the wok should have the same
diameter as the surface element
to ensure proper contact.
Some special cooking procedures
require specific cookware such as
pressure cookers, deep-fat fryers, etc.
All cookware must have flat bottoms
and be the correct size.
Avoid allowing foods to boil dry
as some cookware may stick to the
cooking surface, causing permanent
damage to the cooktop.
Usingthe surface units--Touch pad-controlled models.
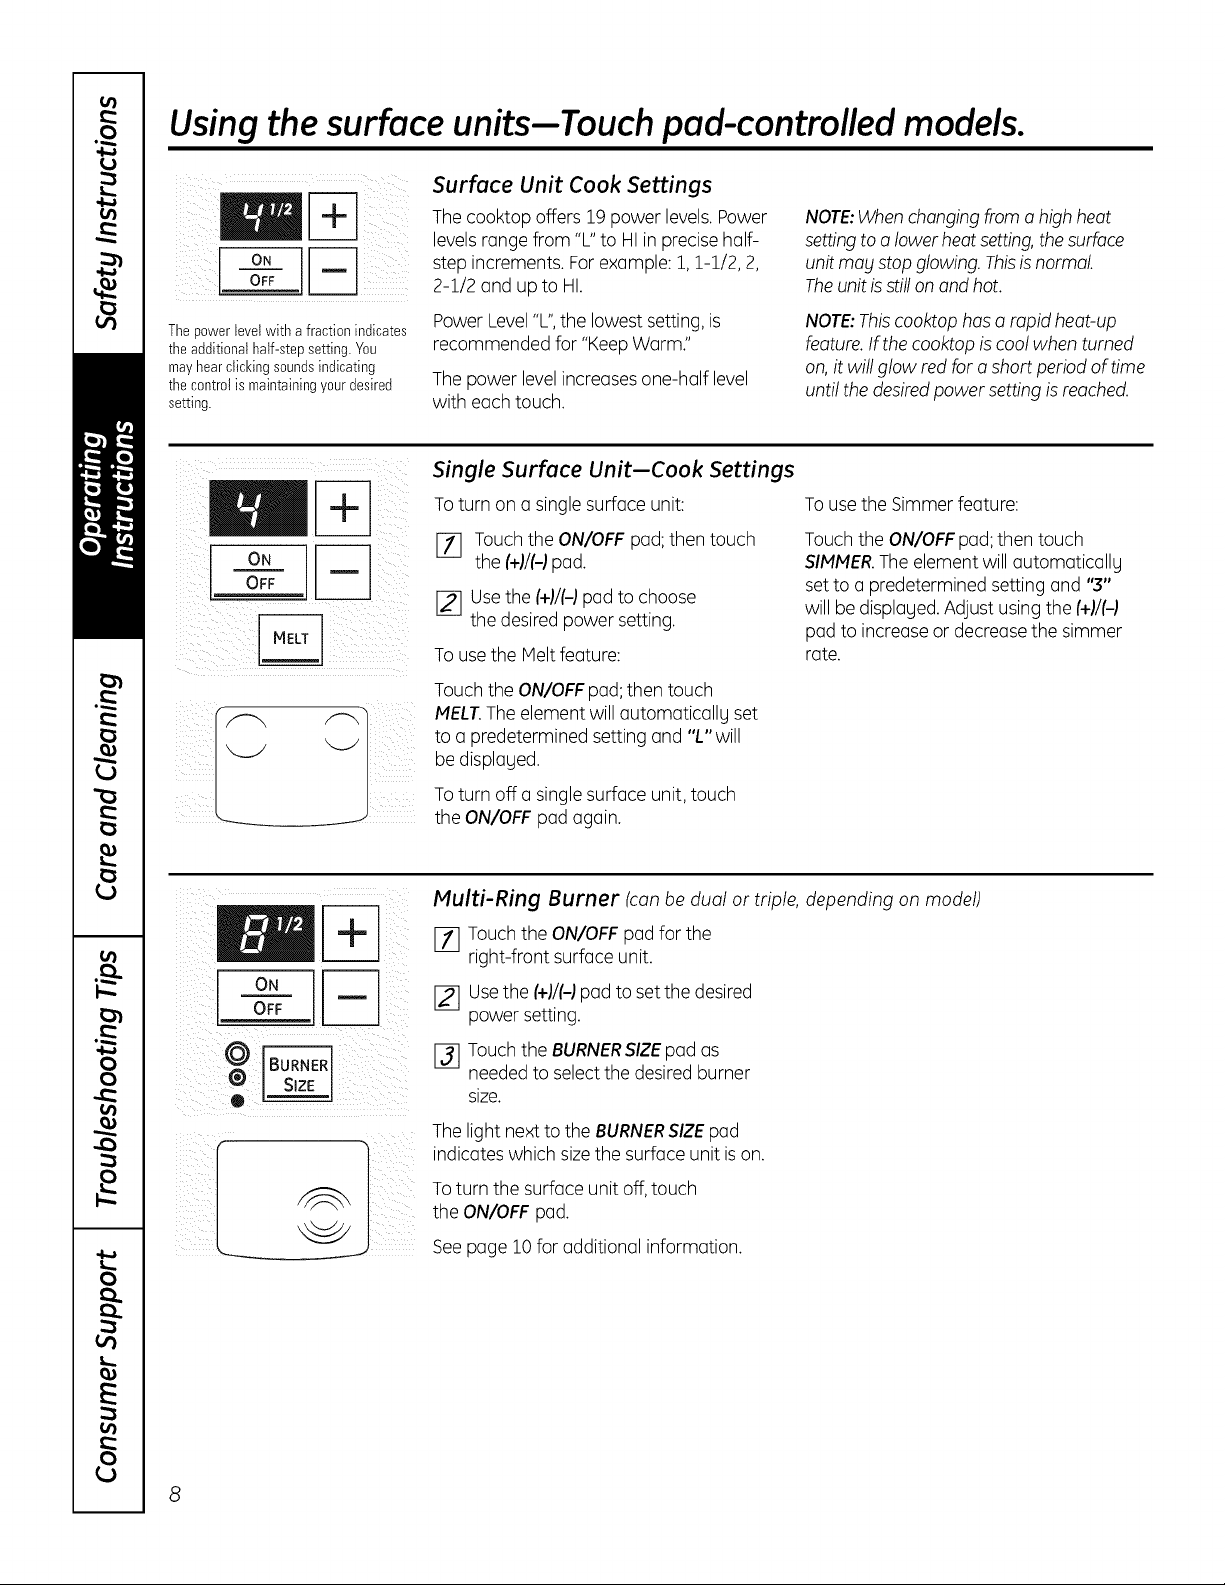
Surface Unit Cook Settings
Thecooktop offers 19 power levels. Power
levelsrange from "L"to HIin precise half-
step increments. For example: 1, 1-1/2, 2,
2-1/2 and up to HI.
NOTE:Whenchangingfrom a high heat
settingtoa lower heat setting,thesurface
unit mogstop glowing. Thisisnormal.
Theunit isstill onand hot.
Thepowerlevelwith a fractionindicates
theadditional half-stepsetting.You
mayhearclickingsoundsindicating
thecontrotis maintainingyourdesired
setting.
ON
OFF
Power Level"L",the lowest setting, is
recommended for "KeepWorm."
Thepower levelincreases one-half level
with each touch.
NOTE:Thiscooktop has a rapid heat-up
feature.If the cooktop is cool when turned
on,it will glow red for o short period of time
until the desiredpower setting is reached.
Single Surface Unit-Cook Settings
Toturn on a single surface unit:
[_ Touchthe ON/OFF pad;then touch
the (+)/(@pad.
[_ Usethe (+)/(@pad to choose
the desiredpower setting.
To usethe Meltfeature:
Touch the ON/OFFpad;then touch
MELT.The element will automatically set
to a predetermined setting and "L" will
be displaged.
Toturn off a singlesurface unit, touch
the ON/OFF pad again.
Tousethe Simmer feature:
Touchthe ON/OFFpad; then touch
SIMMER.The element will automatically
set to a predetermined setting and "3"
will be displayed. Adjust usingthe (+)/(@
pad to increase or decrease the simmer
rate.
Multi-Ring Burner (canbe dual or triple, depending on model)
ON i
FT] Touch the ON/OFF pad for the
right-front surface unit.
[_ Usethe (+)/(-)pad to setthe desired
power setting.
[_] Touch the BURNERSIZEpad as
needed to select the desired burner
size.
Thelight next to the BURNERSIZEpad
indicates which sizethe surface unit ison.
Toturn the surface unit off, touch
the ON/OFF pad.
Seepage 10for additional information.
GEAppliances.com
I WARNING
000
©@
WARMING ZONE
II
SELECT
ON
OFF
i i iiiii
ON / OFF
SETWARMING ZONE
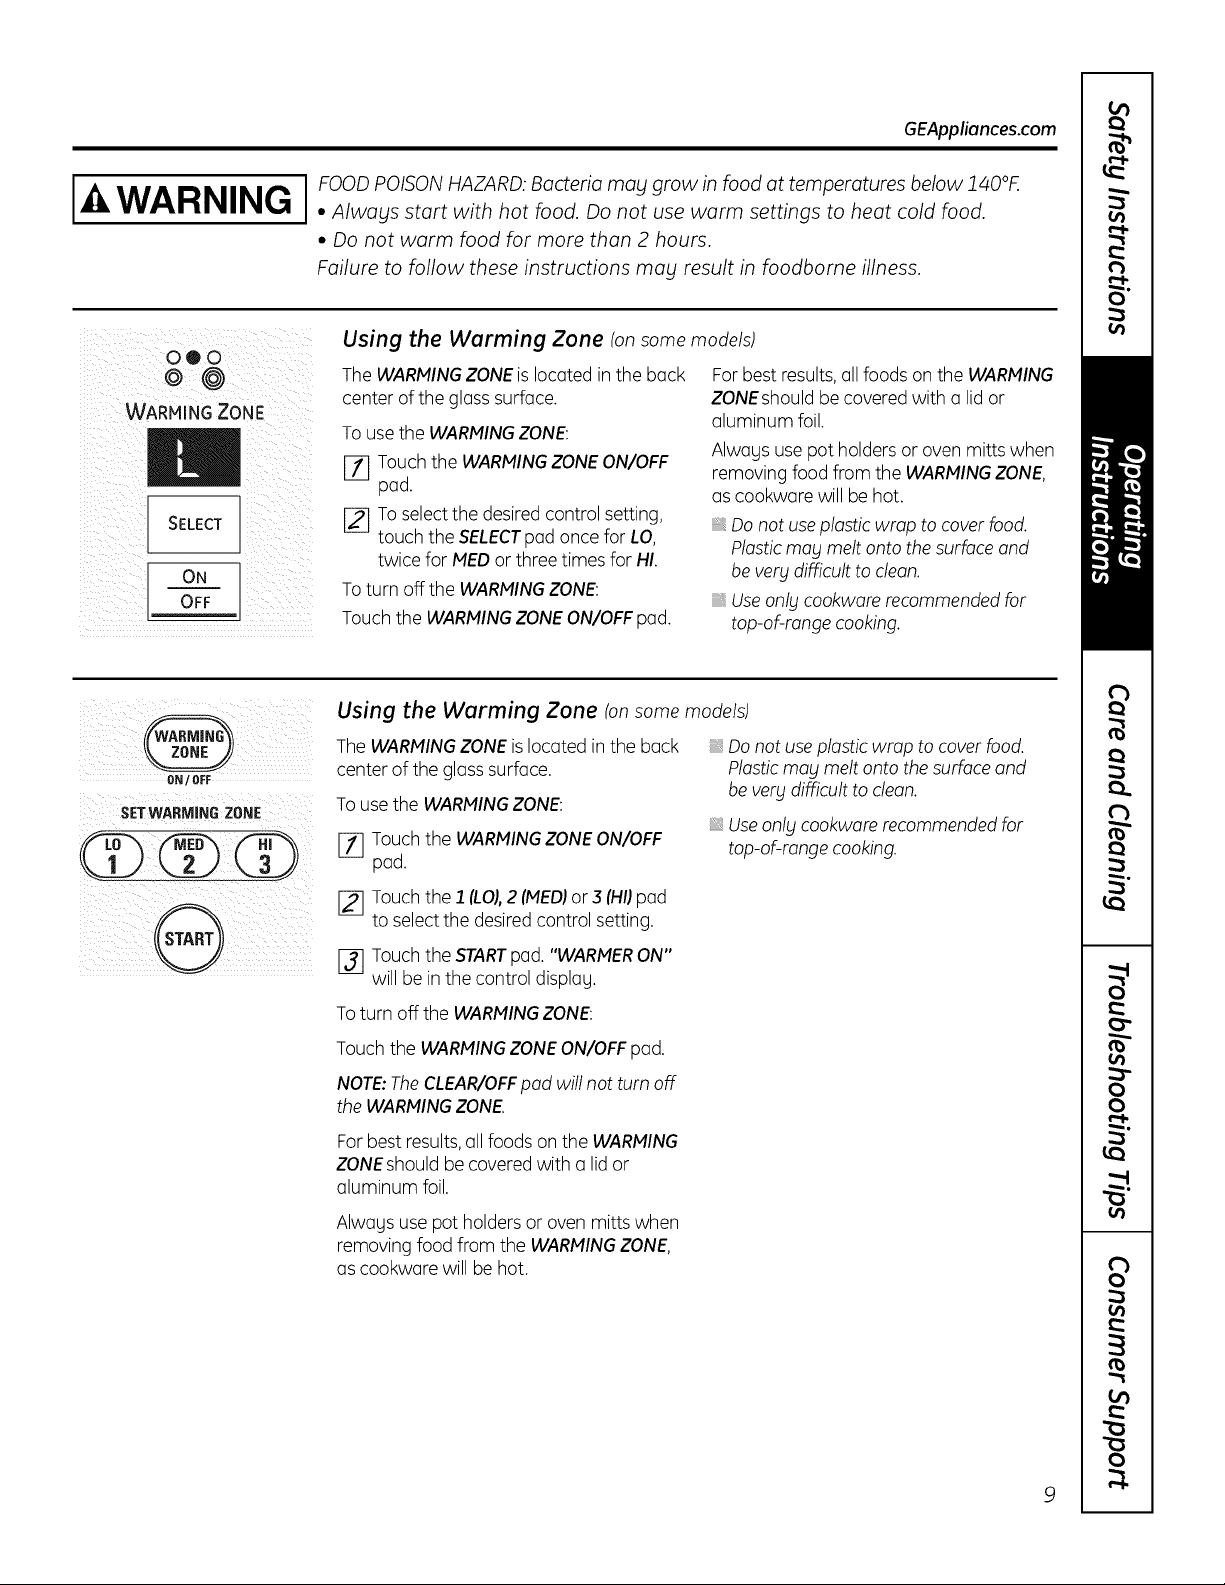
I OOD POISONHAZARD: Bacteria may grow in food at temperatures below 140°F.
• Always start with hot food. Do not use warm settings to heat cold food.
• Do not warm food for more than 2 hours.
Failure to follow these instructions may result in foodbome illness.
Using the Warming Zone (onsome models)
The WARMINGZONEis located in the back
center of the glass surface.
To usethe WARMINGZONE:
[7] Touch the WARMINGZONEON/OFF
pad,
[_ Toselectthe desiredcontrol setting,
touch the SELECTpad once for LO,
twice for MEDor three times for HI.
Toturn off the WARMINGZONE:
Touch the WARMINGZONEON/OFFpad.
Forbest results,all foods on the WARMING
ZONEshould be covered with a lid or
aluminum foil.
Alwogs use pot holders or oven mitts when
removing food from the WARMINGZONE,
as cookwore will be hot.
Donot useplastic wrap to cover food.
Plasticmay melt onto the surfaceand
be very difficult to cleon.
Useonly cookwore recommended for
top-of-range cooking.
Using the Warming Zone (onsomemodels)
TheWARMINGZONEis located in the back
center of the glass surface.
Tousethe WARMINGZONE:
[_ Touch the WARMINGZONEON/OFF
pad.
Do not use plastic wrap to cover food,
Plastic mog melt onto the surface and
be verg difficult to cleon.
_,Useonlg cookwore recommendedfor
top-of-range cooking.
[_ Touch the ] (LO),2 (IVIED)or 3 (HI]pad
to selectthe desiredcontrol setting.
F3l Touch the STARTpad. "WARMERON"
will be in the control displog.
Toturn off the WARMINGZONE:
Touch the WARMING ZONE ON/OFF pad,
NOTE: The CLEAR/OFF pod will not turn off
the WARMING ZONE.
Forbest results,all foods on the WARMING
ZONEshould be covered with a lid or
aluminum foil.
Alwags use pot holders or oven mitts when
removing food from the WARMINGZONE,
as cookware will be hot.
9
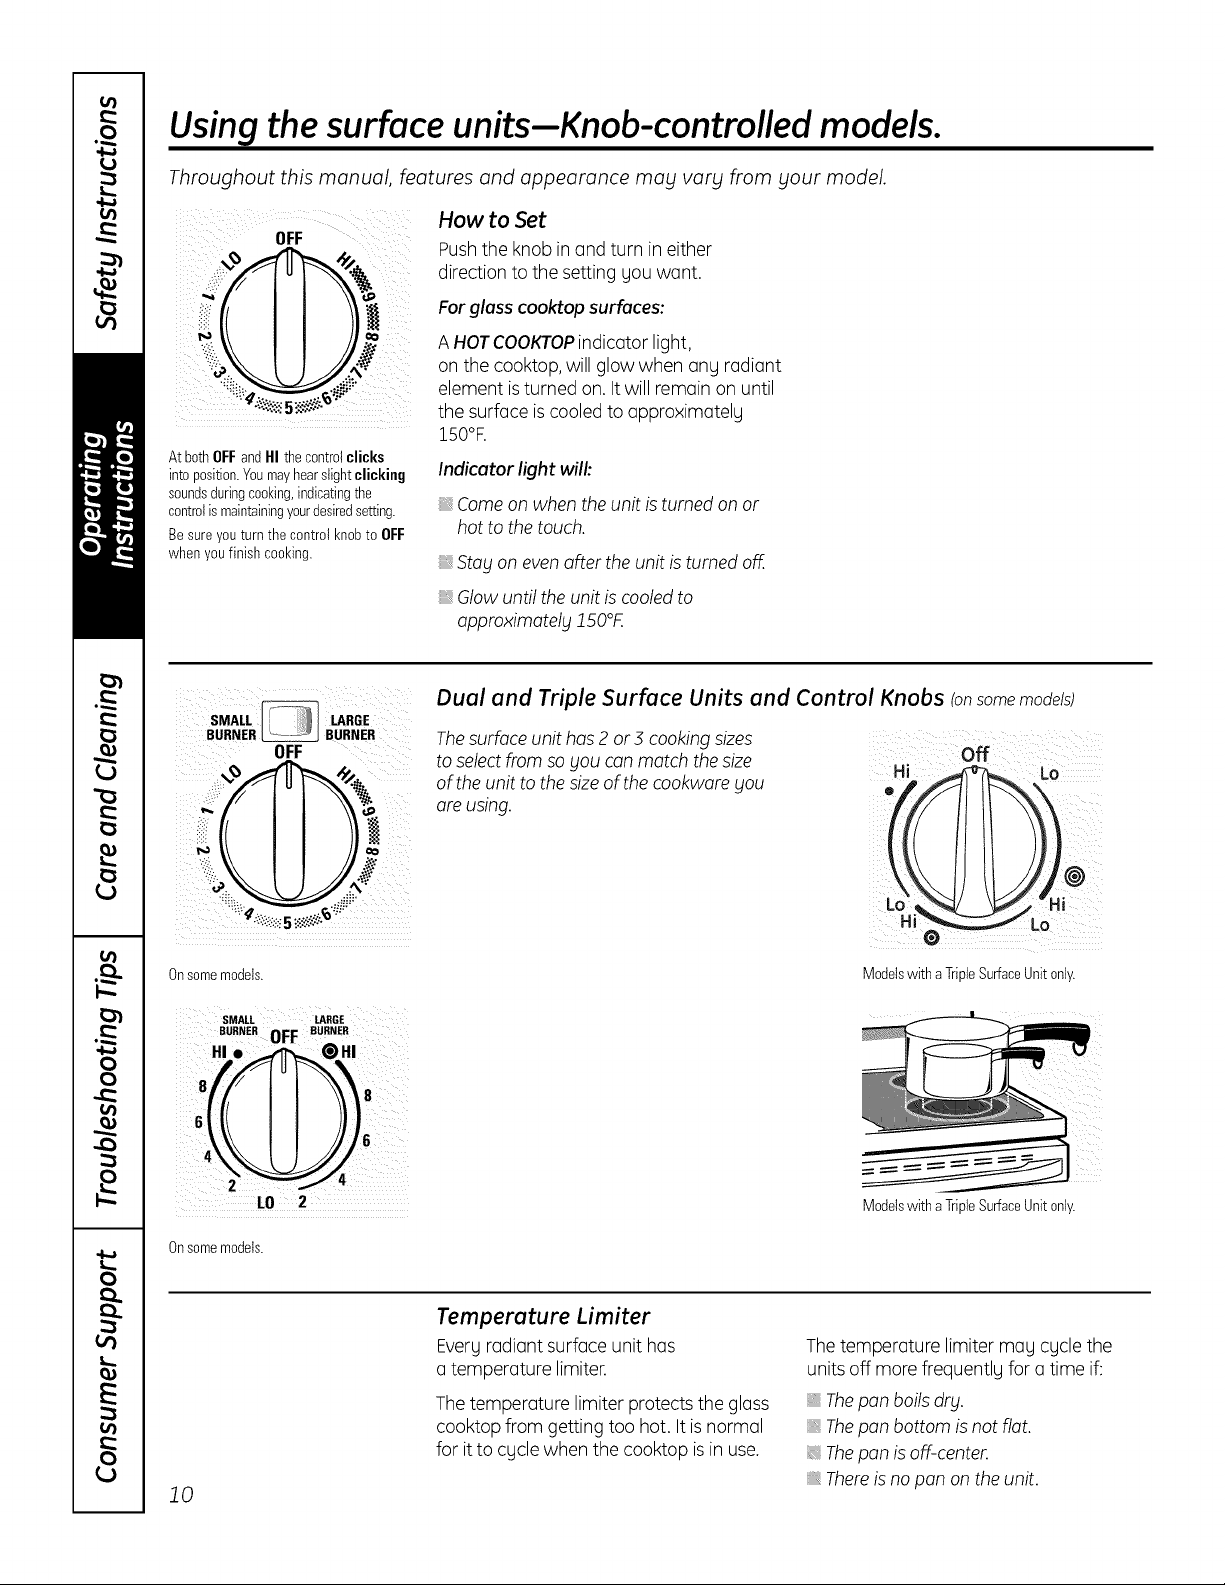
Using the surface units-Knob-controlled models.
Throughout this manual, features and appearance may vary from your model.
OFF
ill
AtbothOFFandHI thecontrolclicks
intoposition.Youmayhearslightclicking
soundsduringcooking,indicatingthe
controlismaintainingyourdesiredsetting.
Besure youturnthe control knobto OFF
whenyoufinish cooking.
SMALL LARGE
BURNER BURNER
OFF
How to Set
Pushthe knob in and turn in either
i
direction to the setting you want.
Forglass cooktop surfaces:
A HOTCOOKTOPindicator light,
on the cooktop, will glow when ang radiant
element isturned on. It will remain on until
the surface iscooled to approximatelg
150°R
Indicatorlight will:
Comeon when the unit isturned on or
hot to the touch.
Stay on evenafter the unit is turned oË..
, Glow until the unit is cooled to
approximately 150°K
Dual and Triple Surface Units and Control Knobs (onsome moddsl
Thesurface unit has 2 or3 cooking sizes
to selectfrom soyou canmatch thesize
of theunit to thesizeof the cookworeyou
are using.
Hi LO
off
Onsomemodels.
SMALL LARGE
BURNER OFF BURNER
HI. _,_ @HI
LO 2
Onsomemodels.
10
_:. -"._-_:
Temperature Limiter
Evergradiant surface unit has
a temperature limiter.
Thetemperature limiter protectsthe glass
cooktop from getting too hot. It is normal
for it to cgcle when the cooktop is in use.
ModelswithaTripleSurfaceUnitonly.
ModelswithaTripleSurfaceUnit only.
Thetemperature limiter mag cgclethe
units off more frequentlg for a time if:
Thepan boilsdry.
Thepan bottom isnot flat.
Thepan isoff-center.
Thereisno pan on theunit.
Throughout this manual, features and appearance may vary from your model.
GEAppliances.com
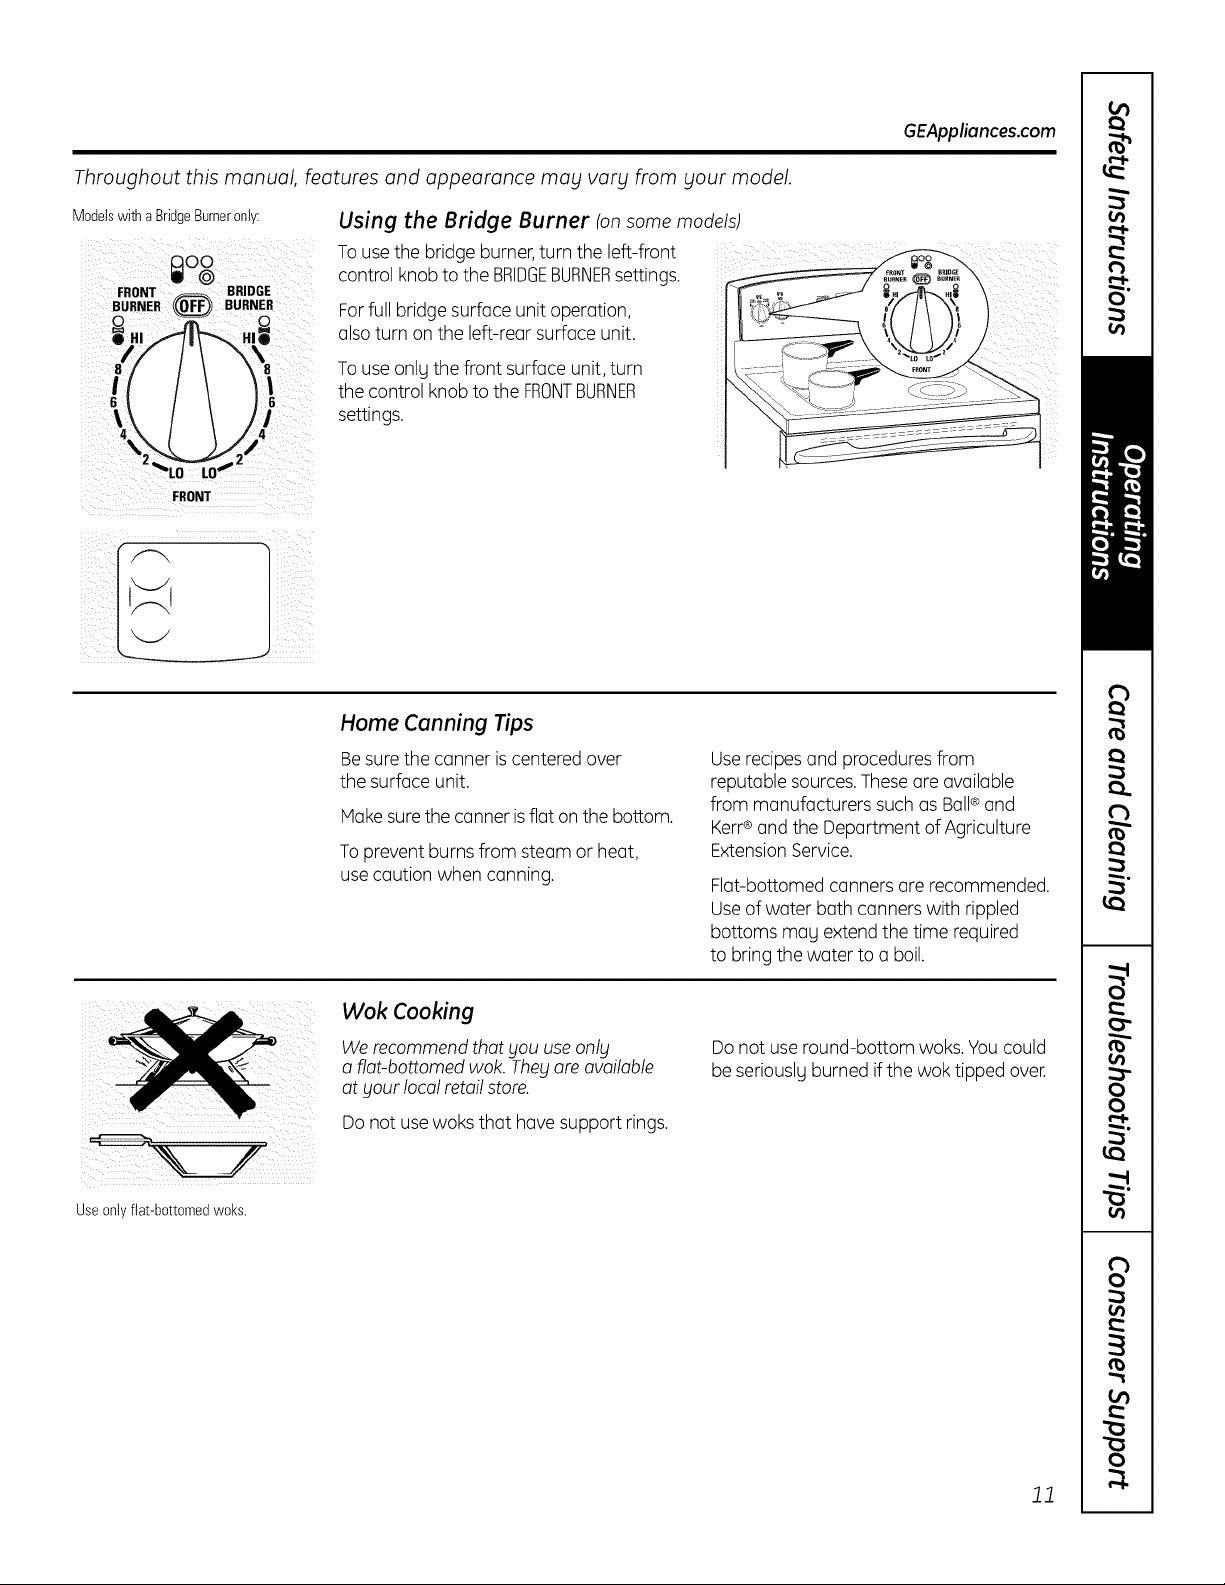
Modelswitha BridgeBurneronly:
LO LO
FRONT
f
I t
J
Using the Bridge Burner (onsome models)
To use the bridge burner, turn the left-front
control knob to the BRIDGEBURNERsettings.
Forfull bridge surface unit operation,
alsoturn on the left-rear surface unit.
Touse onlg the front surface unit, turn
the control knob to the FRONTBURNER
settings.
Home Canning Tips
Besurethe canner iscentered over
the surface unit.
Makesurethe canner isflat on the bottom.
Toprevent burns from steam or heat,
usecaution when canning.
Userecipesand proceduresfrom
reputablesources.Theseareavailable
frommanufacturerssuchasBall® and
Kerr®and the Department of Agriculture
ExtensionService.
Flat-bottomed canners are recommended.
Useof water bath canners with rippled
bottoms mag extend the time required
to bring the water to a boil.
_ii_ilii_:ii__i_i!i:!_i_i__ _!_!i_]iii_iii
Useonly flat-bottomedwoks.
Wok Cooking
We recommend that gou use onlg
a fiat-bottomed wok. They are available
at gour local retail store.
Do not usewoks that have support rings.
Donot use round-bottom woks. Youcould
be seriouslg burned if the wok tipped over.
11
Usingthe griddle.
CAUTION afteruse andremovethegriddlewhenitis oo/ando//surfaceunitsore
I_1_ I BURN HAZARD: Griddle surfaces may be hot enough to cause burns during and
off Use oven mitts if you will touch the griddle while hot. Failure to do so ton
result in burns.
Beforeusing this cookware for the first
time,wash it to make sure it isclean.Then
season it lightlg, rubbing cooking oil onto
the nonstick surface.
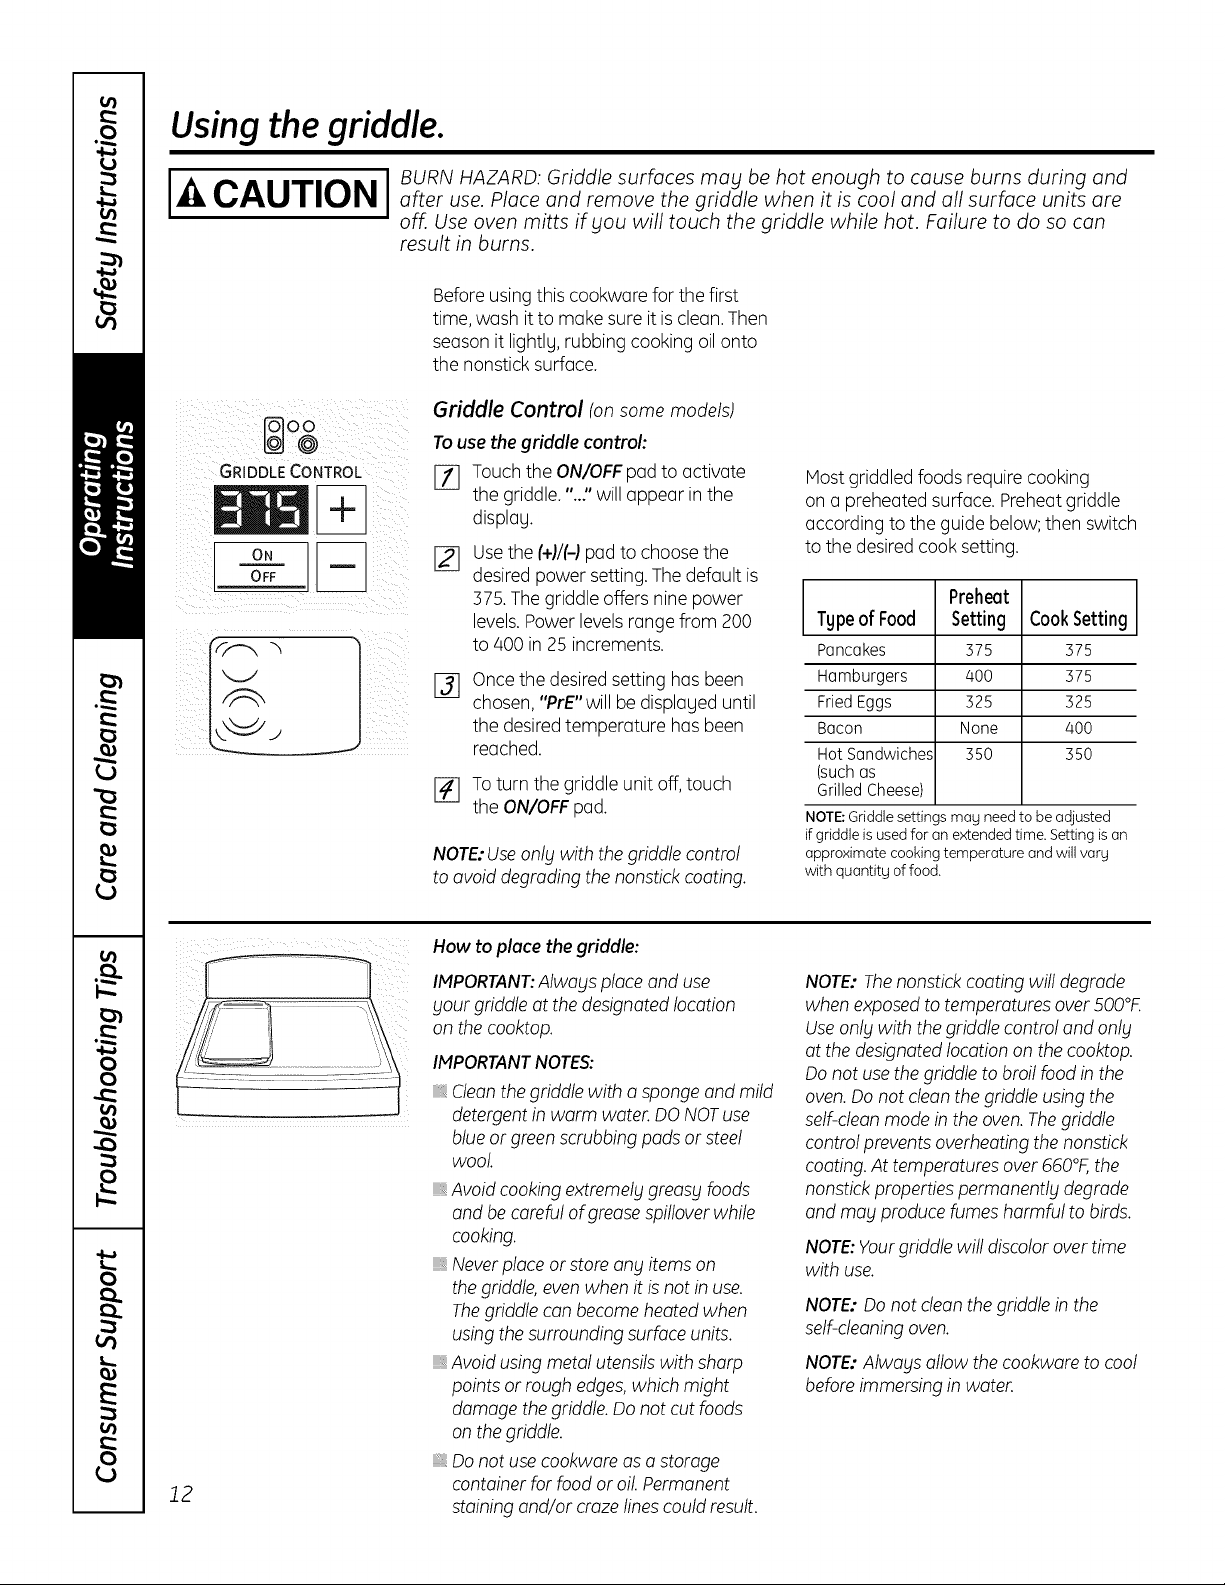
Griddle Control (onsomemodels)
Touse thegriddle control:
GRIDDLE CONTROL
OFF
o.
[_ Touch the ON/OFFpad to activate
the griddle."..:' will appear in the
displag,
[_ Usethe (+)/(-)pad to choose the
desiredpower setting.Thedefault is
375.Thegriddle offers nine power
levels.Power levels range from 200
to 400 in 25 increments.
Oncethe desired setting has been
chosen, "PrE"will be displaged until
%
the desiredtemperature has been
reached.
[] Toturn the griddle unit off,touch
the ON/OFFpad.
NOTE:Useonly with thegriddle control
to avoid degrading the nonstick coating.
Host griddled foods require cooking
on a preheated surface. Preheatgriddle
according to the guide below; then switch
to the desired cook setting.
L Preheat J
TgpeofFood Setting CookSetting
Pancakes 375 375
Hamburgers 400 375
FriedEggs 325 325
Bacon None 400
HotSandwiches 350 350
(suchas
GrilledCheese)
NOTE:Griddle settings mag need to be adjusted
if griddle is usedfor an extended time. Setting is an
approximate cooking temperature and will varg
with quantitg of food.
12
How to place the griddle:
IMPORTANT:Always place and use
your griddle at the designated location
on the cooktop.
IMPORTANTNOTES:
, Cleanthegriddle with a sponge and mild
detergentin warm water. DONOTuse
blueor greenscrubbing pads or steel
wool
Avoidcooking extremely greasy foods
and be careful of grease spilloverwhile
cooking.
, Neverplace or store any items on
thegriddle,evenwhen it isnot in use.
Thegriddle con becomeheated when
usingthe surroundingsurface units.
, Avoid using metal utensilswith sharp
points or rough edges,which might
damage thegriddle.Donot cut foods
on the griddle.
, Donot usecookwore aso storage
container for food or oil Permanent
staining and/or crazelinescouldresult.
NOTE: Thenonstickcoating will degrade
when exposed to temperatures over500°F.
Useonly with thegriddle control and only
at the designated location on the cooktop.
Donot usethe griddle to broil food in the
oven.Donot cleanthegriddle usingthe
self-dean mode in the oven.Thegriddle
control prevents overheating the nonstick
coating.At temperatures over 660°F,the
nonstick propertiespermanently degrade
and may producefumes harmful to birds.
NOTE:Yourgriddle will discolor over time
with use.
NOTE:Do not dean the griddle in the
self-cleaningoven.
NOTE:Always allow thecookware to cool
beforeimmersing in water.
GEAppliances.com
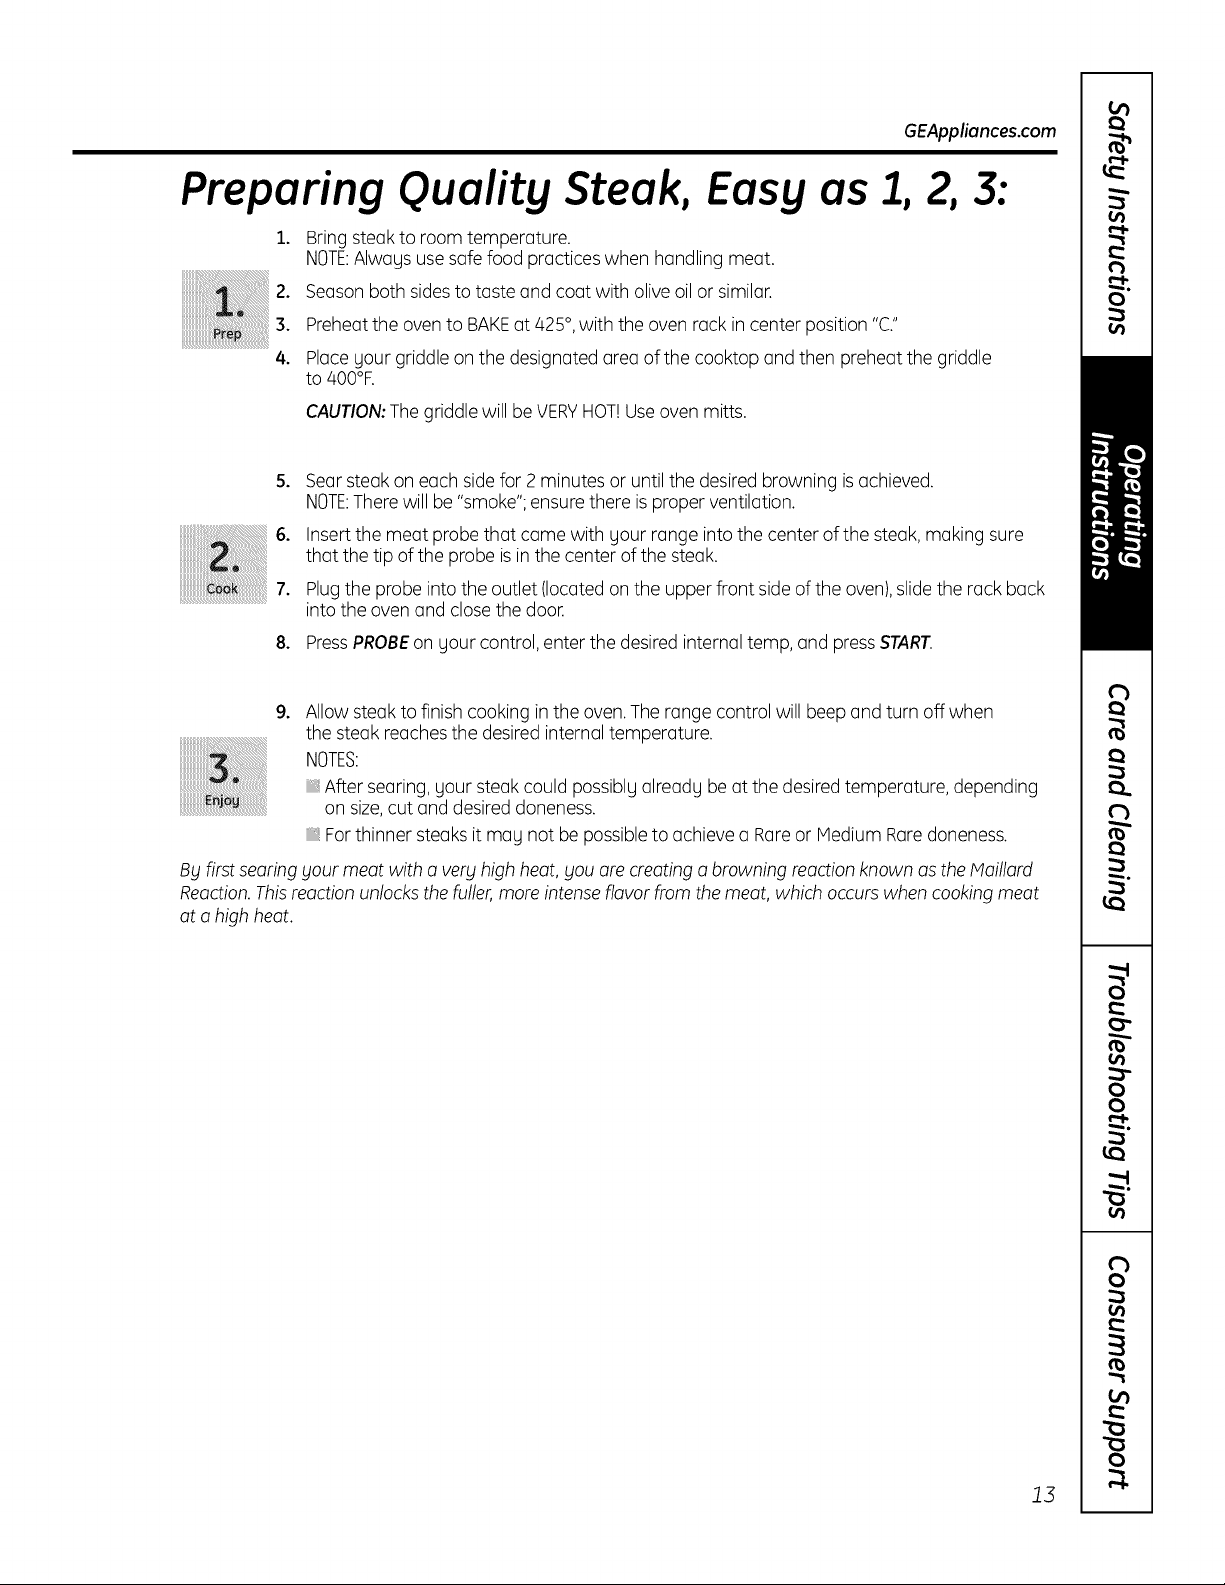
Preparing Ouality Steak, Easy as 1, 2,3:
1. Bringsteakto room temperature.
NOTE:Always usesafe food practiceswhen handling meat.
2. Seasonboth sidesto taste and coat with oliveoil or similar.
3. Preheatthe ovento BAKEat 425°,with the oven rack in center position "C."
4. Place your griddle on the designated area of the cooktop and then preheat the griddle
to 400°R
CAUTION:Thegriddle will be VERYHOT!Useoven mitts.
5o
Searsteak on each sidefor 2 minutes or until the desired browning is achieved.
NOTE:Therewill be "smoke";ensurethere isproper ventilation.
6.
Insertthe meat probe that came with your range into the center of the steak, making sure
that the tip of the probe isin the center of the steak.
7.
Plugthe probe into the outlet (located onthe upper front sideof the oven),slidethe rack back
into the oven and closethe door.
8.
PressPROBE on your control,enter the desiredinternal temp, and pressSTART.
°
Allow steak to finish cooking in the oven.The range control will beep and turn off when
the steak reachesthe desiredinternal temperature.
NOTES:
After searing, your steakcould possiblyalready be at the desired temperature, depending
on size,cut and desireddoneness.
Forthinner steaks it may not be possibleto achieve a Rareor Hedium Raredoneness.
By first searing your meat with a verblhigh heat, blouare creating a browning reaction known as the Maillard
Reaction. This reaction unlocks the fuller,more intense flavor from the meat, which occurs when cooking meat
at a high heat.
13
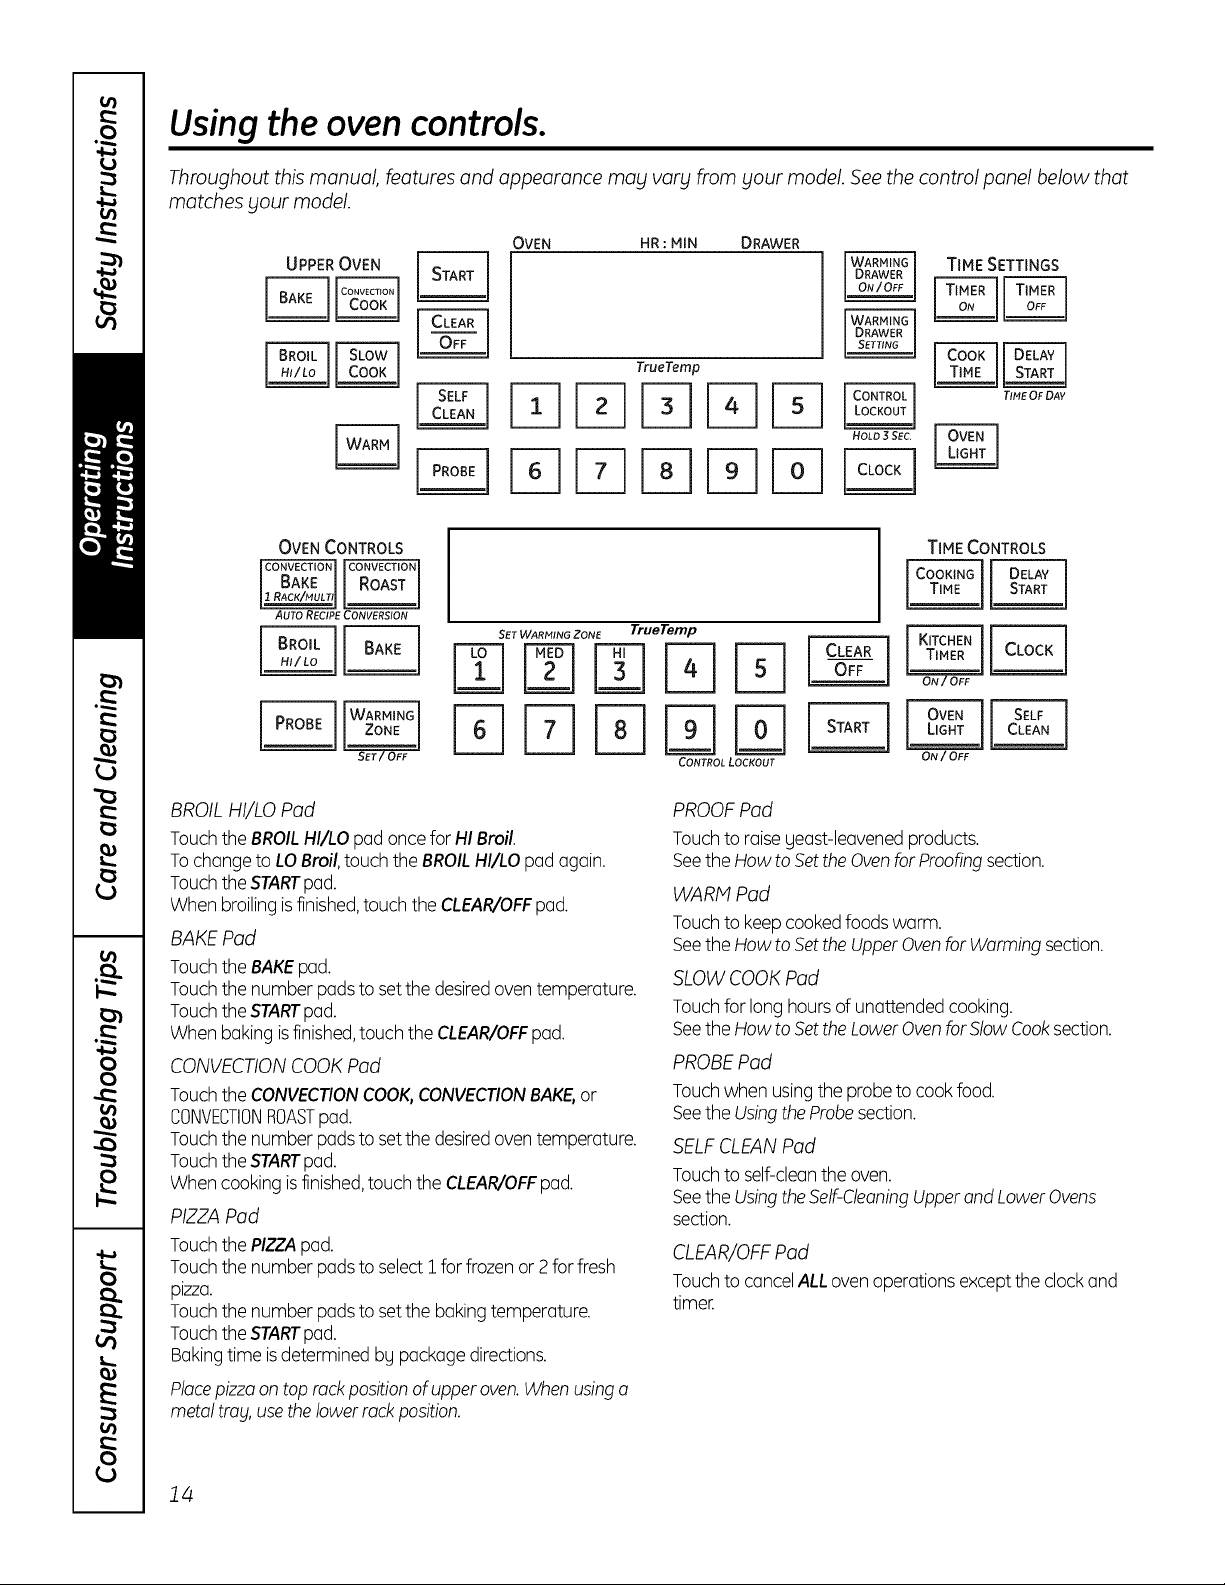
Using the ovencontrols.
Throughout this manual, features and appearance mag varg from gour model. See the control panel below that
matches gour model.
OVEN HR : MIN DRAWER
TIME SETTINGS
TrueTemp
PqPq
OVEN CONTROLS
AUTO RECIPE CONVERSION
SET WARMING ZONE TrueTemp
BROIL HI/LO Pod
Touchthe BROILHI/LOpad oncefor HI Broil.
Tochangeto LOBroil,touch theBROILHI/LOpad again.
Touchthe STARTpad.
Whenbroilingisfinished,touchthe CLEAR/OFFpad.
BAKE Pod
Touchthe BAKEpad.
Touchthe number padsto setthe desiredoventemperature.
Touchthe STARTpad.
Whenbakingisfinished,touchthe CLEAR/OFFpad.
CONVECTIONCOOKPod
Touchthe CONVECTIONCOOK,CONVECTIONBAKE,or
CONVECTIONROASTpad.
Touchthe number padsto setthe desiredoventemperature.
Touchthe STARTpad.
Whencooking isfinished,touch theCLEAR/OFFpad.
PIZZAPod
Touchthe PIZZApad.
Touchthe number padsto selectI forfrozen or2 forfresh
pizza.
Touchthe number padsto setthe baking temperature.
Touchthe STARTpad.
Bakingtime isdetermined bg packagedirections.
Placepizzaon top rackpositionof upper oven.Whenusinga
metal trog,usethe lower rock position.
TIME CONTROLS
CONTROL LOCKOUT
ON/OFF
PROOFPad
Touchto raiseyeast-leavenedproducts.
Seethe How to Set the Ovenfor Proofingsection.
WARM Pad
Touchto keepcookedfoodswarm.
Seethe How to Set the UpperOvenfor Warmingsection.
SLOWCOOKPad
Touchfor long hours of unattended cooking.
Seethe How to Set the LowerOvenforSlow Cooksection.
PROBEPad
Touchwhen usingthe probeto cook food.
Seethe UsingtheProbesection.
SELFCLEANPad
Touchto self-cleanthe oven.
Seethe UsingtheSelf-CleaningUpperand LowerOvens
section.
CLEAR/OFFPad
Touchto cancelALLovenoperationsexceptthe clockand
timer.
14
GEAppliances.com
STARTPod
Mustbe touchedto startany cooking or cleaningfunction.
OVENLIGHTPod
Touchto turn the ovenlightson or off.
TIMERON/OFF Pod(s)/KITCHENTIMERPod
Touchto set the kitchentimer.
Seethe UsingtheKitchenTimersection.
COOKTIME/COOKINGTIMEPod
Touchthis padand then touchthe number padsto setthe
amount of time gouwant gourfood to cook.Theoven will
shut offwhen thecookingtime hasrun out.
DELAYSTARTPod
Usealongwith the COOKTIMEorSELFCLEANpads to set
the ovento start and stop automaticallg at a time gou set.
CLOCKPod
NOTE:Whensettingtimes,you oresetting hours and minutes
only. Thelowesttimeyou consetis oneminute.
Touchthe CLOCKpad.
Touchthe number pads.
Touchthe STARTpad.
Theclockmustbeset tothe correcttimeof dogfor the
automatic oventiming functionstowork properly.Thetime of
dog cannotbe changedduring otimed baking orself-deoning
cycle.
Ifyour oven was set for a timed oven operation and a
power outage occurred, the clock and allprogrammed
functions must be reset. The time of day will flash in the
display when there has been a power outage.
CONTROLLOCKOUTPod
Yourcontrol willallow you to lock out the touch pads and the
cooktop so they cannot be activated when touched
Tolock thecontrols and cooktop:
Touchand holdthe CONTROLLOCKOUTpad for 5seconds.
Theoven displaUwill show "on Locon."
Tounlock the controls:
Touchand holdthe CONTROLLOCKOUTpad for 5seconds.
TheCONTROLLOCKOUTmodeaffectsalltouch pods.
Notouchpods willwork when thisfeatureisactivated
WARMING DRAWER
The warming drawer willkeep hot, cooked foods at serving
temperature. Alwogs start with hot food.
Touch the WARMING DRAWER pad. "WARMERON"and "1"
are lit on thedisplaUand "Set"beginsto blink.Onthe number
pads,touch 1for Low,2 for Mediumor 3for High.The displag
"1"changescorrespondingto the number pad selected.The
warming drawer starts automaticallg after gou touch l, 2 or 3.
"WARMERON"and the number remain lit."Set"stopsblinking.
Onsome models,pressSTART.
Onsomemodels- togglebetweensettingsbg touchingthe
WARMINGDRAWERpod.
Tocancel,touch the WARMINGDRAWERpad.
NOTE:Touchingthe CLEAR/OFFpad doesnotturn off the
warming drawer.
WARMING ZONE
Touchto keephot, cookedfood warm. Seethe Usingthe
WormingZonesection.
15
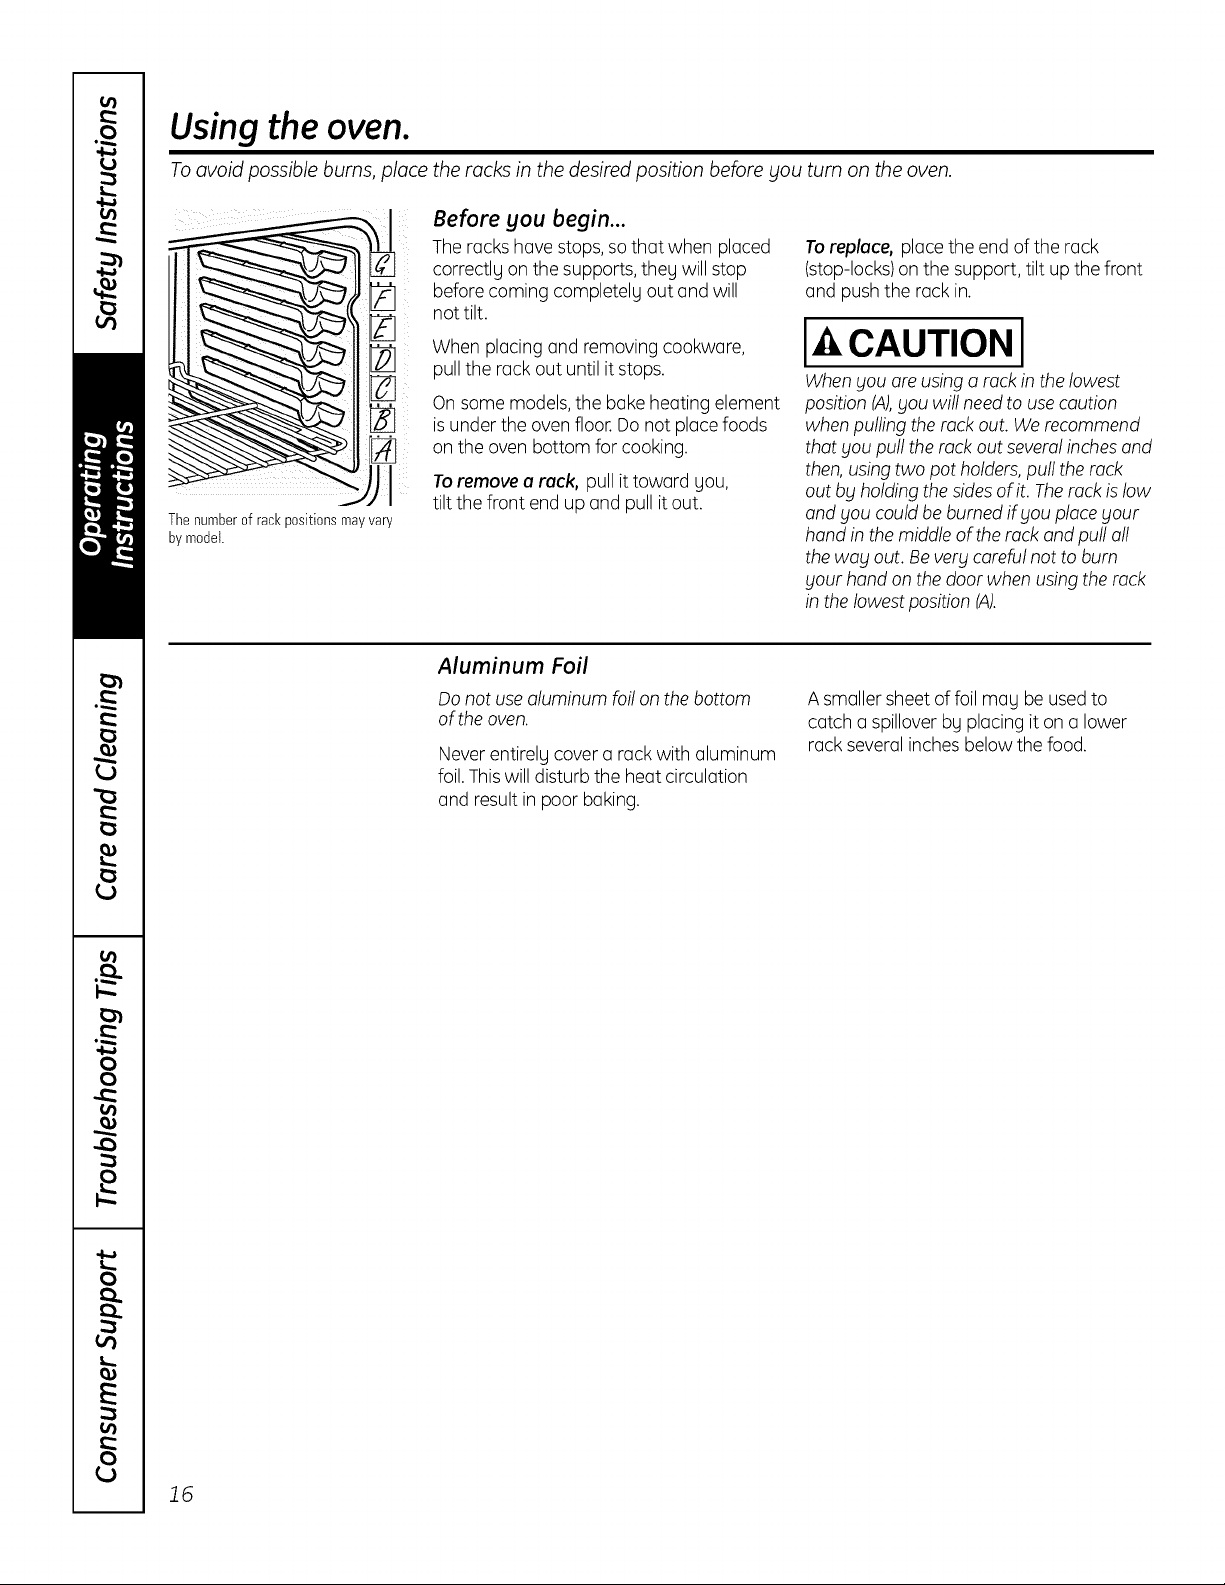
Using the oven.
To avoid possible burns, place the racks in the desired position before you turn on the oven.
Before you begin...
Theracks havestops, so that when placed
correc% on the supports, theu will stop
before coming completelu out and will
not tilt.
Toreplace, place the end of the rack
(stop-locks)on the support, tilt up the front
and push the rack in.
Thenumberof rackpositionsmayvary
by model.
When placing and removing cookware,
pull the rack out until it stops.
On some models,the bakeheating element
isunder the oven floor.Do not placefoods
on the oven bottom for cooking.
Toremove a reck, pull it toward Uou,
tilt the front end up and pull itout.
Aluminum Foil
Donot usealuminum foil on the bottom
ofthe oven.
Never entirely cover a rack with aluminum
foil. Thiswill disturb the heat circulation
and result in poor baking.
I-4,CAUTION I
Whengou ors using a rack in the lowest
position (A),gou will need to use caution
when pulling the rock out. We recommend
that gou pull the rock out severalinchesand
then, using two pot holders,pull the rock
out bg holding thesides of it. Therock islow
and gou could be burned ifgou place gout
hand in the middleof the rock and pull oil
the wag out. Beverg careful not to bum
gout hand on the door when using the rock
in the lowest position (A).
A smaller sheet of foil may be used to
catch a spillover by placing it on a lower
rack several inches below the food.
16
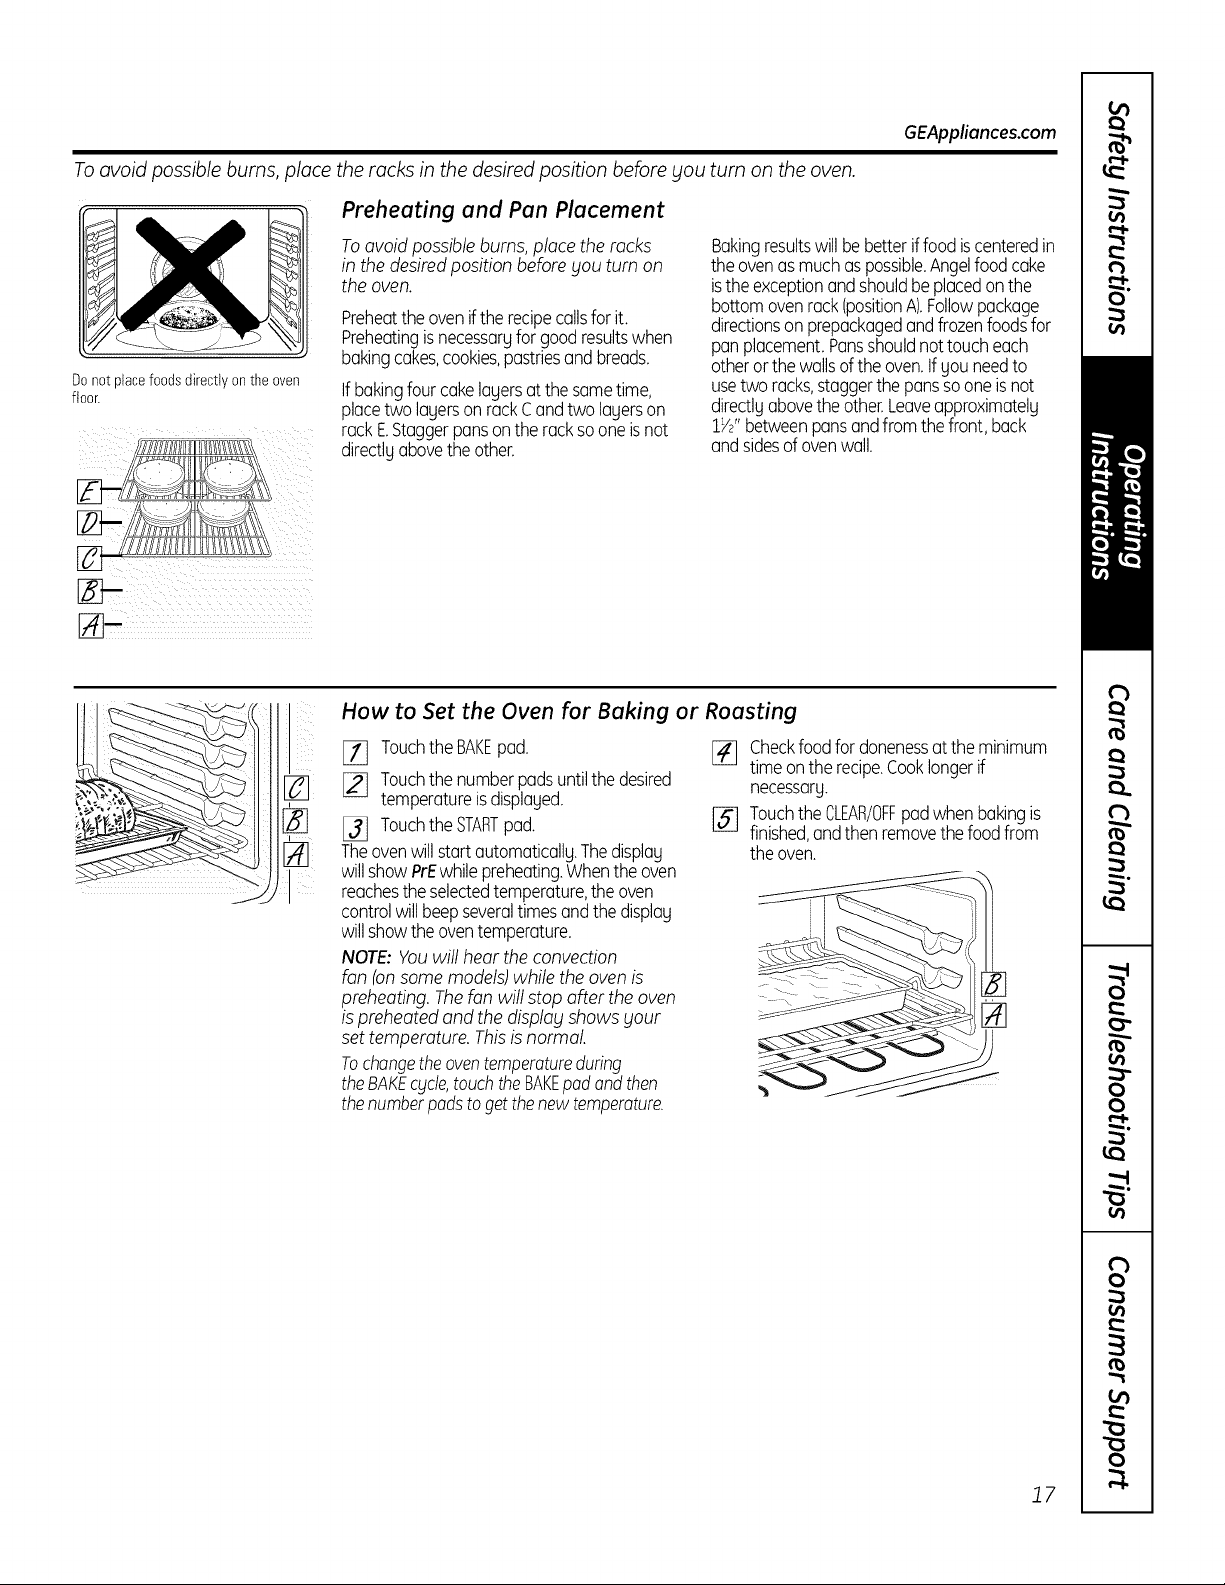
Toavoid possible burns, place the racks in the desired position before you turn on the oven.
Preheating and Pan Placement
Donot placefoodsdirectlyon theoven
floor.
Toavoid possible burns,placethe racks
in the desired position beforegou turn on
the oven.
Preheatthe ovenifthe recipecallsforit.
Preheatingis necessaryfor goodresultswhen
bakingcakes,cookies,pastriesandbreads.
Ifbakingfourcakelagersatthe sametime,
placetwo lagerson rackCandtwo lagerson
rackE.Staggerpansontheracksooneisnot
directlyabovetheother.
Bakingresultswillbe betteriffoodiscenteredin
theovenasmuchaspossible.Angelfoodcake
isthe exceptionandshouldbeplacedonthe
bottomovenrack(positionA).Followpackage
directionson prepackagedandfrozenfoodsfor
panplacement.Pansshouldnottoucheach
otherorthewallsoftheoven.If youneedto
usetworacks,staggerthepanssooneis not
directlyabovethe other.Leaveapproximately
lye"betweenpansandfrom thefront,back
andsidesd ovenwall.
How to Set the Oven for Baking or Roasting
[] TouchtheBAKEpad.
[] Touchthenumberpadsuntilthedesired
temperatureisdisplayed.
131 TouchtheSTARTpad.
Theovenwillstart automatically.Thedisplay
willshowPrEwhilepreheating.Whentheoven
reachestheselectedtemperature,theoven
controlwillbeepseveraltimesandthedisplay
willshowtheoventemperature.
NOTE:Youwill hear the convection
fan (onsome models)while the ovenis
preheating. Thefan will stop after theoven
ispreheated and the displag shows gout
set temperature. Thisisnormal.
Tochangetheoventemperatureduring
theBAKEcgcle,touchtheBAKEpodandthen
thenumberpadstogetthenewtemperature.
r_] Checkfood for donenessat the minimum
ILJ_J
timeonthe recipe.Cooklongerif
necessary.
[_ Touchthe CLEAR/OFFpadwhenbakingis
finished,andthen removethefoodfrom
theoven.
GEAppliances.com
[]
17
Using the oven.
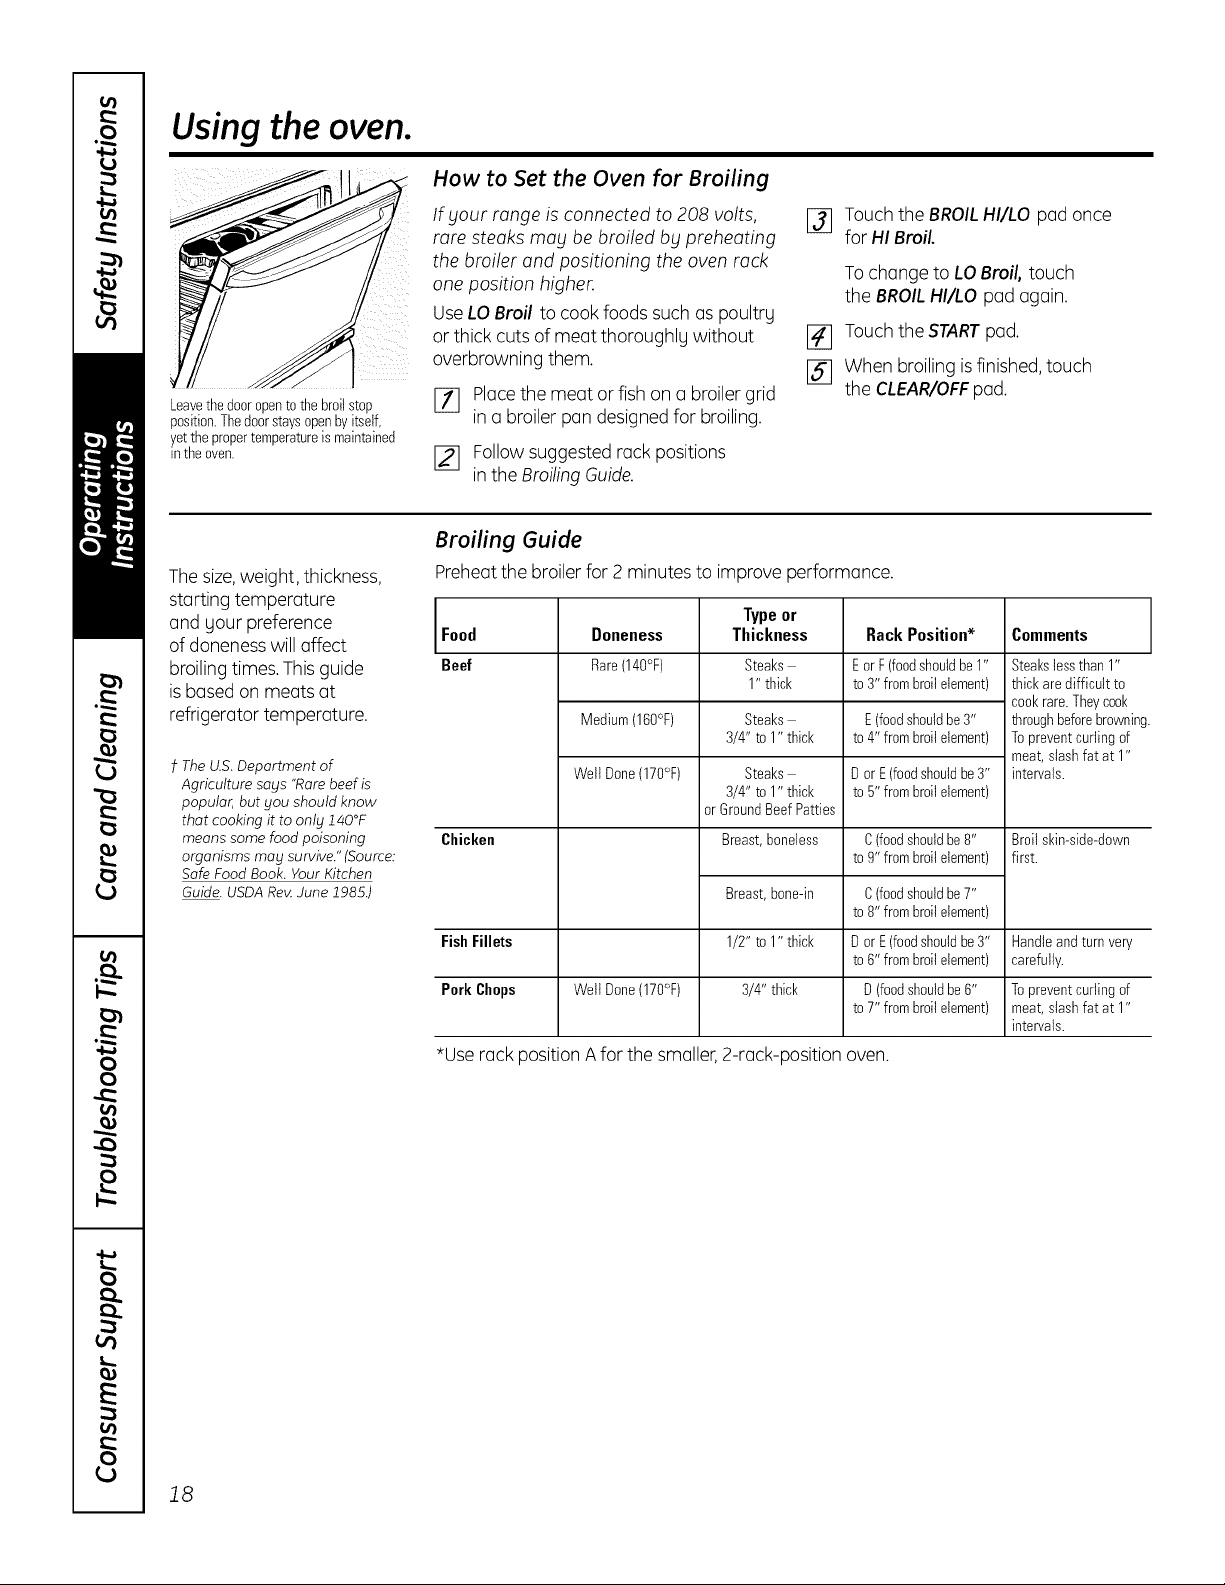
How to Set the Oven for Broiling
Leavethedooropento thebroitstop
position.Thedoorstaysopenbyitself,
yetthe propertemperatureis maintained
inthe oven.
Thesize,weight, thickness,
starting temperature
and gour preference
of doneness will affect
broiling times. Thisguide
is basedon meats at
refrigerator temperature.
t The U.S.Department of
Agriculture sags "Rarebeef is
popular, but you should know
that cooking it to only ff40°F
means some food poisoning
organisms may survive." (Source:
Safe Food Book. Your Kitchen
Guide.USDARe_ dune 19BB.)
Ifgout range is connected to 208 volts,
rare steaks mog be broiled bg preheating
the broiler and positioning the oven rack
one position higher.
[_ Touch the BROILHI/LO pad once
for HI Broil.
To change to LO Broil, touch
the BROILHI/LO pad again.
Use LO Broil to cook foods such as poultrg
or thick cuts of meat thoroughlg without
overbrowning them.
Placethe meat or fish on a broiler grid
[_ Touchthe STARTpad.
[] When broiling isfinished,touch
the CLEAR/OFF pad.
[_ in a broiler pan designedfor broiling.
[_ Follow suggested rack positions
in the Broiling Guide.
Broiling Guide
Preheatthe broiler for 2 minutes to improve performance.
Food Doneness Thickness Rack Position* Comments
Beef Rare(140°F) Steaks Eor F(foodshouldbe1" Steakslessthan1"
Medium(160°F) Steaks E(foodshouldbe3" throughbeforebrowninc
Welt Done(170°F) Steaks Dor E(foodshouldbe3" intervals.
Chicken Breast,boneless C(foodshouldbe8" Broilskin-side-down
Fish Fillets Dor E(foodshouldbe3" Handleandturnvery
Pork Chops Welt Done(170°F) D (foodshouldbe6" Topreventcurling of
Type or
1" thick to3" frombroilelement) thick aredifficult to
3/4" to 1" thick to4" frombroilelement) Topreventcurling of
3/4" to 1" thick to5" frombroilelement)
orGroundBeefPatties
tog" from broilelement) first.
Breast,bone-in
1/2" to 1" thick
3/4" thick
C(foodshouldbe7"
to8" from broilelement)
to6" from broilelement) carefully.
to7" from broilelement) meat,slashfat at 1"
cookrare.Theycook
meat,slashfat at 1"
intervals.
*Userack position A for the smaller, 2-rack-position oven.
18
Usingthetimedbakingandroastingfeatures,ionsomemode sIGEApp,onces.com
NOTE: Foods that spoil easil_l-such as milk, eggs, fish, stuffings, poultr_l and porkishould not be allowed to sit
for more than 1 hour before or after cooking. Room temperature promotes the growth of harmful bacteria.
Be sure that the oven light is off because heat from the bulb will speed harmful bacteria growth.
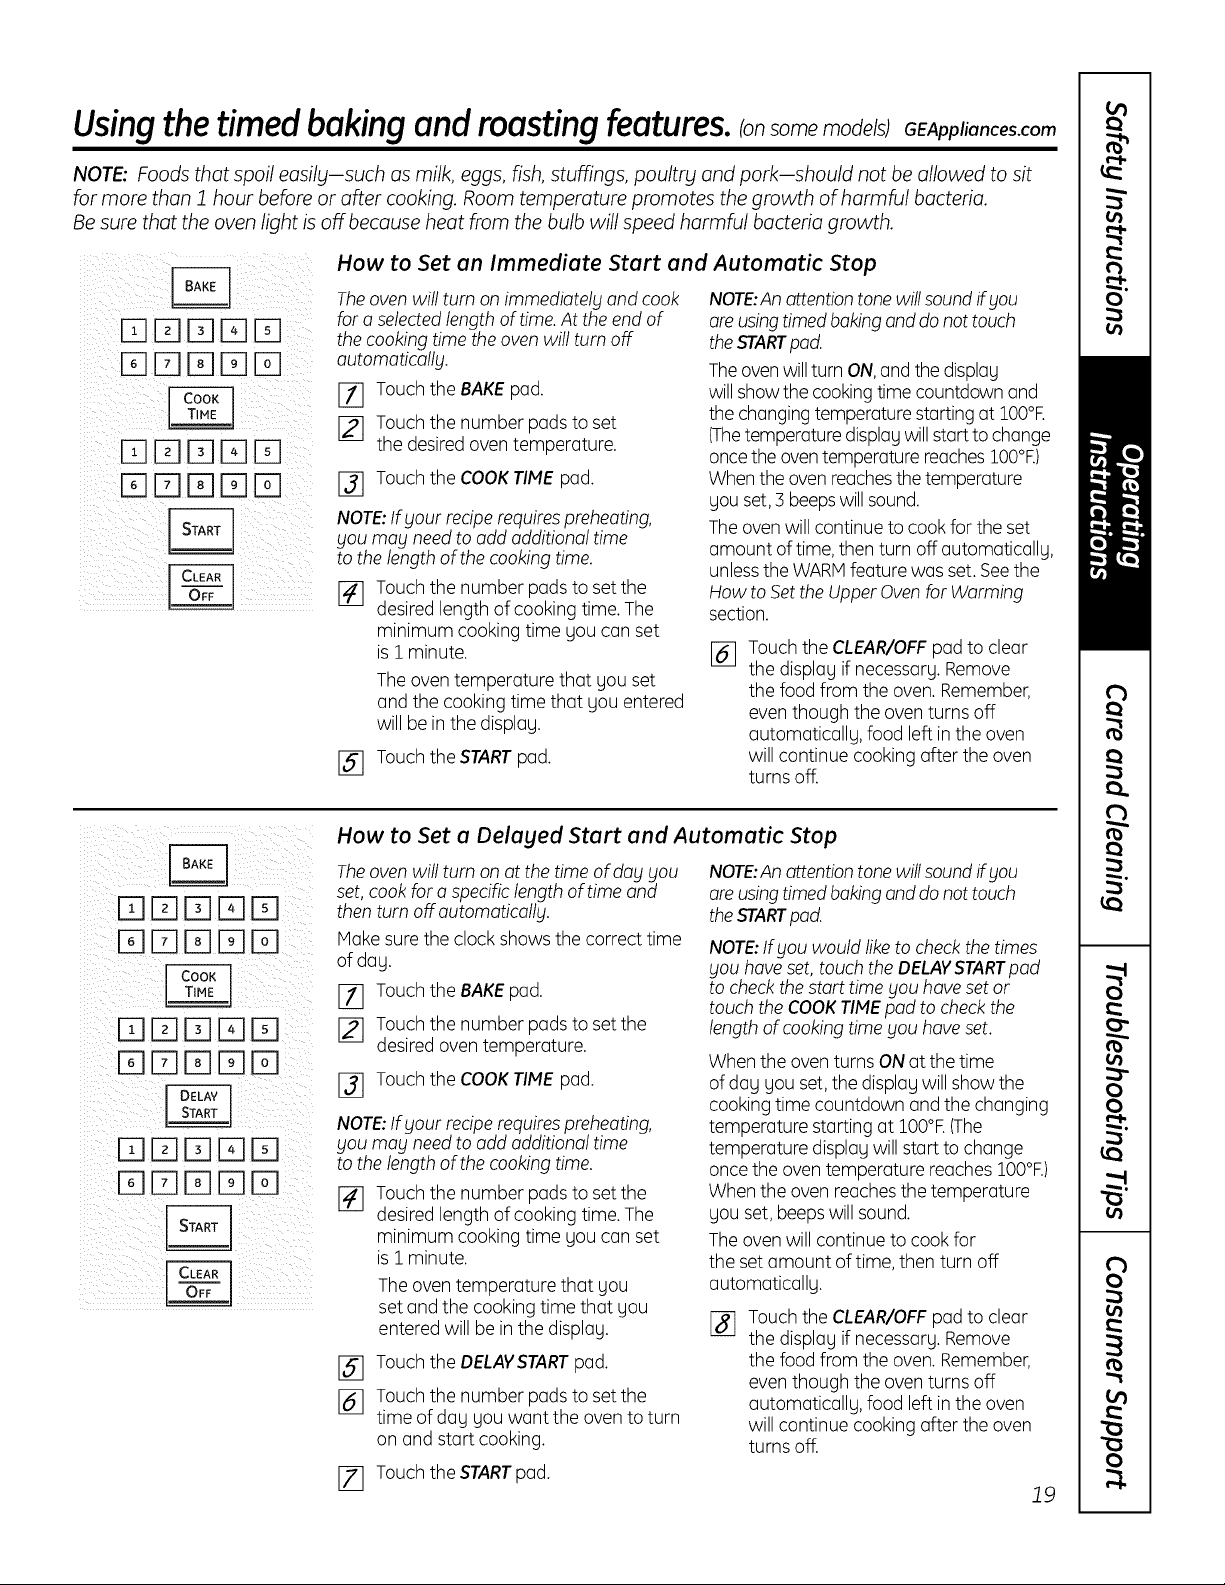
How to Set an Immediate Start and Automatic Stop
Theoven will turn on immediately and cook NOTE:Anattentiontone will soundifyou
for a selectedlength of time.At the end of
the cooking time the ovenwill turn off
outomoticollg.
171 Touch the BAKEpad.
[_ Touch the number pads to set
the desiredoven temperature.
131 Touch the COOKTIME pad.
NOTE:Ifgout reciperequirespreheating,
gou mag need to add additional time
to the length ofthe cooking time.
[_ Touch the number pads to setthe
desiredlength of cooking time. The
minimum cooking time gou can set
is 1 minute.
Theoven temperature that gou set
and the cooking time that gou entered
will be inthe displag.
[_] Touchthe STARTpad.
areusingtimedbaking and do nottouch
theSTARTpad.
Theoven will turn ON,and the displag
willshow the cookingtime countdown and
the changingtemperaturestarting at lO0°R
(Thetemperaturedisplagwill startto change
oncethe oventemperature reacheslO0°R)
Whenthe ovenreachesthe temperature
gou set, 3 beepswill sound.
Theovenwill continue to cook for the set
amount of time, then turn off automaticallg,
unlessthe WARMfeature was set. Seethe
How to Set the Upper Ovenfor Warming
section.
[_ Touch the CLEAR/OFFpad to clear
the displag if necessarg.Remove
the food from the oven. Remember,
eventhough the oventurns off
automaticallg, food left in the oven
will continue cooking after the oven
turns off.
DDD[]D
D[]DDD
DDD[]D
DDDDD
DDD[]D
DDDDD
How to Set a Delayed Start and Automatic Stop
Theoven will turn on at the time of dog gou
set,cook for a specific length of time and
then turn off automaticallg.
Make sure the clock shows the correct time
of dag.
171 Touch the BAKEpad.
[] Touch the number padsto setthe
desiredoven temperature.
[] Touch the COOKTIME pad.
NOTE:Ifgout reciperequirespreheating,
gou mag need to add additional time
to the length ofthe cooking time.
[_ Touch the number pads to setthe
desiredlength of cooking time. The
minimum cooking time gou can set
is 1 minute.
The oventemperature that gou
set and the cooking time that gou
entered will be in the displag.
Touch the DELAVSTARTpad.
%
Touch the number pads to set the
%
time of dag gou want the oven to turn
on and start cooking.
17] Touch the STARTpad.
NOTE:Anattentiontonewill soundifgou
areusingtimedbaking and do nottouch
theSTARTpad.
NOTE:Ifgou would like to check the times
gou have set, touch the DELAVSTARTpod
to checkthestart time gou haveset or
touch the COOKTIMEpad to check the
length of cooking time gou have set.
Whenthe oventurns ON at the time
of dag gou set,the displagwill show the
cooking time countdown and the changing
temperature starting at lO0°R(The
temperature displagwill start to change
oncethe oventemperature reaches lO0°R)
Whenthe oven reachesthe temperature
gou set, beeps will sound.
Theovenwill continue to cook for
the set amount of time, then turn off
automaticallg.
[] Touch the CLEAR/OFFpad to clear
the displag if necessarg.Remove
the food from the oven. Remember,
eventhough the oventurns off
automaticallg, food left in the oven
will continue cooking after the oven
turns off.
19
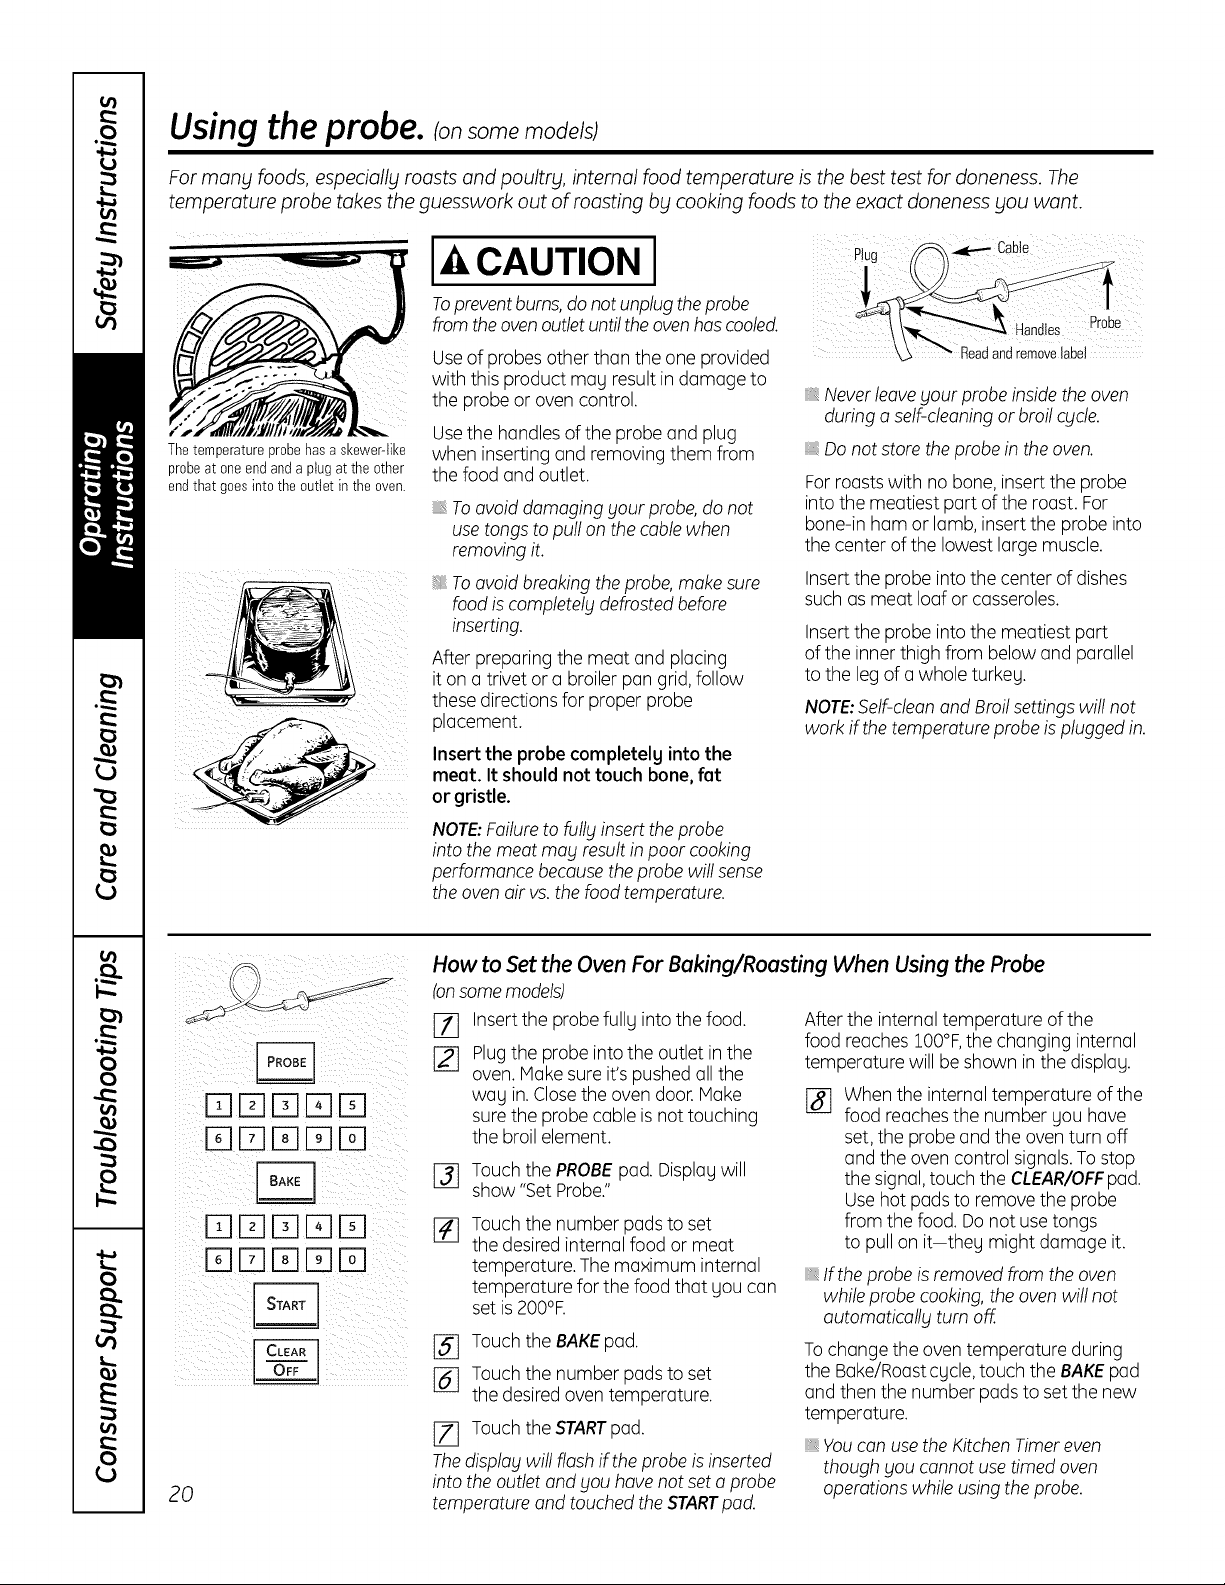
Using the probe, ionsomemode sj
For many foods, especially roasts and poultry, internal food temperature is the best test for doneness. The
temperature probe takes the guesswork out of roasting by cooking foods to the exact doneness you want.
J-&CAUTION I c0,,,
Topreventburns,donotunplugtheprobe
from the ovenoutlet untilthe ovenhascooled.
Useof probes other than the one provided _ _ Readandremovelabel
The temperature probe has a skewer-like
probe at one end and a plug at the other
end that goes into the outlet in the oven.
with this product may result indamage to
the probe or oven control.
Usethe handlesof the probe and plug
when inserting and removing them from
the food and outlet.
Toovoid damaging gout probe, do not
use tongs to pull on the cable when
removing it.
i Toovoid breaking the probe, make sure
food iscompletely defrosted before
inserting.
After preparing the meat and placing
it on a trivet or a broiler pan grid,follow
these directions for proper probe
placement.
Insert the probe completelg into the
meat. It should not touch bone, fat
or gristle.
NOTE:Failureto fully insert the probe
into the meat may result in poor cooking
performance because the probe will sense
the oven air vs. the food temperature.
_,Neverleavegout probe insidethe oven
during o self-cleaningor broil cycle.
Do not store the probe in the oven.
Forroastswith no bone,insert the probe
into the meatiest part of the roast. For
bone-in ham or lamb, insert the probe into
the center of the lowest large muscle.
Insertthe probe into the center of dishes
such as meat loaf or casseroles.
Insertthe probe into the meatiest part
of the inner thigh from below and parallel
to the leg of a whole turkey.
NOTE:Self-cleon and Broilsettings will not
work if the temperature probe is plugged in.
20
How to Set the Oven For Baking/Roasting When Using the Probe
Ionsomemodels)
Insertthe probe fully into the food.
Plugthe probe into the outlet in the
[]
oven. Hake sure it's pushedall the
way in. Closethe oven door.Hake
surethe probe cable is not touching
the broil element.
[_ Touch the PROBEpad. Displaywill
show "Set Probe."
Touch the number pads to set
the desiredinternal food or meat
temperature. The maximum internal
temperature for the food that you can
set is 200°F.
[_ Touch the BAKEpad.
[_ Touch the number pads to set
the desiredoven temperature.
[Z] Touch the STARTpad.
Thedisplay will flash if the probe is inserted
into the outlet and you have not set o probe
temperature and touched the STARTpod.
After the internal temperature of the
food reaches 100°F,the changing internal
temperature will be shown in the display.
[] When the internal temperature of the
food reaches the number you hove
set,the probe and the oven turn off
and the oven control signals.To stop
the signal,touch the CLEAR/OFFpad.
Usehot padsto remove the probe
from the food. Donot usetongs
to pull on it-they might damage it.
Ifthe probe is removed from the oven
while probe cooking, the oven will not
automatically turn off.
Tochange the oventemperature during
the Bake/Roostcycle, touch the BAKEpod
and then the number pods to set the new
temperature.
You con use the Kitchen Timer even
though you cannot use timed oven
operations while using the probe.

Usingthe kitchentimer. OEApp,i°nces.com
To Set the Kitchen Timer
(on some models)
TIMER TIMER
I
ON OFF
(onsomemodels)
TheKitchen_meris in hoursandminutes.
TheKitchenTimerdoesnotcontroloven
operations.Themaximumsettingonthe
KitchenTimeris9 hoursand59minutes.
Touch the KITCHENTIMERON/OFFor
%
TIMERONpad (depending on model).
Touch the number pads until the
[]
amount of time gou want shows
in the display. Forexample,to set
2 hours and 45 minutes,touch 2, 4
and 5 inthat order. If gou make a
mistake,touch the KITCHENTIMER
ON/OFFor TIMEROFFpad (depending
on model) and begin again.
_] Touch the START pad.
To Reset the Kitchen Timer
If the display isstill showing the time
remaining, gou mag change it bg
touching the KITCHENTIMERON/OFFor
TIMERON pad (depending on model),then
touch the number pads until the time gou
want appears in the displGg.
After touching theSTARTpod, SET
disappears;this tellsgou the timeis
counting down, although the displog does
not change until one minute has passed.
Secondswill not beshown in thedisplog
until the last minute iscounting down.
[_ Whenthe kitchentimer reaches:00,
the control will beep 3 times followed
by one beep every 6 seconds until
the KITCHENTIMERON/OFFor
TIMEROFFpad (dependingon model)
istouched.
The&second tone canbe cancelledby
following the steps in theSpatial features
of your oven control section under Tones
at the Endof o TimedCycle.
If the remaining time isnot in the displ%
(clock,delag start orcooking time are in
the displag),recallthe remaining time bg
touching the KITCHENTIMERON/OFFor
TIMERON pad (depending on model) and
then touching the number pads to enter
the new time gou want.
(onsomemodels)
I TIMER TIMER
ON OFF
(onsomemodels)
To Cancel the Kitchen Timer
Touchthe KITCHENTIMERON/OFFor
TIMERONpad (depending on model) twice
or touch TIMEROFF.
21
Adjust the oven thermostat--Do it yourself!
You may find that your new oven cooks differently than the one it replaced. Use gout new oven for a few weeks
to become more familiar with it. If blou still think your new oven is too hot or too cold, you can adjust the
thermostat yourself.
Do not use thermometers, such as those found in grocery stores, to check the temperature setting of blour oven.
These thermometers mabl varb120-/40 degrees.
NOTE: This adjustment will only affect baking and roasting temperatures; it will not affect broiling or self-cleaning
temperatures. The adjustment will be retained in memorbl after a power failure.
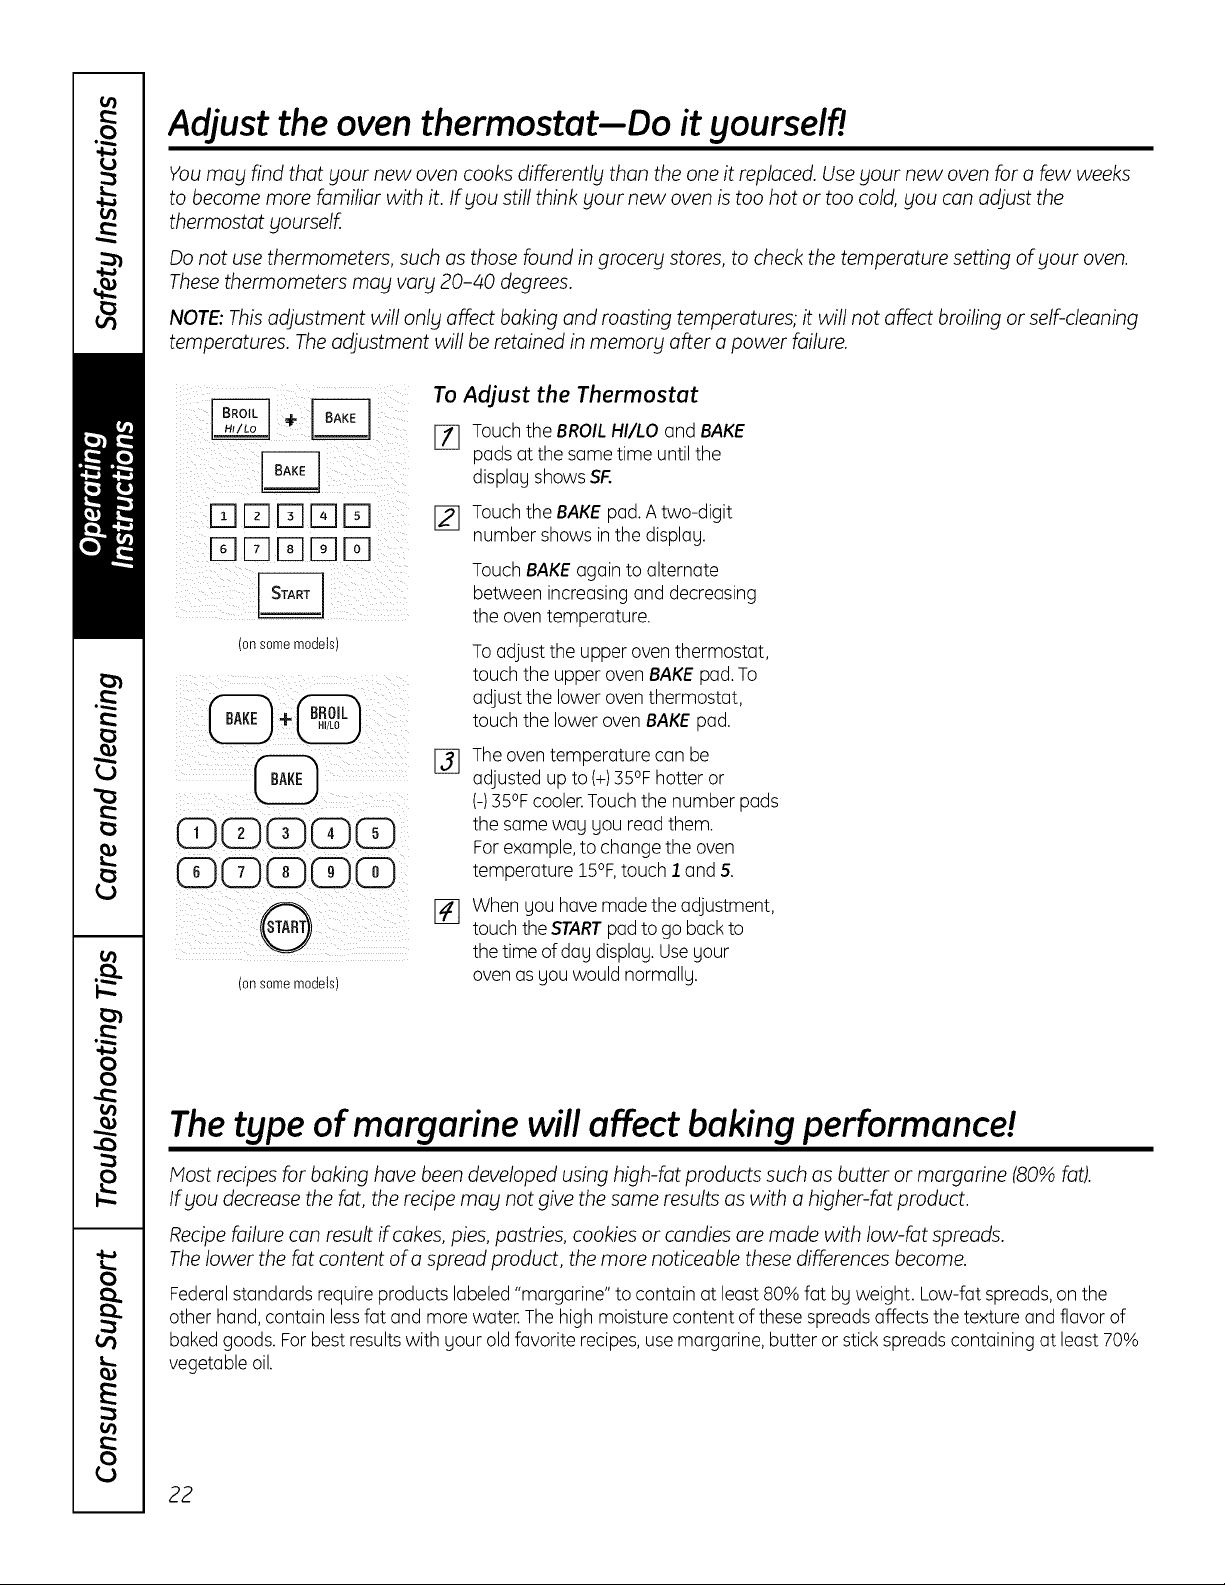
To Adjust the Thermostat
[_ Touch the BROILHI/LO and BAKE
pads at the same time until the
_ii!_ii i_i_iII!E_]_ _ :_i_!i_
i:(16-1E] F1F] F1i: ¸
(onsomemodels)
display shows SR
12] Touch the BAKEpad.A two-digit
number shows in the display.
Touch BAKEagain to alternate
between increasing and decreasing
the oven temperature.
To adjust the upper oven thermostat,
touch the upper oven BAKEpad.To
adjust the lower oven thermostat,
touch the lower oven BAKE pad.
The oventemperature can be
adjusted up to (+)35°Fhotter or
(435°F cooler.Touch the number pads
CDEDEDEDEE)
CE)EDEE)EDED
(onsomemodels)
the same way you read them.
Forexample,to change the oven
temperature 15°F,touch 1 and 5.
When you havemade the adjustment,
touch the STARTpad to go backto
the time of day display. Useyour
ovenas you would normally.
Thetype of margarine will affect baking performance!
Most recipes for baking have been developed using high-fat products such as butter or margarine (80% fat).
If blou decrease the fat, the recipe mabl not give the same results as with a higher-fat product.
Recipe failure can result if cakes, pies, pastries, cookies or candies are made with low-fat spreads.
The lower the fat content of a spread product, the more noticeable these differences become.
Federalstandards require products labeled "margarine" to contain at least 80% fat by weight. Low-fat spreads,on the
other hand,contain lessfat and more water.The high moisture content of these spreads affects the texture and flavor of
baked goods. For best resultswith your old favorite recipes,use margarine, butter or stick spreads containing at least 70%
vegetable oil.
22
Usingtheconvectionoven. somemode sj
GEAppliances.com
CONVECTION
Multi-rack position.
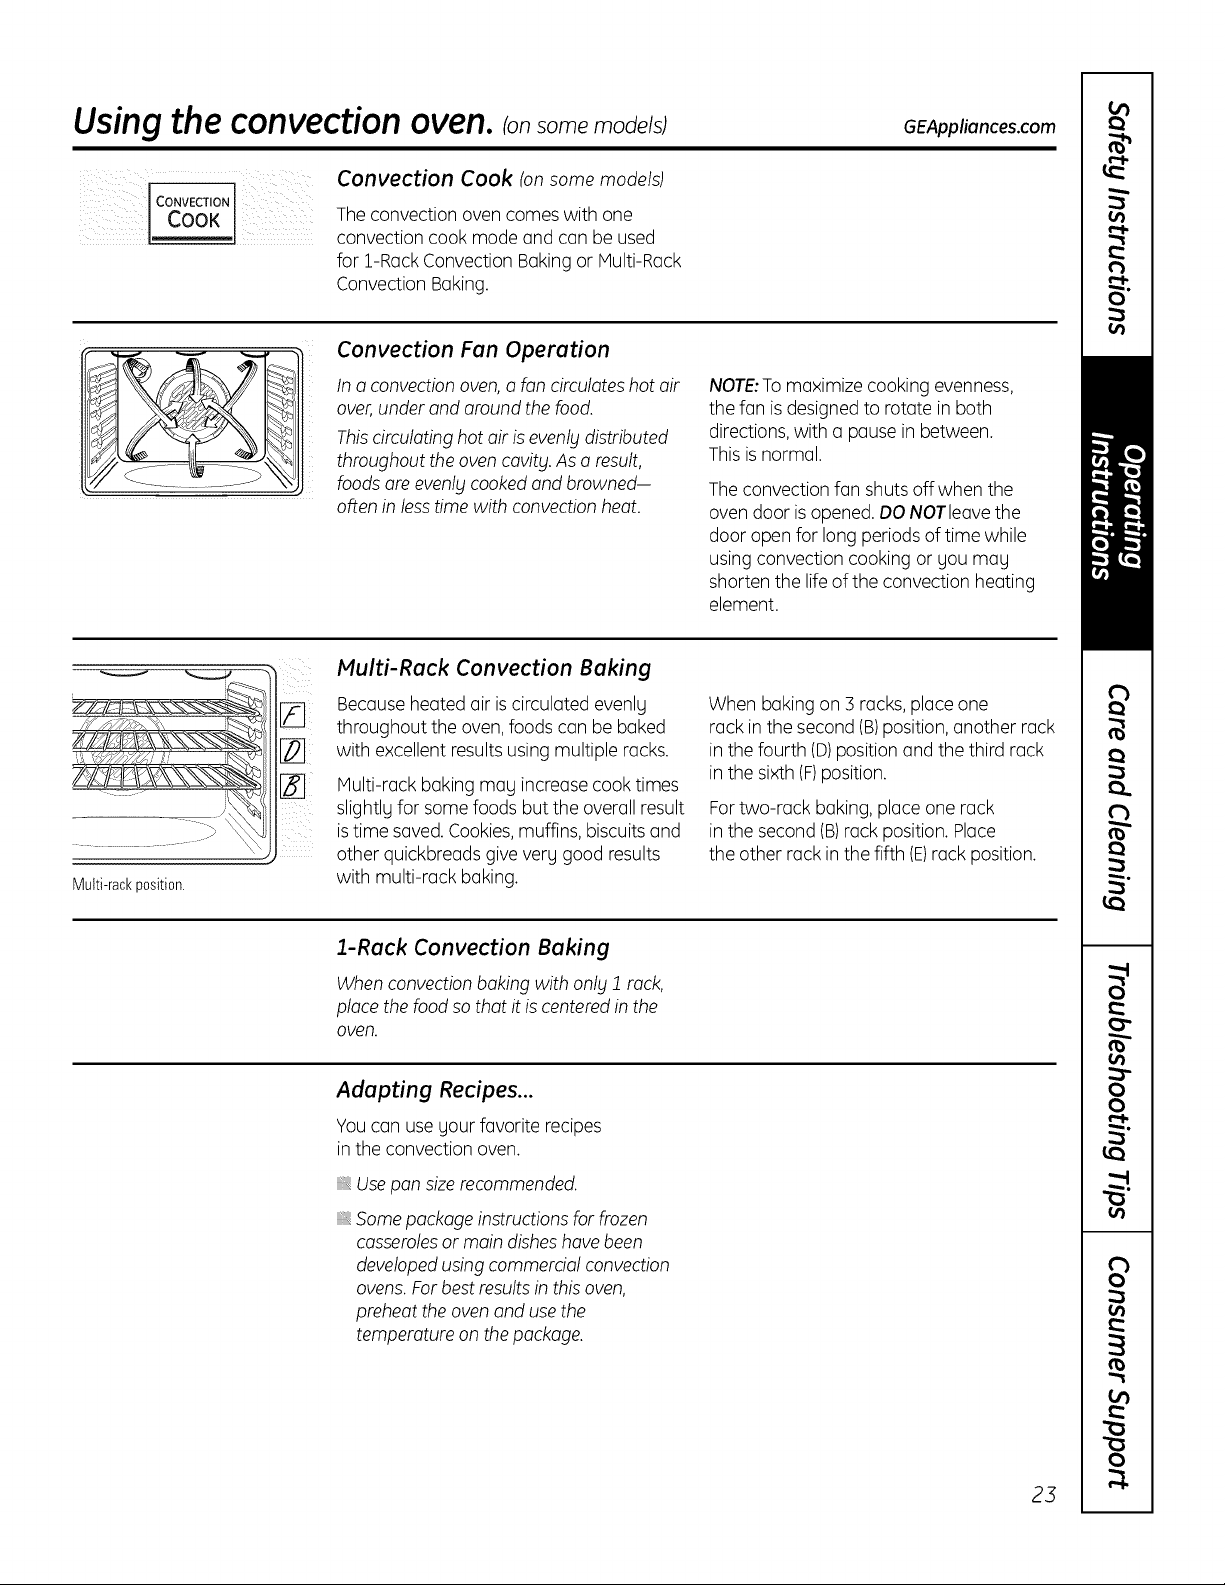
Convection Cook (on some models)
Theconvection oven comes with one
convection cook mode and can be used
for 1-RackConvection Bakingor Multi-Rack
Convection Baking.
Convection Fan Operation
In a convection oven, a fan circulates hot air
over, under and around the food.
This circulating hot air is evenlg distributed
throughout the oven cavity. As a result,
foods are evenlg cooked and browned-
often in less time with convection heat.
Multi-Rack Convection Baking
Because heated air iscirculated evenly
throughout the oven, foods can be baked
with excellent results using multiple racks.
Multi-rack baking may increase cook times
i_ L
slightly for some foods but the overall result
i(
istime saved. Cookies,muffins, biscuitsand
other quickbreadsgive very good results
with multi-rack baking.
NOTE:To maximize cooking evenness,
the fan isdesignedto rotate in both
directions,with a pause in between.
Thisisnormal.
Theconvection fan shuts offwhen the
oven door is opened. DO NOTleave the
door open for long periods of time while
using convection cooking or you may
shorten the life of the convection heating
element.
When baking on 3 racks, place one
rack in the second (B)position, another rack
in the fourth (D)position and the third rack
in the sixth (F)position.
Fortwo-rack baking, place one rack
in the second (B)rack position.Place
the other rack in the fifth (E)rack position.
I-Rack Convection Baking
When convection baking with only 1 rack,
place the food so that it is centered in the
oven.
Adapting Recipes...
Youcan useyour favorite recipes
in the convection oven.
Usepan sizerecommended.
Some package instructions for frozen
casseroles or main dishes have been
developed using commercial convection
ovens. Forbest results in this oven,
preheat the oven and use the
temperature on the package.
23
Usingtheconvectionoven. somemode sJ
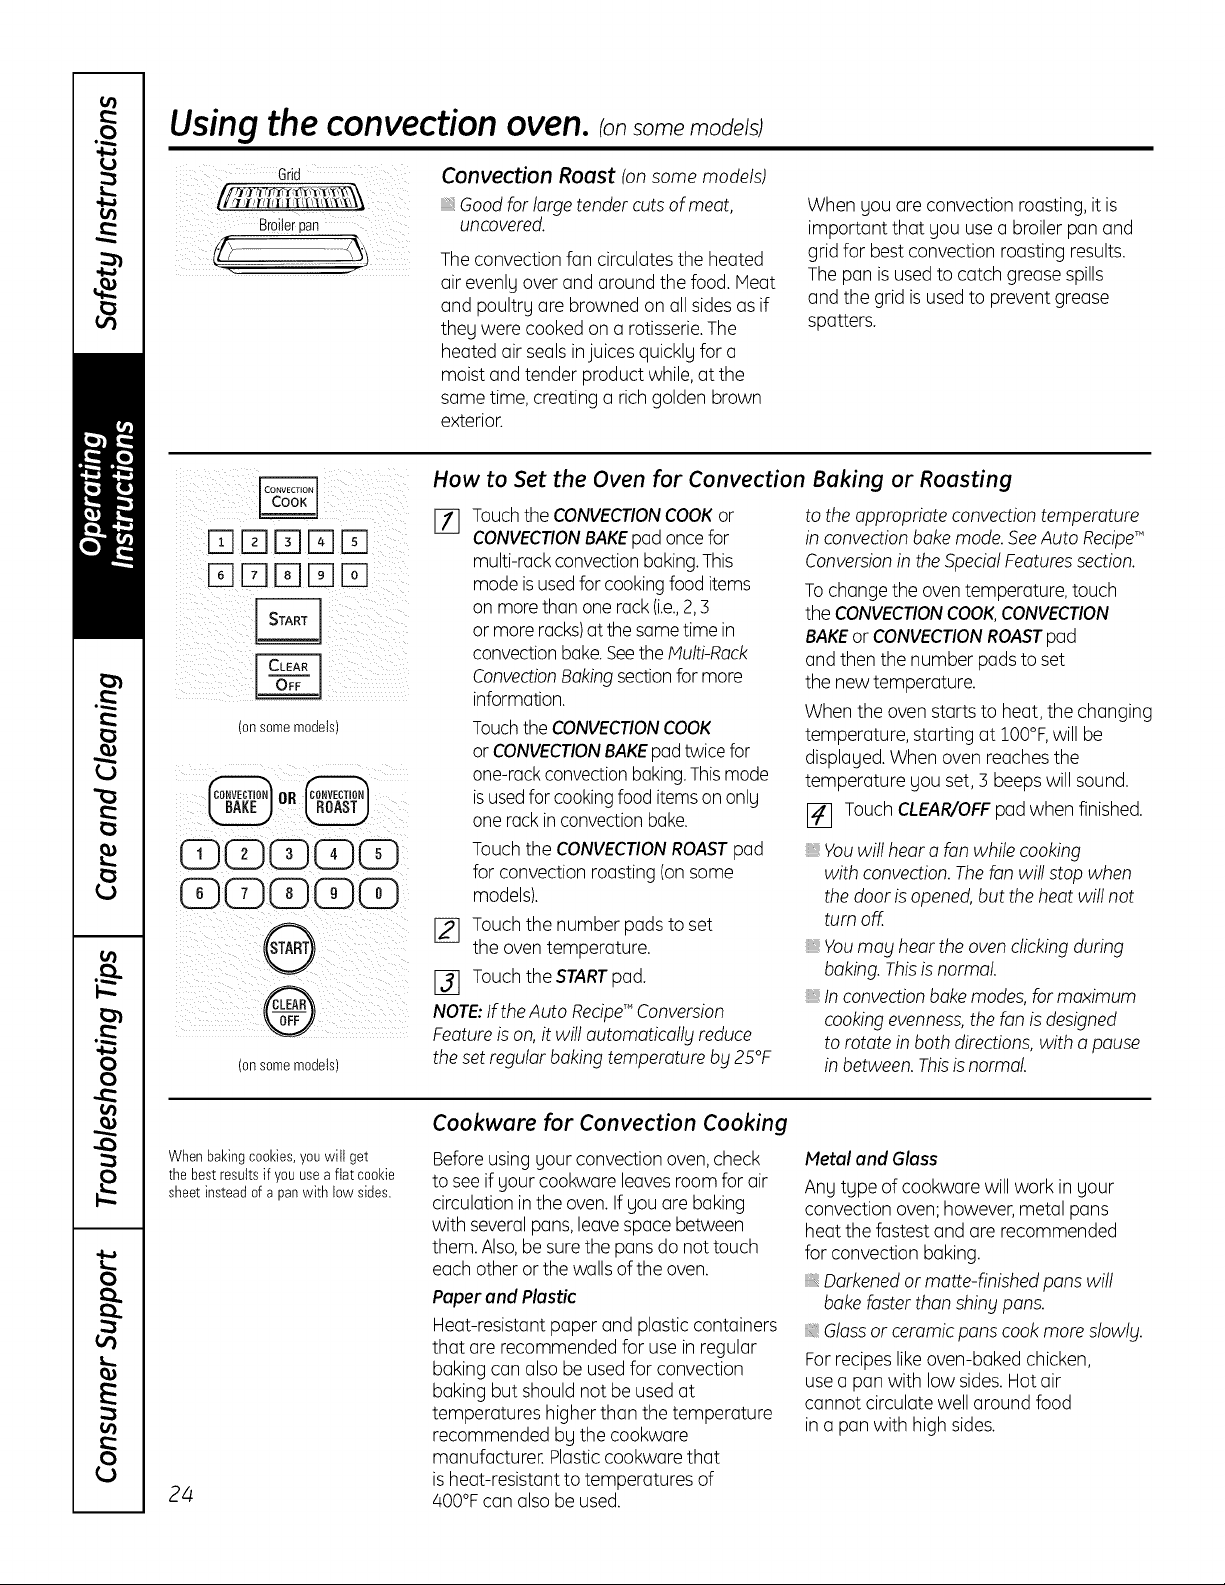
Convection Roast tonsomemodels)
(onsomemodels)
GCDCD(Z)G
(onsomemodels) theset regular baking temperature bg 25°F
Good for large tender cutsof meat,
uncovered.
Theconvection fan circulates the heated
air evenly over and around the food. Meat
and poultry are browned onall sidesasif
they were cooked on a rotisserie.The
heated air sealsinjuices quickly for a
moist and tender product while,at the
some time, creating a rich golden brown
exterior.
How to Set the Oven for Convection Buking or Rousting
Touchthe CONVECTIONCOOKor
%
CONVECTIONBAKEpad oncefor
multi-rack convectionbaking.This
mode isusedfor cookingfood items
on more than one rack(i.e.,2,3
or more racks)atthe sametime in
convectionbake.SeetheMulti-Rock
ConvectionBakingsectionfor more
information.
Touchthe CONVECTIONCOOK
or CONVECTIONBAKEpadtwicefor
one-rackconvectionbaking.Thismode
isusedfor cookingfood itemson only
one rackin convectionbake.
Touch the CONVECTIONROASTpad
for convection roasting (onsome
models).
I_ Touchthe number padsto set
the oven temperature.
13] TouchtheSTART p:d.
NOTE:fftheAutoRecipeConversion
Featureison,it will automatically reduce
When you are convection roosting,it is
important that you use a broiler pan and
grid for best convection roosting results.
Thepan is used to catch grease spills
and the grid isused to prevent grease
spotters.
to the appropriate convection temperature
in convection bakemode.SeeAuto Recipe'"
Conversionin the SpecialFeaturessection.
Tochangethe oventemperature, touch
the CONVECTIONCOOK,CONVECTION
BAKEor CONVECTIONROASTpad
and then the number pads to set
the new temperature.
When the oven starts to heat, the changing
temperature, starting at IO0°F,will be
displayed.When oven reaches the
temperature you set, 3 beepswill sound.
[] Touch CLEAR/OFFpad when finished.
, Youwill hear a fan while cooking
with convection.Thefan will stop when
thedoor is opened,but theheat will not
turn off.
Youmag hear the oven clicking during
baking.Thisis normal.
Inconvectionbakemodes,for maximum
cookingevenness,the fan isdesigned
to rotate in both directions,with apause
in between. Thisis normal.
Whenbakingcookies,youwill get
thebest resultsif youusea flat cookie
sheetinsteadof apan with low sides.
24
Cookware for Convection Cooking
Beforeusingyour convection oven,check
to seeif your cookware leavesroom for air
circulation inthe oven.If you are baking
with severalpans,leavespace between
them.Also,be surethe pans do not touch
each other or the walls of the oven.
Paper and Plastic
Heat-resistant paper and plastic containers
that are recommended for use in regular
baking can also be used for convection
baking but should not be used at
temperatures higher than the temperature
recommended by the cookware
manufacturer. Plasticcookware that
isheat-resistant to temperatures of
400°Fcan also be used.
Metal and Glass
Any type of cookware will work in your
convection oven;however,metal pans
heat the fastest and are recommended
for convection baking.
Darkenedor matte-finished panswill
bake faster than shiny pans.
Glass or ceramic pans cook more slowlg.
Forrecipes like oven-baked chicken,
usea pan with low sides. Hot air
cannot circulate well around food
in a pan with high sides.
Usingthe timed features
for convectioncooking,ronsomemode sj GEAppliances.com
You will hear a fan while cooking with these features. The fan will stop when the door is opened, but the heat
will not turn off.
NOTE: Foods that spoil easily-such as milk, eggs, fish, stuffings, poultry and porkishould not be allowed to
sit for more than 1 hour before or offer cooking. Room temperature promotes the growth of harmful bacteria.
Be sure that the oven light is off becouse heat from the bulb will speed harmful bacteria growth.
i ¸ : : :
CONVECTION
CONVECTION
cook
How to Set an Immediate Start and Automatic Stop
Pressdesired convection function. Proceed to
step2 of Howto Setan ImmediateStartand
AutomaticStopinUsingthe timed bakingand
roastingfeaturessection.
How to Set a Delaged Start and Automatic Stop
Pressdesiredconvectionfunction.Proceedto
step 2 of How to Set a OelagStart and
Automatic Stop inUsing the timed baking and
roasting features section.
25
Usingtheconvectionoven. somemode sj
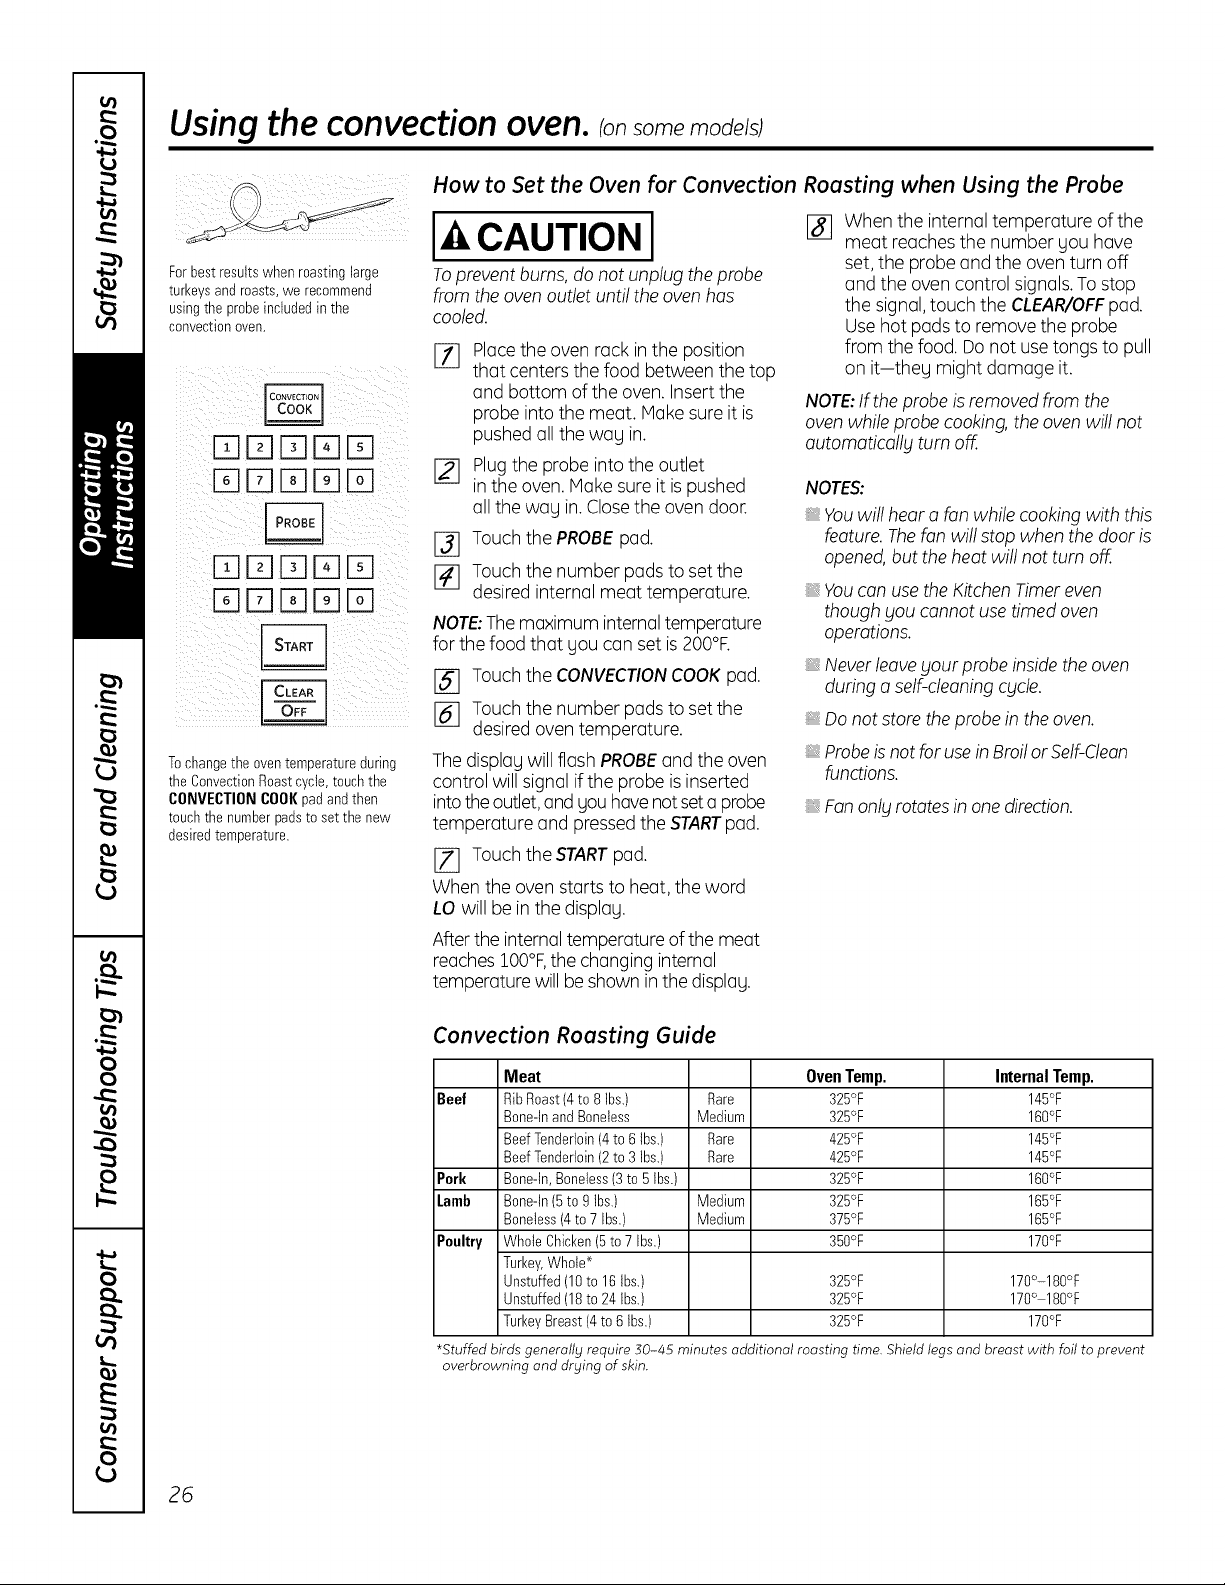
How to Set the Oven for Convection Roasting when Using the Probe
Forbestresults when roastinglarge
turkeysand roasts,we recommend
usingthe probeinctudedin the
convectionoven.
DD[]DD
DD[]DD
DD[]DD
DDDDD
Tochangetheoventemperatureduring
theConvectionRoastcycle,touchthe
CONVECTIONCOOKpad andthen
touchthenumberpadsto set thenew
desiredtemperature.
CAUT,ONI When the internal temperature of the
Toprevent burns, do not unplug the probe
from the oven outlet until the ovenhas
cooled.
Placethe oven rack inthe position
%
that centers the food between the top
and bottom of the oven. Insertthe
probe into the meat. Make sureit is
pushed all the way in.
Plugthe probe intothe outlet
[]
in the oven. Make sure it is pushed
all the way in.Closethe oven door.
[_] Touch the PROBEpad.
[] Touch the number padsto setthe
desiredinternal meat temperature.
NOTE:Themaximum internaltemperature
for the food that you can set is200°F.
meat reaches the number you have
set,the probe and the oven turn off
and the oven control signals.To stop
the signal,touch the CLEAR/OFFpad.
Use hot pads to remove the probe
from the food. Donot usetongs to pull
on it-they might damage it.
NOTE:If theprobe is removed from the
ovenwhile probe cooking, the oven will not
outomoticoll_lturn off.
NOTES:
Youwill hear a fan while cooking with this
feature.Thefan will stop when thedoor is
opened,but the heat will not turn off.
, Youcon use the KitchenTimer even
though _lOUcannot usetimed oven
operations.
, Neverleave your probe insidethe oven
I-_ Touch the CONVECTIONCOOKpad.
[_ Touch the number pads to setthe
desiredoven temperature.
Thedisplay will flash PROBEand the oven
control will signal if the probe isinserted
intotheoutlet,and you havenotseta probe
during a self-cleaningc_Icle.
Donot store the probe in the oven.
, Probeisnot forusein Broilor Self-Cleon
functions.
, Fanonl_lrotatesin one direction.
temperature and pressedthe STARTpad.
[_ Touch the STARTpad.
When the oven starts to heat, the word
LO will be in the display.
Afterthe internaltemperature ofthe meat
reaches 100°F,the changinginternal
temperature will be shown inthe display.
26
Convection Roasting Guide
Meat Oven Temp.
Beef
Pork
Lamb
Poultry
*Stuffed birds generally require 30-45 minutes additional roasting time. Shield legs and breast with foil to prevent
overbrowning and drying of skin.
RibRoast(4to 8 Ibs.) Rare 325°F
Bone-InandBoneless Medium 325°F
BeefTenderloin(4to 6Ibs.) Rare 425°F
BeefTenderloin(2to 3Ibs.) Rare 425°F
Bene-tn,Boneless(3to 5Ibs.) 325°F
Bone-ln(5to gIbs.) Medium 325°F
Boneless(4to7 Ibs.) Medium 375°F
Whole Chicken(5to 7 Ibs.) 350°F
Turkey,Whole*
Unstuffed(10to 16 tbs.) 325°F
Unstuffed(18to 24 Ibs.) 325°F
TurkeyBreast(4to 6 Ibs.) 325°F
Internal Temp.
145°F
160°F
145°F
145°F
160°F
165°F
165°F
170°F
170°-180°F
170° 180°F
170°F
Using the slow cook pizza, warming
and proofing features.
IA WARNING I OOD POISON HAZARD:Bacteria ma_j grow in food at temperatures below 140°£
• Always start with hot food. Do not use warm settings to heat cold food.
GEAppliances.com
• Do not warm food for more than 2 hours.
Failure to follow these instructions may result in foodborne illness.
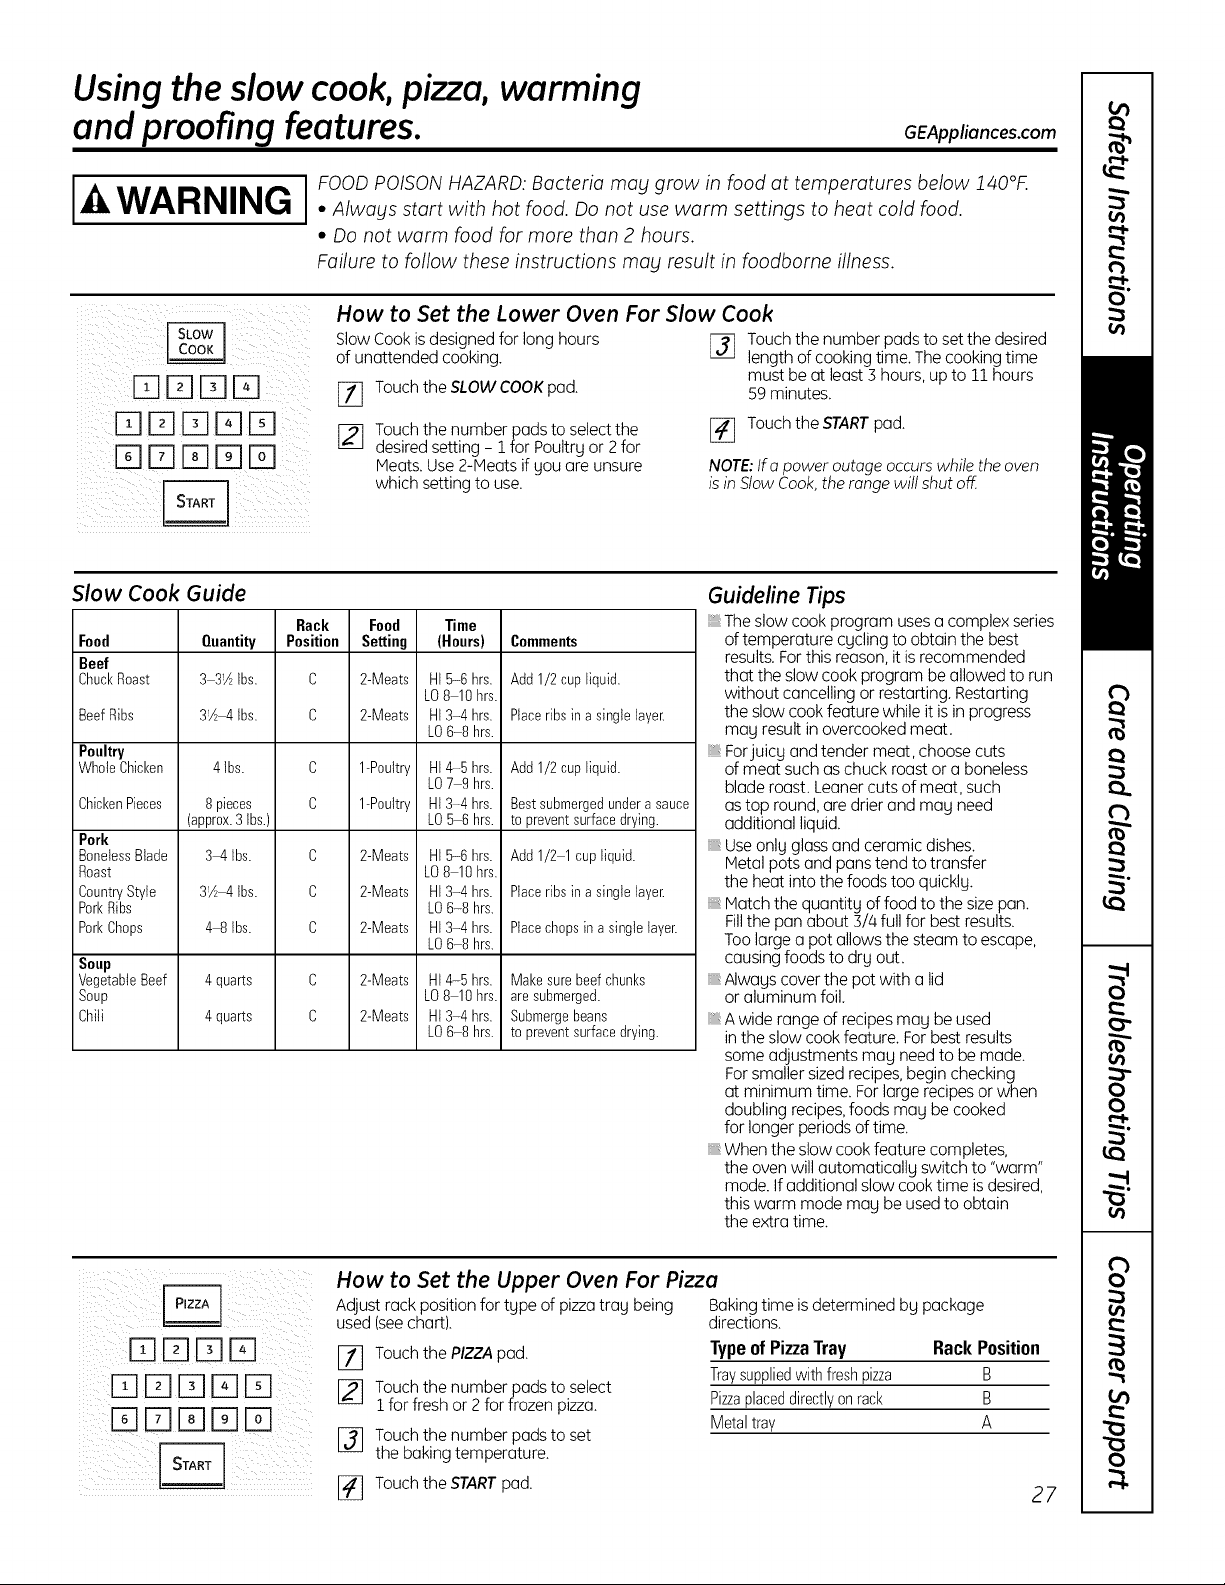
How to Set the Lower Oven For Slow Cook
l-qFqlTlrq
rTlPql-qF-l%
E]FqE3FqEb3
Slow Cook Guide
Food
Beef
ChuckRoast
BeefRibs
Poultry
WholeChicken
ChickenPieces
Pork
BonelessBlade
Roast
CountryStyle
PorkRibs
PorkChops
Soup
VegetableBeef
Soup
Chili
Quantity Position Setting (Hours)
3 31AIbs. C 2-Meats HI5-6 hrs.
31A 41bs. C 2-Meats HI 3-4 hrs.
4 Ibs.
8 pieces
(appr0x.3 Ibs.)
3_4Ibs.
31A 4Ibs.
44 Ibs.
4 quarts
4 quarts
SlowCook is designed for long hours
of unattended cooking.
[_] Touch the SLOWCOOK pod.
[_ Touchthe number pods to select the
desired setting - 1for Poultrg or 2for
Heats. Use 2-Meats if SOUare unsure
which setting to use.
Rack Food Time
LO8 10 hrs.
LO6-8 hrs.
C
1-P0ultry HI4-5 hrs.
C
1-P0ultry HI3-4 hrs.
C
2-Meats HI5-6 hrs.
C
2-Meats HI3-4 hrs.
C
2-Meats HI3-4 hrs.
C
2-Meats HI4-5 hrs.
C
2-Meats HI3-4 hrs.
LO7 9 hrs.
LO5 6 hrs.
LO8 10 hrs.
LO6-8 hrs.
LO6-8 hrs.
LO8 10 hrs.
LO6-8 hrs.
Comments
Add 1/2cupliquid.
Placeribsin a single layer.
Add 1/2cupliquid.
Bestsubmergedunderasauce
to preventsurfacedrying.
Add 1/2 1cup liquid.
Placeribsin a single layer.
Placechopsina singlelayer.
Makesure beefchunks
aresubmerged.
Submergebeans
to preventsurfacedrying.
Touch the number pods to set the desired
length of cooking time. The cooking time
must be at least 3 hours, up to 11 hours
59minutes.
[_ Touchthe STARTpad.
NOTE:Ira power outage occurs while the oven
isin Stow Cook,the rangewilt shut off
Guideline Tips
The slow cook program useso complex series
oftemperature cycling to obtain the best
results.Forthis reason,it isrecommended
that the slow cook program be allowed to run
without cancelling or restarting. Restarting
the slow cook feature while it isin progress
may result in overcooked meat.
Forjuicy and tender meat, choose cuts
of meat such as chuck roost or o boneless
blade roost. Leanercuts of meat, such
astop round, ore drier and may need
additional liquid.
Useonly glossand ceramic dishes.
Metal pots and puns tend to transfer
the heat into the foods too quickly.
Hutch the quontitg of food to the sizepan.
Fillthe pan about 3//4full for best results.
Too large o pot allows the steam to escape,
causingfoods to dry out.
Always coverthe pot with o lid
or aluminum foil.
Awide range of recipes may be used
in the slowcook feature. For bestresults
some adjustments may needto be mode.
Forsmaller sized recipes,beginchecking
at minimum time. For large recipesor when
doubling recipes,foods may be cooked
for longer periods of time.
When the slow cook feature completes,
the oven will automatically switch to "worm"
mode. If additional slow cook time isdesired,
this worm mode may be usedto obtain
the extra time.
iiiii ill i i/}!! ii
How to Set the Upper Oven For Pizza
Adjust rock positionfor tgpe of pizzatrag being Bakingtime isdetermined bg package
used(seechart), directions.
[_ Touchthe PIZZApad.
[_ Touchthe number pods to select
1for fresh or 2for frozen pizza.
[] Touchthe number pods to set
the baking temperature.
[_ Touchthe STARTpod.
Type ofPizza Tray Rack Position
Traysuppliedwith freshpizza B
Pizzaplaceddirectlyonrack B
Metaltray A
27

Using the slow cook, pizza, warming and proofing features.
How to Set the Upper Oven For Warming
iii [ iiiii_i_
START
L
PROOF l
The WARM feature keeps cooked
foods hot.
Thisfeature isnot designed to reheat
cold food.
Tousethe WARMfeature, touch the WARM
pad and then the STARTpad.
To use the WARM feature after Timed
Baking, follow these steps:
E_ Touch the bake mode of cooking.
[_ Touch the number pads to set
the oven temperature.
E_ Touch the COOKTIMEpad.
[_ Touch the number pads to set
the desired length of cooking time.
[] Touch the WARMpad.
[_ Touch the STARTpad.
How to Set the Oven For Proofing (on some models)
The proofing feature maintains o worm environment useful for rising
yeast-leavened products.
NOTE:Plasticcontainers,lids or plastic
wrap will melt if placed in the oven.Melted
plasticmag not be removableand is not
coveredunder gout warrantg.
START
TIMER
I ON
[ CLEAR
(onsomemodels)
(onsomemodels)
'
E_ Placethe covered dough ina dish
in the oven on rack Bor C.
NOTE:Forbest results, cover the dough
with a cloth or with greased plastic wrap
(the plastic mag need to be anchored
underneath the container so the oven
fan willnot blow it off).
[] Touch the PROOFpad and then
the STARTpad.
Thedisplagwill read PrF (proof).
Theoven interior light turns on and remains
on during proofing.
Theproofing feature automaticallg
provides the optimum temperature for
the proofing process,and therefore does
not havea temperature adjustment.
E_] Set the Timer for the minimum
proof time.
[] When proofing isfinished,touch
the CLEAR/OFFpad.
Toavoid lowering the oven temperature
and lengthening proofing time, do not
open the oven door unnecessarilg.
_,Checkbreadproducts earl_lto ovoid
overproofing.
NOTES:
, Donot usetheproofing mode for
warming food or keepingfood hot.
Theproofing oven temperature is
not hot enough to hold foodsat safe
temperatures.Usethe WARMfeature
to keepfoodworm.
Proofing will not operate when oven
is above 225°E "HOT" will show
in the display.
28
Using the self-cleaning upper and lower ovens.
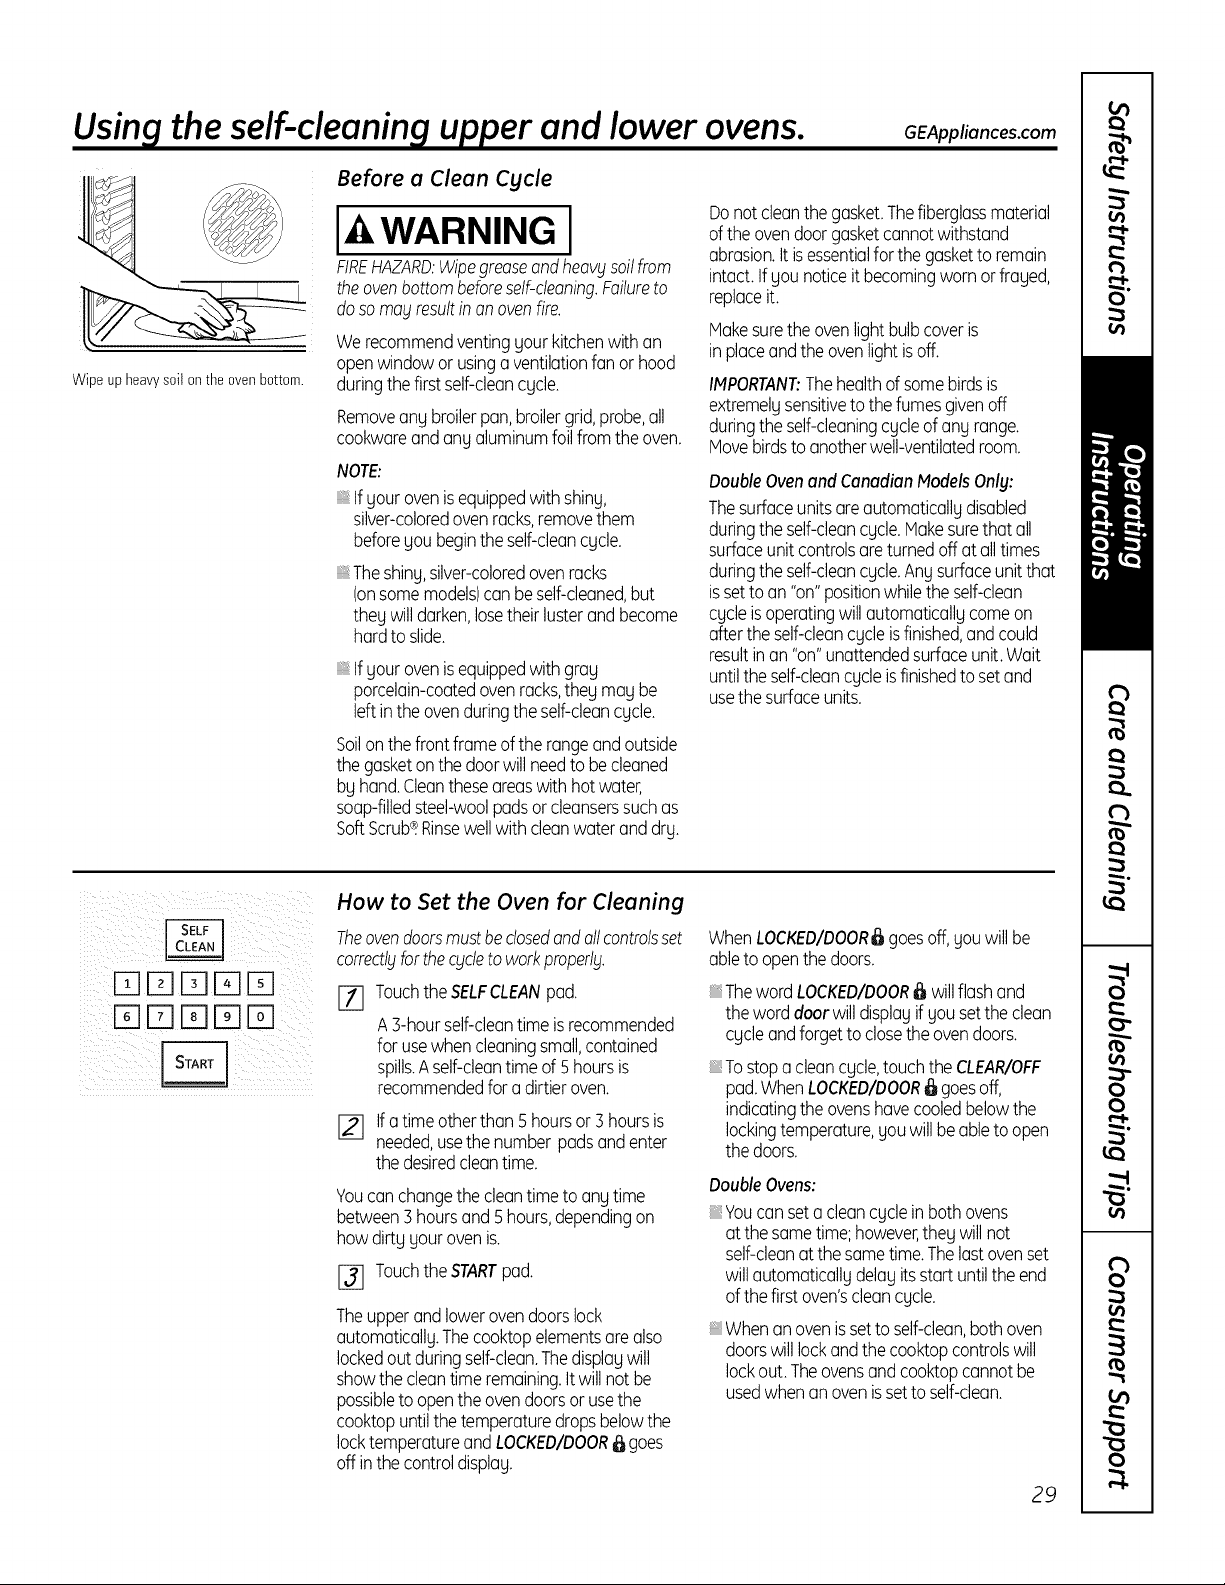
Before a Clean Cycle
Donot cleanthegasket.Thefiberglassmaterial
oftheovendoorgasketcannotwithstand
abrasion.It isessentialforthegasketto remain
intact.Ifyou noticeit becomingwornorfrayed,
replaceit.
Makesuretheovenlightbulbcoveris
inplaceandtheovenlightisoff.
IMPORTANT:Thehealthofsomebirdsis
extremelysensitiveto the fumesgivenoff
duringtheself-cleaningcycleofanyrange.
Movebirdstoanotherwell-ventilatedroom.
DoubleOvenand CanadianModelsOnly:
Thesurfaceunitsareautomaticallydisabled
duringtheself-cleancycle.Makesurethat all
surfaceunitcontrolsareturnedoff at alltimes
duringtheself-cleancycle.Anysurfaceunitthat
issettoan "on"positionwhiletheself-clean
cycleisoperatingwillautomaticallycomeon
aftertheself-cleancycleisfinished,andcould
resultinan "on"unattendedsurfaceunit.Wait
untilthe self-cleancycleisfinishedtosetand
usethesurfaceunits.
Wipe up heavysoil onthe ovenbottom.
I WARNING I
FIREHAZARD:Wipegreaseandheavblsoilfrom
theovenbottombeforeself-cleaning.Failureto
dosomoblresultinonovenfire.
Werecommendventingyour kitchenwith an
openwindowor usinga ventilationfan or hood
duringthefirst self-deancycle.
Removeany broilerpan,broilergrid,probe,all
cookwareandanyaluminumfoil fromtheoven.
NOTE:
Ifyourovenisequippedwithshiny,
silver-coloredovenracks,removethem
beforeyou begintheself-cleancycle.
Theshiny,silver-coloredovenracks
(onsomemodels)canbeself-cleaned,but
they willdarken,losetheirlusterandbecome
hardtoslide.
Ifyourovenisequippedwithgray
porcelain-coatedovenracks,theymay be
left intheovenduringtheself-cleancycle.
Soilonthefrontframeofthe rangeandoutside
thegasketonthedoorwill needtobecleaned
byhand.Cleantheseareaswithhotwater,
soap-filledsteel-woolpadsorcleanserssuchas
SoftScrub®.Rinsewellwith cleanwateranddry.
GEAppliances.com
I--qFql-flI-ql-q
D rq IZ]rq IT1
How to Set the Oven for Cleaning
Theovendoorsmustbeclosedandallcontrolsset
correctlblforthecycleto workproperlbl.
[] TouchtheSELFCLEANpad.
A 3-hourself-cleantimeisrecommended
forusewhencleaningsmall,contained
spills.Aself-cleantimeof 5hoursis
recommendedfor a dirtieroven.
[_ Ifatimeotherthan Shoursor3 hoursis
needed,usethenumber padsandenter
thedesiredcleantime.
Youcanchangethecleantimetoanytime
between3 hoursand5hours,dependingon
howdirtyyourovenis.
[_ Touchthe STARTpad.
Theupperandlowerovendoorslock
automatically.Thecooktopelementsarealso
lockedout duringself-clean.Thedisplaywill
showthecleantimeremaining.It willnot be
possibleto opentheovendoorsorusethe
cooktopuntilthetemperaturedropsbelowthe
locktemperatureandLOCKEDIDOOR_ goes
off inthe controldisplay.
WhenLOCKED/DOOR6goesoff,youwillbe
abletoopenthedoors.
ThewordLOCKED/DOOR_ willflashand
theworddoor willdisplayif you setthe clean
cycleandforgetto closethe ovendoors.
Tostop a clean cycle,touch the CLEAR/OFF
pad. When LOCKED/DOOR_ goes off,
indicating the ovens have cooled below the
locking temperature, you will be ableto open
the doors.
DoubleOvens:
Youcanseta cleancycleinbothovens
atthesametime;however,they will not
self-cleanat the sametime.Thelastovenset
willautomaticallydelay itsstart untiltheend
ofthefirstoven'scleancycle.
Whenanovenissetto self-clean,bothoven
doorswilllockandthe cooktopcontrolswill
lockout. Theovensandcooktopcannotbe
usedwhenanovenissettoself-clean.
29
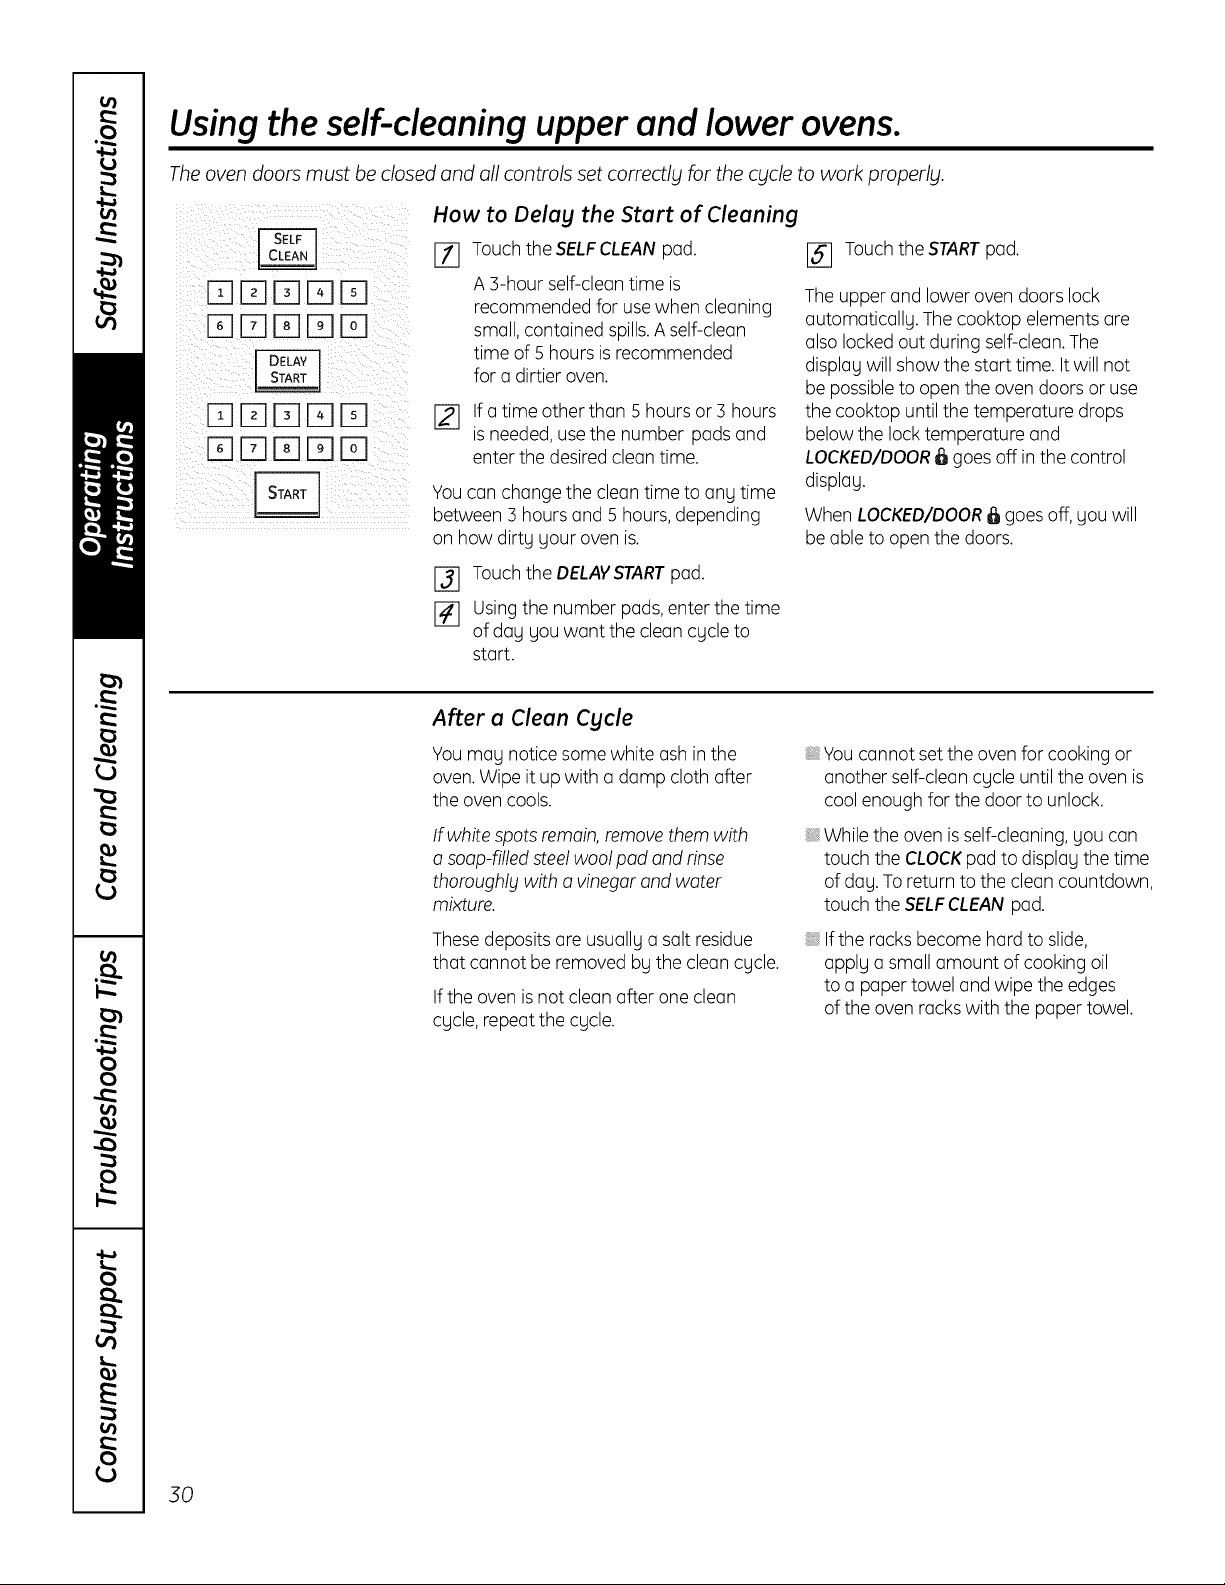
Using the self-cleaning upper and lower ovens.
The oven doors must be closed and all controls set correctly for the cycle to work properly.
How to Delag the Start of Cleaning
[]DD[]D
DDDD
I71 Touch the SELFCLEANpad.
A ]-hour self-cleantime is
recommended for usewhen cleaning
small, contained spills,A self-clean
time of 5 hours isrecommended
for a dirtier oven.
If a time other than 5 hours or 3 hours
is needed,use the number pads and
enter the desired cleantime.
Youcan change the cleantime to angtime
between 3 hoursand 5 hours,depending
on how dirtg gour oven is.
E_ Touchthe DELAVSTARTpad.
E_] using the number pads,enter the time
of day you want the clean cycle to
start.
After a Clean Cycle
Youmau notice some white ash inthe
oven.Wipe it up with a damp cloth after
the oven cools.
If white spotsremain, remove them with
a soap-filled steelwool pad and rinse
thoroughly with a vinegar andwater
mixture.
Thesedepositsare usuallua salt residue
that cannot be removed bu the cleancycle.
If the oven is not clean after one clean
cucle,repeat the cucle.
[] Touchthe STARTpad.
Theupper and lower oven doors lock
automaticallu. Thecooktop elements are
also locked out during self-clean.The
display will show the start time. It will not
be possible to open the oven doors or use
the cooktop until the temperature drops
below the lock temperature and
LOCKED/DOOR_ goes off in the control
display.
When LOCKED/DOOR_ goes off, you will
be able to open the doors.
You cannot set the oven for cooking or
another self-clean cycle until the oven is
coolenough for the door to unlock.
While the oven isself-cleaning, Uoucan
touch the CLOCKpad to displau the time
of day. To return to the clean countdown,
touch the SELFCLEAN pad.
Ifthe racks become hard to slide,
applu a small amount of cooking oil
to a paper towel and wipe the edges
ofthe oven rackswith the paper towel.
30
 Loading...