

Page 1

GFK-2892B
Programmable Control Products
PACSystems* RX3i
Genius* Communications Gateway
User Manual
August
2016
Public
Page 2

Legal Information
These instructions do not purport to cover all details or variations in equipment, nor to provide for every possible
contingency to be met during installation, operation, and maintenance. The information is supplied for
informational purposes only, and GE makes no warranty as to the accuracy of the information included herein.
Changes, modifications, and/or improvements to equipment and specifications are made periodically and these
changes may or may not be reflected herein. It is understood that GE may make changes, modifications, or
improvements to the equipment referenced herein or to the document itself at any time. This document is
intended for trained personnel familiar with the GE products referenced herein.
GE may have patents or pending patent applications covering subject matter in this document. The furnishing of
this document does not provide any license whatsoever to any of these patents.
Public - This document is approved for public disclosure.
GE provides the following document and the information included therein as is and without warranty of
any kind, expressed or implied, including but not limited to any implied statutory warranty of
merchantability or fitness for particular purpose.
For further assistance or technical information, contact the nearest GE Sales or Service Office, or an authorized
GE Sales Representative.
Revised: Aug 2016
Issued: June 2014
© 2014 - 2016 by General Electric Company.
* indicates a trademark of General Electric Company and/or its subsidiaries.
All other trademarks are the property of their respective owners.
Public
Page 3
Safety Symbol Legend
Warning
Caution
Attention
Indicates a procedure or condition that, if not strictly observed, could result in
personal injury or death.
Indicates a procedure or condition that, if not strictly observed, could result in
damage to or destruction of equipment.
Indicates a procedure or condition that should be strictly followed to improve these
applications.
Public
Page 4

Contact Information
If you purchased this product through an Authorized Channel Partner, contact the seller directly.
General Contact Information
Online technical support and GlobalCare http://support.ge-ip.com
Additional information http://www.ge-ip.com/
Solution Provider solutionprovider.ip@ge.com
Technical Support
If you have technical problems that cannot be resolved with the information in this manual, contact us by
telephone or email, or on the web at http://support.ge-ip.com
Americas
Online Technical Support http://support.ge-ip.com
Phone 1-800-433-2682
International Americas Direct Dial 1-780-420-2010 (if toll free 800 option is unavailable)
Technical Support Email support.ip@ge.com
Customer Care Email customercare.ip@ge.com
Primary language of support English
Europe, the Middle East, and Africa
Online Technical Support http://support.ge-ip.com
Phone
EMEA Direct Dial
Technical Support Email support.emea.ip@ge.com
Customer Care Email customercare.emea.ip@ge.com
Primary languages of support English, French, German, Italian, Czech, Spanish
+
420-23-901-5850 (if toll free 800 option is unavailable or
dialing from a mobile telephone)
+
800-1-433-2682
Asia Pacific
Online Technical Support http://support.ge-ip.com
+
Phone
Technical Support Email
+
86-21-3217-4826 (India, Indonesia, and Pakistan)
support.in.ip@ge.com (remaining Asia customers)
86-400-820-8208
support.cn.ip@ge.com
support.jp.ip@ge.com (Japan)
(China)
Customer Care Email
Public
customercare.apo.ip@ge.com
customercare.cn.ip@ge.com (China)
Page 5

Contents
Contents
INTRODUCTION ..................................................................................................................7 CHAPTER 1
1.1 DESCRIPTION ..................................................................................................................................................... 7
1.2 PRODUCT OVERVIEW ........................................................................................................................................... 8
1.3 SPECIFICATIONS .................................................................................................................................................. 9
1.4 CONTROLS AND INDICATORS ............................................................................................................................... 10
1.4.1 Mounting ............................................................................................................................................. 11
1.5 PROFINET OPERATION OVERVIEW ..................................................................................................................... 12
1.6 SYSTEM LIMITS ................................................................................................................................................. 15
1.7 OPERATIONAL DIFFERENCES VS. GENIUS BUS CONTROLLER ....................................................................................... 16
1.8 SUPPORTED GENIUS DEVICES .............................................................................................................................. 17
I
NSTALLATION ................................................................................................................. 19 CHAPTER 2
2.1 PRE-INSTALLATION CHECK .................................................................................................................................. 19
2.2 INSTALLATION LOCATION .................................................................................................................................... 19
2.3 INSTALLATION IN HAZARDOUS AREAS ................................................................................................................... 20
2.3.1 ATEX Zone 2 ......................................................................................................................................... 20
2.3.2 ATEX Marking ...................................................................................................................................... 20
2.4 MODULE INSTALLATION ..................................................................................................................................... 21
2.4.1 Install SD Card ...................................................................................................................................... 21
2.4.2 Mounting the GCG001 ......................................................................................................................... 21
2.4.3 GCG001 Module Removal .................................................................................................................... 23
2.4.4 Light-Emitting Diode (LED) Indications ................................................................................................ 24
2.4.5 Fault Notifications ................................................................................................................................ 25
2.5 CONFIGURING THE GENIUS GATEWAY TO OPERATE WITH THE RX3I CPU .................................................................... 25
2.6 ETHERNET PORT CONNECTIONS ........................................................................................................................... 25
2.6.1 RJ-45 Port Connections ........................................................................................................................ 26
2.7 FIRMWARE UPDATES ......................................................................................................................................... 26
2.8 SPARE PARTS ................................................................................................................................................... 27
GFK-2892B Public i
C
ONFIGURATION .............................................................................................................. 29 CHAPTER 3
3.1 CONFIGURATION TOOLS ..................................................................................................................................... 29
3.2 CONFIGURATION OVERVIEW ............................................................................................................................... 29
S
YSTEM OPERATION ......................................................................................................... 33 CHAPTER 4
4.1 SYSTEM OVERVIEW ........................................................................................................................................... 33
4.1.1 Communications .................................................................................................................................. 33
4.1.2 Redundancy ......................................................................................................................................... 34
4.1.3 I/O Scans .............................................................................................................................................. 35
4.1.4 Alarms .................................................................................................................................................. 36
D
IAGNOSTICS .................................................................................................................. 37 CHAPTER 5
5.1 STATUS DATA .................................................................................................................................................. 37
5.1.1 PROFINET Status Data ......................................................................................................................... 37
5.1.2 Genius Status Data .............................................................................................................................. 38
5.2 MODULE LED INDICATORS ................................................................................................................................. 38
5.3 POWER-UP ..................................................................................................................................................... 39
5.3.1 Problems during Power-up .................................................................................................................. 39
5.3.2 Transitioning from Firmware Update Mode to Operational Mode ..................................................... 39
Page 6

Contents
5.4 MODULE FAULTS IN THE RX3I I/O FAULT TABLES ................................................................................................... 40
5.4.1 Fault Types Reported to the RX3i Controller I/O Fault Table ............................................................... 41
5.4.2 Clearing the RX3i Fault Tables ............................................................................................................. 43
COMMREQ/D
ATA_INIT_COMM PROGRAMMING ................................................................. 45 CHAPTER 6
6.1 COMMREQS AND PASSWORDS ......................................................................................................................... 45
6.2 PROGRAMMING FOR A COMMREQ COMMUNICATION REQUEST ............................................................................. 45
6.3 COMMREQ COMMAND BLOCK FORMAT ............................................................................................................ 46
6.3.1 COMMREQ Command Block Contents ................................................................................................. 47
6.3.2 COMMREQ Commands Supported by the Genius Gateway (GCG001) ................................................ 48
6.3.3 COMMREQ Command Block Quick Reference ..................................................................................... 49
6.3.4 Mechanics of the COMMREQ Instruction ............................................................................................ 50
6.3.5 Comparison: COMMREQ vs Data_Init_Comm ..................................................................................... 55
6.3.6 COMMREQ Differences: Genius Bus Controllers and Genius Gateway ................................................ 56
6.4 COMMREQ DESCRIPTIONS AND FORMATS .......................................................................................................... 57
6.4.1 COMMREQ #1: Pulse Test Command ................................................................................................... 57
6.4.2 COMMREQ #2: Read Configuration Command .................................................................................... 58
6.4.3 COMMREQ #3: Write Configuration Command ................................................................................... 59
6.4.4 COMMREQ #4: Read Diagnostics Command ....................................................................................... 60
6.4.5 COMMREQ #5: Clear Circuit Fault Command ...................................................................................... 61
6.4.6 COMMREQ #6: Clear All Circuit Faults Command ................................................................................ 61
6.4.7 COMMREQ #7: Assign Monitor Command .......................................................................................... 62
6.4.8 COMMREQ #11: Read Device Command ............................................................................................. 63
6.4.9 COMMREQ #12: Write Device Command ............................................................................................ 64
6.4.10 COMMREQ #19: Read Identification .................................................................................................... 65
6.4.11 COMMREQ #20: Write Point Command .............................................................................................. 66
6.4.12 COMMREQ #21: Read Block I/O Command ......................................................................................... 67
6.4.13 COMMREQ #22: Read Map Command ................................................................................................ 71
6.4.14 COMMREQ #23: Write Map Command ............................................................................................... 72
6.4.15 COMMREQ #24: Read Data Command ................................................................................................ 73
6.4.16 COMMREQ #25: Write Data Command ............................................................................................... 73
ii Public PACSystems RX3i Genius Communications Gateway User Manual GFK-2892B
Page 7

Contents
Figures
Figure 1: PLC System Using Genius Gateway GCG001 ............................................................................................................................. 7
Figure 2: GCG001 Module ......................................................................................................................................................................................... 8
Figure 3: Genius Gateway GCG001 Front Panel View ............................................................................................................................ 10
Figure 4: GCG001 Panel Mount Diagram ...................................................................................................................................................... 11
Figure 5: Application Relationships between PROFINET Controller & Genius Gateway ....................................................... 12
Figure 6: Real-Time & Non-Real-Time Data Types ................................................................................................................................... 13
Figure 7: PLC - GCG - Genius Scan Cycles .................................................................................................................................................... 14
Figure 8: Rear View of GCG001 .......................................................................................................................................................................... 21
Figure 9: GCG001 Power Connector ................................................................................................................................................................ 21
Figure 10: Daisy Chain Genius Bus Wiring.................................................................................................................................................... 22
Figure 11: Genius Bus Wiring for Bus Termination .................................................................................................................................. 22
Figure 12: PROFINET Discovery Screenshot ................................................................................................................................................ 23
Figure 13: GCG001 Firmware Upgrade ZIP File UnZIPped to SD Card .......................................................................................... 26
Figure 14: Hardware Configuration Expanded Tree ............................................................................................................................... 29
Figure 15: Change Module List for Genius Gateway GCG001 ............................................................................................................ 30
Figure 16: Populating the Genius IO Devices to be Controlled by the Genius Gateway ...................................................... 31
Figure 17: Populating Slots in S90-70 Rack Controlled by Remote I/O Scanner (BEM733) ................................................ 31
Figure 18: Genius Gateway Configuration Example ............................................................................................................................... 32
Figure 19: Genius Hot Standby Redundancy .............................................................................................................................................. 34
Figure 20: PROFINET Media Redundancy...................................................................................................................................................... 35
Figure 21: Gateway Status Data ........................................................................................................................................................................ 37
Figure 22: Genius Status Data ............................................................................................................................................................................ 38
Figure 23: Genius Discrete Block "No Load Present" Fault Display (Example) ........................................................................... 42
Figure 24: Genius Analog Block "Over Range" Fault Display (Example) ........................................................................................ 43
Figure 25: Ladder Logic to Clear Circuit Fault ............................................................................................................................................ 54
Figure 26: Data_Init_Comm to Clear Circuit Fault ................................................................................................................................... 55
GFK-2892B Public iii
Page 8

Contents
AR
PROFINET Application Relationship
CR
PROFINET Communication Relationship
DCP
PROFINET Discovery & Configuration Protocol
GCG
Genius Communications Gateway (specifically GCG001)
GENA
Genius Network Adaptor
GENI
Genius Network Interface
GNIU
Genius Network Interface Unit
GR7
Series 90-70 Remote I/O Scanner (IC697BEM733)
GSDML
General Station Description Markup Language
HHM
Genius Hand-Held Monitor
LAN
Local Area Network
LED
Light Emitting Diode
MRC
Ethernet Media Redundancy Client
MRM
Ethernet Media Redundancy Manager
MRP
Ethernet Media Redundancy Protocol
NRT
Non-Real-Time PROFINET Communication
PCIM
Personal Computer Interface Module
PME
Proficy Machine Edition
PNC
PROFINET Controller
PPV
PLC Protocol Variables
RT
Real-Time PROFINET Communication
SBA
Genius Serial Bus Address
SD
Secure Digital Card Slot
STP
Shielded Twisted Pair
UTP
Unshielded Twisted Pair
GEK-90486-1
Genius I/O System and Communications User's Manual
GEK-90486-2
Genius I/O Discrete and Analog Blocks User’s Manual
GFK–0579
Series 90-70 Remote I/O Scanner User’s Manual
GFK-1535
VersaMax System Genius Network Interface Unit User’s Manual
GFK-2222
PACSystems RX3i and RX7i CPU Reference Manual
GFK-2314
PACSystems RX3i System Manual
GFK-2571
PACSystems RX3i PROFINET IO-Controller Manual
GFK-2892
PACSystems RX3i Genius Communications Gateway Module User Manual
GFK-2900
PACSystems RX3i Genius Communications Gateway Module Important Product
Information
Acronyms and Abbreviations
Related Documents
User manuals, product updates and other information sources are available on the Support website,
http://www.ge-ip.com/support
4 Public PACSystems RX3i Genius Communications Gateway User Manual GFK-2892B
, under Controllers and IO, RX3i Controllers.
Page 9

Contents
Rev
Date
Description
• Added support for VersaMax Genius Network Interface
• Behavior of GCG001 with respect to input references associated with a faulted block is
Jun
Document Updates
B
A
Aug
2016
Mar
2015
2014
• Added IC660BSS101 isolated I/O block
• Added additional Genius baud rates
described in Section 1.8, with workaround in Section 4.1.4.
• Correction to Figure 19: Genius Hot Standby Redundancy to indicate CPU type is CRU and
RMX modules are required.
• Clear All Faults can now be dispatched to all blocks on the bus in a single command. See
Section 6.4.6.
Initial release
GFK-2892B PACSystems RX3i Genius Communications Gateway User Manual Public 5
Page 10

Contents
Notes
6 Public PACSystems RX3i Genius Communications Gateway User Manual GFK-2892B
Page 11
Chapter 1. Introduction
P
S
C
P
U
P
N
C
Genius
I/O
G
R
7
I OI OI
O
Vmax
NIUI OI OI OI O
Genius
I/
O
Genius
I/O
PROFINET I
/
O
Genius I/O
Introduction Chapter 1
This manual describes the RX3i Genius Communications Gateway, which acts as a gateway
between PROFINET and Genius I/O. Introductory material may be found in this chapter.
Chapter 2 provides installation and set-up information. Chapter 3 provides configuration
instructions. Chapter 4 describes system operation. Chapter 5 provides diagnostic
information. Chapter 6 covers the use and format of ladder logic COMMREQ instructions.
1.1 Description
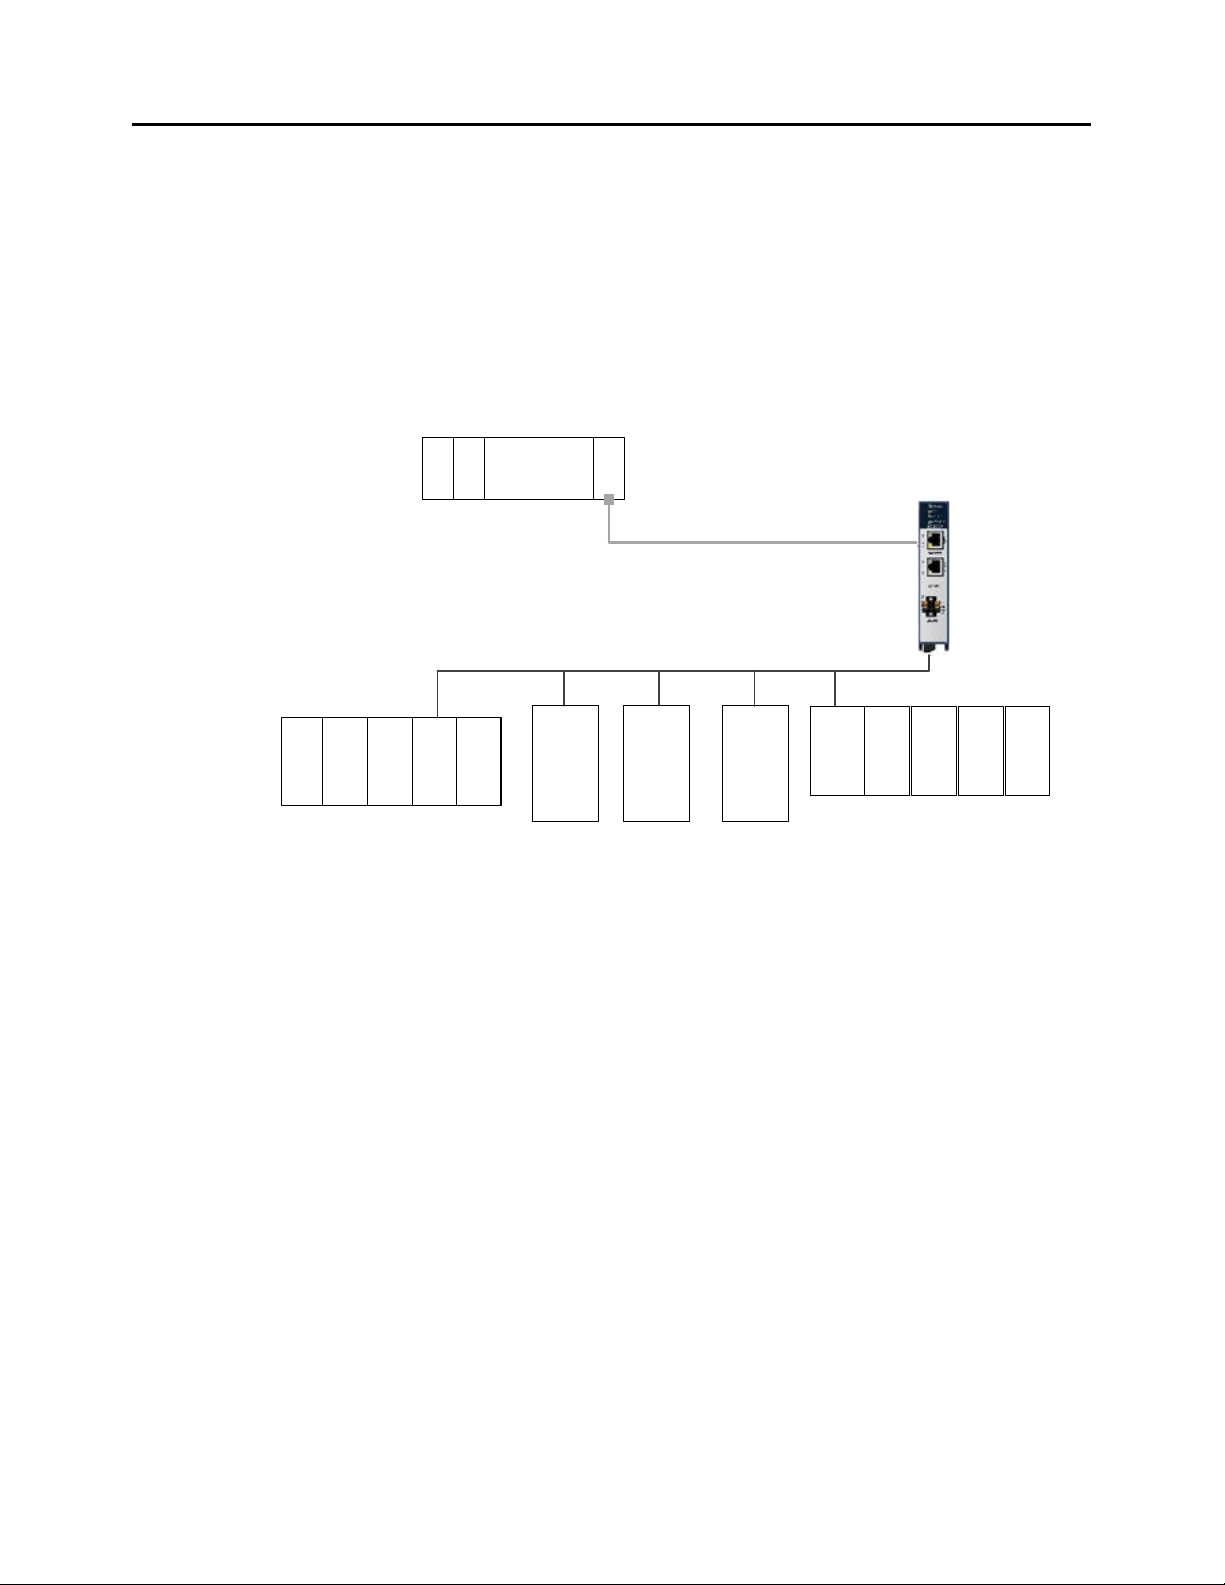
The RX3i Genius Communications Gateway, IC695GCG001 (or GCG001), interfaces Genius IO
devices on a Simplex Genius Serial Bus to a GE Intelligent Platforms PROFINET IO Controller.
Figure 1: PLC System Using Genius Gateway GCG001
The GCG001 operates as a Genius Bus Controller on a Genius network. It scans the Genius IO
devices configured to it, retrieving input data and providing output data. It then exchanges
that data with its configured PROFINET IO Controller over its Ethernet interfaces at the
configured production rate. The GCG001 can manage communications for up to 31 Genius IO
devices on a single Genius Serial Bus.
The GCG001 also operates as an “IO Device” on PROFINET, controlled by the PROFINET IO
Controller (PNC001 or CPE330 LAN 2) to which it is attached. Thus, when correctly configured,
the entire Genius Bus, including the GCG001 itself, becomes visible to the controlling PLC. Note
that the GCG001 operates only with GE PLC PROFINET IO Controllers.
PROFINET operates on an Ethernet network. If the Ethernet network or Genius serial bus
communications are lost, the GCG001 manages I/O states according to the individual module
configurations.
Both PROFINET and Genius may be set up in Redundant configurations. These are discussed
later in this manual.
GFK-2892B PACSystems RX3i Genius Communications Gateway User Manual Public 7
Page 12

Chapter 1. Introduction
ETHERNET
ACT
LINK
PORT 1
PORT 2
COM
POWER
FAULT
CONNECT
OK
GCG001
LINK
ACT
GENIUS A
SER 1
SER 2
SHLD
IN
GENIUS
SHLD
OUT
1.2 Product Overview
Features of the GCG001 module include:
• Attachment of two RJ-45 Ethernet connections (Ports 1 & 2)
• Support for both star (switched) and linear (daisy-chained) network
topologies
• Supports Ethernet Media Redundancy Protocol (MRP)
• LEDs to indicate Ethernet status (ACT & LINK)
• Attachment Genius bus connections
• Supports Genius Redundancy consisting of a single Genius bus with
two GCG001 Gateways, one at SBA #30 and the other at SBA #31.
No other form of Genius redundancy is supported.
• LED to indicate Genius Communications Status (COM)
• LEDs to indicate module status (refer to module header)
• Panel-mount (typical)
• Optional mounting in RX3i expansion slot
• Cable tie-down loop on underside of module (at front)
• 24Vdc power connector on underside of module
• 0.2A maximum current draw
• Secure Digital (SD) Card Slot, accessible at rear of module
• Firmware load pushbutton, accessible at rear of module
8 Public PACSystems RX3i Genius Communications Gateway User Manual GFK-2892B
Figure 2: GCG001 Module
Note: Although the hardware supports the 10/100BASE TX Ethernet standard, PROFINET I/O
over wired infrastructure must be 100Mbps full-duplex or faster. 10Mbps should not be
used for PROFINET.
Page 13

Chapter 1. Introduction
RX3i Genius Communications Gateway Specifications
RX3i CPE330
PNC001 Compatibility
Firmware version 2.05 or later
RX3i CPE330 embedded PROFINET with firmware version 8.90 or
Operating Temperature Range
Number of Port Connectors
IEEE 802.2 Logical Link Control Class I
Status Data
64 (two banks of 32 bits)
Supports One Genius Bus.
HHM Compatibility
IC66* HHM501
Other Genius Compatibility
See table in Section 1.9
SD Card
The Genius Gateway requires an external 24Vdc power
1.3 Specifications
PROFINET Support
CPU Compatibility
Embedded PROFINET Compatibility
Proficy* Machine Edition Compatibility
Power Requirements
Local Area Network (LAN)
Genius Bus Support
Configuration
PROFINET version 2.3 Class A IO-Device
RX3i CPE305/CPE310 with firmware version 8.15 or later
RX3i CPU315/CPU320/CRU320 with firmware version 8.15 or later
later
Machine Edition 8.0 or later
External 24Vdc: (±10%) 0.2A
0 to 60°C
Two RJ-45
IEEE 802.3 CSMA/CD Medium Access Control 10/100 Mbps
Serial 1, Serial 2, Shield In and Shield Out, as marked.
Up to 31 additional devices supported per Genius Bus.
Selectable Baud Rate, per Genius specifications.
Genius Hot Standby and Duplex Redundancy supported.
2GB or smaller. Not compatible with SDHC or SDXC cards.
GSDML file is available on the Support website for download
and import into Proficy Machine Edition. The GSDML
supporting a firmware release is part of the firmware
upgrade kit available on the Support website.
supply and does not draw power from the Rx3i backplane.
Hot Swappable
For system standards, general operating specifications, and installation requirements, refer to
the PACSystems RX3i System Manual, GFK-2314.
GFK-2892B PACSystems RX3i Genius Communications Gateway User Manual Public 9
Swapping out the GCG001 will therefore not impact the PLC.
However, this cannot be performed without disconnecting its
power supply. If configured to support Genius Hot Standby,
the loss of a single GCG001 will be tolerated; otherwise not.
Page 14
Chapter 1. Introduction
ETHERNET
ACT
LINK
PORT 1
PORT 2
COM
POWER
FAULT
CONNECT
OK
GCG001
LINK
ACT
GENIUS A
SER 1
SER 2
SHLD
IN
GENIUS
SHLD
OUT
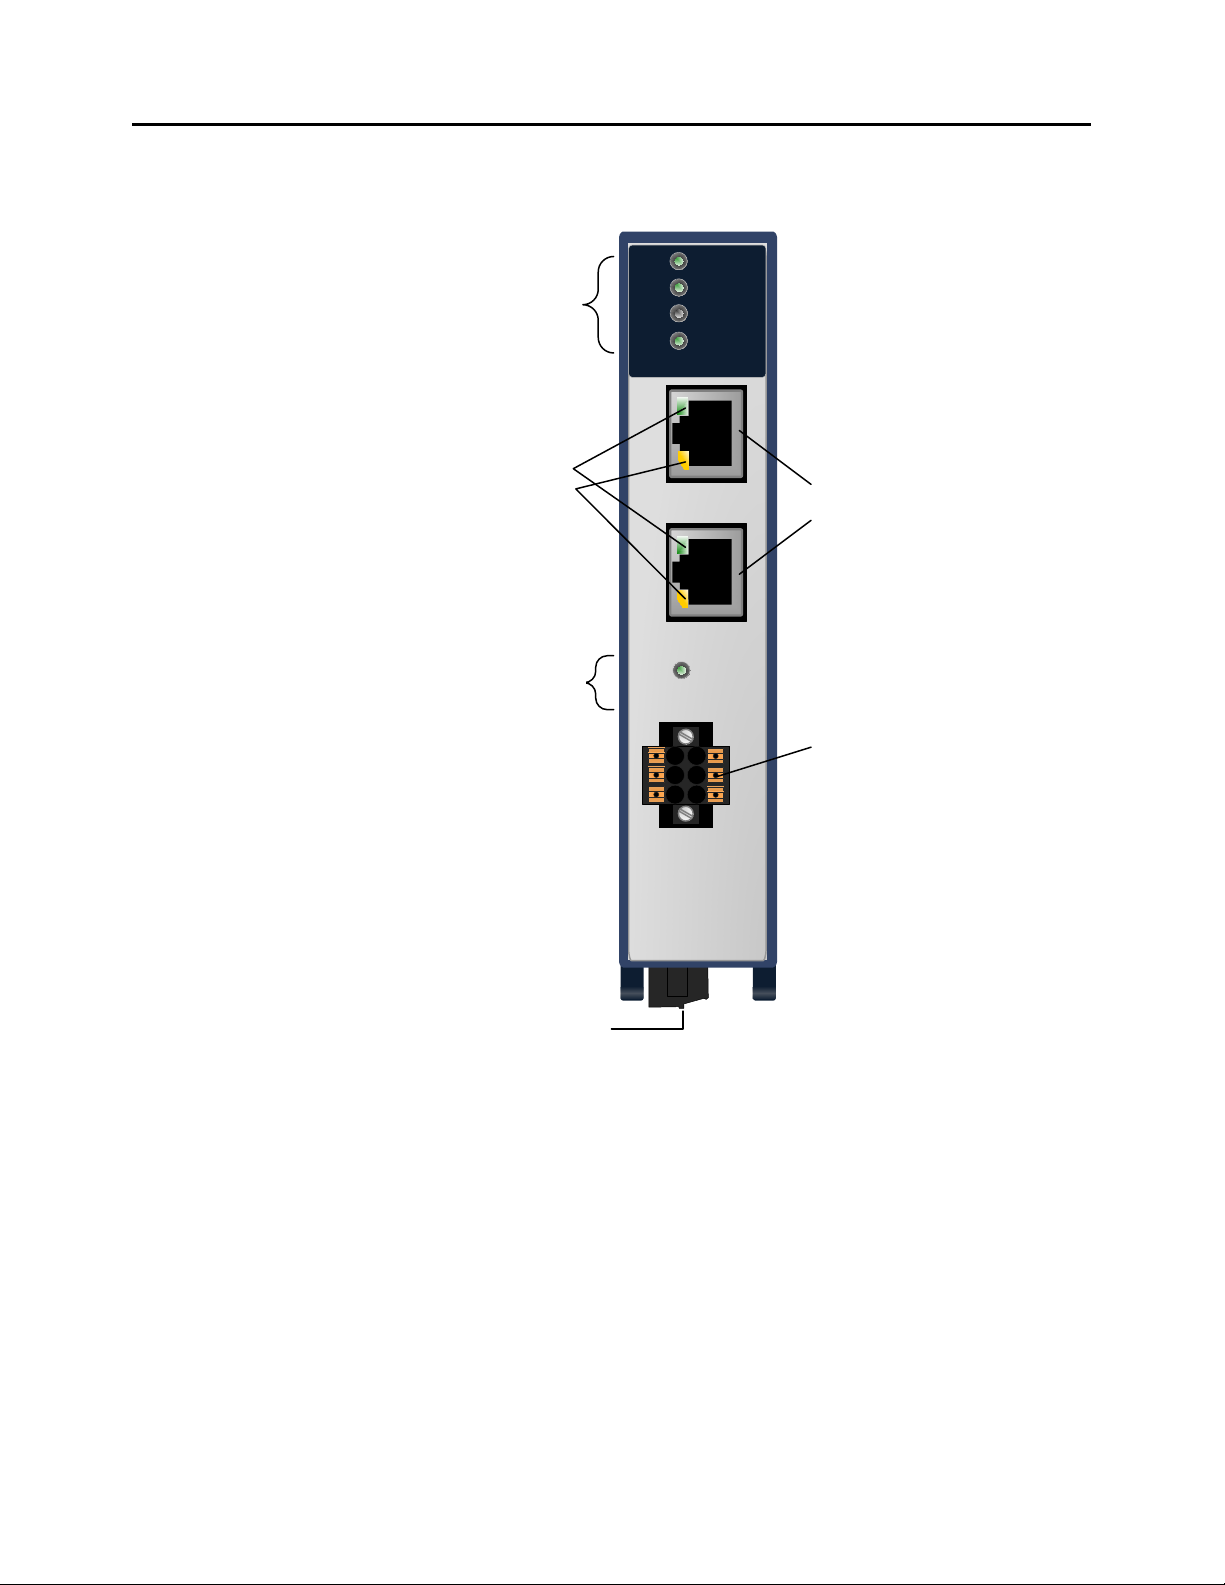
Module Status
Indicator LEDs:
POWER, OK,
FAULT,
CONNECT
Ethernet Port
Indicator LEDs:
LINK,
ACT
24 V dc
Power
Connector
Genius Bus
Indicator LEDs:
COM
PROFINET
Ports
Genius Bus
Connector
1.4 Controls and Indicators
The following figure shows the front of the module and identifies the controls and indicators.
Figure 3: Genius Gateway GCG001 Front Panel View
10 Public PACSystems RX3i Genius Communications Gateway User Manual GFK-2892B
Page 15
Chapter 1. Introduction
1.4.1 Mounting
The GCG001 may either be panel-mounted or mounted in the rightmost slot (expansion slot)
of an RX3i rack (IC695CHS012, IC695CHS016).
Note: The SD Card supplied with the GCG001 will have been installed at the factory. See
section 2.4.1 for instructions for installing the SD Card when doing a retrofit. The presence of
the SD Card should be checked before mounting the module.
Note: Clearance of 3 inches (75mm) must be provided above and below the module for
proper ventilation and to permit cable access.
Note: External power must always be supplied to the module, regardless of which
mounting arrangement is chosen. When rack-mounted, the GCG001 does not draw power
from the RX3i Universal Backplane.
RX3i Backplane Mounting
The GCG001 may be mounted in the
rightmost slot (expansion slot) of an RX3i
Universal Backplane.
The two captive M3.5 screws at the rear
of the GCG001 align with mating tapped
holes on the right side of the backplane,
providing a convenient mounting
location. When rack-mounted, the
module does not make contact with the
backplane connector.
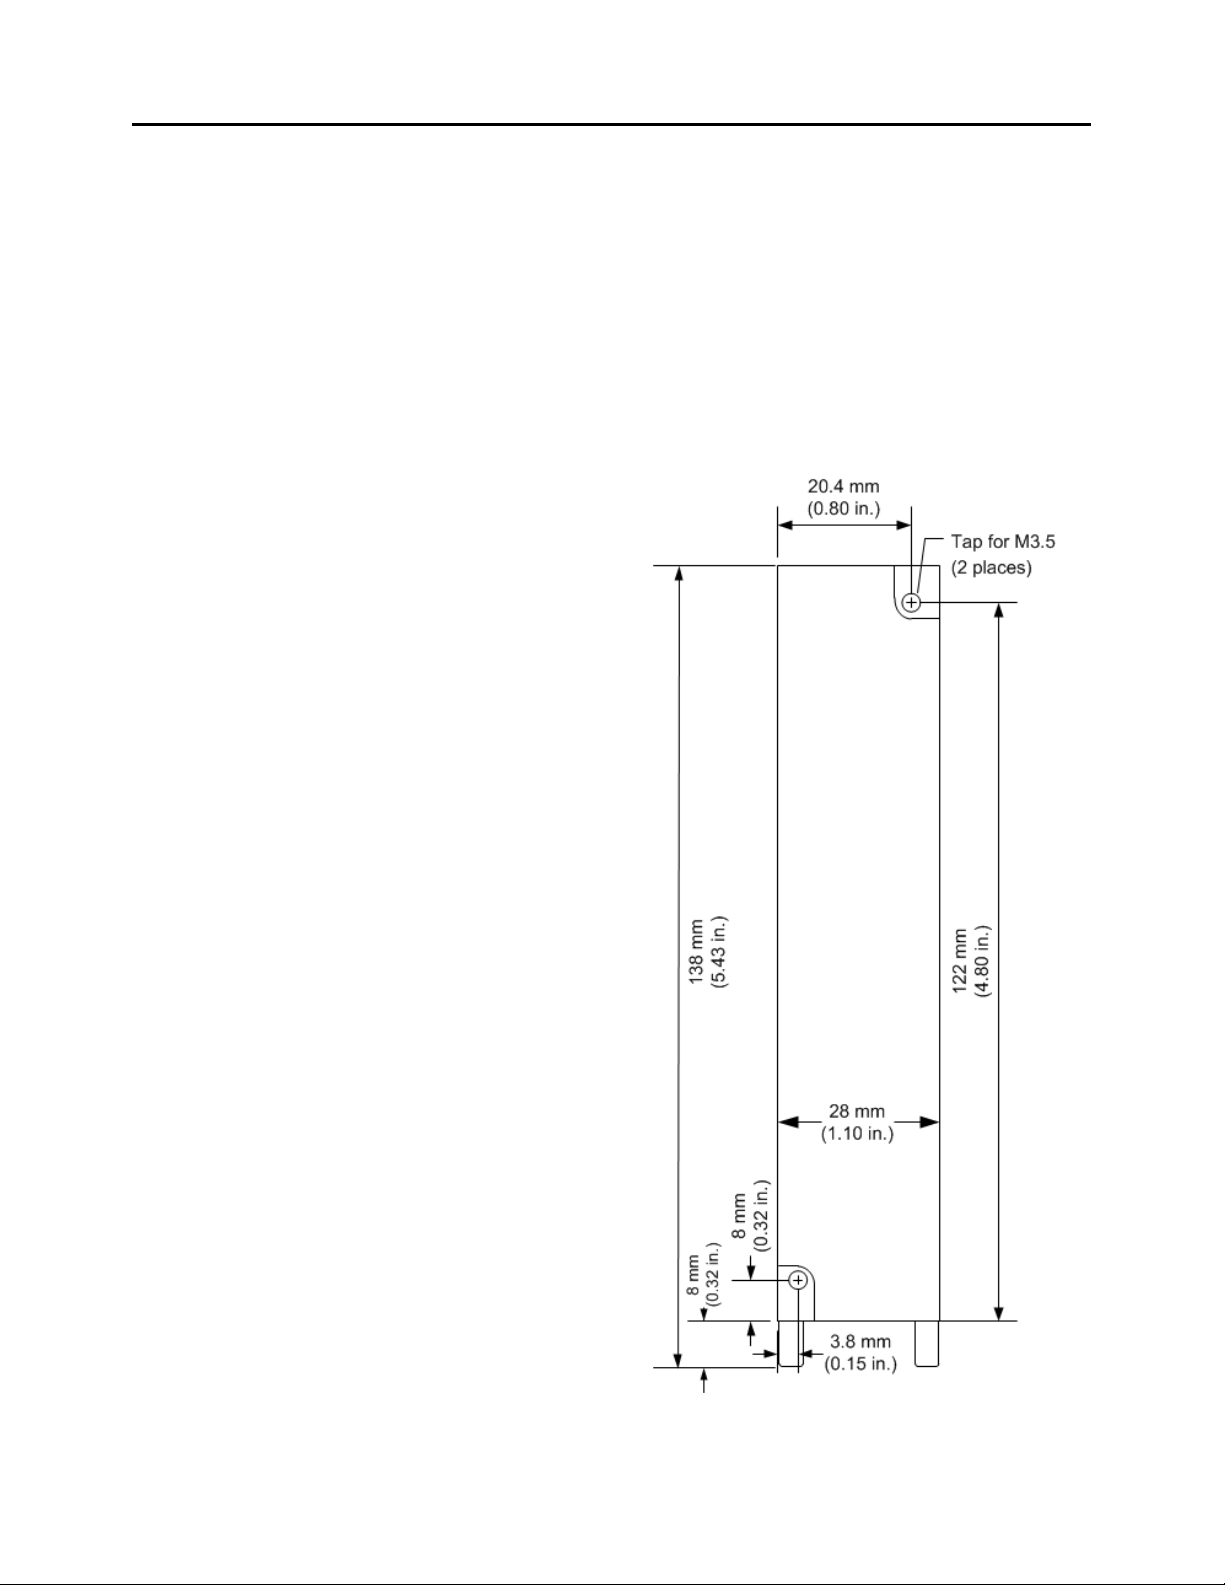
Panel-Mounting
Panel-mounting allows for mounting
where no RX3i backplane slot is
available. The two captive M3.5 machine
screws on the GCG001 can be used for
attaching the unit to a panel.
Note: The panel must have a
minimum thickness of 2.4mm (0.094in).
1. Drill two mounting holes using the
spacing shown in the drawing (at
right) and tap for M3.5 (3.5 x 0.6mm).
2. Align the two mounting screws of the
module with the mounting holes in
the panel.
3. Using a Philips screwdriver, tighten
the two screws to a maximum torque
of 0.5 Nm (4.4 in-lbs).
Figure 4: GCG001 Panel Mount Diagram
GFK-2892B PACSystems RX3i Genius Communications Gateway User Manual Public 11
Page 16
Chapter 1. Introduction
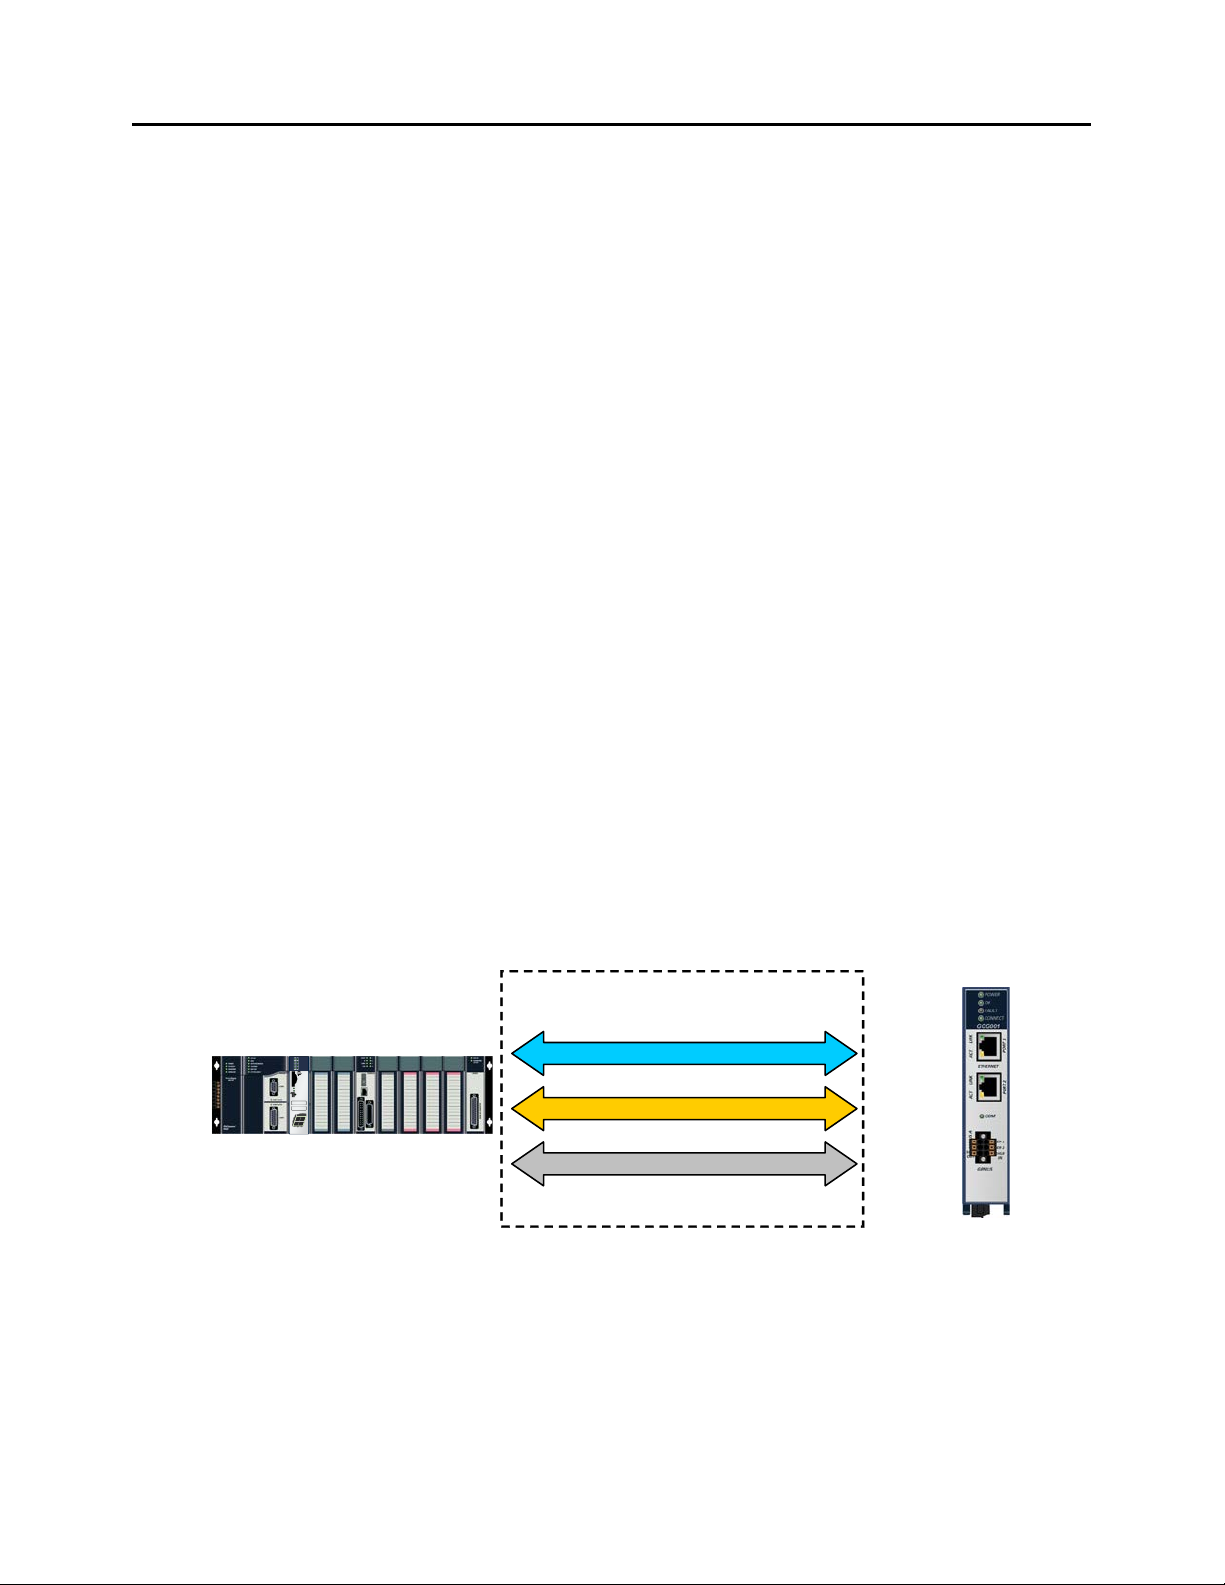
Record Data Communication Relationship
I/O Data Communication Relationship
Alarm Communication Relationship
Application Relationship
Genius Gateway (GCG001)
1
2
3
4
PNS001
ACTIVE
USB
OK
LAN
STATUS
CONN
USB
IP ADDRESS
MAC ADDRESS
PORTS
TO INSTALL,
TORQUE TO
6 IN-LB.
IO DEVICE
FRONT
3 4
1 2
SD CARD
!
RX3i with PROFINET Controller (PNC)
1.5 PROFINET Operation Overview
An RX3i Genius Communications Gateway (GCG001) uses PROFINET communications for data
exchange with the PLC. As noted above, the data rate must be 100Mbps full-duplex or faster.
The same network may be used for basic Ethernet communications, but use of a separate
Ethernet network and RX3i Ethernet interface is recommended.
PROFINET Communications
Communications on an RX3i PROFINET network use the standard PROFINET communications
described in this section. Note, however, that the Genius Gateway GCG001 is constrained to
work only with GE PROFINET PLC products.
Application Relationships
Before a PROFINET IO-Controller can exchange data with a PROFINET IO-Device such as the
GCG001, an Application Relationship (connection) must be established between the devices.
The PROFINET IO-Controller automatically sets up the correct number and types of Application
Relationship and Communication Relationship channels (see below) based on its Proficy
Machine Edition (PME) configuration. Usually, only one Application Relationship is established
per IO-Device.
Communication Relationships within an Application Relationship
Within each Application Relationship, the PROFINET IO-Controller establishes the following
types of Communication Relationships (CRs):
• Record Data CRs – always the first to be established within an Application Relationship.
Record Data Communication Relationships are used for non-real-time transfers of data
records such as startup parameter data, diagnostics data, identification data, and
configuration data.
• IO CRs – used for the real-time, cyclic transfer of IO data
• Alarm CR – used for real-time, acyclic transfer of alarms and events
The following illustration represents an Application Relationship between an RX3i PROFINET
Controller and an RX3i Genius Gateway GCG001.
12 Public PACSystems RX3i Genius Communications Gateway User Manual GFK-2892B
Figure 5: Application Relationships between PROFINET Controller & Genius Gateway
Page 17
Chapter 1. Introduction
1
2
3
4
PNS001
ACTIVE
USB
OK
LAN
STATUS
CONN
USB
IP ADDRESS
MAC ADDRESS
PORTS
TO INSTALL,
TORQUE TO
6
IN-
LB.
IO DEVICE
FRONT
3 4
1 2
SD CARD
!
RX3i with PROFINET Controller (PNC)
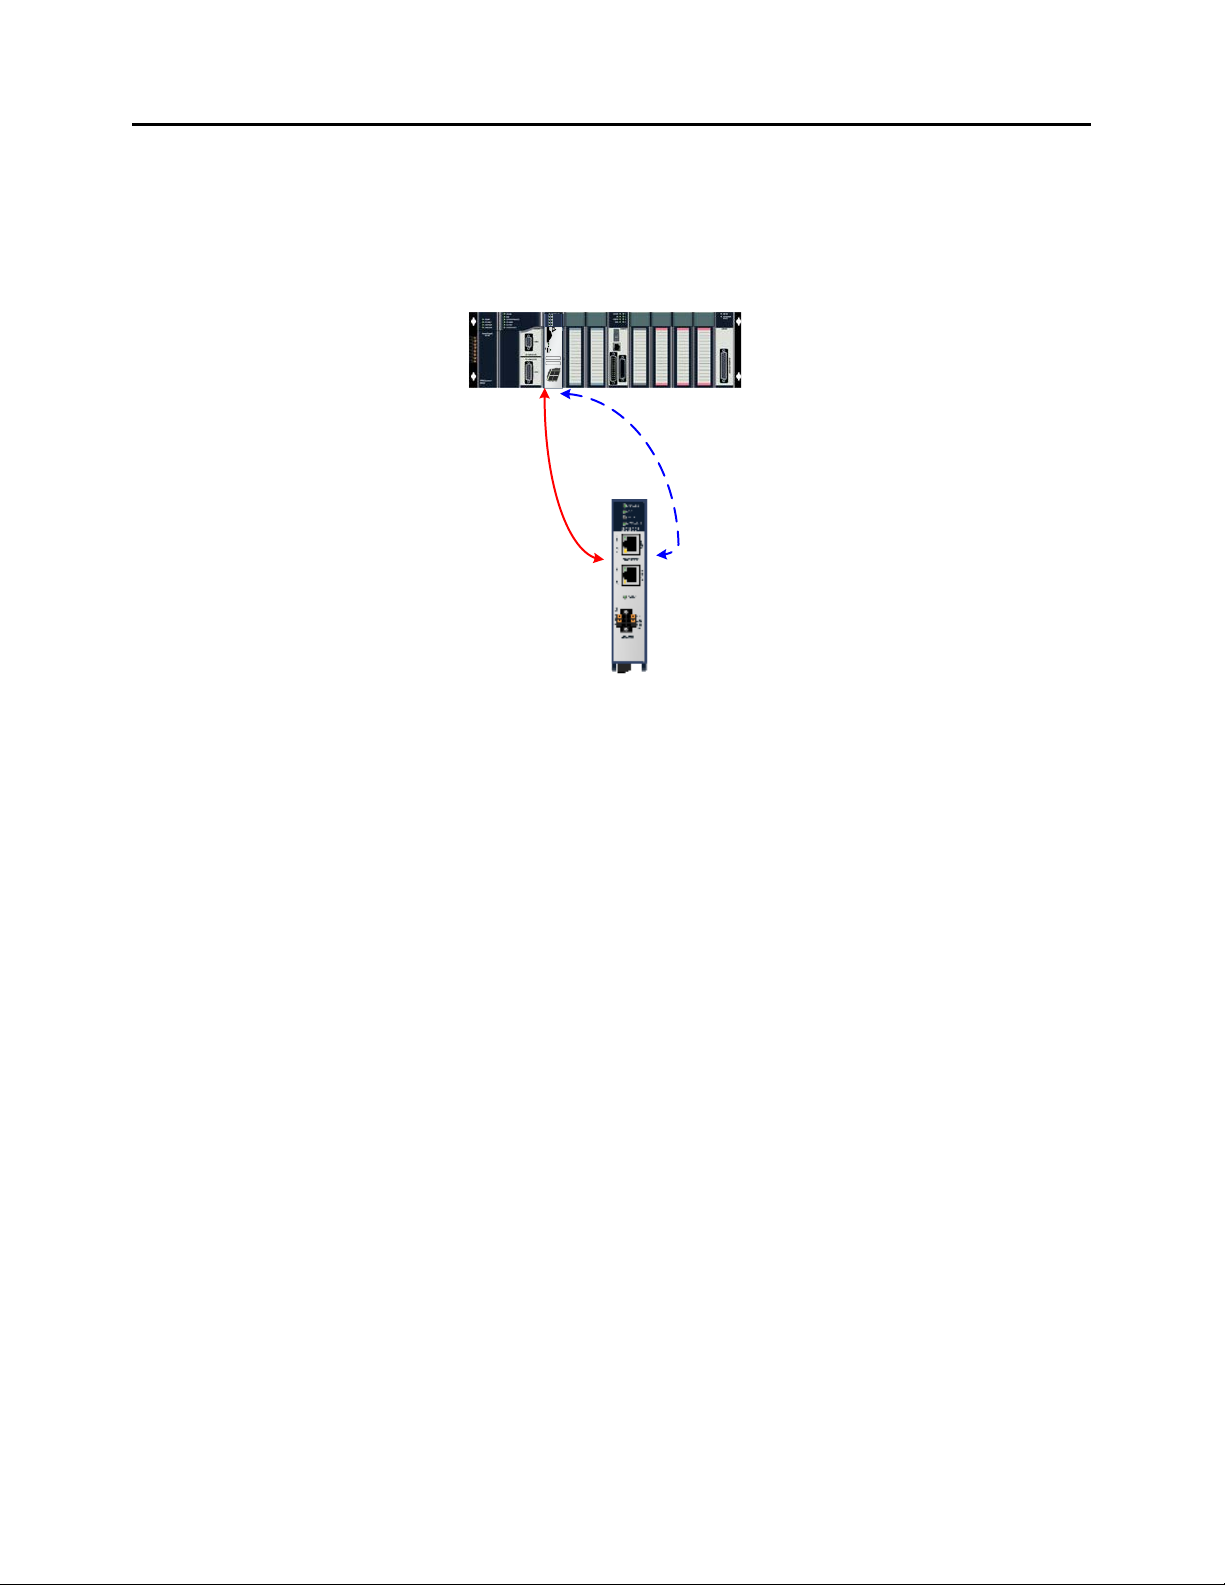
Real-Time Data
Inputs
Outputs
Alarms
Non Real-Time
Data
Parameters
Configuration Data
Types of PROFINET Communications
Genius Communications Gateways use two types of PROFINET communication transfers: realtime and non-real-time. The illustration below shows real-time communications as solid lines
and non-real-time communications as dashed lines.
Figure 6: Real-Time & Non-Real-Time Data Types
• Real-Time (RT) communication: PROFINET real-time communication is used for time-sensitive
data. A PROFINET IO-Controller (PROFINET Controller) and PROFINET IO-Device use two types
of real-time communications to exchange data: cyclic communication and acyclic
communication:
• Real-time Cyclic communication is used to periodically transfer the application’s input
and output data. Cyclic communication occurs each PROFINET IO production cycle.
• Real-time Acyclic communication is used to transfer non-periodic data such as alarms.
Acyclic communication occurs only when needed.
• Non-Real-Time (NRT) communication: PROFINET non-real-time communication is used for
less time-sensitive data such as configuration, parameterization, diagnostics, and
identification data.
Operations of the Genius Communications Gateway
The Genius Communications Gateway performs the following operations:
• Consumes PROFINET IO-Device configuration from the PROFINET IO-Controller over the
PROFINET network.
• Scans input data from each Genius device it manages and produces that data to the
PROFINET IO-Controller.
• Consumes the output data that it receives from the PROFINET IO-Controller and applies it
to each Genius device it manages.
• Where needed, translates Genius Datagrams (background traffic) into PROFINET
packages that are sent to the PROFINET Controller. This includes Datagrams that
originated at the Genius Devices, such as Fault Reports.
• Translates PROFINET packages that are sent by the PROFINET Controller into Genius
Datagrams. This includes Datagrams that originated at the PLC through use of COMMREQ
or Data_Init_Comm instructions. For example, a COMMREQ is used to generate a Clear
Fault Report datagram.
GFK-2892B PACSystems RX3i Genius Communications Gateway User Manual Public 13
Page 18
Chapter 1. Introduction
Genius
I/
O
Genius
I/O
Genius
I/O
Genius
I/
O
Genius
I/O
PROFINET I/O
Genius
I/O
Genius
I/
O
Genius
I/O
Genius
I/O
Genius
I/O
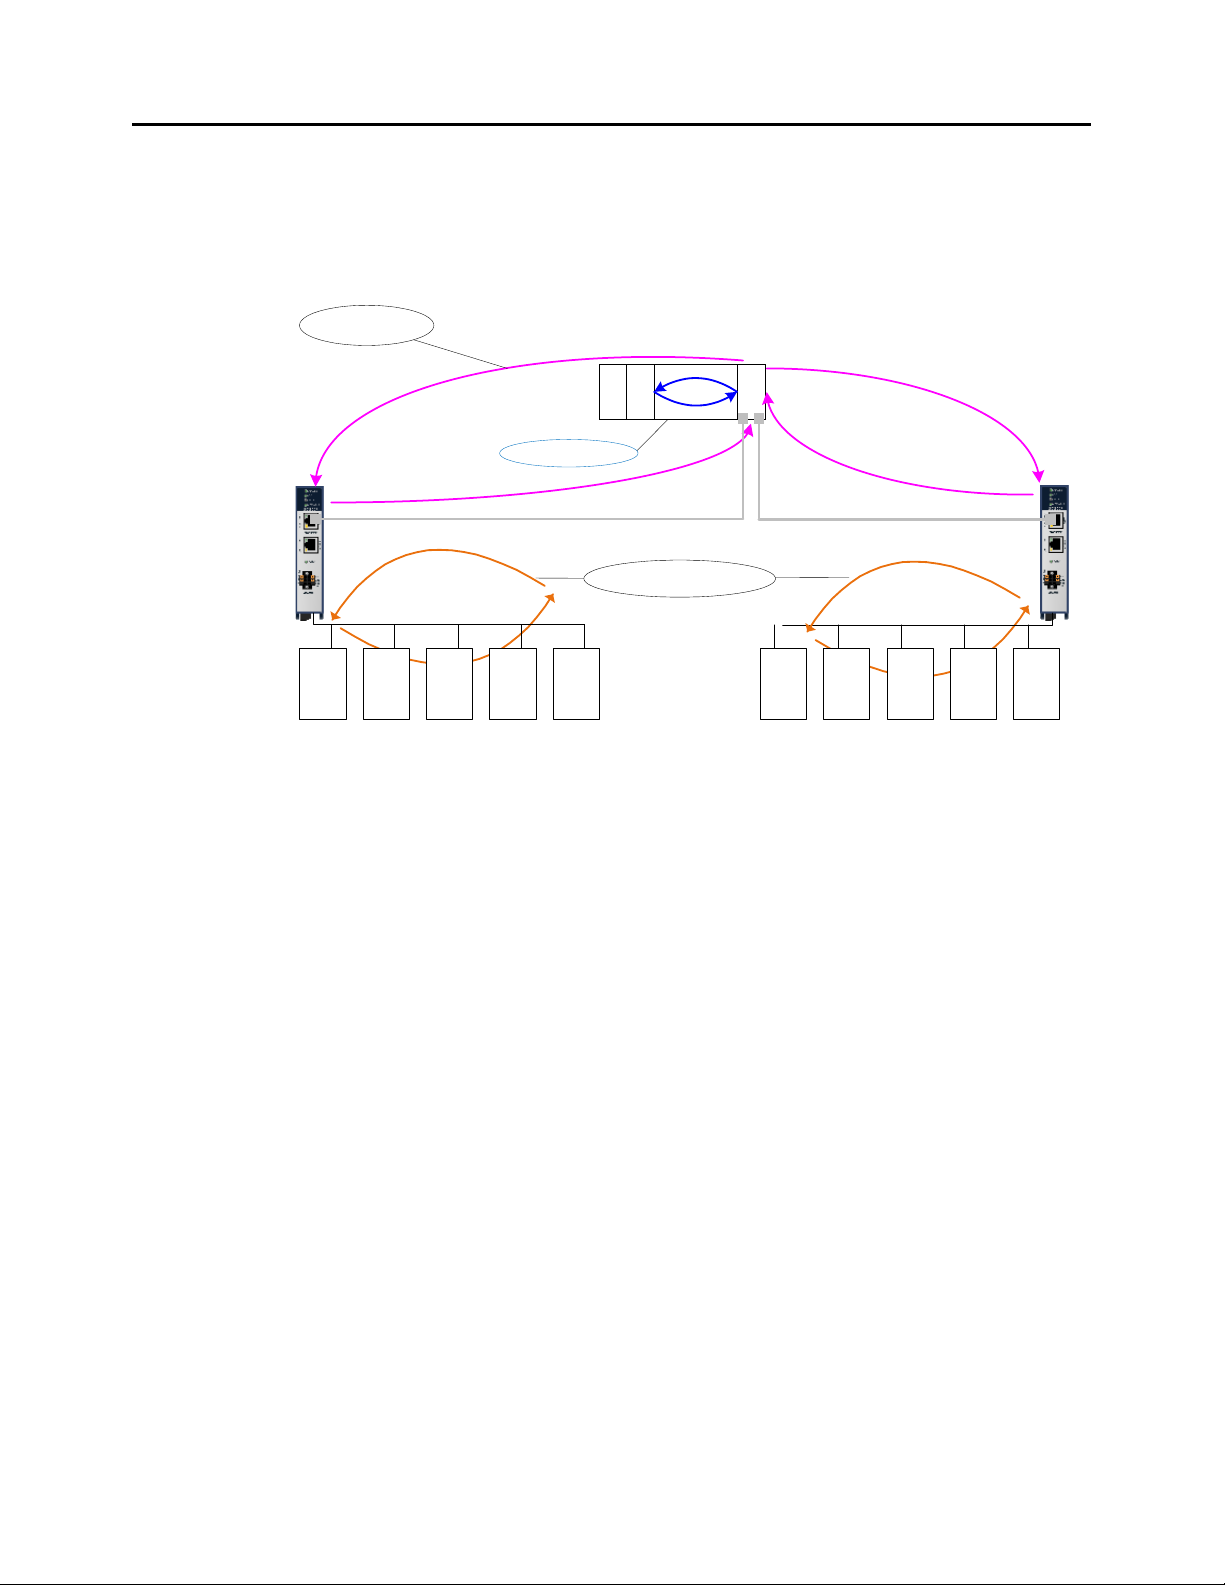
Genius Bus Scans
P
S
C
P
U
P
N
C
PROFINET IO
Production Cycle
RX3i CPU Sweep
IO Scanning
In the PACSystems RX3i PROFINET network, multiple IO cycles run asynchronously and
independently. Figure 7) illustrates typical cycles in a system with an RX3i CPU with a
PROFINET Controller module communicating with a Genius Communications Gateway. Cycles
may be different for third-party devices.
Figure 7: PLC - GCG - Genius Scan Cycles
• Genius IO-Device Scan: In this example, each GCG scans all of its Genius devices. The GCG
stores the devices’ input data into its internal memory. Every time the GCG gets a turn on the
Genius bus, it transmits the output data from its internal memory to each of the Genius
devices.
rd
party devices: The transfer of IO data between an IO module and the PROFINET IO network
• 3
is device dependent. Refer to the third party manufacturer documentation for specifics for a
particular device.
• PROFINET IO Production Cycle: Each PROFINET Controller and IO-Device publishes data from
its internal memory onto the network at its scheduled PROFINET production cycle (Note:
Production cycles between IO-Controllers and IO-Devices are not synchronized; each
publishes at its configured update rate independently). The PROFINET Controller publishes
output data received from the RX3i CPU to each IO-Device, and the IO-Device publishes input
data from its memory to the PROFINET Controller.
• RX3i CPU Sweep: The RX3i CPU Sweep includes both an input scan and an output scan. The
CPU input scan retrieves the current input data being stored within the PROFINET Controller
module. This input data is then available for use by the application logic. After the logic
solution, the CPU output scan writes the outputs to the PROFINET Controller.
14 Public PACSystems RX3i Genius Communications Gateway User Manual GFK-2892B
Page 19

Chapter 1. Introduction
Media Redundancy Protocol Support
PROFINET Media Redundancy Protocol (MRP) supports devices configured in a ring topology.
MRP is specified as part of IEC62439 and has been adopted by the PROFINET specification,
which provides for convenient configuration of the ring topology and necessary parameters.
Like PROFINET IO data, Media Redundancy Protocol operations are not routable between
different IP subnets.
Each device within an MRP ring has two physical pathways to the IO-Controller. To connect to
the ring, each device requires an integrated switch with at least two external ports (ring ports)
that support MRP. Devices that are not MRP-capable can be connected to a device in the ring
(i.e., an MRP-capable switch in the ring), but they should not be in the ring themselves. The
redundancy capability offered by the ring topology only extends to the devices on the ring
that are MRP-capable and enabled.
One of the devices on the ring must be configured as the Media Redundancy Manager (MRM),
and all the other devices must be configured as Media Redundancy Clients (MRCs). The
GCG001 can be configured as an MRC. Configuring the GCG as an MRC alters how the
Ethernet ports connect to the network. They attempt to indicate their state to the MRM before
allowing traffic to flow between the ports and close the ring topology through the internal
switch. They also send out notifications to the MRM when a port is lost. Operation of the
GCG001 is otherwise unchanged.
The MRP configuration is stored in non-volatile storage in the GCG001 and activated
immediately upon powering up. Non-volatile storage is updated as part of a connection with
the IO-Controller. A PROFINET Discovery & Configuration Protocol (DCP) Reset disables MRP
Client operation and updates non-volatile storage. The current state of the MRP configuration
is provided as part of the GCG’s Gateway Status Bits which are accessible to user application
logic. Refer to the description of Gateway Status Bits in Section 5.1.1 for further details.
Fast ring-break detection is not fully functional until all MRP clients have received their MRP
configuration. For a discussion of ring-break detection, refer to the following section,
Bumpless Operation with MRP.
Bumpless Operation with MRP
The GCG001 supports bumpless operation under MRP.
1.6 System Limits
IO-Controllers have limitations on the size of the system they support. One of these limits is
the number of PROFINET sub-modules supported. The GCG001 uses four sub-modules: two
for basic operation and two built-in port sub-modules that are always configured. Each
Genius device attached to a GCG001 uses one additional sub-module.
Other limitations, such as the configuration and IO sizes are specific to the configuration
options chosen. Note that not every combination of options is supported in every system. If
the configuration uses all Genius bus slots with a corresponding large device count, the
memory of the IO-Controller system will be a limiting resource.
See GFK-2571 for actual limits in the RX3i PROFINET Controller (PNC001).
See GEK-90486, Genius I/O System and Communications User's Manual for information on how
much I/O, and which type of I/O, need to be allocated to Genius devices,
Machine Edition (v8.0 or later) takes into account both system limits and I/O allocation.
GFK-2892B PACSystems RX3i Genius Communications Gateway User Manual Public 15
Page 20

Chapter 1. Introduction
1.7 Operational Differences vs. Genius Bus Controller
Persons migrating from a Genius environment where the Genius Bus Controller performs
functions similar to those of the GCG001 will want to be aware of the following differences:
1. COMMREQ function block SYSID and Task parameters change. SYSID is now the rack &
slot of the PNC connected to the GCG001. Task is now 132.
2. COMMREQ data blocks are different, mainly due to added PROFINET Device Number and
expansion of memory address fields from one word to two words. See COMMREQ
summary in Section 6.3.3.
3. Pulse Test and Assign Monitor COMMREQs do not support Genius bus address of 255 to
send messages to all blocks.
4. COMMREQ commands: GCG001 does not support all datagrams. See section 6.3.2 for a
corresponding list of supported COMMREQs.
5. GCG001 supports hot-standby and duplex redundancy modes only. No support for dual-
bus redundancy.
6. GCG001 can be assigned to bus addresses 30 and 31 only.
7. GCG001 does not support Field Control, GENI, GENA, or PCIM.
8. Prior to V2.0.0, GCG001 did not support 76.8K and 38.4K baud rates. Beginning with
V2.0.0, all Genius baud rates are supported.
9. Prior to V1.1.1, fault contact operation has changed. Whenever there is a fault on a single
channel of a Genius block, all fault contacts associated with that Genius block will
become active. All faults on that device must be cleared before any of the fault contacts
will de-energize. Beginning with V1.1.1, when there is a fault on a single channel, none of
the fault contacts will become active.
10. Genius faults routed through a GCG001 appear as PROFINET faults to the CPU. The same
fault routed through a Genius Bus Controller will present a different error code.
11. Prior to V1.1.1, when a Genius block encounters a circuit fault on one or more points or
channels, the GCG001 causes all of the input references associated with that block to
either hold last state or go to default values until such time as the fault is cleared. See the
Alarms discussion in section 4.1.4 for a work-around to this behavior. However, beginning
with V1.1.1, when a Genius block encounters a circuit fault on one or more points or
channels, the GCG will cause only the faulted input references to hold the last state or go
to default values. The other points or channels on the block will continue to operate
normally.
16 Public PACSystems RX3i Genius Communications Gateway User Manual GFK-2892B
Page 21

Chapter 1. Introduction
1.8 Supported Genius Devices
The following Genius devices are compatible with the GCG001 Genius Communications Gateway.
Catalog Number Description
IC200GBI001† VersaMax Genius Network Interface Unit (GNIU)
IC660BBA020 24/48Vdc 4-Input/2-Output Analog Block
IC660BBA021 24/48Vdc RTD Input Block
IC660BBA023 24/48Vdc Thermocouple Input Block
IC660BBA024 24/48Vdc Current–Source Analog Block
IC660BBA025 24/48Vdc Current–Source Output Block
IC660BBA026 24/48Vdc Current–Source Input Block
IC660BBA100 115Vac 4-Input/2-Output Analog Block
IC660BBA101 115Vac RTD Input Block
IC660BBA103 115Vac/125Vdc Thermocouple Input Block
IC660BBA104 115Vac/125Vdc Current–Source Analog Block
IC660BBA105 115Vac/125Vdc Current–Source Output Block
IC660BBA106 115Vac/125Vdc Current–Source Input Block
IC660BBD020 24/48Vdc 16-Circuit Source I/O Block
IC660BBD021 24/48Vdc 16-Circuit Sink I/O Block
IC660BBD022 24Vdc 16-Circuit Source I/O Block
IC660BBD023 24Vdc 16-Circuit Sink I/O Block
IC660BBD024 12/24Vdc 32-Circuit Source I/O Block
IC660BBD025 5/12/24Vdc 32-Circuit Sink I/O Block
IC660BBD101 115Vac Low–Leakage 8-Circuit Grouped Block
IC660BBD110 115Vac 16-Circuit Input Block
IC660BBD120 High–Speed Counter Block
IC660BBR100 16-Circuit Relay Block, Normally–Closed
IC660BBR101 16-Circuit Relay Block, Normally–Open
IC660BBS100 115Vac/125Vdc 8-Circuit Isolated I/O Block
IC660BBS101 115Vac/125Vdc 8-Circuit Isolated I/O Block Without Failed Switch Diagnostic
IC660BBS102 115Vac/125Vdc 8-Circuit Isolated I/O Block
IC660BBS103 115Vac/125Vdc 8-Circuit Isolated I/O Block Without Failed Switch Diagnostic
IC697BEM733 ‡ Series 90-70 Remote I/O Scanner (GR7)
†
Refer to GFK-1535 Chapter 1 for a list of VersaMax modules supported by GBI001.
‡
Refer to GFK–0579, Chapter 1 for a list of S90-70 modules supported by BEM733.
GFK-2892B PACSystems RX3i Genius Communications Gateway User Manual Public 17
Page 22

Chapter 1. Introduction
Notes
18 Public PACSystems RX3i Genius Communications Gateway User Manual GFK-2892B
Page 23

Chapter 2. Installation
Installation Chapter 2
This chapter provides instructions for installing the module. The following topics are covered.
• Pre-Installation check
• Module installation and removal
• Port connections
• LED indications
• Firmware updates
For additional information about RX3i system installation, see the PACSystems RX3i System
Manual, catalog number GFK-2314.
For additional information about PROFINET installation and configuration, see GFK-2571 for
the RX3i PROFINET Controller. You will also need Proficy Machine Edition (PME) configuration
and programming software, version 8.0 or later.
2.1 Pre-Installation Check
Upon receiving your RX3i equipment, carefully inspect all shipping containers for damage. If
any part of the system is damaged, notify the carrier immediately. The damaged shipping
container should be saved as evidence for inspection by the carrier.
As the consignee, it is your responsibility to register a claim with the carrier for damage
incurred during shipment. GE Intelligent Platforms will cooperate fully with you, however,
should such action be necessary.
After unpacking the RX3i equipment, record all serial numbers. Serial numbers are required if
you should need to contact Customer Care during the warranty period. All shipping containers
and all packing material should be saved should it be necessary to transport or ship any part
of the system.
Verify that all components of the system have been received and that they agree with your
order. If the system received does not agree with your order, contact Customer Care.
If you need technical help, contact Technical Support. For phone numbers and email
addresses, see the Contact Information page in the front of this manual.
2.2 Installation Location
This product is primarily intended for use with the RX3i system. Its components are considered
open equipment (having live electrical parts that may be accessible to users) and must be
installed in an ultimate enclosure that is manufactured to provide safety. At a minimum, the
enclosure shall provide a degree of protection against solid objects as small as 12mm (e.g.
fingers). This equates to a NEMA/UL Type 1 enclosure or an IP20 rating (IEC 60529) providing at
least a pollution degree 2 environment. For details about installing RX3i rack systems, refer to
GFK-2314, PACSystems RX3i System Manual.
GFK-2892B PACSystems RX3i Genius Communications Gateway User Manual Public 19
Page 24
Chapter 2. Installation
Warning
2.3 Installation in Hazardous Areas
The following information is for products bearing the UL marking for Hazardous Areas or ATEX
marking for explosive atmospheres:
CLASS 1 DIVISION 2 GROUPS ABCD
• This equipment is an open-type device and is meant to be installed in an enclosure
suitable for the environment that is only accessible with the use of a tool.
• Suitable for use in Class I, Division 2, Groups A, B, C and D Hazardous Locations, or
nonhazardous locations only.
EXPLOSION HAZARD - SUBSTITUTION OF COMPONENTS MAY IMPAIR
SUITABILITY FOR CLASS I, DIVISION 2.
WHEN IN HAZARDOUS LOCATIONS, TURN OFF POWER BEFORE
REPLACING OR WIRING MODULES; AND
DO NOT CONNECT OR DISCONNECT EQUIPMENT UNLESS POWER
HAS BEEN SWITCHED OFF OR THE AREA IS KNOWN TO BE
NONHAZARDOUS.
Warning
2.3.1 ATEX Zone 2
The module must be mounted in an enclosure certified in accordance with EN60079-15 for
use in Zone 2, Group IIC and rated IP54. The enclosure shall only be able to be opened with the
use of a tool.
2.3.2 ATEX Marking
II 3 G Ex nA IIC T4 X Ta: 0 - 60C
EXPLOSION HAZARD - USB PORT IS ONLY FOR USE IN
NONHAZARDOUS LOCATIONS, DO NOT USE UNLESS AREA IS KNOWN
TO BE NON-HAZARDOUS.
20 Public PACSystems RX3i Genius Communications Gateway User Manual GFK-2892B
Page 25

Chapter 2. Installation
+24 VDC
RTN
24 Vdc Power
Connector
(Use for cable
tie-downs)
2.4 Module Installation
2.4.1 Install SD Card
The SD card slot is designed to support a Secure Digital (SD) non-volatile memory card in
standard capacity format. This optional card has two distinct uses: (1) backup storage of some
key PROFINET configuration data and (2) loading new GCG001 module firmware. Insert the SD
Card into its slot at the rear of the GCG001 before mounting the module, as shown in Figure 8.
When shipped from the factory, the SD card will have been pre-installed. It will have been
programmed with the then-current version of the firmware for the GCG001. In the event the
firmware on the SD card needs to be updated, see section 2.7. Note that the firmware
upgrade should be performed before mounting the module.
Figure 8: Rear View of GCG001
2.4.2 Mounting the GCG001
The GCG001 is designed to mounted in one of the following ways:
a. In the expansion slot of an RX3i Universal Backplane
b. Panel-mounted
In both cases, at least 75 mm (3 in.) must remain clear above and below the module to allow
for convection cooling. See section 1.5.1 for mounting details.
Once the module has been mounted, connect 24Vdc power via the connector on the
underside of the module, connect PROFINET via the RJ-45 connectors and the Genius bus via
twisted pair cable. Each connection is described in the following section.
Once all connections are in place, it will be necessary to configure PROFINET. This is also
discussed in the following sections.
Power Connection
The module requires a user-supplied
24Vdc (±10%) power source wired to the
removable screw-terminal block located
on the bottom of the module. Connector
pin-outs are identified on the module, as
indicated at right. The module draws
0.2 A maximum current.
Figure 9: GCG001 Power Connector
GFK-2892B PACSystems RX3i Genius Communications Gateway User Manual Public 21
Page 26

Chapter 2. Installation
COM
GENIUS A
SER
1
SER 2
SHLD
IN
GENIUS
SHLD
OUT
COM
GENIUS A
SER 1
SER
2
SHLD
IN
GENIUS
SHLD
OUT
Bus
termination
resistor
Grounding
For proper operation, always connect the GCG001 ground terminal (see Figure 9) to earth
ground. The panel to which the GCG001 module is mounted, or the RX3i Universal Backplane
to which it is mounted, must have a safety ground connection to protective earth. This ground
2
wire must be at least 1.5 mm
(16 AWG).
• Connect the frame ground connection on the power plug to protective earth.
• Terminate all ground wires at the same grounding point.
• Make all ground wires as short as possible.
• Where the grounding terminal contacts a painted enclosure panel, scrape the paint
away down to clean, bare metal to ensure good contact.
PROFINET Connection
Attach the PROFINET via one or both of the RJ-45 connectors provided (Port 1 & Port 2).
Various configurations are possible. Refer to the manual for the PROFINET controller used in
the application (GFK-2571 for the RX3i PROFINET Controller).
Genius Bus Connection
The GCG module is equipped with one active six-terminal Genius Serial Bus connector.
22 Public PACSystems RX3i Genius Communications Gateway User Manual GFK-2892B
Figure 10: Daisy Chain Genius Bus Wiring
Two terminals each are provided on a removable terminal block for Serial 1, Serial 2, and
Shield connections. The figure (above left) shows the Genius connection continuing through
the connector block (daisy chain).
Whenever the Genius bus is terminated at the GCG001, a bus termination resistor should
connect Serial 1 to Serial 2, with SHLD IN unterminated, (as shown above right). The value of
the termination resistor must match the impedance of the Genius Bus cable.
Note that whenever the GCG001 Genius terminal blocks are removed from the faceplate, the
continuity of the Genius Bus is disrupted.
Figure 11: Genius Bus Wiring for Bus Termination
Page 27

Chapter 2. Installation
PROFINET Configuration
Once all connections are in place, it will be necessary to set up the PROFINET configuration.
This requires use of the PC-based PROFINET Discovery tool. Be sure your PC is connected to
the same PROFINET network and interrogate the network to discover what is connected, as
shown in the following screen-shot.
Figure 12: PROFINET Discovery Screenshot
Initially, the out-of-the box GCG001 will not have a name assigned. Select the row containing
the GCG001, then click on the Edit Device button in order to assign a unique name.
Configuration tools and procedures are discussed in detail in Chapter 3.
2.4.3 GCG001 Module Removal
• Power down the external 24Vdc source
• Remove the Power connector from the underside of the GCG001 module
• Disconnect the RJ-45 PROFNET connector(s)
• Remove the Genius terminal block
• While holding the GCG001, loosen the two captive M3.5 screws that hold the module
in place, then pull away from the mounting surface. Note that, if mounted to an RX3i
rack, there is no pivot attachment or backplane connection to the rack.
• The SD Card may be transferred from the removed GCG001 to another (successor)
GCG001. This permits the PROFINET configuration of the removed module to be
transferred to the successor module.
• Once the successor module has been mounted, the original Power, PROFINET and
Genius connections may be restored to it.
GFK-2892B PACSystems RX3i Genius Communications Gateway User Manual Public 23
Page 28

Chapter 2. Installation
2.4.4 Light-Emitting Diode (LED) Indications
The four LEDs in the module header provide a visual indication of the GCG001 module status.
POWER — indicates the presence of power to the module.
Green, ON steady
OFF
OK — indicates GCG001 readiness to perform normal module operations.
Green, ON steady
Power supply is good.
Power supply is off or not good.
Module able to perform normal operations.
Green/Amber,
blinking
Amber, ON steady
OFF
FAULT — indicates the detection of faults by the module.
OFF No faults present.
Red, blinking 2Hz DCP Device Identification Signal received on PROFINET.
Red, ON
CONNECT — indicates status of the connection to a PROFINET controller.
OFF
Red, blinking
Red, ON No PROFINET Controller connection
The two LEDs associated with each Ethernet port (used here as PROFINET ports) are labelled ACT and LINK. These LEDs provide information about activity on that particular port.
PORT 1, PORT 2 LINK — indicates connection status on Ethernet ports.
Green, ON steady
Module loading main operating system
Module loading boot-loader operating system
Module has an unrecoverable fault or power is not applied.
A fault or other PROFINET diagnostic data exists on the
Gateway
One or more connections with GE Intelligent Platforms
PROFINET Controllers have been established to this device.
Device trying to connect to a controller.
Continuous if device has not been assigned a valid station
name.
Ethernet connection established
24 Public PACSystems RX3i Genius Communications Gateway User Manual GFK-2892B
OFF
PORT 1, PORT 2 ACT — indicates activity on PROFINET ports.
Amber, blinking Communications occurring on port
OFF No communication
No Ethernet connection
Page 29

Chapter 2. Installation
The LED located directly above the Genius connector provides information about the Genius bus.
COM — indicates the status of Genius Bus communications.
Green, ON steady
The Genius Bus is configured and operating properly.
Green, blinking
OFF
A Genius Bus error has been detected.
The Genius Bus has failed or no Genius Bus configuration
has been received.
2.4.5 Fault Notifications
Powering up or down, or connecting/disconnecting the GCG001 from the controlling
PROFINET device will have effects specific to the particular controlling device. The discussion
below relates to using the RX3i PROFINET Controller as the controlling device.
Removing a GCG001 from the PROFINET network causes a Loss of Device fault for the GCG001
itself and all Genius devices connected via that GCG001.
Adding a GCG001 to the PROFINET network causes an Addition of Device fault for the GCG001
itself and all Genius devices connected via that GCG001.
Note that when a GCG001 is replaced by a successor GCG001, it is important to ensure that
the successor is configured for PROFINET in the same manner as its predecessor. The quickest
way to ensure this is to remove the SD Card from the original and insert it into the successor
GCG001.
2.5 Configuring the Genius Gateway to Operate with the RX3i CPU
1) Start the Machine Edition application, then open or create the project which will contain
the GCG001 module.
2) Configuring the rack, power supply, CPU and PROFINET Controller in the Project tab of the
Navigator
3) Follow the instructions in the RX3i PROFINET Controller System Manual GFK-2571 for
adding devices to the PROFINET IO Network. The GCG001 will be one of those devices.
4) Note that each IO Device connected to the GCG001 will be mapped per the RX3i
PROFINET Controller configuration.
2.6 Ethernet Port Connections
As noted earlier, PROFINET IO operates at 100Mbps or higher (full duplex). The GCG001 Genius
Gateway cannot operate at a data rate greater than 100Mbps. Thus, for normal operation, at
least one port must be operated at 100Mbps. Other devices operating at 10Mbps may co-exist
on that network, though this would not be typical.
Each Ethernet port on the GCG001 module (see Figure 3) operates independently, so devices
that operate at different speeds and/or duplex modes may be attached to the ports. Each port
automatically detects the attached cable and functions properly with either straight-through
or crossover cables.
Note: The module operates only in auto-negotiate mode. All PROFINET devices
and switches that are connected to the module should be configured to
use auto-negotiation.
GFK-2892B PACSystems RX3i Genius Communications Gateway User Manual Public 25
Page 30

Chapter 2. Installation
2.6.1 RJ-45 Port Connections
The two RJ-45 ports on the GCG001 Genius Gateway can be used for PROFINET network
connections or for general Ethernet communications on a 10BaseT or 100BaseTX IEEE 802.3
network; 1000BaseTX is not supported. If the port is connected to an external switch, hub, or
repeater, up to 12 PROFINET nodes may be connected in a star wiring topology. Cables may
be up to 100 meters in length. Cables for 100BaseTX must be data grade Category 5 or better
unshielded twisted pair (UTP) or shielded twisted pair (STP). 10BaseT may be used for the
general Ethernet traffic, but not for PROFINET communications.
2.7 Firmware Updates
Refer to the rear view of the GCG001 module shown in Figure 8 (above). Whenever the
GCG001 firmware needs to be updated, remove the SD card from its slot at the rear of the
module, then install the SD Card in your PC and copy the new firmware to the SD Card. The ZIP
file containing the GCG001 firmware upgrade may be found on the GE Intelligent Platforms
Product Support web-site http://www.ge-ip.com/support
following figure.
. Unzip the file as shown in the
Figure 13: GCG001 Firmware Upgrade ZIP File UnZIPped to SD Card
After the SD card has received an update of the GCG001 firmware, install the SD card in its
slot (see Figure 8). Note that the GCG001 must not be powered up while installing the SD Card.
Next, while holding down the Firmware Load Pushbutton (see Figure 8), apply power to the
module. This action causes the firmware to be copied from the SD Card to the GCG001
module itself. Continue holding the pushbutton until the OK LED turns amber, then release the
pushbutton. When the OK LED turns green, the firmware has been loaded. Cycle power on the
module and wait for the OK LED to turn green and steady. The module is then ready to be
properly mounted (see section 1.5.1) .
26 Public PACSystems RX3i Genius Communications Gateway User Manual GFK-2892B
Page 31

Chapter 2. Installation
GCG001
Usage
Manufacturer
Power
Phoenix
Genius
Terminal
Block
Config
Backup
2.8 Spare Parts
The following spare parts may be obtained directly from the indicated vendors:
Manufacturer
Contact
Weidmueller 127787000
Verbatim 44015 SD CARD, 2GB www.verbatim.com
P/N
1763180 CONN TB PLUG 1X3 3.81MM TIN SCW LCKS BLK www.phoenixcontact.com
Description Contact Information
CON,3X2,PLUG,W/SCREWS,SPRING CONN, TERM
BLOCK
www.wiedmueller.com
GFK-2892B PACSystems RX3i Genius Communications Gateway User Manual Public 27
Page 32

Chapter 2. Installation
Notes
28 Public PACSystems RX3i Genius Communications Gateway User Manual GFK-2892B
Page 33

Chapter 3. Configuration
Configuration Chapter 3
The RX3i GCG001 Genius Gateway receives its configuration via its connected PROFINET I/O
Controller (PROFINET Controller). The PROFINET Controller, in turn, is configured by a PROFINET
I/O configuration tool. This tool will require a GSDML file for the GCG001 Genius Gateway. The
RX3i GCG001 GSDML can be obtained from GE’s Automation and Controls support website,
http://www.geautomation.com
import the RX3i GCG001 GSDML file into the Tool Chest of Proficy Machine Edition.
3.1 Configuration Tools
• PACSystems RX3i CPU Firmware 8.00 or later.
• Proficy Machine Edition configuration and programming software, version 8.0 or later.
• Serial or Ethernet cable for connecting the Proficy Machine Edition programmer computer
to the RX3i CPU.
• General Station Description Markup Language (GSDML) file for the GCG001, available from
GE’s Automation and Controls support website, http://www.geautomation.com
3.2 Configuration Overview
The steps involved in configuring a GCG001 Genius Gateway are as follows:
1. If you haven’t already done so, use Machine Edition to add a PROFINET IO-Controller
(IC695PNC001) to the Hardware Configuration of the target control system.
2. Select the PNC001 in the Navigator window, then browse the module and the Local Area
Network (LAN) configuration in the Inspector window, changing parameters as necessary
for your system. Note that the GCG001 will operate at 100Mbps, and will cause the
Network Speed to be auto-negotiated to this speed.
3. Right-click the PNC001, then select Add IO-Device to add the GCG001 as a connected
device on the PROFINET LAN. In the PROFINET Device Catalog dialog that subsequently
appears, select Have GSDML…, then browse to the location on your computer where the
file is located, select it, and Open. As mentioned above, the GSDML can be conveniently
stored in the PME Tool Chest.
4. Use PROFINET/DCP tool in Machine Edition to assign a name to the GCG001 Gateway so
that the PROFINET Controller can connect to it and send its configuration. To do this, rightclick the PNC001, then select Launch Discovery Tool GCG001.The tool will appear in a
new InfoViewer tab entitled PROFINET DCP – Direct Connection (see Figure 12).
, using GCG001 as your search term. For subsequent use,
.
Note: This tool can also be activated from the Utilities tab in the Navigation pane
by selecting PROFINET DCP.
5. With the GCG001 connected to the PNC001 via Ethernet cables, and both the RX3i rack
and the GCG001 powered up, select Refresh Device List. Find the GCG001 in the list. If its
Device Name does not match the Device Name configured on the PNC001 , select the
GCG001 , then select Edit Device, change the Device Name, then Exit.
6. GeniusGateway… appears in the Device Catalog tree.
Select GeniusGateway, then OK.
7. geniusgateway…
now appears
(Figure 14) as an
IO device in the
Hardware
Configuration
tree under the
GFK-2892B PACSystems RX3i Genius Communications Gateway User Manual Public 29
Figure 14: Hardware Configuration
Expanded Tree
Page 34

Chapter 3. Configuration
PNC001. Within the geniusgateway branch, two daughter devices are displayed by
default: the GCG (shown at slot 0 with its connected PNC) and the Gateway module itself
at slot 31. You may drag the gateway to slot 30, if desired.
Note that slot 0, normally used by the Genius HHM, is not really consumed by the GCG001.
The slot 0 indication for the GCG001 in the ME display should be ignored: it does not
impact the SBA assignments on the Genius Bus.
Note: geniusgateway… is the default PROFINET Device Name that Machine Edition
gives to a GCG001 in the Hardware Configuration under a PNC001. This
Device Name must match that given to the module itself using the
PROFINET/DCP (Discovery and Configuration Protocol) tool (see below). If
there are multiple GCG001s on a PROFINET bus, each of the modules’ Device
Names must be unique. You can change it by selecting the device in the
Navigator, then typing in a new name in the Inspector.
Example: GCG_inside and GCG_outside are acceptable Device Names.
8. Add Genius I/O devices to the Genius Bus by right-clicking geniusgateway… and selecting
Change Module List…. (see Figure 15). If the application is a retrofit of an existing Genius
solution, be sure to set all I/O reference addresses to match those of the Genius
configuration being incorporated. To ease confusion, it is also recommended that the
Genius Devices be assigned the same serial bus addresses (Location column) as had
been assigned in the system under retrofit.
30 Public PACSystems RX3i Genius Communications Gateway User Manual GFK-2892B
Figure 15: Change Module List for Genius Gateway GCG001
Page 35

Chapter 3. Configuration
9. Select individual Genius I/O devices from the right-hand panel of Figure 15 and then drop
them into the appropriate location row on the left-hand side, resulting in Figure 16.
Figure 16: Populating the Genius IO Devices to be Controlled by the Genius Gateway
10. Special consideration needs to be given to the configuration of a Series 90-70 Remote I/O
Scanner (BEM733) device on the Genius Bus, since this device is capable of controlling a
rack filled with I/O modules, each of which needs to be suitably configured.
a. Add the BEM733 to the Genius Bus configuration as described above.
b. Drill down into the BEM733. A display of rack I/O will be presented (Figure 17).
Figure 17: Populating Slots in S90-70 Rack Controlled by Remote I/O Scanner (BEM733)
GFK-2892B PACSystems RX3i Genius Communications Gateway User Manual Public 31
Page 36

Chapter 3. Configuration
c. For each slot in the BEM733-controlled rack, select a generic I/O device (such as a 16-
point discrete input module or a 4-channel analog output module) and attach that to
its corresponding slot in the I/O rack. Note that actual part numbers have not been
assigned for this procedure. If in doubt, check the data sheet related to each product
number to determine the type of I/O it consumes (Analog or Discrete / Input or
Output) and the number of I/O points it requires.
d. Once all BEM733-controlled rack slots have been suitably populated, save that
portion of the configuration.
11. Configuration of a VersaMax Genius Network Interface Unit (GNIU) is similar to the
process described for the Series 90-70 Remote I/O Scanner.
a. Add a GBI001 to the Genius Bus configuration as described above.
b. Drill down into the GBI001. A display of VersaMax I/O will be presented.
c. For each rack and slot controlled by the GBI001, select the VersaMax I/O device that
corresponds with the actual VersaMax device that is in use.
12. Once all the Genius Devices have been “populated” onto the Genius Bus topology as
shown in Figure 16, click the OK button to save that portion of the configuration.
13. Note that the I/O addresses associated with each Genius Device will have been provided
with default assignments by Machine Edition. Double-click on each Genius device to
examine its properties, and change the I/O assignments where needed. In retrofits, for
example, it will likely be crucial to keep the same I/O assignments from the earlier
implementation so that the controller logic can operate with the same I/O allocations as
before. For each “location” on the Genius Bus, keep a note of the assigned I/O addresses.
14. In Machine Edition, store the Hardware Configuration to the RX3i CPU, which also stores
the GCG001 configuration data to the PNC001.
The following screenshot shows a completed configuration.
32 Public PACSystems RX3i Genius Communications Gateway User Manual GFK-2892B
Figure 18: Genius Gateway Configuration Example
Page 37

Chapter 4. System Operation
System Operation Chapter 4
This chapter provides a System Overview and describes:
• Communications
• Redundancy
• I/O Scans
• Alarms
4.1 System Overview
4.1.1 Communications
As shown in Figure 7, the Genius Gateway (GCG001) sits on a PROFINET network which is
connected to a PROFINET Controller (PNC001, for instance). The PROFINET Controller is
mounted in an RX3i rack. This aspect of the architecture allows the RX3i to interact with the
GCG001.
The PROFINET network to which the GCG001 is connected operates at 100Mbps only. The
Network Speed will be set through auto-negotiation if necessary. Details of PROFINET
communications may be found in the RX3i PROFINET Controller System Manual GFK-2571.
The GCG001 is also connected to a Genius Bus. It takes the place of a traditional Genius Bus
Controller, meaning it is capable of communicating with up to 31 other Genius Devices.
The Genius Bus operates as a Local Area Network (LAN) using twisted pair wiring. The wiring is
daisy-chained via the terminal strips on each device, as shown in Figure 10. The Genius LAN
will not be disrupted if power is lost on one its networked devices, since the wiring passes
through each device without requiring any active electronics to be present. The LAN cabling
must be terminated at one end of the cable run, using a resistor, the value of which matches
the impedance of the cable used in the application. See Figure 11 for terminating the bus at
the GCG001.
The Genius Bus is capable of operating at a number of different baud rates. All devices on the
bus must operate at the same agreed baud rate. For further details, refer to the Genius I/O
System and Communications User's Manual (GEK-90486). The default baud rate of the GCG001,
when shipped from the factory is 153.6 kBaud. This may be changed via the Machine Edition
configuration software.
In the event the baud rate needs to be changed, the following sequence is recommended:
1. Disconnect the GCG001 module from the Genius bus.
2. Change the baud rate to the new value on all Genius devices connected to that bus.
3. Cycle power to all Genius devices on which the baud rate has just been changed.
4. Use the HHM to verify the baud rate was successfully changed on each device.
5. Retry the above steps on any devices that failed to switch over to the new baud rate.
6. Using Machine Edition, configure the GCG001 module to operate at the new baud rate.
7. Reconnect the GCG001 to the Genius bus.
8. Note that the HHM will not work reliably on a mixed baud rate bus. Connect the HHM
directly to any device under these circumstances and disconnect that device from the
Genius bus temporarily. The baud rate of the HHM can be altered (via the HHM keyboard)
to match the configured baud rate of the device (which may be unknown). Once both the
HHM and target device are set to the same baud rate, the HHM can command the target
device to change to a new baud rate, which will take effect upon power cycling the
device. Remember to then change the baud rate of the HHM to the new baud rate.
GFK-2892B PACSystems RX3i Genius Communications Gateway User Manual Public 33
Page 38

Chapter 4. System Operation
Genius
I/O
Genius
I/O
Genius
I/O
PROFINET I/O
Genius IO Bus
G
R
7
I OI
O
I
O
P
S
C
R
U
P
N
C
P
S
C
R
U
P
N
C
SBA#31SBA#30
PROFINET I/O
R
M
X
R
M
X
R
M
X
R
M
X
Vmax
NIU
I OI
O
I OI
O
4.1.2 Redundancy
Genius Hot Standby and Duplex Redundancy
Genius supports a number of different forms of redundancy, as described in the Genius I/O
System and Communications User's Manual - GEK-90486-1. Only Genius Hot Standby and
Duplex type redundancy (see GEK-90486-1 Chapter 8) is supported by the Genius Gateway
(GCG001).
Figure 19: Genius Hot Standby Redundancy
To support either Genius Hot Standby or Duplex type redundancy, two GCG001 modules are
present on the same physical Genius Bus, one at SBA #31 and the other at SBA #30, as shown
in Figure 19. This architecture is designed to withstand the loss of one GCG001 and the loss of
the PLC to which it is attached. The two GCG001 modules involved should therefore be
powered via independent 24Vdc power supplies. Alternately, a Genius Bus Controller may be
used at SBA #30 or #31.
In Genius Hot Standby, the I/O Blocks (both Analog and Digital) report all inputs to both
SBA#30 and #31, but use output data from SBA#30 only whenever SBA#31 becomes
unavailable. I/O controlled by the GR7 and GNIU also behave in this way.
In Genius Duplex Redundancy, Discrete Output Blocks vote on the output data received from
both SBA #30 and #31. A configuration parameter “Duplex Default State” must be configured
for each output point. This parameter determines how the output will behave in the event the
commanded output states received from SBA#30 and SBA#31 disagree. See GEK-90486-1
Chapter 8 for details. Whenever one of the controlling devices at SBA#30 or SBA#31 becomes
unavailable, the output will be controlled by the remaining device. Discrete outputs in the I/O
controlled by the GR7 and GNIU also behave in this way.
Note that the GCG001 does not support Genius Dual Bus Redundancy.
34 Public PACSystems RX3i Genius Communications Gateway User Manual GFK-2892B
Page 39

Chapter 4. System Operation
Genius
I/O
Genius
I
/O
Genius
I/O
Genius IO Bus
G
R
7
I OI OI
O
P
S
C
P
U
P
N
C
SBA
#31
SBA#
30
PROFINET I/O
Vmax
NIU
I OI OI OI
O
Ethernet Media Redundancy Protocol
PROFINET also supports redundancy in the form of Ethernet Media Redundancy Protocol
(MRP). As shown in Figure 20, this form of redundancy is designed to permit all devices on the
network to continue to communicate even though the network cable has been compromised
at one point. For details, see the RX3i PROFINET Controller System Manual (GFK-2571).
4.1.3 I/O Scans
As shown in Figure 7, there are a number of I/O Scans that effect how the input and output
devices on the Genius bus exchange data with the RSX3i PLC.
The RX3i scan reads input data from all the devices connected to it and active in its
configuration. It uses this input data to solve the control logic supplied for the application. At
the conclusion of the logic execution, the output data is ready for distribution and the output
portion of the RX3i scan takes place.
The PNC001 PROFINET Controller operates on its own cycle, receiving input data for all devices
connected to it, including the GCG001 Genius Gateway. It passes the input data to the RX3i
during the RX3i input scan. When the RX3i performs its output scan, the output data
configured to the PNC001 is transmitted by the PNC001 to the output devices on its network,
including the GCG001 Genius Gateway.
The GCG001 also operates on its own scan cycle. As the Genius bus token passes from one
SBA to the next, each device on the Genius Bus takes its turn to transmit its input data to the
GCG001, which then makes that input data available to the PNC001. The GCG001 also
consumes all the output data produced by the PNC001 and broadcasts that data to all the
output devices on the Genius bus whenever it receives the Genius Bus token.
All of the I/O scans described above are asynchronous and may vary depending on the path
through the RX3i logic, traffic on the PROFINET and traffic on the Genius Bus. Should I/O
update rates be a concern for the application, it would be prudent to perform a worst-case
analysis of the interacting scan cycles.
Figure 20: PROFINET Media Redundancy
GFK-2892B PACSystems RX3i Genius Communications Gateway User Manual Public 35
Page 40

Chapter 4. System Operation
4.1.4 Alarms
Whenever an alarm condition occurs on a Genius Device, a background message (datagram)
is transmitted from the device to the GCG001. This transmission occurs while the alarmed
device has the Genius Bus token. Upon reception, the GCG001 formulates an Alarm message
to be passed to the PNC001, which in turn passes it to the RX3i CPU. The RX3i takes
appropriate action and notifies the operator per the logic in the application.
Alarms may be cleared programmatically using either the Clear Circuit Fault COMMREQ (see
Figure 25) or the Clear All Circuit Fault COMMREQ, or via the Genius Hand-Held Monitor (HHM).
Note that whenever the HHM is used to clear a circuit fault, the GCG001 will not be aware of
this condition, thus will not have cleared the corresponding fault. Under these conditions, the
“Diagnosis Disappears” Fault will not have been logged and any subsequent fault from the
same point will not be reported to the I/O Fault Table. Be sure to follow up any HHM clearing
of faults with a COMMREQ to clear the same fault(s) in order to eliminate the discrepancy
described here.
Typically, the field problem needs to be investigated and resolved before the alarm can be
successfully cleared. For the alarm to be cleared, the alarm condition must no longer be
present and the Genius device must receive a suitable background message instructing it to
clear the alarm notification. If the alarm condition is absent, the Genius device will cease to
exhibit the alarm indication (LEDs will operate normally again). If the alarm condition is still
present, a new alarm cycle will be initiated. See Sections 6.4.5, 6.4.6 and 6.4.4 for related
COMMREQ or Data_Init_Comm instructions. Refer to GEK-90486-1, Genius I/O System and
Communications User's Manual, for further details.
As mentioned in Section 1.8, the behavior of the input references associated with a Genius
Device that has indicated a fault, and which is interfaced to the CPU via the GCG001, is to
cause all inputs to either hold last state or to default to a known state (per GCG001
configuration parameters). If this behavior is problematic for your application, you can disable
fault reporting at the block, using the Genius Hand-Held Monitor (HHM) – see “Report Faults” in
GEK-90486-2. The downside is that your application will no longer be able to automatically
sense faults at the corresponding Genius Device. The LEDs on the Genius Device will continue
to indicate Fault conditions; however no datagram will be issued for each fault occurrence. An
intermediate solution is to periodically query each such device with a “Read Diagnostics”
datagram (Section 6.4.4) and parse the response in order to detect faulted circuits.
36 Public PACSystems RX3i Genius Communications Gateway User Manual GFK-2892B
Page 41

Chapter 5. Diagnostics
Diagnostics Chapter 5
This chapter describes:
• Status Bits
• Module LED Indicators
• Power-up
5.1 Status Data
The GGC001 produces a total of 64 bits (8 bytes) to supply status information to the controlling
PROFINET Controller. When ultimately controlled by an RX3i PLC, these reference bits consume
a total of 64 reference address bits in %I memory. The 64 bits consist of
• 32 bits related to the operation of the GCG001 itself referred to in PME as “Gateway
Status Data” and
• 32 bits related to the operation of the Genius bus which it controls – referred to as
“Genius Status Data” in PME.
Each bank of 32 bits may be assigned a different set of Input reference addresses in RX3i
memory.
For each bank of 32 status bits, a default beginning reference (the next available %I) for the
status bits is automatically assigned by Proficy Machine Edition (PME). These assignments may
be changed by clicking on the GCG001 and keying in different %I references.
o Genius Status Bits for Genius Gateway
o PROFINET Status Bits for Genius Gateway
o Module Restart
o Problems During Power-up and Reset
o Transitioning from Firmware Update Mode to Normal Operating Mode
5.1.1 PROFINET Status Data
For the Genius Gateway GCG001, the thirty-two bits in the PROFINET Status Data are
organized as follows, beginning at the first %I status reference assigned to this bank of 32:
Figure 21: Gateway Status Data
GFK-2892B PACSystems RX3i Genius Communications Gateway User Manual Public 37
Page 42

Chapter 5. Diagnostics
Bit
OFF
The GCG001 module is powering up or has failed.
ON
Indicates the GCG001 module is functioning properly.
OFF
No GCG001 diagnosis data available; FAULT LED is Off.
ON
GCG001 diagnosis data is available; FAULT LED is On.
Port is not connected to a properly configured device,
Port is connected to another device and is
Port is not connected to a properly configured device,
Port is connected to another device and is
OFF
Always off
ON
N/A
OFF
MRP is not enabled
ON
MRP is enabled
Indicates that the GCG001 is an MRP Client (if MRP is
Indicates role is that of an MRP Manager – this is not a
OFF
Always off
ON
N/A
Bit
OFF
No device present at SBA, or device not configured, or device not communicating.
ON
Device present, configured and communicating at corresponding SBA.
Bit# Name
0 Module OK
1 Fault Present
2 Port1 Link Up
3 Port2 Link Up
4-9 Reserved
10 MRP Enabled
11 MRP Role
Condition
OFF
ON
OFF
ON
OFF
ON
Meaning of Status Bit
or port is experiencing communications errors.
communicating.
or port is experiencing communications errors.
communicating.
enabled), or that MRP is not enabled.
possible role for the GCG001.
12-31 Reserved
5.1.2 Genius Status Data
For the Genius Status Data, status bits are arranged in ascending order of the Genius Serial
Bus Addresses (SBAs), beginning at the first %I status reference assigned to this bank of 32.
Figure 22: Genius Status Data
Condition
Meaning of Status Bit
5.2 Module LED Indicators
Refer to Section 2.4.4 for a description of LED indications.
38 Public PACSystems RX3i Genius Communications Gateway User Manual GFK-2892B
Page 43

Chapter 5. Diagnostics
5.3 Power-Up
The GCG001 powers up whenever 24Vdc power is properly applied via the connector shown
in Figure 9. During the power-up sequence, the GCG001 module runs diagnostics and
initializes its hardware components. When the necessary hardware components have been
initialized and tested, the module transitions to either normal operation or, if the firmware
load pushbutton is being depressed (see Figure 8), to the firmware update mode.
The firmware update mode is described in Section 2.7.
As the GCG001 transitions to normal operation, it attempts to establish communications with
the PROFINET Controller. Until communications have been established, normal operation
cannot begin.
Once the PROFINET Controller matches the configured PROFINET Device Name that of the
GCG001, PROFINET communications will begin. Any faults detected by the GCG001 prior to
this event will then be uploaded to the PROFINET Controller.
Normal system operation will begin once the RX3i is in RUN mode, PROFINET communications
are up and running and Genius Bus operations are also up and running.
5.3.1 Problems during Power-up
Certain conditions can prevent the module from powering up and becoming operational or
entering firmware update mode:
Problem Indication Action
Hardware failure
Invalid boot image
Invalid firmware image
All Indicator LEDs off.
Module unresponsive.
Power LED is ON but OK LED is off or
Power LED alternates Green & Amber
Contact Technical
Support to arrange for
repair and replacement
Perform firmware update
5.3.2 Transitioning from Firmware Update Mode to Operational Mode
As described in Section 2.7, the firmware load pushbutton (see Figure 8) must be depressed
during power-up in order to invoke the GCG001 firmware load mode. Whenever the GCG001
is powered up without this button being depressed, normal operating mode will commence
following power-up testing and initialization. Cycling power transitions the module from one
mode to the other, depending on the condition of the pushbutton.
GFK-2892B PACSystems RX3i Genius Communications Gateway User Manual Public 39
Page 44

Chapter 5. Diagnostics
5.4 Module Faults in the RX3i I/O Fault Tables
Module faults from the Genius Devices downstream from the GCG001 Genius Gateway are
passed to the PROFINET Controller and then to the PLC, where they are visible in the PLC’s I/O
Fault Table. For details on the operation of the RX3i Fault Table, see GFK-2222 Chapter 14.
The I/O fault table displays I/O faults such as circuit faults, address conflicts, forced circuits,
I/O module addition/loss faults and I/O bus faults. The contents of the I/O Fault Table entry are
as follows:
Entry Description
Location Identifies the location of the fault by bus and serial bus address (SBA).
CIRC No.
Variable
Name
Ref.
Address
Fault
Category
Fault Type
Date/Time
Details To view detailed information, click the fault entry.
Note: The Reference Address field displays 16-bits and %W memory has a 32-bit range.
Addresses in %W are displayed correctly for offsets in the 16-bit range (≤65,535). For %W
offsets greater than 16-bits, the I/O Fault Table displays a blank reference address.
As mentioned in Section 5.1, the GCG001 consumes two banks of 32 bits in %I as status bits
(a) for the GCG001 itself and (b) for the Genius bus devices it controls. These are not to be
confused with the entries in the I/O Fault Table.
When applicable, identifies the specific faulted I/O point on the module
(enumerated 1-8 for an 8-point I/O block, for instance).
If the fault is associated with a point that is mapped to an I/O variable, and the
variable is set to publish (either internal or external), the I/O fault table displays
the variable name. Unpublished I/O variables will not be displayed in this field.
If the fault is on a point that is mapped to a reference address, this field
identifies the I/O memory type and location (offset) that corresponds to the
point experiencing the fault. When a Genius device fault or local analog module
fault occurs, the reference address refers to the first point on the block where
the fault occurred.
Specifies a general classification of the fault.
Consists of subcategories under certain fault categories. Set to zero when not
applicable to the category. See Section 5.4.1 below.
The date and time the fault was recorded by the CPU based on the RX3i CPU
clock.
40 Public PACSystems RX3i Genius Communications Gateway User Manual GFK-2892B
Page 45

Chapter 5. Diagnostics
Fault Type
Description
257
Internal Circuit fault
258
Shared RAM fault
259
Electronics Assembly EEPROM fault
260
Communication interface fault
261
Terminal Strip EEPROM fault or NVRAM fault
262
EEPROM fault
263
Private RAM fault
264
Processor fault
273
Failed Switch
274
Open Input / Over-Temperature
275
No Load Present
276
Overload
277
Short Circuit
278
Loss of I/O Power
289
Feedback Error
290
Output channel over-range
291
Output channel under-range
292
Input channel open wire
293
Input channel over-range
294
Input channel under-range
295
Input channel high alarm
296
Input channel low alarm
305
Input channel shorted
306
Internal channel fault
307
Input channel wiring error
308
Input channel open wire
309
Input channel over-range
310
Input channel under-range
311
Input channel high alarm
312
Input channel low alarm
400
unknown Error-Type
513
VersaMax I/O fault
769
Series 90-70 I/O fault
1026
Invalid Genius Gateway module configuration
1027
Invalid Genius Gateway module configuration
1028
Extra Genius device
1029
Configuration mismatch in S90-70 Remote Scanner Rack
1030
Configuration mismatch in VersaMax I/O Station
5.4.1 Fault Types Reported to the RX3i Controller I/O Fault Table
When imported into the Rx3i I/O Fault Table, the following Error Codes are displayed without
explanation. The following table is provided to assist in decoding the displayed error codes.
GFK-2892B PACSystems RX3i Genius Communications Gateway User Manual Public 41
Page 46

Chapter 5. Diagnostics
Controller Date/Time:
01-07-2000 20:43:51
Last Cleared:
01-07-2000 20:26:42
Status
Online
I/O Fault Table (Displaying 2 of 2 faults, 0 Overflowed)
CIRC
Variable
Ref.
0.7.D25.r0.s1.
Channel Diagnosis
Manufacturer specific
01-07-
Bus
Address
Point
Address
Group
Category
Fault
Type
1
25 0 28
1:Informational
41
275
Fault Extra
Fault
Description
Lan Name:
LAN01
Device
0.7.D25.r0.s1.
Manufacturer specific
01-07-
Bus
Address
Point
Address
Group
Category
Fault
Type
1
25 0 28
2:Diagnostic
40
275
Fault Extra
Fault
Description
Lan Name:
Device
Table Entry
Explanation
Value
Interpretation
Loc
Location of Fault
0.7.D25.r0.s1.ss1
Rack 0 Slot 7 = location of PNC
Circ No.
Genius Device Circuit #
0
First point on Genius device is faulted
Variable
Alternate to Ref
Will display if variable name has been assigned
Ref. Address
PLC Reference Address
%QI 00041
Point 41 in %QI table is referenced
Fault
Coded Fault Category
Channel Diagnosis
“Appears” when fault first detected at PLC.
Fault Type
Coded Fault Type
Manufacturer specific
See table of Fault Types (page 41).
Date/Time
Date/Time
Date/Time fault is registered by PLC.
The linked image cannot be displayed. The file may have been moved, renamed, or deleted. Verify that the link points to the correct file and location.
Fault Table Viewer
Loc
ss1
The linked image cannot be displayed. The file may have been moved, renamed, or deleted. Verify that the link points to the correct file and location.
ss1
No.
0 %QI 00041
0 %QI 00041 Channel Diagnosis Appears
Name
Address
Fault Category Fault Type Date/Time
Disappears
I/O Bus
00 04 50 00 01 13 00 00 00 00 00 00 00 00 00 00 00 00 00
Data
Name:
I/O Bus
Data
(275)
Action
00 00
geniusgateway8
(275)
Action
a8 03 48 00 01 13 00 00 00 00 00 00 00 00 00 00 00 00
00 00 00
2000 20:31:23
2000 20:31:17
Name
Category
Address
LAN01
Name:
Figure 23: Genius Discrete Block "No Load Present" Fault Display (Example)
geniusgateway8
D25 = Device Number of GCG
r0 = SBA of faulted Genius device
s1, ss1 not used
Appears/Disappears
“Disappears” when fault has been resolved.
42 Public PACSystems RX3i Genius Communications Gateway User Manual GFK-2892B
Page 47

Chapter 5. Diagnostics
Controller Date/Time:
01-01-2000 01:58:51
Last Cleared:
01-01-2000 01:55:01
Status
Online
I/O Fault Table (Displaying 2 of 2 faults, 0 Overflowed)
CIRC
Variable
Ref.
0.7.D27.r0.s3.
Channel Diagnosis
Manufacturer specific
(290)
01-01-
Bus
Address
Point
Address
Group
Category
Fault
Type
1
27 0 28
1:Informational
41
290
Fault Extra
Fault
Description
Lan Name:
LAN01
Device
0.7.D27.r0.s3.
Manufacturer specific
(290)
01-01-
Bus
Address
Point
Address
Group
Category
Fault
Type
1
27 0 28
2:Diagnostic
40
290
Fault Extra
Fault
Description
Lan Name:
LAN01
Device
Fault Table Viewer
Loc
ss1
The linked image cannot be displayed. The file may have been moved, renamed, or deleted. Verify that the link points to the correct file and location.
ss1
The linked image cannot be displayed. The file may have been moved, renamed, or deleted. Verify that the link points to the correct file and location.
No.
0 %AQ 00101
0 %AQ 00101 Channel Diagnosis Appears
Name
Address
Fault Category Fault Type Date/Time
Disappears
I/O Bus
00 0a 52 00 01 22 00 00 00 00 00 00 00 00 00 00 00 00 00
Data
Name:
Action
00 00
geniusgateway9
I/O Bus
00 09 4a 00 01 22 00 00 00 00 00 00 00 00 00 00 00 00
Data
Action
00 00 01
2000 01:56:11
2000 01:56:05
Name:
geniusgateway9
Figure 24: Genius Analog Block "Over Range" Fault Display (Example)
5.4.2 Clearing the RX3i Fault Tables
Clearing the RX3i CPU’s I/O fault tables has no effect on the GCG001 or on the Genius Devices
downstream from it. This action merely clears the I/O Fault Table temporarily. Use the Genius
HHM or COMREQs in the PLC program to exercise I/O points that had previously exhibited
faults, and where the underlying field fault condition has already been corrected.
GFK-2892B PACSystems RX3i Genius Communications Gateway User Manual Public 43
Page 48

Chapter 5. Diagnostics
Notes
44 Public PACSystems RX3i Genius Communications Gateway User Manual GFK-2892B
Page 49

Chapter 6. COMMREQ/Data_Init_Comm Programming
CPU Memory
Application Program
⇐
CPU Memory
Application Program
⇐
Application Program
PROFINET-Genius
Genius Device
COMMREQ instruction issued
Gateway converts
COMMREQ/Data_Init_Comm Programming Chapter 6
This chapter explains how to use Communication Requests (COMMREQs) to perform specific
tasks with Genius devices that are attached to a Gateway’s Genius bus. COMMREQs are
instructions in the RX3i ladder logic (see example in Figure 25). When a COMMREQ is executed
in ladder logic, communications traffic is directed to the indicated PROFINET Controller
module (IC695PNC001). The PROFINET Controller then communicates with the Genius
Gateway over PROFINET. The Genius Gateway subsequently sends the corresponding
background datagram to the Genius block Serial Bus Address (SBA) specified in the COMMREQ.
Status, and optionally some data, is returned from the Genius Block via the Genius Gateway to
the PROFINET Controller and then to the reference memory in the CPU module.
Data_Init_Comm is a ladder logic instruction that can be used to help set up a COMMREQ. It is
a more user-friendly instruction from the programmer’s perspective. It performs the same
functions as are described in this Chapter. An example is shown at Figure 26.
For additional information about Genius datagrams, see the Genius I/O System and
Communications Manual (GEK–90486–1), which describes Genius Datagrams in detail.
6.1 COMMREQs and Passwords
Level 1 and 2 controller passwords, which prevent write access, cannot be used in
applications that include COMMREQs. COMMREQs require write access to return their
completion status and requested data.
6.2 Programming for a COMMREQ Communication Request
In order to communicate via a COMMREQ with a Genius device attached via a Genius
Gateway module, the application program should perform the following actions.
1) Supply the content of the COMMREQ communication. Ladder logic Block Moves,
Data_Init_Comm, or similar program instructions can be used to place the required
information into CPU memory. This content is called the Command Block.
GFK-2892B PACSystems RX3i Genius Communications Gateway User Manual Public 45
Command Block
2) Clear status block. The program should set the status block to all zeroes (see
programming example Figure 25). Establishing this initial condition allows the program to
differentiate between the result of an earlier command and the currently–executing
COMMREQ command.
Status Block
3) Use a COMMREQ instruction to perform the intended function.
to targeted PROFINET
Controller
COMMREQ content into
Genius Datagram
Edit content of COMMREQ
Clear status block
(set value to zero)
I/O Module receives Genius
Datagram from Gateway
Page 50

Chapter 6. COMMREQ/Data_Init_Comm Programming
CPU Memory
Application Program
⇐
address + 6 to
4) Check the status of the initiated COMMREQ task. COMMREQs should be executed
sequentially. The application program should check that the status of the previous
COMMREQ to the targeted PROFINET Controller is complete before sending it another one.
Failure to do this may result in improper operation of the PROFINET Controller.
6.3 COMMREQ Command Block Format
The first step in programming communications requests is to set up the contents of the
COMMREQ instruction. This can be done using Block Moves or similar program instructions, as
shown later in this chapter.
Command Block
Data is placed in adjacent locations in CPU memory to form a Command Block, per the format
shown below:
Location Data Field Value
address
address + 1 Wait/No Wait Flag Always 0
address + 2 Status Pointer Memory Type
address + 3 Status Pointer Offset
address + 4 Idle Timeout Value (ms) Always 0
address + 5 Max. Communication Time (ms) Always 0
address + 78
The length of the Command Block depends on the type of COMMREQ being sent. Seventy
words is the maximum and is used only for a COMMREQ that transfers a 128–byte datagram.
Most Command Blocks are much shorter. The table in Section 6.3.3 gives an overview of the
contents of each type of COMMREQ that may be sent to a PROFINET Controller for transfer to
a Genius Gateway.
“Data Block” Length
Data Block
Edit content of COMMREQ
46 Public PACSystems RX3i Genius Communications Gateway User Manual GFK-2892B
Page 51

Chapter 6. COMMREQ/Data_Init_Comm Programming
6.3.1 COMMREQ Command Block Contents
Each field in the Command Block is described below:
Data Field Explanation
“Data Block” Length
Wait/No Wait Flag
Status Pointer Memory
Type
Status Pointer Offset
This is the amount of data from
[address + 6]
to the end of the Command Block. Each
type of COMMREQ command has a unique Data Block. See Section 6.4.
This must be set to zero, indicating No Wait.
The Status Pointer Memory Type and Status Pointer Offset defined below
combine to identify the location in CPU Memory of the Status Block associated
with this COMMREQ.
The Status Block is the location to which the COMMREQ will return its status. If one
of the bit–oriented memories (%I or %Q) is used as the Status Block location, those
bits can be monitored by the PLC program.
The Memory Type used is defined by
[address + 2]
, as follows:
Memory Type Description Required Entry
%I
%Q
%R
%AI
%AQ
%W
The offset into the Memory Type (above) is defined by
discrete input table
discrete output table
register memory
analog input table
analog output table
Bulk Memory
70
72
8
10
12
196
[address + 3]
.
Note that the offset is 0–based. For example, if the Status Block were located at
%R099, memory type would be specified as 08 (for %R memory) and the offset
would be entered as 98 so as to point to %R099.
Note that if a bit–oriented memory (%I or %Q) is specified, a byte boundary must be
used for the offset.
Idle Timeout Value (ms) This field is not used for the No Wait mode of communication.
Max. Communication
Time (ms)
This field is not used for the No Wait mode of communication.
The Data Block contains the parameters of the command. Complete descriptions of
all commands appear later in this chapter (see Section 6.4).
Location Function
Data Block
address + 6
address + 7
address + 8
thru address + 78
Command Number (see Section 6.3.2)
PROFINET Device Number (1-255) of the targeted Genius Gateway.
Targeted Genius Device Number (0-31). The serial bus address (SBA)
of the Genius device connected to the targeted Genius Gateway.
Parameters of the specific Command Number (see following
sections in this chapter).
GFK-2892B PACSystems RX3i Genius Communications Gateway User Manual Public 47
Page 52

Chapter 6. COMMREQ/Data_Init_Comm Programming
6.3.2 COMMREQ Commands Supported by the Genius Gateway (GCG001)
Command # Function Section
1
2
3
4
5
6
7
11
12
19
20
21
22
23
24
25 Write Data 6.4.16
1
Note that while the GCG001 does support the indicated COMMREQs, the devices which
respond to such COMMREQs are not currently supported by the GCG001.
Pulse Test
Read Configuration
Write Configuration
Read Diagnostics
Clear Circuit Fault
Clear All Circuit Faults
Assign Monitor
Read Device1
Write Device1
Read Identification
Write Point1
Read Block I/O
Read Map
Write Map
Read Data
6.4.1
6.4.2
6.4.3
6.4.4
6.4.5
6.4.6
6.4.7
6.4.8
6.4.9
6.4.10
6.4.11
6.4.12
6.4.13
6.4.14
6.4.15
48 Public PACSystems RX3i Genius Communications Gateway User Manual GFK-2892B
Page 53

Chapter 6. COMMREQ/Data_Init_Comm Programming
Status
Read
Write
Clear Circuit
Clear All Circuit
Read
6.3.3 COMMREQ Command Block Quick Reference
The table below summarizes all COMMREQs supported by the Genius Gateway. Beyond
“Address+8”, please see the individual COMMREQ specification in Sections 6.4.1 thru 6.4.16.
COMMREQ Content
COMMREQ
Pulse Test
Addr Addr+1 Addr+2 Addr+3 Addr+4 Addr+5 Addr+6 Addr+7
Length
Wait/
No
Wait
Pointer
Memory
Type
Status
Pointer
Offset
Idle
Timeout
Value
3 0 see 6.3.1 0 0 1 1-255 0-31
Max.
Comm
Time
COMM
REQ #
PROFINET
Device
Number
Addr+8
Genius
Device
Number
Configuration
Configuration
Read Diagnostics
Fault
Faults
Assign Monitor
Read Device
Write Device
Identification
Write Point
Read Block I/O
Read Map
Write Map
Read Data
Write Data
7 0 see 6.3.1 0 0 2 1-255 0-31
4+n 0 see 6.3.1 0 0 3 1-255 0-31
7 0 see 6.3.1 0 0 4 1-255 0-31
4 0 see 6.3.1 0 0 5 1-255 0-31
3 0 see 6.3.1 0 0 6 1-255 0-31
4 0 see 6.3.1 0 0 7 1-255 0-31
18 0 see 6.3.1 0 0 11 1-255 0-31
14-78 0 see 6.3.1 0 0 12 1-255 0-31
7 0 see 6.3.1 0 0 19 1-255 0-31
8 0 see 6.3.1 0 0 20 1-255 0-31
8 0 see 6.3.1 0 0 21 1-255 0-31
7 0 see 6.3.1 0 0 22 1-255 0-31
12 0 see 6.3.1 0 0 23 1-255 0-31
9 0 see 6.3.1 0 0 24 1-255 0-31
7 0 see 6.3.1 0 0 25 1-255 0-31
GFK-2892B PACSystems RX3i Genius Communications Gateway User Manual Public 49
Page 54

Chapter 6. COMMREQ/Data_Init_Comm Programming
active
no
true
false
6.3.4 Mechanics of the COMMREQ Instruction
Once the content of the of the COMMREQ communication has been set up (in the COMMREQ
Command Block, as described above) the application program will need to activate the
corresponding COMMREQ instruction in order to initiate communications with the target
Genius Device (via the interconnected PROFINET Controller and Genius Gateway.
This section describes the mechanisms employed by the PLC logic to initiate and monitor the
COMMREQ instruction and its aftermath.
The COMMREQ instruction has four inputs and two outputs:
COMMREQ Inputs
COMMREQ
Input
(enable)
IN
SYSID
TASK
Thus, the input specifies the conditions under which the COMMREQ is to be activated, and
specifies which PROFINET Controller and which Genius Gateway are targeted in this activity.
Description
Permissive logic that controls power flow to the COMMREQ function block.
The memory location of the Command Block containing the specific COMMREQ
command information. The Command Block may be located in any word–
oriented area of memory (%P, %L, %R, %AI, %AQ, or %W).
A two-byte hex value that gives the rack and slot location of the controlling
PROFINET Controller. The rack number must be zero and occupies the more
significant byte; the slot number in which the PROFINET Controller is located
occupies the less significant byte. Example:
Rack# Slot# Resulting SysID Hex Word Value
0 4 0004h
The task is 16#0084 for the IC695PNC001.
The task is 16#0002 0084 for the IC695CPE330.
COMMREQ Outputs
COMMREQ Output Description
OK
Indicates correct execution of the COMMREQ.
FT
The behavior of the COMMREQ Outputs is shown in the following truth table. Note that the OK
and FT outputs are never both true at the same time:
Enable Error? OK FT
active yes false true
not active no execution false false
The COMMREQ passes power flow to its OK output unless:
• The specified module (in rack/slot) is not present.
• The specified task is not valid for the target device.
• The data length is zero.
50 Public PACSystems RX3i Genius Communications Gateway User Manual GFK-2892B
Indicates a fault condition in COMMREQ execution.
Page 55

Chapter 6. COMMREQ/Data_Init_Comm Programming
CPU Memory
Application Program
⇒
If any fault intrinsic to the conduct of the COMMREQ occurs, power flow passes to the FT
output instead.
If there are errors in the portion of the Command Block used specifically by the PROFINET
Controller or Genius Gateway (for example, the Device Number entered is incorrect), these
errors are reflected in the value returned in the Status Block location, not in the FT output.
COMMREQ Status Block
Once a COMMREQ command is completed, the PROFINET Controller writes any resulting data
into the area designated in the COMMREQ command and then sets the status to Complete (4).
However, if an error occurred during processing of the command, the status will be set to one
of the possible error values. Possible status values are listed below.
Note: Because COMMREQs require write access to return their status, level 1 and 2 Controller
passwords, which prevent write access, cannot be used with COMMREQs. If an illegal memory
type is specified, a fault will be generated.
If one of the bit–oriented memories (%I or %Q) is used as the status location, the designated
bits can be monitored. These bits correspond to the binary values listed below. For example, if
%I048 were selected as the beginning location, reference %I050 would be set to 1 each time
the COMMREQ completed successfully (corresponding to a value of 04 Hex).
Clearing the Status Block
COMMREQs to the target PROFINET Controller should be executed sequentially. Before
sending a COMMREQ to the PROFINET Controller, the application program should check the
status of any previous COMMREQ to that specific PROFINET Controller.
Status Block
Check completion of prior
COMMREQ
When the previous COMMREQ has completed, the user’s PLC program should set the Status
Block to zero. Establishing this initial condition allows the program to differentiate between
the result of an earlier command and the currently–executing command.
Contents of the Status Block
The Status Block consists of two words in PLC memory to which the PROFINET Controller
returns the status of the COMMREQ.
The lower word is used for general information about the execution of the COMMREQ:
decimal
(word)
128 00000000 10000000 Command not supported.
4096 00010000 00000000 Command failed.
32769 00100000 00000001 Unknown Task ID rejected by the PNC COMMREQ Manager.
32770 00100000 00000010 PNC COMMREQ Manager got an internal error while dispatching the request.
VALUE
binary
(bit)
0 00000000 00000000 Command has not been processed.
1 00000000 00000001 Command not accepted: target PROFINET Controller busy with previous request.
2 00000000 00000010 Command currently being processed, not yet completed.
4 00000000 00000100 Command completed successfully.
8 00000000 00001000 Command terminated due to a syntax error.
16 00000000 00010000 Command terminated due to a data error.
DESCRIPTION
GFK-2892B PACSystems RX3i Genius Communications Gateway User Manual Public 51
Page 56

Chapter 6. COMMREQ/Data_Init_Comm Programming
The upper word of the status location provides additional status information.
VALUE
decimal
(word)
0 0 Command has not been processed.
1 1 Non-specific command failure.
2 2 Null or invalid command block.
3 3
4 4 Command completed successfully.
5 5 Incorrect command block length.
10 0x0A Unknown command number.
11 0x0B
12 0x0C
13 0x0D PROFINET API value is out of range. The value should be 0 or 1 (always 0 for Gateway requests).
14 0x0E
15 0x0F
16 0x10 Invalid transfer length specified. Value is either too large, or zero.
17 0x11 PROFINET stack interface failure; read_req call failed at invocation site.
18 0x12
19 0x13 PROFINET stack interface failure; write_req call failed at invocation site.
20 0x14
21 0x15 Invalid Genius device number. Value should be in range 0 through 31.
22 0x16 Invalid circuit number. Value should be in range 1 through 32.
23 0x17
24 0x18
25 0x19
26 0x1A
27 0x1B Gateway status check (via read index 0x0200) returned an invalid value (not 0, 1, or 2).
28 0x1C
29 0x1D The message status byte associated with a Genius Reply is not 0, indicating a problem.
30 0x1E A Genius Reply does not have the expected length.
31 0x1F
32 0x20 A Read Block I/O COMMREQ specified an invalid offset value.
33 0x21 An internal error has been detected in the PNC COMMREQ firmware.
34 0x22 The COMMREQ request is not supported by the specified Genius device.
35 0x23
VALUE
Hex
(word)
DESCRIPTION
Unknown Task ID detected. Task ID should be 132 for Gateway COMMREQs, or 131 for generic
PROFINET acyclic requests.
Invalid PROFINET device number. Number should be in the range 1 through
MAX_PROFINET_IO_DEVICE_CONNECTIONS (model-specific definition).
PROFINET device is ‘undeclared’. The PROFINET device specified in the command block is not
known to the PNC as currently configured.
PROFINET slot value is out of range. The value should be in the range 0 through 31 (Gateway
requests normally use 31, except when using read index 0x0203).
PROFINET subslot value is out of range. Gateway requests always use subslot 1. Generic
acyclic requests test for a subslot value in range 1 through 32784.
Error returned from PROFINET stack; a generic acyclic request issued a read_req call that
produced a negative confirmation callback.
Error returned from PROFINET stack; a generic acyclic request issued a write_req call that
produced a negative confirmation callback.
Error returned from PROFINET stack; a Gateway request issued a write_req call that produced
a negative confirmation callback.
Error returned from PROFINET stack; a Gateway request issued a read_req call that produced
a negative confirmation callback.
Last write request to the Gateway timed out or had an error. When Gateway status was
checked (via read index 0x0200), the returned value was 2.
Last write request to the Gateway caused a “stuck busy” result. Gateway status checks (via
read index 0x0200) have returned a value of 1 for more than 300 msec.
Error returned from PROFINET stack; an attempt to retrieve a Genius Reply from the Gateway
(via read index 0x0201) produced a negative confirmation callback.
A Write Configuration COMMREQ specified a configuration data length that does not match
the required configuration length for the device.
The data type code specified for a Read Data or Write Data COMMREQ does not have a value
recognized by the High-Speed Counter.
52 Public PACSystems RX3i Genius Communications Gateway User Manual GFK-2892B
Page 57

Chapter 6. COMMREQ/Data_Init_Comm Programming
A Read Diagnostics COMMREQ was issued for a device that does not have any diagnostic data.
VALUE
decimal
(word)
36 0x24
37 0x25
38 0x26
39 0x27
40 0x28
41 0x29
42 0x2A
VALUE
Hex
(word)
DESCRIPTION
The counter number specified for a Read Data or Write Data COMMREQ does not have a value
recognized by the High-Speed Counter.
A Read Configuration or Write Configuration COMMREQ was issued for a device that does not
have any configuration data.
A Read Device or Write Device COMMREQ specified an invalid program name when attempting
to access %P or %L memory.
A Read Device or Write Device COMMREQ specified an invalid block name when attempting to
access %L memory.
A Genius Reply does not have the expected sub-function code. This could indicate that the
Gateway delivered a stale or out-of-sequence reply.
A Read Device or Write Device COMMREQ sent to a 90-30 GBC (BEM331) attempted to access
memory types (%P, %L, %W) not handled by the BEM331.
GFK-2892B PACSystems RX3i Genius Communications Gateway User Manual Public 53
Page 58

Chapter 6. COMMREQ/Data_Init_Comm Programming
Example: Ladder Logic to Clear Circuit Fault
The ladder logic displayed in Figure 25 shows how to clear a fault on circuit #2 of the Genius
Device at SBA#13 when connected via a Genius Gateway to the PROFINET Controller located
at Rack 0 Slot 7. Figure 26 uses a Data_Init_Comm to set up the same COMMREQ.
54 Public PACSystems RX3i Genius Communications Gateway User Manual GFK-2892B
Figure 25: Ladder Logic to Clear Circuit Fault
Page 59

Chapter 6. COMMREQ/Data_Init_Comm Programming
Figure 26: Data_Init_Comm to Clear Circuit Fault
6.3.5 Comparison: COMMREQ vs Data_Init_Comm
Data_Init_Comm is an instruction designed to help programmers set up COMMREQs.
Note that when programming a COMMREQ (Figure 25), the entry for
than the intended beginning address for the Status Block. When programming a
Data_Init_Comm (Figure 26), the entry for
for the beginning address for the Status Block.
This difference applies to all command blocks detailed in the following sections 6.4.1 - 6.4.16.
If the COMMREQ requires “n” for the Status Block location, the equivalent Data_Init_Comm will
require “n+1” in its
Also note that the pop-up window presented in Data_Init_Comm (as shown in Figure 26),
allows the user to scroll through the parameters of the command. This is especially useful
where the command has multiple parameters.
GFK-2892B PACSystems RX3i Genius Communications Gateway User Manual Public 55
Address+3
.
Address+3
is the actual intended memory location
Address+3
is one less
Page 60

Chapter 6. COMMREQ/Data_Init_Comm Programming
6.3.6 COMMREQ Differences: Genius Bus Controllers and Genius Gateway
COMMREQs supported by the Genius Gateway (GCG) are intended to perform the same
functions as their Genius Bus Controller (GBC) counterparts. However there are four significant
differences that break compatibility with the GBC COMMREQ Command Blocks:
1. GCG COMMREQs require a PROFINET Device Number at Address +7. This value is
required to identify which PROFINET /GCG combination is expected to process the
COMMREQ.
2. As a result of (1) above, any COMMREQ command parameters above Address +7 are
shifted with respect to the comparable GBC COMMREQ.
3. SYSID consists of the Rack/Slot location of the PROFINET Controller networked to the
targeted GCG rather than the Rack/Slot location of the GBC.
4. For COMMREQs that return data to CPU memory, e.g., Read Configuration, the Memory
Offset field has been expanded from one to two words. This allows the use of bulk
memory (%W) addresses greater than 65,535. When using offsets less than or equal to
65,535, the more significant offset word must be zero.
The following table shows all Genius COMMREQs and where they are supported.
COMMREQ#
1
2
3
4
5
6
7
8
9
10
11
12
13
14
15
16
17
18
19
20
21
22
23
24
25
Function
Pulse Test
Read Configuration
Write Configuration
Read Diagnostics
Clear Circuit Fault
Clear All Circuit Faults
Assign Monitor
Outputs Enable/Disable
Global Data Enable/Disable
Switch BSM
Read Device
Write Device
De-Queue Datagram
Send Datagram
Request Datagram Reply
I/O Faults Enable/Disable
Do Output
Read Bus Address of Bus Controller
Read Identification
Write Point
Read Block I/O
Read Map
Write Map
Read Data
Write Data
GCG GBC 30 GBC 70
56 Public PACSystems RX3i Genius Communications Gateway User Manual GFK-2892B
Page 61

Chapter 6. COMMREQ/Data_Init_Comm Programming
Address
Command Length
3 Address +1
No Wait
0
Address +2
Status Block memory type
70 (%I), 72 (%Q), 8 (%R), 10 (%AI), 12 (%AQ) or 196 (%W)
Address +3
Status Block offset
Beginning address for the COMMREQ Status Block.
Address +4
Idle timeout value
0
Address +5
Max. communications time
0 Address +6
Command number
1
Address +7
PROFINET Device number
1-255: The device number of the targeted GCG Genius Gateway.
Address +8
Genius Device Number
0-31: the SBA of the targeted Genius Device.
6.4 COMMREQ Descriptions and Formats
6.4.1 COMMREQ #1: Pulse Test Command
The Pulse Test command causes the Genius Gateway to send a Pulse Test datagram.
Pulse testing is used to verify the operation of outputs on discrete Genius I/O blocks. It checks
whether the outputs will change state, and whether output circuits (wires, power sources,
loads) will start or stop current flow. Any circuit faults generated by pulse tests are reported
through the normal Report Fault message. Pulse testing is recommended for blocks that
seldom change state. It is typically done once per hour, or once per shift; it should not be done
more often than once per minute. Pulse testing provides assurance that when needed, an
output will operate correctly. Blocks that control outputs that change state frequently do not
need to be pulse tested. Pulse testing does not provide enough energy to activate
mechanical devices such as motor starters, replays, or solenoid valves, but may change the
state of a very small load. If appropriate, blocks can be configured (with the Hand-Held
Monitor or via a Write Configuration command) to ignore a Pulse Test datagram. Pulse
testing can also be done using a Hand-Held Monitor.
Command Block for the Pulse Test Command
GFK-2892B PACSystems RX3i Genius Communications Gateway User Manual Public 57
Page 62

Chapter 6. COMMREQ/Data_Init_Comm Programming
Address
Command Length
7
Address +1
No Wait
0
Address +2
Status Block memory type
70 (%I), 72 (%Q), 8 (%R), 10 (%AI), 12 (%AQ) or 196 (%W)
Address +3
Status Block offset
Beginning address for the COMMREQ Status Block.
Address +4
Idle timeout value
0
Address +5
Max. communications time
0 Address +6
Command number
2
Address +7
PROFINET Device number
1-255: The device number of the targeted GCG Genius Gateway.
Address +8
Genius Device Number
0-31: the SBA of the targeted Genius Device.
18 words (288 bits): any discrete block.
that might be returned.
Enter the code representing the CPU Memory Type where the GCG will
same codes as in Address+2.
Address +11
Address +12
Memory offset, bytes 1, 2
bytes 3 ,4
Starting address within the Deposit Memory type.
(Byte 4 is msb, Byte 1 is lsb)
6.4.2 COMMREQ #2: Read Configuration Command
The Read Configuration command is used to request configuration data from device on the
Genius bus. It causes the Gateway to send a Read Configuration datagram to the indicated
device. After receiving the request, the block returns its configuration data to the Gateway in
16-byte increments. When the Gateway has received all the configuration data, it transfers
that complete data image to the PNC, which then transfers the data to the deposit memory
location specified in the Command Block. Because configuration data consists of both bittype and byte-type portions, it is best to place it in word memory, then move the bit-oriented
data to bit memory. Contents of Read Configuration Reply messages for I/O blocks are shown
in the Genius I/O System User’s Manual.
The VersaMax I/O Station (GNIU) does not support this COMMREQ. Use Machine Edition to
read the GNIU’s configuration data.
Command Block for the Read Configuration Command
Address +9
Address +10
Maximum data memory
length. May represent
either bits or words
(depends on the memory
type selected below).
Deposit Memory type
13 words (208 bits): 16-Circuit AC Input block.
42 words (672 bits): Analog blocks (4-in/2-out)
42 words (672 bits): RTD or Thermocouple block.
42 words (672 bits): 6-Input Analog blocks.
35 words (560 bits): High-Speed Counter.
If the length of data returned by the device exceeds the length
specified here, the GCG writes as much data as possible to the PLC
CPU Memory and returns a data error to the COMMREQ Status Block.
The GCG will not write past the computed end-point.
If the same COMMREQ will be used to read configuration data from
more than one type of block (for example, in a subroutine), be sure to
allow enough length to accommodate the largest amount of data
deposit the data obtained from the target Genius Device. Use the
58 Public PACSystems RX3i Genius Communications Gateway User Manual GFK-2892B
Page 63

Chapter 6. COMMREQ/Data_Init_Comm Programming
This number equals the sum of the amount of configuration data to be
with other Genius devices.
Address +1
No Wait
0
Address +2
Status Block memory type
70 (%I), 72 (%Q), 8 (%R), 10 (%AI), 12 (%AQ) or 196 (%W)
Address +3
Status Block offset
Beginning address for the COMMREQ Status Block.
Address +4
Idle timeout value
0
Address +5
Max. communications time
0 Address +6
Command number
3
Address +7
PROFINET Device number
1-255: The device number of the targeted GCG Genius Gateway.
Address +8
Genius Device Number
0-31: the SBA of the targeted Genius Device.
Up to 248 bytes (128 words) of configuration data may be written to
Address +10
Address +n
6.4.3 COMMREQ #3: Write Configuration Command
The Write Configuration command is used to send configuration data from the CPU to a
device on the Genius bus. The Gateway cannot write configuration data to another Genius
Gateway, to a Bus Interface module, or to a Hand-Held Monitor.
The PLC sends the intended configuration data from CPU memory to the PNC which then
transfers it to the Gateway. The Gateway schedules background Write Configuration
datagrams to the target Genius device. Once message transmission begins, the Gateway
sends the configuration data to the target Genius device, up to 16 bytes per bus scan. The
block does not use any of the new configuration data until it has all been received. No new
datagrams can be sent to the Genius device until the operation has been completed. When all
the data has been sent, the Gateway changes the status to 4 (Done), and this is replicated by
the PNC.
The length of the data sent with this command must exactly match the length specified for
the target Genius device. If the lengths are not equal, the Gateway returns a Syntax Error to
the COMMREQ Status Block.
GNIU does not support this COMMREQ. Use Machine Edition to download configuration data
to a GNIU.
Command Block for the Write Configuration Command
Address
Address +9
to
Command Length
Length of configuration
data (
in bytes
Configuration Data
)
sent to the target Genius device, plus 4. For example, for an RTD block,
which has 42 words of configuration data, you would enter 46 here.
See “COMMREQ #2: Read Configuration” for data lengths associated
the target Genius device. See “COMMREQ #2: Read Configuration”
for data lengths associated with other Genius devices.
Configuration data for transfer to the target Genius device.
Formats are given in the Genius I/O System User’s Manual.
GFK-2892B PACSystems RX3i Genius Communications Gateway User Manual Public 59
Page 64

Chapter 6. COMMREQ/Data_Init_Comm Programming
Address
Command Length
7
Address +1
No Wait
0
Address +2
Status Block memory type
70 (%I), 72 (%Q), 8 (%R), 10 (%AI), 12 (%AQ) or 196 (%W)
Address +3
Status Block offset
Beginning address for the COMMREQ Status Block.
Address +4
Idle timeout value
0
Address +5
Max. communications time
0
Address +6
Command number
4
Address +7
PROFINET Device number
1-255: The device number of the targeted GCG Genius Gateway.
Address +8
Genius Device Number
0-31: the SBA of the targeted Genius Device.
This entry tells the CPU how much memory is being allocated to
The GCG will not write past the computed end-point.
Enter the code representing the CPU Memory Type where the GCG will
same codes as in Address+2.
Address +11
Memory offset, bytes 1, 2
Starting address within the Deposit Memory type.
6.4.4 COMMREQ #4: Read Diagnostics Command
Use this command to request diagnostic information from a Genius device or a bus interface
module. Diagnostics can be requested from any Genius device, even those configured not to
issue Report Fault messages. The diagnostic data returned by a block will indicate faults that
have occurred since power-up or since the last Clear Faults datagram. Current diagnostic
state can be found by issuing a Clear Faults command to the circuit(s) or channel(s) to clear
the fault history, then issuing a Read Diagnostics command.
This command causes the Genius Gateway to send a Read Diagnostics datagram to the
specified device. When the device receives this datagram, it returns a Read Diagnostics Reply
datagram. I/O blocks return data in message segments of up to 16 bytes per bus scan. The
content of the Read Diagnostics Reply message depends on the device being queried. The
first word of the reply will contain the length of the data that follows. Data is packed two
bytes per word. Message formats are shown in the Genius I/O System User’s Manual. When
all the data has been received, the Gateway transfers it to the PNC, which then transfers it to
the CPU.
Command Block for the Read Diagnostics Command
Maximum data memory
Address +9
Address +10
Address +12
length. May represent
either bits or words
(depends on the memory
type selected below).
Deposit Memory type
bytes 3, 4
store the diagnostic data returned by the Genius device. The
number of bits or words needed depends on the number of circuits
on the block and the block type:
10 words (160 bits): Discrete blocks, 8-ckt.
18 words (288 bits): Discrete blocks, 16-ckt.
34 words (544 bits): Discrete blocks, 32-ckt.
8 words (128 bits): Analog, 4-in/2-out blocks.
8 words (128 bits): RTD Input blocks.
8 words (128 bits): Thermocouple Input blocks.
6 words (96 bits): High-Speed Counter block.
If the length of data returned by the device exceeds the length
specified here, the GCG writes as much data as possible to the PLC
CPU Memory and returns a data error to the COMMREQ Status Block.
deposit the data obtained from the target Genius Device. Use the
(Byte 4 is msb, Byte 1 is lsb)
60 Public PACSystems RX3i Genius Communications Gateway User Manual GFK-2892B
Page 65

Chapter 6. COMMREQ/Data_Init_Comm Programming
Address
Command Length
4
Address +1
No Wait
0
Address +2
Status Block memory type
70 (%I), 72 (%Q), 8 (%R), 10 (%AI), 12 (%AQ) or 196 (%W)
Address +3
Status Block offset
Beginning address for the COMMREQ Status Block.
Address +4
Idle timeout value
0
Address +5
Max. communications time
0 Address +6
Command number
5
Address +7
PROFINET Device number
1-255: The device number of the targeted GCG Genius Gateway.
Address +8
Genius Device Number
0-31: the SBA of the targeted Genius Device.
This is the relative number of the circuit within the Genius device.
5, enter 5 here.
Address
Command Length
3
Address +1
No Wait
0
Address +2
Status Block memory type
70 (%I), 72 (%Q), 8 (%R), 10 (%AI), 12 (%AQ) or 196 (%W)
Address +3
Status Block offset
Beginning address for the COMMREQ Status Block.
Address +4
Idle timeout value
0
Address +5
Max. communications time
0
Address +6
Command number
6
Address +7
PROFINET Device number
1-255: The device number of the targeted GCG Genius Gateway.
0-31 or 255: the SBA of the targeted Genius Device. Enter 255 to
send this command to all blocks on the bus.1
6.4.5 COMMREQ #5: Clear Circuit Fault Command
This command is used to clear any faults on a specified circuit of a targeted Genius I/O device.
Command Block for the Clear Circuit Fault Command
It is not its reference number assigned in CPU Memory. The first
Address +9
Relative Circuit Number
circuit on the Genius device is considered to be number 1. For
example, to clear faults on discrete I/O block circuit #
For a 4-Input/2-Output analog block, circuit numbers 1 to 4 are for
input channels, 5 and 6 are for output channels.
6.4.6 COMMREQ #6: Clear All Circuit Faults Command
The Clear All Circuit Faults command is used to clear all faults on a targeted Genius I/O device.
Command Block for the Clear All Circuit Faults Command
Address +8
Genius Device Number
1
This enhancement (use of 255 as Genius Device Number) requires that the supervising PNC001 firmware be version 2.11
GFK-2892B PACSystems RX3i Genius Communications Gateway User Manual Public 61
or later; otherwise the COMMREQ command will fail.
Page 66

Chapter 6. COMMREQ/Data_Init_Comm Programming
Address
Command Length
4 Address +1
No Wait
0
Address +2
Status Block memory type
70 (%I), 72 (%Q), 8 (%R), 10 (%AI), 12 (%AQ) or 196 (%W)
Address +3
Status Block offset
Beginning address for the COMMREQ Status Block.
Address +4
Idle timeout value
0
Address +5
Max. communications time
0 Address +6
Command number
7
Address +7
PROFINET Device number
1-255: The device number of the targeted GCG Genius Gateway.
Genius Device Number of
reports.
0-31: the SBA of a sending Genius Device.
each, entering a different SBA in this field each time.
Genius Device Number of
fault reports.
6.4.7 COMMREQ #7: Assign Monitor Command
An Assigned Monitor is an additional bus interface module (usually in another PLC) that
monitors Genius I/O devices on the bus. Remote I/O Scanners and I/O blocks broadcast their
inputs to all devices on the bus. Therefore, any interface module on the bus will receive all
inputs sent by the blocks. However, blocks direct fault reports and configuration change
messages only to the bus interface module that sends them outputs. Blocks configured for
CPU Redundancy will automatically transmit two copies of any fault report or configuration
change message, directing them to Device Numbers 30 and 31.
The Assign Monitor command can be used to have Genius I/O devices send extra fault report
and configuration change messages to a monitoring bus interface module. Blocks would
send two copies of each fault report or configuration message in a non-redundant system.
Blocks in a redundant system would send three (two to the redundant bus interface modules,
and the third to the Assigned Monitor).
Command Block for the Assign Monitor Command
Address +8
Address +9
the I/O device(s) that
should send extra fault
the bus interface device
that will RECEIVE the extra
In the event only selected blocks should report their faults to the
assigned monitor, program separate Assign Monitor commands for
0-31: the SBA of the receiving Genius Device (i.e. the Assigned
Monitor).
62 Public PACSystems RX3i Genius Communications Gateway User Manual GFK-2892B
Page 67

Chapter 6. COMMREQ/Data_Init_Comm Programming
Address
Command Length
18
Address +1
No Wait
0
Address +2
Status Block memory type
70 (%I), 72 (%Q), 8 (%R), 10 (%AI), 12 (%AQ) or 196 (%W)
Address +3
Status Block offset
Beginning address for the COMMREQ Status Block.
Address +4
Idle timeout value
0
Address +5
Max. communications time
0 Address +6
Command number
11
Address +7
PROFINET Device number
1-255: The device number of the targeted GCG Genius Gateway.
0-31: the SBA of the targeted Genius Device from which data is to
be retrieved.
Source Memory Address,
Specify the location FROM which the requested data will be read.
a Read Device COMREQ to a computer).
Program name,
Required to read %P or %L memory in another PLC, otherwise zero.
trailing characters MUST be entered as nulls (00h).
Block name,
characters 7, 8
This is the amount of data to be read from the targeted device.
The maximum length is equal to 128 bytes.
Maximum Deposit memory
length
Memory length needed for the returned data.
Value in bits or words
(depends on memory type selected in Address+21 below).
Enter the code representing the CPU Memory Type where the GCG will
same codes as in Address+2.
Address +22
Memory offset, bytes 1, 2
bytes 3, 4
Starting address within the Deposit Memory type.
(Byte 4 is msb, Byte 1 is lsb)
6.4.8 COMMREQ #11: Read Device Command
To read up to 128 bytes of data from another CPU and place it in the host PLC CPU memory,
use the Read Device command. This causes the Genius Gateway to issue a Read Device
datagram. When the requested data is received, it will automatically be placed in the CPU
memory location specified in the Command Block.
Note that while the GCG001 does support this COMMREQ, the Genius devices which respond
to such a COMMREQ are not currently supported by the GCG001.
Command Block for the Read Device Command
Address +8
Address +9
Address +10
Address +11
Address +12
Address +13
Address +14
Address +15
Address +16
Address +17
Address +18
Address +19
Address +20
Address +21
Address +23
Genius Device Number
characters 1, 2
characters 3, 4
characters 5, 6
characters 7, 8
characters 1, 2
characters 3, 4
characters 5, 6
Source Data length,
(in words, bytes, or bits).
Deposit Memory type
bytes 1, 2
bytes 3, 4
(It is not necessary to specify a source memory address when sending
If the target of the command is NOT a PLC, Address +11 through
Address +18 are ignored; they may contain any value.
Program names are limited to 7 characters. Character 8 and all other
Required to read %L memory in a PLC, otherwise zero.
For %P, Address+15 through Address +18 are ignored.
Block names are limited to 7 characters. Character 8 and all other
trailing characters MUST be entered as nulls (00h).
When reading a PLC, data length is defined in bits or words,
depending on the memory type being read. For other types of
devices, the length entered here is as expected by the target device.
deposit the data obtained from the target Genius Device. Use the
Device Memory Addressing
For Series 90 and PACSystems PLCs, Address+9 contains the segment selector value for the
memory type being read. Address+10 contains the zero-based offset into the memory being
read.
For legacy devices, use an absolute address, where Address+9 is the least-significant word of
the address and Address+10 is the most-significant word of the address field.
GFK-2892B PACSystems RX3i Genius Communications Gateway User Manual Public 63
Page 68

Chapter 6. COMMREQ/Data_Init_Comm Programming
Address
Command Length
14 – 78 depending on length of data specified in Address +19.
Address +1
No Wait
0
Address +2
Status Block memory type
70 (%I), 72 (%Q), 8 (%R), 10 (%AI), 12 (%AQ) or 196 (%W)
Address +3
Status Block offset
Beginning address for the COMMREQ Status Block.
Address +4
Idle timeout value
0
Address +5
Max. communications time
0
Address +6
Command number
12
Address +7
PROFINET Device number
1-255: The device number of the targeted GCG Genius Gateway.
0-31: the SBA of the targeted Genius Device to which data is to be
Target Memory Address,
Specify the location TO which the supplied data will be
transmitted
.
Required to write to %P or %L memory in another PLC, otherwise zero.
trailing characters MUST be entered as nulls (00h).
Block name,
characters 7, 8
This is the amount of data to be written to the targeted device.
The maximum length is equal to 128 bytes.
Address +20
Address +n
6.4.9 COMMREQ #12: Write Device Command
To send up to 128 bytes of data to another CPU on the bus, use the Write Device command.
Any type of data that can be addressed by its memory type and offset can be sent. This
command causes the Gateway to issue a Write Device datagram to the specified device.
Note that while the GCG001 does support this COMMREQ, the Genius devices which respond
to such a COMMREQ are not currently supported by the GCG001.
Using Write Device Messages Instead of Global Data
Write Device datagrams can replace Global Data when the target device is a PLC that is using
a Genius Bus Controller to connect to the Genius bus. However, Write Device will not work in
this manner when the target PLC is using a Genius Gateway to connect to the Genius bus.
Command Block for the Write Device Command
Address +8
Address +9
Address +10
Address +11
Address +12
Address +13
Address +14
Address +15
Address +16
Address +17
Address +18
Address +19
to
Genius Device Number
Program name,
Target Data length,
(in words, bytes, or bits).
Data
characters 1, 2
characters 3, 4
characters 5, 6
characters 7, 8
characters 1, 2
characters 3, 4
characters 5, 6
bytes 1, 2
bytes 3, 4
transmitted.
(It is not necessary to specify a source memory address when sending
a Write Device COMREQ to a computer).
If the target of the command is NOT a PLC, Address +11 through
Address +18 are ignored; they may contain any value.
Program names are limited to 7 characters. Character 8 and all other
Required to write to %L memory in a PLC, otherwise zero.
For %P, Address+15 through Address +18 are ignored.
Block names are limited to 7 characters. Character 8 and all other
trailing characters MUST be entered as nulls (00h).
When reading a PLC, data length is defined in bits or words,
depending on the memory type being written. For other types of
devices, the length entered here is as expected by the target device.
Data to be transmitted, then written into the specified memory of
the target device.
64 Public PACSystems RX3i Genius Communications Gateway User Manual GFK-2892B
Page 69

Chapter 6. COMMREQ/Data_Init_Comm Programming
Address
Command Length
7
Address +1
No Wait
0
Address +2
Status Block memory type
70 (%I), 72 (%Q), 8 (%R), 10 (%AI), 12 (%AQ) or 196 (%W)
Address +3
Status Block offset
Beginning address for the COMMREQ Status Block.
Address +4
Idle timeout value
0
Address +5
Max. communications time
0
Address +6
Command number
19
Address +7
PROFINET Device number
1-255: The device number of the targeted GCG Genius Gateway.
Address +8
Genius Device Number
0-31: the SBA of the targeted Genius Device.
This entry tells the CPU how much memory is being allocated to
on the memory type selected as the Deposit Memory type below).
Enter the code representing the CPU Memory Type where the GCG will
same codes as in Address+2.
Address +11
Memory offset, bytes 1, 2
bytes 3, 4
Starting address within the Deposit Memory type.
(Byte 4 is msb, Byte 1 is lsb)
Word #
Description
MSB
LSB
Device Status Bits
Bit
Description
0
Device Forced if set to 1
1,2
01 = inputs only
11 = combination
3
HHM Present if set to 1
4
BSM Present if set to 1
5
BSM Controller if set to 1
6
BSM Actual State
7
BSM Forced if set to 1
Assigned controller bus address
Baud Rate Code
Bits
Baud Rate
0 0 0 0 x x x x
153.6 K baud, extended
0 0 0 1 x x x x
153.6 K baud, standard
0 0 1 0 x x x x
76.8 K baud
0 0 1 1 x x x x
38.4 K baud
6.4.10 COMMREQ #19: Read Identification
To read the identification data from a Genius device and place it in PLC CPU memory, use the
Read Identification command. This causes the Gateway to issue a Read Identification
datagram. When the data is received from the target Genius device, via a Read Identification
Reply Datagram, it will automatically be placed in the CPU memory location specified in the
Command Block.
Command Block for the Read Identification Command
Address +9
Address +10
Address +12
Deposit Memory length.
(either bits or words)
Deposit Memory type
store the identification data returned by the Genius device.
Enter 6 for word memory types or 96 for bit memory types (depends
deposit the data obtained from the target Genius Device. Use the
Read Identification Reply Data
The datagram returned by the target Genius Device has the following data content:
0 Output data length (bytes) Input data length (bytes)
1 Number of diagnostic data bytes Number of configuration data bytes
10 = outputs only
2 Device Status Table Address (lsb)
Device Model Number OR
3
GENA application ID if a GENA
Device Status Table Address (msb)
OR S6 GBC DIP switch, if S6 GBC
4
OR GENA application rev #, if GENA
5
Device Software Revision Number
Device Model Number
GFK-2892B PACSystems RX3i Genius Communications Gateway User Manual Public 65
Page 70

Chapter 6. COMMREQ/Data_Init_Comm Programming
Address
Command Length
7
Address +1
No Wait
0
Address +2
Status Block memory type
70 (%I), 72 (%Q), 8 (%R), 10 (%AI), 12 (%AQ) or 196 (%W)
Address +3
Status Block offset
Beginning address for the COMMREQ Status Block.
Address +4
Idle timeout value
0
Address +5
Max. communications time
0 Address +6
Command number
20
Address +7
PROFINET Device number
1-255: The device number of the targeted GCG Genius Gateway.
0-31: the SBA of the targeted Genius Device to which data is to be
transmitted.
Target Device Address
bytes 3, 4
AND and OR Masks
for byte 1
AND and OR Masks
for byte 2
6.4.11 COMMREQ #20: Write Point Command
This command is intended for use with legacy devices that use absolute memory addressing,
such as the Series Six. For Series 90 and PACSystems PLCs, use the Write Device command.
Note that while the GCG001 does support this COMMREQ, the Genius devices which respond
to such a COMMREQ are not currently supported by the GCG001.
Command Block for the Write Point Command
Address +8
Address +9
Address +10
Address +11
Address +12
Genius Device Number
bytes 1, 2
Address within target device to be modified per the AND and OR masks
supplied below. Byte 1 is lsb of this address, Byte 4 is msb.
AND mask is in the LSB OR mask is in the MSB
AND mask is in the LSB OR mask is in the MSB
66 Public PACSystems RX3i Genius Communications Gateway User Manual GFK-2892B
Page 71

Chapter 6. COMMREQ/Data_Init_Comm Programming
Address
Command Length
8
Address +1
No Wait
0
Address +2
Status Block memory type
70 (%I), 72 (%Q), 8 (%R), 10 (%AI), 12 (%AQ) or 196 (%W)
Address +3
Status Block offset
Beginning address for the COMMREQ Status Block.
Address +4
Idle timeout value
0
Address +5
Max. communications time
0 Address +6
Command number
21
Address +7
PROFINET Device number
1-255: The device number of the targeted GCG Genius Gateway.
0-31: the SBA of the targeted Genius Device from which data is to
be retrieved.
Length of data to be returned by the target Genius device.
Value in bits or words, depending on memory type selected below
Enter the code representing the CPU Memory Type where the GCG will
same codes as in Address+2.
Address +11
Address +12
Memory offset, bytes 1, 2
bytes 3, 4
Starting address within the Deposit Memory type.
(Byte 4 is msb, Byte 1 is lsb)
Address +13
I/O Offset
Byte offset from the beginning of the device’s I/O data (zero-based).
6.4.12 COMMREQ #21: Read Block I/O Command
This command is used to read input and output data from the following Genius blocks:
• 4-Input/2-Output Analog Blocks
• Current-source Analog Blocks
• Thermocouple Input Blocks
The data available to this command includes the I/O data that is part of the block’s periodic
I/O update as well as other related data, such as the raw counts.
Command Block for the Read Block I/O Command
Address +8
Address +9
Address +10
Genius Device Number
Length
Deposit Memory type
deposit the data obtained from the target Genius Device. Use the
I/O Data Format Returned by 4-In/2-Out Analog and Strain Gauge/mV Blocks
Byte # Description
0
1
2
3
4-5
6-7
8-9
10
11
12-13 D/A value for Output Channel 2 *
14
15
16-17 Engineering Units value for input channel 2
18-19 Engineering Units value for input channel 3
20-21 Engineering Units value for input channel 4
22
23
24-25 Engineering Units value for output channel 2 *
Block Model Number
Block Software Revision Number
A/D value for Input Channel 1 (LSB)
A/D value for Input Channel 1 (MSB)
A/D value for Input Channel 2
A/D value for Input Channel 3
A/D value for Input Channel 4
D/A value for Output Channel 1 (LSB) *
D/A value for Output Channel 1 (MSB) *
Engineering Units value for input channel 1 (LSB)
Engineering Units value for input channel 1 (MSB)
Engineering Units value for output channel 1 (LSB) *
Engineering Units value for output channel 1 (MSB) *
GFK-2892B PACSystems RX3i Genius Communications Gateway User Manual Public 67
Page 72

Chapter 6. COMMREQ/Data_Init_Comm Programming
I/O Data Format Returned by Current Source Analog (CSA) Blocks
Byte # Description
0
1
2
3
4-5
6-7
8-9
10-11 µA commanded value for output channel 1
12-13 µA commanded value for output channel 2
14
15
16-17 Engineering Units value for input channel 2
18-19 Engineering Units value for input channel 3
20-21 Engineering Units value for input channel 4
22-23 Engineering Units value for output channel 1
24-25 Engineering Units value for output channel 2
26
27
28-29 µA Feedback value for output channel 2
30 Engineering Units feedback value for output channel 1 (LSB)
31 Engineering Units feedback value for output channel 1 (MSB)
32-33 Engineering Units feedback value for output channel 2
Block Model Number
Block Software Revision Number
µA value for Input Channel 1 (LSB)
µA value for Input Channel 1 (MSB)
µA value for Input Channel 2
µA value for Input Channel 3
µA value for Input Channel 4
Engineering Units value for input channel 1 (LSB)
Engineering Units value for input channel 1 (MSB)
µA Feedback value for output channel 1 (LSB)
µA Feedback value for output channel 1 (MSB)
I/O Data Format Returned by Current Source Output (CSO) Blocks
Byte # Description
0
1
2
3
4-5
6-7
8-9
10-11 µA commanded value for output channel 5
12-13 µA commanded value for output channel 6
14
15
16-17 Engineering Units value for output channel 2
18-19 Engineering Units value for output channel 3
20-21 Engineering Units value for output channel 4
22-23 Engineering Units value for output channel 5
24-25 Engineering Units value for output channel 6
Block Model Number
Block Software Revision Number
µA commanded value for output channel 1 (LSB)
µA commanded value for output channel 1 (MSB)
µA commanded value for output channel 2
µA commanded value for output channel 3
µA commanded value for output channel 4
Engineering Units value for output channel 1 (LSB)
Engineering Units value for output channel 1 (MSB)
68 Public PACSystems RX3i Genius Communications Gateway User Manual GFK-2892B
Page 73

Chapter 6. COMMREQ/Data_Init_Comm Programming
I/O Data Format Returned by Current Source Input (CSI) Blocks
Byte # Description
0
Block Model Number
1
Block Software Revision Number
2
µA value for input channel 1 (LSB)
3
µA value for input channel 1 (MSB)
4-5
µA value for input channel 2
6-7
µA value for input channel 3
8-9
µA value for input channel 4
10-11 µA value for input channel 5
12-13 µA value for input channel 6
14
Engineering Units value for input channel 1 (LSB)
15
Engineering Units value for input channel 1 (MSB)
16-17 Engineering Units value for input channel 2
18-19 Engineering Units value for input channel 3
20-21 Engineering Units value for input channel 4
22-23 Engineering Units value for input channel 5
24-25 Engineering Units value for input channel 6
GFK-2892B PACSystems RX3i Genius Communications Gateway User Manual Public 69
Page 74

Chapter 6. COMMREQ/Data_Init_Comm Programming
I/O Data Format Returned by Thermocouple Input Block
Byte # Description
0
1
2
3
4-5
6-7
8-9
10-11 Channel 5 T/C input voltage (hundredths of mV)
12-13 Channel 6 T/C input voltage (hundredths of mV)
14
15
16-17 Channel 2 Engineering Units value
18-19 Channel 3 Engineering Units value
20-21 Channel 4 Engineering Units value
22-23 Channel 5 Engineering Units value
24-25 Channel 6 Engineering Units value
26
27
28-29 Channel 3/4 XJV voltage (hundredths of mV)
30-31 Channel 5/6 XJV voltage (hundredths of mV)
32
33
34-35 Channel 3/4 XJV temperature (tenths of degrees C)
36-37 Channel 5/6 XJV temperature (tenths of degrees C)
38
39
40-41 Channel 3/4 XJI current (tenths of µA)
42-43 Channel 5/6 XJI current (tenths of µA)
44
45
46-47 Channel 3/4 XJI temperature (tenths of degrees C)
48-49 Channel 5/6 XJI temperature (tenths of degrees C)
50
51
52-53 Channel 3/4 internal CJS current (tenths of µA)
54-55 Channel 5/6 internal CJS current (tenths of µA)
56
57
58-59 Channel 3/4 internal CJS temperature (tenths of degrees C)
60-61 Channel 5/6 internal CJS temperature (tenths of degrees C)
62-73 Reserved
Block Model Number
Block Software Revision Number
Channel 1 T/C input voltage (hundredths of mV) (LSB)
Channel 1 T/C input voltage (hundredths of mV) (MSB)
Channel 2 T/C input voltage (hundredths of mV)
Channel 3 T/C input voltage (hundredths of mV)
Channel 4 T/C input voltage (hundredths of mV)
Channel 1 Engineering Units value (LSB)
Channel 1 Engineering Units value (MSB)
Channel 1/2 XJV voltage (hundredths of mV) (LSB)
Channel 1/2 XJV voltage (hundredths of mV) (MSB)
Channel 1/2 XJV temperature (tenths of degrees C) (LSB)
Channel 1/2 XJV temperature (tenths of degrees C) (MSB)
Channel 1/2 XJI current (tenths of µA) (LSB)
Channel 1/2 XJI current (tenths of µA) (MSB)
Channel 1/2 XJI temperature (tenths of degrees C) (LSB)
Channel 1/2 XJI temperature (tenths of degrees C) (MSB)
Channel 1/2 internal CJS current (tenths of µA) (LSB)
Channel 1/2 internal CJS current (tenths of µA) (MSB)
Channel 1/2 internal CJS temperature (tenths of degrees C) (LSB)
Channel 1/2 internal CJS temperature (tenths of degrees C) (MSB)
70 Public PACSystems RX3i Genius Communications Gateway User Manual GFK-2892B
Page 75

Chapter 6. COMMREQ/Data_Init_Comm Programming
Address
Command Length
7
Address +1
No Wait
0 Address +2
Status Block memory type
70 (%I), 72 (%Q), 8 (%R), 10 (%AI), 12 (%AQ) or 196 (%W)
Address +3
Status Block offset
Beginning address for the COMMREQ Status Block.
Address +4
Idle timeout value
0
Address +5
Max. communications time
0
Address +6
Command number
22
Address +7
PROFINET Device number
1-255: The device number of the targeted GCG Genius Gateway.
Address +8
Genius Device Number
0-31: the SBA of the targeted Genius Device.
This entry tells the CPU how much memory is being allocated to
(8 words or 128 bits)
Enter the code representing the CPU Memory Type where the GCG will
same codes as in Address+2.
Address +11
Address +12
Memory offset, bytes 1, 2
bytes 3, 4
Starting address within the Deposit Memory type.
(Byte 4 is msb, Byte 1 is lsb)
6.4.13 COMMREQ #22: Read Map Command
To read the I/O mapping configuration from a 90-70 Remote Scanner, use the Read Map
Command. When the data is received, it will automatically be placed in the CPU memory
location specified in the Command Block.
Command Block for the Read Map Command
Address +9
Address +10
Deposit Memory Length
(either bits or words)
Deposit Memory type
Read Map Returned Data
Byte # Description
0
Remote Rack ID
1-2
%I Starting Reference
3
Length of %I data (bytes)
4-5
%AI Starting Reference
6
Length of %AI data (bytes)
7-8
%Q Starting Reference
9
Length of %Q data (bytes)
10-11 %AQ Starting Reference
12
Length of %AQ data (bytes)
13
8-bit additive checksum
14-15 16-bit LRC checksum
store the data returned by the Genius device. Value specified in bits
or words, depending on memory type selected below.
deposit the data obtained from the target Genius Device. Use the
GFK-2892B PACSystems RX3i Genius Communications Gateway User Manual Public 71
Page 76

Chapter 6. COMMREQ/Data_Init_Comm Programming
Address
Command Length
11
Address +1
No Wait
0
Address +2
Status Block memory type
70 (%I), 72 (%Q), 8 (%R), 10 (%AI), 12 (%AQ) or 196 (%W)
Address +3
Status Block offset
Beginning address for the COMMREQ Status Block.
Address +4
Idle timeout value
0
Address +5
Max. communications time
0
Address +6
Command number
23
Address +7
PROFINET Device number
1-255: The device number of the targeted GCG Genius Gateway.
0-31: the SBA of the targeted Genius Device to which data is to be
transmitted.
Address +9
Address +16
6.4.14 COMMREQ #23: Write Map Command
To set the reference table mapping of a 90-70 Remote Scanner on the Genius bus, use the
Write Map command.
Command Block for the Write Map Command
Address +8
to
Genius Device Number
Data to be written to the
target device.
Same format as Read Map Returned Data described above.
The checksums will be ignored.
72 Public PACSystems RX3i Genius Communications Gateway User Manual GFK-2892B
Page 77

Chapter 6. COMMREQ/Data_Init_Comm Programming
Address
Command Length
9
Address +1
No Wait
0
Address +2
Status Block memory type
70 (%I), 72 (%Q), 8 (%R), 10 (%AI), 12 (%AQ) or 196 (%W)
Address +3
Status Block offset
Beginning address for the COMMREQ Status Block.
Address +4
Idle timeout value
0
Address +5
Max. communications time
0 Address +6
Command number
24
Address +7
PROFINET Device number
1-255: The device number of the targeted GCG Genius Gateway.
0-31: the SBA of the targeted Genius HSC Device from which data is
to be retrieved.
This entry tells the CPU how much memory is being allocated to
Bytes 0 thru Byte 3 contain the HSC Data requested.
Enter the code representing the CPU Memory Type where the GCG will
Address +11
Memory offset, bytes 1, 2
Starting address within the Deposit Memory type.
Address +13
Command Code
See Read/Write Data Command Code Table below.
Address +14
Counter Number
1 – 4
Address
Command Length
7
Address +1
No Wait
0
Address +2
Status Block memory type
70 (%I), 72 (%Q), 8 (%R), 10 (%AI), 12 (%AQ) or 196 (%W)
Address +3
Status Block offset
Beginning address for the COMMREQ Status Block.
Address +4
Idle timeout value
0
Address +5
Max. communications time
0 Address +6
Command number
25
Address +7
PROFINET Device number
1-255: The device number of the targeted GCG Genius Gateway.
0-31: the SBA of the targeted Genius Device to which data is to be
transmitted.
Address +9
Command Code
See Read/Write Data Command Code Table below.
Address +10
Counter Number
1-4
Data to be written
bytes 3, 4
6.4.15 COMMREQ #24: Read Data Command
This command is used to read data from a Genius High-Speed Counter. When the data is
received, it will be placed in the CPU memory location specified in the Command Block.
Command Block for the Read Data Command
Address +8
Address +9
Address +10
Address +12
Genius Device Number
Deposit Memory Length
Deposit Memory type
bytes 3, 4
store the data returned by the Genius device. The value (in bytes or
bits) depends on the memory type selected as the Deposit Memory
Address +10
type in
When a HSC block is configured as a Type A counter, enter 2 for
word memory types or 32 for bit memory types. However, when
configured as a Type B or Type C counter, enter 3 for word memory
types or 48 for bit memory types.
Note that the Read Data Reply Datagram always responds with six
bytes of data. The most significant bytes (Byte 4 & Byte 5) are null.
deposit the data obtained from the target Genius Device. Use the
same codes as in Address+2.
(Byte 4 is msb, Byte 1 is lsb)
6.4.16 COMMREQ #25: Write Data Command
This command is used to set data values in a Genius High-speed Counter.
Command Block for the Write Data Command
below.
Address +8
Address +11
Address +12
Genius Device Number
bytes 1, 2
Four bytes of data to be written to the target Genius HSC
(Byte 4 is msb, Byte 1 is lsb)
GFK-2892B PACSystems RX3i Genius Communications Gateway User Manual Public 73
Page 78

Chapter 6. COMMREQ/Data_Init_Comm Programming
Read/Write Data Command Codes for COMMREQs #24 & #25
These commands are used with the Read Data and Write Data COMMREQs to read or write
data to a Genius High-speed Counter block. The Load and Set command codes are used in
conjunction with the Write Data COMMREQ and the Read command codes are used by the
Read Data COMMREQ. In the following descriptions, ‘n’ represents the counter number.
Command (Decimal) Command (Hex) Command Description
0
1
2
3
4
5
6
8
11
12
13
14 000E Load/Read ON Preset n.4
21 0015 Load/Read OFF Preset n.1
22 0016 Load/Read OFF Preset n.2
23 0017 Load/Read OFF Preset n.3
24
31
32
50
0000 Null command
0001 Load/Read Accumulator n
0002 Load/Read Hi Limit n
0003 Load/Read Lo Limit n
0004 Load Accumulator n Increment
0005 Set/Read Counter Direction (Type A counter n only)
0006 Load Time Base n
0008 Load/Read Home Position n
000B Load/Read ON Preset n.1
000C Load/Read ON Preset n.2
000D Load/Read ON Preset n.3
0018 Load/Read OFF Preset n.4
001F Load/Read PRELOAD n.1
0020 Load/Read PRELOAD n.2
0032 Load/Read Oscillator Divisor
74 Public PACSystems RX3i Genius Communications Gateway User Manual GFK-2892B
Page 79

GE Information Centers
Headquarters:
1-800-433-2682 or 1-434-978-5100
Global regional phone numbers
are available on our web site
www.ge-ip.com
©2014-2016 General Electric Company, Inc. All Rights Reserved
*Trademark of General Electric Company, Inc.
All other brands or names are property of their respective holders.
Additional Resources
For more information, visit the GE
Customer Support web site:
www.ge-ip.com
GFK-2892B
 Loading...