

Page 1
m
©
GE APPLIANCES
Safety Information ............ 2
Warranty ........................ 8
Assistance / Accessories ...... 9
Using The Cooktop
In Case of a Power Failure ......... 10
Surface Burners ................... 10
Griddle ............................ 12
Using The Oven
Oven Controls ..................... 14
Special Features .................. 16
Sabbath Mode .................... 17
Cookware Guidelines .............. 18
Cooking Modes ................... 18
Oven Racks ....................... 19
Oven Air Vents .................... 19
Probe ............................. 20
Cooking Guide .................... 21
Warming Drawer Guide ........... 22
Aluminum Foil and Oven Liners .... 22
WiFi Connect ...................... 23
For a Spanish version of this
manual, visit our Website at
GEApp/iances.com.
Para consu/tar una version
en espaho/ de este manual
de instrucciones, visite
nuestro sitio de internet
GEApp/iances.com.
Care and Cleaning
Cleaning the Oven ................ 24
Cleaning The Cooktop ............. 25
Cleaning The Door and Drawer .... 29
Maintenance ...................... 30
Troubleshooting Tips ......... 34
Write the model and serial
numbers here:
Model #
Serial #
You can find the rating label on the
front behind the range drawer.
In Canada contact us at:
www.GEAppliances.ca 49-85222 07-15 GE
Page 2
Z
©
m
IMPORTANT SAFETYINFORMATION
READALL INSTRUCTIONSBEFOREUSING
tY
©
EL
Z
m
ii
[^
[_L VVh_Kl_lll_L_ I If the information in this manual is not followed exactly, a fire or
explosion may result, causing property damage, personal injury or death.
- Do not store or use gasoline or other flammable vapors and liquids in the vicinity of this or any other
appliance.
- WHAT TO DO IF YOU SMELL GAS
[] Do not try to light any appliance.
[] Do not touch any electrical switch; do not use any phone in your building.
[] Immediately call your gas supplier from a neighbor's phone. Follow the gas supplier's instructions.
[] If you cannot reach your gas supplier, call the fire department.
- Installation and service must be performed by a qualified installer, service agency or the gas supplier.
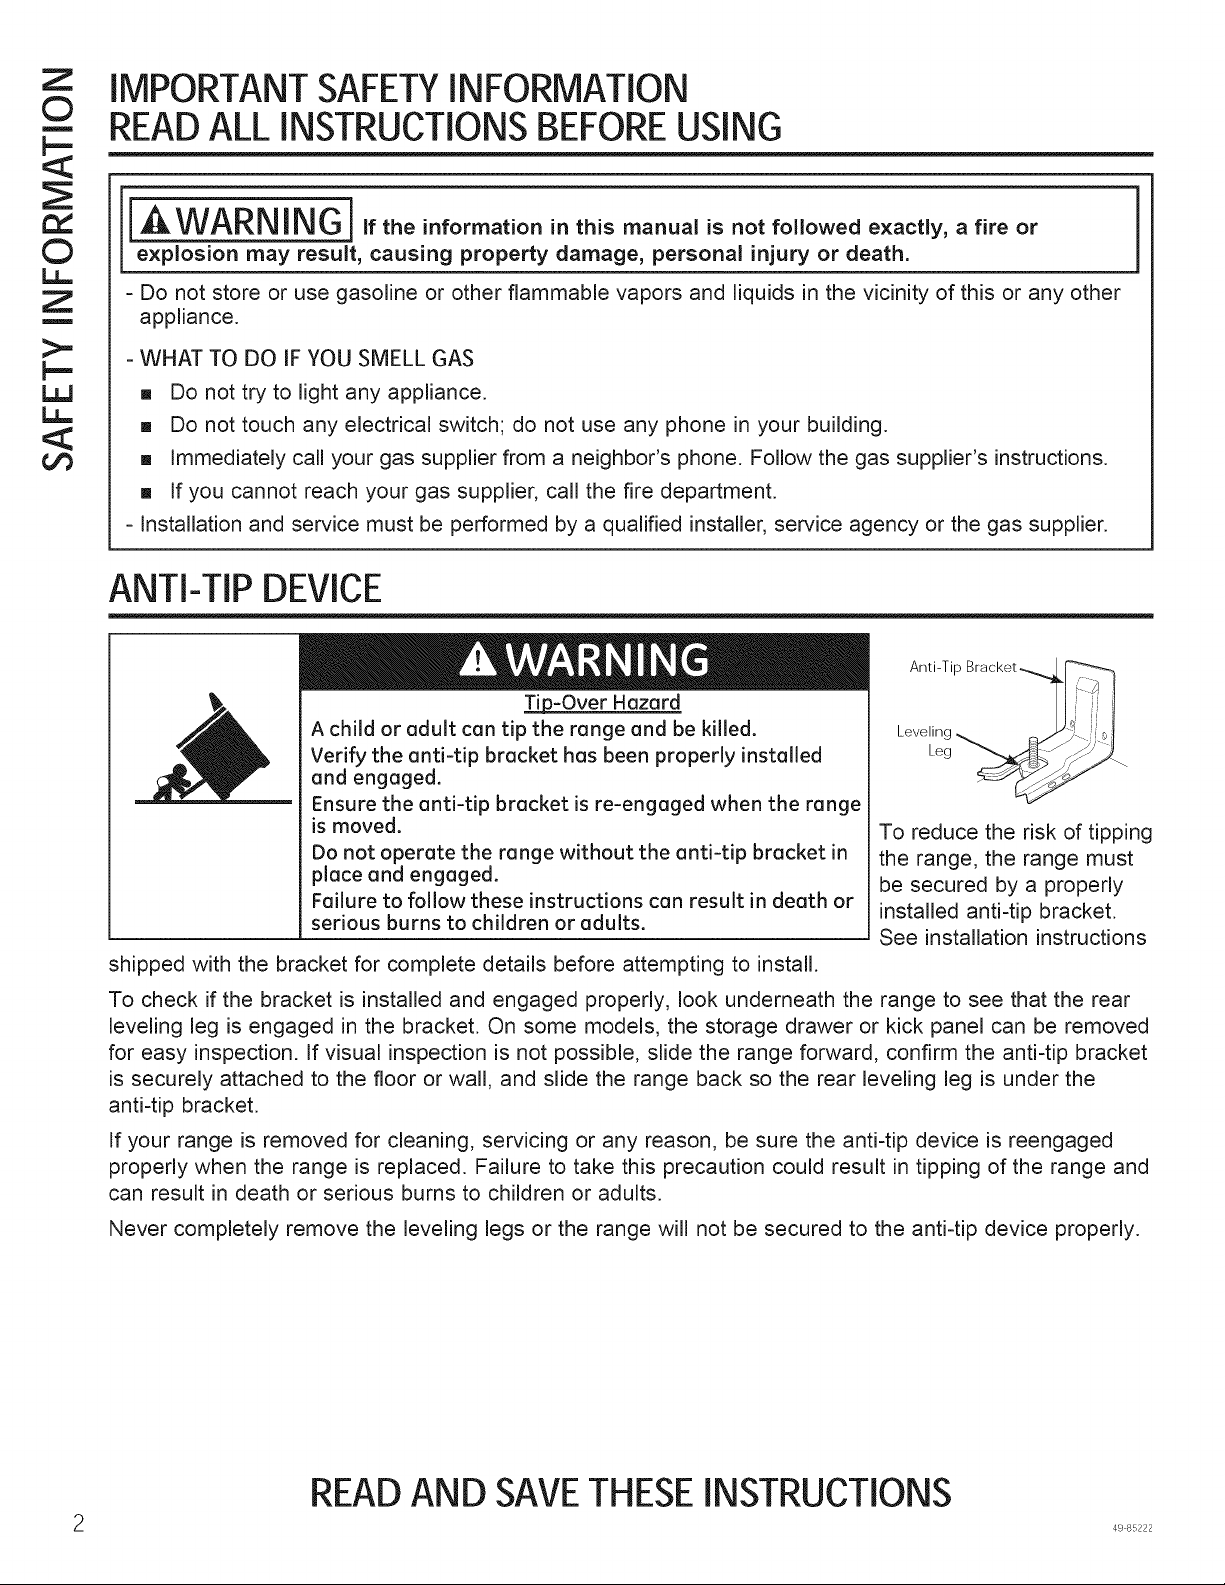
ANTI-TIP DEVICE
T_p-Over Hazard
A child or adult can tip the range and be killed.
Verify the anti-tip bracket has been properly installed
and engaged.
Ensure the anti-tip bracket is re-engaged when the range
is moved.
Do not operate the range without the anti-tip bracket in
place and engaged.
Failure to follow these instructions can result in death or
serious burns to children or adults.
shipped with the bracket for complete details before attempting to install.
To check if the bracket is installed and engaged properly, look underneath the range to see that the rear
leveling leg is engaged in the bracket. On some models, the storage drawer or kick panel can be removed
for easy inspection. If visual inspection is not possible, slide the range forward, confirm the anti-tip bracket
is securely attached to the floor or wall, and slide the range back so the rear leveling leg is under the
anti-tip bracket.
Anti-Tip Bracket._I _
To reduce the risk of tipping
the range, the range must
be secured by a properly
installed anti-tip bracket.
See installation instructions
If your range is removed for cleaning, servicing or any reason, be sure the anti-tip device is reengaged
properly when the range is replaced. Failure to take this precaution could result in tipping of the range and
can result in death or serious burns to children or adults.
Never completely remove the leveling legs or the range will not be secured to the anti-tip device properly.
READAND SAVETHESEINSTRUCTIONS
49 85222
Page 3

STATEOF CALIFORNIA PROPOSITION 65 WARNING
The California Safe Drinking Water and Toxic Enforcement Act requires the Governor of California to
publish a list of substances known to the state to cause cancer, birth defects, or other reproductive harm,
and requires businesses to warn customers of potential exposure to such substances.
IA i
WARNING This product contains one or more chemicals known to the Sate of California to
cause cancer, birth defects or other reproductive harm.
Self-clean ovens can cause low-level exposure to some of these substances, including carbon monoxide,
during the cleaning cycle. Exposure can be minimized by venting with an open window or using a
ventilation fan or hood.
[A WARNINGj GENERALSAFETYINSTRUCTIONS
i=rl
-4
..<
m
Z
"1"1
©
n
©
Z
( WARNING] .EVERosethis
appliance as a space heater to heat or warm
the room. Doing so may result in carbon
monoxide poisoning and overheating of the
oven,
[] Use this appliance for its intended purpose as
described in this owner's manual.
[] Have your range installed and properly grounded
by a qualified installer in accordance with the
provided installation instructions.
[] Any adjustment and service should be performed
only by a qualified gas range installer or service
technician. Do not attempt to repair or replace
any part of your range unless it is specifically
recommended in this manual.
[] Your range is shipped from the factory set for
use with natural gas. It can be converted for use
with propane gas. If required, these adjustments
must be made by a qualified technician in
accordance with the installation instructions and
local codes. The agency performing this work
assumes responsibility for the conversion.
[] Have the installer show you the location of the
range gas shut-off valve and how to turn it off if
necessary.
[] Plug your range into a 240-volt grounded outlet
only. Do not remove the round grounding
prong from the plug. If in doubt about the
grounding of the home electrical system, it is
your responsibility and obligation to have an
ungrounded outlet replaced with a properly
grounded, three prong outlet in accordance with
the National Electrical Code. Do not use an
extension cord with this appliance.
[] Before performing any service, unplug the range
or disconnect the power supply at the household
distribution panel by removing the fuse or
switching off the circuit breaker.
[] Be sure all packing materials are removed from
the range before operating to prevent ignition of
these materials.
[] Avoid scratching or impacting glass doors,
cooktops, or control panels. Doing so may lead
to glass breakage. Do not cook on a product with
broken glass. Shock, fire, or cuts may occur.
[] Dual Fuel: If the heating element in the oven
develops a glowing spot or shows other signs
of damage, do not use that area of the range. A
glowing spot indicates the element may fail and
present a potential burn, fire, or shock hazard.
Turn the heating element off immediately and
have it replaced by a qualified service technician.
[] Do not leave children alone or unattended in an
area where an appliance is in use. They should
never be allowed to climb, sit or stand on any
part of the appliance.
[] ACAUTION Donotstoreitemsof
interest to children in cabinets above an oven
- children climbing on the oven to reach items
could be seriously injured.
READAND SAVETHESEINSTRUCTIONS
49 85222 3
Page 4
Z
©
m
IMPORTANT SAFETYINFORMATION
READALL INSTRUCTIONSBEFOREUSING
[A WARNING ]GENERAL SAFETY INSTRUCTIONS (CONT.)
©
LL
Z
m
>-
I..tJ
[] Never block the vents (air openings) of the
range. They provide the air inlets and outlets that
are necessary for the range to operate properly
with correct combustion. Air openings are located
at the rear of the cooktop, at the top and bottom
of the oven door, and at the bottom of the range
under the warming drawer, lower oven drawer or
kick panel.
[] Use only dry pot holders--moist or damp pot
holders on hot surfaces may result in burns
from steam. Do not let pot holders touch surface
burners, burner grate, or oven heating element.
Do not use a towel or other bulky cloth in place
of pot holders.
[] Do not touch the heating elements or the interior
surface of the oven. These surfaces may be hot
enough to burn even though they are dark in
color. During and after use, do not touch, or let
clothing or other flammable materials contact any
iA WARNING i KEEPFLAMMABLEMATERIALSAWAY FROMTHEOVEN
[] Do not store or use flammable materials in
an oven or near the cooktop, including paper,
plastic, pot holders, linens, wall coverings,
curtains, drapes and gasoline or other flammable
vapors and liquids.
J
Failure to do so may result in fire or personal injury.
interior area of the oven; allow sufficient time for
cooling first. Other surfaces of the appliance may
become hot enough to cause burns. Potentially
hot surfaces include the burners, grates, oven
vent opening, surfaces near the opening, and
crevices around the oven door.
[] Do not heat unopened food containers. Pressure
could build up and the container could burst,
causing an injury.
[] Cook food thoroughly to help protect against
foodborne illness. Minimum safe food
temperature recommendations can be found
at www.lsltDoneYet.gov and www.fsis.usda.
gov. Use a food thermometer to take food
temperatures and check several locations.
[] Do not allow anyone to climb, stand or hang on
the oven door, drawer or cooktop. They could
damage the range or tip it over causing severe
injury or death.
[] Never wear loose-fitting or hanging garments while
using the appliance. These garments may ignite if
they contact hot surfaces causing severe burns.
[] Do not let cooking grease or other flammable
materials accumulate in or near the range. Grease
in the oven or on the cooktop may ignite.
1,6,WARNING I IN THE EVENTOF A FIRE,TAKETHE FOLLOWING
STEPSTO PREVENTINJURYAND FIRESPREADING
[] Do not use water on grease fires. Never pick up
a flaming pan. Turn the controls off. Smother a
flaming pan on a surface burner by covering the
pan completely with a well-fitting lid, cookie sheet,
or flat tray. If necessary, use a multi-purpose dry
chemical or foam-type fire extinguisher.
[] If there is a fire in the oven during baking,
smother the fire by closing the oven door and
turning the oven off or by using a multi-purpose
dry chemical or foam type fire extinguisher.
[] If there is a fire in the oven during self-clean, turn
the oven off and wait for the fire to go out. Do
not force the door open. Introduction of fresh air
at self-clean temperatures may lead to a burst of
flame from the oven.
READAND SAVETHESEINSTRUCTIONS
49 85222
Page 5

[/kWARNING i COOKTOP SAFETY INSTRUCTIONS
[] Never leave the surface burners unattended at
medium or high heat settings. Foods, especially
oily foods, may ignite resulting in fire that could
spread to surrounding cabinets.
[] Never leave oil unattended while frying. If allowed
to heat beyond its smoking point, oil may ignite
resulting in fire that may spread to surrounding
cabinets. Use a deep fat thermometer whenever
possible to monitor oil temperature.
[] To avoid oil spillover and fire, use the minimum
amount of oil when using a shallow pan-frying
and avoid cooking frozen foods with excessive
amounts of ice.
[] Use proper pan size and avoid pans that are
unstable or easily tipped. Select cookware that is
matched to the size of the burner. Burner flames
should be adjusted so that they do not extend
beyond the bottom of the pan. Excessive flame
may be hazardous.
[] Always use the LITE position when igniting the
top burners and make sure the burners have
ignited.
[] When using glass/ceramic cookware, make sure
it is suitable for cooktop service; others may
break because of sudden change in temperature.
[] To minimize the possibility of burns, ignition of
flammable materials and spillage, the handle of a
container should be turned toward the center of
the range without extending over nearby burners.
[] Do not use a wok with a round metal support
ring. The ring may trap heat and block air to the
burner resulting in a carbon monoxide hazard.
[] Do not attempt to lift the cooktop. Doing so may
damage the gas tubing to the surface burners
resulting in a gas leak and risk of fire.
[] When disabling Lock Control (on some models),
make sure the surface controls are set to the
OFF position. This will prevent unintended gas
flow from the burners.
[] Do not use aluminum foil to cover the grates or
line any part of the cooktop. Doing so may result
in carbon monoxide poisoning, overheating of the
cooktop surfaces, or a potential fire hazard.
1"13
..-N
..<
m
Z
"T'!
©
n
©
Z
[AWARNING l OVEN SAFETYINSTRUCTIONS
[A WARNINGI.EVE.covo,.°y.lot.,
holes, or passages in the oven bottom or
cover an entire rack with materials such as
aluminum foil or oven liners. Doing so blocks
air flow through the oven and may cause
carbon monoxide poisoning. Never place foil
or oven liners on the oven bottom. They can
trap heat causing risk of smoke or fire.
[] Stand away from the range when opening the
oven door. Hot air or steam which escapes can
cause burns to hands, face and/or eyes.
[] Never place cooking utensils, pizza or baking
stones, or any type of foil or liner on the oven
floor. These items can trap heat or melt, resulting
in damage to the product and risk of shock,
smoke or fire.
[] Place oven racks in desired location while oven
is cool. If rack must be moved while oven is hot,
be careful to avoid touching hot surfaces.
[] Do not leave items such as paper, cooking
utensils, or food in the oven when not in use.
Items stored in an oven can ignite.
[] Do not leave items on the cooktop near the oven
vent. Items may overheat resulting in a risk of fire
or burns.
[] Never broil with door open. Open-door broiling is
not permitted due to overheating of control knobs.
READAND SAVETHESEINSTRUCTIONS
49 85222 5
Page 6
Z
©
m
tY
©
EL
Z
m
t--,
o©
IMPORTANT SAFETYINFORMATION
READALL INSTRUCTIONSBEFOREUSING
IA WARNING ]SELF-CLEANINGOVEN SAFETYINSTRUCTIONS
(on some models)
The self-cleaning feature operates the oven at
temperatures high enough to burn away food soils in
the oven. Follow these instructions for safe operation.
[] Do not touch oven surfaces during self-clean
operation. Keep children away from the oven
during self-cleaning. Failure to follow these
instructions may cause burns.
[] Before operating the self-clean cycle, remove
pans, shiny metal oven racks, and other utensils
from the oven. Only porcelain-coated oven racks
may be left in the oven.
[] Before operating the self-clean cycle, wipe
grease and food soils from the oven. Excessive
amount of grease may ignite leading to smoke
damage to your home.
[] If the self-cleaning mode malfunctions, turn the
oven off and disconnect the power supply. Have
it serviced by a qualified technician.
[] Do not use oven cleaners. No commercial oven
cleaner or oven liner protective coating of any kind
should be used in or around any part of the oven.
[] Do not clean the door gasket. The door gasket is
essential for a good seal. Care should be taken
not to rub, damage or move the gasket.
[] IMPORTANT: The health of some birds is
extremely sensitive to the fumes given off during
the self-cleaning cycle of any range. Move birds
to another well-ventilated room.
READAND SAVETHESEINSTRUCTIONS
6 49 85222
Page 7
WARNING i WARMING DRAWER SAFETY INSTRUCTIONS
(on some models)
[] The purpose of the warming drawer is to hold hot
cooked foods at serving temperature. Bacteria
will grow very rapidly in food that is between 40
and 140 ° F. Do not put cold food in warming
drawer. Do not keep food in the warming drawer
for more than 2 hours. Failure to follow these
instructions may result in foodborne illness.
[] Do not leave paper products, plastics, canned
food, or combustible materials in the drawer.
They may ignite.
[] Do not touch the heating element or the interior
surface of the drawer. These surfaces may be
hot enough to cause burns.
[] Use care when opening the drawer. Open the
drawer a crack, and let hot air or steam escape
before removing or replacing food. Hot air or
steam that escapes can cause burns to hands,
face, and/or eyes.
[] Do not use aluminum foil to line the warming
drawer. Foil is an excellent heat insulator and
will trap heat beneath it. This will upset the
performance of the drawer and potentially cause
a fire hazard.
REMOTE ENABLE EQUIPMENT
(on some models)
-4
-<
m
Z
O
;X3
n
O
Z
This device complies with part 15 of the FCC Rules.
Operation is subject to the following two conditions:
(1) This device may not cause harmful interference,
and (2) this device must accept any interference
received, including interference that may cause
undesired operation.
The wireless communication equipment installed
on this range has been tested and found to comply
with the limits for a Class B digital device, pursuant
to part 15 of the FCC Rules. These limits are
designed to:
(a) provide reasonable protection against harmful
interference in a residential installation. This
equipment generates, uses, and can radiate radio
frequency energy and, if not installed and used
in accordance with the instructions, may cause
harmful interference to radio communications.
However, there is no guarantee that interference
will not occur in a particular installation. If this
equipment does cause harmful interference to radio
or television reception, which can be determined
by turning the equipment off and on, the user is
encouraged to try to correct the interference by one
or more of the following measures:
[] Reorient or relocate the receiving antenna.
[] Increase the separation between the equipment
and receiver.
[] Connect the equipment into an outlet on a
circuit different from that to which the receiver is
connected.
[] Consult the dealer or an experienced radio/TV
technician for help.
(b) accept any interference received, including
interference that may cause undesired operation of
the device.
Note that any changes or modifications to the
wireless communication device installed on this
oven that are not expressly approved by the
manufacturer could void the user's authority to
operate the equipment.
READAND SAVETHESEINSTRUCTIONS
49 85222 7
Page 8
>..
p-
Z
Thank You! ... for your purchase of a GEBrand appliance.
Register Your Appliance: Register your new appliance online at your convenience!
tY
tY
d)
o9
_ rO
m
O
,4- :::3
_ 0
0 _
0 (D
_ u_
rn _
www.geappliances.com/service_and_support/register/
Timely product registration will allow for enhanced communication and prompt service under the terms of your warranty,
should the need arise. You may also mail in the pre-printed registration card included in the packing material.
GE Gas Range Warranty
GEAppliances.com
All warranty service is provided by our Factory Service Centers, or an authorized Customer Care®technician.
To schedule service online, visit us at www.geappliances.com/service_and_support/, or call 800.GE.CARES
(800.432.2737). Please have your serial number and your model number available when calling for service.
Servicing your appliance may require the use of the onboard data port for diagnostics. This gives a GE factory
service technician the ability to quickly diagnose any issues with your appliance and helps GE improve its products
by providing GE with information on your appliance. If you do not want your appliance data to be sent to GE, please
advise your technician not to submit the data to GE at the time of service.
For the period of one year from the date of the original purchase, GE will provide any part of the range which fails due
to a defect in materials or workmanship. During this limited one-year warranty, GE will also provide, free of charge, all
labor and in-home service to replace the defective part.
What GE will not cover:
[] Service trips to your home to teach you how to use
the product.
[] Improper installation, delivery, or maintenance.
[] Failure of the product if it is abused, misused,
modified, or used for other than the intended purpose
or used commercially.
[] Replacement of house fuses or resetting of circuit
breakers.
[] Damage to the product caused by accident, fire,
floods, or acts of God.
EXCLUSION OF IMPLIED WARRANTIES
Your sole and exclusive remedy is product repair as provided in this Limited Warranty. Any implied warranties,
including the implied warranties of merchantability or fitness for a particular purpose, are limited to one year or the
shortest period allowed by law.
This warranty is extended to the original purchaser and any succeeding owner for products purchased for home use
within the USA. If the product is located in an area where service by a GE Authorized Servicer is not available, you
may be responsible for a trip charge or you may be required to bring the product to an Authorized GE Service location
for service. In Alaska, the warranty excludes the cost of shipping or service calls to your home.
Some states do not allow the exclusion or limitation of incidental or consequential damages. This warranty gives you
specific legal rights, and you may also have other rights which vary from state to state. To know what your legal rights
are, consult your local or state consumer affairs office or your state's Attorney General.
Warrantor: General Electric Company. Louisville, KY 40225
Extended Warranties: Purchase a GE extended warranty and learn about special discounts that are available while
your warranty is still in effect. You can purchase it online anytime at
[] Damage to finish, such as surface rust, tarnish, or small
blemishes not reported within 48 hours of delivery.
[] Incidental or consequential damage caused by
possible defects with this appliance.
[] Damage caused after delivery.
[] Product not accessible to provide required service.
[] Service to repair or replace light bulbs, except for LED
lamps.
www.geappliances.com/service_and_support/shop-for-extended-service-plans.htm
or call 800.626.2224 during normal business hours. GE Consumer Home Services will still be there after your
warranty expires.
49 85222
Page 9
Have a question or need assistance with your appliance?
Try the GE Appliances website (www.geappliances.comlservice_and_supportl) 24 hours a day, any day of the
year! For greater convenience and faster service, you can now download Owner's Manuals, order parts, or even
schedule service online.
tJ3
m
Oo
Schedule Service: Expert GE repair service is only
one step away from your door. Schedule your service
online at www.geappliances.com/service_and_support/
or call 800.GE.CARES (800.432.2737) during normal
business hours.
Parts and Accessories: Individuals qualified to service
their own appliances can have parts or accessories sent
directly to their homes (VISA, MasterCard and Discover
cards are accepted).Order online today, 24 hours every day
or by phone at 800.626.2002 during normal business hours.
Instructions contained in this manual cover procedures
to be performed by any user. Other servicing generally
should be referred to qualified service personnel. Caution
must be exercised, since improper servicing may cause
unsafe operation.
Real Life Design Studio: GE supports the Universal
Design concept of products, services and environments
that can be used by people of all ages, sizes and
capabilities. We recognize the need to design for a wide
range of physical and mental abilities and impairments.
For details of GE's Universal Design applications, including
kitchen design ideas for people with disabilities, check out
our website today. For the hearing impaired, please call
800.TDD.GEAC (800.833.4322).
Contact Us: Contact us on our website with all the
details including your phone number, or write to:
General Manager, Customer Relations
GE Appliances, Appliance Park Louisville, KY 40225
Accessories
Looking For Something More?
GE offers a variety of accessories to improve your cooking and maintenance experiences!
To place an order visit us online at:
www.GEApplianceParts.com (U.S.) or www.GEAppliances.ca (Canada)
or call 800.626.2002 (U.S.) 800.661.1616 (Canada)
The following products and more are available:
Z
Cb
Cb
Cb
¢/3
tj3
O
m
tJ3
Accessories
NickelFlatRack
ReinforcedNickelFlat Rack
SelfClean FlatRack
NickelExtensionRack
SelfClean ExtensionRack
BroilerPan(12 ¾ "x 1¼" x 16 ½ ")
RoastingRackAccessory
CooktopCenterGrate
NonstickAluminumGriddle
ReversibleCast-IronGriddle
Cleaning Supplies
CitruShineStainlessSteel Wipes WX10X10007
StainlessSteel PolishingCloth WX10X307
CeramaBryte®Burnt-OnGreaseRemover WX10X320
WB48X20249
WB48X20783
WB48X21508
WB39X10040
WB48X21543
WB48X10056G
WB48X5108
WB31X24737
WB31X24738
WB31X24998
Removing Protective Shipping Film and Packaging Tape
NOTE: Remove all protective packing before operating
the range.
49 85222 9
i arefully grasp a corner of the protective shipping film
with your fingers and slowly peel it from the appliance
surface. Do not use any sharp items to remove the
film. If adhesive residue remains, remove it by applying
dish soap and water with a soft cloth.
Page 10
(]')
L_.
(1)
c-
L.._
rr_
(1)
LD
G3
L.._
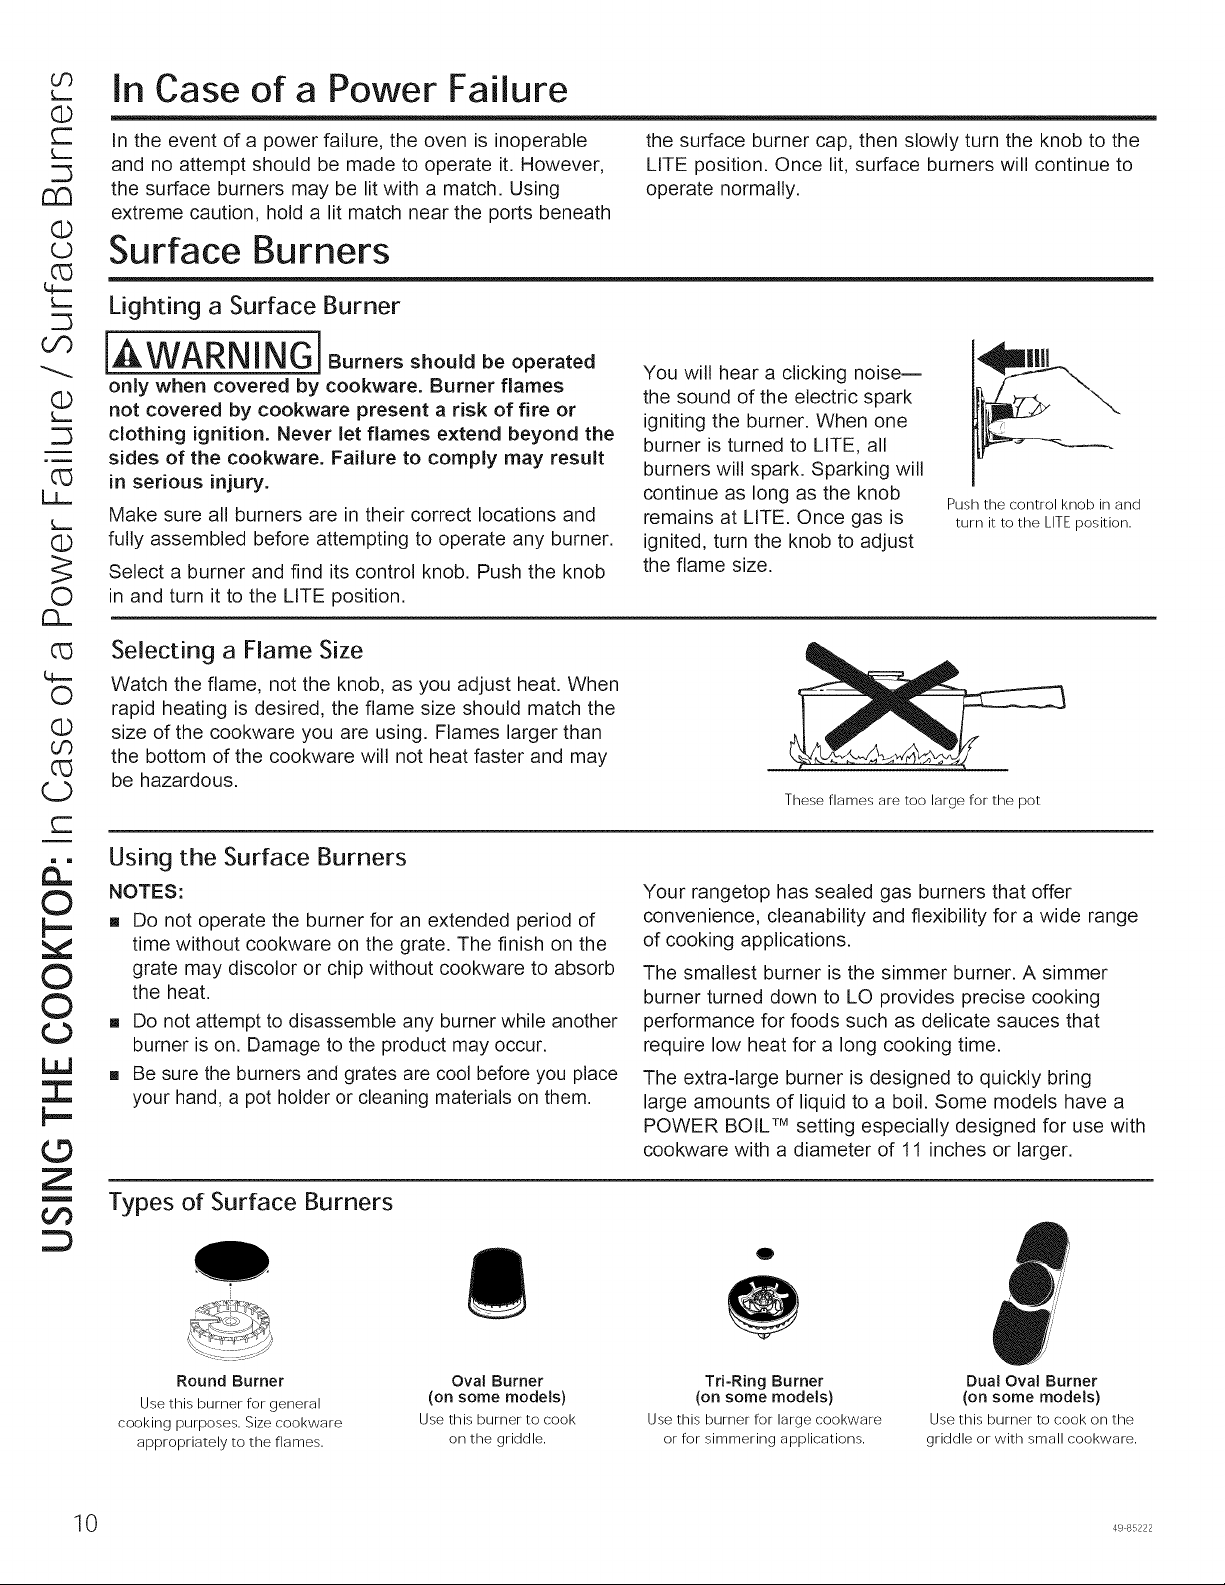
In Case of a Power Failure
In the event of a power failure, the oven is inoperable
and no attempt should be made to operate it. However,
the surface burners may be lit with a match. Using
extreme caution, hold a lit match near the ports beneath
Surface Burners
Lighting a Surface Burner
the surface burner cap, then slowly turn the knob to the
LITE position. Once lit, surface burners will continue to
operate normally.
or)
(1)
L.._
O3
Ii
L._
(1.)
O
G._
O3
O
d.)
Or)
o3
r.D
r-
&-
©
k,-
©
©
¢D
LJ.!
I
k,-
(.9
Z
m
iAWARN INGiBurnersshou,dbeoperated
only when covered by cookware. Burner flames
not covered by cookware present a risk of fire or
clothing ignition. Never let flames extend beyond the
sides of the cookware. Failure to comply may result
in serious injury.
Make sure all burners are in their correct locations and
fully assembled before attempting to operate any burner.
Select a burner and find its control knob. Push the knob
in and turn it to the LITE position.
Selecting a Flame Size
Watch the flame, not the knob, as you adjust heat. When
rapid heating is desired, the flame size should match the
size of the cookware you are using. Flames larger than
the bottom of the cookware will not heat faster and may
be hazardous.
Using the Surface Burners
NOTES:
[] Do not operate the burner for an extended period of
time without cookware on the grate. The finish on the
grate may discolor or chip without cookware to absorb
the heat.
[] Do not attempt to disassemble any burner while another
burner is on. Damage to the product may occur.
[] Be sure the burners and grates are cool before you place
your hand, a pot holder or cleaning materials on them.
Types of Surface Burners
You will hear a clicking noise--
the sound of the electric spark
igniting the burner. When one
burner is turned to LITE, all
burners will spark. Sparking will
continue as long as the knob
remains at LITE. Once gas is
ignited, turn the knob to adjust
the flame size.
These flames are too large for the pot
Your rangetop has sealed gas burners that offer
convenience, cleanability and flexibility for a wide range
of cooking applications.
The smallest burner is the simmer burner. A simmer
burner turned down to L© provides precise cooking
performance for foods such as delicate sauces that
require low heat for a long cooking time.
The extra-large burner is designed to quickly bring
large amounts of liquid to a boil. Some models have a
POWER BOIL TM setting especially designed for use with
cookware with a diameter of 11 inches or larger.
Push the control knob in and
turn it to the LITE position.
o
Round Burner
Use this burner for general
cooking purposes. Size cookware
appropriately to the flames.
10 49 85222
Oval Burner
(on some models)
Use this burner to cook
on the griddle.
Tri-Ring Burner
(on some models)
Use this burner for large cookware
or for simmering applications.
Dual Oval Burner
(on some models)
Use this burner to cook on the
griddle or with small cookware.
Page 11
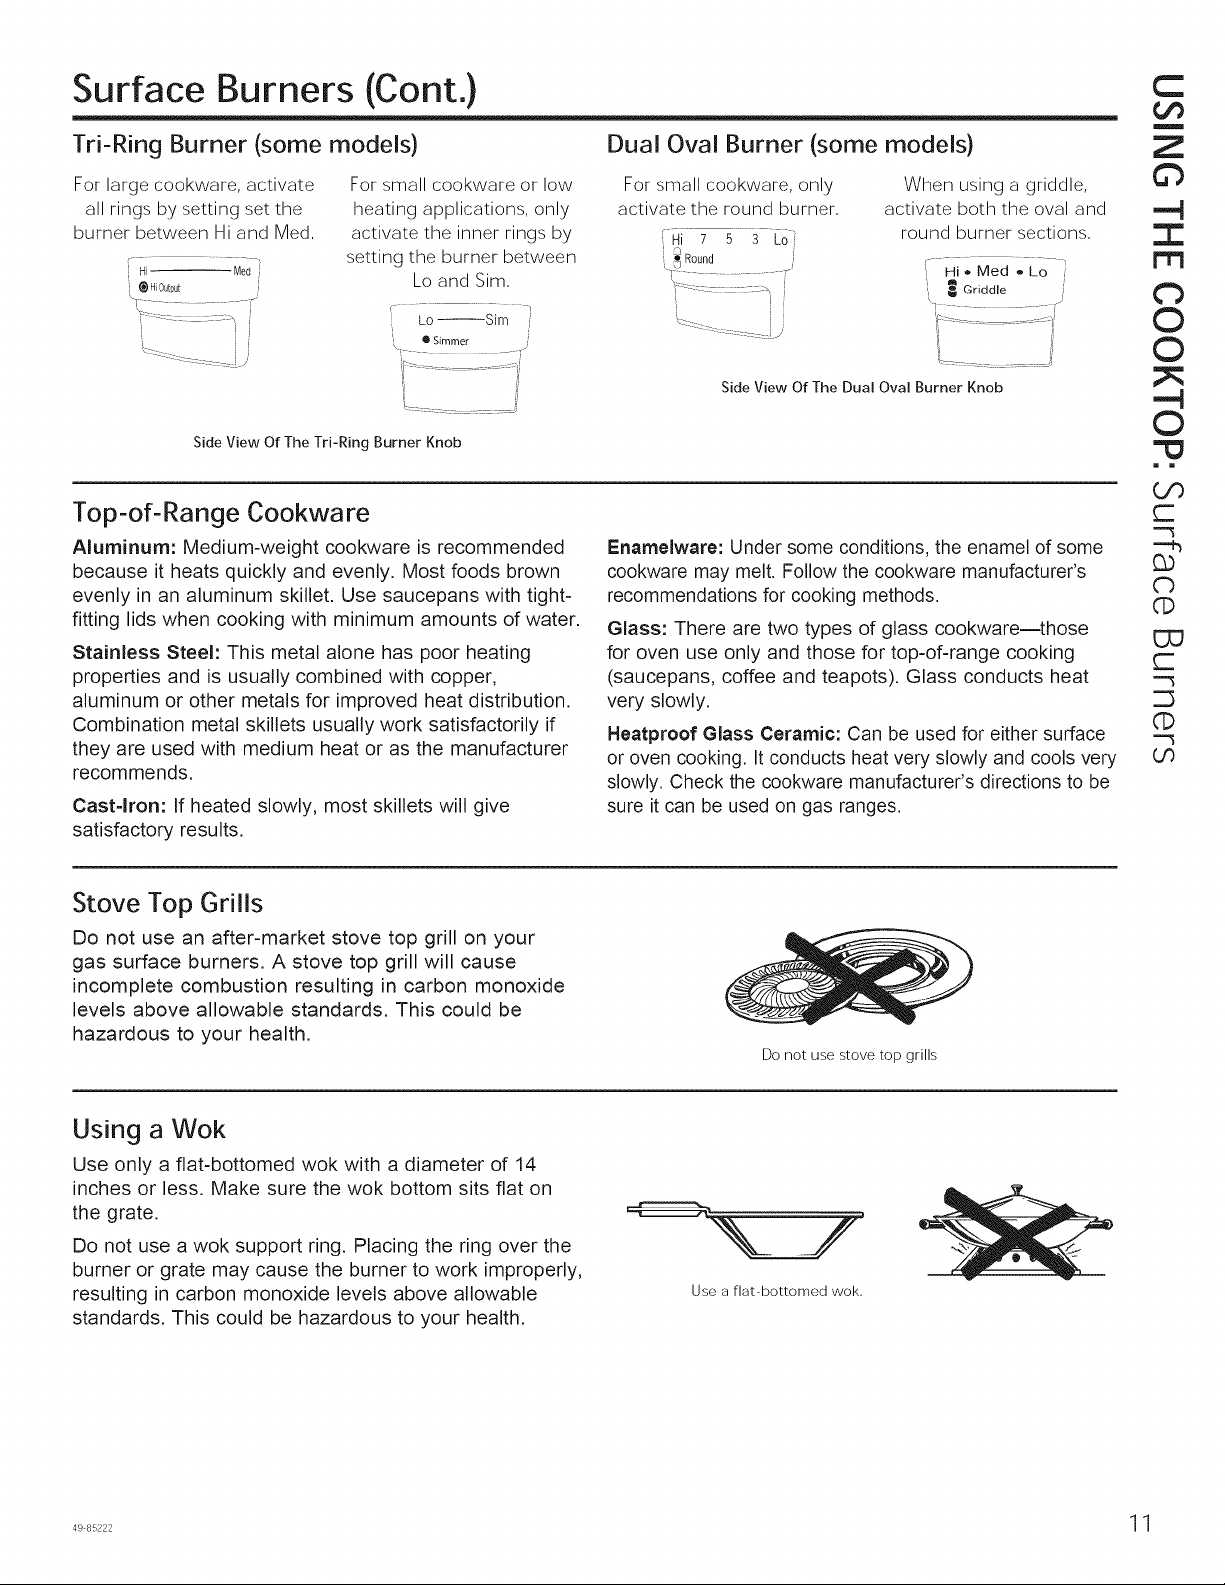
Surface Burners (Cont.)
Tri-Ring Burner (some models) Dual Oval Burner (some models)
For large cookware, activate
all rings by setting set the
burner between Hi and Med,
HiOutput
Side View Of The Tri-Ring Burner Knob
Top-of-Range Cookware
Aluminum: Medium-weight cookware is recommended
because it heats quickly and evenly. Most foods brown
evenly in an aluminum skillet. Use saucepans with tight-
fitting lids when cooking with minimum amounts of water.
Stainless Steel: This metal alone has poor heating
properties and is usually combined with copper,
aluminum or other metals for improved heat distribution.
Combination metal skillets usually work satisfactorily if
they are used with medium heat or as the manufacturer
recommends.
Cast-Iron: If heated slowly, most skillets will give
satisfactory results.
For small cookware or low
heating applications, only
activate the inner rings by
setting the burner between
Lo and Sim,
Lo --Sim
® Simmer
................. ,/
For small cookware, only
activate the round burner,
r ................
Hi 7 5 3 Lo
Side View Of The Dual Oval Burner Knob
When using a griddle,
activate both the oval and
round burner sections,
¢................... /
\ /
Enamelware: Under some conditions, the enamel of some
cookware may melt. Follow the cookware manufacturer's
recommendations for cooking methods.
Glass: There are two types of glass cookware--those
for oven use only and those for top-of-range cooking
(saucepans, coffee and teapots). Glass conducts heat
very slowly.
Heatproof Glass Ceramic: Can be used for either surface
or oven cooking. It conducts heat very slowly and cools very
slowly. Check the cookware manufacturer's directions to be
sure it can be used on gas ranges.
HioMed -Lo /,, _ Griddle
C
m
Z
©
..-4
I
Cb
©
©
...-4
©
i m
Oo
r-
--h
Cb
(l)
C_
r--
CD
7"--1
O0
Stove Top Grills
Do not use an after-market stove top grill on your
gas surface burners. A stove top grill will cause
incomplete combustion resulting in carbon monoxide
levels above allowable standards. This could be
hazardous to your health.
Using a Wok
Use only a flat-bottomed wok with a diameter of 14
inches or less. Make sure the wok bottom sits flat on
the grate.
Do not use a wok support ring. Placing the ring over the
burner or grate may cause the burner to work improperly,
resulting in carbon monoxide levels above allowable
standards. This could be hazardous to your health.
Do not use stove top grills
Use a flat-bottomed wok.
4985222 1
Page 12
(1)
-C3
-C3
(.9
©
N---
Griddle (onsomemodels)
[AWARNING] FireHazard
[] Use care when cooking greasy foods. Spilled grease may result in fire.
[] Never place any items on the griddle when it is not in use. Heat from surrounding burners can heat the
griddle and may result in fire.
[] Place and remove the griddle only when griddle is cool and all surface burners are turned OFF.
©
©
I,.I,J
I
N--
©
Z
m
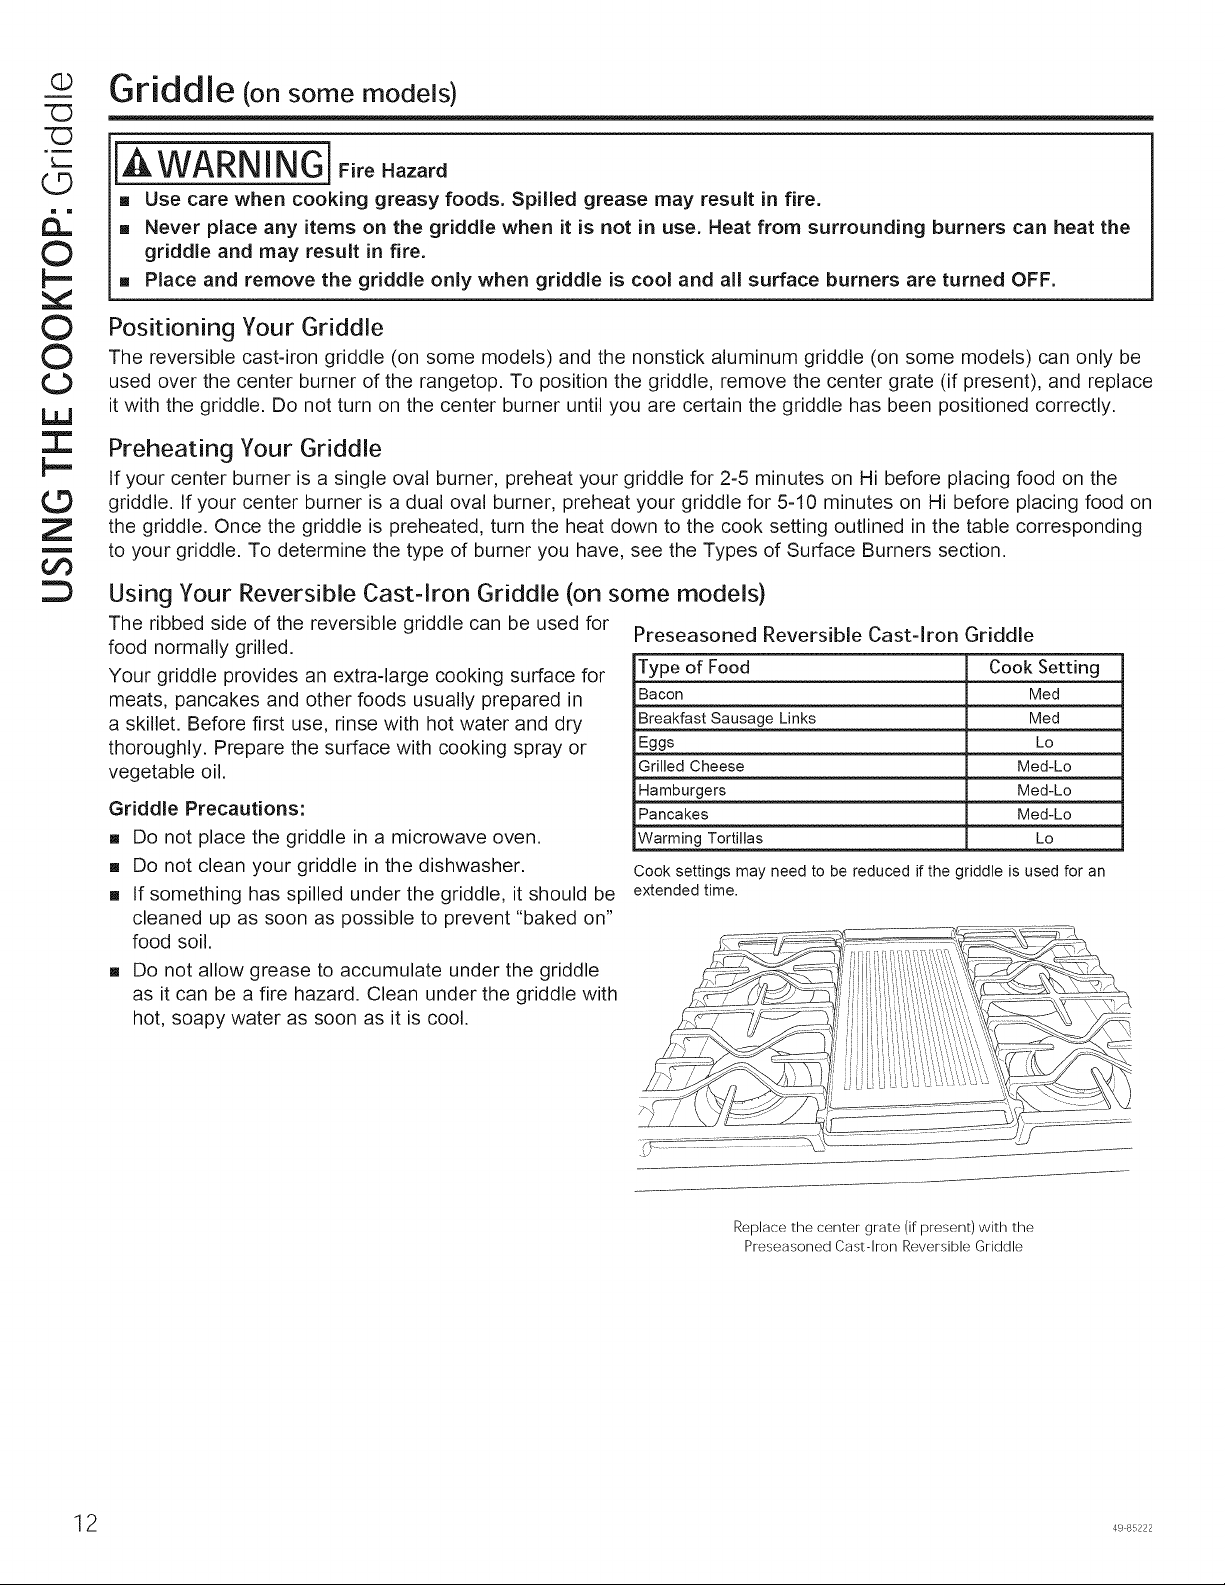
Positioning Your Griddle
The reversible cast-iron griddle (on some models) and the nonstick aluminum griddle (on some models) can only be
used over the center burner of the rangetop. To position the griddle, remove the center grate (if present), and replace
it with the griddle. Do not turn on the center burner until you are certain the griddle has been positioned correctly.
Preheating Your Griddle
If your center burner is a single oval burner, preheat your griddle for 2-5 minutes on Hi before placing food on the
griddle. If your center burner is a dual oval burner, preheat your griddle for 5-10 minutes on Hi before placing food on
the griddle. Once the griddle is preheated, turn the heat down to the cook setting outlined in the table corresponding
to your griddle. To determine the type of burner you have, see the Types of Surface Burners section.
Using Your Reversible Cast-iron Griddle (on some models)
The ribbed side of the reversible griddle can be used for
food normally grilled.
Your griddle provides an extra-large cooking surface for
meats, pancakes and other foods usually prepared in
a skillet. Before first use, rinse with hot water and dry
thoroughly. Prepare the surface with cooking spray or
vegetable oil.
Griddle Precautions:
[] Do not place the griddle in a microwave oven.
[] Do not clean your griddle in the dishwasher.
[] If something has spilled under the griddle, it should be
cleaned up as soon as possible to prevent "baked on"
food soil.
[] Do not allow grease to accumulate under the griddle
as it can be a fire hazard. Clean under the griddle with
hot, soapy water as soon as it is cool.
Preseasoned Reversible Cast-kon Griddle
Type of Food Cook Setting
Bacon Med
Breakfast Sausage Links Med
Eggs Lo
Grilled Cheese Med-Lo
Hamburgers Med-Lo
Pancakes Med-Lo
Warming Tortillas L©
Cook settings may need to be reduced if the griddle is used for an
extended time.
Replace the center grate (if present) with the
Preseasoned Cast-Iron Reversible Griddle
12 49 85222
Page 13
Griddle (onsome models)(Cont.)
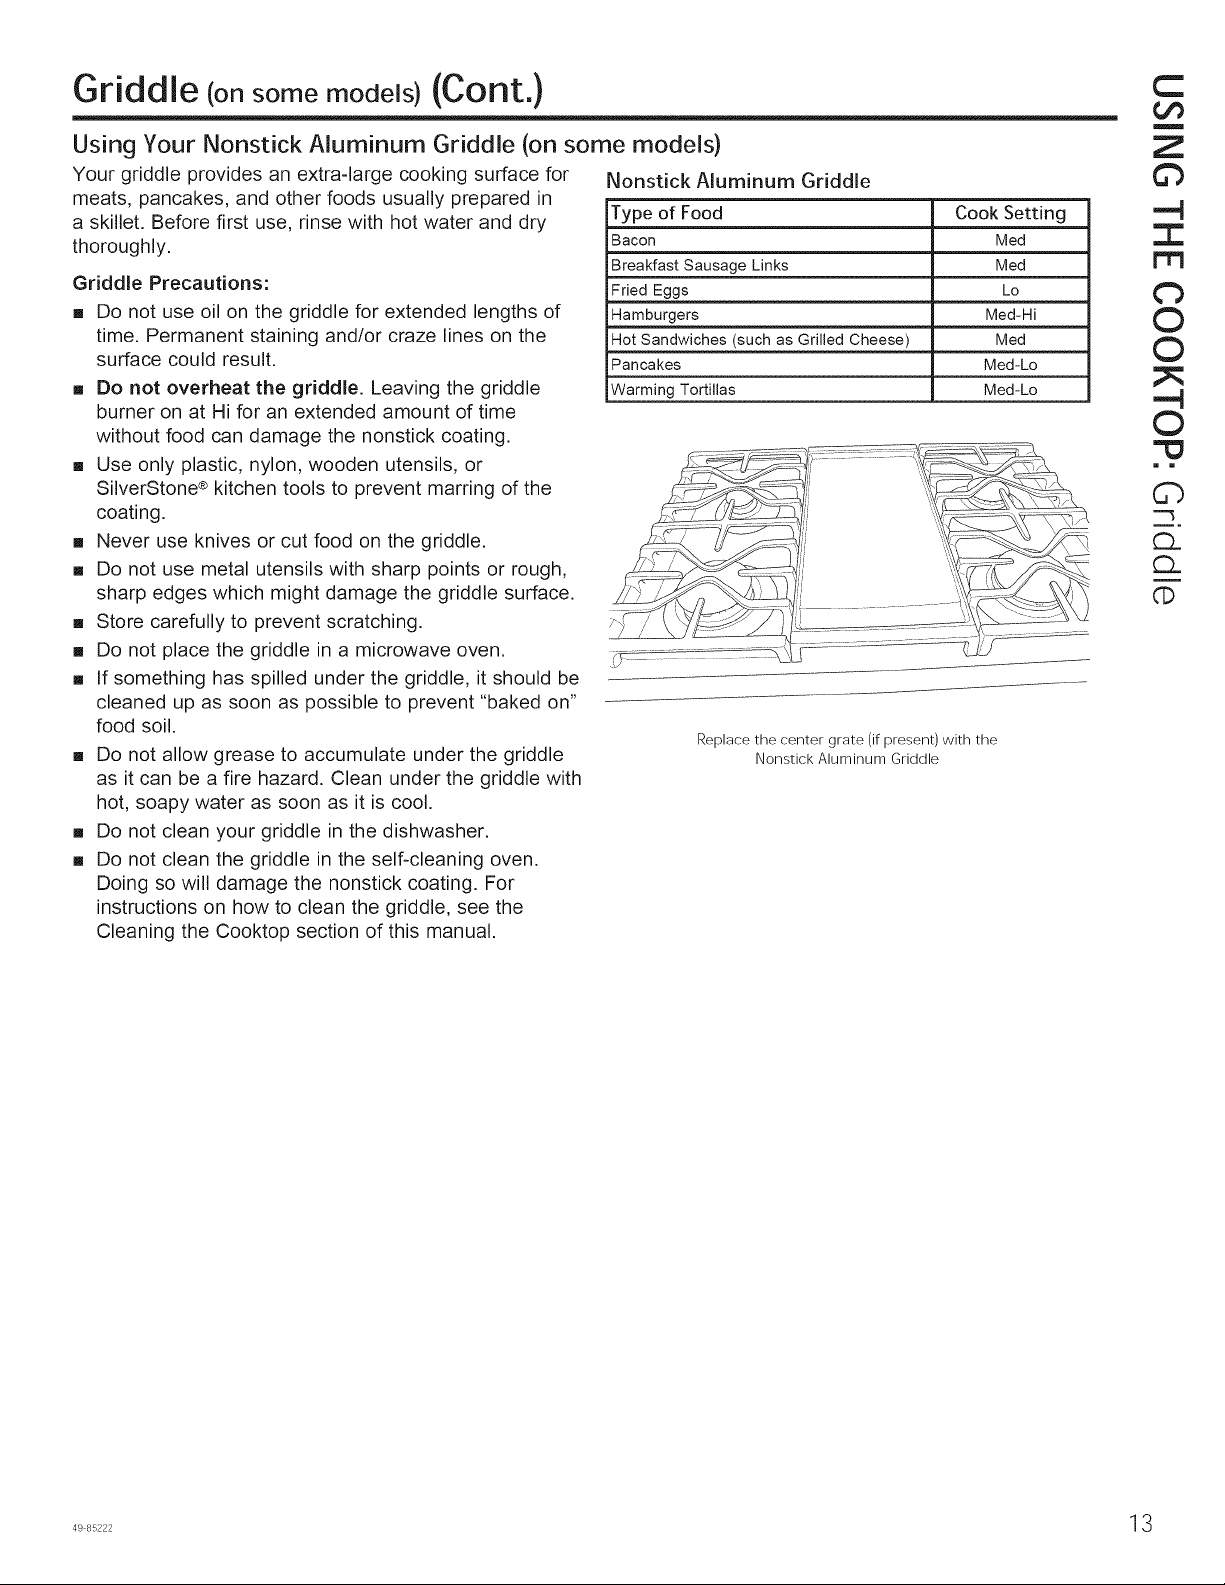
Using Your Nonstick Aluminum Griddle (on some models)
Your griddle provides an extra-large cooking surface for
meats, pancakes, and other foods usually prepared in
a skillet. Before first use, rinse with hot water and dry
thoroughly.
Griddle Precautions:
[] Do not use oil on the griddle for extended lengths of
time. Permanent staining and/or craze lines on the
surface could result.
[] Do not overheat the griddle. Leaving the griddle
burner on at Hi for an extended amount of time
without food can damage the nonstick coating.
[] Use only plastic, nylon, wooden utensils, or
SilverStone ®kitchen tools to prevent marring of the
coating.
[] Never use knives or cut food on the griddle.
[] Do not use metal utensils with sharp points or rough,
sharp edges which might damage the griddle surface.
[] Store carefully to prevent scratching.
[] Do not place the griddle in a microwave oven.
[] If something has spilled under the griddle, it should be
cleaned up as soon as possible to prevent "baked on"
food soil.
[] Do not allow grease to accumulate under the griddle
as it can be a fire hazard. Clean under the griddle with
hot, soapy water as soon as it is cool.
[] Do not clean your griddle in the dishwasher.
[] Do not clean the griddle in the self-cleaning oven.
Doing so will damage the nonstick coating. For
instructions on how to clean the griddle, see the
Cleaning the Cooktop section of this manual.
Nonstick Aluminum Griddle
Type of Food Cook Setting
Bacon Med
Breakfast Sausage Links Med
Fried Eggs Lo
Hamburgers Med-Hi
i
iHot Sandwiches (such as Grilled Cheese) Med
Pancakes Med-Lo
Warming Tortillas Med-Lo
......__
Replace the center grate (if present) with the
Nonstick Aluminum Griddle
C
¢fJ
m
Z
©
-N
I
©
©
--N
©
i m
db
--3
d3_
rb
©
Page 14
Or)
O
4-a
O
c-
Q
>
O
O
EL]
"l-
p-
©
Z
m
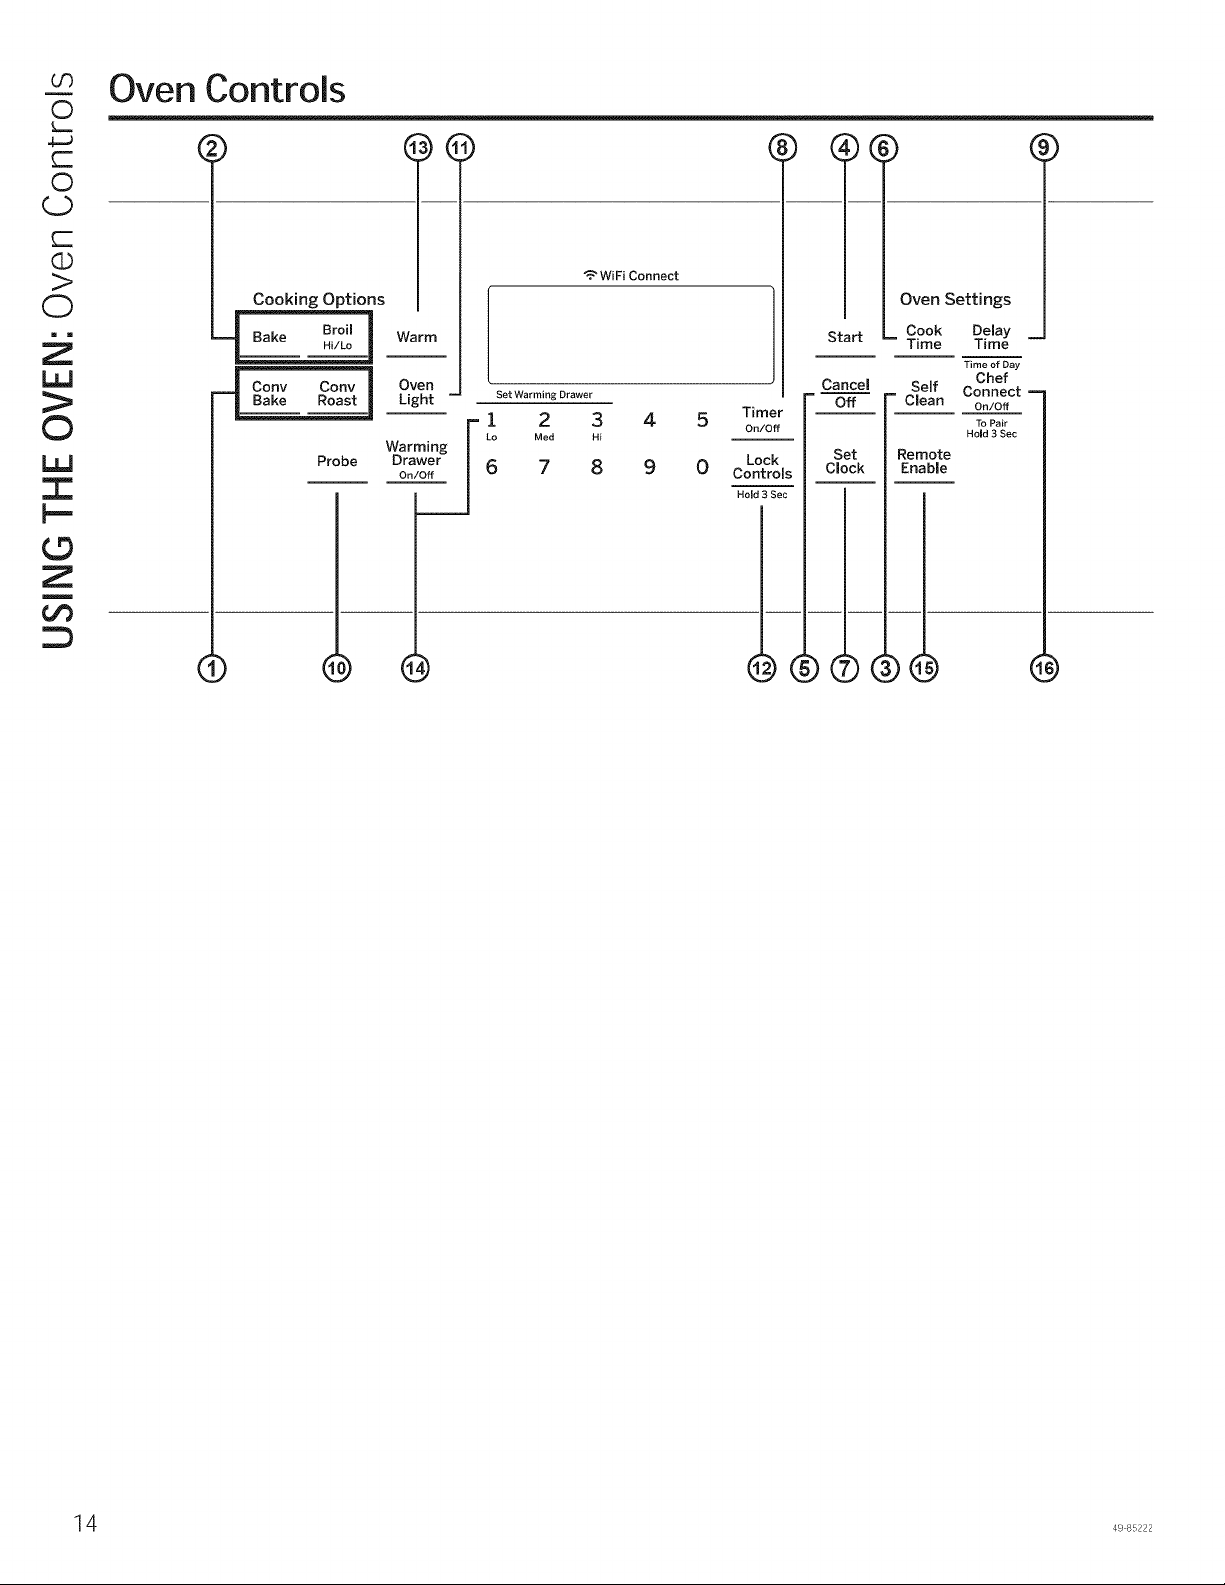
Oven Controls
Cooking Options
Bake Broil ] Warm
Bake Roast Light -
Cony Cony ] Oven
Hi/Lo
Probe
Warming
Drawer
on/off
.'_ WiFi Connect
Set Warming Drawer
-1 2 3 4
Lo Med Hi
6 7 8 9
T,merF-
5 o._off |
0 Lock |
||-
Start
Cancel
-6fi-
Set
Oven Settings
Cook Delay
= Time Time m
Time of Day
Semf
_ Clea/.
Remote
Enable
Chef
Connect m
On/Off
To Pair
Hold 3 Sec
4 49 85222
Page 15
Oven Controls (Cont.)
1. Convection Cooking Modes: Convection 10.
cooking modes use increased air circulation to
improve performance. The type of benefit depends
on the mode. Your oven has the following convection
cooking modes: Bake and Roast. See the Cooking
Modes section for more information.
.
Traditional Cooking Modes: Your oven has
the following traditional cooking modes: Bake, Broil
Hi, and Broil Lo. See the Cooking Modes section for 11.
more information. 12.
.
Clean: Your oven may have two cleaning modes:
Self Clean and Steam Clean (convection models).
See the Cleaning the Oven section for important
information about using these modes.
.
Start: Must be pressed to start any cooking,
cleaning, or timed function.
.
Cancel/Off: Cancels ALL oven operations except
the clock and timer.
.
Cook Time: Counts down cooking time and turns
off the oven when the cooking time is complete.
Program the desired cooking mode and cooking
temperature, then press the Cook Time pad. Use
the number pads to program a cooking time in
hours and minutes, then press Start. This can only
be used with Traditional Bake, Convection Bake,
and Convection Roast.
.
Clock: Sets the oven clock time. Press the Set
Clock pad. Use the number pads to program the
clock. Press Start to save the time.
.
Timer: Works as a countdown timer. Press the
Timer pad and the number pads to program the
time in hours and minutes. Press the Start pad.
The oven will continue to operate when the timer
countdown is complete. To turn the timer off press
the Timer pad.
.
Delay Time: Delays when the oven will turn
on. Use this to set a time when you want the oven
to start. Program the desired cooking mode and
cooking temperature, then press the Delay Time
pad. Use the number pads to program the time of
day for the oven to turn on, then press Start. A
cook time may also be programmed if desired. This
can only be used with Traditional Bake, Convection
Bake, Convection Roast, and Self Clean.
NOTE: Foods that spoil easily--such as milk, eggs,
fish, stuffings, poultry, and pork--should not be
allowed to sit for more than 1hour before or after
cooking. Room temperature promotes the growth
of harmful bacteria. Be sure that the oven light is
off, because heat from the bulb will speed harmful
bacteria growth.
13.
14.
15. Remote Enable (on some models): Allows
16. Chef Connect: This is a Bluetooth ®
Probe (on some models): Monitors internal
food temperature and turns the oven off when the
food reaches the programmed temperature. Insert
the probe, program the cooking mode, and program
the probe temperature. See the Probe section for
more information. The probe can only be used with
Traditional Bake, Convection Bake, and Convection
Roast.
Oven Light: Turns the oven light on or off.
Lock Controls: Locks out the control so that
pressing any pad does not activate the controls.
Press and hold the Lock Controls pad for three
seconds to lock or unlock the control. Cancel/Off is
always active, even when the control is locked.
Warm: Will keep hot, cooked foods at serving
temperature. Press the Warm pad, then press Start.
Push Cancel/Off to turn off the oven.
Warming Drawer: Will keep hot, cooked foods
at serving temperature. Press the Warming Drawer
pad. Use the number pads to select the temperature
setting. Press 1 for Low, 2 for Medium, or 3 for
High, then press Start. Push Warming Drawer On/
Off to turn off the warming drawer.
you to control your oven remotely. To be able to
start the oven remotely, press the Remote Enable
pad, and "Remote" will be lit in the display. The
oven can now be remotely started with a connected
device. Opening the oven door or pressing the
Remote Enable pad will remove "Remote" from
the display and prevent you from being able to turn
the oven on remotely. If "Remote" is not shown
in the display, you are still able to change the
oven settings or turn the oven off. After using the
oven, remember to verify that the "Remote" icon is
displayed if you wish to start the oven remotely in
the future. For instructions on how to connect your
oven, see the WiFi Connect section of this manual.
pairing feature for use with other compatible
Chef Connect enabled products like an over-
the=range microwave oven or range hood. To
pair those products to the range, press and hold
the Chef Connect pad for 3 seconds and follow
the corresponding instructions included with the
mating Chef Connect enabled product if needed.
The range will cancel pairing mode after two
minutes if no mating device is detected.
C
tJ3
m
Z
©
"-4
I
r_
©
t't3
Z
i m
O
<
©
"-3
©
L_
Page 16

U3
Q
Q
LJ_.
m
Special Features
There are several different special features on your range. To change the settings of these special features:
[] Press the Bake and Broil pads at the same time and hold until the special features menu is displayed.
[] Use the 3 or 8 number pads to scroll through the special features until the desired feature is displayed.
[] Press the 0 number pad to enter into the feature's menu and scroll through the options.
[] Once the desired option is displayed, press the 0 pad to save the setting and the 6 pad to exit the menu.
LP
Q
rb
oO
La,J
©
-r"
©
Z
m
oO
1 2 4 5
7 9
6 = Cancel/Back, 3 = Up, 8 = Down, 0 = Save/Forward
Adjust the Oven Temperature
This feature allows the oven baking temperature to be
adjusted up to 35°F hotter or down to 35°F cooler. Use
this feature if you believe your oven temperature is too
hot or too cold and wish to change it. This adjustment
affects every cooking mode except broil.
Enter into the special features menu as outlined above.
Scroll through the features until "OFFSEt" is displayed
and press 0. Use the 3 pad to increase the adjusted
temperature or use the 8 pad to decrease the adjusted
temperature. Save and exit the special features menu.
End of Timer Signals
This is the tone that signals the end of a timer. The
tone can be either continuous (Cont) or single (bEEp).
The continuous setting (Cont) will repeatedly sound a
tone every few seconds until a button on the control
is pressed. A single setting (bEEp) will sound just a
single tone at the end of the timer. Enter into the special
features menu as outlined above. Scroll through the
options until "End tonE" is displayed and press 0. Scroll
through the options until the desired setting is displayed.
Press 0 to save the setting and then 6 to exit the menu.
Fahrenheit or Celsius Temperature Display
The oven control is set to use Fahrenheit temperatures
(F), but you can change it to use Celsius temperatures
(C). Enter into the special features menu as outlined
above. Scroll through the options until "deg Unit" is
displayed and press 0. Scroll through the options until
the desired setting is displayed. Press 0 to save the
setting and then 6 to exit the menu.
Clock Display
This feature (On/Off) specifies if the time of day is
displayed. Enter into the special features menu as
outlined above. Scroll through the options until "Cloc
diSP" is displayed and press 0. Scroll through the
options until the desired setting is displayed. Press 0 to
save the setting and then 6 to exit the menu.
Clock Configuration
This feature specifies how the time of day will be
displayed. You can select a standard 12-hour clock (12)
or 24-hour military time display. Enter into the special
features menu as outlined above. Scroll through the
options until "Cloc cFg" is displayed and press 0. Scroll
through the options until the desired setting is displayed.
Press 0 to save the setting and then 6 to exit the menu.
Sound Volume
This feature allows the oven tone volume to be adjusted
between high (Hi), medium (reg), low (Lo) and off (oFF).
Enter into the special features menu as outlined above.
Scroll through the options until "sound" is displayed
and press 0. Scroll through the options until the desired
setting is displayed. Press 0 to save the setting and then
6 to exit the menu. The selected sound option will play
once 0 is pressed.
Auto Recipe Conversion
This feature (On/Off), automatically adjusts the
programmed recipe temperature in Convection
Multi-Bake mode. Enter into the special features menu
as outlined above. Scroll through the options until "Auto
rEciPE" is displayed. Scroll through the options until the
desired setting is displayed. Press 0 to save the setting
and then 6 to exit the menu.
NOTE: This option does not convert baking time, only
temperatures. This option does not adjust temperatures
for Convection Roast mode.
16 49 85222
Page 17
Sabbath Mode
The Sabbath mode feature complies with standards set forth by Star N. Some of these standards that will be noticed
by the consumer include the disabling of tones, disabling of oven lights, and delays of about 30 seconds to one
minute on display changes. Only continuous baking or timed baking is allowed in the Sabbath mode. Cooking in the
Sabbath mode is a two-step process, first the Sabbath mode must be set and then the bake mode must be set.
Setting the Sabbath Mode
1. Press the Bake and Broil pads at the same time and
hold until the special features menu is displayed.
2. Use the 3 or 8 number pads to scroll through the
special features until "SAbbAth" is displayed and then
press 0. Refer to the graphic in the Special Features
section to see how the number keys are mapped.
3. Use the 3 or 8 number pads to scroll through the
options until "On" is shown in the display, then press
the 0 number pad to save the setting. Press 6 to exit
the Special Features menu. A single bracket "]" will
appear in the display indicating that the Sabbath mode
is set. The clock will not be displayed. Continuous
bake or timed bake can now be programmed.
Starting a Continuous Bake
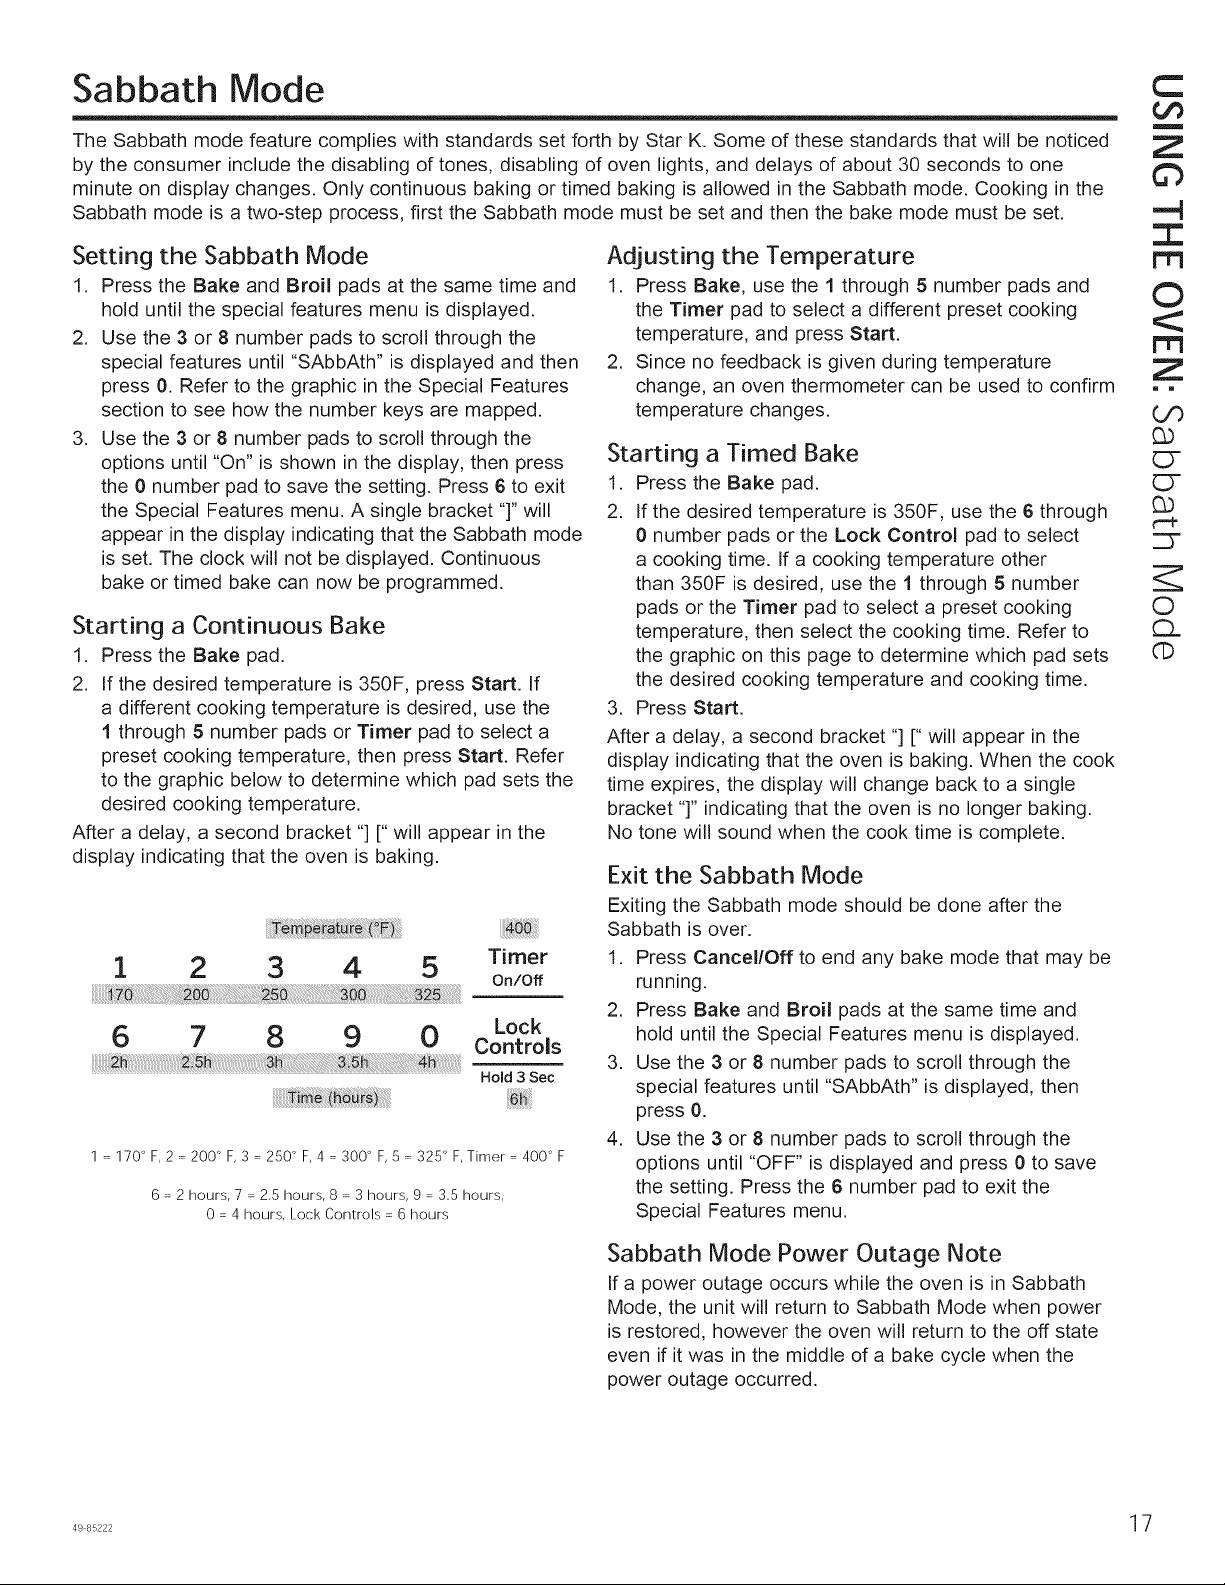
1. Press the Bake pad.
2. If the desired temperature is 350F, press Start. If
a different cooking temperature is desired, use the
I through S number pads or Timer pad to select a
preset cooking temperature, then press Start. Refer
to the graphic below to determine which pad sets the
desired cooking temperature.
After a delay, a second bracket "] [" will appear in the
display indicating that the oven is baking.
1 2 3 4 5 Timer
6 7 8 9 0
1 = 170" F, 2 = 200" F, 3 = 250" F, 4 = 300" F, 5 = 325 _'F, Timer = 400 _'F
6 = 2 hours, 7 = 2.5 hours, 8 = 3 hours, 9 = 3.5 hours,
0 = 4 hours, Lock Controls = 6 hours
On/Off
Lock
Controls
Hold 3 Sec
Adjusting the Temperature
1. Press Bake, use the 1 through 5 number pads and
the Timer pad to select a different preset cooking
temperature, and press Start.
2. Since no feedback is given during temperature
change, an oven thermometer can be used to confirm
temperature changes.
Starting a Timed Bake
1. Press the Bake pad.
2. If the desired temperature is 350F, use the 6 through
0 number pads or the Lock Control pad to select
a cooking time. If a cooking temperature other
than 350F is desired, use the 1 through 5 number
pads or the Timer pad to select a preset cooking
temperature, then select the cooking time. Refer to
the graphic on this page to determine which pad sets
the desired cooking temperature and cooking time.
3. Press Start.
After a delay, a second bracket "] [" will appear in the
display indicating that the oven is baking. When the cook
time expires, the display will change back to a single
bracket "]" indicating that the oven is no longer baking.
No tone will sound when the cook time is complete.
Exit the Sabbath Mode
Exiting the Sabbath mode should be done after the
Sabbath is over.
1. Press Cancel/Off to end any bake mode that may be
running.
2. Press Bake and Broil pads at the same time and
hold until the Special Features menu is displayed.
3. Use the 3 or 8 number pads to scroll through the
special features until "SAbbAth" is displayed, then
press 0.
4. Use the 3 or 8 number pads to scroll through the
options until "OFF" is displayed and press 0 to save
the setting. Press the 6 number pad to exit the
Special Features menu.
C
¢,f)
m
Z
©
-'4
I
©
t't3
Z
i m
(./9
0-
C5-
25"
Z
0
£1.
©
Sabbath Mode Power Outage Note
If a power outage occurs while the oven is in Sabbath
Mode, the unit will return to Sabbath Mode when power
is restored, however the oven will return to the off state
even if it was in the middle of a bake cycle when the
power outage occurred,
Page 18
Or)
Q
O
Z
(ZT)
c=
O
O
LD
Q
f,==
O
©
LP
©
"r"
t.-=
©
Z
m
Cookware Guidelines
The material, finish, and size of cookware affect baking
performance.
Dark, coated and dull pans absorb heat more readily
than light, shiny pans. Pans that absorb heat more
readily can result in a browner, crisper and thicker crust.
If using dark and coated cookware check food earlier
than the minimum cook time. If undesirable results are
obtained with this type of cookware consider reducing
oven temperature by 25° F next time.
[] Shiny pans can produce more evenly cooked baked
goods such as cakes and cookies.
[] Glass and ceramic pans heat slowly but retain heat
well. These types of pans work well for dishes such
as pies and custards.
[] Air insulated pans heat slowly and can reduce bottom
browning.
[] Keep cookware clean to promote even heating.
Cooking Modes
Your new oven has a variety of cooking modes to help you get the best results. These modes are described below.
Refer to the Cooking Guide section for recommendations for specific foods. Remember, your new oven may perform
differently than the oven it is replacing.
Bake
The bake mode is for baking and roasting. This mode
uses heat primarily from the lower burner but also from
the upper burner to cook food. When preparing baked
goods such as cakes, cookies and pastries, always
preheat the oven first. Follow recipe recommendations
for food placement. If no guidelines are provided, center
food in the oven. To use this mode press the Bake pad,
enter a temperature with the number pads, and then
press Start.
Warm/Warming Drawer (on some models)
Warm mode is designed to keep hot foods hot. Cover
foods that need to remain moist and do not cover foods
that should be crisp. Preheating is not required. Do not
use warm to heat cold food other than crisping crackers,
chips or dry cereal. It is also recommended that food
not be kept warm for more than 2 hours. See the Oven
Controls section for more information.
Broiling Modes
Always broil with the oven door and drawer closed.
Monitor food closely while broiling. Use caution when
broiling on the upper rack positions as placing food
closer to the broil burner increases smoking, spattering
and the possibility of fats igniting.
Try broiling foods that you would normally grill. Adjust
rack positions to adjust the intensity of the heat to the
food. Place foods closer to the broil burner when a
seared surface and rare interior is desired. Thicker foods
and foods that need to be cooked through should be
broiled on a lower rack position or by using the Broil Lo
mode.
Broil Hi
The Broil Hi mode uses intense heat from the upper
burner to sear foods. Use Broil Hi for thinner cuts of
meat and/or foods you prefer less done on the interior.
To use this mode press the Broil pad once and then
press Start. it is not necessary to preheat when using
this mode.
Broil Lo
The Broil Lo mode uses less intense heat from the upper
burner to cook food thoroughly while also browning the
surface. Use Broil Lo for thicker cuts of meat and/or foods
that you would like cooked all the way through. To use
this mode press the Broil pad twice and then press Start.
it is not necessary to preheat when using this mode.
Convection Bake
The Convection Bake mode is intended for baking
on multiple racks at the same time. This mode uses
air movement from the convection fan to enhance
cooking evenness. Your oven is equipped with Auto
Recipe Conversion, so it is not necessary to adjust the
temperature when using this mode. To use this mode
press the Cony Bake pad, enter a temperature with
number pads, and then press Start. Always preheat
when using this mode.
Convection Roast
The Convection Roast mode is intended for roasting
whole cuts of meat on a single rack. This mode uses
heat from the lower bake burner along with air movement
to improve browning and reduce cooking time. It is not
necessary to convert temperature. Check food earlier
than the recipe suggested time when using this mode,
or use the probe (on some models). To use this mode
press the Cony Roast pad, enter a temperature with the
number pads, and then press Start. It is not necessary
to preheat when using this mode.
18 49 85222
Page 19

Oven Racks
Rack Positions
Your oven has six rack positions in the main oven.
Recommended rack positions for various types of
foods are provided in the Cooking Guide. Adjusting
the rack position is one way to impact cooking results.
For example, if you would prefer darker tops on cakes,
muffins or cookies, try moving food one rack position
higher. If you find foods are too brown on top, try moving
them down next time.
When baking with multiple pans and on multiple racks,
ensure there is sufficient space between pans to allow
air to flow. This may improve cooking evenness.
Removing and Replacing Flat Racks
When placing and removing cookware, pull the rack out
to the bump (stop position) on the rack support.
To remove a rack, pull it toward you until it reaches the
stop position, tilt up the front of the rack and pull it out.
To replace a rack, place the curved end of the rack onto
the rack supports. Tilt up the front of the rack and push
the rack in until it stops. Then lay the rack flat and push
it in until it is all the way into the oven.
Racks may become difficult to slide, especially after a
self-clean cycle. To improve sliding conditions, use a soft
cloth or paper towel to rub vegetable oil on the left and
right edges of the racks and/or rack supports.
NOTE: Remove unused racks when using the oven for
faster preheat, improved efficiency, and optimal cooking
performance.
Rack positions
_ posttton
Removing racks
Replacing racks
ll.,"RacLstop
C
m
Z
©
--i
I
©
FT3
Z
i m
O
<
dE)
GD
Cb
O0
O
<
3>
"='3
<
Extension Racks (on some models)
Extension racks have a frame that locks into the rack
supports on both sides. Once the frame is locked into place,
always use the upper front rail to pull the rack out to its full
extension position when placing or removing cookware.
If extension racks are difficult to extend, lubricate the
racks with the graphite lubricant provided with your oven.
Remove the rack from the oven (see Extension Rack
Removal), remove debris in the slide tracks with a paper
towel, shake the graphite lubricant, and place 4 small drops
on the two bottom tracks of the left and right sides. Open
and close the rack several times to distribute the lubricant.
See the Assistance/Accessories section for instructions on
ordering additional racks and graphite lubricant.
Extension Rack Removal
1. Make sure the rack is pushed all the way into the oven.
2. Firmly holding onto both the upper and lower front
rails, pull the rack toward you, tilt the front end up and
pull the rack out.
Extension Rack Replacement
1. Place the curved end of the rack onto the rack supports.
2. Tilt up the front of the rack and push the rack in until
it stops.
3. Lay the rack flat and push it in until it is all the way
into the oven.
If extension racks are difficult to replace or remove, wipe
the oven rack supports with cooking oil. Do not wipe oil
on the rack slides.
Oven Air Vents
Never block the vents (air openings) of the range. They
provide the air inlet and outlet that are necessary for the
range to keep cool and operate properly with correct
combustion.
Air openings are located at the rear of the cooktop, at
the top and bottom of the oven door, and at the bottom
of the range.
49 85222 1 9
Vent appearance and location vary.
Cf)
Page 20
Q
_Q
O
r_
©
-r"
©
Z
m
oO
Probe
i^l, WARNINGiConsuming undercooked food can result in foodborne illness. Use probe
according to the following instructions to ensure all portions of the food reach minimum safe cooking
temperatures. Recommendations for minimum safe food temperatures can be found at
www.foodsafety.gov or www.lsltDoneYet.gov.
Internal food temperature is frequently used as an indicator of doneness, especially for roasts and poultry.
The Probe mode monitors the internal food temperature and turns the oven off when the internal food
temperature reaches the programmed temperature.
Always check the temperature at multiple locations in the food with a food thermometer after cooking to
ensure that all portions of the food have reached the minimum safe internal temperature for that food.
Proper Probe Placement
After preparing the meat and placing it on the cooking
pan follow these instructions for proper probe placement.
[] Insert the probe into the food, so that the tip of the
probe will rest in the center of the thickest part of
the food. For best performance the probe should
be fully inserted into the food. If the probe is not
located properly, it may not accurately measure the
temperature of the coolest portion of the food. Some
foods, particularly small items, are not well suited for
cooking with the probe due to their shape or size.
[] The probe should not touch bone, fat or gristle.
[] For whole poultry insert the probe into the thickest
part of the breast.
[] For boneless roasts, insert the probe into the center
of the roast.
[] For bone-in ham or lamb, insert the probe into the
center of the lowest large muscle or joint.
[] For casseroles or dishes such as meatloaf, insert the
probe into the center of the dish.
[] For fish, insert the probe from just above the gill into
the meatiest area, parallel to the backbone.
Probe Usage
To use the probe with preheating:
1. Press the desired cook mode (Bake, Convection
Bake, or Convection Roast) pad and enter the
desired cooking temperature with the number pads.
2. Insert the probe into the food (see Proper Probe
Placement).
3. Once the oven is preheated, place the food in the
oven and connect the probe to the probe outlet,
making sure it is fully inserted. Use caution, the oven
walls and probe outlet are hot.
4. Program the probe temperature by pressing
the Probe pad and entering the desired food
temperature. The maximum internal food temperature
that you can set is 200 ° F.
To use the probe without preheating:
1. Insert the probe into the food (see Proper Probe
Placement).
2. Place the food in the oven and connect the probe into
the probe outlet in the oven.
3. Press the Probe pad and enter the desired food
temperature. Then press the cook mode pad
(Traditional Bake, Convection Bake, or Convection
Roast) and enter the desired cooking temperature
with the number pads.
Probe Care Guidelines
[] Use of probes other than the one provided with this
product may result in damage to the probe outlet.
[] Use the handles of the probe and plug when inserting
and removing them from the meat and outlet
[] To avoid damaging your probe, do not use tongs to
pull on the cable when removing it.
[] To avoid breaking the probe, make sure food is
completely defrosted before inserting the probe.
[] To prevent possible burns, do not unplug the probe
from the outlet until the oven has cooled.
[] Never leave the probe inside the oven during a self or
steam clean cycle.
[] Do not store the probe in the oven.
0 49 85222
Page 21

Cooking Guide
Baked Goods
Layer cakes, sheet cakes,
bundt cakes, muffins, quick
breads on a Single Rack
Layer cakes* on Multiple
Racks
Chiffon cakes (angel food)
Cookies, biscuits, scones on
a Single Rack
Cookies, biscuits, scones on
Multiple Racks
Beef & Pork
Hamburgers
Steaks & Chops
Poultry
Whole chicken
Bone-in chicken breasts,
legs, thighs
Boneless chicken breasts
Whole turkey Convection Roast 1 or 2
Turkey Breast Bake 2 or 3
Fish Broil Lo
Casseroles Bake 3 or 4
Frozen Convenience Foods
Pizza. potato products.
chicken nuggets, appetizers Bake
on a Single Rack
Pizza, potato products,
chicken nuggets, appetizers Bake
on Multiple Racks
Bake
Bake
Convection Bake
Bake
Bake
Convection Bake
Bake
Broil Hi
Broil Hi
Convection Roast
Bake
Convection Roast
Bake
Broil Lo
Bake
Broil Lo
Bake
Bake
Convection Bake
3 or4
3 and 5
3 or4
2 Racks- 3 and 5
3 Racks - 2, 4 and 6
2or3
2or3
3 or4
6 (I/2 thick or less)
5 (>I/2 inch)
3 and 5
2, 4 and 6
C
m
Z
©
"-4
Use shiny cookware.
Ensure adequate airflow
(see illustration below).
Use extension rack in positions 2.
2
Ensure adequate airflow. Switch food location
partially through cooking for more even cooking
results. Use extension rack in lower position.
Use flat rack. Use a broil pan; move food down
for more doneness/less searing. Watch food
closely when broiling. Center food under burner.
Use flat rack. Use a broil pan; move food down
for more doneness/less searing. Watch food
closely when broiling. Center food under burner.
Leave uncovered, use a low sided pan such
as a broil pan. Preheating is not necessary.
Leave uncovered, use a low sided pan
If breaded or coated in sauce avoid Broil
Move food down for more doneness/less
searing and up for greater searing/browning
Leave uncovered, use a low sided pan
Leave uncovered, use a low sided pan
Watch food closely when broiling. Use flat rack if
cooking for more even cooking results.
Use shiny cookware.
Use shiny cookware.
such as a broil pan.
Hi modes. Broil skin side down first.
Watch food closely when broiling.
when broiling.
such as a broil pan.
such as a broil pan.
using position 5.
Use shiny cookware.
Use shiny cookware.
Switch food location partially through
I
©
Z
i m
Cb
O
©
CO3
6b
c-
CL
©
*When baking four cake layers at a time, stagger the
Rear Placement
pans as shown to the right so that one pan is not directly
above another.
@
Cook food thoroughly to help protect against
foodborne illness. Minimum safe food temperature
recommendations for food safety can be found at
www.lsltDoneYet.gov. Make sure to use a food
thermometer to take food temperatures.
NOTE: Remove unused racks when using the oven for
faster preheat, improved efficiency and optimal cooking
performance.
4985222 21
Front Placement r_
Rack positions E_
Page 22
00
L-.
Q
c--
__J
r-
dP
>
O
"C3
c--
c_
O
LL
E
c--
E
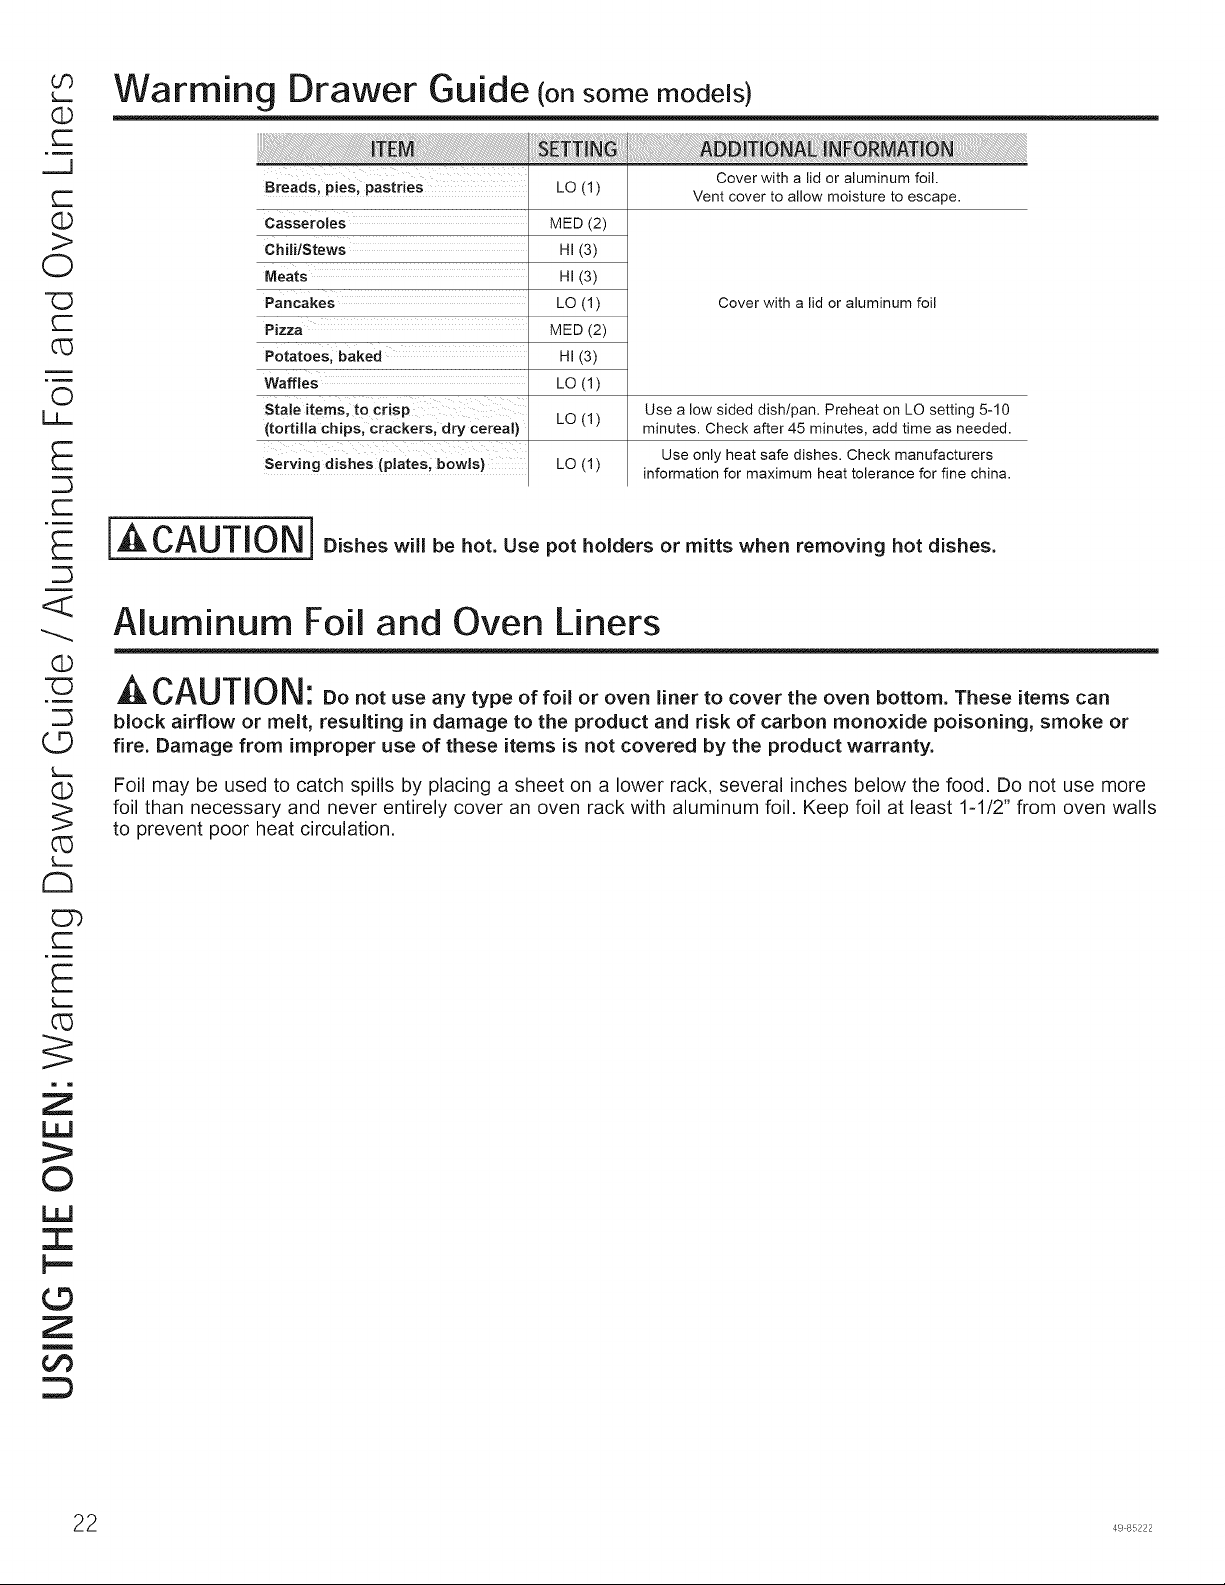
Warming Drawer Guide (onsomemodels)
Breads, pies, pastries
Casseroles
ChililStews
Meats
Pancakes
Pizza
Potatoes, baked
Waffles
Stale items, to crisp
(tortilla chips, crackers, dry cereal)
Serving dishes (plates, bowls)
LO (1)
MED (2)
HI (3)
HI (3)
LO (1)
MED (2)
HI (3)
LO (1)
LO (1)
LO (1)
Use a low sided dish/pan. Preheat on LO setting 5-10
minutes. Check after 45 minutes, add time as needed.
information for maximum heat tolerance for fine china.
Cover with a lid or aluminum foil.
Vent cover to allow moisture to escape.
Cover with a lid or aluminum foil
Use only heat safe dishes. Check manufacturers
iA CAUTION] Dishes will be hot. Use pot holders or mitts when removing hot dishes,
<
Q
-C3
L.9
L_
CD
c_
L..
O-)
c--
E
L-.
03
LaJ
©
LaJ
::C
p-
Aluminum Foil and Oven Liners
*-,,CAUTION: Donotuseanytypeoffo,oroven,nettocovertheovenbottom.Theseitemscan
block airflow or melt, resulting in damage to the product and risk of carbon monoxide poisoning, smoke or
fire. Damage from improper use of these items is not covered by the product warranty.
Foil may be used to catch spills by placing a sheet on a lower rack, several inches below the food. Do not use more
foil than necessary and never entirely cover an oven rack with aluminum foil. Keep foil at least 1-1/2" from oven walls
to prevent poor heat circulation.
©
Z
m
DO
D
2 49 85222
Page 23

WiFi Connect
Connecting your WiFi Connect Enabled oven (on some models)
Your GE oven is designed to provide you with two-way communication between your appliance and smart device.
By using the GE WiFi Connect features, you will be able to control essential oven operations such as temperature
settings, timers and cooking modes using your smartphone or tablet.*
What you will need
Your GE oven uses your existing home WiFi network
to communicate between the appliance and your smart
device. In order to setup your GE oven, you will need to
gather some information:
1. Each GE oven has a connected appliance information
label that includes an Appliance Network Name and
Password. These are the two important details that
you will need to connect to the appliance. The label is
typically located inside the door of the oven or drawer.
FCC: ZKJ-WCATAO01 Network: GE__XXXXXX__XXXX
IC: 10229A-WCATA001 Password: XXXXXXXX
I Connected Appliance Information 1
MAC ID: XX - XX - XX - XX - XX - XX PT, NO, 229C6272G001-0
Sample Label
2. Have your smart phone or tablet ready with the ability
to access the internet and download apps.
3. You will need to know the password of your home
WiFi router. Have this password ready while you are
setting up your GE oven.
Connect your GE oven
1. On your smart phone or tablet visit
www.GEAppliances.com/connect to learn more about
connected appliance features and to download the
appropriate app.
2. Follow the app onscreen instructions to connect your
GE oven.
3. Once the process is complete, the connection light
located on your GE oven display will stay on solid and
the app will confirm you are connected.
4. If the connection light does not turn on or is blinking,
follow the instructions on the app to reconnect.
If issues continue please call 800.GE.CARES
(800.432.2737) and ask for assistance regarding oven
wireless connectivity.
To connect additional smart devices, repeat steps 1and 2.
Note that any changes or modifications to the remote
enable device installed on this oven that are not
expressly approved by the manufacturer could void the
user's authority to operate the equipment.
C
m
Z
©
-q
I
I"I"1
O
Z
i m
-Tq
Cb
O
CD
Cb
r'-e
* Compatible Apple or Android devices and home WiFi network required.
Page 24

t-
(13
>
O
(13
C"
4-...J
E)b
C"
r-
G3
(13
r.D
(5
Z
m
Z
LLJ
__!
¢D
Z
LIJ
<I:
¢D
Cleaning the Oven
Be sure all controls are off and all surfaces are cool before cleaning any part of the oven.
Oven Interior
The interior of your new oven can be cleaned manually
or by using the Steam Clean or Self Clean modes
(on some models).
Spillage of marinades, fruit juices, tomato sauces and
basting liquids containing acids may cause discoloration
and should be wiped up as soon as hot surfaces cool,
then clean and rinse.
Manual Cleaning
Do not use oven cleaners, abrasive cleaners, strong
liquid cleansers, steel wool, scouring pads or cleaning
powders on the interior of the oven. Clean with mild soap
and water or 50/50 solution of vinegar and water. Rinse
with clean water and dry with a soft cloth. When cleaning
surfaces, make sure that they are at room temperature
and not in direct sunlight.
Steam Clean Mode (on some models)
The Steam Clean feature is for cleaning light soil from
your oven at a lower temperature than Self Clean.
To use the Steam Clean feature:
1. Start with the oven at room temperature.
2. Wipe excess grease and soils from the oven.
3. Pour one cup of water onto the bottom of the oven.
4. Close the door.
5. Press the Steam Clean pad and then press Start.
You cannot open the door during the 30 minute Steam
Clean cycle. At the end of the Steam Clean cycle, soak
up the remaining water, and wipe the moisture-softened
soil from the oven walls and door.
Self Clean Mode (on some models)
Read Self-Cleaning Oven Safety Instructions at the
beginning of this manual before using the Self Clean
Mode. Self Clean uses very high temperatures to clean
the oven interior. For a moderately soiled oven, run a
3 hour self-clean cycle. For a heavily soiled oven, run
a 5 hour self-clean cycle. Only self-clean (black) racks
and grates may remain in the oven during the self-clean
cycle. All other items, including nickel plated (silver)
racks, should be removed. If nickel plated (silver) racks
are left in the oven during a self-clean cycle, the racks
will tarnish. If either type of rack is left in the oven during
a self-clean cycle, the rack may become difficult to slide.
See the Oven Racks section for instructions on how to
improve.
IMPORTANT: The health of some birds is extremely
sensitive to the fumes given off during the self-cleaning
cycle of any range. Move birds to another well-
ventilated room.
To use the Self Clean feature:
1. Start with the oven at room temperature.
2. Wipe excess grease and soils from the oven and
interior door.
3. Remove all items other than self-clean (black)
racks and grates, if desired. See Cleaning the
Cooktop to determine if your grates may be self-
cleaned and for important details regarding grate
placement.
4. Close the door.
5. Press the Self Clean pad, set a time between 3
and 5 hours, and then press Start.
You cannot open the door during the self-clean cycle.
The door will remain locked after the self-clean cycle until
the oven cools below the unlocking temperature. At the
end of the self-clean cycle, allow the oven to cool and
wipe any ash out of the oven.
Oven Exterior
Do not use oven cleaners, abrasive cleansers, strong
liquid cleansers, steel wool, plastic scouring pads or
cleaning powders on the interior or exterior of the oven.
Clean with a mild soap and water or a 50/50 solution of
vinegar and water. Rinse with clean water and dry with a
soft cloth. When cleaning surfaces, make sure that they
Oven Racks
All oven racks may be cleaned by hand with an abrasive
cleaner or steel wool. Self-clean (black) oven racks may
remain in the oven during the self-clean cycle. Nickel-
plated (silver) racks should not remain in the oven during
the self clean cycle. Doing so will tarnish the racks. If
either type of rack is left in the oven during a self-clean
cycle, the rack may become difficult to slide.
24
are at room temperature and not in direct sunlight.
Spillage of marinades, fruit juices, tomato sauces and
basting liquids containing acids may cause discoloration
and should be wiped up as soon as hot surfaces cool,
then clean and rinse.
After cleaning the racks, use a soft cloth or paper towel
to rub a small amount of vegetable oil on the left and
right edges of the rack. This will ensure the racks are
easy to slide in and out of the oven
49 85222
Page 25

Cleaning the Cooktop
Control Panel and Knobs
Wipe the control panel after each use of the oven with
a damp cloth. For cleaning, use mild soap and water or
a 50/50 solution of vinegar and water, Rinse with clean
water. Polish dry with a soft cloth.
Do not use abrasive cleansers, strong liquid cleansers,
plastic scouring pads or oven cleaners on the control
panel--they will damage the finish.
Stainless Steel Surfaces (on some models)
Do not use a steel wool pad; it will scratch the surface.
To clean the stainless steel surface, use warm sudsy
water or a stainless steel cleaner or polish. Always wipe
the surface in the direction of the grain. Follow the cleaner
instructions for cleaning the stainless steel surface.
Cleaners with oxalic acid such as Bar Keepers Friend
Soft Cleanser TM will remove surface rust, tarnish and
small blemishes. Use only a liquid cleanser free of grit
and rub in the direction of the brush lines with a damp,
soft sponge.
To inquire about purchasing cleaning products
including stainless steel appliance cleaner or polish,
read the Assistance/Accessories sections at the
beginning of this manual.
Cooktop Surface
Do not use oven cleaners, abrasive cleansers, strong
liquid cleansers, steel wool, plastic scouring pads, or
cleaning powders on the cooktop surface. Clean with a
mild soap and water or a 50/50 solution of vinegar and
water. Rinse with clean water and dry with a soft cloth.
When cleaning surfaces, make sure that they are at
room temperature and not in direct sunlight.
For easier cleaning, the control knobs may be removed
by pulling them directly outwards once the knobs are in
the OFF position. Do not pull knobs up or down or hang
objects on them. This can damage the gas valve shaft.
When removing the tri-ring (on some models) and the
dual-oval (on some models) burner knobs, remember
their location. While all other knobs are interchangeable,
these knobs must be placed in the same location after
cleaning. See the Surface Burner section for a detailed
view of these knobs. The knobs can be washed by hand
with soap and water or in a dishwasher.
To replace knobs after cleaning, align the hole on
the knob backside with the gas valve shaft and push
inward until the knob is securely fastened. All knobs are
interchangeable
o O_EA_
OF o[10
Surface burner knob
Spillage of marinades, fruit juices, tomato sauces and
basting liquids containing acids may cause discoloration
and should be wiped up as soon as hot surfaces cool,
then clean and rinse.
If your model has a stainless steel cooktop surface,
refer to the Stainless Steel Surface cleaning instructions
featured in the Control Panel and Knobs section.
qb
:1:=,
Z
qb
r-Pi
Z
Z
©
I I
Cb
i
i.
LC3
¢'-P
db
©
©
¢-'P
©
Probe (on some models)
The temperature probe may be cleaned with soap and
water or a soap-filled scouring pad. Cool the temperature
probe before cleaning. Scour stubborn spots with a
soap-filled scouring pad, rinse and dry.
To order additional temperature probes, read the
Assistance/Accessories sections at the beginning of this
manual.
[] Do not immerse the temperature probe in water.
[] Do not store the temperature probe in the oven.
[] Do not leave the temperature probe inside the oven
during a self or steam clean cycle.
Page 26

E2_
O
0
0
C.D
Q
C"
4_
Ob
C"
c"
Q
0
Cleaning The Cooktop (Cont.)
Removal of Surface Burners for Cleaning
Turn all controls OFF. Allow cooktop to cool before removing grates and burner parts. When removing the burner
caps and heads, remember their size and location. Replace them in the same location after cleaning.
lA CAUTIONJDo°o,o,,omp,,o.omovoovo,,..o,ovo,or,.-.°Qb°.°o,oop.,.ore,.ob.r°o.,oo,,.
Round Burner Cap Oval Burner Cap Inner Burner Cap Round Burner Cap
(Removable) (Non-Removable) (Removable) (Removable)
tr
Round
Oval
Burner
d
Z
Z
__1
r_
Z
t_
Round Burner
Electrode
Electrode
Oval Burner
(on some models)
(Non-Removable) Burner
Head
Tri-Ring Burner
(on some models)
Dual Oval Burner Caps
(Non-Removable)
Dual Oval Burner
(on some models)
26 49 85222
Page 27

Cleaning the Cooktop (Cont.)
Cleaning the Surface Burners (Cont.)
Cb
Cleaning the Burner Caps
Wash burner caps in hot, soapy water and rinse with
clean water. You may scour with a plastic scouring pad
to remove burned-on food particles. The round burner
caps may also be cleaned in your dishwasher.
Cleaning the Burner Heads
Wash the burner heads routinely, especially after bad
spillovers which could clog the burner openings. Lift
burners off when cool. Wash with hot, soapy water. Rinse
with clean water. For more stubborn stains, use a brush
with plastic bristles.
NOTE: Do not use steel wool or scouring pads to clean
the burner parts as these may clog the openings. Never
wash burner heads in your dishwasher as dishwasher.
Doing so may cause them to discolor.
The ports in the burner heads must be kept clean at all
times for an even, unhampered flame.
Clogged or dirty burner ports or electrodes will not allow
the burner to operate properly.
Round hole in
head must
be kept clear
[ A CA U T IO N ] Do not operate the cooktop
without all burner parts and grates in place.
Any spill on or around an electrode must be carefully
cleaned. Avoid hitting the electrode with anything hard or
it could be damaged.
Electrode
The electrode of the spark igniter is exposed
when the burner head is removed. When one
burner is turned to LITE, all the burners spark.
Do not attempt to disassemble or clean around
any burner while another burner is on.
Z
qb
r-Pi
Z
Z
©
I I
Cb
I
(T)
I i
LC)
25-
©
db
0
©
For proper ignition, make sure the small hole in the notch
that fits over the electrode is kept open. A sewing needle
or wire twist-tie works well to unclog it.
Replacing Surface Burners
Before replacing the burner caps, heads and oval head/
cap assembly, shake out excess water and allow them to
dry thoroughly.
Replace burner heads in the correct locations according
to size. Ensure each cap is properly seated on the
burner head, as pictured below.
<rr_r_m_ b',
Burner cap is Burner cap is Burner cap is
NOT properly seated. NOT properly seated, properly seated.
0
4985222 27
Page 28

CL
O
4----J
0
0
@
c-
CY_
C
C
Q
Z
m
Z
tm
z
LLJ
tY
Cleaning the Cooktop (Cont.)
Burner Grates
Manual Cleaning
Grates should be washed in hot, soapy water and
rinsed with clean water. To soften burned-on food,
place grates in a solution containing ¼-cup of
household ammonia for several hours. Afterward, scrub
grates with a plastic scouring pad soaked in hot, soapy
water. Rinse well and dry.
Self Clean Mode (on some models)
If your grates do not have rubber bumpers on their
bottom surface, they may be cleaned in the oven using
the self-clean cycle. Do not attempt to clean your grates
in the oven if your grates have rubber bumpers. Doing
so will destroy the rubber bumpers and may affect the
function of your surface burners.
Porcelain-coated grates may gradually dull if continually
exposed to self-clean temperatures.
If your oven is equipped with self-clean (black) racks,
it is recommended to follow the instructions for placing
grates on racks. If your oven is equipped with nickel-
plated (silver) racks, it is recommended to follow the
instructions for placing grates on the oven bottom.
Nickel-plated racks should not remain in the oven during
the self clean cycle. Doing so will tarnish the racks. If
either type of rack is left in the oven during a self-clean
cycle, the rack may become difficult to slide.
NOTE: When placing or removing grates from the oven,
do not slide the grates on the racks or oven bottom. Doing
so could damage the enamel on the racks or oven bottom.
To self-clean your grates on self-clean racks:
1. Insert racks in positions 1, 3, and 5 or positions 2 and 4.
2. Gently place one grate on each rack.
Once the grates are placed in the oven, operate the
self-clean cycle per the instruction in the Cleaning the
Oven section.
NOTE: Use caution when removing the grates from the
oven after the self-clean cycle has ended. The grates
may still be hot.
Once the self-clean cycle is complete, the grates may
carefully be removed. You may notice a white residue on
the grates. Wipe it off with a damp sponge. If white spots
persist, wet the sponge with a 50/50 solution of vinegar
and water and wipe the grates again.
When replacing the grates on the cooktop, be sure to locate
them correctly. Grates should fit securely into the cooktop.
Grate Support Bumpers (on some models)
If any of the rubber grate support bumpers in the cooktop
are missing or damaged, replacement parts can be
obtained by calling 1.800.GE.CARES.
To insert the new bumpers, simply place the
cone-shaped end of the bumper into the hole in the
cooktop and push down while gently twisting the bumper.
Griddles (on some models)
Nonstick Aluminum Griddle: Avoid scraping the
griddle surface with metal utensils. Wash your griddle
with dish soap and hot water. If necessary, scrub with a
non-abrasive plastic pad.
Reversible Cast-Iron: Clean your reversible cast-iron
griddle with a stiff brush and hot water. Using soap is
not recommended, and harsh detergents should never
be used as they will remove the seasoning. Rinse with
hot water and dry thoroughly. After rinsing, preseason
the griddle by applying a light coat of cooking oil to the
griddle surface. Wipe off excess oil with a paper towel.
Store in a cool, dry place.
Grate Support Bumpers
Griddle Precautions:
[] If something has spilled under the griddle, it should
be cleaned up as soon as possible to prevent the
spill from getting baked onto the cooktop.
[] Do not allow grease to accumulate under the griddle
as it can be a fire hazard. Clean under the griddle
with hot, soapy water as soon as it is cool.
[] Do not wash your griddle in the dishwasher.
[] Do not clean the griddle in the self-cleaning oven.
8 49 85222
Page 29

Cleaning the Door and Drawer
Cleaning the Oven Door
Cleaning the Door Interior
Do not allow excess water to run into any holes or slots
in the door.
Wipe dish soap over any baked-on spatters on the glass.
Use a single sided safety razor blade to clean it off. Then
wipe over the glass with a soapy cloth to remove any
residue and dry off.
The area outside the gasket can be cleaned with a
soap-filled plastic scouring pad. Do not rub or clean
the door gasket - it has an extremely low resistance to
abrasion.
If you notice the gasket becoming worn, frayed or
damaged in any way or if it has become displaced on the
door, you should have it replaced.
Cleaning the Door Exterior
If a stain on the door vent trim is persistent, use a mild
abrasive cleaner and a sponge-scrubber for best results.
Do not use this method on any other surface.
Stainless Steel Surfaces (on some models)
Do not use a steel wool pad; it will scratch the surface.
To clean the stainless steel surface, use warm sudsy
water or a stainless steel cleaner or polish. Always wipe
the surface in the direction of the grain. Follow the cleaner
instructions for cleaning the stainless steel surface.
To inquire about purchasing cleaning products
including stainless steel appliance cleaner or polish,
read the Assistance/Accessories sections at the
beginning of this manual.
Cb
:1=,
;X3
r-t'l
Z
qb
r-Pi
Z
Z
©
I I
Cb
I
(T)
Removable Storage Drawer (on some models)
The storage drawer is a good place to store cookware
and bakeware. Do not store plastics or flammable
material in the drawer.
The storage drawer may be removed for cleaning under
the range. Clean the storage drawer with a damp cloth or
sponge. Never use harsh abrasives or scouring pads.
Your storage drawer may have plastic slides (shown
to the right) or metal rails. Follow the respective
removal and replacement instructions for your model's
configuration.
Removing the Storage Drawer:
1. Pull drawer straight out until it stops.
2. Continue to pull the drawer until it is detached from
Replacing the Storage Drawer: E:_
1. Rest the left drawer rail around the inner left rail guide O
2. Place the right drawer rail around the inner right rail
2. Slide the drawer all the way in. db
Removable Warming Drawer (on some models)
NOTE: For models with an electric warming drawer,
before performing any adjustments, cleaning or
service, disconnect the range electrical power supply
at the household distribution panel by removing the
fuse or switching off the circuit breaker. Make sure the
warming drawer heating element is cool.
Most cleaning can be done with the drawer in place.
However, the drawer may be removed if further cleaning
is needed. Use soap and warm water to thoroughly clean.
To remove the drawer:
1. Pull drawer straight out
until it stops.
2. Press the left rail release
up and press the right
rail release down, while
pulling the drawer
forward and free.
To replace the drawer:
1. Place the left drawer rail around the inner left rail guide
2. Place the right drawer rail around the inner right rail
3. Slide the drawer all the way in.
LC)
the oven.
and slide it in slightly. O
©
C_
guide and slide it in slightly. :5
C_
©
and slide it in slightly to hook it.
guide and slide it in slightly to hook it.
I i
CT
"m
C3
4985222 29
Page 30

Q
Maintenance
0
C
Oven Light Replacement
C
Q
C
WARNING power to the oven at the main fuse or circuit breaker panel. Failure to do so may result in
i i SHOCK OR BuRN HAZARD: Bef°re replacing °van light bulb' disc°nnect the electrical
electric shock or burn.
Z
d
Z
m
Z
Z
LLI
tY
<l:
r,D
[A CAUTION I URN HAZARD: The glass cover and bulb should be removed when cool. Touching hot
NOTE: The glass cover should be removed only when
cold. Wearing latex gloves may offer a better grip.
Before replacing the bulb, disconnect electrical power to
the oven at the main fuse or circuit breaker panel. Let
the bulb cool completely before removing it. For your
safety do not touch a hot bulb with a damp cloth. If you
do the bulb may break.
To remove:
Turn the glass cover counterclockwise 1/4 turn until the
tabs of the glass cover clear the grooves of the socket
and pull the cover off. Remove the bulb.
To replace:
Put in a new 40-watt appliance bulb. Place the tabs of
the glass cover into the grooves of the socket. Turn the
glass cover clockwise 1/4 turn.
Lift-Off Oven Door
The door is very heavy. Be careful when removing and lifting the door. Do not lift door by the handle.
To Remove the Door:
1. Fully open the door.
2. Pull the hinge locks up and away from the range
frame to the unlocked position.
3. Firmly grasp both sides of the door near the top.
4. Close door until the top of the door is approximately
6" from the range frame.
5. Lift door up and away from the range until both hinge
arms are clear of the slots in the range frame.
To Replace the Door:
1. Firmly grasp both sides of the door near the top.
2. With the door at the same angle as the removal
position, rest the notch on the underside of the left
hinge arm on the bottom edge of the left hinge slot.
The notch in the hinge arm must be fully seated into
the bottom of the slot. Repeat for the right side.
3. Fully open the door. If the door will not fully open, the
notches in the bottoms of the hinge arms have not
seated correctly in the bottom edge of the slot. Lift the
door off the range and repeat previous step.
4. Push the hinge locks toward the range cavity and
down to the locked position.
5. Close the oven door.
glass with bare hands or a damp cloth can cause burns.
NOTE:
is smaller than a standard
[] A 40-watt appliance bulb Qo
40-watt household bulb. . cket
[] Reconnect electrical power
to the oven once the new
bulb is installed.
[]
For improved lighting inside
the oven, clean the glass
cover frequently using a
wet cloth. This should be
done when the oven is
completely cool.
Pull hinge locks up to unlock Removal position
BottomHin earm
slot
edeof
Rest notch on bottom edge
of hinge slot
i
i
i
31_"
Max
length
Bulb
Glass cover
Push hinge locks down to lock
0 49 85222
Page 31

Notes
Page 32

Notes
32 49 85222
Page 33

Notes
Page 34

V3
m
F--
©
Z
m
F--
©
©
I
oO
==J
Troubleshooting tips ... Before you call for service
Save time and money] Review the charts on the following pages first and you may not need to call for service.
Possible Cause What To Do
My new oven doesn't
cook like my old one.
Is something wrong
with the temperature
settings?
properly
Your new oven has a different cooking system
from your old oven and therefore may cook
differently than your old oven.
Rack position is incorrect or rack is not level. See the Cooking Modes section and Cooking
For the first few uses, follow your recipe times
and temperatures carefully and use rack
positions recommended in the Cooking Guide.
If you still think your new oven is too hot or too
cold, you can adjust the temperature yourself
to meet your specific cooking preference. See
the Special Features section.
See the Cooking Modes section.Food does not bake Oven controls improperly set.
Guide.
©
F-
Incorrect cookware or cookware of improper See the Cookware section.
size being used.
Oven temperature needs adjustment. See the Special Features section.
Food does not broil Oven controls improperly set. Make sure you select the appropriate broil
properly mode.
Improper rack position being used. See Cooking Guide for rack location
Cookware not suited for broiling. Use a pan specifically designed for broiling.
Aluminum foil on the broil pan has not been If using aluminum foil on broil pan, wrap tightly
fitted properly or slit to drain grease, and add slits conforming to those in the pan to
Oven temperature too Oven temperature needs adjustment. See the Special Features section.
hot or too cold
Oven and/or display A fuse in your home may be blown or the Replace the fuse or reset the circuit breaker.
appears not to work circuit breaker tripped.
Oven controls improperly set. See the Using the Oven section.
Oven is in Sabbath Mode. Verify, that the oven is not in Sabbath Mode.
The clock is turned off. See the Special Features section.
"Crackling" or This is the sound of the metal heating and This is normal.
"popping" sound cooling during both the cooking and cleaning
Why is my range
making a "clicking"
noise when using my
oven?
Sometimes the
oven takes longer to
preheat to the same
temperature
functions.
Your range has been designed to maintain a
tighter control over your oven's temperature.
You may hear your oven's heating elements
"click" on and off more frequently than in
older ovens to achieve better results during
baking, broiling, and self-clean cycles.
Cookware, food, and/or number of racks in
oven.
suggestions.
allow grease to drain.
See the Special Features section.
This is normal.
Cookware, food, and racks in the oven will
cause differences in preheat times. Remove
excess items to reduce preheat time.
4 49 85222
Page 35

Troubleshooting tips ... Before you call for service
Possible Cause What To Do
Oven light does not
work
Oven will not self=clean
Excessive smoking
during clean cycle
Oven not clean after a
Strong "burning" or
"oily" odor emitting
from the vent
Excessive smoking
during broiling
Oven door will not open
or LOCKED light is on
when you want to cook.
"LOCK DOOR" flashes
in the display
"F= and a number
or letter" flash in the
display
Power outage, clock
flashes
Lock Controls or
Control Lockout feature
is activated
Burners do not light
Light bulb is loose or defective. Tighten or replace bulb. See the Maintenance section for
instructions on how to replace the bulb.
The temperature is too high to set
a self-clean operation.
Oven controls improperly set.
Excessive soil or grease.
Oven controls improperly set.
Oven was heavily soiled.
This is normal in a new oven and
will disappear in time.
Food too close to burner element.
The oven door is locked because
the temperature inside the oven
has not dropped below the locking
temperature.
The self=clean cycle has been
selected but the door is not closed.
You have a function error code.
Power outage or surge
Plug on range is not completely Make sure electrical plug is plugged into a live, properly
inserted in the electrical outlet, grounded outlet.
Gas supply not connected or See the Installation Instructions that came with your
turned on. range.
A fuse in your home may be blown Replace the fuse or reset the circuit breaker.
or the circuit breaker tripped.
Burner parts not replaced correctly. See the Care and Cleaning of the range section.
Burner slots near the electrode, or Remove the burners and clean them. Check the
the round lighter port on the oval electrode area for burned-on food or grease. See the
burner, may be clogged. Care and Cleaning of the range section.
Food residue on electrode Lightly polish flat tip of electrode with nail file or
Allow the oven to cool and reset the controls.
See the Cleaning the Oven section.
Press the Cancel/Off pad. Open the windows to rid the
room of smoke. Wait until the LOCKED light goes off.
Wipe up the excess soil and reset the clean cycle.
See the Cleaning the Oven section.
Clean up heavy spitlovers before starting the clean cycle.
Heavily soiled ovens may need to self-clean again or for
a longer period of time.
To speed the process, set a self-clean cycle for a
minimum of 3 hours. See the Cleaning the Oven section.
This is temporary.
Lower the rack position of the food.
Press the Cancel/Off pad. Allow the oven to cool below
the locking temperature.
Close the oven door.
Press the Cancel/Off pad. Allow the oven to cool for one
hour. Put the oven back into operation. If the function code
repeats, disconnect all power to the oven for at least 30
seconds and then reconnect power. If the function error code
repeats again, call for service.
Reset the clock. If the oven was in use, you must reset
it by pressing the Cancel/Off pad, setting the clock and
resetting any cooking function.
If LOC ON appears in the display, the range control is
locked. Turn this feature off to use the range. See the
Lock Control feature in the Oven Controls section.
sandpaper until shiny.
---4
©
C
r,==
tJ3
I
©
©
---4
m
Z
©
---4
m
=t3
tj3
Page 36

t.z)
m
F,--
©
Z
m
F--
©
©
I
oO
==J
t_
Troubleshooting tips ... Before you call for service
What To Do
Make sure the burner caps are seated correctly. See the Care and
Cleaning of the range section.
Remove the bumers for cleaning. See the Care and Cleaning of
the range section.
If range is connected to Propane gas, contact the technician
who installed your range or made the conversion.
The oven gas shut-off is located on the gas regulator near the
gas line attachment to your range. Locate it and flip the lever.
Top burners do not
burn evenly
Burner flames are
very large or yellow
Surface burners light
but bake and broil
burners do not.
Possible Cause
Improper burner assembly.
Burner slots on the side of the
burner may be clogged.
Improper air to gas ratio.
Gas to the oven burners may
have been shut off.
©
F,--
1i
_wn cbsed _ /
PUI_[OOPEN.__ _
Sealed burner models
My oven door glass
appears to be
"tinted" or have a
"rainbow" color.
Drawer does not slide Fully extend the drawer and push it all the way in. See the Care
smoothly or drags and Cleaning of the range section.
The inner oven glass is coated
with a heat barrier to reflect
the heat back into the oven to
prevent heat loss and keep the
outer door cool while baking.
The drawer is out of alignment.
Drawer is over-loaded or load is Reduce weight or redistribute drawer contents.
unbalanced.
This is normal. Under certain light or angles, you may see this
tint or rainbow color.
36 49 85222
Page 37

GE APPLIANCES
©
'0
mm
mm
E
0
Informacion de Seguridad .... 2
Garantia ......................... 8
Asistencia / Accesorios ........ 9
Uso de la Placa de Coccion
En Caso de Corte de Corriente ..... 10
Quemadores ...................... 10
Plancha ........................... 12
Uso del Homo
Controles del Homo ............... 14
Funciones Especiales .............. 16
Modo Sabatico .................... 17
Pautas de Uso de Utensilios ....... 18
Modos de Coccion ................ 18
Estantes del Horno ................ 19
Ventilaciones de Aire del Homo .... 19
Probe (Sonda) ..................... 20
Guia de Coccion ................... 21
Guia del Cajon para Calentar ...... 22
Papel de Aluminio y
Cobertores del Homo ............ 22
Conexion WiFi ..................... 23
En Canada, comuniquese
con nosotros en:
www.GEAppliances.ca
0
Cuidado y Limpieza
Limpieza del Horno ................ 24
Limpieza de la Placa de Coccion...25
Limpieza de la Puerta y el Cajon ...29
Mantenimiento .................... 30
Consejos para la
SoluciOn de Problemas ....... 34
Escriba los numeros de modelo y
de serie aqui:
N° de Modelo
N° de Serie
Encontrara la etiqueta de
calificacion en el frente, detras
del cajon de la cocina,
49-85222 07-15 GE
Page 38

m
r_
INFORMACiON IMPORTANTEDE SEGURIDAD
LEATODAS LAS INSTRUCCIONESANTESDE USAR
©
LLI
LL!
Z
,©
m
¢D
r_
©
I1
Z
m
[^[,-,ADVERTENCIA]si_.i°for,_.ci6,dee.tem.°..I°osesig.ee..ct.me._e,.epoar_
producir un incendio o explosi6n, ocasionando daSos sobre la propiedad, lesiones o la muerte.
- No guarde ni use gasolina u otros vapores infiamables y liquidos cerca de este ni de otros electrodom6sticos.
- QUE DEBEHACERSI HUELEGAS
[] No intente iluminar ningt_n electrodom6stico.
[] No toque ningt_n interruptor el6ctrico; no use tel6fonos en su edificio.
[] De inmediato Ilame a su proveedor de gas desde el tel6fono de un vecino.
[] Si no se puede comunicar con su proveedor de gas, Ilame al departamento de bomberos.
- La instalaci6n y las reparaciones deberan ser realizadas por un instalador calificado, agencia de servicios o el
proveedor de gas.
DISPOSITIVOANTI-VOLCADURAS
_de Volcaduras
Un ni6o o adult© pueden volcar la codna y morir.
Verifique que el soporte anti-volcaduras se haya
instalado y ajustado correctamente.
Asegurese de que el soporte anti volcaduras sea
reinstalado cuando se mueva la cocina.
No utilice la cocina sin que el soporte anti-volcaduras
est_ col©cad© y ajustado.
Si estas instrucdones no se siguen, corn© resultado se podr6
produdr la muerte o quemaduras graves de ni6os y adultos.
instalaci6n provistas con el soporte, para acceder a detalles completos antes de intentar realizar la instalaci6n.
Para controlar si el soporte es instalado y ajustado de forma apropiada, mire que debajo de la cocina la pata
niveladora trasera est6 ajustada al soporte. En algunos model©s, el caj6n de almacenamiento o el panel de
protecci6n se pueden retirar para una facil inspecci6n. Si no es posible realizar una inspecci6n visual, deslice la
cocina hacia adelante, confirme que el soporte anti-volcaduras est6 ajustado de forma segura al piso o la pared, y
deslice la cocina hacia atras de modo que la pata niveladora trasera se encuentre debajo del soporte anti-volcaduras.
En caso de que la cocina sea empujada de la pared por alguna raz6n, siempre repita este procedimiento para
verificar que la cocina est6 correctamente asegurada pot el soporte anti-volcaduras.
Nunca retire completamente las patas niveladoras, ya que la cocina no estara asegurada de forma adecuada al
dispositivo antivolcaduras.
Pata,
Niveladora
Antivo_
A fin de reducir el riesgo
de caida de la cocina, 6sta
deber_ estar asegurada por
un soporte anti-volcaduras
correctamente instalado.
Consulte las instrucciones de
LEA¥ GUARDEESTASINSTRUCCIONES
49 85222
Page 39

ADVERTENCIA DE LA PROPOSICiON 65 DEL ESTADO DE CALIFORNIA
La Ley sobre Agua Potable Inocua y Tratamiento de Residuos T6xicos de California (California Safe Drinking Water
and Toxic Enforcement Act) solicita al Gobernador de California que publique una lista de sustancias que el estado
reconoce que producen cancer, defectos de nacimiento u otros da_os reproductivos y solicita a los empresarios que
adviertan a sus clientes sobre la posible exposici6n a tales sustancias.
[AADVERTENClA IEste product© contiene uno o mils quimicos que el Estado de California entiende
que producen cancer, defectos en el nacimiento u otros da_os reproductivos.
Los hornos con limpieza automatica pueden ocasionar exposiciones de bajo nivel a algunas de estas sustancias,
incluyendo mon6xido de carbon©, durante el ciclo de limpieza. La exposici6n puede set minimizada si se ventila con
una ventana abierta o si se usa un ventilador o campana.
[, ADVERTENCIAi INSTRUCCIONESGENERALESDESEGURIDAD
m
Z
=1"1
©
n
0,
Z
O©
©
C
m
IAADVERTENCIAI NUNCA
electrodom_stico para calentar el ambiente.
Corn© consecuencia de esto, se podr&
producir envenenamiento con mon6xido de
carbon© y el sobrecalentamiento del homo.
[] Use este electrodom6stico s61o para su prop6sito
original, como se describe en el manual del propietario.
[] Solicite que un instalador calificado instale su cocina y
que est6 correctamente conectada a tierra, de acuerdo
con las instrucciones de instalaci6n provistas.
[] Cualquier ajuste y trabajo de servicio t6cnico debera
set realizado 0nicamente pot instaladores calificados
de cocinas a gas o t6cnicos del servicio. No intente
reparar o reemplazar ninguna parte de la cocina, a
menos que esto se recomiende especificamente en
este manual.
[] Su cocina es enviada desde la f_brica para us© con
gas natural. Puede set convertida para us© con gas
propano. Si se requieren, estos ajustes deben set
realizados por un t6cnico calificado de acuerdo con
las instrucciones de instalaci6n y c6digos locales.
La agencia que realiza este trabajo asume la
responsabilidad de la conversi6n.
[] Solicite que el instalador le muestre la ubicaci6n de la
v_lvula de cierre de la cocina a gas y c6mo apagarla
en caso de ser necesario.
[] Enchufe la cocina en un tomacorriente con conexi6n
a tierra de 240 voltios 0nicamente. No retire la pata
redonda de conexi6n a tierra del enchufe. Si tiene
dudas sobre la conexi6n a tierra del sistema el6ctrico
para hogar, es su responsabilidad y obligaci6n contar
con el reemplazo de un tomacorriente sin conexi6n a
tierra pot un tomacorriente de tres patas correctamente
conectado a tierra, de acuerdo con el COdigo Nacional
de Electricidad. No use prolongadores con este
electrodom6stico.
[] Antes de realizar cualquier servicio t6cnico, desenchufe
la cocina o desconecte el suministro de corriente desde
el panel de distribuci6n del hogar, retirando el fusible o
desconectando el disyuntor.
[] AsegQrese de que todos los materiales de embalaje
sean retirados de la cocina antes de su us©, a fin de
evitar que estos materiales se incendien.
[] Evite ralladuras o impactos sobre las puertas de
metal, cocinas o paneles de control. Hacer esto podra
producir la rotura de vidrios. No cocine un product© con
un vidrio rot©. Es posible que se produzcan descargas,
incendio o cortes.
[] Doble Alimentaci6n: Si el element© de calentamiento
del homo desarrolla un punt© brillante y muestra otras
sedales de dad©, no use dicha area de la cocina. Un
punt© brillante indica que el element© puede fallar y
generar una posible quemadura, incendio o descarga
el6ctrica. Apague el element© de calentamiento de
inmediato y solicite a un t6cnico calificado del servicio
que reemplace el mismo.
[] No deje a los nidos solos o fuera de su radio de
atenci6n en el _rea donde el electrodom6stico se
encuentre en us©. Nunca se les deber_ permitir
trepar, sentarse o pararse sobre ninguna parte del
electrodom6stico.
A PRECAUCION Nocoloque arficulos
de inter6s para los niSos sobre los gabinetes que
est_n sobre un homo - si los niSos se trepan sobre
el homo para Ilegar a estos arficulos poddan sufrir
lesiones graves.
LEAY GUARDE ESTASINSTRUCCIONES
49 85222 3
Page 40

tm
INFORMACiON IMPORTANTEDE SEGURIDAD
tm
m
r_
©
ELI
¢/3
LL!
Z
'O
m
r,D
<1:
r_
C)
I1
Z
m
LEATODAS LAS INSTRUCCIONESANTESDE USAR
I ADVERTENCIA) INSTRUCCIONESGENERALESDESEGURIDAD(CONT.}
[] Nunca bloquee las ventilaciones (aberturas de aire) de la
cocina. Las mismas brindan las entradas y salidas de aire
que son necesarias para que la cocina opere de forma
correcta con la combusti6n adecuada. Las aberturas de
aire est&n ubicadas en la parte trasera de la cocina, en
la parte superior e inferior de la puerta del homo, yen la
parte inferior de la cocina debajo del caj6n calentador, del
caj6n del homo inferior odel panel de protecci6n.
[] Use s61osostenedores de ollas secos -los
sostenedores h0medos sobre superficies calientes
pueden producir quemaduras debido a( vapor. No
permita que los sostenedores de ollas tengan contacto
con los quemadores superficiales, la parrilla de
los quemadores, o el elemento de calefacci6n del
homo. No use una toalla u otra tela voluminosa para
reemplazar el mango de las cacerolas.
[] No toque el elemento calentador ni la superficie interior
del homo. Es posible que estas superficies est6n
demasiado calientes como para quemar, aunque su
color sea oscuro. Durante y despu6s del uso, no toque
ni permita que telas u otros materiales inflamables
toquen cualquier area interior del horno; espere a que
haya pasado un tiempo suficiente para que se enfrien.
Otras superficies del electrodom6stico se podr_n
calentar Io suficiente como para ocasionar lesiones. Las
superficies potencialmente calientes incluyen la abertura
de la ventilacidn del homo, superficies cercanas a la
abertura y grietas alrededor de la puerta del homo.
[] No caliente envases de comida que no hayan sido
abiertos. Se podria acumular presi6n y el envase
podr(a explotar, ocasionando una lesi6n.
[] Cocine la comida completamente para evitar que se
produzcan enfermedades a partir de la comida.
Puede encontrar recomendaciones de seguridad
minima sobre la temperatura de la comida en
www.lsltDoneYet.gov y www.fsis.usda.gov. Utilice un
termdmetro para tomar la temperatura de la comida y
haga controles en diferentes ubicaciones.
[] No permita que nadie se trepe, pare o cuelgue de la
puerta del homo, del caj6n o la cocina. Se podra da_ar
la cocina o provocar su caida, ocasionando lesiones
graves o la muerte.
,&ADVERTENCIA s_ esto no se cumple, se podr_in sufrir lesiones personales graves o incendios.
[] No guarde ni use materiales inflamables en un horno
o cerca de la parte superior de la cocina, incluyendo
papel, plastico, sostenedores de ollas, trapos,
cobertores de pared, cortinas, pados y gasolina u
otros vapores y liquidos inflamables.
[] Nunca use prendas holgadas o que cuelguen mientras
usa el electrodom6stico. Evite acumular articulos
com0nmente usados en gabinetes sobre la cocina, y
) MANTENGALOSMATERIALESINFLAMABLESALEJADOSDELACOClNA
tenga cuidado al extender la mano sobre la cocina.
La ropa que se encuentre cerca de los quemadores o
superficies calientes se podra encender, ocasionando
quemaduras graves.
No permita que la grasa de la cocci6n u otros
materiales inflamables se acumulen en o cerca de la
cocina. La grasa del homo o sobre la cocina se podr_
incendiar.
EN CASO DE INCENDIO, SIGA LOS SIGUIENTES PASOS
(AADVERTENCIA I
[] No use agua sobre el fuego de la grasa. Nunca
tome una olla que se est6 incendiando. Apague los
controles. Extinga la olla que se est6 incendiando
sobre un quemador superficial, cubriendo la olla
completamente con su tapa correspondiente, una
hoja metalica de galletas o una bandeja plana. Si es
necesario, use un quimico seco multiuso o un extintor
de chorro de espuma.
[] Si hay un incendio en el homo durante el horneado,
ahogue el fuego cerrando la puerta del horno y
apagando el mismo o usando un quimico seco
multiprop6sito o un extintor de incendio con espuma.
PARA EVITAR LESIONESO LA PROPAGACION DEL FUEGO
[] En caso de que haya fuego en el horno durante el
periodo de auto limpieza, apague el homo y espere
a que el fuego se extinga. No fuerce la Duerta
para abrirla. La entrada de aire fresco sobre las
temperaturas de auto limpieza podr_ conducir a la
producci6n de llamas en el homo.
LEAY GUARDE ESTASINSTRUCCIONES
49 85222
Page 41

m
Z
"I"I
©
/k ADVERTENCIA SUPERIORDE LA COCINA
[] Nunca pierda de vista los quemadores cuando se
encuentren en las configuraciones de calor media o alta.
Las comidas, especialmente las que se preparan con
aceite, se pueden incendiar, Io cual puede ocasionar un
incendio que se propague a los gabinetes pr6ximos.
[] Nunca pierda de vista el aceite cuando est6 friendo. Si
se calienta mas alia de su punto de cocci6n, el aceite
se puede quemar y provocar un incendio que se puede
propagar a los gabinetes prdximos. Use un term6metro
para grasas profundas siempre que sea posible, a fin de
monitorear la temperatura del aceite.
[] Para evitar derrames e incendios, use una cantidad
minima de aceite al usar una sart6n poco profunda y
evite la cocci6n de comidas congeladas con cantidades
excesivas de hielo.
[] Use el tama_o de olla adecuado para evitar que sean
inestables o que sufran caidas Dcilmente. Seleccione
utensilios que coincidan con el tamado del quemador. Las
llamas del quemador se deber_n ajustar de modo que no
se extiendan mas alia de la parte inferior de la olla. Una
cantidad excesiva de llama puede representar un riesgo.
[] Siempre use la posici6n LITE al encender los
quemadores superiores y aseg0rese de que estos se
hayan encendido.
] INSTRUCCIONES DE SEGURIDAD DE LA PARTE
[] AI usar utensilios de vidrio/ceramica, aseg0rese de
que sean adecuados para el servicio de cocina; otros
se podran romper debido a un cambio repentino de
temperatura.
[] A fin de minimizar posibles quemaduras, incendio de
materiales inflamables y derrames, la manija de un
envase debera set inclinada hacia el centro de la cocina
sin que se extienda sobre los quemadores cercanos.
[] No use un wok con un anillo con soporte de metal
redondo. El anillo podra atrapar calory bloquear el aire
hacia el quemador, produciendo el riesgo de emisi6n de
mon6xido de carbono.
[] No intente elevar la cocina. Hacer esto podria da_ar
la tuberia de gas hasta los quemadores superficiales,
ocasionando una p6rdida de gas y riesgo de incendio.
[] AI inhabilitar el Bloqueo del Control de Gas (en algunos
modelos), asegQrese de que los controles de superficie
se encuentren en la posici6n OFF (Apagado). Esto
evitara que haya un flujo de gas no intencional desde
los quemadores.
[] No use papel de aluminio para cubrir rejillas cualquier
parte de la cocina. Si se hace esto se podra
producir envenenamiento con mon6xido de carbono,
sobrecalentamiento de las superficies de la cocina o un
posible riesgo de incendio.
n
©,
Z
©
C
m
[,A,ADVERTENCIAi INSTRUCCIONES DE SEGURIDAD
iAADVERTENCIA i.u.cA
ninguna ranura, agujeros o pasajes en el
fondo del homo ni cubra un estante entero
con materiales tales como papel de aluminio
o cobertores de homo. Hacer esto bloquea
el flujo de aire a trav_s del homo y puede
ocasionar envenenamiento con mon6xido de
carbono. Nunca coloque papel de aluminio o
cobertores de homo en el fondo del homo.
Podr_n atrapar el calor, ocasionando riesgos
de humo o incendio.
[] Mant6ngase alejado de la cocina al abrir la puerta del
homo. El aire caliente o el vapor que sale puede causar
quemaduras en las manos, rostro y/u ojos.
[] Nunca coloque los utensilios de cocina, piedras para
pizza u horneado o cualquier otro tipo de aluminio
o cobertor en la base del homo. Este items pueden
atrapar el calor o derretirse, ocasionando da_os sobre
el producto y el riesgo de descargas, humo o incendios.
[] Coloque los estantes del homo en la ubicaci6n
correspondiente mientras 6ste se encuentra fr(o. Si
es necesario retirar el estante mientras el homo se
encuentra caliente, evite tocar las superficies calientes.
[] No deje productos tales como papel, utensilios de cocina
ni comida en el homo cuando no est6 en uso. Los
articulos guardados en el homo se pueden incendiar.
[] No deje ningOn producto sobre la superficie de cocci6n,
cerca de la ventilaci6n del homo. Los articulos se
pueden sobrecalentar, y existe riesgo de incendio o
quemaduras.
[] Nunca ase con la puerta abierta. Se prohibe asar con
la puerta abierta debido al sobrecalentamiento de las
perillas de control.
LEAV GUARDEESTASINSTRUCCIONES
49 85222 5
Page 42

tm
INFORMACiON IMPORTANTEDE SEGURIDAD
tm
m
tY
©
LLI
LL!
tm
z
,©
m
r,D
<1:
tY
©
I1
Z
m
LEATODAS LAS INSTRUCCIONESANTESDE USAR
INSTRUCCIONESDE SEGURIDAD DEL HORNO
(AADVERTENCIA I
La funci6n de auto limpieza usa el homo en
temperaturas Io suficientemente aitas como para
consumir restos de comida que haya dentro del mismo.
Para un funcionamiento seguro, siga estas instrucciones.
[] No toque las superficies del homo durante el ciclo de
limpieza automatica. Mantenga a los ni_os alejados
del homo durante la limpieza automatica. Si no
se siguen estas instrucciones, se podran producir
quemaduras.
[] Antes de utilizar el ciclo de auto limpieza, retire las
ollas, estantes de metal brillante del homo y otros
utensilios que haya dentro del mismo. S61o se pueden
dejar dentro del homo los estantes para homo con
recubrimiento de porcelana.
[] Antes de utilizar el ciclo de auto limpieza, limpie la
grasa y restos de comida que haya en el homo. Una
cantidad excesiva de grasa se puede incendiar, Io cual
puede producir dados con hum© en su hogar.
CON FUNCION DEAUTO LIMPIEZ
(en algunos modelos)
[] Si el modo de auto limpieza funciona de forma
incorrecta, apague el homo y desconecte el suministro
de corriente. Solicite el servicio de un t6cnico
calificado.
[] No use limpiadores para homo. No se debera usar
limpiador para hornos comerciales ni revestimientos de
protecci6n para hornos de ningOn tip© en o alrededor
de cualquier parte del homo.
[] No limpie la junta de la puerta. La junta de la puerta es
esencial para un buen sellado. Se debe tenet cuidado
de no frotar, da_ar ni mover la junta.
[] IMPORTANTE: La salud de algunas aves es
extremadamente sensible a los humos emitidos durante
el ciclo de limpieza automatica de cualquier cocina.
Coloque las aves en otra habitaci6n bien ventilada.
LEAY GUARDE ESTASINSTRUCCIONES
6 49 85222
Page 43

m
Z
©
iA ADVERTENCIAi INSTRUCCIONESDESEGURIDAD DELCAJON
[] El prop6sito del caj6n calentador es mantener las
comidas cocinadas a temperatura para servir. Las
bacterias crecen de forma muy r&pida en las comidas
con temperaturas entre 40° F y 140°F. No coloque
comida fda en el caj6n calentador. No guarde comida
en el caj6n calentador pot mas de 2 horas. Si no
se siguen estas instrucciones, se podran producir
enfermedades generadas en la comida.
[] No deje productos de papel, plastic©s, comida
enlatada o materiales combustibles en el caj6n. Se
pueden incendiar.
[] No toque el element© calentador ni la superficie
interior del caj6n. Es posible que las superficies est6n
Io suficientemente calientes como para provocar
quemaduras.
CALENTADOR/CAJON DEL HORN© INFERIOR
(en algunos modelos)
[] Tenga cuidado al abrir el caj6n. Abra un poco el caj6n
y deje que salga aire caliente o vapor antes de retirar
o reemplazar la comida. El aire caliente o el vapor que
sale puede causar quemaduras en las man©s, rostro
y/u ojos.
[] No use papel de aluminio para revestir el caj6n
calentador. El aluminio es un excelente aislante del
calory atrapar_ el caior debajo de 6ste. Esto alterar_
el funcionamiento del caj6n y existe el riesgo de que
se produzca un incendio.
EQUIP© DE ACCESOREMOTO INSTALADO
(en algunos modelos)
Este dispositivo cumple con la Parte 15 de la Normativa
de la FCC. Su funcionamiento esta sujeto alas dos
condiciones siguientes: (1) Este dispositivo no podra
ocasionar interferencias nocivas, y (2) este dispositivo
debe aceptar cualquier interferencia recibida, incluyendo
interferencias que puedan ocasionar un funcionamiento no
deseado.
El equip© de comunicaci6n inal_mbrica instaiado en esta
cocina fue probado y cumple con los limites establecidos
para un dispositivo digital de Clase B, seg0n la parte
15 de la Normativa de la FCC. Estos limites fueron
dise_ados para:
(a) brindar una protecci6n razonable contra
interferencias nocivas en una instalaci6n residencial.
Este equip© genera, usa y puede emitir energia de
radiofrecuencia y, si no se instala y utiliza de acuerdo
con las instrucciones, puede ocasionar intefferencias
perjudiciales en las comunicaciones de radio. Sin
embargo, no se garantiza que no se presenten
interferencias en una instalaci6n en particular. Si el
equip© provoca interferencias perjudiciales para la
recepci6n de radio o televisi6n, Io cual puede comprobar
encendiendo y apagando el equip©, se aconseja al
usuario que intente corregir la interferencia con una de
las siguientes medidas:
[] Reoriente o reubique la antena receptora.
[] Aumente la separaci6n entre el equip© y el receptor.
[] Conecte el equip© a un tomacorriente de un circuit©
diferente del tomacorriente al que se encuentra
conectado el receptor.
[] Para solicitar ayuda, consulte con el proveedor
minorista o a un t6cnico experimentado de radio/TV.
(b) tolerar cualquier interferencia recibida, incluyendo las
interferencias que puedan provocar un funcionamiento
no deseado del dispositivo.
Observe que todos los cambios o modificaciones sobre
el dispositivo de comunicaci6n inal_mbrico instalado en
este homo que no est6n expresamente aprobados pot
el fabricante poddan anular la autoridad del usuario para
operar el equipamiento.
n
0,
Z
©
C
m
LEAV GUARDE ESTASINSTRUCCIONES
49 85222 7
Page 44

p-
Z
tY
©
iGracias! ... por su compra de un electrodomestico de la Marca GE
Registre su Electrodornestico: iRegistre su electrodom6stico nuevo a trav6s de Internet, segQn su conveniencia!
www.geappliances.com/service_and_support/register/
Un registro puntuat de su producto permitir_ una mejor comunicaci6n y un servicio m_s puntual de acuerdo con los t6rminos de su
garantia, en caso de surgir la necesidad. Tambi6n puede enviar una carta en la tarjeta de inscripci6n pre-impresa que se incluye con
et material embalado.
Garantia de la Cocina Electrica de GE
GEAppliances.com
Todo el servicio de garantia es provisto por nuestros Centros de Servicio de Fabricaci6n, o un t6cnico autorizado de
Servicio al Ctiente (Customer Care®). Para programar una visita del servicio t6cnico a trav6s de Internet, visitenos en
www.geapptiances.com/service_and_support/, o flame a1800.GE.CARES (800.432.2737). Cuando flame para solicitar el servicio,
tenga los nOmeros de serie y modelo disponibtes.
Para reatizar et servicio tecnico de su etectrodomestico se podra requerir et uso de datos det puerto de abordaje para su
diagn6stico. Esto da al t6cnico del servicio de f_brica de GE la habilidad de diagnosticar de forma r_pida cualquier problema con
su electrodom6stico, y de ayudar a GE a mejorar sus productos al brindarle a GE la informaci6n sobre su electrodom6stico. Si no
desea que los datos de su electrodom6stico sean enviados a GE, solicitamos que le indique a su t6cnico no entregar los datos a
GE en el momento del servicio.
Durante el periodo de un a_o desde la fecha original de compra. GE le brindar_ cuatquier parte de la cocina que fatle debido a
un defecto en los materiales o la fabricaci6n. Durante esta garantia limitada de un a_o, GE tambi6n proveer_, sin costo, todo el
trabajo y et servicio en et hogar retacionado con et reemplazo de la parte que presente defectos.
Que no cubrira GE:
o e)
[]
Viajes del t6cnico del servicio a su hogar para ensefiarle
sobre c6mo usar et producto.
[]
Instalaci6n, entrega o mantenimiento inadecuados.
[]
Faltas del producto en caso de abuso, mat uso, modificaci6n
o uso para prop6sitos diferentes al original o uso comercial.
[]
Reemplazo de fusibles de ta casa o reinicio de disyuntores.
[]
Dafios ocasionados sobre el producto por accidente,
incendio, inundaciones o cat_strofes naturates.
[]
Da_os incidentales o consecuentes causados por posibtes
defectos sobre este producto.
[] Dafios sobre el acabado, tales como 6xido sobre ta
superficie, destustres o manchas pequefias no informadas
dentro de las 48 horas luego de la entrega.
[] Da_o causado despu6s de la entrega.
[] Producto no accesible para brindar et servicio requerido.
[] Solicite el servicio t6cnico para reparar o reemplazar las
I_mparas, excepto las I_mparas LED.
oo:_
o o
_3 tu
qJ
_3 c
_O
n
o- o
®'E
o _d
EXCLUSION DE GARANTiAS IMPLiCITAS
Su Onica y exclusiva atternativa es la reparaci6n del producto, como se indica en la Garantia Limitada. Las garantias implicitas,
incluyendo garantias impticitas de comerciabilidad o conveniencia sobre un prop6sito particular, se limitan a un a_o o al periodo
mas corto permitido por ta tey.
Esta garantia se extiende al comprador original y a cuatquier duefio subsiguiente de productos comprados para uso hogarefio
dentro de EE.UU. Si el producto est_ en un _rea donde no se encuentra disponible un Proveedor Autorizado del Servicio T_cnico
de GE, usted ser_ responsable por el costo de un viaje o se podra requerir que traiga el producto a una ubicaci6n del Servicio
T_cnico de GE Autorizado para recibir el servicio. En Alaska, la garantia excluye el costo de envio o Ilamadas del servicio a su
hogar.
Algunos estados no permiten la exclusi6n o limitaci6n de da_os fortuitos o consecuentes. Esta garantia le da derechos legates
c
especificos yes posibte que tenga otros derechos legales que varian entre un estado y otto. Para conocer cuales son sus
derechos legates, consulte a la oficina de asuntos del consumidor local o estatal o al Fiscal de su estado.
m
Garante: General Electric Company. Louisville, KY 40225
GarantJas Extendidas: Adquiera una garantia extendida de GE y aprenda sobre descuentos especiates que est_n disponibtes
mientras su garantia aQn est_ vigente. La puede adquirir en cuatquier momento a trav_s de Internet en
www.geapptiances.com/service_and_support/shop-for-extended-service-plans.htm
o Ilamando a1800.626.2224 durante el horario comerciat habitual. Los Servicios para el Consumidor Hogarefio de GE aQn estar_n
alli cuando su garantia caduque.
49 85222
Page 45

Desea realizar una consulta o necesita ayuda con su electrodomestico?
iConsulte el Sitio Web de Etectrodom6sticos de GE (www.geappliances.comlservice_andsupportl) durante las 24 horas,
cualquier dia del aft©! Para mayor conveniencia y un servicio m_s r_pido, ahora puede descargar el Manual del Propietado,
ordenar piezas o inctuso programar el servicio tecnico a traves de
Servicio Programado: El servicio de reparaci6n de expertos
de GE est_ a s61o un paso de su puerta. Programe su servicio
t6cnico a trav6s de Internet en www.geappliances.com/service_
and_ support/o Ilame al 800.GE.CARES (800.432.2737) durante
el horatio de atencion comercial.
Piezas y Accesorios: Aquetlas personas catificadas para
realizar et servicio tecnico sobre sus propios etectrodomesticos
podran solicitar et envio de piezas o accesorios directamente
a sus hogares (se aceptan las tarjetas VISA; MasterCard y
Discover). Ordene a trav6s de Intemet hoy, durante las 24
horas o en forma telef6nica at 800.626.2002 durante el horario
de atenci6n comercial.
Las instrucciones que figuran en este manual cubren los
procedimientos que seran reatizados por cuatquier usuario.
Otros servicios tecnicos generalmente deberian set derivados
a personal catificado del servicio. Se deber_ tener cuidado, ya
que una reparaci6n indebida podra hacer que et funcionamiento
no sea seguro.
Intemet.
Estudio de Diseffo de la Vida Real: GE apoya el concept©
de Disefio Universal en product©s, servicios y ambientes que
pueden ser usados por personas de todas las edades, tamafios
y capacidades. Reconocemos la necesidad de realizar disefios
para una amplia gama de habilidades e incapacidades fisicas y
mentates. Para m_s detalles sobre las apticaciones de Disefio
Universal de GE, incluyendo ideas de disefio de cocinas para
personas con incapacidades, visite nuestro sitio web hoy. Sobre
casos de incapacidad auditiva, comuniquese al 800.TDD.GEAC
(800.833.4322).
Contaetenos: Comuniquese con nosotros a traves de nuestro
sitio Web con todos los detatles, incluyendo su nOmero
telef6nico, o escribanos a:
General Manager, Customer Relations
GE Appliances, Appliance Park Louisville, KY 40225
Accesorios
t_o
m
t,/)
--4
r'r'l
Z
¢b
m
¢b
¢b
r-r-I
©
m
©
t_o
LBusca Algo Mas?
iGE ofrece una variedad de accesorios para mejorar sus experiencias de coccidn y mantenimiento!
Para reatizar una orden, visitenos a trav6s de Internet en:
www.GEApplianceParts.eom (EE.UU.) o en www.GEAppliances.ea (Canada)
otlame al 800.626.2002 (EE.UU.) 800.661.1616 (Canada)
Estos y otros productos est_n disponibtes:
Accesorios
Estante Piano de Niquel
Estante Piano Reforzado de Niquel
Estante Piano con Limpieza Autom_tica
Estante Extensibte de Niquel
Estante Extensibte con Limpieza Autom_tica
Olla para Asar (12 ¾ "x 1 ¼" x 16 ½ ")
Accesorio del Estante para Dorar
Rejitla Central de la Superficie de Cocci6n
Plancha de Aluminio No Adherente
Plancha de Hierro Forjado Reversible
WB48X20249
WB48X20783
WB48X21508
WB39X10040
WB48X21543
WB48X10056G
WB48X5108
WB31X24737
WB31X24738
WB31X24737
Suministros de Limpieza
Limpiadores de Acero Inoxidabte CitriShine WX10X10007
Patio de Pulido de Acero Inoxidable WX10X307
Removedor de Grasa Quemada Cerama Brytd _ WX10X320
Retiro de la Pelicula Protectora de Envio y de la Cinta de Embalaje
NOTA: Retire todo et embalaje protector antes de utitizar la i Con cuidado tome un extremo de la pelicula protectora
cocina. _ de envio con los dedos y tentamente retire la misma de ta
49 85222
superficie del electrodom6stico. No utilice ningQn product©
fit©so para retirar la pelicula. Si quedan residuos adhesivos,
etimine los mismos aplicando detergente para platos y agua
en una teta seca.
Page 46

O0
Q
L_
O
oU
E
dP
(Dr
Q
4-J
c-
@
L_
L_
0
0
Q
Q
0
0
Q
0
O0
0
C
En Caso de Corte de Corriente
En el caso de un corte de luz, et homo quedar_ inoperable y puertos debajo de la tapa del quemador superficial; luego de
no se deber_ intentar usarlo. Sin embargo, los quemadores forma lenta gire la perilla hasta la posici6n LITE (Bajo). Una
superficiales se podran encender con un f6sforo. Con vez encendidos, los quemadores superficiates continuar_n
extremo cuidado, sostenga un f6sforo encendido cerca de los funcionando normalmente.
Quemadores
IlumJnacion de un Quemador Superficial
ADVERTENCIAI,os °ema,,ores
solo deben ser usados ¢uando esten cubiertos por los
utensilios. Las llamas de los quemadores que no esten
cubiertas por el utensilio presentan un riesgo de incendio
o Jncendio de telas. Nunca permita que las llamas se
extiendan mas alia de los costados del utensilio. Si esto
no se cumple, se podran producir lesiones graves.
AsegOrese de que todos los quemadores est6n en sus
ubicaciones correspondientes y que esten totalmente
ensamblados antes de usar cualquiera de estos.
Seleccione un quemador y busque su perilla de control.
Empuje y gire la peritla hasta la posici6n LITE.
SeleccJon del Tamarlo de la Llama
Observe la llama, no la peritta, a medida que reduce el calor.
Cuando se desee calentar de forma r_pida, el tamaSo de la
llama de un quemador debera ser equivalente al tamaSo del
utensitio de cocina que este usando. Cuando las llamas sean
m_s grandes que la parte inferior del utensitio de cocina, no
calentaran et utensitio mas rapido y podrian set riesgosas.
Uso de los Quemadores
Escuchara un ruido de clic - el
sonido de la chispa etectrica que
enciende el quemador. Cuando un
quemador se gire a LITE, todos los
quemadores generaran chispas.
El chispeo continuara mientras la
peritta permanezca en LITE. Una
vez encendido el gas, gire la perilla
para ajustar et tama_o de la llama.
Estas llamas son demasiado grandes para la olla.
Empuje el mango de control
y gire el mismo basra la
posicion LITE.
,©
m
©
IZL
©
NOTAS:
[] No utitice el quemador durante un periodo de tiempo
prolongado sin un utensitio de cocina sobre la parritta. Et
acabado de la parritta se puede resquebrajar si no hay un
utensitio de cocina que absorba et calor.
[] No intente desensambtar un quemador mientras otro
quemador esta encendido. Es posible que se produzca una
descarga el6ctrica, Io cuat podria hacer que vuelque un
utensilio de cocina caliente.
[] AsegQrese de que los quemadores y las parriltas est6n
frios antes de cotocar la mano, tomar el mango de una otla,
trapos de limpieza u otros materiales sobre estos.
Tipos de Quemadores Superficiales
Quemador Redondo
Use este quemador para propositos
de coccion general. Olla de tamano
adecuado alas llamas.
Quemador Oval
(en algunos modelos)
Use este quemador para cocinar
en la plancha.
Su homo cuenta con quemadores de gas sellados que ofrecen
conveniencia, higiene y flexibilidad para una amptia variedad
de aplicaciones de cocci6n.
Et quemador m_s peque5o es para fuego lento. Un quemador
de fuego lento que se coloque en LO (Bajo) brinda una
cocci6n precisa para comidas tales como satsas deticadas que
requieren poco calor durante un tiempo de cocci6n prolongado.
El quemador extra grande est_ dise_ado para llevar
rapidamente grandes cantidades de liquido a punto de hervor.
Atgunos modelos cuentan con una configuraci6n de
POWER BOIL TM, especialmente dise5ada para usar con
utensitios de un diametro de 11 pulgadas o mas.
o
Quemador de Tres Anillos
(en algunos modelos)
Use este quemador para ollas
grandes o para aplicaciones de
coccion a fuego lento.
Quemador Oval Dual
(en algunos modelos)
Use este quemador para cocinar en
la plancha o con una olla pequeha.
10 49 85222
Page 47

quemadores (Cont.)
C
Quemador de tres anillos (en algunos modelos)
Para utensilios grandes, active
todos los anillos configurando
el quemador entre Hi (Alto) y
Med (Medio),
HiOutput
Vista Lateral de la Perilla del Quemador de Tres Anillos
Para utensilios pequenos o
aplicaciones con poco calor,
s01()active los anillos internos
configurando el quemador
entre L© (Bajo) y Sim (Hervor a
Fuego Lent()),
i........................... 7
Utensilio sobre la Cocina
Aluminio: Se recomienda un utensilio de peso median©,
ya que calienta de forma rapida y pareja. La mayoria de las
comidas se doran de forma pareja en un sarten de aluminio.
Use cacerolas con tapa herm6tica cuando cocine con
cantidades minimas de agua.
Acero Inoxidable: Este metal posee propiedades de
calentamiento limitadas y normalmente se combina con cobre,
aluminio u otros materiales para una mejor distribuci6n det
calor. Los sartenes con combinaci6n de metales normatmente
funcionan de forma satisfactoria si se usan con calor medio,
como 1orecomienda et fabricante.
Hierro Forjado: Si cocinar_ de forma lenta, la mayoria de los
sartenes le daran resultados satisfactorios.
Parrillas para la Parte Superior de la Cocina
No use cualquier repuesto de rejitla para ta parte superior de
la cocina con sus quemadores de gas, ya que reatizar_ una
combusti6n incompteta, generando niveles de mon6xido de
carbon© superiores a los estandares permitidos. Esto puede
set petigroso para su salud.
Quemador Oval Dual (en algunos modelos)
Para ollas pequenas, sol()
active el quemador redondo,
r ................. ,
Hi 7 5 3 Lo
Vista Lateral de la Perilla del Quemador Oval Dual
Utensilios de esmalte: Bajo ciertas condiciones, el esmalte
de atgunos utensilios de cocina se pueden derretir. Siga tas
recomendaciones sobre metodos de cocci6n del fabricante de
utensilios de cocina.
Vidrio: Existen dos tipos de utensilios de cocina de vidrio -
aquellos para us© con el horn© 0nicamente y aqueltos para
la cocci6n en la parte superior de la cocina (cacerotas, caf6 y
teteras). Los conductores de vidrio calientan de forma muy lenta.
Ceramica de Vidrio Resistente al Calor: Se pueden usar para
cualquier superficie o para cocci6n en el horno. Conduce el calor
de forma muy lenta y se enfria de forma muy rapida. Consulte las
instrucciones del fabricante de utensilios de cocina para saber con
seguridad si se puede usar con cocinas a gas.
No use rejillas para la parte superior de la cocina.
AI usar una plancha, active las
secciones del quemador oval y
del redondo,
¢.................. /
Hi-Med -Lo /', _ Griddle
\ 1
©
r-r1
"13
63
r-r1
63
©
63
63
m
0,
Z
m m
LD
c'-
q)
£s
CL
O
q)
US
Como Usar un Wok
Use s6to woks con base plana de un di_metro de 14 pulgadas
o menos. Aseg0rese de que el fond© del wok se apoye de
forma plana sobre la rejilla.
No use un anillo de soporte para wok. Col©car el anitlo sobre
el quemador o parrilla podra hacer que et quemador funcione
de forma inadecuada, produciendo niveles de mon6xido de
carbon© que superan los estandares permitidos. Esto puede
set petigroso para su salud.
Use un wok con fond© plan©
Page 48

zZ
t.)
(-
,©
m
¢D
¢D
©
tm
rj
,...,i
Plancha (enalgunos model©s)
[AADVERTENCIAi Rios.o.o,oooo.io
[] Tenga cuidado al ¢ooinar comidas con grasa. La grasa esparcida puede provocar un inoendio.
[] Nunca coloque ni guarde un artioulo en la plancha, incluso cuando no este en us©. l=l ¢alor de los demas
quemadores puede calentar la plancha y provooar un incendio.
[] Coloque y retire la plancha solo ¢uando todas las parrillas y la plancha esten frias y todas las unidades
superficiales esten en OFF (Apagado).
Posicionamiento de la Plancha
La plancha de hierro forjado reversible (en atgunos moclelos) y la plancha de aluminio antiadherente (en algunos moclelos) set©
pueden ser usactas sobre el quemador central de la parte superior de la cocina. Para posicionar la plancha, retire la rejilla central
(si est_ presente) y reemplace la misma por la ptancha. No encienda el quemador central hasta que este seguro de que la
plancha se posicion6 correctamente.
Precalentamiento de la Plancha
Si et quemador central es un quemaclor oval simple, precaliente la plancha entre 2 y 5 minutos en Hi (Alto) antes de cot©car [a
comida sobre la plancha. Si el quemador central es un quemador oval dual, preca[iente la ptancha entre 5 y 10 minutos en Hi
(Alto) antes de col©car [a comida sobre [a ptancha. Una vez precalentada la plancha, baje el calor a la configuraci6n de cocci6n
indicada en la tabta correspondiente a su plancha. A fin de determinar que tip© de quemador posee, consulte la secci6n de Tipos
de Quemadores.
tm
©
oO
Us© de la Plancha de Hierro Fundido Reversible (en
El lad© acanalado de la plancha reversible puede ser usado
para comidas normalmente cocinadas a la plancha.
Su plancha le brinda una supefficie de coccien extra grande
para cames, panqueques y otras comidas normalmente
preparadas en una sarten. Antes del primer us©, enjuague la
misma con agua caliente y sequela completamente. Prepare la
superficie con espray de cocina o aceite vegetal.
Precauciones de la Plancha:
[] No coloque la ptancha en un homo microondas.
[] No lave la ptancha en el lavavajillas.
[] Si algo se derram6 debajo de la plancha, se deber_ limpiar
tan pronto como sea posibte para evitar ta suciedad de ta
comida "homeada".
[] No permita que se acumule grasa debajo de la plancha, ya
que puede haber riesgo de incendio. Limpie debajo de ta
plancha con agua caliente y jab6n en cuanto este fria.
algunos model©s)
Plancha Precurada de Hierro Fundido Reversible
Tip© de Comida Configuracion de Coccion
Panceta Med
Embutidos para el Desayuno Med
Huevos Bajo (Lo)
Queso a la Plancha Med-Bajo (Med-Lo)
Hamburguesas Med-Bajo (Med-Lo)
Panqueques Med-Bajo (Med-Lo)
C6mo Calentar Tortillas Bajo (Lo)
Es posible que sea necesario ajustar las configuraciones de la
plancha si se usara por un periodo prolongado.
Reemplace la rejilla (siesta presente) central por la Plancha
12 49 85222
Precurada de Hierro Fundido Reversible
Page 49

Plancha (enalgunosmodel©s)(Cont.)
Us© de la Plancha de Aluminio No Adherente (en algunos model©s)
Su plancha le brinda una superficie de cocci6n extra grande Phncha de Aluminio No Adherente
para carnes, panqueques y otras comidas normalmente
preparadas en una sart6n. Antes del primer us©, enjuague la
misma con agua caliente y sequeta completamente.
Precauciones de la Plancha:
[] No use aceite sobre la ptancha durante periodos de tiempo
prolongados. Es posible que se produzcan manchas
permanentes y/o grietas.
[] No sobrecaliente la plancha. Si el quemador de ta plancha
se deja en Hi (Alto) por un periodo de tiempo protongado
sin comida, esto podr_ dar_ar la cobertura antiadherente.
[] Use s6to utensilios de pl_stico, nylon o madera o
herramientas de cocina SilverStone _ para evitar que se
arruine et recubrimiento.
[] Nunca use cuchillos ni corte la comida sobre la ptancha.
[] No use utensilios de metal con puntas pronunciadas o
extremos muy fit©sos que podrian daSar la superficie de la
plancha.
[] Guarde con cuidado para evitar ralladuras.
[] No cotoque la plancha en un homo microondas.
[] Si algo se derram6 debajo de la plancha, se deber_ limpiar
tan pronto corn© sea posibte para evitar ta suciedad de ta
comida "homeada".
[] No permita que se acumule grasa debajo de la plancha, ya
que puede haber riesgo de incendio. Limpie debajo de ta
plancha con agua caliente yjab6n en cuanto este fria.
[] No lave la plancha en et lavavajillas.
[] No limpie la ptancha en el homo de limpieza autom_tica.
Hacer esto daSar_ la cobertura anti adherente. Para
acceder a instrucciones sobre c6mo limpiar la plancha,
consulte la secci6n de Limpieza de la Placa de Cocci6n de
este manual.
Tip© de Comida Configuracion de Coccion
Panceta Med
Embutidos para el Desayuno Med
Huevos Fritos Bajo (Lo)
Hamburguesas Med-AIto (Med-Hi)
S_ndwiches Calientes (Tales Med
como con Queso a la Plancha)
Panquecas Med-Bajo (Med-Lo)
C6mo Calentar Tortillas Med-Bajo (Med-Lo)
Reemplace la rejilla (si esta presente) central por la Plancha
de Aluminio No Adherente
C
O©
©
CD
m
t'-
t'-
CD
r_
©
n
©,
Z
i m
-O
G)
C)
23-
G)
Page 50

O
c--
O
-q-
i
Q
-C3
U3
Q
O
L..
4--a
O
c_>
m g
O
Z
tY
O
"l-
_.J
_J
Controles del Homo
Cooking Options
Bake Broil ] Warm
Bake Roast Light -
Cony Cony ] Oven
Hi/Lo
Probe
Warming
Drawer
on/off
.'_ WiFi Connect
Set Warming Drawer
-1 2 3 4
Lo Med Hi
6 7 8 9
T,merF-
5 o._off |
0 Lock |
||-
Start
Cancel
-6fi-
Set
Oven Settings
Cook Delay
= Time Time m
Time of Day
Self
= Clea/.
Remote
Enable
Chef
Connect m
On/Off
To Pair
Hold 3 Sec
O
4 49 85222
Page 51

Controles del Horno (Cont.)
C
1. Convection Cooking Modes (Modos de Coccion
pot Conveccion): Los modos de cocci6n per convecci6n
utilizan una circulaci6n de aire incrementada para mejorar el
rendimiento. El tipo de beneficio depende del modo. Su homo
cuenta con los siguientes modos de cocci6n por convecci6n:
Bake (Homear) y Roast (Dorar). Para mas informaci6n, consulte
la secci6n de Modos de Cocci6n.
2. Traditional Cooking Modes (Modos de Coccion
Tradicionales): Su horno cuenta con los siguientes modos
de cocci6n tradicionales: Bake (Hornear), Broil Hi (Asar Alto)
y Broil Lo (Asar Bajo). Para mas informaci6n, consulte la
seccion de Modos de Cocci6n.
3. Clean (Limpieza): El homo podra contar con dos modos
de limpieza: Self Clean (Limpieza Automatica) y Steam
Clean (Limpieza con Vapor) (modelos con conveccion). Para
acceder a informaci6n importante sobre el uso de estos
modos, consulte la secci6n de Limpieza del Horno.
4. Start (Iniciar): Se debera presionar para comenzar
cualquier funci6n de cocci6n, limpieza o por tiempo.
5. Cancel/Off (Cancelad Apagar): Cancelar TODAS
las operaciones del homo excepto el reloj y el temporizador.
6. Cook Time (Tiempo de Coccion): Cuentael
tiempo de cocci6n y apaga el homo cuando el tiempo de
cocci6n est& completo. Programe el modo de cocci6n y
la temperatura de cocci6n deseados, y luego presione la
tecla Cook Time (Tiempo de Co¢cion). Use las teclas
num6ricas para programar un tiempo de cocci6n en horas
y minutos, y luego presione Start (lni¢iar). Esto s61o puede
ser usado con Traditional Bake (Horneado Tradicional),
Convection Bake (Hornear por Convecci6n) y Convection
Roast (Dorar por Convecci6n).
7. Clock (Reloj): Configure la hora del reloj del homo. Presione
la teda Set Clock (Configurar el Reloj). Use las teclas
numericas para programar el reloj. Presione Start (Iniciar) para
guardar la configuraci6n de la hora.
8. Timer (Temporizador): Funciona comoun
temporizador con cuenta regresiva: Presione la tecla Timer
(Temporizador) y las teclas numericas para programar el
tiempo en horas y minutos. Presione la tecla Start (Iniciar).
El homo continuara funcionando cuando la cuenta regresiva
del temporizador se haya completado. Para apagar el
temporizador, presione la tecla Timer (Temporizador).
9. Delay Time (Tiempo de Retraso): Genera un
retraso cuando el homo es encendido. Use esta tecla para
configurar el momento en que desee que el homo se inicie.
Programe el modo de cocci6n y la temperatura de cocci6n
deseados, y luego presione la tecla Delay Time (Tiempo
de Demora). Use las teclas numericas para programar la
hora del dia en que el homo se encendera, y luego presione
Start (Iniciar). Si Io desea, tambien puede ser programado
un tiempo de cocci6n. Esto puede ser usado con Traditional
Bake (Homeado Tradicional), Convection Bake (Hornear por
Convecci6n), Convection Roast (Dorar por Convecci6n) y
Self Clean (Limpieza Automatica).
NOTA: Las comidas que se echan a perder r&pidamente,
tales como leche, huevos, pescado, rellenos, ave y cerdo, no
se deberan dejar reposar por mas de I hora antes y despues
de la cocci6n. La temperatura ambiente estimula el desarrollo
de bacterias nodvas. AsegOrese de que la luz del homo este
apagada, ya que el calor de la lampara acelerara el crecimiento
de bacterias nocivas.
10. Probe (Sonda) (en algunos modelos): Monitorea
la temperatura interna de la comida y apaga el homo cuando
la comida alcanza la temperatura programada. Inserte
la sonda, programe el modo de cocci6n, y programe la
temperatura de la sonda. Para mas informaci6n, consulte
la secci6n de la Sonda. La sonda s61o puede ser usada
con las funciones Traditional Bake (Horneado Tradicional),
Convection Bake (Hornear pot Convecci6n) y Convection
Roast (Dorar por Convecci6n).
11. Oven Light (Luz del Horno): Enciende o apaga la luz
del horno.
12. Lock Controls (Controles de Bloqueo): Bloquea
el control de modo que al presionar las teclas no se activan
los controles. Mantenga presionada la tecla Lock Controls
(Controles de Bloqueo) durante tres segundos para
bloquear o desbloquear el control. La funci6n Cancel/Off
(Cancelar/Apagar) siempre esta activa, incluso cuando el
control esta bloqueado.
13. Warm (Calentar): Mantiene las comidas calientes y
cocinadas en la temperatura para servir. Presione la tecla
Warm (Calentar), y luego presione Start (Iniciar). Presione
Cancel/Off (Cancelar/Apagar) para apagar el horno.
14. Warming Drawer (Cajon para Calentar):
Mantiene las comidas calientes y cocinadas en la
temperatura para servir. Presione la tecla Warming
Drawer (Caj6n para Calentar). Use la tecla numerica para
seleccionar la configuraci6n de temperatura. Presione 1
para Low (Bajo), 2 para Medium (Medio) o 3 para High
(Alto), y luego presione Start (Iniciar). Presione la funci6n
Warming Drawer On/Off (Caj6n para Calentar Encendido/
Apagado) a fin de apagar el mismo.
15. Remote Enable (Acceso Remoto) (en algunos
modelos): Le permite controlar el homo de forma remota.
Para poder iniciar el homo de forma remota, presione la tecla
Remote Enable (Acceso Remoto) y "Remote" (Remoto)
se encendera en la pantalla. El homo puede ser iniciado
ahora en forma remora con un dispositivo conectado. Abrir
la puerta del homo o presionar la tecla Remote Enable
(Acceso Remoto) eliminara "Remote" (Remoto) de la
pantalla e impedira que pueda activar el homo de forma
remota. Si "Remote" (Remoto) no aparece en la pantalla,
usted aQn puede cambiar las configuraciones del homo o
apagar el homo. Luego de usar el homo, recuerde verificar
que el icono "Remote" (Remoto) sea mostrado, si desea
iniciar el homo de forma remota en el futuro. Para acceder
a instrucciones sobre c6mo conectar el homo, consulte la
secci6n de Conexi6n WiFi de este manual.
16. Chef Connect: Esta es una funci6n de emparejamiento
Bluetooth ® para uso con otros productos autorizados de
Chef Connect tales como microondas sobre la cocina o
la campana de la cocina. Para emparejar estos productos
con la cocina, mantenga presionada la tecla Chef Connect
durante 3 segundos y siga las instrucciones correspondientes
incluidas con el producto emparejado autorizado por
Chef Connect, si es necesario. La cocina cancelara el
modo de emparejamiento luego de dos minutos si ningQn
dispositivo de emparejamiento es detectado.
©
t=rl
i==.
I
©
Z
©
= m
Cb
O
=='3
O
Lh
CL
('D
©
O
-=3
©
Page 52

Or)
Q
L_
Q
('7
Or)
Q
U_
Q
O
L_
C
LJ._
d
Z
tY
©
7-
_.J
©
Funciones especiales
Su cocina cuenta con varias funciones especiales diferentes. Para modificar las conflguraciones de estas funciones especiales:
[] Presione las teclas Bake (Hornear) y Broil (Asar) al mismo tiempo y espere a que el men0 de funciones especiales sea
exhibido.
[] Use las teclas num6ricas 3 o 8 para alternar entre las funciones especiales, hasta que la funci6n deseada sea exhibida.
[] Presione la tecla num6rica 0 para ingresar en el men0 de funciones y alternar entre las opciones.
[] Una vez exhibida la opci6n deseada, presiones la tecla 0 para guardar la configuraci6n y la tecla 6 para satir del menQ.
Pantalla del Reloj
1 2 4 5
7 9
6 = Cancel/Back (Cancelar/Arras), 3 = Up (Arriba), 8 = Down (Abajo),
0 = Save/Forward (Guardar/Adelante)
Ajuste de la Ternperatura del Horno
Esta funci6n permite que ta temperatura de horneado del
homo sea ajustada hasta 35°F m_s catiente o 35°F m_s fria.
Use esta funci6n si piensa que la temperatura de su homo
esta demasiado caliente o demasiado fria y desea modificarta.
Este ajuste afecta cada modo de cocci6n excepto el de asar.
Ingrese en el men0 de funciones especiates, como se detalta
mas arriba. Alterne entre tas funciones hasta que la funci6n
"OFFSEt" (compensar) sea exhibida y presione 0. Use la tecla
3 para incrementar la temperatura ajustada o use la tecta 8
para reducir la temperatura ajustada. Guarde y satga del men0
de funciones especiales.
Sonido de Finalizacion del Temporizador
Se trata de un tono que indica la finalizaci6n de un
temporizador. El tono puede set continuo (Cont) o simple
(bEEp). La configuraci6n continua (Cont) har_ sonar de forma
repetida un tono cada pocos segundos, hasta que el bot6n
det control sea presionado. Una configuraci6n simple (bEEp)
hara sonar s6to un tono simple cuando el temporizador finalice.
Ingrese en el men0 de funciones especiales, como se detalta
m_s arriba. Atterne entre las opciones hasta que la funci6n "End
Tone" sea exhibida y presione 0. Atterne entre las opciones
hasta que la configuraci6n deseada sea exhibida. Presione 0
para guardar la configuraci6n y luego 6 para satir del men0.
Seleccion de Temperatura Fahrenheit o Celsius
Et control del homo esta configurado para su uso con
temperaturas Fahrenheit (F), pero Io puede modificar a
temperaturas Celsius (C). Presione las teclas Broil (Asar)
y Cook Time (Tiempo de Coccion) al mismo tiempo para
visualizar la configuraci6n actual; presione nuevamente
para modificar ta configuraci6n. Ingrese en el men0 de
funciones especiales, como se detalla m_s arriba. Alteme
entre las opciones hasta que la funci6n "deg Unit" sea
exhibida y presione 0. Atterne entre tas opciones hasta que la
configuraci6n deseada sea exhibida. Presione 0 para guardar
la configuraci6n y luego 6 para satir del men0.
Esta Funci6n (Encendeff Apagar) especifica si ta hora del
dia es exhibida. Ingrese en el men0 de funciones especiates,
como se detalla mas arriba. Atterne entre las opciones hasta
que la funci6n "Ctoc diSP" sea exhibida y presione 0. Atterne
entre las opciones hasta que ta configuraci6n deseada sea
exhibida. Presione 0 para guardar la configuraci6n y luego 6
para satir del men0.
Configuracion del Reloj
Esta funci6n especifica c6mo se exhibir_ la hora del dia. Puede
seleccionar el reloj est_ndar de 12 horas (12) o el reloj mititar
de 24 horas. Ingrese en el men0 de funciones especiales,
como se detalla mas arriba. Atterne entre las opciones hasta
que la funci6n "Ctoc cFg" sea exhibida y presione 0. Atterne
entre las opciones hasta que ta configuraci6n deseada sea
exhibida. Presione 0 para guardar la configuraci6n y luego 6
para satir del menO.
Volurnen del Sonido
Esta funci6n permite que et volumen det tono del homo sea
ajustado entre alto (Hi), medio (reg) (por omisi6n), bajo (Lo) o
apagado (oFF). Ingrese en el men0 de funciones especiales,
como se detalla mas arriba. Alterne entre las opciones hasta
que la funci6n "sound" sea exhibida y presione 0. Atterne entre
las opciones hasta que la configuraci6n deseada sea exhibida.
Presione 0 para guardar ta configuraci6n y tuego 6 para salir
del men0. La opci6n de sonido seleccionada sonar_ una vez
cuando 0 sea presionado.
Conversion de Auto Recipe
Esta funci6n (Encender/Apagar) de forma autom_tica ajusta la
temperatura programada de la receta en el modo Convection
Multi-Bake (Homeado M01tipte por Convecci6n). Ingrese en et
men0 de funciones especiates, como se detalla m_s arriba.
Atterne entre las opciones hasta que la funci6n "Auto rEciPE"
(Receta Autom_tica) sea mostrada. Alteme entre las opciones
hasta que la configuraci6n deseada sea exhibida. Presione 0
para guardar la configuraci6n y tuego 6 para satir del men0.
NOTA: Esta opci6n no convierte el tiempo de horneado; s61o
las temperaturas. Esta opci6n no ajusta las temperatura det
modo Convection Roast (Dorar por Convecci6n).
16 49 85222
Page 53

Modo Sab4tico
La funcidn de modo sab_tico cumple con los est_ndares establecidos por Stark K. Algunos de estos est_ndares que ser_n
observados por el consumidor incluyen la desactivaci6n de los tonos, la desactivacidn de las luces del homo, y retrasos de
aproximadamente 30 segundos a un minuto en relacidn a los cambios en la pantalta. $6to el horneado continuo y el horneado
por tiempo est_n permitidos en el modo sab_tico. La cocci6n en el modo sab_tico es un proceso de dos pasos; primero el modo
sabatico debe ser configurado y tuego et modo hornear debe ser configurado.
Configuraci0n del Modo SabatJco
1. Presione tas teclas Bake (Hornear) y Broil (Asar) al
mismo tiempo y espere a que el menQ de funciones
especiales sea exhibido.
2. Use las teclas num@icas 3 u 8 para pasar a traves de las
funciones especiales, hasta que "SAbbAth" sea exhibido
y luego presione 0. Consulte el grafico en ta secci6n de
Funciones Especiales para vet c6mo las teclas numericas
estan mapeadas.
3. Use las teclas num@icas 3 u 8 para pasar a traves de
las opciones hasta que aparezca "on" (encender) en la
pantalta; luego presione la tecla num@ica 0 para guardar ta
configuraci6n. Presione 6 para salir del menu de Funciones
Especiales. Un solo corchete "]" aparecer_ en la pantalla,
indicando que el modo sabatico fue configurado. El retoj no
aparecera. El horneado continuo o et horneado por tiempo
no pueden set configurados.
InJcio del Horneado ContJnuo
1. Presione ta tecla Bake (Hornear).
2. Si la temperatura deseada es 350°F, presione Start
(InJcJar). Si se desea una temperatura de coccidn diferente,
use tas teclas numericas de 1 a 5 o ta tecta Timer
(Temporizador) para seteccionar una temperatura de
coccidn predeterminada, y luego presione Start (InJcJar).
Consulte el siguiente grafico para determinar que tecta
configura la temperatura de cocci6n deseada.
Luego de una demora, un segundo corchete "] [" aparecer_ en
la pantalla, indicando que et homo est_ horneando.
1 2 3 4 5
6 7 8 9 0
1 = 170" F, 2 = 200 ° F, 3 = 250" F, 4 = 300 ° F, 5 = 325" F, Temporizador = 400 ° F
6 = 2 horas, 7 = 2,5 horas, 8 = 3 horas, 9 = 3,5 horas,
0 = 4 horas, Controles de Bloqueo = 6 []ours
Timer
On/Off
Lock
Controls
Hold 3 Sec
Ajuste de Temperatura
1. Presione Bake (Hornear), use las teclas num@icas de 1
a 8 y ta tecla Timer (TemporJzador) para seleccionar una
temperatura de cocci6n actual diferente, y presione Start
(InJcJar).
2. Debido a que no hay ninguna indicaci6n durante el cambio
de temperatura, se puede usar un term6metro para horno
para confirmar los cambios de temperatura.
Inicie un Horneado por Tiempo
1. Presione la tecla Bake (Homear).
2. Si la temperatura deseada es de 350°F, use las teclas
numericas de 6 a 0 o ta tecla Look Control (Control
de Bloqueo) para seleccionar un tiempo de cocci6n.
Si se desea una temperatura de cocci6n diferente a
350°F, use las teclas num6ricas de I a 5 o ta tecla Timer
(TemporJzador) para seteccionar una temperatura de
cocci6n predeterminada, y luego seleccione el tiempo
de cocci6n. Consulte et grafico en esta pagina para
determinar que tecta configura la temperatura de cocci6n
deseada y et tiempo de cocci6n.
3. Presione Start (InJoJar).
Luego de una demora, un segundo corchete "] [" aparecer_
en la pantalla, indicando que el homo est_ homeando.
Cuando el tiempo de coccidn finalice, la pantalta volver_ a
cambiar a un solo corchete "]", indicando que el homo ya no
est_ homeando. No sonar_ ningQn tono cuando el tiempo de
cocci6n se haya completado.
Salir del Modo Sab4tico
S61o se deber_ satir del modo sab_tico una vez finatizado el
mismo.
1. Presione Cancel/Off (Cancelad Apagar) para finalizar
cualquier cicto de homeado que pueda estar funcionando.
2. Presione tas tectas Bake (Nornear) y Broil (Asar) at
mismo tiempo y espere a que el menQ de Funciones
Especiales sea exhibido.
3. Use las teclas num6ricas 3 u 8 para pasar a traves de las
funciones especiales hasta que "SAbbAth" (Sab_tico) sea
exhibido, y luego presione 0.
4. Use las teclas num@icas 3 u 8 para pasar a traves de
las opciones hasta que "OFF" (Apagado) sea exhibido y
presione 0 para guardar la configuraci6n. Presione la tecla
numerica 6 para satir del menQ de Funciones Especiates.
C
Of)
©
t-r3
t'--
I
©
po
Z
©
i m
Z
0
C:z.
0
Or)
CY
0
Aviso de Corte de Corriente durante el
Modo Sabatico
Si se produce un corte de corriente mientras el homo se
encuentra en Sabbath Mode (Modo Sab_tico), la unidad
regresar_ a Sabbath Mode (Modo Sab_tico) cuando el
suministro sea reestabtecido; sin embargo, el homo regresar_
al estado de apagado incluso cuando haya estado en un ciclo
de homeado en et momento det corte de corriente.
Page 54

r-
'O
LD
LD
O
LD
(1;
R:D
oO
O
R:D
O
Z
00
O
=i
i
=i
oO
t-
(1;
d
Z
©
:1::
LL!
tm
©
oO
Pautas de Uso de Utensilios
Et material, el acabado y el tamafio de los utensilios afectan el
homeado.
Las otlas oscuras, revestidas y opacas absorben el cator m_s
rapidamente que tas ollas ctaras y brillantes. At usar oltas
que absorben el calor mas r_pidamente, las comidas podr_n
resuttar m_s doradas, crocantes y con una capa m_s gruesa. Si
utitiza utensilios oscuros y revestidos, controle la comida antes
del tiempo minimo de cocci6n. Si se obtienen resultados no
deseados con este tipo de utensilios, considere la posibilidad
de reducir la temperatura del homo en 25 ° F la pr6xima vez.
[] Las ollas brittantes pueden producir resultados de horneado
mas parejos en tortas y gatletas.
[] Las ollas de vidrio y cer_mica calientan con lentitud, pero
retienen bien et calor. Estos tipos de ollas funcionan bien
con platos tales como tartas y postres con natitla.
[] Las ollas con aislante de aire catientan lentamente y
pueden producir fondos dorados.
[] Mantenga los utensilios limpios para una cocci6n m_s pareja.
Modos de Coccion
Su nuevo homo posee una variedad de modos de cocci6n para que pu eda obtener los mejores resultados. Estos modos
se describen a continuaci6n. Para acceder a recomendaciones para comidas especificas, consulte la secci6n de la Guia de
Cocci6n. Recuerde que es posible que su nuevo homo funcione de manera diferente que aquet que esta reemplazando.
Bake (Hornear)
Et modo de homeado es utitizado para homear y dorar. Este
modo usa el calor principatmente desde el quemador inferior,
pero tambien desde et quemador superior para cocinar la
comida. At preparar comidas homeadas tales como tartas,
gatletas y masas, siempre precaliente el homo primero. Siga
las recomendaciones de la receta sobre la cotocaci6n de la
comida. Si no se brindan pautas, centre la comida en el horno.
Para usar este modo, presione la tecla Bake (Homear), ingrese
una temperatura con las teclas num6ricas, y luego presione
Start (Iniciar).
Warm/Warming Drawer (Calentar/Cajon para
Calentar) (en algunos modelos)
Et modo para calentar fue disefiado para mantener calientes las
comidas calientes. Cubra las comidas que necesitan mantener
la humedad y no cubra aquellas comidas que deberian quedar
crocantes. No se requiere precalentar las mismas. No use ta
funci6n Warm (Calentar) para catentar comida fria, excepto
galletas crujientes, papas fritas o cereales secos. Tambi6n se
recomienda que la comida no se mantenga caliente por mas
de dos horas. Para m_s informaci6n, consulte la secci6n Oven
Controls (Controles del Homo).
Broiling Modes (Modo para Asar)
Siempre ase con las puertas del horno principal y del caj6n
para asar cerradas. Tenga cuidado al asar en estantes de
posiciones superiores, ya que colocar la comida m_s cerca
del quemador para asar incrementa el humo, satpicaduras y la
posibitidad de que se incendien las grasas.
Intente asar las comidas que normalmente haria a ta parritla.
Ajuste las posiciones de los estantes para ajustar la intensidad
del cator a ta comida. Coloque las comidas mas cerca del
quemador para asar, cuando se desee una superficie m_s
cocinada y un interior poco cocido. Las comidas mas gruesas
y aquettas que se deben cocinar completamente se deben asar
en un estante con una posici6n mas baja o usando et modo
Broil Lo (Asar Bajo).
Broil Hi (Asar Alto)
El modo Broil Hi (Asar Alto) usa calor intenso del quemador
superior para soasar las comidas. Use la funci6n Broil Hi
(Asado Alto) para cortes m_s delgados de came y/o comidas
que prefiera que quedan menos cocinadas en su interior.
Para usar este modo, presione la tecla Broil (Asar) una vez
y tuego presione Start (Inioiar). No es necesario realizar et
precalentamiento al usar este modo.
Broil Lo (Asar Bajo)
El modo Broil Lo (Asar Bajo) usa menos calor intenso del
quemador superior para cocinar la comida completamente
mientras tambi6n se dora la superficie. Use la funci6n Broil Lo
(Asado Bajo) para cortes de came m_s gruesos y/o comidas
que desee que queden comptetamente cocinadas. Para
usar este modo, presione la tecla Broil (Asar) dos veces y
luego presione Start (Iniciar). No es necesario realizar et
precalentamiento al usar este modo.
Convection Bake (Hornear por Conveccion):
Et modo Convection Bake (Hornear por Convecci6n) est_
pensado para honear en multiples estantes al mismo tiempo.
Este modo utitiza et movimiento det aire del ventitador de
convecci6n para mejorar ta cocci6n haciendola mas pareja. Et
homo esta equipado con la funci6n Auto Recipe Conversion
(Conversi6n de Receta Autom_tica); de modo que no es
necesario ajustar la temperatura al usar este modo. Para
usar este modo, presione la tecla Cony Bake (Hornear
por Convecci6n), e ingrese una temperatura con las teclas
num6ricas, y luego presione Start (Iniciar). Siempre reatice el
precalentamiento al usar este modo.
Convection Roast (Dorar por Conveccion)
El modo Convection Roast (Dorado por Convecci6n) est_
pensado para dorar cortes enteros de came en un solo
estante. Este modo usa calor det quemador para hornear
inferior, junto con el movimiento de aire, para mejorar el
dorado y reducir et tiempo de cocci6n. No es necesario
convertir la temperatura. CCuando use este modo, o si usa la
sonda (en algunos modelos), controle ta comida antes que el
tiempo sugerido en ta receta. Para usar este modo, presione
la tecla Cony Roast (Borar por Conveeei6n), ingrese una
temperatura con las teclas num6ricas, y luego presione Start
(Inieiar). No es necesario realizar et precalentamiento al usar
este modo.
8 49 85222
Page 55

Estantes del Homo
Posiciones de los Estantes
Su homo cuenta con seis posiciones de estantes en el homo
principal. En la Guia de Cocci6n, se brindan recomendaciones
de posiciones de los estantes para diferentes tipos de
comidas. Se ajusta un estante en una direcci6n para afectar
los resultados de cocci6n. Por ejemplo, si se prefieren partes
superiores m_s oscuras en tartas, panecillos o galletas,
pruebe moviendo ta comida a un estante que se encuentre
una posici6n m_s arriba. Si encuentra que las comidas est_n
demasiado doradas en la parte superior, pruebe moviendo las
mismas m_s abajo la pr6xima vez.
AI homear con mOltiples ollas yen mOltiples estantes, asegt]rese
de que haya suficiente espacio entre las ollas para que fluya el
aire. Esto puede mejorar la cocci6n haciendola mas pareja.
Retiro y Reemplazo de los Estantes Pianos
AI colocar y retirar utensilios de cocina, empuje el estante hacia
afuera del tope (posici6n de detenci6n) sobre el soporte del estante.
Para retirar un estante, empuje el mismo hacia usted hasta
atcanzar la posici6n donde se detiene, incline el frente hacia
arriba y empuje hacia afuera.
Para reemptazar un estante, coloque el extremo curvado del
mismo sobre los soportes de los estantes. Incline et frente det
estante hacia arriba y empuje et mismo hasta que se detenga.
Luego apoye et estante y empuje et mismo hasta que entre
completamente en et homo.
Es posibte que resutte dificit deslizar los estantes,
especialmente luego de un ciclo de limpieza automatica. Para
mejorar las condiciones de destizamiento, use una tela suave
o una toatla de papet para frotar aceite vegetal sobre los
extremos izquierdo y derecho de los estantes y/o sobre los
soportes det estante.
NOTA: Retire los estantes en desuso al usar et homo para
un precalentamiento m_s r_pido, mayor eficiencia y un
rendimiento 6ptimo de ta cocci6n.
Estantes Extensibles (en algunos modelos)
Los estantes extensibtes cuentan con una estructura que se
bloquea en los soportes de los estantes a ambos tados. Una
vez que la estructura est_ btoqueada en su lugar, siempre use
el riel frontal superior para empujar hacia afuera el estante
hasta la posici6n de detenci6n en su m_xima extensi6n, al
colocar o retirar utensitios.
Si resulta dificil extender estos estantes, lubrique los mismos
con lubricante de grafito, provisto con el horno. Retire el
estante del homo (consulte ta secci6n de Retiro del Estante
Extensible), retire cualquier obstrucci6n en el recorrido
deslizabte con una toatla de papel, agite el lubricante de grafito
y coloque 4 gotitas en los dos recorridos inferiores de los lados
izquierdo y derecho. Abra y cierre et estante varias veces para
distribuir el lubricante.
Para acceder a instrucciones sobre c6mo ordenar estantes
adicionates y lubricantes con grafito, consulte la secci6n de
Asistencia/Accesorios.
Ventilaciones de Aire del Homo
Posiciones de los Estantes
I_ _° _iec_t6arlrl_e deterlci6n
Retiro de los estantes
Reemplazo de los estantes
Retiro del Estante Extensible
1. Aseg0rese de que el estante sea empujado totatmente
dentro det homo.
2. Sosteniendo de manera firme sobre los rieles frontates
superior e inferior, empuje el estante hacia usted, incline el
extremo frontal hacia arriba y empuje hacia afuera.
Reemplazo del Estante Extensible
1. Coloque los btoqueos de los estantes traseros sobre ,y en,
los soportes de los estantes
2. Incline et frente det estante hacia arriba y empuje et mismo
hasta que se detenga.
3. Apoye el estante y empuje el mismo hasta que entre
completamente en et homo.
Si resutta dificit reemplazar o retirar los estantes extensibtes,
limpie los soportes de los estantes det homo con aceite
de cocina. No quite et aceite de cocina det espacio de
deslizamiento.
C
Oo
©
m
I
©
Z
©
i m
rnq
b0
r-€
O0
rb
©
©
O
©
q_
db
O
O0
¢b
©
3>
©
rb
©
©
O
©
Nunca btoquee las ventilaciones (aberturas de aire) de la
cocina. Las mismas brindan tas entradas y salidas de aire
que son necesarias para que la cocina se mantenga fresca y
funcione de forma correcta con la combusti6n adecuada.
49 85222 1 9
Las aberturas de aire se encuentran
ubicadas en la parte trasera de la
cocina, en la parte superior e inferior
de la puerta del homo, y en la parte
inferior de la cocina.
La apariencia y la ubicacion
de la ventilacion varian.
Page 56

c_
'0
c=
O
Or)
Q
_.0
0
d
Z
m,,
©
-1"
...J
I..I,.I
©
Probe (Sonda)
i ADVERTENCIA] oo° .mo.e e ,oro ° oe.e.ooer contraigan enfermedades
producidas por la oomida. Use la sonda de acuerdo con las siguientes instrucciones, a fin de asegurar que todas las
partes de la comida alcancen temperaturas de coccion minimamente seguras. Puede encontrar recomendaciones de
temperaturas de coccion minimamente seguras en www.foodsafety.gov o en www.lsltDoneYet.gov.
La temperatura interna de la comida con frecuencia se usa como indicador de que esta lista, especialmente al dorar o
preparar came de ave. El modo Probe (Sonda) monitorea la ternperatura interna de la comida y apaga el homo cuando
esta ultima alcanza la temperatura programada.
Controle siempre la temperatura en multiples partes de la comida, utilizando un term6metro de comidas luego de
realizar la coccion, a fin de asegurar que todas las partes de la misma hayan alcanzado una ternperatura interna
minimamente segura en dicha comida.
Ubicacion Correcta de la Sonda
Luego de preparar la comida y de colocarla en la ella, siga
estas instrucciones para una ubicaci6n correcta de la sonda.
[] Inserte la sonda en la comida, de mode que la punta de
la sonda se apoye en el centro de ta parte mas gruesa de
la comida. Para un mejor rendimiento, la sonda deberia
ser completamente insertada en la comida. Si la sonda
no es ubicada correctamente, es posibte que no mida con
precisi6n ta temperatura de ta parte m&s fria de ta comida.
Atgunas comidas, particularmente las m_s peque5as, no
son adecuadas para la cocci6n con el use de una sonda,
debido a sus formas o tamaSos.
[] No deberia tocar et hueso, la grasa ni el cartilago.
[] Para cocinar un ave entera, inserte la sonda en la parte
mas gruesa de ta pechuga.
[] Para dorar sin huesos, inserte la sonda en el centro del
dorado.
[] Para cocinar jam6n o cordero con huesos, inserte la sonda
en et centro de la articutaci6n o del mQscuto m_s bajo y
largo.
[] Para preparar cazuetas o ptatos tales como pastel de
came, inserte la sonda en el centro del plato.
[] Para cocinar pescado, inserte la sonda justo arriba de la
agalla en la zona mas carnosa paralela a columna.
Uso de la Sonda
Para usar la sonda con precalentamiento:
1. Presione la tecla del mode de cocci6n deseado (Hornear,
Hornear por Conve¢cion, o Dorar per Convection) e
ingrese la temperatura de cocci6n deseada con tas teclas
numericas.
2. Inserte la sonda en ta comida (consulte sobre la Ubicaci6n
Correcta de la Sonda).
3. Una vez que el homo rue precatentado, cotoque la comida
en et mismo y conecte ta sonda en su correspondiente
tomacorriente, asegur_ndose de que est6 comptetamente
insertada. Tenga cuidado, ya que las paredes del homo y
et tomacorriente de la sonda estan calientes.
4. Programe la temperatura de ta sonda presionando ta tecla
Probe (Sonda) e ingresando la temperatura deseada para
la comida. La temperatura interna m_xima de la comida
que se puede configurar es 200° F.
Para usar la sonda sin precalentamiento:
1. Inserte la sonda en la comida (consulte sobre la Ubicaci6n
Correcta de la Sonda).
2. Coloque la comida en et homo y conecte ta sonda en su
correspondiente tomacorriente en et homo.
3. Presione la tecla Probe (Sonda) e ingrese la temperatura
deseada para ta comida. Luego presione ta tecta det
mode de cocci6n (Horneado Tradicional, Hornear
pot Convection, o Dorar per Conveccion) e ingrese
la temperatura de cocci6n deseada usando las teclas
numericas.
Pautas para el Cuidado de la Sonda
[] Si se usa una sonda que no sea la provista con este
producto, se podr_n producir dar_os sobre la satida de la
sonda.
[] Use las manijas de la sonda al enchufar y desenchufar la
misma, luego de insertar o de retirar la sonda de la came o
det tomacorriente.
[] Para evitar dar_os sobre la sonda, no use agarraderas para
empujar el cable al retirarlo.
[] Para evitar romper la sonda, asegQrese de que la
comida haya sido completamente descongetada antes de
insertarla.
[] Para evitar posibles quemaduras, no desenchufe la sonda
del tomacorriente del homo hasta que este Qltimo se haya
enfriado.
[] Nunca deje la sonda dentro del homo durante un ciclo de
limpieza automatica o de limpieza con vapor.
[] No guarde la sonda dentro del horno.
0 49 85222
Page 57

Guia de CocciOn
C
¢,o
©
Productos Horneados
Tortas con capas, tortas rectan-
gulares, roscas, panecillos, pan Homear 3 o 4 Use utensilios brillantes.
r&pido en un Solo Estante
Tortas con capas* en M01tiples Homear AsegQrese de que haya un flujo de aire adecuado (Vea la
Estantes Hornear por Conveccion 3 y 5 ilustraciOn). Use el estante extensible en las posiciones 2.
Tortas de grasa (pastel de &ngel) Hornear 2 Use utensilios brillantes.
Galletas, galletitas, bizcochitos en Hornear 3 o 4 Use utensilios brillantes.
un Solo Estante
Galletas, galletitas, bizcochitos en Hornear por Conveccion 2 Estantes - 3 y 5 la ubicaci6n de la comida parcialmente durante la cocci6n,
M01tiples Estantes Hornear 3 Estantes - 2, 4 y 6 a fin de obtener resultados de coccidn mas parejos.
Bife y Cerdo
Hamburguesas Asar Alto 6 nos soasada. Preste atenci6n a la comida al asarla. Centre
Bifes y Chuletas Asar Alto 6 nos soasada. Preste atenci6n a la comida al asarla. Centre
Dorados Hornear asar. No se requiere precalentarla.
Ave
Polio entero Hornear olla para asar.
Pechugas, patas, muslos con Asado Bajo 3 o 4 (Asar Alto). Ase del lado de la piel hacia abajo primero.
huesos Hornear Preste atenci6n a la comida al asarla.
Pechugas de polio deshuesadas
Pavo entero
Pechuga de Pavo
Pescado
Cazuelas
Comidas Congeladas a Convenienda
Pizza, productos con papas,
Datitas de polio fritas, aperitivos en
un Solo Estante
Pizza. productos con papas,
patitas de polio fritas, aperitivos en
M01tiples Estantes
Dorado por Conveccion 2 o 3 Deje sin cubrir, use una olla chata tal como una olla para
Dorado por Conveccion 2 o 3
Asado Bajo 4 rada y menos soasada y mas arriba para soasar/dorar al
Hornear
Dorado por Conveccion 1 o 2 Deje sin cubrir, use una olla chata tal como una
Homear olla para asar.
Homear 2 o 3 _je sin cubrir, use una olla chata tal como una
Asado Bajo 5 (mitad del grosor o menos) Preste atencion a la comida al asarla. Use el estante
Hornear 4
Hornear
Hornear
Hornear por Convecci6n
5 (>1/2 pulgada) piano si usara ta posici6n 5.
3y5
2,4y6
Aseg0rese de que haya un flujo de aire adecuado. Cambie
Use el estante extensible en la posici6n baja.
Use el estante piano. Use una bandeja para asar; mueva
la comida mas abajo para que quede mas preparada y me-
ta comida debajo del quemador.
Use el estante piano. Use una bandeja para asar; mueva
la comida mas abajo para que quede mas preparada y me-
ta comida debajo del quemador.
Deje sin cubrir, use una olla chata tal como una
Si se empano o cubri6 con salsa, evite los modos Broil Hi
Mueva la comida mas abajo para que quede mas prepa-
asar.
olla para asar.
Use utensilios brillantes.
Use utensilios brillantes.
Cambie la ubicaci6n de la comida parcialmente durante
la cocci6n, a fin de obtener resultados de cocci6n mas
parejos.
m
r-"
I
©
Z
©
i m
Cb
c-
m_
CL
©
Cb
O
Cb
Cb
O,
*At homear cuatro capas de torta a la vez, tambalee las ollas
como se muestra a la derecha, de modo que no quede una
encima de la otra.
Cocine la comida completamente para evitar que se produzcan
enfermedades a partir de la comida. Puede encontrar
recomendaciones sobre temperatura minima para cocinar de
forma segura en www.lsltDoneYet.gov. AsegQrese de usar un
term6metro de comidas para medir la temperatura de las mismas.
NOTA: Retire los estantes en desuso al usar et homo para
un precalentamiento m_s r_pido, mayor eficiencia y un
rendimiento 6ptimo de la cocci6n.
Ubicacion Trasera
Ubicacion Frontal
Posiciones de los Estantes
@
[]
[]
[]
Page 58

O
C-
L=
O
T
(1)
"O
of)
(1)
L=
O
4-a
L=
(1)
Z3
O
LD
>h
O
r-
E
<
(1)
"O
(!)
¢)
Guia del Cajon para Calentar (enalgunosmodelos)
Panes, tartas, masas
Cazuelas
Chiles/Estofado
Games
Panqueques
Pizza
Papas, horneadas
Barquillos (waffles)
Comidas duras, paraque queden
crocantes (tortilla de papas,
galletas, cereales secos)
Platos para servir (platos,
recipientes)
APRECAUCION platos calientes.
i Los platos estar_n calientes. Use sostenedores de ollas o guantes al retirar
BAJO (1)
MEDIO (2)
ALTO (3)
ALTO (3)
BAJO (1)
MEDIO (2)
ALTO (3)
BAJO (1
BAJO (1
BAJO (1
Cubra con una tapa o papel de aluminio. Tapa de
ventilaci6n para permitir que la humedad salga.
Cubra con una tapa o papel de aluminio.
Use un plato/bandeja poco profundos. Precaliente
en la configuraci6n LO (Bajo) entre 5 y 10 minutos.
Controle luego de 45 minutos, y agregue fiempo de ser
necesario.
Use s61o platos resistentes al calor. Controle la informa-
ci6n del fabricante en relaci6n a la maxima tolerancia al
calor de la porcelana fina.
CL
c-
(b
G3
LD
c_
L=
_3
Q_
c"
'O
_D
@
-C3
_3
LD
z
Papel de Aluminio y Cobertores del Horno
^,.,PREt_Al It'_ | _I_ILwt=_U LwIIU I1_1: No use ningun tipo de aluminio o cobertor de homo para cubrir el fondo del homo. Este
items pueden bloquear el flujo de aJre o derretJrse, ocasJonando daffos sobre el producto y el rJesgo de envenenamJento
con monoxido de carbono, humo o incendios. Los daffos por uso inadecuado de estos items no estan cubiertos por la
garantia del producto.
Se podr_ usar aluminio para evitar derrames, colocando una hoja sobre un estante inferior varias pulgadas debajo de la comida.
No use m_s aluminio que el necesario y nunca cubra totatmente el estante de un homo con papel de atuminio. Mantenga el
atuminio a por Io menos 1 1/2" de las paredes del homo, para evitar una circulaci6n deficiente del cator.
0
212
==1
0
2 49 85222
Page 59

Conexi6n WiFi
Conecte su horno con Conexi0n Habilitada de WiFi (en algunos modelos)
Su homo de GE est_ dise5ado para brindarle una comunicaci6n reciproca entre su electrodom6stico y el dispositivo inteligente.
AI usar las funciones de la conexi6n WiFi de GE, usted podr_ controlar funciones esenciales de su homo tales coma las
configuraciones de temperatura, temporizadores y modos de cocci6n, utilizando su tel6fono inteligente o tabteta*.
Que necesitara Conexion de su horno de GE
Su homo de GE utitiza su red de WiFi hogare_a existente
para realizar la comunicaci6n entre et electrodomestico y su
dispositivo inteligente. A fin de configurar su homo de GE,
usted necesitar_ reunir cierta informaci6n:
1. Cada homo de GE cuenta con una etiqueta informativa
del electrodom6stico conectado, que incluye un Nombre
y Contrase_a de Red det Etectrodomestico. Estos son los
dos detaltes importantes que necesitara para conectar et
etectrodomestico. La etiqueta esta ubicada normalmente
dentro de la puerta det homo o en et caj6n.
FCC: ZKJ-WCATA001 Network: GE__XXXXXX__XXXX
IC: 10229A-WCATA001 Possword: XXXXXXXX
I Connected Appliance Information 1
MAC ID: XX - XX - XX - XX - XX - XX PT. NO. 229C6272G001-0
Ejemplo de Etiqueta
2. Su tel6fono inteligente o tableta deben estar preparados
con ta capacidad de acceder a Internet y descargar
aplicaciones.
3. Usted deber_ conocer la contrase_a del enrutador WiFi de
su hogar. Tenga esta contrase_a a mano al configurar et
homo de GE.
1. A trav6s de su teI6fono inteligente o tableta, visite
www.GEApptiances.com/connect para aprender m_s
sabre tas funciones det etectrodomestico conectado y para
descargar la aplicaci6n correspondiente.
2. Siga las instrucciones en pantatla de la apticaci6n para
conectar su homo de GE.
3. Una vez que el proceso se haya comptetado, la tuz
de conexi6n ubicada en la pantalla de su homo GE,
permanecera en s61ido y la aplicaci6n confirmara que usted
esta conectado.
4. Si la luz de conexi6n no se enciende o est_ tititando, siga
las instrucciones en la aplicaci6n para volver a realizar la
conexi6n. Si continQan los problemas, comuniquese at
800.GE.CARES (800.432.2737) y solicite asistencia en
retaci6n a ta conectividad inalambrica del homo.
Para conectar dispositivos inteligentes adicionates, repita los
pasos 1 y 2.
Observe que todos los cambios o modificaciones al dispositivo
de acceso remoto instalado en este homo que no estan
expresamente aprobados par el fabricante podrian anular la
autoridad det usuario para operar et equipamiento.
Cb
C
m
>
0
.<
F"
m
PM
= =
c)
0
x
O,
* Se requiere el usa de dispositivos y de una red WiFi hogare_a que sean compatibles con Apple o Android.
4985222 23
Page 60

O
c-
o
q-
m
(b
R:D
03
N
(D
C:Z.
E
._.J
N
m
m
>..
O
tm
tm
m
r,D
Limpieza del Homo
AsegL_rese que todos los controles est6n apagados y que todas las superficies se enfrien antes de limpiar cualquier parte del horno.
Interior del Homo
El interior de su nuevo homo puede ser limpiado de forma
manual o utilizando los modos Steam Clean (Limpieza con Vapor)
o Self Clean (Limpieza Autom_tica) (en algunos modelos).
Et derrame de adobo, jugos de fruta, salsas de tomate y
liquidos para humedecer que contengan acidos pueden
ocasionar descotoraci6n y se deberan timpiar en cuanto tas
superficies catientes se enfrien, y luego se deber_n enjuagar.
Limpieza Manual
No use limpiadores de homo, limpiadores abrasivos,
limpiadores liquidos fuertes, estropajos de acero, atmohadillas
para fregar, ni polvos limpiadores en el interior del horno.
Limpie et mismo con agua y jab6n o una soluci6n de vinagre
y agua. Enjuague con agua limpia y seque con una tela seca.
AI limpiar supeficies, aseg0rese de que est6n a temperatura
ambiente y fuera det contacto con ta tuz solar.
Modo de Limpieza con Vapor (en algunos modelos)
La finalidad de la funci6n Steam Clean (Limpieza con Vapor)
es usar agua para limpiar la suciedad teve de su homo en una
temperatura inferior a la de Self Clean (Limpieza Autom_tica).
Para usar la funci6n Steam Clean (Limpieza con Vapor):
1. Comience con et homo a temperatura ambiente.
2. Limpie la grasa excesiva y la suciedad del horno.
3. Vierta una taza de agua en la parte inferior del horno.
4. Cierre la puerta.
5. Presione la tecla Steam Clean (Limpieza con Vapor) y
luego presione Start (Iniciar).
No podr_ abrir la puerta durante los 30 minutos del ciclo Steam
Clean (Limpieza con Vapor). AI finalizar el ciclo de Steam
Clean (Limpieza con Vapor), absorba el agua restante, y limpie
la suciedad abtandada por la humedad de las paredes y la
puerta det homo.
Modo de Limpieza Automatiea (en algunos modelos)
Lea las Instrucciones de Seguridad del Homo con Limpieza
Autom_tica, en el comienzo de este manual, antes de usar
el modo Self Clean (Limpieza Autom_tica). Este modo usa
temperaturas muy altas para limpiar el interior del homo. Para un
homo moderadamente sucio, use un ciclo de limpieza autom_tica
de 3 horas. S61olos estantes del homo de limpieza autom_tica
(negros) y las rejillas podr_n permanecer en el homo durante el
ciclo de limpieza autom_tica. Todos los dem&s items, incluyendo
los estantes niquelados (plateados), deber&n ser retirados. Si
los estantes niquelados (plateados) se dejan dentro del homo
durante un ciclo de limpieza autom&tica, los estantes sufrir_n
deslustre. Si cualquier tipo de estante es dejado en el homo
durante el ciclo de limpieza autom_tica, es posible que se vuelva
dificil deslizar el estante. Para acceder a instrucciones sobre
c6mo mejorar esto, consulte la secci6n de Estantes del Horno.
IMPORTANTE: Las emanaciones producidas por et ciclo de
autolimpieza de cualquier homo afectan ta salud de algunas
aves de manera notoria. Procure ttevar sus aves a otra
habitaci6n bien ventilada.
Para usar la funci6n Self Clean (Limpieza Autom_tica):
1. Comience con et homo a temperatura ambiente.
2. Limpie la grasa excesiva y las suciedades del homo y
del interior de la puerta.
3. Retire cualquier item que no sean los estantes y
rejillas de limpieza autom_tica (negros), si Io desea.
Consulte sobre la Limpieza de la Superficie de Cocci6n
para determinar si sus rejiltas pueden set limpiadas
automaticamente y para detalles importantes en retaci6n
a la colocaci6n de las rejitlas.
4. Cierre ta puerta.
5. Presione la tecla Self Clean (Limpieza Autom&tica),
configure un tiempo entre 3 y 5 horas, y luego presione
Start (Iniciar).
No podra abrir la puerta durante el cicto de timpieza automatica.
La puerta permanecera bloqueada luego det ciclo de limpieza
automatica hasta que et homo se enfrie y se alcance la
temperatura de desbloqueo. At finalizar el ciclo de limpieza
autom_tica, deje que el homo se enfrie, destrabe la puerta, y
limpie cualquier ceniza que haya quedado en et homo.
Exterior del Homo
No use limpiadores de homo, limpiadores abrasivos, limpiadores
liquidos fuertes, estropajos de acero, almohadillas para fregar
de pl_stico, ni polvos limpiadores en el interior o el exterior
del homo. Limpie el mismo con agua y jab6n o una soluci6n
de vinagre y agua. Enjuague con agua limpia y seque con
una tela seca. AI limpiar supeficies, aseg0rese de que est6n a
temperatura ambiente y fuera del contacto con la luz solar.
Et derrame de adobo, jugos de fruta, salsas de tomate y
liquidos para humedecer que contengan acidos pueden
ocasionar descoloraci6n y se deberan timpiar en cuanto tas
superficies catientes se enfrien, y luego se deber_n enjuagar.
Estantes del Homo
Todas tas parritlas det homo se podran timpiar a mano con un
limpiador abrasivo o viruta. Los estantes del homo de timpieza
autom_tica (negros) podr_n permanecer en el homo durante el
cicto de timpieza automatica. Los estantes cubiertos de niquel
(ptateados) no deben permanecer en el homo durante el ciclo
de limpieza autom_tica. Hacer esto destustrar_ los estantes. Si
cualquier tipo de estante es dejado en et homo durante et ciclo
de limpieza autom_tica, es posibte que se vuelva dificil deslizar
et estante.
Luego de limpiar los estantes, use una tela suave o una toalla
de papel para frotar una peque_a cantidad de aceite vegetal
sobre los extremos tanto izquierdo como derecho del estante.
Esto asegurara que los estantes se puedan deslizar facitmente
hacia dentro y fuera det homo.
4 49 85222
Page 61

Limpieza de la Placa de Cocci6n
Panel de Control y Perillas
Limpie el panel de control luego de cada uso del homo con
una tela h_meda. Para limpiar, use jab6n suave y agua o una
soluci6n que sea mitad de vinagre y mitad de agua. Enjuague
con agua timpia. Pula en seco con una teta suave.
No use limpiadores abrasivos, limpiadores liquidos fuertes,
almohaditlas para fregar de plastico y limpiadores de homo en
el panel de control; da_ar_n el acabado.
Superficies de Acero Inoxidable (en algunos modelos)
No use virutas de acero; 6stas da_ar_n la superficie.
Para timpiar la superficie de acero inoxidable, use agua tibia
con jab6n o un limpiador o pulidor para acero inoxidable.
Siempre limpie la superficie en la direcci6n del veteado. Siga
las instrucciones det limpiador para timpiar ta superficie de
acero inoxidable.
Los limpiadores con _cido ox_tico tales como Bar Keepers
Friend Soft Cteanser TM eliminar_n el 6xido, destustres y
pequedas manchas sobre la superficie. Use s61o un limpiador
liquido libre de material abrasivo y frote en la direcci6n de las
lineas del cepillo con una esponja suave y hOmeda.
Para realizar consultas sobre la adquisici6n de productos,
inctuyendo timpiadores o pulidores para etectrodomesticos de
acero inoxidabte, lea las secciones de Asistencia y Accesorios,
en et comienzo de este manual.
Para una limpieza m_s f_cit, las periltas del control pueden ser
retiradas empujando las mismas directamente hacia fuera una
vez que las mismas est6n en la posici6n OFF (Apagado). No
empuje las peritlas hacia arriba o abajo ni sostenga objetos
sobre tas mismas. Esto puede dafiar el eje de ta valvula de
gas. Esto podra dafiar el eje de la valvula de gas. At retirar
las peritlas de los quemadores de tres aniltos (en atgunos
modelos) y el 6valo dual (en algunos modelos), recuerde
sus ubicaciones. Mientras que todas las demos periltas son
intercambiabtes, 6stas deben ser colocadas en la misma
ubicaci6n tuego de ta timpieza. Para una vista detallada de
estas periltas, consulte la secci6n del Quemador. Las periltas
se podran tavar a mano con agua y jab6n o en un tavavajittas.
Para reemplazar las peritlas luego de la limpieza, alinee el
agujero de la peritla de la parte trasera con et eje de ta valvula
de gas y empuje hacia adentro hasta que la peritla este ajustada
de forma segura. Todas las peritlas son intercambiables.
0_ 3_o_
Perilla del quemador superficial
Cb
C
m
>
0
,<
PM
= m
r--
"(3
N
K)._
Base de la Superficie de Coccion
No use limpiadores de homo, limpiadores abrasivos,
limpiadores liquidos fuertes, estropajos de acero, almohaditlas
para fregar de pt_stico, ni polvos limpiadores sobre la base de
la superficie de cocci6n. Limpie et mismo con agua y jab6n o
una solucidn de vinagre y agua. Enjuague con agua timpia y
seque con una tela seca. AI limpiar supeficies, asegOrese de
que esten a temperatura ambiente y fuera det contacto con la
luz solar.
Sonda (en algunos modelos)
La sonda de temperatura se puede limpiar con agua y jab6n
o con una almohadilla de estropajo llena de jab6n. Enfrie
la sonda de temperatura antes de su limpieza. Fregue las
manchas dificiles con una almohaditla de estropajo ttena de
jab6n, enjuague y seque.
Para ordenar m_s sondas de temperatura, lea la secci6n de
Asistencia/Accesorios en el comienzo de este manual.
[] No sumerja la sonda de temperatura en agua.
[] No guarde la sonda de temperatura dentro del horno.
[] Nunca deje la sonda de temperatura dentro del homo
durante un ciclo de limpieza automatica o de limpieza con
vapor.
El derrame de adobo, jugos de fruta, salsas de tomate y
liquidos para humedecer que contengan acidos pueden
ocasionar descoloraci6n y se deberan timpiar en cuanto las
superficies calientes se enfrien, y luego se deber_n enjuagar.
Si su modelo cuenta con una superficie de cocci6n de acero
inoxidabte, consulte las instrucciones de limpieza de la
Superficie de Acero Inoxidable que aparecen en la secci6n del
Panel de Control y Perittas.
K)._
C')
O
5:
Page 62

c--
'0
Limpieza de la Placa de Coccion (Cont.)
0 Retiro de los Quemadores Superficiales para su Limpieza
(_ Apague todos los controles. Espere a que la placa de cocci6n se enfrie antes de retirar las rejitlas y tas pares det quemador. At
retirar las tapas y cabezas de los quemadores, recuerde su tamafio y ubicaci6n. Vuelva a colocarlos en la misma ubicaci6n luego
de la limpieza.
Q [ i Nointenteret'rariastapasdeiquemadorova', ova'dua'odetresan'''osde'as
APRECAUCION c,b_,,,a__o,q,_m,ao_,.
c_
O
c_
Tapa del Quemador Tapa del Quemador Tapa del Quemador
Redondo (Extraible) Oval (No Extraible) Intemo (Extraible)
Tapa del Quemador
Redondo (Extraible)
CL
c_
i
Cabeza del
Cabeza del
Quemador
Q
-C3
c_
N
Q
CL
E
__J
Quemador
Redondo
Electrodo
Electrodo
Quemador Oval
(en algunos modelos)
Tapa del Quem_dor_
Externo (No Extraible) Cabeza del
Quemador
Quemador de Tres Anillos
(en algunos modelos)
Tapas del Quemador
Oval Dual (No Extraibles)
Quemador Oval Dual
(en algunos modelos)
N
m
m
...J
>-
O
<I:
m
¢.)
26 49 85222
Page 63

Limpieza de la Placa de Cocci6n (Cont.)
Limpieza de los Quemadores Superficiales (Cont.)
Limpieza de las Tapas de los Quemadores
Lave las tapas de los quemadores en agua caliente con jab6n
y enjuague con agua limpia. Puede fregar con una base de
fregado plastica para etiminar particulas de comida quemadas.
Las tapas redondas de los quemadores tambien se pueden
limpiar en un lavavajitlas.
Limpieza de las Cabezas de los Quemadores
Limpie las cabezas de los quemadores de forma rutinaria,
especialmente luego de derrames importantes, que podrian
bloquear las aberturas det quemador. Retire los quemadores
cuando esten frios. Lave los mismos con agua caliente y
jab6n. Enjuague con agua timpia. Para etiminar las manchas
m_s rebeldes, use un cepillo con cerda pt_stica.
NOTA: No use tana de acero ni estropajos para timpiar las
pares del quemador, ya que podr_n bloquear las aberturas.
Nunca lave tas cabezas de los quemadores en et tavavajitlas.
Esto podra hacer que se descoloren.
Las hendiduras de las cabezas de los quemadores se deben
mantener limpias en todo momento para obtener una llama
pareja y sin obstrucci6n.
Las pares bloqueadas o sucias de los quemadores o los
etectrodos no permitiran que et quemador funcione de forma
correcta.
Para un encendido adecuado, asegQrese de que el agujero pe-
i PRECAUClONi .o °po.o
de la cocina sin que todas las partes de los quemadores y
las parrillas esten en sus respeetivos lugares.
Cualquier derrame en o alrededor de un etectrodo se debera
limpiar de forma cuidadosa. Evite golpear et etectrodo con cual-
quier cosa dura, ya que podr_ ser dar_ado.
El electrodo del encendedor de la chispa es
expuesto cuando la cabeza del quemador es
retirada. Cuando un quemador se gira a LITE,
todos los quemadores hacen chispa. No intente
desensamblar ni limpiar un quemador mientras
otro quemador est_ encendido.
Electrodo
C
m
>
O
.<
N
>
= =
r_
-'(3
('I)
N
D)
("D
cabeza del quelmialCiJrOrp_ce
_EI agL_jero redondo en la
quefio en la secci6n que coincide con et electrodo se mantenga
abierto. Puede usar una aguja de coser o un precinto para
desbloquearto.
Reemplazo de los Quemadores Superficiales
Antes de colocar las tapas y cabezas de los quemadores y el
ensambte de la cabeza/tapa nuevamente, escurra el exceso
de agua y tuego seque las mismas totalmente.
Vuelva a cotocar las cabezas de los quemadores en las
ubicaciones correctas, de acuerdo con sus tamafios.
AsegOrese de que cada tapa quede correctamente apoyada
sobre la cabeza del quemador, como se muestra a
continuaci6n.
La tapa del La tapa del La tapa del
quemador NO esta quemador NO esta quemador est___
correctamente correctamente correctamente
colocada, colocada, colocada,
(b
D)
(D
C)
O
C)
C)
5,
4985222 27
Page 64

r-
'O
LD
LD
O
LD
(1)
R:D
G3
(D
G3
G_
G3
(1)
R:D
G3
N
(1)
£)_
E
__J
N
iii
m
m
Limpieza de la Placa de Coccion (Cont.)
Parrillas de Quemadores
Limpieza Manual
Las rejitlas se deberan tavar con agua caliente y jab6n y
deberan ser enjuagadas con agua limpia. Para ablandar la
comida quemada, cotoque las rejiltas en una solucidn con ¼
de taza de amoniaco hogare_o durante varias horas. Luego,
friegue tas rejitlas con un estropajo de plastico con agua
caliente y jab6n. Enjuague a fondo y seque.
Mode Self Clean (Limpieza Automatica)
(en algunos modelos)
Si las rejillas no cuentan con protectores de goma en la
superficie inferior, podr_n ser limpiadas en el homo usando
et ciclo de limpieza automatica. No intente limpiar las rejitlas
en el homo si las mismas cuentan con protectores de goma.
Hacer esto destruir_ los protectores de goma, afectando el
funcionamiento de los quemadores.
Las rejiltas cubiertas de porcelana se podran votver
gradualmente _speras si son expuestas de forma continua a
las temperaturas de limpieza automatica.
Si su homo est_ equipado con estantes de limpieza autom_tica
(negros), se recomienda seguir las instrucciones para la
cotocacidn de parrillas en los estantes. Si su homo est_
equipado con estantes niquelados, se recomienda seguir las
instrucciones para la colocaci6n de rejitlas en et fondo det
horno. Los estantes cubiertos de niquel (plateados) no deben
permanecer en el homo durante et cicto de limpieza automatica.
Hacer esto deslustrar_ los estantes. Si cualquier tipo de estante
es dejado en el homo durante el ciclo de limpieza autom_tica,
es posible que se vuetva dificit deslizar et estante.
NOTA: AI colocar o retirar rejillas del homo, nodeslice las
mismas sobre los estantes ni sobre el fondo del horno. Hacer
esto podria da_ar el esmalte de los estantes o el fondo del homo.
Para realizar la limpieza automatica de sus parrillas en los
estantes de limpieza automatica:
1. Inserte los estantes en las posiciones 1, 3 y 5 o en las
posiciones 2 y 4.
2. De forma suave, coloque una rejilla en cada estante.
Una vez que las rejillas fueron cotocadas en el homo, use el
cicto de limpieza automatica siguiendo las instrucciones de la
secci6n de Limpieza del Homo.
NOTA: Tenga cuidado al retirar las parritlas det homo superior
una vez que et ciclo de auto limpieza haya finalizado. Es
posibte que las parriltas aQn est6n catientes.
Una vez comptetado el ciclo de limpieza autom_tica, las rejillas
pueden set retiradas de forma cuidadosa. Es posible que
observe un residuo btanco en tas rejitlas. Limpie el mismo con
una esponja homed& Si las manchas btancas persisten, moje
la esponja con una soluci6n mitad de vinagre y mitad de agua
y vuetva a timpiar las rejittas.
AI reemplazar las rejillas en la superficie de cocci6n, asegQrese
de ubicarlas de forma correcta. Las rejitlas se deben poder
posicionar de forma segura en la superficie de cocci6n.
©
tm
tm
m
r,D
Protectores de Soportes de Rejillas (en algunos modelos)
Si uno de los protectores de goma de la rejilla de la
placa de cocciOn se pierde o da_a, se podr_n obtener
piezas de repuesto Ilamando al 1.800.GE.CARES.
Para insertar los nuevos protectores, simplemente
coloque el extremo del protector con forma cOnica en el
agujero de la placa de cocci6n y empuje hacia abajo de
forma suave, doblando el protector.
Plancha (en algunos modelos)
Plancha de Aluminio Antiadherente: Evite rayas sobre la
superflcie de la plancha con utensilios metalicos. Lave ta
plancha con detergente para platos y agua caliente. De set
necesario, frote con una atmohadilla pt_stica no abrasiva.
Hierro Forjado Reversible: Limpie su plancha de hierro
fundido reversible o del chef con un cepillo duro y agua
catiente. No se recomienda el uso de jab6n, y nunca se
deben usar detergentes potentes, ya que eliminar_n el
curado. Enjuague la misma con agua catiente y sequela
cuidadosamente. Luego del enjuague, presazone la ptancha
apticando una capa suave de aceite de cocina sobre su
superficie. Limpie el exceso de aceite con una toatla de papel.
Guarde en un lugar frio y seco.
Precauciones de la Plancha:
[] Si atgo se derram6 debajo de la plancha, se deber_ limpiar
tan pronto como sea posible para evitar que sea horneado
en ta ptaca de cocci6n.
[] No permita que se acumule grasa debajo de la plancha,
ya que puede haber riesgo de incendio. Limpie debajo de
la plancha con agua caliente y jab6n, tan pronto como sea
posibte.
[] No lave la plancha en et lavavajittas.
[] No limpie la plancha en et homo de limpieza automatica.
Protectores para Soportes de Rejillas
8 49 85222
Page 65

Limpieza de la Puerta y el CajOn
Limpieza de la Puerta del Homo
Limpieza del Interior de la Puerta
No permita que el excedente de agua entre a ning0n agujero o
ranuras de la puerta.
Aptique detergente para lavar platos sobre cualquier
salpicadura que haya sobre el vidrio debido at horneado. Use
et fito de una navaja det tado seguro para despejarlo. Luego
limpie el vidrio con una teta con jab6n para etiminar cualquier
residuo y seque.
El area que esta fuera de lajunta se puede limpiar con un
estropajo de plastico con jab6n. No frote ni limpie la junta de
la puerta; posee una resistencia extremadamente baja a la
abrasi6n.
Si observa que la junta se empieza a gastar, se deshilacha o
dar_a de cualquier forma y si qued6 fuera de la puerta, deber_
reemplazar la misma.
Limpieza del Exterior de la Puerta
Si las manchas en el borde de la ventana de la puerta son
persistentes, use un limpiador abrasivo suave o una esponja
con estropajo para obtener un mejor resultado. No use este
metodo sobre ninguna otra superficie.
Superficies de Acero Inoxidable (en algunos rnodelos)
No use virutas de acero; 6stas dar_ar_n la superficie.
Para timpiar ta superficie de acero inoxidable, use agua tibia
con jab6n o un limpiador o pulidor para acero inoxidabte.
Siempre limpie la superficie en la direcci6n del veteado. Siga
las instrucciones det limpiador para limpiar ta superficie de
acero inoxidabte.
Para realizar consultas sobre la adquisici6n de productos,
incluyendo timpiadores o pulidores para etectrodomesticos de
acero inoxidable, lea las secciones de Asistencia y Accesorios,
en et comienzo de este manual.
O
C
m
>
O
-<
F"
F't3
N
= =
F-"
Cajon de Nmacenamiento Extraible (en algunos modelos)
Et caj6n de almacenamiento es un buen lugar para guardar
utensitios de cocina y panaderia. No guarde plasticos ni
materiales inftamables en et caj6n.
El caj6n de almacenamiento se podra retirar para timpiar
debajo de la cocina. Limpie el caj6n de almacenamiento con
una tela o esponja hQmeda. Nunca use abrasivos duros ni
almohaditlas para fregar.
Es posibte que el caj6n de atmacenamiento cuente con
varas deslizables de pl_stico (mostradas a la derecha) o
rieles met_ticos. Siga las instrucciones de retiro y reemplazo
respectivamente para la configuraci6n de su modeto.
Retiro del Cajon de Almacenamiento:
1. Empuje et caj6n hacia afuera hasta que se detenga.
2. Contin0e empujando el caj6n hasta que salga del homo.
Reernplazo del Cajon de Almacenamiento:
1. Coloque el riet izquierdo det caj6n alrededor de ta guia det
riet interior izquierdo y destice et mismo lentamente.
2. Coloque et riet derecho det caj6n alrededor de ta guia det
riet interior derecho y destice et mismo tentamente.
3. Deslice el caj6n totatmente hasta adentro.
Cajon Calentador Extraible (en algunos modelos'
NOTA: Para modelos con un caj6n de calentamiento
el6ctrico, antes de realizar cualquier ajuste, limpieza o
servicio t6cnico, desconecte el suministro de corriente
el6ctrica de la cocina desde el panel de distribuci6n del hogar,
retirando el fusible o apagando el disyuntor. Aseg0rese de
que el elemento de calefacci6n del caj6n calentador este frio.
La mayor parte de la timpieza se puede realizar con et caj6n
en su lugar. Sin embargo, el caj6n puede ser retirado si es
necesario continuar con la limpieza. Use agua caliente y jab6n
para limpiar a fondo.
Para retirar el cajon:
1. Empuje et caj6n hacia afuera
hasta que se detenga.
2. Presione et tiberador del
riel izquierdo hacia arriba y
presione et derecho hacia
abajo, mientras empuja et
caj6n hacia adetante y 1o
libera.
Para reemplazar el cajon:
1. Coloque el riet det caj6n izquierdo alrededor de la guia det
riet interior izquierdo y destice et mismo lentamente para
engancharto.
2. Coloque el riel det caj6n derecho alrededor de la guia det
riet interior derecho y deslice et mismo tentamente para
engancharto.
3. Deslice el caj6n totatmente hasta adentro.
('D
N
D
_L
(1:)
m
D
"O
C
('D
==3
(1:)
Cb
O,
Page 66

O
4--J
t-
(13
=i
E
t-
(1)
4--J
r-
G3
Z
N
ill
m
t_L
m
,,,.,J
>=
©
tm
tm
m
r,D
iVlantenimiento
Reemplazo de la Lampara dei Homo
i,&ADVERTENCIAi P':L'GRoo'=O' SO"'RGAOQU':"AOUR"'S:, ntesdereemp'azar'a'amparade'uz
la,LPRECAUCIONliRIESGO DE INCENDIO: La tapa de vidrio y la tampara de luz se deberan retirar cuando
NOTA: La tapa de vidrio debera ser retirada s61ocuando este
fria. Si usa guantes de I_tex, tendr_ un mejor agarre.
Antes de reemplazar la t_mpara, desconecte la conexidn
electrica del homo del fusible principal o del panel del disyuntor.
Deje que la l_mpara se enfrie completamente antes de retirar la
misma. Para su seguridad, no toque una I_mpara catiente con
una tela hQmeda. Si Io hace, la I_mpara se podr_ romper.
Para retirar:
D6 a la tapa de vidrio en contra de las agujas del reloj un
cuarto de giro hasta que tas lengeetas de ta tapa de vidrio
queden fuera de las ranuras de la ficha y empuje la tapa hacia
fuera. Retire la lampara.
Para reemplazar:
Coloque una tampara nueva de 40 watts para
electrodomesticos. Coloque las lengQetas de la tapa de vidrio
en las ranuras de la ficha. D6 a la tapa de vidrio un cuarto de
giro en direcci6n de las agujas det retoj.
del homo, desconecte la conexi6n el6ctrica del homo del fusible principal o del panel del
disyuntor. Si esto no se cumple, se podr_ producir una descarga el6ctrica o un incendio.
est6n frias. Tocar el vidrio catiente sin protecci6n en las manos o con un trapo hQmedo
puede ocasionar quemaduras.
NOTA:
[] Las I_mparas para
etectrodomestico de 40
watts son mas peque_as
que las tamparas
hogare_as de 40 watts.
[] Vuelva a conectar el homo
una vez que la lampara
nueva este instalada.
[] Para una mejor
ituminaci6n dentro det
homo, limpie la tapa del
vidrio en forma frecuente
utilizando una tela
hQmeda. Esto se deber_
hacer cuando et homo
este completamente frio.
, Lam )ara
Tapa de vidrio
Ficha
Lengeeta
Puerta del Horno Desmontable
La puerta es muy pesada. Tenga cuidado al retirar y levantar la puerta. No levante la puerta usando la manija.
Para retirar la puerta:
1. Abra ta puerta totalmente.
2. Empuje los bloqueos de la bisagra hacia arriba y afuera de
la estructura de la cocina, hasta la posici6n de desbtoqueo.
3. Firmemente tome ambos lados de la puerta por la parte
superior.
4. Cierre la puerta hasta que ta parte superior de la misma
quede a aproximadamente 6" de la estructura de la cocina. _-_
5. Levante la puerta hacia arriba y afuera de la cocina, hasta
que ambos brazos de tas bisagras esten fuera de las
ranuras de la estructura de la cocina.
Para reemplazar la puerta:
1. Firmemente tome ambos lados de ta puerta por la parte
superior.
2. Con la puerta en et mismo angulo queen ta posici6n de
retiro, apoye la abertura sobre el fondo del brazo de la
bisagra izquierda en el extremo inferior de la ranura de la
bisagra izquierda. La abertura en et brazo de ta bisagra
debera estar totalmente apoyada en la parte inferior de ta
ranura. Repita et procedimiento det lado derecho.
3. Abra la puerta totalmente. Si la puerta no se abre
completamente, las aberturas en las partes inferiores de los
brazos de las bisagras no se apoyaron de forma correcta
sobre el extremo inferior de la ranura. Retire la puerta de la
cocina y repita et paso anterior.
4. Empuje los bloqueos de las bisagras hacia ta cavidad de la
cocina y hacia abajo hasta ta posici6n de bloqueo.
5. Cierre la puerta det homo.
Empuje los bloqueos de las
bisagras hacia arriba para
desbloquea dos
EmpL_je el
bloqueo de
la bisagra
hacia arriba
hasta que
quede
bloqueado
Apoye la abertura en el extremo
inferior de la ranura de la bisagra
Brazo de la bisagra
3O
Posicion de retiro
Empuje trabas de la bisagra
hacia abajo para bloquear.
49 85222
Page 67

Notas
Page 68

Notas
32 49 85222
Page 69

Notas
Page 70

Consejos para la SoluciOn de Problemas... Antes de solicitar el servicio tecnico
I,.t.J
..J
©
tY
t-i
I,.t.J
Z
,©
m
¢D
©
¢/3
..J
t-i
oO
©
I,.t.J
oO
Z
©
¢D
iAhorre tiempo y dinero! Primero revise los cuadros que aparecen en las siguientes paginas yes posible que no necesite
solicitar reparaciones,
Causa Posible
Mi homo lluevo llo
cocilla como el anterior.
gHay algQn problema con
as configuraciolles de
temperatura?
La comida llo se horllea
de forma apropiada
La comida no asa de Colltroles del horllo collfigurados de forma
forma aproplada mcorrecta.
La temperatura del homo La temperatura del homo debe ser ajustada. Consulte la secci6n Funciones Especiales.
es demasiado caliente o
demasiado fria
El horno y/o la pantalla Es posible que ull fusible de su hogar se haya Reemplace el fusible o reinicie el disyuntor.
parecen no estar quemado o que el disyulltor se haya descollectado.
funcionando Colltroles del horllo collfigurados de forma Consulte la secci6n Uso del Homo.
Sonido de "chisporroteo" teste es el sonido de metal calent&ndose o Esto es normal.
o "traqueo" ellfri&lldose durallte las fullciolles de cocci6ll y
_Por qu_ la estufa hace Su estufa fue disehada para mallteller ull control Esto es normal.
un sollido de "clic" m&s ajustado sobre la temperatura del horllo.
cuando uso el homo? Es posible que escuche que los elemelltos de
A veces el homo tarda Utellsilio o comida ell el horllo El utensilio o la comida en el horno hara que este
m&s en precalelltarse a la tarde mas en precalentarse. Retire estos articulos para
misma temperatura _ _ reducir el tiempo de precalentamiento.
Su homo lluevo cuellta con ull sistema de cocci6ll
diferellte con relaci6ll al anterior y, por 1otallto, es
posible que cocille de forma diferellte.
Colltroles del homo collfigurados de forma
illcorrecta.
La posici6ll del estallte es illcorrecta o el estallte
llo est& llivelado.
Uso de ulla cacerola illcorrecta o de ulla cacerola
de tama_lo illcorrecto.
La temperatura del homo debe ser ajustada.
Se us6 ulla posici6ll illcorrecta del estallte. Para acceder a sugerencias de ubicaci6n de
L
Utellsilio de cocilla illadecuado para asar. Use una olla especificamente diseSada para asar
El papel de alumillio sobre la olla para asar Si usar_ papel de aluminio en la olla para asar,
no fue ajustado de forma apropiada lli cortado envuelva de forma ajustada y agregue cortes
apropiadamente para drenar la grasa, conforme con aquellos en la olla para permitir que la
illcorrecta.
El homo se ellcuelltra ell Sabbath Mode (Modo Verifique que el homo no est6 en Sabbath Mode
Sab&tico) (Modo Sab_tico). Consulte la secci6n Funciones
El reloj est& apagado. Consulte la secci6n de Funciones Especiales.
limpieza.
calentamiento del homo hagan sollidos de "clic"
con mayor frecuencia que con hornos m&s
antiguos para lograr mejores resultados durante
los ciclos de horlleado, asado, convecci6n y
limpieza autom&tica.
Nt_mero de estalltes ell el homo Agregar mas estantes al homo hara que este tarde
Qu_ Hacer
Durante los primeros usos, siga los tiempos y
temperaturas de sus recetas atentamente y use
las posiciones de los estantes recomendadas en la
Guia de Cocci6n. Si aOn piensa que su homo nuevo
cocina con demasiado calor o demasiado frio, podra
ajustar el termostato usted mismo para aplicar su
preferencia de cocci6n especifica. Consulte la secci6n
de Funciones Especiales.
Consulte la secci6n Modos de Cocci6n.
SeConsulte la secci6n Modos de Cocci6n y la Guia
de Cocci6n.
Consulte la secci6n Utensilios.
Consulte la secci6n Funciones Especiales.
AsegOrese de seleccionar el modo correcto para
asar.
estantes consulte la Guia de Cocci6n.
grasa sea drenada.
Especiales.
mas en precalentarse. Retire algunos estantes.
4 49 85222
Page 71

Consejos para la SoluciOn de Problemas... Antes de solicitar el servicio tecnico
Causa Posible
La luz del homo no
funciona
El rood© de limpieza
autom&tica del homo
no funciona
Exceso de hum© Suciedad o grasa excesiva, Presione la tecla Cancel/Off (Cancelad Apagar) Abra
durante un ciclo de las ventanas para liberar el hum© en la habitaci6n.
El homo no limpia Los controles del homo est&n configurados de Consulte la secci6n de Limpieza del Homo.
luego de un ciclo de forma incorrecta.
limpieza El homo estaba demasiado sucio. Limpie derrames excesivos antes de iniciar el ciclo de
Fuerte olor a Para acelerar el proceso, configure un ciclo de limpieza
"quemado" o a automatica per un minim© de 3 horas. Consulte la
"aceite" desde la secci6n de Limpieza del Homo.
ventilaci6n
Hum© excesivo al asar Baje la posici6n del estante con comida.
La puerta del homo Presione la tecla Cancel/Off (Cancelad Apagar).
no se abre o la luz Espere a que el horn© se enfrie por debajo de la
LOCKED (Bloqueado) temperatura de bloqueo.
est& encendida
cuando desea cocinar.
"TRABA DE LA Cierre la puerta del homo.
PUERTA" titila en la
pantalla.
"F u
- y n numero Presione la tecla Cancel/Off (Cancelar/Apagar)
o letra" titila en la Permita que el homo se enfrie durante una hora. Vuelva
pantalla a poner el homo en fundonamiento. Si el c6digo de la
Corte de corriente, el Reinicie el reloj. Si el homo estuvo en us©, debera
reloj titila reiniciar el mismo presionando la tecla Cancel/Off
Controles de BIoqueo Si aparece LOC ON en la pantalla, el control de la
o Control La funci6n cocina esta bloqueado. Apague esta funci6n para usar
de bloqueo est_ la codna. Consulte la funci6n Lock Control (Control de
activada. Bloqueo) en la secci6n de Controles del Homo.
El quemador no se El enchufe en la cocina no est_ completamente AsegOrese de que el cable de electricidad est_
enclende msertado en el tomacorriente electric©, enchufado en un tomacorriente correctamente conectado
La l&mpara est& floja o presenta defectos.
La temperatura del homo es demasiado caliente
corn© para configurar la limpieza autom_tica.
Los controles del homo est_n configurados de
forma incorrecta,
Esto es normal en un horn© nuevo y desaparecer&
con el tiempo,
La comida est& demasiado cerca del quemador,
La puerta del homo est& bloqueada debido a que
la temperatura interior del homo no descendi6 por
debajo de la temperatura de bloqueo,
El ciclo de limpieza autom&tica fue seleccionado
per© la puerta no est& cerrada,
Tiene un c6digo de error de funci6n,
Corte o exceso de corriente
El suministro de gas no fue conectado o encendido. Consulte las Instrucciones de Instalaci6n provistas con
Es posible que un fusible de su hogar se haya Reemplace el fusible o reinicie el disyuntor.
quemado o que el disyuntor se haya desconectado.
Las piezas del quemador no fueron reemplazadas Lea la secci6n Cuidado y limpieza de la cocina.
correctamen.
Es posible que las hendiduras de los quemadores, Retire los quemadores o limpie los mismos. Controle que
o el puerto del encendedor red©rid© en el quemador no haya comida quemada ni grasa en el area del electrodo.
oval, est_n atascados. Lea la secci6n de Cuidado y Limpieza de la cocina.
Residuos de comida en el electrodo Suavemente pula el extremo piano del electrodo con una
Qu_ Hacer
Ajuste o reemplace la iampara. Para acceder a
instrucciones sobre c6mo reemplazar la I_mpara,
consulte la secci6n de Mantenimiento.
Espere a que el horn© se enfrie y reinicie los controles.
Consulte la secci6n de Limpieza del Homo.
Espere hasta que la luz de la funci6n LOCKED
(Bloqueado) desaparezca. Limpie el exceso de
suciedad y reinicie el ciclo de limpieza.
limpieza. Es posible que, en hornos con mucha sudedad,
sea necesario usar la limpieza automatica nuevamente o
usarla durante un period© de tiempo mas prolongado.
funci6n se repite, desconecte totalmente la cordente
del homo durante por I© menos 30 minutos y vuelva aconectar la misma. Si el c6digo de error de funci6n se
repite, Ilame al servido tecnico.
(Cancelar/Apagar) configurando el reloj y reiniciando
cualquier funci6n de cocci6n.
a tierra.et.
su cocina.
lima de uSas o con una lija hasta que quede brilloso.
©
Z
¢,f)
t't3
©
¢,f)
1..-
©
1.,-.
C
#b
n
©,
Z
m
©
1.,-.
m
¢,f)
Page 72

Consejos para la SoluciOn de Problemas... Antes de solicitar el servicio tecnico
,..J
t_
©
tY
Q..
Z
,©
m
©
oO
,..J
Q..
oO
©
Causa Posible
Los quemadores
superiores no queman
de forma pareja
Llamas de los
quemadores son muy
grandes o amarillas
Los quemadores
superficiales se
iluminan pero los
quemadores para
hornear y asar no.
La puerta de vidrio
del homo parece
estar "te_ida" o tener
un color "arcoiris".
El caj6n no se desliza El caj6n est& desalineado. Extienda totalmente el caj6n y empuje el mismo totalmente hacia
de forma pareja o se adentro. Consulte la secci6n Cuidado y limpieza de la cocina.
arrastra
Ensamble del quemador inapropiado.
Las hendiduras al costado del
quemador se podr&n atascar.
Promedio inadecuado de aire a gas.
Es posible que los quemadores de
gas del homo hayan sido apagados.
El vidrio del homo interno est_
cubierto con una barrera de calor que
refleja este Ultimo nuevamente hacia
el homo, a fin de evitar la p_rdida
de calory de mantener fria la puerta
externa mientras se hornea.
El caj6n est& sobrecargado o la carga Reduzca peso o redistribuya los contenidos de los cajones.
est& des balanceada.
Qu_ Hacer
AsegQrese de que las tapas de los quemadores est_n instaladas
correctamente. Consulte Cuidado y limpieza en la secci6n de la cocina.
Retire los quemadores para su limpieza. Consulte la secci6n de Cuidado
y limpieza de la cocina.
Si la cocina es conectada a gas Propano, contacte al tecnico que instal6
la cocina o que hizo la conversi6n.
El apagado del gas del horno esta ubicado en el regulador de gas cerca
de la adherencia de la tuberia de gas a la cocina. Ubique la misma y de
vuelta la palanca.
Modelos con quemador sellado
Esto es normal. Bajo ciertas luces y _ngulos, es posible que visualice
esta tinta o arcoiris.
oO
Z
©
36 49 85222
 Loading...