

Page 1
ge.com
0
!31
Qm
0
m
U
m
Safety instructions .... 2-7
Operating instructions
Aluminum Foil ................ 13
Clock and Timer ........... 16, 17
Oven ..................... ii-28
Baking and Roasting ..... 13, 14
Broiling, Broiling Guide ....... 15
Oven Control ............... !!
Power Outage .............. 12
Preheating ................. 13
Sabbath Feature ......... 22, 23
Self-Cleaning ............ 27, 28
Shelves ..................... 13
Special Features ......... 19-21
Thermostat Adjustment ...... 24
Timed Baking
and Roasting ............... 18
Surface Cooking ........... 8-!0
Griddle ..................... 10
Warming Drawer .......... 25, 26
Care and Cleaning
Sealed Burner
Assemblies ............... 29, 30
Burner Grates ................ 3!
Control Panel and Knobs ...... 32
Cooktop Surface ............. 31
Door Removal ................ 33
Drawer ...................... 35
Griddle ...................... 29
Oven Bottom ................. 33
Oven Light Replacement ...... 34
Oven Vents .................. 32
Self-Cleaning ............. 27, 28
Shelves ...................... 34
Stainless Steel Surfaces ....... 31
installation
instructions .......... 36-47
Air Adjustment ............... 46
Anti-Tip Device ............ 39, 47
Assemble Surface Burners .... 44
Checking Burner
Ignition ...................... 45
Connecting the Range
to Gas ................... 40-42
Dimensions and Clearances ...38
Electrical Connections ..... 43, 44
Leveling the Range ........... 46
LP ........................... 47
Troubleshooting
Tips .................... aS-s i
Accessories .............. 52
Consumer Support
Consumer Support ...Back Cover
Product Registration ....... 53, 54
Warrantg for Customers
in Canada ................... 59
Warrantg for Customers
in the U.S.A.................. 58
P2B912
In Canada contact us at:
www. GEAppliances.ca
Write the model and serial
numbers here:
Model #
Serial #
You can find them on a label
on the front of the range behind
the warming drawer.
183D5580P221 49-85!57 05-07 JR
Page 2
IMPORTANTSAFETYINFORMATION.
READALL INSTRUCTIONSBEFOREUSING.
WARNING!
For your safety, the information in this manual must be followed to minimize the risk of fire or
explosion, electric shock, or to prevent property damage, personal injury, or loss of life.
WARNING: If the information
in this manual is not followed exactlg,
a fire or explosion mag result causing
propertg damage, personal injurg
or death.
Do not store or use gasoline or other
flammable vapors end liquids in the
vicinitg of this or eng other appliance.
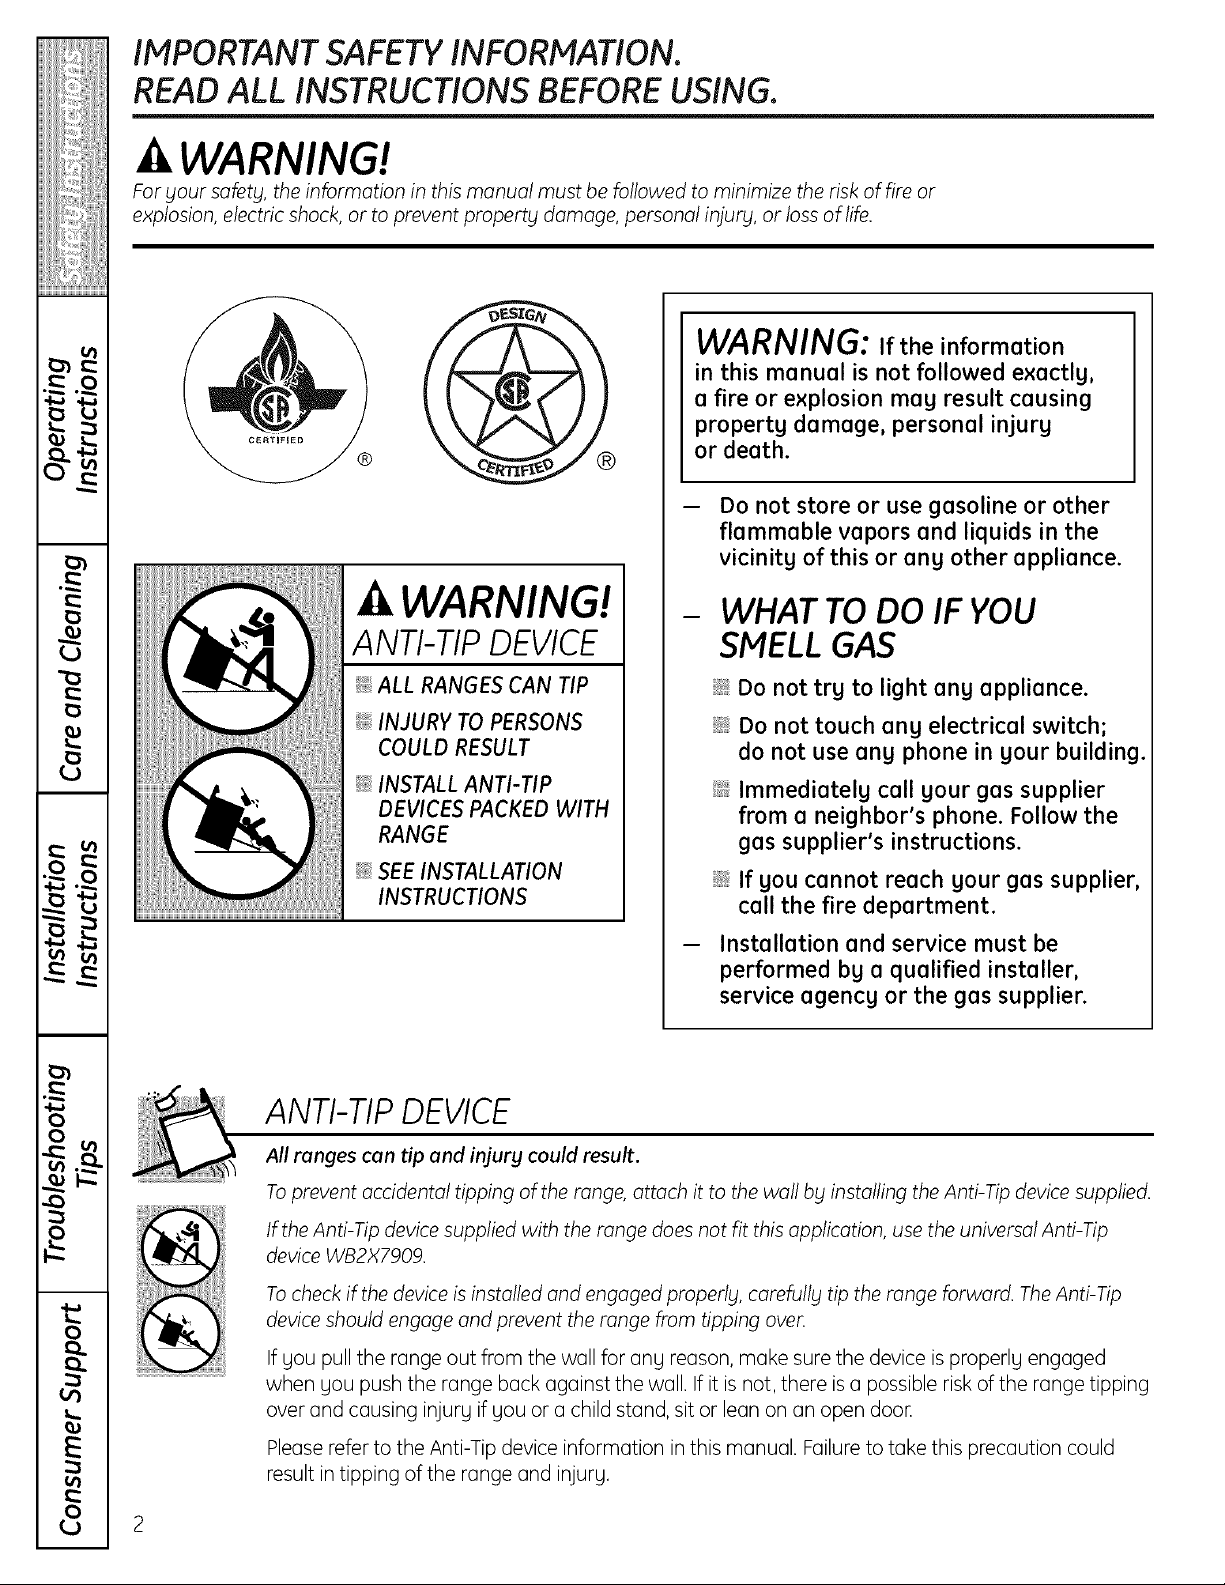
,tl,WARNING!
ANTI-TIPDEVICE
i!_ALL RANGES CAN TIP
_: INJURY TO PERSONS
COULD RESULT
_: INSTALL ANTI-TIP
DEVICES PACKED WITH
RANGE
_; SEE INSTALLATION
INSTRUCTIONS
ANTI-TIP DEVICE
All ranges can tip and injury could result.
WHAT TO DO IF YOU
SMELL GAS
i_:;i_Do not trg to light eng appliance.
i_i:iDo not touch eng electrical switch;
do not use eng phone in gour building.
ii_ Immediatelg call gour gas supplier
from e neighbor's phone. Follow the
gas supplier's instructions.
i_i_iIf gou cannot reach gour gas supplier,
cell the fire department.
Installation end service must be
performed bg a qualified installer,
service agencg or the gas supplier.
Toprevent accidental tipping of the range, attach it to the wall bg installing the Anti-Tip device supplied.
If the Anti-Tip device supplied with the range does not fit this application, use the universal Anti-Tip
device WB2X7909.
To check if the device is installed and engaged properly, carefull_l tip the range forward. The Anti-Tip
device should engage and prevent the range from tipping ove_
If you pull the range out from the wall for any reason, make sure the device is properly engaged
when you push the range back against the wall. If it is not, there isa possible risk of the range tipping
over and causing injury if you or a child stand, sit or lean on an open doon
Please refer to the Anti-Tip device information in this manual. Failure to take this precaution could
result intipping of the range and injury.
Page 3
ge.com
WARNING!
IMPORTANT SAFETY NOTICE
The Califomia Safe Drinking Water and Toxic Enforcement Act requires the Governor of California to
publish a list of substances known to the state to cause birth defects or other reproductive harm, and
requires businesses to worn customers of potential exposure to such substances.
Gas appliances can cause minor exposure to four of these substances, namely benzene, carbon
monoxide formaldehyde and soot, caused primarily by the incomplete combustion of natural gas
or LP fuels. Properly adjusted burners, indicated by a bluish rather than o yellow flame will minimize
incomplete combustion. Exposure to these substances con be minimized by venting with on open
window or using o ventilation fan or hood.
SAFETY PRECAUTIONS
Have the installer show you the location of the range gas shut-off valve and how to shut it off if
necessary.
_::Have your range installed and properly
grounded by a qualified installer, in
accordance with the Installation Instructions.
Any adjustment and service should be
performed only by qualified gas range
installers or service technicians.
;_i:,:Do not attempt to repair or replace any
part of your range unless it is specifically
recommended in this manual, All other service
should be referred to a qualified technician.
_t_:_Plug your range into a 120-volt grounded
outlet only, Do not remove the round
grounding prong from the plug. If in doubt
about the grounding of the home electrical
system, it is your personal responsibility and
obligation to have an ungrounded outlet
replaced with a properly grounded,
three-prong outlet in accordance with
the National Electrical Code. Do not use
an extension cord with this appliance.
Page 4
IMPORTANT SAFETY INFORMATION.
READ ALL INSTRUCTIONS BEFORE USING.
SAFETYPRECAUTIONS
_t_:_Locate the range out of kitchen traffic path
and out of drafty locations to prevent poor air
circulation.
_::Be sure all packaging materials are removed
from the range before operating it to prevent
fire or smoke damage should the packaging
material ignite.
;_::,:Besure your range is correctlg adjusted by
a qualified service technician or installer for
the type of gas (natural or LP)that is to be
used. Your range can be converted for use
with either type of gas. See the Installation
of the range section.
WARNING:These adjustments must
be made by a qualified service technician
in accordance with the manufacturer's
instructions and all codes and requirements
of the authority having jurisdiction. Failure
to follow these instructions could result in
serious injury or property damage. The
qualified agency performing this work
assumes responsibilitg for the conversion.
_t_::After prolonged use of a range, high floor
temperatures may result and many floor
coverings will not withstand this kind of use.
Never install the range over vinyl tile or
linoleum that cannot withstand such tgpe
of use. Never install it directlg over interior
kitchen carpeting.
_?_::Do not leave children alone or unattended
where a range is hot or in operation.
They could be seriouslg burned.
_ Do not allow anyone to climb, stand or
hang on the oven door,warming drawer
or cooktop. Theycould damage the range and
even tip it over, causing severepersonal injury,
CAUTION: Items of interest to children
should not be stored in cabinets above a
range or on the backsplash of a range-
children climbing on the range to reach
items could be seriouslg injured.
_::Never wear loose fitting or hanging garments
while using the appliance. Be careful when
reaching for items stored in cabinets over the
range. Flammable material could be ignited
if brought in contact with flame or hot oven
surfaces and may cause severe burns.
Do not store flammable materials in an oven,
a range drawer or near a cooktop.
Do not store or use combustible materials,
gasoline or other flammable vapors and
liquids in the vicinity of this or any other
appliance.
Do not let cooking grease or other flammable
materials accumulate in or near the range.
Do not use water on grease fires. Never
pick up a flaming pan, Turn the controls off.
Smother a flaming pan on a surface burner
by covering the pan completely with a
well-fitting lid, cookie sheet or flat tray.
Use a multi-purpose dry chemical or
foam-type fire extinguishe[
Flaming grease outside a pan can be put
out by covering it with baking soda or,
if available, by using a multi-purpose dry
chemical or foam-tgpe fire extinguisher.
Flame in the oven or warming drawer can
be smothered completely by closing the oven
door or drawer and turning the control to off
or by using a multi-purpose dry chemical or
foam-tgpe fire extinguisheE
;_i:,:Let the burner grates and other surfaces cool
before touching them or leaving them where
children can reach them.
;;i:,:Never block the vents (air openings)of the
range, They provide the air inlet and outlet
that are necessary for the range to operate
properlg with correct combustion. Air openings
are located at the rear of the cooktop, at the
top and bottom of the oven door, and at the
bottom of the range under the warming
drawer
;_i_,:Large scratches or impacts to glass doors
can lead to broken or shattered glass.
WARNING: NEVER use this
appliance as a space heater to heat or
warm the room. Doing so may result
in carbon monoxide poisoning and
overheating of the oven.
4
Page 5
ge.com
WARNING!
SURFACEBURNERS
Use proper pan size-avoid pans that are unstobfe or eosify tipped, Select cookware having flat
bottoms large enough to cover burner grates. To ovoid spiffovers, make sure cookware is large enough
to contain the food properly. This will both save cleaning time and prevent hazardous accumulations of
food, since heavy spattering or spiffovers left on range con ignite, Use pans with handles that con be
easily grasped and remain cool,
;_):,:Always use the LITE position when igniting the
top burners and make sure the burners have
ignited.
_t:::Never leave the surface burners unattended
at high flame settings. Boiloverscause smoking
and greasy spillovers that may catch on fire.
_t:::Adjust the top burner flame size so it
does not extend beyond the edge of the
cookware. Excessive flame is hazardous.
;_i:,:Use only dry pot holders- moist or damp pot
holders on hot surfaces may result in burns
from steam. Do not let pot holders come near
open flames when lifting cookware. Do not use
a towel or other bulky cloth in place of a pot
holder.
_i:,:When using glass cookware, make sure it
isdesigned for top-of-range cooking.
_t:::To minimize the possibilitg of burns, ignition
of flammable materials and spillage, turn
cookware handles toward the side or back
of the range without extending over adjacent
burners.
;_i:,:Carefully watch foods being fried at a high
flame setting.
:_ Always heat fat slowlg, and watch as it heats.
_t_:_Do not leave any items on the cooktop. The
hot air from the vent may ignite flammable
items and will increase pressure in closed
containers, which may cause them to burst.
_t::_Ifa combination of oils or fats will be used
in frying, stir together before heating or
as fats melt slowlg.
;_i:,:Use a deep fat thermometer whenever
possible to prevent overheating fat beyond
the smoking point.
_t::_Usethe least possible amount of fat for
effective shallow or deep-fat frying. Filling the
pan too full of fat can cause spillovers when
food is added.
;_):,:Do not flame foods on the cooktop. Ifyou do
flume foods under the hood, turn the fan on.
_t_:_Do not use a wok on the cooking surface
if the wok has a round metal ring that is
placed over the burner grate to support the
wok. This ring acts as a heat trap, which may
damage the burner grate and burner head.
Also, it may cause the burner to work
improperly. This may cause a carbon
monoxide level above that allowed by current
standards, resulting in a health hazard.
;_::,:Foods for frying should be as dry as possible.
Frost on frozen foods or moisture on fresh
foods can cause hot fat to bubble up and
over the sides of the pan.
_t_:_Never try to move a pan of hot fat, especially
a deep fat fryer, Wait until the fat is cool.
;_i:,:Do not leave plastic items on the cooktop-
they may melt if left too close to the vent.
;_::,:Keep all plastics away from the surface
burners.
_::To avoid the possibility of a burn, always be
certain that the controls for all burners are
at the OFF position and all grates are cool
before attempting to remove them.
_::If range is located near a window, do not hang
long curtains that could blow over the surface
burners and create a fire hazard.
;_i:,:If you smell gas, turn off the gas to the range
and call a qualified service technician. Never
use an open flame to locate a leak.
;_):,:Always turn the surface burner controls off
before removing cookware.
_:_Do not lift the cooktop. Lifting the cooktop
can lead to damage and improper operation
of the range.
Page 6

IMPORTANT SAFETY INFORMATION.
READ ALL INSTRUCTIONS BEFORE USING.
ELECTRICWARMING DRAWER
_t_:_The purpose of the warming drawer
isto hold hot cooked foods at serving
temperature. Alwags start with hot food;
cold food cannot be heated or cooked
in the warming drawer
_i:,:Do not use the drawer to drg newspapers.
If overheated, they can catch on fire.
_t_:_Do not leave paper products, plastics, canned
food, or combustible materials in the drawer.
_t_:_Never leave jars or cans of fat drippings in or
near your drawer
;_i:,:Do not warm food in the drawer for more
than two hours.
_ Do not touch the heating element or
the interior surface of the drawer. These
surfaces may be hot enough to burn.
REMEMBER"The inside surface of the drawer
may be hot when the drawer isopened.
_t_:_Use care when opening the drawer. Open
the drawer a crack and let hot air or steam
escape before removing or replacing food.
Hot air or steam which escapes can cause
burns to hands, face and/or eyes.
;_i:,:Do not use aluminum foil to line the drawer.
Foil is an excellent heat insulator and will
trap heat beneath it. This will upset the
performance of the drawer and it could
damage the interior finish.
COOKMEATAND POULTRYTHOROUGHLY...
Cook meat and poultry thoraughly-meat to at least an INTERNALtemperature of ff60°F and poultry
to at least an INTERNALtemperature of J80°E Cooking to these temperatures usually protects against
foodbome illness.
SELF-CLEANINGTHEOVEN
_::,:Besure to wipe off excess spillage before
self-cleaning operation.
_::,:Before self-cleaning the oven, remove any
broiler pan, broiler grid, all cookware and any
aluminum foil.
_::,:Oven shelves should be removed from the
oven before beginning the self-clean cycle.
_ Clean only parts listed in this Owner's Manual.
_t_::Do not clean the door gasket. The door gasket
is essential for a good seal. Care should be
taken not to rub, damage or move the gasket.
;_i:,:If the self-cleaning mode malfunctions,
turn the oven off and disconnect the power
supply. Have it serviced by a qualified
technician.
_t_::Do not use oven cleaners. No commercial
oven cleaner or oven liner of any kind should
be used in or around any part of the oven.
Residue from oven cleaners will damage the
inside of the oven when the self-clean cycle
is used.
6
Page 7

ge.com
OVEN
Stand away from the range when opening the door of a hot oven. The hot air and steam that escape
can cause bums to hands, face and eyes.
_::Do not use the oven for a storage area.
Items stored in the oven can ignite.
h_Keep the oven free from grease buildup.
_::Place the oven shelves in the desired position
while the oven is cool.
_i_,:Pulling out the shelf to the stop-lock is a
convenience in lifting heavy foods. It is also
a precaution against burns from touching hot
surfaces of the door or oven walls. The lowest
position is not designed to slide.
_::Do not heat unopened food containers.
Pressure could build up and the container
could burst, causing an injury.
WARNING: NEVERcoverany
slots, holes or passages in the oven bottom
or cover an entire rack with materials such
as aluminum foil. Doing so blocks air flow
through the oven and may cause carbon
monoxide poisoning. Aluminum foil linings
may also trap heat, causing a fire hazard.
_::Do not use aluminum foil anywhere in the
oven except as described in this manual.
Misuse could result in a fire hazard or
damage to the range.
_:::When using cooking or roasting bags in the
oven, follow the manufacturer's directions.
;;i:,:Donot useyour oven to dry newspapers.
If overheated, they can catch fire.
_::Useonly glass cookware that is recommended
for use in gas ovens.
_:_Always removeany broiler pan from range as
soon asyou finish broiling.Greaseleft in the
pan can catch fire if oven is usedwithout
removingthe greasefrom the broiler pan.
_t::_When broiling, if meat istoo closeto the flame
the fat may ignite.Trim excessfat to prevent
excessiveflare-ups.
_t:_makesureany broiler pan is in place correctlL
to reducethe possibilityof greasefires.
;;i:,:If you should have a greasefire ina broiler
pan,touch the Cleer/Offpad, and keep
the oven door closed to contain fire until
itburns out.
;_i:,:For safety and proper cooking performance,
always bake and broil with the oven door
closed.
;;i:,:The unit should not be operated in any mode
with the bake element removed.
READAND FOLLOW THISSAFETYINFORMATION
CAREFULLY.
SAVE THESE INSTRUCTIONS
Page 8
i
¢tl
i
.£
¢tl
O_
"o
Using the gas surface burners.
Throughout this manual, features and appearance may vary from your model.
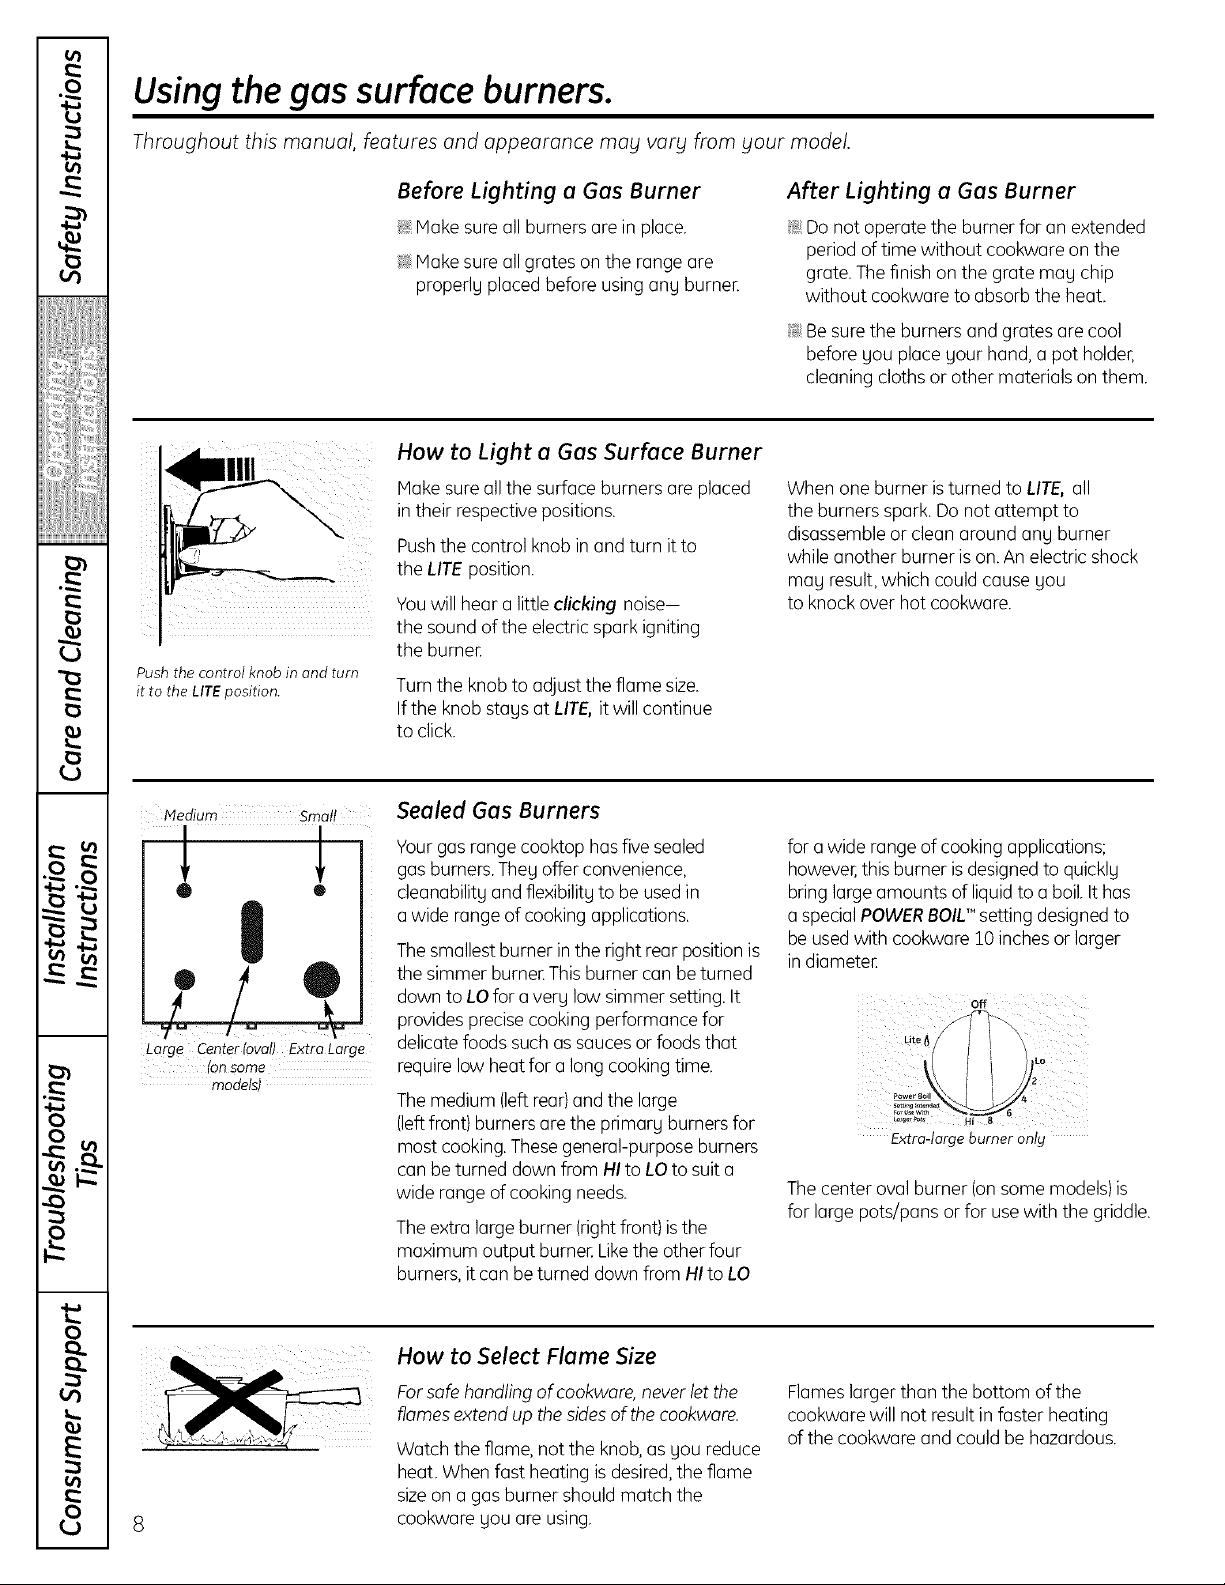
Push the control knob in and turn
it to the LITEposition.
Before Lighting a Gas Burner
!_,_Hake sureall burners arein place.
_: Make sure all grates on the range are
properly placed before using any burner:
How to Light u Gas Surface Burner
Hake sure all the surface burners are placed
in their respective positions.
Push the control knob in and turn it to
the LifE position.
Youwillhear a littleclicking noise-
the sound of the electric spark igniting
the burner:
Turn the knob to adjustthe flame size.
If the knob stagsat LifE, it will continue
to click.
After Lighting a Gas Burner
_ Donot operate the burner for an extended
period of time without cookware on the
grate. Thefinish on the grate may chip
without cookware to absorb the heat.
!i_:Be sure the burners and grates are cool
before gou place gour hand, a pot holder,
cleaning cloths or other materials on them.
When one burner isturned to LITE,all
the burners spark. Donot attempt to
disassembleor clean around ang burner
while another burner ison.Anelectric shock
mag result, which could cause gou
to knock over hot cookware.
Medium Small
v
u
v
!
Sealed Gas Burners
Yourgas range cooktop has five sealed
gas burners.Theg offerconvenience,
cleanabilitg andflexibilitgto beusedin
a wide range of cooking applications.
Thesmallestburner in the right rear positionis
the simmer burner:Thisburner can beturned
down to LOfor a verg low simmer setting. It
for a wide rangeof cooking applications;
however,this burner isdesignedto quicklg
bring large amounts of liquid to a boil. Ithas
a specialPOWERBOIU"setting designedto
be usedwith cookware 10inchesor larger
in diameter:
off
provides precisecookingperformance for
Large Center tovatl Extra Large
tonsom_
moaelsl
delicate foodssuchas saucesor foods that
requirelow heat for a long cooking time.
Themedium (leftrear)and the large
(leftfront) burnersare the primarg burners for
mostcooking. Thesegeneral-purpose burners
Extra-large burner ontg
can be turned down from HI to LOto suit a
wide range ofcooking needs.
The center oval burner (on some models)is
for large pots/pans or for use with the griddle.
The extra large burner (rightfront) is the
maximum output burner:Likethe other four
m
burners,it can beturned down from HI to LO
0
How to Select Flame Size
£a
Forsafe handling of cookware,never letthe
flamesextend up the sidesof thecookware.
Watch the flame,not the knob, as you reduce
o_
heat. When fast heating isdesired,the flame
Flames larger than the bottom of the
cookware will not result in faster heating
of the cookware and could be hazardous.
sizeon a gas burner should match the
0
8
cookware gou are using.
Page 9
i
€
Top-of-Range Cookware
Aluminum: Hedium-weight cookware is
recommended because it heats quickly
and evenly.Host foods brown evenly
in an aluminum skillet.Usesaucepanswith
tight-fitting lids when cooking with minimum
amounts of waten
Cast-Iron: If heated slowly,most skillets
will give satisfactorg results.
Enamelware: Undersome conditions,
the enamel of some cookware may melt.
Follow cookware manufacturer's
recommendations for cooking methods.
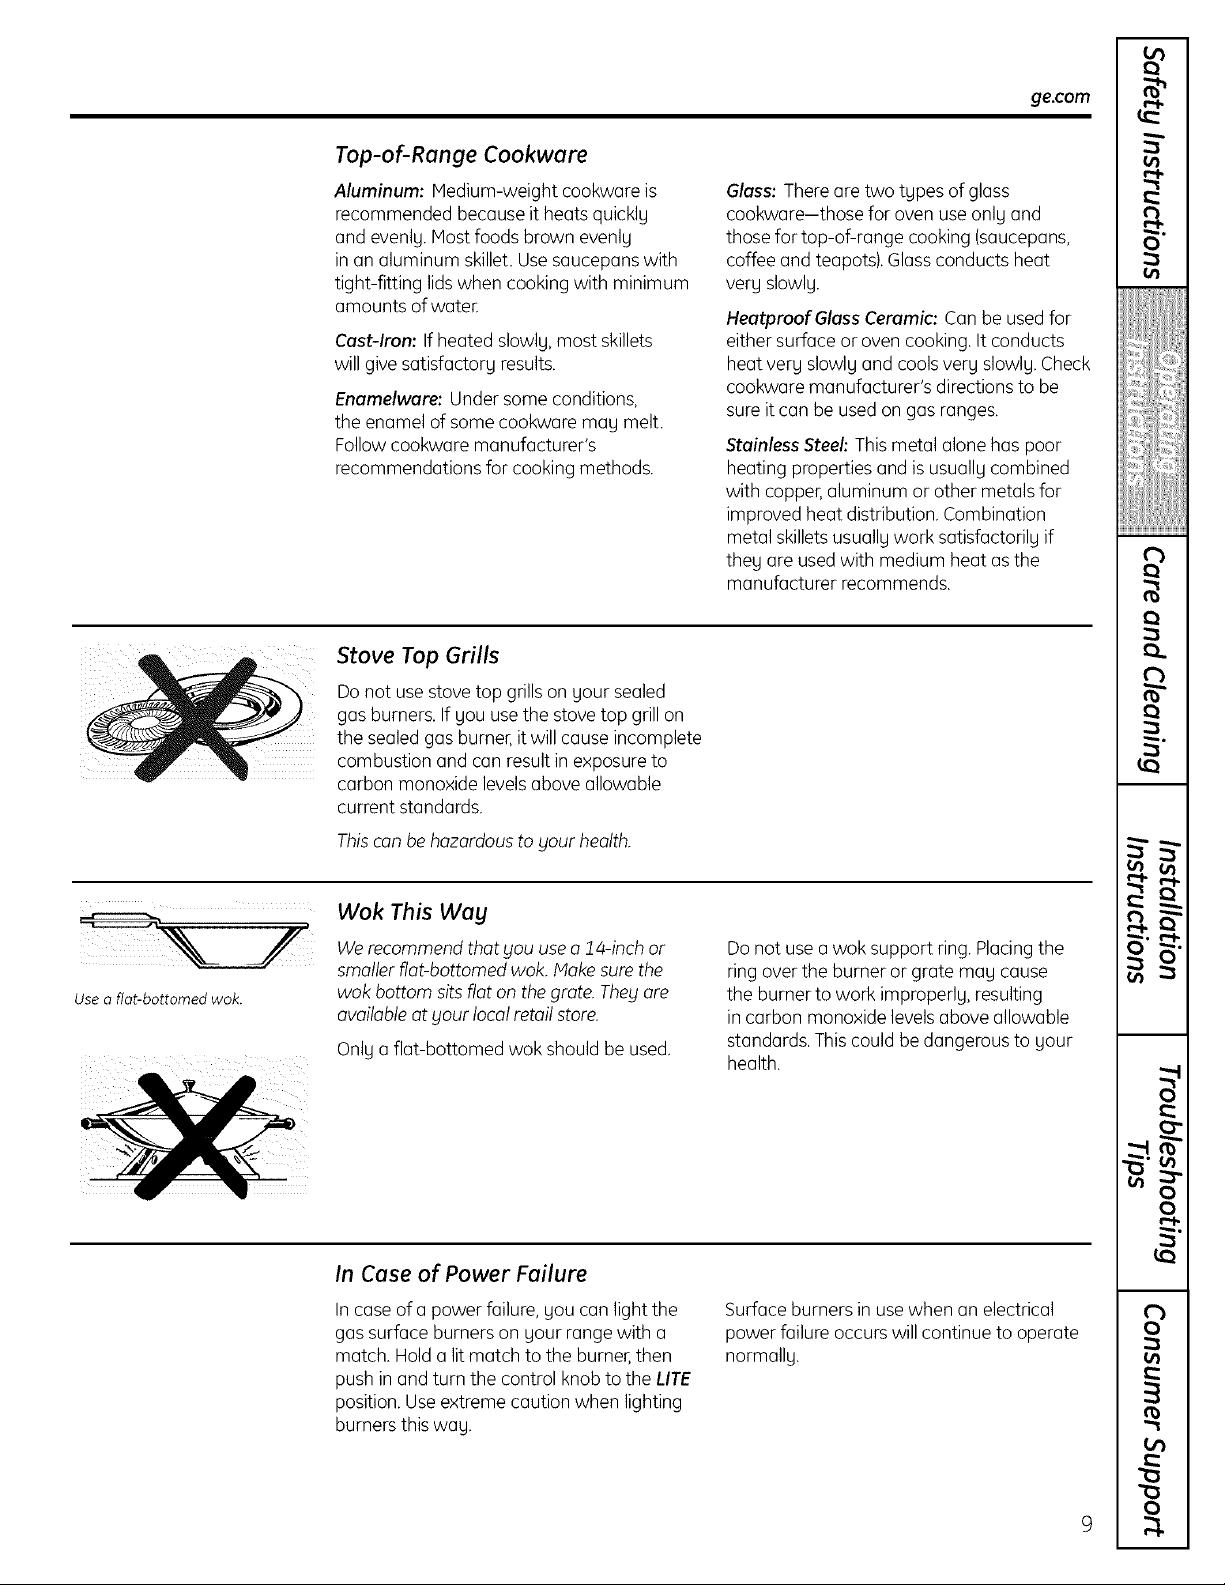
Stove Top Grills
ge.com
Glass: Therearetwo tgpes of glass
cookware-those for oven useonly and
those for top-of-range cooking (saucepans,
coffeeand teapots).Glassconducts heat
very slowly.
HeatproofGlass Ceramic: Can be usedfor
eithersurface or oven cooking. It conducts
heat very slowly and coolsverg slowly. Check
cookware manufacturer's directions to be
sureit can be usedon gas ranges.
Stainless Steel: Thismetal alone has poor
heating properties and is usually combined
with copper,aluminum or other metals for
improved heat distribution. Combination
metal skilletsusually work satisfactorily if
theg are usedwith medium heat asthe
manufacturer recommends.
r
€
f
f
€
€
m
f
Use a fiat-bottomed wok.
Donot use stovetop gnllsongour sealed
gas burners. If you use the stove top grill on
the sealed gasburner,it will cause incomplete
combustion and can result in exposure to
carbon monoxide levelsabove allowable
current standards.
Thiscan be hazardousto your health.
Wok This Way
Werecommend that you usea14-inch or
smaller fiat-bottomed wok. Hake surethe
wok bottom sits fiat onthe grate. Theyore
availableat your local retail store.
Only a flat-bottomed wok should be used.
In Case of Power Failure
In case of a power failure, you can light the
gas surface burners on your rangewith a
match. Hold a lit match to the burner,then
push in and turn the control knob to the LITE
position. Useextreme caution when lighting
burners this way.
Donot usea wok support ring. Placingthe
ring overthe burner or grate mag cause
the burner to work improperly, resulting
in carbon monoxide levelsabove allowable
standards.This could be dangerous to your
health.
Surface burners in usewhen an electrical
power failure occurswill continue to operate
normally.
f
q
v
€
€
€
1
€
i
€
I
€
r
Page 10
m
.o
m
a
vl (_
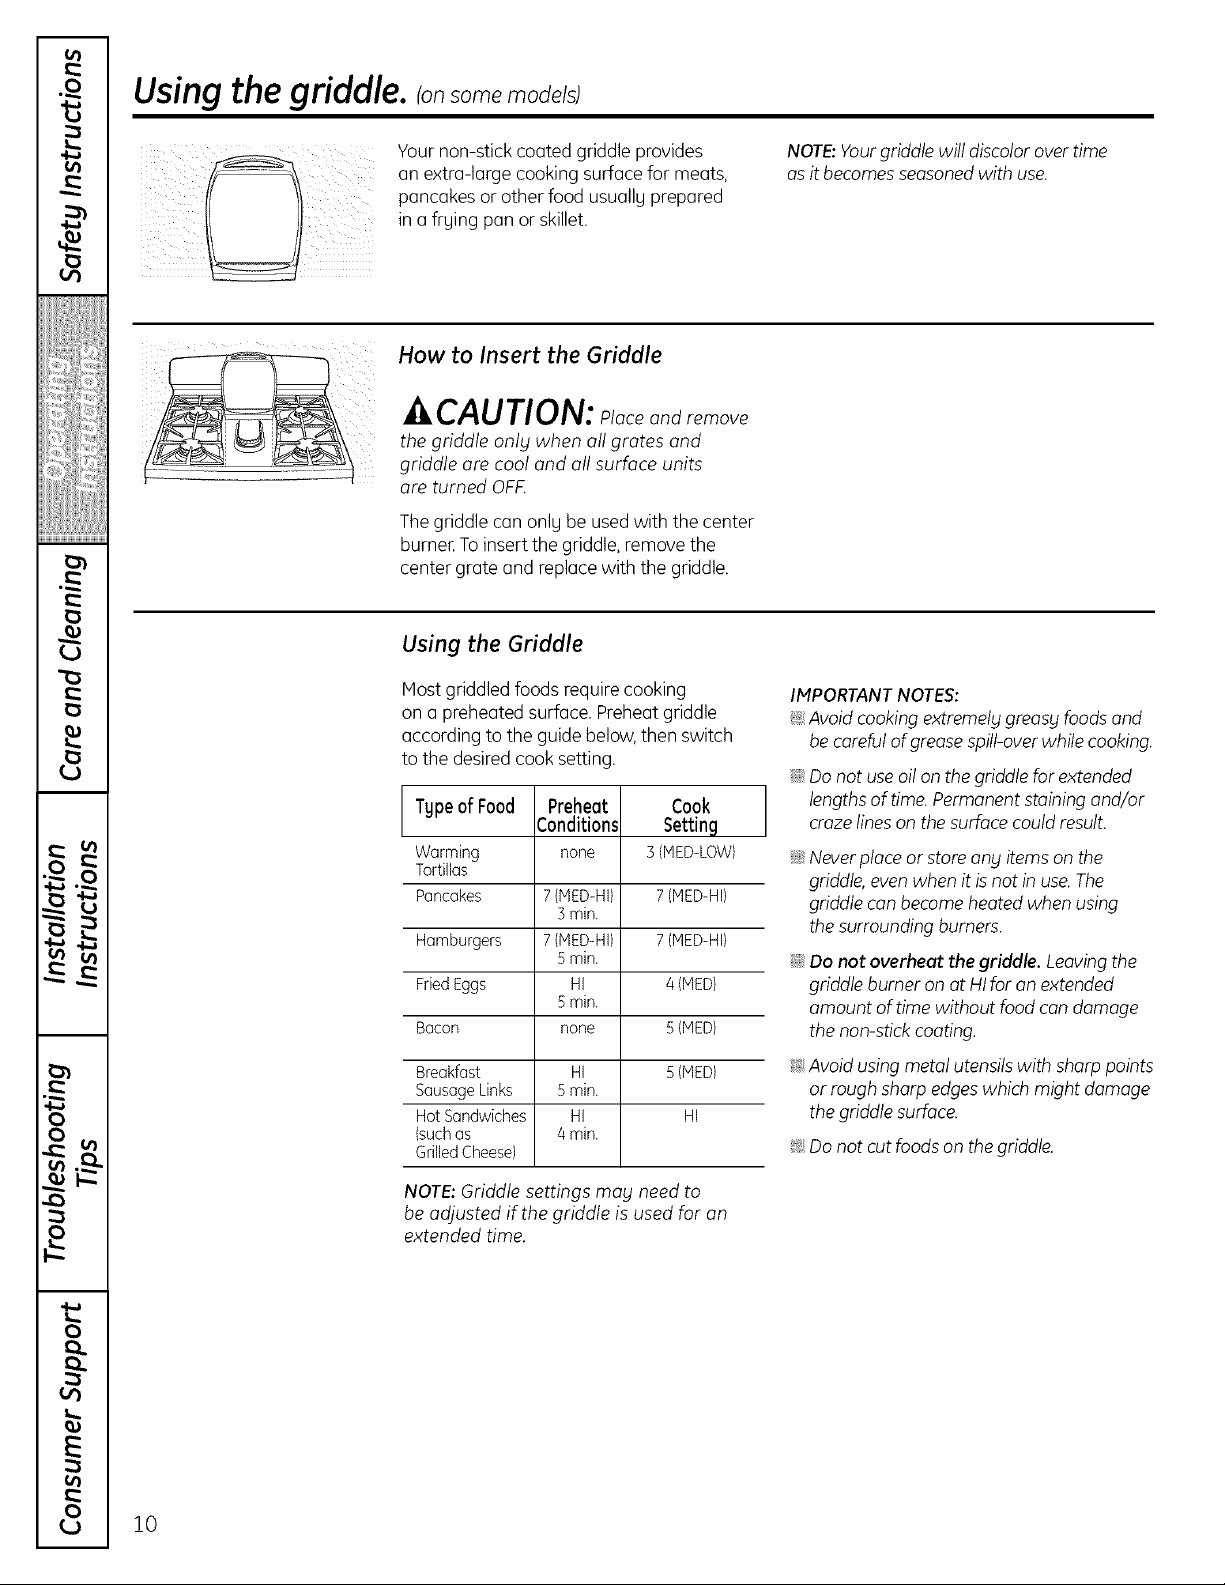
Yournon-stick coated griddle provides
an extra-large cookingsurface for meats,
pancakes or other food usually prepared
in afrying pan or skillet.
How to Insert the Griddle
A CAUTION: pUceandremove
the griddle only when all grates and
griddle are cool and all surface units
are turned OFF.
Thegriddle can only be usedwith the center
burner.To insertthe griddle,removethe
center grate and replacewith the griddle.
Using the Griddle
Mostgriddled foods require cooking
on a preheated surface. Preheatgriddle
according to the guidebelow,then switch
to the desiredcook setting.
Tgpeof Food Preheat Cook
Warming none 3 (HED-LOW)
Tortillas
Pancakes 7 (HED-HI) 7 (MED-HI)
Hamburgers 7 (MED-HI) 7 (MED-HI)
Fried Eggs HI 4 (PIED)
Bacon none 5(PIED)
Conditions Settinq
3min.
5min.
5min.
NOTE:Yourgriddle will discolorover time
asit becomesseasonedwith use.
IMPORTANTNOTES:
_:Avoid cookingextremel£greas£foodsand
be carefulofgreasesprayer while cooking.
::J_::Do not useoilon the griddle for extended
lengths of time.Permanentstaining and/or
crazelineson the surface couldresult.
::J_:,Neverplace or storean£items on the
griddle,even when it is not in use.The
griddle con becomeheated when using
the surrounding burners.
::Ji::Do not overheat the griddle. Leavingthe
griddle burner onat HIfor on extended
amount oftime without food can damage
the non-stick coating.
Breakfast HI 5(HED)
SausageLinks 5min.
HotSandwiches HI HI
(suchas 4rain.
GrilledCheese)
_:Avoid using metal utensilswith sharp points
or rough sharp edgeswhichmight damage
the griddle surface.
_:Do not cut foods on the griddle.
NOTE:Griddle settings ma£ need to
be adjusted if the griddle is used for an
extended time.
m
0
0
!0
Page 11
Using the oven controls.
[Throughout this manual, features and appearance may vary from your model.)
°
N CONTR( S___
[
Features, appearance
and pad locations
may vary.
HI/Lo
O,_/ OFF
SET WARMING DRAWER
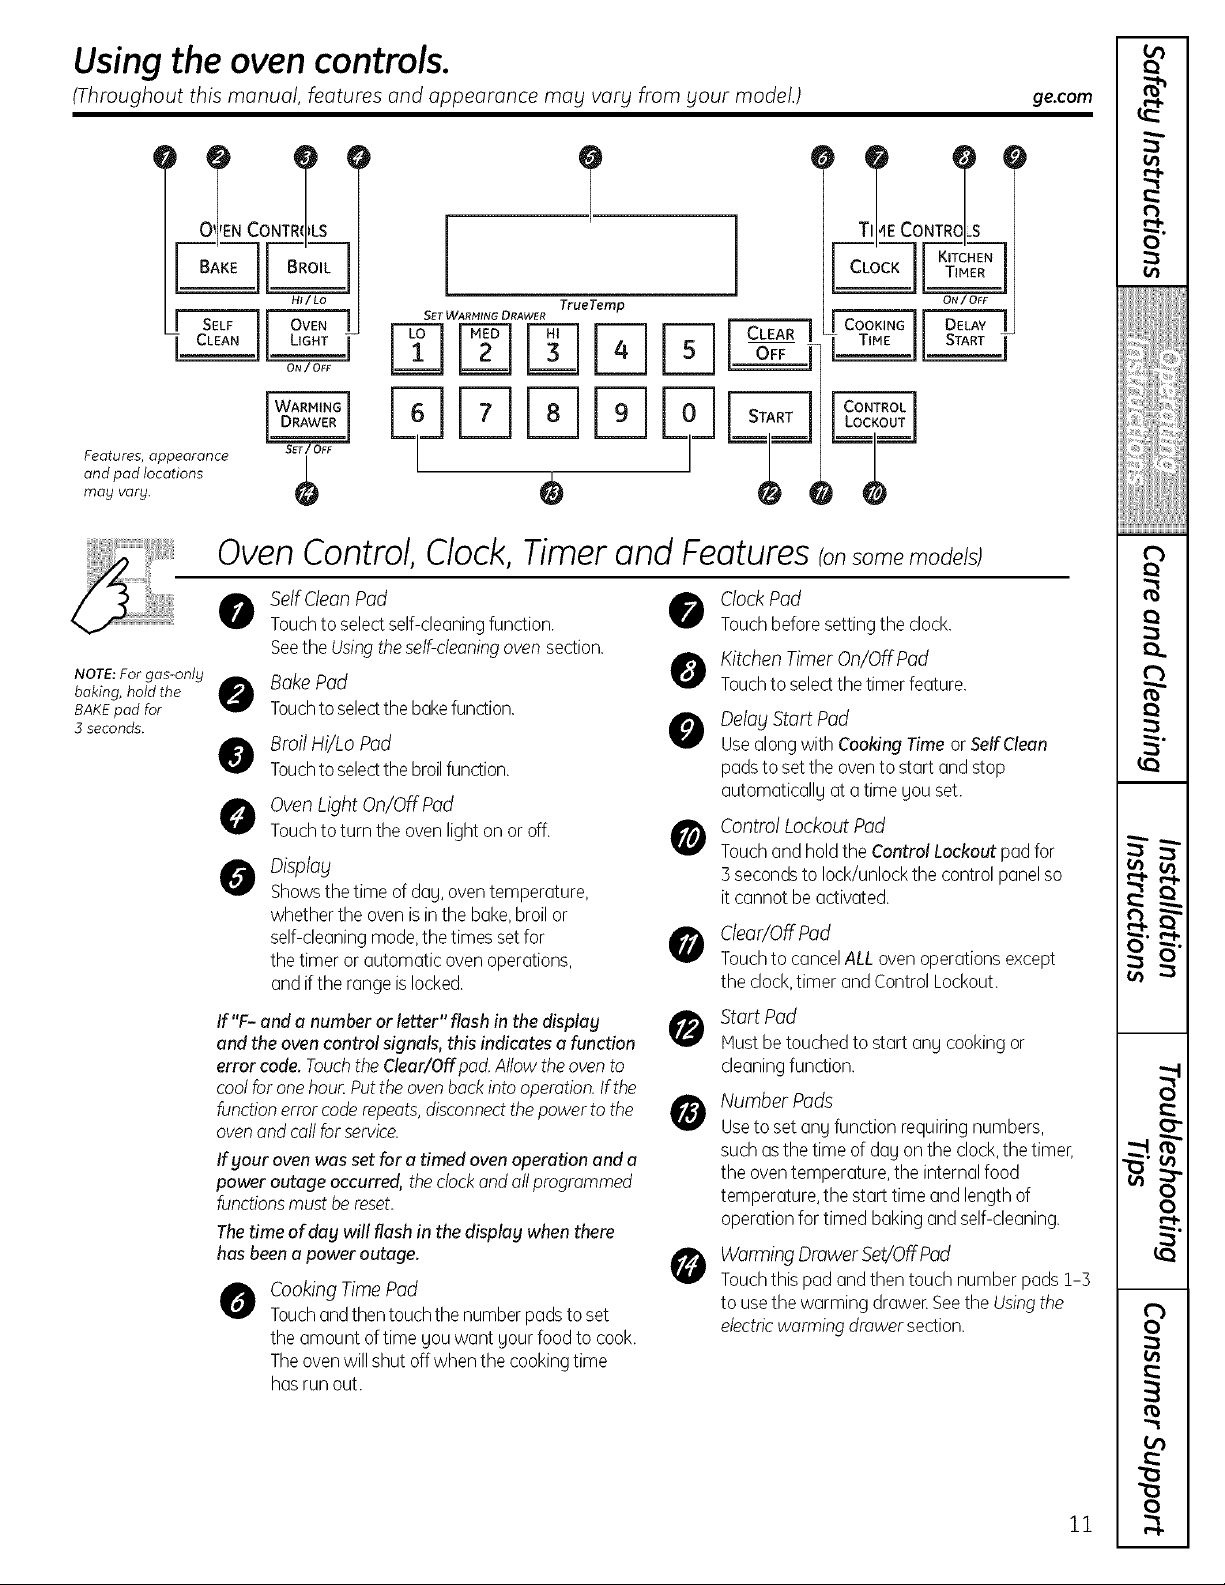
Oven Control, Clock, Timer and Features (onsome models)
TrueTemp
ge.com
i
€
t
€
r
f
€
€
i
(
NOTE:For gas-only
baking, hold the
BAKEpad for
5 seconds.
SelfCleanPad @
Touchto selectself-cleaningfunction.
Seethe Usingtheself-cleaningoven section.
@ BokePod 0
Touchtoselectthebakefunction.
Broil Hi/Lo Pad
Touchtoselectthebroilfunction.
OvenLight On/OffPad
Touchtoturn the ovenlighton or off.
Display
Showsthetime of day,oventemperature,
whetherthe ovenisinthe bake,broil or
self-cleaningmode,the timessetfor
thetimer or automaticovenoperations,
and ifthe rangeislocked.
If "F- and a numberor letter" flash in the display
and the ovencontrol signals, this indicatesa function
error code.TouchtheClear/Offpad.Allow theovento
coolfor onehour.Puttheovenbackinto operation.Ifthe
functionerrorcode repeats,disconnectthepowerto the
ovenand callforservice.
Ifsour oven was set for a timed oven operation and a
power outage occurred,the clockandall programmed
functionsmustbe reset.
The time of day will flash in the display when there
has been a power outage.
Cooking TimePad
0
Touchandthentouchthenumberpadsto set
the amount oftimeSouwant sour foodto cook.
Theovenwill shut offwhenthe cookingtime
hasrun out.
ClockPad
Touchbeforesettingthe clock.
Kitchen Timer On/Off Pad
Touchto selectthetimer feature.
Delay Start Pad
0
Usealong with CookingTimeorSelfClean
padsto set the ovento start andstop
automatically atatimeSouset.
Control Lockout Pod
Touchand holdthe Control Lockout padfor
3 secondstolock/unlockthe control panelso
it cannotbe activated.
Clear/OffPod
Touchto cancelALL ovenoperationsexcept
theclock,timer and ControlLockout.
Start Pad
Mustbetouchedto startany cookingor
cleaningfunction.
Number Pads
0
Useto set anyfunction requiringnumbers,
suchasthe time ofday onthe clock,the timer,
theoven temperature,the internalfood
temperature,thestart time andlengthof
operationfor timed bakingand self-cleaning.
Warming Drawer Set!OffPad
Touchthis padandthentouch numberpads1-3
to usethe warming drawer.Seethe Usingthe
electricwarmingdrawer section.
t
f
(
t
f
€l
i
w
(
€
€
1
€
€
I
11
€
i
i
Page 12
m
m
.o
Using the upper oven.
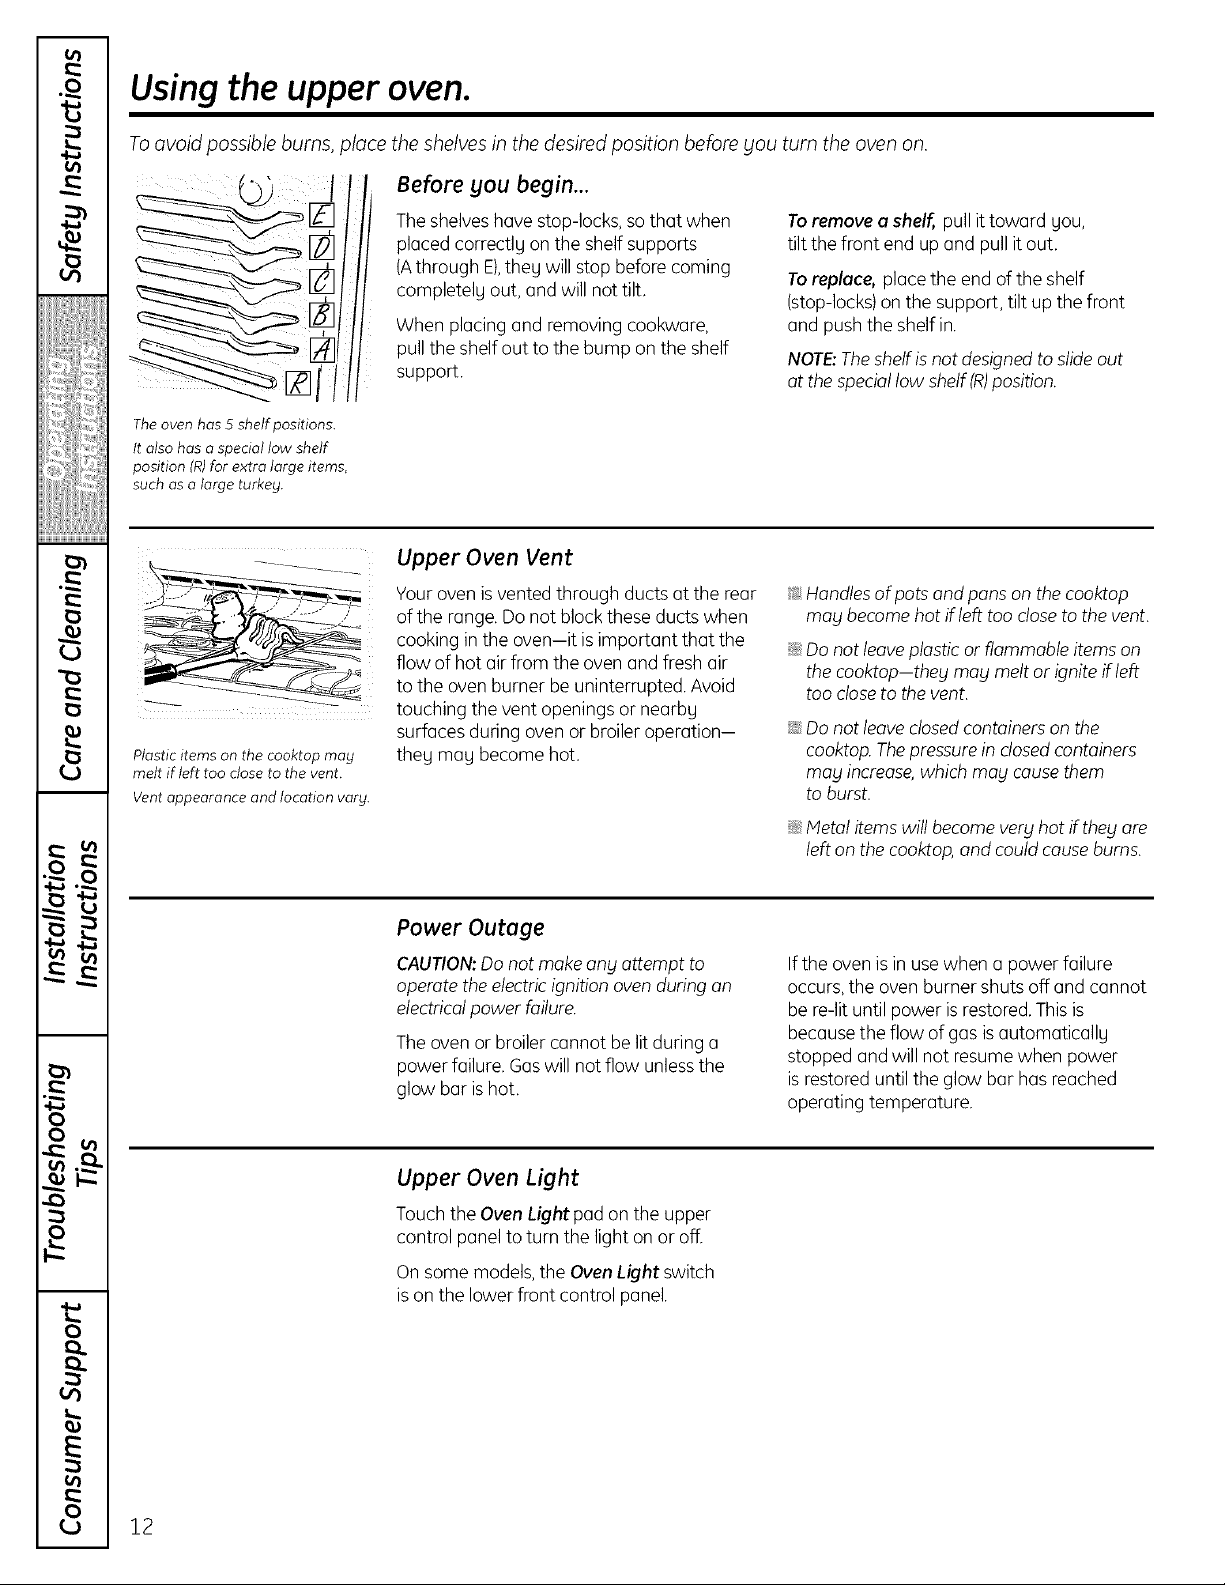
To avoid possible burns, place the shelves in the desired position before you turn the oven on.
(j>_) l
The oven has 5 shelf positions.
it also has a special low shelf
position (R)for extra large items,
such as a large turkey.
Z
Plastic items on the cooktop may
melt if left too close to the vent.
Vent appearance and location vary.
Before you begin...
The shelveshave stop-locks, sothat when
placed correctlg on the shelf supports
(Athrough E),theg will stop before coming
completelg out, and will nottill
When placing and removing cookware,
pull the shelf out to the bump on the shelf
support.
Upper Oven Vent
Youroven isventedthrough ducts at the rear
of the range.Donot block these ducts when
cooking in the oven-it isimportant that the
flow of hot airfrom the oven and fresh air
to the ovenburner be uninterrupted. Avoid
touching the vent openings or nearbg
surfaces during oven or broiler operation-
theg mag become hot.
Toremove a shelf, pull it toward gou,
tilt the front end up and pull itout.
Toreplace, place the end of the shelf
(stop-locks)on the support, tilt up the front
and push the shelfin.
NOTE:Theshelf isnot designedto slideout
at the speciallow shelf(R)position.
!i_:Handles ofpots and pans on the cooktop
mag become hot ifleft too closeto the vent.
iJi::Do not leave plastic or flammable items on
the cooktop-theg mag melt or ignite if left
too close to the vent.
::J_::Do not leaveclosedcontainers on the
cooktop. Thepressurein dosed containers
mog increase,which mog causethem
to burst.
ij_::Metal itemswill become verghot iftheg are
left on the cooktop,and couldcauseburns.
vl (_
m
t..
0
t..
0
12
Power Outage
CAUTION: Do not make any attempt to
operate the electric ignition oven during on
electrical power failure.
The oven orbroiler cannot be lit during a
power failure. Gaswill not flow unlessthe
glow bar ishot.
Upper Oven Light
Touch the OvenLightpad on the upper
control panel to turn the light on or off.
On somemodels,the OvenLight switch
ison the lower front control panel.
If the ovenis in usewhen a power failure
occurs,the oven burner shuts off and cannot
be re-lituntil power is restored.Thisis
because the flow of gas isautomaticallg
stopped and will not resumewhen power
is restored until the glow bar has reached
operating temperature.
Page 13
Using the upper oven. ge.com
i
€
I
t
!
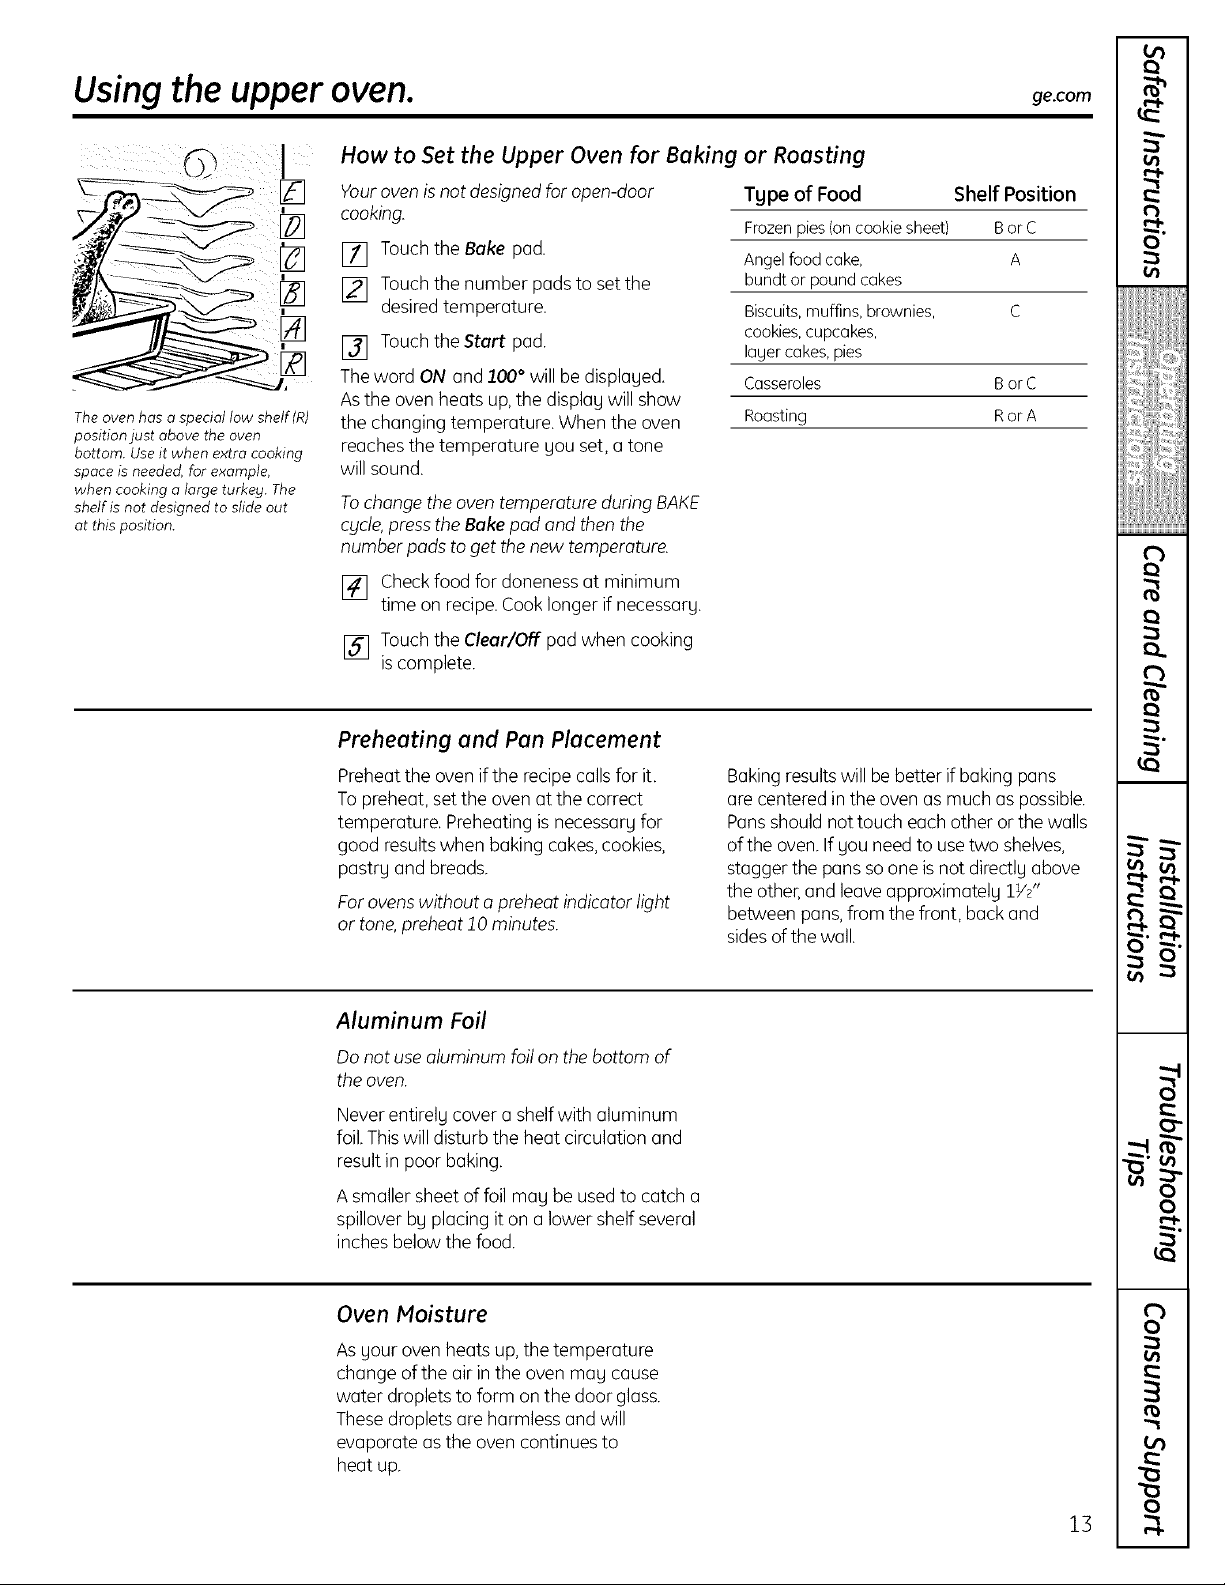
The oven has o special low shelf(R)
positionjust above the oven
bottom. Use it when extra cooking
space is needed, for example,
when cooking o large turke 9. The
shelf is not designed to slide out
at this position.
How to Set the Upper Oven for Baking or Roasting
Your oven is not designed for open-door
cooking.
[] Touch the Bake pad.
[] Touch the number pads to set the
desired temperature.
[] Touch the Start pad.
Theword ON and 100° will be displayed,
Asthe oven heats up,the display will show
the changing temperature. When the oven
reaches the temperature you set, a tone
will sound.
Tochange the oventemperature during BAKE
cycle,pressthe Bakepad and then the
number pods to get the new temperature.
[] Checkfood for donenessat minimum
time on recipe.Cooklonger if necessary.
[] Touch the Clear/Off pad when cooking
is complete.
Tgpe of Food Shelf Position
Frozenpies(on cookiesheet) Bor C
Angel food cake, A
bundt or pound cakes
Biscuits,muffins, brownies, C
cookies,cupcakes,
layer cakes,pies
Casseroles Bor C
Roasting Ror A
Preheating and Pan Placement
Preheat the oven ifthe recipe calls for it.
To preheat, set the oven at the correct
temperature, Preheating is necessary for
good results when baking cakes, cookies,
pastry and breads.
Forovens without a preheat indicator light
or tone, preheat 10 minutes.
Bakingresults will be better if baking pans
are centeredinthe oven as muchas possible.
Pansshould not touch each other or the walls
of the oven.If you needto usetwo shelves,
stagger the pans so one isnot directly above
the other,and leaveapproximately 1V2"
between pans,from the front, backand
sidesof the wall.
€
r
I
f
€
€
i
(
I
t
f
I
(
t
f
€l
i
Aluminum Foil
Do not use aluminum foilon the bottom of
the oven.
Never entirely covera shelfwith aluminum
foil.Thiswill disturb the heat circulation and
result in poor baking.
A smallersheetof foil may be usedto catch a
spillover by placing it on a lower shelf several
inches below the food.
Oven Moisture
Asyour ovenheats up, the temperature
change of the air in the oven may cause
water droplets to form on the door glass.
These dropletsareharmless and will
evaporate asthe oven continuesto
heat up.
13
w
(
€
€
1
€
€
I
€
i
r
i
Page 14
m
.o
13
e')
Using the oven.
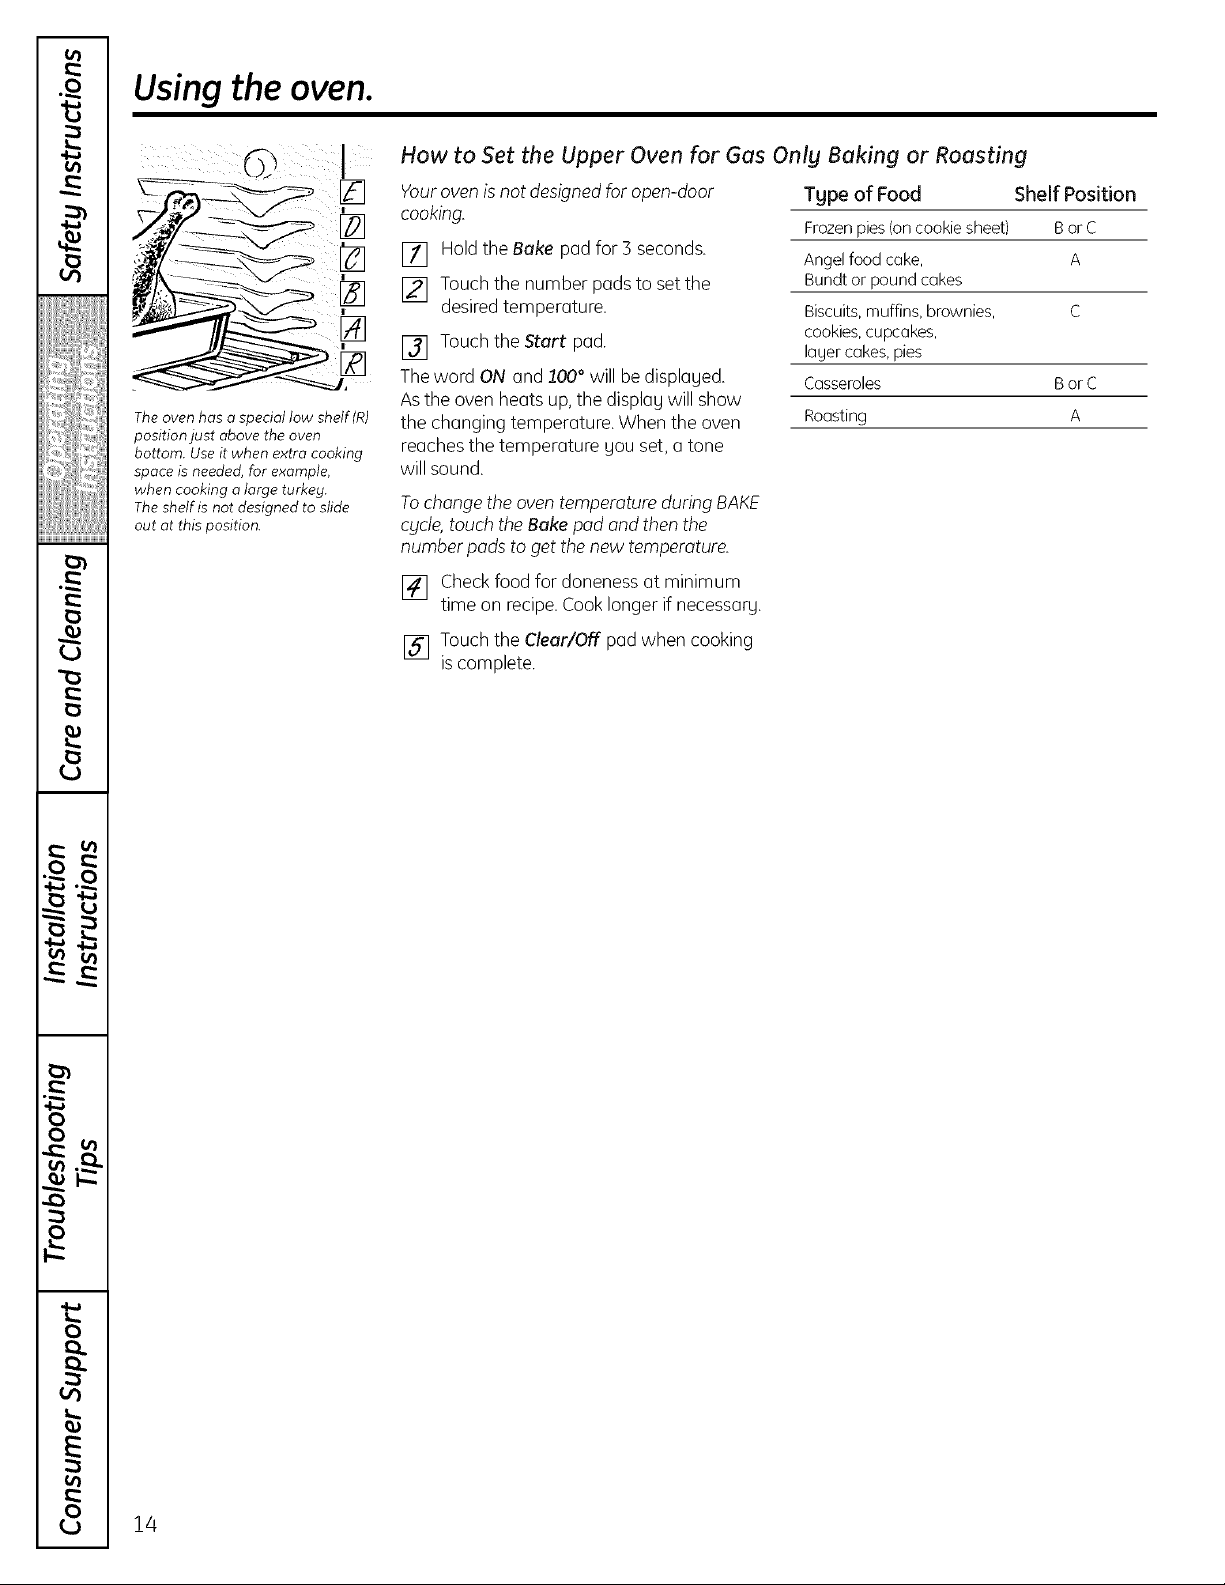
How to Set the Upper Oven for Gas Only Baking or Roasting
Yourovenis not designedfor open-door
cooking.
[] Hold the Beke padfor 3 seconds.
[] Touchthe number padsto set the
desiredtemperature.
Tgpe of Food Shelf Position
Frozen pies (on cookie sheet) Bor C
Angelfoodcake, A
Bundtor pound cokes
Biscuits, muffins, brownies, C
cookies,cupcakes,
[] Touchthe Start pad.
Theword ON and 100° will be displaued.
Iouer cakes, pies
Casseroles Bor C
Asthe oven heats up,the display will show
The oven has e special low shelf(R)
position just above the oven
bottom. Use it when extra cooking
space is needed, for example,
when cooking o large turkey.
The shelf is not designed to slide
m
out at this position.
the changing temperature. When the oven
reaches the temperature Uouset, a tone
will sound.
Tochonge the oventemperoture during BAKE
cgcle,touch the Beke pod ond then the
number pods to get the new temperoture.
Roosting A
[] Check food for doneness at minimum
time on recipe.Cooklonger if necessarg.
[] Touchthe Cleer/Off pad when cooking
"0
iscomplete.
vl (_
m
0
0
14
Page 15
ge.com
i
€
{
{
r
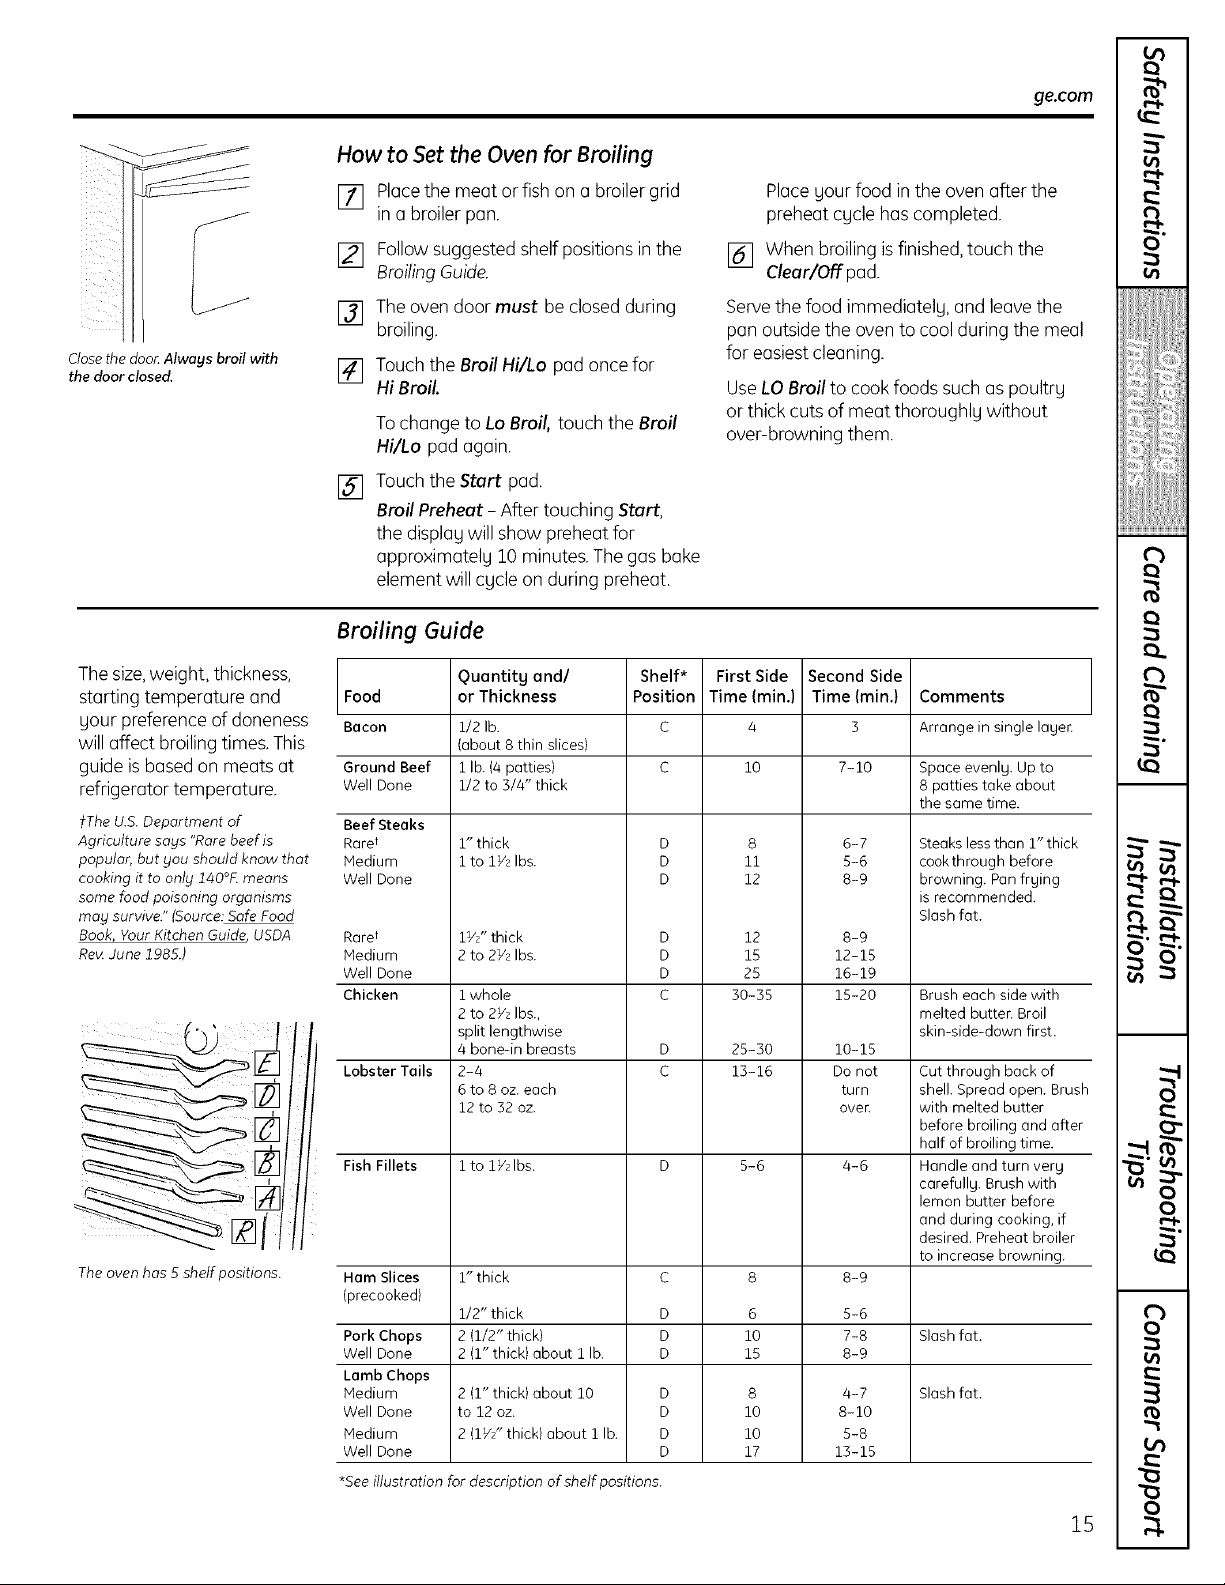
_iiiiI
Closethe doon Always broil with
the door closed.
Thesize,weight, thickness,
starting temperature and
gour preferenceof doneness
will affect broiling times. This
guide isbased on meats at
refrigerator temperature.
tThe U.S.Department of
Agriculture sags "Rare beef is
popular, but you should know that
cooking it to only 140°£ means
some food poisoning organisms
may survive." (Source: SafeFood
Book, Your Kitchen Guide, USDA
Rev.June 1985.)
The oven has 5 shelf positions.
How to Set the Oven for Broiling
[] Placethe meat or fish on a broiler grid
tn a broiler pan.
[] Follow suggested shelfpositionsin the
Broiling Guide.
[] The oven door must be closed during
broiling.
[] Touch the Broil Hi/Lo pad once for
Hi Broil.
To change to Lo Broil, touch the Broil
Hi/Lo pad again.
[] Touch the Start pad.
Broil Preheat - After touching Start,
the displagwill show preheat for
approximatelg 10 minutes. The gas bake
element will cgcle on during preheat.
Broiling Guide
Food
Bacon
Ground Beef
Well Done
Beef Steaks
Raret
Hedium
Well Done
Raret
Hedium
Well Done
Chicken
Lobster Tails
Fish Fillets
Ham Slices
(precooked)
Pork Chops
Well Done
Lamb Chops
Hedium
Well Done
Hedium
Well Done
*See illustration for description of shelf positions.
Quantitg and/
or Thickness
1/2 lb. C 4
(about 8 thin slices)
1 lb. (4 patties) C 10
1/2 to 3/4" thick
1" thick
i to 1V_Ibs.
1///' thick
2 to 2Vz Ibs.
i whole
2 to 2V_ Ibs.,
split lengthwise
4 bone-in breasts
2-4
6 to 8 oz. each
12 to 32 oz.
1 to 1Vz Ibs. D 5-6
1" thick C 8
1/2" thick D 6
2 (1/2" thick) D 10
2 (1" thick) about 1 lb. D 15
2 (1" thick) about 10 D 8
to 12 oz. D 10
2 (1V/' thick) about 1 lb. D 10
Shelf* First Side
Position Time (min.)
D 8
D 11
D 12
D 12
D 15
D 25
C 30-35
D 25-30
C 13-16
D 17
Placegour food in the oven after the
preheat cgcle has completed.
[] When broiling is finished,touch the
Clear/Off pad.
Servethe food immediatelg, and leavethe
pan outside the oven to cool during the meal
for easiest cleaning.
UseLOBroil to cook foods such as poultrg
or thick cuts of meat thoroughlg without
over-browning them.
Second Side
Time (min.)
7-10
6-7
5-6
8-9
8-9
12-15
16-19
15-20
10-15
Do not
turn
oven
4-6
8-9
5-6
7-8
8-9
4-7
8-10
5-8
13-15
Comments
Arrange in single lager.
Space evenlg. Up to
8 patties take about
the same time.
Steaks less than 1" thick
cookthrough before
browning. Pan frging
is recommended.
Slash fat.
Brush each side with
melted butter. Broil
skin-side-down first.
Cut through back of
shell. Spread open. Brusl
with melted butter
before broiling and after
half of broiling time.
Handle and turn verg
carefullg. Brush with
lemon butter before
and during cooking, if
desired. Preheat broiler
to increase browning.
Slash fat.
Slash fat.
15
€
f
I
f
(
€
m
(
{
{
{
{
(
{
{
II
v
(
(
€
1
€
i
€
l
I
t
Page 16
m
.9
13
(I)
Usingthe clock and timer.
Not all features are on all models.
(/1
To Set the Clock
m
"0
3
vl {_
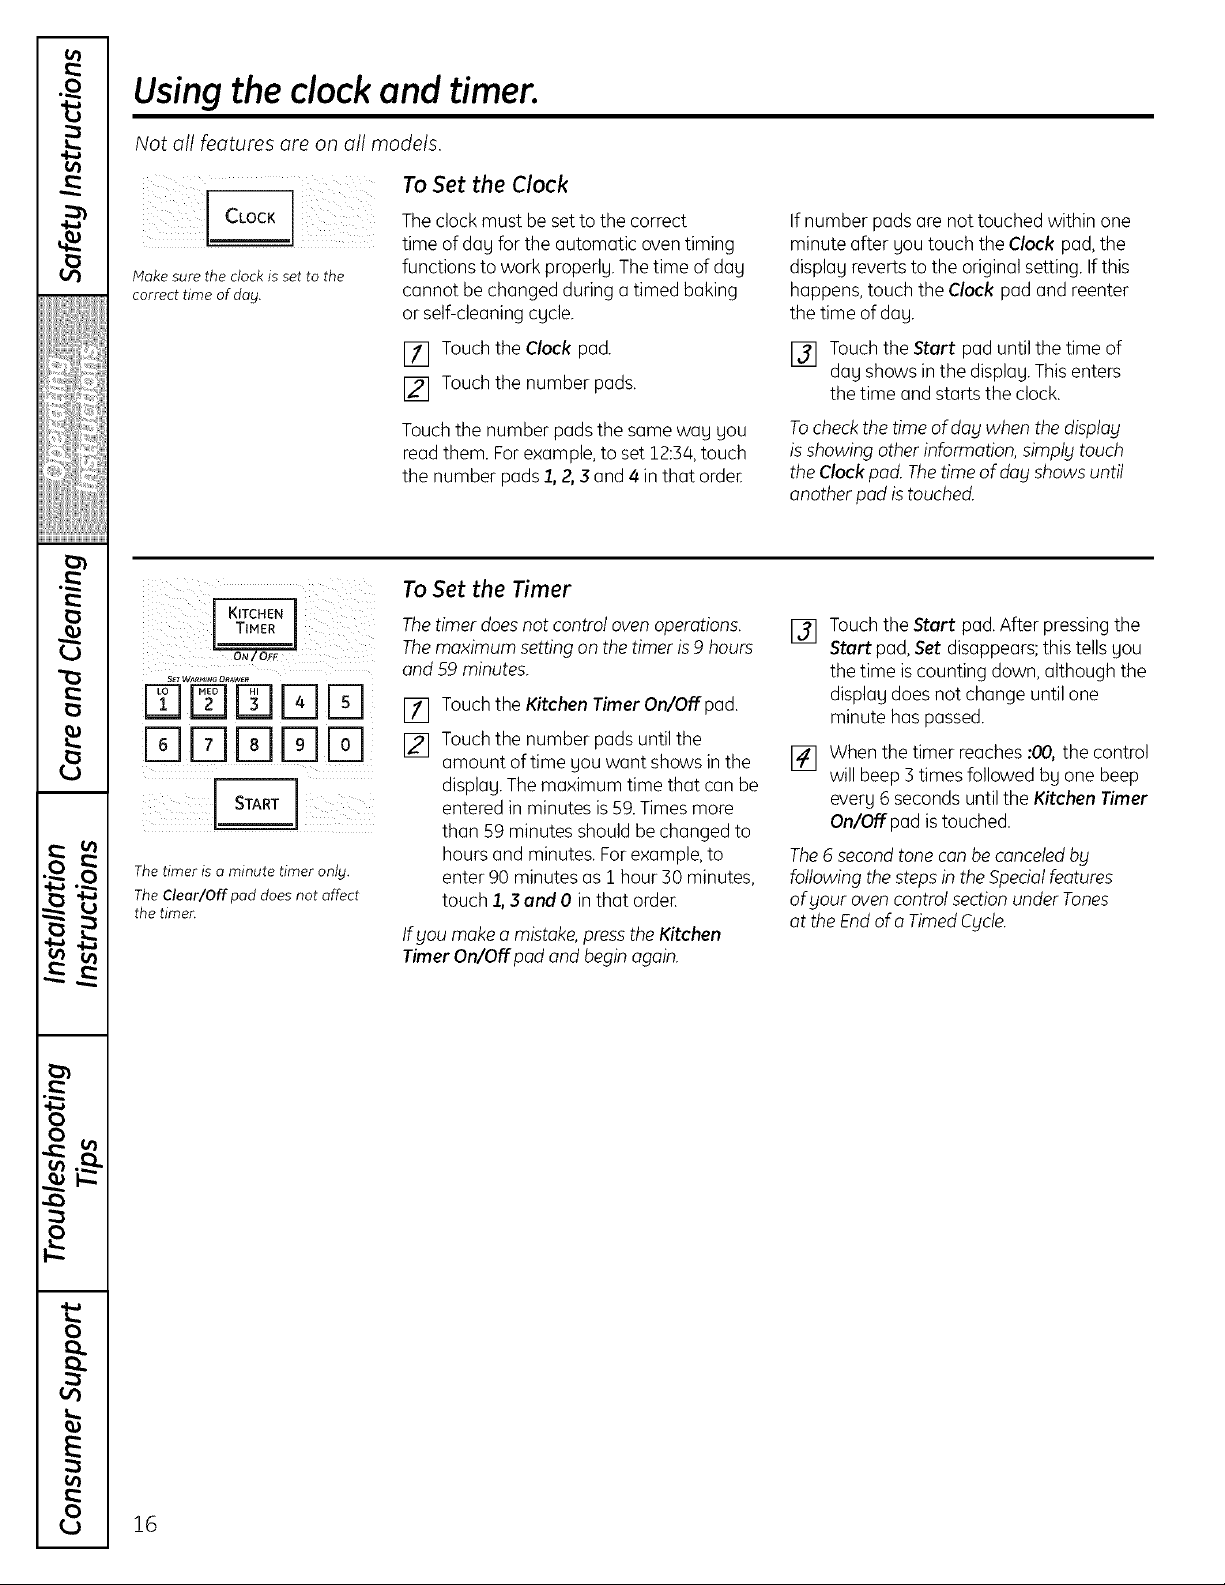
Make sure the clock is set to the
correct time of day.
s_ WA_M_N_O_AWE_
r [z]E]Fq
E]FqE]FqFq
The timer is o minute timer only.
The Clear/Off pod does not affect
the timer.
The clockmust be set to the correct
time of day for the automatic oven timing
functions to work properly. Thetime of day
cannot be changed during a timed baking
or self-cleaning cycle.
[] Touch the Clock pad.
[] Touch the number pads.
Touch the number pads the same way you
read them. Forexample, to set 12:38,touch
the number pads1,2,3 and 4 in that order
To Set the Timer
Thetimer does not control oven operations.
Themaximum setting on thetimer is9 hours
and 59 minutes.
[] Touch the Kitchen Timer On/Off pad.
[] Touch the number pads untilthe
amount oftime you want shows in the
display.The maximum time that can be
entered in minutes is59.Timesmore
than 59 minutes should be changed to
hours and minutes. Forexample,to
enter 90 minutes as 1 hour 30 minutes,
touch 2,3 and 0 in that order
Ifyou make a mistake,pressthe Kitchen
Timer On/Off pad and beginagain.
If number padsare not touched within one
minute after you touch the Clock pad,the
display reverts to the original setting. If this
happens,touch the Clock pad and reenter
the time of day.
[] Touch the Start pad until the time of
day shows inthe display.This enters
the time and starts the clock.
Tocheck the time of day when the display
isshowing other information, simply touch
the Clock pad.Thetimeof dog shows until
another pad istouched.
[] Touch the Start pad.After pressingthe
Start pad, Set disappears;this tells you
the time iscounting down, although the
display does not change until one
minute has passed.
[] When the timer reaches :00,the control
will beep 3 times followed by one beep
every 6seconds until the Kitchen Timer
On/Offpad istouched.
The6 secondtone con be canceledI_y
following the stepsinthe Specialfeatures
of your ovencontrol sectionunderTones
at the Endofa TimedCycle.
m
4_
0
0
16
Page 17

m
€
To Reset the Timer
Ifthe display isstillshowing the time
remaining, you may change it by touching
the Kitchen Timer On/Off pad, then touch
the number pads until the time you want
appears in the display.
To Cancel the Timer
Touchthe Kitchen Timer On/Off padtwice.
Power Outage
tf oflashingtime is in the display,you hove
experiencedo power failure.Resetthe clock.
ge.com
If the remaining time isnot inthe display
(clock,delay start orcooking time are in
the display),recallthe remaining time by
touching the Kitchen Timer On/Off pad
and then touching the number padsto
enter the new time you want.
Touch the Clock pad once to reset. Enter
the correct time of day by touching the
appropriate number pads.Touchthe
Start pad.
f
€
r
f
€
€
m
f
f
f
f
€l
w
17
€
€
€
€
€
f
"I
€
i
f
Page 18
i
¢tl
i
.£
¢tl
"o
"0
Using the timed baking and roasting features. Cupm on/y)
NOTE: Foods that spoil easily-such as milk, eggs, fish, stuffings, poultry and pork-should not be allowed to sit for
more than 1 hour before or after cooking. Room temperature promotes the growth of harmful bacteria. Be sure that
the oven light is off because heat from the bulb will speed harmful bacteria growth.
How to Set an Immediate Start and Automatic Stop
s_r WA_t_NeDRAWER
D D D E]D
%E]E]D D
COOKING
S_TW_RM_N_ DRAWE_
D E]E]E]D
Theupperovenwillturnonimmediotd£and
cookforo selectedlengthoftime.Attheendofthe
cookingtime,theovenwillturnoff automatically.
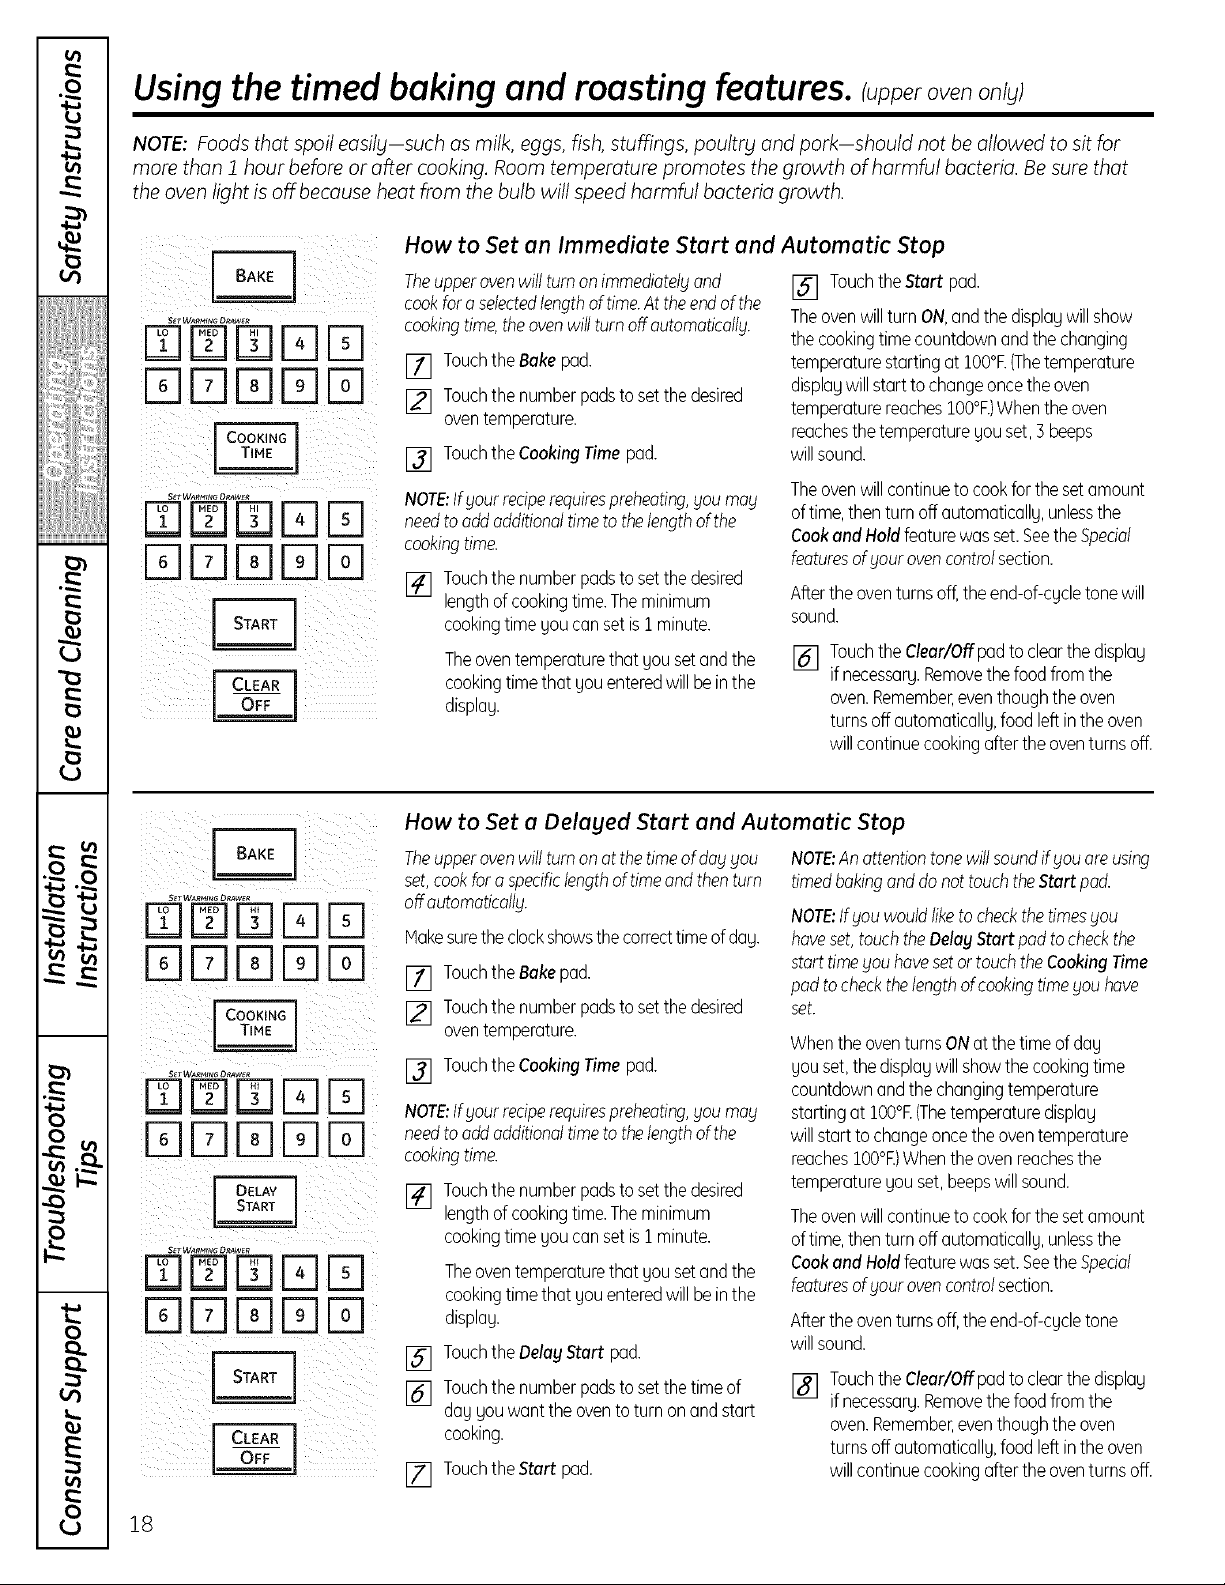
[] TouchtheBakepod.
[] Touchthenumberpodstosetthedesired
oventemperature.
[] TouchtheCookingTimepad.
NOTE:Ifyourreciperequirespreheating,you mo£
needtooddadditionaltimeto thelengthofthe
cookingtime.
[] Touchthenumberpadstosetthedesired
lengthofcookingtime.Theminimum
cookingtime youcan setisI minute.
Theoventemperaturethat yousetandthe
cookingtimethatyouenteredwillbeinthe
display.
[] TouchtheStart pad.
TheovenwillturnON,andthe displaywillshow
thecookingtimecountdownandthechanging
temperaturestartingatlO0°E(Thetemperature
displaywillstartto changeoncetheoven
temperaturereacheslO0°E)Whentheoven
reachesthetemperatureyouset,3 beeps
willsound.
Theovenwillcontinueto cookforthesetamount
oftime,thenturn offautomatically,unlessthe
CookandHoldfeaturewasset.SeetheSpedol
featuresof £ourovencontrolsection.
Aftertheoventurnsoff,theend-of-cycletonewill
sound.
[] TouchtheClear/Offpadto clearthedisplay
ifnecessary.Removethefoodfromthe
oven.Remember,eventhoughthe oven
turnsoffautomatically,foodleftinthe oven
willcontinuecookingafterthe oventurnsoff.
How to Set a Delayed Start and Automatic Stop
v
v
S_TWA_ D_AW_R
m
0
Theupperovenwillturnonatthetimeofdogyou
set,cookforo specificlengthoftimeandthenturn
offoutomoticollg.
Hakesuretheclockshowsthecorrecttimeofday.
[] TouchtheBakepad.
[] Touchthenumberpadstosetthedesired
oventemperature.
[] TouchtheCookingTimepad.
NOTE:IfFourreciperequirespreheating,pu may
needtooddadditionaltimeto thelengthofthe
cookingtime.
[] Touchthenumberpadstosetthedesired
lengthofcookingtime.Theminimum
cookingtime youcan setisI minute.
Theoventemperaturethat yousetandthe
cookingtimethatyouenteredwillbeinthe
display.
[] TouchtheDelayStart pad.
[] Touchthenumberpadstosetthetimeof
dayyouwantthe oventoturnonandstart
cooking.
[] TouchtheStart pad.
NOTE:Anattentiontonewillsoundifyou oreusing
timedbakinganddonottouchtheStartpod.
NOTE:Ifpu wouldliketo checkthetimesyou
haveset,touchtheDelayStart podtocheckthe
starttime£ouhavesetortouchtheCookingTime
podtocheckthelengthofcookingtime_louhave
set.
WhentheoventurnsONatthe timeofday
youset,thedisplaywillshowthe cookingtime
countdownandthechangingtemperature
startingat IO0°F.(Thetemperaturedisplag
willstart tochangeoncetheoventemperature
reachesIO0°F.)Whentheovenreachesthe
temperatureyou set,beepswillsound.
Theovenwillcontinueto cookforthesetamount
oftime,thenturn offautomatically,unlessthe
CookandHoldfeaturewasset.SeetheSpedol
featuresof pur ovencontrolsection.
Aftertheoventurnsoff,theend-of-cycletone
willsound.
[] TouchtheClear/Offpadto clearthedisplag
ifnecessarg.Removethefoodfromthe
oven.Remember,eventhoughthe oven
turnsoffautomatically,foodleftinthe oven
willcontinuecookingafterthe oventurnsoff.
_J
0
18
Page 19

i
€
Special features of your upper oven control.
ge.com
Yournew touch pad control hasadditional featuresthatyou may chooseto use.Thefollowing arethefeaturesand
how you may activate them.
Thespecialfeature modes can only beactivated while the display is showing the time of day. Theyremainin the
control'smemory until the stepsare repeated.
Whenthedisplay shows your choice,touch the Start pad. Thespecialfeatureswill remain inmemory after
a power failure.
12 Hour Shut-Off
Touch the Delay Start pad.Thedisplay
will show 12 shdn (12hour shut-off).
Touch the Delay Start pad again
and the display will showno shdn
(noshut-off).
Touch the Start pad to activate the no
shut-off and leavethe control set inthis
specialfeatures mode.
HI/Lo
With thisfeature,shouldyou forgetand leave []
off theovenoffer 12hoursduringbaking
functionsor after3hoursduringa broilfunction.
If you wish to turn OFF this feature, follow
the steps below. []
[] Touch the Bake and Broil Hi/Lo pads
at the sametime for 3 seconds untilthe
display shows SF.
Fahrenheit or Celsius Temperature Selection
HI/Lo
Hs/Lo
Yourovencontrol is setto usethe Fahrenheit
temperature selections,but you may change
this to usethe Celsiusselections.
[] Touch the Bake and Broil Hi/Lo pads [] Touch the Broil Hi/Lo and Cooking
at the sametime for 3 seconds untilthe Time pads again at the same time.
display shows SF. The display will show C (Celsius).
[] Touch the Broil Hi/Lo and Cooking
Time pads at the same time. The display
will show F (Fahrenheit).
€
€
r
f
(
€
i
(
€
f
(
€
!
€l
i
Hf/Lo
ON / OFF
Tones at the End of a Timed Cycle
At the end of a timed cycle,3 short beeps will
sound followed by one beep every 6 seconds
until the Cleor/Off pod is touched. This
continual 6-second beep may be canceled.
To cancel the 6-second beep:
[] Touch the Bake and Broil Hi/Lo pads
at the sametime for 3 seconds untilthe
display shows SF.
[] Touch the Start pad.
[] Touch the Kitchen Timer On/Off
pad,The display shows CONBEEP
(continual beep)and BEEP.Touch the
Kitchen Timer On/Off pad again. The
displag showsBEER(Thiscancelsthe
one beep everg6 seconds.)
[] Touch the Start pad.
19
w
(
(
€
1
(
(
I
"I
€
i
r
Page 20

i
g'l
.o
g'l
Special features ofgour ovencontrol.
Primary Bake Made Select
Theoven control isset to use the electricbake
and broil elementswhile baking,ttcan be
changedto useonlblthe gas bakeburoen
If you wish to switchto gas only,follow the
steps below.
[] Touch the Bake and Broil Hi/Lo pads
i i _i_i_ _i_ii_I_I_
at the same time for 3 seconds until the
display showsSF.
[] Touch the Bake and SelfClean pads
at the sametime.Thedisplay will show
BAKE2.
[] Touch the 9 pad and the displaywill
change to BAKE1.
[] Touch the Start pad.
!if:fill!
Broil Preheat
i
(,4
"0
Ht/Lo
Theoven isset to useBroil Preheatduring
Broiling.
If you wish to turn ONthis feature, follow the
stepsbelow.
[] Touch the Delay Start and Broil Hi/Lo
pads at the same time for 3 seconds
until the display shows SF.
[] Touch the Broil Hi/Lo and Delay Start
pads at the same time.Thedisplay will
show PrEON.
[] Touch the 9 pad and the displaywill
change to PrEOFI_
[] Touch the Start pad.
v
v
m
0
0
20
Page 21

ge.com
€
I CONTROL I
I'ocKooTI
_ii// i_ i_ i_ !ii_ii__/iiiii_
LCLocK
)i START
ii i i i i i i i i
Control Lockout
Yourcontrol will allow you to lockout the
touch padsso they cannot beactivatedwhen
touched or cleaningtheglasspanel.
To lock the controls:
[] Touch the Control Lockout pad for
5 seconds until the control beeps twice.
The display will show LOC continuouslg
and the time of day if not blacked out.
NOTE: All cooking and timing functions will be
cancelled when locking out the control.
12-Hour, 24-Hour or Clock Blackout
Yourcontrol is setto use a 12-hour clock.
If you would preferto have a 24-hour
military time clock or black out the clock
display,follow the stepsbelow.
[] Touchthe Bake and Broil Hi/Lo
pads at the same time for S seconds
until the display shows SF.
[] Touch and hold the Clock pad untilthe
display changes.The display will show
12hr. If this isthe choice you want,
touch the Start pad.
[] To unlock the control, touch the
Control Lockout pad for 5 seconds until
the control beepstwice, and LOC will
be removed from the display.
Touchthe Clock pad again to changeto the
24-hour military time clock.Thedisplay will
show24 hr. If this isthe choice you want,
touch the Start pad.
Touchthe Clock pad again to black out
the clock display.Thedisplay will show OFF.
If thisis the choice you want, touch the
Start pad.
NOTE:tfthe clockis inthe block-out mode,
blOUwill not be able to usethe DelayStart
function.
r
f
(
(
€
(
€
€l
Ht/Lo
Cook and Hold
Yournew control hasacookand hold
feature that keepscookedfoodswarm for
up to3 hours after the cooking function is
finished.
[
This feature can onlg be usedwhen timed
cooking.
To activate this feature,follow the steps
below.
[] Touchthe Bakeand Broil Hi/Lopads at
the same time for 3 seconds untilthe
displag showsSF.
[] Touch the Cooking Time pad.
The displagwill show Hid OFF.
Touch the Cooking Time pad again
to activate the feature. Thedisplagwill
show Hid ON.
[] Touch the Start pad to activate the
cook and holdfeature andleave the
control setin this specialfeatures mode.
21
w
(
€
€
(
"1
"1
€
i
r
Page 22

m
.o
Using the Sabbath Feature.
(Designed for use on the Jewish Sabbath and Holidays)
TheSabbath feature can be used for baking/roasting in the upper oven only. It cannot be used for broiling,
self-cleaning or Delay Start cooking.
NOTE:The oven light comes on automatically (on some models) when the door is opened and goes off when the door
is closed. The bulb may be removed. See the Oven Light Replacement section. On models with a light switch on the
control panel, the oven light may be turned on and left on.
How to Set for Regular Baking/Roasting
m
.£
"0
- ul
vl (_
=
m
4_
t..
0
Ht/Lo
S_r WARM_ DRAWER
mmND%
%N E]D D
When the display shows D the
oven is set in Sabbath. When the
display shows D c the oven is
baking/roasting.
IOAKEI+[0,O];:
HI/Lo
ill!_ _i_ iI TIME j_ _ii_iii _
$_TWAR_G DRaWeR
N rn[Z]53Fq
FqFq53D Fq
When the display shows _ the
oven is set in Sabbath. When the
displag shows _ c the oven is
baking/roasting.
Hake surethe clockshows the correcttime
of day andthe ovenis off
[] Pressand hold both the Bake and Broil
Hi/Lo pads,at the same time, until the
displag shows SF.
[] Tapthe DelagStart pad until
SAbbAtH appears in the displag.
[] Touchthe Start pad and D will appear
tnthe displag.
[] Touchthe Bake pad. No signalwill
be given.
Usingthe number pads,enter the
[]
desiredtemperature between 170°
and 550°.No signalortemperature
will be given.
[] Touch the Start pad.
[] After a random delag period of
approximatelg 30 secondsto 1 minute,
D c willappear in thedisplag,indicating
that the oven isbaking/roasting.IfD c
doesn't appear in the displag, start
again at Step4.
Toadjust the oven temperature, touch
the Bake pad, enter the new temperature
usingthe number pads and touch the
Start pad.
NOTE:The Clear/Off and Cooking Time pads
are active during the Sabbath feature.
How to Set for Timed Baking/Roasting-Immediate Start and Automatic Stop
Hake surethe clockshows the correcttime
of day and the ovenisoff
[] Pressand hold both the Bake and Broil
Hi/Lo pads,at the same time, until the
displag showsSF.
[] Tap the Delag Start pad until
SAbbAtH appears in the displag.
[] Touch the Start pad and _ will appear
in the displag.
[] Touch the Cooking Time pad.
[] Touch the number padsto set
the desiredlength of cooking time
between 1minute and 9 hours and
99 minutes.Thecooking time that gou
entered will bedisplaged.
[] Touch the Start pad.
[] Touch the Bake pad. No signalwill
be given.
[] Usingthe number pads,enterthe
desiredtemperature. No signalor
temperature will be given.
[] Touch the Start pad.
[] After a random delag period of
approximatelg30 secondsto 1 minute,
c will appear inthe displag,indicating
that the oven isbaking/roasting.If_ c
doesn'tappear in the displag,start again
at Step7.
Toadjust the oven temperature, touch
the Bake pad, enterthe new temperature
usingthe number pads and touch the
Start pad.
When cooking isfinished,the displag will
change from _ c to _ and 0:00 will appear,
indicating that the oven has turned OFF
but isstillsetin Sabbath. Removethe
cooked food.
t..
0
22
Page 23

i
Using the Sabbath Feature.
How to Exit the Sabbath Feature
[] Touch the Clear/Off pad.
[] If the oven iscooking,wait for a
random delay period of approximately
ffl/Lo
DELAY
START
START I
30 secondsto i minute, until only D is
in the display.
[] Pressand hold both the Bake andBroil
Hi/Lo pads,at the same time, untilthe
display shows SF.
ge.com
[] Tap the Delay Start pad until
12shdn or no shdn appears in the
display.12shdn indicates that the oven
will automatically turn off after 12
hours, noshdn indicatesthat the oven
will not automatically turn off.
[] Touch the Start pad.
NOTE:Ira power outage occurredwhile
the ovenwasin Sabbath,the ovenwill
outomoticallbtturn off and stagoffevenwhen
thepower returns.The ovencontrol must
be reset.
t"
r
I'
€
i
(
(
€l
i
w
(
€
€
1
23
{
l
"I
"I
€
i
r
i
Page 24

m
m
.o
"0
Adjust the upper oven thermostat--Do it gourselfi
Youmay find thatyour new ovencooksdifferentlythantheoneit replaced. Useyour newovenforafew weekstobecome
¢tl
morefamiliarwithit. Ifyou stillthinkgout new ovenistoo hotor too cold,you canadjustthethermostatyourself
Do not use thermometers, such as those found in grocery stores, to check the temperature setting of your oven.
These thermometers may vary 20-40 degrees.
NOTE; This adjustment will not affect the broiling or the self-cleaning temperatures. The adjustment will be retained
in memory after a power failure.
To Adjust the Thermostat
BAKE I "_ _
HI/Lo
5FT WARt4tNG DRAWER
E]E E E3E]
E]FqE E]E]
[] Touch the Bake and Broil Hi/Lo pads
at the same time for Sseconds until the
display showsSF.
[] Touch the Beke pad.A two digit number
shows in the display.
Touch Bake onceto decrease(-)
the oventemperature, or twice to
increase (+).
The oventemperature can be adjusted
[]
up as much as S5°Ror down asmuch
asS5°RTouch the number pads the
same way you read them. For example,
to change the oventemperature 15°F,
touch I and 5.
[] When you have made the adjustment,
touch the Start pad to go back to the
time of day display. Useyour ovenas
you would normally.
vl (_
m
s..
0
C).
Thetgpeof margarine will affect baking performance!
Most recipes for baking have been developed using high fat products such as butter or margarine (80% fat). If you
decrease the fat, the recipe may not give the same results as with a higher fat product.
Recipe failure con result if cokes, pies, pastries, cookies or candies are made with low fat spreads. The lower the fat
content of a spread product, the more noticeable these differences become.
Federalstandards require products labeled "margarine" to contain at least 80% fat by weight. Lowfat spreads,onthe
other hand, contain lessfat andmore water The high moisture content ofthese spreads affects the texture and flavor
of baked goods.Forbest resultswith your old favorite recipes,usemargarine, butter or stick spreads containing at least
70% vegetable oil.
0
L.J
24
Page 25

i
€
Using the electric warming drawer, consome
ge.com
The warming drawer will keep hot, cooked foods at serving temperature. Always start with hot food. Do not
use to heat cold food other than crisping crackers, chips or dry cereal.
To Use the Warming Drawer
[] Touch the Warming Drawer pad.
"Warm" and "1" are lit on the displag
and "Set"beginsto blink.
SET WARMING DRAWER
Onthe number pad,press1 for Low,
[] 2 for Medium or 3 for High.
The displag "1"changes corresponding
to the number pad selected.
[] Touch the Start pad.
"Warm" and the number remain lit.
"Set"stops blinking.
Tocancel, touch the Warming Drawer pad.
NOTE:Touching the Clear/Off pod does not
turn the worming drawer off
I Number Pad Setting I
i Lo(pies)
2 iVled(casseroles)
3 Hi(meats)
NOTES:
iJi::Thewarmingdrawercannotbeusedduringa
self-deancycle.
iJi::The warming drawerhas three settings:1, 2 and
3.These settings maintain differenttemperature
levelsin the warming drawer.
!_:_Onsome models, if using the oven at the same
time as the warming drawer,only the oven
settings willbe displayed.
When Using the Warming Drawer
t
€
r
f
!
€
i
t
f
The warming drawer willkeep hot, cooked
foods at serving temperature. Alwags start
with hot food. Donot use to heat cold food
other than crisping crackers, chips or drg
cereal.
Do not line the warming drawer or pan
with aluminum foil. Foil is on excellent heat
insulator and will trap heat beneath it. This
will upset the performance of the drawer
and could damage the interior finish.
Allow approximately 25 minutes for the
warming drawer to preheat.
::J_:,Do not put liquid orwater inthe
warming drawer
::J_:,For moist foods, coverthem with a lid
or aluminum foil.
i;_:,For crispfoods,leavethem uncovered.
?_:Food should be kept hot in its cooking
container or transferred to a heat-safe
serving dish.
CAUTION:Plastic containers or plastic wrap
will melt if in direct contact with the drawer,
pan or a hot utensil. Melted plastic may not
be removable and is not covered under your
warranty.
?_:Remove servingspoons,etc.,before
placing containers inwarming drawer
i
6"
w
t
f
€l
25
€
€
€
1
€
€
I
€
i
r
Page 26

i
.o
13
i
u'}
Using the electric warming drawer, consom
Temperature Selection Chart
ul
To keepseveraldifferentfoods hot, set
the control to the food needingthe highest
setting.
::Ji::The temperature, type and amount of
food, and the time held will affect the
quality of the food.
::Ji::Food in heat-safe glass and glass-ceramic
utensilsmay need a higher control setting
as compared to food in metal utensils.
?_:Repeatedopening of the drawer allowsthe
hot airto escapeand the food to cool.
::J_::Allow extra time for the temperature inside
the drawer to stabilize after adding items.
?_:With large loads it may be necessary to
use a higher warming drawer setting and
cover some of the cooked food items.
FoodType Setting
Bacon 3
Breads 2
Control
Casserole 2
Chicken,fried 3
Eggs,scrambled 2
Fish 3
Gravy, sauces 3
Ham 3
Huffins 2
Onionrings 3
Pies i
Pizza 3
Potatoes,baked 3
Potatoes,mashed 2
TortillaChips i
vl (_
5_:Do not use plasticcontainers or
plastic wrap.
To Crisp Stale Items
::Ji::Placefood in low-sided dishes or pans.
::Ji::Preheat on 1setting.
::J_::Check crispnessafter 45 minutes.Addtime
as needed.
To Warm Serving Bowls and Plates
To warm serving bowls and plates, set the
control on I..
::Ji::Useonly heat-safe dishes.
::J_::If you want to heat fine china, please
check with the manufacturer ofthe dishes
for their maximum heat tolerance.
_: Youmay warm empty servingdisheswhile
preheating the drawen
CAUTION:Disheswill behot. Usepot holders
or mitts when removing hot dishes.
CAUTION:Donot keepfood in the warming
drawer for morethan two hours.
i
t.
0
t.
0
26
Page 27

Using the self-cleaning oven. ge.com
i
€
{
{
r
The oven door must be closed and off controls set correctfg for the cycle to work properfg.
Before a Clean Cycle
Wipe up heovg soil on the oven
bottom.
Forthe first self-cleancgcle,we recommend
venting gour kitchenwith an open window or
usinga ventilation fan or hood.
Removeang broiler pan,broilergrid, all
cookware and ang aluminum foil from the
oven-theg cannot withstand the high
cleaningtemperatures.
NOTE:
?_:Ifgout oven is equipped with oven
shelves,remove them before gou begin
the self-clean cgcle.
Soilon the front frame of the range and
outside the gasket on the door will needto
be cleaned bg hand. Clean theseareaswith
hot water,soap-filled scouring pads or
cleanserssuch as SoftScrub1 Rinsewell
with clean water and drg.
Donot clean the gasket.Thefiberglass
material of the oven door gasket cannot
withstand abrasion. Itisessentialfor the
gasket to remain intact. If gou notice it
becoming worn or fraged, replaceit.
Wipe up any heavy spillovers on the oven
bottom.
Make surethe ovenlight bulb cover isin
place and the ovenlight isoff.
IMPORTANT:The health of some birds
isextremelg sensitive to the fumes given
off during the self-cleaningcycle of ang
range. Movebirds to another well ventilated
room.
NOTE: Use caution when opening the oven
after the self-dean cycle has ended. The oven
may still be hot.
CAUTION: The unit should not be operated in
any mode with the bake element removed.
€
f
{
f
(
€
i
(
{
{
{
{
(
{
{
SfT WARNinGD_AWFR
DDDDD
DD[-qDD
How to Set the Oven for Cleaning
[] Touch the SelfClean pad.
[] Usingthe number pads, enter the
desiredclean time, if atime other than
5 hours isneeded.
Cleancgcle time isnormullg 5 hours.
Youcon change the clean time to ang time
between 3 hours and 5 hours,depending on
how dirtg gour ovenis.
[] Touch the Start pad.
Thedoor locks automaticallg. Thedisplag
will show the cleantime remaining. It will
not be possibleto openthe oven door
until the temperature drops below the
lock temperature and the LOCKEDDOOR
light goes off.
When the LOCKEDDOORlightisoff,open
the dooE
The ovenshuts off automaticallg when the
cleancgcle is complete.
?_:Thewords LOCKDOORwill flash and
the oven control will signalif gou set
the clean cgcleand forget to close the
ovendoon
_Ji::To stop a clean cgcle,touch the Clear/Off
pad.When the LOCKEDDOORlightgoes
off,indicating the ovenhas cooled below
the lockingtemperature, open the door.
i
(st
v
Lc
(
(
€
{
27
(
i
(
I
(
r
i
Page 28

m
i
.9
L)
O_
O_
"o
"0
Using the self-cleaning oven.
The oven door must be closed and off controls set correctfg for the cgcfe to work properfg.
How to Delay the Start of Cleaning
_i i% L _ LLLLI ii
B3N FflE]Ffl
E]E]53E]53
SETwa_t_ OR,_WER
N N N N
Hake surethe clockshows the correct time
of day.
[] Touch the Self Clean pad.
[] Usingthe number pads,enter the
desiredclean time.
[] Touch the Delay Start pad.Theearliest
start time you can set will appear in the
display.
[] Usingthe number pads, enterthe time
of day you want the clean cycle
to start.
[] Touch the Start pad.
Thedoor locks automatically. Thedisplay will
show the start time. It will not be possibleto
open the oven door until the temperature
drops belowthe lock temperature and the
LOCKEDDOORlight goes off.
When the LOCKEDDOORlightis off, open
the dooE
%N %N N
After a Clean Cycle
P_
v
0
m
Youmay notice some white ash in the oven.
Wipe it upwith adamp cloth after the
oven cools.
tf white spotsremain, remove them with o
soap-filled scouringpodand rinse thoroughlg
i,ii
u
v
with a vinegarand water mixture.
Thesedepositsare usually a salt residue
that cannot be removed by the clean cycle.
Ifthe oven is not clean after one clean cycle,
repeatthe cycle.
!;_:You cannot set the oven for cooking until
the oven is coolenough for the door to
unlock.
?_:While the ovenis self-cleaning,you
can touch the Clock pad to display
the time of day.Toreturn to the clean
countdown, touch the Cooking Time pad.
?_:Ifthe shelvesbecome hard to slide,apply a
small amount of vegetable oilor cooking oil
to a paper towel and wipe the edgesofthe
oven shelveswith the paper towel.
o_
_J
0
o_
0
28
Page 29

Care and cleaning of the range, gecom
Besure electrical power is off and off surfaces are cool before cleaning an_tpart of the range,
If tjour range is removed for cleaning, servicing or any reason, be sure the anti-tip
device is re-engaged properly when the range is replaced. Failure to take this
precaution could result in tipping of the range and cause injury.
Sealed Burner Assemblies
//Electroae
Siae gra_e
0
Burner cad
Burner neaa
CooktoD
Turn all controls OFF before removing the
burner parts.
Theround side burner capsandburner
headscan be lifted off, making them easgto
clean.Theelectrodes are not removable.
Theoval center bumer head and cap
assemblg can be lifted off,making it easg
to clean.The burner electrode isnot
removable.
:iiliii i ii :iliii !
Center
/J gridd!e
Burner
[ .__ll_. Cap
_.9_ assemblg
Griddle (onsomemodels)
NOTES:
_ Thegriddle isto be usedover the center
burner onlb!.
!;_:_;Donot cleon thegriddlein o dishwasher.
_JWash with hot, soapgwater offereach use
while usingo sponge or dishcloth.
_ tf oilorfood residueis lefton thegriddle,
further cooking will harden the residueand
causesticking overtime.In this case,use o
non-abrasive deonsersuch asBanAmi®or
one of thesoft scrub cleansers.Apply with
o sponge,,scrunge®or othercleaningpad
labeledsafe for non-stickpans
_ Useonlbtplastic,nbllonor wooden utensils
or Silver.Stone®kitchentools toprevent
marring of the coating.
head and
^ CAUTION: onotoperatethe
cooktop without all burner parts and grates in
place.
The electrode of the spark igniter
isexposed when the burner head is
removed.When one burner isturned
to LifE, all the burners spark. Do not
attempt to disassemble or clean
around ang burner while another
burner ison. Anelectric shock maU
result,which could cause gouto knock
over hot cookware.
Griddle Precautions:
_ If something has spilledunder thegriddle,
it should becleanedup assoon aspossible
to prevent "bakedon" food soil.
_ Do not allow greaseto accumulate under
the griddle asit conbe o fire hazard.Cleon
under thegriddle as soonas it iscool.Cleon
with hot soopblwater
;;Ji:,Do not place b!ourgriddle in the microwave.
_ Always turn off oil surfaceburnersbefore
removing thegriddle. Usecaution when
handling o hot griddle.
;;Ji:,Neveruse knivesor cut foodon the griddle.
Wash with hot, soapywater offereach use.
`storecorefullgto prevent scratching.
29
Page 30

Care and cleaning of the range.
Burner Caps and Heads
Before removing the burner caps and heads,
remember their size and location. Replace
them in the same location offer cleaning.
NOTE:Do not use steel wool or scouring
powders to cleon the burner parts.
Burner caps
Liftoff when cool.Wash burner caps in hot,
soapg water and rinsewith clean wateEYou
mag scour with a plasticscouring pad to
remove burned-on food particles.
Burner Heeds end Oval (Centefl Burner
Burnerheods Heud/Cap Assemblg
The burner heads and the oval burner
head/cap assemblg are removable.
Simplg lift them off the range for cleaning.
For proper ignition, make sure the
small hole in the section that fits over the
electrode is kept open. A sewing needle
or wire twist-tie works well to unclog it.
Replacement
Burner Heads
Replaceburner headsover the electrodes
on the cooktop, in the correct locations
according to their size.Thereisone small,
one medium, one large and one extra large
burner head.
! cleanata,t,mesforanevenunhamperedTheslits in the burner headsmust be kept
d m . flame.
Simptg lift them off the range for
cleaning. Clogged or dirtg burner ports or electrodes
will not allow the burner to operate properlg.
Hole in
burner Ang spillon or around an electrode must
electrode with angthing hard or itcould be
damaged.
Cleanthe burner headsroutinelg, especiallg
after bad spillovers,which could clog the
dy e carefullg cleaned.Takecareto not hiton
openings. Liftoff when cool.
needle or twist-tie to Unclog the To remove burned-on food, soak the burner
smallholein theburnerheads, headsin a solution of mild liquid detergent
and hot water for 20-30 minutes. Formore
stubborn stains,usea toothbrush.
After cleaning
Before putting the burner caps, heads and
oval head/cap assemblg back, shake out
excess water and then drg them thoroughlg
bg setting in a warm oven for 30 minutes.
Oval (Centefl Burner Head/Cap
Assemblg
Replace the oval (center) head/cap assemblg
over the electrode on the cooktop.
Oval head and Cap Make Sure the Slot in
assemblg the burner head is
S--_ positioned over the
l 1 electrode
Front of range Electrode
Caps
Replacethe matching sizecaps onto the
burner basesorheads.
30
2p
Front of range cap
Hake surethat the headsand caps are
replacedin the correct locations.
Page 31

Burner Grates
ge.com
i
i ii i i
Appearance may vary.
The grates may be cleaned in a
dishwasher.
Left Front Center Right Fronl
Your range has three professional-stgle
double grates. These grates are position-
specific. For maximum stabilitg, these
grates should onlg be used in their proper
position; theg cannot be interchanged left to
right or front to back. For convenience, the
undersides of the left and right grates are
marked "LEFTFRONT"and "RIGHTFRONT."
Hake sure the front portion of both grates is
infront. The middle grate has a bow infront.
Hake sure the bowed portion is toward the
front of the range.
Cleaning
Liftout when cool. Grates should be washed
regularlg and, of course, after spillovers.
Wash them in hot, soapg water and rinse
with clean wateE When replacing the grates,
be sure theg are positioned securelg over
the burners. Replace the grates so that
continuous arcs are formed with the
center ribs of all three grates.
Cooktop Surface
Donot operate a bumer for an extended
period of time without cookware on the grate.
Thefinish on the grate mag chip without
cookwareto absorb the heat.
Toget rid of burned-on food, place the grates
in acovered containeEAdd 1/4 cup ammonia
and let them soak severalhours or overnight
Wash, rinsewell and drg.
Although theg are durable,the grates
will graduallg losetheir shine,regardless
ofthe best care gou can give them. This
isdue to their continual exposureto high
temperatures. Youwill noticethis sooner
with lighter color grates.
NOTE:Do not clean the grates in a
self-cleaningoven.
To avoid damaging the porcelain enamel
surface of the cooktop and to prevent it
from becoming dull,clean up spillsright
awag. Foodswith a lot of acid (tomatoes,
sauerkraut, fruit juices,etc.)orfoodswith
high sugar content could cause a dull spot
if allowed to set.
When the surface has cooled,wash and
rinse.Forother spillssuch asfat spatterings,
etc.,wash with soap and water once the
surface has cooled.Then rinseand polish
with a drg cloth.
Stainless Steel Surfaces Ionsomemodels)
Do not use u steel wool pad; it will scratch
the surface.
To cleanthe stainlesssteel surface, use
warm sudsg water or astainlesssteelcleaner
or polish.Alwags wipe the surface in the
direction of the grain. Followthe cleaner
instructions for cleaningthe stainlesssteel
surface.
NOTE:Do not store flammable materials
in an oven,drawer or near thecooktop.
Donot store oruse combustiblematerials,
gasoline or other flammable vapors and
liquidsin the vicinitblofthis or any other
appliance.
NOTE:Do not liftthe cooktop. Lifting the
cooktop can lead to damage and improper
operation of the range.
To inquire about purchasing stainlesssteel
appliance cleaner or polish,orto find the
location of a dealer nearest gou, please call
our toll-free number:
National Parts Center 800.62&2002 (U.SJ
888.261.3055(Canada)
ge.comIU.S.)
www.GEAppliances.ca (Canada)
31
Page 32

Care and cleaning of the range.
Oven Air Vents
Never blockthe vents (airopenings) of the
range.Theg provide the air inlet and outlet
that are necessarUfor the range to operate
properlg with correct combustion.
Vent appearance and location vor 9.
fgl {k x x x
Surface burner knob
Air openings are located at the rear of
the cooktop, at the top and bottom of the
oven door,and at the bottom of the range,
under the warming drawer:
Control Panel
Onmodels soequipped,lockout the touch
pods beforecleaning.
Seethe ControlLockout information in the
Specialfeatures ofgout ovencontrol section
in this manual.
Cleanup splatters with a damp cloth.
Lower Control Panel (Front Manifold
It'sagood idea to wipe the control panel
after each useof the oven. Usea damp cloth
to clean or rinse.Forcleaning, usemild soap
and water ora 50/50 solution of vinegar and
water Forrinsing, usecleanwater Polishdrg
with a soft cloth.
Donot use abrasive cleansers,strong liquid
cleaners,plastic scouring pads or oven
cleaners onthe control panel-they will
damage the finish.
Donot trg to bend knobs bg pullingthem up
or down or bg hanging a towel or other such
loads.This can damage the gas valve shaft.
You mag also use a glass cleaner:
Removeheavier soilwith warm soapg water
Donot useabrasives of ang kind.
Unlockthe touch pads after cleaning.
Pane and Knobs
Thecontrol knobs mag be removedfor easier
cleaning.
Make surethe knobs areinthe OFFpositions
and pullthem straight off the stemsfor
cleaning.
Theknobs can be cleaned in a dishwasher
or theg mag also be washed with soapand
water:Make surethe insidesof the knobs are
drg before replacing.
Replacethe knobs in the OFFposition
to ensure proper placement.
Metal parts can be cleanedwith soap and
water Do not use steel wool, abrasives,
ammonia, acids or commercial oven
cleaners.Dry with a soft cloth.
32
Page 33

Lift the door straight up and off the
hinges.
Thegasket is designed with a gap
at the bottom to aJJowfor proper
air circulation.
Do not rub or clean the door
gasket-it has an extremely low
resistance to abrasion.
If gou notice the gasket becoming
worn, frayed or damaged in any
way or if it has become displaced
on the door, you should have it
replaced.
Lift-Off Oven Door
Theoven door isremovable,but it is heavy.
Youmay need helpremovingandreplacing
the doon
Toremove the door, open it a few inchesto
the special stop position that will hold the
door open.Grasp firmlg on each sideand lift
the door straight upand offthe hinges.
NOTE:Be careful not to place handsbetween
the hinge and the oven door frame asthe
hinge couldsnap backandpinch fingers.
Toreplace the door, makesurethe hinges
are inthe special stop position.Positionthe
slotsin the bottom ofthe door squarelgover
the hinges.Then lower the door slowlg and
evenlg over both hinges at the same time. If
the hinges snap back against the oven frame,
pull them backout.
Tocleon the inside of the door:
?_:Do not allow excesswater to run into
ang holes or slotsinthe door.
::J_::Becausethe area inside the gasket is
cleaned during the selfclean cgcle,gou do
not need to cleanthis bg hand. Ang soap
left onthe liner causesadditional stains
when the oven isheated.
ge.eom
?_:Thearea outside the gasket can be
cleaned with a soap-filled plastic
scouring pad.
Tocleon the outside of the door:
::J_:,Usesoap and water to thoroughlg clean
the top, sidesand front of the oven door.
Rinsewell.You mag also use a glass
cleaner to cleanthe glasson the outside
of the door.
?_:Spillage of marinades, fruitjuices, tomato
sauces and basting materials containing
acids may cause discoloration and should
be wiped up immediatelg. When the
surface is cool,cleanand rinse.
?_:Do not useoven cleaners,cleansing
powders or harsh abrasivesonthe
outside of the door.
Oven Bottom
The oven bottom has aporcelain enamel
finish.To make cleaning easier,protect the
oven bottom from excessivespilloversbg
placing a cookie sheet on the shelf below the
shelf gou arecooking on.This isparticularlg
important when baking a fruit pie or other
foods with ahigh acid content. Hot fruit
fillings orother foods that are highlg acidic
(suchas tomatoes, sauerkraut and sauces
with vinegar or lemonjuice) mag cause
pitting and damage to the porcelain enamel
surface and should bewiped up immediatelg.
We don't recommend using aluminum foilon
the oven bottom. Itcan affect air flow if the
holesare blocked and it can concentrate heat
at the bottom of the oven, resultingin poor
baking performance.
To clean upspillovers,usesoap and water, an
abrasive cleaner or soap-filled scouring pad.
Rinsewell to removeang soap before self-
cleaning.
33
Page 34

Care and cleaning of the range.
Oven Shelves and Drawer Racks
If Four oven is equipped with nickel oven
shelves, theg should be removed from the
oven before beginning the self-clean cgcle.
To clean the nickel shelves, use an abrasive
cleansen After cleaning, rinse the shelves with
clean water and drg with a clean cloth. If the
shelves ever become hard to slide, wipe the
shelf edges or oven shelf supports with
vegetable oil.
Oven Light Replacement
CAUTION: Before replacing Four oven light
bulb, disconnect the electrical power to the
range at the main fuse or circuit breaker
panel. Be sure to let the light cover and
bulb cool completel F.
[] Do not touch hot bulbwith a wet cloth.
Replacebulb with a40-watt household
appliance bulb.
Toreplace cover:
Wire cover holden
Theoven light bulb iscoveredwith a
removable glasscoverthat is held inplace
with a bail-shaped wire. Removethe oven
door,if desired,to reach cover easilg.
TO remove:
[] Hold a hand underthe cover soit
doesn'tfall when released.With fingers
ofthe same hand, firmlg push back the
wire cover holden Liftoffthe coven
Do not remove ang screws to remove
the cover.
Oven Heating Elements
CAUTION:The unit should not be operated in
any mode with the bake element removed.
Do not clean the bake element or the broil
element. An F soilwill burn off when the
_ elementsare heated.
Onlg removethe oven heating element
to clean up largespills.Cleanaround the
elements when cleaning up small spills.
Toclean the ovenfloor,removethe two
screws securingthe bakeelement to the
back of the oven and remove the element.
Cleanthe oven floor with warm soapg waten
Replacethe bake element andtwo screws.
[] Place it into the groove of the light
receptacle. Pullthe wire forward to the
center ofthe cover untilit snaps into
place.When in place,the wire holdsthe
cover firmlg. Be certain the wire isin the
depressionin the center of the coven
[] Connect electrical powerto the range.
34
Page 35

ge,com
Removable Warming Drawer
cleaningor service,disconnectthe range
electricalpower supplblat the household
- distribution panel bblremoving the fuseor
switching off the circuit breaker Make sure
the warming drawer heating element iscool.
Most cleaning can be done with the drawer
in place.However,the drawer mag be
removed if further cleaning is needed.Use
soap and warm water to thoroughlg clean.
To remove the drawer:
[] Pullthe drawer straight out until
it stops.
[] Pressthe left rail releaseup and
pressthe right rail releasedown, while
pulling the drawer forward and free.
To replace the drawer:
[] Placethe left drawer railaround the
inner left rail guideand slide it in
slightlg to hook it.
[] Place the right drawer rail around the
tnnerright rail guide and slideit in
slightly to hook it.
[] Slidethe drawer all the wag in.
35
Page 36

Installation
Instructions
Range
In the Commonwealth
of Massachusetts
• This product must be installed by a licensed plumber
or gas fitter.
• When using ball type gas shut-off valves, they shall
be the T-handle type.
• A flexible gas connector, when used, must not exceed
3 feet.
BEFORE YOU BEGIN
Read these instructions completely and carefully.
Installation of this range must conform with local
codes, or in the absence of local codes, with the
National Fuel Gas Code, ANSI Z223.1/NFPA.54, latest
edition. In Canada, installation must conform with
the current Natural Gas Installation Code, CAN/CGA-
B149.1 or the current Propane Installation Code,
CAN/CGA-B149.2, and with local codes where
applicable. This range has been design-certified bg
CSA International according to ANSI Z21.1, latest
edition and Canadian Gas Association according
to CANICGA-I.1 latest edition.
As with any appliance using gas and generating heat,
there are certain safety precautions you should follow.
You will find these precautions in the Important Safety
Information section in the front of this manual. Read
them carefully.
FOR YOUR SAFETY
Do not store or use combustible materials, gasoline or
other flammable vapors and liquids in the vicinity of
this or any other appliance.
If you smell gas:
O Open windows.
O Don't touch electrical switches.
Extinguish any open flame.
Immediately call your gas supplier.
TOOLS YOU WILL NEED
Phillipsscrewdriver
_:@====_
Flat-blade screwdriver
Pencil and ruler
Pipe wrenches (2)
(one for backup)
Open-endor
adjustablewrench
Level
Drill, awl or nail
• IMPORTANT- Savetheseinstructions
for local electrical inspector's use.
• IMPORTANT- Observe all governing
codes and ordinances.
• Note to Installer - Leave these instructions
with the appliance after installation is completed.
• Note to Consumer - Keepthis Owner's Hanual
and Installation Instructions for future reference.
• Note - This appliance must be properly grounded.
• Servicer - The electrical diagram isin an envelope
attached to the back of the range.
• Skill level - Installation of this appliance requires
basic mechanical skills.
• Proper installation is the responsibility of the installe[
• Product failure due to improper installation is not
covered under the Warranty.
MATERIALS YOU MAY NEED
•Gas line shut-off valve
• Pipejoint sealant or UL-approved pipethread tape with
Teflon*that resistsaction of natural and LPgases
• Flexiblemetal appliance connector (1/2" I.D.)
A 5-foot length isrecommended for ease of installation
but other lengths areacceptable.Neveruse an old
connector when installing a new range.
• Flareunion adapter for connection to gas supply line
(3/4" or i/2" NPTx i/2" I.D.)
• Flareunion adapter for connection to pressure regulator
on range (1/2" NPTx I/2" I.D.)
• Liquidleak detector or soapy waten
• Lagbolt or i/2" O.D.sleeve anchor (forconcrete floors
only).
*Teflon: Registered trademark of DuPont
36
Page 37

instatlation Instructions
-&WARNING!
INSTALLATION SAFETY
INSTRUCTIONS
Read these instructions completelg and carefullg.
Improper installation, adjustment, alteration,
service or maintenance can cause injurg or propertg
damage. Refer to this manual. For assistance or
additional information, consult a qualified installer,
service agencg, manufacturer (dealer) or the gas
supplier.
Never reuse old flexible connectors. The use of old
flexible connectors can cause gas leaks and personal
injury. Always use NEW flexible connectors when
installing a gas appliance.
IMPORTANT - Remove allpacking material
and literaturefrom oven beforeconnecting gas and
electricalsupplyto range.
CAUTION- Do not attempt to operate
the oven of this range during o power failure (Electric
Ignition models only).
• Hove gour range installed bg a qualified instollen
• Your range must be electricallg grounded in
accordance with local codes or,in the absence
of local codes, in accordance with the Notional
Electrical Code (ANSI/NFPA70, latest edition).
In Canada, electrical grounding must be in
accordance with the current CSAC22.1 Canadian
Electrical Code Port 1 and/or local codes. See
Electrical Connections in this section.
• Before installing gour range on linoleum or ang other
synthetic floor covering, make sure the floor covering
con withstand 180°F without shrinking, warping or
discoloring. Do not install the range over carpeting
unless a sheet of 1/4" thick plgwood or similar
insulator is placed between the range and carpeting.
• Make sure the wall coverings around the range con
withstand heat generated bg the range up to 200°F.
Avoid placing cabinets above the range. To reduce
the hazard caused by reaching over the open flumes
of operating burners, install a ventilation hood over
the range that projects forward at least 5" beyond
the front of the cabinets.
The ventilating hood must be constructed of sheet
metal not less than 0.0122" thick. Install above the
cooktop with a clearance of not less than 1/4"
between the hood and the underside of the
combustible material or metal cabinet. The hood
must be at least as wide as the appliance and
centered over the appliance. Clearance between
the cooking surface and the ventilation hood surface
MUSTNEVERBE LESSTHAN 24 INCHES.
EXCEPTION:Installation of a listed microwave oven or
cooking appliance over the cooktop shall conform to
the installation instructions pocked with that appliance.
• Ifcabinetsore placed above the range,allow a
minimum clearanceof 30" between the cooking
surfaceand the bottom ofunprotectedcabinets.
If a 30" clearance between cooking surface and
overhead combustible material or metal cabinets
cannot be maintained, protect the underside of the
cabinets above the cooktop with not less than 1/4"
insulating millboard covered with sheet metal not less
than 0.0122" thick. Clearance between the cooking
surface and protected cabinets MUSTNEVERBELESS
THAN 24 INCHES.
The vertical distance from the plane of the cooking
surface to the bottom of adjacent overhead cabinets
extending closer than 1" to the plane of the range
sides must not be lessthan 18". (Seethe Dimensions
and Clearances illustration in this section.)
CAUTION - Items of interest to children
should not be stored in cabinets above a range or
on the backsplash of a range-children climbing on
the range to reach items could be seriouslg injured.
37
Page 38

Installation Instructions
DIMENSIONS AND CLEARANCES
Provide adequate clearances between the range and adjacent combustible surfaces. These dimensions must be
met for safe use of your range. The location of the electrical outlet and pipe opening (see Gas Pipe and Electric
Outlet Locations) may be adjusted to meet specific requirements.
The range may be placed with 0" clearance (flush) at the back wall.
M'n'mumI I I
to cabinets
on either
sideofthe __ 30"
range -- 30 I'
18"-'
Minimum
clearance
to left wall
3tt-_ _- Minimum
-_ _- 6'tHinimum
clearance to
right wall
lll..f"--_' _._forward _}
depth for
Haximum
cabinets above
countertops
Front
edge of
the range
side panel
from
cabinet
1
_-0"
To cabinets
below cooktop
and at the
range back
I 30" I 29VJ'"''"1_1_'_ Depth varies depending on model.
Depth with door ape
46 s/j, \
Depth with door closed (includes door handle)
See specifications sheet for gour
model.
38
Page 39

instatlation Instructions
WARNING!
ANTI-TIP DEVICE
All ranges can tip and injury could
result.
@
To prevent accidental tipping of the range,
attach an approved Anti-Tip device to the
wall. (See Installing the Anti-Tip Device in
®
• For your safety, never use your range for warming
or heating the room. Your oven and cooktop are not
designed to heat your kitchen. Top burners should
not be operated without cookware on the grate. Such
abuse could result in fire and damage to your range
and will void your warranty.
• Do not store or use combustible materials, gasoline
or other flammable vapors and liquids in the vicinity
of this or any other appliance. Explosions or fires
could result.
this section.) To check if the device is
installed and engaged properly, carefully
tip the range forward. The Anti-Tip device
should engage and prevent the range from
tipping over.
If you pull the range out from the wall for
any reason, make sure the Anti-Tip device
is engaged when you push the range back
against the wall.
LOCATION
Do not locate the range where it may be subject to
strong drafts. Any openings in the floor or wall behind
the range should be sealed. Make sure the openings
around the base of the range that supply fresh air for
combustion and ventilation are not obstructed by
carpeting or woodwork.
Your range, like many other household items, is
heavy and can settle into soft floor coverings such as
cushioned vinyl or carpeting. Use care when moving the
range on this type of flooring. It is recommended that
the following simple and inexpensive instructions be
followed to protect your floor.
The range should be installed on a sheet of plywood
(or similar material). When the floor covering ends at the
front of the range, the area that the range will rest on
should be built up with plywood to the same level or
higher than the floor covering.
This will allow the range to be moved for cleaning
or servicing. Also, make sure your floor covering will
withstand 180°F.(Seethe Installation Safety Instructions
section.)
Hake sure the wall coverings around your range can
withstand the heat generated (up to 200°F)by the
range. (Seethe Installation Safety Instructions section.)
• Do not use oven for a storage area, Items stored in
the oven can ignite.
• Do not let cooking grease or other flammable
materials accumulate in or near the range.
IMPORTANT!
Remove all tape and packaging. Make sure the
burners are properly seated and level.
Take the accessory pack out of the oven and/or
drawer.
Check to be sure that no range parts have come loose
during shipping.
39
Page 40

Installation Instructions
[] PROVIDE ADEQUATE GAS SUPPLY
Your range is designed to operate at a pressure of 5" of
water column on natural gas or, if designed for LP gas
(propane or butane), 10" of water column.
Hake sure you are supplying your range with the type of
gas for which it is designed.
This range isconvertible for use on natural or
propane gas. If you decide to use this range on LPgas,
conversion must be made by a qualified LPinstaller
before attempting to operate the range on that gas.
For proper operation, the pressure of natural gas supplied
to the regulator must be between 5" and 13" of water
column.
For LP gas, the pressure supplied must be between
10" and 13" of water column.
When checking for proper operation of the regulator,
the inlet pressure must be at least 1" greater than the
operating (manifold) pressure as given above.
The pressure regulator located at the inlet of the range
manifold must remain in the supply line regardless of
whether natural or LP gas is being used.
A flexible metal appliance connector used to connect the
range to the gas supply line should have an I.D.of 1/2"
and be 5 feet in length for ease of installation. In Canada,
flexible connectors must be single wall metal connectors
no longer than 6 feet in length.
[] CONNECT THE RANGE TO GAS
Shut off the main gas supplg valve before
disconnecting the old range and leave it off until
the new hook-up has been completed. Don't forget to
relight the pilot on other gas appliances when gou turn
the gas back on.
Because hard piping restricts movement of the range,
the use of a CSA International-certified flexible metal
appliance connector is recommended unless local codes
require a hard-piped connection.
Never use an old connector when installing a new range.
If the hard piping method is used, you must carefully
align the pipe; the range cannot be moved after the
connection is made.
To prevent gas leaks, put pipe joint compound on, or wrap
pipe thread tape with Teflon* around, all male (external)
pipe threads.
A. Install a manual gas line shut-off valve in the gas line
in an easily accessed location outside of the range.
Make sure everyone operating the range knows where
and how to shut off the gas supply to the range.
B. Install male 1/2" flare union adapter to the 1/2" NPT
internal thread at inlet of regulator. Use a backup
wrench on the regulator fitting to avoid damage.
When installing the range from the front, remove the
90° elbow for easier installation.
C.
Install male 1/2" or 3/4" flare union adapter to the NPT
internal thread of the manual shut-off valve, taking
care to back-up the shut-off valve to keep it from
turning.
D. Connect flexible metal appliance connector to the
adapter on the range. Position range to permit
connection at the shut-off valve.
E.When all connections have been made, make sure
all range controls are in the off position and turn on the
main gas supply valve. Use a liquid leak detector at all
joints and connections to check for leaks in the system.
WARNING: DO NOT USE A FLAME TO
CHECKFORGASLEAKS.
When using test pressures greater than 1/2 psig to
pressure test the gas supply system of the residence,
disconnect the range and individual shut-off valve from
the gas supply piping. When using test pressures of 1/2
psig or less to test the gas supply system, simply isolate
the range from the gas supply system by closing the
individual shut-off valve.
*Teflon: Registered trademark of DuPont
4O
Page 41

instatlation instructions
GAS PIPE AND ELECTRICAL OUTLET LOCATIONS
Recommended area for 120V
outlet on rear wall and area for
through-the-wall connection of
pipe stub and shut-off valve.
Recommended area for ._
through-the-fleer connection
of pipe stub and shut-off valve
41
Page 42

instatlation instructions
FLEXIBLECONNECTOR HOOKUP
Installer: Inform 1 !k_'_ Gas
the consumer of U2" or 3/4" _r _ I]/_- shut-off
the location of the Gas pipe_ L_ - valve
gas shut-off va re.
Adopter
_-_ Adapter
RiGiD PiPEHOOKUPOPTIONS
45° Elbow
_-I]_ _ __'_ 90° Elbow
(._'/z)"_ Nipple / ii_ - iron pipe
_///S_. Union
_X//_. Pressure _
regulator _ _ Union
i I]'_"" Nipple
Installer: Inform I _ Gas
the location of the _,I_[L _ valve
the consumer of I I I_i-_-- shut-off
gas shut-off va ve.
_ ]/2" or 3/4"
Gas pipe
Alternate Hookup
0O bow " bow
Gas ,_-I KL _ Nipple , .
shut-off _ FPr_ _ / ono regu,a,or
valve _ _, _ Elbow 1,
112"or314".,._ I /'_11'11__
Gas i e z 90° Elbow _*'--WAd_L_
Installer: Inform the I
consumer of the location
Adapter
M __Nipp,e
Nipple--_'_[ I _J_" ^ -
I I _ q2UiCKconnect
I_ 1_/or union
L_ _ _ . . Pressure
PP , . _
Adapter -'_
Iof the gas shut-off valve.
42
Page 43

instatlation instructions
[] ELECTRICAL CONNECTIONS
Electrical Requirements
You must use a 120-volt, 60 Hertz, properly grounded
dedicated circuit protected bg a 1S-amp or 20-amp
circuit breaker or time delag fuse.
Extension Cord Cautions
Because of potential safety hazards associated with
certain conditions, we strongly recommend against the
use of an extension cord. However, if you still elect to use
an extension cord, it is absolutely necessary that it be a
UL-listed, 3-wire grounding-tgpe appliance extension
cord and that the current carrying rating of the cord in
amperes be equivalent to, or greater than, the circuit
rating.
Grounding
IMPORTANT--(Please read carefully}
FORPERSONALSAFETY,THIS APPLIANCEMUSTBE
PROPERLYGROUNDED.
Method
Preferred
Ensure proper ground
exists before use
The power cord of this appliance is equipped with
a three-prong (grounding) plug which mates with
a standard three-prong grounding wall receptacle to
minimize the possibilitg of electric shock hazard from
this appliance.
The customer should have the wall receptacle and circuit
checked bg a qualified electrician to make sure the
receptacle is properly grounded.
Where a standard two-prong wall receptacle is
encountered, it is the personal responsibilitg and
obligation of the customer to have it replaced with
a properly grounded three-prong wall receptacle.
DO NOT, UNDERANY CIRCUMSTANCES,CUTOR REMOVE
THE THIRD (GROUND)PRONG FROMTHE POWERCORD.
A word about GFCI's- GFCI'sare not required or
recommended for gas range receptacles.
Ground Fault Circuit Interrupters (GFCI's)are devices that
sense leakage of current in a circuit and automatically
switch off power when athreshold leakage level is
detected. These devices must be manually reset bg the
consumeE The National Electrical Code requires the use of
GFCI'sin kitchen receptacles installed to serve countertop
surfaces. Performance of the range will not be affected if
operated on a GFCI-protected circuit but occasional
nuisance tripping of the GFCIbreaker is possible.
[] ELECTRICAL CONNECTIONS [CONT.)
A. Usage Situations where Appliance Power Cord will be
Disconnected Infrequentlg.
An adapter may be used only on a iS-amp circuit. Do not
use an adapter on a 20-amp circuit. Where local codes
permit, a TEMPORARYCONNECTION maNbe made to a
properly grounded two-prong wall receptacle bg the use
of a UL-listed adapter, available at most hardware stores.
The larger slot in the adapter must be aligned with the
larger slot in the wall receptacle to provide proper polaritg
in the connection of the power cord.
Temporarg Method
(Adapter plugs not permitted in Canada)
Align large
prongs/slots
Ensure proper ground
and firm connection
before use
CAUTION: Attaching the adapter
ground terminal to the wall receptacle cover
screw does not ground the appliance unless
the cover screw is metal, and not insulated,
and the wall receptacle is grounded through
the house wiring. The customer should have
the circuit checked bg a qualified electrician to
make sure the receptacle is properly grounded.
When disconnecting the power cord from the adapter,
alwags hold the adapter with one hand. If this is not done,
the adapter ground terminal isverg likely to break with
repeated use. Should this happen, DO NOT USEthe
appliance until a proper ground has again been
established.
43
Page 44

Installation Instructions
[] ELECTRICAL CONNECTIONS (CONT.)
B. Usage Situations where Appliance Power Cord will be
Disconnected Frequently.
Do not use an adapter plug in these situations because
disconnecting the power cord places undue strain on
the adapter and leads to eventual failure of the adapter
ground terminal. The customer should have the two-
prong wall receptacle replaced with a three-prong
(grounding) receptacle by a qualified electrician
before using the appliance.
The installation of appliances designed for mobile home
installation must conform with the Hanufactured Home
Construction and Safety Standard, Title 24 CFR,Part 3280
(formerly the Federal Standard for Hobile Home
Construction and Safety, Title 24, HUD,Part 280) or,
when such standard is not applicable, the Standard
for Hanufactured Home Installations, latest edition
(Manufactured Home Sites,Communities and Set-Ups),
ANSI A225.1, latest edition, or with local codes. In Canada,
mobile home installation must be in accordance with
the current CAN/CSAZ240/MH Hobile Home Installation
Code.
Electric Disconnect
• Locate disconnect plug on the range back.
• Pinch sides of connector and pull out of range back.
[] ASSEMBLE SURFACE BURNERS (CONT.}
Make sure the slot in
the burner head is
positioned over the j'<"-_}
electrode.
Electrode _" Slot
[] Oval {Center} Burner Head/Cap Assembly
Place the oval (center) head/cap assembly over the
electrode on the cooktop.
Oval head and cap
assembly
Front of range
[] Caps
Place the matching size caps onto the burner bases
or heads.
Make sure the slot in the
burner head is positioned over
the electrode.
_t
Electrode
[] SEAL THE OPENINGS
Sealany openings in the wall behindthe range and in the
floor under the rangewhen hookups are completed.
[] ASSEMBLE SURFACE BURNERS
[] Burner Heads Ion some models}
Place burner heads over the electrodes on the
cooktop, in the correct locations according to their
size. There is one small, one medium, one large and
one extra large burner head.
head
Me[do__ _. _ Extrcllorle
Front of range cap
Hake sure that the heads (on some models) and
caps are replaced in the correct locations.
[] Grates
Place the left, right and center grates on the
cooktop. These grates are position specific.
The undersides of the left and right grates are
marked "LEFT FRONT" and "RIGHT FRONT." Place
the middle grate with its bowed front toward the
front of the range.
Left Front Center Right Front
-& CAUTION: Do not operate the burner
without all burner parts in place.
44
Page 45

Installation Instructions
[] CHECK IGNITION OF SURFACE
BURNERS
Operation of all cooktop and oven burners should be
checked after the range and gas supplu lines have been
carefullu checked for leaks.
Electric Ignition Models
Select a top burner knob and simultaneousl U push in
and turn to LITE position. You will hear a clicking sound
indicating proper operation of the spark module. Once the
air has been purged from the supplu lines, burners should
light within 4 seconds. After burner lights, rotate knob out
of the LITE position. TrUeach burner in succession until
all burners have been checked.
Qualitg of Flames
The combustion quality of burner flames needs to be
determined visually.
(A) Yellow flames--
Call for service
(B) Yellow tips on
outer cones--
Normal for LP gas
[] CHECK IGNITION OF OVEN BURNER
Theoven isdesignedto operatequietlu and automaticallu.
Tooperatethe oven,touch the BAKEpadand then touch
thenumber padsuntil 350° appearsin the displau.Touchthe
STARTpad.After30-90 seconds,the ovenburnerwill ignite
and burnuntilthe settemperature isreached.
Electricignition modelsrequireelectricalpowerto operate.
Incaseof a poweroutage,the ovenburnersonthesemodels
cannot belit manualluwith a match.Gaswill not flow unless
theglow bar ishot.
Ifthe ovenisin usewhen a poweroutage occurs,the burner
willshut off and cannot be re-lituntil poweris restored.
(C)Soft blue
flumes--Normal
for natural gas
If burner flames look like (A), call for service. Normal
burner flames should look like (B) or (C), depending on
the tgpe of gas gou use.
With LPgas,some uellow tipping on outer cones
is normal.
45
Page 46

instatlation instructions
[] ADJUST OVEN BURNER AIR
ADJUSTMENT SHUTTER IF
NECESSARY
Air adjustment shutter for the bottom burner regulates
the flow of air to the flames.
Loosen
\
adjustment
shutter
The shutter for the bottom (oven) burner is near the back
wall behind the warming drawee Remove the drawer.
See the Core and cleaning of the range section.
To adjust the flow of air to the burner, loosen the
Phillips head screw and rotate the shutter toward open
or closed position as needed.
[] LEVELING THE RANGE
A. Install the oven shelves in the oven and position the
range where it will be installed.
I'1 II _ Raise Lower
range
(on some models)
B.
Check for levelness by placing a spirit level or a cup,
partially filled with water, on one of the oven shelves.
If using a spirit level, take two readings-with the level
placed diagonally first in one direction and then the
other.
C.
Remove the drawer. Seethe Care and cleaning of the
range section. The front leveling legs can be adjusted
from the bottom and the rear legs can be adjusted
from the top or the bottom.
D. Usean open-end or adjustable wrench to adjust the
leveling legs until the range is level.
E.After the range is level, slide the range away from the
wall so that the Anti-Tip device can be installed.
Lower range range
range
(on some models)
To determine if the bottom burner flames are burning
properlg, remove the oven bottom. Flames should have
approximatelg 1" blue cones and, if range is supplied with
natural gas, should burn with no gellow tipping. (With
most LPgas, small gellow tips at the end of outer cones
are normal.) Flames should not lift off burner ports. If
lifting is observed, graduallg reduce air shutter opening
until flames are stabilized.
To remove the oven bottom:
A. Remove the two screws securing the bake element
to the back of the oven and remove the element.
B. Remove the screws holding down rear of the
oven bottom.
C. Grasp the oven bottom at finger slots on each side.
Oven
bottom
O. Lift the rear of the oven bottom enough to clear the lip
of the range frame, push it back, and then pull it up
and out.
46
Page 47

instatlation instructions
[] INSTALLING THE ANTI-TIP DEVICE
-&WARNING!
• Range must be secured with an approved Anti-Tip
device.
Unless properly installed, the range could be
tipped bg you or a child standing, sitting or leaning
on an open door.
After installing the Anti-Tip device, verifg that it is
in place bg carefully attempting to tilt the range
forward.
• This range has been designed to meet all
recognized industrg tip standards for all normal
conditions.
The use of this device does not preclude tipping of
the range when not properlg installed.
If the Anti-Tip device supplied with the range does
not fit this application, use the universal Anti-Tip
device WB2X7909.
A. Mark the wall where the RIGHTEDGE of the range
is to be located. Be sure to allow for the countertop
overhang if gou intend to install the range next to
cabinets,
Slotted head
screw
Narked edge of range
B. Locate the outside edge of the device 2Y8" toward the
center of the range from the marked edge of the range.
C. Using the device as a template, mark the position of
the hole for the screw.
[] INSTALLING THE ANTI-TIP DEVICE
(CONT.)
Wallboard
Install the sleeve anchor into the drilled hole and then
install the lag bolt through the device. The bolts must be
properlg tightened as recommended for the hardware.
E.Slide the range against the wall, and check for proper
installation bg grasping the front edge of the cooktop
and carefullg attempting to tilt the range forward.
Back of range
WHEN ALL HOOKUPS ARE COMPLETED
Make sure all controls are left in the off position. Make
sure the flow of combustion and ventilation air to the
range is unobstructed.
CONVERTING TO LP GAS Ior converting
back to natural gas from LP)
This range leaves the factorg set for use with natural
gas. If gou want to convert to LPgas, the conversion
must be performed bg a qualified LPgas installer.
The conversion instructions and LPorifices can be found
attached to the range next to the pressure regulatoc
Keep these instructions and the orifices in case gou want
to convert back to natural gas.
D. For wood construction, drill a pilot hole at an angle of
20 degrees from the horizontal. A nail or awl mag be
used if a drill is not available.
Mount the Anti-Tip device with the screw provided.
For cement or concrete construction, gou will need
a 1/4" x 1_//' lag bolt and a 1/2" O.D,sleeve anchor, which
are not provided. Drill the recommended size hole for the
hardware.
47
Page 48

m
of}
.o
13
Before you call for service...
Troubleshooting Tips
Save time and moneg! Review the charts on the following
pages first and Sou mog not need to call for service.
QJ I
m
"0
:P_ :: Possible Causes
What To Do
Topburners do not light Plug on range is not completelg • Hake sure electrical plug isplugged into a live,propedg
or do not burn evenly, inserted in the electrical outlet, grounded outlet.
I
(Thefront right burner Burner slitsonthe sideofthe • Removethe burners and clean them. Checkthe
q
is designed to have burner mag be clogged, electrode area for burned-on food or grease.See
slightlg smaller flames the Core and cleaning of the range section.
between the 6 and
9 o'clock positions. Improper burner assemblg. • Hake sure the burner parts are installed correctlg.
Thisis normal.) See the Care and cleaning of the range section,
Burner flames verg Improper air to gas ratio. • If range is connected to LPgas, contact the person
large or gellow who installed sour range or made the conversion.
Surface burners light The oven gas shut-off valve • To check the oven gas shut-off valve, remove the
but oven does not mag have accidentallg been warming drawer (see the Core and cleaning of the range
moved during cleaning or section). Look for the gas shut-off lever at the back of
moving, the range.
PULL TO OPEN.
v ,
h
liiiii!iiiii ii
0
0
48
Page 49

Possible Causes What To Do
Control signals after You forgot to enter a bake • Touch the Bake pad and desired temperature or
entering cooking time temperature or cleaning time. the Self Clean pad and desired clean time.
or start time
Food does not bake or Oven controls improperlg set. • See the Using the oven section.
roast properly in the Shelf position is incorrect. * See the Using the oven section.
oven
Incorrect cookware or cookware * See the Using the oven section.
of improper size being used.
Oven thermostat needs * See the Adjust the oven thermostat Do it
adjustment, yourself! section.
Clock not set correctlg. • See the Using the clock and timer section.
Aluminum foil used improperlg * See the Core and cleaning of the range section,
in the oven.
Oven bottom not securelg * See the Installation of the range section.
seated in position.
ge.com
Food does not broil Oven controls improperlg set. • Hake sure you touch the Broil Hi/Lo pad.
properly in the oven
Oven temperature Oven thermostat * See the Adjust the oven thermostat Do it
too hot or too cold needs adjustment, yourself! section.
Clock and timer Plug on range is not completelg ° Hake sure electrical plug is plugged into a live, properlu
do not work inserted in the electrical outlet, grounded outlet.
Oven door not closed. * See the Using the oven section.
Improper shelf position * See the Broiling Guide.
being used.
Food being cooked in a hot pan. • For best results, use a pan designed for broiling.
Make sure it is cool.
Cookware not suited for broiling. • For best results, use a pan designed for broiling,
Oven bottom not securelg • See the Installation of the range section.
seated in position.
A fuse in gour home mug be • Replace the fuse or reset the circuit breakeE
blown or the circuit breaker
tripped.
Oven controls improperlg set. • See the Using the clock and timer section.
49
Page 50

What To Do
• Tighten or replacethe bulb.
• Makesure electrical plug isplugged into a live,propedy
grounded outlet.
• Allowthe rangeto cool to room temperature and
reset the controls.
• Seethe Usingthe self-cleaningoven section.
• Thisis normal.
• Touch the Clear/Off pad. Open the windows to
rid the room of smoke. Wait until the LOCKEDDOOR
light goes off. Wipe up the excess soil and reset the
clean cycle.
• Allow the oven to cool below locking temperature.
• Seethe Usingthe self-cleaning oven section.
• Clean up heavy spillovers before starting the clean
cycle. Heavily soiled ovens may need to self-clean
again or for a longer period of time.
• Closethe oven door.
• Touch the Clear/Off pad. Allow the oven to cool.
• Touchthe Clear/Off pad.Allow the oven to cool for
one hour Putthe ovenback into operation.
• Disconnect all power to the range for 5 minutes
and then reconnect power. If the function error
code repeats, call for service.
• Apply a small amount of vegetable oilto a paper
towel and wipe the edges of the oven shelves with
the paper towel. Do not spray with Pam®or other
lubricant sprays.
Page 51

Possible Causes What To Do
ge.com
Display goes blank Afuse in your home may
• Replacethe fuse or resetthe circuit breakeE
be blown or the circuit
breaker tripped.
The clock is in the • See the Special features of your oven control section.
black-out mode.
Display flashes Power failure. • Reset the clock,
Unable to get the Oven control pads were • The Bake and Broil Hi/Lo pads must be touched at
display to show "SF" not pressed properly, the same time and held for Bseconds.
Power outage, Power outage or surge. • Reset the clock. If the oven was in use, you must reset
clock flashes it by touching the Clear/Off pad, setting the clock
and resetting any cooking function.
"Burning" or "oily" This is normal in o new oven • To speed the process, set a self-clean cycle for a
odor emitting from and will disappear in time. minimum of 3 hours. Seethe Using the self-cleaning
the vent oven section.
Strong odor An odor from the insulation • This is temporary.
around the inside of the oven
is normal for the first few times
the oven is used.
Drawer does not slide The drawer isout of alignment. • Fully extend the drawer and push it all the way in.
smoothly or drags See the Core and cleaning of the range section.
Drawer is over-loaded or load • Reduce weight. Redistribute drawer contents.
is unbalanced.
Warming drawer will A fuse in your home may be • Replace the fuse or reset the circuit breaker,
not work blown or the circuit breaker
tripped.
The oven is self-cleaning. • Wait for the self-clean cycle to finish and the oven
to cool.
Controls improperly set. • See the Electric worming drawer section.
Excessive condensation Liquid in drawer. • Remove liquid.
in the drawer
Uncovered foods. • Cover food with lid or aluminum foil,
Temperature setting too high. • Reduce temperature setting.
Food dries out in the Moisture escaping. • Cover food with lid or aluminum foil.
warming drawer
Drawer not fully closed. • Push drawer in until latch engages.
51
Page 52

Accessories.
Looking For Something More?
You can find these accessories and manF more at ge.com (U.S.)or
www.GEAppliunces.cu (Canada), or calf 800.626.2002 (U,S.)or 888.261.3055 (Canada)
(during normal business hours). Have Four model number readF.
Oven and Drawer Racks
Grates
Broiler Pan
Surface Burner Caps
0
Light Bulbs Knobs
Cleaner
52
Tired of discolored racks? Wishing you had extra-heavy-duty oven racks?
NOW AVAILABLE for your range:
GE's innovative, self-cleanable porcelain-coated oven racks!
• Heavy Duty
• Durable
• Able to be cleaned in a self-cleaning oven
Visit ge.com (U.S.) or www.GEAppliunces.cu (Canada) for more information.
Page 53

GE Service Protection Plus'"
GE, a name recognized worldwide for quality and dependability, offers you
Service Protection Plus_'-comprehensive protection on all your appliances-
No Hatter What Brand!
Benefits Include:
• Backed bg GE
• All brands covered
• Unlimited service calls
• All parts and labor costs included
• No out-of-pocket expenses
• No hidden deductibles
• One 800 number to coil
You will be completely satisfied with our service protection or you may request your money back
on the remaining value of your contract. No questions asked. It's that simple.
Protect your refrigerator, dishwasher, washer and dryer, range, TV,VCRand much more-any brand!
Plusthere's no extra charge for emergency service and low monthly financing is available. Evenicemaker
coverage and food spoilage protection is offered. You can rest easy, knowing that all your valuable household
products are protected against expensive repairs.
Place your confidence in GEand call us in the U.S.toll-free at 800.626.2224
for more information.
*All brands covered, up to 20 years old, in the continental US
We'll Cover Ang
Appliance. Angwhere.
Angtime.*
,_ Cut here
Please place in envelope and mail to:
General Electric Company
Warranty Registration Department
RO. Box 32150
Louisville, KV 40232-2150
53
Page 54

Consumer Product Ownership Registration
Dear Customer:
Thank gou for purchasing our product and thank gou for placing gour confidence in us.
We ore proud to hove gou as a customer!
Follow these three steps to protect your new appliance investment:
Complete and mail
your Consumer
Product Ownership
Registration today.
Have the peace of
mind of knowing we
can contact gou in the
unlikelg event of a
safetg modification.
After mailing the
registration below,
store this document
in a safe place. It
contains information
gou will need should
gou require service.
Our service number
is 800.GECARES
(800.432.2737).
Model Number Serial Number
,,, , , , , , II , , , , , , , , I
Important: If gou did not get a registration card with gour
product, detach and return the form below to
ensure that gour product is registered, or register
online at ge.com.
Consumer Product Ownership Registration
Read gour Owner's
Manual carefullg.
It will help gou
operate gour new
appliance properlg.
._,_ Cut here
I,,,,,, , , , , , II , , , , , , ,
M_i ] Ms, Nrs i Missi
FirstI I Lastl
Name I I I I I I I I I Name I I I I I I I I I I I I
Street I
Address I I I I I I I I I I I I I I I I I I I I I I I I
Apt. # I I
citg I
Date Placed
In Use I I I
Month
I I I I I I I E-mail Address*
I I I I I I I I I I I I I I
Dayl I I Yearl I I Phone
GE Consumer & Industrial
Appliances
General Electric Compang
Louisville, KY 40225
ge.com
Model Number Serial Number
State I I I Code I I I I I
Number I
* Please provide gour e-mail address to receive, via e-mail, discounts, special offers and other
important communications from GEAppliances (GEA).
[l Check here if gou do not want to receive communications from GEA'scarefullg selected
partners.
FAILURETOCOMPLETEAND RETURNTHISCARDDOESNOT DIMINISH YOURWARRANTYRIGHTS.
For information about GEA's privacg and data usage policg, go to ge.com and click on
"Privacg Policg" or call 800.626.2224.
_, I-I,, I-I,,, I
Zip
54
I
I
Page 55

Notes.
m
¢t}
0
¢n
Lt} ,,,.__
m
¢b
P_
n
55
v
o
m
0
¢s)
€_
b_
0
Page 56

m
¢t)
.o
13
._ o
m
Notes.
v
o
m
L..
0
L..
L_
0
56
Page 57

Notes.
m
r,,t) _
m
¢t}
¢b
O"
n
u
¢b
Q
¢b
Q
_,,_°
o
57
m
¢b
0
¢t}
0
Page 58

GE Gas Range Warranty. (Forcustomerstheunitedstotesj
Allwarranty service provided by our Factory Service Centers,
or an authorized Customer Care ®technician. To schedule
service, on-line, visit us at go.cam, or call 800.GE.CARES
(800.432.2737). Please have serial number and model
number available when calling for service.
GE Will Replace:
One Year
From the dote of the
original purchase
::J_:_Service trips to gour home to teach gou how to use
the product.
!t,JImproper installation, deliverg or maintenance.
_: Failure of the product if it is abused, misused,
or used for other than the intended purpose or
used commerciallg.
::Ji::Replacement of house fuses or resetting of circuit
breakers.
Any part of the range which fails due to adefect in materials or workmanship. During this
limited one-gear warrants, GEwill also provide,free of charge, all labor and in-home service
to replace the defective part.
Staple sour receipt here.
Proof of the original purchase
dote is needed to obtain service
under the warrants.
iJi::Damage to the product caused bg accident, fire, floods
or acts of God.
_:Incidental or consequentialdamage caused bg possible
defects with this appliance.
_:Damage caused after deliverg.
::J_:_Product not accessibleto provide required service.
EXCLUSION OF IMPLIED WARRANTIES--Your sole and exclusive remedy is product repair us
provided in this Limited Warranty. Any implied warranties, including the implied warranties of
merchantability or fitness for a particular purpose, are limited to one year or the shortest period
allowed by law.
This warranty is extended to the original purchaser and ang succeeding owner for products purchased for
home use within the USA. If the product is located in an area where service by a GE Authorized Servicer is
not available, you may be responsible for a trip charge or you may be required to bring the product to an
Authorized GE Service Location for service. In Alaska, the warranty excludes the cost of shipping or service
calls to your home.
Some states do not allow the exclusion or limitation of incidental or consequential damages. This warranty
gives you specific legal rights, and you may also have other rights which vary from state to state. To know
what your legal rights are, consult your local or state consumer affairs office or your state's Attorney General.
Warrantor: General Electric Company. Louisville, KY 40225
58
Page 59

GE Gas Range Warranty. CForcustomers/ncono oJ
m
Al! warranty service provided by our Factory Service Centers
or on authorized Customer Care ®technician. For service,
call 1.800.561.3344. Please have serial number and model
number available when coiling for service.
Mabe Will Replace:
One Year
From the date of the
odgina! purchase
_ Service trips to gour home to teach gou how to use
the product.
::Ji::Improper installation, deliverg or maintenance.
_ Failure of the product if it is abused, misused,
or used for other than the intended purpose or
used commerciallg.
::Ji::Replacement of house fuses or resetting of circuit
breakers.
Ang part ofthe range which fails due to a defect in materials or workmanship. During this
limited one-gear warranty, Mabewill alsoprovide, freeof charge, all labor and in-home service
to replace the defective part.
Staple gout receipt here.
Proof of the original purchase
date is needed to obtain service
under the warrants.
!i_Damage to the product caused bg accident, fire, floods
or acts of God.
::Ji_Incidental or consequential damage caused bg oossible
defects with this appliance.
_ Damage caused after delivery.
::J_Product not accessible to provide required serwce.
¢n
o
¢n
) :
)
m
EXCLUSION OF IMPLIED WARRANTIES--Vour sole and exclusive remedg is product repair as
provided in this Limited Warrantg. Ang implied warranties, including the implied warranties of
merchantabilitg or fitness for a particular purpose, are limited to one gear or the shortest period
allowed bg law.
I WARRANTOR IS NOT RESPONSIBLE FOR CONSEQUENTIAL DAMAGES. I
I Warrant°r: iVlABECANADA INC I
_o
f
.o r
) -
¢
c
€
¢
r
i!il;i;i;i_iii[i!iiiiiH_
59
!ii!!iiiiii_iiiiiil
ii/iiiii®iii!i
Page 60

Consumer Support.
GE
A__i,, HHllancesWebsite Intheu.s.:ge.com
Have a questionor need assistance with uourappliance?Tru the GEAppliances Website 24 hours a dau,
any dag of the year! Forgreater convenience and faster service,you can now download Owner's Manuals,
order parts or even schedule serviceon-line.
Schedule Service Inthe U.S.:ge.com
Expert GErepair serviceisonlUone step away from uour door Geton-line and schedule gour serviceat uour
convenience 24 hours anu dag of the uead Or call800.GE.CARES(800.432.2737)during normal businesshours.
In Canada, call 1.800.561.3344
RealLifeDesignStudio Inthe u.s.:ge.com
GEsupports the UniversalDesign concept-products, servicesand environments that can beusedbu people of all
ages,sizesand capabilities. We recognizethe need to design for a wide rangeof phusical and mental abilitiesand
impairments. For detailsof GE'sUniversalDesignapplications, including kitchen designideas for people with disabilities,
check out our Websitetodau. Forthe hearing impaired, pleasecall 800.TDD.GEAC(800.833.4322).
In Canada, contact: Manager,Consumer Relations,Mabe Canada Inc.
Suite310, 1 FactorULane
Moncton, N.B.EIC 9M3
ExtendedWarranties Inthe U.S.:ge.com
Purchasea GEextended warrantu and learn about specialdiscounts that are available while uour warrantu is still
in effect. You can purchase it on-line anutime, or call800.626.2224during normal businesshours. GEConsumer Home
Serviceswill still bethere after uour warrantu expires.In Canada, cell 1.888.261.2133
Parts and Accessories Inthe U.S.:ge.com
Individualsqualified to service their own appliancescan haveparts or accessoriessent directly to their homes
(VISA,MasterCardand Discovercards are accepted).Orderon-line today, 24 hours every day orby phone at
800.626.2002during normal business hours.
Instructions contained in this manual cover procedures to beperformed bg ang user. Other servicing generallg
should be referred to qualified service personnel. Caution must be exercised,since improper servicing meg cause
unsafe operation.
Customers in Canada should consultthe yellow pagesfor the nearest Mabe servicecenter,or call 1.888.261.3055.
Contact Us IntheU.S.:ge.com
If you are not satisfiedwith the service you receivefrom GE,contact us on ourWebsite with all the details including
your phone number,or write to: General Manager,Customer Relations
GEAppliances,Appliance Park
Louisville,KY40225
In Canada: www.GEAppliances.ca, orwrite to: Director,Consumer Relations,MabeCanada Inc.
Suite310, 1 Factory Lane
Moncton, N.B.EIC 91t3
RegisterYourAppliance In the U.S.:ge.com
Register gour new appliance on-line--at gour convenience! Timely product registration will allow for enhanced
communication and prompt service underthe terms of your warranty, should the need arise.You may also mail
in the pre-printed registration card included in the packing material. In Canada: www.GEAppliances.ca
Printed inMexico
This book is printed on recycled popen
 Loading...