

GE Monogram ZDB24 BB, Monogram ZDB24 WW, Monogram ZDW24 BB Installation Instructions Manual
Page 1

GE Monogram
Installation
Instructions
®
www.monogram.com
Beverage Center
Model
ZDB24 WW
ZDB24 BB
Wine Chiller
Model
ZDW24 WW
ZDW24 BB
Page 2

CAUTION
WARNING
Important Information
Beverage Center & Wine Chiller
Before you begin—Read these instructions completely and carefully.
IMPORTANT: Save these instructions for local inspector’s use.
IMPORTANT: OBSERVE ALL GOVERNING CODES AND ORDINANCES.
NOTE TO INSTALLER: Be sure to leave these instructions with the Consumer.
NOTE TO CONSUMER: Keep these instructions with your Owner’s Manual for future refer-
ence.
This appliance must be properly grounded. See “Electrical Supply”, page 4.
CAUTION
ATTENTION
If you received a damaged beverage center or
wine chiller, you should contact your dealer.
Proper installation is the responsibility of the
installer. Product failure due to improper
installation is not covered under the GE
Appliance Warranty. See the Owner’s Manual
for warranty information.
For Monogram local service in your area,
1-800-444-1845.
For Monogram service in Canada
1-888-880-3030.
For Monogram Parts and Accessories, call
1-800-626-2002.
Cet appareil doit être correctement mis à la terre.
Consulter « Alimentation électrique », page 4.
WARNING
• Use this appliance only for its intended
purpose.
• Immediately repair or replace electric
service cords that have become frayed or
damaged.
• Unplug the beverage center or wine
chiller before cleaning or making repairs.
• Repairs should be made by a qualified
service technician.
ATTENTION
• Il ne faut utiliser cet appareil que pour
l’usage pour lequel il a été construit.
• Il faut réparer ou remplacer
immédiatement tout cordon
d’alimentation électrique effiloché ou
endommagé.
• Débrancher le bar ou le réfrigérateur
à vin avant le nettoyage ou toute
intervention.
• Les réparations doivent être faites par un
technicien qualifié.
Contents
2
Design Information
Models Available.................................................................................................................................. 3
Dimensions and Clearances ............................................................................................................... 3
Installation Preparation
Grounding the Beverage Center or Wine Chiller ............................................................................ 4
Reverse Door Swing ............................................................................................................................ 5
Installation
Step 1: Remove the Packaging ........................................................................................................... 6
Step 2: Install Handle ......................................................................................................................... 6
Step 3: Install Leveling Legs ............................................................................................................... 7
Step 4: Slide the Unit into the Cutout ............................................................................................... 7
Template for nameplate location ...................................................................................................... 8
Page 3
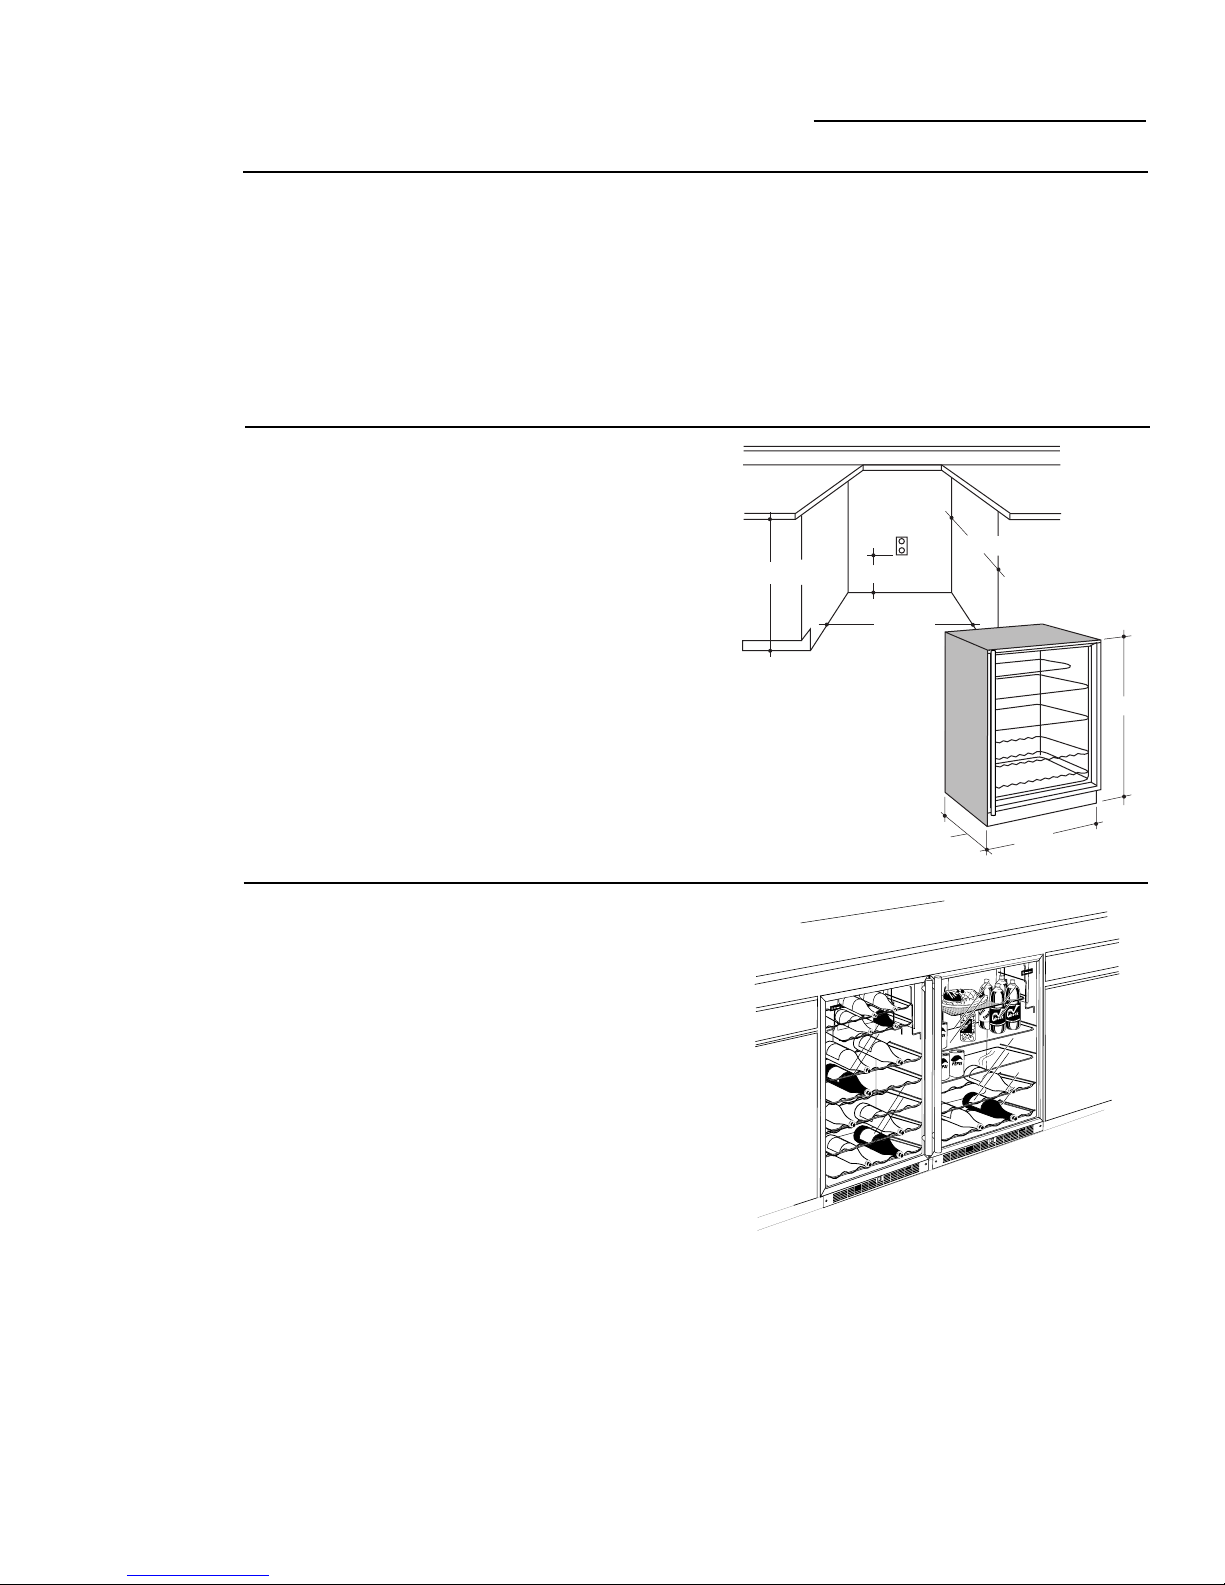
Design Information
Locate
Outlet
34-1/2"-35"
24" Min.
24" Min.
5"
34-1/2"
24-1/8"
23-7/8"
Beverage Center & Wine Chiller
Models
Available
Dimensions
& Clearances
ZDB24 WW
White Beverage Center
ZDB24 BB
Black Beverage Center
ZDW24 WW
White Wine Chiller
ZDW24 BB
Black Wine Chiller
Front ventilation allows the beverage center
or wine chillder to be installed as a built-in
and still operate efficiently.
The bottom front grille area must remain
unobstructed for proper air circulation and
operation.
Cutout dimensions shown allow for a full door
swing and access to the pull-out racks.
The Monogram beverage center or the wine
chiller adds an eloquent statement of style,
convenience and flexibility.
The Monogram beverage center and wine
chiller can be used freestanding or as a
built-in.
Installation
Options
Increase storage capacity by installing two
Monogram beverage centers side by side or
two Monogram wine chillers side by side.
Or, install a Monogram beverage center next
to a Monogram wine chiller for a complete
refreshment center.
A side by side installation requires a 48" wide
opening. No trim kits required.
• The glass door fronts should align evenly
with adjacent cabinet door fronts.
Frameless Cabinets:
• If installing between frameless cabinets, a
1/2" wide filler strip or side panel may be
required. The filler strip will act as a spacer
between the door case and adjacent cabinet
and will prevent interference with cabinet
door swing. The width of the opening must
include filler panels.
Provide two separate properly grounded
electrical outlets for a side by side installation.
Each electrical outlet should have a voltage
rating that matches the rating plate.
3
Page 4

Installation Preparation
Beverage Center & Wine Chiller
Grounding
the
Beverage Center
or Wine Chiller
IMPORTANT - (Please read carefully)
FOR PERSONAL SAFETY, THIS APPLIANCE
MUST BE PROPERLY GROUNDED.
The power cord of this appliance is equipped
with a three-prong (grounding) plug which
mates with a standard
three-prong (grounding)
wall receptacle to minimize
the possibility of electric
shock hazard from this
appliance.
Use of Adapter plug
Because of potential hazards under certain
conditions, we strongly recommend against
use of an adapter plug. However, if you still
elect to use an adapter, where local codes
permit, a TEMPORARY CONNECTION, may
be made to a properly grounded 2-prong wall
outlet by use of a UL listed adapter available
at most hardware stores.
Align Large Prongs/Slots
Ensure Proper Grounding and Firm
Connection Exists Before Use
The larger slot in the adapter must be aligned
with the larger slot in the wall outlet to
provide proper polarity in the connection of
the power cord.
Have the wall outlet and circuit checked by a
qualified electrician to make sure the outlet is
properly grounded.
Where a standard 2-prong wall outlet is encountered, it is your personal responsibility and
obligation to have it replaced with a properly
grounded 3-prong wall outlet.
DO NOT, UNDER ANY CIRCUMSTANCES,
CUT OR REMOVE THE THIRD (GROUND)
PRONG FROM THE POWER CORD.
When disconnecting the power cord from the
adapter, always hold the adapter in place with
one hand and pulling the power cord with the
other hand. If this is not done, the adapter
ground terminal is very likely to break with
repeated use.
Should the adapter ground terminal break, DO
NOT USE the appliance until a proper ground
has again been established.
Use of Extension Cords
Because of potential safety hazards under
certain conditions, we strongly recommend
against the use of an extension cord. However,
if you still elect to use an extension cord, it is
absolutely necessary that it be a UL listed 3-wire
grounding type appliance extension cord
having a grounding type plug and outlet and
that the electrical rating of the cord be 15
amperes (minimum) and 120 volts.
Use of an adapter plug will increase the
cutout depth required.
CAUTION
Attaching the adapter ground terminal to a
wall outlet cover screw does not ground the
appliance unless the cover screw is metal,
and not insulated, and the wall outlet is
grounded through the house wiring. You
should have the circuit checked by a
qualified electrician to make sure the
outlet is properly grounded.
4
PRUDENCE
Brancher la borne de terre d’un adaptateur
sur la vis du couvercle de la prise murale ne
met pas l’appareil à la terre, sauf si la vis du
couvercle est métallique, n’est pas isolée et
si la prise murale est mise à la terre par
l’intermédiaire des fils de la maison. Il faut
faire vérifier le circuit par un électricien
qualifié pour s’assurer que la prise est
correctement mise à la terre.
Page 5

Installation Preparation
Beverage Center & Wine Chiller
Reverse
Door
Swing
To remove the door:
• Remove the top hinge pin using a 1/8" Allen
wrench. Set aside.
• Lift the door off the bottom hinge.
• Remove the top hinge and set aside.
• Remove the bottom hinge, the plastic washer
and the bottom hinge pin using a Phillips
screwdriver.
• Install the Phillips hinge pin in the top
hinge and re-install the top hinge on the
bottom left side.
• Re-install the plastic washer over the hinge
pin.
• Install the Allen wrench hinge pin in the
bottom hinge and re-install the bottom
hinge on the top left side.
• Insert the supplied plug buttons into the old
hinge holes, top and bottom.
The light trigger on the bottom of the door
must be removed and secured to the opposite
end.
• Remove the light trigger by backing out 2
screws. Set the trigger and screws aside.
• Install screws from plastic bag packed with
Owner’s Manual into light trigger holes.
• Turn the door upside down.
• Measure and mark 12-1/4" and 13" from the
right side (or 3/4" from the first location).
Measure and mark 11/16" from the front
side of the door. See illustration.
• Drill holes with 5/32" drill bit.
• Install the light trigger with original screws.
• Remove the top hinge pin using the 1/8"
allen wrench.
• Place the door onto the bottom hinge, and
install the top hinge pin with allen wrench.
• Open and close door to test door swing. If
door drags and does not close evenly, loosen
hinge screws and slip shims behind the
hinge. Tighten screws and test again.
Light Trigger
Top of the Door
Upper Left
Corner of
Glass
Top of Name Plate
DOOR
NAME PLATE
LOCATION
Door Frame Side
P/N 41005263
11/16"
Front of the Door
Top of Glass Door
Slip Shim
Behind Hinge
Top Hinge
Bottom Hinge
3/4"
12-1/4"
Position new nameplate:
• Remove the original nameplate, now located
on the bottom of the door.
• Locate the template on the back of this
instruction book.
• Hold or tape template behind glass door.
• Remove backing from Monogram nameplate.
• Place nameplate onto front side of door,
matching illustration on template.
5
Page 6

Installation
Beverage Center & Wine Chiller
Step
1
Remove the
Packaging
Remove all packing material and tape.
Tools and materials required:
• #2 Phillips screwdriver
Parts List:
A. Stainless tubular handle
B. 2 Handle standoffs
C. 3 Screws for mounting handle standoffs
(2 required, 1 extra)
D. 3 Set screws (2 required, 1 extra)
E. 3/32" Allen wrench for set screws
F. 4 U-Clips
G. 4 Leveling legs
H. GE Monogram nameplate
I. 8 Plug buttons
J. Hinge Shims
K. 2 Screws for light trigger hole
CAUTION: Small objects are a choke
hazard to children. Remove and
discard any parts not used.
PRUDENCE – Les petits objets
peuvent étrangler les enfants. Il faut
jeter toutes les pièces qui ne sont pas
utilisées.
B.
D.
F.
H.
A.
I.
J.
K
C.
E.
G.
Note:
Step
2
Install
Handle
6
Consider door swing direction. If you wish to change door
swing, complete the instructions shown on page 5 before installing
the handle.
• Place handle standoff against the top screw hole
in the door. Position the standoff so that the
small screw hole points toward the floor.
• Drive screw through the standoff and into the
door. Do not tighten.
• Install bottom standoff. Do not tighten.
• Place handle to standoffs so that handle mount-
ing posts are inserted into the standoffs. The
handle should fit into the curved shape of the
standoff. Again, the set screw hole should be
pointing downwards.
• Remove the handle and tighten standoffs to
door.
• Place handle to standoffs and install set screws
through the bottom of standoffs using the allen
wrench provided.
• The handle should be tight against the standoff.
• Save the allen wrench for future use.
Screw
Allen Wrench
Page 7

Installation
Beverage Center & Wine Chiller
Step
3
Install
Leveling
Legs
• Tilt the unit slightly to one side to access the
bottom corner holes.
• Install a U-Clip into the front and rear holes
on the bottom as shown.
CAUTION: See illustration. Be sure the tangs
on the clips are on the outside and the
straight portion is inserted into the holes.
• Screw the leveling legs into the U-clips all
the way until snug. Then, adjust the leveling
legs to installation height.
• Follow the same procedure for the opposite
side.
A.
B.
C.
D.
Step
4
Slide the
Unit into
the Cutout
• Move the beverage center/wine chiller close
to the opening.
• Connect the power cord plug to the properly
grounded receptacle.
• Slide the unit into the opening.
Monogram
kist
Sunkist
C
kist
heck
Sunkist
C
heck
7
Page 8

Template
Beverage Center & Wine Chiller
Template For Nameplate Location
To be used when door swing has been reversed,
with handle on right side, hinge on left side.
To position new nameplate:
• Remove the original nameplate, now located on
the bottom of the door.
• Cut template along dotted line.
• Hold or tape template behind glass door in the
upper left corner so that it is visible from the
front side.
• Remove backing from Monogram nameplate.
• Place nameplate onto front side of door,
matching illustration on template.
P/N 41005263
Upper Left
Corner of
Glass
NAME PLATE
LOCATION
Door Frame Side
Top of Name Plate
DOOR
Top of Glass Door
Upper Left
Corner of
Glass
®
Monogram.
General Electric Company
Louisville, KY 40225
DOOR
NAME PLATE
LOCATION
Door Frame Side
Cut on Dotted Line
Top of Glass Door
Top of Name Plate
NOTE: While performing installations described in this book,
safety glasses or goggles should be worn.
For Monogram local service in your area, call
1-800-444-1845.
NOTE: Product improvement is a continuing endeavor at General
Electric. Therefore, materials, appearance and specifications are
subject to change without notice.
Pub. No. 49-60148
Part No. 197D4432P001
(N.D. 204) 6/01
41006773 Rev. A
 Loading...