

Page 1

USE& CARE
Built-In Dishwashers
monogrom.com
Page 2

Consumer Informotion
Dishwasher
Introduction Your new Monogram dishwasher makes an eloquent statement of style, convenience
and kitchen planning flexibility. Whether you chose it for its purity of design, practical
features or attention to detail-or for all of these reasons-you'll find that your
Monogram dishwasher's superior blend of form and function will delight you for years
to come.
The information on the following pages will help you operate and maintain your
dishwasher properly.
If you have any other questions, visit our Website at: monogram.com
Contents
Appliance Registration ...................... 27
Care and Cleaning ....................... 15-17
Consumer Services ........................ 3, 24
Dishwasher Parts ............................ 8
Fault Codes ................................. 20
Controls/Features ......................... 9-12
Baskets/Racks............................. 9
Control Panel............................. !0
Control Panel Operation ............... !0, !!
Detergents ............................... 1/4
Lighting Features ......................... 12
Loading .................................. 13
Rinse Agent .............................. 12
Water Temperature ...................... 12
Model and Serial Number Location ............ 3
Problem Solver........................... 21-23
Registration Card ........................ 26, 27
Safety Instructions ......................... 4-7
Settings.................................. 18, !9
Technical Information ........................ 8
Warranty ................................... 25
Page 3

Consumer Information
Dishwasher
Before
using
your
dishwasher
Write
down the
model &
serial
numbers
If you received
a damaged
dishwasher
Readthis manual carefully. It is intended to help
you operate and maintain your new dishwasher
properly.
Keep it handy for answers to your questions.
You can locate your model and serial numbers
on the tub wall just inside the door.
Immediately contact the dealer (or builder) that
sold you the dishwasher.
If you don't understand something or need more
help, there is a list of toll-free consumer service
numbers included on the Consumer Services
page in the back section of this manual.
OR
Visit our Website at: monogram.cam
Before sending in the card, please write these
numbers here:
Model Number
Serial Number
Usethese numbers in any correspondence or
service calls concerning your dishwasher.
Save time
& money
If you
need service
Before you request service, check the Problem
Solver in the back of this manual.
To obtain service, see the Consumer Services
page in the back of this manual.
We're proud of our service and want you to be
pleased. If for some reason you are not happy
with the service you receive, here are steps to
follow for further help.
For customers in the USA:
FIRST,contact the people who serviced your
appliance. Explain why you ore not pleased.
In most cases, this will solve the problem.
NEXT,if you are still not pleased, contact us on
our website, write oil the details-including your
phone number-or write to:
Manager, Customer Relations
GEAppliances
Appliance Park
Louisville, KY40225
It lists causes of minor operating problems that
you can correct yourself.
For customers in Canada:
FIRST,contact the people who serviced your
appliance. Explain why you ore not pleased.
In most cases, this will solve the problem.
NEXT,if you ore still not pleased, write oil the
details-including your phone number-to:
Manager, Consumer Relations
Mabe Canada Inc,
1 Factory Lane, Suite 3!0
Moncton, N.B.E1C9M3
Page 4
IMPORTANT SAFETY INSTRUCTIONS
READ ALL INSTRUCTIONS BEFORE USE
SAVE THESE INSTRUCTIONS
--_,WARN!NG! For your safety, the information in this manual must be followed to minimize the risk
of fire or explosion, electric shock, and to prevent property damage, personal injury, or
death.
IkiA DVERTENCIA! Para su seguridad, debe cumplirse con la informaci6n de este manual a fin de
minimizar el desgo de incendio o explosi6n, descarga el_ctrica y para prevenir
dafos a la propiedad, lesiones personales o la muerte.
_kWARNING! WATER HEATER SAFETY
Undercertain conditions,hydrogengas may be
produced in a water heaterthat has not been
used for two weeks or more. HYDROGEN GAS
IS EXPLOSIVE.
If the hot water has not been used for two weeks
or more, prevent the possibility of damage or injury
by turning on all hot water faucets and allow them
to run for several minutes. Dothis before using any
electrical appliance which isconnected to the hot
water system.Thissimple procedure will allow any
built-up hydrogen gas to escape.Sincethe gas is
flammable, do not smoke or use anopen flame or
appliance during this process.
IkiADVERTENCIA! SEGURIDAD DEL CALENTADOR DE AGUA
Bajo ciertas condiciones,puede producirse gas de
hidr6geno en un sistemade aguacaliente queno se
ha usado durante dos semanas o mds.ELGASDE
HIDROGENOESEXPLOSIVO.
Sielagua caliente no se ha utilizado par dos
semanaso mds, evitela posibilidad de dahos o
lesionesabriendotodos los grifos de agua caliente
y dejdndoloscarter durante varios minutos. Haga
esto antes de utilizar cualquieraparato eldctrico que
se encuentreconectado al sistema de agua caliente.
Estesimpleprocedimiento permitird que selibere
cualquier clasedeacumulaci6n de gas de hidr6geno.
Yaqueelgas es inflamable, no fume o utiliceuna
llama abierta o un aparato durante esteproceso.
PROPER INSTALLATION AND MAINTENANCE
This dishwasher must be properly installed and located in accordance with the Installation
Instructions before it is used. If you did not receive an Installation Instructions sheet with
your dishwasher, you can receive one by visiting our website at monogram.com.
. Connectto a grounded metal, permanent wiring
system;or run an equipment-grounding conductor
with the circuit conductors and connect to the
equipment-grounding terminal or lead of the
appliance.
• Improper connection of the equipment-grounding
conductor can result in a riskof electric shock.
Checkwith a qualified electricianor service
representative if you are in doubt whether the
appliance isproperly grounded.
• Disposeofdiscarded appliances and shipping
or packing material properly.
^_ WARNING! Do not touch the heating element during or immediately after use.
• Donot attempt to repair or replace any part
ofyour dishwasher unless it isspecifically
recommended in this manual. Allother servicing
should be referred to a qualified technician.
•To minimizethe possibility of electric shock,
disconnect this appliance from the power supply
before attempting any maintenance.
NOTE;Turningthe dishwasher off doesnot
disconnectthe appliance from the power supply.
Werecommend having a qualified technician
serviceyour appliance.
• Referto installation instructions for proper
grounding.
• Consulte las instrucciones de instalaci6n para
efectuar una adecuada conexi6n a tierre.
IkADVERTENCIA! Notoqueel elemento calentador durante el uso o inmediatamente despu_s de
finalizar el uso.
4
Page 5

IMPORTANT SAFETY INSTRUCTIONS
READ ALL INSTRUCTIONS BEFORE USE
SAVE THESE INSTRUCTIONS
CAUTION:
To prevent minor inJury or property damage
.,Using a detergent that is
not specifically designed
for dishwashers will cause
the dishwasher
to fill with suds.
If your dishwasher isconnected to a wall
switch, ensure that the switch is on
prior to use.
On dishwashers with electronic
controls, if you choose to turn the wall
switch off between wash cycles,allow
5-10 secondsafter turning the switch
on before touching START/RESETto
allow the control to initialize.
J
, Non-Dishware Items:Do not wash items such
as electronic air cleaner filters,furnace filters
and paint brushes in your dishwasher. Damage
to dishwasher and discoloration or staining of
dishwasher may result.
, Closesupervision is necessary if this appliance
isused byor near children.
, Load light, plastic items so they will not
become dislodged and drop to the bottom of
the dishwasher.
A PRECAUCION: ,. ,.RoP, o. o
,Elementos no aptos para lavaplatos: No lave
, Utilizar un detergente
no diseflado
especfficamente para
lavaplatos provocarc_que
el aparato se Ilenede
espuma.
, Si su lavaplatos se encuentra conectado a
un interruptor de pared, verifique
que el interruptor se encuentre
encendido antes del uso.
On dishwashers with electrontc
controls, if you choose to turn the wall
switch off between wash cycles,allow
5-10 seconds after turning the switch
on before touching START/RESETtoallow
the control to initialize.
elementos como filtros de limpiadores de aire
electr6nicos, filtros de hornos y pinceles de
pintura en su lavaplatos. Pueden producirse
daflos en el lavaplatos y decoloraci6n o
manchas en el aparato.
,Se requiere unasupervisi6n estricta sieste aparato
es utilizado por niflos o en su cercan[a.
,Cargue elementos livianos y plc_sticosde modo
que no se desplacen y caigan al fondo del
lavaplatos, ya que pueden entrar en contacto
con el elemento calentador y daflarse.
Enlavavajillascon controles electr6nicos, si usted
elijeapagar el interruptor de pared entre ciclos
de lavado,deje pasar 5-10 segundos despu6sde
encender el interruptor antes de presionar START/
RESETpara permitir que elcontrol se inicie.
Page 6

IMPORTANT SAFETY INSTRUCTIONS
READ ALL INSTRUCTIONS BEFORE USE
SAVE THESE INSTRUCTIONS
A WARNING! RISK OF CHILD ENTRAPMENT
PROPER DISPOSAL OF THE DISHWASHER
Junked or abandoned dishwashers are dungerous...even if
they will sit for "just u few days." If you are getting rid of your
old dishwasher, please follow the instructions below to help
prevent accidents.
Before You Throw Away Your Old Dishwasher:
.Take off the door of the washing compartment or remove
the door latch keeper (as shown).
\
\
IkiADVERTENCIA! RIESGO DE ENCIERRO PARA NlfilOS
Doorlatch
keeper
ELIMINACION CORRECTA DEL LAVAPLATOS
Un lavaplatos desechado o abandonado resulta peligroso...
a6n si quedarc_en un lugar por %61ounos d[as". Siva a
desechar su viejo lavaplatos, siga las siguientes instrucciones
para prevenir accidentes
Antes de desechar su viejo lavaplatos:
. Quite la puerta del compartimento de lavado o saque la traba
de la puerta (como puede verse).
'_0
Trabade la
puerta
Page 7

IMPORTANT SAFETY INSTRUCTIONS
READ ALL INSTRUCTIONS BEFORE USE
SAVE THESE INSTRUCTIONS
WARNING! When using your dishwasher,
. Usethis appliance only for its intended purpose
as described in this Owner's Manual.
. Use only powder,tabs, liquid detergents or rinse agents
recommended for use in a dishwasher and keep them out of the
reach of children.Cascade®, Cascade®CompleteAutomatic
Dishwashing Detergents, and CascadeCrystal ¢lear_ rinse
agent have been approved for use in all GEdishwashers.
. Locate sharp items sothat they are not likelyto damage the
door seal.
, Load sharp kniveswith the handles up to reduce the riskof cut-
type injuries.
. Do not wash plastic items unless marked dishwasher safe
or the equivalent. Forplastic items not so marked, checkthe
manufacturer's recommendations.
, Do not operate your dishwasher unlessall enclosure panels are
properly in place.
, Do not tamper with controls.
iAD VERTENCIA! Cuando use su lavaplatos, siga precauciones b6sicas de seguridad,
, Use esteaparato s61ocon elobjetivo para el que rue creado,
como se describe en este ilanual del Propietario.
, Utilices61odetergentes en polvo, Ifquidoo tabletas o agentes de
enjuague recomendados para uso en lavaplatos y mant6ngalos
alejados del alcance de los niBos. Losdetergentes para
lavaplatos autom6ticos Cascade@y Cascade@Complete,y el
agente de enjuague CascadeCrystalClear@han sido aprobados
para el uso en todos loslavaplatos GE.
Ubique loselementos filososde modo que no dahen el sellado
de la puerta.
Carguecuchillos filososcon losmangos hacia arriba para reducir
el riesgo de un corte.
. No laveelementos pl6sticos a menos que est6n marcados
como aptos para lavaplatos o equivalente. Enel casode
elementos pl6sticos que no est6n marcados asi,verifique las
recomendaciones del fabricante.
, No haga funcionar el lavaplatos a menos que todos lospaneles
del recinto seencuentren en su lugar
, No altere o modifique los controles.
incluyendo las siguientes:
follow basic precautions, including the following:
, Donot abuse,sit on or stand on the door or dish rack of the
dishwasher.
Donot allow children to play around dishwasher when opening
or closing door due to the possibilityof small fingers being
pinched in the door.
, Donot discard a dishwasher without first removing the door or
the door latch keeper of the washing compartment.
Donot store or usecombustible materials, gasolineor other
flammable vapors and liquidsin the vicinity of this or any other
appliance.
Donot allow children to play with, on or insidethis appliance or
any discarded appliance.
, No maltrate, ni se siente o se pare sobre la puerta o bandejas de
losplatos del lavaplatos,
, No permita que los niBosjueguen alrededor del lavaplatos
cuando abra o cierre la puerta debido a la posibilidadde pellizcar
susdeditos con la puerta
, No deseche el lavaplatos sin antes quitar la puerta del
compartimento de lavado o la traba de la puerta.
Noalmacene o use materiales combustibles, gasolina u otros
vapores o liquidosinflamables cerca de este o cualquier otro
aparato.
. No permita que los niBosjueguen sobre, con o dentro de este o
cualquier otro aparato descartado.
READANDFOLLOWTHISSAFETYINFORMATIONCAREFULLY.
SAVETHESEINSTRUCTIONS
Page 8

Dishwasher Parts
Dishwasher
Parts of the
Dishwasher
1. Upper basket
2. Spray arms
3. Lump
4. Cutlery basket
5. Lower basket
6. Dishwasher detergent compartment
7. Main power switch
8. Rinse Aid Compartment
9. Filter
10. Rating plate
11. Knife Trey
7 8
9
10
Technical
Information
Height
Width
Depth
Weight
Water pressure
Connection
Max output
33-7/8"- 36"
23s/8"
22 7/8" (without door)
i01Ibs
4.2 - 140 psi
0.03 - 1.0 MPa
0.3-10 Bar
Single phase, 120 V,60 Hz, 15 A
1200 W
Page 9

Baskets
Dishwasher
Upper
Basket
1.Wine gloss shelf
2. Upper spray arm
3. Runner for adjusting basket height
4. Catch
5. Knife Stop
2
Raising/lowering the upper basket
,, Pull out the upper basket.
,, Pull out the cutches (4) on either side
of the upper basket and lift or raise the
upper basket at the some time.
3
,, Release the catches once the basket is
in the desired position.
Lower
Basket
Cutlery
Basket
4
Page 10
Control
Panel
Control P(]nel
Dishwasher
Ill mmmm m
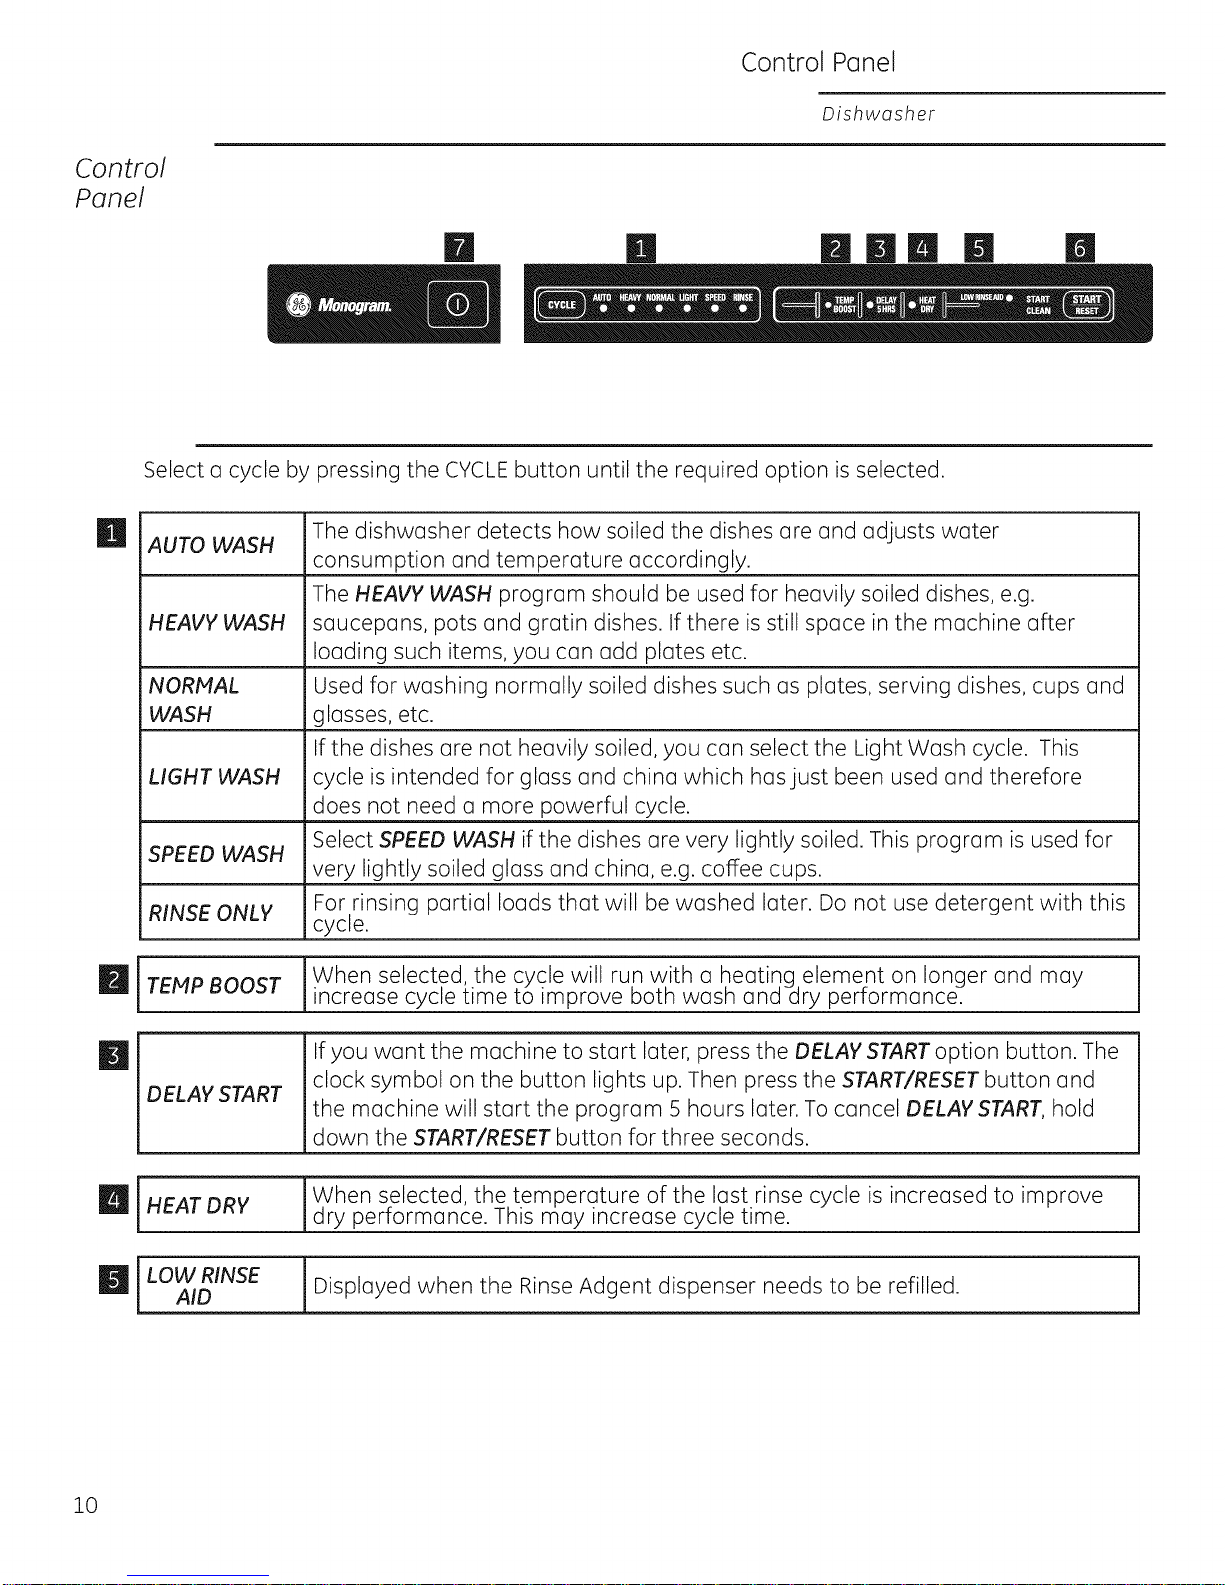
Select a cycle by pressing the CYCLEbutton until the required option is selected.
AUTO WASH
HEAVY WASH
NORMAL
WASH
LIGHT WASH
SPEED WASH
RINSE ONLY
m jTEMPBOOST
El
DELAY START
The dishwasher detects how soiled the dishes are and adjusts water
consumption and temperature accordingly.
The HEAVY WASH program should be used for heavily soiled dishes, e.g.
saucepans, pots and gratin dishes. If there is still space in the machine after
loading such items, you can add plates etc.
Used for washing normally soiled dishes such as plates, serving dishes, cups and
glasses, etc.
If the dishes are not heavily soiled, you can select the Light Wash cycle. This
cycle is intended for glass and china which has just been used and therefore
does not need a more powerful cycle.
Select SPEED WASH if the dishes are very lightly soiled. This program is used for
very lightly soiled glass and china, e.g. coffee cups.
For rinsing partial loads that will be washed later. Do not use detergent with this
cycle.
When selected, the cycle will run with a heating element on longer and may
increase cycle time to improve both wash and ;dry performance.
If you want the machine to start later, press the DELAYSTART option button. The
clock symbol on the button lights up. Then press the START/RESET button and
the machine will start the program 5 hours later. To cancel DELAY START, hold
down the START/RESET button for three seconds.
When selected, the temperature of the last rinse cycle is increased to improve
dry performance. This may increase cycle time.
j Displayed when the Rinse Adgent dispenser needs to be refilled.
10
Page 11

Control Panel/Operation
Dishwasher
m
START/RESET
m
POWER you wish to disconnect power, just switch off Gt the mG_npower switch. (The
After selecting the cycle and desired enhGncements, press the START/RESETp(]d
one time to reGdy the dishwGsher to begin the cycle. Close the door to stGrt the
cycle or begin the DELAYHOURS countdown. When the cycle stGrts, the wGter
fill begins Gnd GpproximGtely 60 seconds IGter the wGsh Gction begins.
The dishwGsher will GIwGys displGy your IGst selection Gnd enhGncements.
If you don t wGnt to chGnge the settings, simply press the START/RESETpGd
one time to reGdy the disl_wGsher Gndclose the door to begin the cycle.
If you wish to chGnge the program Gfter stGrting the m(]chince, press Gnd hold
the START/PAUSE button for 3 seconds. Select Gnew progrGm Gnd press START/
RESET.MGke sure there is detergent in the dispenser.
Once the dishwGsher hGsfinished, it only drGws stGndby current. Should
overflow function in the dishwGsher remGins Gctive.).
11
Page 12
Using the Dishwasher
Dishwasher
Lighting
Features
Water
Temperature
Interior Lights
The interior Halogen lights provide better visibility
for loading and unloading. They turn on when
the door isopened and turn off when the door is
latched.
This dishwasher can beplumbed to either a hot or
cold water line.
Hot water line connection: For effective cleaning
and to prevent dish damage, the entering water
supply should be at least 120°F (49°C)and not
more than 140°F(60°C).Youcan check the water
temperature with a candy or meat thermometer.
Turn on the hot water faucet nearest the
dishwasher, place the thermometer in a glass and
let the water run continuously into the glass until
the temperature ceases to rise.
Do not attempt to replace the bulbs. If light bulb
replacement is necessary, please contact the
GEAnswer Center for service by calling
1.800.626.2000.
Cold water line connection: The dishwasher's
water heater will bring the water temperature to
the appropriate levelfor cleaning.
NOTE:Host cycle times will increase when
plumbed to a cold water line.
Use a
Rinse
Agent
A rinse agent improves dry performance,
reduces spots and prevents new film buildup
on your dishes, glasses, flatware, cookware
and plastic. Cascade Crystal Clear® isthe
recommended rinse agent for Monogram
Dishwashers.
The rinse agent dispenser holds/4.7 oz. of rinse
agent. Under normal conditions, this will last
approximately one month. Try to keep it full,
but do not overfill.
To fill the rinse agent dispenser, make sure the
dishwasher door isfully open.
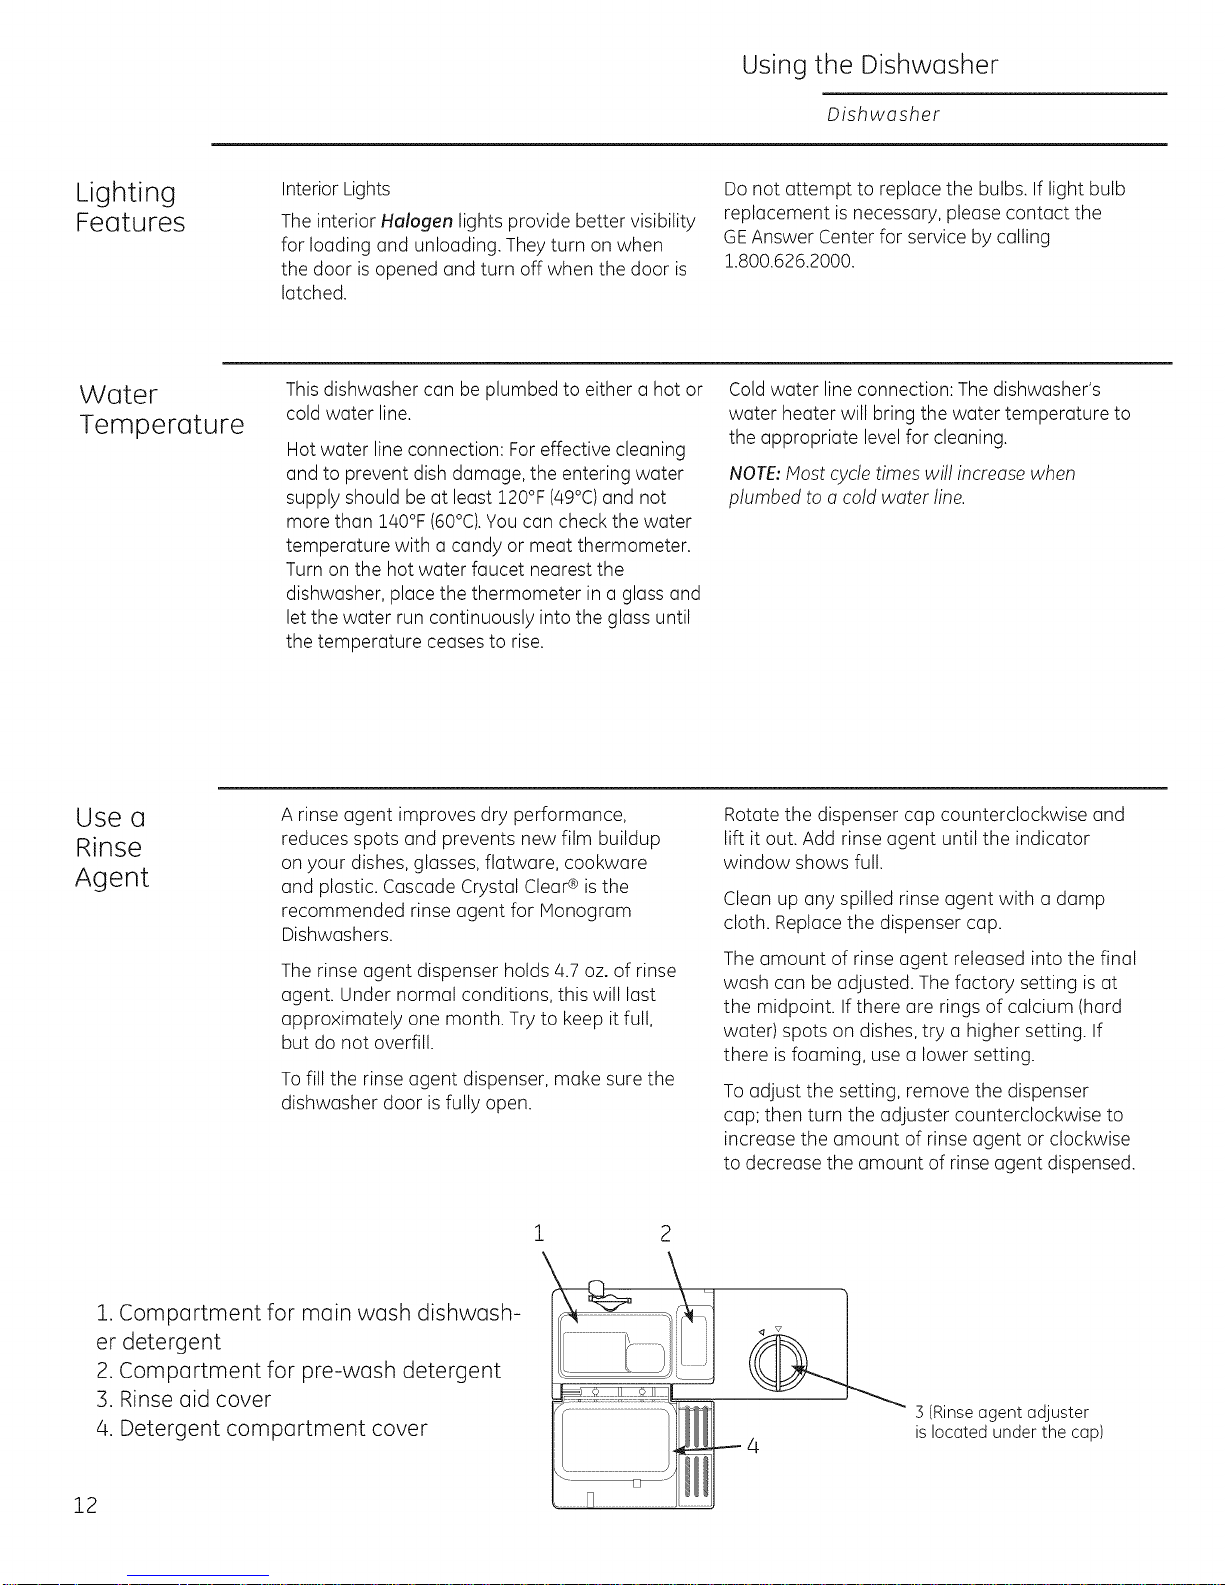
1. Compartment for main wash dishwash-
er detergent
2. Compartment for pre-wash detergent
3. Rinse aid cover
/4.Detergent compartment cover
Rotate the dispenser cap counterclockwise and
lift it out. Add rinse agent until the indicator
window shows full.
Clean up any spilled rinse agent with a damp
cloth. Replace the dispenser cap.
The amount of rinse agent released into the final
wash can be adjusted. The factory setting is at
the midpoint. If there are rings of calcium (hard
water) spots on dishes, try a higher setting. If
there is foaming, use a lower setting.
To adjust the setting, remove the dispenser
cap; then turn the adjuster counterclockwise to
increase the amount of rinse agent or clockwise
to decrease the amount of rinse agent dispensed.
1
\
3 (Rinseagent adjuster
4
is located under the cap)
12
Page 13

Using the Dishwasher
Dishwasher
Loadthe
machine
You do not need to rinse the dishes under
running water. Scrape off large food
particles before loading the machine.
Place glasses, cups, bowls, side plates and
saucers in the upper basket, wine glasses
should be placed on the wine glass shelf,
and knives in the knife stand if present.
NOTE:
Ensure that all soiled surfaces face
inwards or downwards!
Do not put cutlery made of different
materials, e.g. silver and stainless steel, in the
same compartment (risk of stains).
Check that the spray arms are able to move
freely.
Place dinner plates, side plates, serving
dishes, saucepans and cutlery (in the
cutlery basket)in the lower basket.
Stand the cutlery with handles downward
and as spread out as possible. Ensure that
spoons are not resting inside each other.
13
Page 14

Using the Dishwasher
Dishwasher
Detergent Detergent should be dispensed in
dosage accordance with the water's hardness
level.
Follow the dosage instructions on the
detergent package.
Pour the dishwasher detergent into the
dishwasher detergent compartment.
There is one compartment for pre-wash
and one for main wash, see Dispenser.
Phone the dishwasher detergent
manufacturer if you have any questions
regarding the detergent.
Dishwasher tablets
Halve the tablet if it is difficult to close
the dispenser cover.
3in1/Combined detergent
NOTE:
Read through the directions for these
products carefully. If anything is unclear,
contact the dishwasher detergent
manufacturer.
DO NOT USE HAND DISH DETERGENT
m
m
NOTE: Using a detergent that is not specifically
designed for dishwashers will cause the dish-
washer to fill with suds. During operation, these
suds will spill out of the dishwasher vents, covering
the kitchen floor and making the floor wet. Hand
and Clothes washing detergent cannot be used as
the build-up of foam may damage or impede the
machine's performance.
Because so many detergent containers look alike,
store the dishwasher detergent in a separate
space from all other cleaners. Show anyone who
may use the dishwasher the correct detergent and
where it is stored.
14
m
ACAUTION
Protect your children!
- Dishwasher detergent is corrosive!
Recommended detergent amounts based on water hardness
Water hardness
Soft
(0-3 grains per gallon)
Medium
(a-8 grains per gallon)
hard
(9+ grains*)
* 12 grains and higher is extremely hard water.
m
ACAUTiON
Proteja a sus niSos!
- El detergente para lavavajillas es corrosivo!
Detergent amounts
Prewash i teaspoon
Main wash i to 1-1/2 tablespoons
Prewash i teaspoon
Main wash i to 2 tablespoons
Prewash i teaspoon
Main wash 2 to 3 tablespoons
Page 15

The dishwasher's inner container is made of
stainless steel and is kept clean through normal use.
However, if you hove calciferous (hard) water, lime
deposits con form in the dishwasher. In this case,
run a normal wash program with two tablespoons
of citric acid in the dishwasher detergent
comportment.
Spray arm
\
strainer
Fine filter
Cleaning
Dishwasher
5. Remove and clean the fine filter.
/4.Replace in reverse order. Ensure that the
edges are properly sealed when replacing
the fine filter.
Coarse filter
The coarse filter traps larger food particles, which
cannot get past the drain pump.
Empty the coarse filter as necessary.
1. Lift the coarse filter by the handle.
2. Empty the coarse filter. Don't forget to replace it!
Fine filter
Debris that collects on the fine filter is auto
matically rinsed away during each wash.
However, the fine filter and its pipe section
should be cleaned once or twice a year.
1.Turn the handle once counter-clockwise.
2. Lift the pipe section straight up by the
handle. Free the course filter to clean the
pipe section.
5. Lock the filter in place by turning the handle
clockwise to the stop position: the handle should
point out from the dishwasher.
Note: The dishwasher must not be used without the
filter in place!
An improperly fitted coarse filter may affect the dish-
washing result!
15
Page 16

Cleoning
Dishwasher
Drain pump
The pump can be accessed from inside the
machine.
A WARNING!
Disconnect the power from the machine
Desconecte la energfa el6ctrica de la mSquina.
1. Remove the coarse filter and pipe
section.
2. Remove the small fitted aiece at the left of
the bottom drain (see the _mage below).
].You can release and turn the pump blade
by inserting your finger into the hole and
release anything blocking it.
a. Reinstall the fitted piece and filters.
5. Plug the plug into the wall socket.
If the machine still does not start and a
buzzing sound is heard, the overflow guard
has been activated.
,, Shut off the water.
,, Pull the plug out from the wall socket.
,, Call the service division.
Note: Do not forget to reinstoll the fitted piece.
The spray arms
Holes and bearings can sometimes become
blocked.
1. Pull the lower washer arm straight up to
release it.
2. Remove any deposits using a needle or
similar.
The washer arms also have holes under
neath.
3. Reassemble washer arm befor using the dish-
washer.
26
Page 17

To rele(]se the upper spr(]y (arm,the upper b(]sket
must be removed.
1. Pull out the b(]sket.
2. Remove the upper spr(]y (]rm by unscrewing it
counter-clockwise from the b(]sket (]nd cle(]n it.
3. Screw the spr(]y (]rm b(]ck into pl(]ce.
Cleoning
Dishwasher
Spray arm
Door
When cle(]ning the edge Ground the door, use only (]
slightly d(]mp cloth, possibly with (] little detergent.
Do not use (] spr(]y bottle or simil(]r (]round the door
c(]tch. This is to ensure th(]t w(]ter does not pen-
etmte into the door c(]tch (]nd come into cont(]ct
with the electric(]l components.
ACAUTiON
Do not use e sprey bottle or similer eround the door
cetch.
No utilice une botelle pulveriz(]dore o un elemento
similer elrededor de le trebe de le puerte.
17
Page 18

Settings
Dishwasher
Reprogramming
Some of the machine's functions can be reprogrammed. You can change the dishwasher's programming
by using the keypad. The selection will be retained until the next time you reset this function.
Even if the machine is turned off at the main switch or loses power for any other reason, all selections reg-
istered before the interruption of power will be retained.
Child-safe button lock
You can prevent a child starting the machine by accident or changing the settings by programming the
machine with a button lock, which requires the Temperature and Drying buttons to be pressed simultane-
ously to start up the machine. The button lock will automatically be reactivated after three minutes.
1.Switch off the dishwasher with the main switch.
2. Hold in the TEHP BOOSTand HEAT DRY buttons while pressing the main switch. The
Temperature, Drying and start symbols will flash. Release the Temperature and Drying
buttons.
3. Press the CYCLE button - when the Auto wash symbol is lit,
the button lock has been activated.
4. Then press the START/RESET button to store the setting.
or Reset:
1. Switch offthe dishwasher with the main switc.
2. Hold in the TENP BOOST and HEAT DRY buttons at the same time as pressing the main
switch
3. Press the CYCLE- when the Auto wash symbol goes out,
the button lock has been deactivated
/4.Then press the START/RESET button to confirm the setting.
18
Page 19

Settings
Dishwasher
Setting a signal
If you want the machine to signal when the wash is complete, you can program it to do this.
The machine is set without a signal by default.
1. Switch off the dishwasher at the main switch.
2. Hold in the DELAYstart button at the same time as you press the
main switch. The button flashes. Release the button.
3. Press the CYCLE button - when the Auto wash symbol lights, the
signal is activated.
4. Press the START/RESET button and the setting will be stored until next time
you want to make a change.
or Reset
1. Switch off the dishwasher with the main switch.
E 2. Hold in the DELAYstart button at the same time us you press the
main switch. The button flashes. Release the button.
O 3.Press the CYCLE button - when the Auto wash symbol goes out, the
signal is deactivated.
4. Press the START/RESET button and the setting will be stored until next time
you want to make u change.
19
Page 20

Fault Codes
Dishwasher
Display Flashes Type of fault Action
HEAVY
NORMAL
LIGHT
SPEED
RINSE
Too much water in the dishwasher
Phone service
LIGHT
SPEED
AUTO
HEAVY
AUTO
NORMAL
Fault with water inlet
Valve leak
Blocked drain
Clogged filter
Check that the water tap is open
Shut off the water tap and contact service
See 'Possible causes' in chapter Trouble shooting
Clean the filters, see chapter on cleaning
To remove the fault indications from the display, turn off the main switch and then turn it back on again.
20
Page 21

Before You Cull for Service
Dishwasher
Problems
The dishes
are not
clean
Possible cause
• The spray arms are not rotating
• Old dishwasher detergent.
Note: Detergent is a perishable
• Incorrect dosage of detergent
,, Insufficiently powerful dishwashing
program
,, Incorrect program chosen
,, Incorrect loading of the dishwasher
Action
,, Lift off the arms and clean
• Avoid large packs
,, Dispense according to the level of water
hardness
,, Select the TEMP BOOST or switch to a more
powerful wash setting
,, Change to a more powerful wash setting
,, Do not cover china with large bowls or
similar
,,Avoid placing very tall glasses in the corners
of baskets
Stains or a
film on the
china
The china
has a
whitish-
blue sticky
film
,, Glasses and cups have tipped over during
the wash
,, Dishwasher fitted with water softener is
leaking salt
,, Incorrectly set rinse aid dispenser
,, Phosphate-free detergent in combination
with hard water
,, Too high a temperature and/or too
much detergent can cause etching on
(crystal) glass. Unfortunately this cannot be
remedied, only prevented!
,, Too high dosage of rinse aid
,, Load the china securely
,, Check that the cover of the salt
compartment is properly screwed on.
Otherwise phone for Service
,, See the chapter on rinse aid
,, Change detergent
,,Wash (crystal) glass at a low temperature
and dispense dishwasher detergent with
care. Contact the dishwasher detergent
manufactu rer.
,, Reduce dosage. See the chapter on rinse
aid. If the water is very soft, you could try
diluting the rinse aid (1 part rinse aid, 1 part
water).
21
Page 22

Before You Coil for Service
Dishwasher
Problems
Stains on
stainless
steel or
silver
Stains
which
remain
after dish-
washing
Rattling
sound
during
dishwash-
ing
Possible cause
,, Certain food remnants such as mus-
tard, mayonnaise, lemon, vinegar, salt and
dressings con couse stoins on stoinless
steel if ollowed to remoin for ony length
of time. All stoinless steel con mork silver
if ollowed to come into contoct during the
dishwoshing process. Aluminium con olso
couse stoins on dishes.
,, Lipstick ond teo con be difficult to remove.
• The dishes ore not properly Iooded or the
sproy orms ore not rototing.
Action
,, Rinse off food residue of this type if you do
not intend to stort the dishwosher immedi-
utely.
,, Seperote your cutlery into the vurious com-
portments in the bosket. Muke sure silver ond
stoinless steel ore not together.
,, Chonge to o detergent with chlorine.
,, More powerful wash settings are longer and
use higher temperatures for dirtier loads. Use
o more powerful wosh setting suited for the
Iood.
,, Check thot the chino is Iooded securely.
Spin the sproy orms to moke sure thot they
rotote.
The
machine
will not
start
,, You hove forgotten to switch on the moin
switch.
,, The door is not properly closed.
• A fuse has blown.
,, The druin pump plug is not in pluce.
,, The woter top is off.
,, Overfilling/leukuge.
,, A droning sound (druinoge
pump) con be heurd from the muchine, this
will stop when the power is switched off us-
ing the moin power switch.
• Check
• Check
• Check
• Check
• Check
,, Contoct our customer core center.
1. Close the woter top
2. Disconnect power
5. Coil o service engineer
22
Page 23

Before You Coil for Service
Dishwasher
Problems
Water
remains in
the
machine
Bad odor in
the
machine
The dishes
are not
sufficiently
dry
Possible cause
,, Obstruction in the droin hose
,, Kinks in the droin hose
,, The filters ore clogged
,, Items in the droin pump
,, Dirt olong the strips ond in corners
,, Dirt olong the strips ond in corners
,, The HEAT DRY button h(]s not been
selected
Action
,, Disconnect the droin hose where it is
connected to the sink's woter trop. Check
thot no debris hos become stuck. Isthe
cone-shoped port of the pipe cut so thot the
diometer is ot leost 16 mm?
,, Check thot the hose is free from kinks or
shorp bends
,, Clean out the coarse filter, the fine filter ond
the filter
,, Clean out the drain pump. See chapter on
cleaning
,, Cleon with o dish brush ond Iow-lother
detergent.
• Cleon with o dish brush ond Iow-lother
detergent.
• Select the HEAT DRY option.
Door will
not close
,, The machine is not fully loaded
,, The rinse aid has run out or the set dose
is too low
,, The baskets are not correctly placed
,, Fully Iood the mochine
,, Replenish rinse old or increose the dose of
rinse old if required
• Open door slightly when oll cycles hove
completed
,, Hoke sure oil boskets ore in the horizontol
position. Check thot the bosket woter
connector is oligned with the sproy pipe
23
Page 24

Consumer Services
Dishwasher
With the purchase of your new Monogram appliance, receive the
assurance that if you ever need information or assistance from
GE, we'll be there. All you have to do is cull-toll-free!
GE Answer CenteP _
In the USA:
800.626.2000
Repair Service
In the USA:
800.444.1845
In Canada:
800.561.3344
For Customers With
Special Needs...
In the USA:
800.626.2000
Whatever your question about any Monogram major appliance, GEAnswer Center®
information service is available to help. Your cull-and your question-will be answered promptly
and courteously. Cullthe GEAnswer Center®Monday to Friday, 8:00 a.m. to 10 p.m. EST,and
Saturday, 8 u.m. to 7 p.m. EST.
OR
Visit our Website at: monogram.cam
In Canada, cull 800.561.3344.
AGE consumer service professional will provide expert repair service, scheduled at u time that's
convenient for you. To schedule service, cull Monday to Friday, 7:00 u.m. to 10:00 p.m. EST,or
Saturday and Sunday, 8:00 u.m. to 6:00 p.m. EST.Many GE Consumer Service company-operated
locutions offer you service today or tomorrow, or at your convenience. Our factory-trained
technicians know your appliance inside and out-so most repairs can be handled injust one visit.
In Canada: Monday to Friday, 7:00 a.m. to 8:00 p.m. and Saturday, 8:00 a.m. to S:00p.m. EDST.
GEoffers, free of charge, a brochure to assist in planning a barrier-free
kitchen for persons with limited mobility.
Consumers with impaired hearing or speech who have access to a TDD
or a conventional teletypewriter may call 800.TDD.GEAC(800.833./4322)
to request information or service.
SEC11ONA-A
Service Contracts
In the USA:
800.626.2224
In Canada:
800.561.3344
Parts and
Accessories
In the USA:
800.626.2002
In Canada:
800.561.3344
24
You can have the secure feeling that GE Consumer Service will still be there after your
warranty expires. Purchase a GEcontract while your warranty is still ineffect and you'll
receive a substantial discount. With a multiple-year contract, you're assured of future
service at today's prices.
Individuals qualified to service their own appliances can have parts or accessories sent directly
to their home.The GE parts system provides access to over/47,000 parts...and all GEGenuine
Renewal Parts are fully warranted. VISA,MasterCard and Discover cards are accepted.
User maintenance instructions contained in this manual cover procedures intended to be
performed by any user. Other servicing generally should be referred to qualified service personnel.
Caution must beexercised, since improper servicing may cause unsafe operation.
Page 25

Warranty for Customers in the USA
Dishwasher
YOUR MONOGRAM DISHWASHER WARRANTY
Staple sales slip or cancelled check here. Proof of original purchase
date is needed to obtain service under warranty.
WHAT IS
COVERED
From the Date
of the Original
Purchase
ONE-YEAR
Any part of the dishwasher which fails due to a defect in materials or workmanship. During this
limited one-year warranty, GEwill also provide, free of charge, all labor and in-home service to
replace the defective part.
Five Years
The dishwasher rack and/or the electronic control module, if these should fail due to a defect in
materials or workmanship. During this five-year limited warranty, you will be responsible for any
labor or in-home service costs.
Lifetime
The stainless steel tub or door liner, if it fails to contain water due to a defect in materials or
workmanship. During this limited lifetime warranty, GEwill also provide, free of charge, all labor
and in-home service to replace the defective part.
• ® • ® ® • • • ® • ® • • • • • • • • ® • • ® • • ® Q ® • • • • • • • • • Q • • ® • ® • • • • •
This warranty isextended to the original purchaser and any succeeding owner for the products
purchased for ordinary home use in the 48 mainland states, Hawaii or Washington, D.C.If the product
islocated in an urea where service by u GEAuthorized Servicer isnot available, you may be responsible
for u trip charge or you may be required to bring the product to an Authorized GEService location for
service. In Alaska the warranty isthe same except that it is LIMITEDbecauseyou must pay to ship the
product to the service shop or for the service technician's travel cost to your home.
All warranty service will be provided by our Factory Service Centers or by our authorized Customer
Care®servicers during normal working hours.
Should your appliance need service, during warranty period or beyond, call 800.4/44.!845.
Please have serial number and model number available when calling for service.
WHAT IS NOT
COVERED
49-55073
09/13/10 25
. Service trips to your home to teach you
how to use the product.
. Improper installation, delivery or maintenance.
. Replacement of house fuses or resetting
of circuit breakers.
. Failure of the product if it isabused, misused,
or used for other than the intended purpose or
used commercially.
. Damage to the product caused by accident,
fire, floods or acts of God.
. Incidental or consequential damage caused by
Limited Warranty. Any implied warranties, including the implied warranties of merchantability or fitness for a
EXCLUSIONOF IMPLIEDWARRANTIES--Yoursole and exclusive remedy is product repair as provided in this
particular purpose, are limited to one year or the shortest period allowed by law.
Some states do not allow the exclusion or limitation of incidental or consequential damages, so the above
limitation or exclusion may not apply to you. This warranty gives you specific legal rights, and you may also
have other rights which vary from state to state. To know what your legal rights are in your state, consult your
local or state consumer affairs office or your state's Attorney General.
Warrantor: General Electric Company,
Louisville, KY/40225
possible defects with this appliance.
. Cleaning or servicing of the air gap device
in the drain line.
. Damage caused after delivery, including
damage from items dropped on the door.
. Product not accessible to provide required
service.
Page 26

_DpOJ. ]!DH
.uoJ,Jo
UO
OJ:_S!6a_
®
:pnpoJd
uMo
o9
saoun!lddV 39
IIIII
Place
1stClass
Letter
Stamp
Here
General Electric Company
Wa rra nty Registration Department
P.O. Box 34980
Louisville, KY 40232-2150
ImJ
26
Page 27

Consumer Product Ownership Registration
Dear Customer:
Thank you for purchasing our product and thank you for placing your confidence in us. We are proud to have you
us u customer!
Follow these three steps to protect your new appliance investment:
Complete and mail
your Consumer
Product Ownership
Registration today.
Hove the peace of mind
of knowing we can
contact you in the
unlikely event of a
safety modification.
After completing this
registration, write your
model and serial numbers
in this manual and store
this document in a safe
place. You will need this
information should
you require service. The
service number in the USA:
800.444.1845. tn Canada:
1.888.880.3030.
Readyour "Owner's
"Manual" carefully. Itwill
help you operate your new
appliance properly.
Important: If you did not get a registration card with your product, detach and return the form below to
ensure that your product is registered, or register online at monogram.com.
FOLDHERE
Consumer
Dishwasher I ,
Mr. [] Mrs. []
Ms. [] Miss []
First _ Last
Name Name
Street
Product Ownership Registration
Product
Model Number Serial Number
, , , , , , , , , , I I , , , , , , , ,
Address
Date Placed
L ........................................................... _
I I
Apt. # _ E-mail Address*
City State _ ZiPcode
Month _ Day Year Number
* pleaseprovideyoure-mailaddresstoreceive,viae-mail,discounts,specialoffersandotherimportant
communicationsfromGEAppliances(GEA).
[] CheckhereifyoudonotwanttoreceivecommunicationsfromGEA'scarefu@selectedpartners.
FAILURE TO COMPLETE AND RETURN THIS CARD DOES NOT DIMINISH YOUR WARRANTY RIGHTS.
Forinformation about GEA'sprivacy and data usage policy,go to monogram.cam and click on "Privacy Policy"
or call 800.626.2224.
TAPE CLOSED
27
Page 28

MAN UELD'UTILISATION
D'ENTRETIEN
Love-voisseile encostr@s
ET
monogrom.com
Page 29

Information pour le consommateur
Lave-vaisselle
Introduction Votre nouveau lave-vaisselle Monogram est un symbole 41oquent de style, de confort et
de souplesse dons votre cuisine. Que vous le choisissiez pour so puret@ de ligne, pour
ses caract@ristiques techniques ou pour sa recherche approfondie du d@tail,ou pour
toutes ces raisons r@unies, vous trouverez que la combinaison hors pair de formes et
de fonctions de votre lave-vaisselle Monogram fera votre bonheur pendant des ann@es.
Vous trouverez dons les pages suivantes des renseignements qui vous aideront 8 bien
faire fonctionner et 8 bien entretenir votre lave-vaisselle.
En cos de questions suppl@mentaires, consultez notre site intemet : monogram.cam
Table des
mati@res
Inscription de votre (]ppc]reil ................ 27
Entretien et nettoyc]ge.................... 15-!7
Service 6 la clientele ....................... 3, 24
PiScesdu I(]ve-vc]isselle ..................... 8
Codes d'erreur .............................. 20
Commc]ndes/Fonctions ................... 9-12
Paniers/Egouttoirs ........................ 9
Tableau de commc]ndes .................. 10
Fonctionnementdutableau de commandes!0, !1
D6tergents ............................... !/4
Eclairage ................................. !2
Chargement ............................. !3
Agent de rinqc]ge......................... !2
Temp6rature de I'ec]u..................... !2
Emplacementdesnum_rosde moduleet des_rie . 3
En cas de probl_me ...................... 2!-23
Fiche d'inscription ........................ 26, 27
Consignes de s6curit6 ...................... 4-7
R6glages................................. 18, !9
Information techniques ....................... 8
Gc]rc]ntie.................................... 25
Page 30

Information pour le consommateur
Lave-vaisselle
Avant
d'utiliser
votre lave-
vaisselle
Ecrivez /es
numdros
de mod_/e
et de sdrie
Si vous oyez
requ un lave-
vaisselle
endommag_
Lisezsoigneusement ce manuel. IIa pour
objet de vous aider 6 bien faire fonctionner et
entretenir votre lave-vaisselle.
Conservez-le 6 port_e de main. Vous y trouverez
des r6ponses 6 vos questions.
Vous trouverez vos num@os de module et de
s@iesur la paroi de la cuve juste 6 I'int@ieur de
la porte.
Contactez imm6diatement votre revendeur (ou le
fabricant) qui vous a vendu votre lave-vaisselle.
Si vous ne comprenez pas bien ce qui est 6crit
ou avez besoin d'une aide suppl6mentaire, vous
trouverez une liste de num@os de service 6 la
clientele dans la derni_re section de ce manuel.
OU
Consultez notre site Internet 6 I'adresse
monogram.cam
Avant d'envoyer la carte, veuJllez 6crire ces
num6ros ici:
Num6ro du module
Num@o de S@ie
Utilisez ces num@os dans toute correspondance
ou dans tous vos appels de service relatifs 5
votre lave-vaisselle.
Economisez
votre temps
et votre
argent !
Si vous
devez
appeler un
technicien
Avant d'appeler un d_panneur, v@ifiez la section Vous y trouverez les causes de probl@mesde
de r6solution des probl_mes 6 la fin de ce fonctionnement mineurs que vous pourrez r6gler
manuel, vous-m_me.
Pourjoindre un technicien, consultez la page de
service 6 la clientele 6 la fin de ce manuel.
Nous sommes tiers de notre service et tenons
6 ce que vous soyez satisfaits. Si,pour quelque
raison que ce soit, vous n'_tes pas heureux du
service que vous recevez, voici quelques mesures
6 prendre pour obtenir davantage d'aide.
Pour les clients aux U.S.A.:
Pour commencer, appelez les gens qui ant fait
I'entretien de votre appareil 61ectrom6nager.
Dites-leur pourquoi vous n'@tespas satisfait.
Dons la plupart des cos, cela suffira d r6gler votre
probleme.
Ensuite, si vous n'_tes toujours pas satisfait,
contactez-nous par notre site internet en
donnant vos coordonn6es, y compris votre
num@o de t616phone, ou 6crivez 6 I'adresse
suivante :
Directeur, Relations Clientele
GEAppliances
Appliance Park
Louisville, KY40225
Pour les clients au Canada :
Pour commencer, appelez les gens qui ant fait
I'entretien devotre appareil 61ectrom6nager.
Dites-leur pourquoi vous n'@tespas satisfaits.
Dons la plupart des cos, cela suffira d r6gler votre
probleme.
Ensuite, sivous n'_tes toujours pas satisfait,
6crivez tousles d@ails, y compris votre num@o
de t616phone, 6 I'adresse suivante :
Directeur, Relations Clientele
Mabe Canada Inc.
1 Factory Lane, Suite 310
Moncton, N.B.EIC 9M3
Page 31

IMPORTANTES CONSlGNES DE SECURIT(:
VEUILLEZ LIRE TOUTES LES CONSlGNES AVANT UTILISATION
CONSERVEZ CES INSTRUCTIONS
,_A VFRTIC;C;FMFiklTI Pour votre s6curit6, les informations contenues dons ce manuel doivent
.................. 6tre suivies afin de minimiser les risques d'incendie ou d'explosion, de chocs
61ectriques et d'6viter les dommages mat6riels, les blessures corporelles
voire la mort.
AAVERTISSEMENT ! SE-CURITE DU CHAUFFE-EAU
Dons certaines conditions, de I'hydrog_ne
gazeux peut _tre produit dons un chauffe-eau
Iorsque ce demier n'a pas dtd utilisd,pendant
deux semaines ou plus. L'HYDROGENEESTUN
GAZ EXPLOSIF.
Sivous n'avez pas utilis_ I'eauchaude depuis
plus de deux semaines,6viteztout dommage
ou blessureen ouvrant tous lesrobinets d'eau
J
chaude et en leslaissantcouler pendant quelques
minutes. Effectuez ce geste avant d'utiliser tout
appareil 61ectrom6nager branch6 au syst_me d'eau
chaude. Cette proc6dure simple permet 6 toute
accumulation d'hydrog_ne gazeux de s'6chapper.
Comme cegaz est inflammable, ne fumez
pas,n'utilisez pas de flamme vive ou d'appareil
61ectrom6nagerpendant cette proc6dure.
CONFORMITE DE L'INSTALLATION ET DE L'ENTRETIEN
Ce lave-vaisselle doit _tre correctement installd dons un emplacement approprid
conformdment aux instructions d'installation avant toute utilisation. Si vous n'avez pas requ
les instructions d'installation avec ce lave-vaisselle, vous pouvez vous en procurer en allant
sur notre site intemet 8 monogram.cam
• RaccordezI'appareil 6 un syst@me61ectrique
permanent et mis 6 la terre ou installezun fil
de mise 6 la terre des appareilsavec les ills
d'alimentation et raccordez-le 6 la borne ou au fil
de mise 6 la terre de I'appareil.
• Uneconnexion incorrecte de ce fil de terre pourrait
provoquer un risque de choc 61ectrique.V@ifiez
aupr@sd'un 61ectricienqualifi6 ou d'un technicien
sivous n'@espas sQrque votre appareil soit
correctement mis 6 la terre.
• Mettez au rebut lesappareils 61ectriques
hors service et les mat@iaux d'emballage ou
d'exp6dition correctement.
• N'essayezpasde r6parer ou de remplacer une
piecede I'appareil,6 mains d'une recommandation
pr6cise6 cet effet dans ce manuel.Tout autre
entretien doit _tre effectu6 par un technicien
qualifi6.
• Pour minimiser lapossibilit6d'61ectrocution,
d6branchez I'appareil du circuit d'alimentation
avanttout entretien.
REMARqUE:L'arr_tdu lave-vaissellene met pas
I'appareil hats tension. Nous recommandons qu'un
techniciencompdtent rdpare votre appareil.
• R6f@ez-vousaux instructions d'installation pour
une mise 6 la terre correcte.
^ ^_VERTISSEM ENT! Ne tou_h_ pas les _l_ments chauffants pendant ou imm_cliatement aprgs
leur utilisation.
Page 32

IMPORTANTES CONSIGNES DE SI'--CURITE
VEUILLEZ LIRE TOUTES LES CONSIGNES AVANT UTILISATION
CONSERVEZ CES INSTRUCTIONS
NISE
EN GARDE"
.,L'utilisation d'un d@ergent
qui n'est pas conqu
sp6cifiquement pour lelave-
vaisselle remplira celui-ci de
mousse.
, Si lelave-vaisselle est raccord6 6 un interrupteur
mural, assurez-vous que I'interrupteur de celui-ci
soit sur ON avant d'utiliser cet appareil.
, Sur leslave-vaisselledot6s de commandes
_lectroniques et sivous pr6f@ezfermer
I'interrupteur mural entre les cycles de
lavage, attendez de 5 6 !0 secondesapr_s
avoir remis I'interrupteur surON avant de
toucher au bouton START/RESET(IVlarche/
r6initialisation)pour permettre aux commandes de
ser6initialiser..
, Utilizar un detergente
no diseflado
especfficamente para
lavaplatos provocar6 que
el aparato se Ilenede
espuma.
, Si su lavaplatos se encuentra conectado a
un interruptor de pared, verifique
que el interruptor se encuentre
encendido antes del usa.
Enlavavajillascon controles
electr6nicos,si usted elije apagar el
interruptor de pared entre ciclos de
lavado, deje pasar 5-10 segundos
despu6s de encender el interruptor antes de
presionar START/RESETpara permitir que el
control se inicie.
, POUREVITER LES BLESSURES MINEURES OU LES DOPIPIAGES PIATERIELS
, Articlesautres que lavaisselle:Ne lavezpus des
articles comme lesfiltres de purificateur d'air,filtres
de chaudi@es oupinceaux duns le lave-vaisselle.
Le lave-vaissellepourrait @reendommag_ et une
d_coloration ou destaches pourraient en r6sulter.
, Unesurveillance accrue est n6cessaire Iorsde
I'utilisation decet appareil en pr6sence d'enfants.
, Chargez les articles 16gersen plastique de
mani@e 6 ce qu'ils ne se d_placent pas et ne
tombent pas au fond du lave-vaisselle.
,Elementos no aptos para lavaplatos: No lave
elementos coma filtros de limpiadores de aire
electr6nicos, filtros de hornos y pinceles de
pintura en su lavaplatos. Pueden producirse
dahos en el lavaplatos y decoloraci6n o
manchas en el aparato.
.Se requiere unasupervisi6n estricta sieste aparato
es utilizado por nihos o en sucercan[a.
.Cargue elementos livianos y pl6sticos de modo
que no se desplacen y caigan al fondo del
lavaplatos, ya que pueden entrar en contacto
con el elemento calentador y da_arse.
Page 33

IMPORTANTES CONSIGNES DE SI'--CURITII-
VEUILLEZ LIRE TOUTES LES CONSlGNES AVANT UTILISATION
CONSERVEZ CES INSTRUCTIONS
%
IkAVERTISSEMENT! RISQUE DE PIEGE POUR LES ENFANTS
NISE AU REBUT CORRECTE
Leslave-vaissellejet6sou abandonn6ssont dangereuxm@me
sivous neleslaissezaurebut que pour<<quelquesjours >>.si
vousvoulezjeter votre vieuxlave-vaisselle,suivezlesinstructions
suivantespour emp@cherlesaccidents.
Avant de jeter votre vieux lave-vaisselle :
. Enlevez laporte du compartiment de lavage ou enlevez le
verrou de la porte (comme lemontre I'illustration).
DE VOTRE LAVE-VAISSELLE
\
\
IkIADVERTENCIA! RIESGO DE ENCIERRO PARA NlfilOS
ELININACION CORRECTA DEL LAVAPLATOS
Un lavaplatos desechado o abandonado resulta peligroso...
a6n si quedarc_en un lugar pot '%61ounos dias". Siva a
desechar su viejo lavaplatos, siga las siguientes instrucciones
para prevenir accidentes
Antes de desechar su viejo lavaplatos:
. Quite la puerta del compartimento de lavado o saque la traba
de la puerta (como puede verse).
Door latch
keeper
Traba de la
puerta
Page 34

IMPORTANTES CONSIGNES DE S(--CURITE
VEUILLEZ LIRE TOUTES LESCONSIGNES AVANT UTILISATION
CONSERVEZ CES INSTRUCTIONS
VERTISSEMENT! _o_ _ fonctionnement, suivez les pr_cautions de base dont celles-c, :
, N'utilisezcet appareil qu'aux fins pr6vues d6crites dans le
manuel d'utilisation.
, N'utilisezque les d@ergentset agents de rinqage liquides,en
poudre ou en tablette, recommand6s pour leslave-vaisselleet
gardez-les hors de la port6e des enfants. Lesd@ergentspour
lave-vaisselleCascade@et Cascade@Complete et lesagents de
tin€age CascadeCrystal Clear@sont approuv6s avec leslave-
vaisselleGE
, Placezles articles coupants de mani@e 6 ce qu'ils n'abtment pas
lejoint de la porte
, Placezles couteaux avec le manche vers le haut pour r6duire les
risques de coupures.
, Ne lavezpas les articles en plastique 6 moins qu'ilsn'aillent
au lave-vaisselleou 1'6quivalent.Silesarticlesen plastique ne
sont pas marqu6s en ce sens,voyezles recommandations du
fabricant.
,Ne faites pas fonctionner lelave-vaissellesi lespanneaux de
I'enceintene sont pas install6s.
, Ne modifiezjamais lescommandes.
iADVERTENCIA! uon,ouso. ovoUo.os.sigaprecauciones b6sicas de seguridad,
, Use esteaparato s61ocon elobjetivo para el que rue creado,
como se describe en este Manual del Propietario.
, Utilices61odetergentes en polvo, liquidoo tabletas o agentes de
enjuague recomendados para uso en lavaplatos y mant6ngalos
alejados del alcance de los ni_os. Losdetergentes para
lavaplatos autom6ticos Cascade@y Cascade@Complete,y el
agente de enjuague CascadeCrystalClear@han sido aprobados
para el uso en todos loslavaplatos GE.
, Ubique loselementos filososde modo que no dahen el sellado
de la puerta.
Carguecuchillos filososcon losmangos hacia arriba para reducir
el riesgo de un corte.
, No laveelementos pl6sticos a menos que est6n marcados
como aptos para lavaplatos o equivalente. Enel casode
elementos pl6sticos que no est6n marcados asi,verifique las
recomendaciones del fabricante.
, No haga funcionar el lavaplatos a menos que todos lospaneles
del recinto seencuentren en su lugar
No altere o modifique loscontroles.
induyendo las siguientes:
, Nemaltraitez pas,ne vous asseyezpaset ne montez pas sur la
porte ou sur le panier.
, Nelaissezpaslesenfantsjouer autour du lave-vaisselle Iorsque
vous ouvrez et fermez la porte pour 6viter que leurs petits doigts
ne se coincent dans la porte.
, Nejetez pas un lave-vaissellesans d'abord enlever laporte du
compartiment de lavageou le verrou de la porte.
Nestockez paset n'utilisezpas d'essenceou d'autres vapeurs
et liquidesinflammables dans lesparages de cet appareil ou de
tout autre appareil.
Nelaissezpaslesenfants s'amuser avec ou dans cet appareil ou
avec tout appareil mis au rebut.
, No maltrate, ni se siente o se pare sobre la puerta o bandejas de
losplatos del lavaplatos,
, No permita que los niBosjueguen alrededor del lavaplatos
cuando abra o cierre la puerta debido a la posibilidadde pellizcar
susdeditos con la puerta
, No deseche el lavaplatos sin antes quitar la puerta del
compartimento de lavado o la traba de la puerta.
Noalmacene o use materiales combustibles, gasolina u otros
vapores o liquidosinflamables cerca de este o cualquier otro
aparato.
, No permita que los niBosjueguen sobre, con o dentro de este o
cualquier otto aparato descartado.
READANDFOLLOWTHISSAFETYINFORMATIONCAREFULLY.
SAVETHESEINSTRUCTIONS
Page 35

Pi_ces du lave-vaisselle
Lave-vaisselle
PiSces
du /ave-
vaisse/le
1. Panier sup_rieur
2. Bras gicleurs
3. Lumi_re
4. Panier 8 couverts
5. Panier inf_rieur
6. Compartiment de d6tersif
7. Interrupteur principal
8. Compartiment d'agent de rinqage
9. Filtre
10. Plaque signal_tique
11.Tiroir 8 coutellerie
4
5
6
9
7 8
Information
technique
Hauteur
Largeur
Profondeur
Poids
Pression d'eau
Connexion
Puissance max.
33-7/8po - 36po
23 5/8po
22 7/8po (without door)
101 Ibs
4.2 - 140 psi
0.03 - 2.0 IVlpa
0.3-10 Bar
monophas# 120 V, 60 Hz, 15 A
1200 W
Page 36

Paniers
Lave-vaisselle
Panier
supdrieu
1. Support de verres _]vin
2. Brc]s gicleur sup6rieur
3. Rail pour le r6gtage de la hauteur du
partier
4. Loquet
5. But6e pour couteaux
2
Pour monter ou descendre le pc]nier
sup_rieur
,, Tirez sur le pc]nier sup6rieur pour le
sortir du IGve-vaisselle.
3
4
,, Tirez sur les Ioquets (4)de chaque c6t6
du panier sup6rieur tout en soulevant le
panier au m_me moment.
,, Relachez les Ioquets Iorsque le panier
est dans la position souhait6e.
Panier
infdrieur
Panier
couvert5
Page 37

Tableau de
commandes
Choisissez un programme en appuyant sur le bouton CYCLE(Programme)jusqu'6 ce que le pro-
gramme requis salt s61ectionn6.
Lavage au- Le lave-vaisselle d6tecte le niveau de salet6 de la vaisselle et ajuste la
m
tomatique consommation d'eau et la temp6rature en fonction.
Lavage inten- exemple, les casseroles, les po_les et les plats 6 gratin Si votre lave-vaisselle
sif
Lavage nor- Ce programme est conqu pour laver la vaisselle normalement sale, telle que les
real assiettes, les plats de service, les tasses et les verres, etc.
Lavage L_ger Light Wash (Lavage 16get). Ce programme est conqu pour lesverres et la
Lavage rap-
ide peu sale. Ce programme est conqu pour les verres et la porcelaine tr_s peu sales,
Tableau de commandes
Lave-vaisselle
Ill mmmm m
Le mode HEAVYWASH (Lavage intensif) est utilis6 pour la vaisselle tr_s sale, par
n'est pas plein, vous pouvez ajouter des assiettes, etc.
Si les ustensiles ne sont pas tr6s sales, vous pouvez s61ectionner le programme
porcelaine r6cemment utilis6s qui ne demandent pas un programme puissant.
S61ectionnez le programme SPEEDWASH (Lavage rapide) si la vaisselle est tr_s
par exemple, des tasses 6 car6.
20
Rin_age Pour rincer les charges partielles qui seront lav6es plus tard. N'utilisez pas de
uniquement d6tergent avec ce programme.
IAugmentationl Lorsque cette option est s61ectionn6e, 1'616mentchauffant fonctionne pendant
[de la chaleur ] efficacit6FlusIonqtemp.Sdulavageetla dur6eetdu s6chage.dUprogramme peut _tre augment6e pour am61iorer
Si vous souhaitez que le lave-vaisselle se mette en marche plus tard, appuyez
sur la touche DELAY START (D6part diff6r6). Le symbole de I'horloge s'allumera.
D6part diff6r6
Chaleurs_che de rinqage est augment6e pour am61iorer lefficacit6 du s6chage. La duree du
j Niveau d'agent j
de rin_age j S'affiche Iorsque le distributeur d'agent de rinqage dolt 6tre rempli.
[
has l
Appuyez ensuite sur le bouton START/RESET (Marche/r6initialisation) Pour an-
nuler la fonction DELAY START (D6part diff6r6), maintenez le bouton START/RESET
(Marche/r6initialisation) appuy6 pendant 3 secondes.
_ L:orsque cette option est s61ectionn6e, la tem_6rature de la derni_re procjramme
programme peut etre augment6e.
I
Page 38

Tableau de comm(]ndes / Fonctionnement
Lave-vaisselle
m
m
Marche/
r_initialisation
Alimentation
Apr_s avoir choisi le cycle et les additions souhait6es, appuyez une fois sur
la touche START/RESET (mise en marche/r6initialisation) pour pr6parer le
lave-vaisselle (_commencer le programme. Fermez la porte pour lancer
le programme ou commencer le compte (_ rebours si DELAY HOURS (mise
en marche diff6r6e) est s61ectionn6. Ouand le programme commence, le
rem.plissage commence suivi du processus de lavage environ 60 secondes
apres.
Le lave-vaisselle affiche toujours votre dernier choix et vos derni_res additions.
Si vous ne d_sirez pas changer les r_glages, appuyez simplement une fois sur
la touche START/RESET (mise en mardheTr_initlalisation) pour preparer le lave-
vaisselle et fermez la porte pour lancer le programme.
Si vous souhaitez modifiez le programme upr_s avoir d_marr_ le lave-
vaisselle, appuyez sur la touche START/PAUSE (Marche/Pause) pendant 3
secondes. Cholsissez un nouveau programme et appuyez sur START/RESET
(mise en marche/r_initialisation). Assurez-vous qu'il y a du d_tergent dans le
compartiment pr_vu c_cet effet.
Lorsque le progrc]mme est termin6, le Iove-vc]isselle ne n6cessite qu'une
GlimentGtion _lectrique de veille. Si vous souhGitez mettre IGppGreil hors
tension, utilisez I'interrupteur principal. (LGfonction d6bordement du IGve-
vGisselle reste active).
11
Page 39

Utilisation du lave-vaisselle
Lave-vaisselle
Fonctions
d'6clairage
Temp6rature
de I'eau
Eclairageint@ieur
Leslampes 6 halog_ne int@ieures permettent
une meilleure visibilit6 pour le chargement et le
d6chargement du lave-vaisselle. Elless'allument
6 I'ouverture de la porte et s'6teignent au
verrouillage de la porte.
Le lave-vaisselle peut @trebranch_ au circuit
d'eau chaude ou froide.
Branchement au circuit d'eau chaude : Pour un
lavage efficace et pour _viter d'endommager la
vaisselle, la temp@ature de I'eau entrant dans
le lave-vaisselle doit _tre sup@ieure (_120°F
(49°C)et inf@ieure (_140°F (60°C).Vous pouvez
v@ifier la temp@ature (_I'aide d'un thermometre
(_sirop ou (_viande. Ouvrez le robinet d'eau
chaude le plus proche du lave-vaisselle, placez le
thermometre dons un verre et laissezI'eau couler
N'essayez pas de remplacer ces ampoules. Si une
ampoule doit _tre remplac6e, veuillez contacter
le service d'information GEAnswer Center@ en
composant le 1.800.626.2000.
sur le thermometre jusqu'(_stabilisation de la
temp@ature.
Branchement au circuit d'eau froide : Le
chauffe-eau du lave-vaisselle amenera I'eau a la
temp@rature requise pour le lavage.
REt4ARQUb Lo durde de la majoritd des
programmes augmentera sile lave-vaisselle est
branchd au circuit d'eau froide.
Utilisation
d'un agent
de rinCage
Un agent de rinqage am61iore le s6chage,
r6duit les taches et emp_che la formation d'une
pellicule sur vos assiettes, vos verres, votre
argenterie, vos ustensiles de cuisine et vos
mati_res plastiques. L'agent de rinqage Cascade
Crystal Clear@est recommand6 pour les lave-
vaisselle Monogram.
Le distributeur d'agent de rinqage contient 4,7
onces d'agent de rinqage. Dans des conditions
normales, cette quantit6 dure environ un
mois. Essayezde le maintenir plein, mais ne le
remplissez pas trop.
Pour remplir le distributeur d'agent de rinqage,
assurez-vous que la porte du lave-vaisselle est
bien ouverte.
1. Compartiment pour le d@ergent princi-
pal
2. Compartiment pour le d@ergent de
pr61avage
3. Capuchon pour le distributeur d'agent
de rinqage
4. Capuchon pour le compartiment de
d@ergent
12
Tournez le capuchon du distributeur dans le sens
inverse des aiguilles d'une montre et retirez-le en
le soulevant. Ajoutez I'agent de rinqage jusqu'(]
ce que la fen_tre indicatrice indique que le
distributeur est plein.
Nettoyez tout agent de rinqage qui a coul6 6
I'aide d'un linge humide. Remettez en place le
capuchon du distributeur.
Vous pouvez ajuster la quantit6 d'agent de
rinqage qui s'6coule au moment du lavage final.
Le r6glage d'usine est moyen. Encas de traces
de calcium (eau dure) sur les ustensiles, essayez
d'utiliser un r_glage 6 une valeur plus 61ev6e.En
cas de moussage, utilisez une valeur plus basse.
Pour ajuster le r6glage, enlevez le capuchon du
distributeur; tournez ensuite la mollette de r6glage
1
\
dans le sens inverse des aiguilles d'une montre
pour augmenter la quantit_ d'agent de rinqage
distribu_ ou dans le sensdes aiguilles d'une
montre pour diminuer levolume
/ d'agent de rinqage distribu6.
_7
4 rinqagedistribu_situ_
/
_"_ 3 (Mollettede r@glage
du volumed'agentde
sousle capuchon)
Page 40

Utilisation du lave-vaisselle
Lave-vaisselle
Chargement
du lave-
vaisselle
II n'est pas n6cessaire de rincer la
vaisselle avant de la mettre dons le Iove-
vaisselle. Enlevez simplement les salet6s
importantes.
Placez les verres, les tosses, les bols, les
petites assiettes et les soucoupes duns le
panier sup@ieur, les verres 8 vins doivent
@re places duns le support _ verres _ vin,
les couteaux duns le tiroir 8 coutellerie, le
cos _ch_unt.
REMARQUE:
Assurez-vous que les surfaces soles soient
orient6es vers I'int6rieur ou vers le bas!
V@ifiez que les bras gicleurs peuvent tourner
librement.
Placez les grandes et petites assiettes,
les plots de service, les casseroles et les
couverts (dons le panier 8 couverts) duns
le panier inf_rieur.
Placezles couverts avec le manche vers
le haut en les r6partissant leplus possible.
Assurez-vous que les cuill_res ne sont
pas imbriqu6es les unes dans lesautres.
Nem61angezles couverts en diff_rents
m@aux dans le m_me compartiment (par
exemple I'argent et I'inox sous peine de
d'apparition de t@ches).
13
Page 41

Utilisation du lave-vaisselle
Lave-vaisselle
Dosage de
d6tergent
D_tergent 3 en 1
REMARQUE:
Veuillez lire attentivement les instructions
pour ces produits. Si vous n'_tes pas sQr,
contactez le fabricant de d6tergent
m
AMISE EN GARDE
La quantit_ de d#tergent 4_utiliser
d6pend de la duret6 de I'eau.
Veuillez suivre les instructions de
dosage donn_es sur le paquet de
d6tergent.
Versez le d6tergent 4_lave-vaisselle dans
le compartiment destin# 5 cet effet. II y
a un compartiment pour le pr61avage
et un compartiment pour le lavage
principal. Voir la section Distributeur.
Appelez le fabricant de d6tergent si
vous avez des questions concernant
votre d6tergent.
Tmblettes de d_tergent pour
Iove-vaisselle
coupez la tablette en deux si le
couvercle du distributeur est difficile 5
fermer.
N'UTILISEZ PAS DE D_'TERGENT POUR LE
LAVAGE DE LA VAISSELLE A LA HAIN
m
REMARQUE: L'utilisation d'un d4tergent qui n'est
pas conqu sp4cifiquement pour le lave-vaisselle
remplira celui-ci de mousse. Pendant le fonction-
nement, cette eau savonneuse sortira des #vents
de votre lave-vaisselle, en couvrant et mouillant le
sol de la cuisine. Le ddtergent pour le lavage de la
vaisselle 8 la main ainsi que la lessive ne peuvent
8tre utilis#s dons un lave-vaisselle. L'accumulation
de mousse pourrait endommager le lave-vaisselle
ou I'empScher de fonctionner.
Comme toutes les boites de d6tergent se ressem-
blent, gardez votre d#tergent pour lave-vaisselle
6 part de tous vos autres produits nettoyants.
Indiquez le ban d6tergent et I'endroit oQvous le
gardez 6 toute personne qui risque d'utiliser votre
lave-vaisselle.
Prot6gez vos enf(]nts !
- Le d_tergent pour I(]ve-v(]isselle est
corrosif !!
d_tergent recommand_ des montants fondus sur la duret_ de I'eau
Dictionnaire - Voir le dictionnaire d_taill_
Duret_ de I'eau
Douce
(0-3 groins per gallon)
Moyenne
(4-8 grains per gallon)
Dure
(9+ grains*)
14
* Une eau 6 12 grains et plus est extr6mement dure.
ListenRead phonetically
Quantit_s de d_tergent
Pr#lavage i cuill_re 4_caf_
Lavage principal 1 4_1 1Acuill_re 4_soupe
Pr#lavage i cuill_re 5 caf6
Lavage principal 1 4_2cuill_res 4_soupe
Pr#lavage i cuill6re 5 caf6
Lavage principal 2 4_3 cuill_res 4_soupe
Page 42

La cuve interne du lave-vaisselle est en acier
inoxydable et reste propre par I'utilisation du
lave-vaisselle. Toutefois, si votre eau est calcaire
(dure), des d6p6ts peuvent mppmraitre duns le lave-
vaisselle. Duns ce cos, luncez un programme de
lavuge avec deux cuill_res _ soupe d'acide citrique
duns le compmrtiment de d@ergent.
Bras gicleur
\
Collecteur tubu-
laire
Filtre fin
Nettoyage
Lave-vaisselle
3. Retirez et nettoyez le fittre fin.
4. Remontez les diff@ents _16ments duns le sens in-
verse du d6montuge. Assurez-vous que les bards
sont ferm_s herm@iquement Iors du remontage
Filtre princip_
Filtre principal
Lefittre principal permet de collecter les plus
grosses particules qui ne peuvent pas passer par la
pompe de vidange.
Videz le filtre principal aussi souvent que n6cessaire.
1. Soulevez le fittre principal par la poign6e.
2. Videz-le. N'oubliez pas de le remettre en place!
Filtre fin
Les d6bris qui s'accumulent sur le filtre fin sonta
tomatiquement rinc6s _ chaque lavage. Toutefois,
le fittre fin et so tuyauterie doivent _tre nettoy_s
une ou deux lois par an.
1.Tournez la poign_e d'un tour dons le sens inverse
des aiguilles d'une montre.
2. Sortez la tuyauterie en tirant vers le haut @I'aide
de la poign_e. Lib@ez le filtre principal pour net-
toyer cette partie de tuyauterie.
du filtre fin.
5. Verrouillez le fittre en tournant lu poign_e d'un
tour duns le sens des aiguilles d'une montrejusqu'8
la butte : La poign_e dolt @redirig_e vers la porte
du lave-vaisselle.
Remarque" TLelave-vaissellene doit pas _tre utilis4
sans _ltre!
SileFiltreprincipal est mal remis, I'efficacitd du lave-
vaissellerisque d'en p_tir !
2B
Page 43

Nettoy(]ge
Lave-vaisselle
Pompe de vidange
IIest possible d'acc6der 6 k] pompe de I'int6rieur du
lave-vaisselle
AAVERTISSEMENT!
D_branchez le lave-vaisselle.
1.Retirez le filtre principal et la tuyauterie associ_e.
2. Retirez la petite pi6ce encastr6e sur la gauche
du syst6me de vidange inf_rieur (voir schema ci-
dessous).
3. Vous pouvez lib6rez et faire tourner le rotor de I(]
pompe en ins#rant votre doigt dans I'ouverture et
en lib_rant tout ce qui pourrait bebloquer.
4. R_installez la piece encastr_e et les fittres.
5. Rebranchez la fiche dans k] prise du mur.
Si le I(]ve-vc]isselle ne m(]rche toujours pc]s et que
vous entendez un bourdonnement, la protection
de trop-plein s'est activ6e.
,, Fermez le robinet d'eau.
,, D_branchez la fiche du mur.
,, Appelez le service technique.
Remerque: N'oub/iez pas de rdinstollez Io piSce en-
castrde.
Bras gicleurs
Les orifices et les roulements peuvent parfois 6tre
bouch_s/bloqu6s.
1.Tirez le bras gicleur inf_rieur vers le haut pour le
relacher.
2. Retirez tousles d6p6ts 6 I'aide d'une aiguille ou
tout outil similaire.
Les bras gicleurs sont _galement _quip6s d'orifices
sur le dessous.
3. R_installez le bras gicleur avant d'utiliser le lave-
vaisselle.
16
Page 44

Pour lib6rer le brGs gicleur sup_rieur, il est n_ces-
sGire de retirer le pGnier sup_rieur.
1. Sortez le pGnier.
2. Retirez le bras gicleur sup6rieur en le d6vissGnt
du panier dans le sens inverse des aiguilles d'une
montre et nettoyez-le.
3. Revissez le bras gicleur.
Nettoy(]ge
Lave-vaisselle
Br(]sgicleur
Porte
Lorsque vous nettoyez le tour de IGporte, utili-
sez uniquement un chiffon 16g_rement humide, si
n#cessGire Gvec un peu de d_tergent. N'utilisez pGs
de vGporisGteur ou Gutre produit similGire Gutour du
Ioquet de IGporte. Ceci 6vite que de I'eGu ne p_n_-
tre dGns le Ioquet et ne vienne en contGct Gvec des
composGnts _lectriques.
,&MISE EN GARDE
N'utilisez pos de voporisateur ou outre produit
similaire autour du Ioquet de la porte.
17
Page 45

R@gloges
Lave-vaisselle
Reprogrammation
Certaines des fonctions du lave-vaisselle peuvent @tre reprogramm6es. Vous pouvez modifier la program-
motion du lave-vaisselle en utilisant le clavier. Votre s6lection sera conserv6jusqu'6 la prochaine fois que
vous r6initialisez cette fonction.
H_me si I'appareil est @eint/d6branch6 ou en cos de panne d'@lectricit6, pour quelque raison que ce soit,
toutes les s6lections enregistr6es avant I'interruption seront conserv6es.
Verrouillage des touches pour la protection des enfants
Vous pouvez emp@cher un enfant de mettre accidentellement le lave-vaisselle en marche ou de modifier
les r6glages 6 I'aide d'un verrouillage des touches. II est alors n6cessaire d'appuyer simultan6ment sur les
boutons Temperature (Temperature) et Drying (S@chage)pour mettre I'appareil en marche. Le verrouillage
des touches sera automatiquement r6octiv6 au bout de trois minutes.
1. Eteignez le lave-vaisselle au niveau de I'interrupteur principal.
2. Appuyez sur les touches TEHP BOOST (Augmentation de la chaleur) et HEATDRY (Chaleur
s6che) tout en appuyant sur I'interrupteur principal. Les symboles Temperature (Tem-
p6rature), Drying (S6chage) et Start (Harche) se mettront 6 clignoter. Relachez les touches
Temperature (Temp6rature)et Drying (S6chage).
3. Appuyez sur la touche CYCLE(Programme), Iorsque le symbole Auto Wash s'allume, le
verrouillage des touches est alors activ&
/4.Puis, appuyez sur START/RESET(Harche/R6initialiser) pour enregistrer les r6glages.
Ou REINITIALISER:
1. Eteignez le lave-vaisselle au niveau de I'interrupteur principal.
2. Appuyez sur les touches TEHP BOOST(Augmentation de la chaleur) et HEAT DRY(Cha-
leur s@che)tout en appuyant sur I'interrupteur principal.
3. Appuyez sur la touche CYCLE(Programme), Iorsque le symbole Auto Wash s'@eint, le
verrouillage des touches est alors d6sactiv_
/4.Puis, appuyez sur START/RESET(Harche/R6initialiser) pour confirmer les r_glages.
18
Page 46

R@gloges
Lave-vaisselle
Programmation d'un signal
Sivous souhaitez que votre lave-vaisselle _mette un signal 6 la fin d'un programme, il est pos-
sible d'en programmer un. Par d6faut, le lave-vaisselle est r_gl6 sans signal.
1. Eteignez le lave-vaisselle au niveau de I'interrupteur principal.
2. Plaintenez la touche DELAYSTART(D6part diff6r6) enfonc6e tout en appuyant
I'interrupteur principal. La touche clignote. Relachez.
3. Appuyez sur la touche CYCLE(Programme), Iorsque le symbole Auto Wash
s'allume, le signal est alors active.
4. Appuyez sur la touche START/RESET(Marche/r_initialisation) et le r_glage sera
enregistr_jusqu'6 la prochaine modification.
Ou R@initialiser
Eteignez
1.. le lave-vaisselle niveau de
au
I'interrupteur principal.
E 2. Plaintenez la touche DELAYSTART(D_part diff6r_) enfonc_e tout en appuyant
I'interrupteur principal. Latouche clignote. Relachez.
O 3.Appuyez sur la touche CYCLE(Programme), Iorsque le symbole Auto Wash
s'_teint, le signal est alors d6sactiv_.
4. Appuyez sur la touche START/RESET(Marche/r_initialisation) et le r_glage sera
enregistr_jusqu'6 la prochaine modification.
19
Page 47

Codes d'erreur
Lave-vaisselle
L'affichage Type de panne Action
clignote
Lavage intensif
Lavage normal
Lavage I_ger
Lavage rapide
Ringage
Trop d'eau dans le lave-vaisselle
Appelez le technicien
Lavage I_ger
Lavage rapide
Automatiqu
Lavage intensif
Automatique
Lavage normal
en eau
Fuite au niveau du robinet
Tuyau de vidange bouch@
Filtresale
Fermez le robinet d'eau et appeler le technicien
Voir <<Causes possibles >>dans le chapitre <<Diag-
Nettoyez les filtres, voir le chapitre <<Nettoyage >>
V@rifiez que le robinet est ouvert
nostic des pannes >>
Pour annuler I'affichage des codes d'erreur, @eignez et rallumez le lave-vaisselle 5 I'interrupteur principal.
Panne au niveau de I'alimentation
2O
Page 48

Avant d'appeler 5 un technicien
Lave-vaisselle
Probl_mes
La vaisselle
n'est pas
propre
Des taches
ou une pel-
licule sur la
verrerie
Un film
bleut_ et
I_g_rement
collant
s'est
d_pos_ sur
lu verrerie
Ceuse possible
,, Les bras gicleurs ne tournent pas
,, Le d6tergent est trop vieux.
Remerque: Led6tergent est p6rissable
,, Mauvais dosage de d6tergent
,, Le programme de lavage n'est assez
puissant.
• Mauvais choix de programme
,, Le lave-vaisselle est mal charg_
,, Des verres ou des tasses se sont ren-
vers_s pendant le lavage
,, Le lave-vaisselle est 6quip6 d'un adoucis-
seur d'oG fuit du sel.
,, Le distributeur d'agent de rinqage est mal
r_gl6.
,, Utilisation d'un d6tergent sans phosphate
avec une eau dure
,, Une temperature trop #levee et/ou trop
de d6tergent qui provoquent des rayures
sur les verres (cristal). Malheureusement,
ceci ne peut _tre r_par_, seulement _vit6 !
,, Trop d'agent de rinqage
Action
,, Retirez les bras gicleurs et nettoyez-les
,, Evitez les paquets trop volumineux
,, Utilisez une dose de d6tergent appropri6e 6
la duret6 de votre eau
,, S_lectionnez I(] fonction TEP1P BOOST (Aug-
mentation de la chaleur) ou p(]ssez 6 un
programme de lavage plus puissant
,, Passez 6 un programme de lavage plus
puissant
,, Ne couvrez pas la verrerie avec des bols
plus grands
,, Evitez de placez des verres tr_s hauts dans
les coins des paniers
,, Placez la verrerie dans le lave-vaisselle de
faqon 6 ce qu'elle ne bouge pas
,,V_rifiez que le couvercle du compartiment
5 sel est correctement viss_. Sinon appelez le
technicien
,,Voir le chapitre sur I'agent de rinqage
,, Changez de d6tergent
,, Lavez les verres (cristal) 6 basse
temp#r(]ture et n'utilisez pus trop de
d#tergent. Contactez le fabricant du
d6tergent pour lave-vaisselle.
,, R_duisez la dose d'agent de rinqage. Voir
le chapitre sur I'agent de rinq(]ge. Si I'eau est
tr_s douce, vous pouvez diluer votre (]gent de
rinqage (1volume d'agent de rinqage pour 1
volume d'eau).
21
Page 49

Avant d'appeler @un technicien
Lave-vaisselle
Probl_mes
Taches sur
I'inox ou
I'argent
II testa
des taches
apr_s le
lavage
Cliquetis
pendant le
lavage
Cause possible
,, Apr_s un certain temps de contact, cer-
tains restes d'aliments, tels que la mou-
tarde, la mayonnaise, le citron, le vinaigre,
le sel et les sauces peuvent provoquer des
taches sur I'inox. L'inox peut 6galement
provoquer des taches sur I'argent si ces
deux m6taux sont en contact pendant le
processus de lavage. L'aluminium peut
_galement provoquer des taches sur la
vaisselle.
,, Les taches de rouge 6 I_vre et de th_
peuvent _tre difficiles 6 _liminer
,, La vaisselle n'est pas correctement
charg_e ou les bras gicleurs ne tournent
pas.
Action
,, Rincez les r6sidus d'oliments si vous n'ovez
pus I'intention de mettre le lave-vaisselle en
marche imm_diatement.
,, S6parez vos couverts dens les diff6rents
compartiments du punier. Assurez-vous que
I'argent et I'inox ne sont pus ensemble dens le
m6me compartiment.
,, Passez 5 un d6tergent contenant du chlore.
,, Les programmes de lavage plus puissants
durent plus Iongtemps et utilisent des
temp6ratures plus 61ev6es pour une vaisselle
plus sale. Utilisez un programme de lavage
plus puissant adapt6 6 la charge.
,,V6rifiez que la verrerie est bien charg6e et
ne bouge pas. Faites tourner les bras gicleurs
pour s'assurer qu'ils tournent correctement.
Le lave-
vaisselle ne
fonctionne
pas
22
,, Vous ovez oubliez d'ollumer I'interrupteur
principal.
,, LGporte n'est pus correctement ferm_e.
• Un fusible a saut6.
,, II manque le bouchon de Io pompe de
vidonge.
,, Le robinet d'eou est ferm6.
,, Le lave-voisselle se remplit trap/fuites.
,, Le Iove-voisselle _met un ronronne-
ment (pompe de vidonge), celui-ci s'orr@te
Iorsque le lave-vaisselle est _teint 5
I'interrupteur principal.
,, V6rifiez
,, V6rifiez
,, V6rifiez
,, V6rifiez
,, V6rifiez
,, Contactez le centre de service 6 la client61e.
1. Fermez le robinet d'eau
2. D6branchez I'appareil
3. Appelez un d6panneur
Page 50

Avant d'appeler 5 un technicien
Lave-vaisselle
Probl_mes
II reste de
I'eau dans
le lave-
vaisselle
Mauvaise
odeur dans
le lave-
vaisselle
La vaisselle
n'est pas
assez s_che
Ceuse possible
,, Le tuyau de vidange est bouch@
,, Le tuyau de vidange est pli6
,, Les filtres sont bouch_s
Des objets se sont gliss6s dans la pompe
,, IIy a des salet6s dans les coins et sur les
bards
,, IIy a des salet6s dans les coins et sur les
bards
,, Lo fonction HEATDRY(Chaleur s6che) n'a
pas _t6 s_lectionn_e
Action
• D_branchez le tuyau de vidange au niveau
du siphon de I'_vier. V6rifiez I'absence de
d_bris. La partie conique du tuyau est-elle
coup6e de faqon 5 ce que le diam_tre salt
sup6rieur 516 mm ?
• V6rifiez que le tuyau n'est pas pli6 ou tordu
,, Nettoyez lefiltre principal, le filtre fin et le
filtre
• Nettoyez la pompe de vidange. Voir chapitre
sur le nettoyage
,, Nettoyez 5 I'aide d'une brosse de vaisselle et
un d6tergent peu moussant.
,, Nettoyez 5 I'aide d'une brosse de vaisselle et
un d6tergent peu moussant
,, S_lectionnez I'option HEATDRY (Chaleur
s_che).
La porte ne
se ferme
pGs
,, Le lave-vaisselle n'est pas compl_tement
charg_
• II n'y a plus d'agent de ringage ou la dose
est trap faible
,, Les paniers ne sont pas correctement
positionn@s
,, Chargez compl_tement le lave-vaisselle
• Rajoutez de I'agent de rinqage dans le
compartiment ou augmentez la dose si
n@cessaire
Ouvrez 16g@rement la porte 5 la fin des
programmes
,,Assurez-vous que les paniers sont bien
horizontaux. V@rifiezque le raccord du panier
est bien align@ avec le tuyau alimentant les
bras gicleurs.
23
Page 51

Services @la client@le
Lave-vaisselle
Avec I'achat de votre nouvel appareil Monogram, soyez assur6
de recevoir toute I'information ou I'assistance dont vous pourriez
avoir besoin,de la part de GE. Tout ce que vous avez a faire,
c'est de nous appeler gratuitement !
Service d'information
GE Answer Center<_
Aux I_tats-Unis •
800.626.2000
Service de r6parations
Aux l_tats-Unis •
800.444.1845
Au Canada:
800.561.3344
Pour nos clients
qui ont des besoins
sp6cifiques...
Aux I_tats-Unis •
800.626.2000
q)uelle que soit votre question sur les appareils Monogram, le service d'information GEAnswer
Center@est @votre disposition pour vous assister. Nous r6pondrons rapidement et courtoisement
@votre appel - et @votre question. Appelez le service d'information GEAnswer Center@du
lundi au vendredi de 8h00 @22h00 (Heure normale de I'Est)et le samedi de 8h00 @!9h00 (Heure
normale de I'Est).
OU
Consultez notre site Internet @I'adresse monogram.com
Au Canada, appelez le800.561.3344.
Un professionnel du service clientele de GEvous offrira un service de r@aration expert, pr@u
6 une heure qui vous convient. Pour programmer une r6paration, appelez du lundi au vendredi
de 7h00 6 22h00 (Heure normale de I'Est) et le samedi et le dimanche de 8h00 @!8h00 (Heure
normale de I'Est).LeService @la Clientele de GE,exploit6 par la compagnie dans de nombreuses
Iocalisations vous offre un service aujourd'hui, demain, ou quand cela vous convient. Nos
techniciens, form6s en usine, connaissent parfaitement votre appareil - la plupart des r6parations
peuvent _tre effectu6es en une seule visite.
Au Canada: Du lundi au vendredi, de 7h00 6 20h00 et le samedi de 8h00 6 !7h00 HAE.
GEoffre gratuitement une brochure pour aider @la planification d'une
cuisine sans entrave pour les personnes @mobilit6 r6duite.
Lesconsommateurs malentendants ou muets qui ont acc@s@unTDD
ou @un t616scripteur conventionnel peuvent appeler le 800.TDD.GEAC
(800.833.4322) pour solliciter des informations ou un service
SEC11ONA-A
Contrats de service
Aux I_tats-Unis •
800.626.2224
Vous pouvez _tre rassur6 de savoir que le service GEsera toujours 16apr_s I'expiration de votre
garantie. Souscrivez @un contrat GEpendant que votre garantie est toujours en vigueur et vous
b6n6ficierez d'une ristourne importante. Avec un contrat sur plusieurs ann6es, vous _tes assur6
d'un futur service au prix d'aujourd'hui.
Au Canada:
800.561.3344
Pi@ces D6tach6es et
Accessoires
Aux I_tats-Unis :
800.626.2002
Au Canada:
800.561.3344
24
Les personnes qualifi6es pour r6parer leurs propres appareils peuvent commander des pi_ces
d_tach@s et des accessoires et les faire envoyer directement @leur domicile. Le service de pi_ces
d6tach@s GEpermet un acc_s rapide @plus de 47000 pi_ces ...ettoutes les pi_ces GEsont sous
garantie. Lescartes VISA,MasterCard et Discover sont accept@s.
Les instructions contenues dans ce manuel d@aillent les proc6dures @utiliser pour n'importe quel
utilisateur. II est pr6f@able que les autres r6parations soient effectu6es par un r6parateur qualifi6.
La prudence doit _tre de mise, toute maintenance incorrecte peut entra?ner un fonctionnement
dangereux.
Page 52

CE QUI
COUVERT
A compter de
la date d'achat
initial
Garantie pour les clients aux U.S.A.
Lave-vaisselle
VOTRE GARANTIE DE LAVE-VAISSELLE MONOGRAM
Agrafez votre facture ou votre cheque annul6 ici. Pour obtenir le
service sous garantie, une preuve de la date d'achat initial est
n6cessaire.
UN AN
Toute piece du lave-vaisselle qui s'av@e d6fectueuse en raison d'un d6faut de mat@iau ou de
fabrication. Pendant la validit6 de la pr6sente garantie limit6e d'un an, GEfournira 6galement
gratuitement la main d'oeuvre et le service sur place pour r6parer la piece d6fectueuse.
Cinq Ans
Les paniers/6gouttoirs du lave-vaisselle et/ou le module de commande 61ectronique si ceux-ci
s'av@ent d_fectueux en raison d'un d6faut de mat@iau ou de fabrication. Pendant cette garantie
limit6e de cinq ans, I'utilisateur est responsable des frais de main d'oeuvre et de service associ6.
i vie
La cure en acier inoxydable ou lejoint de porte, s'il fuit @cause d'un vice de mat@iau ou de
main-d'oeuvre. Pendant la validit6 de la pr6sente garantie limit_e @vie, GEfournira 6galement
gratuitement la main d'oeuvre et le service sur place pour r6parer la piece d6fectueuse.
Cette garantie est @endue @I'acheteur d'origine et aux propri@aires suivants pour tout produit achet6
pour une utilisation domestique dans les a8 @ats continentaux, @Hawaii ou @Washington D.C.Sile
produit est install6 dans une r6gion o6 ne se trouve aucun r6parateur autoris6 GE,vous devrez peut-
_tre assumer les frais detransport ou apporter I'appareil (3un centre de service autoris6 GE.EnAlaska,
cette garantie est 6quivalente @I'exception des frais d'exp_dition de I'appareil au centre de r6paration
ou des frais de transport du technicien pour un d6pannage @domicile qui restent @la charge du
propri@aire.
Tout le service en vertu de cette garantie sera fourni par nos centres de service de fabrique ou par
nos techniciens autoris6s du service 6 la clientele Customer Care ® pendant les heures de travail
normales.
Sivotre appareil 61ectrom_nager a besoin d'une r@aration pendant la p@iode de garantie ou apr_s
cette p@iode, appelez le !.800.aaal8a5. Veuillez avoir votre num@o de s6rie et votre num6ro de
module @port@ de main Iorsque vous appelez pour obtenir un service.
CE QUI N'EST
PAS COUVERT
49-55073
09/ls/10 25
. Les d6placements (%votre domicile pour vous
expliquer I'utilisation de ce produit
Une installation, livraison ou maintenance
d_fectueuse.
Le remplacement des fusibles ou le
r6enclenchement du disjoncteur du domicile.
Une panne du produit par abus d'utilisation,
par mauvaise utilisation, par modification ou s'il
a 6t6 utilis6 dans un but autre que celui pour
lequel il a 6t_ fabriqu6, ou s'il a 6t6 utilis6 @des
fins commerciales.
EXCLUSIONDESGARANTtESTACtTES--Votre recoursexclusifest I'@changeduproduitsuivant lesmodalit@s
dela GarantieLimit@e.Toutesgarantiestacites,y comprislesgarantiesdevaleursmarchandesou
d'ad@quation6 desfins particuli@es,sont limit@es6unedur@ed'unan ou 6 la dur@ela pluscourteautoris@e
parla Ioi.
Certaines provinces n'acceptent pas d'exclusion ou de limites aux dommages indirects ou accessoires, cette
exclusion ou restriction pourrait ne pas s'appliquer 6 vous. Certains droits particuliers vous sont d@volusen vertu
de la pr@sentegarantie et peuvent s'accompagner d'autres droits qui varient selon votre lieu de r@sidence.Pour
conna?tre vos droits juridiques, veuillez consulter le bureau local ou d'@tatdes affaires aux consommateurs ou le
Procureur G@n@ralde votre @tat.
Garant: General Electric Company,
Louisville, KYa0225
Tout dommage caus@par accident, incendie,
inondation ou catastrophe naturelle.
Tout dommage fortuit ou indirect caus6 par
des d6fauts @entuels de cet appareil.
Tout nettoyage ou entretien siphon anti-retour
dans la conduite de vidange.
Tout dommage occasionn6 apr_s livraison, y
compris tout dommage occasionn6 par des
articles tombant 6 terre.
Le service s'il est impossible d'avoir acc@sau
produit
Page 53

!nq0pJnofno sap Jalsod V :IUD:IJodLu I
LUOJl_alal)aJDdd ,P
J
oJd pu p,d. OSUl
saoun!lddV 39
IIIII
Utilisez un I
timbre de I
l_re clossI
Generul Electric Compuny
Service d'enregistrement de gorontie
BoTte Postale 34980
Louisville, KY40232-2150
I=J
26
Page 54

Inscription du propri@aire d'appareii iectrom nager
Chef client:
Merci de votre achat et de la confiance que vous avez mise en notre appareil Nous sommes tiers de vous avoir pour client!
Veuillez suivre les _tapes suivantes pour prot_ger votre investissement:
L
Remplissez et envoyez
votre fiche d'inscription
du propri_taire d'appareil
_lectrom_nager d&s
aujourd'hui. Vous aurez ainsi
la tranquillit_ de savoir que
nous pouvons vous contacter
en cos de modification de
s_curit_.
Apr_s avoir rempli cette
the d inscription, veuillez
nscrire votre num_ro de
od_le et de s_rie dens
e manuel et conservez ce
ocument. Vous ourez besoin
eces informations si vous
vez besoin de nos services.
es num_ros de service sont
aux USA : 800.444.1845 et au
Canada : 1.888.880.:3030.
Veuillez !ire attentive votre
_monuel d utilisation. Ceci vous
permettra d'utiliser votre
nouvel appareil correctement.
Important: si vous n'avez pas requ de fiche d'inscription avec votre appareil, d_tachez et envoyez le
formulaire ou inscrivez-vous en ligne sur monogram.com.
PLIER
Inscription du propri taire d'appareil
lectrom nager
Num_ro de s_rie
, Dishwasher I , , , , , , , , , , ,
M. [] Mme. []
Mme. [] Mile []
Pr_nom _ Nom
Rue
Produit Lave-vaisselle
! ! ! ! ! ! ! !
L
I I
N° .# _ Adresse courriel*
Ville
Datede mise
°° oorl, I
* veuillezfournirvotreadressecourrielpourrecevoir,parcourtier61ectronique,lesr6ductions,lesoffressp6cialeset
toutesautrescommunicationsimportantesconcernontlesElectrom6nugersGE(GEA).
[] Cochezicisivousnesouhuitezpasrecevoird'inforrnutiondespurtenairesGEAsoigneusements61ectionn6s.
ENON-RENVOIDECE]q-EFICHEN'AFFECTEPASVOSDROffS/_LAGARANTIE.
Pourtoute informationconcernantlapolitiquede GEAconcernuntI'utilisationdesdonn6espersonnelles,allezsur
monogram.cornet diquezsur<<PrivacyPolicy>>ouappelezle800.626.2224.
COLLER POUR FERMER
t_l_phone
j j Code J
Etat
postal I I I I I
27
 Loading...