

GE Monogram Refrigerator Owner's Manual

OwneI"s
Manual
Side-by-Side
Built-In Refrigerators
Monogram._

Consumer Intormation
Built-In R@igerators
Introduction Your new Monogram refrigerator makes an eloquent statement of style, convenience and kitchen
planning flexibility. Whether you chose it for its purity of design, practical storage arrangements
or assiduous attention to derail--or for all of these reasons--you'll find that your Monogram
refligerator's superior blend of form and fimction will delight you for years to come.
The Monogram refligerator was designed to provide the flexibility to blend in with your kitchen
cabinetry. Decorative door insert panels allow it to match your kitchen cabinets or blend with
your kitchen decor. Through a series of product choices, the Monogram refligerator can be
beaufiflflly integrated into the kitchen.
Since this is designed to be a built-in product, custom panels may be required on the front
of the Monogram refligerator. Consult your kitchen designer or cabinemmker for your
customized look.
The information on the following pages will help you operate and maintain your
refligerator properl>
If you have any questions, visit our website at: www.monogram.com
Contents
Consumer Services
Safety InsuucOons ................... 3, 4
Care and Cleaning
Cleaning--Outside and Inside ........... 17
I,ight Bulb Replacement ............ 18-21
Moving and Vacation .................. 22
Operating Instructions
Automatic Icemaker . ................... 9
Climate Control Drawer . ......... 10, 11, 13
Conuol I,ock ........................ 11
Freezer Comparunent ................. 16
Ice and Water Dispenser . ............. 7, 8
Shelves and Bins ................... 14, 15
Storage Pans ...................... 12, 13
Temperature Conuols .................. 5
Water Filter Cartridge .................. 6

IMPORTANT SAFETY INSTRUCTIONS
t 2AD AND SAVE THt'2SEINS TR UCJTONS
kWARNING: Whenusing
electrical appliances, basic safety precautions
should be followed, including the following:
• Use this appliance only for its intended
purpose as described in this Owner's Manual.
This refrigerator must be properly installed
in accordance with the Installation
Instructions before it is used. Also see the
How to Connect Electricity section.
Do not allow children to climb, stand or
hang on the shelves in the refrigerator.
They could damage the refligerator and
seriously i_jure themselves.
After your refrigerator is in operation,
do not touch the cold surfaces in the
freezer compartment, particularly when
hands are damp or wet. Skin may adhere
to these extremely cold surfaces.
• Do not store or use gasoline or other
flammable vapors and liquids in the
vicinity of this or any other appliance.
• Do not attempt to stand on top of the
refrigerator. Doing so may result in bodily
injury or damage to the refrigerator.
• Do not allow children to play with the
refrigerator or tamper with the controls.
Installation of the icemaker must be done
by a qualified service technician.
In refrigerators with an automatic icemaker,
avoid contact with the moving parts of the
ejector mechanism, 02 with the heaung
element located on the bottom of the
icemakeL Do not place fingers 02 hands on
the automa0c icemaking mechanism while
the refiigerator is plugged in.
Keep fingers out of the "pinch point" areas:
clearances between tim doors and between
the doors and cabinet are necessarily small.
Be careful closing doors when children are
in the area.
Unplug your refrigerator before cleaning
and maldng repairs. NOTE: We suongly
recommend that any servicing be performed
by a qualified individual.
Before replacing a burned-out light bulb,
the refrigerator should be unplugged
in order to avoid contact with a live wire
filament. (A burned-out light bulb may break
when being replaced.) NOTE: Setting the
refligerator temperature controls to OFF
does not remove power to the light circuit.
Do not refreeze frozen foods which have
thawed completely.
Always clean the Climate Control Tray after
thawing food.
DANGER: RISK OF CHIIJ) ENTRAPNIENT
Child enuapment and suff\)cafion are not
problems of the past. Junked 02 abandoned
refligera0on products are still dangerous...
even if they will sit for "just a few days."
If you are getting rid of your old appliance,
please follow these insuuctions to help
prevent accidents.
REFt?JGERANTS
All refligeraOon products contain refligerants,
which under federal law must be removed prior
to product disposal. If you are getting rid of an
Before You Throw Away Your Old
Refligerafion Product:
• Take off the doors and discard separately.
• I,eave the shelves in place so that children
may not easily climb inside.
• If the refligeramr has a lock, make it unusable.
old refligerafion product, check with the
company handling the disposal about what
to do.
IMPORTANT SAFETY INSTRUCTIONS
HOW TO CONNE CT EI _; CTPd CITY
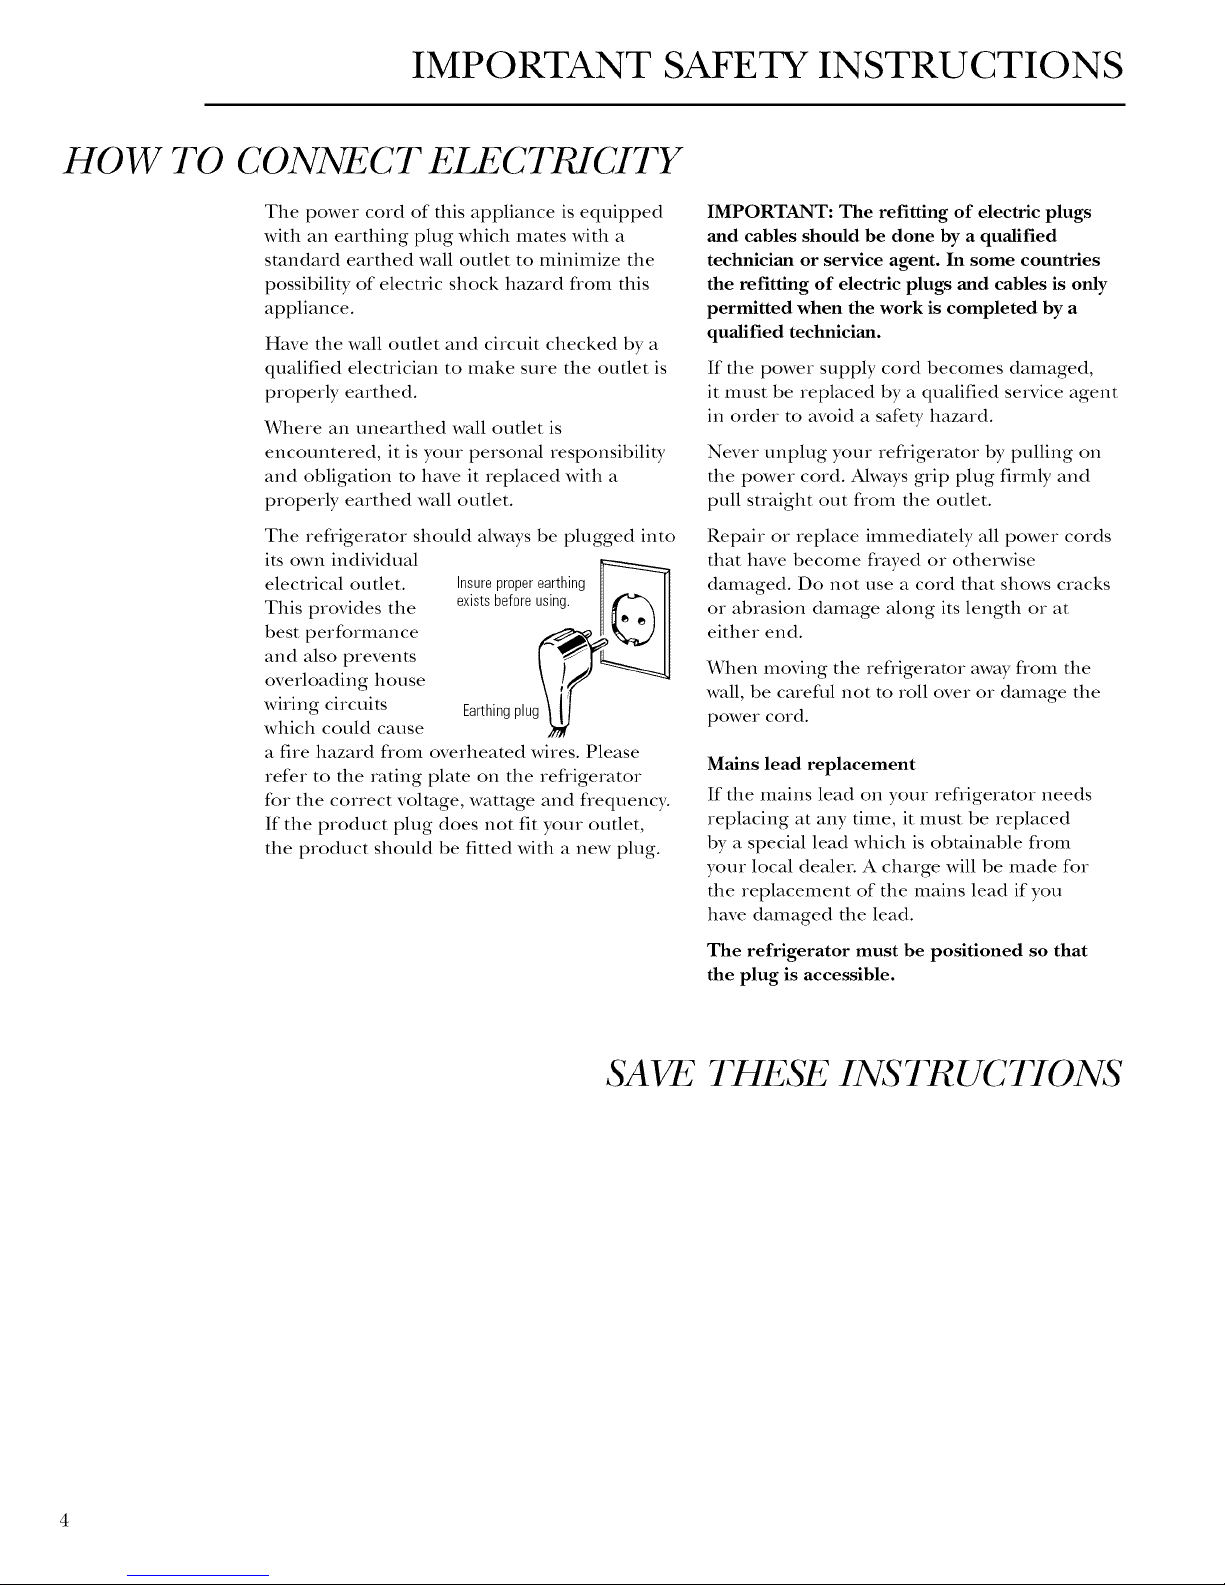
The power cord of tiffs appliance is equipped
with an earthing plug which mates with a
standard earthed wall outlet to minimize the
possibility of electric shock hazard flom this
appliance.
Have the wall outlet and circuit checked by a
qualified elecuician to make sure the outlet is
properly earthed.
Where an unearthed wall oudet is
encountered, it is your personal responsibility
and obligation to have it replaced with a
properly earthed wall outlet.
The refligerator should always be plugged into
its own individual
electrical outlet.
This provides the
Insureproperearthing
existsbeforeusing. I]_'_1
best performance
and also prevents
overloading house
wiring circuits
Earthingplug_
which could cause
a fire hazard flom overheated wires. Please
refer to the rating plate on the refligerator
for the correct voltage, wattage and frequency.
If the product plug does not fit your outlet,
the product should be fitted with a new plug.
IMPORTANT: The refitting of electric plugs
and cables should be done by a qualified
technician or service agent. In some countries
the refitting of electric plugs and cables is only
permitted when the work is completed by a
qualified technician.
If the power supply cord becomes damaged,
it must be replaced by a qualified service agent
in order to avoid a safety hazard.
Never unplug your refligerator by pulling on
the power cord. Always grip plug firmly and
pull straight out flom the outlet.
Repair or replace immediately all power cords
that have become flayed or otherwise
damaged. Do not use a cord that shows cracks
or abrasion damage along its length or at
either end.
When moving the refligerator away flom the
wall, be carefifl not to roll over or damage the
power cord.
Mains lead replacement
If the mains lead on your refi-igerator needs
replacing at any time, it must be replaced
by a special lead which is obtainable flom
your local dealer. A charge will be made for
the replacement of the mains lead if you
have damaged the lead.
The refrigerator must be positioned so that
the plug is accessible.
SAVE THESE INS TR UC770NS
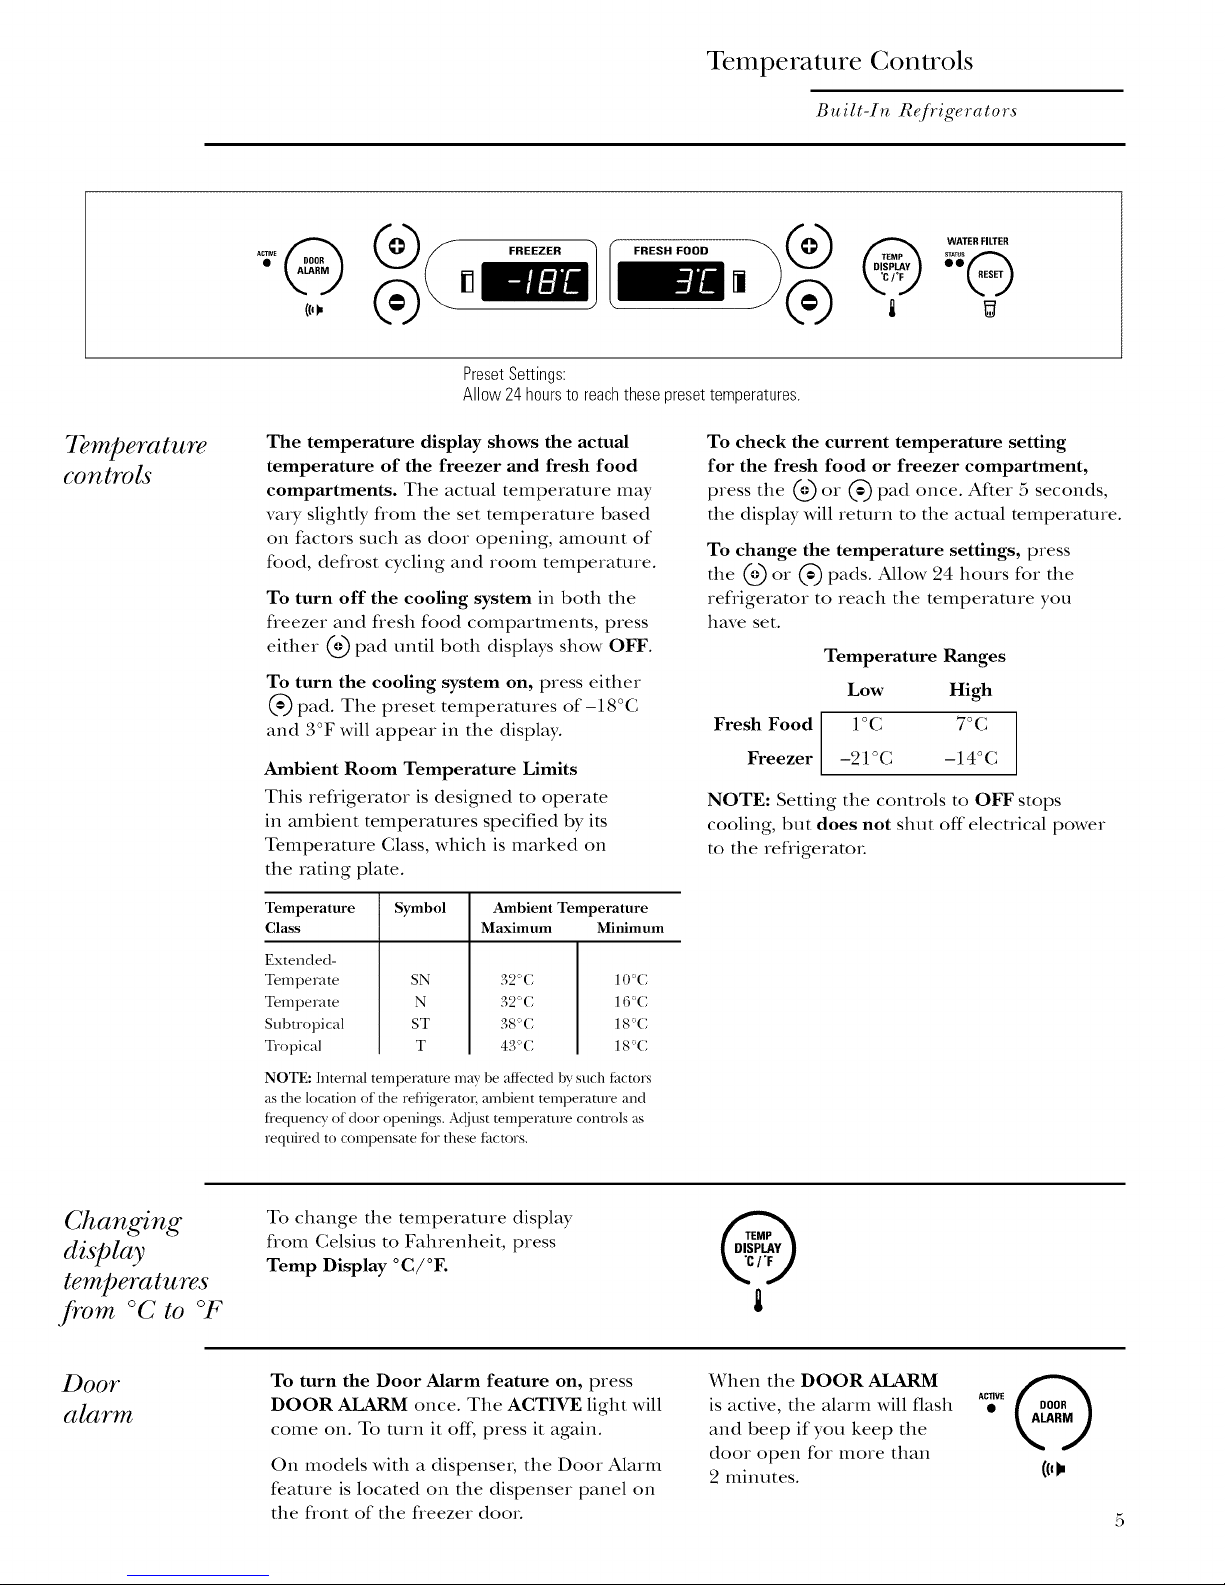
Temperature Controls
FRESH FOOD
I
PresetSettings:
Allow 24 hoursto reachthesepresettemperatures.
Built-In Refrigerators
Temperature
controls
The temperature display shows the actual
temperature of the freezer and fresh food
compartments. The actual temperature may
wuy slightly from the set temperature based
oi1 factors such as door opening, anlount of
food, deflost cycling and room temperature.
To turn off the cooling system in both the
fleezer and flesh food compartmelltS, press
either @ pad until both displays show OFF.
To turn the cooling system on, press either
@')pad. The preset temperatures of-18°C
3o
and, F will appeal in the display.
Ambient Room Temperature Limits
This refligerator is designed to operate
in ambient temperatures specified by its
TemperaUlre Class, which is marked on
the rating plate.
Temperature Symbol Ambient Temperature
Class Maximum Minimum
Extended-
Temperate
Temperate
Subtropical
Tropical
NOTE: Internal temperature ma} be atiected b} such titctors
as the location of the refl'igeratox; ambient temperature and
ti'equen W of door openings. ,M!just temperature conu'ols as
required to compensate tor these timtors.
SN
N
ST
T
32 ' C l 0 'C
32'C 16'C
38'C I8'C
43'C 18'C
To check the current temperature setting
for the fresh food or freezer compartment,
press the @ or @ pad once. After 5 seconds,
the display will return to the actual temperature.
To change the temperature settings, press
the @ or @ pads. Allow 24 hours for the
refrigerator to reach the temperature you
have set.
Temperature Ranges
Low High
Fresh Food
Freezer
I°C 7°(;
-21°C -14°C
NOTE: Setting the controls to OFF stops
cooling, but does not shut off electrical power
to the refligeratoL
Changing
display
To change the temperature display
flom Celsius to Fahrenheit, press
Temp Display °C/°F.
temperatures
from °C to OF
To turn the Door Alarm feature on, press
DOOR ALARM once. The ACTIVE light will
come on. To turn it of L press it again.
On models with a dispenser, the Door Alarm
feature is located on the dispenser panel on
the front of the freezer dooL
When the DOOR ALARM
is active, the alarm will flash
and beep if you keep the
door open for more than
2 minutes.
ACTIVE_ @

Water Filter Cartridge
Built-In Refrigerators
Water filter
cartridge
The wamr filter cartridge is located in the
back upper iight corner of the refligeramr
compartment.
To Replace the Filter:
The filmr cartridge is desigmed
WATERFILTER
to last approximately 12 months.
It should be replaced when die
smnls light unns red or if you notice
the ice cubes getting hollow or sm_fll.
Installing the Filter Cartridge:
1°
Remove dm old camidge by slowly turning
it to die left. A smM1 amount of water may
drip down. Do not pull down on die cartridge.
.
Fill the new caruidge Mtb water flom the
tap to allow for bettor flow immediately after
installation.
3. I,ine up die arrow on die cartridge Mtb the
cenmr of the holdeL Do not push it up into
the holdeL
4. Slowly turn it to die right until the cartridge
stops. It will rotate about 1/4 turn. DO NOT
OVERTIGHTEN.
To Reset the Filter Status Light:
Press and hold the RESET pad for 3 seconds.
Filter Bypass Plug:
You must use die filter bypass plug:
a) if you have a housellold __
reveise osmosis water systeI_l
h) if a replacement filter is not ss
available.
The icemaker and dispenser will not operate
without the filmr or filter bypass plug inst_dled.
Replacement Filters:
To order additional filters, contact your
local distributor.
Slowlyturnit totheright.
Donotovertighten.
Cartridge
Ice & Water Dispenser (on some models)
Built-In Refrigerators
Dispenser
with
glass-touch
controls
How it Works
The elecuonic controls on the dispenser are
uuly interactive. The conuol panel is equipped
with a proximity sensor that causes the panel
to light up as you approach the dispenser
(approx. 50 ram). To make a selection,
simply touch the graphic for the feature you
want, and the halo for that feature will light
up. When you walk away flom the refligerato_,
the lighted graphics switch off automatically.
NOTE: Fluctuations in the power line voltage
may activate the dispenser controls, turning
the lights on. The lights will switch off
automatically after a few seconds. This does
not indicate a malfimction and will not aff>ct
the operation of the controls.
How to Use
.:.:.:
To dispense water or ice: select WATER _,
CUBED ICE _ or CRUSHED ICE _.
Then press the ,glassgently against the
top of the dispenser cradle.
The spill shelf is not self-draining. To reduce
water spotting, the shelf and its grille should
be cleaned regularly.
If no water is dispensed when the refiigerator
is first installed, there may be air in the water
line system. Press the dispenser cradle for at
least two minutes to remove trapped air fiom
the water line and to fill the water system.
To flush out impurities in the water line,
throw away the first gallon ofwateL
CAUTION: Neverput fingers
or any other objects into the ice crusher
discharge opening.
@©®
@®®
1
,q
\ \
SpillShelf
Dispenser Light:
This feature turns the night light
on and off: The light also comes
on when the dispenser cradle is
pressed. If this light burns out,
it should be replaced with a 6 watt
12V maximum bulb. To order replacement
bulbs, contact your local distributoL
Door Alarm:
To turn the Door Alarm feature
on, touch DOOR ALARM once.
To mrn it off', press it again.
When the DOOR
is active, the alarm will flash and beep if you
keep the door open for more than 2 minutes.
O
Locking the Dispenser:
Touch CONTROL LOCK for
3 seconds to lock the dispenser
and conuol pad. To unlock,
touch it again for 3 seconds.
Ice & Water Dispenser (on some models)
Built-In Refrigerators
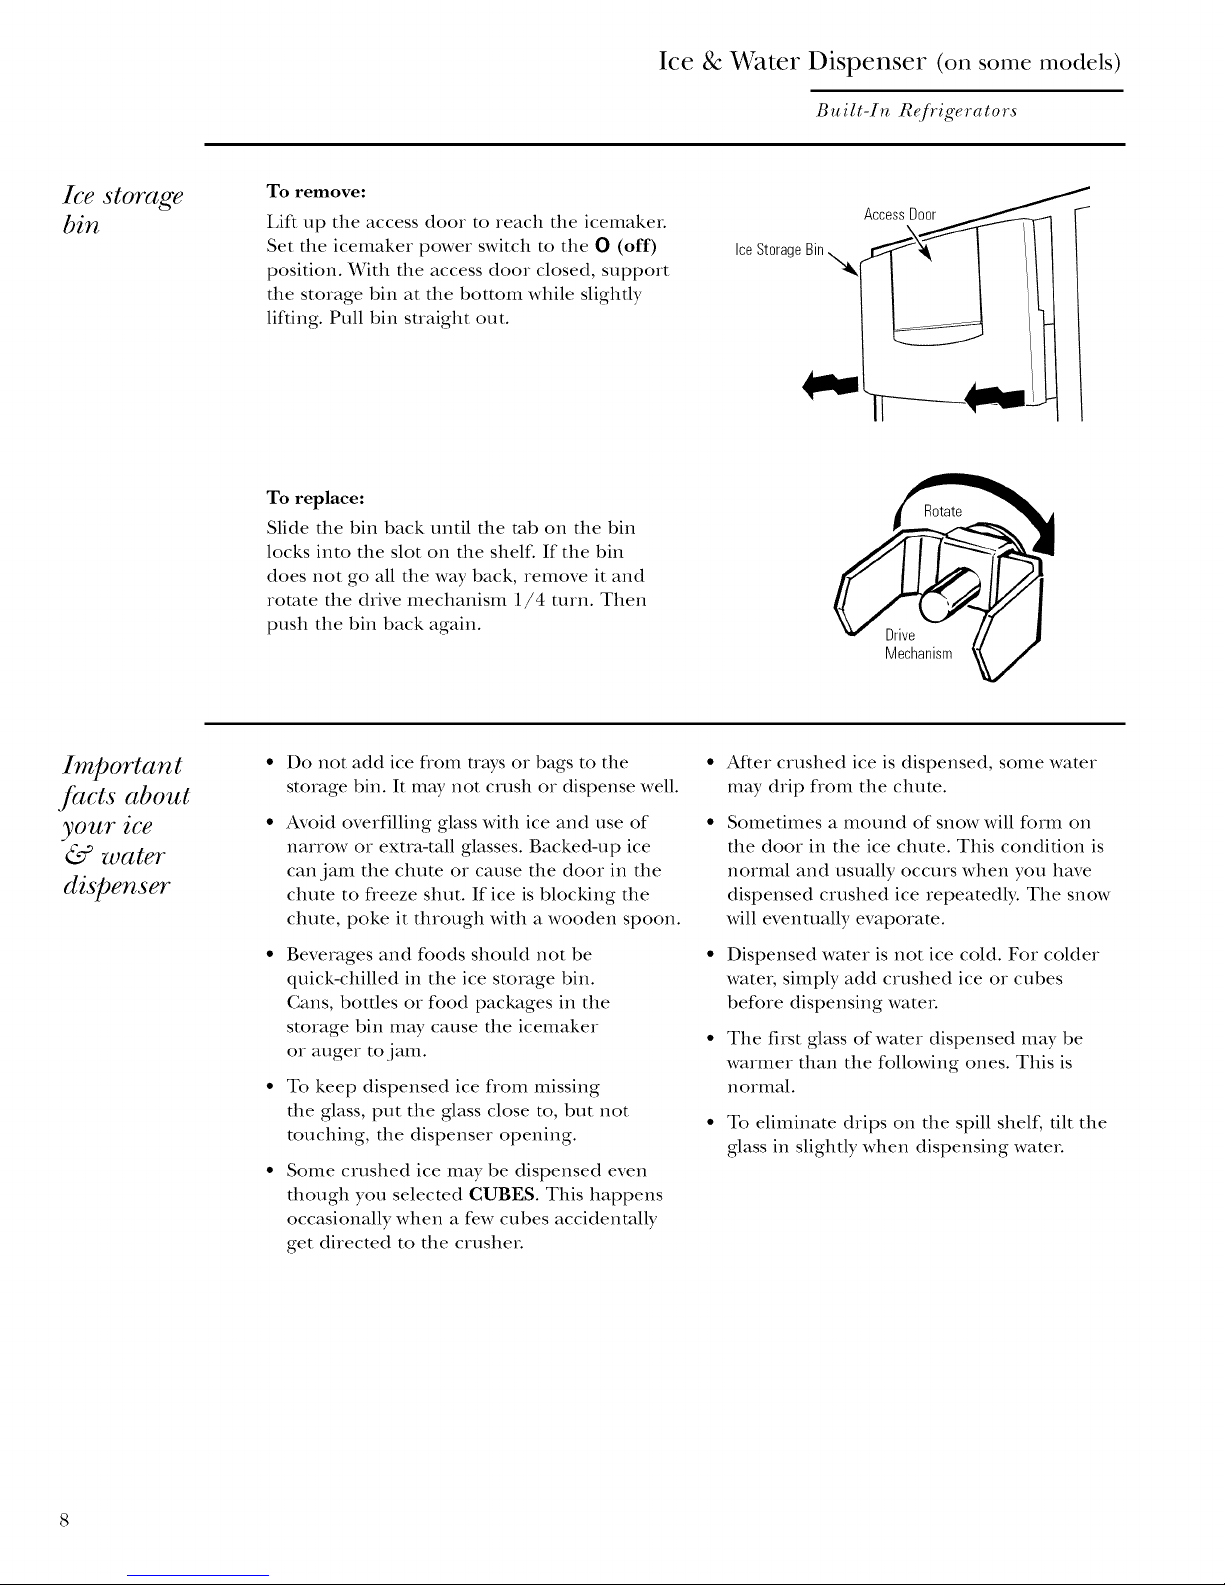
Ice storage
bin
Important
facts about
your ice
& water
dispenser
To remove:
I,iff up the access door to reach the icemaker.
Set the icemaker power switch to the O (off)
position. With the access door closed, support
the storage bin at the bottom while slighdy
lifting. Pull bin suaight out.
To replace:
Slide the bin back until the mb oi1 the bill
locks into the slot on the shelf. If the bin
does not go all the way back, remove it and
rotate the drive mechalfisnl 1/4 unn. Then
push the bin back again.
Do not add ice fiom trays or bags to the
storage bin. It may not crush or dispense well.
Avoid overfilling glass with ice and use of
narrow or extra-tall glasses. Backed-up ice
call jam the chute or cause the door ill the
chute to fleeze shut. If ice is blocking the
chute, poke it through with a wooden spoon.
AccessD_
Rotate
Drive
Mechanism
AtYer crushed ice is dispensed, some water
may drip flom the chute.
Sometimes a mound of snow will form on
the door ill the ice chute. This condition is
normal and usually occurs when you have
dispensed crushed ice repeatedly. The snow
will eventually evaporate.
Beverages and foods should not be
quick-chilled in the ice storage bin.
Cans, bottles oa food packages ill the
storage bill may cause the icemaker
or auger to jam.
To keep dispensed ice flom missing
the glass, put the glass close to, but not
touching, the dispenser opening.
Some crushed ice may be dispensed even
though you selected CUBES. This happens
occasionally when a few cubes accidentally
get directed to the crushei.
Dispensed water is not ice cold. For colder
water, simply add crushed ice or cubes
before dispensing wateL
The first glass of water dispensed may be
warmer than the following ones. This is
noItllal.
To eliminate drips on the spill shelf, tilt the
glass in slightly when dispensing wateL

Automatic Icemaker
Built-In, Refrigerators
Automatic
icemaker
A newly-installed refrigerator may take
12-24 hours to begin making ice.
The icemake_ will pioduce seven cubes pe_
cycle--app_oximately 15 cycles in a 24-houi
pe_iod, depending on fleeze_ compa_mlent
tempe_atuie, _oom tempe_atu_e, numbe_ of
doo_ openings and other use conditions.
If the iefligeiato_ is ope_ated befo_e the water
connection is made to the icemake_, set the
power switch to O (off).
When the ieflige_ato_ has been connected
to the wateI supply, set the poweI switch to
I (on). The g_een light will come on.
Th_ow away the fiIst full bucket of ice.
Be sme nothing inte_fe_es with the sweep
of the feeler am1.
When the bin fills to the level of the feeleI
am1, the icemake_ will stop p_oducing ice.
It is nomlal fo_ seve_al cubes to be joined
together.
If ice is not used fiequently, old ice cubes
will become cloudy, taste stole and shyink.
PowerSwitch
GreenPower
Light FeelerArm
A_YeI the icemakei has been UlHled on again,
the_e will be a delay of about 45 minutes
befo_e the icemake_ _esumes ope_afions.
Icemaker
NOTE: In homes with lowe_-than-ave_age
wateI p_essu_e, you may heaI the icemake_
water vane cycle on seveial times when
making one batch of ice.
 Loading...