

GE Built-in ovens, Monogram Advantium ZSC2000, Monogram Advantium ZSC2001 Use And Care Manual
Page 1

Monogram
®
Use and Care Guide
for Advantium
Built-In Ovens
www.monogram.com
Page 2

Advantium Oven
2
PRECAUTIONS TO AVOID POSSIBLE EXPOSURE
TO EXCESSIVE MICROWAVE ENERGY
(a)
Do Not Attempt to operate this oven with the
door open since open-door operation can
result in harmful exposure to microwave
energy. It is important not to defeat or
tamper with the safety interlocks.
(b)
Do Not Place any object between the oven
front face and the door or allow soil or cleaner
residue to accumulate on sealing surfaces.
(c)
Do Not Operate the oven if it is damaged.
It is particularly important that the oven
door close properly and that there is no
damage to the:
(1) door (bent),
(2) hinges and latches (broken
or loosened),
(3) door seals and sealing surfaces.
(d)
The Oven Should Not be adjusted or
repaired by anyone except properly
qualified service personnel.
IMPORTANT SAFETY INSTRUCTIONS
Advantium
Advantium Quick Start . . . . . . . . . . . . . . . . . . .10
Cooking controls . . . . . . . . . . . . . . . . . . . . . . . .13
Customer information . . . . . . . . . . . . . . . . . . . .8
Oven features . . . . . . . . . . . . . . . . . . . . . . . . . . .12
What is Advantium? . . . . . . . . . . . . . . . . . . . . . . .9
Safety . . . . . . . . . . . . . . . . . . . . . . . . . . . . . . . . .2–7
Speedcooking
Cooking tips . . . . . . . . . . . . . . . . . . . . . . . . . . . .15
Custom speedcook recipes . . . . . . . . . . . . .18–19
Custom speedcook recipe log . . . . . . . . . . . . .20
Manual speedcook . . . . . . . . . . . . . . . . . . . . . . .17
Power level . . . . . . . . . . . . . . . . . . . . . . . . . . . . .16
Repeat last . . . . . . . . . . . . . . . . . . . . . . . . . . . . . .15
Resume feature . . . . . . . . . . . . . . . . . . . . . . . . .15
Speedcook cookware . . . . . . . . . . . . . . . . . . . . .17
Speedcook menu guide . . . . . . . . . . . . . . . . . .11
Speedcook-safe cookware . . . . . . . . . . . . . . . . . .5
Things that are normal . . . . . . . . . . . . . . . . . . .21
Using a pre-set speedcook menu . . . . . . . . . . .14
Microwaving
Cooking tips . . . . . . . . . . . . . . . . . . . . . . . . . . . .23
Custom microwave recipes . . . . . . . . . . . . .24–25
Custom microwave recipe log . . . . . . . . . . . . .24
Defrost (auto) . . . . . . . . . . . . . . . . . . . . . . . . . . .26
Defrost (time) . . . . . . . . . . . . . . . . . . . . . . . . . . .26
Defrosting tips . . . . . . . . . . . . . . . . . . . . . . . . . .27
Micro Express . . . . . . . . . . . . . . . . . . . . . . . .11, 23
Microwave power levels . . . . . . . . . . . . . . . . . . .23
Microwave-safe cookware . . . . . . . . . . . . . . . . . .6
Precautions to avoid possible exposure to
excessive microwave energy . . . . . . . . . . . . . . . .2
Sensor cooking . . . . . . . . . . . . . . . . . . . . . . .28–29
Things that are normal . . . . . . . . . . . . . . . . . . .30
Time cook . . . . . . . . . . . . . . . . . . . . . . . . . . . . . .23
Using pre-set microwave selections . . . . . . . . .22
Other Features
Automatic fan . . . . . . . . . . . . . . . . . . . . . . . . . . .34
Beeper volume . . . . . . . . . . . . . . . . . . . . . . . . . .32
Child lockout . . . . . . . . . . . . . . . . . . . . . . . . . . .34
Clock . . . . . . . . . . . . . . . . . . . . . . . . . . . . . . .10, 32
Display ON/OFF . . . . . . . . . . . . . . . . . . . . . . . .32
Help . . . . . . . . . . . . . . . . . . . . . . . . . . . . . . . . . . .33
Review . . . . . . . . . . . . . . . . . . . . . . . . . . . . . . . . .32
Scroll speed . . . . . . . . . . . . . . . . . . . . . . . . . . . . .32
Timer . . . . . . . . . . . . . . . . . . . . . . . . . . . . . . . . . .34
Care and Cleaning
Cleaning the inside . . . . . . . . . . . . . . . . . . .35–36
Cleaning the outside . . . . . . . . . . . . . . . . . . . . .37
Lamp covers . . . . . . . . . . . . . . . . . . . . . . . . . . . .36
Troubleshooting
Problem Solver . . . . . . . . . . . . . . . . . . . . . . .38, 39
Customer Service
Customer information . . . . . . . . . . . . . . . . . . . .8
Product Registration . . . . . . . . . . . . . . . . . .41, 42
Service phone numbers . . . . . . . . . . . . . . . . . .43
Warranty . . . . . . . . . . . . . . . . . . . . . . . . . . . . . . .44
Contents
Page 3

■ Read all instructions before using
this appliance.
When using electrical appliances, basic
safety precautions should be followed,
including the following:
■ Read and follow the specific precautions in
the PRECAUTIONS TO AVOID POSSIBLE
EXPOSURE TO EXCESSIVE MICROWAVE
ENERGY section on page 2.
■ Be sure your appliance is properly
installed and grounded by a qualified
technician in accordance with the
provided installation instructions.
■ Install or locate this appliance only
in accordance with the provided
installation instructions.
■ Some products such as whole eggs and
sealed containers—for example, closed
jars—will explode and should not be
heated in this oven. Such use of the
oven could result in injury.
■ Do not mount this appliance over
a sink.
■ This oven is not approved or tested for
marine use.
■ This oven is UL listed for standard wall
installation.
■ Do not operate this appliance if it has
been damaged or dropped.
■ As with any appliance, close supervision is
necessary when used by children.
■ Use this appliance only for its intended
use as described in this manual.
■ Do not use corrosive chemicals or vapors
in this appliance.
■ This oven is specifically designed to heat,
dry or cook food, and is not intended for
laboratory or industrial use.
■ This appliance should be serviced only by
qualified service personnel. Contact
nearest authorized service facility for
examination, repair or adjustment.
■ Do not cover or block any openings on
the appliance.
■ Do not store this appliance outdoors.
Do not use this product near water—for
example, in a wet basement, near a
swimming pool or near a sink.
■ See door surface cleaning instructions in
the Care and Cleaning of the Oven section
of this manual.
■ To reduce the risk of fire in the oven
cavity:
— Do not overcook food. Carefully attend
appliance if paper, plastic or other
combustible materials are placed inside
the oven while cooking.
— Remove wire twist-ties and metal handles
from paper or plastic containers before
placing them in the oven.
— Do not use the oven for storage
purposes. Do not leave paper products,
cooking utensils or food in the oven
when not in use.
— If materials inside the oven should
ignite, keep the oven door closed, turn
the oven off and disconnect the power
cord, or shut off power at the fuse or
circuit breaker panel. If the door is
opened, the fire may spread.
3
WARNING!
IMPORTANT SAFETY INSTRUCTIONS
Advantium Oven
SAFETY PRECAUTIONS
To reduce the risk of burns, electric shock, fire, injury to persons,
or exposure to excessive microwave energy:
Page 4

4
WARNING!
■ Do not operate the oven without the oven
rack (turntable) in place. The oven rack
(turntable) must be unrestricted so it
can turn.
■ During and after use, do not touch, or let
clothing or other flammable materials
contact any interior area of the oven; allow
sufficient time for cooling first.
■ Cook meat and poultry thoroughly—
meat to at least an INTERNAL
temperature of 160°F, and poultry to at
least an INTERNAL temperature of
180°F. Cooking to these temperatures
usually protects against foodborne illness.
■ Keep the oven free from grease buildup.
■ Potentially hot surfaces include the
oven door, floor, walls and oven rack
(turntable).
IMPORTANT SAFETY INSTRUCTIONS
Advantium Oven
SAFETY PRECAUTIONS
Arcing is the microwave term for sparks in
the oven. Arcing is caused by:
■ Metal or foil touching the side of the oven.
■ Foil not molded to food (upturned edges
act like antennas).
■ Metal cookware used during either
speedcook or microwave cooking (except
for the pans provided with the oven).
■ Metal, such as twist-ties, poultry pins,
or gold-rimmed dishes, in the oven.
■ Recycled paper towels containing small
metal pieces being used in the oven.
■ Use foil only as recommended in
this guide.
ARCING
Arcing can occur during both speedcooking and microwave cooking. If you see arcing, press the
CLEAR/OFF pad and correct the problem.
Page 5
5
WARNING!
■ When microwaving, place all foods
and containers on the white ceramic
tray.
■ Do not pop popcorn in your oven
unless in a special microwave popcorn
accessory or unless you use popcorn
labeled for use in microwave ovens.
■ Do not boil eggs in this oven. Pressure
will build up inside egg yolk and will
cause it to burst, possibly resulting
in injury.
■ Do not operate the oven without food
inside. This may cause damage to the
oven. It increases the heat around the
magnetron and can shorten the life of
the oven.
■ Foods with unbroken outer “skin”
such as potatoes, hot dogs, sausages,
tomatoes, apples, chicken livers and
other giblets, and egg yolks should
be pierced to allow steam to escape
during cooking.
■ SUPERHEATED WATER
Microwaved water and other liquids do not
always bubble when they reach the boiling
point. They can actually get superheated
and not bubble at all.
Superheated liquid will bubble up out of the
cup when it is moved or when something
like a spoon or tea bag is put into it.
To prevent this from happening and
causing injury, do not heat any liquid for
more than 2 minutes per cup. After heating,
let the cup stand in the microwave for 30
seconds before moving it or putting
anything into it.
■ The oven and door will get very hot
when speedcooking.
■ Cookware will become hot because of
heat transferred from the heated food.
Oven mitts will be needed to handle
the cookware.
■ Do not use coverings, containers
or cooking/roasting bags made
of foil, plastic, wax or paper when
speedcooking.
■ Do not cover the oven rack
(turntable), trays or any part
of the oven with metal foil.
This will cause arcing in the oven.
■ Use the black metal flat tray in the
same way you would use a shallow
baking pan or baking tray.
■ Use the black grill tray for cooking
steaks, fish and poultry.
■ Place food directly on the trays
when cooking.
■ Any oven-safe dish can be used in
your oven. Recipes in the Advantium
Cookbook were tested in Pyrex® and
Anchor Hocking® glass cookware and
Corningware® ceramic casseroles.
Cooktimes and results may vary
when using other types of oven-safe
dishes. Place them directly on the
oven rack (turntable).
■ Do not use the oven to dry
newspapers.
■ Use of the white ceramic tray when
speedcooking will result in inferior
cooking performance.
IMPORTANT SAFETY INSTRUCTIONS
Advantium Oven
FOODS
Speedcook
oven-safe
cookware
The oven rack
(turntable) must always
be in place when using
the oven.
Put food directly on the
black metal flat tray
to speedcook.
Put food directly on
the black grill tray
to speedcook foods you
would normally cook
on the grill.
Page 6

6
IMPORTANT SAFETY INSTRUCTIONS
Advantium Oven
WARNING!
■ Place food or microwavable container
directly on the white ceramic tray to
cook your food.
■ Use of either black metal tray during
microwave cooking will result in
inferior cooking performance.
■ If you are not sure if a dish is
microwave-safe, use this test: Place in
the oven both the dish you are testing
and a glass measuring cup filled with
1 cup of water—set the measuring cup
either in or next to the dish.
Microwave 30-45 seconds at high.
If the dish heats, it should not be used
for microwaving.
■ If the dish remains cool and only the
water in the cup heats, then the dish
is microwave-safe.
■ Cookware may become hot because
of heat transferred from the heated
food. Oven mitts may be needed to
handle the cookware.
■ Do not use recycled paper products.
Recycled paper towels, napkins and
waxed paper can contain metal flecks
which may cause arcing or ignite.
Paper products containing nylon or
nylon filaments should be avoided,
as they may also ignite.
■ Use foil only as directed in this guide.
TV dinners may be microwaved in foil
trays less than 3/4″ high; remove the
top foil cover and return the tray to
the box. When using foil in the oven,
keep the foil at least 1 inch away from
the sides of the oven.
■ Do not use the oven to dry
newspapers.
■ If you use a meat thermometer while
cooking, make sure it is safe for use in
microwave ovens.
■ Some styrofoam trays (like those that
meat is packaged on) have a thin strip
of metal embedded in the bottom.
When microwaved, the metal can
burn the floor of the oven or ignite a
paper towel.
■ Paper towels, waxed paper and plastic
wrap can be used to cover dishes in
order to retain moisture and prevent
spattering. Be sure to vent plastic wrap
so steam can escape.
■ Not all plastic wrap is suitable for use
in microwave ovens. Check the
package for proper use.
■ “Boilable” cooking pouches and
tightly closed plastic bags should be
slit, pierced or vented as directed by
package. If they are not, plastic could
burst during or immediately after
cooking, possibly resulting in injury.
Also, plastic storage containers should
be at least partially uncovered because
they form a tight seal. When cooking
with containers tightly covered with
plastic wrap, remove covering carefully
and direct steam away from hands
and face.
■ Plastic cookware—Plastic cookware
designed for microwave cooking is
very useful, but should be used
carefully. Even microwave-safe plastic
may not be as tolerant of overcooking
conditions as are glass or ceramic
materials and may soften or char if
subjected to short periods of
overcooking. In longer exposures
to overcooking, the food and
cookware could ignite.
Follow these guidelines:
1. Use microwave-safe plastics only
and use them in strict compliance
with the cookware manufacturer’s
recommendations.
2. Do not microwave empty containers.
3. Do not permit children to use
plastic cookware without complete
supervision.
Microwavesafe
cookware
The oven rack
(turntable) must always
be in place when using
the oven.
The white ceramic tray
should always be in
place when
microwaving.
Make sure to use suitable cookware during microwave cooking. Most glass casseroles,
cooking dishes, measuring cups, custard cups, pottery or china dinnerware which does
not have metallic trim or glaze with a metallic sheen can be used. Some cookware is labeled
“suitable for microwaving.”
Page 7

7
IMPORTANT SAFETY INSTRUCTIONS
Advantium Oven
WARNING!
■ Don’t defrost frozen beverages in
narrow-necked bottles (especially
carbonated beverages). Even if the
container is open, pressure can build
up. This can cause the container to
burst, possibly resulting in injury.
■ Spontaneous boiling—Under certain
special circumstances, liquids may
start to boil during or shortly after
removal from the oven. To prevent
burns from splashing liquid, we
recommend the following: before
removing the container from the oven,
allow the container to stand in the
oven for 30 to 40 seconds after the
oven has shut off. Do not boil liquids
in narrow-necked containers such as
soft drink bottles, wine flasks and
especially narrow-necked coffee cups.
Even if the container is opened,
excessive steam can build up and
cause it to burst or overflow.
■ Foods cooked in liquids (such as
pasta) may tend to boil more rapidly
than foods containing less moisture.
Should this occur, refer to the Care
and Cleaning of the oven section for
instructions on how to clean the inside
of the oven.
■ Hot foods and steam can cause
burns. Be careful when opening any
containers of hot food, including
popcorn bags, cooking pouches
and boxes. To prevent possible injury,
direct steam away from hands
and face.
■ Do not overcook potatoes. They could
dehydrate and catch fire, causing
damage to your oven.
■ Avoid heating baby food in glass jars,
even with the lid off. Make sure all
infant food is thoroughly cooked. Stir
food to distribute the heat evenly. Be
careful to prevent scalding when
warming formula. The container may
feel cooler than the formula really is.
Always test the formula before feeding
the baby.
■ Do not attempt to deep fry in the oven.
SAFETY PRECAUTIONS
SAVE THESE INSTRUCTIONS
Page 8

Product
registration
Fill out the Consumer Product Registration Card.
Two Easy Ways To Register Your Appliance!
■ Through the internet at www.geappliances.com.
■ Complete and mail the enclosed Product Registration Card.
Write
down the
model &
serial
numbers
You can find them on a label, behind the
open oven door, on the front face.
These numbers are also on the Consumer
Product Ownership Registration Card
packed separately with your oven.
Proof of the original purchase date is
needed to obtain service under the
warranty.
For future reference, please write these
numbers here:
Model Number
Serial Number
Read this
manual
Inside you will find many helpful hints on
how to use and maintain your oven
properly. Just a little preventive care on
your part can save you a great deal of time
and money over the life of your oven.
If you
need service
You’ll find many answers to common
problems in the Before You Call For Service
section. If you review our chart of
Troubleshooting Tips first, you may not
need to call for service at all.
If you do need service, you can relax
knowing help is only a phone call away.
A list of toll-free customer service numbers
is included in the back section.
Or, you can always call the GE Answer
Center® at 800.626.2000, 24 hours a day,
7 days a week.
Contact us at www.monogram.com
Customer Information
Advantium Oven
8
Congratulations! You are now part of the cooking revolution!
As part of the vision to help consumers live better, easier lives, Monogram introduces the
revolutionary Advantium oven with Speedcook technology. This new oven roasts, grills,
bakes, browns and broils, just like your conventional oven—only faster—and with delicious
results. You also save time because Advantium requires no preheating.
The information on the following pages will help you operate and maintain your
new Advantium oven. We appreciate your purchase, and hope you will continue
to rely on us whenever you need quality appliances for your home. We thank you
for buying Monogram.
Introduction
Page 9
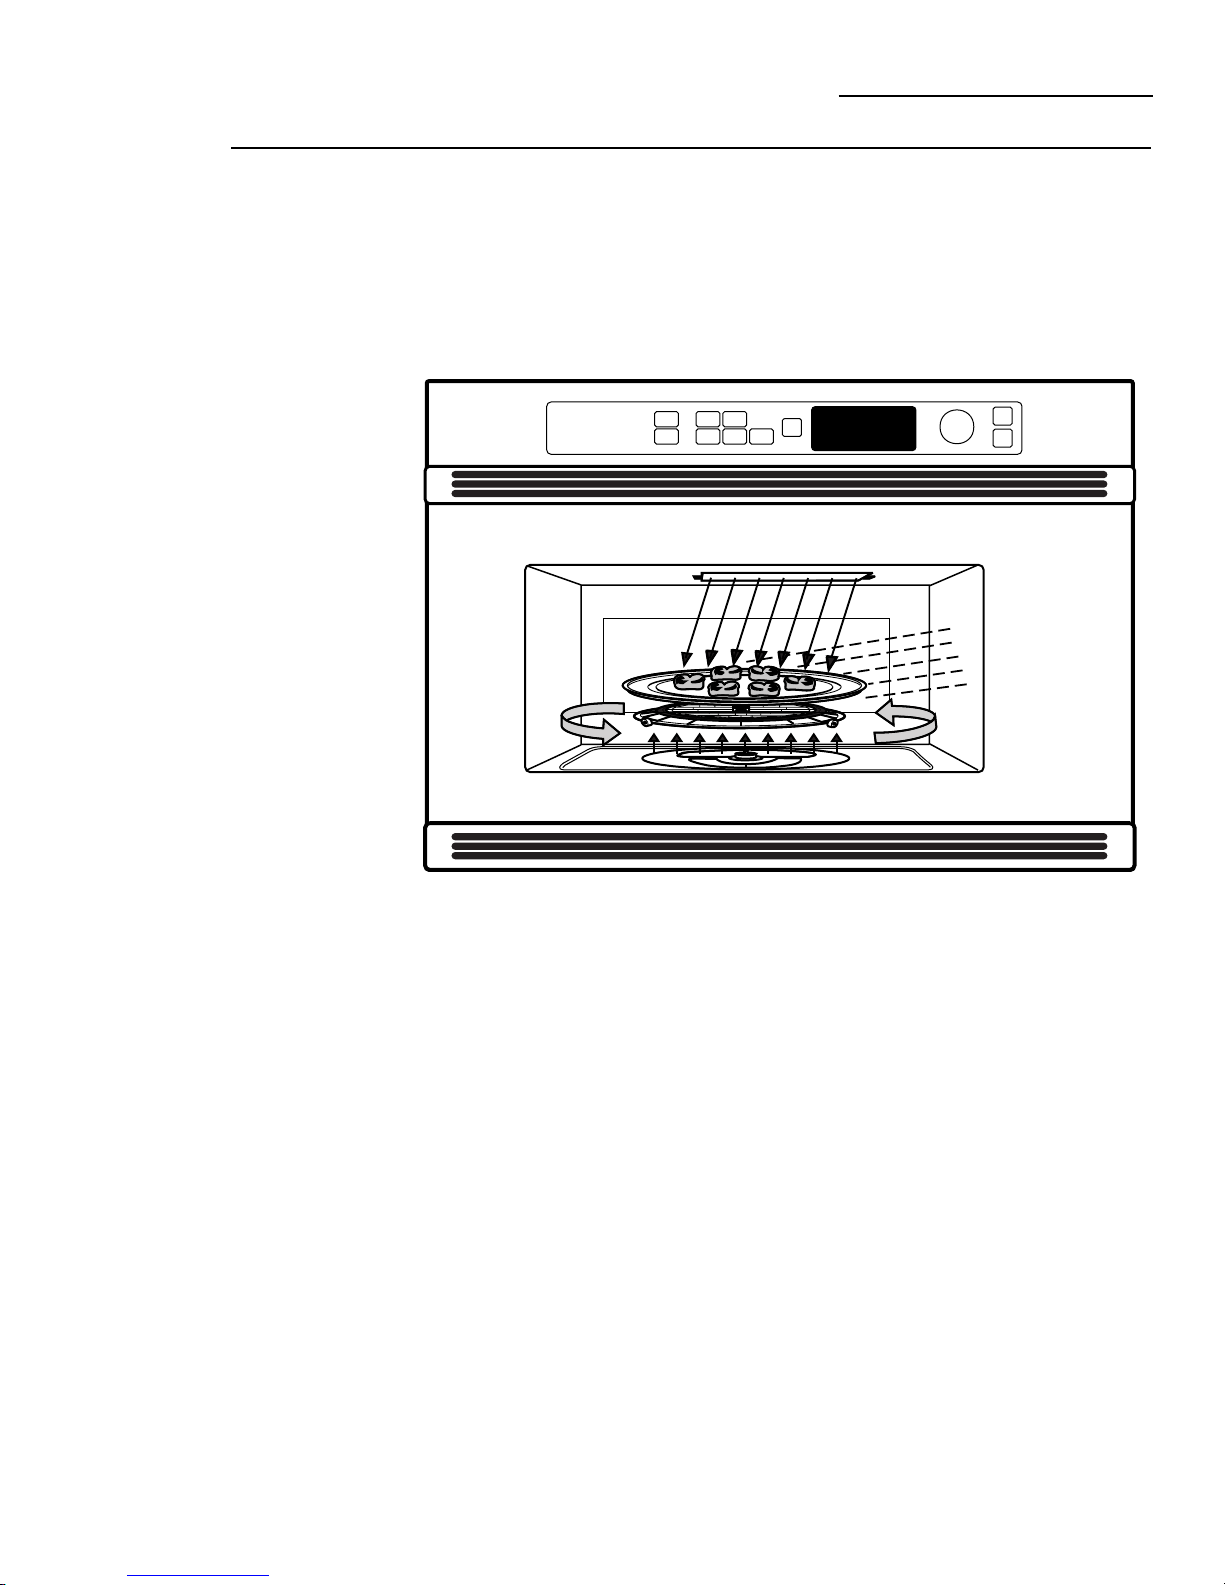
What is Advantium?
Advantium Oven
The new Advantium oven uses
breakthrough Speedcook technology
to harness the power of light. The
Advantium oven cooks the outside
of foods much like conventional
radiant heat, while also penetrating
the surface so the inside cooks
simultaneously. While halogen light
is the primary source of power, a
“microwave boost” is added with
certain foods. Foods cook evenly and
fast, retaining their natural moisture.
Turntable
■ The oven rack (turntable) rotates to ensure even cooking.
Controls
■ The oven control contains preset recipes.
■ Turn and press dial makes menu selection easy.
Halogen Lamps
■ Two 1500 watt halogen bulbs cook food from above.
■ One 1500 watt halogen bulb cooks food from below.
Microwave
■ A microwave “boost” is automatically added with certain foods.
■ The oven can also be used as a 950 watt microwave oven.
Grill
■ The oven emits air from the lower grill area.
Getting to know
Advantium
9
Page 10
Advantium Quick Start
Advantium Oven
10
Set the
clock
When you first plug in the oven or after
a power outage:
1. Turn the selector dial to set
the hour. Press the dial to enter.
2. Turn the dial to set the minute.
Press the dial to enter.
3. Turn the dial to select AM or PM.
Press the dial to enter.
To change the time:
1. Press the OPTIONS button.
2. Turn the dial to CLOCK.
Press the dial to enter and follow the
display directions to set.
Begin
speedcooking
Step 1:
Press the SPEEDCOOK button.
Step 2:
Turn the dial to select the type of food
category you want. Press the dial to
enter it.
Step 3:
Turn the dial to select the specific food.
Press the dial to enter it.
Step 4:
Turn the dial to select the amount, size,
and/or doneness (if required, the oven
will prompt you). Press the dial after
each selection.
Step 5:
Once the display shows ADJUST TIME
OR START, either press the dial or start
button to start cooking.
■ Press CLEAR/OFF at any time to
stop cooking.
Microwaving
with Micro
Express
Press MICRO EXPRESS repeatedly
for 30 second increments of microwave
cooking time.
The oven starts immediately.
T
U
R
N
T
O
S
E
L
E
C
T
P
R
E
S
S
T
O
E
N
T
E
R
START
PAUSE
CLEAR
OFF
BACK
POWER
LEVEL
SPEED
COOK
MANUAL
COOK
OPTIONS
TIMER
HELP
MICRO
WAVE
MICRO
EXPRESS
REPEAT LAST OVEN LIGHT
RECIPE
The oven rack (turntable)
must always be in place
when using the oven.
Put food directly on the black
metal tray to speedcook.
As a great option, put food
directly on the black grill tray
to speedcook foods you would
normally cook on the grill.
The oven rack (turntable)
must always be in place
when using the oven.
The white ceramic tray
should always be in place
when microwaving.
T
U
R
N
T
O
S
E
L
E
C
T
P
R
E
S
S
T
O
E
N
T
E
R
START
PAUSE
CLEAR
OFF
BACK
POWER
LEVEL
SPEED
COOK
MANUAL
COOK
OPTIONS
TIMER
HELP
MICRO
WAVE
MICRO
EXPRESS
REPEAT LAST OVEN LIGHT
RECIPE
T
U
R
N
T
O
S
E
L
E
C
T
P
R
E
S
S
T
O
E
N
T
E
R
START
PAUSE
CLEAR
OFF
BACK
POWER
LEVEL
SPEED
COOK
MANUAL
COOK
OPTIONS
TIMER
HELP
MICRO
WAVE
MICRO
EXPRESS
REPEAT LAST OVEN LIGHT
RECIPE
T
U
R
N
T
O
S
E
L
E
C
T
P
R
E
S
S
T
O
E
N
T
E
R
START
PAUSE
CLEAR
OFF
BACK
POWER
LEVEL
SPEED
COOK
MANUAL
COOK
OPTIONS
TIMER
HELP
MICRO
WAVE
MICRO
EXPRESS
REPEAT LAST OVEN LIGHT
RECIPE
T
U
R
N
T
O
S
E
L
E
C
T
P
R
E
S
S
T
O
E
N
T
E
R
START
PAUSE
CLEAR
OFF
BACK
POWER
LEVEL
SPEED
COOK
MANUAL
COOK
OPTIONS
TIMER
HELP
MICRO
WAVE
MICRO
EXPRESS
REPEAT LAST OVEN LIGHT
RECIPE
Page 11
11
Speedcook Menu Guide
Advantium Oven
Display
prompts
1. Turn the dial until
CHICKEN appears.
Press the dial to enter.
2. Turn the dial until
BONELESS BREASTS
appears.
Press the dial to enter.
3. Turn the dial to
Select SIZE:
Small (3–4 oz)
Large (5+ oz)
Press the dial to enter.
4. Turn the dial to
Select amount:
1–2 pieces
3–4 pieces
Press the dial to enter.
5. Use ROUND METAL
TRAY is displayed.
NOTE: When speedcooking, use black trays.
After pressing the SPEEDCOOK
button, the oven will prompt you to
make several selections, such as the
example below.
Food Category Menu Selection
Appetizers Bagel Bites
and Snacks Cheese Sticks, Froz
Jalapeno Poppers
Mini Egg Rolls, Froz
Mini Nachos, Froz
Onion Rings, Frozen
Other Bite Size
Pizza Rolls, Froz
Breads Biscuits, Refrig.
Breadsticks, Ref
Cheese Loaf, Frozen
Cornbread Sticks, Ref
Crescent Rolls
French Bread, Ref
Garlic/Cheese Bread
Texas Toast
Breakfast Belgian Waffles
Breakfast Burritos
Breakfast Pizza
Cinnamon Rolls, Refr
French Toast, Froz
Pancakes, Frozen
Sausage Links
Sausage Patties
Strudels, Froz
Waffles, Froz
Waffle Sticks, Froz
Chicken Bone-In Pieces
Boneless Breasts
Fingers, Frozen
Fried Chicken, Froz
Nuggets, Frozen
Patties, Frozen
Tenders, Frozen
Whole Chicken
Wings, Frozen
Food Category Menu Selection
Desserts Churros, Frozen
Cookie Dough, Froz
Cookie Dough, Refr
Pie Crust, Refr
Turnovers, Frozen
Turnovers, Refr
Fish and Seafood Breaded Fish, Frozen
Fish Sticks, Frozen
Salmon Steaks
Shellfish
Swordfish Steaks
Tuna Steaks
Whitefish Fillets
Meats Filet Mignon
Hamburger
Lamb Chops
Pork Chops
Steaks–Ribeye
Steaks–Sirloin
Steaks–Strip
Steaks–T-bone
Pizza Deli/Fresh
Pizza Shell, Filled
Reg. Crust, Frozen
Rising Crust, Frozen
Potatoes Baked Potatoes
Frozen French Fries
Frozen Tater Tots
Recipe Personal Recipes
Sandwiches Burritos, Frozen
Corn Dogs, Frozen
Cres Roll/Hot Dogs
Grilled Sandwiches
Pocket Sandwiches
Pre-set
speedcook
menu
selections
■ After a cooking cycle has been
completed, use the Resume feature
to cook for additional time.
■ To review settings during cooking,
press the selector dial.
T
U
R
N
T
O
S
E
L
E
C
T
P
R
E
S
S
T
O
E
N
T
E
R
START
PAUSE
CLEAR
OFF
BACK
POWER
LEVEL
SPEED
COOK
MANUAL
COOK
OPTIONS
TIMER
HELP
MICRO
WAVE
MICRO
EXPRESS
REPEAT LAST OVEN LIGHT
RECIPE
Page 12
Oven Features
Advantium Oven
12
Oven
features
Throughout this manual, features and appearance may vary from your model.
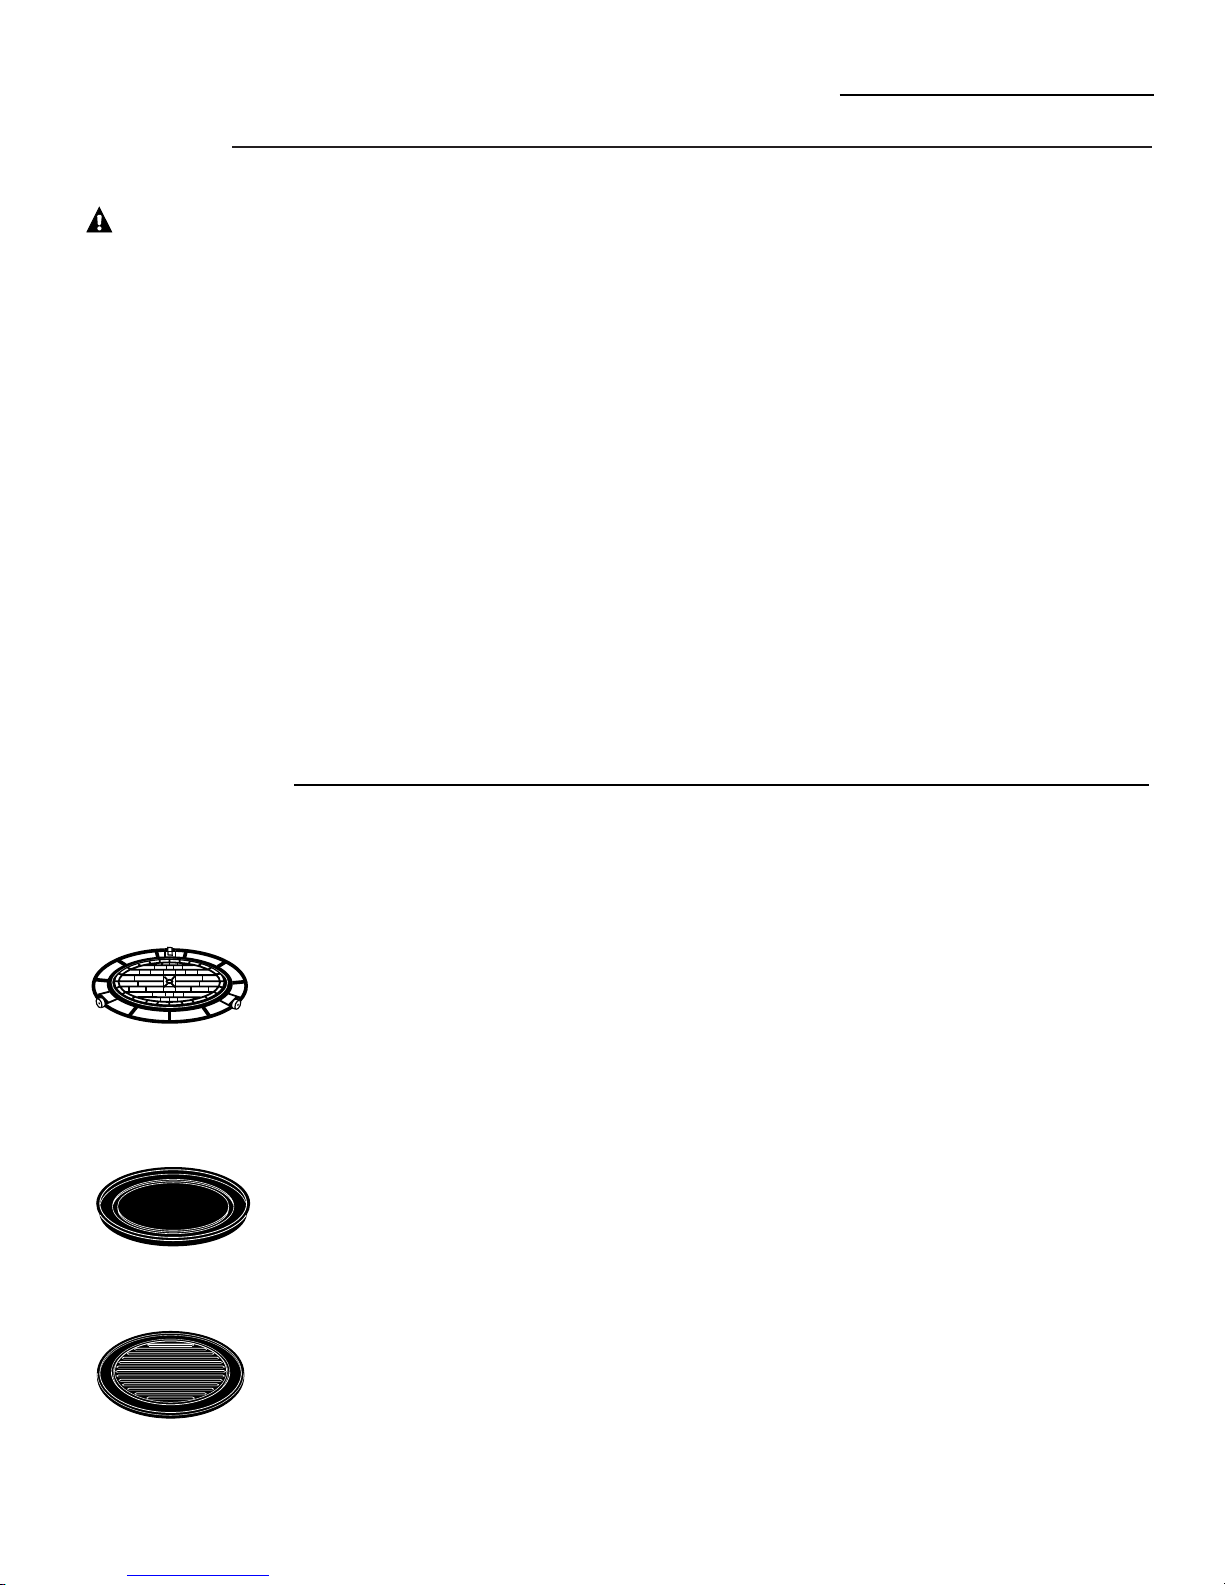
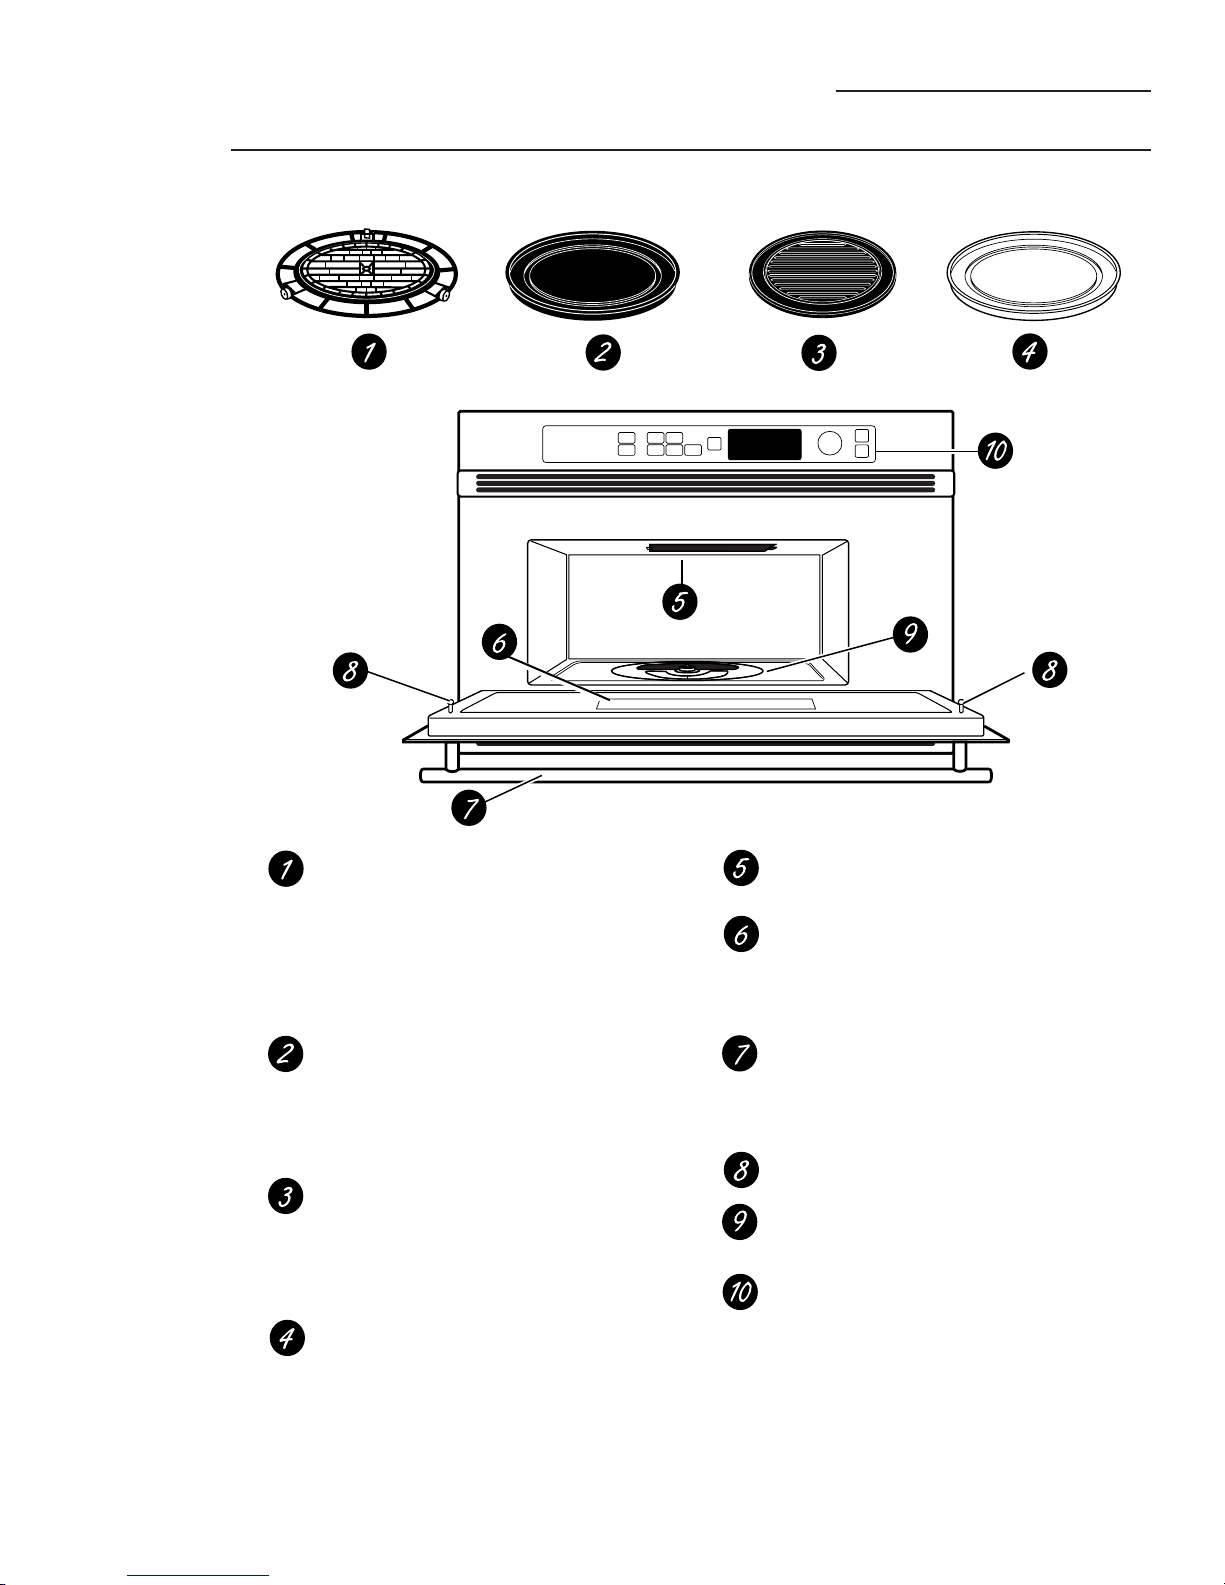
Oven Rack (Turntable)
The oven rack (turntable) must
always be in place, on the oven
floor, for all cooking. Be sure the
oven rack (turntable) is seated
securely over the square spindle
in the center of the oven.
Black Metal Tray/Baking Sheet
Put food directly on the black metal
tray and place on the oven rack
(turntable) when using the
speedcook features.
Black Grill Tray/Baking Sheet
Put food directly on the black grill
tray and place on the oven rack
(turntable) when speedcooking foods
you would normally cook on the grill.
White Ceramic Tray
Place on the oven rack (turntable)
when using the microwave features.
Place food or microwave-safe
cookware directly on the tray.
Upper Halogen Lamps
Operate when using speedcook.
Window
Allows cooking to be viewed while
keeping microwaves confined in
the oven.
Door Handle
Pull to open the door. The door
must be securely latched for the
oven to operate.
Door Latches
Lower Halogen Lamp
Operates when using speedcook.
Control Panel
The buttons used to operate the oven
are located on the control panel.
Page 13

13
Advantium Oven
Cooking
controls
Oven Features
T
U
R
N
T
O
S
E
L
E
C
T
P
R
E
S
S
T
O
E
N
T
E
R
START
PAUSE
CLEAR
OFF
BACK
POWER
LEVEL
SPEED
COOK
MANUAL
COOK
OPTIONS
TIMER
HELP
MICRO
WAVE
MICRO
EXPRESS
REPEAT LAST OVEN LIGHT
RECIPE
With your Advantium oven, you can cook with high-intensity halogen lights and/or
conventional microwave energy.
Selector Dial
SPEEDCOOK/REPEAT LAST
Press this button to access the pre-set
speedcook menu. Press and hold for 3
seconds to repeat the last cooking
selection.
MANUAL COOK/RECIPE
Press this button to set your own
speedcook program.
SELECTOR DIAL–Turn to select, Press to enter
First turn then press the dial to make food
selections. Also use the dial to increase
(turn clockwise) or decrease (turn
counterclockwise) cooking times.
START/PAUSE
Press this button to start or pause any
cooking function.
CLEAR/OFF
Press this button to cancel ALL oven
programs except the clock and timer.
BACK
Press this button to step back one or
more levels in the program process, such
as when entering custom recipes.
POWER LEVEL
Press this button and turn/press the
selector dial to change the speedcook
upper lamps, lower lamp and microwave
power level before and during cooking.
TIMER
Press this button to set the minute timer.
MICROWAVE/OVEN LIGHT
Press this button to operate the
microwave. Press while microwave cooking
to light the oven cavity. The light will come
on and will remain on until the end of the
cooking cycle.
MICRO EXPRESS
Press for 30 seconds of microwave cooking
time. Each time the button is pressed adds
an additional 30 seconds to the remaining
cooking time. The oven starts immediately.
OPTIONS
Press this button to set the Clock and
access the Beeper Volume, Clock Display
ON/OFF, Display Scroll Speed features.
HELP
Press this button to find out more about
your oven’s features.
Page 14
14
Advantium Oven
Speedcooking
Advantium is already pre-set to cook over
100 popular dishes.
1. Press the speedcook button.
If no selection is made within 15
seconds, the display will revert back
to the time of day.
2. Turn the selector dial to select the
type of food category you want.
Press the dial to enter.
3. Turn the selector dial to select the
specific food (menu selection).
Press the dial to enter.
4. Turn the selector dial to select
amount, size, and/or doneness
(if required, the oven will prompt
you.) Press the dial after each
selection.
5. Once the display shows:
ADJUST TIME OR START
either press start or the selector
dial to start cooking.
Turn the food over when the oven signals
TURN FOOD OVER (for certain foods).
When the oven signals CHECK for
DONENESS, check to see if your food is
done to your liking (for certain foods).
To review settings during cooking,
press the selector dial.
If you enter an undesired selection at any
time, simply press the BACK button and
re-enter the desired selections.
Using
speedcook
features
CAUTION: When using speedcook programs, remember that the oven, door and
dishes will be very hot!
Prior to the first use of your oven, the clock must be set. See the Advantium Quick
Start section.
Before you begin, make sure the oven rack (turntable) is in place.
Use the black metal tray (baking sheet), the black grill tray (baking sheet) or your own
glass or ceramic cookware.
The oven rack (turntable) must always
be in place when using the oven.
Put food directly on the black metal
flat tray to speedcook.
Put food directly on the black grill
tray to speedcook foods you would
normally cook on the grill.
SPEEDCOOK PRE-SET FOOD SELECTIONS:
■ Appetizers & Snacks ■ Chicken ■ Meats ■ Recipe
■ Breads ■ Desserts ■ Pizza ■ Sandwiches
■ Breakfast ■ Fish & Seafood ■ Potatoes
To use a
pre-set
speedcook
menu
■ Early in a speedcook program, you will
see OPTIMIZING COOK TIME in the
display. The oven automatically senses
the electrical voltage level in your home
and adjusts the cooking time up or
down for proper cooking.
■ If the door is opened during cooking,
the oven will stop and PAUSE will
appear in the display. Close the door
and press the START/PAUSE button
to resume cooking.
■ At anytime during cooking you can
turn the selector dial to change the
cooking time. You can change power
levels by pressing POWER LEVEL.
■ To assure consistent cooking results,
the oven may adjust power levels
downward if the oven is hot at the
beginning of a program.
■ At the end of cooking, the automatic
fan will continue to run for a short time
to cool internal components.
■ To cook for additional time after a
cooking cycle has been completed,
use the resume feature.
START
PAUSE
T
U
R
N
T
O
S
E
L
E
C
T
P
R
E
S
S
T
O
E
N
T
E
R
CLEAR
OFF
BACK
POWER
LEVEL
SPEED
COOK
MANUAL
COOK
OPTIONS
TIMER
HELP
MICRO
WAVE
MICRO
EXPRESS
REPEAT LAST OVEN LIGHT
RECIPE
Page 15

Speedcooking
Advantium Oven
15
Cooking tips
for great
tasting results
To ensure consistent and even browning
when cooking foods directly on the black
metal tray, arrange food as shown below.
Foods can touch but should not overlap.
Circular pattern
(Example: biscuits, cookies)
Spoke pattern
(Example: crescent rolls, breadsticks)
Single layer
(Example: appetizers)
Circular pattern
(Example: biscuits, cookies, meats)
Repeat last
1. Press and hold the SPEEDCOOK/
REPEAT LAST button for about
3 seconds.
2. The last pre-set food will
be displayed.
3. Press the START/PAUSE
button or the selector dial to
start cooking.
Use this time saving feature for cooking
repetitive items like cookies or appetizers.
NOTE: The last program used is stored
for two hours.
Resume
feature
1. If your food needs to cook a bit
longer, you can restart the oven
by pressing the START button
or selector dial.
2. RESUME COOKING will be
displayed and the oven will
restart immediately at 10%
of the original time.
The program stays in memory for 10
minutes. After that you will need to
begin the program again.
See To use a pre-set speedcook menu.
Fresh meat, chicken, fish or seafood that has been frozen should be thawed before
cooking (the microwave defrost feature can be used). For other frozen prepackaged
foods, follow package directions.
START
PAUSE
T
U
R
N
T
O
S
E
L
E
C
T
P
R
E
S
S
T
O
E
N
T
E
R
CLEAR
OFF
BACK
POWER
LEVEL
SPEED
COOK
MANUAL
COOK
OPTIONS
TIMER
HELP
MICRO
WAVE
MICRO
EXPRESS
REPEAT LAST OVEN LIGHT
RECIPE
T
U
R
N
T
O
S
E
L
E
C
T
P
R
E
S
S
T
O
E
N
T
E
R
START
PAUSE
CLEAR
OFF
BACK
POWER
LEVEL
SPEED
COOK
MANUAL
COOK
OPTIONS
TIMER
HELP
MICRO
WAVE
MICRO
EXPRESS
REPEAT LAST OVEN LIGHT
RECIPE
Page 16

Speedcooking
Advantium Oven
Speedcook
power level
Advantium uses power from
high intensity halogen lights and
microwaves to cook food from
the top, bottom and interior
simultaneously to seal in
moisture and flavor.
When using the pre-set menu foods,
the power levels are already selected
for you. However, power levels can
be adjusted when cooking both preset menu foods and manual cooking.
Each power level gives you halogen
lamp power and microwave energy
for a certain percentage of the time.
U=07 Upper halogen lamp on
70% of the time.
L=07 Lower halogen lamp on
70% of the time.
M=05 Microwave on 50% of
the time.
NOTE: Be careful when adjusting
power levels so that you do not over- or
undercook your food.
1. Press the SPEEDCOOK button
and select your food (follow
instructions from To use a pre-set
speedcook menu).
2. When display shows ADJUST
TIME or START, press the
POWER LEVEL button.
3. Turn the dial clockwise to increase
or counterclockwise to decrease
the upper power level. Press the
dial to enter.
4. Turn the dial to change the
lower power level. Press the
dial to enter.
5. Turn the dial to change the
microwave power level. Press
the dial to enter.
6. Press the START/PAUSE
button or the selector dial to
start cooking.
If you do not want to change one of the
settings, just press the dial to move to the
next selection.
16
U = Select a higher setting for
thin foods requiring a golden
brown top (example: fish
fillets, toast, boneless
chicken breasts).
Select a lower setting for
thicker foods and foods with
high sugar or fat content
(example: cakes, roasts).
L = Select a higher setting for thick
or dense foods that may not
cook quickly in the center
(example: casseroles).
Select a lower setting for thin
foods (example: cookies) and
foods containing high fat or
sugar content (example:
pastry, cakes).
M = Select a higher setting to
shorten cooking time for dense
or heavy foods (example:
casseroles, whole chicken).
Select a lower setting for
delicate foods (example: cakes,
breads, souffles) or foods
requiring longer cook times
for tender results (example:
stew, pot roast).
Follow these general guidelines when selecting the best U=, L=, M= settings
for your favorite recipes:
START
PAUSE
T
U
R
N
T
O
S
E
L
E
C
T
P
R
E
S
S
T
O
E
N
T
E
R
CLEAR
OFF
BACK
POWER
LEVEL
SPEED
COOK
MANUAL
COOK
OPTIONS
TIMER
HELP
MICRO
WAVE
MICRO
EXPRESS
REPEAT LAST OVEN LIGHT
RECIPE
Page 17

Speedcooking
Advantium Oven
Manual
speedcook
Advantium gives you the flexibility to
cook your favorite dishes.
If you want to cook a food item that is
not among the pre-set selections, use
manual speedcook.
1. Press the MANUAL
COOK/RECIPE button.
If no entries are made within 15 seconds,
the display will revert back to the time
of day.
2. Turn the selector dial to select
the cooking time. Press the dial
to enter.
The display will prompt you to select
UPPER POWER, LOWER POWER,
and MICROWAVE POWER.
3. Turn the dial clockwise to increase
or counterclockwise to decrease
the upper power level. Press the
dial to enter.
4. Turn the dial to change the
lower power level. Press the
dial to enter.
5. Turn the dial to change the
microwave power level. Press
the dial to enter.
6. Press the START/PAUSE
button or press the selector
dial to start cooking.
For power level and cooking time
suggestions, use your cooking guide
or cook book.
Speedcook
cookware
■ Follow cookware suggestions on the
oven display or in the Cookbook or
Cooking guide.
■ Cookware will become hot because of
heat transferred from the heated food.
Oven mitts will be needed to handle
the cookware.
■ Place food directly on the black trays
when cooking.
■ Use the black metal flat tray in the
same way you would use a shallow
baking pan or baking tray.
■ Use the black grill tray for cooking
steaks, fish and poultry.
■ In addition to the cookware provided,
you can use non-metal casserole
dishes, pie plates and other heat-safe
cookware. Place them directly on the
oven rack (turntable).
■ Be sure to select a size that will
rotate easily.
■ Place the black metal tray, glass, or
ceramic cookware directly on the oven
rack (turntable).
■ Do not use cookware or coverings made
of paper, plastic, or foil when cooking
during a speedcook cycle.
17
START
PAUSE
T
U
R
N
T
O
S
E
L
E
C
T
P
R
E
S
S
T
O
E
N
T
E
R
CLEAR
OFF
BACK
POWER
LEVEL
SPEED
COOK
MANUAL
COOK
OPTIONS
TIMER
HELP
MICRO
WAVE
MICRO
EXPRESS
REPEAT LAST OVEN LIGHT
RECIPE
Page 18

Speedcooking
Advantium Oven
Speedcook
recipe—to
enter and
save
Create up to 30 of your own
Speedcook recipes, or customize
an existing custom recipe to suit
your tastes. Once it’s done, your
food cooks just the way you want it
every time!
1. Press the SPEEDCOOK button.
2. Turn the dial until RECIPE
appears. Press the dial to enter.
3. Turn the dial until CUSTOM #:
EMPTY appears. Press the dial
to enter.
4. ENTER COOK TIME appears.
Turn the dial to select the
cooking time. Press the dial to
enter.
The display will prompt you to select
UPPER POWER, LOWER POWER
and MICROWAVE POWER.
5. Turn the dial clockwise to
increase or counterclockwise to
decrease the upper power level.
Press the dial to enter.
6. Turn the dial to change the
lower power level. Press the
dial to enter.
7. Turn the dial to change the
microwave power level. Press
the dial to enter.
8. SPELL THE FOOD NAME
appears. Turn the dial to the first
letter of your food description
and press the dial to enter.
Continue this process to spell
the rest of the food name.
PRESS START TO END appears.
Press the START button to save
the recipe.
9. Recipe Added. Press START to Run
appears. To begin cooking press
the START/PAUSE button. To
store the recipe without cooking,
press the CLEAR/OFF button.
For power level and cooking time
suggestions, use your cooking guide
or cook book.
To find and use stored custom
speedcook recipes:
1. Press the SPEEDCOOK button.
2. Turn dial to RECIPE and press
to enter.
3. CUSTOM#: and the recipe names
you entered will appear.
4. Turn dial until the recipe you
want is displayed and press the
dial to enter.
5. Press the START/PAUSE
button or press the selector
dial to start cooking.
Speedcook
recipe—to find
and use
18
START
PAUSE
T
U
R
N
T
O
S
E
L
E
C
T
P
R
E
S
S
T
O
E
N
T
E
R
CLEAR
OFF
BACK
POWER
LEVEL
SPEED
COOK
MANUAL
COOK
OPTIONS
TIMER
HELP
MICRO
WAVE
MICRO
EXPRESS
REPEAT LAST OVEN LIGHT
RECIPE
START
PAUSE
T
U
R
N
T
O
S
E
L
E
C
T
P
R
E
S
S
T
O
E
N
T
E
R
CLEAR
OFF
BACK
POWER
LEVEL
SPEED
COOK
MANUAL
COOK
OPTIONS
TIMER
HELP
MICRO
WAVE
MICRO
EXPRESS
REPEAT LAST OVEN LIGHT
RECIPE
Page 19

Speedcooking
Advantium Oven
Speedcook
recipe—to
adjust or
change
To adjust or change stored custom
speedcook recipes:
1. Press the SPEEDCOOK button.
2. Turn the dial until RECIPE
appears. Press the dial to enter.
3. Turn the dial to the recipe you
want to change. Press the dial
to enter. ADJUST TIME or
START appears.
4. Press the MANUAL
COOK/RECIPE button.
5. The display will prompt you to
ADJUST COOK TIME, then
select UPPER POWER, LOWER
POWER, MICROWAVE POWER,
and CATEGORY. Turn the dial
and press to enter the
appropriate settings.
(For more detailed instructions,
follow steps 4 through 8 in the
section Speedcook recipe—to enter
and save.)
6. Recipe Added. Press START to Run
appears. To begin cooking press
the START/PAUSE button. To
store the recipe without cooking,
press the CLEAR/OFF button.
For power level and cooking time
suggestions, use your cooking guide
or cook book.
To delete stored custom speedcook
recipes:
1. Press the SPEEDCOOK button.
2. Turn the dial until RECIPE
appears and press the dial
to enter.
3. Turn dial to the recipe you
want to delete and press the
dial to enter.
4. ADJUST TIME or START appears.
Press and hold the MANUAL
COOK/RECIPE button for 3
seconds. This deletes the recipe.
You may now enter and save a
new recipe or press CLEAR/OFF
to return to the clock display.
Speedcook
recipe—to
delete
19
START
PAUSE
T
U
R
N
T
O
S
E
L
E
C
T
P
R
E
S
S
T
O
E
N
T
E
R
CLEAR
OFF
BACK
POWER
LEVEL
SPEED
COOK
MANUAL
COOK
OPTIONS
TIMER
HELP
MICRO
WAVE
MICRO
EXPRESS
REPEAT LAST OVEN LIGHT
RECIPE
START
PAUSE
T
U
R
N
T
O
S
E
L
E
C
T
P
R
E
S
S
T
O
E
N
T
E
R
CLEAR
OFF
BACK
POWER
LEVEL
SPEED
COOK
MANUAL
COOK
OPTIONS
TIMER
HELP
MICRO
WAVE
MICRO
EXPRESS
REPEAT LAST OVEN LIGHT
RECIPE
Page 20

Custom
speedcook
recipes
Speedcooking
Advantium Oven
20
Custom Cook Power Level Comments
Recipe Name Time U
1.
2.
3.
4.
5.
6.
7.
8.
9.
10.
11.
12.
13.
L
M
14.
15.
16.
17.
18.
19.
20.
21.
22.
23.
24.
25.
26.
27.
28.
29.
30.
Page 21

Speedcooking
Advantium Oven
Things that
are normal
Cooking Times
■ When speedcooking preprogrammed
foods, you may see OPTIMIZING COOK
TIME in the display several seconds after
you press START. The oven automatically
senses the electrical voltage level in your
home and adjusts the cooking time up or
down for proper cooking.
Fan/Grill
■ The fan will be on during cooking. At the
end of cooking, the automatic fan will
continue to run for a short time, and the
display will read Oven is Cooling. The fan
will automatically shut off when the
internal parts of the oven have cooled.
■ The oven grill will emit warm air while the
oven is on.
Lights
■ When the oven is on, light may be visible
around the door or outer case.
■ The halogen lights will dim and cycle
on and off during a speedcook cycle,
sometimes even at full power levels.
This is normal. The oven senses the heat
level and adjusts automatically.
Oven Heat
■ No preheating time is required. The oven
begins cooking immediately.
■ The door and inside of the oven will be
very hot. Use caution when opening the
door and removing food.
■ Do not use cookware or coverings made
of paper, plastic, or foil when cooking
during a speedcook cycle.
■ When cooking for an extended period
of time, the oven may automatically
reduce the power levels to maintain
the appropriate level of oven heat.
Sounds
■ Clicks and a fan blowing are normal
sounds during cooking. The relay board
is turning components on and off.
21
Page 22

Microwaving
Advantium Oven
Using the
microwave
features
Make sure the oven rack (turntable) and white ceramic tray are in place.
Place food or microwavable container directly on the white ceramic tray
to cook your food.
■ Bacon
■ Beverage
■ Defrost (Auto and Time)
■ Popcorn
■ Recipe
■ Reheat (one serving)
■ Soup
■ Time cook
■ Vegetables ( fresh,
frozen, canned)
MICROWAVE PRE-SET FOOD SELECTIONS:
The oven rack (turntable) must always be in
place when using the oven.
The white ceramic tray should always be
in place when microwaving.
How to use
pre-set
microwave
selections
1. Press the MICROWAVE/OVEN
LIGHT button.
If no selection is made within 15 seconds,
the display will revert back to the time of
day.
2. Turn the dial to find the food
you want to cook. Press the dial
to enter.
3. Turn the selector dial to select
amount, weight or size.
(If required, the oven will
prompt you). Press the dial
after each selection.
4. Press the dial or the START/
PAUSE button to start cooking.
To review settings during cooking, press
the selector dial.
If the door is opened during cooking, the
oven will stop and PAUSE will appear
in the display. Close the door and press
START/ PAUSE to resume cooking.
NOTE: There is no light that
automatically comes on during
microwaving.
To see the food that is cooking, press
MICROWAVE/OVEN LIGHT.
The light will come on and stay on for the
remainder of the microwave cooking cycle.
If you enter an undesired selection at any
time, simply press the BACK button and
re-enter the desired selections.
22
Cookware
■ Make sure that cookware is suitable
for microwaving.
■ Place food or microwavable container
directly on the white ceramic tray to
cook your food.
T
U
R
N
T
O
S
E
L
E
C
T
P
R
E
S
S
T
O
E
N
T
E
R
START
PAUSE
CLEAR
OFF
BACK
POWER
LEVEL
SPEED
COOK
MANUAL
COOK
OPTIONS
TIMER
HELP
MICRO
WAVE
MICRO
EXPRESS
REPEAT LAST OVEN LIGHT
RECIPE
Page 23

Microwaving
Advantium Oven
Time Cook
Use Time Cook to microwave food that is
not in the recipe section.
■ The power level is automatically
set at high, but you can change it
for more flexibility.
1. Press the MICROWAVE/OVEN
LIGHT button.
2. Turn the dial to TIME COOK
and press the dial to enter.
3. Turn the dial to set the time
and press the dial to enter.
4. To change the power level if you
don’t want full power, press the
POWER LEVEL button. Turn
the dial to select. Press the dial
to enter.
5. Press the dial or the START/
PAUSE button to start cooking.
You may open the door during TIME
COOK to check the food. Close the door
and press START to resume cooking.
Press MICRO EXPRESS repeatedly
for 30 second increments of
microwave cooking time. Oven
starts immediately.
Micro
Express
Microwave
power level
1. First, follow directions for TIME
COOK, TIME DEFROST or
MICRO EXPRESS.
2. Press the POWER LEVEL button.
3. Turn the dial clockwise to increase
and counterclockwise to decrease
the power level. Press the dial
to enter.
4. Press the dial or the
START/PAUSE button to start
cooking.
■ You can change the power level before
or during a cooking program (except
when using MICRO EXPRESS).
Here are some examples of uses for various
power levels:
High 10: Fish, bacon, vegetables,
boiling liquids.
Med-High 7: Gentle cooking of meat
and poultry; baking casseroles and
reheating.
Medium 5: Slow cooking and
tenderizing for stews and less
tender cuts of meat.
Low 2 or 3: Defrosting; simmering;
delicate sauces.
Warm 1: Keeping food warm;
softening butter.
■ When cooking bacon, layer strips
on a plate. Cover each layer with a
paper towel.
■ When cooking vegetables,
use a microwave-safe casserole
or bowl. Cover with a lid or
vented plastic wrap.
■ For frozen vegetables, follow
the package instructions for
adding water.
■ For fresh vegetables, add
two tablespoons of water for
each serving.
Cooking tips
23
T
U
R
N
T
O
S
E
L
E
C
T
P
R
E
S
S
T
O
E
N
T
E
R
START
PAUSE
CLEAR
OFF
BACK
POWER
LEVEL
SPEED
COOK
MANUAL
COOK
OPTIONS
TIMER
HELP
MICRO
WAVE
MICRO
EXPRESS
REPEAT LAST OVEN LIGHT
RECIPE
T
U
R
N
T
O
S
E
L
E
C
T
P
R
E
S
S
T
O
E
N
T
E
R
START
PAUSE
CLEAR
OFF
BACK
POWER
LEVEL
SPEED
COOK
MANUAL
COOK
OPTIONS
TIMER
HELP
MICRO
WAVE
MICRO
EXPRESS
REPEAT LAST OVEN LIGHT
RECIPE
T
U
R
N
T
O
S
E
L
E
C
T
P
R
E
S
S
T
O
E
N
T
E
R
START
PAUSE
CLEAR
OFF
BACK
POWER
LEVEL
SPEED
COOK
MANUAL
COOK
OPTIONS
TIMER
HELP
MICRO
WAVE
MICRO
EXPRESS
REPEAT LAST OVEN LIGHT
RECIPE
Page 24

Microwaving
Advantium Oven
Microwave
recipe—to
enter and
save
Create and store up to 10 of your
own microwave recipes.
1. Press the MICROWAVE/OVEN
LIGHT button.
2. Turn dial until RECIPE appears.
Press the dial to enter.
3. Turn dial until CUSTOM#:EMPTY
appears. Press the dial to enter.
4. ENTER COOK TIME appears.
Turn the dial to select the
cooking time you want. Press
the dial to enter.
5. Select POWER LEVEL. Turn the
dial and press the dial to enter.
6. SPELL THE FOOD NAME
appears. Turn the dial to the first
letter of your food description and
press the dial to enter. Continue
this process to spell the rest of the
food name. PRESS START TO
END appears. Press the START
button to save the recipe.
7. Recipe Added. Press START to Run
appears. To begin cooking, press
the START/ PAUSE button or
press the CLEAR/OFF button to
store the recipe without cooking.
Microwave
recipe—to find
and use
To find and use stored custom
microwave recipes:
1. Press the MICROWAVE/OVEN
LIGHT button.
2. Turn dial to RECIPE and press the
dial to enter.
3. CUSTOM#: and the recipe names
you entered will appear.
4. Turn dial to your recipe and press
the dial to enter.
5. Press the START/PAUSE
button or the selector dial
to start cooking.
24
Custom
microwave
recipes
POWER
SPEED
COOK
REPEAT LAST OVEN LIGHT
MANUAL
COOK
RECIPE
MICRO
TIMER
LEVEL
WAVE
BACK
MICRO
OPTIONS
HELP
EXPRESS
POWER
SPEED
COOK
REPEAT LAST OVEN LIGHT
MANUAL
COOK
RECIPE
MICRO
TIMER
LEVEL
WAVE
BACK
MICRO
OPTIONS
HELP
EXPRESS
O
S
T
E
L
N
E
R
C
T
U
T
P
R
R
E
E
T
S
N
S
E
T
O
START
PAUSE
CLEAR
OFF
O
S
T
E
L
N
E
R
C
START
T
U
T
PAUSE
CLEAR
OFF
P
R
R
E
E
T
S
N
S
E
T
O
Custom Cook Power Level Comments
Recipe Name Time Microwave
1.
2.
3.
4.
5.
6.
7.
8.
9.
10.
Page 25

Microwaving
Advantium Oven
Microwave
recipe—to
adjust or
change
To adjust or change stored custom
microwave recipes:
1. Press the MICROWAVE/OVEN
LIGHT button.
2. Turn dial to RECIPE and press the
dial to enter.
3. Turn the dial to the recipe you
want to change. Press the dial
to enter.
4. ADJUST TIME or START appears.
5. Press the MANUAL COOK/
RECIPE button. Turn the dial to
select the cook time and press the
dial to enter.
6. Turn the dial to select the POWER
LEVEL and press the dial to enter.
7. Recipe Added. Press START to Run
appears. To begin cooking, press
the START/PAUSE button or
press the CLEAR/OFF button to
store the recipe without cooking.
Microwave
recipe—to
delete
To delete stored custom microwave
recipes:
1. Press the MICROWAVE/OVEN
LIGHT button.
2. Turn dial to RECIPE and press the
dial to enter.
3. Turn the dial to the recipe you
want to delete. Press the dial
to enter.
4. ADJUST TIME OR START
appears. When prompted to press
the START button, press and hold
the MANUAL COOK/RECIPE
button for 3 seconds. You may
now enter and save a new recipe
or press CLEAR/OFF to return to
the clock display.
25
T
U
R
N
T
O
S
E
L
E
C
T
P
R
E
S
S
T
O
E
N
T
E
R
START
PAUSE
CLEAR
OFF
BACK
POWER
LEVEL
SPEED
COOK
MANUAL
COOK
OPTIONS
TIMER
HELP
MICRO
WAVE
MICRO
EXPRESS
REPEAT LAST OVEN LIGHT
RECIPE
T
U
R
N
T
O
S
E
L
E
C
T
P
R
E
S
S
T
O
E
N
T
E
R
START
PAUSE
CLEAR
OFF
BACK
POWER
LEVEL
SPEED
COOK
MANUAL
COOK
OPTIONS
TIMER
HELP
MICRO
WAVE
MICRO
EXPRESS
REPEAT LAST OVEN LIGHT
RECIPE
Page 26

Microwaving
Advantium Oven
Auto defrost
Auto Defrost automatically sets the
defrosting times and power levels to
give even defrosting results for meats,
poultry and fish weighing up to six
pounds.
1. Remove food from the package
and place it on a microwave-safe
dish.
2. Press the MICROWAVE/OVEN
LIGHT button.
3. Turn the dial to DEFROST
(AUTO). Press the dial to enter.
4. Turn the dial to the food weight,
using the Conversion Guide
at right. For example, dial 1.2 for
1.2 pounds (1 pound, 3 oz.)
Press the dial to enter.
5. Press the dial or START/PAUSE
button to start defrosting.
6. Turn the food over when the oven
signals TURN FOOD OVER.
■ Remove defrosted meat or shield
warm areas with small pieces of
foil for even defrosting.
■ After defrosting, most meats need
to stand 5 minutes to complete
defrosting. Large roasts should
stand for about 30 minutes.
Conversion Guide
If the weight of food is stated in pounds
and ounces, the ounces must be converted
to tenths (.1) of a pound.
Weight of Food Enter Food Weight
in Ounces (tenths of a pound)
1–2 .1
3.2
4–5 .3
6–7 .4
8.5
9–10 .6
11 .7
12–13 .8
14–15 .9
Use Time Defrost to defrost for a selected
length of time.
1. Press the MICROWAVE/OVEN
LIGHT button.
2. Turn the selector dial to
DEFROST (TIME). Press
the dial to enter.
3. Turn the dial to select the time
you want. Press the dial to enter.
4. Press the dial or START/PAUSE
button to start defrosting.
5. Turn the food over when the oven
signals TURN FOOD OVER.
Power level is automatically set at 3,
but can be changed. To change the power
levels, see the Microwave Power Level
section. You can defrost small items
quickly by raising the power level after
entering the time. Power level 7 cuts the
total defrosting time in about half; power
level 10 cuts the total time to about 1/3.
When defrosting at high power levels,
food will need more frequent attention
than usual.
Time defrost
26
T
U
R
N
T
O
S
E
L
E
C
T
P
R
E
S
S
T
O
E
N
T
E
R
START
PAUSE
CLEAR
OFF
BACK
POWER
LEVEL
SPEED
COOK
MANUAL
COOK
OPTIONS
TIMER
HELP
MICRO
WAVE
MICRO
EXPRESS
REPEAT LAST OVEN LIGHT
RECIPE
T
U
R
N
T
O
S
E
L
E
C
T
P
R
E
S
S
T
O
E
N
T
E
R
START
PAUSE
CLEAR
OFF
BACK
POWER
LEVEL
SPEED
COOK
MANUAL
COOK
OPTIONS
TIMER
HELP
MICRO
WAVE
MICRO
EXPRESS
REPEAT LAST OVEN LIGHT
RECIPE
Page 27

Microwaving
Advantium Oven
Defrosting
tips
Use AUTO DEFROST for meat, poultry
and fish.
Use TIME DEFROST for most
other frozen foods.
■ Foods frozen in paper or plastic
can be time defrosted in the
package, but foods should be
taken out of the package when
using
DEFROST (AUTO)
. Closed
packages should be slit, pierced or
vented after food has partially
defrosted. Plastic storage
containers should be partially
uncovered.
■ Family-size, prepackaged frozen
dinners can be defrosted and
microwaved. If the food is in a foil
container, transfer it to a
microwave-safe dish.
■ Foods that spoil easily should not
be allowed to sit out for more than
one hour after defrosting. Room
temperature promotes the growth
of harmful bacteria.
■ For more even defrosting of
larger foods, such as roasts, use
DEFROST (AUTO)
.
Be sure large
meats are completely defrosted
before cooking.
■ When defrosted, food should be
cool but softened in all areas.
If still slightly icy, return to the
microwave very briefly, or let
it stand a few minutes.
27
Page 28

The sensor feature detects the increasing
humidity released during cooking. The
oven automatically adjusts the cooking
time to various types and amounts of food.
The proper containers and covers are
essential for best sensor cooking.
■ Always use microwave-safe
containers and cover them with
lids or vented plastic wrap.
Never use tight sealing plastic
containers—they can prevent
steam from escaping and cause
food to overcook.
■ Be sure the outside of the cooking
containers and the inside of the
oven are dry before placing food
in the oven. Beads of moisture
turning into steam can mislead
the sensor.
■ Beverages are best heated
uncovered.
Microwaving
Advantium Oven
Microwave
sensor
cooking
28
Covered
Vented
Dry off dishes so they don’t
mislead the sensor.
MICROWAVE SENSOR PROGRAMS:
■ Beverage
■ Popcorn – Prepackaged microwave popcorn, 1.5 oz. to 3.5 oz.
■ Reheat – Single servings (4 to 6 oz.) of leftovers.
■ Soup
Page 29

Microwaving
Advantium Oven
To use all
sensor
programs
29
Advantium’s microwave mode features
sensor cooking. The oven automatically
senses when food is done and shuts itself
off—eliminating the need to program
cooktimes and power levels.
1. Press the MICROWAVE/OVEN
LIGHT button.
2. Turn the dial to select the food
you want. Press the dial to enter.
3. Press the dial or press the START/
PAUSE button to start cooking.
Do not open the oven door until time
is counting down in the display. If the
door is opened, close it and press
START/PAUSE immediately. If the
food is not done enough, use TIME
COOK in the microwave selector to
cook for more time.
■ If you have been speedcooking
and the oven is already hot, it may
indicate that it is too hot for
sensor cooking. Of course, you
can always continue with TIME
COOK or SPEEDCOOK.
■ To shorten or lengthen the cook
time, wait until the time
countdown shows in the display.
Then turn the dial to add or
subtract time.
■ Drinks heated with the
BEVERAGE feature may be
very hot. Remove the container
with care.
■ If you open the door while
SENSOR Cooking, SENSOR
ERROR will appear. Close the
door, press START to begin again.
Notes about the Reheat program:
Reheated foods may have wide
variations in temperature. Some
areas may be extremely hot.
It is best to use TIME COOK and not
REHEAT for these foods:
■ Bread products
■ Food that must be reheated
uncovered.
■ Foods that need to be stirred
or turned.
■ Foods calling for a dry look or
crisp surface after reheating.
T
U
R
N
T
O
S
E
L
E
C
T
P
R
E
S
S
T
O
E
N
T
E
R
START
PAUSE
CLEAR
OFF
BACK
POWER
LEVEL
SPEED
COOK
MANUAL
COOK
OPTIONS
TIMER
HELP
MICRO
WAVE
MICRO
EXPRESS
REPEAT LAST OVEN LIGHT
RECIPE
Page 30

Microwaving
Advantium Oven
30
Things that
are normal
Interference
■ TV/radio interference might be
noticed while using the microwave.
Similar to the interference caused by
other small appliances, it does not indicate
a problem with the microwave. Move
the radio or TV as far away from the
microwave as possible, or check the
position of the TV/radio antenna.
Lights
■ The oven light will not come on
during a microwave cooking cycle.
To see the food that is cooking, press
MICROWAVE/OVEN LIGHT.
The light will come on and stay on
for the remainder of the microwave
cooking cycle.
Oven Heat
■ Cookware may become hot because of
heat transferred from the heated food.
Oven mitts may be needed to handle
the cookware.
■ Steam or vapor may escape from around
the door.
Sounds
■ You may hear a dull thumping sound while
the oven is operating.
Page 31

Microwaving
Advantium Oven
31
Notes and
comments
Page 32

Other Advantium Features
Advantium Oven
“YOUR
FOOD IS
READY”
To remind you that you have food
in the oven, the oven will display
YOUR FOOD IS READY and beep
once a minute until you either
open the oven door or press the
CLEAR/OFF button.
T
Features
under the
OPTIONS
button
Clock:
The clock must be set before you can use
your oven for the first time (see Quick Start
for instructions).
1. To change the clock time, press
the OPTIONS pad and turn the
dial to CLOCK. Press the dial
to enter.
2. Turn the dial to set hours. Press
the dial to enter.
3. Turn the dial to set minutes. Press
the dial to enter.
4. Turn the dial to select AM or PM.
Press the dial to enter.
Clock Display ON/OFF:
Use this feature to turn your clock
display on or off. Press the OPTIONS
button, turn the dial to select CLOCK
DISPLAY ON/OFF. Turn the dial
to select ON or OFF. Press the dial
to enter.
Beeper Volume:
Use this feature to adjust the volume
of the beeper. You can even turn it
off. Press the OPTIONS button, turn
the dial to select BEEPER VOLUME,
press the dial to enter, and follow the
display directions.
Scroll Speed:
Is the message scroll too slow or
too fast? Change it! Press the
OPTIONS button, turn the dial
to select DISPLAY SCROLL SPEED,
press the dial to enter, and follow
the display directions.
Use this feature to review the current
cooking selections you have set.
Press the selector dial during
speedcooking or microwave cooking.
Review
32
T
U
R
N
T
O
S
E
L
E
C
T
P
R
E
S
S
T
O
E
N
T
E
R
START
PAUSE
CLEAR
OFF
BACK
POWER
LEVEL
SPEED
COOK
MANUAL
COOK
OPTIONS
TIMER
HELP
MICRO
WAVE
MICRO
EXPRESS
REPEAT LAST OVEN LIGHT
RECIPE
T
U
R
N
T
O
S
E
L
E
C
T
P
R
E
S
S
T
O
E
N
T
E
R
START
PAUSE
CLEAR
OFF
BACK
POWER
LEVEL
SPEED
COOK
MANUAL
COOK
OPTIONS
TIMER
HELP
MICRO
WAVE
MICRO
EXPRESS
REPEAT LAST OVEN LIGHT
RECIPE
R
U
T
BACK
P
R
E
N
S
S
Page 33

Other Advantium Features
Advantium Oven
Help
Use this feature to find out more about
your oven and its features.
1. Press the HELP button.
2. Turn the dial to select the feature
name. Press the dial to enter.
The display will show a description
for the program you have chosen.
Adjust
Auto Night Light
Back
Bacon
Beeper Volume
Beverage
Child Lockout
Clear/Off
Clock
Clock Display On/Off
Defrost (Auto)
Defrost (Time)
Help
Manual Speedcook
Microwave Cooking
Microwave Express
Options
Oven Light
Popcorn
Power Level
Recipe
Reheat–One Serving
Repeat Last
Resume
Review
Scroll Speed
Soup
Start/Pause
Speedcook
Time Cook
Timer On/Off
Vegetables (Canned)
Vegetables (Fresh)
Vegetables (Frozen)
Features found in the HELP function.
33
T
U
R
N
T
O
S
E
L
E
C
T
P
R
E
S
S
T
O
E
N
T
E
R
START
PAUSE
CLEAR
OFF
BACK
POWER
LEVEL
SPEED
COOK
MANUAL
COOK
OPTIONS
TIMER
HELP
MICRO
WAVE
MICRO
EXPRESS
REPEAT LAST OVEN LIGHT
RECIPE
Page 34

Other Advantium Features
Advantium Oven
Use this feature anytime you need a
general purpose timer. It can even be
used while cooking in the oven.
1. Press the TIMER button.
2. Turn the dial to select the
minutes. Press the dial
to enter.
3. Turn the dial to select the
seconds. Press the dial to enter.
To pause, press TIMER. To restart, press
TIMER again.
To cancel, press and hold the TIMER
button down for about 3 seconds.
Timer
An automatic fan protects the oven
from too much heat inside the oven
cavity.
It automatically turns on at low speed
if it senses too much heat.
The fan will automatically turn off
when the internal parts are cool. It
may stay on for 30 minutes or more
after the oven control is turned off.
Automatic
fan
34
You may lock the control panel to prevent
the oven from being accidentally started
or used by children.
Press and hold CLEAR/OFF for
about 3 seconds to lock and unlock.
When the control panel is locked,
CONTROL IS LOCKED will be
displayed briefly anytime a button
or dial is pressed.
Child
lock-out
T
U
R
N
T
O
S
E
L
E
C
T
P
R
E
S
S
T
O
E
N
T
E
R
START
PAUSE
CLEAR
OFF
BACK
POWER
LEVEL
SPEED
COOK
MANUAL
COOK
OPTIONS
TIMER
HELP
MICRO
WAVE
MICRO
EXPRESS
REPEAT LAST OVEN LIGHT
RECIPE
T
U
R
N
T
O
S
E
L
E
C
T
P
R
E
S
S
T
O
E
N
T
E
R
START
PAUSE
CLEAR
OFF
BACK
POWER
LEVEL
SPEED
COOK
MANUAL
COOK
OPTIONS
TIMER
HELP
MICRO
WAVE
MICRO
EXPRESS
REPEAT LAST OVEN LIGHT
RECIPE
Page 35

The area underneath the oven rack
(turntable) should be cleaned
frequently to avoid odors and
smoking during a cooking cycle.
The oven rack (turntable) can be
broken if dropped. Wash carefully
in warm, sudsy water.
Dry completely and replace.
To replace the oven rack (turntable),
place its center over the square
spindle in the center of the oven
and turn it until it seats into place.
Care and Cleaning
Advantium Oven
Helpful
hints
Clean the inside of the oven often for
proper heating performance.
Some spatters can be removed with
a paper towel, others may require a
warm soapy cloth. Remove greasy
spatters with a sudsy cloth, then rinse
with a damp cloth.
Do not use abrasive cleaners or sharp
utensils on oven walls.
Never use a commercial oven cleaner
on any part of your oven.
Do not clean the inside of the oven
with metal scouring pads. Pieces can
break off the pad, causing electrical
shock.
Do not remove the halogen lamp
glass covers.
Open the oven door a few minutes
after cooking to air out the inside.
An occasional thorough wiping with
a solution of baking soda and water
keeps the inside fresh.
Be certain the oven control is
turned off before cleaning any
part of this oven.
Walls, Floor, Inside Window, Metal
and Plastic Parts on the Door
Do not use the oven without the
oven rack (turntable) in place.
How to
clean the
inside
Removable
oven rack
(turntable)
Oven Rack (Turntable)
35
Page 36

Care and Cleaning
Advantium Oven
Grill tray for speedcooking
White ceramic tray for
microwaving
Black metal tray for
speedcooking
Baking sheets
(cooking trays)
To prevent breakage, allow the trays
to cool completely before cleaning.
Wash carefully in warm, sudsy water
or in the dishwasher.
Do not use metal scouring pads
or abrasives, as they may damage
the finish. A soap-filled scouring pad
may be used to clean the trays.
Both the upper and lower halogen
lamp covers must be kept free of
grease and food spatterings in order
to operate effectively.
Clean the lamp glass covers often to
avoid excess smoking and decreased
cooking power.
Do not remove the halogen lamp
glass covers.
To clean the upper and lower lamp
covers: Allow the oven rack
(turntable) and glass covers to cool
completely. Remove the oven rack
(turntable) and wipe clean with a
warm soapy cloth or plastic scrubbie.
Replace the oven rack (turntable).
For heavy burned on soil, a cleaning
scraper may be used to clean the
halogen lamp covers. Wearing an
oven mitt, hold the cleaning scraper
at a 30° angle. Scrape the glass clean
and wipe up excess soil.
Upper halogen lamp cover
Lower halogen lamp cover
(with turntable removed)
For heavy or burned on soil
Halogen
lamp covers
36
Page 37

Care and Cleaning
Advantium Oven
How to clean
the outside
Do not use cleaners containing
ammonia or alcohol on the outside
surface of the oven because they can
damage the oven.
Case
Clean the outside with a sudsy cloth.
Rinse and then dry. Wipe the window
clean with a damp cloth.
Glass Control Panel and Door
(on some models)
Wipe with a clean damp sponge.
Dry thoroughly. Do not use cleaning
sprays, large amounts of soap and
water, abrasives or sharp objects on
the panel—they can damage it.
Stainless Steel Surfaces
(on some models)
Do not use a steel wool pad; it will
scratch the surface.
Clean with hot soapy water.
Rinse and dry.
If food soil remains, try a general
kitchen cleaner, such as Fantastik®,
Simple Green®, or Formula 409®.
For hard to clean soil, use a standard
stainless steel cleaner, such as BonAmi® or Cameo®. Soils can be soaked
several hours with wet towels. Apply
cleaner with a damp sponge, rinse
thoroughly, and dry. Always scrub
lightly in the direction of the grain.
After cleaning, use a stainless steel
polish, such as Stainless Steel Magic®,
Revere Copper and Stainless Steel
Cleaner®, or Wenol All Purpose
Metal Polish®. Follow the product
instructions for cleaning the stainless
steel surface.
Grill
Use warm soapy water and a
dishcloth to wipe off the grill.
Door Frame
It’s important to keep the area
clean where the door seals against
the oven. Use only mild, nonabrasive detergents applied with
a clean sponge or soft cloth.
Rinse well.
37
Page 38

38
Troubleshooting
Advantium Oven
Questions?
Use this
problem
solver
Problem Possible Causes What To Do/Explanation
LIGHTS
There is no oven This is normal. The • Press MICROWAVE/OVEN
light on during glass is too dark for LIGHT button to light the oven.
microwave cooking a microwave light.
Light during a This is normal. • This is normal. The oven senses the
speedcook cycle Power level has been heat level and adjusts automatically.
dims and cycles on automatically reduced
and off, even at full because the oven is hot.
power levels
Light visible around This is normal. • When the oven is on, light may
the door and outer be visible around the door and
case while outer case.
speedcooking
FAN
Fan continues to run The oven is cooling. • The fan will automatically shut off
after cooking stops when the internal parts of the oven
have cooled.
Oven vent emits warm This is normal.
air while oven is on
Fan comes on This is normal. • If the microwave is used after
automatically when speedcook and the oven senses
using the microwave that it is too hot, the vent fan comes
on to cool the oven.
COOKING
The oven makes Clicks and fans blowing • These sounds are normal.
unusual sounds are normal. The relay
while cooking board is turning the
components on and off.
Smoke comes out Food is high in fat • Smoke is normal when cooking high-
of the oven when content. Aerosol spray fat foods. Use vegetable oil or olive
I open the door used on the pans. oil on the meat itself instead of
coating the entire pan.
Food is not fully Programmed times • Increase or decrease time for
cooked or browned may not match the size doneness or adjust the upper or
at the end of a or amount of food you lower lamps for browning; change
cooking program are cooking. the microwave power for doneness.
There may be grease • Clean the light covers with a scraper.
build-up on the glass
covers.
Page 39

39
Questions?
Use this
problem
solver
Advantium Oven
Problem Possible Causes What To Do/Explanation
DISPLAY
The display is blank The clock display has • Check the OPTIONS menu for clock
been turned off. display settings. Turn the display on.
“CONTROL IS The control has • Press and hold CLEAR/OFF for about
LOCKED” appears been locked. 3 seconds to unlock the control.
in display
Control display is Clock is not set. • Set the clock.
lighted yet oven
Door not securely closed. • Open the door and close securely.
will not start
START/PAUSE button • Press START/PAUSE.
not pressed after entering
cooking selection.
Another selection already • Press CLEAR/OFF.
entered in oven and
CLEAR/OFF button not
pressed to cancel it.
Size, quantity, or cooking • Make sure you have entered cooking
time not entered after time after selecting.
selecting VEGETABLES
(FRESH, FROZEN, CANNED),
BACON, DEFROST (TIME)
or TIME COOK.
CLEAR/OFF was pressed • Reset cooking program and press
accidentally. START/PAUSE.
Food weight not entered • Make sure you have entered food
after selecting weight after selecting DEFROST
DEFROST (AUTO). (AUTO).
OTHER PROBLEMS
The door and inside The heat lamps • This is normal.
of the oven feels hot produce intense heat • Use oven mitts to remove food when
in a small space. when ready.
Oven will not start A fuse in your home • Replace fuse or reset circuit breaker.
may be blown or the
circuit breaker tripped.
Troubleshooting
Page 40

40
Notes
Advantium Oven
Notes and
comments
Page 41

41
General Electric Company
Warranty Registration Department
P.O. Box 32150
Louisville, KY 40232-2150
Place
1st Class
Letter
Stamp
Here
GE Appliances
Consumer Product
Ownership Registration
Important Mail Today
Page 42

42
Consumer Product Ownership Registration
Dear Customer:
Thank you for purchasing our product and thank you for placing your confidence in us. We are proud to
have you as a customer!
Follow these three steps to protect your new appliance investment:
1
Complete and mail
your Consumer
Product Ownership
Registration today.
Have the peace of mind
of knowing we can
contact you in the
unlikely event of a
safety modification.
2
After completing this
registration, write your
model and serial numbers
in this guide. You will need
this information should
you require service. The
service number in the
USA: 800.444.1845. In
Canada: 1.888.880.3030.
3
Read your “Use and Care
Guide” carefully. It will
help you operate your
new appliance properly.
If you have questions, or
need more information
in the USA, call the
GE Answer Center
®
800.626.2000. In Canada
call 1.888.880.3030
www.monogram.com
Important: To ensure that your product is registered, mail the separate product registration card.
If the separate product registration card is missing, fold and mail the form below. No envelope is needed.
Consumer Product Ownership Registration
Product Model Serial
Advantium Oven
Important
Mail
Today!
First
Name
Apt. #
Street
Address
City
Last
Name
Zip
CodeState
Date Placed
In Use
Month Day Year
Phone
Number
TAPE CLOSED
FOLD HERE
Mr. l Ms. l Mrs. l Miss l
General Electric Company
Louisville, KY 40225
Monogram®
✄ ✄
✄
www.monogram.com
Page 43

Consumer Services
Advantium Oven
With the purchase of your new Monogram appliance, receive the
assurance that if you ever need information or assistance from GE,
we’ll be there. All you have to do is call—toll- free!
GE Answer
Center
®
In the USA:
800.626.2000
Whatever your question about any Monogram major appliance, GE Answer Center®
information service is available to help. Your call—and your question—will be answered
promptly and courteously. And you can call any time. GE Answer Center® service is open
24 hours a day, 7 days a week.
In Canada, call 888.880.3030
In-Home Repair
Service
In the USA:
800.444.1845
In Canada:
888.880.3030
A GE consumer service professional will provide expert repair service, scheduled at a time
that’s convenient for you. Many GE Consumer Service company-operated locations offer
you service today or tomorrow, or at your convenience (7:00 a.m. to 7:00 p.m. weekdays,
9:00 a.m. to 2:00 p.m. Saturdays). Our factory-trained technicians know your appliance
inside and out—so most repairs can be handled in just one visit.
Service Contracts
In the USA:
800.626.2224
In Canada:
888.880.3030
You can have the secure feeling that GE Consumer Service will still be there after your
warranty expires. Purchase a GE contract while your warranty is still in effect and you’ll
receive a substantial discount. With a multiple-year contract, you’re assured of future
service at today’s prices.
Parts and
Accessories
In the USA:
800.626.2002
In Canada:
888.880.3030
Individuals qualified to service their own appliances can have parts or accessories sent directly
to their home. The GE parts system provides access to over 47,000 parts…and all GE Genuine
Renewal Parts are fully warranted. VISA, MasterCard and Discover cards are accepted.
User maintenance instructions contained in this guide cover procedures intended to be
performed by any user. Other servicing generally should be referred to qualified service
personnel. Caution must be exercised, since improper servicing may cause unsafe operation.
For Customers
With Special
Needs…
In the USA:
800.626.2000
GE offers Braille controls for a variety of GE appliances, and a
brochure to assist in planning a barrier-free kitchen for persons
with limited mobility.
Consumers with impaired hearing or speech who have access to a
TDD or a conventional teletypewriter may call 800.TDD.GEAC
(800.833.4322) to request information or service.
43
www.monogram.com
Page 44

44
Warranty for Customers in the USA
Advantium Oven
YOUR MONOGRAM ADVANTIUM OVEN WARRANTY
Staple sales slip or cancelled check here. Proof of original purchase
date is needed to obtain service under warranty.
WHAT IS
COVERED
From the Date
of the Original
Purchase
FULL ONE-YEAR WARRANTY
For one year from date of original purchase, we will provide, free of charge, parts and service
labor in your home to repair or replace any part of the oven that fails because of a defect in materials
or workmanship.
FULL TEN-YEAR WARRANTY
For ten years from date of original purchase, we will provide, free of charge, parts and service
labor in your home to repair or replace the halogen speedcook lamps if they fail because of a defect
in materials or workmanship.
LIMITED TEN-YEAR WARRANTY
From the second through the tenth year, we will provide, free of charge, parts to replace
the magnetron tube if it fails because of a defect in materials or workmanship.. You pay for
the service trip to your home and for service labor charges.
This warranty is extended to the original purchaser and any succeeding owner for products
purchased for ordinary home use in the 48 mainland states, Hawaii and Washington, D.C.
In Alaska the warranty is the same except that it is LIMITED because you must pay to ship
the product to the service shop or for the service technician’s travel costs to your home.
All warranty service will be provided by our Factory Service Centers or by our authorized Customer
Care® servicers during normal working hours.
Should your appliance need service, during warranty period or beyond, in the U.S.A call
800.444.1845.
Some states do not allow the exclusion or limitation of incidental or consequential damages, so the
above limitation or exclusion may not apply to you. This warranty gives you specific legal rights, and
you may also have other rights which vary from state to state. To know what your legal rights are in
your state, consult your local or state consumer affairs office or your state’s Attorney General.
Warrantor: General Electric Company. If further help is needed concerning this warranty, write:
Manager—Customer Relations, GE Appliances, Louisville, KY 40225
WHAT IS NOT
COVERED
• Service trips to your home to teach you how to
use the product.
Read your Use and Care material.
If you then have any questions about operating
the product, please contact your dealer or our
Customer Relations office at the address below,
or call, toll free:
GE Answer Center®
800.626.2000
consumer information service
www.monogram.com
• Replacement of house fuses or resetting of
circuit breakers.
• Damage to the product caused by accident,
fire, floods or acts of God.
• Failure of the product if it is used for
other than its intended purpose or
used commercially.
• Improper installation.
WARRANTOR IS NOT RESPONSIBLE FOR
INCIDENTAL OR CONSEQUENTIAL
DAMAGES TO PERSONAL PROPERTY
CAUSED BY POSSIBLE DEFECTS WITH
THIS APPLIANCE.
Part No. 164D3370P100
Pub No. 49-40102
Printed in Korea
3-00 JR
General Electric Company
Louisville, KY 40225
Monogram®
FlashBake technology is used by GE under license from Quadlux, Inc.
ZSC2000 ZSC2001
 Loading...